Automating Trading Strategies in MQL5 (Part 36): Supply and Demand Trading with Retest and Impulse Model
Introduction
In our previous article (Part 35), we developed a Breaker Block Trading System in MetaQuotes Language 5 (MQL5) that identified consolidation ranges, validated breaker blocks with swing points, and traded retests with customizable risk parameters and visual feedback. In Part 36, we develop a Supply and Demand Trading System utilizing a retest and impulse model. This model detects supply and demand zones through consolidation, validates them with impulsive moves, and executes trades on retests with trend confirmation and dynamic chart visualizations. We will cover the following topics:
By the end, you’ll have a functional MQL5 strategy for trading supply and demand zone retests, ready for customization—let’s dive in!
Understanding the Supply and Demand Strategy Framework
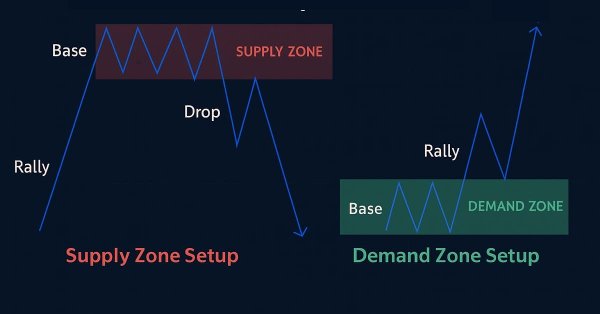
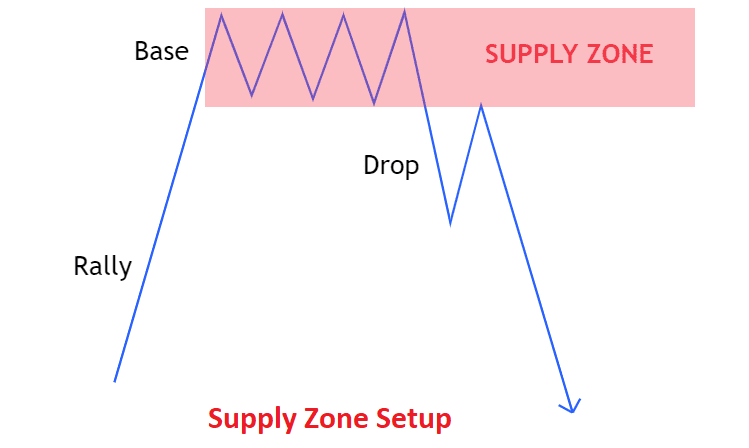
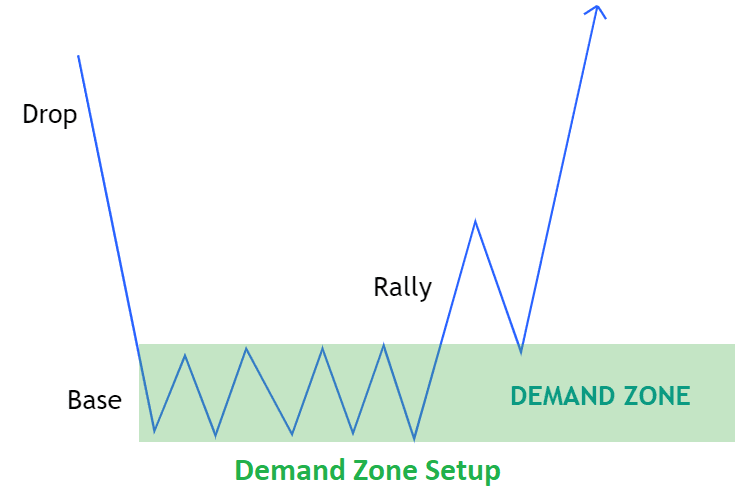
The supply and demand strategy identifies key price zones where significant buying (demand) or selling (supply) has occurred, typically after periods of consolidation. After an impulsive price move confirms a zone's validity, traders aim to trade its retest. They may enter buy trades when price revisits a demand zone in a downtrend, or initiate sell trades at a supply zone in an uptrend, expecting a bounce. By defining risk and reward levels, traders capitalize on high-probability setups. Have a look below at the different setups we could have.
Supply Zone Setup:
Demand Zone Setup:
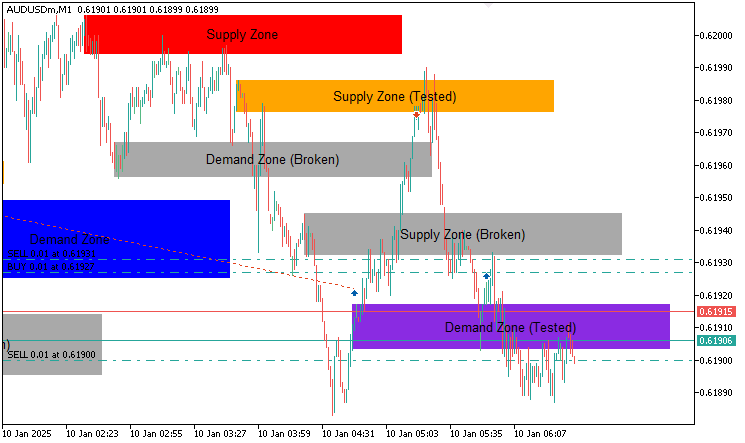
Our plan is to detect consolidation ranges over a set number of bars, validate zones with impulsive moves using a multiplier-based threshold, and confirm trade entries with optional trend checks. We will implement logic to track zone status, execute trades on retests with customizable stop-loss and take-profit settings, and visualize zones with dynamic labels and colors, creating a system for precise supply and demand trading. In brief, here is a visual representation of our objectives.
Implementation in MQL5
To create the program in MQL5, open the MetaEditor, go to the Navigator, locate the Experts folder, click on the "New" tab, and follow the prompts to create the file. Once it is made, in the coding environment, we will need to declare some input parameters and global variables that we will use throughout the program.
//+------------------------------------------------------------------+
//|                                         Supply and Demand EA.mq5 |
//|                           Copyright 2025, Allan Munene Mutiiria. |
//|                                   https://t.me/Forex_Algo_Trader |
//+------------------------------------------------------------------+
#property copyright "Forex Algo-Trader, Allan"
#property link "https://t.me/Forex_Algo_Trader"
#property version "1.00"
#property strict

#include <Trade/Trade.mqh>                         //--- Include Trade library for position management
CTrade obj_Trade;                                  //--- Instantiate trade object for order operations
We begin the implementation by including the trade library with "#include <Trade/Trade.mqh>", which provides built-in functions for managing trade operations. We then initialize the trade object "obj_Trade" using the CTrade class, allowing the Expert Advisor to execute buy and sell orders programmatically. This setup will ensure that trade execution is handled efficiently without requiring manual intervention. Then we can declare some enumerations that will enable classification of some user inputs.
//+------------------------------------------------------------------+
//| Enum for trading tested zones                                    |
//+------------------------------------------------------------------+
enum TradeTestedZonesMode {                        // Define modes for trading tested zones
   NoRetrade,                                      // Trade zones only once
   LimitedRetrade,                                 // Trade zones up to a maximum number of times
   UnlimitedRetrade                                // Trade zones as long as they are valid
};

//+------------------------------------------------------------------+
//| Enum for broken zones validation                                 |
//+------------------------------------------------------------------+
enum BrokenZonesMode {                             // Define modes for broken zones validation
   AllowBroken,                                    // Zones can be marked as broken
   NoBroken                                        // Zones remain testable regardless of price break
};

//+------------------------------------------------------------------+
//| Enum for zone size restriction                                   |
//+------------------------------------------------------------------+
enum ZoneSizeMode {                                // Define modes for zone size restrictions
   NoRestriction,                                  // No restriction on zone size
   EnforceLimits                                   // Enforce minimum and maximum zone points
};

//+------------------------------------------------------------------+
//| Enum for trend confirmation                                      |
//+------------------------------------------------------------------+
enum TrendConfirmationMode {                       // Define modes for trend confirmation
   NoConfirmation,                                 // No trend confirmation required
   ConfirmTrend                                    // Confirm trend before trading on tap
};
We forward declare some key enumerations to configure trading behavior and zone validation. First, we create the "TradeTestedZonesMode" enum with options: "NoRetrade" (trade zones once), "LimitedRetrade" (trade up to a set limit), and "UnlimitedRetrade" (trade while valid), which control how often zones can be traded. Then, we define the "BrokenZonesMode" enum with "AllowBroken" (mark zones as broken if price breaches them) and "NoBroken" (keep zones testable), determining zone validity after breakouts. Next, we implement the "ZoneSizeMode" enum with "NoRestriction" (no size limits) and "EnforceLimits" (restrict zone size within bounds), ensuring zones meet size criteria.
Finally, we add the "TrendConfirmationMode" enum with "NoConfirmation" (no trend check) and "ConfirmTrend" (require trend validation), enabling optional trend-based trade filtering. This will make the system have a flexible configuration for zone trading and validation rules. We can use these enumerations to create our user inputs.
//+------------------------------------------------------------------+
//| Input Parameters                                                 |
//+------------------------------------------------------------------+
input double tradeLotSize = 0.01;                   // Trade size in lots
input bool   enableTrading = true;                  // Enable automated trading
input bool   enableTrailingStop = true;             // Enable trailing stop
input double trailingStopPoints = 30;               // Trailing stop points
input double minProfitToTrail = 50;                 // Minimum trailing points
input int    uniqueMagicNumber = 12345;             // Magic Number
input int    consolidationBars = 5;                 // Consolidation range bars
input double maxConsolidationSpread = 30;           // Maximum allowed spread in points for consolidation
input double stopLossDistance = 200;                // Stop loss in points
input double takeProfitDistance = 400;              // Take profit in points
input double minMoveAwayPoints = 50;                // Minimum points price must move away before zone is ready
input bool   deleteBrokenZonesFromChart = false;    // Delete broken zones from chart
input bool   deleteExpiredZonesFromChart = false;   // Delete expired zones from chart
input int    zoneExtensionBars = 150;               // Number of bars to extend zones to the right
input bool   enableImpulseValidation = true;        // Enable impulse move validation
input int    impulseCheckBars = 3;                  // Number of bars to check for impulsive move
input double impulseMultiplier = 1.0;               // Multiplier for impulsive threshold
input TradeTestedZonesMode tradeTestedMode = NoRetrade; // Mode for trading tested zones
input int    maxTradesPerZone = 2;                  // Maximum trades per zone for LimitedRetrade
input BrokenZonesMode brokenZoneMode = AllowBroken; // Mode for broken zones validation
input color  demandZoneColor = clrBlue;             // Color for untested demand zones
input color  supplyZoneColor = clrRed;              // Color for untested supply zones
input color  testedDemandZoneColor = clrBlueViolet; // Color for tested demand zones
input color  testedSupplyZoneColor = clrOrange;     // Color for tested supply zones
input color  brokenZoneColor = clrDarkGray;         // Color for broken zones
input color  labelTextColor = clrBlack;             // Color for text labels
input ZoneSizeMode zoneSizeRestriction = NoRestriction; // Zone size restriction mode
input double minZonePoints = 50;                    // Minimum zone size in points
input double maxZonePoints = 300;                   // Maximum zone size in points
input TrendConfirmationMode trendConfirmation = NoConfirmation; // Trend confirmation mode
input int    trendLookbackBars = 10;                // Number of bars for trend confirmation
input double minTrendPoints = 1;                    // Minimum points for trend confirmation
Here, we establish the configuration input parameters for our system to define its trading and visualization behavior. We have added self-explanatory comments to make everything easy and straightforward. Finally, since we will be managing several supply and demand zones, we need to declare a structure where we will store the zones' information for ease of management.
//+------------------------------------------------------------------+
//| Structure for zone information                                   |
//+------------------------------------------------------------------+
struct SDZone {                                    //--- Define structure for supply/demand zones
   double   high;                                  //--- Store zone high price
   double   low;                                   //--- Store zone low price
   datetime startTime;                             //--- Store zone start time
   datetime endTime;                               //--- Store zone end time
   datetime breakoutTime;                          //--- Store breakout time
   bool     isDemand;                              //--- Indicate demand (true) or supply (false)
   bool     tested;                                //--- Track if zone was tested
   bool     broken;                                //--- Track if zone was broken
   bool     readyForTest;                          //--- Track if zone is ready for testing
   int      tradeCount;                            //--- Track number of trades on zone
   string   name;                                  //--- Store zone object name
};

//+------------------------------------------------------------------+
//| Global variables                                                 |
//+------------------------------------------------------------------+
SDZone zones[];                                    //--- Store active supply/demand zones
SDZone potentialZones[];                           //--- Store potential zones awaiting validation
int    maxZones = 50;                              //--- Set maximum number of zones to track

//+------------------------------------------------------------------+
//| Expert initialization function                                   |
//+------------------------------------------------------------------+
int OnInit() {
   obj_Trade.SetExpertMagicNumber(uniqueMagicNumber); //--- Set magic number for trade identification
   return(INIT_SUCCEEDED);                        //--- Return initialization success
}

//+------------------------------------------------------------------+
//| Expert deinitialization function                                 |
//+------------------------------------------------------------------+
void OnDeinit(const int reason) {
   ObjectsDeleteAll(0, "SDZone_");                //--- Remove all zone objects from chart
   ChartRedraw(0);                                //--- Redraw chart to clear objects
}
First, we create the "SDZone" structure to store zone details, including high and low prices, start, end, and breakout times, flags for demand/supply type ("isDemand"), tested status ("tested"), broken status ("broken"), readiness for testing ("readyForTest"), trade count ("tradeCount"), and object name ("name"). Then, we initialize global variables: "zones" array to hold active supply and demand zones, "potentialZones" array for zones awaiting validation, and "maxZones" set to 50 to limit tracked zones. You can increase or decrease this value based on your timeframe and settings; we just chose an arbitrary standard value.
In the OnInit event handler, we call "SetExpertMagicNumber" on "obj_Trade" with "uniqueMagicNumber" to tag trades and return INIT_SUCCEEDED for successful initialization. In the OnDeinit function, we use ObjectsDeleteAll to remove all chart objects with the "SDZone_" prefix, as we will be naming all our objects with this prefix, and call ChartRedraw to refresh the chart, ensuring clean resource cleanup. We can now define some helper functions that will help us detect and manage the zones. We will start with the logic that will detect the zones, but first, let us have a helper function that will help in debugging the zones.
//+------------------------------------------------------------------+
//| Print zones for debugging                                        |
//+------------------------------------------------------------------+
void PrintZones(SDZone &arr[]) {
   Print("Current zones count: ", ArraySize(arr)); //--- Log total number of zones
   for (int i = 0; i < ArraySize(arr); i++) {     //--- Iterate through zones
      Print("Zone ", i, ": ", arr[i].name, " endTime: ", TimeToString(arr[i].endTime)); //--- Log zone details
   }
}
To monitor zone states, we develop the "PrintZones" function, which takes an "SDZone" array, logs the total number of zones using Print with ArraySize, and iterates through the array to log each zone’s index, name, and end time with "Print" and TimeToString for clear tracking. We can now develop the core logic to detect the zones.
//+------------------------------------------------------------------+
//| Detect supply and demand zones                                   |
//+------------------------------------------------------------------+
void DetectZones() {
   int startIndex = consolidationBars + 1;                 //--- Set start index for consolidation check
   if (iBars(_Symbol, _Period) < startIndex + 1) return;   //--- Exit if insufficient bars
   bool isConsolidated = true;                             //--- Assume consolidation
   double highPrice = iHigh(_Symbol, _Period, startIndex); //--- Initialize high price
   double lowPrice = iLow(_Symbol, _Period, startIndex);   //--- Initialize low price
   for (int i = startIndex - 1; i >= 2; i--) {             //--- Iterate through consolidation bars
      highPrice = MathMax(highPrice, iHigh(_Symbol, _Period, i)); //--- Update highest high
      lowPrice = MathMin(lowPrice, iLow(_Symbol, _Period, i)); //--- Update lowest low
      if (highPrice - lowPrice > maxConsolidationSpread * _Point) { //--- Check spread limit
         isConsolidated = false;                           //--- Mark as not consolidated
         break;                                            //--- Exit loop
      }
   }
   if (isConsolidated) {                                   //--- Confirm consolidation
      double closePrice = iClose(_Symbol, _Period, 1);     //--- Get last closed bar price
      double breakoutLow = iLow(_Symbol, _Period, 1);      //--- Get breakout bar low
      double breakoutHigh = iHigh(_Symbol, _Period, 1);    //--- Get breakout bar high
      bool isDemandZone = closePrice > highPrice && breakoutLow >= lowPrice; //--- Check demand zone
      bool isSupplyZone = closePrice < lowPrice && breakoutHigh <= highPrice; //--- Check supply zone
      if (isDemandZone || isSupplyZone) {                   //--- Validate zone type
         double zoneSize = (highPrice - lowPrice) / _Point; //--- Calculate zone size
         if (zoneSizeRestriction == EnforceLimits && (zoneSize < minZonePoints || zoneSize > maxZonePoints)) return; //--- Check size restrictions
         datetime lastClosedBarTime = iTime(_Symbol, _Period, 1); //--- Get last bar time
         bool overlaps = false;                             //--- Initialize overlap flag
         for (int j = 0; j < ArraySize(zones); j++) {       //--- Check existing zones
            if (lastClosedBarTime < zones[j].endTime) {     //--- Check time overlap
               double maxLow = MathMax(lowPrice, zones[j].low); //--- Find max low
               double minHigh = MathMin(highPrice, zones[j].high); //--- Find min high
               if (maxLow <= minHigh) {                     //--- Check price overlap
                  overlaps = true;                          //--- Mark as overlapping
                  break;                                    //--- Exit loop
               }
            }
         }
         bool duplicate = false;                        //--- Initialize duplicate flag
         for (int j = 0; j < ArraySize(zones); j++) {   //--- Check for duplicates
            if (lastClosedBarTime < zones[j].endTime) { //--- Check time
               if (MathAbs(zones[j].high - highPrice) < _Point && MathAbs(zones[j].low - lowPrice) < _Point) { //--- Check price match
                  duplicate = true;                     //--- Mark as duplicate
                  break;                                //--- Exit loop
               }
            }
         }
         if (overlaps || duplicate) return;             //--- Skip overlapping or duplicate zones
         if (enableImpulseValidation) {                 //--- Check impulse validation
            bool pot_overlaps = false;                  //--- Initialize potential overlap flag
            for (int j = 0; j < ArraySize(potentialZones); j++) { //--- Check potential zones
               if (lastClosedBarTime < potentialZones[j].endTime) { //--- Check time overlap
                  double maxLow = MathMax(lowPrice, potentialZones[j].low); //--- Find max low
                  double minHigh = MathMin(highPrice, potentialZones[j].high); //--- Find min high
                  if (maxLow <= minHigh) {              //--- Check price overlap
                     pot_overlaps = true;               //--- Mark as overlapping
                     break;                             //--- Exit loop
                  }
               }
            }
            bool pot_duplicate = false;           //--- Initialize potential duplicate flag
            for (int j = 0; j < ArraySize(potentialZones); j++) { //--- Check potential duplicates
               if (lastClosedBarTime < potentialZones[j].endTime) { //--- Check time
                  if (MathAbs(potentialZones[j].high - highPrice) < _Point && MathAbs(potentialZones[j].low - lowPrice) < _Point) { //--- Check price match
                     pot_duplicate = true;      //--- Mark as duplicate
                     break;                     //--- Exit loop
                  }
               }
            }
            if (pot_overlaps || pot_duplicate) return; //--- Skip overlapping or duplicate potential zones
            int potCount = ArraySize(potentialZones); //--- Get potential zones count
            ArrayResize(potentialZones, potCount + 1); //--- Resize potential zones array
            potentialZones[potCount].high = highPrice; //--- Set zone high
            potentialZones[potCount].low = lowPrice; //--- Set zone low
            potentialZones[potCount].startTime = iTime(_Symbol, _Period, startIndex); //--- Set start time
            potentialZones[potCount].endTime = TimeCurrent() + PeriodSeconds(_Period) * zoneExtensionBars; //--- Set end time
            potentialZones[potCount].breakoutTime = iTime(_Symbol, _Period, 1); //--- Set breakout time
            potentialZones[potCount].isDemand = isDemandZone; //--- Set zone type
            potentialZones[potCount].tested = false; //--- Set untested
            potentialZones[potCount].broken = false; //--- Set not broken
            potentialZones[potCount].readyForTest = false; //--- Set not ready
            potentialZones[potCount].tradeCount = 0; //--- Initialize trade count
            potentialZones[potCount].name = "PotentialZone_" + TimeToString(potentialZones[potCount].startTime, TIME_DATE|TIME_SECONDS); //--- Set zone name
            Print("Potential zone created: ", (isDemandZone ? "Demand" : "Supply"), " at ", lowPrice, " - ", highPrice, " endTime: ", TimeToString(potentialZones[potCount].endTime)); //--- Log potential zone
         } else {                                 //--- No impulse validation
            int zoneCount = ArraySize(zones);     //--- Get zones count
            if (zoneCount >= maxZones) {          //--- Check max zones limit
               ArrayRemove(zones, 0, 1);          //--- Remove oldest zone
               zoneCount--;                       //--- Decrease count
            }
            ArrayResize(zones, zoneCount + 1);    //--- Resize zones array
            zones[zoneCount].high = highPrice;    //--- Set zone high
            zones[zoneCount].low = lowPrice;      //--- Set zone low
            zones[zoneCount].startTime = iTime(_Symbol, _Period, startIndex); //--- Set start time
            zones[zoneCount].endTime = TimeCurrent() + PeriodSeconds(_Period) * zoneExtensionBars; //--- Set end time
            zones[zoneCount].breakoutTime = iTime(_Symbol, _Period, 1); //--- Set breakout time
            zones[zoneCount].isDemand = isDemandZone; //--- Set zone type
            zones[zoneCount].tested = false;      //--- Set untested
            zones[zoneCount].broken = false;      //--- Set not broken
            zones[zoneCount].readyForTest = false; //--- Set not ready
            zones[zoneCount].tradeCount = 0;      //--- Initialize trade count
            zones[zoneCount].name = "SDZone_" + TimeToString(zones[zoneCount].startTime, TIME_DATE|TIME_SECONDS); //--- Set zone name
            Print("Zone created: ", (isDemandZone ? "Demand" : "Supply"), " zone: ", zones[zoneCount].name, " at ", lowPrice, " - ", highPrice, " endTime: ", TimeToString(zones[zoneCount].endTime)); //--- Log zone creation
            PrintZones(zones);                    //--- Print zones for debugging
         }
      }
   }
}
Here, we implement the zone detection logic for our system. In the "DetectZones" function, we set "startIndex" to "consolidationBars + 1", exiting if insufficient bars exist via the iBars function. We assume consolidation ("isConsolidated" true), initialize "highPrice" and "lowPrice" with iHigh and iLow at "startIndex", and iterate backward through bars, updating with MathMax and MathMin, marking "isConsolidated" false if the range exceeds "maxConsolidationSpread * Point". If consolidated, we check the last bar’s close ("iClose"), low ("iLow"), and high ("iHigh") to identify demand ("closePrice > highPrice" and "breakoutLow >= lowPrice") or supply zones ("closePrice < lowPrice" and "breakoutHigh <= highPrice").
For valid zones, we verify size restrictions with "zoneSizeRestriction" and "minZonePoints"/"maxZonePoints", check for overlaps or duplicates in "zones" and "potentialZones" using "MathMax" and "MathMin", and, if "enableImpulseValidation" is true, add to "potentialZones" with ArrayResize, setting fields like "high", "low", "startTime" (iTime), "endTime" ("TimeCurrent + zoneExtensionBars"), and "name" ("PotentialZone"), logging with "Print"; otherwise, we add directly to "zones", removing the oldest if "maxZones" is reached, and log with "Print" and "PrintZones" for debugging so we keep track of our zones, hence creating the core logic for detecting and storing supply and demand zones. We can run this in the OnInit event handler to detect the zones.
//+------------------------------------------------------------------+
//| Expert tick function                                             |
//+------------------------------------------------------------------+
void OnTick() {
   static datetime lastBarTime = 0;                      //--- Store last processed bar time
   datetime currentBarTime = iTime(_Symbol, _Period, 0); //--- Get current bar time
   bool isNewBar = (currentBarTime != lastBarTime);      //--- Check for new bar
   if (isNewBar) {                                       //--- Process new bar
      lastBarTime = currentBarTime;                      //--- Update last bar time
      DetectZones();                                     //--- Detect new zones
   }
}
In the OnTick event handler, we track new bars by comparing the current bar’s time from iTime (for the symbol and period at shift 0) with a static "lastBarTime", setting "isNewBar" to true, and updating "lastBarTime" if different. If a new bar is detected, we call our function, "DetectZones", to identify new supply and demand zones based on consolidation patterns. We are now able to detect the zones as below.
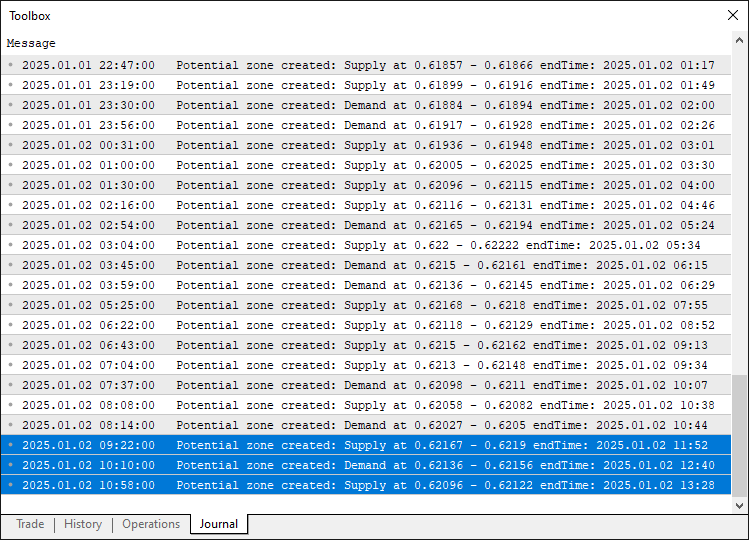
Now that we can detect potential supply and demand zones, we just have to validate them via the rally up or down movements, which we will refer to as impulse movements. For modularization, we can have the entire logic in a function.
//+------------------------------------------------------------------+
//| Validate potential zones based on impulsive move                 |
//+------------------------------------------------------------------+
void ValidatePotentialZones() {
   datetime lastClosedBarTime = iTime(_Symbol, _Period, 1);   //--- Get last closed bar time
   for (int p = ArraySize(potentialZones) - 1; p >= 0; p--) { //--- Iterate potential zones backward
      if (lastClosedBarTime >= potentialZones[p].endTime) {   //--- Check for expired zone
         Print("Potential zone expired and removed from array: ", potentialZones[p].name, " endTime: ", TimeToString(potentialZones[p].endTime)); //--- Log expiration
         ArrayRemove(potentialZones, p, 1);                   //--- Remove expired zone
         continue;                                            //--- Skip to next
      }
      if (TimeCurrent() > potentialZones[p].breakoutTime + impulseCheckBars * PeriodSeconds(_Period)) { //--- Check impulse window
         bool isImpulsive = false;                            //--- Initialize impulsive flag
         int breakoutShift = iBarShift(_Symbol, _Period, potentialZones[p].breakoutTime, false); //--- Get breakout bar shift
         double range = potentialZones[p].high - potentialZones[p].low; //--- Calculate zone range
         double threshold = range * impulseMultiplier;        //--- Calculate impulse threshold
         for (int shift = 1; shift <= impulseCheckBars; shift++) { //--- Check bars after breakout
            if (shift + breakoutShift >= iBars(_Symbol, _Period)) continue; //--- Skip out-of-bounds
            double cl = iClose(_Symbol, _Period, shift);      //--- Get close price
            if (potentialZones[p].isDemand) {                 //--- Check demand zone
               if (cl >= potentialZones[p].high + threshold) { //--- Check bullish impulse
                  isImpulsive = true;                         //--- Set impulsive flag
                  break;                                      //--- Exit loop
               }
            } else {                                          //--- Check supply zone
               if (cl <= potentialZones[p].low - threshold) { //--- Check bearish impulse
                  isImpulsive = true;                         //--- Set impulsive flag
                  break;                                      //--- Exit loop
               }
            }
         }
         if (isImpulsive) {                                  //--- Process impulsive zone
            double zoneSize = (potentialZones[p].high - potentialZones[p].low) / _Point; //--- Calculate zone size
            if (zoneSizeRestriction == EnforceLimits && (zoneSize < minZonePoints || zoneSize > maxZonePoints)) { //--- Check size limits
               ArrayRemove(potentialZones, p, 1);            //--- Remove invalid zone
               continue;                                     //--- Skip to next
            }
            bool overlaps = false;                           //--- Initialize overlap flag
            for (int j = 0; j < ArraySize(zones); j++) {     //--- Check existing zones
               if (lastClosedBarTime < zones[j].endTime) {   //--- Check time overlap
                  double maxLow = MathMax(potentialZones[p].low, zones[j].low); //--- Find max low
                  double minHigh = MathMin(potentialZones[p].high, zones[j].high); //--- Find min high
                  if (maxLow <= minHigh) {                   //--- Check price overlap
                     overlaps = true;                        //--- Mark as overlapping
                     break;                                  //--- Exit loop
                  }
               }
            }
            bool duplicate = false;                          //--- Initialize duplicate flag
            for (int j = 0; j < ArraySize(zones); j++) {     //--- Check for duplicates
               if (lastClosedBarTime < zones[j].endTime) {   //--- Check time
                  if (MathAbs(zones[j].high - potentialZones[p].high) < _Point && MathAbs(zones[j].low - potentialZones[p].low) < _Point) { //--- Check price match
                     duplicate = true;                       //--- Mark as duplicate
                     break;                                  //--- Exit loop
                  }
               }
            }
            if (overlaps || duplicate) {                     //--- Check overlap or duplicate
               Print("Validated zone overlaps or duplicates, discarded: ", potentialZones[p].low, " - ", potentialZones[p].high); //--- Log discard
               ArrayRemove(potentialZones, p, 1);            //--- Remove zone
               continue;                                     //--- Skip to next
            }
            int zoneCount = ArraySize(zones);                //--- Get zones count
            if (zoneCount >= maxZones) {                     //--- Check max zones limit
               ArrayRemove(zones, 0, 1);                     //--- Remove oldest zone
               zoneCount--;                                  //--- Decrease count
            }
            ArrayResize(zones, zoneCount + 1);               //--- Resize zones array
            zones[zoneCount] = potentialZones[p];            //--- Copy potential zone
            zones[zoneCount].name = "SDZone_" + TimeToString(zones[zoneCount].startTime, TIME_DATE|TIME_SECONDS); //--- Set zone name
            zones[zoneCount].endTime = TimeCurrent() + PeriodSeconds(_Period) * zoneExtensionBars; //--- Update end time
            Print("Zone validated: ", (zones[zoneCount].isDemand ? "Demand" : "Supply"), " zone: ", zones[zoneCount].name, " at ", zones[zoneCount].low, " - ", zones[zoneCount].high, " endTime: ", TimeToString(zones[zoneCount].endTime)); //--- Log validation
            ArrayRemove(potentialZones, p, 1);               //--- Remove validated zone
            PrintZones(zones);                               //--- Print zones for debugging
         } else {                                            //--- Zone not impulsive
            Print("Potential zone not impulsive, discarded: ", potentialZones[p].low, " - ", potentialZones[p].high); //--- Log discard
            ArrayRemove(potentialZones, p, 1);               //--- Remove non-impulsive zone
         }
      }
   }
}
Here, we create a function to implement the validation logic for potential supply and demand zones. In the "ValidatePotentialZones" function, we iterate backward through "potentialZones", checking if the last closed bar’s time (iTime at shift 1) exceeds a zone’s "endTime", removing expired zones with ArrayRemove, and logging the action. For zones within the impulse window ("TimeCurrent > breakoutTime + impulseCheckBars * PeriodSeconds"), we calculate the zone range ("high - low") and impulse threshold ("range * impulseMultiplier"), then check bars after the breakout (iBarShift) for a close price (iClose) exceeding the high plus threshold for demand zones or below the low minus threshold for supply zones, setting "isImpulsive" if met.
If impulsive, we verify zone size against "minZonePoints" and "maxZonePoints" if "zoneSizeRestriction" is "EnforceLimits", check for overlaps or duplicates in "zones" using MathMax and MathMin, and, if valid, move the zone to "zones" with ArrayResize, updating its name to "SDZone_" and end time, logging with the "Print" and "PrintZones" functions, then remove it from "potentialZones"; non-impulsive zones are discarded with ArrayRemove and logged, creating a system for validating zones based on impulsive moves and ensuring unique, valid zones. When you call the function in the tick event handler, you should get something that depicts the following.
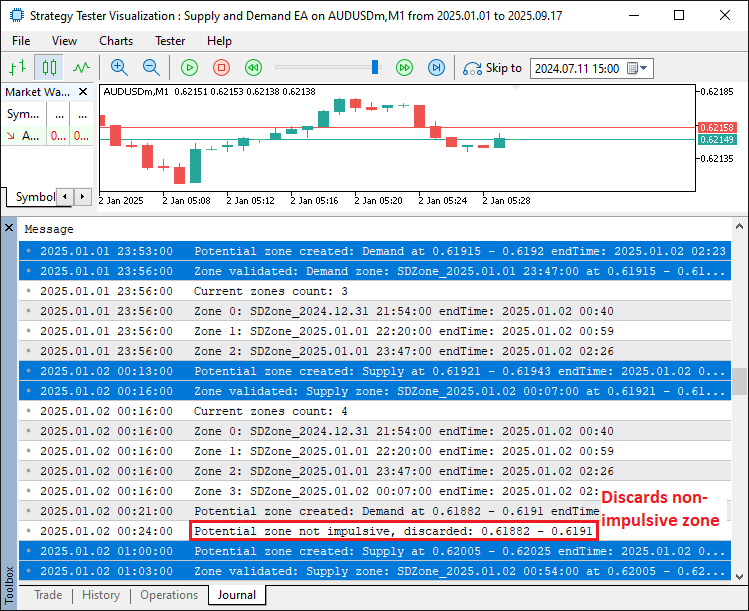
Now that we can validate the zones, let us manage and visualize the zones on the chart for easier tracking.
//+------------------------------------------------------------------+
//| Update and draw zones                                            |
//+------------------------------------------------------------------+
void UpdateZones() {
   datetime lastClosedBarTime = iTime(_Symbol, _Period, 1); //--- Get last closed bar time
   for (int i = ArraySize(zones) - 1; i >= 0; i--) { //--- Iterate zones backward
      if (lastClosedBarTime >= zones[i].endTime) { //--- Check for expired zone
         Print("Zone expired and removed from array: ", zones[i].name, " endTime: ", TimeToString(zones[i].endTime)); //--- Log expiration
         if (deleteExpiredZonesFromChart) {    //--- Check if deleting expired
            ObjectDelete(0, zones[i].name);    //--- Delete zone rectangle
            ObjectDelete(0, zones[i].name + "Label"); //--- Delete zone label
         }
         ArrayRemove(zones, i, 1);             //--- Remove expired zone
         continue;                             //--- Skip to next
      }
      bool wasReady = zones[i].readyForTest;   //--- Store previous ready status
      if (!zones[i].readyForTest) {            //--- Check if not ready
         double currentClose = iClose(_Symbol, _Period, 1); //--- Get current close
         double zoneLevel = zones[i].isDemand ? zones[i].high : zones[i].low; //--- Get zone level
         double distance = zones[i].isDemand ? (currentClose - zoneLevel) : (zoneLevel - currentClose); //--- Calculate distance
         if (distance > minMoveAwayPoints * _Point) { //--- Check move away distance
            zones[i].readyForTest = true;      //--- Set ready for test
         }
      }
      if (!wasReady && zones[i].readyForTest) { //--- Check if newly ready
         Print("Zone ready for test: ", zones[i].name); //--- Log ready status
      }
      if (brokenZoneMode == AllowBroken && !zones[i].tested) { //--- Check if breakable
         double currentClose = iClose(_Symbol, _Period, 1); //--- Get current close
         bool wasBroken = zones[i].broken;     //--- Store previous broken status
         if (zones[i].isDemand) {              //--- Check demand zone
            if (currentClose < zones[i].low) { //--- Check if broken
               zones[i].broken = true;         //--- Mark as broken
            }
         } else {                              //--- Check supply zone
            if (currentClose > zones[i].high) { //--- Check if broken
               zones[i].broken = true;         //--- Mark as broken
            }
         }
         if (!wasBroken && zones[i].broken) {  //--- Check if newly broken
            Print("Zone broken in UpdateZones: ", zones[i].name); //--- Log broken zone
            ObjectSetInteger(0, zones[i].name, OBJPROP_COLOR, brokenZoneColor); //--- Update zone color
            string labelName = zones[i].name + "Label"; //--- Get label name
            string labelText = zones[i].isDemand ? "Demand Zone (Broken)" : "Supply Zone (Broken)"; //--- Set broken label
            ObjectSetString(0, labelName, OBJPROP_TEXT, labelText); //--- Update label text
            if (deleteBrokenZonesFromChart) {  //--- Check if deleting broken
               ObjectDelete(0, zones[i].name); //--- Delete zone rectangle
               ObjectDelete(0, labelName);     //--- Delete zone label
            }
         }
      }
      if (ObjectFind(0, zones[i].name) >= 0 || (!zones[i].broken || !deleteBrokenZonesFromChart)) { //--- Check if drawable
         color zoneColor;                        //--- Initialize zone color
         if (zones[i].tested) {                  //--- Check if tested
            zoneColor = zones[i].isDemand ? testedDemandZoneColor : testedSupplyZoneColor; //--- Set tested color
         } else if (zones[i].broken) {           //--- Check if broken
            zoneColor = brokenZoneColor;         //--- Set broken color
         } else {                                //--- Untested zone
            zoneColor = zones[i].isDemand ? demandZoneColor : supplyZoneColor; //--- Set untested color
         }
         ObjectCreate(0, zones[i].name, OBJ_RECTANGLE, 0, zones[i].startTime, zones[i].high, zones[i].endTime, zones[i].low); //--- Create zone rectangle
         ObjectSetInteger(0, zones[i].name, OBJPROP_COLOR, zoneColor); //--- Set zone color
         ObjectSetInteger(0, zones[i].name, OBJPROP_FILL, true); //--- Enable fill
         ObjectSetInteger(0, zones[i].name, OBJPROP_BACK, true); //--- Set to background
         string labelName = zones[i].name + "Label"; //--- Generate label name
         string labelText = zones[i].isDemand ? "Demand Zone" : "Supply Zone"; //--- Set base label
         if (zones[i].tested) labelText += " (Tested)"; //--- Append tested status
         else if (zones[i].broken) labelText += " (Broken)"; //--- Append broken status
         datetime labelTime = zones[i].startTime + (zones[i].endTime - zones[i].startTime) / 2; //--- Calculate label time
         double labelPrice = (zones[i].high + zones[i].low) / 2; //--- Calculate label price
         ObjectCreate(0, labelName, OBJ_TEXT, 0, labelTime, labelPrice); //--- Create label
         ObjectSetString(0, labelName, OBJPROP_TEXT, labelText); //--- Set label text
         ObjectSetInteger(0, labelName, OBJPROP_COLOR, labelTextColor); //--- Set label color
         ObjectSetInteger(0, labelName, OBJPROP_ANCHOR, ANCHOR_CENTER); //--- Set label anchor
      }
   }
   ChartRedraw(0);                                //--- Redraw chart
}
We proceed to implement the zone management and visualization logic for the system. In the "UpdateZones" function, we iterate backward through "zones", checking if the last closed bar’s time (iTime at shift 1) exceeds a zone’s "endTime", removing expired zones with ArrayRemove, deleting their chart objects (OBJ_RECTANGLE and "Label") if "deleteExpiredZonesFromChart" is true, and logging, ensuring that if a zone is expired, it is no longer our concern. For non-ready zones, we calculate the distance from the current close (iClose) to the zone’s high (demand) or low (supply), marking "readyForTest" true if it exceeds "minMoveAwayPoints * _Point", logging if newly ready.
If "brokenZoneMode" is "AllowBroken" and the zone is untested, we mark it broken if the close falls below the low (demand) or above the high (supply), updating the color to "brokenZoneColor" with ObjectSetInteger and label to "Demand/Supply Zone (Broken)" with ObjectSetString, deleting objects if "deleteBrokenZonesFromChart" is true, and logging the instance. For drawable zones (existing or not broken with "deleteBrokenZonesFromChart" false), we set colors ("demandZoneColor", "supplyZoneColor", "testedDemandZoneColor", "testedSupplyZoneColor", or "brokenZoneColor") based on status, draw rectangles with ObjectCreate ("OBJ_RECTANGLE") using "startTime", "high", "endTime", and "low", and add centered labels with "ObjectCreate" (OBJ_TEXT) using "labelTextColor", then redraw the chart with the ChartRedraw function, thus updating zone states and rendering them dynamically. We can now call this function in the tick event handler, and when we do, we get the following outcome.
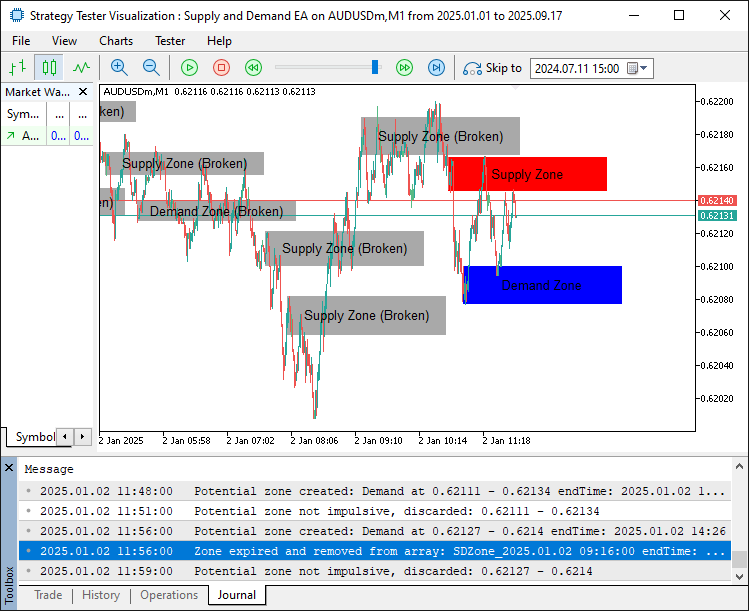
Now that we can manage the zones and visualize them on the chart, we just need to track them and trade based on fulfilled trading conditions. We will create a function that will loop through the valid zones and check the trading conditions.
//+------------------------------------------------------------------+
//| Trade on zones                                                   |
//+------------------------------------------------------------------+
void TradeOnZones(bool isNewBar) {
   static datetime lastTradeCheck = 0;                   //--- Store last trade check time
   datetime currentBarTime = iTime(_Symbol, _Period, 0); //--- Get current bar time
   if (!isNewBar || lastTradeCheck == currentBarTime) return; //--- Exit if not new bar or checked
   lastTradeCheck = currentBarTime;                      //--- Update last trade check
   double currentBid = NormalizeDouble(SymbolInfoDouble(_Symbol, SYMBOL_BID), _Digits); //--- Get current bid
   double currentAsk = NormalizeDouble(SymbolInfoDouble(_Symbol, SYMBOL_ASK), _Digits); //--- Get current ask
   for (int i = 0; i < ArraySize(zones); i++) {          //--- Iterate through zones
      if (zones[i].broken) continue;                     //--- Skip broken zones
      if (tradeTestedMode == NoRetrade && zones[i].tested) continue; //--- Skip tested zones
      if (tradeTestedMode == LimitedRetrade && zones[i].tested && zones[i].tradeCount >= maxTradesPerZone) continue; //--- Skip max trades
      if (!zones[i].readyForTest) continue;              //--- Skip not ready zones
      double prevHigh = iHigh(_Symbol, _Period, 1);      //--- Get previous high
      double prevLow = iLow(_Symbol, _Period, 1);        //--- Get previous low
      double prevClose = iClose(_Symbol, _Period, 1);    //--- Get previous close
      bool tapped = false;                               //--- Initialize tap flag
      bool overlap = (prevLow <= zones[i].high && prevHigh >= zones[i].low); //--- Check candle overlap
      if (zones[i].isDemand) {                           //--- Check demand zone
         if (overlap && prevClose > zones[i].high) {     //--- Confirm demand tap
            tapped = true;                               //--- Set tapped flag
         }
      } else {                                           //--- Check supply zone
         if (overlap && prevClose < zones[i].low) {      //--- Confirm supply tap
            tapped = true;                               //--- Set tapped flag
         }
      }
      if (tapped) {                                      //--- Process tapped zone
         bool trendConfirmed = (trendConfirmation == NoConfirmation); //--- Assume no trend confirmation
         if (trendConfirmation == ConfirmTrend) {        //--- Check trend confirmation
            int oldShift = 2 + trendLookbackBars - 1;    //--- Calculate lookback shift
            if (oldShift >= iBars(_Symbol, _Period)) continue; //--- Skip if insufficient bars
            double oldClose = iClose(_Symbol, _Period, oldShift); //--- Get old close
            double recentClose = iClose(_Symbol, _Period, 2); //--- Get recent close
            double minChange = minTrendPoints * _Point; //--- Calculate min trend change
            if (zones[i].isDemand) {                    //--- Check demand trend
               trendConfirmed = (oldClose > recentClose + minChange); //--- Confirm downtrend
            } else {                                    //--- Check supply trend
               trendConfirmed = (oldClose < recentClose - minChange); //--- Confirm uptrend
            }
         }
         if (!trendConfirmed) continue;                 //--- Skip if trend not confirmed
         bool wasTested = zones[i].tested;              //--- Store previous tested status
         if (zones[i].isDemand) {                       //--- Handle demand trade
            double entryPrice = currentAsk;             //--- Set entry at ask
            double stopLossPrice = NormalizeDouble(zones[i].low - stopLossDistance * _Point, _Digits); //--- Set stop loss
            double takeProfitPrice = NormalizeDouble(entryPrice + takeProfitDistance * _Point, _Digits); //--- Set take profit
            obj_Trade.Buy(tradeLotSize, _Symbol, entryPrice, stopLossPrice, takeProfitPrice, "Buy at Demand Zone"); //--- Execute buy trade
            Print("Buy trade entered at Demand Zone: ", zones[i].name); //--- Log buy trade
         } else {                                       //--- Handle supply trade
            double entryPrice = currentBid;             //--- Set entry at bid
            double stopLossPrice = NormalizeDouble(zones[i].high + stopLossDistance * _Point, _Digits); //--- Set stop loss
            double takeProfitPrice = NormalizeDouble(entryPrice - takeProfitDistance * _Point, _Digits); //--- Set take profit
            obj_Trade.Sell(tradeLotSize, _Symbol, entryPrice, stopLossPrice, takeProfitPrice, "Sell at Supply Zone"); //--- Execute sell trade
            Print("Sell trade entered at Supply Zone: ", zones[i].name); //--- Log sell trade
         }
         zones[i].tested = true;                        //--- Mark zone as tested
         zones[i].tradeCount++;                         //--- Increment trade count
         if (!wasTested && zones[i].tested) {           //--- Check if newly tested
            Print("Zone tested: ", zones[i].name, ", Trade count: ", zones[i].tradeCount); //--- Log tested zone
         }
         color zoneColor = zones[i].isDemand ? testedDemandZoneColor : testedSupplyZoneColor; //--- Set tested color
         ObjectSetInteger(0, zones[i].name, OBJPROP_COLOR, zoneColor); //--- Update zone color
         string labelName = zones[i].name + "Label";                   //--- Get label name
         string labelText = zones[i].isDemand ? "Demand Zone (Tested)" : "Supply Zone (Tested)"; //--- Set tested label
         ObjectSetString(0, labelName, OBJPROP_TEXT, labelText);       //--- Update label text
      }
   }
   ChartRedraw(0);                                       //--- Redraw chart
}
To implement the trading logic for zone retests or taps, we create the "TradeOnZones" function. First, we track new bars with a static "lastTradeCheck" and exit if not new or already checked, updating "lastTradeCheck" with iTime if true, and retrieve bid and ask prices normalized with the SymbolInfoDouble and NormalizeDouble functions. We iterate through "zones", skipping broken, over-tested (based on "tradeTestedMode" and "maxTradesPerZone"), or unready zones, then check the previous bar’s high (iHigh), low ("iLow"), and close (iClose) for overlap with the zone; for demand zones ("isDemand"), we confirm a tap if "overlap" is true and "prevClose > high", for supply if "overlap" and "prevClose < low", setting "tapped" accordingly.
If tapped, we confirm trend if "trendConfirmation" is "ConfirmTrend" by comparing old and recent closes ("iClose") over "trendLookbackBars" against "minTrendPoints * _Point", skipping if not confirmed. For valid taps, we execute trades: for demand, buy at ask with stop loss below "low" by "stopLossDistance * _Point" and take profit above entry by "takeProfitDistance * _Point" using "obj_Trade.Buy", logging with Print; for supply, sell at bid with stop loss above "high" and take profit below entry, using "obj_Trade.Sell". We mark the zone as "tested", increment "tradeCount", log if newly tested, update the zone color to "testedDemandZoneColor" or "testedSupplyZoneColor" with ObjectSetInteger, and refresh the label text to "Demand/Supply Zone (Tested)" with the ObjectSetString function. Finally, we redraw the chart. When we call the function, we get the following outcome.
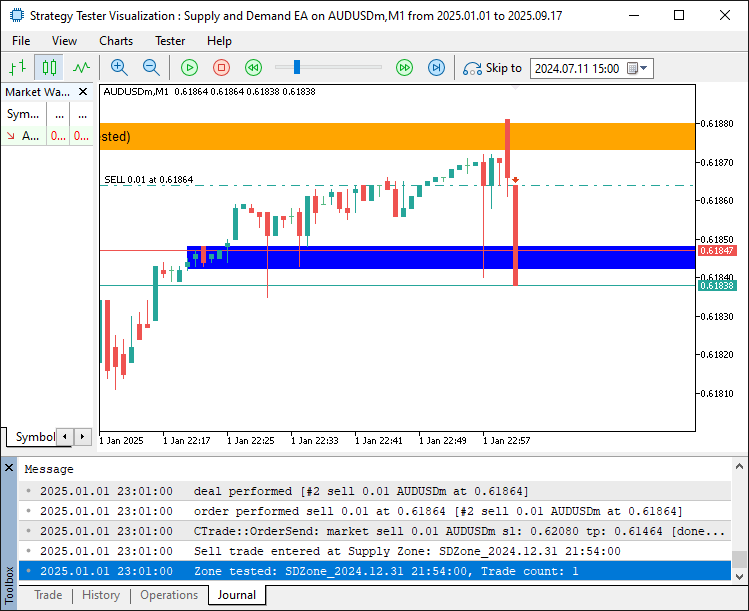
From the image, we can see that we detect the zone tapping and store the number of trades or taps essentially for that zone, so that we can trade it on some other taps if needed. What now remains is adding a trailing stop to maximize the gains. We will have it in a function as well.
//+------------------------------------------------------------------+
//| Apply trailing stop to open positions                            |
//+------------------------------------------------------------------+
void ApplyTrailingStop() {
   double point = _Point;                               //--- Get point value
   for (int i = PositionsTotal() - 1; i >= 0; i--) {    //--- Iterate through positions
      if (PositionGetTicket(i) > 0) {                   //--- Check valid ticket
         if (PositionGetString(POSITION_SYMBOL) == _Symbol && PositionGetInteger(POSITION_MAGIC) == uniqueMagicNumber) { //--- Verify symbol and magic
            double sl = PositionGetDouble(POSITION_SL); //--- Get current stop loss
            double tp = PositionGetDouble(POSITION_TP); //--- Get current take profit
            double openPrice = PositionGetDouble(POSITION_PRICE_OPEN); //--- Get open price
            if (PositionGetInteger(POSITION_TYPE) == POSITION_TYPE_BUY) { //--- Check buy position
               double newSL = NormalizeDouble(SymbolInfoDouble(_Symbol, SYMBOL_BID) - trailingStopPoints * point, _Digits); //--- Calculate new stop loss
               if (newSL > sl && SymbolInfoDouble(_Symbol, SYMBOL_BID) - openPrice > minProfitToTrail * point) { //--- Check trailing condition
                  obj_Trade.PositionModify(PositionGetInteger(POSITION_TICKET), newSL, tp); //--- Update stop loss
               }
            } else if (PositionGetInteger(POSITION_TYPE) == POSITION_TYPE_SELL) { //--- Check sell position
               double newSL = NormalizeDouble(SymbolInfoDouble(_Symbol, SYMBOL_ASK) + trailingStopPoints * point, _Digits); //--- Calculate new stop loss
               if (newSL < sl && openPrice - SymbolInfoDouble(_Symbol, SYMBOL_ASK) > minProfitToTrail * point) { //--- Check trailing condition
                  obj_Trade.PositionModify(PositionGetInteger(POSITION_TICKET), newSL, tp); //--- Update stop loss
               }
            }
         }
      }
   }
}
Here, we implement the trailing stop logic to manage open positions dynamically. In the "ApplyTrailingStop" function, we retrieve the point value with _Point and iterate backward through open positions using PositionsTotal, verifying each position’s ticket with PositionGetTicket, symbol with PositionGetString, and magic number with PositionGetInteger against the magic number.
For buy positions (POSITION_TYPE_BUY), we calculate a new stop loss as the bid price (SymbolInfoDouble with SYMBOL_BID) minus "trailingStopPoints * point", normalized with NormalizeDouble, and update it with "obj_Trade.PositionModify" if higher than the current stop loss ("PositionGetDouble(POSITION_SL)") and the profit exceeds "minProfitToTrail * point". For sell positions, we calculate the new stop loss as the ask price ("SYMBOL_ASK") plus "trailingStopPoints * point", updating if lower than the current stop loss and profit exceeds the threshold, thus adjusting stop losses to lock in profits during favorable price movements. We can just call it on every tick now to do the management as follows.
//+------------------------------------------------------------------+
//| Expert tick function                                             |
//+------------------------------------------------------------------+
void OnTick() {
   if (enableTrailingStop) {                      //--- Check if trailing stop enabled
      ApplyTrailingStop();                        //--- Apply trailing stop to positions
   }
   static datetime lastBarTime = 0;               //--- Store last processed bar time
   datetime currentBarTime = iTime(_Symbol, _Period, 0); //--- Get current bar time
   bool isNewBar = (currentBarTime != lastBarTime); //--- Check for new bar
   if (isNewBar) {                                //--- Process new bar
      lastBarTime = currentBarTime;               //--- Update last bar time
      DetectZones();                              //--- Detect new zones
      ValidatePotentialZones();                   //--- Validate potential zones
      UpdateZones();                              //--- Update existing zones
   }
   if (enableTrading) {                           //--- Check if trading enabled
      TradeOnZones(isNewBar);                     //--- Execute trades on zones
   }
}
When we run the program, we get the following outcome.
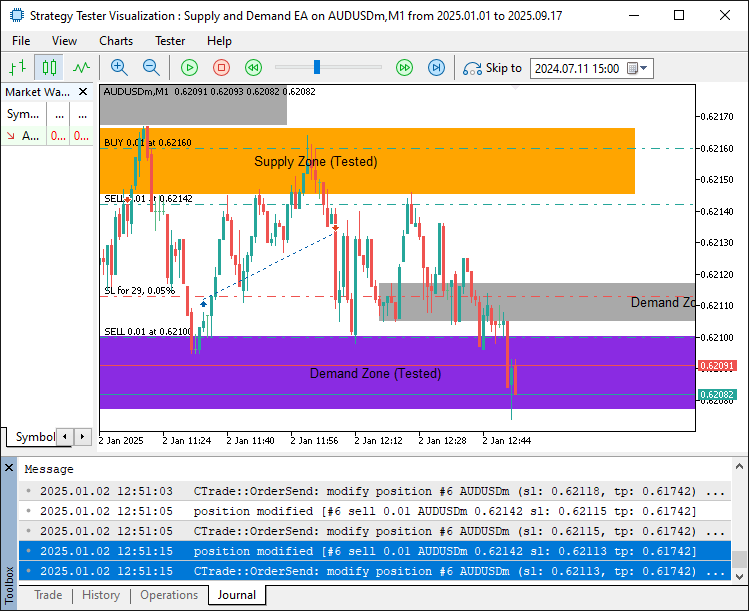
From the image, we can see that the trailing stop is fully enabled when the price goes in our favour. Here is a unified test for both zones in the previous month.
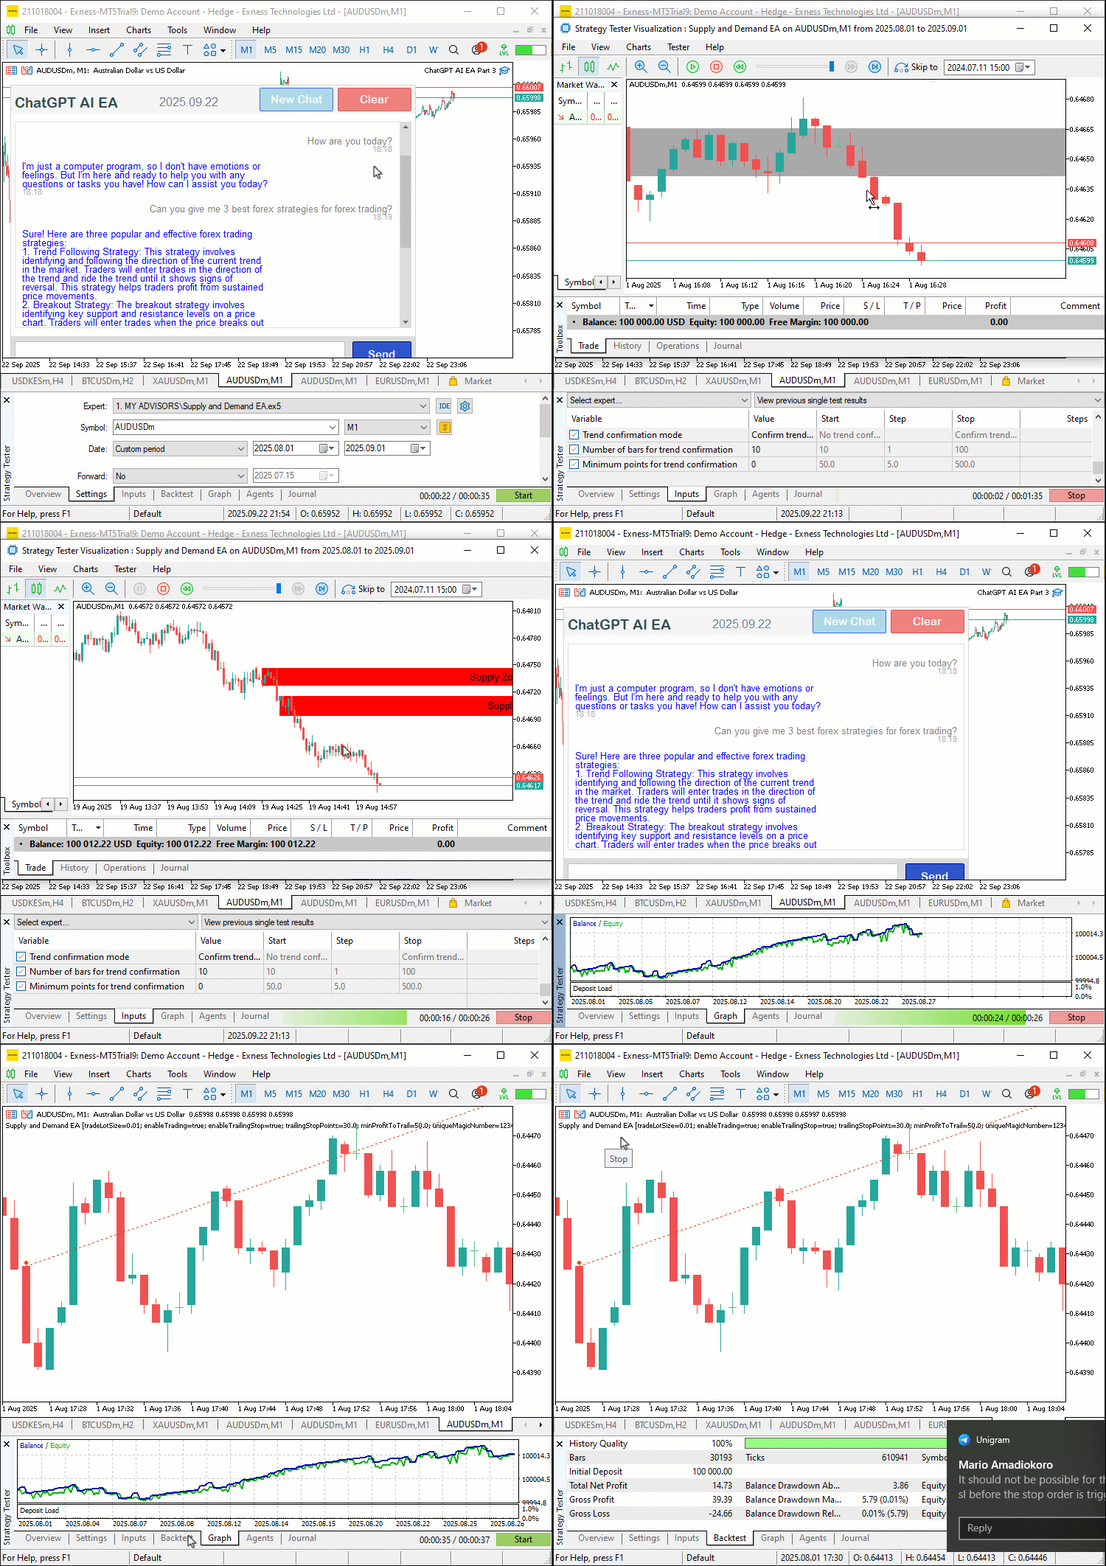
From the visualization, we can see that the program identifies and verifies all the entry conditions, and if validated, opens the respective position with the respective entry parameters, hence achieving our objective. The thing that remains is backtesting the program, and that is handled in the next section.
Backtesting
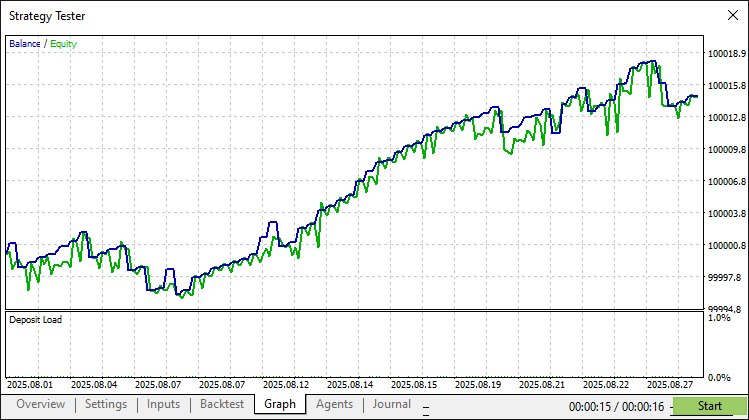
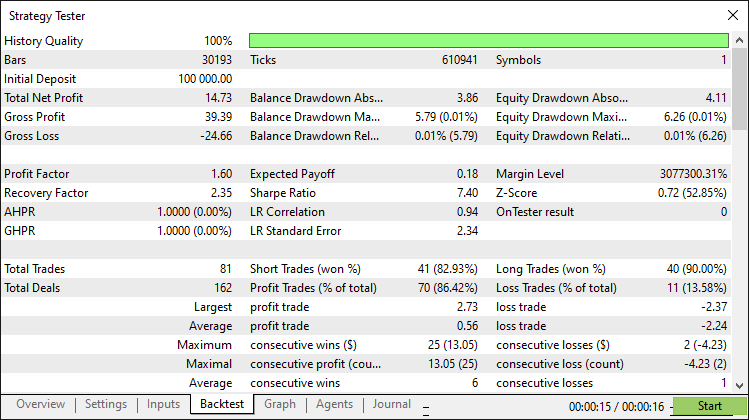
After thorough backtesting, we have the following results.
Backtest graph:
Backtest report:
Conclusion
In conclusion, we’ve created a supply and demand trading system in MQL5 for detecting supply and demand zones through consolidation, validating them with impulsive moves, and trading retests with trend confirmation and customizable risk settings. The system visualizes zones with dynamic labels and colors, incorporating trailing stops for effective risk management.
Disclaimer: This article is for educational purposes only. Trading carries significant financial risks, and market volatility may result in losses. Thorough backtesting and careful risk management are crucial before deploying this program in live markets.
With this supply and demand strategy, you’re equipped to trade retest opportunities, ready for further optimization in your trading journey. Happy trading!
Warning: All rights to these materials are reserved by MetaQuotes Ltd. Copying or reprinting of these materials in whole or in part is prohibited.
This article was written by a user of the site and reflects their personal views. MetaQuotes Ltd is not responsible for the accuracy of the information presented, nor for any consequences resulting from the use of the solutions, strategies or recommendations described.
 Neural Networks in Trading: A Hybrid Trading Framework with Predictive Coding (Final Part)
 Developing Advanced ICT Trading Systems: Implementing Signals in the Order Blocks Indicator
 MQL5 Wizard Techniques you should know (Part 81): Using Patterns of Ichimoku and the ADX-Wilder with Beta VAE Inference Learning
 Price Action Analysis Toolkit Development (Part 43): Candlestick Probability and Breakouts
- Free trading apps
- Over 8,000 signals for copying
- Economic news for exploring financial markets
You agree to website policy and terms of use
i compiled it withou any errors.Unfortunately, you can't see anything in the backtest or on the chart. Neither supply & demand zones are plotted, nor are signals recognized or trades executed. The debug and journal are also empty. Has anyone gotten it to work? Can the auto check if the code is complete and up to date?
Worked on 1m time frame