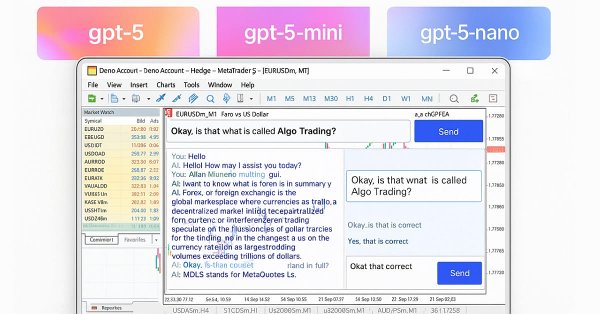
Building AI-Powered Trading Systems in MQL5 (Part 2): Developing a ChatGPT-Integrated Program with User Interface
Introduction
In our previous article (Part 1), we developed a JSON (JavaScript Object Notation) parsing framework in MetaQuotes Language 5 (MQL5) using a class, which enables the serialization and deserialization of JSON data for AI (Artificial Intelligence) API (Application Programming Interface) interactions. In Part 2, we create a ChatGPT-integrated program with a user interface, leveraging the JSON framework to send prompts to OpenAI’s API and display responses on a MetaTrader 5 chart, facilitating interactive AI-driven trading insights. We will cover the following topics:
- Understanding the ChatGPT AI Program Framework
- Setting Up OpenAI API Access and MetaTrader 5 Configuration
- Implementation in MQL5
- Testing the ChatGPT Program
- Conclusion
By the end, you’ll have a functional MQL5 program that integrates ChatGPT for interactive AI queries, ready to enhance trading strategies—let’s dive in!
Understanding the ChatGPT AI Program Framework
The ChatGPT AI Program we aim to build integrates an AI model’s capabilities into MQL5, allowing us to interact with the AI by sending prompts and receiving insights directly on the MetaTrader 5 chart, building on the JSON parsing foundation established in the previous part. This program will provide a user-friendly interface for inputting queries and viewing AI responses, offering a practical step toward AI-driven trading systems that can analyze markets or suggest strategies.
Our plan is to create a dashboard with an input field, a submit button, and a response display area, allowing us to query the AI and see formatted responses, while ensuring all interactions are logged for debugging. We will configure the program to communicate with an AI API, process responses, and display them clearly, setting the stage for future programs that will enhance the system with automated trading based on AI insights. Here is a visualization of what we want to achieve.
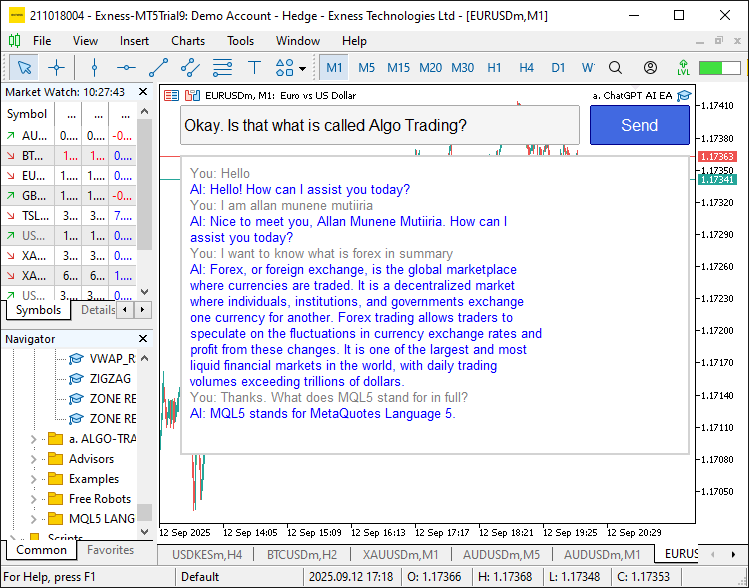
Let’s proceed to setting up the API and MetaTrader 5 configuration!
Setting Up OpenAI API Access and MetaTrader 5 Configuration
To enable the ChatGPT AI Program to communicate with OpenAI’s API, we must obtain a valid API key and configure MetaTrader 5 (MT5) to allow HTTP requests, ensuring seamless integration. We will guide you through acquiring an OpenAI API key, verifying its functionality using curl tests, and configuring the trading terminal to permit the API endpoint URL (Uniform Resource Locator) for reliable communication.
Obtaining an OpenAI API Key
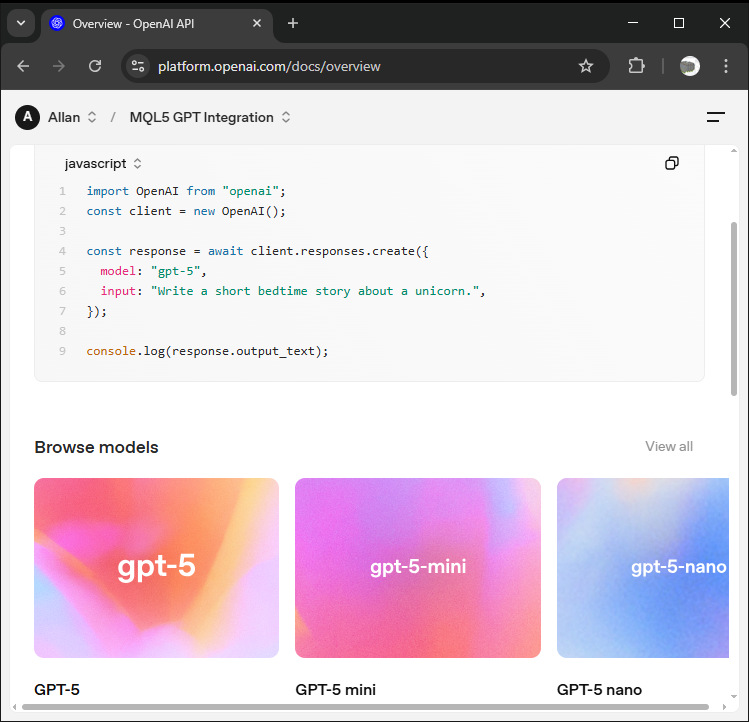
Create an OpenAI Account: Visit "platform.openai.com" and sign up or log in to your account. Navigate to the API section and generate a new API key under the “API Keys” dashboard. Copy the key (e.g., starting with “sk-”) securely, as it will be used in the program’s configuration.
Initial Load:
Secret Key Generation:
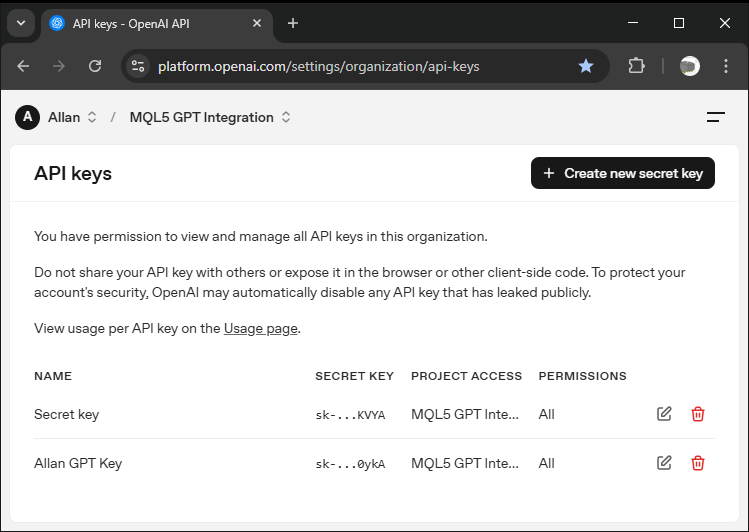
Secure the API Key: Store the key in a safe location, as it grants access to OpenAI’s services. Note that they can terminate the key in case it is leaked.
Verifying API Key with Curl Tests
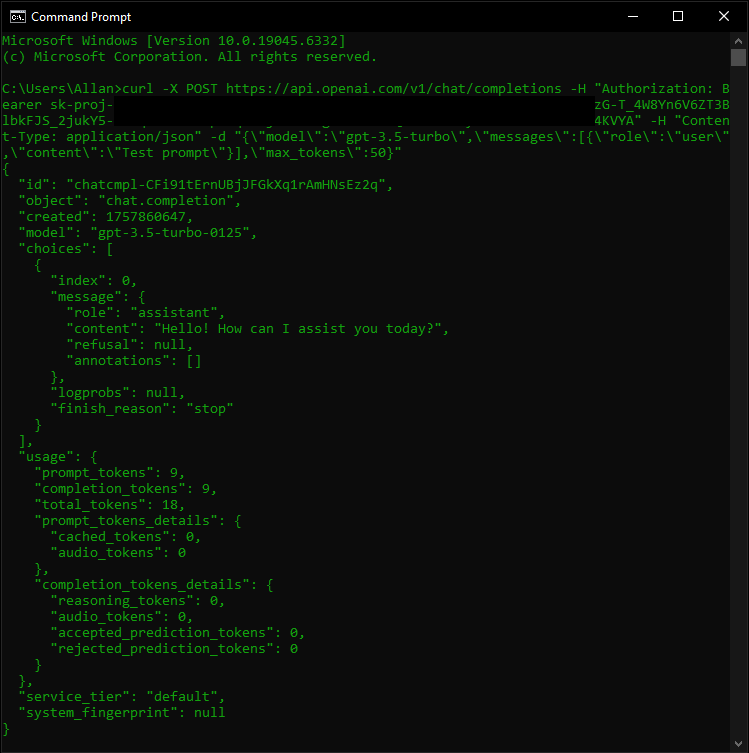
To ensure the API key is functional, let us perform a curl test from the command line to simulate an API request:
- Install Curl: Ensure curl is installed on your system (available by default on most Linux/macOS systems or downloadable for Windows).
- Run a Test Request: Open a terminal (Command Prompt on Windows) and execute the following curl command, replacing <YOUR_API_KEY> with your actual OpenAI API key:
curl -X POST https://api.openai.com/v1/chat/completions -H "Authorization: Bearer <YOUR_API_KEY>" -H "Content-Type: application/json" -d "{\"model\":\"gpt-3.5-turbo\",\"messages\":[{\"role\":\"user\",\"content\":\"Test prompt\"}],\"max_tokens\":50}"- Verify Response: A successful response (HTTP 200) returns a JSON object with a “choices” array containing the AI’s response (e.g., “content”: “This is a test response”). If the response includes an “error” field (e.g., invalid API key or quota exceeded), troubleshoot by checking the key’s validity or your OpenAI account’s billing status. Log the response to confirm functionality. Upon successful run, you should have something like this.
If this process is hard, you could create a simple test file and run it in your browser as follows.
<!DOCTYPE html>
<html>
<head>
    <title>OpenAI API Test</title>
    <style>
        body { font-family: Arial, sans-serif; max-width: 800px; margin: 0 auto; padding: 20px; }
        .container { border: 1px solid #ddd; padding: 20px; border-radius: 5px; }
        input, textarea, button { width: 100%; padding: 10px; margin: 5px 0; }
        textarea { height: 100px; }
        .response { background-color: #f5f5f5; padding: 15px; margin-top: 10px; }
    </style>
</head>
<body>
    <div class="container">
        <h2>OpenAI API Test</h2>

        <div>
            <label for="apiKey">API Key:</label>
            <input type="text" id="apiKey" placeholder="Enter your API key">
        </div>

        <div>
            <label for="prompt">Prompt:</label>
            <textarea id="prompt" placeholder="Enter your prompt">Test prompt</textarea>
        </div>

        <div>
            <label for="maxTokens">Max Tokens:</label>
            <input type="number" id="maxTokens" value="50">
        </div>

        <button onclick="testAPI()">Test API</button>

        <div id="response" class="response" style="display: none;">
            <h3>Response:</h3>
            <pre id="responseContent"></pre>
        </div>
    </div>

    <script>
        async function testAPI() {
            const apiKey = document.getElementById('apiKey').value;
            const prompt = document.getElementById('prompt').value;
            const maxTokens = document.getElementById('maxTokens').value;

            if (!apiKey) {
                alert('Please enter your API key');
                return;
            }

            try {
                const response = await fetch('https://api.openai.com/v1/chat/completions', {
                    method: 'POST',
                    headers: {
                        'Authorization': `Bearer ${apiKey}`,
                        'Content-Type': 'application/json'
                    },
                    body: JSON.stringify({
                        model: 'gpt-3.5-turbo',
                        messages: [{role: 'user', content: prompt}],
                        max_tokens: parseInt(maxTokens)
                    })
                });

                const data = await response.json();

                // Display response
                document.getElementById('responseContent').textContent = JSON.stringify(data, null, 2);
                document.getElementById('response').style.display = 'block';

                // Check for errors
                if (data.error) {
                    console.error('API Error:', data.error);
                }
            } catch (error) {
                console.error('Error:', error);
                document.getElementById('responseContent').textContent = `Error: ${error.message}`;
                document.getElementById('response').style.display = 'block';
            }
        }

        // Pre-fill with your API key (optional - remove if you don't want this)
        document.getElementById('apiKey').value = 'sk-proj-fb... <YOUR_API_KEY>... X75...';

    </script>
</body>
</html>
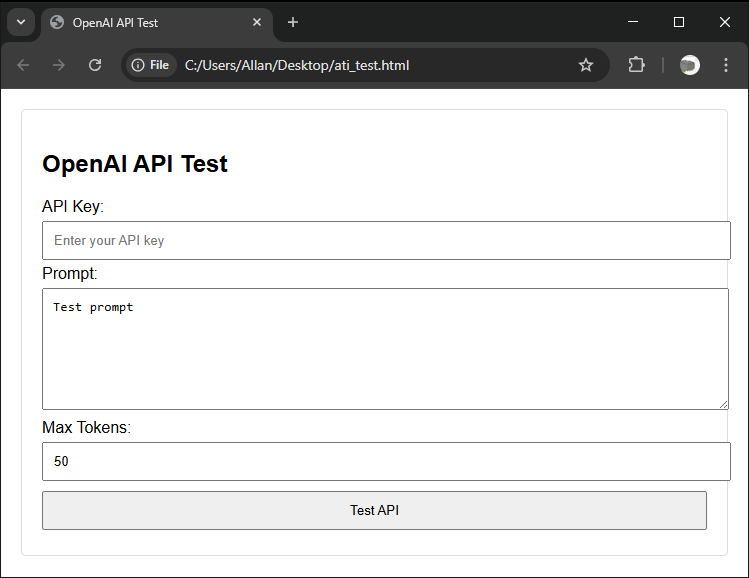
Save this as an HTML file (e.g., api_test.html), open it in your web browser, and add your key. You should have the following interface.
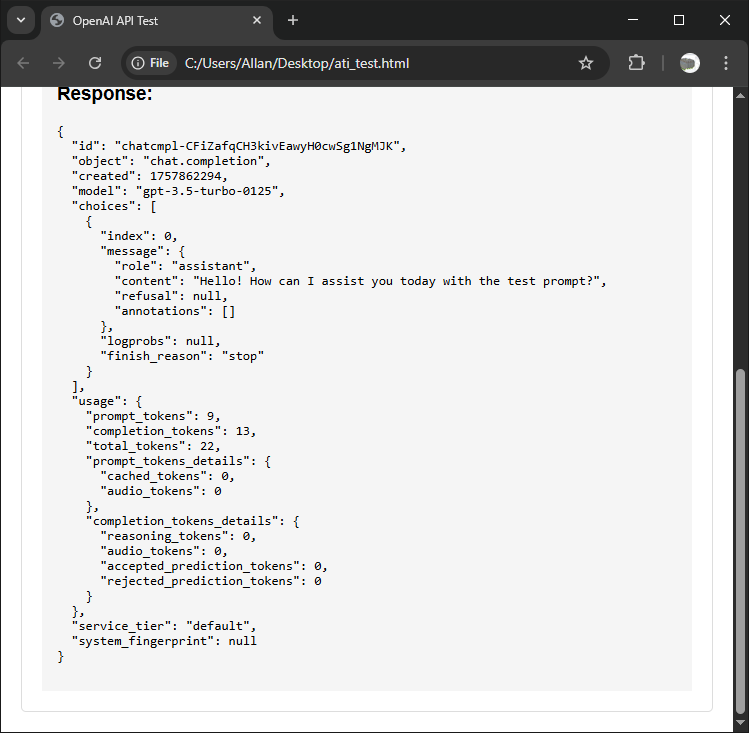
When we click on "Test API", you should get the response as follows.
Configuring MetaTrader 5 for API Communication
To allow the program to send HTTP requests to OpenAI’s endpoint, we will configure the trading terminal as follows:
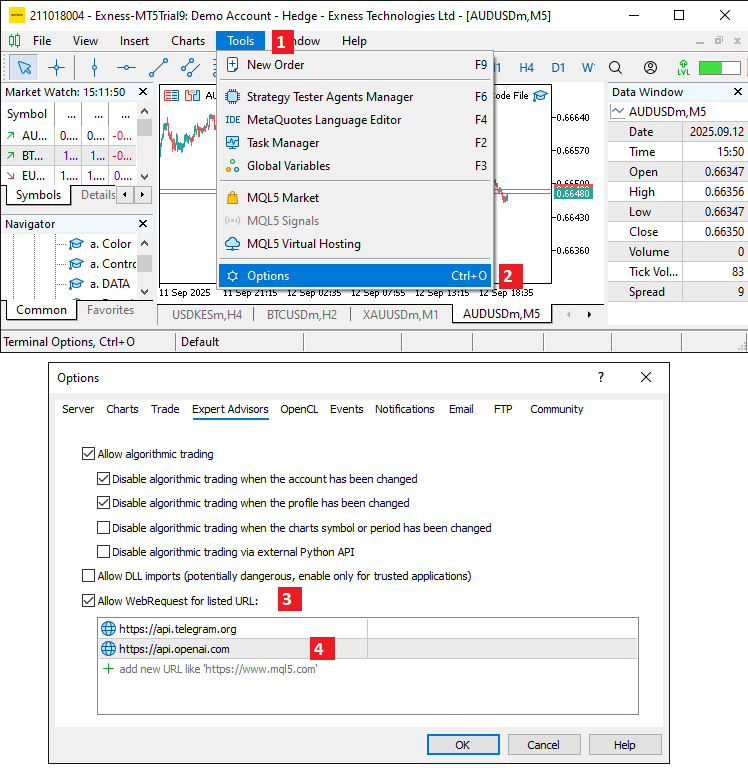
- Enable Web Requests: Open MT5, navigate to Tools > Options > Expert Advisors, and check "Allow WebRequest for listed URL".
- Add API Endpoint: In the "WebRequest URLs" field, add "https://api.openai.com" to permit requests to OpenAI’s API. This ensures the program’s WebRequest function can communicate without being blocked by MT5’s security settings.
Here is the complete visualization.
This configuration will enable the program to send prompts and receive AI responses, paving the way for the implementation. Let’s proceed to building the program!
Implementation in MQL5
To create the program in MQL5, open the MetaEditor, go to the Navigator, locate the Indicators folder, click on the "New" tab, and follow the prompts to create the file. Once it is made, in the coding environment, we will need to declare some global variables and inputs that we will use throughout the program.
//+------------------------------------------------------------------+
//|                                             a. ChatGPT AI EA.mq5 |
//|                           Copyright 2025, Allan Munene Mutiiria. |
//|                                   https://t.me/Forex_Algo_Trader |
//+------------------------------------------------------------------+
#property copyright "Copyright 2025, Allan Munene Mutiiria."
#property link "https://t.me/Forex_Algo_Trader"
#property version "1.00"
#property strict

//--- Input parameters
input string OpenAI_Model = "gpt-3.5-turbo";                                 // OpenAI Model
input string OpenAI_Endpoint = "https://api.openai.com/v1/chat/completions"; // OpenAI API Endpoint
input int MaxResponseLength = 500;                                           // Max length of ChatGPT response to display
input string LogFileName = "ChatGPT_EA_Log.txt";                             // Log file name
//--- Hardcoded API key (confirmed valid via curl test)
//--- Keep your API key private, for us, we added some parts so you can get the actual thing you should be having
string OpenAI_API_Key = "sk-proj-vjKCf ... <YOUR FULL ACTUAL API KEY HERE> ... jY..79n...";
We begin the implementation of the program, focusing on the initial setup of input parameters to configure the program’s connection to OpenAI’s API. First, we define the input parameter "OpenAI_Model" as a string set to "gpt-3.5-turbo", specifying the ChatGPT model to use for API requests, allowing flexibility to switch models if needed. You can switch to your model here. Then, we set "OpenAI_Endpoint" to "https://api.openai.com/v1/chat/completions", defining the URL for sending HTTP POST requests to OpenAI’s API.
Next, we configure "MaxResponseLength" as an integer set to 500, limiting the display length of ChatGPT’s response to ensure manageable output on the MetaTrader 5 chart. Last, we define "LogFileName" as "ChatGPT_EA_Log.txt" to specify the file for logging API interactions and errors, and hardcode "OpenAI_API_Key" with our confirmed valid API key (starting with "sk-proj-") for authenticating requests, forming the foundation for the program’s functionality. For logging and button visualization, we add the following variables.
//--- Global variables
string conversationHistory = "";                             //--- Stores conversation history
int logFileHandle = INVALID_HANDLE;                          //--- Handle for log file
bool button_hover = false;                                   //--- Flag for button hover state
color button_original_bg = clrRoyalBlue;                     //--- Original button background color
color button_darker_bg;                                      //--- Darkened button background for hover
We have added comments to the variables to make them self-explanatory. The next thing we need to do is define helper functions that we will use to create the interface, but first, make sure to copy and paste the JSON logic from the previous part, as we don't want to create several files. You could as well create and include the file in the program, but we will do that as the program gets more complex. For now, let's keep everything straightforward and easy.
//+------------------------------------------------------------------+
//| Creates a rectangle label object                                 |
//+------------------------------------------------------------------+
bool createRecLabel(string objName, int xDistance, int yDistance, int xSize, int ySize,
                    color bgColor, int borderWidth, color borderColor = clrNONE,
                    ENUM_BORDER_TYPE borderType = BORDER_FLAT,
                    ENUM_LINE_STYLE borderStyle = STYLE_SOLID,
                    ENUM_BASE_CORNER corner = CORNER_LEFT_UPPER) {   //--- Create rectangle label
   ResetLastError();                                         //--- Reset previous errors
   if (!ObjectCreate(0, objName, OBJ_RECTANGLE_LABEL, 0, 0, 0)) { //--- Attempt creation
      Print(__FUNCTION__, ": failed to create rec label! Error code = ", _LastError); //--- Print error
      return (false);                                        //--- Return failure
   }
   ObjectSetInteger(0, objName, OBJPROP_XDISTANCE, xDistance); //--- Set x distance
   ObjectSetInteger(0, objName, OBJPROP_YDISTANCE, yDistance); //--- Set y distance
   ObjectSetInteger(0, objName, OBJPROP_XSIZE, xSize);       //--- Set width
   ObjectSetInteger(0, objName, OBJPROP_YSIZE, ySize);       //--- Set height
   ObjectSetInteger(0, objName, OBJPROP_CORNER, corner);     //--- Set corner
   ObjectSetInteger(0, objName, OBJPROP_BGCOLOR, bgColor);   //--- Set background color
   ObjectSetInteger(0, objName, OBJPROP_BORDER_TYPE, borderType); //--- Set border type
   ObjectSetInteger(0, objName, OBJPROP_STYLE, borderStyle); //--- Set border style
   ObjectSetInteger(0, objName, OBJPROP_WIDTH, borderWidth); //--- Set border width
   ObjectSetInteger(0, objName, OBJPROP_COLOR, borderColor); //--- Set border color
   ObjectSetInteger(0, objName, OBJPROP_BACK, false);        //--- Not background
   ObjectSetInteger(0, objName, OBJPROP_STATE, false);       //--- Not pressed
   ObjectSetInteger(0, objName, OBJPROP_SELECTABLE, false);  //--- Not selectable
   ObjectSetInteger(0, objName, OBJPROP_SELECTED, false);    //--- Not selected
   ChartRedraw(0);                                           //--- Redraw chart
   return (true);                                            //--- Success
}
//+------------------------------------------------------------------+
//| Creates a button object                                          |
//+------------------------------------------------------------------+
bool createButton(string objName, int xDistance, int yDistance, int xSize, int ySize,
                  string text = "", color textColor = clrBlack, int fontSize = 12,
                  color bgColor = clrNONE, color borderColor = clrNONE,
                  string font = "Arial Rounded MT Bold",
                  ENUM_BASE_CORNER corner = CORNER_LEFT_UPPER, bool isBack = false) { //--- Create button
   ResetLastError();                                         //--- Reset errors
   if (!ObjectCreate(0, objName, OBJ_BUTTON, 0, 0, 0)) {    //--- Attempt creation
      Print(__FUNCTION__, ": failed to create the button! Error code = ", _LastError); //--- Print error
      return (false);                                        //--- Failure
   }
   ObjectSetInteger(0, objName, OBJPROP_XDISTANCE, xDistance); //--- Set x distance
   ObjectSetInteger(0, objName, OBJPROP_YDISTANCE, yDistance); //--- Set y distance
   ObjectSetInteger(0, objName, OBJPROP_XSIZE, xSize);       //--- Set width
   ObjectSetInteger(0, objName, OBJPROP_YSIZE, ySize);       //--- Set height
   ObjectSetInteger(0, objName, OBJPROP_CORNER, corner);     //--- Set corner
   ObjectSetString(0, objName, OBJPROP_TEXT, text);          //--- Set text
   ObjectSetInteger(0, objName, OBJPROP_COLOR, textColor);   //--- Set text color
   ObjectSetInteger(0, objName, OBJPROP_FONTSIZE, fontSize); //--- Set font size
   ObjectSetString(0, objName, OBJPROP_FONT, font);          //--- Set font
   ObjectSetInteger(0, objName, OBJPROP_BGCOLOR, bgColor);   //--- Set background
   ObjectSetInteger(0, objName, OBJPROP_BORDER_COLOR, borderColor); //--- Set border color
   ObjectSetInteger(0, objName, OBJPROP_BACK, isBack);       //--- Set back
   ObjectSetInteger(0, objName, OBJPROP_STATE, false);       //--- Not pressed
   ObjectSetInteger(0, objName, OBJPROP_SELECTABLE, false);  //--- Not selectable
   ObjectSetInteger(0, objName, OBJPROP_SELECTED, false);    //--- Not selected
   ChartRedraw(0);                                           //--- Redraw
   return (true);                                            //--- Success
}
//+------------------------------------------------------------------+
//| Creates an edit field object                                     |
//+------------------------------------------------------------------+
bool createEdit(string objName, int xDistance, int yDistance, int xSize, int ySize,
                string text = "", color textColor = clrBlack, int fontSize = 12,
                color bgColor = clrNONE, color borderColor = clrNONE,
                string font = "Arial Rounded MT Bold",
                ENUM_BASE_CORNER corner = CORNER_LEFT_UPPER,
                int align = ALIGN_LEFT, bool readOnly = false) {  //--- Create edit
   ResetLastError();                                         //--- Reset errors
   if (!ObjectCreate(0, objName, OBJ_EDIT, 0, 0, 0)) {      //--- Attempt creation
      Print(__FUNCTION__, ": failed to create the edit! Error code = ", _LastError); //--- Print error
      return (false);                                        //--- Failure
   }
   ObjectSetInteger(0, objName, OBJPROP_XDISTANCE, xDistance); //--- Set x distance
   ObjectSetInteger(0, objName, OBJPROP_YDISTANCE, yDistance); //--- Set y distance
   ObjectSetInteger(0, objName, OBJPROP_XSIZE, xSize);       //--- Set width
   ObjectSetInteger(0, objName, OBJPROP_YSIZE, ySize);       //--- Set height
   ObjectSetInteger(0, objName, OBJPROP_CORNER, corner);     //--- Set corner
   ObjectSetString(0, objName, OBJPROP_TEXT, text);          //--- Set text
   ObjectSetInteger(0, objName, OBJPROP_COLOR, textColor);   //--- Set text color
   ObjectSetInteger(0, objName, OBJPROP_FONTSIZE, fontSize); //--- Set font size
   ObjectSetString(0, objName, OBJPROP_FONT, font);          //--- Set font
   ObjectSetInteger(0, objName, OBJPROP_BGCOLOR, bgColor);   //--- Set background
   ObjectSetInteger(0, objName, OBJPROP_BORDER_COLOR, borderColor); //--- Set border color
   ObjectSetInteger(0, objName, OBJPROP_ALIGN, align);       //--- Set alignment
   ObjectSetInteger(0, objName, OBJPROP_READONLY, readOnly); //--- Set read-only
   ObjectSetInteger(0, objName, OBJPROP_BACK, false);        //--- Not back
   ObjectSetInteger(0, objName, OBJPROP_STATE, false);       //--- Not active
   ObjectSetInteger(0, objName, OBJPROP_SELECTABLE, false);  //--- Not selectable
   ObjectSetInteger(0, objName, OBJPROP_SELECTED, false);    //--- Not selected
   ChartRedraw(0);                                           //--- Redraw
   return (true);                                            //--- Success
}
//+------------------------------------------------------------------+
//| Creates a text label object                                      |
//+------------------------------------------------------------------+
bool createLabel(string objName, int xDistance, int yDistance,
                 string text, color textColor = clrBlack, int fontSize = 12,
                 string font = "Arial Rounded MT Bold",
                 ENUM_BASE_CORNER corner = CORNER_LEFT_UPPER,
                 ENUM_ANCHOR_POINT anchor = ANCHOR_LEFT_UPPER) {   //--- Create label
   ResetLastError();                                         //--- Reset errors
   if (!ObjectCreate(0, objName, OBJ_LABEL, 0, 0, 0)) {     //--- Attempt creation
      Print(__FUNCTION__, ": failed to create the label! Error code = ", _LastError); //--- Print error
      return (false);                                        //--- Failure
   }
   ObjectSetInteger(0, objName, OBJPROP_XDISTANCE, xDistance); //--- Set x distance
   ObjectSetInteger(0, objName, OBJPROP_YDISTANCE, yDistance); //--- Set y distance
   ObjectSetInteger(0, objName, OBJPROP_CORNER, corner);     //--- Set corner
   ObjectSetString(0, objName, OBJPROP_TEXT, text);          //--- Set text
   ObjectSetInteger(0, objName, OBJPROP_COLOR, textColor);   //--- Set color
   ObjectSetInteger(0, objName, OBJPROP_FONTSIZE, fontSize); //--- Set font size
   ObjectSetString(0, objName, OBJPROP_FONT, font);          //--- Set font
   ObjectSetInteger(0, objName, OBJPROP_BACK, false);        //--- Not back
   ObjectSetInteger(0, objName, OBJPROP_STATE, false);       //--- Not active
   ObjectSetInteger(0, objName, OBJPROP_SELECTABLE, false);  //--- Not selectable
   ObjectSetInteger(0, objName, OBJPROP_SELECTED, false);    //--- Not selected
   ObjectSetInteger(0, objName, OBJPROP_ANCHOR, anchor);     //--- Set anchor
   ChartRedraw(0);                                           //--- Redraw
   return (true);                                            //--- Success
}
Here, we create essential graphical elements for trader interaction on the chart. First, we implement the "createRecLabel" function, which uses ObjectCreate to draw a rectangle label (OBJ_RECTANGLE_LABEL) at specified coordinates ("xDistance", "yDistance") with dimensions ("xSize", "ySize"), setting properties like background color (OBJPROP_BGCOLOR), border width, color ("OBJPROP_COLOR"), type ("OBJPROP_BORDER_TYPE" as "BORDER_FLAT"), style ("OBJPROP_STYLE" as "STYLE_SOLID"), and corner ("OBJPROP_CORNER" as "CORNER_LEFT_UPPER") via ObjectSetInteger, ensuring non-selectable, non-background display with ChartRedraw for refresh, and returning false if creation fails with an error logged via the Print function.
Then, we develop the "createButton" function, which creates a button (OBJ_BUTTON) with similar coordinate and size parameters, setting text (OBJPROP_TEXT), text color ("OBJPROP_COLOR"), font size, font (Arial Rounded MT Bold), background color, border color, and corner via ObjectSetString and "ObjectSetInteger", with an optional background flag ("isBack"), ensuring non-selectable, non-pressed state, and refreshing the chart, returning false on failure with error logging.
Next, we implement the "createEdit" function, which creates an editable text field (OBJ_EDIT) with parameters for text, alignment ("OBJPROP_ALIGN" as "ALIGN_LEFT"), read-only status, and similar styling properties, using "ObjectSetString" and "ObjectSetInteger" to configure appearance and behavior, refreshing the chart and handling errors similarly. Last, we add the "createLabel" function, which creates a text label (OBJ_LABEL) with specified text, color, font size, font, corner, and anchor point ("OBJPROP_ANCHOR" as "ANCHOR_LEFT_UPPER"), ensuring non-selectable display and chart refresh. These functions establish the graphical foundation for our program’s dashboard, enabling input and display of AI interactions. We want to have a hoverable button that darkens on hover. Let us have a function for that.
//+------------------------------------------------------------------+
//| Darkens a given color by a factor                                |
//+------------------------------------------------------------------+
color DarkenColor(color colorValue, double factor = 0.8) {   //--- Darken color function
   int red = int((colorValue & 0xFF) * factor);              //--- Calculate darkened red component
   int green = int(((colorValue >> 8) & 0xFF) * factor);     //--- Calculate darkened green component
   int blue = int(((colorValue >> 16) & 0xFF) * factor);     //--- Calculate darkened blue component
   return (color)(red | (green << 8) | (blue << 16));        //--- Combine and return darkened color
}
Here, we implement the "DarkenColor" function, which takes a color value and an optional factor (default 0.8) to reduce brightness, calculating the darkened red, green, and blue components by extracting each using bitwise operations ("colorValue & 0xFF" for red, "(colorValue >> 8) & 0xFF" for green, "(colorValue >> 16) & 0xFF" for blue), multiplying by the factor, and combining them with bitwise shifts ("red | (green << 8) | (blue << 16)") to return the new color. Let us now create the dashboard to get ready.
//+------------------------------------------------------------------+
//| Creates the dashboard UI                                         |
//+------------------------------------------------------------------+
void CreateDashboard() {                                     //--- Create UI
   createEdit("ChatGPT_InputEdit", 20, 20, 400, 40, "", clrBlack, 12, clrWhiteSmoke, clrDarkGray, "Arial", CORNER_LEFT_UPPER, ALIGN_LEFT, false); //--- Input edit
   createButton("ChatGPT_SubmitButton", 430, 20, 100, 40, "Send", clrWhite, 12, button_original_bg, clrDarkBlue, "Arial", CORNER_LEFT_UPPER, false); //--- Submit button
   createRecLabel("ChatGPT_ResponseBg", 20, 70, 510, 300, clrWhite, 2, clrLightGray, BORDER_FLAT, STYLE_SOLID, CORNER_LEFT_UPPER); //--- Response background
   ChartRedraw();                                            //--- Redraw
}
We proceed by implementing the "CreateDashboard" function to construct the user interface on the chart, enabling us to interact with the AI. First, we call "createEdit" to create an editable text field named "ChatGPT_InputEdit" at coordinates (20, 20) with dimensions 400x40 pixels, using black text, 12-point Arial font, a white smoke background, dark gray border, left-aligned, and non-read-only, allowing us to input prompts. Then, we use "createButton" to add a "ChatGPT_SubmitButton" at (430, 20) with dimensions 100x40 pixels, labeled "Send" in white text, 12-point Arial font, with a royal blue background ("button_original_bg") and dark blue border, positioned at the top-left corner for triggering API requests.
Next, we invoke "createRecLabel" to create a response background named "ChatGPT_ResponseBg" at (20, 70) with dimensions 510x300 pixels, featuring a white background, 2-pixel light gray border, flat border type, and solid style, providing a clear area for displaying AI responses. Last, we call ChartRedraw to refresh the chart, ensuring all UI elements are visible. We can now call the function in the OnInit event handler to see what we have achieved.
//+------------------------------------------------------------------+
//| Expert initialization function                                   |
//+------------------------------------------------------------------+
int OnInit() {                                               //--- Initialization
   button_darker_bg = DarkenColor(button_original_bg);       //--- Set darker button color
   logFileHandle = FileOpen(LogFileName, FILE_READ | FILE_WRITE | FILE_TXT); //--- Open log
   if(logFileHandle == INVALID_HANDLE) {                     //--- Check handle
      Print("Failed to open log file: ", GetLastError());    //--- Print error
      return(INIT_FAILED);                                   //--- Fail init
   }
   FileSeek(logFileHandle, 0, SEEK_END);                     //--- Seek end
   FileWriteString(logFileHandle, "EA Initialized at " + TimeToString(TimeCurrent()) + "\n"); //--- Log init
   CreateDashboard();                                        //--- Create UI
   return(INIT_SUCCEEDED);                                   //--- Success
}
//+------------------------------------------------------------------+
//| Expert deinitialization function                                 |
//+------------------------------------------------------------------+
void OnDeinit(const int reason) {                            //--- Deinit
   ObjectsDeleteAll(0, "ChatGPT_");                          //--- Delete objects
   if(logFileHandle != INVALID_HANDLE) {                     //--- Check handle
      FileClose(logFileHandle);                              //--- Close log
   }
}
In the OnInit function, we call "DarkenColor" with "button_original_bg" to compute a darker shade for "button_darker_bg", enabling a hover effect for the submit button. Then, we open the log file specified by "LogFileName" using FileOpen with read, write, and text flags, storing the handle in "logFileHandle"; if the handle is invalid, we log an error and return INIT_FAILED. This will ensure we keep track of what we do in the background.
Next, we use "FileSeek" to move to the end of the log file and write an initialization message with FileWriteString, including the current time via the TimeToString function. We then call "CreateDashboard" to set up the user interface and return INIT_SUCCEEDED to confirm successful initialization. In the OnDeinit function, we clean up by calling ObjectsDeleteAll to remove all chart objects prefixed with "ChatGPT_", and if "logFileHandle" is valid, we close the log file with the FileClose function. All this time, while the program is attached to the chart, we keep the file open. That means we can't open it while the program is running. You could choose to close the file after sending and getting a response, but it is not convenient if we are actively interacting. Upon running the program, we get the following outcome.
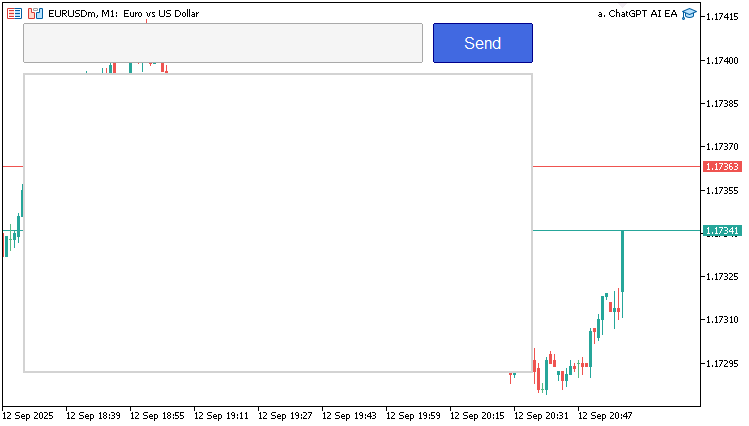
Now that we have created the interface, we need to figure out a way to display the conversation as a normal chat, but the issue is that MQL5 does not offer a direct way of achieving that. The label function alone can display a text up to 63 characters. So what we need to do is implement a text wrapping mechanism that will break down the conversation into multiple labels instead of just one, and restrict the maximum characters in a given label to the maximum cap. Here is the logic we adopt for that.
//+------------------------------------------------------------------+
//| Wraps text respecting newlines and max width                     |
//+------------------------------------------------------------------+
void WrapText(const string inputText, const string font, const int fontSize, const int maxWidth, string &wrappedLines[], int offset = 0) { //--- Wrap text function
   const int maxChars = 60;                                  //--- Max chars per line
   ArrayResize(wrappedLines, 0);                             //--- Clear output array
   TextSetFont(font, -fontSize * 10, 0);                     //--- Set font for measurement
   string paragraphs[];                                      //--- Array for paragraphs
   int numParagraphs = StringSplit(inputText, '\n', paragraphs); //--- Split by newline
   for (int p = 0; p < numParagraphs; p++) {                 //--- Loop paragraphs
      string para = paragraphs[p];                           //--- Get paragraph
      if (StringLen(para) == 0) continue;                    //--- Skip empty
      string words[];                                        //--- Array for words
      int numWords = StringSplit(para, ' ', words);          //--- Split by space
      string currentLine = "";                               //--- Current line builder
      for (int w = 0; w < numWords; w++) {                   //--- Loop words
         string testLine = currentLine + (StringLen(currentLine) > 0 ? " " : "") + words[w]; //--- Test add word
         uint wid, hei;                                      //--- Width, height
         TextGetSize(testLine, wid, hei);                    //--- Get size
         int textWidth = (int)wid;                           //--- Cast width
         if (textWidth + offset <= maxWidth && StringLen(testLine) <= maxChars) { //--- Fits
            currentLine = testLine;                          //--- Update line
         } else {                                            //--- Doesn't fit
            if (StringLen(currentLine) > 0) {                //--- Add current if not empty
               int size = ArraySize(wrappedLines);           //--- Get size
               ArrayResize(wrappedLines, size + 1);          //--- Resize
               wrappedLines[size] = currentLine;             //--- Add line
            }
            currentLine = words[w];                          //--- Start new with word
            TextGetSize(currentLine, wid, hei);              //--- Get size
            textWidth = (int)wid;                            //--- Cast
            if (textWidth + offset > maxWidth || StringLen(currentLine) > maxChars) { //--- Word too long
               string wrappedWord = "";                      //--- Word builder
               for (int c = 0; c < StringLen(words[w]); c++) { //--- Char loop
                  string testWord = wrappedWord + StringSubstr(words[w], c, 1); //--- Test add char
                  TextGetSize(testWord, wid, hei);           //--- Get size
                  int wordWidth = (int)wid;                  //--- Cast
                  if (wordWidth + offset > maxWidth || StringLen(testWord) > maxChars) { //--- Char exceeds
                     if (StringLen(wrappedWord) > 0) {       //--- Add if not empty
                        int size = ArraySize(wrappedLines);  //--- Get size
                        ArrayResize(wrappedLines, size + 1); //--- Resize
                        wrappedLines[size] = wrappedWord;    //--- Add
                     }
                     wrappedWord = StringSubstr(words[w], c, 1); //--- New with char
                  } else {                                   //--- Fits
                     wrappedWord = testWord;                 //--- Update
                  }
               }
               currentLine = wrappedWord;                    //--- Set current
            }
         }
      }
      if (StringLen(currentLine) > 0) {                      //--- Add remaining line
         int size = ArraySize(wrappedLines);                 //--- Get size
         ArrayResize(wrappedLines, size + 1);                //--- Resize
         wrappedLines[size] = currentLine;                   //--- Add
      }
   }
}
We implement the "WrapText" function to format text for display on the chart, to ensure readable AI responses. First, we define a constant "maxChars" set to 60 to limit line length, but you could cap it at 63, clear the output array "wrappedLines" with ArrayResize, and set the font using TextSetFont with the specified font and size (scaled by -fontSize * 10). Then, we split the input text into paragraphs using StringSplit with newline as the delimiter and iterate through each non-empty paragraph. For each paragraph, we split it into words using "StringSplit" again but this time with a space delimiter, initializing an empty "currentLine" variable.
Next, we loop through words, building a "testLine" by appending each word with a space if "currentLine" is non-empty, and use TextGetSize to measure its width; if the width plus offset is within "maxWidth" and the length is under "maxChars", we update "currentLine", otherwise, we add "currentLine" to "wrappedLines" if non-empty and start a new line with the current word. For oversized words, we iterate through characters, building "wrappedWord" and checking its width, adding it to "wrappedLines" when it exceeds "maxWidth" or "maxChars", and updating "currentLine" with the remaining word. Finally, we add any remaining "currentLine" to "wrappedLines", ensuring all text is formatted for clear display in the program’s response area. We can now use this logic and update our display with a sample text telling the user how to start.
//+------------------------------------------------------------------+
//| Updates the response display                                     |
//+------------------------------------------------------------------+
void UpdateResponseDisplay() {                               //--- Update display
   int total = ObjectsTotal(0, 0, -1);                       //--- Get total objects
   for (int j = total - 1; j >= 0; j--) {                    //--- Loop backwards
      string name = ObjectName(0, j, 0, -1);                 //--- Get name
      if (StringFind(name, "ChatGPT_ResponseLine_") == 0 || StringFind(name, "ChatGPT_MessageBg_") == 0) { //--- Check prefix
         ObjectDelete(0, name);                              //--- Delete
      }
   }
   string displayText = conversationHistory;                 //--- Get history
   if (displayText == "") {                                  //--- If empty
      string objName = "ChatGPT_ResponseLine_0";             //--- Name
      createLabel(objName, 30, 80, "Type your message above and click Send to chat with the AI.", clrGray, 10, "Arial", CORNER_LEFT_UPPER, ANCHOR_LEFT_UPPER); //--- Placeholder
      ChartRedraw();                                         //--- Redraw
      return;                                                //--- Exit
   }
   string font = "Arial";                                    //--- Font
   int fontSize = 10;                                        //--- Size
   int padding = 10;                                         //--- Padding
   int maxWidth = 510 - 2 * padding;                         //--- Max width
   string wrappedLines[];                                    //--- Wrapped lines
   WrapText(displayText, font, fontSize, maxWidth, wrappedLines, 0); //--- Wrap text
   TextSetFont(font, -fontSize * 10, 0);                     //--- Set font
   uint wid, hei;                                            //--- Size vars
   TextGetSize("A", wid, hei);                               //--- Get height
   int lineHeight = (int)hei;                                //--- Line height
   int responseHeight = 300;                                 //--- Response height
   int maxVisibleLines = (responseHeight - 2 * padding) / lineHeight; //--- Max lines
   int numLines = ArraySize(wrappedLines);                   //--- Num lines
   int startLine = MathMax(0, numLines - maxVisibleLines);   //--- Start line
   int textX = 20 + padding;                                 //--- Text x
   int textY = 70 + padding;                                 //--- Text y
   color currentColor = clrWhite;                            //--- Current color
   for (int i = startLine; i < numLines; i++) {              //--- Loop lines
      string line = wrappedLines[i];                         //--- Get line
      if (StringFind(line, "You: ") == 0) {                  //--- User color
         currentColor = clrGray;                             //--- Set gray
      } else if (StringFind(line, "AI: ") == 0) {            //--- AI color
         currentColor = clrBlue;                             //--- Set blue
      }
      string objName = "ChatGPT_ResponseLine_" + IntegerToString(i - startLine); //--- Name
      createLabel(objName, textX, textY, line, currentColor, fontSize, font, CORNER_LEFT_UPPER, ANCHOR_LEFT_UPPER); //--- Create label
      textY += lineHeight;                                   //--- Next y
   }
   ChartRedraw();                                            //--- Redraw
}
Here, we implement the "UpdateResponseDisplay" function to dynamically render the conversation history. First, we use ObjectsTotal to count all chart objects and iterate backward, calling ObjectName to retrieve each object’s name and ObjectDelete to remove objects with prefixes "ChatGPT_ResponseLine_" or "ChatGPT_MessageBg_", clearing previous display elements. Then, we check if "conversationHistory" is empty; if so, we call "createLabel" to display a placeholder message at (30, 80) in gray, 10-point Arial font, prompting users to enter a message, and exit after redraw.
If "conversationHistory" contains text, we set font to Arial, font size to 10, padding to 10, and calculate "maxWidth" as 510 minus twice the padding, then call "WrapText" to split the text into "wrappedLines". Next, we use TextSetFont and TextGetSize to determine the line height, calculate "maxVisibleLines" based on a 300-pixel response height, and set the starting line with MathMax to display the most recent lines. We iterate through "wrappedLines" from "startLine", setting "currentColor" to gray for lines starting with "You: " or blue for "AI: ", and call "createLabel" to display each line at coordinates ("textX", "textY"), incrementing "textY" by "lineHeight" for each label, with unique names like "ChatGPT_ResponseLine_0". Finally, we call ChartRedraw to refresh the chart, ensuring the conversation is visually clear and distinguishable. When we call this function on initialization, we get the following outcome.
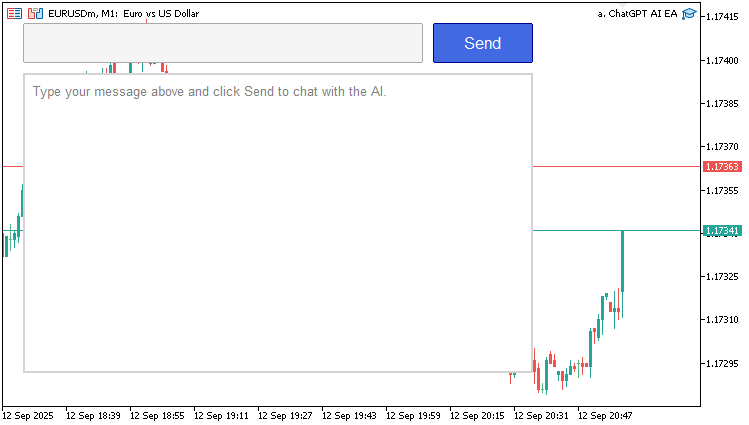
From the image, we can see we have updated the display with an initial message, and we are ready to render conversations. Let us now create a function to get the response from the prompts we send, but first, let us define helper functions that we will need.
//+------------------------------------------------------------------+
//| Escapes string for JSON                                          |
//+------------------------------------------------------------------+
string JsonEscape(string value) {                            //--- JSON escape
   StringReplace(value, "\\", "\\\\");                       //--- Escape backslash
   StringReplace(value, "\"", "\\\"");                       //--- Escape quote
   StringReplace(value, "\n", "\\n");                        //--- Escape newline
   StringReplace(value, "\r", "\\r");                        //--- Escape carriage
   StringReplace(value, "\t", "\\t");                        //--- Escape tab
   StringReplace(value, "\f", "\\f");                        //--- Escape form feed
   for(int i = 0; i < StringLen(value); i++) {               //--- Loop chars
      ushort charCode = StringGetCharacter(value, i);        //--- Get char
      if(charCode < 32 || charCode == 127) {                 //--- Control chars
         string hex = StringFormat("\\u%04x", charCode);     //--- Hex escape
         string before = StringSubstr(value, 0, i);          //--- Before part
         string after = StringSubstr(value, i + 1);          //--- After part
         value = before + hex + after;                       //--- Replace
         i += 5;                                             //--- Skip added
      }
   }
   return value;                                             //--- Return escaped
}
//+------------------------------------------------------------------+
//| Logs char array as hex for debugging                             |
//+------------------------------------------------------------------+
string LogCharArray(char &data[]) {                          //--- Log char array
   string result = "";                                       //--- Result string
   for(int i = 0; i < ArraySize(data); i++) {                //--- Loop array
      result += StringFormat("%02X ", data[i]);              //--- Append hex
   }
   return result;                                            //--- Return
}
Before we create the actual logic to handle responses,we implement utility functions to handle JSON string escaping and debugging for robust API communication. First, we implement the "JsonEscape" function, which takes a string input and escapes special characters for JSON compliance using StringReplace to convert backslash to "\\", quote to "\"", newline to "\n", carriage return to "\r", tab to "\t", and form feed to "\f"; it then iterates through each character with StringGetCharacter, checking for control characters (ASCII < 32 or 127), replacing them with a Unicode escape sequence ("\uXXXX") via StringFormat, updating the string with StringSubstr to concatenate parts before and after the escape, and adjusting the index to skip added characters, returning the escaped string.
Then, we develop the "LogCharArray" function, which converts a character array to a hexadecimal string for debugging, initializing an empty result string, iterating through the array with ArraySize, appending each character’s hex value using "StringFormat" with "%02X" format, and returning the formatted string. These functions will ensure proper formatting of prompts for OpenAI API requests and provide debugging support for API data inspection. We can now use them to create the base function to get the responses.
//+------------------------------------------------------------------+
//| Gets ChatGPT response via API                                    |
//+------------------------------------------------------------------+
string GetChatGPTResponse(string prompt) {                   //--- Get AI response
   string escapedPrompt = JsonEscape(prompt);                //--- Escape prompt
   string requestData = "{\"model\":\"" + OpenAI_Model + "\",\"messages\":[{\"role\":\"user\",\"content\":\"" + escapedPrompt + "\"}],\"max_tokens\":500}"; //--- Build JSON
   FileWriteString(logFileHandle, "Request Data: " + requestData + "\n"); //--- Log data
   char postData[];                                          //--- Post array
   int dataLen = StringToCharArray(requestData, postData, 0, WHOLE_ARRAY, CP_UTF8); //--- To char array
   ArrayResize(postData, dataLen - 1);                       //--- Remove terminator
   FileWriteString(logFileHandle, "Raw Post Data (Hex): " + LogCharArray(postData) + "\n"); //--- Log hex
   string headers = "Authorization: Bearer " + OpenAI_API_Key + "\r\n" + //--- Build headers
                    "Content-Type: application/json; charset=UTF-8\r\n" +
                    "Content-Length: " + IntegerToString(dataLen - 1) + "\r\n\r\n";
   FileWriteString(logFileHandle, "Request Headers: " + headers + "\n"); //--- Log headers
   char result[];                                            //--- Result array
   string resultHeaders;                                     //--- Result headers
   int res = WebRequest("POST", OpenAI_Endpoint, headers, 10000, postData, result, resultHeaders); //--- Send request
   if(res != 200) {                                          //--- Check status
      string response = CharArrayToString(result, 0, WHOLE_ARRAY, CP_UTF8); //--- To string
      string errMsg = "API request failed: HTTP Code " + IntegerToString(res) + ", Error: " + IntegerToString(GetLastError()) + ", Response: " + response; //--- Error msg
      Print(errMsg);                                         //--- Print
      FileWriteString(logFileHandle, errMsg + "\n");          //--- Log
      FileWriteString(logFileHandle, "Raw Response Data (Hex): " + LogCharArray(result) + "\n"); //--- Log hex
      return errMsg;                                         //--- Return error
   }
   string response = CharArrayToString(result, 0, WHOLE_ARRAY, CP_UTF8); //--- To string
   FileWriteString(logFileHandle, "API Response: " + response + "\n"); //--- Log response
   JsonValue jsonObject;                                     //--- JSON object
   int index = 0;                                            //--- Index
   char charArray[];                                         //--- Char array
   int arrayLength = StringToCharArray(response, charArray, 0, WHOLE_ARRAY, CP_UTF8); //--- To char
   if(!jsonObject.DeserializeFromArray(charArray, arrayLength, index)) { //--- Deserialize
      string errMsg = "Error: Failed to parse API response JSON: " + response; //--- Error
      Print(errMsg);                                         //--- Print
      FileWriteString(logFileHandle, errMsg + "\n");         //--- Log
      return errMsg;                                         //--- Return
   }
   JsonValue *error = jsonObject.FindChildByKey("error");    //--- Find error
   if(error != NULL) {                                       //--- If error
      string errMsg = "API Error: " + error["message"].ToString(); //--- Get message
      Print(errMsg);                                         //--- Print
      FileWriteString(logFileHandle, errMsg + "\n");         //--- Log
      return errMsg;                                         //--- Return
   }
   string content = jsonObject["choices"][0]["message"]["content"].ToString(); //--- Get content
   if(StringLen(content) > 0) {                              //--- If content
      StringReplace(content, "\\n", "\n");                   //--- Replace escapes
      StringTrimLeft(content);                               //--- Trim left
      StringTrimRight(content);                              //--- Trim right
      return content;                                        //--- Return
   }
   string errMsg = "Error: No content in API response: " + response; //--- Error
   Print(errMsg);                                            //--- Print
   FileWriteString(logFileHandle, errMsg + "\n");            //--- Log
   return errMsg;                                            //--- Return
}
We finalize the core functionality of our program by implementing the "GetChatGPTResponse" function to handle API communication with OpenAI’s ChatGPT. First, we call "JsonEscape" to escape the input prompt, ensuring JSON compatibility, and construct a JSON string "requestData" with "OpenAI_Model", a user message array containing the escaped prompt, and "max_tokens" set to 500, logging it with FileWriteString to "logFileHandle". Then, we convert "requestData" to a character array "postData" using StringToCharArray with UTF-8 encoding, resize it with ArrayResize to remove the null terminator, and log the hex representation using the "LogCharArray" function.
Next, we build HTTP headers with the "OpenAI_API_Key", content type, and content length, logging them, and send a POST request to "OpenAI_Endpoint" using WebRequest with a 10-second timeout, storing the response in "result". If the response code is not 200, we convert "result" to a string with CharArrayToString, log an error with "Print" and "FileWriteString", and return the error message. Otherwise, we parse the response into a "JsonValue" object using "DeserializeFromArray" after converting it to a character array; if parsing fails, we log and return an error. We check for an "error" key using "FindChildByKey", logging and returning any error message if present.
Finally, we extract the AI response from "jsonObject['choices'][0]['message']['content']" using "ToString", replace escaped newlines with StringReplace, trim whitespace with StringTrimLeft and StringTrimRight, and return the content if non-empty, otherwise logging and returning an error. This function will now enable the program to query ChatGPT and process its responses for display. What we now need to do is send our first message. We will need to implement the OnChartEvent event handler function to listen to the edits we make and act.
//+------------------------------------------------------------------+
//| Chart event handler                                              |
//+------------------------------------------------------------------+
void OnChartEvent(const int id, const long &lparam, const double &dparam, const string &sparam) { //--- Event handler
   if(id == CHARTEVENT_OBJECT_CLICK && sparam == "ChatGPT_SubmitButton") { //--- Button click
      string prompt = (string)ObjectGetString(0, "ChatGPT_InputEdit", OBJPROP_TEXT); //--- Get input
      if(StringLen(prompt) > 0) {                            //--- If not empty
         string response = GetChatGPTResponse(prompt);       //--- Get AI response
         Print("User: " + prompt);                           //--- Print user
         Print("AI: " + response);                           //--- Print AI
         conversationHistory += "You: " + prompt + "\nAI: " + response + "\n\n"; //--- Append history
         ObjectSetString(0, "ChatGPT_InputEdit", OBJPROP_TEXT, ""); //--- Clear input
         UpdateResponseDisplay();                            //--- Update display
         FileWriteString(logFileHandle, "Prompt: " + prompt + " | Response: " + response + " | Time: " + TimeToString(TimeCurrent()) + "\n"); //--- Log
         ChartRedraw();                                      //--- Redraw
      }
   }
}
Here, we enhance the interactivity of the program by implementing the OnChartEvent function to handle user interactions on the chart. First, we check if the event "id" is CHARTEVENT_OBJECT_CLICK and the "sparam" is "ChatGPT_SubmitButton", indicating a click on the submit button. If true, we retrieve the user’s input from the "ChatGPT_InputEdit" text field using ObjectGetString with OBJPROP_TEXT and store it in the "prompt" variable.
Then, if "prompt" is non-empty (checked with StringLen), we call "GetChatGPTResponse" to fetch the AI response, log the user prompt and AI response, append them to "conversationHistory" with labels "You: " and "AI: " separated by newlines, clear the input field using ObjectSetString with an empty string, update the chart display by calling "UpdateResponseDisplay", log the interaction with timestamp using FileWriteString to "logFileHandle" and TimeToString, and refresh the chart. This implementation enables the program to process our prompts and display AI responses interactively, completing the core functionality of the dashboard. Upon compilation, here is the outcome we get.
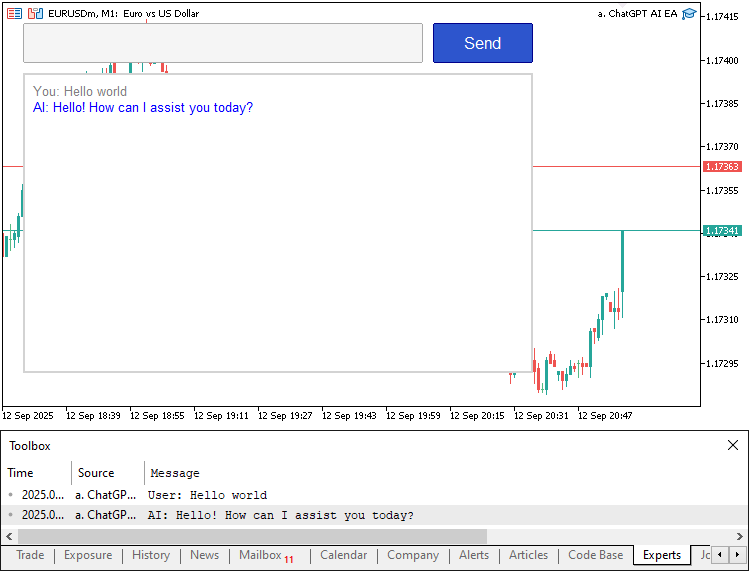
From the image, we can see that we have successfully integrated the AI model into our program. Let us try to open the log file and see if we got in there. You can find the file in the common files folder as below. Right-click and follow prompts to open it. See below.
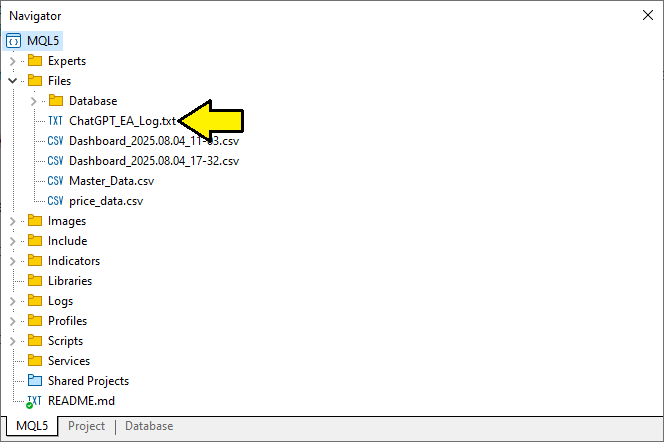
When we open the file, here is the outcome we get.
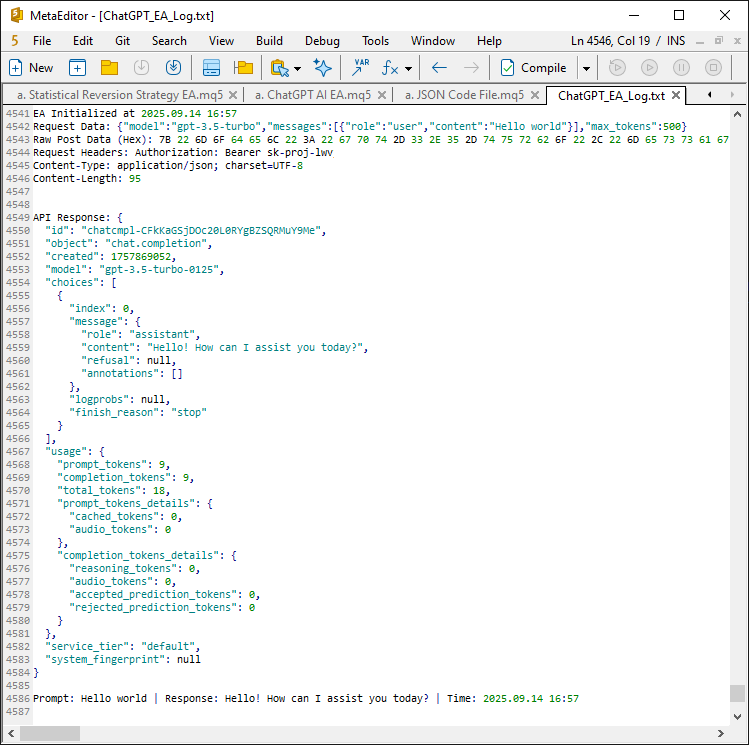
From the image, we can see that we can log the activity data, which will ensure we track what we are doing, our prompts, and the responses that we get. What we need to do now is ensure we add a hover effect to the send button. To achieve that, we will need to track the mouse movement coordinates, which will require us to enable the chart's mouse movement on the top layer.
//+------------------------------------------------------------------+
//| Expert initialization function                                   |
//+------------------------------------------------------------------+
int OnInit() {                                               //--- Initialization
   button_darker_bg = DarkenColor(button_original_bg);       //--- Set darker button color
   logFileHandle = FileOpen(LogFileName, FILE_READ | FILE_WRITE | FILE_TXT); //--- Open log
   if(logFileHandle == INVALID_HANDLE) {                     //--- Check handle
      Print("Failed to open log file: ", GetLastError());    //--- Print error
      return(INIT_FAILED);                                   //--- Fail init
   }
   FileSeek(logFileHandle, 0, SEEK_END);                     //--- Seek end
   FileWriteString(logFileHandle, "EA Initialized at " + TimeToString(TimeCurrent()) + "\n"); //--- Log init
   CreateDashboard();                                        //--- Create UI
   UpdateResponseDisplay();                                  //--- Update display
   ChartSetInteger(0, CHART_EVENT_MOUSE_MOVE, true);         //--- Enable mouse events
   return(INIT_SUCCEEDED);                                   //--- Success
}
We just use the ChartSetInteger function to set the chart mouse events to true. We have highlighted the function for clarity. Then, we need to move on to the chart OnChartEvent function and add the logic when the mouse moves.
//+------------------------------------------------------------------+
//| Chart event handler                                              |
//+------------------------------------------------------------------+
void OnChartEvent(const int id, const long &lparam, const double &dparam, const string &sparam) { //--- Event handler
   if(id == CHARTEVENT_OBJECT_CLICK && sparam == "ChatGPT_SubmitButton") { //--- Button click
      string prompt = (string)ObjectGetString(0, "ChatGPT_InputEdit", OBJPROP_TEXT); //--- Get input
      if(StringLen(prompt) > 0) {                            //--- If not empty
         string response = GetChatGPTResponse(prompt);       //--- Get AI response
         Print("User: " + prompt);                           //--- Print user
         Print("AI: " + response);                           //--- Print AI
         conversationHistory += "You: " + prompt + "\nAI: " + response + "\n\n"; //--- Append history
         ObjectSetString(0, "ChatGPT_InputEdit", OBJPROP_TEXT, ""); //--- Clear input
         UpdateResponseDisplay();                            //--- Update display
         FileWriteString(logFileHandle, "Prompt: " + prompt + " | Response: " + response + " | Time: " + TimeToString(TimeCurrent()) + "\n"); //--- Log
         ChartRedraw();                                      //--- Redraw
      }
   } else if(id == CHARTEVENT_MOUSE_MOVE) {                  //--- Mouse move
      int mouseX = (int)lparam;                              //--- X coord
      int mouseY = (int)dparam;                              //--- Y coord
      bool isOver = (mouseX >= 430 && mouseX <= 530 && mouseY >= 20 && mouseY <= 60); //--- Check hover
      if(isOver && !button_hover) {                          //--- Enter hover
         ObjectSetInteger(0, "ChatGPT_SubmitButton", OBJPROP_BGCOLOR, button_darker_bg); //--- Darken
         button_hover = true;                                //--- Set flag
         ChartRedraw();                                      //--- Redraw
      } else if(!isOver && button_hover) {                   //--- Exit hover
         ObjectSetInteger(0, "ChatGPT_SubmitButton", OBJPROP_BGCOLOR, button_original_bg); //--- Restore
         button_hover = false;                               //--- Clear flag
         ChartRedraw();                                      //--- Redraw
      }
   }
}
In the OnChartEvent function, we complete the implementation by adding hover effects for the user interface. Within an else-if block, we check if the event "id" is CHARTEVENT_MOUSE_MOVE, indicating mouse movement, and cast "lparam" to "mouseX" and "dparam" to "mouseY" for coordinates. Then, we evaluate if the mouse is over the submit button by checking if "mouseX" is between 430 and 530 and "mouseY" is between 20 and 60, storing the result in the "isOver" variable.
If "isOver" is true and "button_hover" is false (indicating the mouse has entered the button area), we call ObjectSetInteger to set "ChatGPT_SubmitButton"’s background color to "button_darker_bg" for a hover effect, set "button_hover" to true, and refresh the chart. Conversely, if "isOver" is false and "button_hover" is true (indicating the mouse has left the button area), we restore the button’s background to "button_original_bg" using "ObjectSetInteger", set "button_hover" to false, and call ChartRedraw to update the chart. When we hover over the button now, we get the following outcome.
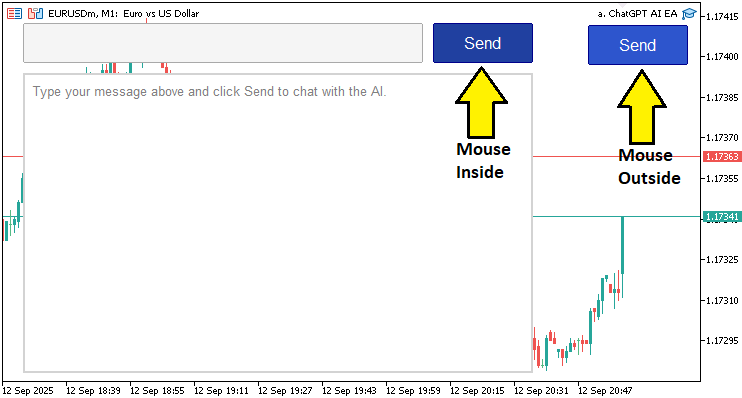
From the image, we can see that we are able to add a hover effect on the button created, hence achieving our objective of creating an interactive AI dashboard for interaction. The thing that remains is backtesting the program, and that is handled in the next section.
Testing the ChatGPT Program
We did the testing, and below is the compiled visualization in a single Graphics Interchange Format (GIF) bitmap image format.
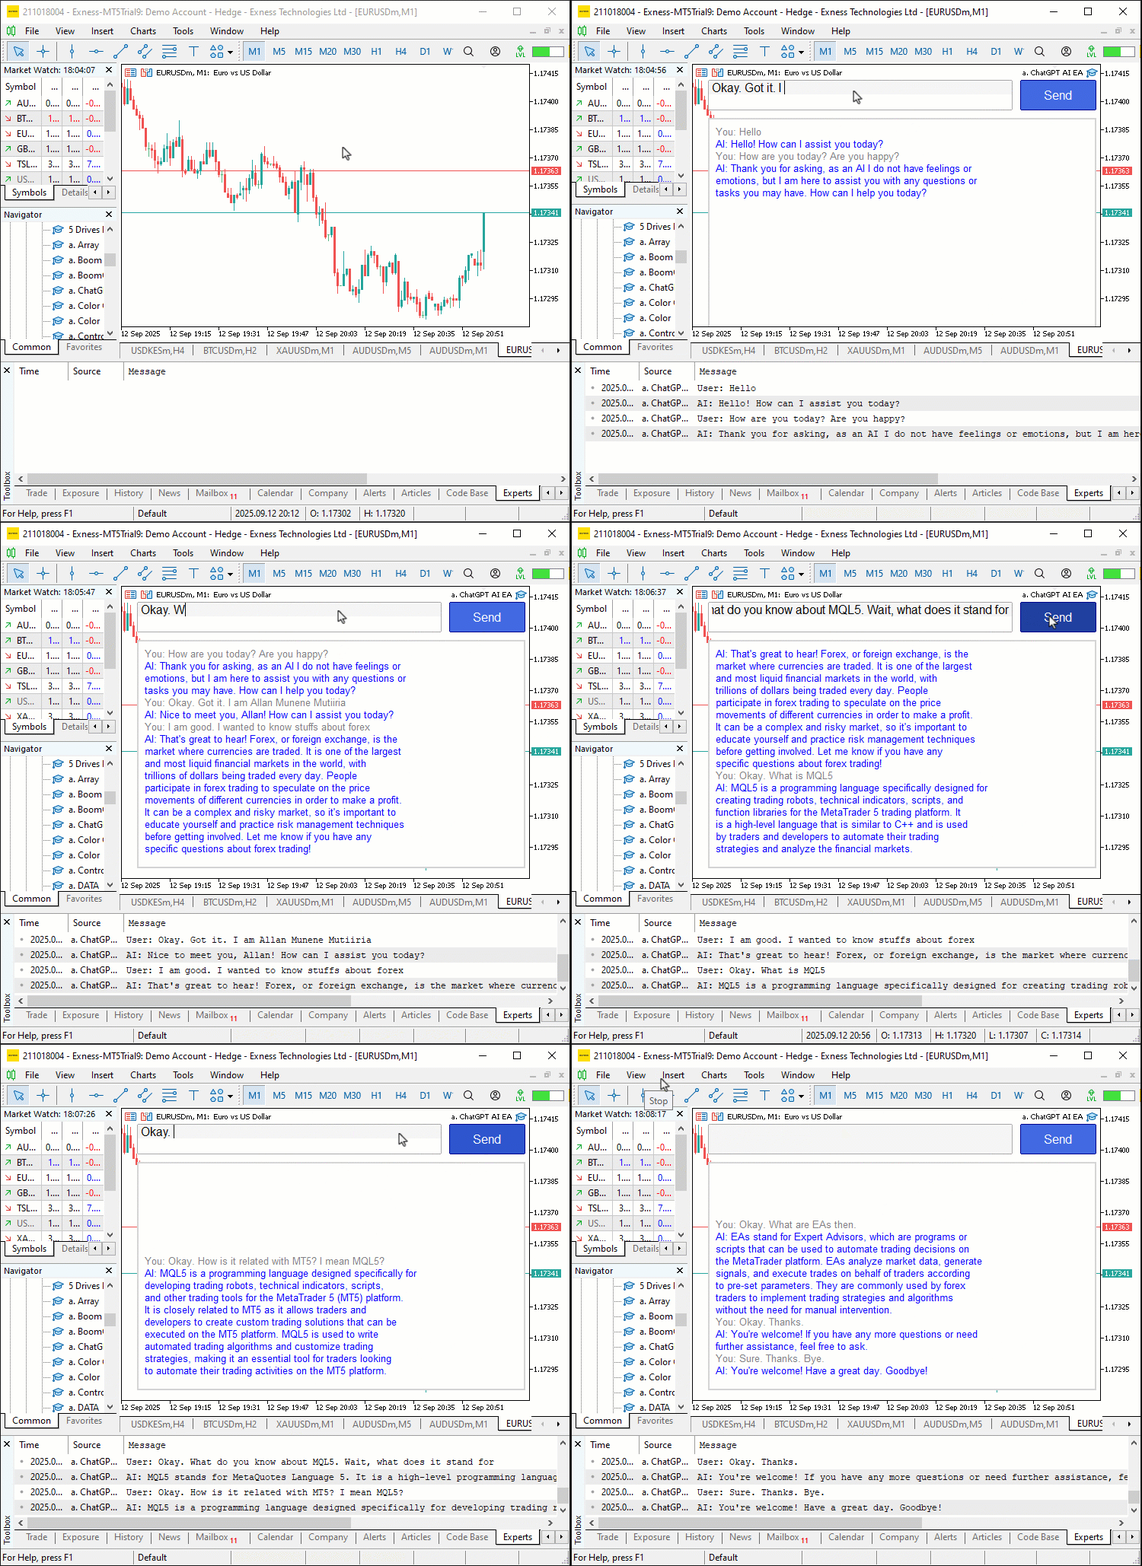
Conclusion
In conclusion, we’ve developed a ChatGPT-integrated program in MQL5 leveraging the JSON parsing framework from the previous part to enable us to send prompts to OpenAI’s API and view responses via an interactive dashboard. Through a user-friendly interface with an input field, submit button, and response display, combined with API communication and logging, the program facilitates real-time AI-driven insights. In the preceding sections, we will update the display to handle more responses and make it scrollable. Stay tuned.
Warning: All rights to these materials are reserved by MetaQuotes Ltd. Copying or reprinting of these materials in whole or in part is prohibited.
This article was written by a user of the site and reflects their personal views. MetaQuotes Ltd is not responsible for the accuracy of the information presented, nor for any consequences resulting from the use of the solutions, strategies or recommendations described.
 Automating The Market Sentiment Indicator
 Developing Trading Strategies with the Parafrac and Parafrac V2 Oscillators: Single Entry Performance Insights
 Overcoming The Limitation of Machine Learning (Part 4): Overcoming Irreducible Error Using Multiple Forecast Horizons
 Developing a Volatility Based Breakout System
- Free trading apps
- Over 8,000 signals for copying
- Economic news for exploring financial markets
You agree to website policy and terms of use