

Code, Tears, and Algo Forge
 1 647
1 647
 14
14

Contents
- Time for Interesting Stories
- A Practical Guide: How It Works in Practice
- The Face of a Project: Art of Documentation
- Conclusion: A New Development Culture
Time for Interesting Stories
Free, uninhibited emotion or strict pragmatism? Amid piles of crumpled drafts and discarded words finally rejected, I couldn’t start writing for a long time. No, not even writing, but trying to describe things that were practically unfamiliar to me. Every time everything was wrong, not right, and not sincere. And now I decided to just tell it like it is. Just my impressions. Personal and not so personal. Let this be an emotional story about the path from something familiar to something necessary... About the path from simple archives to an obscure repository. The immediate question that might arise is, "Why?"... Indeed, why move away from the simple comfort you’ve long been accustomed to for something complex and incomprehensible? What's the point? What's the profit?
What's the point for an ordinary programmer and article writer to research and study something that seems unlikely to be needed for the next three hundred years? All is just so simple: You've written your code, written your article, attached the source code with the archive, and published it. That's all, we can move on to our next task...
However, that's not the case. In fact, this is something we should deal with now rather than later. But we will need to break out of our cocoon. Break out of it and see that turns out, there are things that make life much easier than our cozy Groundhog Day of the repetitive "Code - Article - Archive - Forgot" actions...
When it became clear that ZIP was no longer saving me.
For quite a long time, everything continued like this. Well, it’s convenient, isn't it? Everything goes according to established rules - write your code, publish articles, and share your knowledge... But the more articles were published, the further back in time the beginning of this path of mine went, the more frequent and more numerous were the echoes from the past kept surfacing.
I found an error in the first part of the library while writing some twenty-first one, and it was necessary to correct this error and repackage all the files from the first article to the last into archives, and ask for each one to be republished. Or suddenly someone wrote that they couldn’t install the code attached to an article, or asked questions about the changes that occurred from release to release. I don’t even remember where it all is, in which archive, what I’ve already done there, and what I haven’t managed to do yet... But I must respond to people and provide support for my developments... And now, the search begins, or the downloading of my own source files from my own articles — moreover, two different versions! — and their comparison in search of changes...
Here I began to feel like a hostage to my own publications. And I increasingly began to see MQL Algo Forge as a possible solution to various problems associated with supporting my developments and publications.
The most annoying barrier: I didn't know Git at all.
And here’s the dilemma: I need to write my projects, I need to publish my articles, I need to meet my to-do-list, and then I need to study all this... No, well, I've encountered Git, of course. But only in passing and superficially. When I was writing a C# app for the Waip Squadron (Wild Priest Corps) in Elite Dangerous, I recruited one of the squadron members to help with the project. He's a programmer and he already knew all this. So I just pushed changes and received them before I started working, and only when he told me to. And if something got broken (by me), he fixed everything. And so, as I imagine that, being alone with my projects here, I might suddenly break something. And? What will I do? What if I just wipe everything out with one careless move? Of course, all this kept me from simply "getting started.”
But still, the developers have already integrated working with Algo Forge in the editor, albeit not completely, but at least I didn’t have to keep the help for Git console commands open in front of me and remember that I should write somewhere if I suddenly need something. Well, I'm not one of those people who will brag about my keyboard skills and memorization of the hard-to-translate-commands-that-you-absolutely-must-remember-and-use-as-soon-as-you-wake-up... The editor still has commands integrated into the right-click menu for all basic and necessary steps:
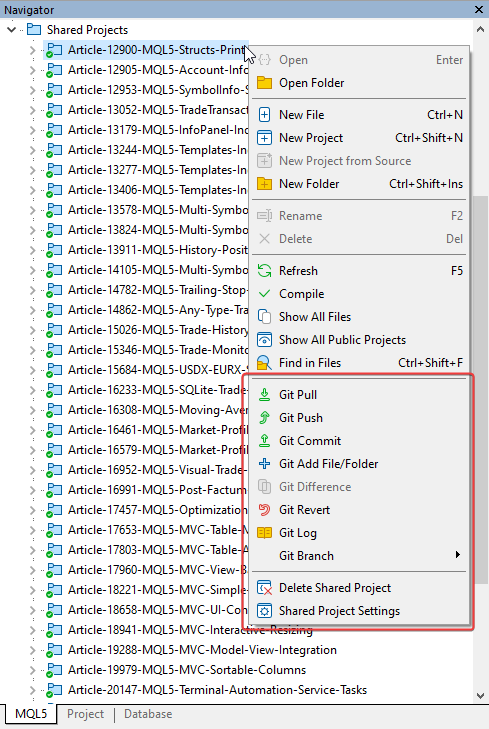
That's where I decided to start little by little, thinking, "I have to start sometime anyway."
First Project Transfer: How I Got Confused About Simple Things
Well, okay, "No sooner said than done," I decide — and begin. Fortunately, I have many and various articles published, even more source files, and no shortage of subjects to choose from. And then the questions piled up on me. Fortunately, everything was fine with my logic, and I didn’t have to think long about which types to choose for different projects. If it is a single script, then the project should be the same; if it is an indicator, then it should be an indicator, etc. If there are many files within one project, it is better to create an empty project and copy all the local files of the experimental project to this new, public one.
Although questions immediately arose, such as: Why does it have to be like this? Why not first make any project empty and then transfer the necessary files into it, one of which is compilable with the program type required? I practiced and realized that it’s all about comfort. In our own, so familiar and close comfort. So, I decided for myself that if I start making a new public project, and it is an executable program, then I will choose the required project type. But if this is a code that has already been written a long time ago, then it’s more convenient for me to make the project empty and then drag the necessary files into it. Well, or if there are or are planned many compilable executable programs of at least one or different types within one project, all this is placed in an empty project.
Okay, "That's what I'll do," I decided. And I did. I happily added files to the project via the right-click menu (already feeling like an Algo Forge guru), went to the web version, and saw all the files added in my new project. Bingo! And then I thought: Why did they appear there? I just added the files to the local repository, I guess. I didn't press the magic Push. what's the matter with it? But then I noticed a comment on the commits – adding new files:
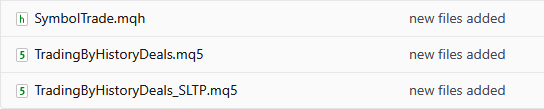
Hmm, okay, maybe the developers just made it like that (so that someone like me wouldn’t have to suffer for too long). And indeed, all my newly added files are visible in the web version, they are perfectly readable, and in general, everything is in its place, and the files have a commit comment by default. Lovely.
But I wanted to add my own commentary to my newly added files. That wouldn’t do. I wanted my own comment there. Well, what I do is the simplest thing. It's already a whopping 2026, but the files show a year that has long gone. So I enter the current year in each file in the editor and save the files. Aha! Icons appeared on the files in the editor indicating that the files have been modified ( ). But the web version still has the same old files.
I go to the editor and commit the changes in Git (a right-click command: Git Commit). Bingo again - the icons on the files in the editor have become normal and the correct color ( ). This means, I think, that they are now the same in the web version. I go there and look - exactly, everything has changed beautifully - the current year is looking at me.
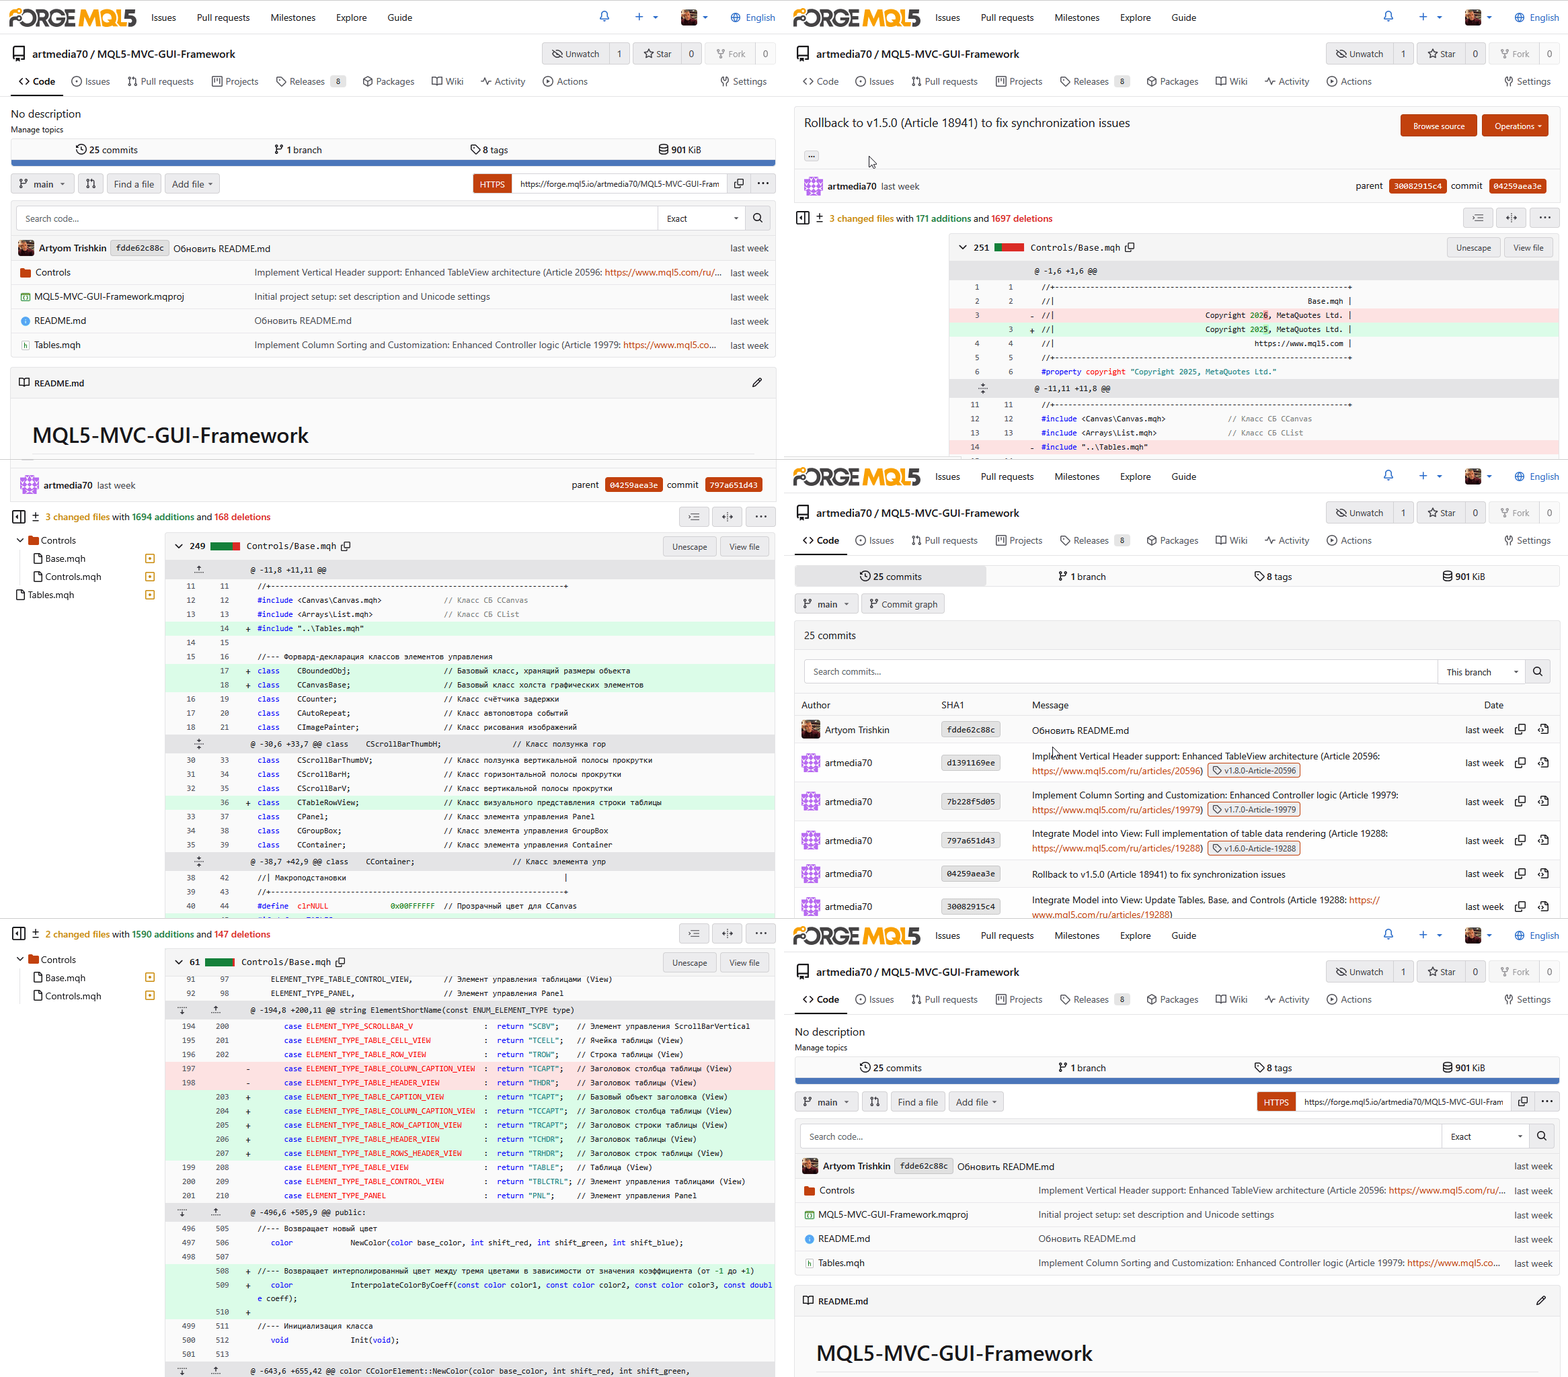
And so I remember the magical property of Git and, accordingly, of Algo Forge: They can remember and display the history of changes made to project files. That is just a game changer — now I can develop my projects in the Shared Projects folder, commit changes, and see the entire history on the website (remembering how they pestered me with questions about what I had changed in different versions of the same library). I try to take a look, but I'm told there: This is a binary file, and I won’t show it to you. What a bummer... And what did I break? The file itself is displayed as normal text — I can see the characters just fine — but it does not show the modifications and still says it is a binary file... Facepalm...
This story, of course, turned out all right — everything worked out, but it was with the help of "big brothers," and this is etched into the mind forever. What's the secret? The secret lies in the current feature of Algo Forge: It only properly handles only files saved in UTF-8 . In the editor, however, files are saved in Unicode by default. And this is a very important nuance: Whenever working with any public project, whether new or assembled from previous work, you should always re-save all project files in UTF-8 before sending them to the repository. And here it is, the change history:
Having solved the problem with displaying the change history, I suddenly realized that a series of further questions had come up. Well, the changes are now visible, but what about large libraries that took weeks, months, and a ton of fixes and improvements to write? Each version of such a library was described in its own corresponding article, and a large number of them have accumulated. And how can I make all of this transparent to those viewing my repository so they can see the library's dynamic development?
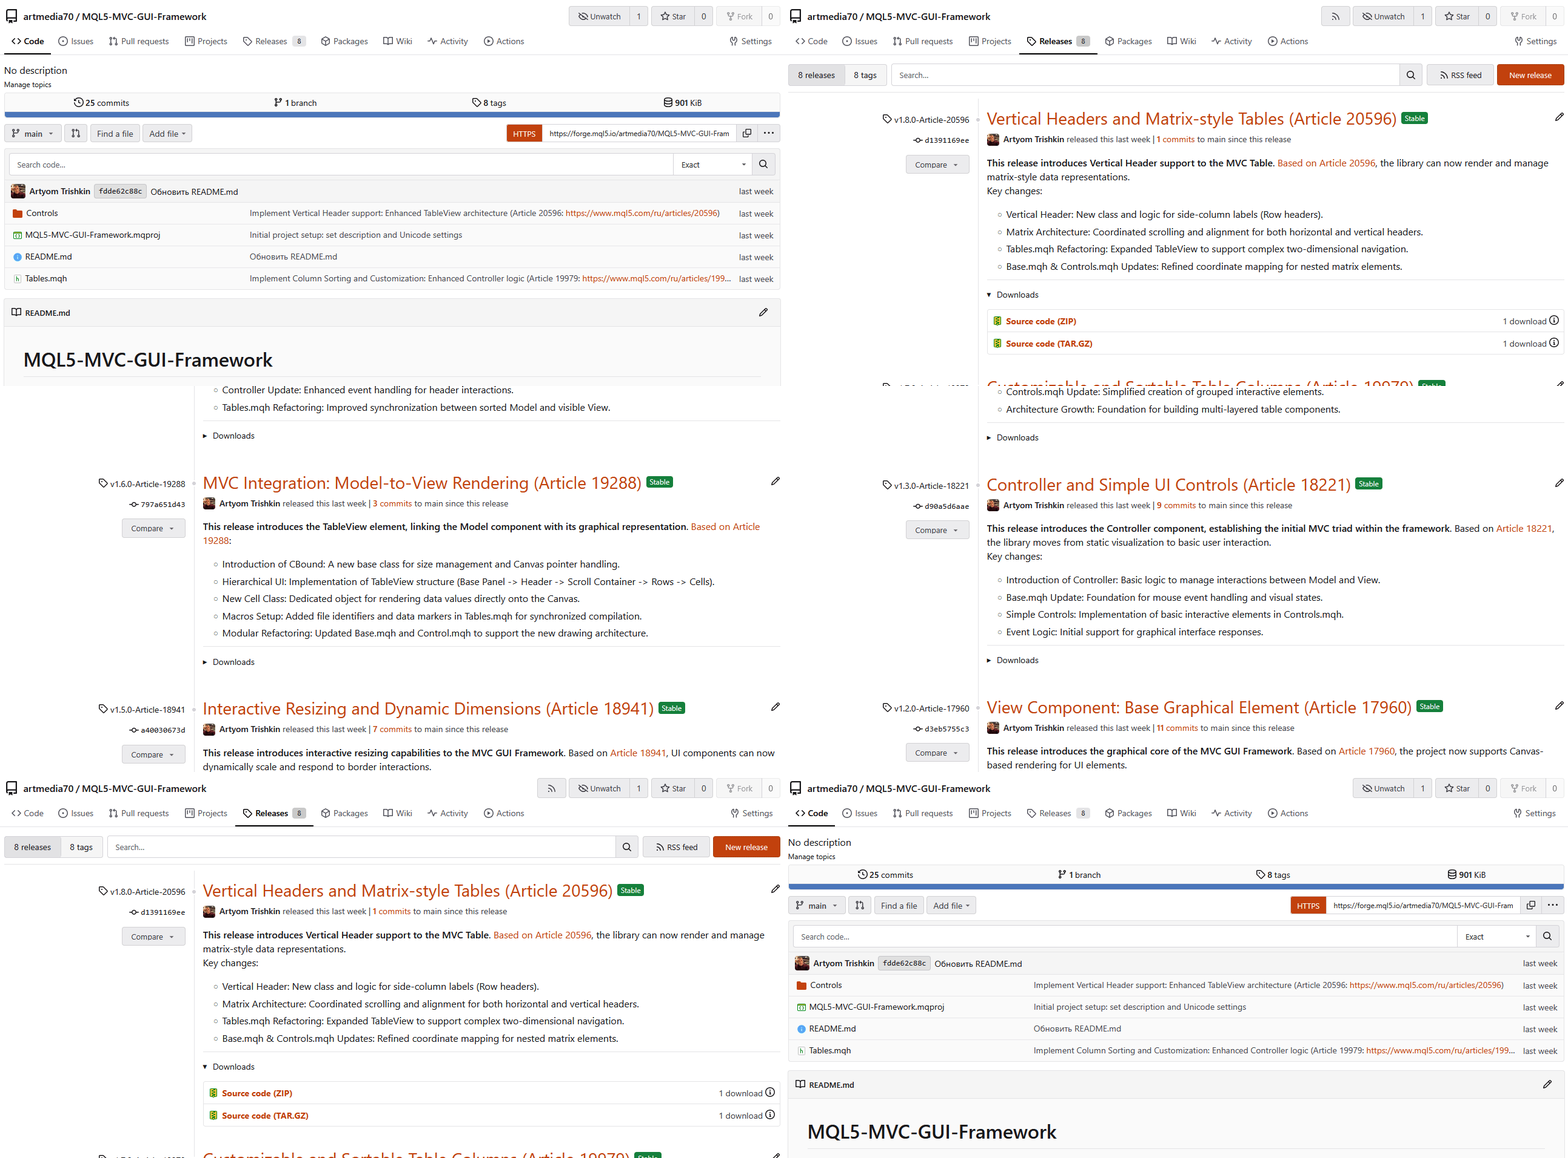
If I upload the final version of the library to a public project, where will the history come from then? I have it locally on my computer and in separate articles online... I remember that I know my way around logic, and I understand that I need to upload everything to the project in parts — from the first version to the last one. And each new article (read: library version), or rather the library files attached to this article as an archive, must be committed to the repository. Then I will have, although not the entire change history, at least the release history will be in the cloud. Good. What if there was a way to label each such issue as a release? It would be absolutely magical — a history of library releases. Moreover, each subsequent article refers to its own library release... So I went off to read the docs and explore the interface. And (miracle!) I find a "Releases" tab in the web version of Algo Forge, and in it, the ability to create a release from the current state:

Bingo for the third time! Moreover, when it is created, a release can be marked as either a stable version or a beta version, for example. And that's great.
So, I collect all my articles on the same library and start sending the code from each article to the public project one by one (remembering to re-save each file in UTF-8). And in the repository, each time after adding all the files from each subsequent article, I create a release and mark it as stable. When all this is completed, I have a repository for this library with eight releases. And I can provide a link to each release. In this case, if you go to this link, it will lead you to the set of files that belong to this release:
I couldn't be happier...
But if you need to create a project from scratch, then, of course, you need to start with a project in the Shared Projects folder, and all commits will immediately be included in the project's change history. Any committed revision is part of the project's development history and will be displayed. When we understand that we can send it out into the world, we make its release. This is how any project will gradually acquire its own history and successive releases.
What turned out to be the hardest thing: Not the code, but the discipline
And you know what? When I commit changes in Git, the submit window includes a comment field. It's clear that I need to enter the reason for the change there or somehow explain what was changed in the code... Even for me, a person who is used to commenting my source code almost in full detail, it was quite stressful to force myself to enter descriptions of the changes into this window. Well, why write an "explanatory note" about it if I only changed one comma in a comment? For whom? What for? That's awful. Why bother? I asked myself. So I left the field empty — it's faster that way. And then, when I needed to find a specific change, I saw a list of empty commits. Well, keep looking for it, my dear, keep looking for it... And I understood. All the questions like "who," "why," "what for" have direct answers: For my beloved self, to keep my lists in order, and to avoid getting lost. And, naturally, for my future readers. This is respect for myself and for people after all!
This is discipline. First of all, for myself. And then... then I looked at README.md. That's when I realized that commenting on my commits isn't a problem at all: If you change something, send a commit — don't forget to describe what you're committing. And README is the data sheet, the face of my project. I can describe the entire project in it so that everyone who visits the project page will immediately understand what it’s all about. This is the cover. The way you format it is the way you will get the response. If I leave it blank, the project will appear to an outside observer as a simple dump of some files and some code with an unclear purpose. Well, I also had to study the documentation for the Markdown markup language. At this point I already understood why I was doing this: To neatly design the project’s cover. This again is respect for the readers. A person comes in and sees a well formatted project, looks at what it’s about and, most importantly, immediately understands what it is.
And for me... For me, README is another reason to learn and explore something new. Yes, I have to go to the Algo Forge website to format it all, but that's no longer a problem. When I start a project, I always start describing it. Every time I make a major change, I can make a note in README. Even if all these notes don’t make it onto the final project cover, for me this is a wonderful notebook with my notes. And I don't even have to go to the web version to read the README — it's perfectly readable right in the editor. All I have to do is get the changes from the Git of this file in the project, and I can open it in the editor window and read my notes. Once I've completed the project, I'll need to go to the web version and create the project's cover, making it easy for the user to understand its purpose.
What helped me not give up halfway through
Learning all of Git, trying things out, redoing them, starting from scratch—of course, I quickly got tired of all this. Just when I thought everything had become clear and I could continue working in the new reality, something would inevitably go wrong again. And I started reading/studying and trying again. So I quickly realized that I was about to burst and simply left myself with the most necessary things for running my projects, where everything is already clear, works, and brings new interesting results. The rest will come with time. It is enough for me to know that any project starts in the Shared Projects folder, any project either has its own specific type or is completely empty, in which I am given complete freedom of choice, but involving the preservation of the development and editing history.
The main thing is to train myself to start each new day by getting changes from Git. Each change needs to be provided with a reasonable comment, so that after a while it will be clear what kind of change it is. In this way, I imperceptibly rose to a new level of design and implementation of my ideas and solutions — things are made as clear as a bell, there is a change history, as well as intermediate and stable releases. As soon as I decided how to follow this path, having defined the goal, everything immediately became definite and clear - there is a goal, there is a path, and there is a solution.
What actually awaits the author who decides to make the transition
Let me tell you right away: Harbor no illusions that everything will turn over at the drop of a hat, begin to roar, and go. None. If you've been using simple folders and archives for years, you'd probably have to rewrite everything a couple of times in a new project. There will be a series of trials and errors, questions like "Why do I need all this if it doesn't speed up my work, but only creates problems and takes my time?" Only gradually will you come to the realization that it is the breaking of your habits that slows down your work at the initial stage. And then there will be the realization that now projects, after being published, do not begin to age along with the publication.
Now the projects will live their own life, breathing it into the article published. Any change to the project becomes available in the article, too. There is no need to worry about how to inform readers that the code in the article has been updated and that they should wait until the article is republished and not download an outdated archive from it. Everything is now done automatically. By overcoming our habits and switching to a repository instead of an archive, we thereby automate the maintenance of our projects and articles.
This gives us the much needed and important peace and orderliness that the full benefit of Algo Forge now becomes visible.
A conclusion I didn't come to right away
Have I moved from talking about problems to marketing without realizing it? Well, it's simply because I've come to understand all the advantages of a repository over static archives, and it's becoming increasingly difficult to remember the time when I felt trapped by my old projects, forced to remember maintaining them instead of calmly moving forward and letting the repository undertake this routine that slows down my development.
At its core, Algo Forge is all about repository, synchronization, version history, and documentation. For me, it also means that it’s impossible to always count on my old archives to live forever. It means that the publish-and-forget principle conflicts with the principle of the need to maintain any of one's projects. This means that this is an extra burden on the author, which is a major distraction from their “pressing matters.” With Algo Forge, my publications are now in order, their history is completely transparent, and the question of "When will I finally clean out my Augean Stables of directories and files?" no longer exists. It's already been solved.
Now, I will definitely answer "no" to the question: "Would I like to return to the previous publishing principles?" Seeing all the advantages of the new publishing and maintaining principle, I can’t do otherwise. Not because an archive is something bad or that it has no right to exist. It's just that the archive is convenient at the moment — right here and now, when publishing. And then it ages along with the publication, and its maintenance starts presenting some difficulties and anxiety. Algo Forge, however, requires an investment of time and effort while publishing, but immediately returns the effort with ease of maintenance, history transparency, and peace of mind in support. This is very important when developing future projects that will no longer gather dust in outdated archives, but will take on a life of their own, as a good original project should.
A Practical Guide: How It Works in Practice
All work with Algo Forge is based on three simple rules that quickly become a habit. First, we lay the foundation in the Shared Projects folder, since this is where direct access to the cloud opens. Then we train ourselves in the "first step" rule: Before we start working on the code, we get the latest version from the repository using the "Get updates from Git" command—this is especially important if you use different computers. Finally, we commit our work: It's sufficient just to click "Commit changes to Git," and our edits are commited and reflected in the cloud.
The developers have simplified this process as much as possible by combining local commit and sending code to the cloud into a single action. By following this artless sequence, you'll forever protect yourself from version confusion, and your project will always be in perfect order and at hand.
Let's see how this looks in practice. The entire process of integrating your code into Algo Forge boils down to two simple paths: Either you give a new lease of life to your old code, or you start a new project right away, following all the rules.
Migrating Code from Previously Published Articles
Think of it like this: You're calmly working on a new project, and suddenly you receive a notification—someone left a comment on your article from two years ago. A reader complains that the code does get not compiled or produces an error in a new terminal build. And so you begin the travail of searching for that very source file on your hard drive. Even worse, sometimes you have to download your own code from the article, unpack it, and try to remember how to put it all together just to answer a question.
Moving such materials to a repository is the best way to protect yourself from such incidents. Make your past work accessible and tidy, because the process itself will take no more time than checking your email. Just follow a few simple steps, and your code will turn into a modern, user-friendly, and, most importantly, fully controllable project:
- Creating a project
Make sure that the login and password for your mql5.com account are specified in the Community tab of the editor settings: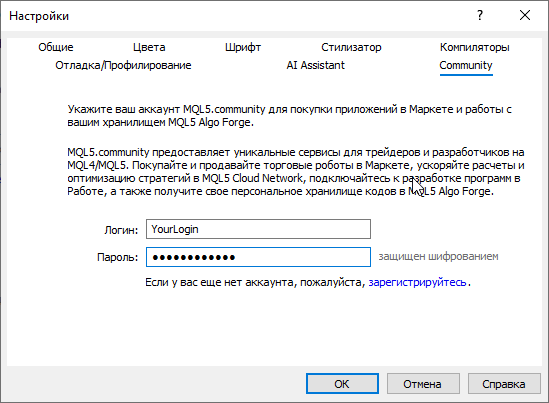
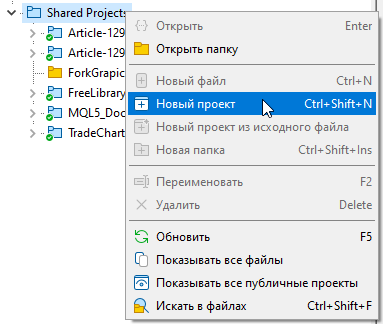
In the MetaEditor navigator, right-click specifically on the Shared Projects folder and select "New Project." This is your entry point into the modern ecosystem:
- Configuration selection:
Here everything depends on the composition of the old archive. If it contains many different files, select "Empty Project." But if your project is just a single compiled Expert Advisor or indicator, it is better to immediately select the appropriate type in the MQL Wizard. In this case, the editor will create the correct project structure, into which you simply copy the required project files. However, even with an empty project, you will also need to place all the necessary files into it.

- Cloud connection:
Give the project a name in the following form: [Material Type]-[ID]-[Short Subject].
By ID we mean the article number from its address (for example, in the link https://www.mql5.com/en/articles/12900 this is the number 12900).
The final name might look like this: Article-12900-MQL5-Structs-Print.
The notification at the bottom of the Wizard that the project will be hosted on Algo Forge confirms its cloud format. - File migration:
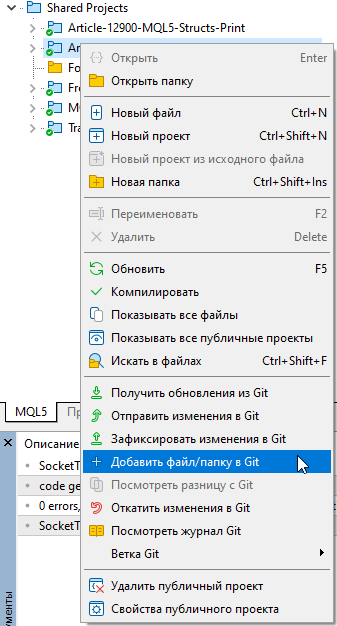
Copy all the project's source code files to the newly created folder in any file manager of your choice. In MetaEditor, select the "Add file/folder to Git" command for each file that should be in the repository, or for the folder itself if all the files within it should be in the group project:
- Commit:
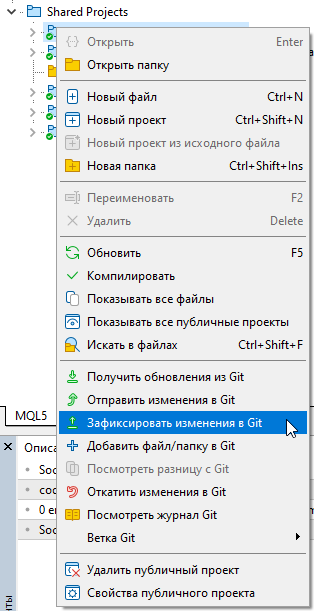
Click "Commit changes to Git" and that's it. Your old work has been moved to a modern storage facility, and it is much easier now to keep it in order.
Development of Projects for New Materials
If you're just planning a new article, start it with the right foundation. Create a project directly in the Shared Projects directory, without waiting until publishing. When you select a suitable template (whether it's a complex advisor with many dependencies or a simple script or indicator), MetaEditor automatically builds the correct project structure.
It is important to take into account one technical feature here: The folder structure in the "Projects" window is virtual. Physically, all your source files may be in a single folder on your drive, but in the MetaEditor interface they will be neatly distributed across logical sections: Program files in Sources, headers in Headers, and resources in Resources:
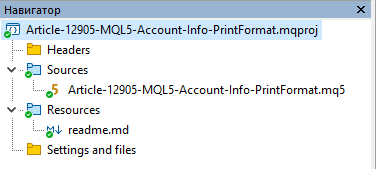
This is done for your convenience, so that you can quickly find the file you need by its affiliation, without roaming through real directories.
By working like this from the very first line of your code, you get into the rhythm of professional development. The process becomes a series of meaningful steps: You have written a logical block, checked it, and then immediately pushed it to the repository by selecting "Commit changes to Git." It is recommended to describe important changes in commit comments—this will allow you to subsequently monitor the process of changes to files without having to remember what exactly was changed in this particular version.
You set the scope of control yourself: You can record changes to the entire project as a whole, or you can "commit" each file individually. This gives you the very flexibility to always return to any version of your code if a fresh idea suddenly leads nowhere.
Finally, by the time you finish writing your article, your project will be fully synced with the cloud while remaining private. It's up to you when to publish it: You simply log into the web version of Algo Forge and, with a single toggle, open public access, making your work visible to everyone exactly when it's convenient and needed.
The Face of a Project: Art of Documentation
So, the technical part is over: The code is debugged, the files are synchronized and carefully arranged in folders in Algo Forge. But if we go to the repository right now, we will see only a plain list of files. For the world outside, the project remains a "self-contained thing" — without a cover, without a title, and without any explanation. For your work to truly "speak" to the reader, it needs a face. This role is performed by the README.md file, which is located in the root directory of your project. It is this file that serves as the connecting link that turns a set of files into a structured knowledge base.
README file is essentially a manual for your web page engine in Algo Forge. It is this that determines the view that someone will see when opening your project in a browser. This is your hallmark, which, before your very eyes, transforms a set of silent source files into a clear and living software product. You must admit that a project with a cool description inspires much more trust than a bare list of files.
But how can you avoid wasting your precious time writing documentation from scratch when it could be used much more effectively? Use modern tools: Today, Artificial Intelligence is your best assistant in this matter. Don't hesitate to off-load all the routine work to AI. Simply provide the neural network with your code and a draft of your article, and ask it to create a README file structure in Markdown. AI will instantly analyze features, highlight key parameters, and offer logical sections. The resulting "skeleton" will only need to be slightly adjusted to suit your own style. Remember: AI is not a replacement for your creativity, but a powerful accelerator that takes care of the tedious markup inside a file and frees up your time for the tasks that really matter.
Syntax and Control Characters
After the neural network has created a README file template, it needs to be refined into a finished showcase that will not simply list functions but also clearly demonstrate the usefulness of your code.
To finalize the file, it is enough to know the basics of the Markdown markup language. Its use allows you to format your text using simple markup symbols, eliminating the need to delve into the intricacies of complex layout. To confidently navigate the design, it is enough to remember a few key rules:
To make your project look professional, it's enough to master a few basics of the Markdown markup language. It's not programming, but rather a set of simple text commands that Algo Forge instantly turns into beautiful layout.
Let's look at the control characters that will become our main design tools:
- Heading hierarchy (#):
The number of hash signs at the beginning of a line determines the section level.
A single # symbol will create the largest heading (the project name), while two ## or three ### will help highlight logical subsections. - Lists (- or *):
A hyphen or asterisk at the beginning of a line automatically creates a structured list, with each item highlighted with a graphic bullet.
This is the best way to describe the program features or input parameters. - Text highlighting (**, *):
Paired symbols are used to put emphasis on something. A word or phrase enclosed in double asterisks **text** will appear bold, while a word or phrase enclosed in single asterisks *text* will appear italicized. - Code snippets (`):
Names of functions or variables within a sentence must be set off by paired backticks: `OnInit`. This visually separates technical terms from regular text. - Code blocks (```cpp):
To insert an entire listing, triple backquotes should be used at the beginning and end of the block. Specifying the "cpp" identifier immediately after the opening quotation marks will enable the familiar syntax highlighting, which correctly displays the structure of C++ and, accordingly, MQL5 projects. - Links and images ([]()):
The [Text](Address) structure creates a regular clickable link by default.
However, if you add an exclamation mark ! before it, the layout engine will interpret this as a "show" command rather than a "go to" command.
In this case, the browser will download the file from the specified address and display it as an image directly in the text.
A short description (alt text) is written in square brackets, and the direct path to the image file is written in round brackets.
This "language of symbols" turns ordinary text into a visual showcase. A couple of screenshots of the trading panel or a chart from the strategy tester will make the project lively and understandable without unnecessary words. By spending just ten minutes on making a README, you can transform your set of files into a high-quality product that attracts attention even before the code is opened. This is a professional approach: When the author takes care of both the logic of the algorithm and those who will study it.
And there is one important detail here: MetaEditor can read and display README.md perfectly well, but it is not designed for editing it. So, to write it, we turn to the web version of Algo Forge.
It is there, in a convenient online editor, you insert the AI template, edit the text, and customize the appearance of your showcase:

Once you click "Save Edits" on the website, your work doesn't disappear—it becomes part of the project. Now, it is enough to return to MetaEditor and click the familiar "Get updates from Git" button to have a fresh, formatted description "come flying" from the cloud directly to your editor.
Recommended Documentation Structure
It is advisable to adhere to a universal structure as a basis for designing the repository. A logical sequence typically includes a brief summary of the project, a list of key features, an overview of the list of the files, and a step-by-step order in which they should be run. The documentation ends with a reference block containing links to the theoretical basis or contacts for feedback. This structure makes the project transparent to the audience and complete from the author's point of view.
Below is an example of a typical README.md file, which can be used as a basis for your own projects:
#Project or library name Brief summary: Description of the problem being solved, its key purpose, and its suitable applications (one or two sentences).

##Key Features - Listing key features or modules.
- Describing unique characteristics, such as performance or cross-platform development.

##Project Composition Overview of the repository structure: What tasks are the main directories or files responsible for?

## Usage sample
Below is a basic sample of how to call the main function from this library:

```cpp
#include <MyLibrary.mqh>

void OnStart()
  {
   double result = MyFunction(10.5, 20.0);
   Print("Computing result: ", result);
  }
```

Use the code carefully.

##Instructions for use - Procedure for integrating into other projects.
- Necessary dependencies and external resources.
- Basic steps for compilation and first run.

##Reference information - Links to theoretical materials or to the main article on the portal.
- Contacts for feedback or links to the community discussions.
We often dismiss README as a boring formality task that can be filled out "for show." But the truth is that even the most brilliant code risks gathering dust on a shelf if it can't be understood in a couple of minutes. A well-designed file is not just a text, it is your signature, a mark of quality, and basic respect for those who will study your code. This showcase transforms a project from just a set of files into a living tool that continues to build your reputation after a year or two, or more after the article has been published.
Conclusion: A New Development Culture
Switching to Algo Forge isn't just a change in how you store files; it's a new standard for professional activities. We're moving away from static ZIP archives and lengthy republishing cycles to living, relevant projects that are under your complete control, right here and now.
For you, as an author, this means, first and foremost, saving time and keeping things in order. There's no longer any need to search for old archives on the drive or explain to readers repeatedly how to manually assemble a project. Now your work lives in the cloud, and any correction can be added to the repository instantly—with a single command from MetaEditor. No unnecessary emails, no waiting for moderation, and no edits to the text of the article itself.
Incorporating such tools into your practice isn't just about following trends, but a way to make your article production more predictable and high-quality. Ultimately, when an author chooses a modern approach to code presentation, it inevitably raises the bar for quality content throughout the entire resource. This is a case where technology helps us focus on what matters most, turning each article into a fully-fledged and long-lasting working tool for the entire community.
Those ready to fully dive into the capabilities of the ecosystem itself, please check out these reference sections:
- Getting Started with MQL5 Algo Forge — a basic guide for a quick start;
- Moving to MQL5 Algo Forge, a series of articles:
To turn theory into practice, I decided to personally test how smoothly the migration was going, so I moved some of my projects to the repository. Experience has shown that everything works exactly as described in the article—quickly, logically, and without unnecessary fuss.
As a live example of what you will end up with, you can take a look at my results.
Here is a list of some of the articles I have already submitted to my repositories:
- Project implemented as a "Single Script" (based on the article "Studying PrintFormat() and applying ready-made examples"):
Here I used the "Script" project type. This is the ideal and fastest way if you need to transfer one specific utility. - Project, implemented as a "Set of Scripts" (based on the article "Structures in MQL5 and methods for printing their data"):
In this case, I chose "Empty Project" to collect several scripts under one cover. - Project of a library based on the MVC pattern with sub-versions corresponding to their articles. It is implemented as an "Empty Project," where each release is merged into the project from its own article with a commit and release creation.
All projects now live in the cloud, and maintaining them has become a matter of one click.
Translated from Russian by MetaQuotes Ltd.
Original article: https://www.mql5.com/ru/articles/21732
Warning: All rights to these materials are reserved by MetaQuotes Ltd. Copying or reprinting of these materials in whole or in part is prohibited.
This article was written by a user of the site and reflects their personal views. MetaQuotes Ltd is not responsible for the accuracy of the information presented, nor for any consequences resulting from the use of the solutions, strategies or recommendations described.

 Duelist Algorithm
 Implementation of the Quantum Reservoir Computing (QRC) circuit
 Automatic Session Volume Profile Builder in MQL5: Rendering POC and Value Area Without Third-Party Tools
 Beyond GARCH (Part VII): Monte Carlo Volatility Forecasting in MQL5

- Free trading apps
- Over 8,000 signals for copying
- Economic news for exploring financial markets
You agree to website policy and terms of use
To be honest, I’d forgotten... I’m sorry.
For example, this repository.
For some reason, I couldn’t find this project in the editor (in the tab with the list of public projects). I struggled to find it on the Forge website, where I discovered it could be downloaded as an archive.
In my opinion, the option of attaching code to an article is still more convenient for readers. The only advantage might be if you need to re-upload incorrect code without editing the article.
I suppose for now it’s best to combine both methods of posting code.
For some reason, I couldn’t find this project in the editor (in the tab with the list of public projects). I eventually managed to find it on the Forge website, where it’s available for download as an archive.
In my opinion, the option of embedding code directly into the article is still more convenient for readers. The only advantage might be the ability to re-upload incorrect code without having to edit the article.
I suppose for now it’s best to combine both methods of posting code.
Of course, you can download it as an archive. But it’s better to create a fork (though, naturally, I can’t create a fork for my own project):
In this case, a mirror of the project will be created on your local machine, where you can make your own corrections and improvements and send them to the author for review. They will receive the proposal and will be able to consider it and add it to their original project.
This would then constitute collaborative work on the project.
An excellent article.
In the latest beta versions, we’ve completely changed our approach and stopped saving source files and projects in Unicode/UTF-16.
This is precisely to ensure maximum compatibility with Git and the AI assistant, which prefers UTF-8.
This is precisely to ensure maximum compatibility with Git and the AI assistant, which prefers UTF-8.