
How to develop any type of Trailing Stop and connect it to an EA
Contents
- Introduction
- Base trailing class
- Trailing classes by indicators
- Trailing the specified StopLoss levels
- Connecting a trailing stop to an EA
- Conclusion
Introduction
Continuing the topic about trailing stop started in the previous article, here we will consider trailing classes for convenient creation of various algorithms for trailing StopLoss positions. Based on the created classes, it will be possible to create any algorithm for shifting stop levels: by stop shift from the current price, by indicators, by specified StopLoss level values, etc. After reading the article, we will be able to create and connect any algorithms for shifting stop positions to any EAs. At the same time, the connection and use of trailing will be convenient and clear.
Let's briefly consider the trailing stop operation algorithm. Let's agree that three operating conditions can be used for each trailing:
- trailing start — number of points of position profit, upon reaching which a trailing stop is triggered;
- trailing step — number of points that the price should move towards the position profit for the next shift of the position StopLoss;
- trailing distance — distance from the current price StopLoss is located at.
These three parameters can be applied to any trailing. Any of these parameters may be present in the trailing settings or absent if it is not needed or is replaced by some value in the trailing algorithm. An example of replacing the "trailing distance" parameter can be the indicator value the position stop loss is set at. In this case, if we use this parameter, the stop will be set not at the price indicated by the indicator, but with an indent from the indicated price by the distance value in points.
In general, the three parameters listed are the most used in various trailings, and we will take them into account when creating trailing classes.
When moving a stop loss position to the required price, the following checks should be performed:
- the StopLoss price should not be closer to the current price by the value of the symbol StopLevel level (SYMBOL_TRADE_STOPS_LEVEL — minimum shift in points from the current closing price for setting Stop orders);
- the StopLoss price should not be equal to the one already set, and should be higher than the current stop loss level for a long position and lower for a short position;
- if the trailing algorithm uses the parameters listed above, then it is necessary to additionally check the conditions set by these parameters.
These are basic checks. Any trailing algorithm works the same way: the price required to set the stop is entered, all necessary restrictions are checked and, if all checks are passed, the stop position is moved to the specified level.
This is how a simple trailing can work:
- in the "trailing start" parameter, the profit in points is indicated, upon reaching which trailing should be started, or zero if this parameter is not used;
- the "trailing step" parameter specifies after how many points of profit the stop level should be pulled up following the price, or zero if this parameter is not used;
- the "trailing distance" parameter sets the distance from the current price to the position stop the stop level should be located at, or zero if this parameter is not used;
- additionally, we can set a symbol and magic number of positions to be trailed or NULL and -1 respectively if we need to trail the positions of all symbols with any magic number.
When the position profit reaches the specified number of points, trailing is started and the position stop is set at the specified distance from the current price. Next, after the price has moved the specified number of points towards the position profit (trailing step), the position stop is again moved following the price so as to maintain the specified distance from it. This is done until the price goes against the position. In this case, the stop remains at the already set level. Once the price reaches it, the position will be closed in profit by StopLoss. Thus, a trailing stop allows us to preserve profit by closing a position when the price reverses, and at the same time allowing the price to "walk" within the specified stop offset from the price, gradually pulling the stop following the price if it moves in the direction of the position.
Instead of the "trailing distance" parameter, we can specify a price value obtained, for example, from an indicator. In this case we will get an indicator trailing. We can pass the value of one of the previous candles (for example, High, Low) - then we will get trailing by bar prices, etc. But the basic trailing algorithm remains unchanged.
Thus, in order to create any trailing stop algorithm, it is necessary to first create a simple trailing that allows us to pass the necessary prices for stop loss positions to it, and moves the StopLoss position to that level with all the necessary checks performed.
In the previous article, we already looked at included features, where there was a simple trailing, as well as trailings of various indicators. This approach allows us to connect a trailing stop to the EA to trail the positions of the current symbol. But it also has its limitations: we need to create an indicator in the EA and send its handle to the trailing function for each trailed indicator. The trailing functions themselves can only work with the positions of the current symbol.
If we use trailing classes, we can create multiple instances of one trailing class with different settings, and then all trails created in this way can work simultaneously in one EA according to a specific algorithm specified by the programmer. In other words, we create a custom trailing that is to work according to its own algorithm in a couple of code strings for each set of parameters. Each created trailing can be launched in the EA under certain conditions, creating complex algorithms for trailing StopLoss positions.
Even if we create two identical trailings for different symbols, then for each symbol a separate trailing will be created, which will work according to the data of the symbol that was specified when creating the trailing. This greatly simplifies the use of trailing in your programs: we only need to create a trailing with the required parameters and call it in the EA handlers. In fairness, it should be noted that this approach may not be optimal in some algorithms, since each type of trailing launches its own search of existing positions in the terminal. If we make a truly universal algorithm that uses the same list of terminal positions for each trailing, it may turn out that the costs of its design and development will not be comparable to its demand. Besides, this topic is beyond the scope of the article.
So, first we need to write the basics: a simple trailing stop class that moves the stop loss of positions to a specified price, while performing all the necessary checks.
In the previous article, this simple basic trailing was called TrailingStopByValue(). Here we will call it SimpleTrailing. It is to be fully used in custom programs.
As in the previous article, we will place all trailing classes in one file. Then this file is simply connected to the EA. Typically, include files are stored in the \MQL5\Include\ folder or in its subfolder.
Base trailing class
In the \MQL5\Include\ terminal folder, create the new Trailings\ subfolder containing the new class file named Trailings.mqh:
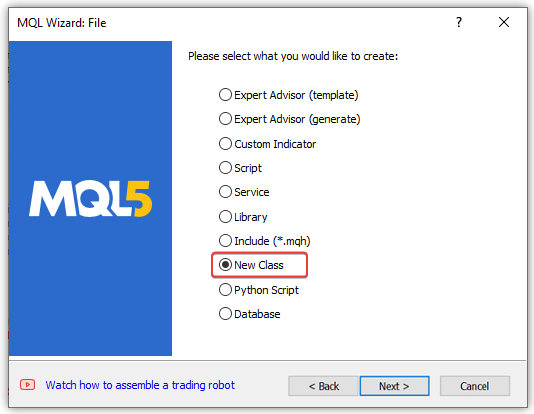
The class name should be CSimpleTrailing, the created file name is Trailings.mqh, while the class of the CObject Standard Library base object class should act as a base class:
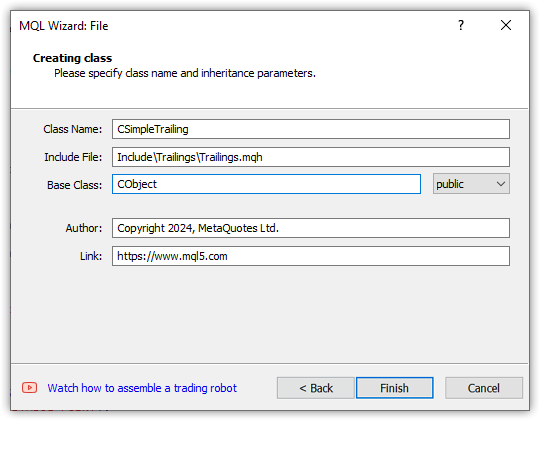
After the MQL wizard has completed its work, we get the following class template in the \MQL5\Include\Trailings\Trailings.mqh:
//+------------------------------------------------------------------+
//|                                                    Trailings.mqh |
//|                                  Copyright 2024, MetaQuotes Ltd. |
//|                                             https://www.mql5.com |
//+------------------------------------------------------------------+
#property copyright "Copyright 2024, MetaQuotes Ltd."
#property link      "https://www.mql5.com"
#property version   "1.00"
class CSimpleTrailing : public CObject
  {
private:

public:
                     CSimpleTrailing();
                    ~CSimpleTrailing();
  };
//+------------------------------------------------------------------+
//|                                                                  |
//+------------------------------------------------------------------+
CSimpleTrailing::CSimpleTrailing()
  {
  }
//+------------------------------------------------------------------+
//|                                                                  |
//+------------------------------------------------------------------+
CSimpleTrailing::~CSimpleTrailing()
  {
  }
//+------------------------------------------------------------------+
Include the file of the Standard Library basic object to the created file:
//+------------------------------------------------------------------+
//|                                                    Trailings.mqh |
//|                                  Copyright 2024, MetaQuotes Ltd. |
//|                                             https://www.mql5.com |
//+------------------------------------------------------------------+
#property copyright "Copyright 2024, MetaQuotes Ltd."
#property link      "https://www.mql5.com"
#property version   "1.00"

#include <Object.mqh>

//+------------------------------------------------------------------+
//| Class of the position StopLoss simple trailing                   |
//+------------------------------------------------------------------+
class CSimpleTrailing : public CObject
Why is it necessary to inherit all created trailing classes from the base object of the Standard Library?
This allows us to easily create trailing collections from these classes - place them in lists, search for the required objects in the lists, etc. In other words, if we just want to use future class objects as instances in EA files, then it is not necessary to inherit from CObject. But if we want to make full-fledged collections out of these classes and use all the possibilities of the Standard Library, then these classes should be derived from the CObject base class:
The CObject class is the base class for building the MQL5 standard library and provides all its descendants with the ability to be an element of a linked list.
In addition, a number of virtual methods are defined for further implementation in descendant classes.
Declare three methods in the private section of the class:
class CSimpleTrailing : public CObject
  {
private:
//--- check the criteria for modifying the StopLoss position and return the flag
   bool              CheckCriterion(ENUM_POSITION_TYPE pos_type, double pos_open, double pos_sl, double value_sl, MqlTick &tick);

//--- modify StopLoss of a position by its ticket
   bool              ModifySL(const ulong ticket, const double stop_loss);

//--- return StopLevel in points
   int               StopLevel(void);

protected:
The CheckCriterion() will return a flag that all necessary checks for modifying the StopLoss position have been successfully passed (or not).
The ModifySL() method will modify the stop loss of the position by the specified value.
The StopLevel() method will return the value of the symbol StopLevel property.
In the previous article, all these methods were separate functions. Now they will work as part of the base trailing class, from which we will then inherit other classes of other trailings.
Declare all the variables necessary for the class to work in the protected section of the class:
protected:
   string            m_symbol;                        // trading symbol
   long              m_magic;                         // EA ID
   double            m_point;                         // Symbol Point
   int               m_digits;                        // Symbol digits
   int               m_offset;                        // stop distance from price
   int               m_trail_start;                   // profit in points for launching trailing
   uint              m_trail_step;                    // trailing step
   uint              m_spread_mlt;                    // spread multiplier for returning StopLevel value
   bool              m_active;                        // trailing activity flag

//--- calculate and return the StopLoss level of the selected position
   virtual double    GetStopLossValue(ENUM_POSITION_TYPE pos_type, MqlTick &tick);

public:
Of all the variables declared here, only the "spread multiplier" requires explanation. The symbol StopLevel value is the distance to the current price, closer to which a stop loss cannot be placed. If the StopLevel value is set to zero on the server, this does not mean that there is no StopLevel. Instead, this means that the stop level is floating and is usually equal to two spreads. Or sometimes three. It all depends on the server settings. Therefore, here we can set this multiplier ourselves. If a double spread is used for the StopLevel value, the value in the m_spread_mlt variable is set to two (default). If it is a triple spread, then three, etc.
The GetStopLossValue() virtual method calculates and returns the StopLoss price for a position. In different types of trailing stops, the stop loss level, the position stop should be placed at is calculated differently. It is for this reason that this method is declared virtual and should be overridden in each inherited trailing class if the stop loss calculation in them differs from what will be written in this class method.
In the public section of the class, write the methods for setting and returning the values to the variables declared in the protected section of the class, as well as the class constructors and a destructor:
public:
//--- set trailing parameters
   void              SetSymbol(const string symbol)
                       {
                        this.m_symbol = (symbol==NULL || symbol=="" ? ::Symbol() : symbol);
                        this.m_point  =::SymbolInfoDouble(this.m_symbol, SYMBOL_POINT);
                        this.m_digits = (int)::SymbolInfoInteger(this.m_symbol, SYMBOL_DIGITS);
                       }
   void              SetMagicNumber(const long magic)       { this.m_magic = magic;       }
   void              SetStopLossOffset(const int offset)    { this.m_offset = offset;     }
   void              SetTrailingStart(const int start)      { this.m_trail_start = start; }
   void              SetTrailingStep(const uint step)       { this.m_trail_step = step;   }
   void              SetSpreadMultiplier(const uint value)  { this.m_spread_mlt = value;  }
   void              SetActive(const bool flag)             { this.m_active = flag;       }

//--- return trailing parameters
   string            Symbol(void)                     const { return this.m_symbol;       }
   long              MagicNumber(void)                const { return this.m_magic;        }
   int               StopLossOffset(void)             const { return this.m_offset;       }
   int               TrailingStart(void)              const { return this.m_trail_start;  }
   uint              TrailingStep(void)               const { return this.m_trail_step;   }
   uint              SpreadMultiplier(void)           const { return this.m_spread_mlt;   }
   bool              IsActive(void)                   const { return this.m_active;       }

//--- launch trailing with StopLoss offset from the price
   bool              Run(void);

//--- constructors
                     CSimpleTrailing() : m_symbol(::Symbol()), m_point(::Point()), m_digits(::Digits()),
                                         m_magic(-1), m_trail_start(0), m_trail_step(0), m_offset(0), m_spread_mlt(2) {}
                     CSimpleTrailing(const string symbol, const long magic,
                                     const int trailing_start, const uint trailing_step, const int offset);
//--- destructor
                    ~CSimpleTrailing() {}
  };
The class will have two constructors:
- The first (default) constructor uses the current symbol, the magic number is set to -1 (for all positions of the current symbol without exception), while the trailing parameters are set to zero.
- The second constructor will be parametric, where its formal parameters will pass a symbol name, position magic number and three trailing parameters - start, step and shift - to the constructor.
Let's consider the implementation of the parametric constructor:
//+------------------------------------------------------------------+
//| Parametric constructor                                           |
//+------------------------------------------------------------------+
CSimpleTrailing::CSimpleTrailing(const string symbol, const long magic,
                                 const int trail_start, const uint trail_step, const int offset) : m_spread_mlt(2)
  {
   this.SetSymbol(symbol);
   this.m_magic      = magic;
   this.m_trail_start= trail_start;
   this.m_trail_step = trail_step;
   this.m_offset     = offset;
  }
Unlike the default constructor, where the initialization string sets all variables to the current symbol value and zero values for the trailing parameters, here the constructor gets the values set to the corresponding variables. The SetSymbol() method sets values to several variables at once:
   void              SetSymbol(const string symbol)
                       {
                        this.m_symbol = (symbol==NULL || symbol=="" ? ::Symbol() : symbol);
                        this.m_point  =::SymbolInfoDouble(this.m_symbol, SYMBOL_POINT);
                        this.m_digits = (int)::SymbolInfoInteger(this.m_symbol, SYMBOL_DIGITS);
                       }
In both constructors, the spread multiplier is set to 2. If necessary, it can be changed using the SetSpreadMultiplier() method.
The virtual method that calculates and returns the StopLoss level of the selected position:
//+------------------------------------------------------------------+
//| Calculate and return the StopLoss level of the selected position |
//+------------------------------------------------------------------+
double CSimpleTrailing::GetStopLossValue(ENUM_POSITION_TYPE pos_type, MqlTick &tick)
  {
//--- calculate and return the StopLoss level depending on the position type
   switch(pos_type)
     {
      case POSITION_TYPE_BUY  :  return(tick.bid - this.m_offset * this.m_point);
      case POSITION_TYPE_SELL :  return(tick.ask + this.m_offset * this.m_point);
      default                 :  return 0;
     }
  }
Since this is a simple trailing, the stop loss of the position is always kept at a specified distance from the current price.
The calculated StopLoss values of the positions are returned from the method and then verified in the CheckCriterion() method:
//+------------------------------------------------------------------+
//|Check the StopLoss modification criteria and return a flag        |
//+------------------------------------------------------------------+
bool CSimpleTrailing::CheckCriterion(ENUM_POSITION_TYPE pos_type, double pos_open, double pos_sl, double value_sl, MqlTick &tick)
  {
//--- if the stop position and the stop level for modification are equal or a zero StopLoss is passed, return 'false'
   if(::NormalizeDouble(pos_sl - value_sl, this.m_digits) == 0 || value_sl==0)
      return false;

//--- trailing variables
   double trailing_step = this.m_trail_step * this.m_point;                      // convert the trailing step into price
   double stop_level    = this.StopLevel() * this.m_point;                       // convert the symbol StopLevel into price
   int    pos_profit_pt = 0;                                                     // position profit in points

//--- depending on the type of position, check the conditions for modifying StopLoss
   switch(pos_type)
     {
      //--- long position
      case POSITION_TYPE_BUY :
         pos_profit_pt = int((tick.bid - pos_open) / this.m_point);              // calculate the position profit in points
         if(tick.bid - stop_level > value_sl                                     // if the StopLoss level is lower than the price with the StopLevel level set down from it (the distance according to StopLevel is maintained)
            && pos_sl + trailing_step < value_sl                                 // if the StopLoss level exceeds the trailing step set upwards from the current position StopLoss
            && (this.m_trail_start == 0 || pos_profit_pt > this.m_trail_start)   // if we trail at any profit or position profit in points exceeds the trailing start, return 'true'
           )
            return true;
         break;

      //--- short position
      case POSITION_TYPE_SELL :
         pos_profit_pt = int((pos_open - tick.ask) / this.m_point);              // calculate the position profit in points
         if(tick.ask + stop_level < value_sl                                     // if the StopLoss level is higher than the price with the StopLevel level set upwards from it (the distance according to StopLevel is maintained)
            && (pos_sl - trailing_step > value_sl || pos_sl == 0)                // if the StopLoss level is below the trailing step set downwards from the current StopLoss or a position has no StopLoss
            && (this.m_trail_start == 0 || pos_profit_pt > this.m_trail_start)   // if we trail at any profit or position profit in points exceeds the trailing start, return 'true'
           )
            return true;
         break;

      //--- return 'false' by default
      default:
         break;
     }

//--- conditions are not met - return 'false'
   return false;
  }
If the StopLoss value passed to the method satisfies all the criteria of all filters, the method returns true and the position stop loss is modified using the ModifySL() method:
//+------------------------------------------------------------------+
//| Modify StopLoss of a position by ticket                          |
//+------------------------------------------------------------------+
bool CSimpleTrailing::ModifySL(const ulong ticket, const double stop_loss)
  {
//--- if the EA stop flag is set, report this in the journal and return 'false'
   if(::IsStopped())
     {
      Print("The Expert Advisor is stopped, trading is disabled");
      return false;
     }
//--- if failed to select a position by ticket, report this in the journal and return 'false'
   ::ResetLastError();
   if(!::PositionSelectByTicket(ticket))
     {
      ::PrintFormat("%s: Failed to select position by ticket number %I64u. Error %d", __FUNCTION__, ticket, ::GetLastError());
      return false;
     }

//--- declare the structures of the trade request and the request result
   MqlTradeRequest   request= {};
   MqlTradeResult    result = {};

//--- fill in the request structure
   request.action    = TRADE_ACTION_SLTP;
   request.symbol    = ::PositionGetString(POSITION_SYMBOL);
   request.magic     = ::PositionGetInteger(POSITION_MAGIC);
   request.tp        = ::PositionGetDouble(POSITION_TP);
   request.position  = ticket;
   request.sl        = ::NormalizeDouble(stop_loss, this.m_digits);

//--- if the trade operation could not be sent, report this to the journal and return 'false'
   if(!::OrderSend(request, result))
     {
      PrintFormat("%s: OrderSend() failed to modify position #%I64u. Error %d",__FUNCTION__, ticket, ::GetLastError());
      return false;
     }

//--- request to change StopLoss position successfully sent
   return true;
  }
To obtain the stop level, use the StopLevel() method:
//+------------------------------------------------------------------+
//| Return StopLevel in points                                       |
//+------------------------------------------------------------------+
int CSimpleTrailing::StopLevel(void)
  {
   int spread     = (int)::SymbolInfoInteger(this.m_symbol, SYMBOL_SPREAD);
   int stop_level = (int)::SymbolInfoInteger(this.m_symbol, SYMBOL_TRADE_STOPS_LEVEL);
   return int(stop_level == 0 ? spread * this.m_spread_mlt : stop_level);
  }
Since the stop level is not a constant value and can change dynamically, each time we call the method we request the required values from the symbol properties. If the StopLevel of a symbol is set to zero, then we use the value of the symbol spread multiplied by 2. This is the default value.
We have already implemented all three methods discussed above in the previous article as separate functions. Now these methods are hidden in the private section of the class and perform their functions without access to them from the outside.
The main trailing method is the Run() method, which starts the cycle of selecting positions and moving their stop levels to the calculated values:
//+------------------------------------------------------------------+
//| Launch simple trailing with StopLoss offset from the price       |
//+------------------------------------------------------------------+
bool CSimpleTrailing::Run(void)
  {
//--- if disabled, leave
   if(!this.m_active)
      return false;
//--- trailing variables
   MqlTick tick = {};                           // price structure
   bool    res  = true;                         // result of modification of all positions
//--- check the correctness of the data by symbol
   if(this.m_point==0)
     {
      //--- let's try to get the data again
      ::ResetLastError();
      this.SetSymbol(this.m_symbol);
      if(this.m_point==0)
        {
         ::PrintFormat("%s: Correct data was not received for the %s symbol. Error %d",__FUNCTION__, this.m_symbol, ::GetLastError());
         return false;
        }
     }

//--- in a loop by the total number of open positions
   int total =::PositionsTotal();
   for(int i = total - 1; i >= 0; i--)
     {
      //--- get the ticket of the next position
      ulong  pos_ticket =::PositionGetTicket(i);
      if(pos_ticket == 0)
         continue;

      //--- get the symbol and position magic
      string pos_symbol = ::PositionGetString(POSITION_SYMBOL);
      long   pos_magic  = ::PositionGetInteger(POSITION_MAGIC);

      //--- if the position does not match the filter by symbol and magic number, leave
      if((this.m_magic != -1 && pos_magic != this.m_magic) || (pos_symbol != this.m_symbol))
         continue;

      //--- if failed to get the prices, move on
      if(!::SymbolInfoTick(this.m_symbol, tick))
         continue;

      //--- get the position type, its opening price and StopLoss level
      ENUM_POSITION_TYPE pos_type = (ENUM_POSITION_TYPE)::PositionGetInteger(POSITION_TYPE);
      double             pos_open =::PositionGetDouble(POSITION_PRICE_OPEN);
      double             pos_sl   =::PositionGetDouble(POSITION_SL);

      //--- get the calculated StopLoss level
      double value_sl = this.GetStopLossValue(pos_type, tick);

      //--- if StopLoss modification conditions are suitable, modify the position stop level and add the result to the res variable
      if(this.CheckCriterion(pos_type, pos_open, pos_sl, value_sl, tick))
         res &=this.ModifySL(pos_ticket, value_sl);
     }
//--- at the end of the loop, return the result of modifying each position that matches the "symbol/magic" filter
   return res;
  }
The method goes through the positions in the list of the terminal active positions, sorts them by symbol and magic number and moves the stops of the positions to the calculated distance from the current price. The result of the StopLoss modification of each position is added to the res variable. At the end of the cycle of modification of stop levels of all positions, we either set true (if the stop levels of all positions matching the symbol/magic filter are successfully modified), or, if at least one position was not successfully modified, the flag will contain the false value. This is done for additional control over modification of stops from the outside.
Now let's connect this class to the EA to test its functionality.
To perform the test, use Moving Average.mq5 from the \MQL5\Experts\Examples\ terminal folder and save it as MovingAverageWithSimpleTrail.mq5.
Include the trailing class file to the EA, enter additional parameters into the settings and create an instance of a simple trailing class:
//+------------------------------------------------------------------+
//|                                 MovingAverageWithSimpleTrail.mq5 |
//|                             Copyright 2000-2024, MetaQuotes Ltd. |
//|                                             https://www.mql5.com |
//+------------------------------------------------------------------+
#property copyright "Copyright 2000-2024, MetaQuotes Ltd."
#property link      "https://www.mql5.com"
#property version   "1.00"

#include <Trade\Trade.mqh>
#include <Trailings\Trailings.mqh>

input group  " - Moving Averages Expert Parameters -"
input double MaximumRisk        = 0.02;    // Maximum Risk in percentage
input double DecreaseFactor     = 3;       // Descrease factor
input int    MovingPeriod       = 12;      // Moving Average period
input int    MovingShift        = 6;       // Moving Average shift

input group  " - Simple Trailing Parameters -"
input int   InpTrailingStart  =  10;      // Trailing start
input int   InpTrailingStep   =  20;      // Trailing step in points
input int   InpTrailingOffset =  30;      // Trailing offset in points
input bool  InpUseTrailing    =  true;    // Use Trailing Stop

//---
int    ExtHandle=0;
bool   ExtHedging=false;
CTrade ExtTrade;

CSimpleTrailing ExtTrailing;              // simple trailing class instance

#define MA_MAGIC 1234501
//+------------------------------------------------------------------+
In the OnInit() handler, set trailing parameters:
//+------------------------------------------------------------------+
//| Expert initialization function                                   |
//+------------------------------------------------------------------+
int OnInit(void)
  {
//--- prepare trade class to control positions if hedging mode is active
   ExtHedging=((ENUM_ACCOUNT_MARGIN_MODE)AccountInfoInteger(ACCOUNT_MARGIN_MODE)==ACCOUNT_MARGIN_MODE_RETAIL_HEDGING);
   ExtTrade.SetExpertMagicNumber(MA_MAGIC);
   ExtTrade.SetMarginMode();
   ExtTrade.SetTypeFillingBySymbol(Symbol());
//--- Moving Average indicator
   ExtHandle=iMA(_Symbol,_Period,MovingPeriod,MovingShift,MODE_SMA,PRICE_CLOSE);
   if(ExtHandle==INVALID_HANDLE)
     {
      printf("Error creating MA indicator");
      return(INIT_FAILED);
     }

//--- set trailing parameters
   ExtTrailing.SetActive(InpUseTrailing);
   ExtTrailing.SetSymbol(Symbol());
   ExtTrailing.SetMagicNumber(MA_MAGIC);
   ExtTrailing.SetTrailingStart(InpTrailingStart);
   ExtTrailing.SetTrailingStep(InpTrailingStep);
   ExtTrailing.SetStopLossOffset(InpTrailingOffset);
//--- ok
   return(INIT_SUCCEEDED);
  }
In the OnTick() handler, launch trailing:
//+------------------------------------------------------------------+
//| Expert tick function                                             |
//+------------------------------------------------------------------+
void OnTick(void)
  {
//---
   if(SelectPosition())
      CheckForClose();
   else
      CheckForOpen();

//--- launch trailing
   ExtTrailing.Run();
  }
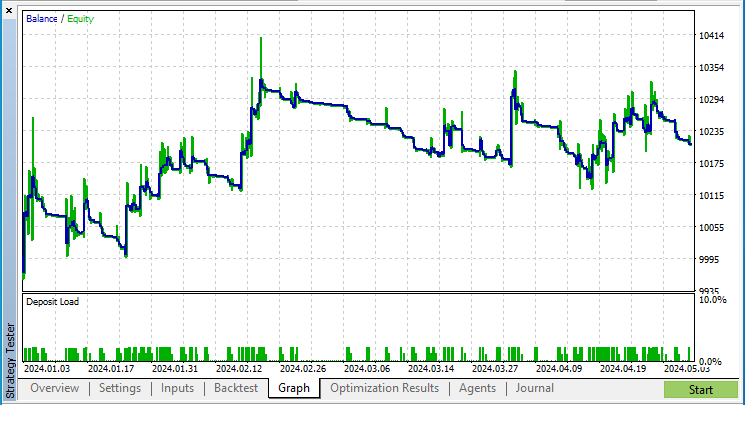
This is all that needs to be additionally entered into the EA file. Let's compile it and run it in the strategy tester on EURUSD M15, a single test for the last year. All ticks without execution delays.
The parameters are as follows (trailing disabled):
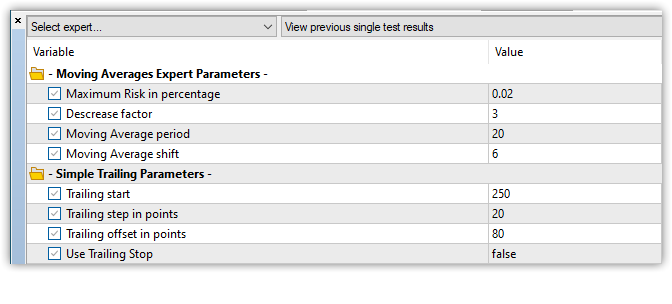
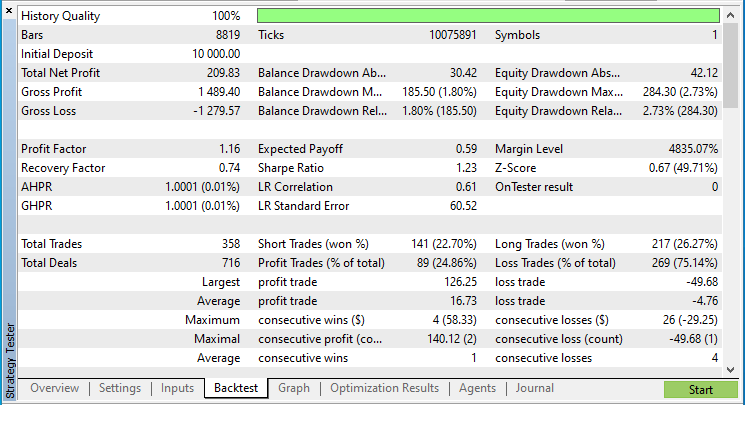
Let's run the test with trailing disabled and have a look at the result:
Now enable the use of trailing:
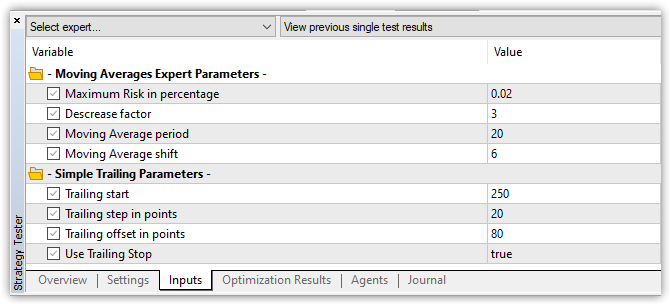
and run exactly the same test.
The test result is as follows:
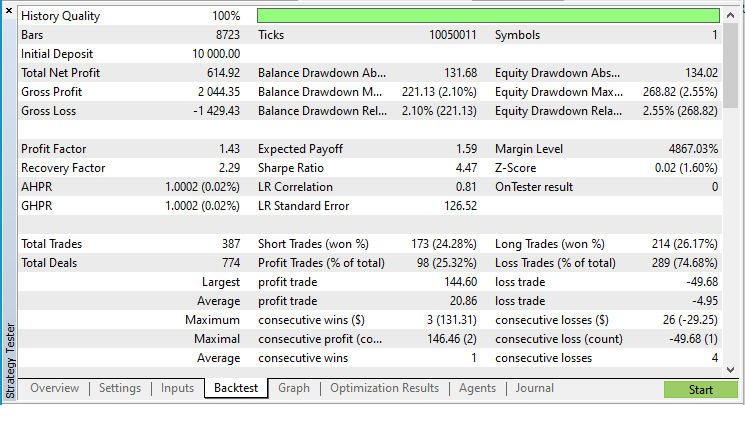
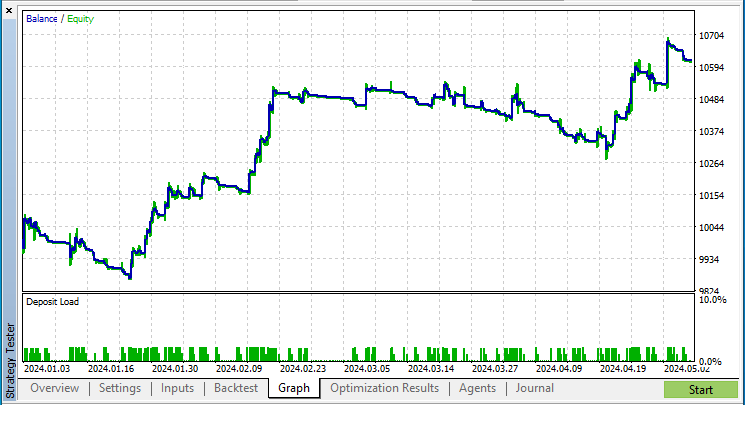
The result is slightly better. It is clear that trailing slightly improves the statistics on these settings.
Now, we can make any other trailings based on the simple trailing created.
Let's implement several indicator trailing classes, including Parabolic SAR and various moving averages from the list of trend-following indicators presented in the client terminal.
Trailing classes by indicators
Let's continue writing code in the same file. In case of indicator-based trailings, we need to create the necessary indicator. To do this, we need to specify a symbol and a timeframe used to build a data series. We also need to save the handle of the created indicator in a variable in order to access the indicator. Receiving data by handle does not depend on the indicator type — the data is obtained by the CopyBuffer(), while specifying the indicator by handle.
All actions for obtaining data from the indicator should be set in the indicator-based trailing classes. In this case, we have to set all these actions in each class of each trailing working on different indicators. This is possible, but not optimal. It is better to create a base class of indicator-based trailings, which will implement methods for obtaining data from an indicator by handle and will specify some variables that are the same for each indicator (symbol, timeframe, data timeseries index and indicator handle). The trailing classes themselves will be derived from the base one. Then the class structure will be organized. The base class will feature the access to the indicator data by handle, while the inherited class will contain the creation of the required indicator and handling its data.
Let's continue writing code in the Trailings.mqh file. Let's implement a basic class of indicator-based trailings:
//+------------------------------------------------------------------+
//| Base class of indicator-based trailings                          |
//+------------------------------------------------------------------+
class CTrailingByInd : public CSimpleTrailing
  {
protected:
   ENUM_TIMEFRAMES   m_timeframe;            // indicator timeframe
   int               m_handle;               // indicator handle
   uint              m_data_index;           // indicator data bar
   string            m_timeframe_descr;      // timeframe description

//--- return indicator data
   double            GetDataInd(void)              const { return this.GetDataInd(this.m_data_index); }

//--- calculate and return the StopLoss level of the selected position
   virtual double    GetStopLossValue(ENUM_POSITION_TYPE pos_type, MqlTick &tick);

public:
//--- set parameters
   void              SetTimeframe(const ENUM_TIMEFRAMES timeframe)
                       {
                        this.m_timeframe=(timeframe==PERIOD_CURRENT ? ::Period() : timeframe);
                        this.m_timeframe_descr=::StringSubstr(::EnumToString(this.m_timeframe), 7);
                       }
   void              SetDataIndex(const uint index)                  { this.m_data_index=index;       }

//--- return parameters
   ENUM_TIMEFRAMES   Timeframe(void)                           const { return this.m_timeframe;       }
   uint              DataIndex(void)                           const { return this.m_data_index;      }
   string            TimeframeDescription(void)                const { return this.m_timeframe_descr; }

//--- return indicator data from the specified timeseries index
   double            GetDataInd(const int index) const;

//--- constructors
                     CTrailingByInd(void) : CSimpleTrailing(::Symbol(), -1, 0, 0, 0), m_timeframe(::Period()),
                                            m_handle(INVALID_HANDLE), m_data_index(1), m_timeframe_descr(::StringSubstr(::EnumToString(::Period()), 7)) {}

                     CTrailingByInd(const string symbol, const ENUM_TIMEFRAMES timeframe, const long magic, const int trail_start, const uint trail_step, const int trail_offset) :
                                    CSimpleTrailing(symbol, magic, trail_start, trail_step, trail_offset), m_data_index(1), m_handle(INVALID_HANDLE)
                       {
                        this.SetTimeframe(timeframe);
                       }
//--- destructor
                    ~CTrailingByInd(void)
                       {
                        if(this.m_handle!=INVALID_HANDLE)
                          {
                           ::IndicatorRelease(this.m_handle);
                           this.m_handle=INVALID_HANDLE;
                          }
                       }
  };
The class is inherited from the simple trailing class, so all the functionality of this class is available in it, as well as the methods for accessing indicator data by handle.
In the protected section of the class, class variables are declared, a method for receiving data from the indicator by handle, and a virtual method for calculating StopLoss levels, which overrides the method of the same name in the parent class.
The public section of the class contains the methods for setting and getting the indicator properties, constructors and destructor.
A magic number with the value of -1 (all positions) and zero parameters for the trailing are passed to the parent class in the initialization string of the default constructor. The current chart timeframe is used for calculating the indicator.
In the parametric constructor, the symbol and period of the chart for calculating the indicator, and all the trailing parameters are passed in the formal parameters of the constructor.
In the class destructor, the calculation part of the indicator is released, while the value of INVALID_HANDLE is set in the variable storing the handle.
The method that returns indicator data from the specified timeseries index:
//+------------------------------------------------------------------+
//| Return indicator data from the specified timeseries index        |
//+------------------------------------------------------------------+
double CTrailingByInd::GetDataInd(const int index) const
  {
//--- if the handle is invalid, report this and return "empty value"
   if(this.m_handle==INVALID_HANDLE)
     {
      ::PrintFormat("%s: Error. Invalid handle",__FUNCTION__);
      return EMPTY_VALUE;
     }
//--- get the value of the indicator buffer by the specified index
   double array[1];
   ::ResetLastError();
   if(::CopyBuffer(this.m_handle, 0, index, 1, array)!=1)
     {
      ::PrintFormat("%s: CopyBuffer() failed. Error %d", __FUNCTION__, ::GetLastError());
      return EMPTY_VALUE;
     }
//--- return the received value
   return array[0];
  }
Use CopyBuffer() to get the value of a single indicator bar by the specified index and return it if received successfully. In case of an error, display a message in the journal and return an empty value (EMPTY_VALUE).
The CopyBuffer() function works with data from any indicator by its handle. Thus, this method is universal and is used without changes in each class of indicator-based trailings.
The virtual method that calculates and returns the StopLoss level of the selected position:
//+------------------------------------------------------------------+
//| Calculate and return the StopLoss level of the selected position |
//+------------------------------------------------------------------+
double CTrailingByInd::GetStopLossValue(ENUM_POSITION_TYPE pos_type, MqlTick &tick)
  {
//--- get the indicator value as a level for StopLoss
   double data=this.GetDataInd();

//--- calculate and return the StopLoss level depending on the position type
   switch(pos_type)
     {
      case POSITION_TYPE_BUY  :  return(data!=EMPTY_VALUE ? data - this.m_offset * this.m_point : tick.bid);
      case POSITION_TYPE_SELL :  return(data!=EMPTY_VALUE ? data + this.m_offset * this.m_point : tick.ask);
      default                 :  return 0;
     }
  }
In this method, namely in the parent class, we simply calculate the stop loss level offset from the price. In this same class of the method, it is necessary to receive data from the indicator and pass it as the StopLoss level. If the data has not been received from the indicator, the method will return the current price. This will prevent us from setting a position stop loss, since the StopLevel level will not allow us to set a stop level at the current price.
As a result, this class implements access to indicator data by its handle and calculation of the level for the StopLoss position by the indicator value, and all its methods will be available in child classes.
Now we can implement indicator-based trailing classes based on the created class.
Parabolic SAR trailing class
Let's continue writing code in the same file \MQL5\Include\Trailings\Trailings.mqh.
Like all other classes of the indicator-based trailings, the Parabolic SAR trailing class should be derived from the base class of the indicator-based trailings:
//+------------------------------------------------------------------+
//| Parabolic SAR position StopLoss trailing class                   |
//+------------------------------------------------------------------+
class CTrailingBySAR : public CTrailingByInd
  {
private:
   double            m_sar_step;             // Parabolic SAR Step parameter
   double            m_sar_max;              // Parabolic SAR Maximum parameter

public:
//--- set Parabolic SAR parameters
   void              SetSARStep(const double step)                   { this.m_sar_step=(step<0.0001 ? 0.0001 : step);   }
   void              SetSARMaximum(const double max)                 { this.m_sar_max =(max <0.0001 ? 0.0001 : max);    }

//--- return Parabolic SAR parameters
   double            SARStep(void)                             const { return this.m_sar_step;                          }
   double            SARMaximum(void)                          const { return this.m_sar_max;                           }

//--- create Parabolic SAR indicator and return the result
   bool              Initialize(const string symbol, const ENUM_TIMEFRAMES timeframe, const double sar_step, const double sar_maximum);

//--- constructors
                     CTrailingBySAR() : CTrailingByInd(::Symbol(), ::Period(), -1, 0, 0, 0)
                       {
                        this.Initialize(this.m_symbol, this.m_timeframe, 0.02, 0.2);
                       }

                     CTrailingBySAR(const string symbol, const ENUM_TIMEFRAMES timeframe, const long magic,
                                    const double sar_step, const double sar_maximum,
                                    const int trail_start, const uint trail_step, const int trail_offset);
//--- destructor
                    ~CTrailingBySAR(){}
  };
In the private section of the class, declare the variables to store the values of the Parabolic SAR indicator parameters.
The public section contains the methods for setting and returning the values of indicator properties. We declared the method for creating an indicator, and two constructors - the default and parametric ones.
In the constructor, by default, an indicator is created on the current symbol and chart period, while the trailing parameter values are set to zero.
In the parametric constructor, all parameters are passed through the constructor inputs, and then an indicator is created based on the parameters passed to the constructor:
//+------------------------------------------------------------------+
//| Parametric constructor                                           |
//+------------------------------------------------------------------+
CTrailingBySAR::CTrailingBySAR(const string symbol, const ENUM_TIMEFRAMES timeframe, const long magic,
                               const double sar_step, const double sar_maximum,
                               const int trail_start, const uint trail_step, const int trail_offset) :
                               CTrailingByInd(symbol, timeframe, magic, trail_start, trail_step, trail_offset)
  {
   this.Initialize(symbol, timeframe, sar_step, sar_maximum);
  }
The Initialize() method creates the Parabolic SAR indicator and returns the result of its creation:
//+------------------------------------------------------------------+
//| create Parabolic SAR indicator and return the result             |
//+------------------------------------------------------------------+
bool CTrailingBySAR::Initialize(const string symbol, const ENUM_TIMEFRAMES timeframe, const double sar_step, const double sar_maximum)
  {
   this.SetSymbol(symbol);
   this.SetTimeframe(timeframe);
   this.SetSARStep(sar_step);
   this.SetSARMaximum(sar_maximum);
   ::ResetLastError();
   this.m_handle=::iSAR(this.m_symbol, this.m_timeframe, this.m_sar_step, this.m_sar_max);
   if(this.m_handle==INVALID_HANDLE)
     {
      ::PrintFormat("Failed to create iSAR(%s, %s, %.3f, %.2f) handle. Error %d",
                    this.m_symbol, this.TimeframeDescription(), this.m_sar_step, this.m_sar_max, ::GetLastError());
     }
   return(this.m_handle!=INVALID_HANDLE);
  }
Let's test the created Parabolic SAR-based trailing class.
To perform the test, let's use the EA from the standard delivery \MQL5\Experts\Advisors\ExpertMACD.mq5, save it as ExpertMACDWithTrailingBySAR.mq5 and add the necessary code strings.
Include the file with trailing classes, add new inputs and declare the trailing class instance:
//+------------------------------------------------------------------+
//|                                                   ExpertMACD.mq5 |
//|                             Copyright 2000-2024, MetaQuotes Ltd. |
//|                                             https://www.mql5.com |
//+------------------------------------------------------------------+
#property copyright "Copyright 2000-2024, MetaQuotes Ltd."
#property link      "https://www.mql5.com"
#property version   "1.00"
//+------------------------------------------------------------------+
//| Include                                                          |
//+------------------------------------------------------------------+
#include <Expert\Expert.mqh>
#include <Expert\Signal\SignalMACD.mqh>
#include <Expert\Trailing\TrailingNone.mqh>
#include <Expert\Money\MoneyNone.mqh>

#include <Trailings\Trailings.mqh>

//+------------------------------------------------------------------+
//| Inputs                                                           |
//+------------------------------------------------------------------+
//--- inputs for expert
input group  " - ExpertMACD Parameters -"
input string Inp_Expert_Title            ="ExpertMACD";
int          Expert_MagicNumber          =10981;
bool         Expert_EveryTick            =false;
//--- inputs for signal
input int    Inp_Signal_MACD_PeriodFast  =12;
input int    Inp_Signal_MACD_PeriodSlow  =24;
input int    Inp_Signal_MACD_PeriodSignal=9;
input int    Inp_Signal_MACD_TakeProfit  =50;
input int    Inp_Signal_MACD_StopLoss    =20;

input group  " - Trailing By SAR Parameters -"
input ENUM_TIMEFRAMES   InpTimeframeSAR   =  PERIOD_CURRENT;   // Parabolic SAR Timeframe
input double            InpStepSAR        =  0.02;             // Parabolic SAR Step
input double            InpMaximumSAR     =  0.2;              // Parabolic SAR Maximum
input int               InpTrailingStart  =  0;                // Trailing Start
input uint              InpTrailingStep   =  0;                // Trailing Step
input int               InpTrailingOffset =  0;                // Trailing Offset
input bool              InpUseTrailing    =  true;             // Use Trailing Stop

//+------------------------------------------------------------------+
//| Global expert object                                             |
//+------------------------------------------------------------------+
CExpert ExtExpert;
CTrailingBySAR ExtTrailing;
In the OnInit() handler, initialize the parabolic-based trailing:
//+------------------------------------------------------------------+
//| Initialization function of the expert                            |
//+------------------------------------------------------------------+
int OnInit(void)
  {
//--- Initializing trailing
   if(ExtTrailing.Initialize(NULL,PERIOD_CURRENT,InpStepSAR,InpMaximumSAR))
     {
      ExtTrailing.SetMagicNumber(Expert_MagicNumber);
      ExtTrailing.SetTrailingStart(InpTrailingStart);
      ExtTrailing.SetTrailingStep(InpTrailingStep);
      ExtTrailing.SetStopLossOffset(InpTrailingOffset);
      ExtTrailing.SetActive(InpUseTrailing);
     }

//--- Initializing expert
In the OnTick() handler, put the trailing to work:
//+------------------------------------------------------------------+
//| Function-event handler "tick"                                    |
//+------------------------------------------------------------------+
void OnTick(void)
  {
   ExtExpert.OnTick();
   ExtTrailing.Run();
  }
Let's compile the EA and run it in the tester with default parameters:

As we can see, the stop levels of positions are correctly trailed by the values of the Parabolic SAR first bar.
Now let's create trailing classes for various moving averages presented in the client terminal.
Moving Averages trailing classes
These classes differ from the Parabolic SAR trailing class only in the set of inputs and in the fact that the Initialize() method creates an indicator corresponding to the class.
Based on this, we will consider only one class: the trailing class based on the adaptive moving average:
//+------------------------------------------------------------------+
//| Adaptive Moving Average position StopLoss trailing class         |
//+------------------------------------------------------------------+
class CTrailingByAMA : public CTrailingByInd
  {
private:
   int               m_period;               // Period AMA parameter
   int               m_fast_ema;             // Fast EMA Period parameter
   int               m_slow_ema;             // Slow EMA Period parameter
   int               m_shift;                // Shift AMA parameter
   ENUM_APPLIED_PRICE m_price;               // Applied Price AMA parameter

public:
//--- set AMA parameters
   void              SetPeriod(const uint period)                    { this.m_period=int(period<1 ? 9 : period);     }
   void              SetFastEMAPeriod(const uint period)             { this.m_fast_ema=int(period<1 ? 2 : period);   }
   void              SetSlowEMAPeriod(const uint period)             { this.m_slow_ema=int(period<1 ? 30 : period);  }
   void              SetShift(const int shift)                       { this.m_shift = shift;                         }
   void              SetPrice(const ENUM_APPLIED_PRICE price)        { this.m_price = price;                         }

//--- return AMA parameters
   int               Period(void)                              const { return this.m_period;                         }
   int               FastEMAPeriod(void)                       const { return this.m_fast_ema;                       }
   int               SlowEMAPeriod(void)                       const { return this.m_slow_ema;                       }
   int               Shift(void)                               const { return this.m_shift;                          }
   ENUM_APPLIED_PRICE Price(void)                              const { return this.m_price;                          }

//--- create AMA indicator and return the result
   bool              Initialize(const string symbol, const ENUM_TIMEFRAMES timeframe,
                                const int period, const int fast_ema, const int slow_ema, const int shift, const ENUM_APPLIED_PRICE price);

//--- constructors
                     CTrailingByAMA() : CTrailingByInd(::Symbol(), ::Period(), -1, 0, 0, 0)
                       {
                        this.Initialize(this.m_symbol, this.m_timeframe, 9, 2, 30, 0, PRICE_CLOSE);
                       }

                     CTrailingByAMA(const string symbol, const ENUM_TIMEFRAMES timeframe, const long magic,
                                    const int period, const int fast_ema, const int slow_ema, const int shift, const ENUM_APPLIED_PRICE price,
                                    const int trail_start, const uint trail_step, const int trail_offset);
//--- destructor
                    ~CTrailingByAMA(){}
  };
//+------------------------------------------------------------------+
//| Parametric constructor                                           |
//+------------------------------------------------------------------+
CTrailingByAMA::CTrailingByAMA(const string symbol, const ENUM_TIMEFRAMES timeframe, const long magic,
                               const int period, const int fast_ema, const int slow_ema, const int shift, const ENUM_APPLIED_PRICE price,
                               const int trail_start, const uint trail_step, const int trail_offset) :
                               CTrailingByInd(symbol, timeframe, magic, trail_start, trail_step, trail_offset)
  {
   this.Initialize(symbol, timeframe, period, fast_ema, slow_ema, shift, price);
  }
//+------------------------------------------------------------------+
//| create AMA indicator and return the result                       |
//+------------------------------------------------------------------+
bool CTrailingByAMA::Initialize(const string symbol, const ENUM_TIMEFRAMES timeframe,
                                const int period, const int fast_ema, const int slow_ema, const int shift, const ENUM_APPLIED_PRICE price)
  {
   this.SetSymbol(symbol);
   this.SetTimeframe(timeframe);
   this.SetPeriod(period);
   this.SetFastEMAPeriod(fast_ema);
   this.SetSlowEMAPeriod(slow_ema);
   this.SetShift(shift);
   this.SetPrice(price);
   ::ResetLastError();
   this.m_handle=::iAMA(this.m_symbol, this.m_timeframe, this.m_period, this.m_fast_ema, this.m_slow_ema, this.m_shift, this.m_price);
   if(this.m_handle==INVALID_HANDLE)
     {
      ::PrintFormat("Failed to create iAMA(%s, %s, %d, %d, %d, %s) handle. Error %d",
                    this.m_symbol, this.TimeframeDescription(), this.m_period, this.m_fast_ema, this.m_slow_ema,
                    ::StringSubstr(::EnumToString(this.m_price),6), ::GetLastError());
     }
   return(this.m_handle!=INVALID_HANDLE);
  }
The class is absolutely identical to the above-mentioned Parabolic SAR-based trailing class. Each MA-based trailing class is to feature its own set of variables for storing indicator parameters, as well as the methods for setting and returning the values corresponding to these variables. All MA-based trailing classes are identical. You can study them by looking at the codes in the Trailings.mqh file attached below. You can test the MA-based trailing class by launching the test EA from the ExpertMACDWithTrailingByMA.mq5 file, which is also attached below.
We have created classes of simple trailing and trailings based on standard indicators provided in the terminal and suitable for indicating levels for placing position StopLoss.
But these are not all trailing types that can be created using the presented classes. There are trailings that move position stop levels to specific price levels specified separately for long and short positions. An example of such a trailing can be a trailing based on High/Low candles, or, for instance, on the fractal indicator.
To implement such a trailing, we should be able to specify a separate level for setting a stop loss for each position type. Let's create such a class.
Trailing the specified StopLoss levels
All that needs to be done to create a trailing based on the specified values is to define variables instead of indicator parameters to set stop loss values for long and short positions. And instead of getting data from the indicator, we just need to calculate the values for StopLoss positions from the values specified in these variables. The values are to be set into the variables from the control program directly when calling the trailing Run() method.
Let's implement the following class:
//+------------------------------------------------------------------+
//| Trailing class based on a specified value                        |
//+------------------------------------------------------------------+
class CTrailingByValue : public CSimpleTrailing
  {
protected:
   double            m_value_sl_long;     // StopLoss level for long positions
   double            m_value_sl_short;    // StopLoss level for short positions

//--- calculate and return the StopLoss level of the selected position
   virtual double    GetStopLossValue(ENUM_POSITION_TYPE pos_type, MqlTick &tick);

public:
//--- return StopLoss level for (2) long and (2) short positions
   double            StopLossValueLong(void)    const { return this.m_value_sl_long;   }
   double            StopLossValueShort(void)   const { return this.m_value_sl_short;  }

//--- launch trailing with the specified StopLoss offset from the price
   bool              Run(const double value_sl_long, double value_sl_short);

//--- constructors
                     CTrailingByValue(void) : CSimpleTrailing(::Symbol(), -1, 0, 0, 0), m_value_sl_long(0), m_value_sl_short(0) {}

                     CTrailingByValue(const string symbol, const long magic, const int trail_start, const uint trail_step, const int trail_offset) :
                                      CSimpleTrailing(symbol, magic, trail_start, trail_step, trail_offset), m_value_sl_long(0), m_value_sl_short(0) {}
//--- destructor
                    ~CTrailingByValue(void){}
  };
It is clear that the class is almost identical to all the classes of indicator-based trailing stops. But there is no Initialize() method here, since no indicator needs to be created.
In the virtual method that calculates and returns the StopLoss level of the selected position, the values for StopLoss are calculated from the set levels for long and short position stop levels:
//+------------------------------------------------------------------+
//| Calculate and return the StopLoss level of the selected position |
//+------------------------------------------------------------------+
double CTrailingByValue::GetStopLossValue(ENUM_POSITION_TYPE pos_type, MqlTick &tick)
  {
//--- calculate and return the StopLoss level depending on the position type
   switch(pos_type)
     {
      case POSITION_TYPE_BUY  :  return(this.m_value_sl_long  - this.m_offset * this.m_point);
      case POSITION_TYPE_SELL :  return(this.m_value_sl_short + this.m_offset * this.m_point);
      default                 :  return 0;
     }
  }
Stop loss values for long and short positions are passed to the class using the Run() method formal parameters:
//+------------------------------------------------------------------+
//| Launch trailing with the specified StopLoss offset from the price|
//+------------------------------------------------------------------+
bool CTrailingByValue::Run(const double value_sl_long, double value_sl_short)
  {
   this.m_value_sl_long =value_sl_long;
   this.m_value_sl_short=value_sl_short;
   return CSimpleTrailing::Run();
  }
First, the values passed in the formal parameters are set to the class member variables, and then the Run() method of the parent class is called. The re-defined GetStopLossValue() virtual method is called from the parent class, while the position stop levels are set to the values calculated in it.
Connecting a trailing stop to an EA
We have already discussed how to connect a trailing to an EA above when testing indicator-based trailings. Let's now consider how to connect and launch a trailing based on the values passed to it, namely, the candle High and Low.
Include trailing to the EA from the standard delivery \MQL5\Experts\Advisors\ExpertMACD.mq5. Save it as ExpertMACDWithTrailingByValue.mq5 and make the necessary improvements.
nclude the file with trailing classes to the EA, add trailing setup inputs and declare the value-based trailing class instance:
//+------------------------------------------------------------------+
//|                                                   ExpertMACD.mq5 |
//|                             Copyright 2000-2024, MetaQuotes Ltd. |
//|                                             https://www.mql5.com |
//+------------------------------------------------------------------+
#property copyright "Copyright 2000-2024, MetaQuotes Ltd."
#property link      "https://www.mql5.com"
#property version   "1.00"
//+------------------------------------------------------------------+
//| Include                                                          |
//+------------------------------------------------------------------+
#include <Expert\Expert.mqh>
#include <Expert\Signal\SignalMACD.mqh>
#include <Expert\Trailing\TrailingNone.mqh>
#include <Expert\Money\MoneyNone.mqh>

#include <Trailings\Trailings.mqh>

//+------------------------------------------------------------------+
//| Inputs                                                           |
//+------------------------------------------------------------------+
//--- inputs for expert
input group  " - ExpertMACD Parameters -"
input string Inp_Expert_Title            ="ExpertMACD";
int          Expert_MagicNumber          =10981;
bool         Expert_EveryTick            =false;
//--- inputs for signal
input int    Inp_Signal_MACD_PeriodFast  =12;
input int    Inp_Signal_MACD_PeriodSlow  =24;
input int    Inp_Signal_MACD_PeriodSignal=9;
input int    Inp_Signal_MACD_TakeProfit  =50;
input int    Inp_Signal_MACD_StopLoss    =20;

input group  " - Trailing By Value Parameters -"
input ENUM_TIMEFRAMES   InpTimeframe      =  PERIOD_CURRENT;   // Data Rates Timeframe
input uint              InpDataRatesIndex =  2;                // Data Rates Index for StopLoss
input uint              InpTrailingStep   =  0;                // Trailing Step
input int               InpTrailingStart  =  0;                // Trailing Start
input int               InpTrailingOffset =  0;                // Trailing Offset
input bool              InpUseTrailing    =  true;             // Use Trailing Stop

//+------------------------------------------------------------------+
//| Global expert object                                             |
//+------------------------------------------------------------------+
CExpert ExtExpert;
CTrailingByValue ExtTrailing;
The Data Rates Timeframe input is a period of the chart, from which High prices for short position stop levels and Low prices for long position stop levels are taken.
The Data Rates Index for StopLoss input is a bar index on the chart with the Data Rates Timeframe period, from which High and Low prices are to be taken to set position StopLoss.
In the EA OnInit() handler, initialize trailing parameters:
//+------------------------------------------------------------------+
//| Initialization function of the expert                            |
//+------------------------------------------------------------------+
int OnInit(void)
  {
//--- Initializing trailing
   ExtTrailing.SetMagicNumber(Expert_MagicNumber);
   ExtTrailing.SetTrailingStart(InpTrailingStart);
   ExtTrailing.SetTrailingStep(InpTrailingStep);
   ExtTrailing.SetStopLossOffset(InpTrailingOffset);
   ExtTrailing.SetActive(InpUseTrailing);

//--- Initializing expert
Only stop levels of positions whose magic number matches the EA one are to be trailed. In other words, we trail only positions opened by the EA.
In the EA OnTick() handler, get the bar data with the index specified in the InpDataRatesIndex input and launch trailing while specifying StopLoss prices (bar High and Low) for long and short positions:
//+------------------------------------------------------------------+
//| Function-event handler "tick"                                    |
//+------------------------------------------------------------------+
void OnTick(void)
  {
   ExtExpert.OnTick();
   MqlRates rates[1]={};
   if(CopyRates(ExtTrailing.Symbol(),InpTimeframe,InpDataRatesIndex,1,rates))
      ExtTrailing.Run(rates[0].low,rates[0].high);
  }
That is all we need to do to connect trailing to the EA. As you may have already noticed, the only difference when connecting different trailings to EA is in declaring instances of different trailing types. All other steps to connect trailings are almost identical and should not raise any questions or doubts.
Let's compile the EA and run it in the visual tester mode with default settings:
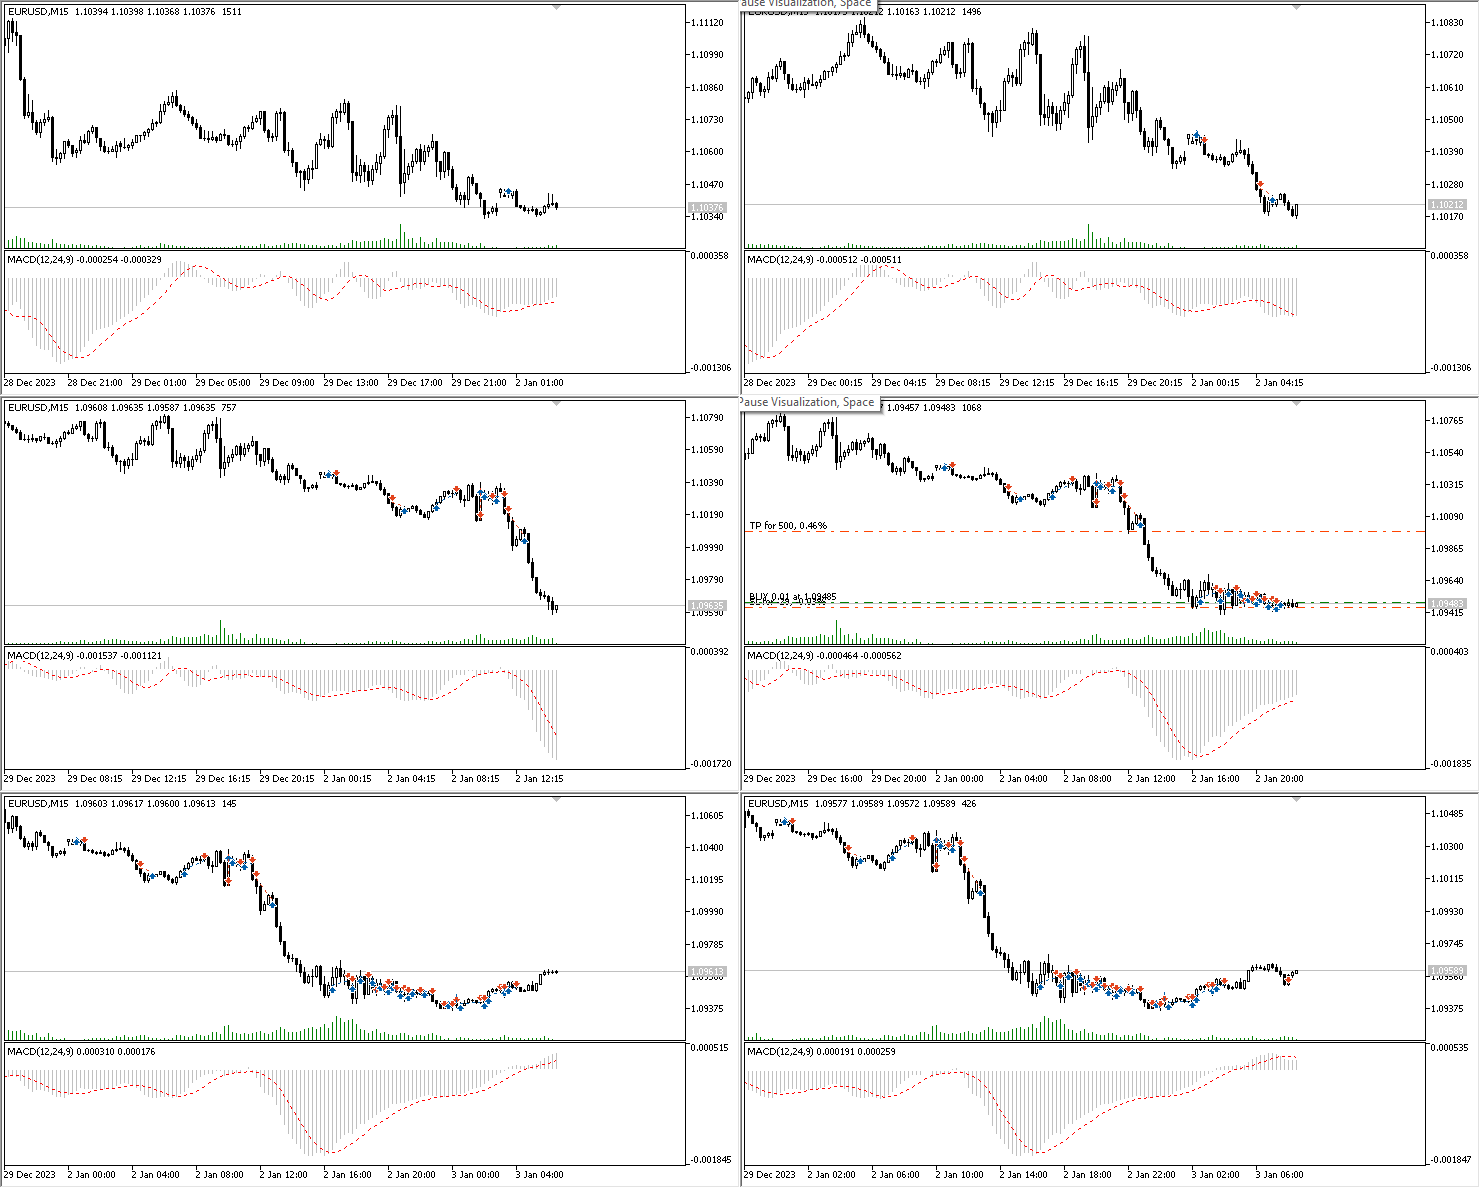
We can see how stop positions are set to the High and Low values of candles having their index in timeseries 2.
To what extent such a trailing can provide a win in a trading system is a subject for independent testing.
In addition, everyone can create a custom trailing stop according to their own algorithm using the classes presented in the article. There is a lot of scope for research here which is almost unlimited.
Conclusion
In this article, we have created classes of various trailing stops that allow us to easily include a trailing stop to any EA. The classes created are also a good set of tools for implementing trailing stops using custom algorithms.
The examples only covered one way of working with class objects - creating an instance of a trailing class object. This approach makes it possible to determine in advance in the program what types of trailing will be required and what parameters the trailing should have. For each trailing, one object is created in the global area. This approach has the right to be used - it is simple and clear. But in order to make a dynamic creation of trailing objects using the 'new' object creation operator right during the program execution, it is better to take advantage of the opportunities provided by the Standard Library to create linked object lists. For these purposes, all trailing classes are derived from the CObject Standard Library base object. This approach can be discussed in the comments, as it is beyond the scope of the current topic.
All classes presented in the article can be used "as is" in your own developments, or you can modify them to suit your needs and tasks.
Translated from Russian by MetaQuotes Ltd.
Original article: https://www.mql5.com/ru/articles/14862
Warning: All rights to these materials are reserved by MetaQuotes Ltd. Copying or reprinting of these materials in whole or in part is prohibited.
This article was written by a user of the site and reflects their personal views. MetaQuotes Ltd is not responsible for the accuracy of the information presented, nor for any consequences resulting from the use of the solutions, strategies or recommendations described.
 Example of new Indicator and Conditional LSTM
 Multiple Symbol Analysis With Python And MQL5 (Part I): NASDAQ Integrated Circuit Makers
 Building A Candlestick Trend Constraint Model (Part 9): Multiple Strategies Expert Advisor (I)
 Comet Tail Algorithm (CTA)
- Free trading apps
- Over 8,000 signals for copying
- Economic news for exploring financial markets
You agree to website policy and terms of use
To do this, you need to maintain virtual positions in the robot. And set stops with pending orders.
To do this, it is necessary to maintain virtual positions in the robot. And set stops with pending orders.
I know that, I have virtual positions and stops.
But most of the forex code that is posted here is not suitable for such work (in particular, on MOEX).
See how I control the closing condition:
Here PSAR is used not to set a moving SL but to give a signal, but the essence is the same.
PSAR: And here it's good to add such thing as spread.... for forex usually the price is drawn by BID and for long positions everything will work +-:))), but short positions on the same Parabolic will be closed by ASK, and this on the thin market is fraught with closing of the deal, although the indicator will show that there is no closing.... and MA will have the same effect....