

From Basic to Intermediate: Object Events (III)
 1 022
1 022
 0
0

Introduction
In the previous article From Basic to Intermediate: Object Events (II) we showed how to implement a very interesting, and even rather curious, type of application whose purpose is to let users edit the text of an OBJ_LABEL object directly on the chart, without opening the Object Properties dialog and editing the displayed text there.
Although that was very interesting and useful from both a practical and educational point of view, we can do something even more interesting than what was shown in the previous article. I think you, dear reader, have probably tested it and may even have wondered whether that same application could be extended to cover any OBJ_LABEL object, not just the one we created in our program. For that reason, I decided to show how this can be done. This can become a truly interesting solution precisely because of another point we will examine later.
As usual, let us move on to the first topic of this article. So it is time to put aside anything that may distract you and focus on what we will cover here, because we will examine several very interesting points.
Improving What Was Already Good
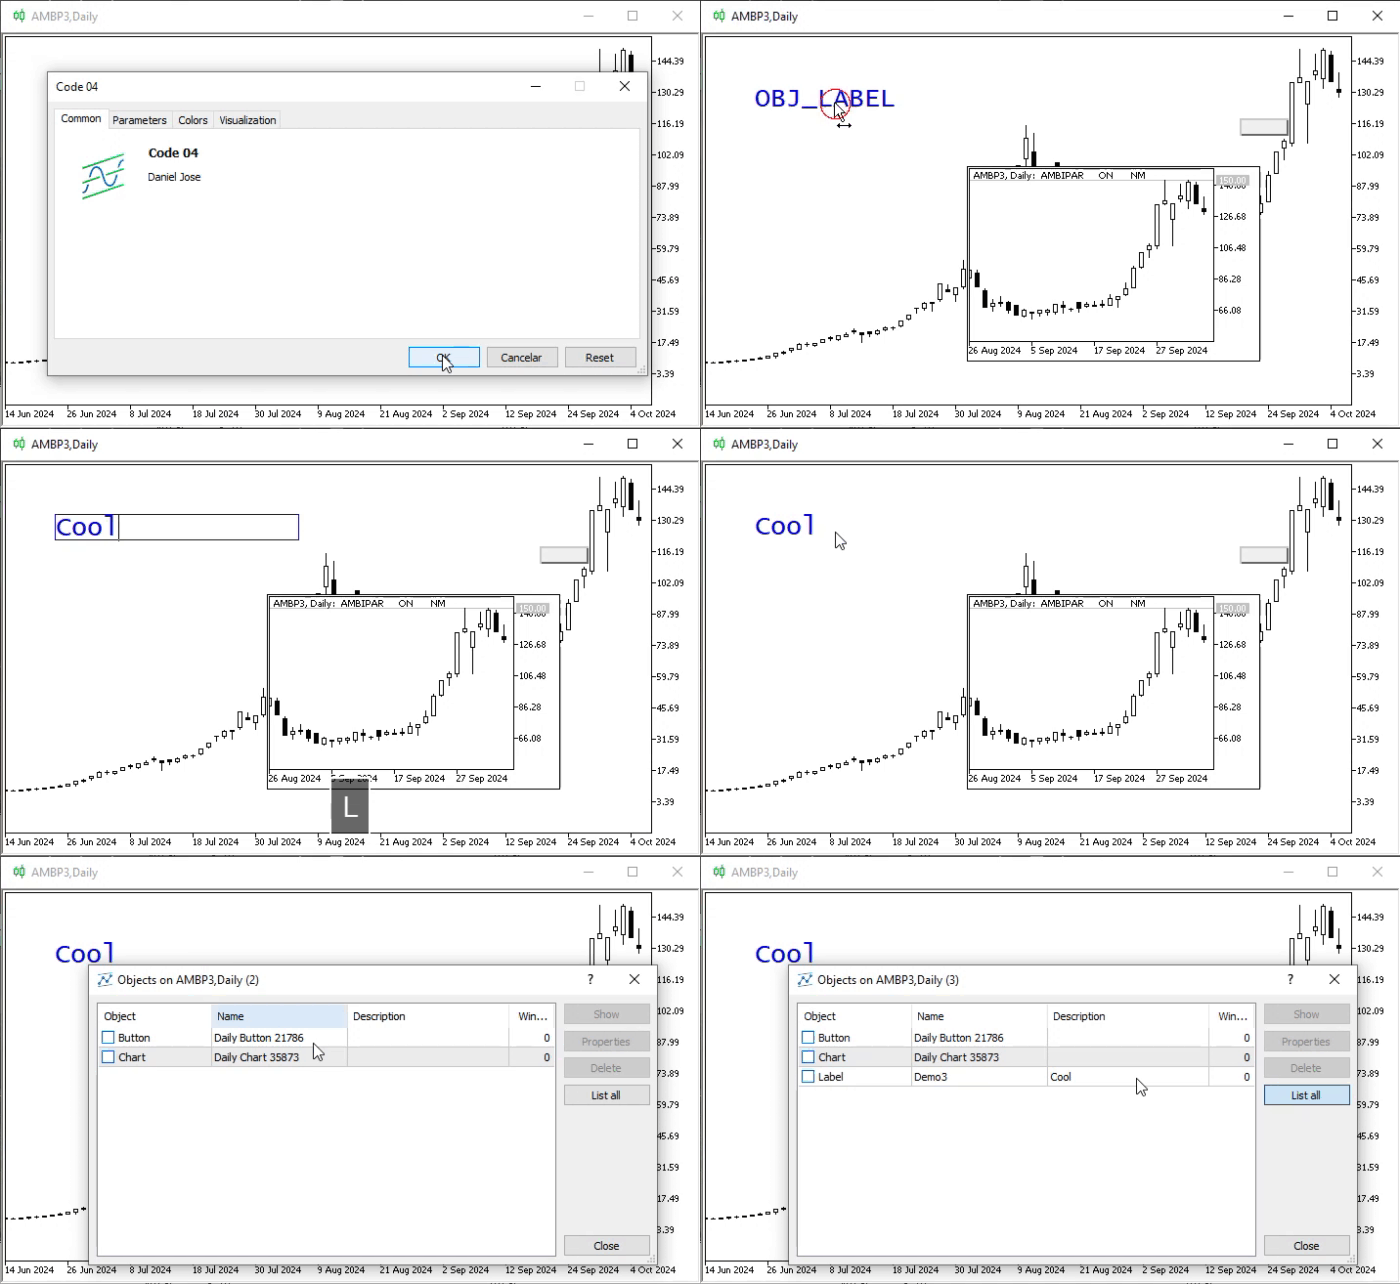
So, in the previous article, we saw that it is possible to do what is shown in the following animation.
Animation 01
This makes it possible to implement a mechanism for directly editing the text contained in an OBJ_LABEL object on the chart. However, if we try to add a new OBJ_LABEL manually, we will see that what is shown in Animation 01 is impossible. Why? The reason lies in the filters used when processing events. In a sense, at first, simply removing the filters would indeed solve the problem. Of course, initially it would. But if we try to do this, we will notice that the application starts going a little crazy.
For this reason, we will quickly show how the source code from the previous article should be changed in order to use the mechanism from Animation 01 to edit any OBJ_LABEL object.
This may seem complicated, but in fact everything is much simpler than it looks, provided, of course, that certain precautions are taken when changing the code. Most of what needs to be done has already been explained in previous articles, so we will focus only on what really matters. This is shown below:
01. //+------------------------------------------------------------------+
02. #property copyright "Daniel Jose"
03. //+------------------------------------------------------------------+
04. int OnInit()
05. {
06.     return INIT_SUCCEEDED;
07. };
08. //+------------------------------------------------------------------+
09. int OnCalculate(const int rates_total, const int prev_calculated, const int begin, const double &price[])
10. {
11.     return rates_total;
12. };
13. //+------------------------------------------------------------------+
14. void OnChartEvent(const int id, const long &lparam, const double &dparam, const string &sparam)
15. {
16.     switch (id)
17.     {
18.         case CHARTEVENT_OBJECT_CLICK    :
19.             if ((ENUM_OBJECT)ObjectGetInteger(0, sparam, OBJPROP_TYPE) == OBJ_LABEL) Swap_ObjLabel_ObjEdit(sparam);
20.             break;
21.         case CHARTEVENT_OBJECT_ENDEDIT  :
22.             Swap_ObjLabel_ObjEdit(sparam);
23.             break;
24.     }
25.     ChartRedraw();
26. };
27. //+------------------------------------------------------------------+
28. void Swap_ObjLabel_ObjEdit(const string szName)
29. {
30.     struct st_Mem
31.     {
32.         string  font, text;
33.         int     x, y, w, h, fontSize;
34.         color   cor;
35.     }mem;
36.     ENUM_OBJECT type = (ENUM_OBJECT)ObjectGetInteger(0, szName, OBJPROP_TYPE) == OBJ_EDIT ? OBJ_LABEL : OBJ_EDIT;
37.
38.     mem.font        = ObjectGetString(0, szName, OBJPROP_FONT);
39.     mem.x           = (int)ObjectGetInteger(0, szName, OBJPROP_XDISTANCE);
40.     mem.y           = (int)ObjectGetInteger(0, szName, OBJPROP_YDISTANCE);
41.     mem.w           = (int)ObjectGetInteger(0, szName, OBJPROP_XSIZE);
42.     mem.h           = (int)ObjectGetInteger(0, szName, OBJPROP_YSIZE);
43.     mem.fontSize    = (int)ObjectGetInteger(0, szName, OBJPROP_FONTSIZE);
44.     mem.cor         = (color)ObjectGetInteger(0, szName, OBJPROP_COLOR);
45.     mem.text        = ObjectGetString(0, szName, OBJPROP_TEXT);
46.
47.     ObjectDelete(0, szName);
48.     ChartRedraw();
49.     ObjectCreate(0, szName, type, 0, 0, 0);
50.
51.     ObjectSetInteger(0, szName, OBJPROP_SELECTABLE, (type != OBJ_EDIT ? true : false));
52.     ObjectSetInteger(0, szName, OBJPROP_XDISTANCE, mem.x);
53.     ObjectSetInteger(0, szName, OBJPROP_YDISTANCE, mem.y);
54.     ObjectSetInteger(0, szName, OBJPROP_XSIZE, mem.w);
55.     ObjectSetInteger(0, szName, OBJPROP_YSIZE, mem.h);
56.     ObjectSetInteger(0, szName, OBJPROP_COLOR, mem.cor);
57.     ObjectSetInteger(0, szName, OBJPROP_FONTSIZE, mem.fontSize);
58.     ObjectSetString(0, szName, OBJPROP_FONT, mem.font);
59.     ObjectSetString(0, szName, OBJPROP_TEXT, mem.text);
60.     if (type == OBJ_EDIT)
61.     {
62.         ObjectSetInteger(0, szName, OBJPROP_BGCOLOR, clrWhite);
63.         ObjectSetInteger(0, szName, OBJPROP_READONLY, false);
64.     }
65. }
66. //+------------------------------------------------------------------+
Code 01
Now I want you to look at Code 01 and tell me: what is difficult about it? If you have been following this series of articles, while also studying and applying the material in practice, your answer will probably be: "There is nothing difficult here; everything is very simple and clear." Dear reader, Code 01 is so simple and clear that I see no need to explain how it works. However, there is a small problem here. Nothing complicated. But before showing how to fix it, let us see what happens when Code 01 is applied to any chart. To do this, we will perform a short sequence of steps, starting with the first one shown below.
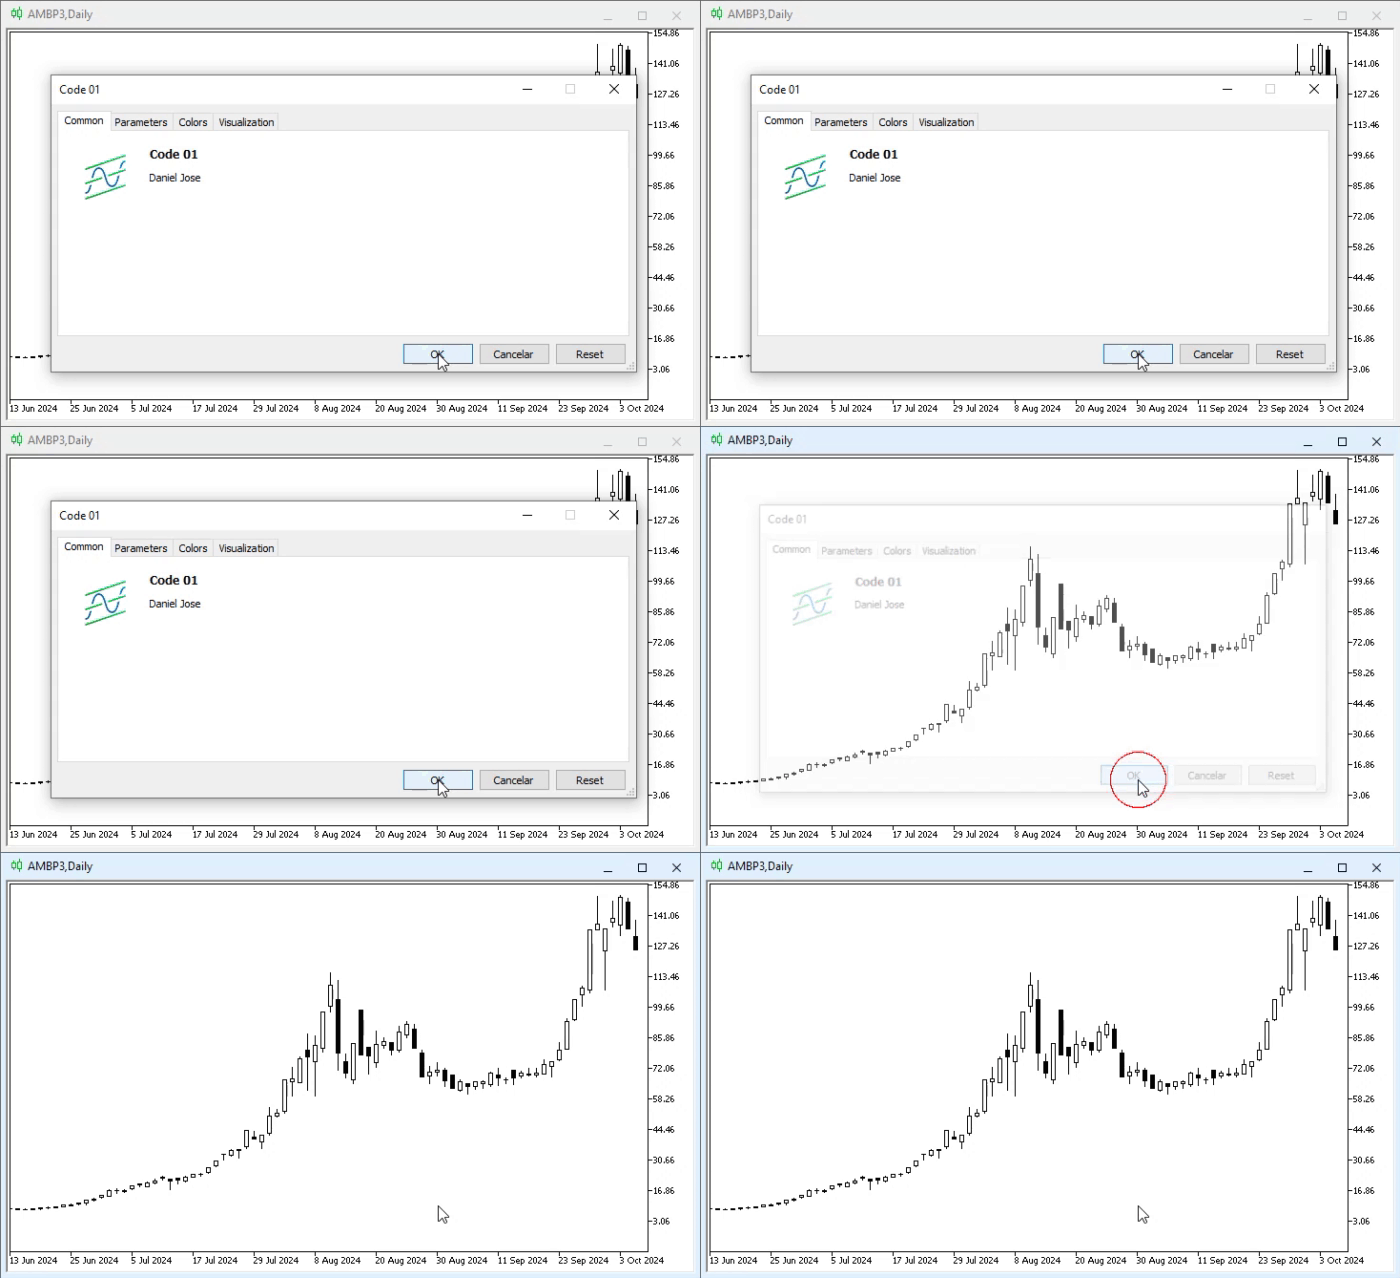
Animation 02
In Animation 02, we added only Code 01 to the chart. Notice that nothing happened, since the goal is not to create anything, but to work with something that has already been created. Immediately after that, we will add several OBJ_LABEL objects. To do this, we use what is shown next:
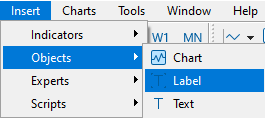
Figure 01
This image shows how to add objects of the required type to the chart. Add as many as you want. In this case, I will add only two, because the goal is precisely to show the existing flaw. The chart will then look like this:
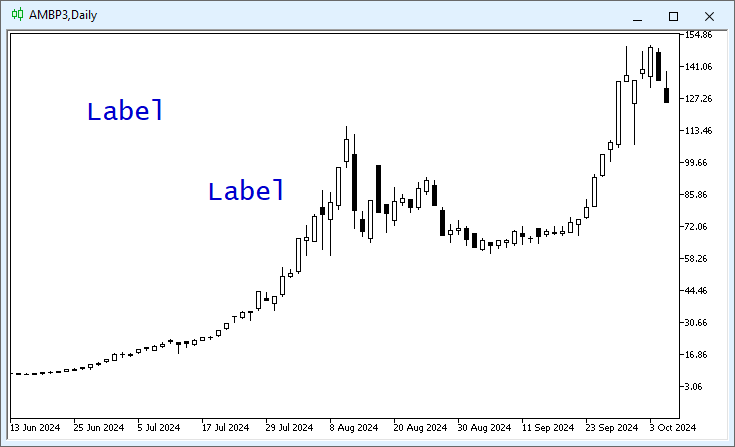
Figure 02
Excellent. Now we come to the part where everything starts to make sense. Once the application is running on the chart and we have an object of the correct type, we will no longer be able to do everything as before. This is because, when we click one of the OBJ_LABEL objects, it is converted into an OBJ_EDIT object, allowing us to directly enter the displayed text. And all of this happens without having to open the Object Properties dialog for the OBJ_LABEL object.
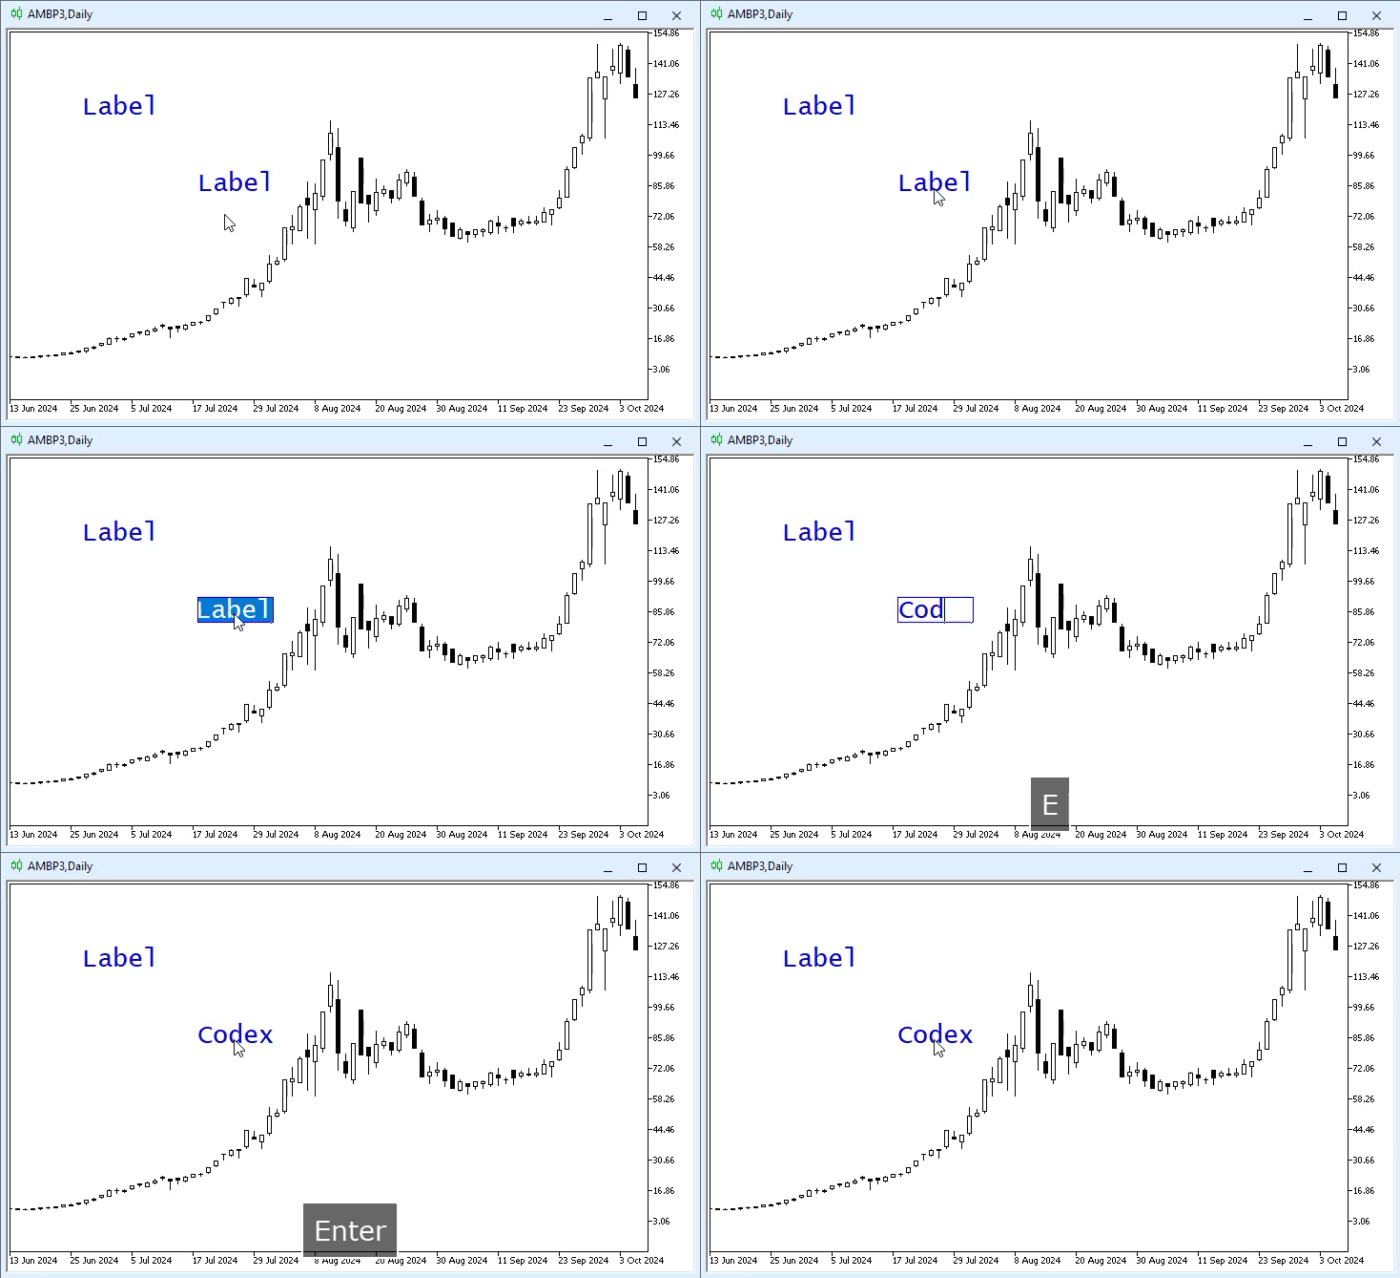
Animation 03
Notice that, as can be seen in Animation 03, we can indeed edit these objects, as promised and demonstrated in the previous article. But that is not all: now we can do this with any OBJ_LABEL object. In addition, we can do much more, although in a somewhat different way. To do this, we need to open the Object List window. This allows us to change certain properties, such as the color, font, font size, and even the name of the object itself.
However, the properties we manipulate in this way are secondary properties. In any case, the OBJ_EDIT and OBJ_LABEL objects will use the same set of properties, since the procedure on line 28, shown in Code 01, will handle the transfer of these properties itself.
So what is the flaw mentioned at the beginning of this topic? Well, dear reader, it is not a terrible or alarming flaw. It is more a problem of selection and deselection. When using the application shown in Code 01, we will often need only one OBJ_EDIT object to be present on the chart. This is because, in some situations, having several OBJ_EDIT objects on the chart does not make much sense. But because of a flaw in the selection and deselection process, look at what happens.
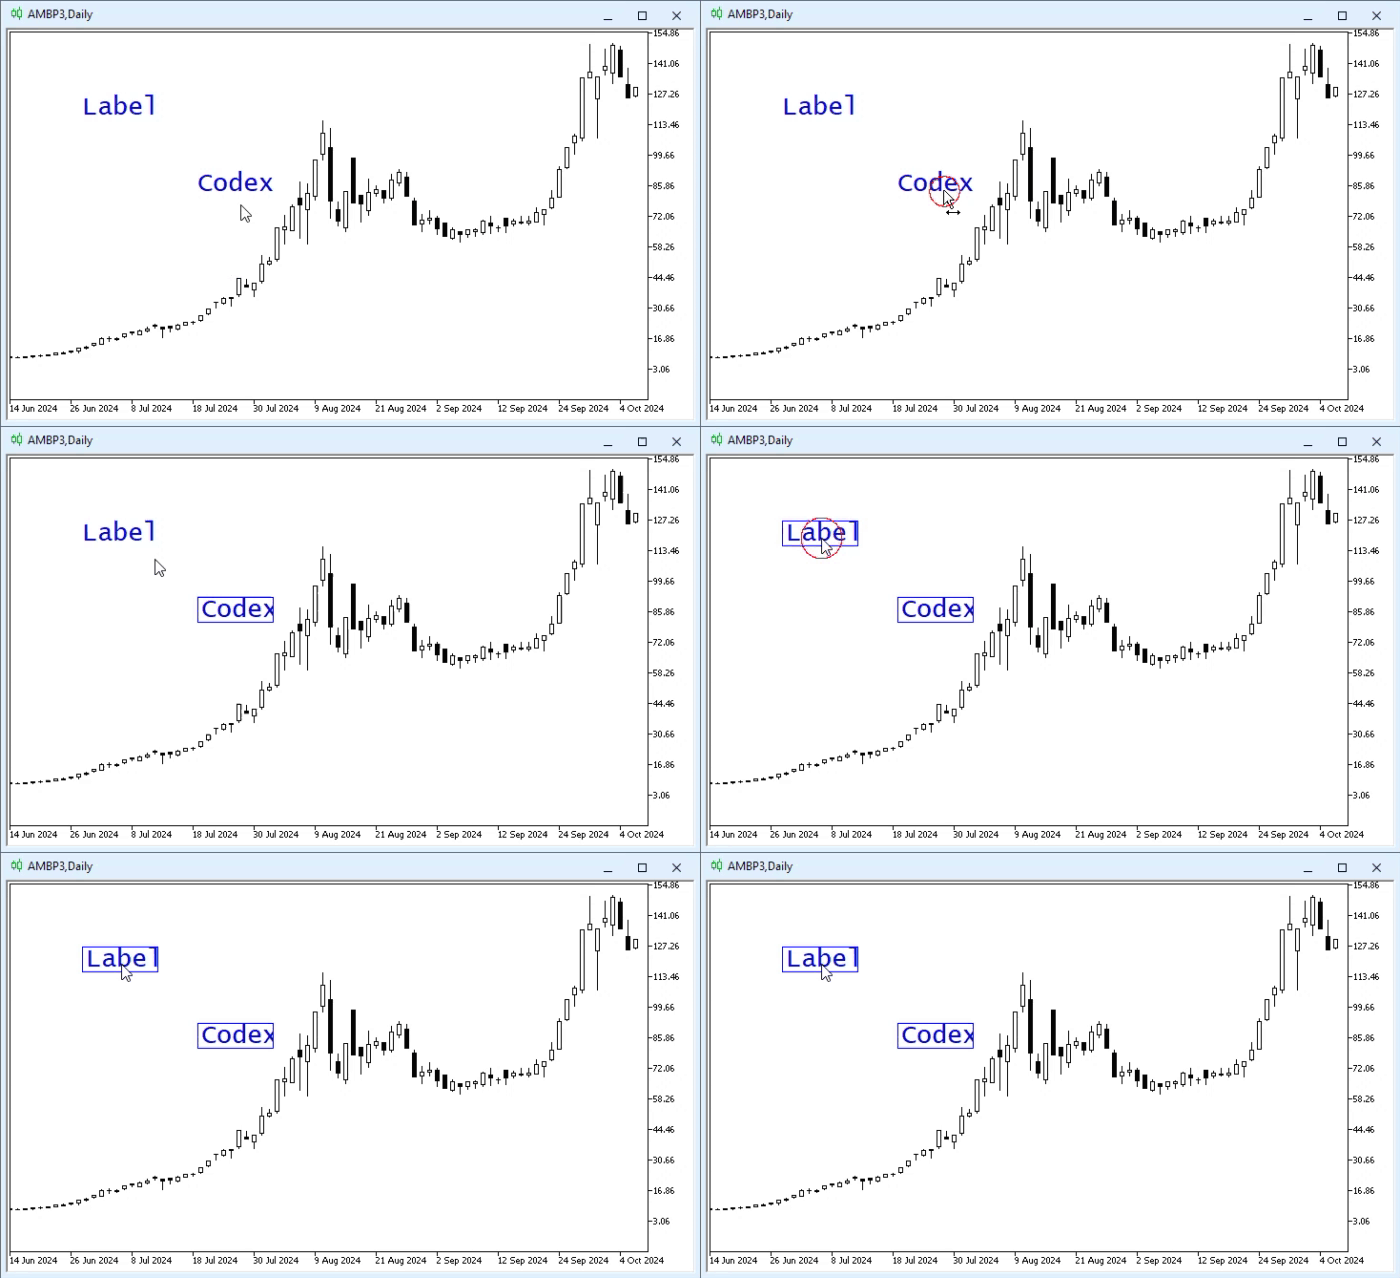
Animation 04
Notice that initially we had two OBJ_LABEL objects, and then two OBJ_EDIT objects appeared. This can be fixed. I am not saying that this is completely wrong, but a situation like the one shown in Animation 04 does not make sense if the goal is simply to be able to edit the OBJ_LABEL text directly on the chart.
Fixing this type of flaw is very simple. To solve this problem, we only need to change the event-handling code. In our specific case, it will be enough to modify the code as shown below:
                   .
                   .
                   .
13. //+------------------------------------------------------------------+
14. void OnChartEvent(const int id, const long &lparam, const double &dparam, const string &sparam)
15. {
16.     static string szOldEdit = "";
17.
18.     switch (id)
19.     {
20.         case CHARTEVENT_OBJECT_CLICK    :
21.             if ((ENUM_OBJECT)ObjectGetInteger(0, sparam, OBJPROP_TYPE) == OBJ_LABEL)
22.             {
23.                 if (szOldEdit != "") Swap_ObjLabel_ObjEdit(szOldEdit);
24.                 Swap_ObjLabel_ObjEdit(szOldEdit = sparam);
25.             }
26.             break;
27.         case CHARTEVENT_OBJECT_ENDEDIT  :
28.             Swap_ObjLabel_ObjEdit(sparam);
29.             szOldEdit = "";
30.             break;
31.     }
32.     ChartRedraw();
33. };
34. //+------------------------------------------------------------------+
                   .
                   .
                   .
Code 02
Please note how simple it is to apply this solution, since we only need to change the points shown in the Code 02 fragment. The result can be seen in Animation 05 below:
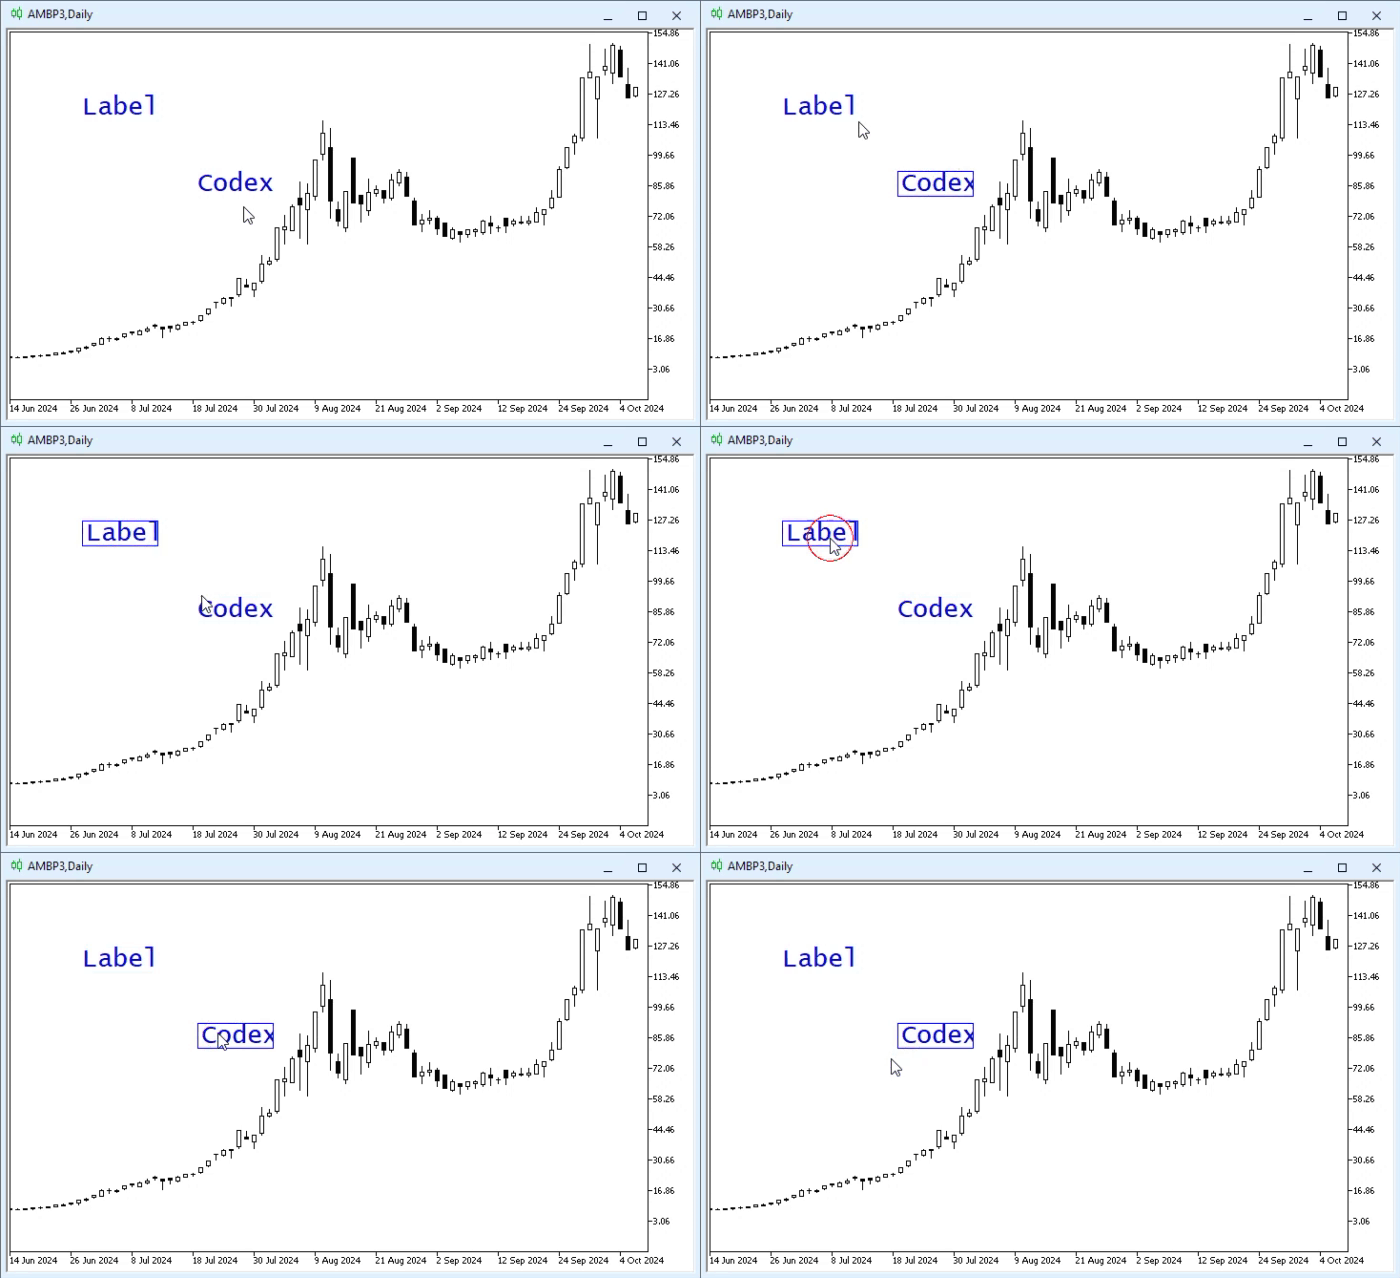
Animation 05
"All right, now I think I understand how important it is to practice and study the material better before repeating something that everyone will repeat simply because it seems right. But I have a question about this application that you have so kindly demonstrated how to create. Is there no way to control other parameters without having to open the Object List window? I ask because, apparently, we have no way to change the object's position on the chart. After the object is placed and the application is running on the chart, moving the object becomes practically impossible.
So is there any way to handle this kind of situation? Because it bothers me quite a bit, although the manipulation method shown seems very interesting to me."
Yes, dear reader, there are ways to solve this problem. That is why it is important for you to understand certain things very well. Always try to understand the concept itself, not the specific code that was used. This is because code can be changed, but the concept cannot.
There are several ways to do what you suggest, that is, to control the position of the object while the application shown here is running on the chart. One of the simplest ways is to change how the OBJ_EDIT object works.
In the previous article, we mentioned that to edit the contents of an OBJ_EDIT object, one of its properties must have a specific value. If that same property contains another value, editing is blocked. "But why is this important to us? Wasn't the idea to create a way to move the object on the chart? How can this information about a specific property and how it affects an OBJ_EDIT object help us solve the issue of moving it? I do not understand. Could you explain in more detail?"
Of course, I can explain in more detail what I am getting at. If you remember, in the last two articles we showed how our code can intercept object events when we need to know what is happening. Since we do not want to take on too much additional work, to the point of telling objects how they should move, we assign that task to MetaTrader 5. Well, that part is easy to understand. Perhaps the difficult part, and the reason why it is important to understand how objects work very well, is that when an OBJ_EDIT object cannot be edited because it is selected, we can hand over responsibility for moving the object to MetaTrader 5.
The hardest part for the vast majority of beginner programmers to understand is that our Code 01, even after adding the fragment from Code 02, will still convert an OBJ_LABEL object into an OBJ_EDIT object. This is done to edit the text that will later be displayed. However, what happens if you click the OBJ_EDIT object again? Based on what we are dealing with in the code, the answer is: NOTHING. But think about it for a moment: when we finish moving the object, MetaTrader 5 will generate an event. It will notify our application that the user has released the object and that it is now in a new position.
Therefore, if we apply a small strategy, we can force the OBJ_EDIT object into a state that allows MetaTrader 5 to manage its movement. This will allow the user to move the object on the chart. When the user releases the object, we will finish editing, or we can simply convert the OBJ_EDIT object back into an OBJ_LABEL object. You, dear reader, must decide which option best suits your goals.
Explained this way, it may seem somewhat complicated. However, when we turn ideas into code, things become much easier to understand. But before we do that, I need to show you something, dear reader. It will be a simple example, but it will make one crucial detail much clearer for us.
When we said in the previous article that we needed to set the OBJPROP_SELECTABLE property of the OBJ_EDIT object to false, we never showed why. Although in some cases we can set OBJPROP_SELECTABLE to true and still be able to edit the text in the OBJ_EDIT object, demonstrating either case in which we can do this would undoubtedly make things much more complicated. To see what was said in practice, look at the code below.
01. //+------------------------------------------------------------------+
02. #property copyright "Daniel Jose"
03. //+------------------------------------------------------------------+
04. int OnInit()
05. {
06.     return INIT_SUCCEEDED;
07. };
08. //+------------------------------------------------------------------+
09. int OnCalculate(const int rates_total, const int prev_calculated, const int begin, const double &price[])
10. {
11.     return rates_total;
12. };
13. //+------------------------------------------------------------------+
14. void OnChartEvent(const int id, const long &lparam, const double &dparam, const string &sparam)
15. {
16.     static string szOldEdit = "";
17.
18.     switch (id)
19.     {
20.         case CHARTEVENT_OBJECT_CLICK    :
21.             if ((ENUM_OBJECT)ObjectGetInteger(0, sparam, OBJPROP_TYPE) == OBJ_LABEL)
22.             {
23.                 if (szOldEdit != "") Swap_ObjLabel_ObjEdit(szOldEdit);
24.                 Swap_ObjLabel_ObjEdit(szOldEdit = sparam);
25.             }
26.             break;
27.         case CHARTEVENT_OBJECT_ENDEDIT  :
28.             Swap_ObjLabel_ObjEdit(sparam);
29.             szOldEdit = "";
30.             break;
31.     }
32.     ChartRedraw();
33. };
34. //+------------------------------------------------------------------+
35. void Swap_ObjLabel_ObjEdit(const string szName, bool Selectable = true)
36. {
37.     struct st_Mem
38.     {
39.         string  font, text;
40.         int     x, y, w, h, fontSize;
41.         color   cor;
42.     }mem;
43.     ENUM_OBJECT type = (ENUM_OBJECT)ObjectGetInteger(0, szName, OBJPROP_TYPE) == OBJ_EDIT ? OBJ_LABEL : OBJ_EDIT;
44.
45.     mem.font        = ObjectGetString(0, szName, OBJPROP_FONT);
46.     mem.x           = (int)ObjectGetInteger(0, szName, OBJPROP_XDISTANCE);
47.     mem.y           = (int)ObjectGetInteger(0, szName, OBJPROP_YDISTANCE);
48.     mem.w           = (int)ObjectGetInteger(0, szName, OBJPROP_XSIZE);
49.     mem.h           = (int)ObjectGetInteger(0, szName, OBJPROP_YSIZE);
50.     mem.fontSize    = (int)ObjectGetInteger(0, szName, OBJPROP_FONTSIZE);
51.     mem.cor         = (color)ObjectGetInteger(0, szName, OBJPROP_COLOR);
52.     mem.text        = ObjectGetString(0, szName, OBJPROP_TEXT);
53.
54.     ObjectDelete(0, szName);
55.     ChartRedraw();
56.     ObjectCreate(0, szName, type, 0, 0, 0);
57.
58.     ObjectSetInteger(0, szName, OBJPROP_SELECTABLE, Selectable);
59.     ObjectSetInteger(0, szName, OBJPROP_XDISTANCE, mem.x);
60.     ObjectSetInteger(0, szName, OBJPROP_YDISTANCE, mem.y);
61.     ObjectSetInteger(0, szName, OBJPROP_XSIZE, mem.w);
62.     ObjectSetInteger(0, szName, OBJPROP_YSIZE, mem.h);
63.     ObjectSetInteger(0, szName, OBJPROP_COLOR, mem.cor);
64.     ObjectSetInteger(0, szName, OBJPROP_FONTSIZE, mem.fontSize);
65.     ObjectSetString(0, szName, OBJPROP_FONT, mem.font);
66.     ObjectSetString(0, szName, OBJPROP_TEXT, mem.text);
67.     if (type == OBJ_EDIT)
68.     {
69.         ObjectSetInteger(0, szName, OBJPROP_BGCOLOR, clrWhite);
70.         ObjectSetInteger(0, szName, OBJPROP_READONLY, false);
71.     }
72. }
73. //+------------------------------------------------------------------+
Code 03
Code 03 is similar to Code 02, where we saw only a fragment of the set, but this time it is shown here almost in full. This can be seen on line 35. The value specified in the second argument is used in only one place, namely on line 58. Now pay attention, because this can become a little confusing depending on the type of configuration you implement in your code. In its current state, Code 03 will behave as follows:
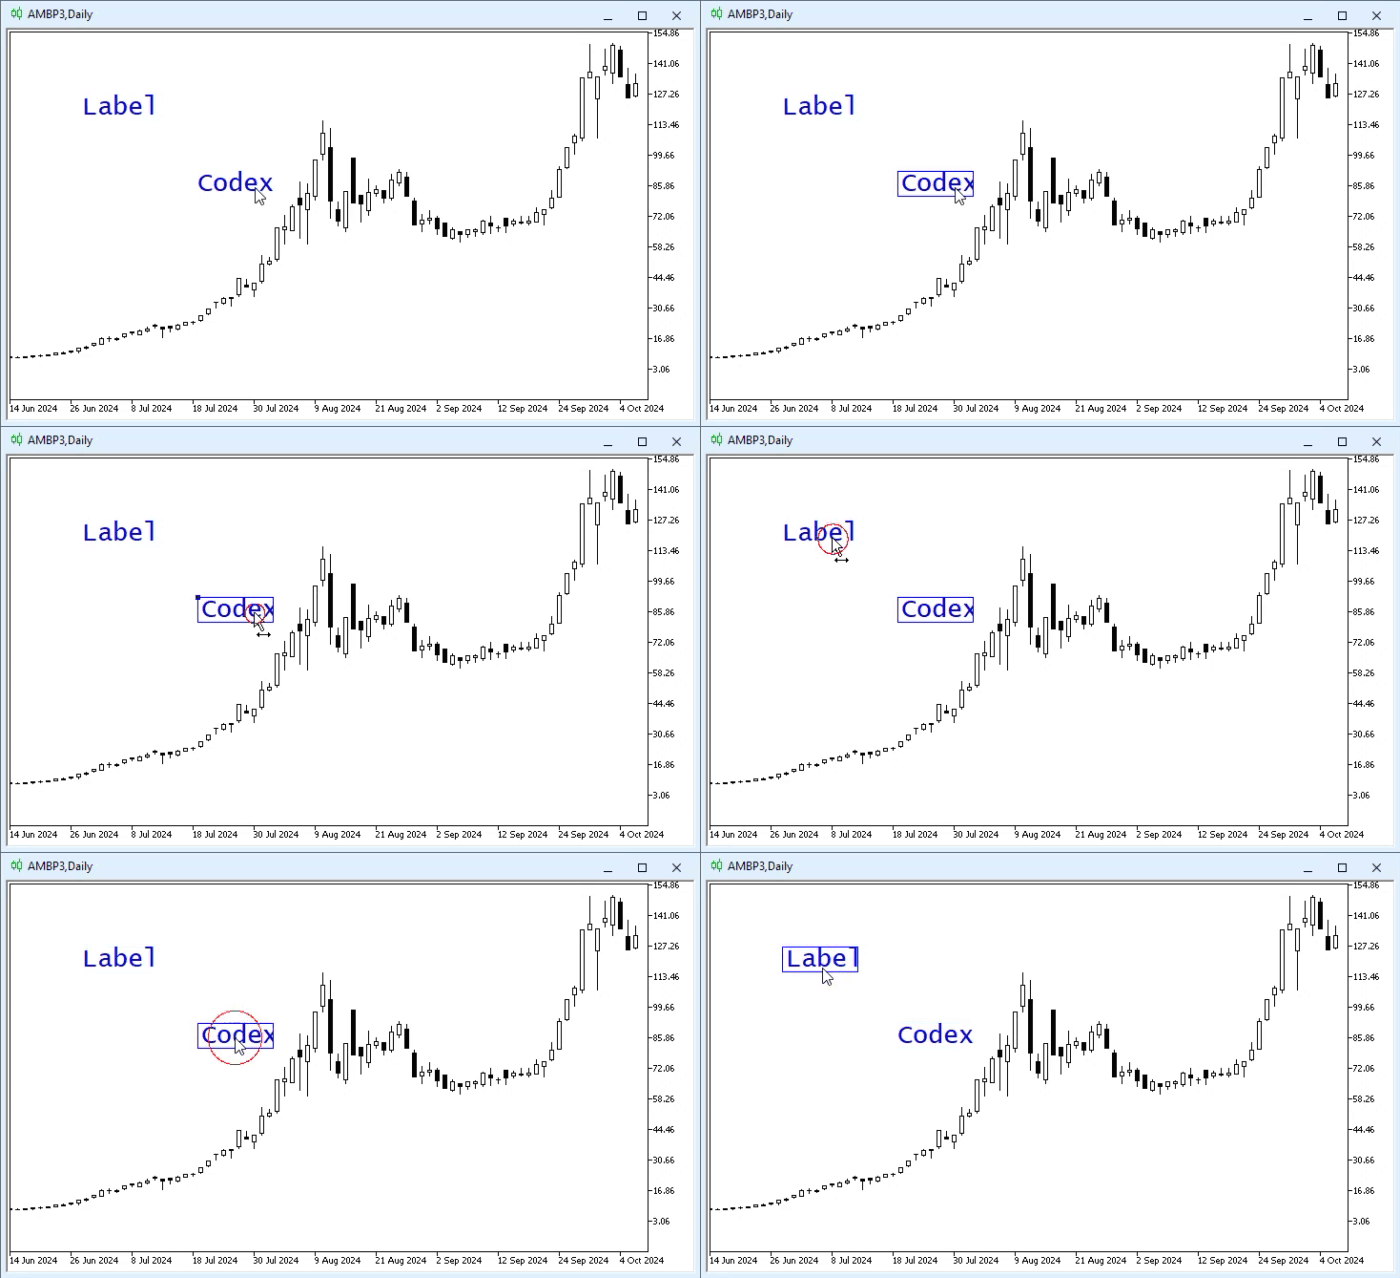
Animation 06
"Wait a second, hold on. This code does not work like Code 02. How is this possible? Did simply changing one property really change the code in this way? That is very strange. But can editing not be allowed at the same time as object selection?" In some cases, yes, dear reader. However, since some issues are quite difficult to explain because they require going into the details of how certain properties work, I prefer to use a different approach. It is easier to explain and demonstrate it this way without confusing you.
So I think you have noticed the following: if the OBJPROP_SELECTABLE property is enabled for an OBJ_EDIT object, we should assume that we cannot edit the text directly on the chart. However, moving the object will be perfectly possible.
Now, taking these facts into account, we can change Code 03 to obtain the expected behavior. This is done by modifying the code as shown below.
                   .
                   .
                   .
18.     switch (id)
19.     {
20.         case CHARTEVENT_OBJECT_CLICK    :
21.             {
22.                 ENUM_OBJECT type = (ENUM_OBJECT)ObjectGetInteger(0, sparam, OBJPROP_TYPE);
23.                 if (type == OBJ_EDIT) ObjectSetInteger(0, sparam, OBJPROP_SELECTABLE, false);
24.                 else if (type == OBJ_LABEL)
25.                 {
26.                     if (szOldEdit != "") Swap_ObjLabel_ObjEdit(szOldEdit);
27.                     Swap_ObjLabel_ObjEdit(szOldEdit = sparam);
28.                     ObjectSetInteger(0, sparam, OBJPROP_SELECTED, true);
29.                 }
30.             }
31.             break;
                   .
                   .
                   .
Code 04
In this case, in Code 04, we will focus only on the part that really needs to be changed in Code 03. In other words, we see only the fragment that required modification. Now, when we use this fragment in Code 03, or in Code 02 if you prefer, the result will be as follows:
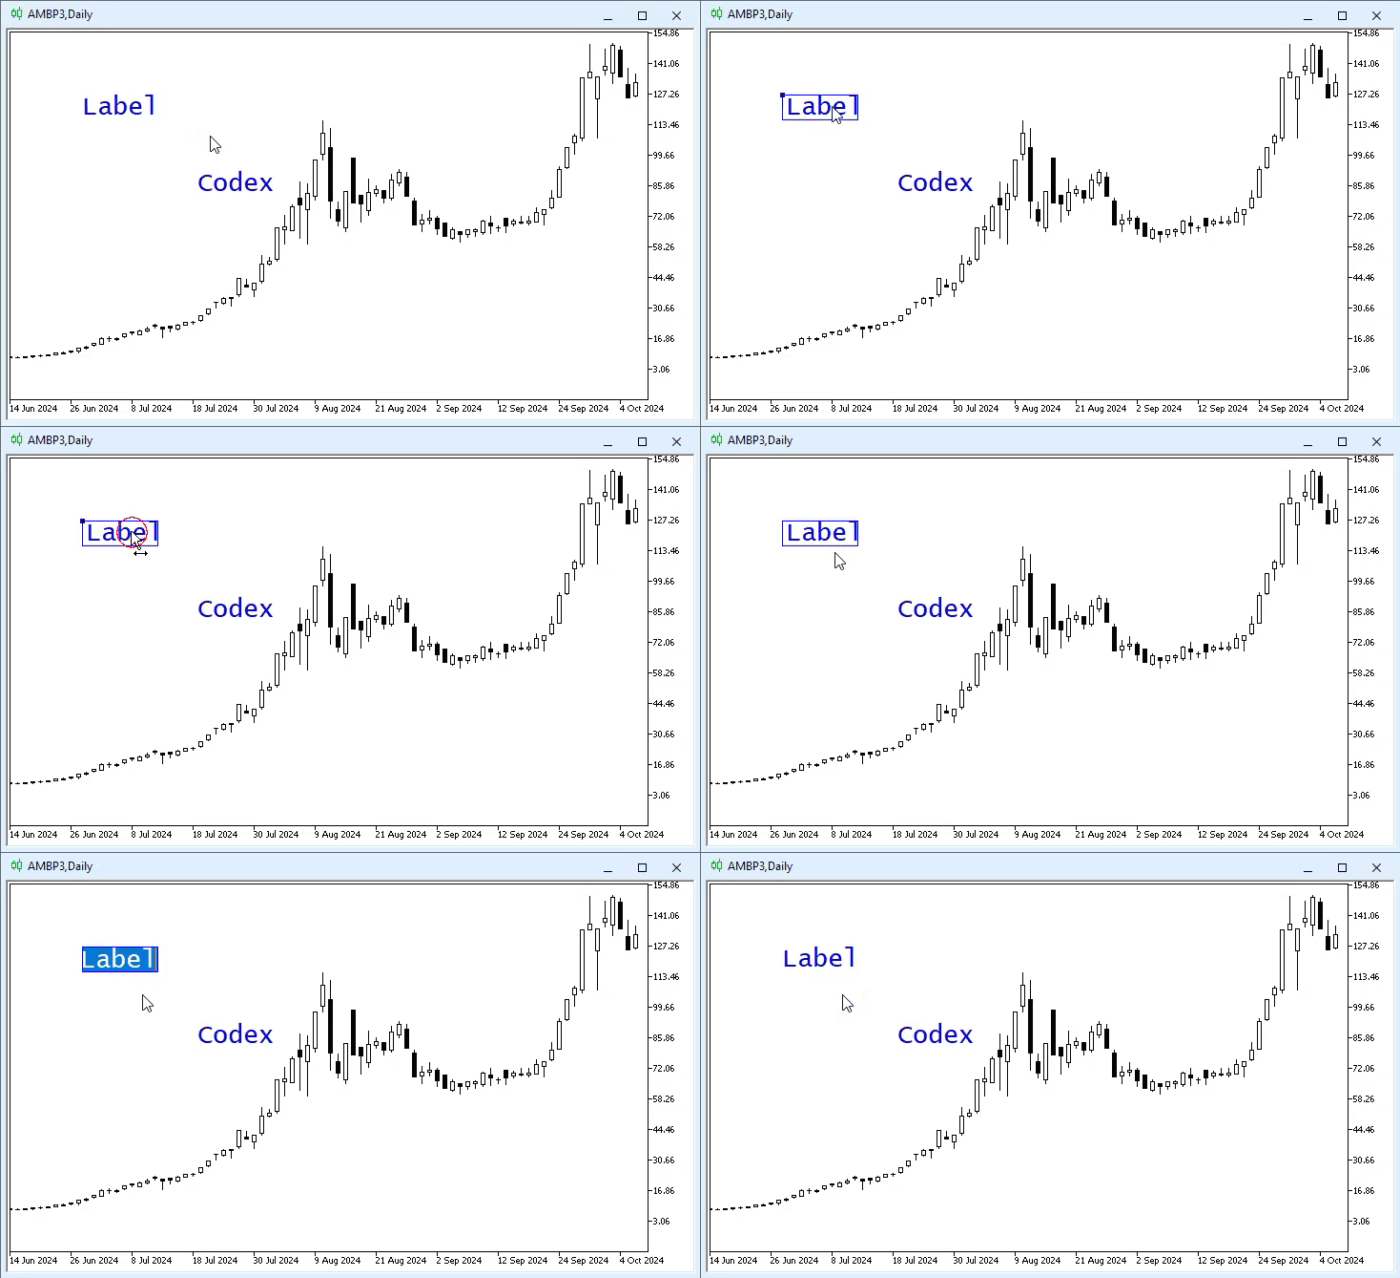
Animation 07
"Come on, what a crazy and absurd solution is being implemented here. You must be insane. It would have been impossible to come up with such a way of solving the problem of moving and editing an OBJ_LABEL object directly on the chart." It really is a crazy idea.
But leaving aside the crazy side of it, is what I have just shown you not amusing? After all, with just a little effort, we managed to create a way to directly edit an OBJ_LABEL object on the chart. Of course, this solution is not 100% perfect. This is because you need to use the application for a while to get used to how it works. It is a sequence of operations that must be performed at specific times, as shown in Animation 07. Therefore, line 24 passes the check, and thus we convert the OBJ_LABEL object into an OBJ_EDIT object. But since we want to be able to move it, on line 28 we enable object selection. This will allow us to move the OBJ_EDIT object on the chart.
As soon as we click the same object again, the check on line 23 disables selection. Thus, on the next click, MetaTrader 5 will select not the OBJ_EDIT object, but the text, allowing it to be changed. This turned out well, but it can be made even better. However, since the goal is NOT to create an application, but to show what we can do and how we can do it, I am already satisfied with the result presented here and can move on to the next topic.
Managing Sizes Directly on the Chart
I can say without false modesty that everything we have seen up to this point has been very fun and interesting. But nothing compares with what we will see now. Let us begin. It should be said that, depending on your creativity and your ability to imagine how everything can fit together, there will be more or fewer options. This is simply because we have already understood how MetaTrader 5 and our application interact with each other, which allows us to obtain a certain type of result and create a particular model for how the application works.
In my view, it is very interesting to use MetaTrader 5 not only for trading, but also to create other things. For example, a graphics editor, a text editor, or even a small platform for simple games such as puzzles or classic games in the style of old arcade machines.
Many may think that such things are impossible, since we apparently do not have the necessary mechanisms for them. However, contrary to what many people think and believe they know about the capabilities of MetaTrader 5, we do in fact have the potential to implement this kind of functionality on the platform. The main thing is to have imagination and the necessary knowledge. More importantly, we must have the right concepts and know how to use them to our advantage. If this happens, you will be able to create many interesting things for working in MetaTrader 5, instead of limiting yourself to looking at dull and uninteresting price charts. Perhaps you may even come up with a slightly more interesting way of plotting a price chart, using, among other things, 3D elements.
But at the moment, you are probably not yet ready to imagine this. In other words, to do something like that, at this stage we are still only at the very basic point of all this. And yes, contrary to what you might imagine, we are still at the basic level of what MQL5 programming represents; we could even say at the beginner level. And look how much we have already managed to do at just this basic level.
Well then, now we will look at something else that is quite easy to do, although it may be a little difficult to understand if you have not been following the articles. Since we will use some techniques, it may seem somewhat complex. However, I do not want to limit your imagination to the basic level of our capabilities. If we can do something, let us do it, even though it takes some time to truly understand what is happening and which concept is being used.
The goal of this topic is to develop a way to resize an object on the chart using the mouse. But we will try to do this without directly using mouse events. That seems quite difficult, does it not? The idea will be to continue using MetaTrader 5 to manage certain events, while we control them in such a way that they produce a specific result.
This really seems like a very difficult task. Something that would occur only to some madman who escaped from a sanatorium and is obsessed with making everyone else the same. But you will see that it is very simple — you just need to keep going. Perhaps it is even simpler than that. However, since this topic is quite extensive and will require more than one article for proper explanation and understanding, we will begin with the following fact: unlike what happened in the rest of the code, here we will already allow you, or any other user, to manipulate the size of any type of object.
Although at the first stage this will not apply to every type. It may have been created by your application or added to the chart by the user. It does not matter; we will treat all of them in the same way. There are some limitations, but we will examine them as we implement the code. So, to begin, let us look at the following code:
01. //+------------------------------------------------------------------+
02. #property copyright "Daniel Jose"
03. //+------------------------------------------------------------------+
04. #define def_Prefix  "Demo"
05. //+------------------------------------------------------------------+
06. #define macro_NameObject  def_Prefix + (string)(ObjectsTotal(0) + 1)
07. //+------------------------------------------------------------------+
08. int OnInit()
09. {
10.     IndicatorSetString(INDICATOR_SHORTNAME, def_Prefix);
11.
12.     return INIT_SUCCEEDED;
13. };
14. //+------------------------------------------------------------------+
15. int OnCalculate(const int rates_total, const int prev_calculated, const int begin, const double &price[])
16. {
17.     return rates_total;
18. };
19. //+------------------------------------------------------------------+
20. void OnChartEvent(const int id, const long &lparam, const double &dparam, const string &sparam)
21. {
22.     switch (id)
23.     {
24.         case CHARTEVENT_KEYDOWN         :
25.             break;
26.         case CHARTEVENT_OBJECT_CLICK    :
27.             break;
28.         case CHARTEVENT_OBJECT_DRAG     :
29.             break;
30.     }
31.     ChartRedraw();
32. };
33. //+------------------------------------------------------------------+
34. void OnDeinit(const int reason)
35. {
36.     ObjectsDeleteAll(0, def_Prefix);
37.     ChartRedraw();
38. };
39. //+------------------------------------------------------------------+
Code 05
Code 05 is our base template. Please note that Code 05 specifies three events that must be handled. This is because we are not going to build some "fantabulous" application here ("fantabulous" being a blend of "fantastic" and "fabulous"). Here we will simply do something simple and understandable: change the size and possibly the position of any object, directly on the chart. As for the position, I am still considering whether it is worth implementing.
"All right, you are in charge here. So what are we going to do next?" Well, dear reader, the next step is to use the CHARTEVENT_OBJECT_CLICK event to obtain data about the object we will work with. In principle, we will work only with this information, namely the object name, because it is the only information that really matters to us and because everything else can be obtained from it. So now we will focus on the OnChartEvent procedure, so that we do not have to show the entire code again. Thus, the first changes can be seen below:
                   .
                   .
                   .
19. //+------------------------------------------------------------------+
20. void OnChartEvent(const int id, const long &lparam, const double &dparam, const string &sparam)
21. {
22.     static string szNameObj = NULL;
23.
24.     switch (id)
25.     {
26.         case CHARTEVENT_KEYDOWN         :
27.             if ((szNameObj != NULL) && (TerminalInfoInteger(TERMINAL_KEYSTATE_ESCAPE))) szNameObj = NULL;
28.             break;
29.         case CHARTEVENT_OBJECT_CLICK    :
30.             if (StringFind(sparam, def_Prefix) != INVALID_HANDLE) break;
31.             if (szNameObj != NULL);
32.             if (szNameObj != sparam); else szNameObj = NULL;
33.             break;
34.         case CHARTEVENT_OBJECT_DRAG     :
35.             break;
36.     }
37.     ChartRedraw();
38. };
39. //+------------------------------------------------------------------+
                   .
                   .
                   .
Code 06
"We still do not know what we are going to do. Could you share a small code fragment? I am starting to get a little worried." Well, dear readers. You asked for it. (LAUGHTER). But before doing that, look at the logic embedded in the code fragment from Code 06. Understanding this logic is very important in order to anticipate the next steps. Therefore, the next step is shown in the code below:
01. //+------------------------------------------------------------------+
02. #property copyright "Daniel Jose"
03. //+------------------------------------------------------------------+
04. #define def_Prefix  "Demo"
05. //+------------------------------------------------------------------+
06. #define macro_NameObject  def_Prefix + (string)(ObjectsTotal(0) + 1)
07. //+------------------------------------------------------------------+
08. struct st_BoxResize
09. {
10.     private :
11.         ushort  x, y, w, h;
12.         bool    isBack;
13.         string  szObjects[4];
14. //+----------------+
15.         void CreateEdge(const char what)
16.         {
17.             ushort p1 = x, p2 = y, p3 = w, p4 = h;
18.
19.             switch (what)
20.             {
21.                 case 0: p4 = 1; break;
22.                 case 1: p3 = 1; break;
23.                 case 2: p2 = y + h; p4 = 1; break;
24.                 case 3: p1 = x + w; p3 = 1; break;
25.             }
26.             szObjects[what] = macro_NameObject;
27.             ObjectCreate(0, szObjects[what], OBJ_RECTANGLE_LABEL, 0, 0, 0);
28.             ObjectSetInteger(0, szObjects[what], OBJPROP_BGCOLOR, clrLime);
29.             ObjectSetInteger(0, szObjects[what], OBJPROP_XDISTANCE, p1);
30.             ObjectSetInteger(0, szObjects[what], OBJPROP_YDISTANCE, p2);
31.             ObjectSetInteger(0, szObjects[what], OBJPROP_XSIZE, p3);
32.             ObjectSetInteger(0, szObjects[what], OBJPROP_YSIZE, p4);
33.         }
34. //+----------------+
35.     public  :
36.         void CreateBoxResize(const string szArg, const uchar adjust = 2)
37.         {
38.             isBack = (bool)ObjectGetInteger(0, szArg, OBJPROP_BACK);
39.             ObjectSetInteger(0, szArg, OBJPROP_BACK, true);
40.             ObjectSetInteger(0, szArg, OBJPROP_SELECTED, false);
41.             x = (ushort)ObjectGetInteger(0, szArg, OBJPROP_XDISTANCE) - adjust;
42.             y = (ushort)ObjectGetInteger(0, szArg, OBJPROP_YDISTANCE) - adjust;
43.             w = (ushort)ObjectGetInteger(0, szArg, OBJPROP_XSIZE) + adjust;
44.             h = (ushort)ObjectGetInteger(0, szArg, OBJPROP_YSIZE) + adjust;
45.             for (uchar c = 0; c < 4; c++)
46.                 CreateEdge(c);
47.         }
48. //+----------------+
49.         void RemoveBoxResize(const string szArg)
50.         {
51.             ObjectSetInteger(0, szArg, OBJPROP_BACK, isBack);
52.             ObjectSetInteger(0, szArg, OBJPROP_SELECTED, false);
53.             ObjectsDeleteAll(0, def_Prefix);
54.         }
55. //+----------------+
56. }gl_RZ;
57. //+------------------------------------------------------------------+
58. int OnInit()
59. {
60.     IndicatorSetString(INDICATOR_SHORTNAME, def_Prefix);
61.
62.     return INIT_SUCCEEDED;
63. };
64. //+------------------------------------------------------------------+
65. int OnCalculate(const int rates_total, const int prev_calculated, const int begin, const double &price[])
66. {
67.     return rates_total;
68. };
69. //+------------------------------------------------------------------+
70. void OnChartEvent(const int id, const long &lparam, const double &dparam, const string &sparam)
71. {
72.     static string szNameObj = NULL;
73.
74.     switch (id)
75.     {
76.         case CHARTEVENT_KEYDOWN         :
77.             if ((szNameObj != NULL) && (TerminalInfoInteger(TERMINAL_KEYSTATE_ESCAPE)))
78.             {
79.                 gl_RZ.RemoveBoxResize(szNameObj);
80.                 szNameObj = NULL;
81.             }
82.             break;
83.         case CHARTEVENT_OBJECT_CLICK    :
84.             if (StringFind(sparam, def_Prefix) != INVALID_HANDLE) break;
85.             if (szNameObj != NULL) gl_RZ.RemoveBoxResize(szNameObj);
86.             if (szNameObj != sparam) gl_RZ.CreateBoxResize(szNameObj = sparam); else szNameObj = NULL;
87.             break;
88.         case CHARTEVENT_OBJECT_DRAG     :
89.             break;
90.     }
91.     ChartRedraw();
92. };
93. //+------------------------------------------------------------------+
94. void OnDeinit(const int reason)
95. {
96.     ObjectsDeleteAll(0, def_Prefix);
97.     ChartRedraw();
98. };
99. //+------------------------------------------------------------------+
Code 07
"Wow! Take it easy, there is no need to go that far." Well, you asked for it, and here is the result. Although it may seem very complex, this code itself is very simple and extremely basic. To understand it, it is enough to calmly observe how everything is done. In any case, I will briefly explain what is being done here, since this is the first part of what we will do later.
On line 08, we create a structure whose purpose is to form a frame around the object we have selected. Now pay attention, dear reader. The object around which we will create this outline must have Cartesian coordinates. Coordinates tied to the price scale are not considered here yet. Since MetaTrader 5 implements few objects of this type, and only two of them may be of interest — the OBJ_TEXT and OBJ_BITMAP objects — I currently see no reason to work with them. However, the others are also important to us.
Please note that in the OnChartEvent event handler, we refer to several procedures inside the structure. But the structure itself contains an internal private procedure. This is the one responsible for creating the lines that will surround the selected object.
In this case, we use a rather bright color. This is defined on line 28. If you wish, you can replace it with another color that seems more suitable. However, avoid changing other parts of the code unless you are experimenting to understand how it works. Excellent. On line 38, we record whether the selected object is in the foreground or is a background object. This is important for us because, in any case, we will send the object to the background and deselect it, thereby showing that it is not selected.
But why do we do this? The reason is to prevent the object from interfering with what we will do next. Remember that when an object is selected, we can use one of its specific points to move it in the chart window. This is done directly by MetaTrader 5. However, in this case we do not need that behavior, because we will take control and manage it ourselves. First, you need to fully understand how this code works. But before finishing this article, let us see what Code 07 is capable of. This is shown in the following animation. But first, look at the objects present on the chart. Try to focus on the object names, because this is important for understanding how the event handler will process each one. This can be seen in Figure 03:
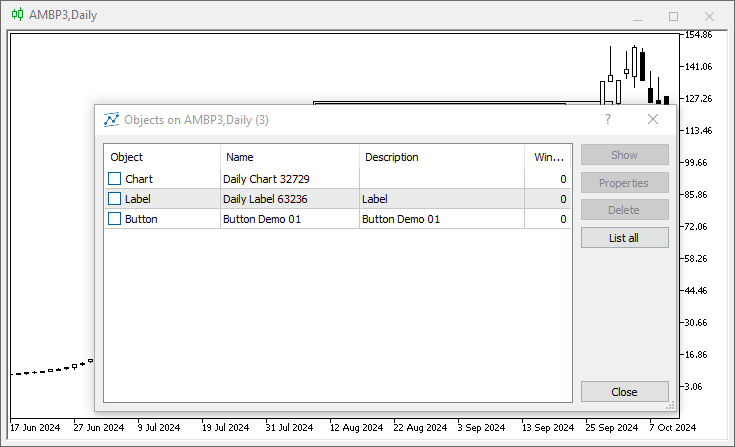
Figure 03
Now let us move on to the demonstration animation.
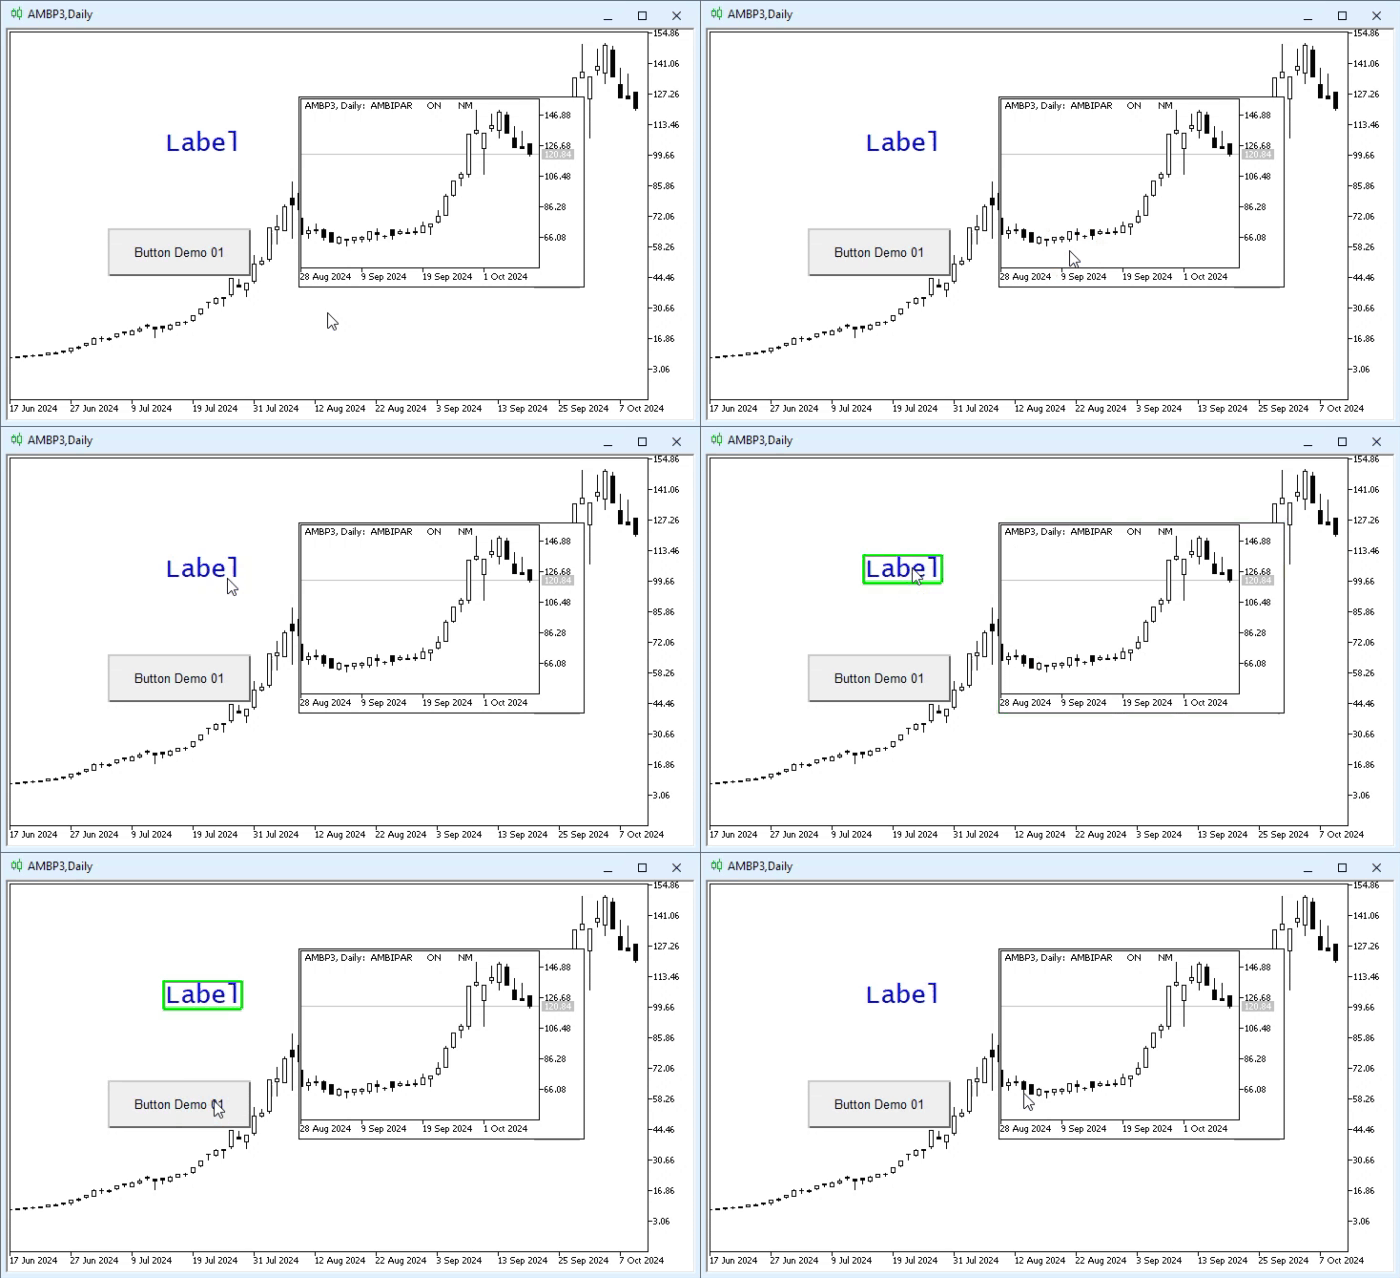
Animation 08
Final Thoughts
In this article, we demonstrated how to work with OBJ_LABEL objects together with OBJ_EDIT objects so that text can be edited directly on the chart. In addition, we saw how to add logic that allows the object to be moved, even if this was not initially possible. This is because, when we switched from an OBJ_LABEL object to an OBJ_EDIT object and back again, we reached a dead end in terms of implementing object movement.
We also saw the beginning of what will be studied in more detail in the next article. But since I want you to try to understand very well what was done here, because it will be needed later, I decided to briefly jump ahead and show something that, in my view, will give you various ideas about controlling MetaTrader 5 using MQL5.
That is all for now. See you in the next article. Good luck with your continued learning, and see you soon!
| MQ5 File | Description |
|---|---|
| Code 01 | Demonstration of object events |
| Code 02 | Demonstration of object events |
| Code 03 | Demonstration of object events |
| Code 04 | Demonstration of object events |
Translated from Portuguese by MetaQuotes Ltd.
Original article: https://www.mql5.com/pt/articles/16075
Warning: All rights to these materials are reserved by MetaQuotes Ltd. Copying or reprinting of these materials in whole or in part is prohibited.
This article was written by a user of the site and reflects their personal views. MetaQuotes Ltd is not responsible for the accuracy of the information presented, nor for any consequences resulting from the use of the solutions, strategies or recommendations described.

 Neural Networks in Practice: Practice Makes Perfect
 Detecting and Visualizing Outlier Bars in MQL5 Using Modified Z-Score on OHLCV Features
 Neural Networks in Trading: Time Series Forecasting Using Adaptive Modal Decomposition (Final Part)
 Engineering a Self-Healing Expert Advisor in MQL5 (Part 5): Real-Time Recovery Dashboard (Final Part)

- Free trading apps
- Over 8,000 signals for copying
- Economic news for exploring financial markets
You agree to website policy and terms of use