
Moving to MQL5 Algo Forge (Part 4): Working with Versions and Releases
Introduction
Our transition to MQL5 Algo Forge continues. We have set up our workflow with personal repositories and have turned to one of the main reasons for this move – the ability to easily use community-contributed code. In Part 3, we explored how to add a public library from another repository to our own project.
The experiment with connecting the SmartATR library to the SimpleCandles Expert Advisor clearly demonstrated that simple cloning is not always convenient, especially when the code requires modifications. We, instead, followed the proper workflow: we created a fork, which became our personal copy of someone else's repository for fixing bugs and making modifications, while preserving the option to later propose these changes to the author via a Pull Request.
Despite certain limitations we encountered within the MetaEditor interface, combining it with the MQL5 Algo Forge web interface allowed us to successfully complete the entire chain of actions, from cloning to committing edits and finally linking the project with an external library. Thus, we solved a specific task and examined a universal template for integrating any third-party components.
In today's article, we will take a closer look at the stage of publishing the edits made in the repository, a certain set of changes that form a complete solution, whether it's adding new functionality to a project or fixing a discovered issue. This is the process of committing or releasing a new product version. We will see how to organize this process and what capabilities MQL5 Algo Forge provides for it.
Finding a Branch
In previous parts, we recommended using a separate repository branch for making a set of edits that address a specific task. However, after completing work on such a branch, it's best to merge it into another (main) branch and then delete it. Otherwise, the repository can quickly turn into a dense thicket where even the owner could easily get lost. Therefore, obsolete branches should be removed. But sometimes, you may need to revert the code to the state it was in just before a certain branch was deleted. How to do this?
First, let's clarify that a branch is simply a sequence of commits arranged chronologically. Technically, a branch is a pointer to a commit considered the latest in a chain of consecutive commits. Therefore, deleting a branch does not delete the commits themselves. At worst, they might be reassigned to another branch or even merged into a single summary commit; but in any case, they continue to exist in the repository (with rare exceptions). Thus, returning to the state "before deleting a branch" essentially means reverting to one of the commits that exist in some branch. The question then becomes: how do we find that commit?
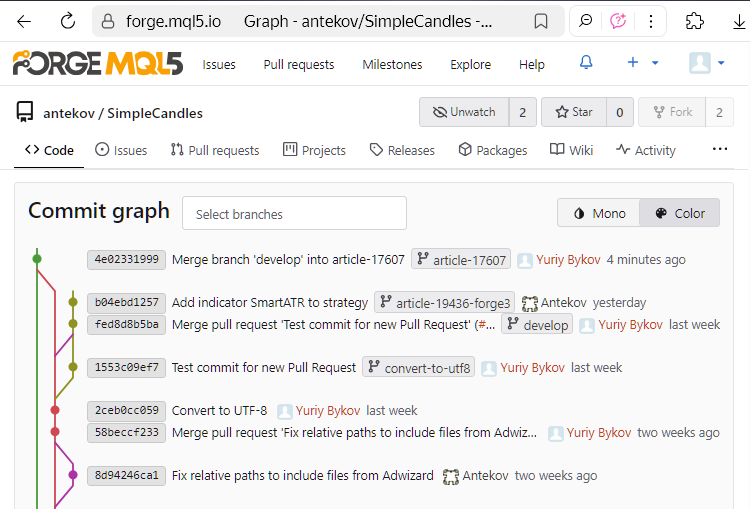
Let's look at the state of the SimpleCandles repository after the changes mentioned in Part 3 were made:
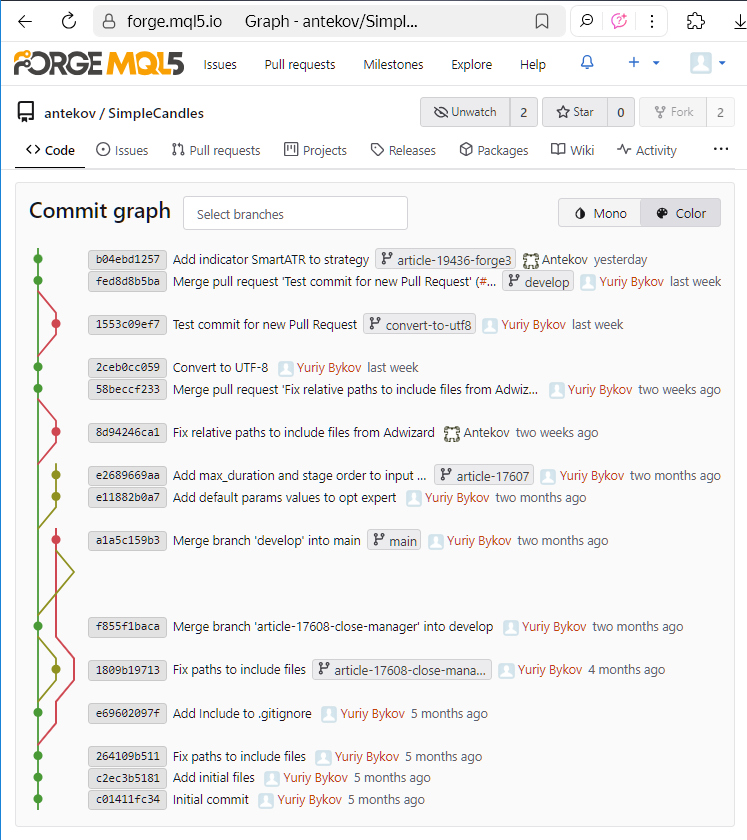
We can see the history of commits and a colored visualization of the relationships between branches on the left. Each commit is identified by its hash (or more precisely, part of it), i.e. a large unique number that distinguishes it from all others. To shorten its representation, the hash is displayed in hexadecimal form (for example, b04ebd1257).
Such a commit tree can be viewed for any repository on a dedicated page of the MQL5 Algo Forge web interface. The screenshot shown was taken some time ago, so visiting this page now will show a slightly different picture: new commits will have appeared in the tree, and the interweaving of branches will have changed due to additional merge commits.
We can also see branch names next to some commits. These are displayed for the most recent commits in each branch. In the provided screenshot, we can count six different branches: main, develop, convert-to-utf8, article-17608-close-manager, article-17607, and article-19436-forge3. The last one is the branch used for changes made while writing Part 3. But when working on Part 2, we also created a separate branch for the planned changes. It was named article-17698-forge2, and it has since been deleted, which is why no commit now carries this branch name. So, where can we find it?
If we look at the full commit message for 58beccf233, it mentions this branch name and indicates that it was merged into develop.

So, we have found the desired commit, but locating it this way is not convenient. Moreover, if we had merged branches manually using console commands like 'git merge' instead of via a Pull Request, we could have written any arbitrary comment for the merge commit. In that case, finding the right commit would have been even harder, since the branch name might not have been included in the message at all.
Now that we've found the desired commit, we can switch to it, restoring our local repository to the state it was in right after that commit. To do this, we can use the commit hash in the 'git checkout' command. However, there are some nuances here. If we try to switch to this commit in MetaEditor by selecting it from the history opened via the project's context menu option "Git Log":

... we'll encounter an error message:

Perhaps, there's a reason for that. Let's take a closer look at what's going on. We'll start by introducing the new concepts of "tag" and "HEAD pointer".
Tags
A tag in the Git version control system is an additional name assigned to a specific commit. You can also think of a tag as a pointer or reference to a particular version of the code in the repository, since it directly points to a specific commit. Using a tag allows you to return at any time to the exact state of the code that corresponds to the tagged commit. Tags are helpful for marking important milestones in a project development, such as version releases, completion stages, or stable builds. In the MQL5 Algo Forge web interface, you can view all tags of a selected repository on a separate page.
There are two types of tags in Git: lightweight and annotated. Lightweight tags contain only a name, while annotated tags can include additional information such as the author, date, comments, and even a signature. In most cases, lightweight tags are used.
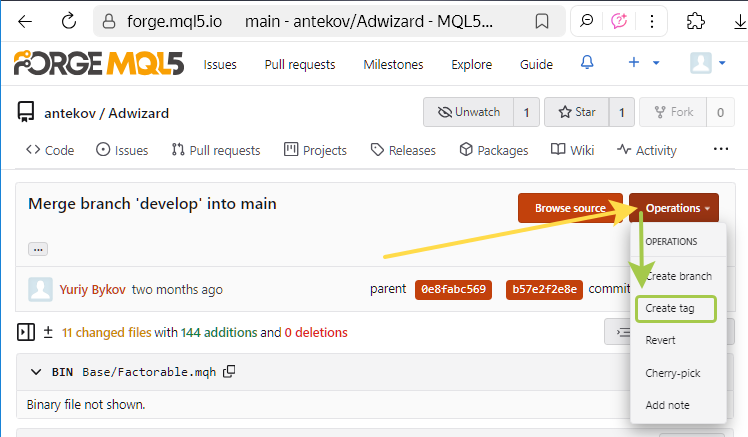
To create a tag via the web interface, you can open the page of any commit (for example, this one), click the 'Operations' button, and select 'Create tag'.
However, we'll return to tag creation a bit later.
To create a tag via Git console commands, you use the 'git tag' command. To create a lightweight tag, simply specify the name of the tag:
git tag <tag-name>
# Example
git tag v1.0
To create an annotated tag, you'll need to add some extra parameters:
git tag -a <tag-name> -m "Tag description"
# Example:
git tag -a v1.0 -m "Version 1.0 release"
In addition to marking versions of code intended for publication or deployment (releases), tags can also be used to signal CI/CD pipelines to trigger predefined actions when a commit with a certain tag appears, or to mark significant development milestones, such as the completion of major features or the fixing of critical bugs, even if they don't represent a new version release.
The HEAD pointer
Having discussed tags, it's worth mentioning another important concept – the HEAD pointer. Its behavior is similar to a tag with a fixed name HEAD, which automatically moves to the latest commit in the currently checked-out branch. HEAD is often referred to as the "marker of the current branch" or "pointer to the active branch". It essentially answers the question: "Where are we in the repository right now?" However, it is not technically a tag.
Physically, this pointer is stored in the .git/HEAD file in the repository. The contents of HEAD may contain either a symbolic reference (a tag or branch name) or a commit hash. When switching between branches, the HEAD pointer automatically updates to point to the latest commit in the current branch. When a new commit is added, Git not only creates the commit object but also moves the HEAD pointer to it.
Thus, the name HEAD can be used in Git console commands instead of the hash of the latest commit or the current branch name. Using the special symbols ~ and ^, you can reference commits located before the latest one. For example, HEAD~2 refers to the commit two steps before the most recent commit. We won't delve into these details right now.
For further discussion, we should also mention the two possible states a repository can be in. The normal state, called 'attached HEAD', means that new commits will appear ahead of the latest commit in the current branch. In this state, all edits are added to the branch sequentially and without conflicts.
The other state, known as 'detached HEAD', occurs when the HEAD pointer refers to a commit that is not the latest in any branch. This can happen, for example, when:- switching the repository to a specific past commit (e.g., using 'git checkout <commit-hash>'),
- switching by tag name (e.g., 'git checkout tags/<tag-name>'),
- switching to a branch that still exists in the remote repository but has been removed from the local repository (e.g., 'git checkout origin/<branch-name>').
This state should be avoided whenever possible, as any changes in this state not associated with any branch may be lost when switching to another branch. However, if you're not going to make changes in this state, it's ok to have it.
No Tags So Far
Let's now return to our attempt to switch our local repository to a specific commit that once was the latest in the deleted branch article-17698-forge2.
Switching a repository to a specific past commit isn't something developers typically do in everyday Git workflows. Under normal circumstances, you'll rarely need to perform such an operation. However, if you do choose to do it, the repository will enter what's known as the "detached HEAD" state. In this case, that commit belongs to the develop branch, which already has newer commits following it, so it's no longer the latest one in the branch.
Still, if we use Git's command-line interface to perform this switch, the operation will complete successfully. Though Git will clearly warn us about being in a "detached HEAD: state:
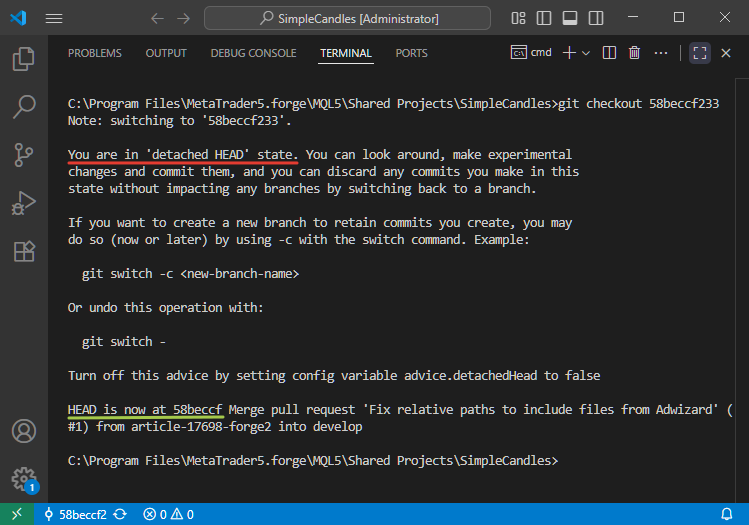
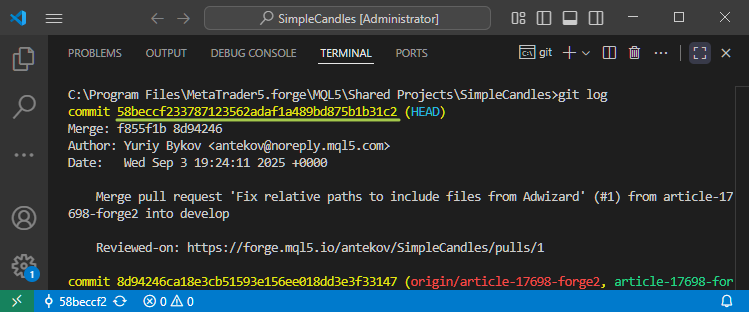
Attentive readers may notice that in the last screenshot we switched to a commit with the hash 58beccf233, but Git reports that the HEAD pointer is now at 58beccf. Where did the last three digits go? Nothing's wrong. They haven't disappeared. Git simply allows the use of shortened commit hashes as long as they remain unique within the repository. Depending on the interface, you might see hashes shortened to anywhere between 4 and 10 characters.
If you ever need to see the full commit hash, you can do so by running the 'git log' command. Each full commit hash contains 40 digits.
Because each hash is generated randomly and uniquely, even the first few digits are almost guaranteed to be distinct within a repository. That's why providing only a short prefix of the hash is usually enough for Git to recognize exactly which commit you're referring to in your commands.
Using UTF-8 Encoding
Here's another interesting aspect. In earlier versions, MetaEditor used the UTF-16LE encoding to save source code files. However, for some reason, files saved in this encoding were treated by Git as binary rather than text files As a result, it was impossible to view the exact lines of code that had been modified in a commit (even though this worked fine in Visual Studio Code). The only information displayed was the file sizes before and after the changes within the commit.
Here' what it looked like in the MQL5 Algo Forge web interface:
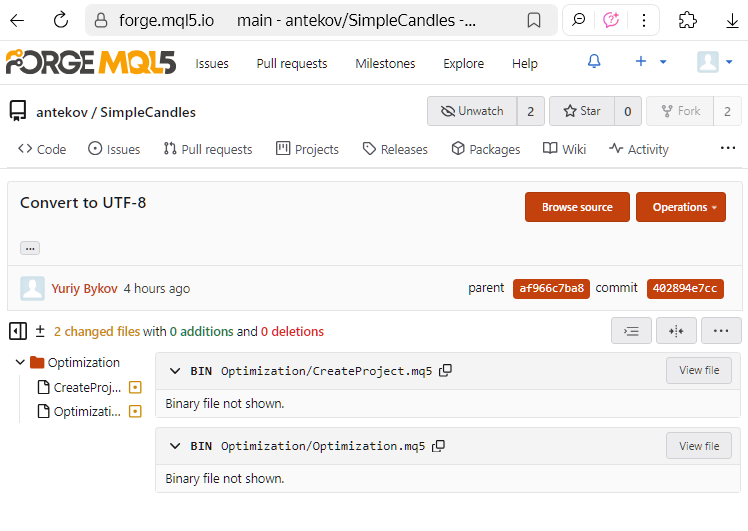
Now, new files created in MetaEditor are saved using UTF-8 encoding, and even the use of national alphabet characters no longer triggers an automatic switch to UTF-16LE. Therefore, it makes sense to convert older files, carried over into the new repository from earlier projects, into UTF-8. After performing such a conversion, starting from the next commit, you'll be able to see exactly which lines and characters were changed. For example, in the MQL5 Algo Forge web interface, it might look like this:

But that was a short digression. Let's return to the discussion of how to publish a new version of code in the repository.
Back to the Main Task
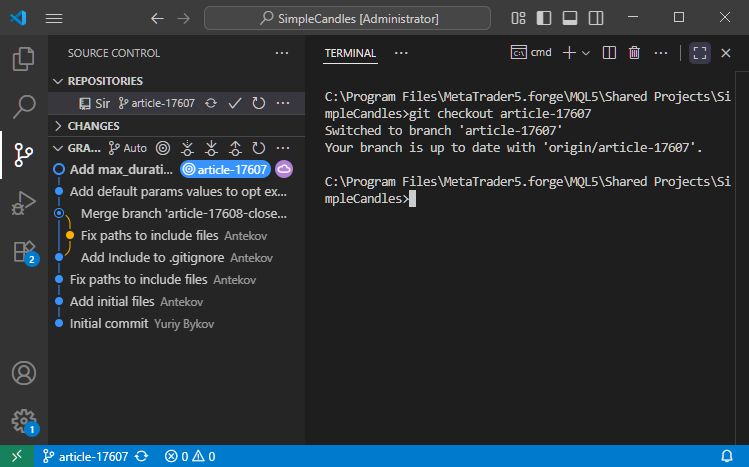
So, among the branches in our repository, let's pay attention to these two: article-17608-close-manager and article-17607. The changes made in these branches have not yet been merged into develop, since the tasks associated with them are still in progress. These branches will continue to develop, so it's too early to merge them into develop. We'll continue work on one of them (article-17607), bring it to a logical point of completion, and then merge it with develop. The resulting state of the code will be tagged with a version number.
To do this, we first need to prepare the selected branch for further edits, because while it existed, other branches also introduced changes. Those changes have already been merged into develop. Therefore, we must ensure that these updates from develop are also incorporated into our chosen branch.
There are several ways to merge changes from develop into article-17607. For example, we could create a Pull Request via the web interface and repeat the merging process described in the previous part. However, that approach is best used when you want to merge new, untested code into a branch containing stable, tested code. In our case, the situation is the opposite: we want to bring stable, verified updates from develop into a branch that still contains new, unchecked code. Therefore, it's perfectly fine to perform the merge using Git console commands. We'll use the console and monitor the process in Visual Studio Code.
First, let's check the current state of the repository. In the version control panel, we can see the commit history with branch names. The current branch is article-19436-forge3, where the latest changes were made. On the right side of the terminal, the output of the 'git status' command is shown:
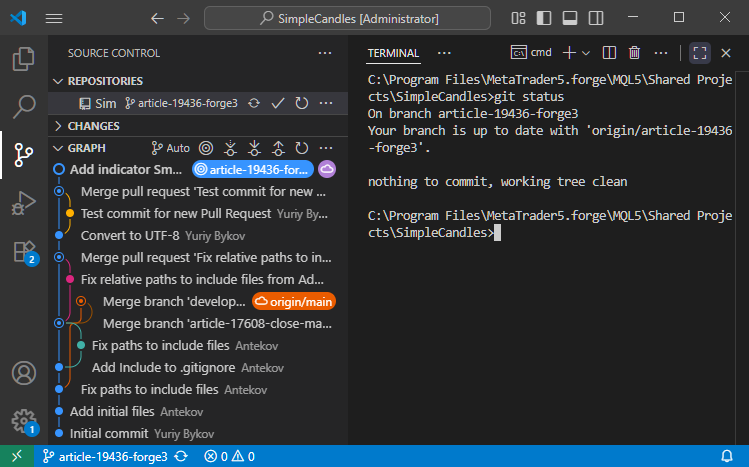
The command confirms that our repository is currently on the article-19436-forge3 branch and that its state is synchronized with the corresponding branch in the remote repository.
Next, we switch to the article-17607 branch using the command 'git checkout article-17607':
Then merge it with develop using 'git merge develop':
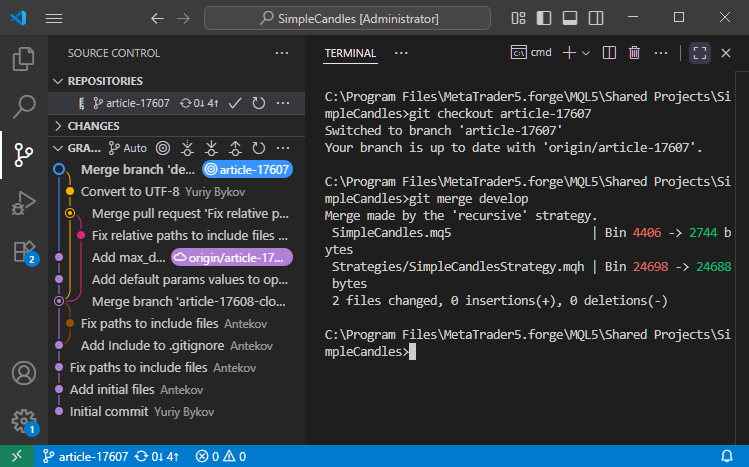
Since the external changes affected parts of the code we didn't modify while working in article-17607, no conflicts arose during the merge. As a result, Git created a new merge commit.
Now we run 'git push' to send the updated information to the remote repository:
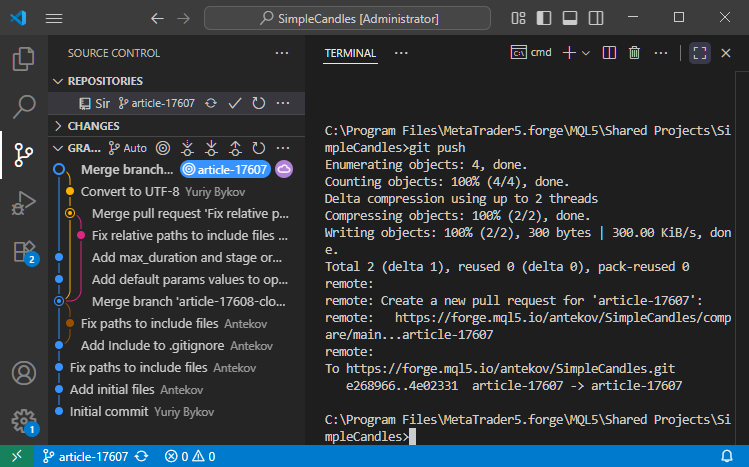
If we check the MQL5 Algo Forge repository, we'll see that our merge steps have successfully been reflected in the remote repository:
The last commit shown in the screenshot is the merge commit between develop and article-17607.
Also note the free end of the article-19436-forge3 branch, which is not yet connected to any other branch. The changes from this branch haven't been merged into develop yet, as the work there is still ongoing. We'll leave it as is for now. When the time comes, we'll return to it.
This completes the preparation for continuing development in article-17607, and we can now proceed with the coding work itself. The solution for the task associated with this branch is described in another article. So, I won't repeat it here. Instead, let's move on to describing how to finalize and record the achieved state of the code after completing the task.
Performing the Merge
Before publishing a particular state of the code, we first need to merge it into the main branch. Our primary branch is main. All updates from the develop branch will eventually flow into main. Changes from individual task branches are merged into develop. For now, we're not ready to merge new code into main, so we'll limit ourselves to merging updates into develop. For demonstrating this mechanism, the specific choice of which branch serves as the main one isn't particularly important.
Let's look at the state of the SimpleCandles repository after finishing work on the selected task:
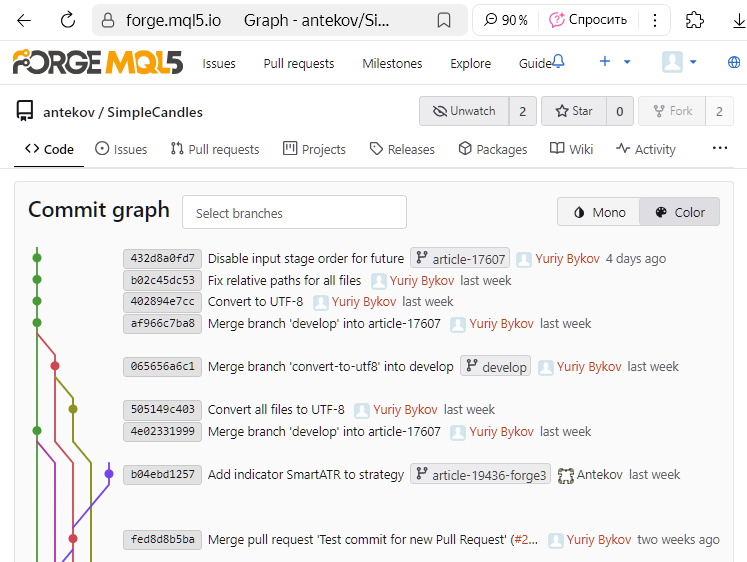
As shown, the latest commit was made in the article-17607 branch. Using the MQL5 Algo Forge web interface, we create a Pull Request to merge this branch into develop, as described earlier.

Let's verify that everything went as expected. We open the commit history page again with the branch tree view:
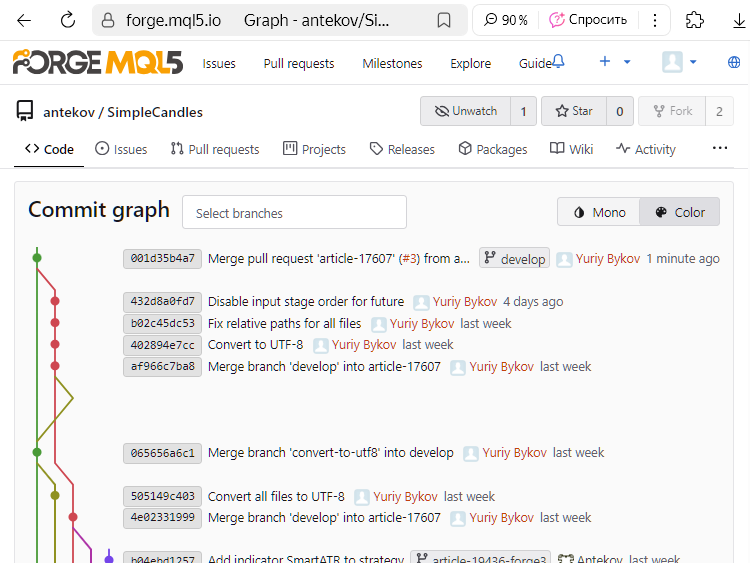
We can see that the commit with hash 432d8a0fd7 is no longer marked as the latest in article-17607. Instead, a new commit with hash 001d35b4a7 appears as the latest in develop. Since this commit records the merging of two branches, we'll refer to it as the merge commit.
Next, open the merge commit page and create a new tag. Earlier in the article, we showed where to do this; and now it's time to actually do it:
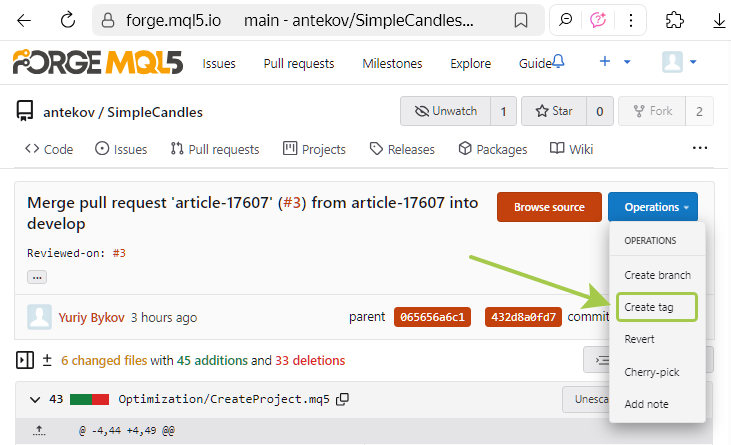
In the pop-up window, enter the tag name "v0.1", since this is still far from the final version. We don't yet know how many more additions will be made to the project, but hopefully quite a few. Therefore, such a small version number serves as a reminder to ourselves that there's still plenty of work ahead. Incidentally, it doesn't look like the web interface currently supports creating annotated tags.
The tag has now been successfully created, and you can see the result on the following page:
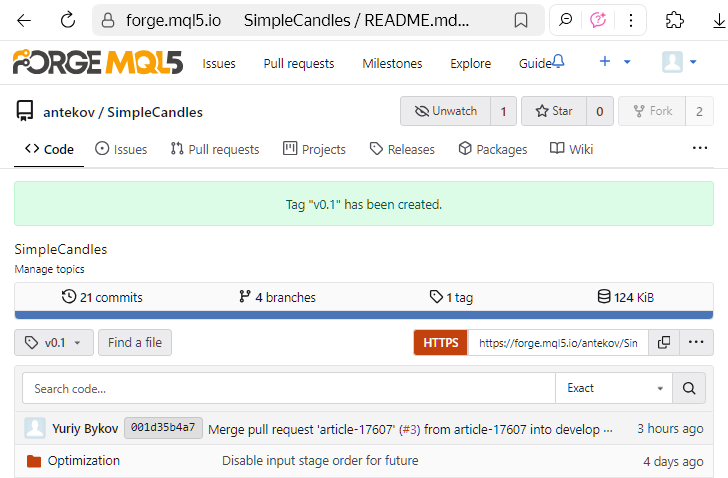
or on the repository's dedicated tags page.
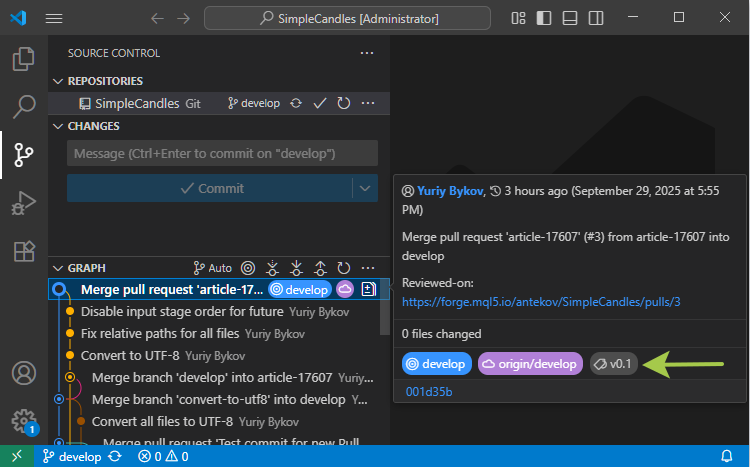
If we update our local repository using 'git pull', the newly created tag will appear there as well. However, since MetaEditor currently doesn't display repository tags, let's check how they look in Visual Studio Code. If you hover the mouse over the desired commit in the commit tree, a color label with the related tag name appears in the tooltip:
Now that the tag is created, we can either stop here and use its name in a 'git checkout' command to switch to that exact code state or go further and create a release based on it.
Creating a Release
A release is a mechanism for marking and distributing specific versions of software, regardless of the programming language used. Commits and branches represent the development workflow, while releases are its official outcomes, i.e. the versions we want to publish. The main purposes of using releases are as follows:
- Versioning. We mark particular states of the code in the repository code as stable, meaning they are free of critical errors (at least apparent ones) and have verified functionality. Other users can use on these specific versions.
- Distributing binaries. Releases can include compiled or packaged files (such as .ex5, .dll, or .zip), so that users don't have to compile the project themselves.
- User communication. A release should include a description, typically listing changes, new features, fixed bugs, and other relevant information about that version. The main goal of this description is to help users decide whether they should update to it.
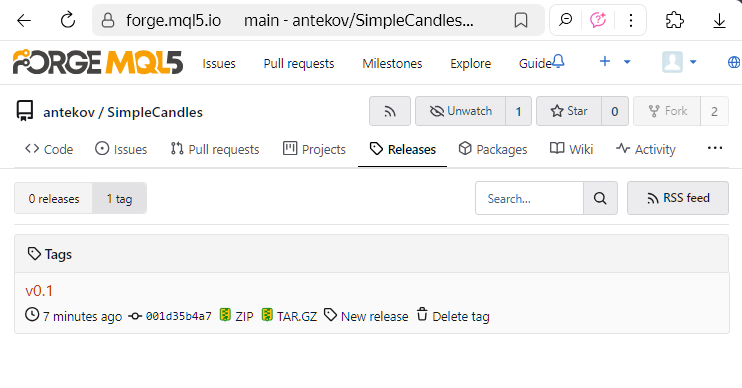
A release can be created based on an existing tag, or a new tag can be generated during the release creation process. Since we already have a tag, we'll create a new release using it. To do this, go to the repository tags page and click 'New release' next to the desired tag:

- Release name, target branch, and tag (either an existing one or a new one to be created),
- Release notes, i.e. a summary of what's new, what's been fixed, and what known issues have been addressed,
- Attached files, for example, compiled programs, documentation, or links to external resources.
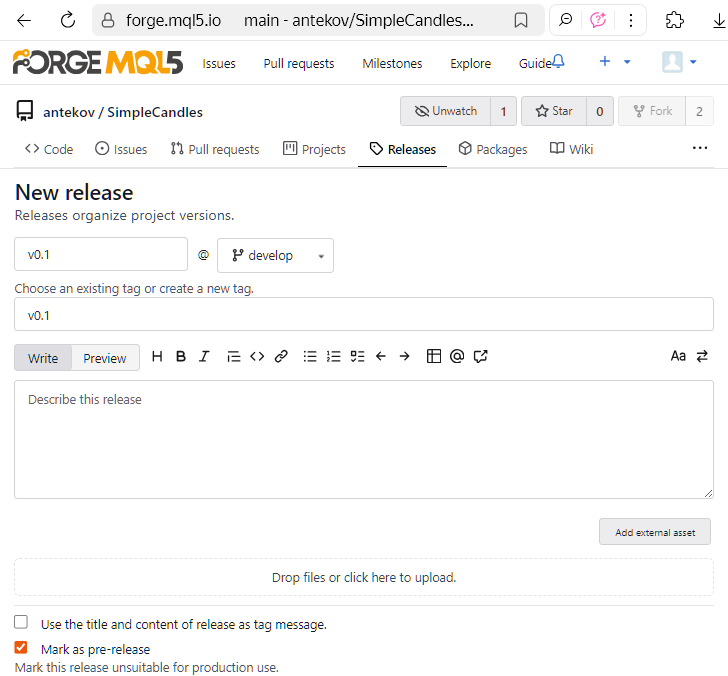
You can save a release as a draft and update its details later, or publish it right away. Even if you publish it now, you can make edits later: for instance, you can still adjust the release description afterward. Once published, the release will appear on the repository's Releases page, visible to other users:
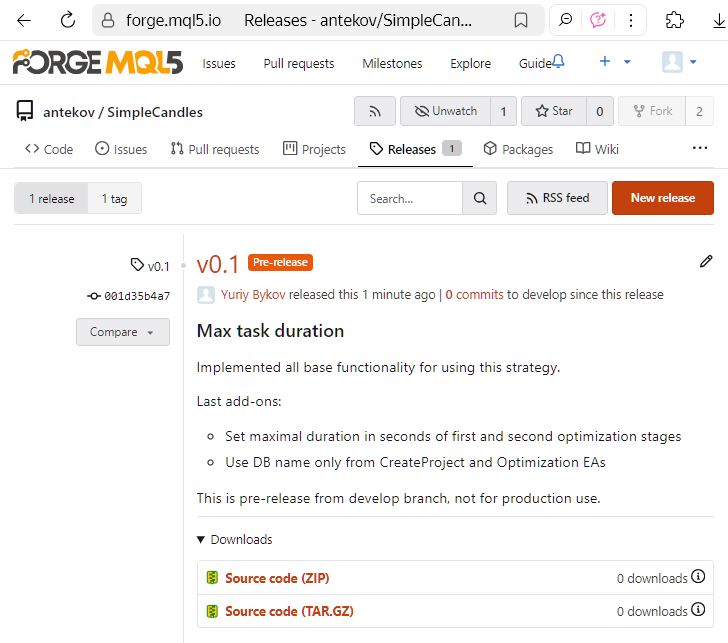
That's it! The new version is now live and ready for use. A little later, we updated the release name (which doesn't have to match the tag name) and added a link to the above-mentioned article describing the implemented solution.
Conclusion
Let's pause for a moment and reflect on the progress we've made. We didn't just explore the technical aspects of version control. We completed a full transformation, moving from scattered edits to a structured, coherent workflow for managing code. The most important milestone we've reached is the final step: releasing completed work as official product versions for end users. Our current repository might not yet represent a fully mature project, but we've laid all the groundwork to reach that level.
This approach fundamentally changes how we perceive the project. What once was a loose collection of source files is now an organized system with a clear history of changes and well-defined checkpoints, allowing us to revert to any stable state at any time. This benefits everyone: both developers and users of the finished solutions.
By mastering these tools, we've elevated our work with the MQL5 Algo Forge repository to a new level, opening the door to more complex and large-scale projects in the future.
Thank you for your attention! See you next time!
Translated from Russian by MetaQuotes Ltd.
Original article: https://www.mql5.com/ru/articles/19623
Warning: All rights to these materials are reserved by MetaQuotes Ltd. Copying or reprinting of these materials in whole or in part is prohibited.
This article was written by a user of the site and reflects their personal views. MetaQuotes Ltd is not responsible for the accuracy of the information presented, nor for any consequences resulting from the use of the solutions, strategies or recommendations described.
- Free trading apps
- Over 8,000 signals for copying
- Economic news for exploring financial markets
You agree to website policy and terms of use