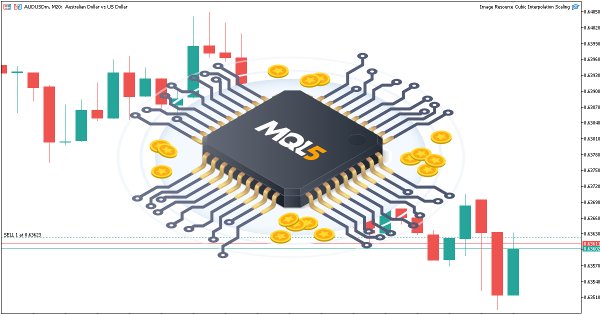
取引チャート上で双三次補間を用いたリソース駆動型画像スケーリングによる動的MQL5グラフィカルインターフェイスの作成
はじめに
取引チャートを動的なビジュアルでカスタマイズすることで、市場分析の質を大幅に向上させることができます。しかし、高品質な画像レンダリングを実現するには、MetaQuotes Language 5(MQL5)による綿密なプログラミングが必要です。本記事では、リソースベースの画像スケーリングとバイキュービック補間を活用した、鮮明で柔軟なチャート表示を可能にする強力なツールをご紹介します。以下のステップを通じてプロセスを解説します。
この記事を読み終える頃には、ユーザーが自在に制御できるプロフェッショナルな画像グラフィックで、取引チャートを変革できる強力なツールを手にしていることでしょう。
動的なリソースベース画像グラフィックの概要
本セクションでは、MetaTrader 5のチャート上に画像を埋め込み、スケーリングして表示するMQL5ツールの構築を目指します。ユーザーがコントロール可能な動的なグラフィカルインターフェイスを実現することが目的です。ビットマップ画像をリソースとして読み込み、バイキュービック補間を使ってチャートのサイズに合わせてスケーリングし、コーナーへのアンカー配置や中央への動的配置など、ユーザー入力に基づいた位置調整をおこないます。この手法により、ロゴやパターンなどのカスタムビジュアルをオーバーレイ表示できるようになり、縦横比を保ったまま、背景または前景としての表示を切り替えることもできます。すべてリアルタイムパフォーマンスを最適化した設計となっており、チャートの見た目をより魅力的で洗練されたものにします。
スケーリング処理には、最近傍法やバイリニア補間ではなく、バイキュービック補間を使用します。最近傍法はピクセル化が目立ち、バイリニア補間は画像のディテールがぼやけてしまいます。以下に、なぜバイキュービック補間を選んだのかを視覚的に示したグラフを紹介します。
グラフの可視化
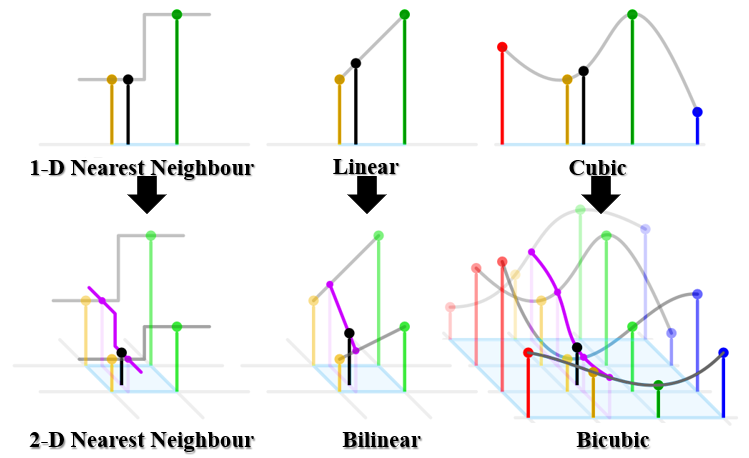
結果として得られるピクセル化の可視化。
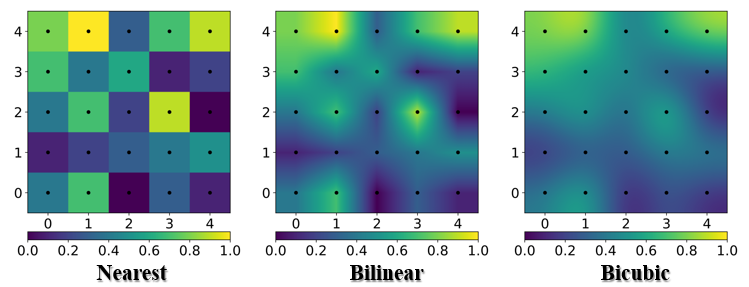
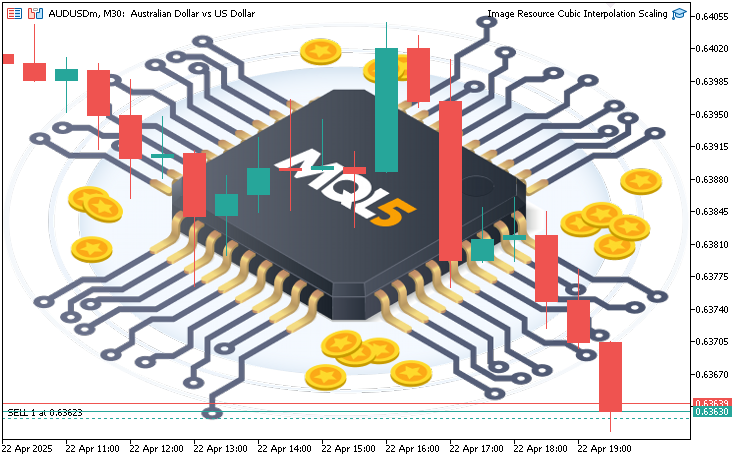
バイキュービック補間は、4×4ピクセルの近傍領域と三次方程式を活用することで、滑らかなグラデーションとシャープなエッジを実現します。私たちがバイキュービック補間を選んだ理由は、高い鮮明度と処理効率の両立にあります。これは、チャートサイズに応じた動的なリサイズに最適であり、取引判断を支える視認性の高いビジュアルを提供してくれます。以下は、カスタムMQL5画像を使用して目指す表示例の1つとなります。
MQL5での実装
MQL5でこのプログラムを作成するには、まず画像を適切な形式にする必要があります。その形式とは、Bitmap (BMP)形式です。BMPは非圧縮のビットマップ画像であり、高解像度を保持できる点で、JPEG (Joint Photographic Experts Group)形式などと比べて優れています。そのため、もし使用したい画像が他の形式(PNGやJPEGなど)で保存されている場合は、無料のオンラインツールを使ってBMP形式に変換することが可能です。なお、この記事で使用する画像はすでに準備済みなので、以下の画像を使って進めていきます。
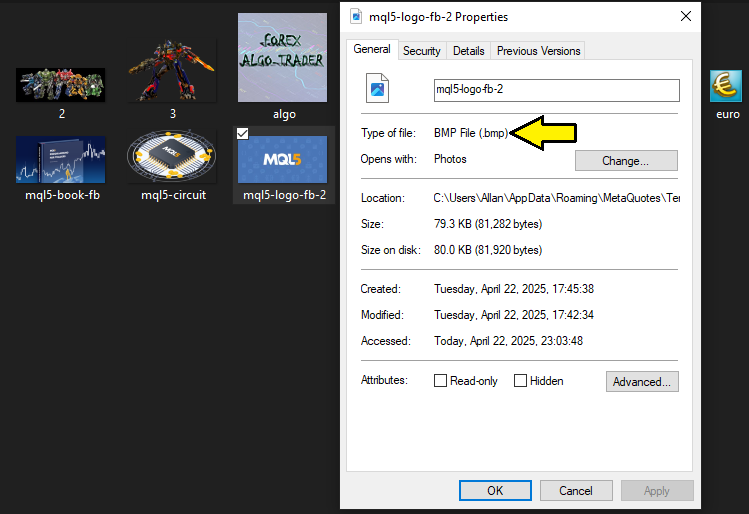
それぞれの画像ファイルを適切な形式で用意できたら、次にそれらをImagesフォルダに移動する必要があります。ナビゲータを開き、Imagesフォルダを見つけて右クリックし、[フォルダを開く]を選択するだけです。すると、デフォルトで含まれている「dollar.bmg」および「euro.bmg」の画像ファイルがあるフォルダが開きます。そこに、先ほど用意したBMP形式の画像ファイルを貼り付ければ完了です。以下に、この手順を示した視覚的な説明を示します。
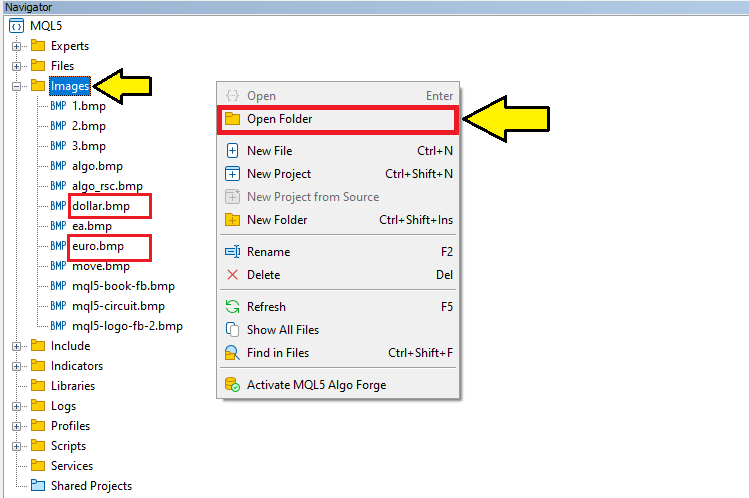
それが完了したら、準備は完了です。最初に、画像をリソースとして追加します。
//+------------------------------------------------------------------+
//|                   Image Resource Cubic Interpolation Scaling.mq5 |
//|                           Copyright 2025, Allan Munene Mutiiria. |
//|                                   https://t.me/Forex_Algo_Trader |
//+------------------------------------------------------------------+
#property copyright "Copyright 2025, Allan Munene Mutiiria."
#property link      "https://t.me/Forex_Algo_Trader"
#property version   "1.00"

#resource "\\Images\\mql5-circuit.bmp" //--- Include the image file as a resource
#define ORIGINAL_IMAGE_RESOURCE "::Images\\mql5-circuit.bmp" //--- Define the resource path for the original image
#define CHART_IMAGE_OBJECT_NAME "ChartImage" //--- Define the name of the chart image object
ここでは、画像をチャートに埋め込み、表示するための基礎を構築します。まず、#resourceディレクティブを使用して、「\Images\mql5-circuit.bmp」にあるビットマップファイルをリソースとして組み込みます。これにより、その画像はプログラム内で即座にアクセス可能となります。
次に、画像リソースのパスを標準化して参照できるように、ORIGINAL_IMAGE_RESOURCEマクロを「::Images\\mql5-circuit.bmp」に設定します。これは、画像データの読み込みに使用します。加えて、チャート上に画像を表示するためのオブジェクトの一意の識別名として、CHART_IMAGE_OBJECT_NAMEマクロを「ChartImage」に定義します。これにより、チャート上の画像オブジェクトを外観や表示状態を制御しながら管理できるようになります。
次に必要なのは、プログラム全体で使用するグローバル変数と入力パラメータの定義です。
// Enum for selecting anchor corner
enum ENUM_ANCHOR_CORNER {
   TOP_LEFT = 0,     // Top-Left
   TOP_RIGHT = 1,    // Top-Right
   BOTTOM_LEFT = 2,  // Bottom-Left
   BOTTOM_RIGHT = 3  // Bottom-Right
};

// Input parameters for user customization
input bool LimitToOriginalSize = true; // Image scaling limited to original size
input bool ImageInBackground = true; // Image displayed in background (true) or foreground (false)
input bool CenterImageDynamically = true; // Image centered dynamically (true) or positioned manually (false)
input ENUM_ANCHOR_CORNER AnchorCorner = TOP_LEFT; // Anchor corner for manual positioning
input int XOffsetFromCorner = 100; // x-offset in pixels from the chosen corner
input int YOffsetFromCorner = 100; // y-offset in pixels from the chosen corner

// Counter for generating unique resource names for scaled images
int scaled_resource_counter = 0; //--- Initialize a counter for creating unique resource names
画像配置に対するユーザーコントロールを設定するために、まずチャート上のコーナーを選択できるよう、列挙型ENUM_ANCHOR_CORNERを定義します。選択肢としては、TOP_LEFT、TOP_RIGHT、BOTTOM_LEFT、BOTTOM_RIGHTがあります。
次に、入力パラメータを設定します。LimitToOriginalSizeは、画像のスケーリングを元のサイズまでに制限するためにtrueに設定されています。ImageInBackgroundは画像を背景として表示するかどうかを決める設定で、こちらも初期値はtrueです。CenterImageDynamicallyは画像をチャートの中央に自動的に配置するかどうかを制御し、これもtrueに設定されています。AnchorCornerでは、画像を表示するチャートのコーナーを選択する初期設定としてTOP_LEFTを使用します。また、コーナーからの位置を調整するためにXOffsetFromCornerおよびYOffsetFromCornerを、それぞれ100ピクセルに設定しています。さらに、スケーリングされた画像リソースに一意の名前を付けて管理できるように、グローバル変数「scaled_resource_counter」を0で初期化します。
画像をチャートに表示する処理は、すべてのロジックを組み込んだカスタム関数内で実行される予定です。
//+------------------------------------------------------------------+
//| Display the image on the chart                                   |
//+------------------------------------------------------------------+
bool DisplayImageOnChart() {
   // Load the original image from the resource
   uint image_pixels[]; //--- Declare an array to store image pixel data
   uint original_image_width, original_image_height; //--- Declare variables for original image dimensions

   if (!ResourceReadImage(ORIGINAL_IMAGE_RESOURCE, image_pixels, original_image_width, original_image_height)) { //--- Read the image resource into the pixel array
      Print("Error: Failed to read original image data from resource."); //--- Log an error if reading the image fails
      return false; //--- Return false to indicate failure
   }

   // Get chart dimensions
   int chart_pixel_width = (int)ChartGetInteger(0, CHART_WIDTH_IN_PIXELS); //--- Retrieve the chart width in pixels
   int chart_pixel_height = (int)ChartGetInteger(0, CHART_HEIGHT_IN_PIXELS); //--- Retrieve the chart height in pixels

   // Calculate scaled dimensions while preserving aspect ratio
   double image_aspect_ratio = (double)original_image_width / original_image_height; //--- Calculate the aspect ratio of the original image
   double chart_aspect_ratio = (double)chart_pixel_width / chart_pixel_height; //--- Calculate the aspect ratio of the chart
   int scaled_image_width, scaled_image_height; //--- Declare variables for scaled image dimensions

   if (image_aspect_ratio > chart_aspect_ratio) { //--- Check if the image is wider relative to the chart
      scaled_image_width = chart_pixel_width; //--- Set scaled width to match chart width
      scaled_image_height = (int)(chart_pixel_width / image_aspect_ratio); //--- Calculate scaled height to maintain aspect ratio
   } else {
      scaled_image_height = chart_pixel_height; //--- Set scaled height to match chart height
      scaled_image_width = (int)(chart_pixel_height * image_aspect_ratio); //--- Calculate scaled width to maintain aspect ratio
   }

   // Limit scaling to original size if enabled
   if (LimitToOriginalSize) { //--- Check if the user has enabled limiting to original size
      scaled_image_width = MathMin(scaled_image_width, (int)original_image_width); //--- Restrict width to original width
      scaled_image_height = MathMin(scaled_image_height, (int)original_image_height); //--- Restrict height to original height
      // Recalculate one dimension to maintain aspect ratio
      if (scaled_image_width < scaled_image_height * image_aspect_ratio) { //--- Check if width is the limiting factor
         scaled_image_height = (int)(scaled_image_width / image_aspect_ratio); //--- Adjust height to maintain aspect ratio
      } else {
         scaled_image_width = (int)(scaled_image_height * image_aspect_ratio); //--- Adjust width to maintain aspect ratio
      }
   }

   // Log dimensions for debugging
   PrintFormat(
      "Original: %dx%d, Chart: %dx%d, Scaled: %dx%d",
      original_image_width, original_image_height,
      chart_pixel_width, chart_pixel_height,
      scaled_image_width, scaled_image_height
   ); //--- Log the original, chart, and scaled dimensions for debugging

   return true;

}
まず、チャート上に画像を描画するために使用するDisplayImageOnChart関数を定義します。最初に、画像のピクセルデータを格納するためのimage_pixelsarrayと、元の画像の幅と高さを保持するoriginal_image_width変数およびoriginal_image_height変数を宣言します。ResourceReadImage関数を使って、ORIGINAL_IMAGE_RESOURCEマクロから画像データをimage_pixels配列に読み込み、その幅と高さを取得します。この操作が失敗した場合、Print関数でエラーメッセージをログに出力し、falseを返して処理を中断します。
次に、画像が適切に収まるようにチャートのサイズを取得します。ChartGetInteger関数を用いてチャートの幅と高さを取得し、それぞれchart_pixel_widthとchart_pixel_heightに整数型で格納します。画像の縦横比を維持するため、original_image_widthをoriginal_image_heightで割った値としてimage_aspect_ratioを計算し、chart_pixel_widthをchart_pixel_heightで割った値としてchart_aspect_ratioを計算します。これらの比率がスケーリングの指針となります。
続いて、スケーリング後の画像の幅と高さを格納するscaled_image_widthとscaled_image_heightを宣言します。縦横比を保つため、image_aspect_ratioとchart_aspect_ratioを比較します。画像の横幅がチャートに対して広い場合(すなわち、image_aspect_ratioがchart_aspect_ratioより大きい場合)は、scaled_image_widthをchart_pixel_widthに設定し、scaled_image_heightはchart_pixel_widthをimage_aspect_ratioで割った値として計算します。そうでなければ、scaled_image_heightをchart_pixel_heightに設定し、scaled_image_widthはchart_pixel_heightにimage_aspect_ratioを掛けた値として計算します。これにより、画像がチャート内に歪みなく収まるようになります。
入力パラメータのLimitToOriginalSizeがtrueの場合は、拡大を防ぐためにスケーリングを元の画像サイズまでに制限します。MathMin関数を使い、scaled_image_widthをoriginal_image_widthで、scaled_image_heightをoriginal_image_heightでそれぞれ上限を設けます。この制限後も縦横比を維持するため、scaled_image_widthがscaled_image_heightにimage_aspect_ratioを掛けた値より小さい場合は、scaled_image_heightをscaled_image_widthをimage_aspect_ratioで割った値で再計算し、そうでなければscaled_image_widthをscaled_image_heightにimage_aspect_ratioを掛けた値で再計算します。
最後に、PrintFormat関数を使って元の画像サイズ、チャートのサイズ、スケーリング後のサイズをログに出力します。これにより、以下に示すようにチャートの動的な変化を追跡することができます。
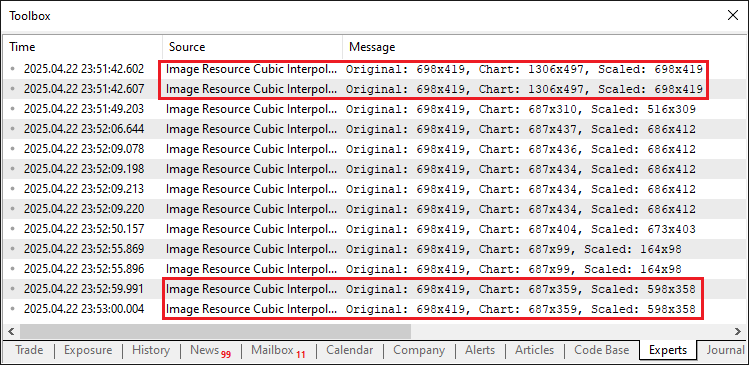
画像から、すでにチャートと画像の寸法を読み取っていることを確認できます。次におこなうべきは、画像をチャートに合わせて動的にスケーリングすることです。そのためにカスタム関数が必要となります。
//+------------------------------------------------------------------+
//| Scale the image using bicubic interpolation                      |
//+------------------------------------------------------------------+
void ScaleImage(
   uint &pixels[], int original_width, int original_height,
   int new_width, int new_height
) {
   uint scaled_pixels[]; //--- Declare an array for scaled pixel data
   ArrayResize(scaled_pixels, new_width * new_height); //--- Resize the array to fit the scaled image

   for (int y = 0; y < new_height; y++) { //--- Iterate over each row of the scaled image
      for (int x = 0; x < new_width; x++) { //--- Iterate over each column of the scaled image
         // Map to original image coordinates
         double original_x = (double)x * original_width / new_width; //--- Calculate the corresponding x-coordinate in the original image
         double original_y = (double)y * original_height / new_height; //--- Calculate the corresponding y-coordinate in the original image

         // Apply bicubic interpolation
         uint pixel = BicubicInterpolate(pixels, original_width, original_height, original_x, original_y); //--- Interpolate the pixel value
         scaled_pixels[y * new_width + x] = pixel; //--- Store the interpolated pixel in the scaled array
      }
   }

   ArrayResize(pixels, new_width * new_height); //--- Resize the original pixel array to the new dimensions
   ArrayCopy(pixels, scaled_pixels); //--- Copy the scaled pixels back to the original array
}
ここでは、バイキュービック補間を使って画像をリサイズするScaleImage関数を定義します。まず、scaled_pixels配列を宣言し、ArrayResize関数で「new_width *new_height」ピクセル分のサイズに調整します。次に、各ピクセルに対してループ処理をおこない、元画像の座標をoriginal_xとoriginal_yでマッピングします。
各ピクセルについては、後ほど説明するBicubicInterpolate関数を呼び出して画素値を計算し、scaled_pixelsの「y * new_width + x」の位置に格納します。最後に、ArrayResizeでpixelsをサイズ変更し、ArrayCopyを使ってscaled_pixelsの内容をコピーして、チャートでの更なる処理に備えます。
以下は、バイキュービック補間で画素値を計算する役割を持つ関数です。まず単一の色成分に対する補間を計算する関数を定義し、その後にそれを用いて各ピクセルの補間を計算していきます。
//+------------------------------------------------------------------+
//| Perform bicubic interpolation for a single color component       |
//+------------------------------------------------------------------+
double BicubicInterpolateComponent(uchar &components[], double fractional_x, double fractional_y) {
   // Calculate cubic interpolation weights for x
   double weights_x[4]; //--- Declare an array for x interpolation weights
   double t = fractional_x; //--- Store the fractional x value
   weights_x[0] = (-0.5 * t * t * t + t * t - 0.5 * t);        //--- Calculate weight for x-1
   weights_x[1] = (1.5 * t * t * t - 2.5 * t * t + 1);         //--- Calculate weight for x
   weights_x[2] = (-1.5 * t * t * t + 2 * t * t + 0.5 * t);    //--- Calculate weight for x+1
   weights_x[3] = (0.5 * t * t * t - 0.5 * t * t);             //--- Calculate weight for x+2

   // Interpolate in x for each y
   double y_values[4]; //--- Declare an array for intermediate y values
   for (int j = 0; j < 4; j++) { //--- Iterate over rows of the neighborhood
      y_values[j] =
         weights_x[0] * components[j * 4 + 0] +
         weights_x[1] * components[j * 4 + 1] +
         weights_x[2] * components[j * 4 + 2] +
         weights_x[3] * components[j * 4 + 3]; //--- Perform interpolation in x for each y
   }

   // Calculate cubic interpolation weights for y
   double weights_y[4]; //--- Declare an array for y interpolation weights
   t = fractional_y; //--- Store the fractional y value
   weights_y[0] = (-0.5 * t * t * t + t * t - 0.5 * t); //--- Calculate weight for y-1
   weights_y[1] = (1.5 * t * t * t - 2.5 * t * t + 1); //--- Calculate weight for y
   weights_y[2] = (-1.5 * t * t * t + 2 * t * t + 0.5 * t); //--- Calculate weight for y+1
   weights_y[3] = (0.5 * t * t * t - 0.5 * t * t); //--- Calculate weight for y+2

   // Interpolate in y
   double result =
      weights_y[0] * y_values[0] +
      weights_y[1] * y_values[1] +
      weights_y[2] * y_values[2] +
      weights_y[3] * y_values[3]; //--- Perform interpolation in y to get the final value

   // Clamp the result to valid color range [0, 255]
   return MathMax(0, MathMin(255, result)); //--- Clamp the interpolated value to the valid color range
}
ここでは、画像スケーリング処理における単一の色成分に対してバイキュービック補間をおこなうBicubicInterpolateComponent関数を実装します。まず、x軸方向の補間重みを格納するためのweights_x配列を宣言し、x座標の小数部分であるfractional_xを変数tにセットします。
続いて、x-1、x、x+1、x+2の位置に対して三次方程式の公式を用いてweights_xに4つの重みを計算し、滑らかな補間を可能にします。次に、4×4ピクセルの近傍領域の4行にわたって処理をおこなうため、中間結果を保持するy_values配列を宣言します。各行jについて、weights_xの値とcomponents配列の対応する色成分(インデックスはj×4+0からj×4+3)を掛け合わせて足し合わせ、x軸方向の補間を計算し、y_values[j]に格納します。
次に、y軸方向の補間重みを格納するweights_y配列を宣言し、変数tにy座標の小数部分fractional_yをセットします。同様の三次多項式の公式を用いてy-1、y、y+1、y+2の位置の重みを計算します。y軸方向の補間は、weights_yを用いてy_valuesの加重和としてresultを算出します。最後に、resultをMathMaxとMathMin関数で色の有効範囲である0から255にクランプし、画素の色表現として適切な値にします。各ピクセルに対して色情報のチャネル成分も必要となるため、次に色チャネルを抽出する関数も用意します。
//+------------------------------------------------------------------+
//| Extract ARGB components from a pixel                             |
//+------------------------------------------------------------------+
void GetArgb(uint pixel, uchar &alpha, uchar &red, uchar &green, uchar &blue) {
   alpha = (uchar)((pixel >> 24) & 0xFF); //--- Extract the alpha channel from the pixel
   red = (uchar)((pixel >> 16) & 0xFF);   //--- Extract the red channel from the pixel
   green = (uchar)((pixel >> 8) & 0xFF);  //--- Extract the green channel from the pixel
   blue = (uchar)(pixel & 0xFF);          //--- Extract the blue channel from the pixel
}
ここでは対象となるピクセルから個々のARGB色成分を抽出するGetArgb関数を実装します。引数としてpixel値と抽出した成分を格納するための参照変数alpha、red、green、blueを受け取ります。ビット演算を使いそれぞれの成分を分離します。具体的にはpixelを24ビット右シフトして0xFFとAND演算を行いalphaを抽出し、16ビット右シフトして0xFFとANDしてred、8ビット右シフトして0xFFとANDしてgreen、そして最下位8ビットを0xFFでマスクしてblueを取得します。各結果はuchar型にキャストされ色表現に適した0~255の範囲に収まるようにします。
ここで0xFFを使うのは32ビットの符号なし整数で表現されたARGB形式のピクセル値から目的のバイト(8ビット)だけを正確に抽出するためです。「& 0xFF」を省略すると他のチャネルの高位ビットが残ってしまい正しくない値になる可能性があります。もしこれらの記号が何か気になるなら、16進数で表した255のことを指しています。こちらをご覧ください。

これらの関数を備えたことで、画像を正確にスケーリングするために、単一のピクセルに対してバイキュービック補間を実行する関数を定義できるようになりました。
//+------------------------------------------------------------------+
//| Perform bicubic interpolation for a single pixel                 |
//+------------------------------------------------------------------+
uint BicubicInterpolate(
   uint &pixels[], int width, int height,
   double x, double y
) {
   // Get integer and fractional parts
   int x0 = (int)x; //--- Extract the integer part of the x-coordinate
   int y0 = (int)y; //--- Extract the integer part of the y-coordinate
   double fractional_x = x - x0; //--- Calculate the fractional part of the x-coordinate
   double fractional_y = y - y0; //--- Calculate the fractional part of the y-coordinate

   // Define 4x4 neighborhood
   int x_indices[4], y_indices[4]; //--- Declare arrays for x and y indices
   for (int i = -1; i <= 2; i++) { //--- Iterate over the 4x4 neighborhood
      x_indices[i + 1] = MathMin(MathMax(x0 + i, 0), width - 1); //--- Calculate clamped x-index
      y_indices[i + 1] = MathMin(MathMax(y0 + i, 0), height - 1); //--- Calculate clamped y-index
   }

   // Get 16 pixels in the 4x4 neighborhood
   uint neighborhood_pixels[16]; //--- Declare an array for the 4x4 neighborhood pixels
   for (int j = 0; j < 4; j++) { //--- Iterate over rows of the neighborhood
      for (int i = 0; i < 4; i++) { //--- Iterate over columns of the neighborhood
         neighborhood_pixels[j * 4 + i] = pixels[y_indices[j] * width + x_indices[i]]; //--- Store the pixel value
      }
   }

   // Extract ARGB components
   uchar alpha_components[16], red_components[16], green_components[16], blue_components[16]; //--- Declare arrays for ARGB components
   for (int i = 0; i < 16; i++) { //--- Iterate over the neighborhood pixels
      GetArgb(
         neighborhood_pixels[i],
         alpha_components[i], red_components[i],
         green_components[i], blue_components[i]
      ); //--- Extract ARGB components for each pixel
   }

   // Perform bicubic interpolation for each component
   uchar alpha_out = (uchar)BicubicInterpolateComponent(alpha_components, fractional_x, fractional_y); //--- Interpolate the alpha component
   uchar red_out = (uchar)BicubicInterpolateComponent(red_components, fractional_x, fractional_y); //--- Interpolate the red component
   uchar green_out = (uchar)BicubicInterpolateComponent(green_components, fractional_x, fractional_y); //--- Interpolate the green component
   uchar blue_out = (uchar)BicubicInterpolateComponent(blue_components, fractional_x, fractional_y); //--- Interpolate the blue component

   // Combine components into a single pixel
   return (alpha_out << 24) | (red_out << 16) | (green_out << 8) | blue_out; //--- Combine ARGB components into a single pixel value
}
ここでは、バイキュービック補間処理を用いて単一ピクセルの色を計算するBicubicInterpolate関数を実装します。まず、入力座標xとyの整数部分をx0とy0に抽出し、小数部分をfractional_xとfractional_yとして計算します。x0とy0の周囲のインデックスを計算するため、x_indicesおよびy_indices配列を定義し、-1から2までループして4×4の近傍座標を求めます。MathMinとMathMaxを使用して、これらのインデックスを有効な範囲[0, width - 1]および[0, height - 1]にクランプします。
次に、4×4の近傍から16ピクセルを格納するためのneighborhood_pixels配列を作成し、y_indicesおよびx_indicesを使ってpixels配列から「y_indices[j] * width + x_indices[i]」の位置にある値を取得し、neighborhood_pixelsに格納します。その後、alpha_components、red_components、green_components、blue_components配列を宣言し、neighborhood_pixels内の16ピクセルに対してGetArgb関数を使ってARGB成分を抽出します。
各色成分に対しては、fractional_xおよびfractional_yを引数にBicubicInterpolateComponent関数を呼び出し、その結果をuchar型でalpha_out、red_out、green_out、blue_outに格納します。最後に、これらをビットシフトを使って1つのピクセル値にまとめます。具体的には、alpha_outを24ビット、red_outを16ビット、green_outを8ビットシフトし、blue_outと合わせてuint型の値を作成し、それをスケーリング後の画像で使用できるように返します。これで、ScaleImage関数を呼び出して処理を実行できるようになります。
// Scale the image using bicubic interpolation
ScaleImage(image_pixels, original_image_width, original_image_height, scaled_image_width, scaled_image_height); //--- Scale the image to the calculated dimensions
関数を呼び出した後、スケーリングされた画像を使用して新しいリソースを作成できるようになります。
// Create a unique resource name for the scaled image
string scaled_resource_name = "::ScaledImage" + IntegerToString(scaled_resource_counter++); //--- Generate a unique resource name using the counter

// Create a new resource with the scaled image
if (!ResourceCreate(
   scaled_resource_name, image_pixels, scaled_image_width, scaled_image_height,
   0, 0, scaled_image_width, COLOR_FORMAT_ARGB_NORMALIZE
)) { //--- Create a new resource for the scaled image
   Print("Error: Failed to create resource for scaled image: ", scaled_resource_name); //--- Log an error if resource creation fails
   return false; //--- Return false to indicate failure
}
スケーリングされた画像をリソースとして生成・保存するために、まずscaled_resource_nameという文字列を定義し、「::ScaledImage」とscaled_resource_counterにIntegerToString関数を適用した結果を連結して一意のリソース名を作成します。その後、scaled_resource_counterをインクリメントして、以降のリソース名が重複しないようにします。
次に、ResourceCreate関数を使用して新しいリソースを作成します。引数にはscaled_resource_name、image_pixels配列、scaled_image_width、scaled_image_height、オフセットを0、幅をscaled_image_width、フォーマットをCOLOR_FORMAT_ARGB_NORMALIZEとして指定します。ResourceCreateが失敗した場合は、Print関数を使ってscaled_resource_nameを含むエラーメッセージを出力し、falseを返して処理を中断します。
ここを通過すれば、チャート上に画像を配置して可視化するだけなので、まずは配置座標を定義しましょう。
// Determine image position based on user input
int x_offset, y_offset; //--- Declare variables for x and y offsets
if (CenterImageDynamically) { //--- Check if the user wants to center the image dynamically
   x_offset = (chart_pixel_width - scaled_image_width) / 2; //--- Calculate horizontal offset to center the image
   y_offset = (chart_pixel_height - scaled_image_height) / 2; //--- Calculate vertical offset to center the image
} else {
   // Set base position based on chosen anchor corner
   switch (AnchorCorner) { //--- Select the anchor corner based on user input
      case TOP_LEFT: //--- Handle Top-Left corner
         x_offset = XOffsetFromCorner; //--- Use user-defined x-offset from top-left
         y_offset = YOffsetFromCorner; //--- Use user-defined y-offset from top-left
         break;
      case TOP_RIGHT: //--- Handle Top-Right corner
         x_offset = chart_pixel_width - scaled_image_width - XOffsetFromCorner; //--- Calculate x-offset from right edge
         y_offset = YOffsetFromCorner; //--- Use user-defined y-offset from top
         break;
      case BOTTOM_LEFT: //--- Handle Bottom-Left corner
         x_offset = XOffsetFromCorner; //--- Use user-defined x-offset from left
         y_offset = chart_pixel_height - scaled_image_height - YOffsetFromCorner; //--- Calculate y-offset from bottom
         break;
      case BOTTOM_RIGHT: //--- Handle Bottom-Right corner
         x_offset = chart_pixel_width - scaled_image_width - XOffsetFromCorner; //--- Calculate x-offset from right edge
         y_offset = chart_pixel_height - scaled_image_height - YOffsetFromCorner; //--- Calculate y-offset from bottom
         break;
      default: //--- Handle unexpected case
         x_offset = XOffsetFromCorner; //--- Default to top-left x-offset
         y_offset = YOffsetFromCorner; //--- Default to top-left y-offset
   }
}
位置指定については、x_offsetとy_offsetを宣言します。CenterImageDynamicallyがtrueの場合は、画像を中央に配置し、x_offsetを(chart_pixel_width - scaled_image_width) / 2、y_offsetを(chart_pixel_height - scaled_image_height) / 2とします。
そうでない場合は、AnchorCornerの値に応じてswitch文でオフセットを設定します。TOP_LEFTの場合はXOffsetFromCornerとYOffsetFromCornerをそのまま使用します。TOP_RIGHTの場合はx_offsetを「chart_pixel_width - scaled_image_width - XOffsetFromCorner」とします。BOTTOM_LEFTではy_offsetを「chart_pixel_height - scaled_image_height - YOffsetFromCorner」とします。BOTTOM_RIGHTでは両方を組み合わせて設定します。defaultではXOffsetFromCornerとYOffsetFromCornerを使用します。
次に、定義された座標を使って画像を配置する関数を定義する必要があります。
//+------------------------------------------------------------------+
//| Create and position the chart image object                       |
//+------------------------------------------------------------------+
void CreateFullChartImage(
   string object_name, string resource_name,
   int x_size, int y_size,
   int x_offset, int y_offset,
   bool is_background
) {
   // Create the bitmap label object if it doesn't exist
   if (ObjectFind(0, object_name) < 0) { //--- Check if the object already exists
      ObjectCreate(0, object_name, OBJ_BITMAP_LABEL, 0, 0, 0); //--- Create a new bitmap label object
   }

   // Set object properties
   ObjectSetString(0, object_name, OBJPROP_BMPFILE, resource_name); //--- Set the resource file for the bitmap
   ObjectSetInteger(0, object_name, OBJPROP_XSIZE, x_size); //--- Set the width of the bitmap
   ObjectSetInteger(0, object_name, OBJPROP_YSIZE, y_size); //--- Set the height of the bitmap
   ObjectSetInteger(0, object_name, OBJPROP_XDISTANCE, x_offset); //--- Set the horizontal position of the bitmap
   ObjectSetInteger(0, object_name, OBJPROP_YDISTANCE, y_offset); //--- Set the vertical position of the bitmap
   ObjectSetInteger(0, object_name, OBJPROP_BACK, is_background); //--- Set whether the bitmap is in the background based on input

   // Redraw the chart to update the display
   ChartRedraw(0); //--- Redraw the chart to reflect changes
}
ここでは、チャート上に画像オブジェクトを作成して配置するためのCreateFullChartImage関数を実装します。まず、ObjectFind関数を使ってobject_nameという名前のオブジェクトが存在するかを確認します。存在しない場合(戻り値が0未満)、ObjectCreate関数を使って新しいビットマップラベルオブジェクトを作成します。引数にはobject_name、OBJ_BITMAP_LABEL、およびデフォルトのチャート座標を指定します。
次に、オブジェクトのプロパティを設定します。ObjectSetString関数を使用して、画像のソースとしてresource_nameをOBJPROP_BMPFILEに関連付けます。ObjectSetInteger関数では、サイズと位置の指定としてOBJPROP_XSIZEにx_size、OBJPROP_YSIZEにy_size、OBJPROP_XDISTANCEにx_offset、OBJPROP_YDISTANCEにy_offsetを設定します。OBJPROP_BACKにはis_backgroundを設定して、画像を背景として表示するか前景に表示するかを切り替えます。最後に、ChartRedraw関数を呼び出して、チャートに新しく作成または変更された画像オブジェクトを反映させます。この関数を呼び出すことで、画像をチャート上に可視化します。
CreateFullChartImage(
   CHART_IMAGE_OBJECT_NAME, scaled_resource_name,
   scaled_image_width, scaled_image_height,
   x_offset, y_offset, ImageInBackground
); //--- Create and position the chart image object, using user-specified background setting
関数の呼び出しが完了すれば、準備は整ったことになります。あとは、このメイン関数をOnInitイベントハンドラ内で呼び出すことで、最初の画像を作成することができます。
//+------------------------------------------------------------------+
//| Expert initialization function                                   |
//+------------------------------------------------------------------+
int OnInit() {
   // Display the image on the chart during initialization
   if (!DisplayImageOnChart()) { //--- Attempt to display the image on the chart
      Print("Error: Failed to display the initial image."); //--- Log an error if image display fails
      return (INIT_FAILED); //--- Return failure status if initialization fails
   }
   return (INIT_SUCCEEDED); //--- Return success status if initialization succeeds
}
OnInitイベントハンドラ内では、初期化時に画像を表示するためにDisplayImageOnChart関数を呼び出します。DisplayImageOnChartがfalseを返した場合は、画像の表示に失敗したことを意味するため、エラーメッセージをログに出力し、INIT_FAILEDを返して初期化失敗としてプログラムの実行を停止させます。表示に成功した場合は、INIT_SUCCEEDEDを返して初期化が正常に完了したことを示し、プログラムの実行を継続させます。コンパイルすると、次のようになります。
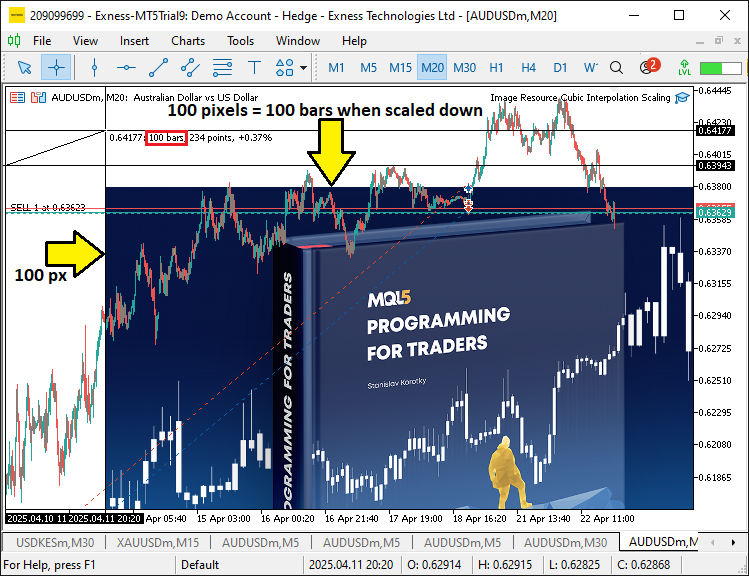
画像から、初回実行時にはリソース画像を正常にマッピングできていることが確認できます。しかし、チャートのサイズが変更された際にも画像が対応できるようにする必要があります。そのためには、OnChartEventイベントハンドラを使用する必要があります。
//+------------------------------------------------------------------+
//| Chart event handler                                              |
//+------------------------------------------------------------------+
void OnChartEvent(
   const int event_id,         // Event ID
   const long &long_param,     // Long type event parameter
   const double &double_param, // Double type event parameter
   const string &string_param  // String type event parameter
) {
   // Handle chart resize events to update the image
   if (event_id == CHARTEVENT_CHART_CHANGE) { //--- Check if the event is a chart change (e.g., resize)
      if (!DisplayImageOnChart()) { //--- Attempt to update the image on the chart
         Print("Error: Failed to update image on chart resize."); //--- Log an error if image update fails
      }
   }
}
ここでは、チャート関連イベントを処理するためにOnChartEventイベントハンドラを定義します。特に、チャートのサイズ変更に対応することを目的としています。まず、event_idがCHARTEVENT_CHART_CHANGEと等しいかどうかを確認します。これはチャートの変更(サイズ変更など)が発生したことを示します。条件が真であれば、DisplayImageOnChart関数を呼び出して、画像の表示を新しいチャートサイズに合わせて更新します。DisplayImageOnChartがfalseを返した場合は、画像の更新に失敗したことを意味するため、問題をユーザーに知らせるエラーメッセージをログに出力します。最後に、プログラムを削除する際には、チャートにマッピングされたすべてのリソースを削除する必要があります。
//+------------------------------------------------------------------+
//| Expert deinitialization function                                 |
//+------------------------------------------------------------------+
void OnDeinit(const int reason) {
   // Clean up by deleting the chart image object
   ObjectDelete(0, CHART_IMAGE_OBJECT_NAME); //--- Remove the chart image object during deinitialization
   // Dynamic resources are automatically freed when the EA is removed //--- Note that dynamic resources are automatically released
}
正常に終了させるために、OnDeinitイベントハンドラ内でObjectDelete関数を呼び出し、CHART_IMAGE_OBJECT_NAMEで識別されるチャート画像オブジェクトをチャートから削除します。これにより、プログラム終了後に不要なオブジェクトが残るのを防ぎます。なお、スケーリングされた画像などの動的リソースは、EAが削除されるとシステムによって自動的に解放されるため、追加のクリーンアップ処理は必要ありません。プログラムを実行すると、次の結果が得られます。
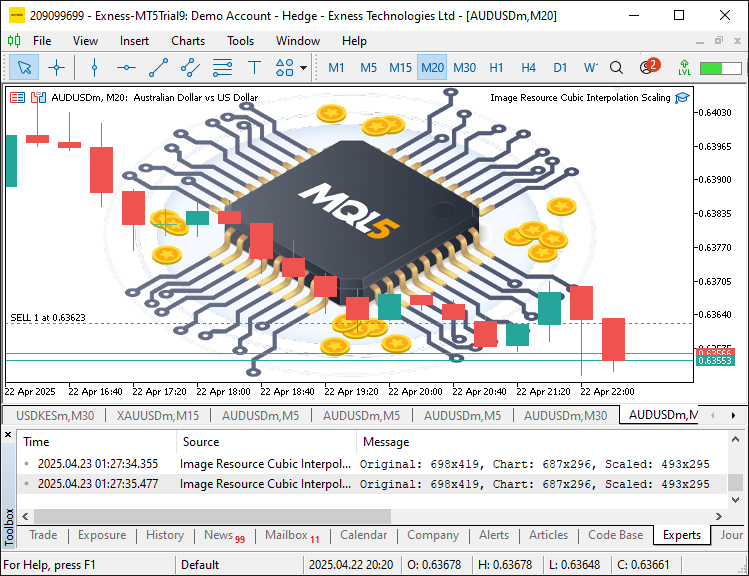
画像から、定義した画像を作成してリソースとして設定し、ユーザー指定に応じて動的にスケーリングすることができ、目的を達成していることが確認できます。残っているのはプログラムを徹底的にテストすることであり、それは次のトピックで扱われます。
テストと検証
私たちはすべてのテストを実施し、それをグラフィカル交換形式(GIF)の可視化にコンパイルしました。これは、プロセス内で品質を損なうことなく、グラフのサイズ変更やユーザー入力に動的に応答することを示しています。
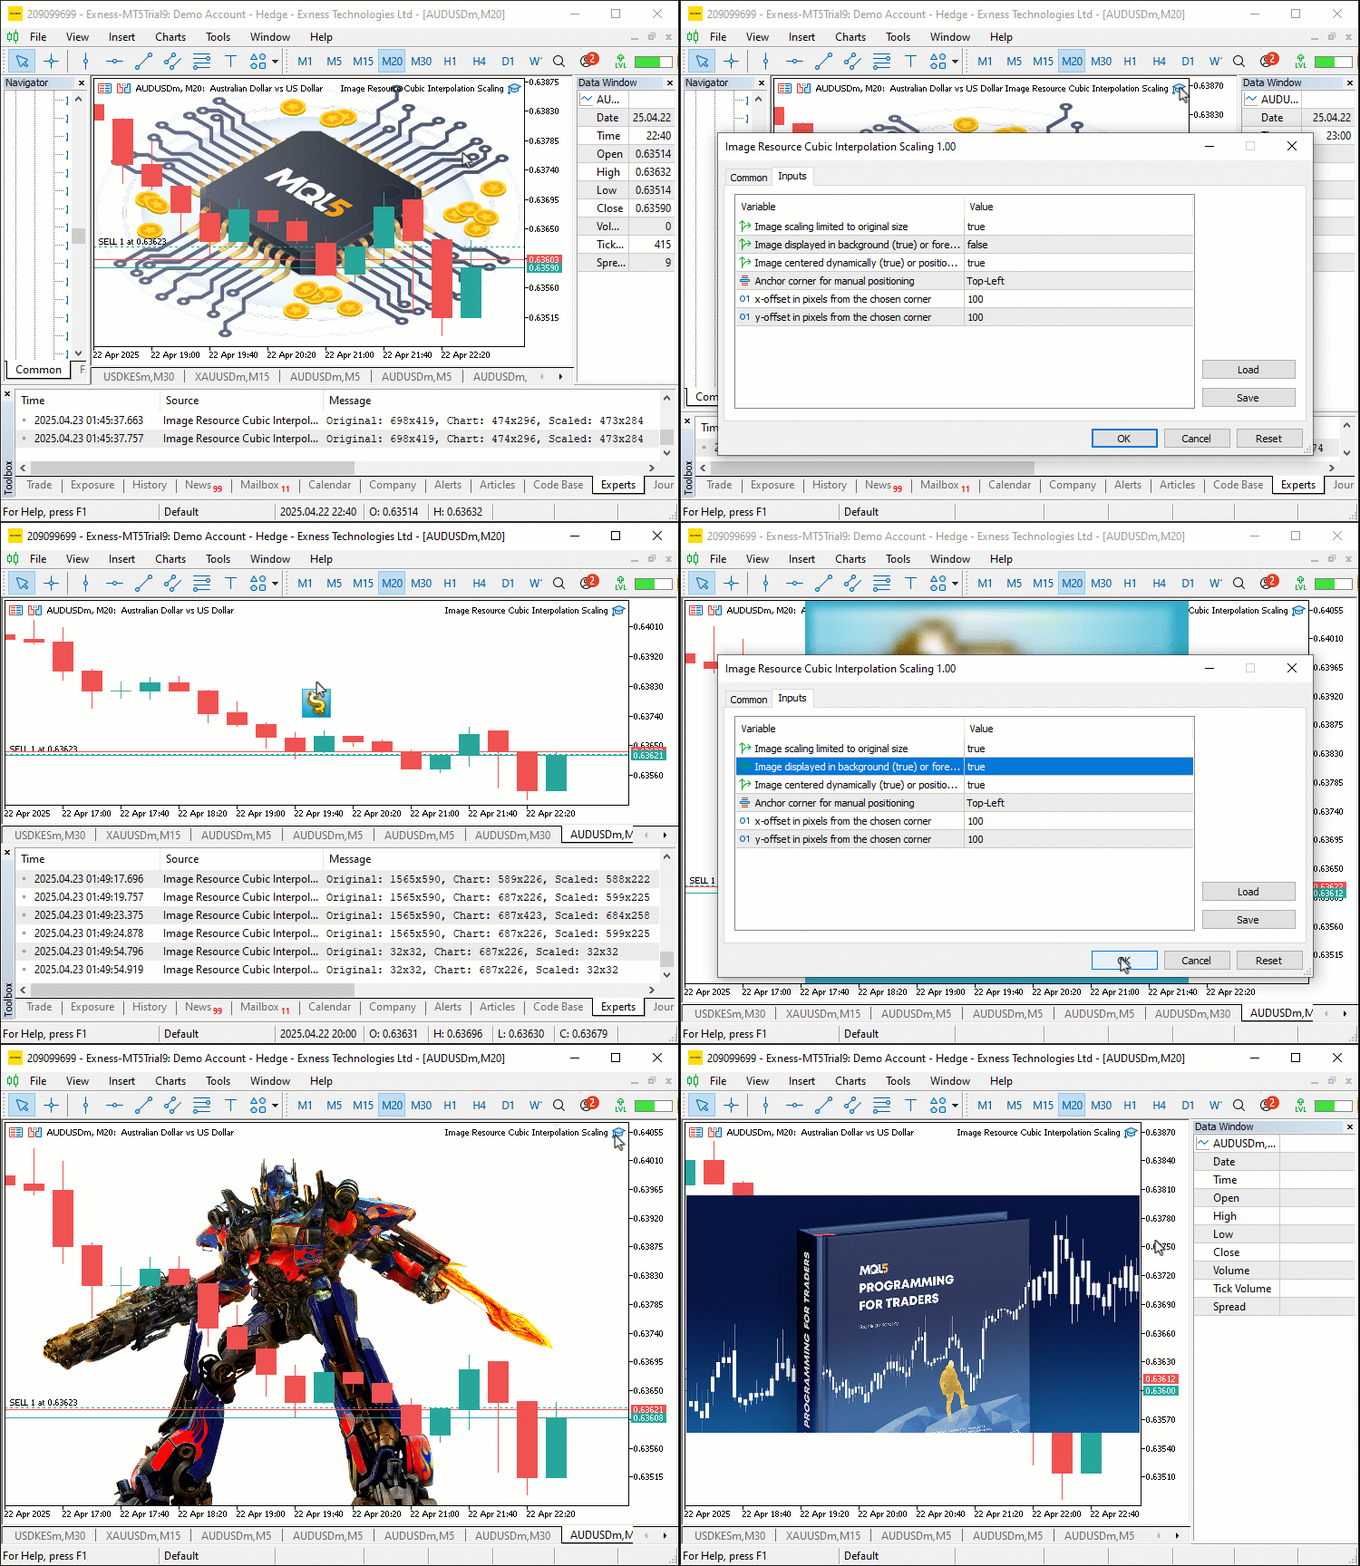
結論
結論として、本記事ではMetaTrader 5チャート上で動的な画像グラフィックスを実現するMQL5ツールを構築しました。バイキュービック補間を用いることで、鮮明かつ柔軟に調整可能なビジュアルを提供しています。ユーザーによる画像のスケーリングや配置を実装・適用する方法も示しました。このツールを活用すれば、取引チャートの機能性や見た目を自由にカスタマイズできます。。
MetaQuotes Ltdにより英語から翻訳されました。
元の記事: https://www.mql5.com/en/articles/17892
警告: これらの資料についてのすべての権利はMetaQuotes Ltd.が保有しています。これらの資料の全部または一部の複製や再プリントは禁じられています。
この記事はサイトのユーザーによって執筆されたものであり、著者の個人的な見解を反映しています。MetaQuotes Ltdは、提示された情報の正確性や、記載されているソリューション、戦略、または推奨事項の使用によって生じたいかなる結果についても責任を負いません。
 Metatrader 5のWebsockets — Windows APIを使用した非同期クライアント接続
 MQL5での取引戦略の自動化(第16回):ミッドナイトレンジブレイクアウト+Break of Structure (BoS)のプライスアクション
 プライスアクション分析ツールキットの開発(第21回):Market Structure Flip Detector Tool
 データサイエンスとML(第37回):ローソク足パターンとAIを活用して市場をリードする
- 無料取引アプリ
- 8千を超えるシグナルをコピー
- 金融ニュースで金融マーケットを探索