手動バックテストを簡単に:MQL5でストラテジーテスター用のカスタムツールキットを構築する
はじめに
取引戦略のバックテストは、成功する取引の基盤です。しかし、すべてのアイデアを自動化するのは制約が多く、とはいえ手動テストでは一貫性や精度に欠けることがよくあります。では、手動取引の柔軟さとMetaTrader 5のストラテジーテスターのパワーを組み合わせることができたらどうでしょうか。本記事では、手動バックテストを直感的かつ効率的に行えるようにする、カスタムのMetaQuotes Language 5 (MQL5)エキスパートアドバイザー(EA)を紹介します。このツールキットを使えば、自分の方法で戦略をテストできる環境が整います。以下の順番で解説していきます。
この記事を読み終える頃には、ストラテジーテスター内で取引アイデアを迅速かつ自信を持ってバックテスト・改善できる、実用的なソリューションを手にしていることでしょう。
計画:手動バックテスト用ツールキットの設計
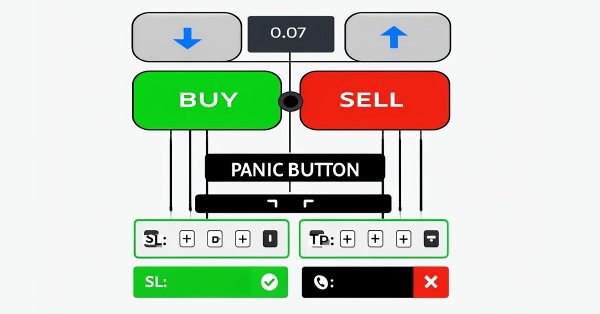
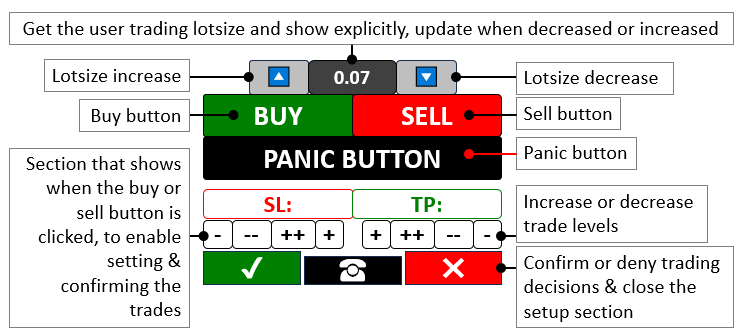
私たちの目標は、MetaTrader 5のストラテジーテスターの高速なバックテスト性能と、手動操作の柔軟性を融合させたツールキットを作成することです。これにより、従来の手動テストで発生するリアルタイムティックの遅さを回避できます。チャート上のボタンで買いや売りの取引を実行し、ロットサイズの調整、ストップロス(SL)やテイクプロフィット(TP)の設定、さらにすべてのポジションを一括で決済する「パニックボタン」を操作できるようプログラムを設計します。これらはすべて、インジケーターや日本のローソク足パターン、プライスアクションなど、あらゆる戦略と組み合わせて使用でき、ストラテジーテスターの高速なスピードで実行できます。この柔軟な構成により、あらゆる取引手法をスピーディかつ正確に、インタラクティブに検証でき、シミュレーション環境における戦略の洗練が効率化されます。以下のようなイメージを目指しています。
MQL5における実装:ツールキットを現実のものにする
MQL5でプログラムを作成するには、まずプログラムのメタデータを定義し、その後にユーザー入力用のパラメータを設定し、最後に取引機能を実現するためのライブラリファイルをインクルードする必要があります。
//+------------------------------------------------------------------+
//|                       Manual backtest toolkit in Strategy Tester |
//|                        Copyright 2025, Forex Algo-Trader, Allan. |
//|                                 "https://t.me/Forex_Algo_Trader" |
//+------------------------------------------------------------------+
#property copyright "Forex Algo-Trader, Allan"
#property link      "https://t.me/Forex_Algo_Trader"
#property version   "1.00"
#property description "This EA Enables manual backtest in the strategy tester"
#property strict //--- Enforce strict coding rules to catch errors early

#define BTN_BUY "BTN BUY" //--- Define the name for the Buy button
#define BTN_SELL "BTN SELL" //--- Define the name for the Sell button
#define BTN_P "BTN P" //--- Define the name for the button that increase lot size
#define BTN_M "BTN M" //--- Define the name for the button that decrease lot size
#define BTN_LOT "BTN LOT" //--- Define the name for the lot size display button
#define BTN_CLOSE "BTN CLOSE" //--- Define the name for the button that close all positions
#define BTN_SL "BTN SL" //--- Define the name for the Stop Loss display button
#define BTN_SL1M "BTN SL1M" //--- Define the name for the button that slightly lower Stop Loss
#define BTN_SL2M "BTN SL2M" //--- Define the name for the button that greatly lower Stop Loss
#define BTN_SL1P "BTN SL1P" //--- Define the name for the button that slightly raise Stop Loss
#define BTN_SL2P "BTN SL2P" //--- Define the name for the button that greatly raise Stop Loss
#define BTN_TP "BTN TP" //--- Define the name for the Take Profit display button
#define BTN_TP1M "BTN TP1M" //--- Define the name for the button that slightly lower Take Profit
#define BTN_TP2M "BTN TP2M" //--- Define the name for the button that greatly lower Take Profit
#define BTN_TP1P "BTN TP1P" //--- Define the name for the button that slightly raise Take Profit
#define BTN_TP2P "BTN TP2P" //--- Define the name for the button that greatly raise Take Profit
#define BTN_YES "BTN YES" //--- Define the name for the button that confirm a trade
#define BTN_NO "BTN NO" //--- Define the name for the button that cancel a trade
#define BTN_IDLE "BTN IDLE" //--- Define the name for the idle button between Yes and No
#define HL_SL "HL SL" //--- Define the name for the Stop Loss horizontal line
#define HL_TP "HL TP" //--- Define the name for the Take Profit horizontal line

#include <Trade/Trade.mqh> //--- Bring in the Trade library needed for trading functions
CTrade obj_Trade; //--- Create a trading object to handle trade operations

bool tradeInAction = false; //--- Track whether a trade setup is currently active
bool isHaveTradeLevels = false; //--- Track whether Stop Loss and Take Profit levels are shown

input double init_lot = 0.03;
input int slow_pts = 10;
input int fast_pts = 100;
ここでは、まずBTN_BUYやBTN_SELLといったインタラクティブなボタンを#defineキーワードで定義し、任意のタイミングで取引を開始できるようにします。これによりエントリーポイントを直接コントロールできます。また、BTN_PとBTN_Mは初期設定が0.03のinit_lotサイズを上下に調整できるボタンで、自分のリスク許容度に合わせて変更できます。さらにBTN_CLOSEは緊急停止用のボタンとして全ポジションを即座に決済するためのものです。そして、tradeInActionで現在取引準備中かどうかを管理し、isHaveTradeLevelsはストップロスやテイクプロフィットの視覚表示が有効かどうかを示します。
次に、<Trade/Trade.mqh>からCTradeクラスを利用し、「obj_Trade」というオブジェクトを作成して、取引の実行をスムーズかつ効率的に管理します。さらに柔軟性を高めるため、slow_ptsを10、fast_ptsを100に設定した調整可能な入力パラメータを追加し、ストップロスやテイクプロフィットのレベルをリアルタイムで微調整できるようにし、どんな戦略にも対応できるツールキットにします。次に、パネルボタンを作成する必要があるため、再利用性とカスタマイズ性を考慮して、すべての入力を受け取る関数を作成しましょう。
//+------------------------------------------------------------------+
//| Create button function                                           |
//+------------------------------------------------------------------+
void CreateBtn(string objName,int xD,int yD,int xS,int yS,string txt,
               int fs=13,color clrTxt=clrWhite,color clrBg=clrBlack,
               color clrBd=clrBlack,string font="Calibri"){
   ObjectCreate(0,objName,OBJ_BUTTON,0,0,0); //--- Create a new button object on the chart
   ObjectSetInteger(0,objName,OBJPROP_XDISTANCE, xD); //--- Set the button's horizontal position
   ObjectSetInteger(0,objName,OBJPROP_YDISTANCE, yD); //--- Set the button's vertical position
   ObjectSetInteger(0,objName,OBJPROP_XSIZE, xS); //--- Set the button's width
   ObjectSetInteger(0,objName,OBJPROP_YSIZE, yS); //--- Set the button's height
   ObjectSetInteger(0,objName,OBJPROP_CORNER, CORNER_LEFT_UPPER); //--- Position the button from the top-left corner
   ObjectSetString(0,objName,OBJPROP_TEXT, txt); //--- Set the text displayed on the button
   ObjectSetInteger(0,objName,OBJPROP_FONTSIZE, fs); //--- Set the font size of the button text
   ObjectSetInteger(0,objName,OBJPROP_COLOR, clrTxt); //--- Set the color of the button text
   ObjectSetInteger(0,objName,OBJPROP_BGCOLOR, clrBg); //--- Set the background color of the button
   ObjectSetInteger(0,objName,OBJPROP_BORDER_COLOR,clrBd); //--- Set the border color of the button
   ObjectSetString(0,objName,OBJPROP_FONT,font); //--- Set the font style of the button text

   ChartRedraw(0); //--- Refresh the chart to show the new button
}
ここでは、CreateBtn関数を定義し、チャート上にBTN_BUYやBTN_SELLなどのボタンを作成します。この関数は、ボタンの識別名を指定するobjName、横と縦の位置を示すxDとyD、幅と高さを指定するxSとyS、そして「BUY」や「SELL」など表示するラベルを表すtxtなどの引数を受け取ります。まず、ObjectCreate関数を使って新しいOBJ_BUTTONオブジェクトをチャート上に作成し、基準座標は簡略化のために(0,0,0)に設定します。次に、ObjectSetInteger関数でOBJPROP_XDISTANCEにxD、OBJPROP_YDISTANCEにyDを設定し、ボタンを正確な位置に配置します。さらに、OBJPROP_XSIZEにxS、OBJPROP_YSIZEにySを設定して、ボタンのサイズを整えます。
配置位置の基準点はOBJPROP_CORNERをCORNER_LEFT_UPPERに設定して左上に固定し、レイアウトの一貫性を保ちます。ObjectSetString関数でOBJPROP_TEXTにtxtを設定し、ボタンの役割を明確に表示させます。スタイル面では、OBJPROP_FONTSIZEにfs(デフォルト13)、OBJPROP_COLORにclrTxt(デフォルト白)、OBJPROP_BGCOLORにclrBg(デフォルト黒)、OBJPROP_BORDER_COLORにclrBd(デフォルト黒)を指定します。また、フォントはOBJPROP_FONTにfont(デフォルトはCalibri)を指定して、全体の見た目を整えます。最後にChartRedraw関数でウィンドウID 0のチャートを更新し、新しいボタンをすぐに表示できるようにします。これにより、ストラテジーテスター内でそのボタンを操作できるようになります。この関数は必要に応じて随時呼び出すことができます。まずはOnInitイベントハンドラ内で実行してボタンを作成します。
//+------------------------------------------------------------------+
//| Expert initialization function                                   |
//+------------------------------------------------------------------+
int OnInit(){
   CreateBtn(BTN_P,150,45,40,25,CharToString(217),15,clrBlack,clrWhite,clrBlack,"Wingdings"); //--- Make the button to increase lot size with an up arrow
   CreateBtn(BTN_LOT,190,45,60,25,string(init_lot),12,clrWhite,clrGray,clrBlack); //--- Make the button showing the current lot size
   CreateBtn(BTN_M,250,45,40,25,CharToString(218),15,clrBlack,clrWhite,clrBlack,"Wingdings"); //--- Make the button to decrease lot size with a down arrow
   CreateBtn(BTN_BUY,110,70,110,30,"BUY",15,clrWhite,clrGreen,clrBlack); //--- Make the Buy button with a green background
   CreateBtn(BTN_SELL,220,70,110,30,"SELL",15,clrWhite,clrRed,clrBlack); //--- Make the Sell button with a red background
   CreateBtn(BTN_CLOSE,110,100,220,30,"PANIC BUTTON (X)",15,clrWhite,clrBlack,clrBlack); //--- Make the emergency button to close all trades

   return(INIT_SUCCEEDED); //--- Tell the system the EA start up successfully
}
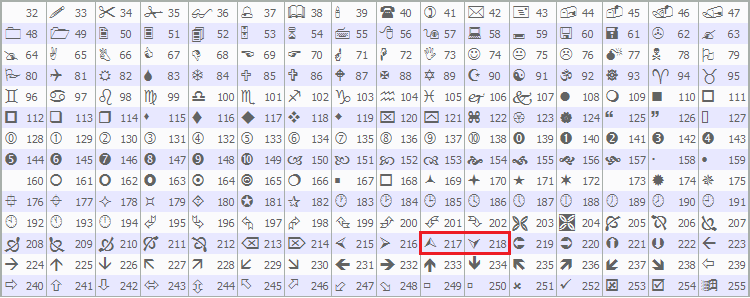
ここでは、OnInitイベントハンドラを使って手動バックテスト用ツールキットの初期化をおこない、ストラテジーテスター内にインターフェイスを構築します。CreateBtn関数を使用して、BTN_PをxD 150、yD 45の位置に配置し、Wingdingsフォントの文字コード217をCharToString(217)で取得した上向き矢印を表示します。BTN_LOTはxD 190にinit_lotの値を表示し、BTN_MはxD 250にCharToString(218)の下向き矢印を設定して、ロットサイズを調整できるようにします。次に、BTN_BUYをxD 110、yD 70に配置してBUYをclrGreenで表示、BTN_SELLはxD 220にSELLをclrRedで表示し、BTN_CLOSEはxD 110、yD 100にPANIC BUTTON (X)をclrBlackで表示して追加します。最後に、returnとINIT_SUCCEEDEDで初期化の成功を通知します。使用しているWingdingsフォントのアイコンは、MQL5であらかじめ定義されている文字コードに基づいています。以下にその一覧を示します。
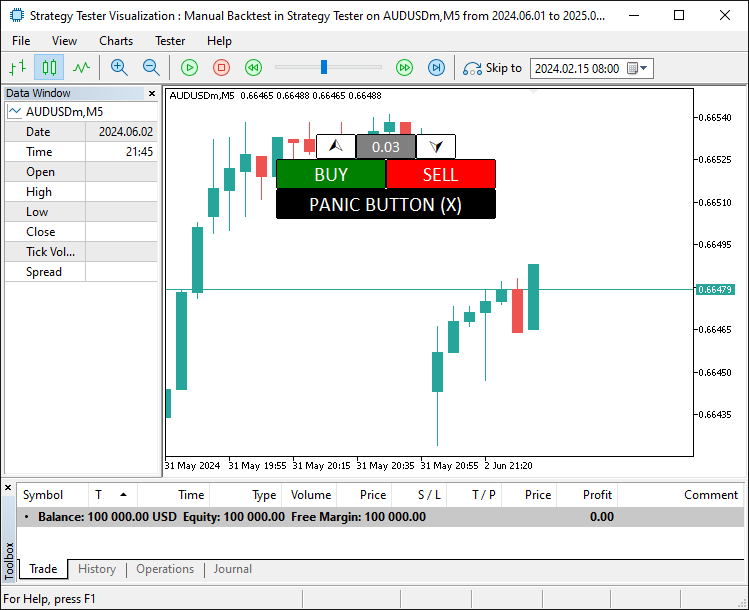
プログラムを実行すると、次の出力が得られます。
これまでに基礎となる背景を整えたので、次は取引に活用するためにボタンの状態や値を読み取る必要があります。したがって、そのための関数もいくつか必要になります。
int GetState(string Name){return (int)ObjectGetInteger(0,Name,OBJPROP_STATE);} //--- Get whether a button is pressed or not
string GetValue(string Name){return ObjectGetString(0,Name,OBJPROP_TEXT);} //--- Get the text shown on an object
double GetValueHL(string Name){return ObjectGetDouble(0,Name,OBJPROP_PRICE);} //--- Get the price level of a horizontal line
ここでは、ボタンクリックを確認するためのGetState関数を定義します。この関数では、ObjectGetInteger関数とOBJPROP_STATEを使ってNameが押されているかどうかを判定します。GetValueでは、ObjectGetStringとOBJPROP_TEXTを使ってNameからテキストを取得し、GetValueHLでは、ObjectGetDoubleとOBJPROP_PRICEを用いてNameの価格レベルを取得し、取引を精密にコントロールすることが可能になります。ストラテジーテスターではOnChartEventイベントハンドラが使えないため、これらの関数を利用して、OnTickイベントハンドラ内でボタンの状態を取得します。以下にその実装方法を示します。
//+------------------------------------------------------------------+
//| Expert tick function                                             |
//+------------------------------------------------------------------+
void OnTick(){
   double Ask = NormalizeDouble(SymbolInfoDouble(_Symbol,SYMBOL_ASK),_Digits); //--- Get the current Ask price and adjust it to the right decimal places
   double Bid = NormalizeDouble(SymbolInfoDouble(_Symbol,SYMBOL_BID),_Digits); //--- Get the current Bid price and adjust it to the right decimal places

   if (GetState(BTN_BUY)==true || GetState(BTN_SELL)){ //--- Check if either the Buy or Sell button is clicked
      tradeInAction = true; //--- Set trade setup to active
   }
}
ここでは、OnTickイベントハンドラを使って、ストラテジーテスター内でツールキットのリアルタイム動作を制御します。NormalizeDouble関数とSymbolInfoDouble関数を使用して、Askに現在のSYMBOL_ASK価格、BidにSYMBOL_BID価格をそれぞれ_Digitsに合わせて正確に設定します。そして、GetStateでBTN_BUYまたはBTN_SELLがtrueである場合、tradeInActionをtrueに設定して取引のセットアップを開始します。この段階で、取引レベルを追加し、レベルの設定や動的な調整ができるようにする必要があります。そのための関数を作成しましょう。
//+------------------------------------------------------------------+
//| Create high low function                                         |
//+------------------------------------------------------------------+
void createHL(string objName,datetime time1,double price1,color clr){
   if (ObjectFind(0,objName) < 0){ //--- Check if the horizontal line doesn’t already exist
      ObjectCreate(0,objName,OBJ_HLINE,0,time1,price1); //--- Create a new horizontal line at the specified price
      ObjectSetInteger(0,objName,OBJPROP_TIME,time1); //--- Set the time property (though not critical for HLINE)
      ObjectSetDouble(0,objName,OBJPROP_PRICE,price1); //--- Set the price level of the horizontal line
      ObjectSetInteger(0,objName,OBJPROP_COLOR,clr); //--- Set the color of the line (red for SL, green for TP)
      ObjectSetInteger(0,objName,OBJPROP_STYLE,STYLE_DASHDOTDOT); //--- Set the line style to dash-dot-dot
      ChartRedraw(0); //--- Refresh the chart to display the new line
   }
}
まず、createHL関数を定義し、ストラテジーテスター内でツールキット用の水平ラインを描画します。ObjectFind関数でobjNameが存在するかを確認し、結果が0未満であれば、ObjectCreate関数を使ってtime1とprice1の位置にOBJ_HLINEを作成します。次に、ObjectSetInteger関数でOBJPROP_TIMEにtime1、OBJPROP_COLORにclr、OBJPROP_STYLEにSTYLE_DASHDOTDOTを設定します。また、ObjectSetDouble関数でOBJPROP_PRICEにprice1を設定し、ChartRedraw関数でウィンドウID 0のチャートを更新してラインを表示します。この関数を他の処理に組み込むことで、取引レベルをシームレスに作成できます。以下にその実装を示します。
//+------------------------------------------------------------------+
//| Create trade levels function                                     |
//+------------------------------------------------------------------+
void CreateTradeLevels(){
   double Ask = NormalizeDouble(SymbolInfoDouble(_Symbol,SYMBOL_ASK),_Digits); //--- Get unnoticed the current Ask price, adjusted for digits
   double Bid = NormalizeDouble(SymbolInfoDouble(_Symbol,SYMBOL_BID),_Digits); //--- Get the current Bid price, adjusted for digits

   string level_SL,level_TP; //--- Declare variables to hold SL and TP levels as strings
   if (GetState(BTN_BUY)==true){ //--- Check if the Buy button is active
      level_SL = string(Bid-100*_Point); //--- Set initial Stop Loss 100 points below Bid for Buy
      level_TP = string(Bid+100*_Point); //--- Set initial Take Profit 100 points above Bid for Buy
   }
   else if (GetState(BTN_SELL)==true){ //--- Check if the Sell button is active
      level_SL = string(Ask+100*_Point); //--- Set initial Stop Loss 100 points above Ask for Sell
      level_TP = string(Ask-100*_Point); //--- Set initial Take Profit 100 points below Ask for Sell
   }

   createHL(HL_SL,0,double(level_SL),clrRed); //--- Create a red Stop Loss line at the calculated level
   createHL(HL_TP,0,double(level_TP),clrGreen); //--- Create a green Take Profit line at the calculated level

   CreateBtn(BTN_SL,110,135,110,23,"SL: "+GetValue(HL_SL),13,clrRed,clrWhite,clrRed); //--- Make a button showing the Stop Loss level
   CreateBtn(BTN_TP,220,135,110,23,"TP: "+GetValue(HL_TP),13,clrGreen,clrWhite,clrGreen); //--- Make a button showing the Take Profit level

   CreateBtn(BTN_SL1M,110,158,27,20,"-",17,clrBlack,clrWhite,clrGray); //--- Make a button to slightly lower Stop Loss
   CreateBtn(BTN_SL2M,137,158,27,20,"--",17,clrBlack,clrWhite,clrGray); //--- Make a button to greatly lower Stop Loss
   CreateBtn(BTN_SL2P,164,158,27,20,"++",17,clrBlack,clrWhite,clrGray); //--- Make a button to greatly raise Stop Loss
   CreateBtn(BTN_SL1P,191,158,27,20,"+",17,clrBlack,clrWhite,clrGray); //--- Make a button to slightly raise Stop Loss

   CreateBtn(BTN_TP1P,222,158,27,20,"+",17,clrBlack,clrWhite,clrGray); //--- Make a button to slightly raise Take Profit
   CreateBtn(BTN_TP2P,249,158,27,20,"++",17,clrBlack,clrWhite,clrGray); //--- Make a button to greatly raise Take Profit
   CreateBtn(BTN_TP2M,276,158,27,20,"--",17,clrBlack,clrWhite,clrGray); //--- Make a button to greatly lower Take Profit
   CreateBtn(BTN_TP1M,303,158,27,20,"-",17,clrBlack,clrWhite,clrGray); //--- Make a button to slightly lower Take Profit

   CreateBtn(BTN_YES,110,178,70,30,CharToString(254),20,clrWhite,clrDarkGreen,clrWhite,"Wingdings"); //--- Make a green checkmark button to confirm the trade
   CreateBtn(BTN_NO,260,178,70,30,CharToString(253),20,clrWhite,clrDarkRed,clrWhite,"Wingdings"); //--- Make a red X button to cancel the trade
   CreateBtn(BTN_IDLE,180,183,80,25,CharToString(40),20,clrWhite,clrBlack,clrWhite,"Wingdings"); //--- Make a neutral button between Yes and No
}
ここでは、CreateTradeLevels関数を定義し、取引レベルの設定をおこないます。SymbolInfoDouble関数とNormalizeDouble関数を使って、AskにSYMBOL_ASK、BidにSYMBOL_BIDを_Digitsで調整して設定し、level_SLとlevel_TPを文字列型で宣言します。GetStateでBTN_BUYがtrueの場合、level_SLを「Bid-100_Point」、level_TPを「Bid+100_Point」に設定し、BTN_SELLがtrueの場合は、level_SLを「Ask+100_Point」、level_TPを「Ask-100_Point」に設定します。
次に、createHL関数を使って、level_SLをdoubleに変換してclrRedの色でHL_SLを、level_TPをdoubleに変換してclrGreenの色でHL_TPを描画します。そして、CreateBtn関数を使って、GetValue(HL_SL)のテキストを持つBTN_SLや、GetValue(HL_TP)のBTN_TP、さらに調整用のボタンBTN_SL1M、BTN_SL2M、BTN_SL2P、BTN_SL1P、BTN_TP1P、BTN_TP2P、BTN_TP2M、BTN_TP1Mなどをマイナス記号やプラス記号で作成します。加えて、確認用、キャンセル用、中立操作用として、Wingdingsフォントの記号をCharToString関数で取得して、BTN_YES、BTN_NO、BTN_IDLEを作成します。この関数を使用することで、BUYやSELLボタンがクリックされたときに、取引レベルの初期化処理をおこなえるようになります。
if (!isHaveTradeLevels){ //--- Check if trade levels aren't already on the chart
   CreateTradeLevels(); //--- Add Stop Loss and Take Profit levels and controls to the chart
   isHaveTradeLevels = true; //--- Mark that trade levels are now present
}
ここでは、!isHaveTradeLevelsでisHaveTradeLevelsがfalseかどうかをチェックし、falseの場合にCreateTradeLevels関数を使ってチャート上にストップロスとテイクプロフィットのコントロールを配置します。その後、isHaveTradeLevelsをtrueに更新して有効状態を示します。コンパイルすると、次の結果が得られます。
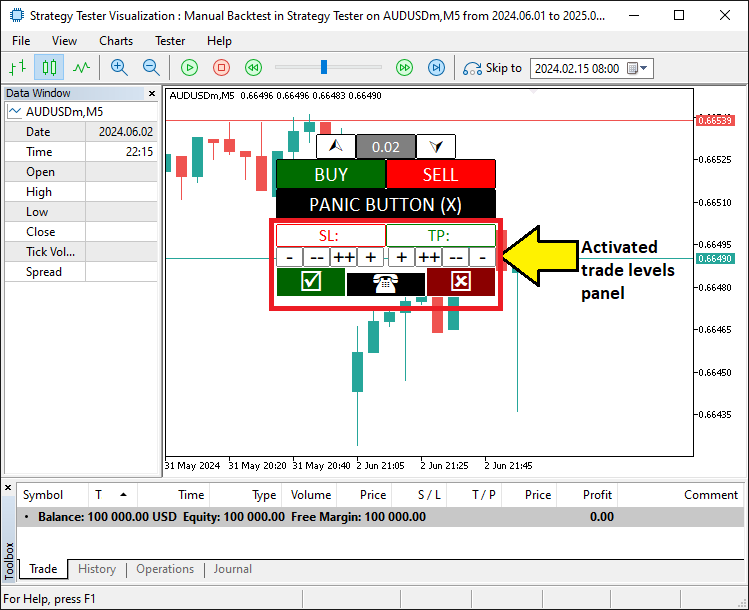
次に、取引レベル用のボタンを動作させて、実際に機能するようにする必要があります。以下にその実装方法を示します。
if (tradeInAction){ //--- Continue if a trade setup is active

   // SL SLOW/FAST BUTTONS
   if (GetState(BTN_SL1M)){ //--- Check if the small Stop Loss decrease button is clicked
      ObjectSetDouble(0,HL_SL,OBJPROP_PRICE,GetValueHL(HL_SL)-slow_pts*_Point); //--- Move the Stop Loss down by a small amount
      ObjectSetInteger(0,BTN_SL1M,OBJPROP_STATE,false); //--- Turn off the button press state
      ChartRedraw(0); //--- Refresh the chart to show the change
   }
   if (GetState(BTN_SL2M)){ //--- Check if the large Stop Loss decrease button is clicked
      ObjectSetDouble(0,HL_SL,OBJPROP_PRICE,GetValueHL(HL_SL)-fast_pts*_Point); //--- Move the Stop Loss down by a large amount
      ObjectSetInteger(0,BTN_SL2M,OBJPROP_STATE,false); //--- Turn off the button press state
      ChartRedraw(0); //--- Refresh the chart to show the change
   }
   if (GetState(BTN_SL1P)){ //--- Check if the small Stop Loss increase button is clicked
      ObjectSetDouble(0,HL_SL,OBJPROP_PRICE,GetValueHL(HL_SL)+slow_pts*_Point); //--- Move the Stop Loss up by a small amount
      ObjectSetInteger(0,BTN_SL1P,OBJPROP_STATE,false); //--- Turn off the button press state
      ChartRedraw(0); //--- Refresh the chart to show the change
   }
   if (GetState(BTN_SL2P)){ //--- Check if the large Stop Loss increase button is clicked
      ObjectSetDouble(0,HL_SL,OBJPROP_PRICE,GetValueHL(HL_SL)+fast_pts*_Point); //--- Move the Stop Loss up by a large amount
      ObjectSetInteger(0,BTN_SL2P,OBJPROP_STATE,false); //--- Turn off the button press state
      ChartRedraw(0); //--- Refresh the chart to show the change
   }

   // TP SLOW/FAST BUTTONS
   if (GetState(BTN_TP1M)){ //--- Check if the small Take Profit decrease button is clicked
      ObjectSetDouble(0,HL_TP,OBJPROP_PRICE,GetValueHL(HL_TP)-slow_pts*_Point); //--- Move the Take Profit down by a small amount
      ObjectSetInteger(0,BTN_TP1M,OBJPROP_STATE,false); //--- Turn off the button press state
      ChartRedraw(0); //--- Refresh the chart to show the change
   }
   if (GetState(BTN_TP2M)){ //--- Check if the large Take Profit decrease button is clicked
      ObjectSetDouble(0,HL_TP,OBJPROP_PRICE,GetValueHL(HL_TP)-fast_pts*_Point); //--- Move the Take Profit down by a large amount
      ObjectSetInteger(0,BTN_TP2M,OBJPROP_STATE,false); //--- Turn off the button press state
      ChartRedraw(0); //--- Refresh the chart to show the change
   }
   if (GetState(BTN_TP1P)){ //--- Check if the small Take Profit increase button is clicked
      ObjectSetDouble(0,HL_TP,OBJPROP_PRICE,GetValueHL(HL_TP)+slow_pts*_Point); //--- Move the Take Profit up by a small amount
      ObjectSetInteger(0,BTN_TP1P,OBJPROP_STATE,false); //--- Turn off the button press state
      ChartRedraw(0); //--- Refresh the chart to show the change
   }
   if (GetState(BTN_TP2P)){ //--- Check if the large Take Profit increase button is clicked
      ObjectSetDouble(0,HL_TP,OBJPROP_PRICE,GetValueHL(HL_TP)+fast_pts*_Point); //--- Move the Take Profit up by a large amount
      ObjectSetInteger(0,BTN_TP2P,OBJPROP_STATE,false); //--- Turn off the button press state
      ChartRedraw(0); //--- Refresh the chart to show the change
   }

}
ここでは、tradeInActionがtrueのときにストップロスとテイクプロフィットの調整をツールキット内で管理します。GetState関数を使ってBTN_SL1M、BTN_SL2M、BTN_SL1P、BTN_SL2Pなどのボタンが押されたかをチェックし、ObjectSetDouble関数とOBJPROP_PRICE、GetValueHLを用いてHL_SLをslow_pts_Pointやfast_pts_Point分だけ調整します。その後、ObjectSetInteger関数でOBJPROP_STATEをfalseにリセットし、ChartRedraw関数でチャートを更新します。同様に、BTN_TP1M、BTN_TP2M、BTN_TP1P、BTN_TP2Pのボタン操作でHL_TPの調整をおこないます。最後にレベルが確定したら、配置を確定してそれぞれのポジションをオープンし、取引レベル設定パネルをクリアしますが、その前にレベル設定パネルを削除する関数が必要です。
//+------------------------------------------------------------------+
//| Delete objects function                                          |
//+------------------------------------------------------------------+
void DeleteObjects_SLTP(){
   ObjectDelete(0,HL_SL); //--- Remove the Stop Loss line from the chart
   ObjectDelete(0,HL_TP); //--- Remove the Take Profit line from the chart
   ObjectDelete(0,BTN_SL); //--- Remove the Stop Loss display button
   ObjectDelete(0,BTN_TP); //--- Remove the Take Profit display button
   ObjectDelete(0,BTN_SL1M); //--- Remove the small Stop Loss decrease button
   ObjectDelete(0,BTN_SL2M); //--- Remove the large Stop Loss decrease button
   ObjectDelete(0,BTN_SL1P); //--- Remove the small Stop Loss increase button
   ObjectDelete(0,BTN_SL2P); //--- Remove the large Stop Loss increase button
   ObjectDelete(0,BTN_TP1P); //--- Remove the small Take Profit increase button
   ObjectDelete(0,BTN_TP2P); //--- Remove the large Take Profit increase button
   ObjectDelete(0,BTN_TP2M); //--- Remove the large Take Profit decrease button
   ObjectDelete(0,BTN_TP1M); //--- Remove the small Take Profit decrease button
   ObjectDelete(0,BTN_YES); //--- Remove the confirm trade button
   ObjectDelete(0,BTN_NO); //--- Remove the cancel trade button
   ObjectDelete(0,BTN_IDLE); //--- Remove the idle button

   ChartRedraw(0); //--- Refresh the chart to show all objects removed
}
ここでは、DeleteObjects_SLTP関数でツールキットのクリーンアップをおこないます。ObjectDelete関数を使ってHL_SL、HL_TP、BTN_SL、BTN_TP、BTN_SL1M、BTN_SL2M、BTN_SL1P、BTN_SL2P、BTN_TP1P、BTN_TP2P、BTN_TP2M、BTN_TP1M、BTN_YES、BTN_NO、BTN_IDLEをチャートから削除し、その後ChartRedraw関数にウィンドウID 0を渡してチャートを更新して、すべてのオブジェクトが削除された状態を表示します。この関数は注文処理のロジック内で使用できます。
// BUY ORDER PLACEMENT
if (GetState(BTN_BUY) && GetState(BTN_YES)){ //--- Check if both Buy and Yes buttons are clicked
   obj_Trade.Buy(double(GetValue(BTN_LOT)),_Symbol,Ask,GetValueHL(HL_SL),GetValueHL(HL_TP)); //--- Place a Buy order with set lot size, SL, and TP
   DeleteObjects_SLTP(); //--- Remove all trade level objects from the chart
   isHaveTradeLevels = false; //--- Mark that trade levels are no longer present
   ObjectSetInteger(0,BTN_YES,OBJPROP_STATE,false); //--- Turn off the Yes button press state
   ObjectSetInteger(0,BTN_BUY,OBJPROP_STATE,false); //--- Turn off the Buy button press state
   tradeInAction = false; //--- Mark the trade setup as complete
   ChartRedraw(0); //--- Refresh the chart to reflect changes
}
// SELL ORDER PLACEMENT
else if (GetState(BTN_SELL) && GetState(BTN_YES)){ //--- Check if both Sell and Yes buttons are clicked
   obj_Trade.Sell(double(GetValue(BTN_LOT)),_Symbol,Bid,GetValueHL(HL_SL),GetValueHL(HL_TP)); //--- Place a Sell order with set lot size, SL, and TP
   DeleteObjects_SLTP(); //--- Remove all trade level objects from the chart
   isHaveTradeLevels = false; //--- Mark that trade levels are no longer present
   ObjectSetInteger(0,BTN_YES,OBJPROP_STATE,false); //--- Turn off the Yes button press state
   ObjectSetInteger(0,BTN_SELL,OBJPROP_STATE,false); //--- Turn off the Sell button press state
   tradeInAction = false; //--- Mark the trade setup as complete
   ChartRedraw(0); //--- Refresh the chart to reflect changes
}
else if (GetState(BTN_NO)){ //--- Check if the No button is clicked to cancel
   DeleteObjects_SLTP(); //--- Remove all trade level objects from the chart
   isHaveTradeLevels = false; //--- Mark that trade levels are no longer present
   ObjectSetInteger(0,BTN_NO,OBJPROP_STATE,false); //--- Turn off the No button press state
   ObjectSetInteger(0,BTN_BUY,OBJPROP_STATE,false); //--- Turn off the Buy button press state
   ObjectSetInteger(0,BTN_SELL,OBJPROP_STATE,false); //--- Turn off the Sell button press state
   tradeInAction = false; //--- Mark the trade setup as canceled
   ChartRedraw(0); //--- Refresh the chart to reflect changes
}
ツールキット内でストラテジーテスターを使って取引を実行します。GetState関数でBTN_BUYとBTN_YESがtrueかどうかを確認し、trueの場合はobj_Trade.Buyメソッドを使ってdouble(GetValue(BTN_LOT))、_Symbol、Ask、GetValueHL(HL_SL)、GetValueHL(HL_TP)を引数に買い注文を出します。BTN_SELLとBTN_YESがtrueの場合はobj_Trade.Sellメソッドを使い、Bidを引数にします。いずれの場合もDeleteObjects_SLTP関数でオブジェクトをクリアし、isHaveTradeLevelsとtradeInActionをfalseに設定します。さらにObjectSetInteger関数でBTN_YES、BTN_BUY、BTN_SELLのOBJPROP_STATEをfalseにリセットし、ChartRedraw関数でチャートを更新します。BTN_NOがtrueの場合はオブジェクトをクリアし状態をリセットしてキャンセルします。同様に取引量を増減させるボタンの操作も次のように処理します。
if (GetState(BTN_P)==true){ //--- Check if the lot size increase button is clicked
   double newLot = (double)GetValue(BTN_LOT); //--- Get the current lot size as a number
   double lotStep = SymbolInfoDouble(_Symbol,SYMBOL_VOLUME_STEP); //--- Get the minimum lot size change allowed
   newLot += lotStep; //--- Increase the lot size by one step
   newLot = NormalizeDouble(newLot,2); //--- Round the new lot size to 2 decimal places
   newLot = newLot > 0.1 ? lotStep : newLot; //--- Ensure lot size doesn't exceed 0.1, otherwise reset to step
   ObjectSetString(0,BTN_LOT,OBJPROP_TEXT,string(newLot)); //--- Update the lot size display with the new value
   ObjectSetInteger(0,BTN_P,OBJPROP_STATE,false); //--- Turn off the increase button press state
   ChartRedraw(0); //--- Refresh the chart to show the new lot size
}
if (GetState(BTN_M)==true){ //--- Check if the lot size decrease button is clicked
   double newLot = (double)GetValue(BTN_LOT); //--- Get the current lot size as a number
   double lotStep = SymbolInfoDouble(_Symbol,SYMBOL_VOLUME_STEP); //--- Get the minimum lot size change allowed
   newLot -= lotStep; //--- Decrease the lot size by one step
   newLot = NormalizeDouble(newLot,2); //--- Round the new lot size to 2 decimal places
   newLot = newLot < lotStep ? lotStep : newLot; //--- Ensure lot size doesn't go below minimum, otherwise set to step
   ObjectSetString(0,BTN_LOT,OBJPROP_TEXT,string(newLot)); //--- Update the lot size display with the new value
   ObjectSetInteger(0,BTN_M,OBJPROP_STATE,false); //--- Turn off the decrease button press state
   ChartRedraw(0); //--- Refresh the chart to show the new lot size
}
ここではロットサイズの調整をおこないます。まず増加の場合、GetState関数でBTN_Pがtrueかを確認し、GetValue関数でBTN_LOTからnewLotを取得します。次にSymbolInfoDouble関数でSYMBOL_VOLUME_STEPからlotStepを取得し、newLotにlotStepを加算します。NormalizeDouble関数で小数点以下2桁に丸め、0.1を超える場合はlotStepで上限を設定します。その後、ObjectSetString関数でBTN_LOTのOBJPROP_TEXTを更新し、ObjectSetInteger関数でBTN_PのOBJPROP_STATEをfalseにリセットし、ChartRedraw関数でチャートを更新します。
減少の場合はGetState関数でBTN_Mをチェックし、同様にnewLotを取得した後、lotStepを減算してnewLotを最低lotStepまで維持します。ObjectSetString関数、ObjectSetInteger関数、ChartRedraw関数の手順でBTN_LOTを更新し、BTN_Mの状態をリセットします。パニックボタンについては、クリックされたときにすべてのポジションを決済する関数を定義する必要があります。
//+------------------------------------------------------------------+
//| Close all positions function                                     |
//+------------------------------------------------------------------+
void closeAllPositions(){
   for (int i=PositionsTotal()-1; i>=0; i--){ //--- Loop through all open positions, starting from the last one
      ulong ticket = PositionGetTicket(i); //--- Get the ticket number of the current position
      if (ticket > 0){ //--- Check if the ticket is valid
         if (PositionSelectByTicket(ticket)){ //--- Select the position by its ticket number
            if (PositionGetString(POSITION_SYMBOL)==_Symbol){ //--- Check if the position is for the current chart symbol
               obj_Trade.PositionClose(ticket); //--- Close the selected position
            }
         }
      }
   }
}
closeAllPositions関数で全ポジションの決済をおこないます。PositionsTotal関数でポジション数を取得し、最後のポジションのインデックス(PositionsTotal - 1)から0までループします。PositionGetTicket関数で各インデックスiのticketを取得し、有効なticketであればPositionSelectByTicketで選択します。次にPositionGetStringでPOSITION_SYMBOLが_Symbolと一致するか確認し、一致すればobj_Trade.PositionCloseメソッドを使ってそのticketのポジションを決済します。この関数はパニックボタンがクリックされたときに呼び出して全ポジションを閉じるために使います。
if (GetState(BTN_CLOSE)==true){ //--- Check if the close all positions button is clicked
   closeAllPositions(); //--- Close all open trades
   ObjectSetInteger(0,BTN_CLOSE,OBJPROP_STATE,false); //--- Turn off the close button press state
   ChartRedraw(0); //--- Refresh the chart to reflect closed positions
}
全取引の決済を管理するために、GetState関数でBTN_CLOSEがtrueかを確認します。trueの場合、closeAllPositions関数を呼び出してすべてのポジションを決済し、その後ObjectSetInteger関数でBTN_CLOSEのOBJPROP_STATEをfalseに設定し、ChartRedraw関数にウィンドウID 0を指定してチャートを更新します。プログラムをコンパイルして実行すると、以下の結果が得られます。
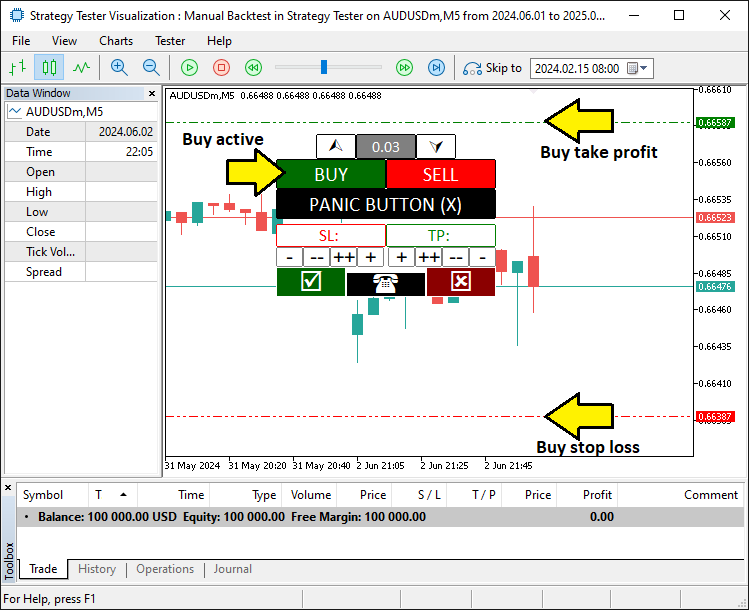
画像から、取引レベルを設定し、ポジションを動的にオープンできていることが確認でき、目的を達成しています。あとはプログラムを十分にテストするだけであり、その内容は以下の次のトピックで扱います。
バックテスト実践:ツールキットの使用法
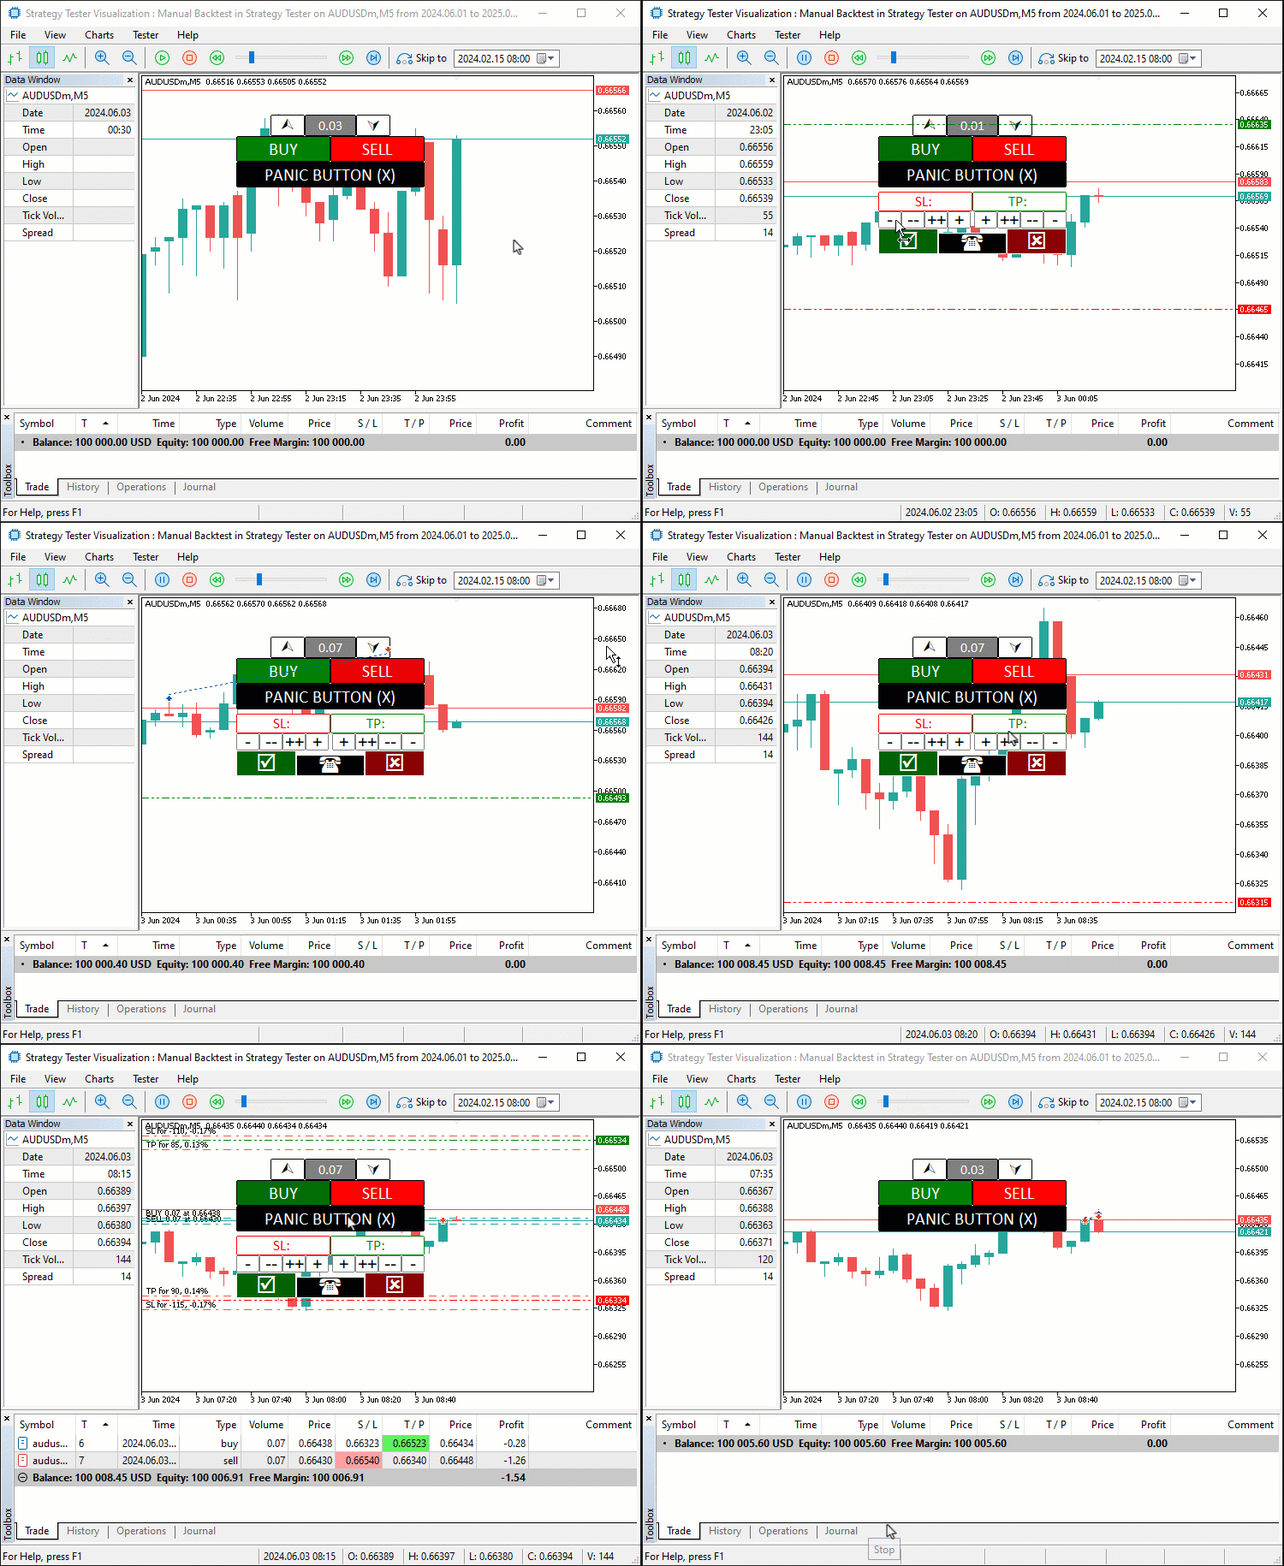
MetaTrader 5のストラテジーテスターでツールキットをテストします。プログラムを読み込み、設定を選択して開始してください。以下のGraphics Interchange Format (GIF)では、Buy、Sell、調整ボタンが高速で動作する様子を確認できます。[Buy]または[Sell]をクリックし、ストップロス、テイクプロフィット、ロットサイズを調整し、Yesで確定、Noでキャンセル、そしてパニックボタンで全取引を素早く閉じることができます。どうぞご覧ください。
結論
今回、手動操作の自由度とMQL5のストラテジーテスターの高速性を融合させた手動バックテスト用ツールキットを作成しました。これにより、取引アイデアの検証がより簡単になりました。設計方法、コーディング手順、ボタン操作による取引調整の使い方を紹介し、高速かつ正確なシミュレーションに対応した内容となっています。このツールキットは用途に応じてカスタマイズ可能で、バックテストの効率化に役立てることができます。
MetaQuotes Ltdにより英語から翻訳されました。
元の記事: https://www.mql5.com/en/articles/17751
警告: これらの資料についてのすべての権利はMetaQuotes Ltd.が保有しています。これらの資料の全部または一部の複製や再プリントは禁じられています。
この記事はサイトのユーザーによって執筆されたものであり、著者の個人的な見解を反映しています。MetaQuotes Ltdは、提示された情報の正確性や、記載されているソリューション、戦略、または推奨事項の使用によって生じたいかなる結果についても責任を負いません。
 PythonとMQL5を使用した特徴量エンジニアリング(第4回):UMAP回帰によるローソク足パターン認識
 プライスアクション分析ツールキットの開発(第19回):ZigZag Analyzer
 ダイナミックマルチペアEAの形成(第2回):ポートフォリオの分散化と最適化
 MQL5での取引戦略の自動化(第14回):MACD-RSI統計手法を用いた取引レイヤリング戦略
- 無料取引アプリ
- 8千を超えるシグナルをコピー
- 金融ニュースで金融マーケットを探索
タイムフレームの違いについて
こんにちは。現在は1つのタイムフレームだけです。近い将来、試してみてください。
ありがとう。
もちろんです。
mq4のインジケーターをmq5に変換する方法を教えてください。
新しい記事をご覧ください:手動バックテストが簡単に:MQL5でストラテジー・テスターのカスタム・ツールキットを構築する。
著者アラン・ムネネ・ムティリア