Price Action Gold Trader
- Indicators
- Kristhara Tharaviriyadech
- Version: 1.3
- Updated: 15 December 2025
- Activations: 20
**Price Action Gold Trader** is a sophisticated, non-repainting multi-timeframe Price Action analysis indicator specifically designed for **XAUUSD (Gold)** trading on MetaTrader 4. This professional-grade tool automatically detects Price Action patterns, provides structured entry zones, precise stop-loss levels, dynamic take-profit targets, and comprehensive market state diagnostics.
Built with systematic trading in mind, this indicator transforms complex Price Action analysis into a fully automated, rule-based trading system. It does not repaint, supports multi-timeframe confirmation, and provides real-time alerts across H4 and H1 timeframes.
---
### ✨ **Key Features**
#### **1. Non-Repainting Signals**
- ✅ All signals are confirmed only after bar closure
- ✅ No false signals or signal disappearance
- ✅ Reliable and trustworthy trading signals
#### **2. Multi-Timeframe Analysis**
- **H4 (Primary Timeframe)**: Main analysis and signal generation
- **H1 (Entry Timeframe)**: Precise entry trigger detection
- **D1 (Context Timeframe)**: Higher timeframe market context and bias
#### **3. Automated Pattern Detection**
The indicator automatically detects three powerful Price Action patterns:
- **PAT1 (Pin Bar)**: Reversal pattern with customizable body/wick ratios
- **PAT2 (Engulfing)**: Strong reversal pattern with configurable engulf percentage
- **PAT3 (3-Bar Pattern)**: Advanced pattern with body collection zone analysis
#### **4. Dual Entry System**
- **Entry 1**: Faster entry with higher risk/reward ratio
- **Entry 2**: More conservative entry with additional confirmation
- Automatic checkpoint detection for optimal entry timing
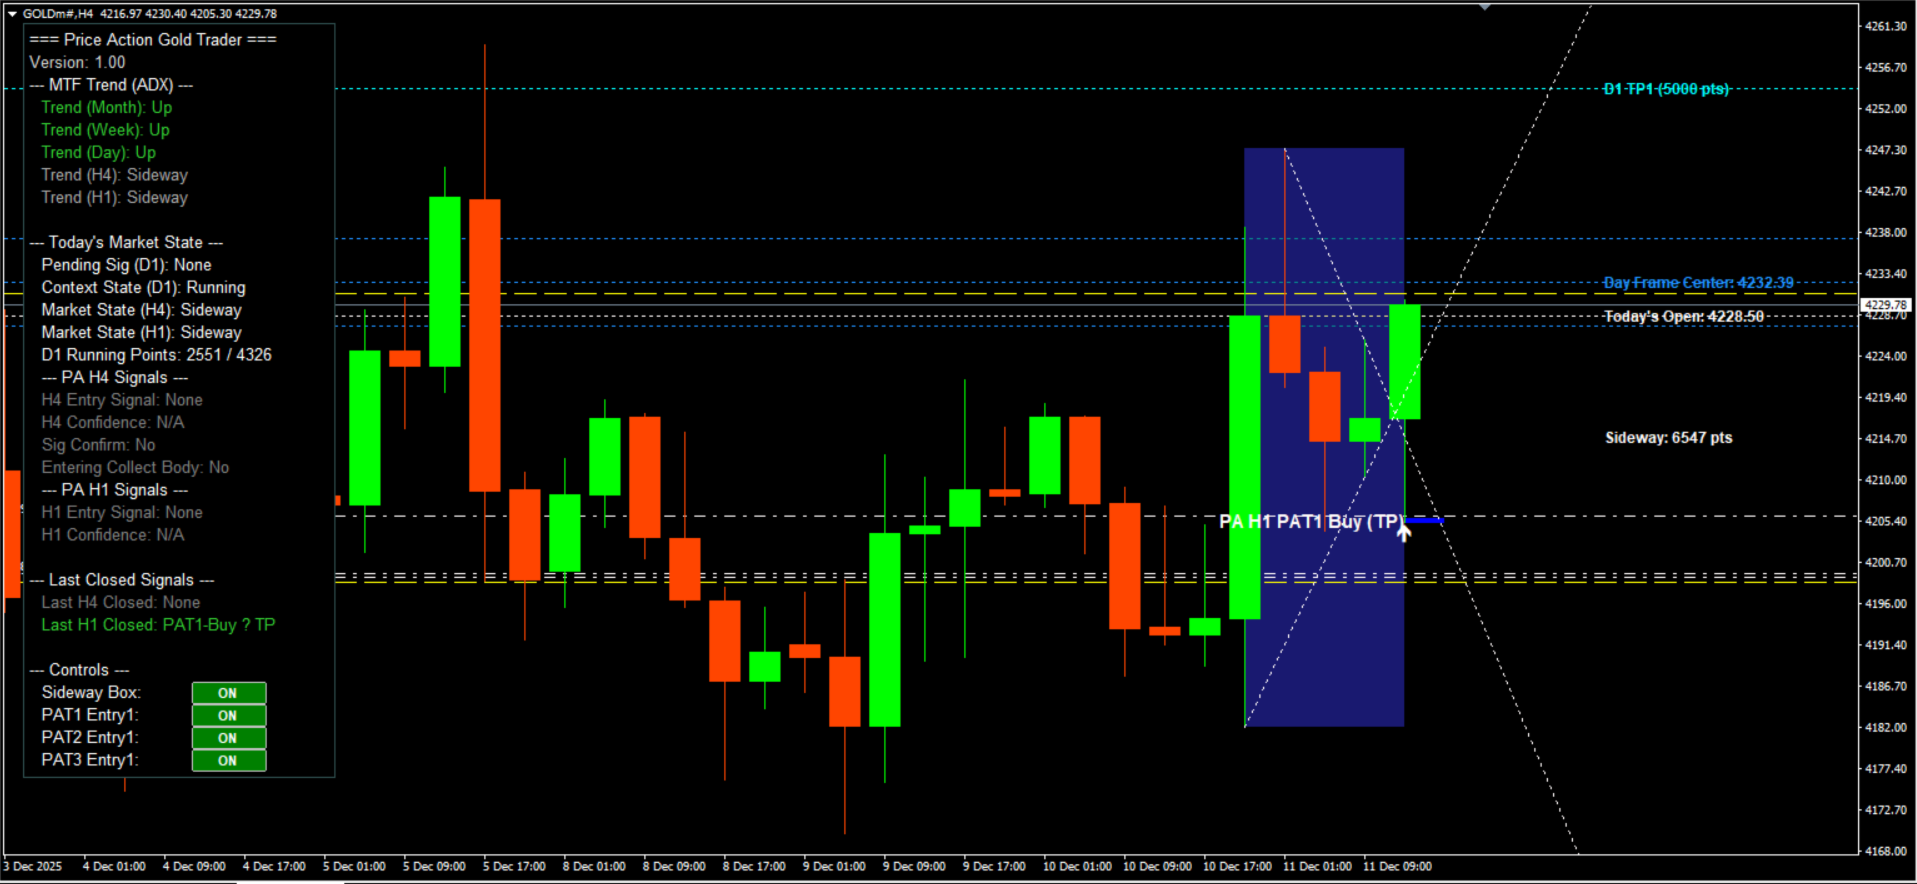
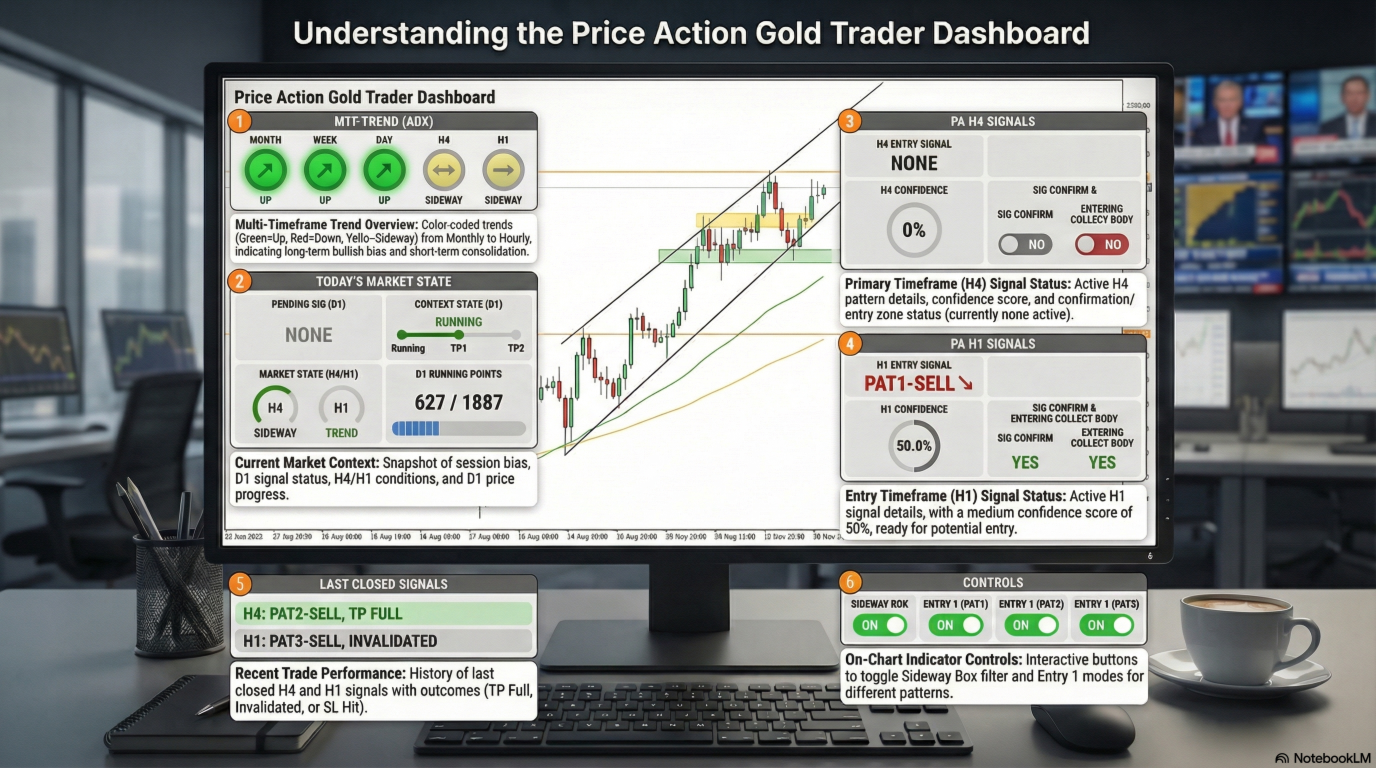
#### **5. Real-Time Dashboard**
Comprehensive on-chart dashboard displaying:
- Multi-timeframe trend analysis (Month, Week, Day, H4, H1) using ADX
- Current market state (Sideway, Up, Down)
- Active and pending signals with confidence levels
- Last closed signals with results (TP Full, Invalidated)
- D1 running points and context state
- Body collection zone status
- Signal confirmation status
#### **6. Advanced Filtering System**
- **PA Filter**: Validates Price Action pattern quality
- **Pending Signal Filter**: Ensures proper signal sequence
- **MTF Override Filter**: Multi-timeframe confirmation
- **Sideway Box Filter**: Identifies and filters sideway market conditions
- **H1 Independent Mode**: Allows H1 signals independent of H4
#### **7. Dynamic Target System**
- **H1 Targets**: TP1 (1000 points default)
- **H4 Targets**: TP1 (1500 points) and TP2 (3000 points)
- **D1 Targets**: TP1 (5000 points) and TP2 (10000 points)
- All targets are automatically calculated based on cycle analysis
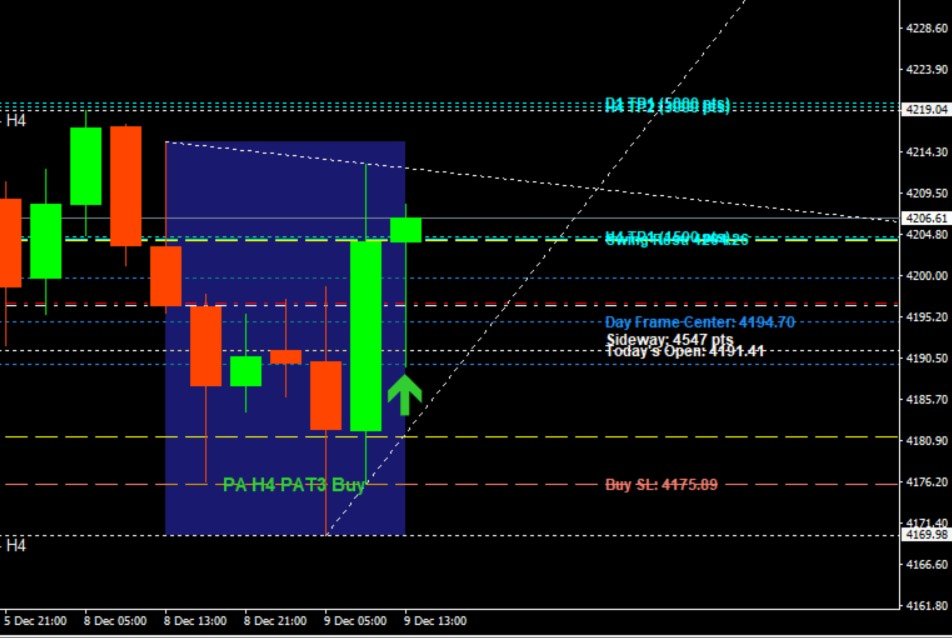
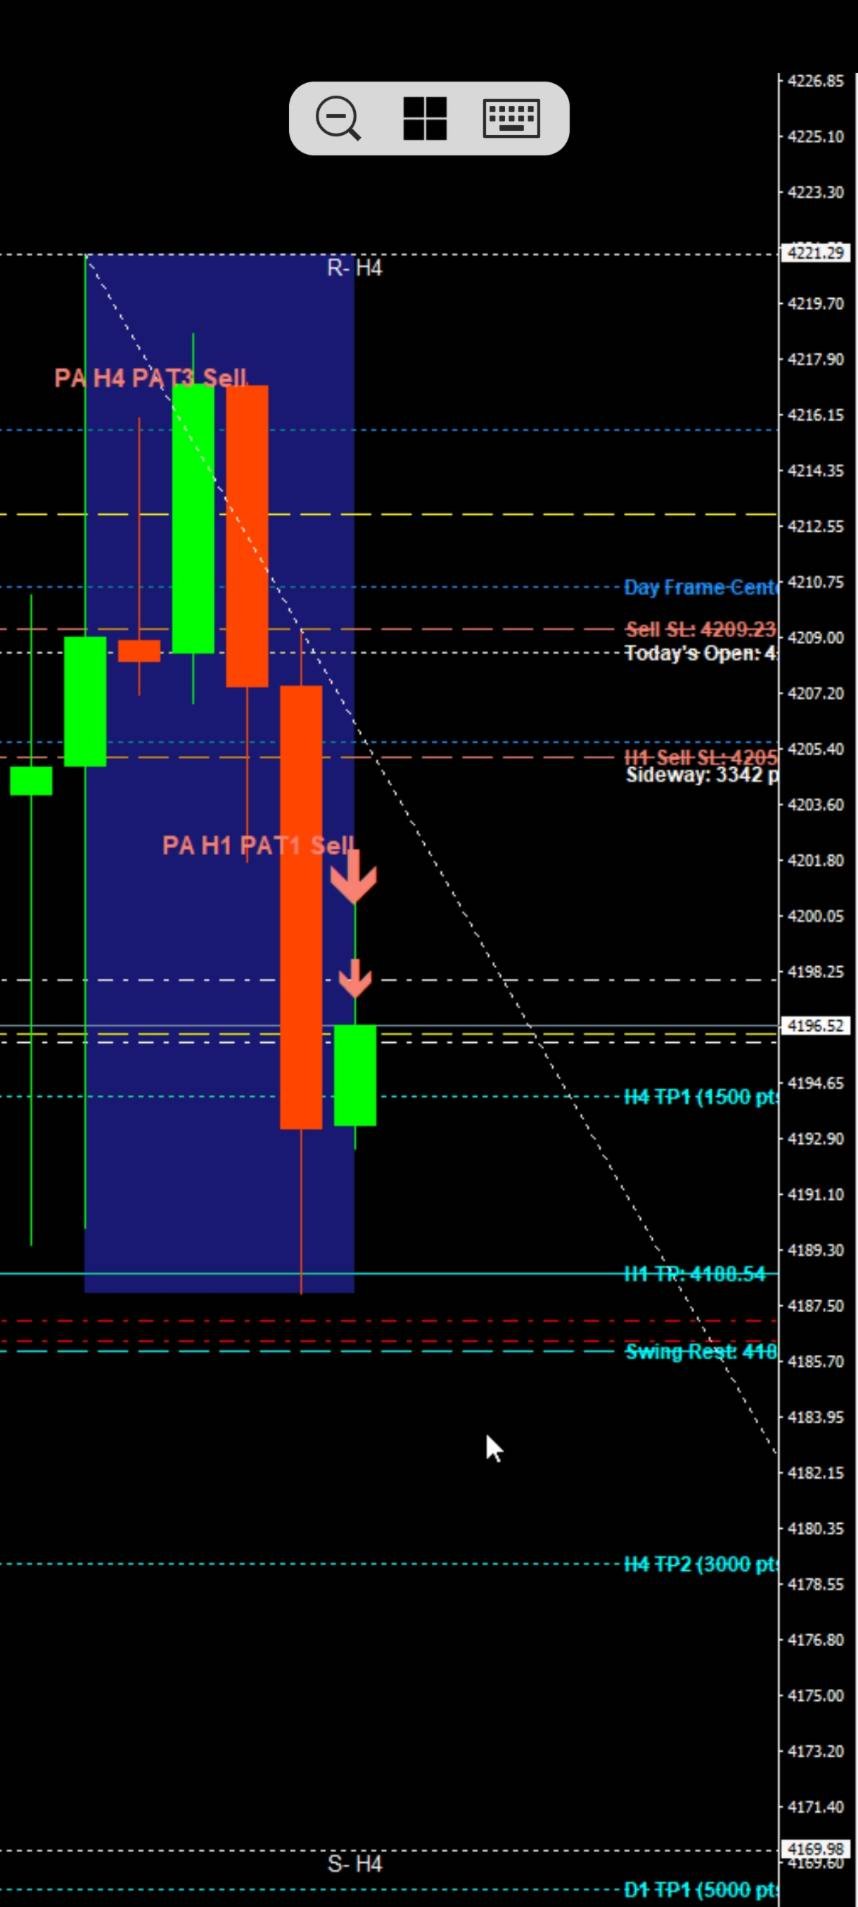
#### **8. Visual Elements**
- Price Action pattern arrows (Buy/Sell)
- Entry signal markers
- Checkpoint lines for Entry 2
- Body collection zones
- Swing rest / Half rest levels
- Take-profit target lines
- Stop-loss lines
- Day Frame box (customizable time and range)
- Today's open line
- Sideway market box
- PA wick lines (optional)
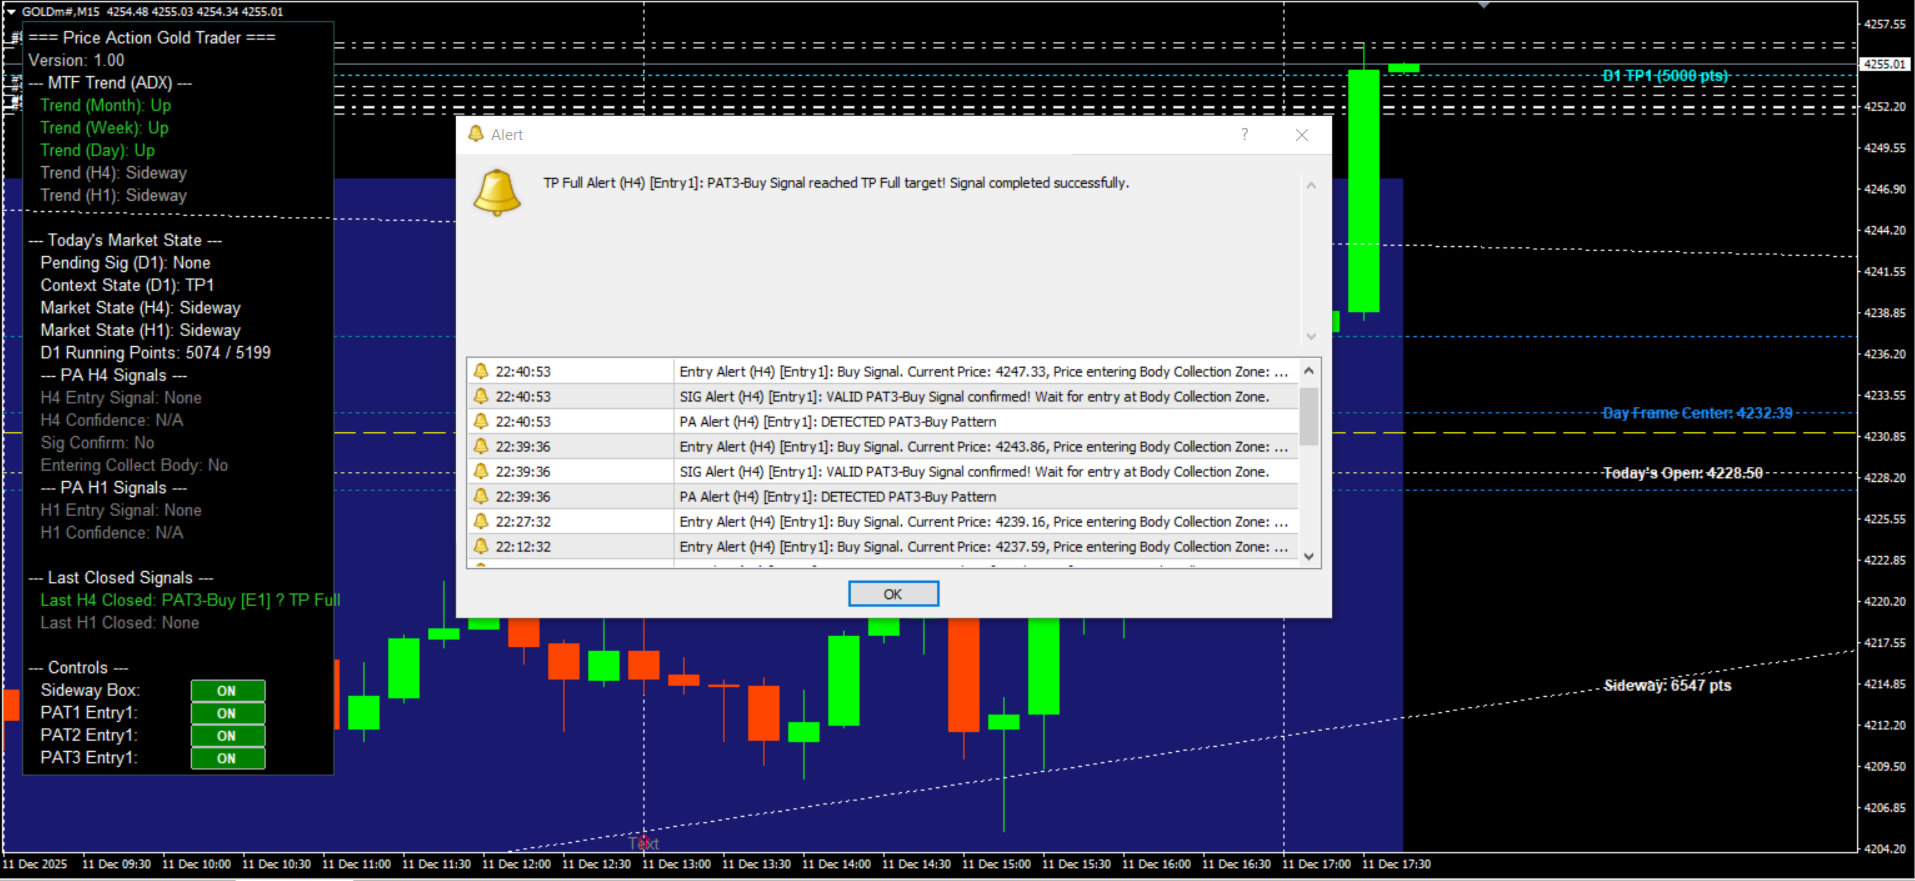
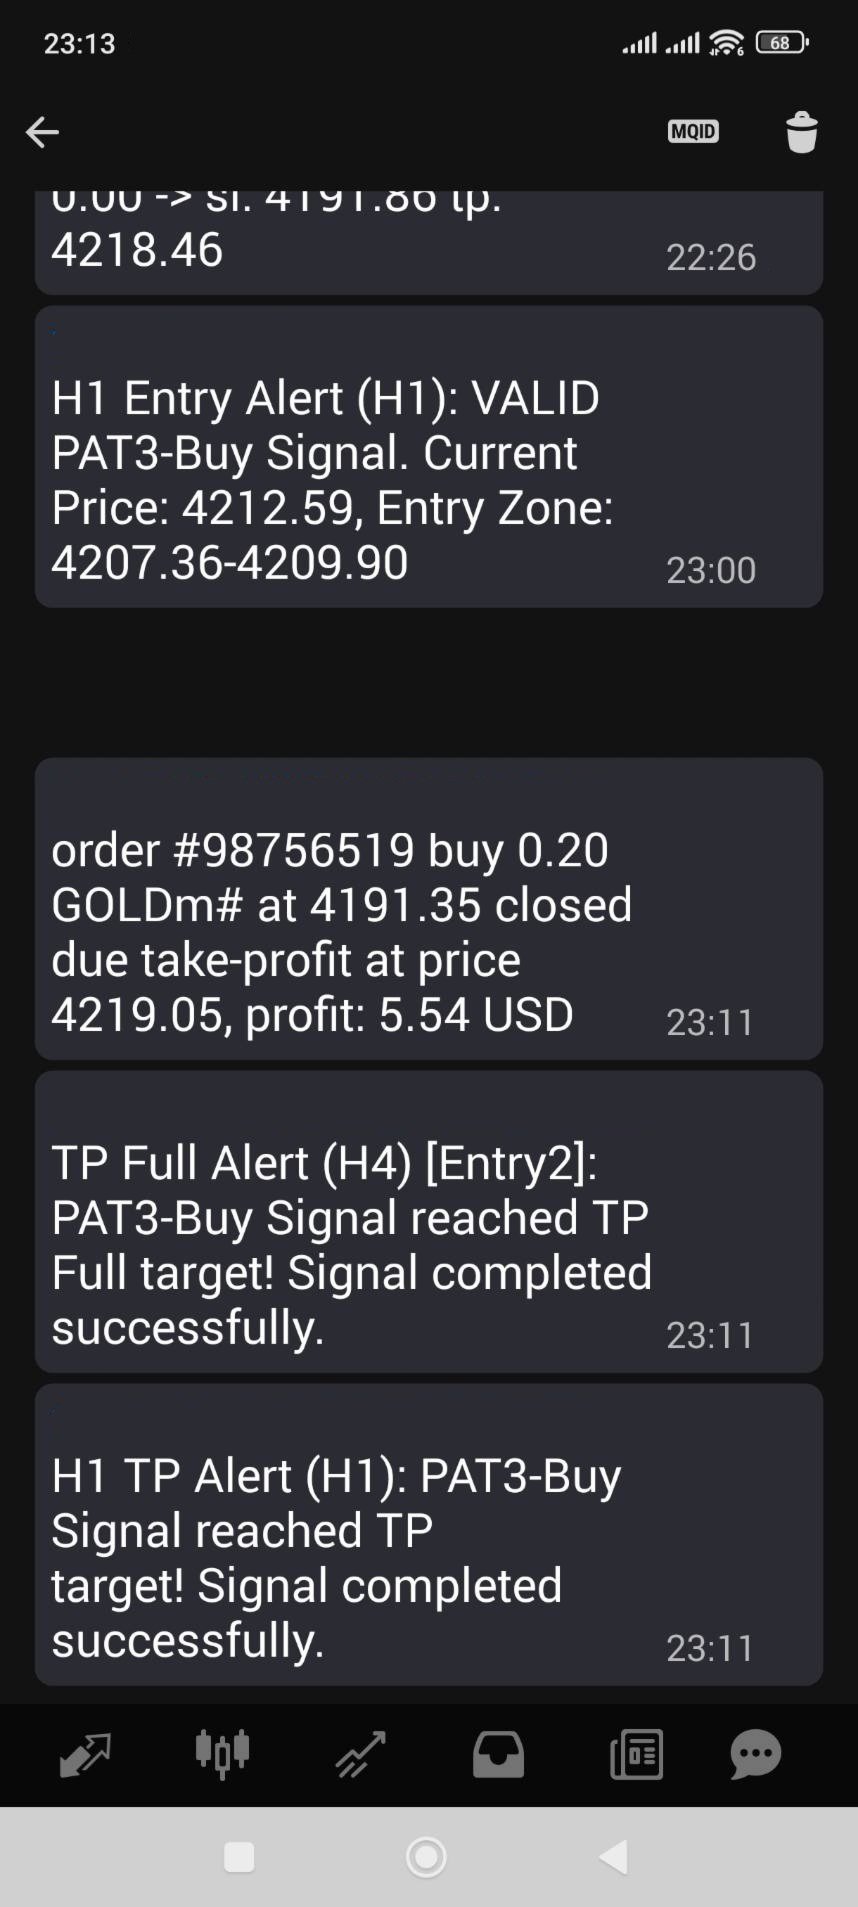
#### **9. Alert & Notification System**
- Real-time alerts for all signal types
- Push notifications (mobile MT4)
- Alerts for:
- New PA pattern detection
- Signal confirmation
- Entry signals (H1)
- TP Full reached
- Signal invalidation
#### **10. Market State Analysis**
- Automatic sideway market detection using ADX
- Day Frame analysis (customizable open time)
- Context state tracking (D1)
- Market bias determination (Buy/Sell/Neutral)
---
User Guide Download Here --> https://drive.google.com/file/d/16Z2ZnAo5jWt90ReGqEoJfWgU_Fw4WmIb/view?usp=sharing
User Guide Download Here --> https://drive.google.com/file/d/16Z2ZnAo5jWt90ReGqEoJfWgU_Fw4WmIb/view?usp=sharing
### 🔧 **How It Works**
#### **Signal Generation Process**
1. **Step 1: Context Check (D1)**
- Analyzes D1 timeframe for market context
- Determines global bias (Buy/Sell/Neutral)
- Identifies pending signals on higher timeframe
2. **Step 2: Structure Position (H4)**
- Checks if price is in high-probability zone
- Validates Day Frame position
- Applies sideway filter if enabled
3. **Step 3: PA Pattern Detection (H4)**
- Scans for PAT1, PAT2, or PAT3 patterns
- Validates pattern quality using filters
- Confirms pattern meets all criteria
4. **Step 4: Signal Confirmation**
- Multi-timeframe confirmation
- Checkpoint detection for Entry 2
- Body collection zone validation
5. **Step 5: Entry Trigger (H1)**
- Monitors H1 timeframe for entry signals
- Provides precise entry points
- Calculates confidence levels
#### **Entry Modes**
- **Entry 1**:
- Faster entry after PA pattern confirmation
- Entry at PA bar + 1 bar (PAT1) or + 2 bars (PAT2/PAT3)
- Higher risk/reward potential
- **Entry 2**:
- More conservative entry with checkpoint confirmation
- Entry at checkpoint bar
- Additional validation for higher probability
---
### 📊 **Priority System & Confidence Calculation**
#### **Priority System**
The indicator uses a 6-level priority system (1-6, where 6 = highest) to rank signals based on pattern type and entry mode. When multiple signals are detected, the system automatically selects the one with the highest priority.
**Priority Ranking (Highest to Lowest):**
1. **Priority 6**: PAT3 Entry 2 (Trend Following / Strong Breakout - Entry 2)
- Most reliable trend following signal
- Highest confidence pattern with checkpoint confirmation
2. **Priority 5**: PAT3 Entry 1 (Trend Following / Strong Breakout - Entry 1)
- Trend following but less certain than Entry 2
3. **Priority 4**: PAT1 Entry 2 (Reversal / First Break - Entry 2)
- More reliable reversal signal with checkpoint confirmation
4. **Priority 3**: PAT1 Entry 1 (Reversal / First Break - Entry 1)
- Reversal signal less certain than Entry 2
5. **Priority 2**: PAT2 Entry 2 (Correction / Sideway - Entry 2)
- More reliable correction/sideway signal with checkpoint confirmation
6. **Priority 1**: PAT2 Entry 1 (Correction / Sideway - Entry 1)
- Lowest priority - correction/sideway signal without checkpoint
**Pattern Type Definitions:**
- **PAT3**: Trend Following / Strong Breakout (highest priority pattern type)
- **PAT1**: Reversal / First Break (medium priority pattern type)
- **PAT2**: Correction / Sideway (lowest priority pattern type)
**Entry Mode Impact:**
- Entry 2 (with checkpoint) always has higher priority than Entry 1 (without checkpoint)
- Checkpoint confirmation adds reliability and increases priority level
---
#### **Confidence Percentage Calculation**
The confidence percentage is calculated using a weighted scoring system based on three key factors. The final confidence value is capped at 100%.
**Formula:**
```
Confidence % = Priority Score + Sideway Position Score + Alignment Score
(Maximum: 100%)
```
**Factor 1: Priority Score (0-40%)**
The priority score is determined by the signal's priority level:
| Priority | Pattern Type | Entry Mode | Score |
|----------|--------------|------------|-------|
| 6 | PAT3 | Entry 2 | 40% |
| 4 | PAT1 | Entry 2 | 30% |
| 3 | PAT1 | Entry 1 | 25% |
| 5 | PAT3 | Entry 1 | 22% |
| 2 | PAT2 | Entry 2 | 15% |
| 1 | PAT2 | Entry 1 | 10% |
**Factor 2: Position in Sideway Box (0-30%)**
This factor evaluates the signal's position within the sideway market range. The scoring is dynamic based on signal direction (Buy Low / Sell High principle).
**For BUY Signals:**
- **Lower Zone (0-30%)**: 30% score (Buy Low - discount price)
- **Mid Zone (30-70%)**: 20% score (medium risk)
- **Upper Zone (70-100%)**: 10% score (chasing high - lowest)
**For SELL Signals:**
- **Upper Zone (70-100%)**: 30% score (Sell High - premium price)
- **Mid Zone (30-70%)**: 20% score (medium risk)
- **Lower Zone (0-30%)**: 10% score (selling too cheap - lowest)
**If no sideway box exists or insufficient data**: 15% (default score)
**Factor 3: Alignment H4/H1 (0-30%)**
This factor measures the alignment between H4 and H1 timeframes, providing extra weight for multi-timeframe confluence.
**For H4 Signals:**
- **Same direction as H1 signal**: 30% score (best - strong confluence)
- **Opposite direction to H1 signal**: 10% score (bad - conflicting signals)
- **No H1 signal exists**: 10% score (reduced from 15%)
**For H1 Signals:**
- **Same direction as H4 signal**: 30% score (best - strong confluence)
- **Opposite direction to H4 signal**: 10% score (bad - conflicting signals)
- **No H4 signal exists**: 10% score (reduced from 15%)
**Confidence Level Interpretation:**
The dashboard displays confidence with color coding:
- **Green (≥70%)**: High confidence - Strong signal with multiple confirmations
- **Yellow (40-70%)**: Medium confidence - Moderate signal quality
- **Red (<40%)**: Low confidence - Weak signal or conflicting factors
**Example Calculation:**
A PAT3 Entry 2 Buy signal:
- Priority Score: 40% (PAT3 Entry 2)
- Sideway Position: 30% (Buy signal in lower zone 0-30%)
- Alignment: 30% (H4 and H1 both Buy)
- **Total Confidence: 100%** (capped at maximum)
A PAT2 Entry 1 Sell signal:
- Priority Score: 10% (PAT2 Entry 1)
- Sideway Position: 20% (Sell signal in mid zone)
- Alignment: 10% (No H4 signal or opposite direction)
- **Total Confidence: 40%** (Medium confidence)
---
### ⚙️ **Configuration Settings**
#### **General Settings**
- Calculation candle count (default: 1000)
- Primary timeframe (H4)
- Entry timeframe (H1)
- Context timeframe (D1)
- Day open time (customizable)
- GMT offset settings (Broker and Local)
- Day frame points range
- Price digits configuration
#### **Pattern Detection Settings**
- Enable/disable each pattern type
- PAT1: Body/wick percentage thresholds
- PAT2: Engulf percentage minimum
- PAT3: Body collection zone percentages
#### **Target Settings**
- H1 TP1 and SL offset
- H4 TP1 and TP2
- D1 TP1 and TP2
- All customizable in points
#### **Filter Settings**
- Sideway box enable/disable
- Sideway range minimum points
- Sideway position tolerance
- Sideway filter bars count
#### **Visual Settings**
- Show/hide all visual elements
- Customizable line styles and widths
- Color customization for all elements
- Dashboard display toggle
#### **Alert Settings**
- Enable/disable all alerts
- Push notification toggle
- Individual alert types
---
### 📊 **Dashboard Information**
The real-time dashboard provides:
- **MTF Trend (ADX)**: Trend direction for Month, Week, Day, H4, H1
- **Today's Market State**:
- Pending signals (D1)
- Context state (D1)
- Market state (H4, H1)
- D1 running points
- **PA H4 Signals**:
- Entry signal status
- Confidence level
- Signal confirmation
- Body collection zone status
- **PA H1 Signals**:
- Entry signal status
- Confidence level
- **Last Closed Signals**:
- H4 closed signal with result
- H1 closed signal with result
- **Controls**:
- Sideway box status
- Entry mode toggles (PAT1/PAT2/PAT3 Entry1)
---
### 📱 **Alert Types**
1. **PA Pattern Alert**: When a new Price Action pattern is detected
2. **Signal Confirmation Alert**: When a signal is confirmed
3. **Entry Signal Alert**: When an H1 entry signal appears
4. **TP Full Alert**: When take-profit full is reached
5. **Invalidation Alert**: When a signal is invalidated
All alerts can be sent as:
- On-screen alerts
- Push notifications (mobile MT4)
---
### 🔍 **Technical Specifications**
- **Platform**: MetaTrader 4
- **Symbol**: XAUUSD (Gold)
- **Timeframes**: Optimized for H4, H1, D1
- **Minimum MT4 Build**: 600+
- **Repainting**: No (non-repainting)
- **Calculation Method**: Bar-by-bar analysis
- **Resource Usage**: Optimized for performance
---
### 💡 **Trading Tips**
1. **Best Practices**:
- Always wait for signal confirmation before entering
- Use Entry 2 for more conservative trades
- Monitor the dashboard for market state changes
- Pay attention to D1 context for overall bias
2. **Risk Management**:
- Always use stop-loss levels provided
- Consider partial profit taking at TP1
- Monitor signal invalidation alerts
- Adjust position size based on confidence levels
3. **Timeframe Analysis**:
- H4 provides the main signal direction
- H1 provides precise entry timing
- D1 provides overall market context
- Use all three for best results
---
### 🛠️ **Support & Updates**
- **Version**: 1.00
- **Developer**: WOW.Bearhunter
- **Email**: wowbearhunter@gmail.com
- **Updates**: Regular updates and improvements
- **Support**: Email support available
---
### ⚠️ **Important Notes**
- This indicator is designed specifically for XAUUSD (Gold)
- Signals are non-repainting and confirmed after bar closure
- Past performance does not guarantee future results
- Always use proper risk management
- Test on demo account before live trading
---
### 📈 **What Makes This Indicator Unique**
1. **Specialized for Gold**: Optimized specifically for XAUUSD characteristics
2. **Non-Repainting**: Reliable signals that don't disappear
3. **Multi-Timeframe**: Comprehensive analysis across H4, H1, and D1
4. **Dual Entry System**: Flexibility in entry timing
5. **Advanced Filtering**: Multiple filters ensure high-quality signals
6. **Real-Time Dashboard**: Complete market state at a glance
7. **Automated Analysis**: No manual pattern recognition needed
8. **Professional Grade**: Built for serious traders
---
### 🎯 **Who Should Use This Indicator**
- Gold traders looking for systematic Price Action analysis
- Traders who prefer non-repainting signals
- Multi-timeframe traders
- Traders seeking automated pattern detection
- Professional traders needing comprehensive market analysis
- Traders who want clear entry/exit levels
---
### 📝 **Conclusion**
**Price Action Gold Trader** is a complete, professional-grade Price Action analysis system for Gold trading. With its non-repainting signals, multi-timeframe analysis, advanced filtering, and comprehensive dashboard, it provides everything you need for systematic Gold trading.
Whether you're a beginner looking for clear signals or a professional trader needing advanced analysis tools, this indicator delivers reliable, actionable trading information.
**Start trading Gold with confidence. Get Price Action Gold Trader today!**
---