Grid Know Sure Thing EA
- Experts
-
AL MOOSAWI ABDULLAH JAFFER BAQER
 To trade successfully we need to go through the proven path that others had gone and reached!
Here are 17 quotes from such successful investors:
1- Limit your size in any position so that fear does not become the prevailing instinct guiding your judgment.
Joe Vidich - Version: 3.16
- Activations: 5
Try it free before anything else: load Grid Know Sure Thing EA in the MetaTrader 5 Strategy Tester, switch on visual mode, and watch which momentum turns it takes and which it lets pass.
ONE MOMENTUM LINE BUILT FROM FOUR. ONE GRID THAT WAITS FOR IT.
A single rate of change reacts to whatever happened over its own window, so a short wiggle and a real turn can look alike. Martin Pring's Know Sure Thing (KST) blends four rates of change, from short to long, and gives the slower ones more weight. When that blended line crosses its own signal line, momentum on several horizons has started to agree. Grid Know Sure Thing EA waits for that crossing on a closed bar, on the right side of zero and of the slow trend, and only then starts a grid cycle. A full management engine then works the oldest exposure down through group closures and partial slices.
At a glance
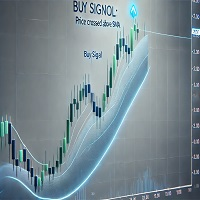
- A BUY cycle can begin only when KST crosses above its signal line on a closed bar. A SELL needs KST to cross below it. Closed bars only, so an accepted signal does not repaint.
- KST is calculated inside the EA from closing prices: rates of change over 10, 15, 20 and 30 bars, smoothed by 10, 10, 10 and 15 bar averages, weighted 1, 2, 3 and 4, with a 9 bar signal line. No custom indicator file and no DLL.
- New in this product: the Zero Side Guard. It accepts a BUY crossing only while KST is still below zero, and a SELL only while it is above zero. It is ON by default because in our runs it removed the late crossings that had overloaded the grid. The numbers with it off are shown below too.
- The Slope Guard wants KST itself to move toward the trade on the signal bar, not only the signal line to fall away from it.
- The EMA 200 filter is on by default, so a cycle starts on the side of the slow trend. Switch it off, or use it to fade.
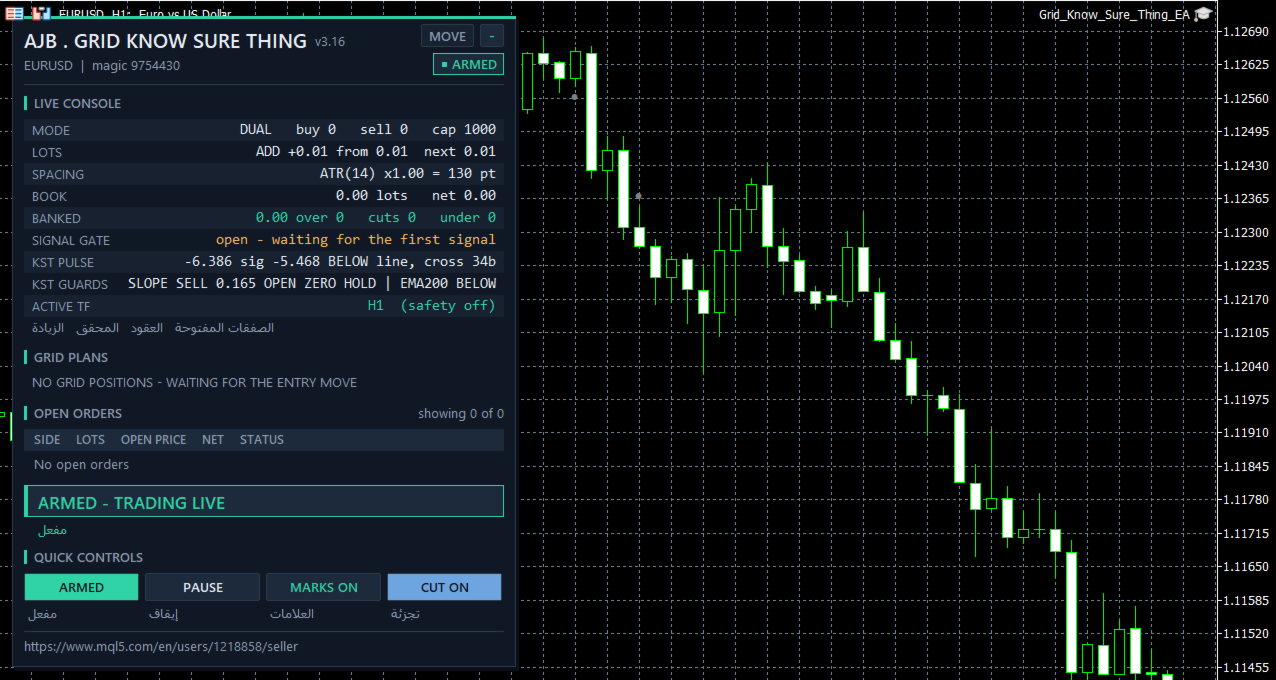
- Past crossings are marked on the live candles: a small arrow when one passed, a grey dot when it was refused.
- No stop loss and no forced close-all. A reached limit refuses new levels while the book keeps being managed, which also means the EA does not cap your losses.
START HERE
Open EURUSD H1, keep the 0.01 starting lot and the additive ladder, and set RunMode to Scan only for the first session. The panel then shows each plan while no order is sent, and one button moves it to Armed when you are ready. Repeat the runs below on your own broker's data, since spreads, swaps and commissions differ. The figures use default inputs, so there is nothing to type in to reproduce them.
What our tests showed, and what they did not
Default inputs, Strategy Tester, 1 minute OHLC model, leverage 1:100, 2025.01.01 to 2026.09.30, one broker's demo data:
- EURUSD H1, $10,000 deposit: net result +2,169.17, maximal equity drawdown 1,708.10 (14.93%), 694 trades, no stop-out and no margin refusals.
- EURUSD H1, $1,000,000 deposit: net result +2,169.17, maximal equity drawdown 1,708.10 (0.17%), 694 trades, no stop-out and no margin refusals.
- XAUUSD D1, $10,000 deposit: net result +20.01, maximal equity drawdown 21.65 (0.22%), 6 trades, no stop-out and no margin refusals.
- XAUUSD D1, $1,000,000 deposit: net result +20.01, maximal equity drawdown 21.65 (0.00%), 6 trades, no stop-out and no margin refusals.
These are simulations of one past period, not a forecast. The money drawdown is the same at both deposits because lots do not grow with the balance, so it is a much larger share of a small account: about 15% of $10,000 on EURUSD H1, which is real risk. Deposits under $10,000 were not tested. Six XAUUSD trades prove nothing.
Why the Zero Side Guard is on. We first ran the plain crossing with the guard off. EURUSD H1 at $10,000 gave a larger net, +5,502.68, but the maximal equity drawdown reached 8,092.12 (59.48%) over 1,299 trades, and the tester log showed 2,190 orders refused for lack of money. That is not a result we would let anyone run on a $10,000 account. With the guard on, the same test gave +2,169.17, a drawdown of 14.93%, 694 trades and no refusals. On XAUUSD D1 at $10,000 the guard took 25 trades down to 6 and net from +66.97 to +20.01, while the drawdown fell from 161.06 to 21.65. So it trades about half as often and earns less, and in exchange the deepest drawdown fell by roughly four fifths. One in-sample run per setting; it was not tuned, and you can switch it off and compare.
Not verified: netting accounts (the code has a netting cap, but no netting run was confirmed), the hedge cycle and the margin timeframe safety (both off in every run), the panel with live open positions and the Hedge Vault card on screen (no positions and hedge off at our screenshot), and any live trading.
Why four horizons instead of one
Each rate of change answers one question: how far has price moved over the last N bars? A 10 bar answer turns quickly and often falsely; a 30 bar answer is steadier but late. KST averages each answer and adds them together with rising weights, so the longer horizons dominate while the shorter ones still speed up the turn. A grid has no stop to undo a poor start, so a false turn sits on the book until the engine works it off. A reading that needs several horizons to lean the same way is a sensible thing to ask before that first order.
One honest limit: KST is still built from past prices only. It confirms a turn after it has begun, and in a sideways market its line crosses back and forth. That is why the guards and the bar gap between signals exist.
The improvement in this release
The Zero Side Guard is this EA's own addition. A BUY crossing that happens far above zero means momentum is already stretched up, and a grid opened there tends to meet the pullback head-on. With InpKSTZeroGuard at 1, only crossings that start from the far side of zero are taken. Set it to 0 to trade every crossing. The KST GUARDS row shows ZERO with OPEN, HOLD or off, so you can watch the check live. Margin-level timeframe safety is included and is off by default.
One cycle, step by step
1. The read. On each closed bar the EA works out the four smoothed rates of change, blends them into KST, and averages KST into its signal line.
2. The crossing. KST must cross its signal line on the signal bar: upward for a BUY, downward for a SELL.
3. The Slope Guard. KST must itself move toward the trade on that bar.
4. The Zero Side Guard. On by default: a BUY crossing must happen below zero, a SELL above it.
5. The trend filter. By default the close must sit on the trade's side of the slow EMA. Switch it off, or set it to fade.
6. The rhythm. A quiet gap of bars separates accepted signals, and a signal stays valid for a few bars if a level cannot be placed at once.
7. The ladder. Levels are spaced by fixed points or by ATR, with a floor, an upper limit and an option to freeze the distance. BUY and SELL grids can run together or in one direction only.
8. The harvest. The closer searches groups of the oldest and newest orders and closes a group once its combined result, after swap and commission, beats your target. If the oldest order is still too heavy, only a slice of it goes.
9. The safety checks. A reopen guard blocks a closure that would put the same level straight back on. Every leg is checked against the deal history, failed legs wait in a retry queue, and a plan is dropped if the book changes before sending.
10. The optional hedge cycle. Off by default and not exercised in our tests. When on, it holds a balanced pair on a symbol you choose and retires it in equal slices, funded by a small surcharge on closures the grid is already making.
The panel
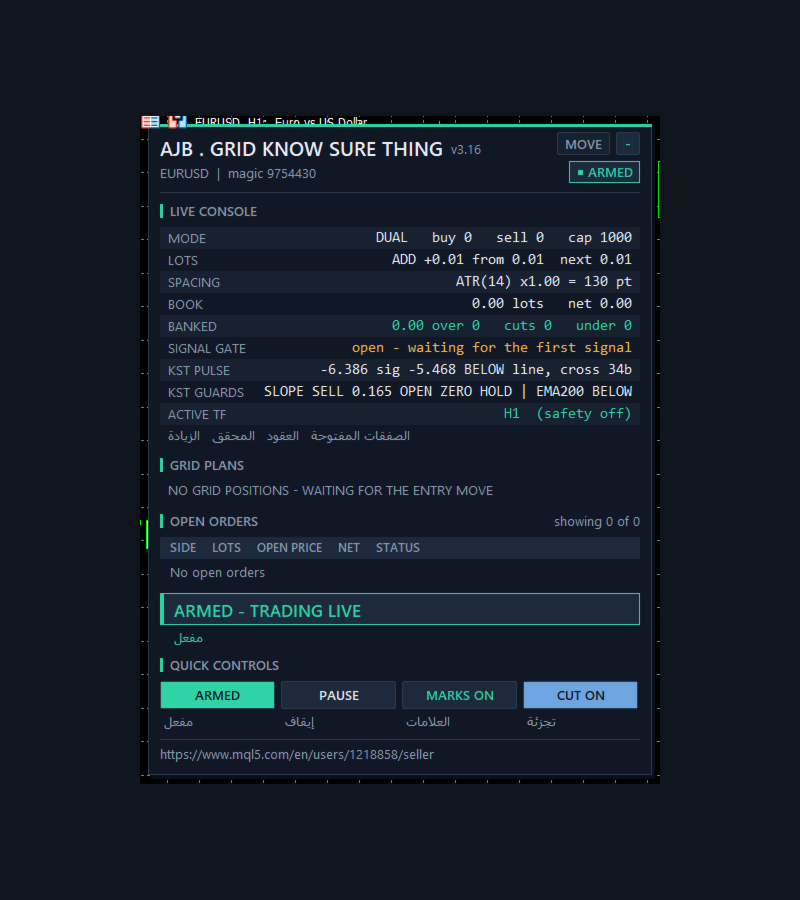
The panel sits on the left and keeps the right side and the price scale clear. It shows the symbol and magic number, a status pill, grid mode, lot step, spacing, banked result, the book, the closing plan for each side and the order list. The KST PULSE row gives KST and its signal line on the last closed bar, whether KST is above or below the line, and how many bars ago the last crossing happened. The KST GUARDS row gives the favoured side with its slope and OPEN or HOLD, the ZERO state, then the EMA side. Buttons switch Armed / Scan only, Pause / Resume, chart marks and slicing. The Hedge Vault card is built to dock under the main panel; it was not on screen in our screenshot because the hedge is off by default. The panel draws nothing in a non-visual backtest, so optimisation stays fast.
Protection you control
No stop loss and no forced close-all. A reached limit stops new levels; it never dumps the book at a bad moment.
Before each order the money check asks one plain question: is there enough free margin, with a safety buffer, for this order?
Limits on levels per grid, orders per side and lot per order keep the ladder bounded.
The code caps the margin of a merged position on netting accounts as a percentage of equity; this has not been verified by our tests, so try it first in the tester on your own netting account.
Optional margin-level timeframe safety moves the signal and the spacing to a higher timeframe when the margin level falls to your chosen levels, and moves back after margin recovers past a cushion. Off by default and not tested by us.
Every copy isolates itself by symbol and magic numbers, so several charts do not touch each other's orders or saved state.
Scan only mode shows every decision without sending any order.
Quick answers
Does it repaint? No. By default signals come from closed bars, and a closed bar's values do not change.
How often does it trade? On EURUSD H1 about 694 trades in 21 months with defaults; on XAUUSD D1 only 6. Daily charts give far fewer crossings.
Can I make it busier? Yes. Turning off the Zero Side Guard roughly doubled the trades in our test, but the drawdown grew to a level we consider unsafe for a $10,000 account. Test any change in the Strategy Tester first.
Do I need to attach an indicator? No. Crossings are marked on the live chart and the readings are shown as numbers on the panel, with no sub-window.
Every setting explained
Grid - how levels are opened
TradeMode - dual grid by default (BUY and SELL side by side), or one direction only.
GridSpacePoints - fixed distance between levels in points when ATR spacing is off (25).
GridSpaceMultiplier - 1.0 keeps levels evenly spaced; a higher value spreads deeper levels further apart.
MaxGridLevels - the most levels one grid may hold (1000).
UpDirectionIsBuy - decides which side an upward move belongs to.
EAMagicNumber - the ID written on this EA's grid orders (9754430).
GridOrderComment - the comment on each grid order (GKST).
OneOrderPerBar - no more than one new level per bar.
Lot ladder
InitialLotSize - volume of the first level (0.01).
LotSizingMode - additive by default, or multiply.
LotMultiplier - in multiply mode, each level is the previous lot times this value (1.25).
LotAddStep - in additive mode, the volume added at each level (0.01; 0 means the starting lot).
MaxOrderVolume - the largest lot any single order may use (1.0).
UseAutoLot - scales the starting lot with the balance (off).
AutoLotBaseBalance - the balance that matches the starting lot (1000).
AutoLotAllowDecrease - lets auto lot go below the starting lot (off).
ATR spacing
GridSpacingMode - ATR by default, or fixed points.
ATRTimeframe - the timeframe volatility is measured on (current chart).
ATRPeriod - ATR length (14).
ATRSpacingFactor - spacing equals ATR times this value (1.0).
ATRBarShift - 1 uses the last closed bar.
ATRMinSpacingPts - the smallest allowed spacing in points (50; 0 means none).
ATRMaxSpacingPts - the largest allowed spacing in points (5000; 0 means none).
ATRFreezeOnStart - keeps one spacing for the whole cycle (off).
Profit target
DesiredProfitPerClosure - the base target in account currency (2.0).
ProfitMultiplier - scales the final target between 1.00 and 2.00.
ProfitTargetMode - scaled by default, so a bigger and deeper book must earn a bigger result.
ProfitVolumePower - how strongly closing volume lifts the target (1.0; 0 turns it off).
ProfitDepthBonus - extra target for each additional open level (0.10).
ProfitMaxMultiple - the cap on the scaled target as a multiple of the base (50).
ProfitMaxReachFraction - keeps the target within a fraction of one grid step so it stays reachable (0.50).
Fragment scanner
UseMultiLegScan - tests combinations of several orders before the simple pair (on).
MaxOldestLegs - the most oldest orders allowed in one closure (3).
MaxNewestLegs - the most newest orders allowed in one closure (6).
ScanPriority - how qualifying groups are ranked; most orders first by default.
NeverBankLessThanPair - a group must also beat the plain pair target (on).
RequireCloseVolumeExceedsTarget - the newest volume must outweigh the oldest volume (on).
MinCloseVolumeRatio - minimum ratio of closing volume to target volume (1.5).
Target slicing - partial closes
EnableTargetSlicing - closes a slice of the oldest order when the whole lot cannot be paid off yet (on).
FragProfitWeightPower - how profit is weighted per closing lot (1.5).
FragMinSlicePercent - the smallest slice as a percent of the target order (20).
FragAllowMultiCloser - lets several newest orders pool their profit to pay for one slice (on).
FragPreferFullClosure - a full closure wins over a slice whenever both qualify (on).
Reopen guard
ReopenGuard - blocks closures that would immediately reopen a level (step based).
ReopenGuardCushion - the safe distance as a fraction of one grid step (0.90).
Account protection
MinMarginLevelPercent - no new levels below this margin level percent (0 = off).
MaxAccountRiskPercent - no new levels above this floating loss as a percent of balance (0 = off).
NetMaxMarginPercent - on netting accounts, the largest margin of the net position as a percent of equity (5.0).
MaxTotalOrders - absolute cap on grid orders per side (1000).
Execution and verification
RunMode - Armed or Scan only; Scan only is the gentle first step.
CloseSequence - the order in which legs are sent; oldest first by default.
MaxSlippagePoints - maximum slippage (30 points).
MaxSpreadPoints - trading pauses above this spread (7500 points).
MinSecondsBetweenClosures - minimum pause between two closures on the same side (5 seconds).
CloseAttemptsPerLeg - send attempts before a leg moves to the retry queue (3).
VerifyTimeoutSeconds - how long a stuck leg keeps being checked (90 seconds).
DeferWhenMarketClosed - waits for the session instead of halting when the market is closed (on).
MarketClosedRetrySeconds - retry interval while the broker refuses orders (30 seconds).
AutoResumeAfterSeconds - clears a halt by itself after this many seconds (300; 0 waits for the panel button).
NoPartialRetryMinutes - tries partial closes again this many minutes after a broker refusal (15; 0 never).
AbortIfBookChanged - drops a plan if a leg changed between the scan and the send (on).
UseFullCommission - counts commission for both sides of a trade (on).
CommissionPerLot - fallback commission when history has none (0 reads it from history).
CloseOrderComment - the comment on closing deals.
Hedge cycle
EnableHedgeCycle - off by default.
HedgeSymbols - comma-separated list of hedge symbols; repeating one gives it more turns (XAGUSD).
HedgeSymbolRotation - how the next cycle's symbol is picked (per cycle).
HedgeMaxSymbolsInTester - limits rotation in the Strategy Tester only (2; 0 means no limit).
HedgeCycleLots - lots on each side of the balanced pair (0.01).
HedgeSliceLots - lots retired from each side per slice (0.01).
HedgeFragmentBonus - extra amount added on top of the slice cost (100).
HedgeBonusIsPercent - the bonus is a percent of the slice cost; false makes it a fixed amount (on).
HedgeMaxSurcharge - money cap on what one closure may be surcharged (0 = no cap).
HedgeMaxSurchargePercent - the most the hedge may raise any closure target, in percent (50).
HedgeMagicNumber - the hedge legs' ID; it must differ from the grid's (9754431).
HedgeReopenOnFinish - opens a fresh cycle when one finishes (on).
HedgeStartRequiresTrade - waits for the grid to open something before the first cycle (on).
HedgeIntegritySeconds - how often both legs are checked to be equal (5 seconds).
HedgeAutoRepair - repairs a lone leg automatically (on).
HedgeNakedAction - what to do with a lone leg; re-hedge by default.
HedgeMaxSpreadPoints - no hedge orders above this spread (0 = off).
HedgeSlippagePoints - maximum slippage on hedge orders (30 points).
HedgeAttemptsPerLeg - send attempts per hedge leg (3).
HedgeVerifyTimeout - how long a stuck hedge leg keeps being checked (90 seconds).
HedgeCommissionPerLot - fallback hedge commission (0 reads it from history).
HedgeOrderComment - the comment on hedge deals.
Weekly cash day
WeeklyCashDay - no new hedge cycle and no slice during your withdrawal window (off).
CashDayOfWeek - 0 Sunday, 1 Monday and so on (1).
CashCutoffHour - server hour after which no new slice is fired (21).
Panel and chart
ShowPanel - shows or hides the panel.
PanelX and PanelY - panel offsets from the chart edges (12 and 15).
PanelFontSize - base font size (9).
ShowArabic - adds an Arabic line under the English on the panel (on).
ShowChartMarks - draws plans and levels on the chart (on).
MaxTableRows - order rows shown per grid (13).
PanelCorner - the chart corner the panel is anchored to.
Entry trigger
EntryTriggerMode - the Know Sure Thing strategy arms the first level by default.
SignalBarShift - 1 means the last closed bar.
SignalBarsDelay - bars that must pass between accepted signals (30; 0 accepts every signal).
SignalValidBars - a signal stays usable for this many bars (3).
SignalAllowBuy and SignalAllowSell - turn each direction on or off separately.
SignalReverse - inverts the direction (off).
Know Sure Thing - the signal
InpKSTRoc1, InpKSTRoc2, InpKSTRoc3, InpKSTRoc4 - the four rate of change lengths in bars (10, 15, 20, 30).
InpKSTSma1, InpKSTSma2, InpKSTSma3, InpKSTSma4 - the averages that smooth each rate of change (10, 10, 10, 15). The smoothed parts are weighted 1, 2, 3 and 4.
InpKSTSignal - length of the signal line average over KST (9).
InpKSTSlopeGuard - Slope Guard: KST itself must move toward the trade on the signal bar (on).
InpKSTZeroGuard - Zero Side Guard: 1 takes a BUY crossing only below zero and a SELL only above zero; 0 takes every crossing (1).
InpKSTTrendFilter - 0 off, 1 trade with the EMA side, 2 trade against it as a fade (1).
InpKSTTrendMAPeriod - the trend EMA length (200).
InpShowSignalArrows - arrows on the candles where a cycle was armed (on).
InpShowKSTOnChart - marks recent signal line crossings on the live chart candles, arrows for passed and grey dots for refused (on; no extra sub-window).
Debug
DebugMode - detailed journal logging (off).
Margin timeframe safety
UseMarginTFSafety - off by default.
Level1MarginPct and Level1TF - at or below 6000 percent margin level, work on M15.
Level2MarginPct and Level2TF - at or below 5000 percent, work on H1.
MarginTFHysteresisPct - how far margin must recover above a level before stepping back (500).
Honest expectations
A grid manages a position; it cannot see the future, and it can lose a large part of an account. A momentum crossing can reverse a few bars later, and a trend can run far past the first level. With no stop loss the book then stays open and grows while the move runs, up to the limits you set. Choose a lot your account can carry through that, test on your own broker first, and let the Strategy Tester show you how it behaves before you trade it live. It runs on any symbol and timeframe, and needs no DLLs and no extra files.
If you use it, a short and honest review of how it went on your account, good or bad, helps the next trader decide.