
Price Action Analysis Toolkit Development (Part 28): Opening Range Breakout Tool

Contents
- Introduction
- Opening Range
- Strategy Overview
- EA Components Breakdown
- Backtesting and Results
- Conclusion
Introduction
On May 6, 2010, U.S. equity markets endured the notorious “Flash Crash,” a breathtaking collapse in which a massive, algorithm‑driven sell order in E‑Mini S&P 500 futures triggered frantic high‑frequency liquidations and sent the Dow plunging nearly 1,000 points in just minutes before an equally swift recovery. This dramatic episode exposed a critical vulnerability: reacting to an unconfirmed price breach, no matter how emphatic, can leave traders stranded when liquidity evaporates and the market snaps back.
A breakout occurs when price decisively moves beyond a clearly defined boundary, such as the high or low of the session’s opening interval, signaling that supply or demand has overwhelmed the opposite side. Spotting genuine breakouts is essential because true breakouts often mark the start of sustained trends, while false breakouts, if acted on prematurely, lead to whipsaw losses.
The Opening Range Breakout (ORB) strategy addresses this by first capturing the upper and lower limits of that opening interval (configurable to any duration) and shading the range on the chart as a rectangle. These bounds serve both as visual landmarks and precise trigger levels. Only when price breaks beyond the rectangle, revisits that boundary, and breaks out again does the strategy confirm entry, filtering out noise and isolating moves driven by actual market conviction.
In this article, you’ll explore a professional MQL5 Expert Advisor implementation of ORB, featuring:
- Encapsulated range capture that tracks and displays the opening high/low without cluttering your main loop,
- Volatility‑adjusted stops and targets via a reusable ATR module,
- Retest confirmation logic that distinguishes real breakouts from transient spikes,
- On‑chart visualization with dynamic dashboard labels and graphical objects,
- A clear state machine in OnTick() to orchestrate each step and reset cleanly at session close.
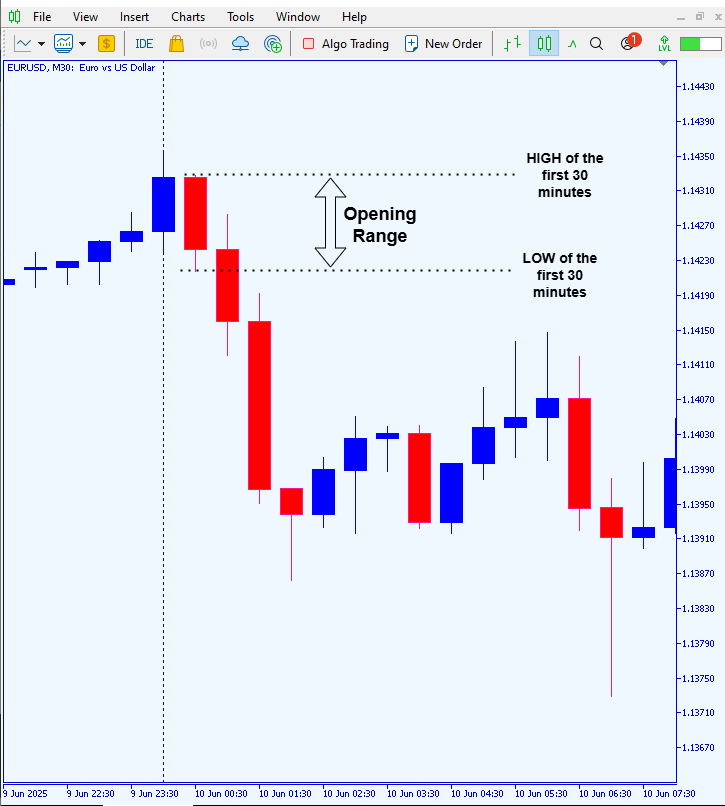
Opening Range
The Opening Range refers to the high and low-price levels established during the first few minutes of a trading session, often the initial 15 or 30 minutes. This period reflects the market’s immediate reaction to overnight news, economic data, and institutional activity, typically marked by high volume and volatility. Traders use the range’s boundaries as reference points; breakouts above or below can signal potential momentum in that direction. These levels help in planning trades with defined entries, stop-losses, and targets, making the opening range a practical tool for early trend identification and structured intraday strategies.
Knowing and trading the Opening Range effectively offers several advantages in intraday markets:
| Advantage | Description |
|---|---|
| Early Trend Detection | A breakout from the initial 15–30 min range signals potential momentum, helping traders align with intraday moves. |
| Clear Trade Rules | With precise high/low boundaries, you get objective entry points and stop levels, reducing guesswork. |
| Built-in Risk Management | Stops can be placed just inside the opposite boundary, defining risk/reward upfront. |
| Time Efficiency and Consistency | Trades confined to the morning window mean less screen time, making the system repeatable. |
| Cross-Market Applicability | Works across stocks, forex, futures, and timeframes for greater trader versatility. |
| Volatility Advantage | Leverages the liquidity and tight spreads seen in early session moves. |
| Strategy Flexibility | Supports breakout, reversal, and scalping tactics within a unified framework. |
We use two primary methods to calculate the opening range.
Method 1: Two‑Candle Range
This approach relies on just two bars. First, take the very last candle of the previous session, its high and low define yesterday’s closing extremes. Next, use the opening candle of the current session, its high and low capture the initial burst of trading. The opening range is simply the distance between the highest high and lowest low of those two bars. This compact calculation gives you an immediate snapshot of early momentum and helps pinpoint potential breakout levels for the day.

First, calculate the exact datetime when your trading session begins (e.g. 09:30 local server time). You can hard‑code this or compute it via SymbolInfoSessionTrade.
// Example: use SymbolInfoSessionTrade to get today's session start
MqlDateTime nowStruct;
TimeToStruct(TimeCurrent(), nowStruct);
datetime from, to;
SymbolInfoSessionTrade(_Symbol,
                       (ENUM_DAY_OF_WEEK)nowStruct.day_of_week,
                       SessionIndex,
                       from, to);
// 'from' now holds seconds since midnight; convert to full datetime:
datetime todayStart = (TimeCurrent() - TimeCurrent()%86400) + from;
Find the index of the very first M1 bar at or after todayStart, then take the next bar up (index+1) as yesterday’s final bar.
// Find bar numbers
int firstBarToday = iBarShift(_Symbol, PERIOD_M1, todayStart, false);
int lastBarYesterday = firstBarToday + 1;
Use the built‑in series functions to pull the high/low of each bar index.
double highYesterday = iHigh(_Symbol, PERIOD_M1, lastBarYesterday);
double lowYesterday  = iLow (_Symbol, PERIOD_M1, lastBarYesterday);

double highToday     = iHigh(_Symbol, PERIOD_M1, firstBarToday);
double lowToday      = iLow (_Symbol, PERIOD_M1, firstBarToday);
Take the maximum of the two highs and the minimum of the two lows to form the opening range, then calculate its size.
double openingHigh = MathMax(highYesterday, highToday);
double openingLow  = MathMin (lowYesterday,  lowToday);
double openingSize = openingHigh - openingLow;

PrintFormat("Opening Range → High: %.5f   Low: %.5f   Size: %.5f",
            openingHigh, openingLow, openingSize);
Method 2
Rather than using specific candles, this approach defines the opening range by the highest and lowest prices hit during the first minutes after the market opens. By tracking those early extremes, you capture the day’s initial sentiment and momentum in real time. These opening high and low levels then serve as your breakout thresholds, once price moves beyond them, it signals a potential trend for the rest of the session.
First, compute the exact timestamp when the current trading session begins (e.g. 09:30). We use SymbolInfoSessionTrade to get the “from” seconds and convert it into a full datetime.
// Calculate the session’s opening datetime
MqlDateTime nowStruct;
TimeToStruct(TimeCurrent(), nowStruct);

datetime fromSec, toSec;
SymbolInfoSessionTrade(_Symbol,
                       (ENUM_DAY_OF_WEEK)nowStruct.day_of_week,
                       SessionIndex,
                       fromSec, toSec);

// Build a full datetime from today’s midnight plus the session offset
datetime sessionStart = (TimeCurrent() - TimeCurrent() % 86400) + fromSec;
Next, loop over each minute‐bar in the first RangeMinutes after sessionStart, tracking the highest high and lowest low seen so far.
double orHigh = -DBL_MAX;
double orLow  =  DBL_MAX;

// Find the bar index at or just after sessionStart
int startIdx = iBarShift(_Symbol, TF, sessionStart, false);

// Loop through the first RangeMinutes bars (M1 timeframe)
for(int i = startIdx; i >= startIdx - (RangeMinutes - 1); i--)
{
  if(i < 0) break;  // safety check

  double h = iHigh(_Symbol, TF, i);
  double l = iLow (_Symbol, TF, i);

  orHigh = MathMax(orHigh, h);
  orLow  = MathMin(orLow, l);
}
Finally, you have orHigh and orLow. You can calculate the range size and compare the current price (Bid) against these levels to generate signals.
double openingSize = orHigh - orLow;
PrintFormat("Opening Range (Method 2): High=%.5f Low=%.5f Size=%.5f",
            orHigh, orLow, openingSize);

// Breakout detection
double bid = SymbolInfoDouble(_Symbol, SYMBOL_BID);
if(bid > orHigh)
  Alert("Breakout Long at price " + DoubleToString(bid, _Digits));
else if(bid < orLow)
  Alert("Breakout Short at price " + DoubleToString(bid, _Digits));
Strategy Overview
This EA automates an Opening Range Breakout strategy by first identifying the high and low boundaries of the market’s opening period. At the start of each session, it records the price at the session open and then continuously updates the maximum high and minimum low over the next RangeMinutes (e.g., 15 minutes). Once that window closes, it draws horizontal lines and a rectangle on the chart to visually mark the “range” region where early volatility lived. An ATR filter (using a configurable ATR period and multiplier) ensures trade signals only trigger when volatility has reached a meaningful level.
After the range is defined, the EA watches for a two‑step breakout: first, price must close outside the range; next, it must retrace back to the boundary and then close beyond it again (the “retest”). When that retest confirmation occurs, the EA plots an up or down arrow at the entry bar, computes stop‑loss and take‑profit levels based on the ATR, and fires alerts (on‑screen, email, and/or push notification) announcing the signal. An on‑chart dashboard continually updates with the EA’s current state, ATR value, and range width, and everything resets cleanly at the next session or at midnight.
EA Components Breakdown
1. File Header and Properties
At the top, we declare our copyright, link and version using #property. This isn’t just boilerplate; the #property strict directive tells the compiler to enforce modern MQL5 rules (no implicit casts, mandatory function prototypes, etc.), which helps catch subtle bugs at compile time. By setting #property link, anyone inspecting the EA in MetaEditor can click through to our MQL5 community profile, which reinforces version control and authorship. You can also use #property description to embed your own annotations that show up in the EA’s properties dialog, making it easier for readers to document their settings without extra UI code.
//+------------------------------------------------------------------+
//|                                                   ORB Breakout EA|
//|                                   Copyright 2025, MetaQuotes Ltd.|
//|                           https://www.mql5.com/en/users/lynnchris|
//+------------------------------------------------------------------+
#property copyright   "Copyright 2025, MetaQuotes Ltd."
#property link        "https://www.mql5.com/en/users/lynnchris"
#property version     "1.0"
#property description "Opening‑Range Breakout with ATR confirmation"
#property strict
2. Input Parameters
We group user‑tweakable settings under clear comments: session index and range length, ATR filter settings, arrow codes/colors, and alert toggles. In MQL5, input variables automatically appear in the EA’s Properties dialog, with proper types and even enums (like ENUM_TIMEFRAMES for timeframes) rendering as dropdowns—no need to hand‑roll your own GUI. Note that by choosing input int ArrowUpCode, we let users pick any Wingdings character code, but if we wanted to force a specific list, we could define our own enum ArrowSymbol { UP=233, DOWN=234 } to restrict choices at compile time. Inputs also support readonly if you want to lock them from being edited on‑the‑fly.
//--- session & range
input int            SessionIndex    = 0;            // 0 = first session
input int            RangeMinutes    = 15;           // minutes to capture range
//--- ATR filter
input ENUM_TIMEFRAMES TF              = PERIOD_M1;   // ATR timeframe
input int            ATRPeriod       = 14;           // ATR look‑back
input double         ATRMultiplier   = 1.5;          // ATR * multiplier
//--- arrows & alerts
input int            ArrowUpCode     = 233;          // wingdings ↑
input int            ArrowDnCode     = 234;          // wingdings ↓
input color          ArrowUpColor    = clrLime;      // long arrow
input color          ArrowDnColor    = clrRed;       // short arrow
input bool           SendEmailAlert  = false;        // email on signal
input bool           PushNotify      = false;        // push on signal
input string         EmailSubject    = "ORB Signal"; // mail subject
3. RangeCapture Class
Encapsulating the opening‑range logic in its own class CRangeCapture keeps our main OnTick() tidy and emphasizes object‑oriented structure in MQL5. We store the start time plus the evolving high/low price, with methods Init(), Update() and IsDefined(). Remember that MQL5 classes don’t auto‑initialize, so explicit Init() calls are mandatory. Also, by keeping hi and lo as double, we take advantage of MQL5’s 64‑bit floating‑point precision, a must for FX prices. You could extend this class to log every tick’s high/low into an internal buffer if you wanted later, illustrating how classes can evolve while preserving the original interface.
class CRangeCapture
  {
private:
   datetime startTime;
   double   hi, lo;
public:
   void Init(datetime t, double price)
     { startTime = t; hi = lo = price; }
   void Update(double price, datetime now)
     { if(now < startTime + RangeMinutes*60)
         { hi = MathMax(hi, price); lo = MathMin(lo, price); } }
   bool IsDefined(datetime now) const
     { return(now >= startTime + RangeMinutes*60); }
   double High() const { return hi; }
   double Low()  const { return lo; }
  };
static CRangeCapture g_range;
4. ATRModule Class
Here we wrap the built‑in ATR indicator handle (iATR) inside class CATRModule. In Init() we create the handle, checking against INVALID_HANDLE to guard against symbol or timeframe issues. The Value() method calls CopyBuffer just once per tick, which is far more efficient than calling iATR inside OnTick() repeatedly. By caching the handle, we avoid memory leaks and reduce overhead. When you call IndicatorRelease() in Release(), you free that handle, without it, you may end up with a slow, crowded indicator list in the Terminal’s “Indicators” tab. This pattern scales cleanly if you wrap additional indicators (EMA, Bollinger Bands) in their own modules.
class CATRModule
  {
private:
   int handle;
public:
   bool Init()
     {
      handle = iATR(_Symbol, TF, ATRPeriod);
      return(handle != INVALID_HANDLE);
     }
   double Value() const
     {
      double buf[];
      if(handle != INVALID_HANDLE && CopyBuffer(handle, 0, 0, 1, buf) == 1)
         return buf[0] * ATRMultiplier;
      return 0.0;
     }
   void Release()
     {
      if(handle != INVALID_HANDLE)
         IndicatorRelease(handle);
     }
  };
static CATRModule g_atr;
5. Retest Logic Class
The CRetestSignal class implements our “break, retest, re‑break” pattern using three simple booleans. We keep breakLong, breakShort and retested internal, exposing only the Reset(), OnBreak() and CheckRetest() methods. This hides implementation details from OnTick(), so readers focus on “what” rather than “how.” Notice how we pass the latest MqlRates bar by reference, saving on copy overhead. If you ever need to support multiple timeframes, you could extend CheckRetest() to accept an array of MqlRates or a timeframe parameter, demonstrating the flexibility of method overloading in MQL5.
class CRetestSignal
  {
private:
   bool breakLong, breakShort, retested;
public:
   void Reset()
     { breakLong = breakShort = retested = false; }
   void OnBreak(double close, double h, double l)
     { breakLong = (close > h); breakShort = (close < l); retested = false; }
   bool CheckRetest(const MqlRates &r, bool &isLong)
     {
      if(breakLong)
        {
         if(!retested && r.low <= g_range.High())
           { retested = true; isLong = true; return false; }
         if(retested && r.close > g_range.High())
           { isLong = true; return true; }
        }
      else if(breakShort)
        {
         if(!retested && r.high >= g_range.Low())
           { retested = true; isLong = false; return false; }
         if(retested && r.close < g_range.Low())
           { isLong = false; return true; }
        }
      return false;
     }
  };
static CRetestSignal g_retest;
6. On‑Chart Dashboard
To give live feedback, CDashboard creates a simple OBJ_LABEL in the upper‑left corner. You see how Init(), Update() and Delete() manage this label’s lifecycle, this same pattern works for OBJ_TEXT, OBJ_RECTANGLE or any other object type. The label updates every tick, but because setting the same text repeatedly is cheap, performance stays high. If you wanted to optimize further, you could cache the last string and only call ObjectSetString() when it actually changes, demonstrating how small tweaks in object‑management can yield micro‑performance gains in tick‑intensive EAs.
class CDashboard
  {
private:
   string name;
public:
   void Init()
     {
      name = "ORB_Info";
      if(ObjectFind(0, name) < 0)
        {
         ObjectCreate(0, name, OBJ_LABEL, 0, 0, 0);
         ObjectSetInteger(0, name, OBJPROP_CORNER, CORNER_LEFT_UPPER);
         ObjectSetInteger(0, name, OBJPROP_XDISTANCE, 10);
         ObjectSetInteger(0, name, OBJPROP_YDISTANCE, 30);
        }
     }
   void Update(const string &txt)
     { ObjectSetString(0, name, OBJPROP_TEXT, txt); }
   void Delete()
     { if(ObjectFind(0, name) >= 0) ObjectDelete(0, name); }
  };
static CDashboard g_dash;
7. Trade Interface & Notifications
Although we’re not sending orders here, we include static CTrade trade; to show how you’d integrate real trades later. More importantly, on a confirmed signal we draw an arrow (OBJ_ARROW) using user‑chosen Wingdings codes and colors, then fire off Alert(), SendNotification() and SendMail(). This triad demonstrates MQL5’s built‑in event and messaging system, no external libraries needed. You can even layer on PlaySound() or EventChartCustom() for web‑hooks, showing readers the breadth of built‑in communication channels.
static CTrade trade;

// ... inside your retest-confirmation block:
string msg = StringFormat("%s Signal @%.5f SL=%.5f TP=%.5f",
                          isLong ? "LONG" : "SHORT",
                          r[0].close, sl, tp);
Alert(msg);
if(PushNotify)    SendNotification(msg);
if(SendEmailAlert) SendMail(EmailSubject, msg);

// draw arrow on chart:
string arrowName = "ORB_Arrow_" + IntegerToString((int)r[0].time);
ObjectCreate(0, arrowName, OBJ_ARROW, 0,
             r[0].time,
             isLong ? r[0].low - 5 * _Point
                    : r[0].high + 5 * _Point);
ObjectSetInteger(0, arrowName, OBJPROP_ARROWCODE, isLong ? ArrowUpCode : ArrowDnCode);
ObjectSetInteger(0, arrowName, OBJPROP_COLOR,     isLong ? ArrowUpColor : ArrowDnColor);
8. OnInit() and OnDeinit()
In OnInit() we initialize our ATR module and dashboard, returning INIT_FAILED if anything goes wrong, this pattern ensures the EA never runs in a half‑broken state. In OnDeinit() we responsibly release the ATR handle and delete all chart objects, preventing orphaned indicators or objects lingering when you reload or remove the EA. This practice is critical in production code: always pair every iXXX handle with IndicatorRelease(), and every ObjectCreate() with either ObjectDelete() in OnDeinit() or conditional logic in your reset routine.
int OnInit()
  {
   if(!g_atr.Init())
      return INIT_FAILED;
   g_dash.Init();
   return INIT_SUCCEEDED;
  }

void OnDeinit(const int reason)
  {
   g_atr.Release();
   ObjectDelete(0, "ORB_High");
   ObjectDelete(0, "ORB_Low");
   ObjectDelete(0, "ORB_Range");
   g_dash.Delete();
  }
9. OnTick() State Machine
The heart of the EA is OnTick(). We use static bool inited and static int state, so they persist across calls, this is how MQL5 achieves per‑EA memory without globals or external storage. First, we calculate the session’s start time and reset once per day, showing a common pattern for intraday logic. Then a switch(state) moves cleanly through our four stages (Capture, Break, Retest, Done). Because MQL5 doesn’t support coroutine‑style yields, using a state machine is the idiomatic way to slice multi‑step strategies into single‑tick processing. It also keeps each branch small and testable.
void OnTick()
  {
   static bool    inited = false;
   static int     state  = 0;
   static datetime sessionStart;

   if(!inited)
     {
      // compute sessionStart, init g_range & g_retest, Alert
      inited = true; state = 0;
     }

   // fetch latest MqlRates r[0] and bid/ask

   switch(state)
     {
      case 0: // Capture
         g_range.Update(bid, TimeCurrent());
         if(g_range.IsDefined(TimeCurrent()))
            state = 1;
         break;
      case 1: // Break
         if(r[0].close > g_range.High() || r[0].close < g_range.Low())
           { g_retest.OnBreak(r[0].close, g_range.High(), g_range.Low()); state = 2; }
         break;
      case 2: // Retest
         {
          bool isLong;
          if(g_retest.CheckRetest(r[0], isLong))
             state = 3;
         }
         break;
      case 3: // Done
         break;
     }
  }
10. Midnight Reset
Finally, we compare today = now - now%86400 with a static datetime lastDay. As soon as the date changes, we delete old objects and reset our flags, no messy “if hour==0” hacks needed. This pattern works for any daily‑based EA: zero-bars, daily pivot routines, end‑of‑day reporting, etc. Encouraging readers to adopt this idiom helps them avoid subtle off‑by‑one errors when clocks cross midnight or when DST shifts occur.
// at the end of OnTick():
static datetime lastDay = 0;
datetime        today   = TimeCurrent() - TimeCurrent() % 86400;
if(today != lastDay)
  {
   lastDay = today;
   inited  = false;
   state   = 0;
   ObjectDelete(0, "ORB_High");
   ObjectDelete(0, "ORB_Low");
   ObjectDelete(0, "ORB_Range");
  }
Backtesting and Results
Backtesting is the process of running your trading strategy, exactly as written in your EA-against historical market data to see how it would have performed in the past. This lets you:
- Validate that your rules produce sensible results
- Measure key metrics like win‑rate, drawdown, and profit factor
- Optimize input parameters (e.g. range length, ATR multiplier) to find combinations that historically worked best.
In MetaTrader 5, the Strategy Tester feeds each historical tick into OnTick(), so:
- OnInit() sets everything up (ATR handle, chart objects, initial state)
- OnTick() drives the range capture, breakout/retest logic, arrow drawing, alerts and dashboard updates on each simulated tick
- OnDeinit() cleans up after the test
In other words, the same code path you use in a live chart is used by the Tester to “back‑test.”
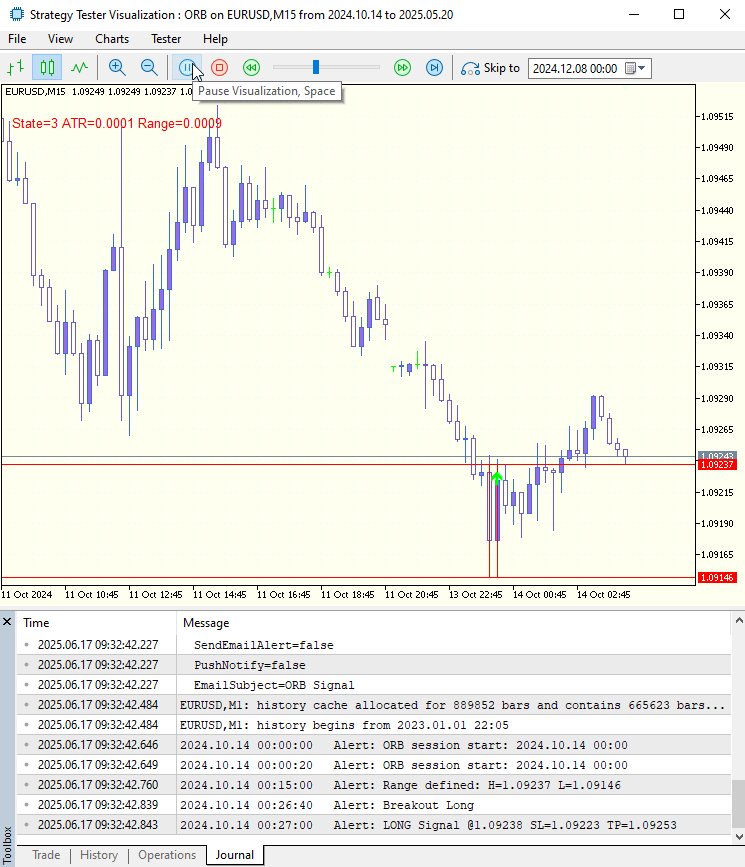
The animated GIF above illustrates the Opening Range Breakout EA running on an EURUSD M15 chart during a back‑test. In the main panel, you can see a shaded rectangle marking the opening range, bounded by two horizontal lines at the high and low of that initial interval. This visual framing immediately communicates where the EA expects significant price action to occur.
Each green arrow on the chart denotes a confirmed long entry. The EA’s “break → retest → re‑break” logic ensures that price must first breach the upper boundary, then revisit it, and finally close above it again before an arrow appears. This two‑step confirmation filters out false breakouts and only signals when genuine momentum is present.
Below the chart, the Journal pane logs every critical event: session start, range definition, breakout detection, and final signal with its exact entry, stop‑loss, and take‑profit values. These log entries mirror the EA’s internal state transitions, providing transparency into how and when decisions are made.
This example demonstrates how the ORB strategy captures early‑session volatility, confirms true breakouts, and produces repeatable, positive signals on the EURUSD M15 timeframe.

I have also tested this EA on AUD/USD using the M5 timeframe to yield a clearer view of intraday price action. See the diagram above.
Conclusion
The Opening Range Breakout EA we’ve developed in MQL5 transforms the simple concept of an early‑session price corridor into a disciplined, automated strategy. By modularizing each component-range capture, volatility‑based stops, retest validation, and on‑chart feedback, we’ve crafted a codebase that’s both easy to maintain and fast enough for live deployment.
This approach addresses two core intraday challenges: distinguishing true momentum from fleeting spikes, and sizing risk in accordance with real‑time market conditions. The “break → retest → re‑break” confirmation sequence weeds out false moves, while ATR‑derived stop‑loss and take‑profit levels adapt dynamically to evolving volatility. In doing so, the EA delivers consistent, high‑conviction signals, precisely the kind of entries that withstand turbulent markets and capitalize on genuine price action.
Now it’s time to make it your own. Compile the EA in MetaEditor, back‑test across various symbols and sessions, and experiment with inputs like range duration and ATR multiplier. Watch the rectangle, lines, and arrows come to life on your chart, and follow the Journal logs to see every decision unfold. With this ORB framework under your belt, you’re equipped to turn each day’s opening fluctuations into repeatable, confidence‑boosting trades. Here’s to sharper entries and smarter risk management.
Warning: All rights to these materials are reserved by MetaQuotes Ltd. Copying or reprinting of these materials in whole or in part is prohibited.
This article was written by a user of the site and reflects their personal views. MetaQuotes Ltd is not responsible for the accuracy of the information presented, nor for any consequences resulting from the use of the solutions, strategies or recommendations described.

- Free trading apps
- Over 8,000 signals for copying
- Economic news for exploring financial markets
You agree to website policy and terms of use