
创建 MQL5-Telegram 集成 EA 交易(第 7 部分):图表指标自动化的命令分析
概述
在本文中,我们将在上一部分(第 6 部分)取得的进展的基础上,集成响应式内联按钮以增强机器人交互。现在,我们的重点转移到使用从 Telegram 发送的命令自动在 MetaTrader 5 图表上添加指标。我们将创建一个系统,其中 EA 交易通过 Telegram 捕获用户定义的指标参数,解析数据,并将指定的指标实时应用于交易图表。
以下主题将逐步指导我们实施这一指标自动化过程:
- 基于 Telegram 指标的交易概述:我们将探讨交易者如何使用 Telegram 命令来控制 MetaTrader 5 上的指标。
- 解析和处理 Telegram 指标命令:本节将详细介绍如何从 Telegram 消息中正确提取和处理指标参数。
- 在 MQL5 中执行指标:我们将演示如何使用解析的命令直接在 MetaTrader 5 中添加和自动化指标。
- 测试指标交易系统:全面的测试过程将确保系统顺利运行,以实现准确的指标自动化。
- 结论:最后,我们将回顾整个过程并讨论关键要点。
读完本文后,您将拥有一个功能齐全的 Telegram 到 MetaTrader 5 指标自动化系统,能够接收和处理来自 Telegram 的命令,以便在 MQL5 中无缝应用技术指标。让我们开始吧!
基于 Telegram 指标的交易概述
在本节中,我们将深入研究如何使用 Telegram 发送可自动进行图表分析的指标命令。许多交易者利用 Telegram 与机器人和 EA 交易进行交互,以便他们直接在 MetaTrader 5上添加、修改或删除技术指标。这些命令通常包括关键信息,例如指标类型、时间范围、周期和价格应用 —— 这对于图表分析至关重要。然而,如果手动处理,应用这些指标可能会出现延误或错误,特别是在快速发展的市场中。
通过 Telegram 命令自动执行应用指标的过程,交易者可以增强他们的技术分析,而无需手动管理图表的麻烦。当正确集成时,这些 Telegram 命令可以在 MetaTrader 5 中解析并转换为可执行指令,从而能够实时将指标添加到图表中。这不仅确保了准确性,还确保了更高效的交易流程,使交易者能够专注于解释结果,而不是管理设置。指标命令的典型可视化如下所示:
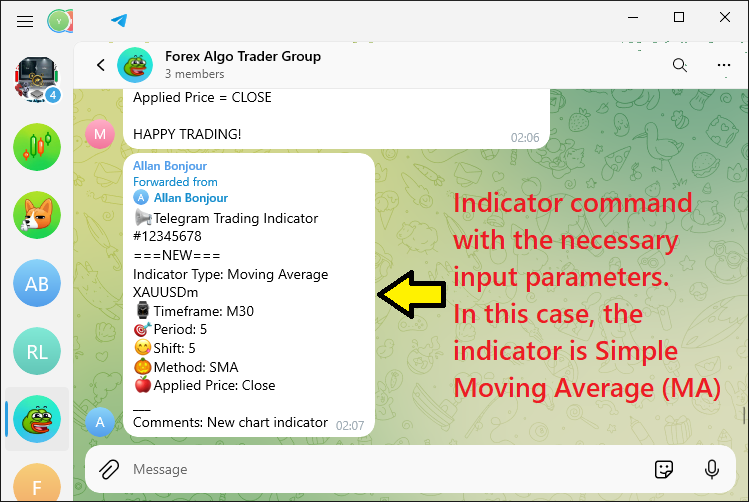
最终,该系统弥合了 Telegram 和 MetaTrader 5 之间的差距,使交易者能够简化图表分析、最大限度地减少错误,并通过自动指标管理充分利用实时市场机会。
解析和处理 Telegram 指标命令
我们需要做的第一件事是获取 Telegram 提供的指标命令,然后在 MetaQuotes Language 5 (MQL5) 中对其进行编码、解析和处理,以便我们可以解释它们并将相应的指标应用于 MetaTrader 5 图表。对于编码和解析部分,我们已经在本系列的第 5 部分介绍了必要的类。然而,在本部分中,我们将重新审视这些类以确保清晰性,特别是因为第 6 部分侧重于内联按钮等不同功能。负责解析和处理 Telegram 指标命令的代码片段如下所示:
//+------------------------------------------------------------------+
//|   Class_Bot_EA                                                   |
//+------------------------------------------------------------------+
class Class_Bot_EA{
   private:
      string            member_token;         //--- Stores the bot’s token.
      string            member_name;          //--- Stores the bot’s name.
      long              member_update_id;     //--- Stores the last update ID processed by the bot.
      CArrayString      member_users_filter;  //--- An array to filter users.
      bool              member_first_remove;  //--- A boolean to indicate if the first message should be removed.

   protected:
      CList             member_chats;         //--- A list to store chat objects.

   public:
      void Class_Bot_EA();   //--- Declares the constructor.
      ~Class_Bot_EA(){};    //--- Declares the destructor.
      int getChatUpdates(); //--- Declares a function to get updates from Telegram.
      void ProcessMessages(); //--- Declares a function to process incoming messages.
};


void Class_Bot_EA::Class_Bot_EA(void){ //--- Constructor
   member_token=NULL; //--- Initialize the bot's token as NULL.
   member_token=getTrimmedToken(InpToken); //--- Assign the trimmed bot token from InpToken.
   member_name=NULL; //--- Initialize the bot's name as NULL.
   member_update_id=0; //--- Initialize the last update ID to 0.
   member_first_remove=true; //--- Set the flag to remove the first message to true.
   member_chats.Clear(); //--- Clear the list of chat objects.
   member_users_filter.Clear(); //--- Clear the user filter array.
}
//+------------------------------------------------------------------+
int Class_Bot_EA::getChatUpdates(void){
   //--- Check if the bot token is NULL
   if(member_token==NULL){
      Print("ERR: TOKEN EMPTY"); //--- Print an error message if the token is empty
      return(-1); //--- Return with an error code
   }

   string out; //--- Variable to store the response from the request
   string url=TELEGRAM_BASE_URL+"/bot"+member_token+"/getUpdates"; //--- Construct the URL for the Telegram API request
   string params="offset="+IntegerToString(member_update_id); //--- Set the offset parameter to get updates after the last processed ID

   //--- Send a POST request to get updates from Telegram
   int res=postRequest(out, url, params, WEB_TIMEOUT);
   // THIS IS THE STRING RESPONSE WE GET // "ok":true,"result":[]}

   //--- If the request was successful
   if(res==0){
      //Print(out); //--- Optionally print the response

      //--- Create a JSON object to parse the response
      CJSONValue obj_json(NULL, jv_UNDEF);
      //--- Deserialize the JSON response
      bool done=obj_json.Deserialize(out);
      //--- If JSON parsing failed
      // Print(done);
      if(!done){
         Print("ERR: JSON PARSING"); //--- Print an error message if parsing fails
         return(-1); //--- Return with an error code
      }

      //--- Check if the 'ok' field in the JSON is true
      bool ok=obj_json["ok"].ToBool();
      //--- If 'ok' is false, there was an error in the response
      if(!ok){
         Print("ERR: JSON NOT OK"); //--- Print an error message if 'ok' is false
         return(-1); //--- Return with an error code
      }

      //--- Create a message object to store message details
      Class_Message obj_msg;

      //--- Get the total number of updates in the JSON array 'result'
      int total=ArraySize(obj_json["result"].m_elements);
      //--- Loop through each update
      for(int i=0; i<total; i++){
         //--- Get the individual update item as a JSON object
         CJSONValue obj_item=obj_json["result"].m_elements[i];

         //--- Extract message details from the JSON object
         obj_msg.update_id=obj_item["update_id"].ToInt(); //--- Get the update ID
         obj_msg.message_id=obj_item["message"]["message_id"].ToInt(); //--- Get the message ID
         obj_msg.message_date=(datetime)obj_item["message"]["date"].ToInt(); //--- Get the message date

         obj_msg.message_text=obj_item["message"]["text"].ToStr(); //--- Get the message text
         obj_msg.message_text=decodeStringCharacters(obj_msg.message_text); //--- Decode any HTML entities in the message text

         //--- Extract sender details from the JSON object
         obj_msg.from_id=obj_item["message"]["from"]["id"].ToInt(); //--- Get the sender's ID
         obj_msg.from_first_name=obj_item["message"]["from"]["first_name"].ToStr(); //--- Get the sender's first name
         obj_msg.from_first_name=decodeStringCharacters(obj_msg.from_first_name); //--- Decode the first name
         obj_msg.from_last_name=obj_item["message"]["from"]["last_name"].ToStr(); //--- Get the sender's last name
         obj_msg.from_last_name=decodeStringCharacters(obj_msg.from_last_name); //--- Decode the last name
         obj_msg.from_username=obj_item["message"]["from"]["username"].ToStr(); //--- Get the sender's username
         obj_msg.from_username=decodeStringCharacters(obj_msg.from_username); //--- Decode the username

         //--- Extract chat details from the JSON object
         obj_msg.chat_id=obj_item["message"]["chat"]["id"].ToInt(); //--- Get the chat ID
         obj_msg.chat_first_name=obj_item["message"]["chat"]["first_name"].ToStr(); //--- Get the chat's first name
         obj_msg.chat_first_name=decodeStringCharacters(obj_msg.chat_first_name); //--- Decode the first name
         obj_msg.chat_last_name=obj_item["message"]["chat"]["last_name"].ToStr(); //--- Get the chat's last name
         obj_msg.chat_last_name=decodeStringCharacters(obj_msg.chat_last_name); //--- Decode the last name
         obj_msg.chat_username=obj_item["message"]["chat"]["username"].ToStr(); //--- Get the chat's username
         obj_msg.chat_username=decodeStringCharacters(obj_msg.chat_username); //--- Decode the username
         obj_msg.chat_type=obj_item["message"]["chat"]["type"].ToStr(); //--- Get the chat type

         //--- Update the ID for the next request
         member_update_id=obj_msg.update_id+1;

         //--- If it's the first update, skip processing
         if(member_first_remove){
            continue;
         }

         //--- Filter messages based on username
         if(member_users_filter.Total()==0 || //--- If no filter is applied, process all messages
            (member_users_filter.Total()>0 && //--- If a filter is applied, check if the username is in the filter
            member_users_filter.SearchLinear(obj_msg.from_username)>=0)){

            //--- Find the chat in the list of chats
            int index=-1;
            for(int j=0; j<member_chats.Total(); j++){
               Class_Chat *chat=member_chats.GetNodeAtIndex(j);
               if(chat.member_id==obj_msg.chat_id){ //--- Check if the chat ID matches
                  index=j;
                  break;
               }
            }

            //--- If the chat is not found, add a new chat to the list
            if(index==-1){
               member_chats.Add(new Class_Chat); //--- Add a new chat to the list
               Class_Chat *chat=member_chats.GetLastNode();
               chat.member_id=obj_msg.chat_id; //--- Set the chat ID
               chat.member_time=TimeLocal(); //--- Set the current time for the chat
               chat.member_state=0; //--- Initialize the chat state
               chat.member_new_one.message_text=obj_msg.message_text; //--- Set the new message text
               chat.member_new_one.done=false; //--- Mark the new message as not processed
            }
            //--- If the chat is found, update the chat message
            else{
               Class_Chat *chat=member_chats.GetNodeAtIndex(index);
               chat.member_time=TimeLocal(); //--- Update the chat time
               chat.member_new_one.message_text=obj_msg.message_text; //--- Update the message text
               chat.member_new_one.done=false; //--- Mark the new message as not processed
            }
         }

      }
      //--- After the first update, set the flag to false
      member_first_remove=false;
   }
   //--- Return the result of the POST request
   return(res);
}
在这里,我们引入 “Class_Bot_EA” 并实现其 “getChatUpdates” 函数来处理来自 Telegram 的传入更新。在构造函数中,我们初始化机器人的令牌、名称和其他相关变量。我们还设置了一个标志来确定是否应该删除第一条消息并清除一些旧数据,包括聊天列表和任何用户筛选器。
“getChatUpdates” 函数为 Telegram API 构建一个 URL,以便我们获取指定机器人的更新。最后处理的更新 ID 用作 URL 中的偏移量,这意味着我们不会获得任何已经处理的更新。在我们构建 URL 之后,我们向 API 发送 POST 请求,并处理来自服务器的响应。由于我们期望从服务器返回 JavaScript 对象表示法(JSON) 数据,因此我们通过尝试解析数据来检查错误。如果解析失败或 JSON 响应中的 “ok” 字段为 false,我们将打印一条错误消息并返回错误代码。
成功响应后,我们从消息中提取相关信息 —— 更新 ID、消息 ID、发件人信息和聊天详细信息 —— 让我们知道对话中发生了什么。然后,我们查看到目前为止的聊天列表,看看这条新信息适合哪里。如果与此新消息连接的聊天不在列表中,我们会将其添加。如果它在列表中,我们会用新消息更新其信息。
最后,我们处理用户定义的消息过滤和每个聊天状态的处理。在完成必要的更新后,我们确保每个聊天的最后处理消息都是最新的。最后,我们返回 POST 请求的结果,表示成功或相应描述的错误。
这就是我们处理收到的命令所需的一切。然后,我们需要解释收到的指标命令,识别所请求的指标,并将其自动添加到图表中以进行进一步分析。这将在下一节中完成。
在 MQL5 中执行指标
为了处理接收到的指标命令,我们将调用负责消息处理的函数,以便我们整体处理消息,然后分段解释消息细节。可以使用下面的函数。
void Class_Bot_EA::ProcessMessages(void){

//...

}
现在真正的处理就在这个函数中开始。我们需要做的第一件事是遍历所有收到的消息并单独处理它们。这很重要,因为提供商可以同时批量发送多个交易品种的信号,例如 “AUDUSD、EURUSD、GBPUSD、XAUUSD、XRPUSD、USDKES、USDJPY、EURCHF” 等等。我们通过以下逻辑实现这一点。
   //--- Loop through all chats
   for(int i=0; i<member_chats.Total(); i++){
      Class_Chat *chat=member_chats.GetNodeAtIndex(i); //--- Get the current chat
      if(!chat.member_new_one.done){ //--- Check if the message has not been processed yet
         chat.member_new_one.done=true; //--- Mark the message as processed
         string text=chat.member_new_one.message_text; //--- Get the message text

         //...

      }
   }
首先,我们循环遍历 “member_chats” 列表中存储的聊天记录。每个聊天对象都通过 “GetNodeAtIndex” 函数获取。我们通过评估 “member_new_one” 结构中的标志来检查与该聊天相关的消息是否已被处理。如果尚未对该消息采取行动,则 “done” 标志设置为 “true”,这意味着同一条消息不会被多次处理。
接下来,我们提取消息的内容。它们存储在 “member_new_one” 结构的 “message_text” 字段中。因此,我们可以直接处理文本,而不必担心已经处理的内容。
我们现在需要做的第一件事是获取用于分析的命令详细信息。具体逻辑如下。
         string user_text = text;
         Print("USER'S PLAIN TEXT IS AS BELOW:\n",user_text);

         StringToUpper(user_text);
         Print("USER'S TRANSFORMED UPPERCASE TEXT IS AS BELOW:\n",user_text);
在这里,我们首先将来自变量 “text” 的传入消息文本存储到名为 “user_text” 的新变量中。这允许我们在不修改原始变量的情况下处理消息内容。然后,我们使用 “Print” 函数打印用户的纯文本消息,该函数将消息输出到 MetaTrader 5 终端以供记录。
接下来,我们使用 StringToUpper 函数将整个 “user_text” 字符串转换为大写。这将消息中的所有字符转换为大写等效字符。这是必要的,因为我们将均衡消息字符,这样更容易处理。转换后,我们再次将更新的消息打印到终端,显示用户输入的转换后的大写版本。此过程允许我们查看消息的原始版本和修改版本,以便进一步处理或响应。当我们再次运行程序时,我们在日志部分得到以下输出。
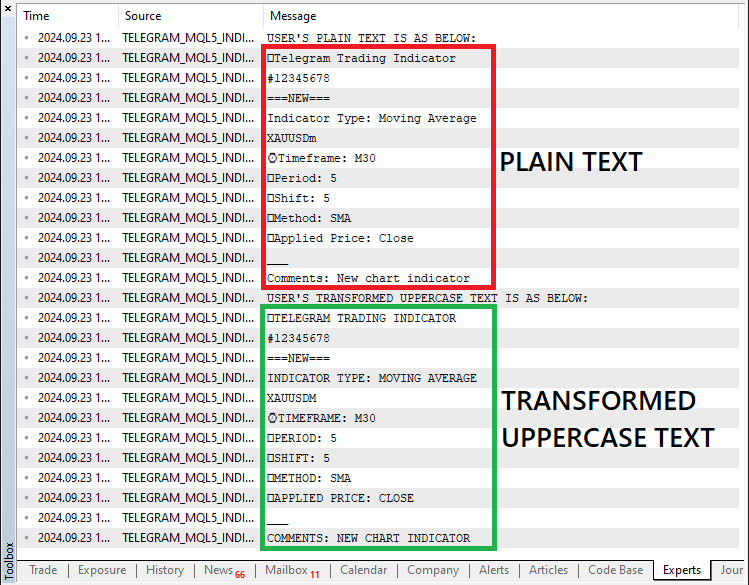
将信号消息转换为大写后,我们需要初始化将保存数据的变量,如下所示:
         // MOVING AVERAGE
         //--- Initialize variables to hold extracted data
         string indicator_type = NULL;
         string indicator_symbol = NULL;
         string indicator_timeframe = NULL;
         long indicator_period = 0;
         long indicator_shift = 0;
         string indicator_method = NULL;
         string indicator_app_price = NULL;
我们首先从移动平均指标开始。我们初始化几个变量,这些变量将保存提取的数据,以便根据 Telegram 的用户输入在 MetaTrader 5 中配置移动平均线(MA)指标。以下是每个变量所代表的内容:
- indicator_type:指标的类型,在本例中,就是移动平均线。
- indicator_symbol:指标适用的交易品种(货币对或资产)。
- indicator_timeframe:绘制指标的图表的时间范围(例如 M1、H1、D1)。
- indicator_period:移动平均线在计算中考虑的周期数(或柱数)。
- indicator_shift:在图表上向前或向后移动指标的偏移或移位值。
- indicator_method:MA(例如,SMA、EMA)的计算方法。
- indicator_app_price:用于 MA 计算的应用价格(例如,收盘价、开盘价)。
为了提取与指标相关的数据元素,我们需要按行拆分消息,并通过每一行循环查找细节。这种实现是通过以下逻辑实现的。
         //--- Split the message by lines
         string lines[];
         StringSplit(user_text,'\n',lines);
         Print("SPLIT TEXT SEGMENTS IS AS BELOW:");
         ArrayPrint(lines,0,",");
在这里,我们将用户转换后的消息拆分为单独的行,以便更容易提取相关的指标信息。我们首先声明一个名为 “lines” 的数组,用于在消息拆分后保存每一行。然后,我们应用 StringSplit 函数,使用换行符('\n')作为分隔符将消息分成单独的行。此函数永远用新行分隔的每个文本部分填充 “lines” 数组。
消息被拆分后,我们就使用 ArrayPrint 函数打印结果段,该函数将每一行作为单独的元素输出。此步骤对于可视化消息结构和确保拆分过程正确进行是必需的。通过以这种方式组织消息,我们可以更容易地处理每一行,以提取交易品种、指标类型和其他详细信息等关键元素。为了获得详细信息,我们需要循环遍历每一行。
         //--- Iterate over each line to extract information
         for (int i=0; i<ArraySize(lines); i++){
            StringTrimLeft(lines[i]);
            StringTrimRight(lines[i]);

            string selected_line = lines[i];
            Print(i,". ",selected_line);

            //...

         }
我们遍历 “lines” 数组,从拆分消息的每一行中提取特定的指标信息。我们使用 for 循环遍历数组中的每个元素,确保每行都单独处理。在循环开始时,我们将 StringTrimLeft 和 StringTrimRight 函数应用于每一行以删除任何前导或尾随空格字符。这确保了没有额外的空格干扰解析过程。
然后,我们将每行修剪后的文本分配给 “selected_line” 变量,该变量保存当前正在处理的文本行。通过将每行文本整齐地修剪并存储在 “selected_line” 变量中,我们可以执行进一步的操作,例如检查该行是否包含特定的交易信号或命令。为了确认我们有正确的信息,我们打印每一行,下面是输出。
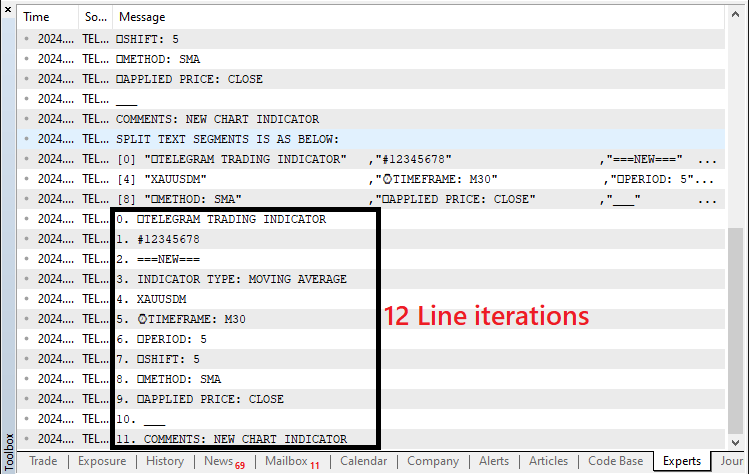
成功了,我们可以继续在所选行中查找具体细节。让我们从寻找交易技术指标的类型开始。我们首先来寻找移动平均线指标类型文本,即 “INDICATOR TYPE”。
            if (StringFind(selected_line,"INDICATOR TYPE") >= 0){
               indicator_type = StringSubstr(selected_line,16);
               Print("Line @ index ",i," Indicator Type = ",indicator_type); //--- Print the extracted details
            }
在这里,我们处理用户的 Telegram 消息以提取指标类型。我们使用 StringFind 函数在当前行(“selected_line”)中搜索文本 “INDICATOR TYPE”。如果找到此文本,函数将返回匹配的起始位置,该位置是一个大于或等于零的值。一旦检测到匹配,我们将使用 StringSubstr 函数提取指标类型,该函数从 “INDICATOR TYPE” 之后的位置(从索引 16 开始)到行尾检索子字符串。提取的值存储在 “indicator_type” 变量中。最后,我们使用 Print 函数打印出该行的索引和提取的 “indicator_type”,以确认数据已成功获取。当我们运行它时,我们得到以下输出。
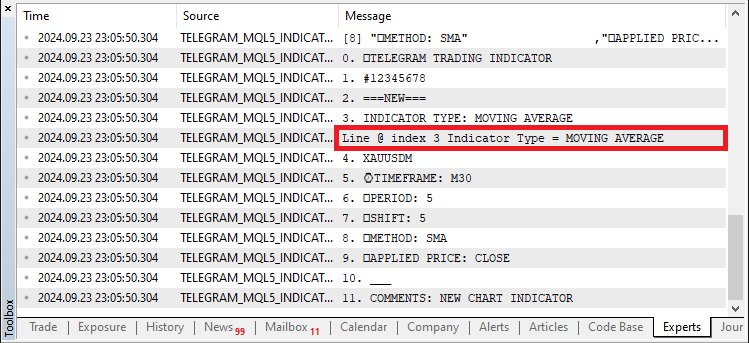
我们可以看到,我们已经成功循环遍历所有命令段并识别了指标名称。接下来,我们需要识别交易品种。将使用类似但稍微复杂一些的逻辑。
            //--- Check for symbol in the list of available symbols and assign it
            for(int k = 0; k < SymbolsTotal(true); k++) { //--- Loop through all available symbols
               string selected_symbol = SymbolName(k, true); //--- Get the symbol name
               if (StringCompare(selected_line,selected_symbol,false) == 0){ //--- Compare the line with the symbol name
                  indicator_symbol = selected_symbol; //--- Assign the symbol if a match is found
                  Print("Line @ index ",i," SYMBOL = ",indicator_symbol); //--- Print the found symbol
               }
            }
在此代码块中,我们根据可用交易品种列表检查用户的输入,并将正确的输入分配给 “indicator_symbol” 变量。首先,我们使用 SymbolsTotal 函数,它返回平台上当前可用的交易品种总数。参数 “true” 指定我们想要可见交易品种的数量。然后,我们使用以变量 “k” 为索引的 for 循环遍历所有可用交易品种。
在循环中,我们使用 SymbolName 函数获取索引 “k” 处的交易品种的名称。第二个参数 “true” 表示我们想要交易品种名称的简称。检索交易品种名称并将其存储在 “selected_symbol” 变量中后,我们使用 StringCompare 函数将此 “selected_symbol” 与用户的输入(“selected_line”)进行比较。“false” 参数表示比较应该不区分大小写。
如果函数返回零,则表示两个字符串匹配,我们将 “selected_symbol” 分配给 “indicator_symbol” 变量。最后,我们使用 Print 函数打印出该行的索引和匹配的 “indicator_symbol”,以确认我们已经正确识别并分配了用户输入的交易品种。这不包含任何额外的文本,因此我们直接搜索。运行时,我们将不会使用当前代码片段获得任何结果,因为提取的文本和默认交易品种不相似,因为它们区分大小写,即 “XAUUSDM” 不等于 “XAUUSDm”。这是我们的交易品种名称:
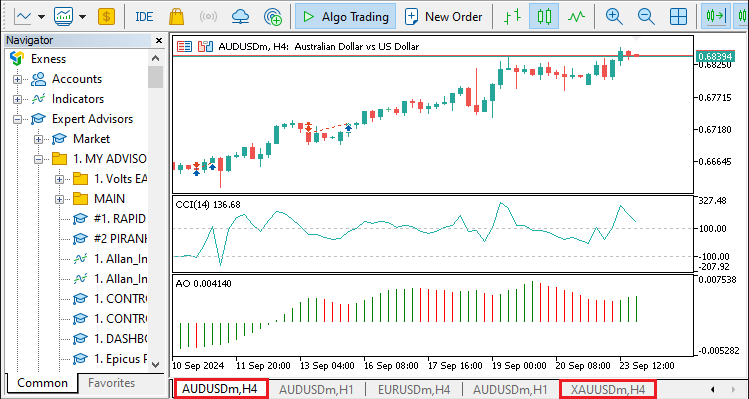
因此,我们需要将默认系统交易品种转换为大写才能进行比较。新更新的代码片段如下:
            //--- Check for symbol in the list of available symbols and assign it
            for(int k = 0; k < SymbolsTotal(true); k++) { //--- Loop through all available symbols
               string selected_symbol = SymbolName(k, true); //--- Get the symbol name
               StringToUpper(selected_symbol);
               if (StringCompare(selected_line,selected_symbol,false) == 0){ //--- Compare the line with the symbol name
                  indicator_symbol = selected_symbol; //--- Assign the symbol if a match is found
                  Print("Line @ index ",i," SYMBOL = ",indicator_symbol); //--- Print the found symbol
               }
            }
利用新的变换,我们可以继续进行比较,得到的结果如下:
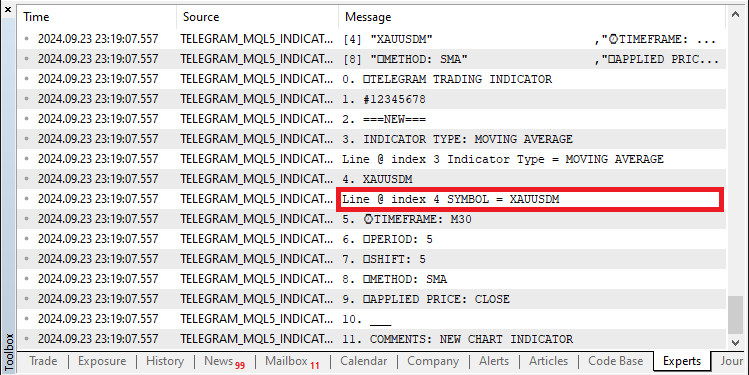
成功了,为了获得其他细节,我们采用了类似的逻辑。
            if (StringFind(selected_line,"TIMEFRAME") >= 0){
               indicator_timeframe = StringSubstr(selected_line,12);
               Print("Line @ index ",i," Indicator Timeframe = ",indicator_timeframe); //--- Print the extracted details
            }
            if (StringFind(selected_line,"PERIOD") >= 0){
               indicator_period = StringToInteger(StringSubstr(selected_line,9));
               Print("Line @ index ",i," Indicator Period = ",indicator_period);
            }
            if (StringFind(selected_line,"SHIFT") >= 0){
               indicator_shift = StringToInteger(StringSubstr(selected_line,8));
               Print("Line @ index ",i," Indicator Shift = ",indicator_shift);
            }
            if (StringFind(selected_line,"METHOD") >= 0){
               indicator_method = StringSubstr(selected_line,9);
               Print("Line @ index ",i," Indicator Method = ",indicator_method);
            }
            if (StringFind(selected_line,"APPLIED PRICE") >= 0){
               indicator_app_price = StringSubstr(selected_line,16);
               Print("Line @ index ",i," Indicator Applied Price = ",indicator_app_price);
            }
         }
当我们运行它时,我们得到以下输出。
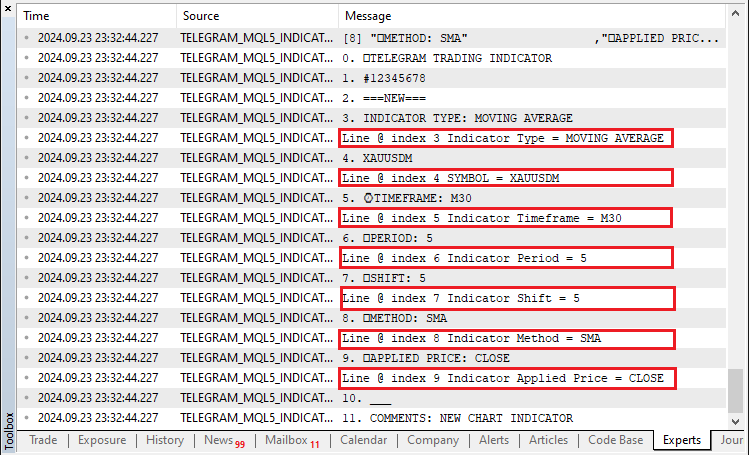
为了以更结构化的方式查看数据,我们可以打印所有获取的提取信息,如下所示:
         //--- Final data
         Print("\nFINAL EXTRACTED DATA:"); //--- Print the final data for confirmation

         Print("Type = ",indicator_type);
         Print("Symbol = ",indicator_symbol);
         Print("Timeframe = ",indicator_timeframe);
         Print("Period = ",indicator_period);
         Print("Shift = ",indicator_shift);
         Print("Method = ",indicator_method);
         Print("Applied Price = ",indicator_app_price);
我们打印最终提取的数据,以确认变量已正确填充。首先,我们使用 “Print” 函数显示一个标题消息:“\nFINAL EXTRACTED DATA:”。这可以作为日志中的可视化提示,标记即将显示已处理数据的位置。
之后,我们按顺序打印每个关键变量的值 ——“indicator_type”、“indicator_symbol”、“indicator_timeframe”、“indicator_period”、“indicator_shift”、“indicator_method” 和 “indicator_app_price”。每次调用 Print 都会输出变量的名称及其当前值。这对于调试和验证非常重要,因为它可以确保在系统继续将指标添加到 MetaTrader 5 中的图表之前,准确捕获从用户输入解析的数据(例如,指标类型、交易品种、时间范围等)。我们得到的输出如下所示:

非常完美!现在,由于我们已经掌握了移动平均线指标所需的所有详细信息,我们可以继续将其添加到图表中。然而,在添加它之前,我们可以按照 Telegram 的指示重新检查我们是否有正确的指标。我们通过使用 if 语句来实现这一点。
         if (indicator_type=="MOVING AVERAGE"){
                //...
         }
确认指标后,我们可以继续将提取的输入转换为各自的数据类型结构。请注意,我们当前的值是字符串或整数数据类型。例如,系统不会理解用户输入的移动平均法“SMA”应为如下所示的 ENUM_MA_METHOD 枚举下的 “SIMPLE MOVING AVERAGE”。

因此,我们需要向程序进一步解释这一点。为了系统地进行,我们将从最明显的开始,即时间框架。
            //--- Convert timeframe to ENUM_TIMEFRAMES
            ENUM_TIMEFRAMES timeframe_enum = _Period;
            if (indicator_timeframe == "M1") {
               timeframe_enum = PERIOD_M1;
            } else if (indicator_timeframe == "M5") {
               timeframe_enum = PERIOD_M5;
            } else if (indicator_timeframe == "M15") {
               timeframe_enum = PERIOD_M15;
            } else if (indicator_timeframe == "M30") {
               timeframe_enum = PERIOD_M30;
            } else if (indicator_timeframe == "H1") {
               timeframe_enum = PERIOD_H1;
            } else if (indicator_timeframe == "H4") {
               timeframe_enum = PERIOD_H4;
            } else if (indicator_timeframe == "D1") {
               timeframe_enum = PERIOD_D1;
            } else if (indicator_timeframe == "W1") {
               timeframe_enum = PERIOD_W1;
            } else if (indicator_timeframe == "MN1") {
               timeframe_enum = PERIOD_MN1;
            } else {
               Print("Invalid timeframe: ", indicator_timeframe);
            }
在本节中,我们将从提取的 “indicator_timeframe” 字符串中将用户提供的时间范围转换为相应的 MetaTrader 5 枚举 “ENUM_TIMEFRAMES”。此步骤至关重要,因为 MetaTrader 5 使用预定义的时间范围,例如 1 分钟图表使用 “PERIOD_M1”,1 小时图表使用 “PERIOD_H1”,等等。这些时间范围被定义为 “ENUM_TIMEFRAMES” 类型的一部分。
我们首先将变量 “timeframe_enum” 初始化为当前图表的时间范围,由 _Period表示。如果用户提供的时间范围无效,这将作为回退默认值。
接下来,我们使用一系列条件 if-else 语句来检查 “indicator_timeframe” 字符串的值。每个条件将提取的字符串与已知的时间范围标识符进行比较,例如 “M1”(1 分钟)、“H1”(1 小时)等。如果找到匹配项,则将相应的“ENUM_TIMEFRAMES”值(如“PERIOD_M1”或“PERIOD_H1”)分配给 “timeframe_enum”变量。
如果所有条件都不匹配,则会触发最后的 else 块,并向日志中打印一条错误消息,指示“无效时间范围”以及 “indicator_timeframe” 的值。这有助于确保在指标创建过程中仅将有效的时间范围传递给 MetaTrader 5。类似地,我们将其他变量转化为各自的形式。
            //--- Convert MA method to ENUM_MA_METHOD
            ENUM_MA_METHOD ma_method = MODE_SMA;
            if (indicator_method == "SMA") {
               ma_method = MODE_SMA;
            } else if (indicator_method == "EMA") {
               ma_method = MODE_EMA;
            } else if (indicator_method == "SMMA") {
               ma_method = MODE_SMMA;
            } else if (indicator_method == "LWMA") {
               ma_method = MODE_LWMA;
            } else {
               Print("Invalid MA method: ", indicator_method);
            }

            //--- Convert applied price to ENUM_APPLIED_PRICE
            ENUM_APPLIED_PRICE app_price_enum = PRICE_CLOSE;

            if (indicator_app_price == "CLOSE") {
               app_price_enum = PRICE_CLOSE;
            } else if (indicator_app_price == "OPEN") {
               app_price_enum = PRICE_OPEN;
            } else if (indicator_app_price == "HIGH") {
               app_price_enum = PRICE_HIGH;
            } else if (indicator_app_price == "LOW") {
               app_price_enum = PRICE_LOW;
            } else if (indicator_app_price == "MEDIAN") {
               app_price_enum = PRICE_MEDIAN;
            } else if (indicator_app_price == "TYPICAL") {
               app_price_enum = PRICE_TYPICAL;
            } else if (indicator_app_price == "WEIGHTED") {
               app_price_enum = PRICE_WEIGHTED;
            } else {
               Print("Invalid applied price: ", indicator_app_price);
            }
转换过程完成后,我们现在可以继续创建指标句柄,我们将使用它来将指标添加到图表中。
int handle_ma = iMA(indicator_symbol,timeframe_enum,(int)indicator_period,(int)indicator_shift,ma_method,app_price_enum);
在这里,我们使用 iMA 函数为移动平均线 (MA) 指标创建一个句柄。此函数根据我们之前提取和处理的参数生成一个指标句柄。该句柄将允许我们稍后在代码中引用和操作图表上的指标。我们向“iMA”函数传递几个参数,每个参数对应于我们从 Telegram 命令中收集的一个参数:
- "indicator_symbol":这指定了将应用该指标的金融工具(例如 EURUSD)。
- "timeframe_enum":此参数指的是先前根据用户输入转换的时间范围(例如,M1 表示 1 分钟,H1 表示 1 小时)。
- "(int)indicator_period":这会将提取的“indicator_period”从长数据类型转换为整数,表示 MA 的周期数。
- "(int)indicator_shift":类似地,这会将“indicator_shift”转换为整数,定义在图表上移动指标的柱数。
- "ma_method":这根据用户的输入指定了 MA 的计算方法,例如简单移动平均线 (SMA) 或指数移动平均线 (EMA)。
- “app_price_enum”:这表示计算 MA 所应用的价格类型(例如收盘价或开盘价)。
“iMA”函数的结果存储在变量 “handle_ma” 中。如果函数成功创建指标句柄,“handle_ma” 将包含有效引用。如果创建失败,它将返回INVALID_HANDLE ,表示一个或多个参数存在问题。由于我们知道 INVALID HANDLE 是失败表示,因此我们可以继续使用它进行进一步处理。
            if (handle_ma != INVALID_HANDLE){
               Print("Successfully created the indicator handle!");

                //...

            }
            else if (handle_ma == INVALID_HANDLE){
               Print("Failed to create the indicator handle!");
            }
在这里,我们通过验证 “handle_ma” 的值来检查移动平均线 (MA) 指标句柄是否已成功创建。如果句柄有效, iMA 函数将返回不等于 INVALID_HANDLE 的值。 在这种情况下,我们会打印一条表示成功的消息:“成功创建指标句柄!”这意味着所有参数(交易品种、时间范围、周期、方法等)都得到了正确解释,并且 MA 指标已准备好在图表上使用。
如果句柄创建失败,即 “handle_ma” 等于 INVALID_HANDLE ,我们将打印一条错误消息:“无法创建指标句柄!”。此情况表示在指标创建过程中出现了问题,例如无效的交易品种、不正确的时间范围或任何其他不正确的参数。这种错误处理有助于我们确保系统能够在指标设置过程中检测到问题并提供信息反馈。然后,我们可以继续打开具有指定交易品种和时间范围的图表,确保它与最新数据同步,并调整其设置以提高清晰度。
               long chart_id=ChartOpen(indicator_symbol,timeframe_enum);
               ChartSetInteger(ChartID(),CHART_BRING_TO_TOP,true);
               // update chart
               int wait=60;
               while(--wait>0){//decrease the value of wait by 1 before loop condition check
                  if(SeriesInfoInteger(indicator_symbol,timeframe_enum,SERIES_SYNCHRONIZED)){
                     break; // if prices up to date, terminate the loop and proceed
                  }
               }

               ChartSetInteger(chart_id,CHART_SHOW_GRID,false);
               ChartSetInteger(chart_id,CHART_SHOW_PERIOD_SEP,false);
               ChartRedraw(chart_id);

               Sleep(7000);
首先,我们使用 ChartOpen 函数根据我们之前从 Telegram 命令中提取的 “indicator_symbol” 和 “timeframe_enum” 打开一个新图表。图表 ID 被返回并存储在变量 “chart_id” 中。为了将此图表置于 MetaTrader 5 的前面,我们使用 ChartSetInteger 函数,传递图表 ID 以及常量 “CHART_BRING_TO_TOP”,以确保图表可见且可进行交互。
接下来,我们实施同步检查以确保图表的价格数据完全更新。这是通过使用 SeriesInfoInteger 函数循环最多 60 次来检查价格数据系列是否同步来完成的。如果在循环完成之前发生同步,我们会提前跳出。确认数据是最新的之后,我们继续自定义图表的外观。使用 ChartSetInteger 函数隐藏网格和周期分隔符,其中我们将 “CHART_SHOW_GRID” 和 “CHART_SHOW_PERIOD_SEP” 传递为 false,从而创建更清晰的图表视图。
完成这些调整后,使用 ChartRedraw 函数强制刷新图表。最后,使用 Sleep 函数添加 7 秒的暂停时间,以便图表和数据有时间完全加载,然后再继续任何进一步的操作。整个过程确保图表已准备好进行交互和显示,具有更新的数据和干净的视觉设置。之后,我们可以继续将指标添加到图表中。
               if (ChartIndicatorAdd(chart_id,0,handle_ma)) {
                  Print("SUCCESS. Indicator added to the chart.");
                  isIndicatorAddedToChart = true;
               }
               else {
                  Print("FAIL: Indicator not added to the chart.");
               }
在这里,我们将之前创建的移动平均线(MA)指标添加到我们之前打开的图表中。我们通过使用 ChartIndicatorAdd 函数来实现这一点,其中我们传递 “chart_id”、零(表示我们正在将指标添加到主图表)和 “handle_ma”,它代表我们创建的 MA 指标的句柄。如果添加成功,我们会打印一条成功消息,指出“成功。指标已添加到图表”,并将布尔变量 “isIndicatorAddedToChart” 设置为 true,表示该指标现在在图表上处于活动状态。我们定义了布尔变量,并在 “if” 语句外将其初始化为 false,如下所示。
bool isIndicatorAddedToChart = false;
相反,如果添加失败,我们会打印一条失败消息,指出 “FAIL:指标未添加到图表”。这项检查至关重要,因为它确保我们可以确认指标是否成功应用于图表,这对于后续的交易操作和可视化分析至关重要。通过处理这两种结果,我们可以保持流程的透明度,并了解图表上指标的状态。如果我们创建指标并将其添加到图表中,我们就可以以相同的代码结构通知用户成功。
         if (isIndicatorAddedToChart){
            string message = "\nSUCCESS! THE INDICATOR WAS ADDED TO THE CHART WITH THE FOLLOWING DETAILS:\n"; //--- Prepare success message
            message += "\nType = "+indicator_type+"\n";
            message += "Symbol = "+indicator_symbol+"\n";
            message += "Timeframe = "+indicator_timeframe+"\n";
            message += "Period = "+IntegerToString(indicator_period)+"\n";
            message += "Shift = "+IntegerToString(indicator_shift)+"\n";
            message += "Applied Price = "+indicator_app_price+"\n";
            message+="\nHAPPY TRADING!"; //--- Add final message line
            Print(message); //--- Print the message in the terminal
            sendMessageToTelegram(chat.member_id,message,NULL); //--- Send the success message to Telegram
         }
在这里,我们通过评估布尔变量 “isIndicatorAddedToChart” 来检查指标是否已成功添加到图表中。如果此条件为 true,我们将继续准备一条详细说明指标配置的成功消息。我们首先用成功消息头初始化一个名为 “message” 的字符串变量:“\nSUCCESS!该指标已添加到图表中,其详细信息如下:\n”。然后,我们将有关该指标的各种信息串联起来,包括其类型、交易品种、时间范围、周期、转变和应用价格。对于数值,我们使用 IntegerToString 函数来确保它们转换为字符串格式以便正确连接。
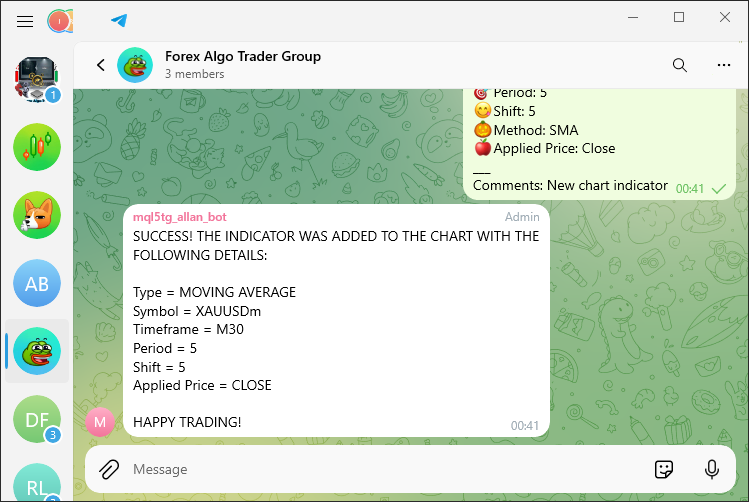
汇总完所有这些信息后,我们在消息的最后一行添加了一行,内容是 “\nHAPPY TRADING!”以传达积极的情绪。然后,我们使用 Print 函数将完整的消息输出到终端,清楚地确认指标的添加及其详细信息。最后,我们调用 “sendMessageToTelegram” 函数向 Telegram 发送相同的成功消息,确保由 “chat.member_id” 标识的相关聊天收到有关操作成功的通知。当我们运行它时,我们得到以下输出。
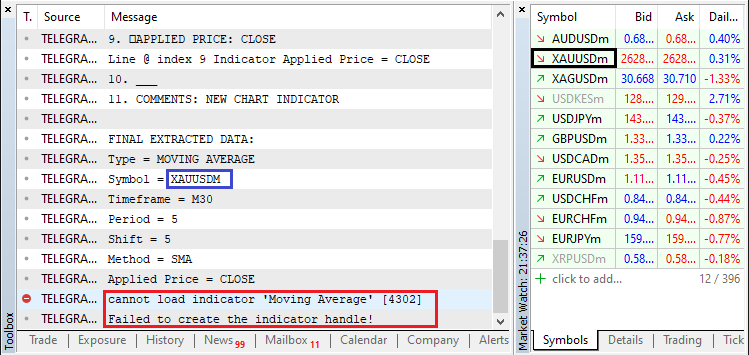
我们可以看到,尽管市场观察中有该交易品种,但我们仍然返回错误消息。这是因为我们将所有内容转换为大写,从而干扰了交易品种名称的正确结构。为了恢复正确的结构,同时仍然保持正确的交易品种解释和比较,我们可以使用大量的选项,但最简单的方法是直接将初始交易品种名称附加回持有人变量,如图所示。
            //--- Check for symbol in the list of available symbols and assign it
            for(int k = 0; k < SymbolsTotal(true); k++) { //--- Loop through all available symbols
               string selected_symbol = SymbolName(k, true); //--- Get the symbol name
               StringToUpper(selected_symbol);
               if (StringCompare(selected_line,selected_symbol,false) == 0){ //--- Compare the line with the symbol name
                  indicator_symbol = SymbolName(k, true); //--- Assign the symbol if a match is found
                  Print("Line @ index ",i," SYMBOL = ",indicator_symbol); //--- Print the found symbol
               }
            }
片段中发生的唯一变化以黄色显示和突出显示。当我们重新运行时,我们得到如下正确的输出:
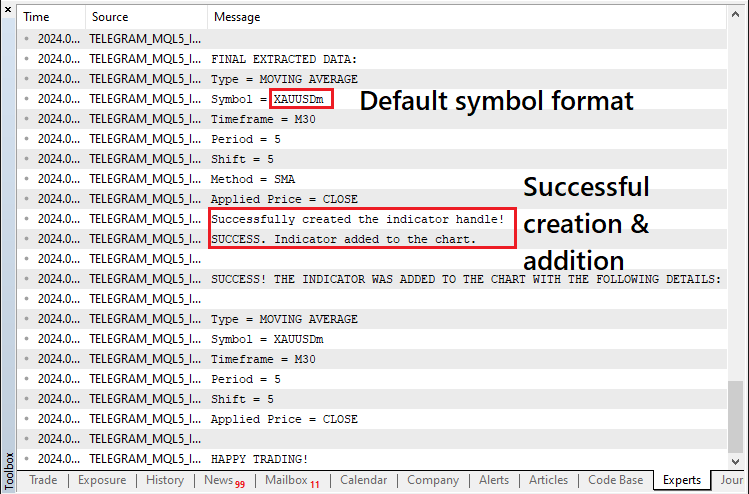
至此,我们已成功将指标添加到图表中。在 Telegram 上,我们收到如下所示的成功响应:
在交易终端上,打开一个新图表并添加指标。以下是可视化确认。
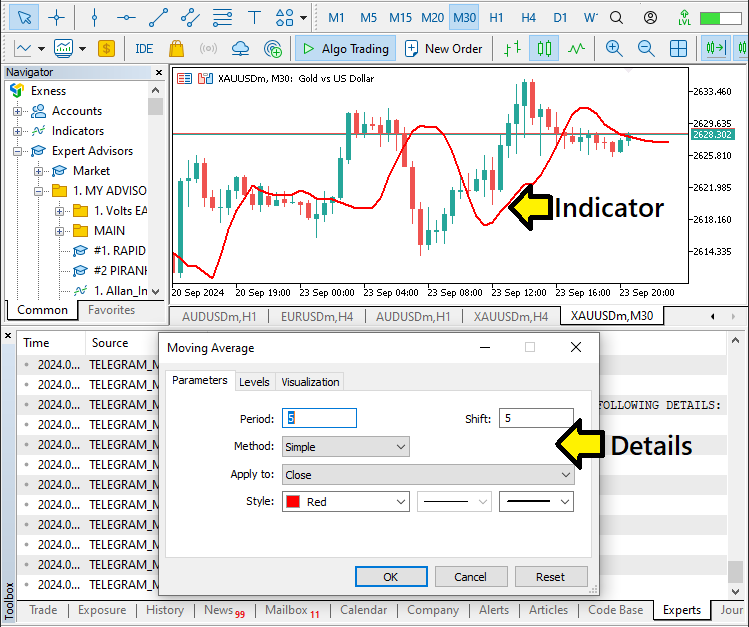
到目前为止,我们可以说我们实现了自动将移动平均技术指标添加到图表中的目的。类似的方法可以应用于其他指标,例如 Awesome Oscillator。通过遵循相同的格式来识别命令、提取相关参数和执行指标的添加,我们可以将各种指标无缝集成到我们的交易系统中,在整个实施过程中保持一致性和效率。然而,我们需要测试实施情况并确认一切正常。这将在下一节中完成。
测试指标交易系统
在本节中,我们将重点验证指标交易系统的功能。测试包括验证指示器是否正确配置,并对从 Telegram 收到的命令做出适当响应。我们将检查向图表添加指标的过程,确保所有参数都设置准确,指标在图表上正确显示。
为了清楚地了解这一过程,我们在视频中演示了 MetaTrader 5 中指标的设置和配置,特别是移动平均线,突出了系统的功能,并确认其已为真实交易场景做好准备,如下所示。
结论
总之,在本文中,我们演示了如何解析和处理通过 Telegram 接收的指标命令,以自动将指标添加到您的 MetaTrader 5 图表中。通过实施这些技术,我们简化了流程,提高了交易效率,减少了人为错误的可能性。
有了从这个实现中获得的知识,您就可以开发出包含其他指示器和命令的更复杂的系统。这个基础将使您能够完善您的交易策略,适应不断变化的市场条件,并最终提高您的交易表现。我们希望您觉得这篇文章易于理解,并提供了增强您的交易系统所需的见解。如果您有任何问题或需要进一步澄清,请随时探索其他资源或尝试本系列中分享的概念。祝您交易愉快!
本文由MetaQuotes Ltd译自英文
原文地址: https://www.mql5.com/en/articles/15962
注意: MetaQuotes Ltd.将保留所有关于这些材料的权利。全部或部分复制或者转载这些材料将被禁止。
本文由网站的一位用户撰写,反映了他们的个人观点。MetaQuotes Ltd 不对所提供信息的准确性负责,也不对因使用所述解决方案、策略或建议而产生的任何后果负责。
 原子轨道搜索(AOS)算法
 开发回放系统(第 69 部分):取得正确的时间(二)
 您应当知道的 MQL5 向导技术(第 45 部分):蒙特卡洛强化学习
