
如何使用MQL5的控件类创建交互式仪表板/面板(第一部分):设置面板
引言
本文将使用MetaQuotes Language 5(MQL5)的控件类创建一个交互式仪表板。布局结构将为仪表板提供外观和基本功能,这将成为更复杂面板操作的核心框架。这个设计的核心是思考并考虑如何使交易体验更简洁、更快速、更直观。到本文结束时,您将在MetaTrader 5图表中拥有一个带有标题、导航按钮和相应操作按钮的基础仪表板——这样就能让仪表板为您所用了。
主导航面板将有三个按钮:交易、平仓和信息。每个部分将有其专用的控件,用于各种命令。例如,交易部分将有用于交易量、价格、止损(SL)、获利(TP)和执行订单(如买入、卖出和买入止损)的按钮。平仓部分将有用于平仓的按钮,选项包括“平仓所有盈利”和“平仓所有挂单”等。信息部分将显示重要的交易数据和状态更新。我们将把文章分为三个关键部分:
- 元素展示
- 在MQL5中组装GUI面板
- 结论
在这段旅程中,我们将广泛使用MetaQuotes Language 5(MQL5)作为在MetaEditor中的主要集成开发环境(IDE)编程语言,使我们能够创建复杂的交易应用程序和界面。我们将在MetaTrader 5交易终端内直接运行我们的程序,以便我们可以监控实时市场数据并与我们的交易程序无缝交互。因此,安装最新版本的MQL5和MetaTrader 5至关重要,以确保兼容性并能够使用所有可用的功能。一切准备就绪后,让我们开始创建交互式交易面板!
元素展示
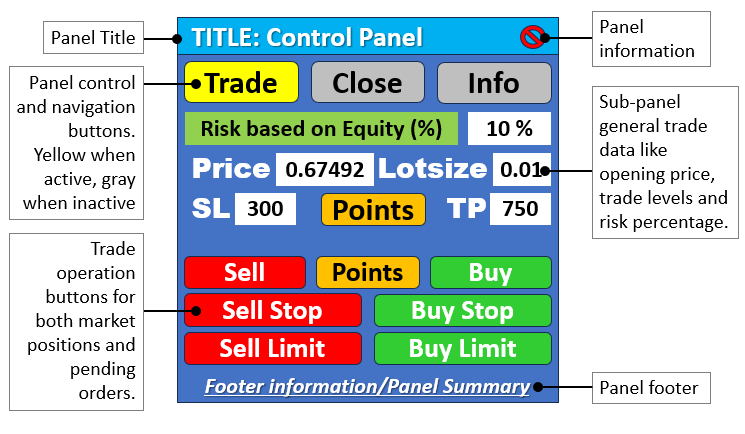
在这里,我们将展示为交易者设计的交互式GUI面板/仪表板的关键组成部分。该面板将由几个基本元素组成,每个元素都有特定的用途,以提高交易效率。我们将重点介绍三个主要的导航按钮:交易、平仓和信息,每个按钮都配有相应的操作按钮。
交易部分将包含用于交易量、价格、止损(SL)和获利(TP)的按钮,以及执行买入、卖出和买入止损等多种操作的按钮。平仓部分将包括“平仓所有盈利”和“平仓所有挂单”等功能,确保快速访问重要的交易管理工具。最后,信息部分将显示重要的交易数据,如账户余额、保证金水平和实时市场更新。
为了直观地展示这些元素,我们将提供一个布局图,展示这些组件在面板中的排列方式。这个图示将作为我们在文章后续部分构建GUI的路线图,指导我们将这些元素整合成一个连贯且用户友好的界面。以下是完整的图示:
在MQL5中组装GUI面板
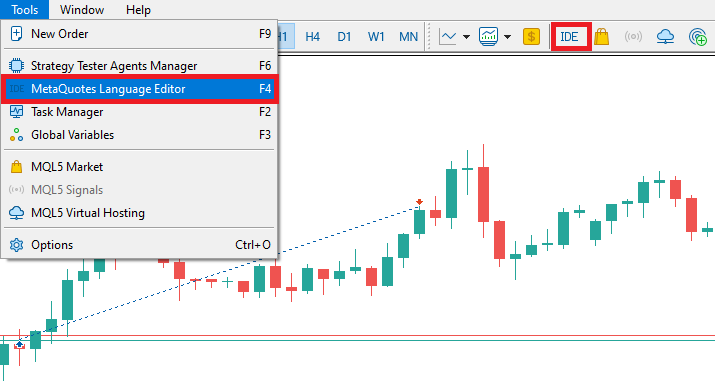
我们将基于一个EA来构建面板。在你的MetaTrader 5终端中,点击工具(Tools)选项卡并选择MetaQuotes语言编辑器(MetaQuotes Language Editor),或者直接按键盘上的F4键。另外,您还可以点击工具栏上的IDE(集成开发环境)图标。这将打开MetaQuotes语言编辑器环境,允许您编写EA、技术指标、脚本和函数库。
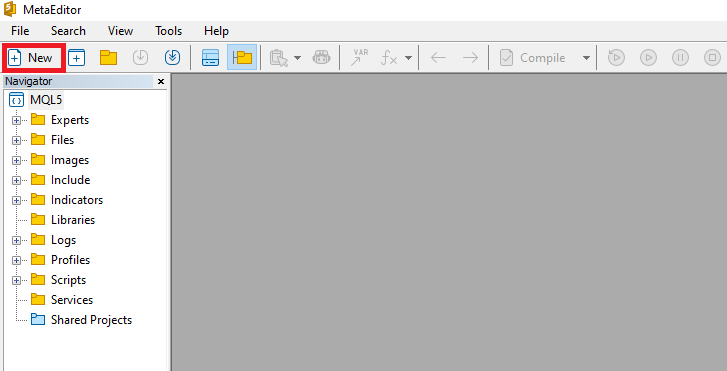
一旦MetaEditor被打开,在工具栏上,导航到“文件”选项卡并选择“新建文件”,或者简单地按CTRL + N,来创建一个新文档。另外,您也可以点击工具栏上的“新建”图标。这将弹出一个MQL向导(MQL Wizard)窗口。
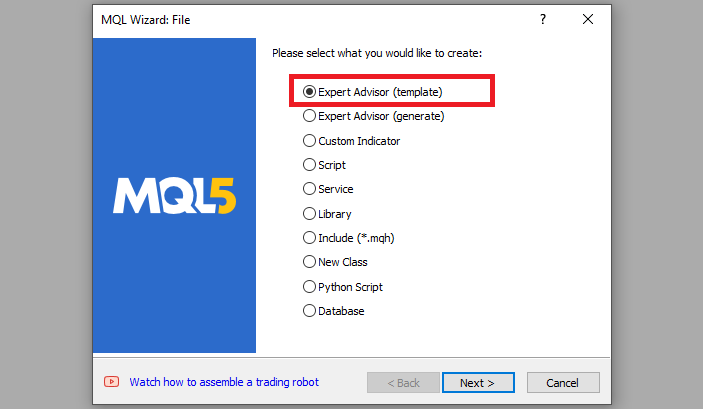
在弹出的向导中,选择“Expert Advisor (template) ”并点击“下一步”。
在EA的一般属性中,在名称部分,输入您的EA文件的名称。请注意,如果要指定或创建一个不存在的文件夹,您需要在EA名称前使用反斜杠。例如,这里我们默认有“Experts\”。这意味着我们的EA将被创建在Experts文件夹中,我们可以在那里找到它。其他部分都很直接,但您可以按照向导底部的链接了解如何精确地进行该过程。
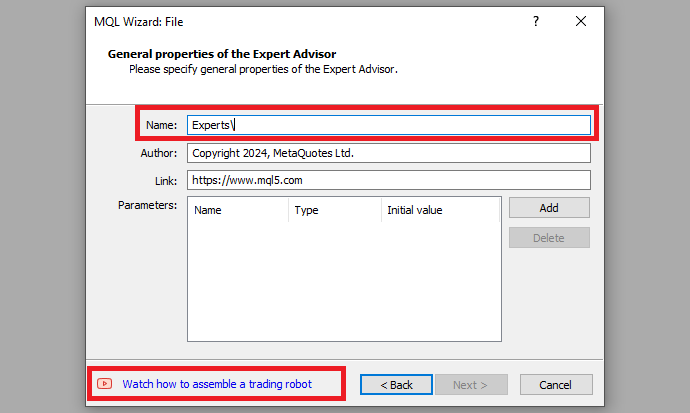
在提供了您想要的EA文件名后,点击“下一步”,再点击“下一步”,然后点击“完成”。 完成这些步骤后,我们就可以开始编写代码并开发我们的GUI面板了。
在新程序默认显示的数据集中,包含了与文件相关的必要属性的元数据。当我们进行自定义时,基础数据如下所示。
//+------------------------------------------------------------------+
//|                                         CONTROL PANEL PART 1.mq5 |
//|                           Copyright 2024, Allan Munene Mutiiria. |
//|                                     https://forexalgo-trader.com |
//+------------------------------------------------------------------+
#property copyright "Copyright 2024, Allan Munene Mutiiria." //--- Set copyright information
#property link      "https://forexalgo-trader.com"            //--- Link to the author's website
#property version   "1.00"                                    //--- Version of the script
从这里开始,我们需要做的第一件事是获取默认的MQL5自定义库的访问权限,这将使我们能够创建面板或仪表板。这些库已经按类组织好了,将使我们的面板创建变得轻松。我们将要使用的文件被组织在“Include”文件夹和“Controls”子文件夹中。要访问它们,只需导航到指定的文件夹并打开它们。具体来说,它们如下所示。
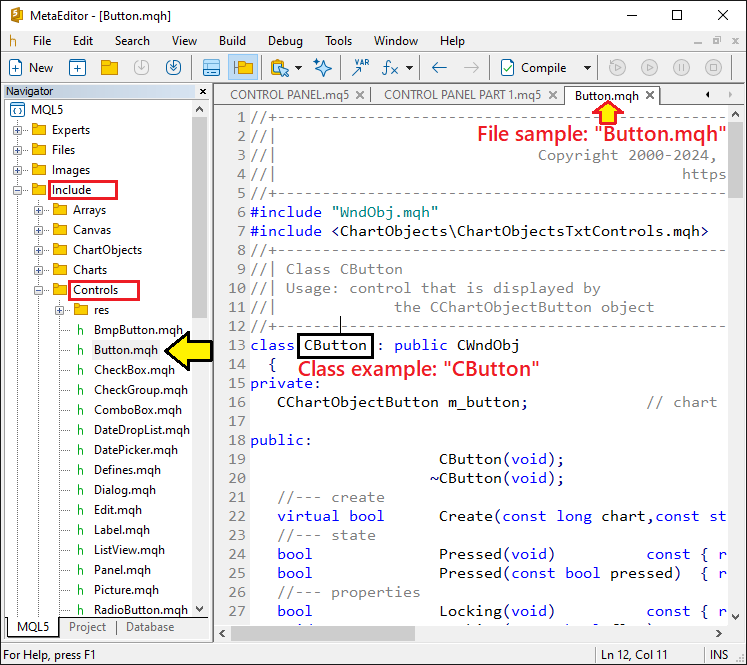
在此之后,我们要做的第一件事就是需要将这些文件包含到我们的程序中,以便我们能够访问它们的属性和方法。首先包含按钮文件。我们通过以下代码来实现这一点。
#include <Controls/Button.mqh> //--- Include button control library
在这一部分中,我们使用了MQL5标准图形用户界面(GUI)控件库中的“Button.mqh”库。通过“Button.mqh”库,我们可以访问“CButton”类,用于创建、配置和管理交易面板的按钮元素。通过使用“Button.mqh”库,我们可以实现各种交互目的的面板按钮,例如导航按钮、交易操作按钮(如执行买入和卖出操作的按钮)以及其他受益于使用按钮作为GUI元素的面板组件。当编译程序时,应该会看到程序中出现了一些其他的文件扩展名,如下所示。
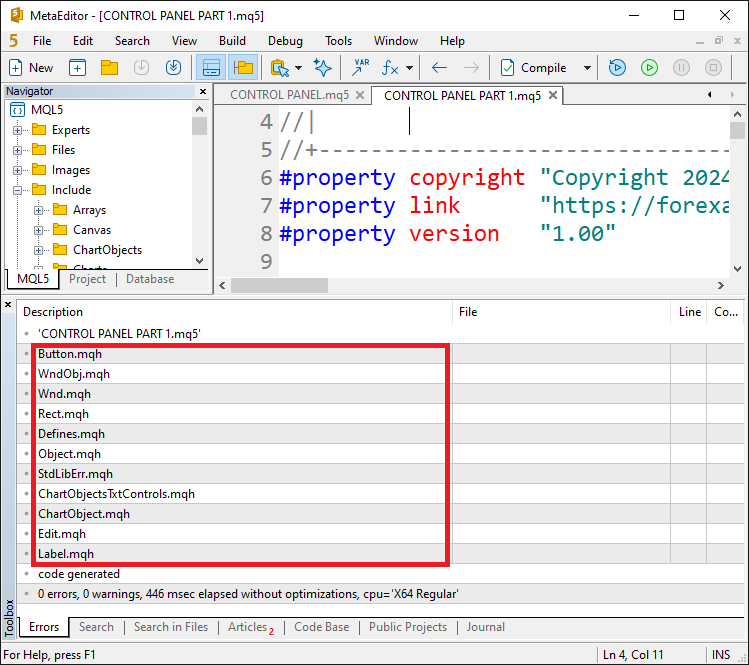
我们可以确认文件已正确添加。从这里开始,现在可以创建一个对象,它将为我们提供访问类成员的权限,并创建面板的主要背景框架。我们通过以下代码来实现这一点。
CButton obj_Btn_MAIN; //--- Main button object
在这里,我们将“obj_Btn_MAIN”变量声明为“CButton”类的一个实例。这意味着“obj_Btn_MAIN”将在程序中充当一个按钮对象。通过创建这个按钮对象,实际上是在内存中预留空间,以表示和操作我们界面中的一个主按钮元素。“CButton”类提供了各种方法和属性,用于创建、自定义和管理按钮控件,例如设置按钮的标签、大小和颜色,以及处理点击事件。有了这些,现在可以在EA初始化时创建按钮,即在OnInit事件处理程序中。
//+------------------------------------------------------------------+
//| Expert initialization function                                   |
//+------------------------------------------------------------------+
int OnInit() {
   //--- Start of the initialization function

   //--- MAIN BUTTON
   obj_Btn_MAIN.Create(0, Btn_MAIN, 0, 30, 30, 0, 0); //--- Create the main button at specified coordinates


   //--- End of initialization function
   return(INIT_SUCCEEDED); //--- Return initialization success status
}
在这里,在OnInit事件处理程序中,当EA首次附加到图表或重新初始化时,我们创建了仪表板的主按钮。我们调用对象“obj_Btn_MAIN”,并使用点运算符来访问所有类成员。使用点运算符,你应该能够看到类似以下内容:
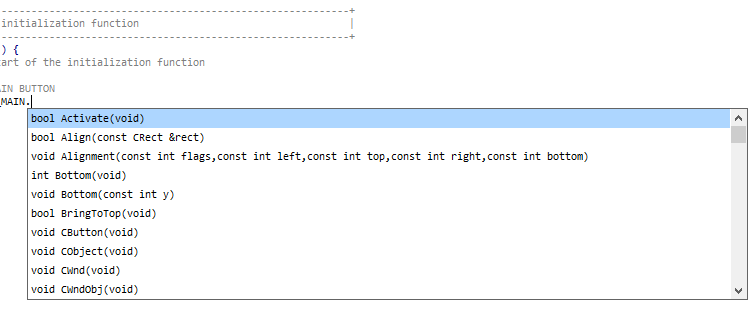
我们选择并提供其必要参数的成员函数是Create。为了清楚地理解每个参数的含义,让我们逐一分析:
- 第一个参数(0)指定图表ID。值为0表示EA运行的当前图表。
- 第二个参数("Btn_MAIN")是一个预定义的字符串常量,表示该按钮的名称。这个名称用于在程序的其他部分引用该按钮。为了便于引用,我们在全局范围内定义如下:
//--- Define button names for easier reference
#define Btn_MAIN "Btn_MAIN"                                   //--- Button name for the main button
- 第三个参数(0)指代子窗口索引。这里,0表示按钮应放置在主图表窗口中。
- 第四个(30)和第五个(30)参数分别设置按钮的X和Y坐标。这些参数决定了按钮在图表上的位置。
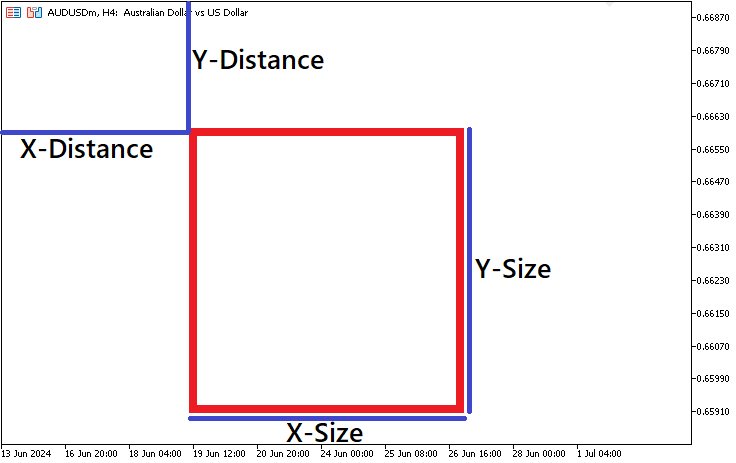
- 最后两个参数(0和0)定义按钮的宽度和高度。在这种情况下,值为0表示按钮将使用默认尺寸。这在下面的图中有所说明:
当我们运行程序时,得到如下输出。
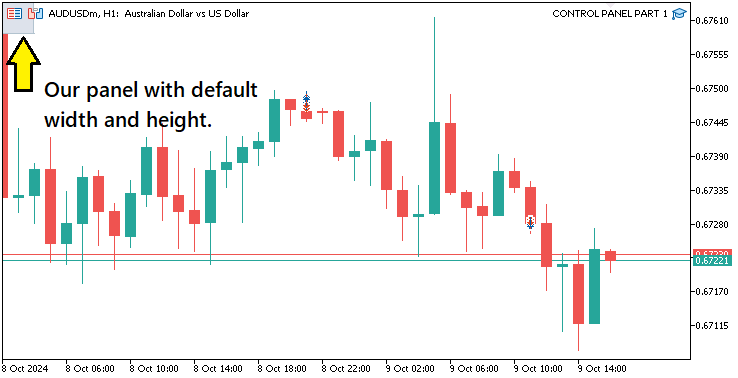
从图中可以看出,第一个坐标被设置为30像素和30像素,但由于我们将第二个坐标保留为0,因此它们在图中显示为0。因此,第二个坐标被映射到原点(0,0)。为了设置第二个坐标,我们可以采用几种方法。第一种方法是在成员函数中直接定义它们。
   //--- MAIN BUTTON
   obj_Btn_MAIN.Create(0, Btn_MAIN, 0, 30, 30, 310, 300); //--- Create the main button at specified coordinates
在这里,我们定义了按钮的第二个坐标。将它们分别设置为310像素和300像素,分别对应X轴和Y轴。我们还将它们用黄色突出显示,以使之更为醒目。运行后,得到了以下输出。
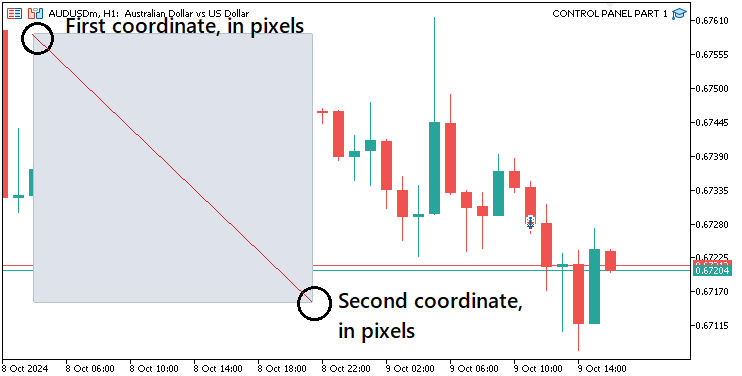
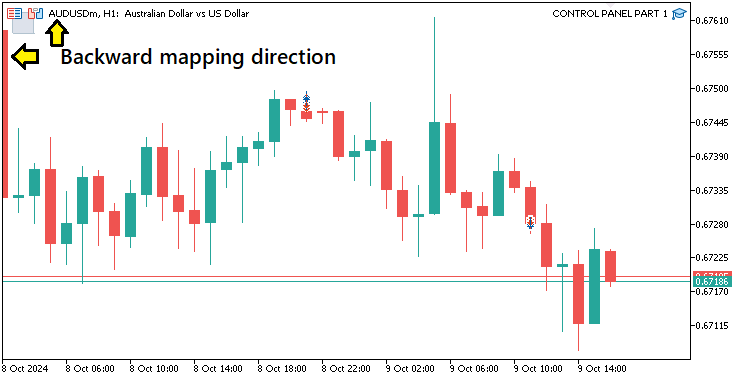
我们得到了预期的结果。然而,要使用这种方法,需要在定义像素时格外小心,因为第二个坐标与第一个坐标没有任何关系。因此,需要进行深入的数学计算,因为所有的像素都是从原点开始计算的。例如,如果我们定义的第二个坐标是10和10,那么按钮在Y轴和X轴上的第二个坐标将分别距离原点10像素。因此,我们的按钮将被反向映射,其大小为(30-10=20)20像素。图示如下:
为了避免第一种方法中涉及的数学计算的麻烦,我们可以采用第二种方法,即直接定义按钮的高度和宽度,这将直接从第一个坐标计算得出。采用如下代码。
   //--- MAIN BUTTON
   obj_Btn_MAIN.Create(0, Btn_MAIN, 0, 30, 30, 0, 0); //--- Create the main button at specified coordinates
   obj_Btn_MAIN.Width(20); //---  Set width of the main button
   obj_Btn_MAIN.Height(20); //---  Set height of the main button
在这里,我们使用宽度和高度成员函数来设置按钮的大小。我们使用了统一的20像素大小,以便我们可以看到差异。编译程序后,我们得到了以下结果。
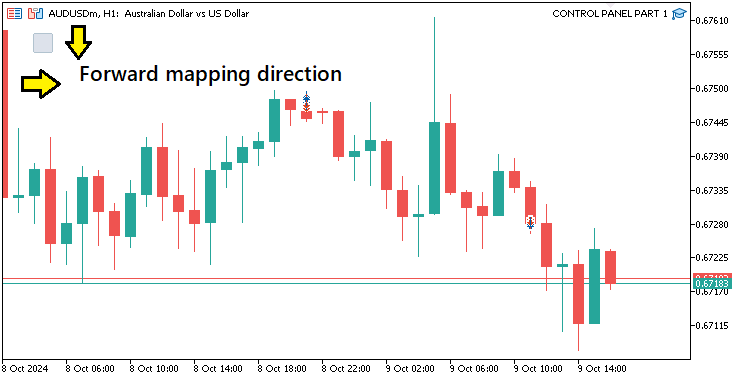
从图中可以看出,我们的按钮被正向映射,这意味着我们在定义起点时不需要担心第二个坐标。还有第三种方法可以直接定义点,通过组合宽度和高度参数来节省空间。其代码片段如下:
   //--- MAIN BUTTON
   obj_Btn_MAIN.Create(0, Btn_MAIN, 0, 30, 30, 0, 0); //--- Create the main button at specified coordinates
   //obj_Btn_MAIN.Width(310); //--- (Commented out) Set width of the main button
   //obj_Btn_MAIN.Height(300); //--- (Commented out) Set height of the main button
   obj_Btn_MAIN.Size(310, 300); //--- Set size of the main button
在这里,我们直接设置了按钮的大小。然而,我们还需要设置按钮的背景颜色及其边框颜色。
   obj_Btn_MAIN.ColorBackground(C'070,070,070'); //--- Set background color of the main button
   obj_Btn_MAIN.ColorBorder(clrBlack); //--- Set border color of the main button
在这里,我们通过设置背景和边框颜色来配置“obj_Btn_MAIN”按钮的视觉外观。首先,调用“obj_Btn_MAIN”对象的“ColorBackground”方法,并将RGB值“C'070,070,070'”作为参数传递。RGB代表红色、绿色和蓝色——这三种基本颜色用于在数字屏幕上生成广泛的色彩光谱。
RGB格式取三个值,分别表示红色、绿色和蓝色的强度,范围从0到255,其中“0”表示无强度,“255”表示最大强度。例如,“C'070,070,070'”表示:
- 将红色分量设置为“70”(最大为255)
- 将绿色分量设置为“70”
- 将蓝色分量设置为“70”
当我们将所有三个RGB值设置为相等时,得到的颜色是灰色。由于我们为所有三个分量都使用了适中的70值,按钮背景变为中等深灰色。这种颜色在视觉上是中性的,确保我们将在面板上创建的其他明亮颜色的元素能够突出显示。
接下来,我们调用“ColorBorder”方法,并使用“clrBlack”常量设置颜色,它代表纯黑色。在这里,每个RGB值为0(“C'000,000,000'”),意味着没有红色、绿色或蓝色分量。通过使用黑色作为边框,我们创建了一个强烈的视觉轮廓,清晰地定义了按钮与深灰色背景的边界,使其看起来更干净、更有条理。这种方法确保了按钮易于区分,并为整体图形界面提供了精致的外观。编译后,我们得到了以下输出。
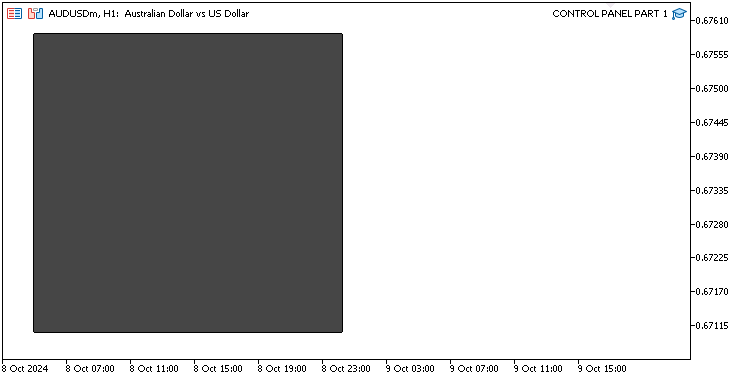
我们终于有了主按钮。最后需要刷新图表,以便自动应用更改,而不是等待手动触发影响刷新的图表事件。以下是采用的代码逻辑。
ChartRedraw(0); //--- Redraw the chart to update the panel
在这里,我们调用ChartRedraw函数来刷新并视觉更新图表界面。这样做是为了确保所有新添加的图形元素——按钮、标签或其他元素——都能正确显示。每当我们在图表中添加、更改或删除元素时,ChartRedraw函数都是必不可少的,因为它强制终端重新渲染当前图表。这在制作交互式面板时尤为重要,我们希望确保面板向用户展示其最新状态。
调用该函数时使用的参数为0。这是图表ID。MetaTrader 5中的每个图表都有一个唯一的ID,0指的是EA附加到的当前图表。为了刷新图表,我们必须传递正确的ID。确保刷新操作应用于这个特定的图表。如果不调用ChartRedraw函数,我们可能会遇到图形问题。新创建的图形对象可能无法显示,或者修改后的图形对象可能无法显示我们对它们所做的修改;它们仍然会显示过时的属性。因此,我们可以通过为该面板调用ChartRedraw函数,确保面板及其内容被正确显示。负责创建主按钮的最终初始化代码如下。
//+------------------------------------------------------------------+
//| Expert initialization function                                   |
//+------------------------------------------------------------------+
int OnInit() {
   //--- Start of the initialization function

   //--- MAIN BUTTON
   obj_Btn_MAIN.Create(0, Btn_MAIN, 0, 30, 30, 0, 0); //--- Create the main button at specified coordinates
   //obj_Btn_MAIN.Width(310); //--- (Commented out) Set width of the main button
   //obj_Btn_MAIN.Height(300); //--- (Commented out) Set height of the main button
   obj_Btn_MAIN.Size(310, 300); //--- Set size of the main button
   obj_Btn_MAIN.ColorBackground(C'070,070,070'); //--- Set background color of the main button
   obj_Btn_MAIN.ColorBorder(clrBlack); //--- Set border color of the main button


   ChartRedraw(0); //--- Redraw the chart to update the panel

   //--- End of initialization function
   return(INIT_SUCCEEDED); //--- Return initialization success status
}
到目前为止,我们已经了解了一些关于我们将要做的事情的基本背景知识以及需要做的必要事项。因此,我们可以定义初始界面所需的所有按钮对象。
#include <Controls/Button.mqh>                                 //--- Include button control library
CButton obj_Btn_MAIN;                                       //--- Main button object
CButton obj_Btn_HEADER;                                     //--- Header button object
CButton obj_Btn_X;                                          //--- Close button (X) object
CButton obj_Btn_TRADE;                                     //--- Trade button object
CButton obj_Btn_CLOSE;                                      //--- Close button object
CButton obj_Btn_INFO;                                       //--- Information button object
CButton obj_Btn_RISK;                                       //--- Risk button object
CButton obj_Btn_POINTS;                                     //--- Points button object
CButton obj_Btn_SELL;                                       //--- Sell button object
CButton obj_Btn_ENTRY;                                      //--- Entry button object
CButton obj_Btn_BUY;                                        //--- Buy button object
CButton obj_Btn_SELLSTOP;                                   //--- Sell Stop button object
CButton obj_Btn_BUYSTOP;                                    //--- Buy Stop button object
CButton obj_Btn_SELLLIMIT;                                  //--- Sell Limit button object
CButton obj_Btn_BUYLIMIT;                                   //--- Buy Limit button object
CButton obj_Btn_FOOTER;                                     //--- Footer button object
在这里,我们使用“CButton”类定义了多个剩余的按钮对象,以表示面板的各种交互元素。每一行都实例化了一个独特的按钮对象,为我们将要创建的仪表板的不同部分搭建了基础结构。让我们来剖析每个按钮的作用和功能:
- “obj_Btn_HEADER”:这个对象将代表面板的标题按钮。我们可以用它来显示标题、图标,或者作为面板顶部区域的视觉分隔符。
- “obj_Btn_X”:这个按钮将充当关闭按钮(通常用“X”表示),允许用户退出或隐藏面板。
- “obj_Btn_TRADE”:代表“交易”按钮,这是一个核心控制元素。按下此按钮将激活交易功能,导航至交易选项,并打开特定于交易操作的子菜单。
- “obj_Btn_CLOSE”:这里的“Close”按钮是一个专用按钮,用于管理交易的平仓操作。它将作为一个切换按钮,用于在面板的交易部分和平仓部分之间切换。
- “obj_Btn_INFO”:这个按钮将用于向用户展示信息内容,例如交易指标、账户详情和面板描述。
对于交易功能按钮,这些对象将在交易上下文中发挥特定作用:
- “obj_Btn_RISK”:作为风险控制按钮。它将允许用户配置或调整风险参数,例如每笔交易的风险百分比。
- “obj_Btn_POINTS”:这个按钮将用于设置或切换到基于点数的交易选项,其中某些水平(如止损或获利)以点数而不是价格水平来定义。
- “obj_Btn_SELL”、“obj_Btn_ENTRY”和“obj_Btn_BUY”:代表直接交易操作按钮。“obj_Btn_SELL”触发卖出交易,“obj_Btn_BUY”发起买入交易,“obj_Btn_ENTRY”将作为市场入场的占位符。
对于挂单,这些按钮定义了操作:
- “obj_Btn_SELLSTOP”和“obj_Btn_BUYSTOP”:控制放置卖出止损和买入止损挂单,这些挂单分别放置在当前价格的下方或上方。
- “obj_Btn_SELLLIMIT”和“obj_Btn_BUYLIMIT”:处理卖出限价和买入限价挂单,允许用户在预期价格回调时在指定水平放置订单。
最后,还有“obj_Btn_FOOTER”,我们用它来定义面板的页脚按钮。这个按钮可以作为装饰元素、重置控件,或者作为导航按钮切换到摘要视图,但在我们的情况下,我们只是用它来显示仪表板摘要。
同样,我们还需要分别定义编辑框和标签字段。采用以下代码。
#include <Controls/Edit.mqh>                                   //--- Include edit control library
CEdit obj_Edit_RISK;                                        //--- Risk edit field object
CEdit obj_Edit_PRICE;                                       //--- Price edit field object
CEdit obj_Edit_LOTS;                                        //--- Lots edit field object
CEdit obj_Edit_SL;                                          //--- Stop Loss edit field object
CEdit obj_Edit_TP;                                          //--- Take Profit edit field object

#include <Controls/Label.mqh>                                  //--- Include label control library
CLabel obj_Lbl_HEADER;                                      //--- Header label object
CLabel obj_Lbl_PRICE;                                       //--- Price label object
CLabel obj_Lbl_LOTS;                                        //--- Lots label object
CLabel obj_Lbl_SL;                                          //--- Stop Loss label object
CLabel obj_Lbl_TP;                                          //--- Take Profit label object
在这里,我们引入了必要的控件库,用于管理用户输入并在仪表板面板上显示文本。首先,我们引入了“Edit.mqh”库,它为可编辑输入字段提供了功能。定义了多个“CEdit”类的对象,包括“obj_Edit_RISK”作为风险编辑字段。“obj_Edit_PRICE”对象代表价格编辑字段,用户可以在其中指定他们希望执行交易的价格。名为“obj_Edit_LOTS”的对象用于仓位大小,用户可以调整它以指定他们希望交易的仓位数量。“obj_Edit_SL”是止损编辑字段。最后,“obj_Edit_TP”作为获利编辑字段。
接下来,我们整合了“Label.mqh”库。这个库简化了在面板上创建静态文本标签的过程,这对于提供用户友好的界面特别有用。该库专为我们当前的工作环境而设计,包含一个“CLabel”类,我们多次实例化该类以创建面板上所需的各个标签。我们实例化的第一个标签称为“obj_Lbl_HEADER”,用于在面板顶部显示标题或最重要的信息。下一个标签称为“obj_Lbl_PRICE”,用于指示我们正在操作的资产的当前价格。在仓位大小输入字段旁边,我们有一个名为“obj_Lbl_LOTS”的标签,用于指示仓位大小。接下来,可以定义面板字段,如下所示:
//--- Define button names for easier reference
#define Btn_MAIN "Btn_MAIN"                                   //--- Button name for the main button
#define Btn_HEADER "Btn_HEADER"                               //--- Button name for the header button
#define Btn_X "Btn_X"                                        //--- Button name for the close button
#define Btn_TRADE "Btn_TRADE"                               //--- Button name for the trade button
#define Btn_CLOSE "Btn_CLOSE"                                //--- Button name for the close button
#define Btn_INFO "Btn_INFO"                                  //--- Button name for the info button

#define Btn_RISK "Btn_RISK"                                  //--- Button name for the risk button
#define Btn_POINTS "Btn_POINTS"                              //--- Button name for the points button
#define Btn_SELL "Btn_SELL"                                  //--- Button name for the sell button
#define Btn_ENTRY "Btn_ENTRY"                                //--- Button name for the entry button
#define Btn_BUY "Btn_BUY"                                    //--- Button name for the buy button
#define Btn_SELLSTOP "Btn_SELLSTOP"                          //--- Button name for the sell stop button
#define Btn_BUYSTOP "Btn_BUYSTOP"                            //--- Button name for the buy stop button
#define Btn_SELLLIMIT "Btn_SELLLIMIT"                        //--- Button name for the sell limit button
#define Btn_BUYLIMIT "Btn_BUYLIMIT"                          //--- Button name for the buy limit button
#define Btn_FOOTER "Btn_FOOTER"                              //--- Button name for the footer button

//---
//--- Define edit field names for easier reference
#define Edit_RISK "Edit_RISK"                                //--- Edit field name for risk input
#define Edit_PRICE "Edit_PRICE"                              //--- Edit field name for price input
#define Edit_LOTS "Edit_LOTS"                                //--- Edit field name for lots input
#define Edit_SL "Edit_SL"                                    //--- Edit field name for stop loss input
#define Edit_TP "Edit_TP"                                    //--- Edit field name for take profit input

//--- Define label names for easier reference
#define Lbl_HEADER "Lbl_HEADER"                              //--- Label name for the header
#define Lbl_PRICE "Lbl_PRICE"                                //--- Label name for the price
#define Lbl_LOTS "Lbl_LOTS"                                  //--- Label name for the lots
#define Lbl_SL "Lbl_SL"                                      //--- Label name for the stop loss
#define Lbl_TP "Lbl_TP"                                      //--- Label name for the take profit
在定义了初始化界面所需的关键元素之后,我们可以继续为面板添加标题,使用已经定义的工具。采用的标题逻辑如下代码片段所示:
   //--- HEADER BUTTON
   obj_Btn_HEADER.Create(0, Btn_HEADER, 0, 30, 30, 0, 0); //--- Create the header button at specified coordinates
   obj_Btn_HEADER.Size(310, 25); //--- Set size of the header button
   obj_Btn_HEADER.ColorBackground(clrLightBlue); //--- Set background color of the header button
   obj_Btn_HEADER.ColorBorder(clrBlack); //--- Set border color of the header button
在这里,我们创建并自定义了仪表板面板的标题按钮。首先使用“obj_Btn_HEADER”对象的“Create”方法,通过指定其图表ID、名称("Btn_HEADER")以及第一组坐标(30, 30)和第二组坐标(0, 0)的参数来初始化按钮。接下来,使用“Size”方法将按钮的大小设置为宽310像素、高25像素,确保它在面板布局中合适地放置。
然后,我们使用“ColorBackground”方法将标题按钮的背景颜色自定义为“clrLightBlue”,以增强视觉吸引力。此外,我们通过“ColorBorder”方法指定边框颜色,并将其设置为“clrBlack”,这增强了按钮相对于面板背景的可见性和定义。编译后,我们得到了以下输出。
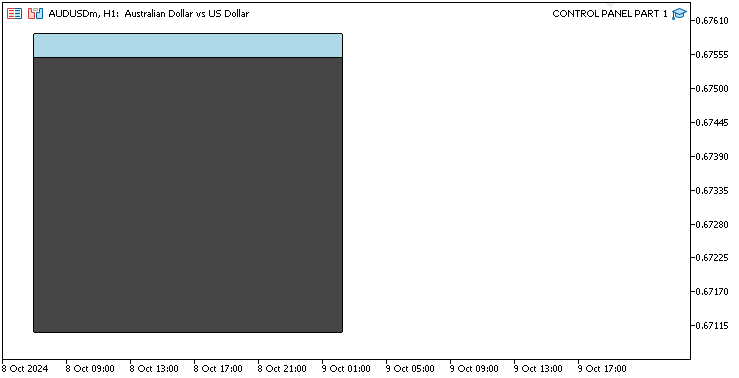
成功了。我们现在可以继续通过添加标签和一个侧边关闭按钮来让标题更具活力。让我们先添加关闭按钮。其代码如下所示。
   //--- X BUTTON
   obj_Btn_X.Create(0, Btn_X, 0, 30 + 280, 30 + 1, 0, 0); //--- Create the close button (X) at specified coordinates
   obj_Btn_X.Size(30 - 1, 25 - 1 - 1); //--- Set size of the close button
   obj_Btn_X.ColorBackground(clrLightBlue); //--- Set background color of the close button
   obj_Btn_X.ColorBorder(clrLightBlue); //--- Set border color of the close button
   obj_Btn_X.Text(CharToString(255)); //--- Set the close button text to an "X" character
   obj_Btn_X.Color(clrBlack); //--- Set text color of the close button
   obj_Btn_X.Font("Wingdings"); //--- Set font of the close button to Wingdings
   obj_Btn_X.FontSize(17); //--- Set font size of the close button
在这里,我们创建并配置了仪表板面板的关闭按钮(X)。首先使用“obj_Btn_X”对象的“Create”方法初始化按钮。我们提供的参数指定了其图表ID、名称("Btn_X")以及在图表上的位置,计算后将其放置在x坐标为(30 + 280)和y坐标为(30 + 1)的位置,确保它在面板布局中正确对齐。
接下来,我们使用“Size”方法将关闭按钮的大小设置为宽29(30 - 1)像素、高23(25 - 1 - 1)像素,略微减小默认大小,以确保它在UI中合适地放置。调整1像素以照顾边框,使其不会覆盖标题的边框,而是位于标题内部。然后,使用“ColorBackground”方法将按钮的背景颜色自定义为浅蓝色,使其与标题按钮保持一致的外观,并完全融入标题中。使用“ColorBorder”方法将边框颜色也设置为浅蓝色,使按钮具有干净的外观,没有对比鲜明的边框。
我们继续使用CharToString函数和255作为参数将按钮的文本设置为图标字符,从而使按钮在视觉上表明其作为关闭按钮的功能。在MQL5中,该字符表示一个Windows图标,但也可以是其他任何内容。文本颜色使用“Color”方法设置为黑色,确保它在浅色背景上突出显示。最后,我们使用“Font”方法将关闭按钮的字体选择为Wingdings,这对于显示Windows符号是合适的,并且使用“FontSize”方法将字体大小设置为17,以增强可读性。以下是MQL5中可能的符号代码的表示。
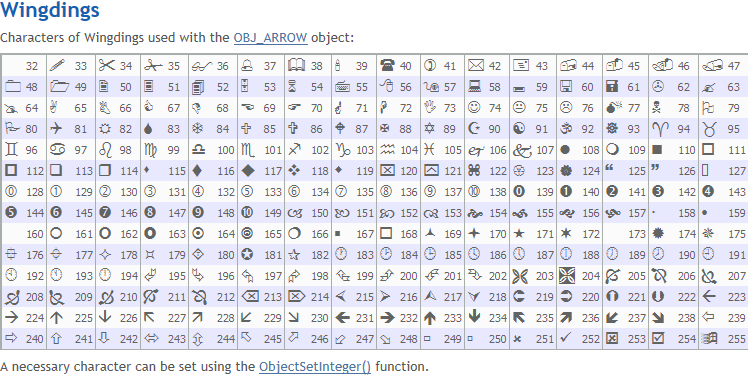
可以看到,有很多选项可供选择,但我们只会始终使用初始的代码255。我们只需要设置标题的标题,就可以完成标题部分。
   //--- HEADER LABEL
   obj_Lbl_HEADER.Create(0, Lbl_HEADER, 0, 40, 30, 0, 0); //--- Create the header label at specified coordinates
   obj_Lbl_HEADER.Text("Control Panel"); //--- Set text of the header label
   obj_Lbl_HEADER.Color(clrRed); //--- Set text color of the header label
   obj_Lbl_HEADER.Font("Cooper black"); //--- Set font of the header label to Cooper Black
   obj_Lbl_HEADER.FontSize(14); //--- Set font size of the header label
在这里,我们创建并配置了交易仪表板的标题标签。首先使用“obj_Lbl_HEADER”对象的“Create”方法初始化标签,提供图表ID、标签名称("Lbl_HEADER")以及其在图表上的位置,x坐标为(40),y坐标为(30)。这种定位确保标题标签在面板布局中适当显示。
接下来,我们使用“Text”方法将标题标签的文本设置为“Control Panel”,清晰地表明仪表板的用途。这当然可以是您选择的任何其他内容。请随意更改它。然后,使用“Color”方法将文本颜色自定义为红色,确保它在背景上突出显示,以提高可见性。标题标签的字体使用“Font”方法设置为“Cooper black”,使文本具有独特且专业的外观。最后,使用“FontSize”方法将字体大小指定为14,确保标题文本易于阅读。编译后,我们得到以下输出。
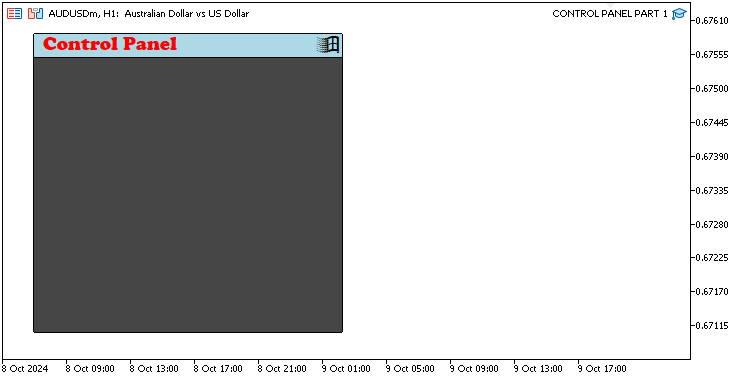
成功了。以类似的格式,我们可以继续创建导航按钮。首先使用以下代码创建交易操作视图按钮。
   //--- TRADE BUTTON
   obj_Btn_TRADE.Create(0, Btn_TRADE, 0, 40, 60, 0, 0); //--- Create the trade button at specified coordinates
   obj_Btn_TRADE.Size(90, 30); //--- Set size of the trade button
   obj_Btn_TRADE.ColorBackground(clrYellow); //--- Set background color of the trade button
   obj_Btn_TRADE.ColorBorder(clrYellow); //--- Set border color of the trade button
   obj_Btn_TRADE.Text("Trade"); //--- Set text of the trade button
   obj_Btn_TRADE.Color(clrBlack); //--- Set text color of the trade button
   obj_Btn_TRADE.Font("Arial Black"); //--- Set font of the trade button to Arial Black
   obj_Btn_TRADE.FontSize(13); //--- Set font size of the trade button
这里,我们改变按钮的大小并将其颜色改为黄色。编译后,我们得到了以下输出。
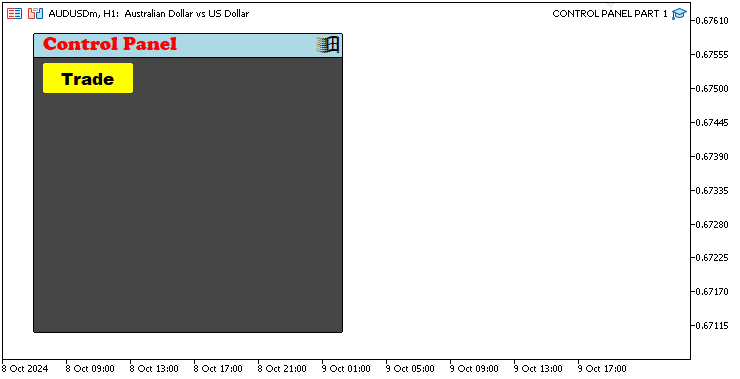
成功了。我们将按钮的颜色变成黄色以表示按钮被激活了。因此,在定义其他导航按钮时,将保持类似的逻辑,但颜色会改为非激活状态的颜色。以下是完整的代码。
   //--- CLOSE BUTTON
   obj_Btn_CLOSE.Create(0, Btn_CLOSE, 0, 40 + obj_Btn_TRADE.Width() + 10, 60, 0, 0); //--- Create the close button at specified coordinates
   obj_Btn_CLOSE.Size(90, 30); //--- Set size of the close button
   obj_Btn_CLOSE.ColorBackground(clrSilver); //--- Set background color of the close button
   obj_Btn_CLOSE.ColorBorder(clrSilver); //--- Set border color of the close button
   obj_Btn_CLOSE.Text("Close"); //--- Set text of the close button
   obj_Btn_CLOSE.Color(clrBlack); //--- Set text color of the close button
   obj_Btn_CLOSE.Font("Arial Black"); //--- Set font of the close button to Arial Black
   obj_Btn_CLOSE.FontSize(13); //--- Set font size of the close button

   //--- INFO BUTTON
   obj_Btn_INFO.Create(0, Btn_INFO, 0, 40 + obj_Btn_TRADE.Width() + 10 + obj_Btn_CLOSE.Width() + 10, 60, 0, 0); //--- Create the info button at specified coordinates
   obj_Btn_INFO.Size(90, 30); //--- Set size of the info button
   obj_Btn_INFO.ColorBackground(clrSilver); //--- Set background color of the info button
   obj_Btn_INFO.ColorBorder(clrSilver); //--- Set border color of the info button
   obj_Btn_INFO.Text("Inform'n"); //--- Set text of the info button
   obj_Btn_INFO.Color(clrBlack); //--- Set text color of the info button
   obj_Btn_INFO.Font("Arial Black"); //--- Set font of the info button to Arial Black
   obj_Btn_INFO.FontSize(13); //--- Set font size of the info button
在这里,我们创建关闭和信息按钮,并将它们的背景颜色设置为银色,以表明它们初始的非激活状态。结果如下:
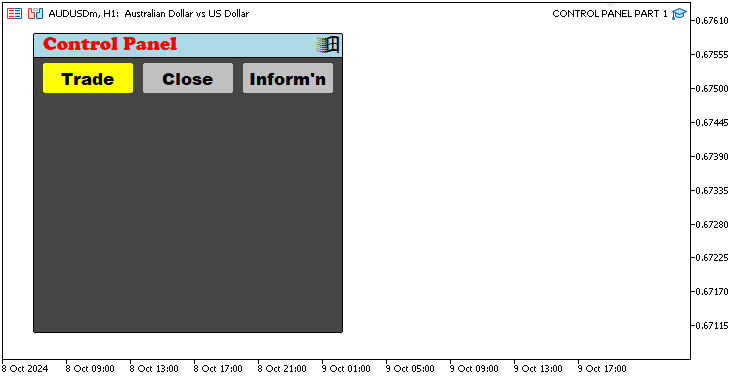
在定义导航按钮之后,我们可以在最终确定初始化交易主体之前定义页脚部分。其逻辑如下代码片段所示。
   //--- FOOTER BUTTON
   obj_Btn_FOOTER.Create(0, Btn_FOOTER, 0, 30 + 1, 305 - 1, 0, 0); //--- Create the footer button at specified coordinates
   obj_Btn_FOOTER.Size(310 - 1 - 1, 25); //--- Set size of the footer button
   obj_Btn_FOOTER.ColorBackground(C'070,070,070'); //--- Set background color of the footer button
   obj_Btn_FOOTER.ColorBorder(C'070,070,070'); //--- Set border color of the footer button
   obj_Btn_FOOTER.Text(ShortToString(0x23F0) + "https://t.me/Forex_Algo_Trader"); //--- Set text of the footer button with a link
   obj_Btn_FOOTER.Color(clrWhite); //--- Set text color of the footer button
   obj_Btn_FOOTER.Font("Calibri bold italic"); //--- Set font of the footer button to Calibri bold italic
   obj_Btn_FOOTER.FontSize(12); //--- Set font size of the footer button
在这里,我们通过传递常规参数来创建和配置交易面板的页脚按钮,并将其放置在面板的底部。接下来,我们使用“Size”方法定义页脚按钮的大小,将其宽度设置为310 - 1 - 1,高度设置为25。这确保按钮能够很好地适配面板的页脚区域。然后,我们通过“ColorBackground”方法将按钮的背景颜色自定义为深灰色(RGB值为“C'070,070,070'”),使其在视觉上更具吸引力,并与整体设计保持一致,与主按钮融为一体。
按钮的边框颜色也通过“ColorBorder”方法设置为相同的深灰色,使按钮看起来无缝衔接。对于按钮的文本,我们使用“Text”方法将其设置为一个图标(由Unicode字符0x23F0表示,显示为一个时钟)和链接“https://t.me/Forex_Algo_Trader”的组合,鼓励用户访问更多资源。我们通过使用ShortToString函数将Unicode字符转换为图标。这些字符以十六进制形式表示,这也是我们需要该函数的原因。
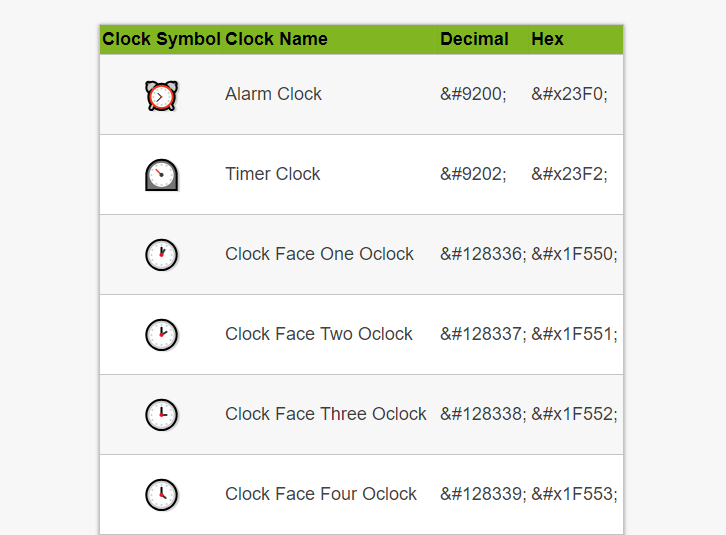
我们使用“Color”方法将文本颜色设置为白色,以增强在深色背景下的可读性。最后,我们通过“Font”方法将页脚按钮的字体设置为“Calibri bold italic”,增添一丝专业感,并使用“FontSize”方法将字体大小设置为12,确保文本保持可读性。编译完成后,我们达到了以下里程碑。
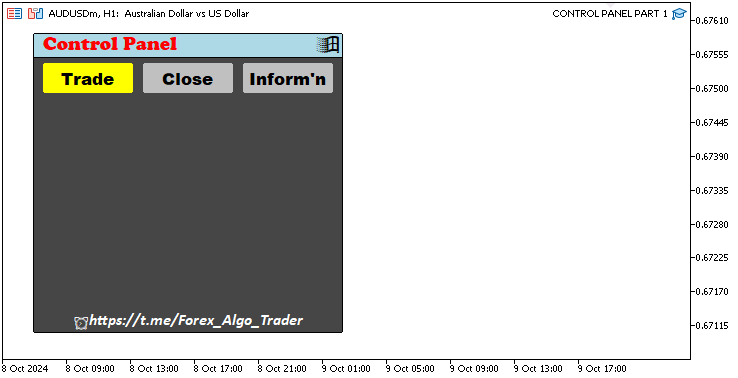
成功了。接下来,我们需要完成面板主体部分的设置,一切就绪。由于我们需要在每个导航按钮激活时不断更改主体视图,因此可以将主体逻辑放在一个函数中,并仅在需要时调用它。
   // BODY OF THE PANEL
   createSection_Trade(); //--- Call function to create the trade section
在这里,我们在面板主体中创建了一个名为“createSection_Trade”的函数,用于设置仪表板的“交易”部分。通常情况下,我们会在定义该函数后调用它。此函数用于创建和配置与交易操作相关的交互元素,例如买入、卖出和订单类型按钮。通过使用该函数,我们确保代码具有模块化和组织性,使所有与交易相关的元素都能在一个单独的函数中进行处理。这使得主面板设置更加简洁,便于根据需要维护和扩展仪表板系统。
我们需要定义该函数。由于这是一个简单的函数,我们将其定义为一个无返回值的函数,并且不传递任何参数。
void createSection_Trade(){

//---

}
为了实现函数的功能,我们使用了与代码中一直使用的类似的创建逻辑。完整的函数代码片段如下。
//+------------------------------------------------------------------+
//|     FUNCTION TO CREATE THE TRADE SECTION                         |
//+------------------------------------------------------------------+
void createSection_Trade(){
   //--- RISK BUTTON
   obj_Btn_RISK.Create(0,Btn_RISK,0,40,100,0,0); //--- Create the risk button
   obj_Btn_RISK.Size(210,25); //--- Set the button size
   obj_Btn_RISK.ColorBackground(clrTurquoise); //--- Set the background color
   obj_Btn_RISK.ColorBorder(clrTurquoise); //--- Set the border color
   obj_Btn_RISK.Text("Risk based on Equity (%)"); //--- Set the button text
   obj_Btn_RISK.Color(clrBlack); //--- Set the text color
   obj_Btn_RISK.Font("Arial Black"); //--- Set the font style
   obj_Btn_RISK.FontSize(11); //--- Set the font size

   //--- RISK EDIT
   obj_Edit_RISK.Create(0,Edit_RISK,0,40+220,100,0,0); //--- Create the risk edit field
   obj_Edit_RISK.Size(70,25); //--- Set the edit field size
   obj_Edit_RISK.ColorBackground(clrWhite); //--- Set the background color
   obj_Edit_RISK.ColorBorder(clrBlack); //--- Set the border color
   obj_Edit_RISK.Text("78"); //--- Set the default text
   obj_Edit_RISK.Color(clrBlack); //--- Set the text color
   obj_Edit_RISK.Font("Times new roman bold"); //--- Set the font style
   obj_Edit_RISK.FontSize(15); //--- Set the font size

   //--- PRICE LABEL
   obj_Lbl_PRICE.Create(0,Lbl_PRICE,0,40,130,0,0); //--- Create the price label
   obj_Lbl_PRICE.Text("Price"); //--- Set the label text
   obj_Lbl_PRICE.Color(clrWhite); //--- Set the text color
   obj_Lbl_PRICE.Font("Arial black"); //--- Set the font style
   obj_Lbl_PRICE.FontSize(13); //--- Set the font size

   //--- PRICE EDIT
   obj_Edit_PRICE.Create(0,Edit_PRICE,0,40+60,130,0,0); //--- Create the price edit field
   obj_Edit_PRICE.Size(90,25); //--- Set the edit field size
   obj_Edit_PRICE.ColorBackground(clrWhite); //--- Set the background color
   obj_Edit_PRICE.ColorBorder(clrBlack); //--- Set the border color
   obj_Edit_PRICE.Text(DoubleToString(SymbolInfoDouble(_Symbol,SYMBOL_ASK),_Digits)); //--- Set the default text to current ask price
   obj_Edit_PRICE.Color(clrBlack); //--- Set the text color
   obj_Edit_PRICE.Font("Times new roman bold"); //--- Set the font style
   obj_Edit_PRICE.FontSize(13); //--- Set the font size

   //--- LOTS LABEL
   obj_Lbl_LOTS.Create(0,Lbl_LOTS,0,40+160,130,0,0); //--- Create the lot size label
   obj_Lbl_LOTS.Text("Lot size"); //--- Set the label text
   obj_Lbl_LOTS.Color(clrWhite); //--- Set the text color
   obj_Lbl_LOTS.Font("Arial black"); //--- Set the font style
   obj_Lbl_LOTS.FontSize(13); //--- Set the font size

   //--- LOTS EDIT
   obj_Edit_LOTS.Create(0,Edit_LOTS,0,40+60+180,130,0,0); //--- Create the lot size edit field
   obj_Edit_LOTS.Size(50,25); //--- Set the edit field size
   obj_Edit_LOTS.ColorBackground(clrWhite); //--- Set the background color
   obj_Edit_LOTS.ColorBorder(clrBlack); //--- Set the border color
   obj_Edit_LOTS.Text("0.01"); //--- Set the default text
   obj_Edit_LOTS.Color(clrBlack); //--- Set the text color
   obj_Edit_LOTS.Font("Times new roman bold"); //--- Set the font style
   obj_Edit_LOTS.FontSize(13); //--- Set the font size

   //--- SL LABEL
   obj_Lbl_SL.Create(0,Lbl_SL,0,40,160,0,0); //--- Create the stop loss label
   obj_Lbl_SL.Text("SL"); //--- Set the label text
   obj_Lbl_SL.Color(clrWhite); //--- Set the text color
   obj_Lbl_SL.Font("Arial black"); //--- Set the font style
   obj_Lbl_SL.FontSize(13); //--- Set the font size

   //--- SL EDIT
   obj_Edit_SL.Create(0,Edit_SL,0,40+30,160,0,0); //--- Create the stop loss edit field
   obj_Edit_SL.Size(70,25); //--- Set the edit field size
   obj_Edit_SL.ColorBackground(clrWhite); //--- Set the background color
   obj_Edit_SL.ColorBorder(clrBlack); //--- Set the border color
   obj_Edit_SL.Text("300"); //--- Set the default text
   obj_Edit_SL.Color(clrBlack); //--- Set the text color
   obj_Edit_SL.Font("Times new roman bold"); //--- Set the font style
   obj_Edit_SL.FontSize(13); //--- Set the font size

   //--- TP LABEL
   obj_Lbl_TP.Create(0,Lbl_TP,0,40+190,160,0,0); //--- Create the take profit label
   obj_Lbl_TP.Text("TP"); //--- Set the label text
   obj_Lbl_TP.Color(clrWhite); //--- Set the text color
   obj_Lbl_TP.Font("Arial black"); //--- Set the font style
   obj_Lbl_TP.FontSize(13); //--- Set the font size

   //--- TP EDIT
   obj_Edit_TP.Create(0,Edit_TP,0,40+30+190,160,0,0); //--- Create the take profit edit field
   obj_Edit_TP.Size(70,25); //--- Set the edit field size
   obj_Edit_TP.ColorBackground(clrWhite); //--- Set the background color
   obj_Edit_TP.ColorBorder(clrBlack); //--- Set the border color
   obj_Edit_TP.Text("750"); //--- Set the default text
   obj_Edit_TP.Color(clrBlack); //--- Set the text color
   obj_Edit_TP.Font("Times new roman bold"); //--- Set the font style
   obj_Edit_TP.FontSize(13); //--- Set the font size

   //--- POINTS BUTTON
   obj_Btn_POINTS.Create(0,Btn_POINTS,0,40+110,160,0,0); //--- Create the points button
   obj_Btn_POINTS.Size(70,25); //--- Set the button size
   obj_Btn_POINTS.ColorBackground(clrGoldenrod); //--- Set the background color
   obj_Btn_POINTS.ColorBorder(clrGoldenrod); //--- Set the border color
   obj_Btn_POINTS.Text("Points"); //--- Set the button text
   obj_Btn_POINTS.Color(clrBlack); //--- Set the text color
   obj_Btn_POINTS.Font("Calibri bold"); //--- Set the font style
   obj_Btn_POINTS.FontSize(14); //--- Set the font size

   //--- SELL BUTTON
   obj_Btn_SELL.Create(0,Btn_SELL,0,40,210,0,0); //--- Create the sell button
   obj_Btn_SELL.Size(100,25); //--- Set the button size
   obj_Btn_SELL.ColorBackground(clrOrangeRed); //--- Set the background color
   obj_Btn_SELL.ColorBorder(clrOrangeRed); //--- Set the border color
   obj_Btn_SELL.Text("Sell"); //--- Set the button text
   obj_Btn_SELL.Color(clrWhite); //--- Set the text color
   obj_Btn_SELL.Font("Calibri bold"); //--- Set the font style
   obj_Btn_SELL.FontSize(14); //--- Set the font size

   //--- ENTRY BUTTON
   obj_Btn_ENTRY.Create(0,Btn_ENTRY,0,150,210,0,0); //--- Create the entry button
   obj_Btn_ENTRY.Size(70,25); //--- Set the button size
   obj_Btn_ENTRY.ColorBackground(clrGoldenrod); //--- Set the background color
   obj_Btn_ENTRY.ColorBorder(clrGoldenrod); //--- Set the border color
   obj_Btn_ENTRY.Text("Entry"); //--- Set the button text
   obj_Btn_ENTRY.Color(clrBlack); //--- Set the text color
   obj_Btn_ENTRY.Font("Calibri bold"); //--- Set the font style
   obj_Btn_ENTRY.FontSize(14); //--- Set the font size

   //--- BUY BUTTON
   obj_Btn_BUY.Create(0,Btn_BUY,0,40+190,210,0,0); //--- Create the buy button
   obj_Btn_BUY.Size(100,25); //--- Set the button size
   obj_Btn_BUY.ColorBackground(clrLimeGreen); //--- Set the background color
   obj_Btn_BUY.ColorBorder(clrLimeGreen); //--- Set the border color
   obj_Btn_BUY.Text("Buy"); //--- Set the button text
   obj_Btn_BUY.Color(clrWhite); //--- Set the text color
   obj_Btn_BUY.Font("Calibri bold"); //--- Set the font style
   obj_Btn_BUY.FontSize(14); //--- Set the font size

   //--- SELL STOP BUTTON
   obj_Btn_SELLSTOP.Create(0,Btn_SELLSTOP,0,40,240,0,0); //--- Create the sell stop button
   obj_Btn_SELLSTOP.Size(140,25); //--- Set the button size
   obj_Btn_SELLSTOP.ColorBackground(clrOrangeRed); //--- Set the background color
   obj_Btn_SELLSTOP.ColorBorder(clrOrangeRed); //--- Set the border color
   obj_Btn_SELLSTOP.Text("Sell Stop"); //--- Set the button text
   obj_Btn_SELLSTOP.Color(clrWhite); //--- Set the text color
   obj_Btn_SELLSTOP.Font("Calibri bold"); //--- Set the font style
   obj_Btn_SELLSTOP.FontSize(14); //--- Set the font size

   //--- BUY STOP BUTTON
   obj_Btn_BUYSTOP.Create(0,Btn_BUYSTOP,0,40+190-40,240,0,0); //--- Create the buy stop button
   obj_Btn_BUYSTOP.Size(140,25); //--- Set the button size
   obj_Btn_BUYSTOP.ColorBackground(clrLimeGreen); //--- Set the background color
   obj_Btn_BUYSTOP.ColorBorder(clrLimeGreen); //--- Set the border color
   obj_Btn_BUYSTOP.Text("Buy Stop"); //--- Set the button text
   obj_Btn_BUYSTOP.Color(clrWhite); //--- Set the text color
   obj_Btn_BUYSTOP.Font("Calibri bold"); //--- Set the font style
   obj_Btn_BUYSTOP.FontSize(14); //--- Set the font size

   //--- SELL LIMIT BUTTON
   obj_Btn_SELLLIMIT.Create(0,Btn_SELLLIMIT,0,40,270,0,0); //--- Create the sell limit button
   obj_Btn_SELLLIMIT.Size(140,25); //--- Set the button size
   obj_Btn_SELLLIMIT.ColorBackground(clrOrangeRed); //--- Set the background color
   obj_Btn_SELLLIMIT.ColorBorder(clrOrangeRed); //--- Set the border color
   obj_Btn_SELLLIMIT.Text("Sell Limit"); //--- Set the button text
   obj_Btn_SELLLIMIT.Color(clrWhite); //--- Set the text color
   obj_Btn_SELLLIMIT.Font("Calibri bold"); //--- Set the font style
   obj_Btn_SELLLIMIT.FontSize(14); //--- Set the font size

   //--- BUY LIMIT BUTTON
   obj_Btn_BUYLIMIT.Create(0,Btn_BUYLIMIT,0,40+190-40,270,0,0); //--- Create the buy limit button
   obj_Btn_BUYLIMIT.Size(140,25); //--- Set the button size
   obj_Btn_BUYLIMIT.ColorBackground(clrLimeGreen); //--- Set the background color
   obj_Btn_BUYLIMIT.ColorBorder(clrLimeGreen); //--- Set the border color
   obj_Btn_BUYLIMIT.Text("Buy Limit"); //--- Set the button text
   obj_Btn_BUYLIMIT.Color(clrWhite); //--- Set the text color
   obj_Btn_BUYLIMIT.Font("Calibri bold"); //--- Set the font style
   obj_Btn_BUYLIMIT.FontSize(14); //--- Set the font size
}
编译后,我们得到了以下输出。
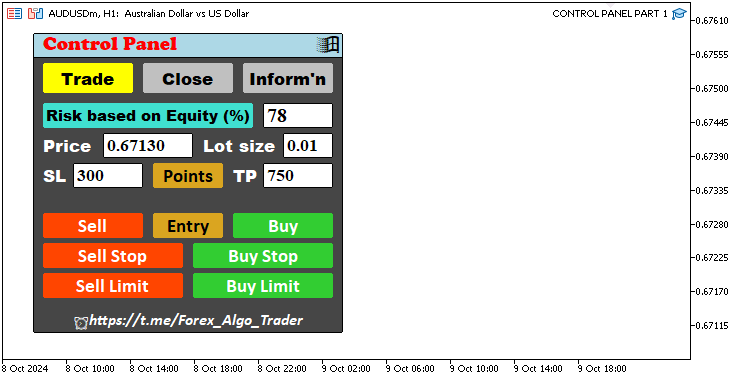
成功了。我们现在已经有了我们想要的应用交易界面。我们只需要继续创建其他导航部分的视图,那就大功告成了。首先,我们将创建关闭界面,并在一个函数中组织其逻辑。然而,在定义函数实用程序之前,我们需要定义按钮的相应名称以及它们的对象声明。以下是对象声明的代码。
CButton obj_Btn_CLOSE_ALL;                                  //--- Close All button object
CButton obj_Btn_CLOSE_ALL_SELL;                             //--- Close All Sell button object
CButton obj_Btn_CLOSE_ALL_BUY;                              //--- Close All Buy button object
CButton obj_Btn_CLOSE_LOSS_SELL;                            //--- Close Loss Sell button object
CButton obj_Btn_CLOSE_LOSS_BUY;                             //--- Close Loss Buy button object
CButton obj_Btn_CLOSE_PROFIT_SELL;                          //--- Close Profit Sell button object
CButton obj_Btn_CLOSE_PROFIT_BUY;                           //--- Close Profit Buy button object
CButton obj_Btn_CLOSE_ALL_LOSS;                             //--- Close All Loss button object
CButton obj_Btn_CLOSE_ALL_PROFIT;                           //--- Close All Profit button object
CButton obj_Btn_CLOSE_PENDING;                              //--- Close Pending button object

//---

CButton obj_Btn_ACC_NUMBER;                                 //--- Account Number button object
CButton obj_Btn_ACC_NAME;                                   //--- Account Name button object
CButton obj_Btn_ACC_TYPE;                                   //--- Account Type button object
CButton obj_Btn_ACC_LEVERAGE;                               //--- Account Leverage button object

CButton obj_Btn_ACC_EQUITY;                                 //--- Account Equity button object
CButton obj_Btn_ACC_BALANCE;                                //--- Account Balance button object
CButton obj_Btn_TIME;                                       //--- Time button object


//---
CLabel obj_Lbl_ACC_NUMBER;                                  //--- Account Number label object
CLabel obj_Lbl_ACC_NAME;                                    //--- Account Name label object
CLabel obj_Lbl_ACC_TYPE;                                    //--- Account Type label object
CLabel obj_Lbl_ACC_LEVERAGE;                                //--- Account Leverage label object

CLabel obj_Lbl_ACC_EQUITY;                                  //--- Account Equity label object
CLabel obj_Lbl_ACC_BALANCE;                                 //--- Account Balance label object
CLabel obj_Lbl_TIME;                                        //--- Time label object
这是对象定义代码。
#define Btn_CLOSE_ALL "Btn_CLOSE_ALL"                        //--- Button name for closing all trades
#define Btn_CLOSE_ALL_SELL "Btn_CLOSE_ALL_SELL"              //--- Button name for closing all sell trades
#define Btn_CLOSE_ALL_BUY "Btn_CLOSE_ALL_BUY"                //--- Button name for closing all buy trades
#define Btn_CLOSE_LOSS_SELL "Btn_CLOSE_LOSS_SELL"            //--- Button name for closing all loss sell trades
#define Btn_CLOSE_LOSS_BUY "Btn_CLOSE_LOSS_BUY"              //--- Button name for closing all loss buy trades
#define Btn_CLOSE_PROFIT_SELL "Btn_CLOSE_PROFIT_SELL"        //--- Button name for closing all profit sell trades
#define Btn_CLOSE_PROFIT_BUY "Btn_CLOSE_PROFIT_BUY"          //--- Button name for closing all profit buy trades
#define Btn_CLOSE_ALL_LOSS "Btn_CLOSE_ALL_LOSS"              //--- Button name for closing all loss trades
#define Btn_CLOSE_ALL_PROFIT "Btn_CLOSE_ALL_PROFIT"          //--- Button name for closing all profit trades
#define Btn_CLOSE_PENDING "Btn_CLOSE_PENDING"                //--- Button name for closing all pending trades

#define Btn_ACC_NUMBER "Btn_ACC_NUMBER"                      //--- Button name for the account number
#define Btn_ACC_NAME "Btn_ACC_NAME"                          //--- Button name for the account name
#define Btn_ACC_TYPE "Btn_ACC_TYPE"                          //--- Button name for the account type
#define Btn_ACC_LEVERAGE "Btn_ACC_LEVERAGE"                  //--- Button name for the account leverage

#define Btn_ACC_EQUITY "Btn_ACC_EQUITY"                      //--- Button name for the account equity
#define Btn_ACC_BALANCE "Btn_ACC_BALANCE"                    //--- Button name for the account balance
#define Btn_TIME "Btn_TIME"                                  //--- Button name for the time

//---
#define Lbl_ACC_NUMBER "Lbl_ACC_NUMBER"                      //--- Label name for the account number
#define Lbl_ACC_NAME "Lbl_ACC_NAME"                          //--- Label name for the account name
#define Lbl_ACC_TYPE "Lbl_ACC_TYPE"                          //--- Label name for the account type
#define Lbl_ACC_LEVERAGE "Lbl_ACC_LEVERAGE"                  //--- Label name for the account leverage

#define Lbl_ACC_EQUITY "Lbl_ACC_EQUITY"                      //--- Label name for the account equity
#define Lbl_ACC_BALANCE "Lbl_ACC_BALANCE"                    //--- Label name for the account balance
#define Lbl_TIME "Lbl_TIME"                                  //--- Label name for the time
在定义了所有需要的参数后,我们来创建平仓函数,如下所示。
//+------------------------------------------------------------------+
//|      FUNCTION TO CREATE THE CLOSE SECTION                        |
//+------------------------------------------------------------------+
void createSection_Close(){
   //--- CLOSE ALL BUTTON
   obj_Btn_CLOSE_ALL.Create(0, Btn_CLOSE_ALL, 0, 80, 120, 0, 0); //--- Create the close all button
   obj_Btn_CLOSE_ALL.Size(210, 25); //--- Set the button size
   obj_Btn_CLOSE_ALL.ColorBackground(clrPeru); //--- Set the background color
   obj_Btn_CLOSE_ALL.ColorBorder(clrWhite); //--- Set the border color
   obj_Btn_CLOSE_ALL.Text("Close All"); //--- Set the button text
   obj_Btn_CLOSE_ALL.Color(clrBlack); //--- Set the text color
   obj_Btn_CLOSE_ALL.Font("Calibri bold"); //--- Set the font style
   obj_Btn_CLOSE_ALL.FontSize(14); //--- Set the font size

   //--- CLOSE ALL SELL BUTTON
   obj_Btn_CLOSE_ALL_SELL.Create(0, Btn_CLOSE_ALL_SELL, 0, 40, 150, 0, 0); //--- Create the close all sell button
   obj_Btn_CLOSE_ALL_SELL.Size(140, 25); //--- Set the button size
   obj_Btn_CLOSE_ALL_SELL.ColorBackground(clrSalmon); //--- Set the background color
   obj_Btn_CLOSE_ALL_SELL.ColorBorder(clrWhite); //--- Set the border color
   obj_Btn_CLOSE_ALL_SELL.Text("Close All Sell"); //--- Set the button text
   obj_Btn_CLOSE_ALL_SELL.Color(clrBlack); //--- Set the text color
   obj_Btn_CLOSE_ALL_SELL.Font("Calibri bold"); //--- Set the font style
   obj_Btn_CLOSE_ALL_SELL.FontSize(14); //--- Set the font size

   //--- CLOSE ALL BUY BUTTON
   obj_Btn_CLOSE_ALL_BUY.Create(0, Btn_CLOSE_ALL_BUY, 0, 190, 150, 0, 0); //--- Create the close all buy button
   obj_Btn_CLOSE_ALL_BUY.Size(140, 25); //--- Set the button size
   obj_Btn_CLOSE_ALL_BUY.ColorBackground(clrMediumSeaGreen); //--- Set the background color
   obj_Btn_CLOSE_ALL_BUY.ColorBorder(clrWhite); //--- Set the border color
   obj_Btn_CLOSE_ALL_BUY.Text("Close All Buy"); //--- Set the button text
   obj_Btn_CLOSE_ALL_BUY.Color(clrBlack); //--- Set the text color
   obj_Btn_CLOSE_ALL_BUY.Font("Calibri bold"); //--- Set the font style
   obj_Btn_CLOSE_ALL_BUY.FontSize(14); //--- Set the font size

   //--- CLOSE LOSS SELL BUTTON
   obj_Btn_CLOSE_LOSS_SELL.Create(0, Btn_CLOSE_LOSS_SELL, 0, 40, 180, 0, 0); //--- Create the close loss sell button
   obj_Btn_CLOSE_LOSS_SELL.Size(140, 25); //--- Set the button size
   obj_Btn_CLOSE_LOSS_SELL.ColorBackground(clrSalmon); //--- Set the background color
   obj_Btn_CLOSE_LOSS_SELL.ColorBorder(clrWhite); //--- Set the border color
   obj_Btn_CLOSE_LOSS_SELL.Text("Close Loss Sell"); //--- Set the button text
   obj_Btn_CLOSE_LOSS_SELL.Color(clrBlack); //--- Set the text color
   obj_Btn_CLOSE_LOSS_SELL.Font("Calibri bold"); //--- Set the font style
   obj_Btn_CLOSE_LOSS_SELL.FontSize(14); //--- Set the font size

   //--- CLOSE LOSS BUY BUTTON
   obj_Btn_CLOSE_LOSS_BUY.Create(0, Btn_CLOSE_LOSS_BUY, 0, 190, 180, 0, 0); //--- Create the close loss buy button
   obj_Btn_CLOSE_LOSS_BUY.Size(140, 25); //--- Set the button size
   obj_Btn_CLOSE_LOSS_BUY.ColorBackground(clrMediumSeaGreen); //--- Set the background color
   obj_Btn_CLOSE_LOSS_BUY.ColorBorder(clrWhite); //--- Set the border color
   obj_Btn_CLOSE_LOSS_BUY.Text("Close Loss Buy"); //--- Set the button text
   obj_Btn_CLOSE_LOSS_BUY.Color(clrBlack); //--- Set the text color
   obj_Btn_CLOSE_LOSS_BUY.Font("Calibri bold"); //--- Set the font style
   obj_Btn_CLOSE_LOSS_BUY.FontSize(14); //--- Set the font size

   //--- CLOSE PROFIT SELL BUTTON
   obj_Btn_CLOSE_PROFIT_SELL.Create(0, Btn_CLOSE_PROFIT_SELL, 0, 40, 210, 0, 0); //--- Create the close profit sell button
   obj_Btn_CLOSE_PROFIT_SELL.Size(140, 25); //--- Set the button size
   obj_Btn_CLOSE_PROFIT_SELL.ColorBackground(clrSalmon); //--- Set the background color
   obj_Btn_CLOSE_PROFIT_SELL.ColorBorder(clrWhite); //--- Set the border color
   obj_Btn_CLOSE_PROFIT_SELL.Text("Close Profit Sell"); //--- Set the button text
   obj_Btn_CLOSE_PROFIT_SELL.Color(clrBlack); //--- Set the text color
   obj_Btn_CLOSE_PROFIT_SELL.Font("Calibri bold"); //--- Set the font style
   obj_Btn_CLOSE_PROFIT_SELL.FontSize(14); //--- Set the font size

   //--- CLOSE PROFIT BUY BUTTON
   obj_Btn_CLOSE_PROFIT_BUY.Create(0, Btn_CLOSE_PROFIT_BUY, 0, 190, 210, 0, 0); //--- Create the close profit buy button
   obj_Btn_CLOSE_PROFIT_BUY.Size(140, 25); //--- Set the button size
   obj_Btn_CLOSE_PROFIT_BUY.ColorBackground(clrMediumSeaGreen); //--- Set the background color
   obj_Btn_CLOSE_PROFIT_BUY.ColorBorder(clrWhite); //--- Set the border color
   obj_Btn_CLOSE_PROFIT_BUY.Text("Close Profit Buy"); //--- Set the button text
   obj_Btn_CLOSE_PROFIT_BUY.Color(clrBlack); //--- Set the text color
   obj_Btn_CLOSE_PROFIT_BUY.Font("Calibri bold"); //--- Set the font style
   obj_Btn_CLOSE_PROFIT_BUY.FontSize(14); //--- Set the font size

   //--- CLOSE ALL LOSS BUTTON
   obj_Btn_CLOSE_ALL_LOSS.Create(0, Btn_CLOSE_ALL_LOSS, 0, 40, 240, 0, 0); //--- Create the close all loss button
   obj_Btn_CLOSE_ALL_LOSS.Size(140, 25); //--- Set the button size
   obj_Btn_CLOSE_ALL_LOSS.ColorBackground(clrSalmon); //--- Set the background color
   obj_Btn_CLOSE_ALL_LOSS.ColorBorder(clrWhite); //--- Set the border color
   obj_Btn_CLOSE_ALL_LOSS.Text("CLOSE LOSS"); //--- Set the button text
   obj_Btn_CLOSE_ALL_LOSS.Color(clrBlack); //--- Set the text color
   obj_Btn_CLOSE_ALL_LOSS.Font("Calibri bold"); //--- Set the font style
   obj_Btn_CLOSE_ALL_LOSS.FontSize(14); //--- Set the font size

   //--- CLOSE ALL PROFIT BUTTON
   obj_Btn_CLOSE_ALL_PROFIT.Create(0, Btn_CLOSE_ALL_PROFIT, 0, 190, 240, 0, 0); //--- Create the close all profit button
   obj_Btn_CLOSE_ALL_PROFIT.Size(140, 25); //--- Set the button size
   obj_Btn_CLOSE_ALL_PROFIT.ColorBackground(clrMediumSeaGreen); //--- Set the background color
   obj_Btn_CLOSE_ALL_PROFIT.ColorBorder(clrWhite); //--- Set the border color
   obj_Btn_CLOSE_ALL_PROFIT.Text("CLOSE PROFIT"); //--- Set the button text
   obj_Btn_CLOSE_ALL_PROFIT.Color(clrBlack); //--- Set the text color
   obj_Btn_CLOSE_ALL_PROFIT.Font("Calibri bold"); //--- Set the font style
   obj_Btn_CLOSE_ALL_PROFIT.FontSize(14); //--- Set the font size

   //--- CLOSE ALL PENDING BUTTON
   obj_Btn_CLOSE_PENDING.Create(0, Btn_CLOSE_PENDING, 0, 80, 270, 0, 0); //--- Create the close all pending button
   obj_Btn_CLOSE_PENDING.Size(210, 25); //--- Set the button size
   obj_Btn_CLOSE_PENDING.ColorBackground(clrPeru); //--- Set the background color
   obj_Btn_CLOSE_PENDING.ColorBorder(clrWhite); //--- Set the border color
   obj_Btn_CLOSE_PENDING.Text("Close All Pending"); //--- Set the button text
   obj_Btn_CLOSE_PENDING.Color(clrBlack); //--- Set the text color
   obj_Btn_CLOSE_PENDING.Font("Calibri bold"); //--- Set the font style
   obj_Btn_CLOSE_PENDING.FontSize(14); //--- Set the font size
}
在初始化事件处理程序中,我们可以通过注释掉交易部分的函数调用逻辑,并通过函数调用来实现关闭部分。通过注释掉函数而不是删除它来实现这一点,因为稍后我们还需要重新使用它。
   // BODY OF THE PANEL
   //createSection_Trade(); //--- Call function to create the trade section
   createSection_Close(); //--- Call function to create the close section
运行程序,我们得到如下输出。
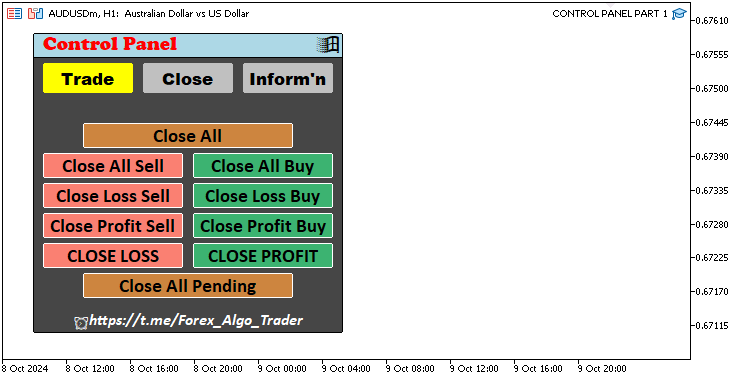
成功了。我们现在可以继续创建最后一个部分,该部分将显示与交易账户相关的信息。为此,我们也使用一个函数。
//+------------------------------------------------------------------+
//|        FUNCTION TO CREATE THE INFO SECTION                       |
//+------------------------------------------------------------------+
void createSection_Information() {
   //--- Create Account Number Label
   obj_Lbl_ACC_NUMBER.Create(0, Lbl_ACC_NUMBER, 0, 40, 100, 0, 0); //--- Initialize label for Account Number
   obj_Lbl_ACC_NUMBER.Text("Account Number"); //--- Set label text to "Account Number"
   obj_Lbl_ACC_NUMBER.Color(clrWhite); //--- Set label color to white
   obj_Lbl_ACC_NUMBER.Font("Calibri bold"); //--- Set label font to Calibri bold
   obj_Lbl_ACC_NUMBER.FontSize(14); //--- Set label font size to 14

   //--- Create Account Number Button
   obj_Btn_ACC_NUMBER.Create(0, Btn_ACC_NUMBER, 0, 40 + 140, 100 + 2, 0, 0); //--- Initialize button for Account Number
   obj_Btn_ACC_NUMBER.Size(150, 20); //--- Set button size to 150x20
   obj_Btn_ACC_NUMBER.ColorBackground(clrGainsboro); //--- Set button background color to Gainsboro
   obj_Btn_ACC_NUMBER.ColorBorder(clrWhite); //--- Set button border color to white
   obj_Btn_ACC_NUMBER.Text(IntegerToString(AccountInfoInteger(ACCOUNT_LOGIN))); //--- Set button text with account number
   obj_Btn_ACC_NUMBER.Color(clrBlack); //--- Set button text color to black
   obj_Btn_ACC_NUMBER.Font("Calibri bold"); //--- Set button font to Calibri bold
   obj_Btn_ACC_NUMBER.FontSize(13); //--- Set button font size to 13

}
我们再次使用类似的格式来创建。然而,在设置文本时,我们使用了一些额外的函数,我们想解释它们的本质。该行以黄色突出显示。我们使用AccountInfoInteger和IntegerToString函数的组合来设置“obj_Btn_ACC_NUMBER”按钮的文本,以显示账户号码。
我们使用AccountInfoInteger函数根据给定的参数检索特定的账户信息。在这种情况下,参数是“ACCOUNT_LOGIN”,这告诉函数从MetaTrader终端获取账户的登录号码。这个登录号码以整数值返回。
接下来,应用IntegerToString函数将这个整数值转换为字符串。这是必要的,因为按钮的“Text”方法要求值以字符串格式正确显示。没有这个转换,按钮将无法正确解析账户号码。以类似的格式,我们设置了账户名称和类型按钮。
   //--- Create Account Name Label
   obj_Lbl_ACC_NAME.Create(0, Lbl_ACC_NAME, 0, 40, 125, 0, 0); //--- Initialize label for Account Name
   obj_Lbl_ACC_NAME.Text("Account Name"); //--- Set label text to "Account Name"
   obj_Lbl_ACC_NAME.Color(clrWhite); //--- Set label color to white
   obj_Lbl_ACC_NAME.Font("Calibri bold"); //--- Set label font to Calibri bold
   obj_Lbl_ACC_NAME.FontSize(14); //--- Set label font size to 14

   //--- Create Account Name Button
   obj_Btn_ACC_NAME.Create(0, Btn_ACC_NAME, 0, 40 + 120, 125 + 2, 0, 0); //--- Initialize button for Account Name
   obj_Btn_ACC_NAME.Size(170, 20); //--- Set button size to 170x20
   obj_Btn_ACC_NAME.ColorBackground(clrGainsboro); //--- Set button background color to Gainsboro
   obj_Btn_ACC_NAME.ColorBorder(clrWhite); //--- Set button border color to white
   obj_Btn_ACC_NAME.Text(AccountInfoString(ACCOUNT_SERVER)); //--- Set button text with account server name
   obj_Btn_ACC_NAME.Color(clrBlack); //--- Set button text color to black
   obj_Btn_ACC_NAME.Font("Calibri bold"); //--- Set button font to Calibri bold
   obj_Btn_ACC_NAME.FontSize(13); //--- Set button font size to 13

   //--- Create Account Type Label
   obj_Lbl_ACC_TYPE.Create(0, Lbl_ACC_TYPE, 0, 40, 150, 0, 0); //--- Initialize label for Account Type
   obj_Lbl_ACC_TYPE.Text("Account Type"); //--- Set label text to "Account Type"
   obj_Lbl_ACC_TYPE.Color(clrWhite); //--- Set label color to white
   obj_Lbl_ACC_TYPE.Font("Calibri bold"); //--- Set label font to Calibri bold
   obj_Lbl_ACC_TYPE.FontSize(14); //--- Set label font size to 14

   //--- Create Account Type Button
   obj_Btn_ACC_TYPE.Create(0, Btn_ACC_TYPE, 0, 40 + 110, 150 + 2, 0, 0); //--- Initialize button for Account Type
   obj_Btn_ACC_TYPE.Size(180, 20); //--- Set button size to 180x20
   obj_Btn_ACC_TYPE.ColorBackground(clrGainsboro); //--- Set button background color to Gainsboro
   obj_Btn_ACC_TYPE.ColorBorder(clrWhite); //--- Set button border color to white
   ENUM_ACCOUNT_TRADE_MODE account_type = (ENUM_ACCOUNT_TRADE_MODE)AccountInfoInteger(ACCOUNT_TRADE_MODE); //--- Retrieve account type
   string trade_mode; //--- Initialize variable for trade mode description
   switch (account_type) { //--- Determine account type
      case ACCOUNT_TRADE_MODE_DEMO: trade_mode = "Demo Account"; break; //--- Set trade_mode for Demo account
      case ACCOUNT_TRADE_MODE_CONTEST: trade_mode = "Contest Account"; break; //--- Set trade_mode for Contest account
      default: trade_mode = "Real Account"; break; //--- Set trade_mode for Real account
   }
   obj_Btn_ACC_TYPE.Text(trade_mode); //--- Set button text to account type description
   obj_Btn_ACC_TYPE.Color(clrBlack); //--- Set button text color to black
   obj_Btn_ACC_TYPE.Font("Calibri bold"); //--- Set button font to Calibri bold
   obj_Btn_ACC_TYPE.FontSize(13); //--- Set button font size to 13
在这里,我们设置了账户名称和类型按钮。然而,由于没有直接获取账户类型的直接方法,我们使用了更复杂的逻辑来获取账户类型。为了强调,这段代码再次以黄色突出显示。我们首先定义了一个名为 “account_type” 的枚举类型变量ENUM_ACCOUNT_TRADE_MODE。这是一种专门设计用来持有各种账户交易模式的枚举数据类型,例如模拟账户、比赛账户或真实账户。然后,我们使用 “AccountInfoInteger” 函数并带有参数 ACCOUNT_TRADE_MODE 为其赋值。这个函数以枚举整数的形式检索账户的当前交易模式。
接下来,我们声明一个名为 “trade_mode” 的字符串变量,用来根据账户类型持有描述性标签。然后,我们使用 switch语句通过检查 “account_type” 的值来确定账户类型。这个 switch 语句有三个分支:
- “ACCOUNT_TRADE_MODE_DEMO”: 如果账户是模拟账户,“trade_mode” 被设置为 “Demo Account”。
- “ACCOUNT_TRADE_MODE_CONTEST”: 如果账户用于比赛,“trade_mode” 被设置为 “Contest Account”。
- 默认情况:对于任何其他类型(通常是真实账户),“trade_mode” 被设置为 “Real Account”。
最后,我们在 “obj_Btn_ACC_TYPE” 按钮上调用 “Text” 方法,并传递 “trade_mode” 字符串。这将更新按钮的文本以显示描述性的账户类型。从这里开始,其余的实用程序以类似的格式定义如下。
   //--- Create Account Leverage Label
   obj_Lbl_ACC_LEVERAGE.Create(0, Lbl_ACC_LEVERAGE, 0, 40, 175, 0, 0); //--- Initialize label for Account Leverage
   obj_Lbl_ACC_LEVERAGE.Text("Account Leverage"); //--- Set label text to "Account Leverage"
   obj_Lbl_ACC_LEVERAGE.Color(clrWhite); //--- Set label color to white
   obj_Lbl_ACC_LEVERAGE.Font("Calibri bold"); //--- Set label font to Calibri bold
   obj_Lbl_ACC_LEVERAGE.FontSize(14); //--- Set label font size to 14

   //--- Create Account Leverage Button
   obj_Btn_ACC_LEVERAGE.Create(0, Btn_ACC_LEVERAGE, 0, 40 + 150, 175 + 2, 0, 0); //--- Initialize button for Account Leverage
   obj_Btn_ACC_LEVERAGE.Size(140, 20); //--- Set button size to 140x20
   obj_Btn_ACC_LEVERAGE.ColorBackground(clrGainsboro); //--- Set button background color to Gainsboro
   obj_Btn_ACC_LEVERAGE.ColorBorder(clrWhite); //--- Set button border color to white
   obj_Btn_ACC_LEVERAGE.Text(IntegerToString(AccountInfoInteger(ACCOUNT_LEVERAGE))); //--- Set button text with account leverage
   obj_Btn_ACC_LEVERAGE.Color(clrBlack); //--- Set button text color to black
   obj_Btn_ACC_LEVERAGE.Font("Calibri bold"); //--- Set button font to Calibri bold
   obj_Btn_ACC_LEVERAGE.FontSize(13); //--- Set button font size to 13

   //--- Create Account Equity Label
   obj_Lbl_ACC_EQUITY.Create(0, Lbl_ACC_EQUITY, 0, 40, 220, 0, 0); //--- Initialize label for Account Equity
   obj_Lbl_ACC_EQUITY.Text("Account Equity"); //--- Set label text to "Account Equity"
   obj_Lbl_ACC_EQUITY.Color(clrAqua); //--- Set label color to Aqua
   obj_Lbl_ACC_EQUITY.Font("Cooper Black"); //--- Set label font to Cooper Black
   obj_Lbl_ACC_EQUITY.FontSize(14); //--- Set label font size to 14

   //--- Create Account Equity Button
   obj_Btn_ACC_EQUITY.Create(0, Btn_ACC_EQUITY, 0, 40 + 170, 220 + 2, 0, 0); //--- Initialize button for Account Equity
   obj_Btn_ACC_EQUITY.Size(120, 20); //--- Set button size to 120x20
   obj_Btn_ACC_EQUITY.ColorBackground(clrBlack); //--- Set button background color to black
   obj_Btn_ACC_EQUITY.ColorBorder(clrBlanchedAlmond); //--- Set button border color to Blanched Almond
   obj_Btn_ACC_EQUITY.Text(DoubleToString(AccountInfoDouble(ACCOUNT_EQUITY), 2)); //--- Set button text with account equity
   obj_Btn_ACC_EQUITY.Color(clrWhite); //--- Set button text color to white
   obj_Btn_ACC_EQUITY.Font("Times new roman bold"); //--- Set button font to Times New Roman bold
   obj_Btn_ACC_EQUITY.FontSize(13); //--- Set button font size to 13

   //--- Create Account Balance Label
   obj_Lbl_ACC_BALANCE.Create(0, Lbl_ACC_BALANCE, 0, 40, 245, 0, 0); //--- Initialize label for Account Balance
   obj_Lbl_ACC_BALANCE.Text("Account Balance"); //--- Set label text to "Account Balance"
   obj_Lbl_ACC_BALANCE.Color(clrAqua); //--- Set label color to Aqua
   obj_Lbl_ACC_BALANCE.Font("Cooper Black"); //--- Set label font to Cooper Black
   obj_Lbl_ACC_BALANCE.FontSize(14); //--- Set label font size to 14

   //--- Create Account Balance Button
   obj_Btn_ACC_BALANCE.Create(0, Btn_ACC_BALANCE, 0, 40 + 170, 245 + 2, 0, 0); //--- Initialize button for Account Balance
   obj_Btn_ACC_BALANCE.Size(120, 20); //--- Set button size to 120x20
   obj_Btn_ACC_BALANCE.ColorBackground(clrBlack); //--- Set button background color to black
   obj_Btn_ACC_BALANCE.ColorBorder(clrBlanchedAlmond); //--- Set button border color to Blanched Almond
   obj_Btn_ACC_BALANCE.Text(DoubleToString(AccountInfoDouble(ACCOUNT_BALANCE), 2)); //--- Set button text with account balance
   obj_Btn_ACC_BALANCE.Color(clrWhite); //--- Set button text color to white
   obj_Btn_ACC_BALANCE.Font("Times new roman bold"); //--- Set button font to Times New Roman bold
   obj_Btn_ACC_BALANCE.FontSize(13); //--- Set button font size to 13

   //--- Create Server Time Label
   obj_Lbl_TIME.Create(0, Lbl_TIME, 0, 40, 270, 0, 0); //--- Initialize label for Server Time
   obj_Lbl_TIME.Text("Server Time"); //--- Set label text to "Server Time"
   obj_Lbl_TIME.Color(clrLime); //--- Set label color to Lime
   obj_Lbl_TIME.Font("Cooper Black"); //--- Set label font to Cooper Black
   obj_Lbl_TIME.FontSize(14); //--- Set label font size to 14

   //--- Create Server Time Button
   obj_Btn_TIME.Create(0, Btn_TIME, 0, 40 + 120, 270 + 2, 0, 0); //--- Initialize button for Server Time
   obj_Btn_TIME.Size(170, 20); //--- Set button size to 170x20
   obj_Btn_TIME.ColorBackground(clrBlack); //--- Set button background color to black
   obj_Btn_TIME.ColorBorder(clrBlanchedAlmond); //--- Set button border color to Blanched Almond
   obj_Btn_TIME.Text(TimeToString(TimeTradeServer(), TIME_DATE | TIME_SECONDS)); //--- Set button text with server time
   obj_Btn_TIME.Color(clrWhite); //--- Set button text color to white
   obj_Btn_TIME.Font("Times new roman bold"); //--- Set button font to Times New Roman bold
   obj_Btn_TIME.FontSize(13); //--- Set button font size to 13
这就是全部。为了检查更改的效果,我们需要在初始化阶段调用该函数,并在其他导航函数调用中将其注释掉。它如下所示:
   // BODY OF THE PANEL
   //createSection_Trade(); //--- Call function to create the trade section
   //createSection_Close(); //--- Call function to create the close section
   createSection_Information(); //--- Call function to create the information section
程序编译并运行后,我们得到了以下输出。
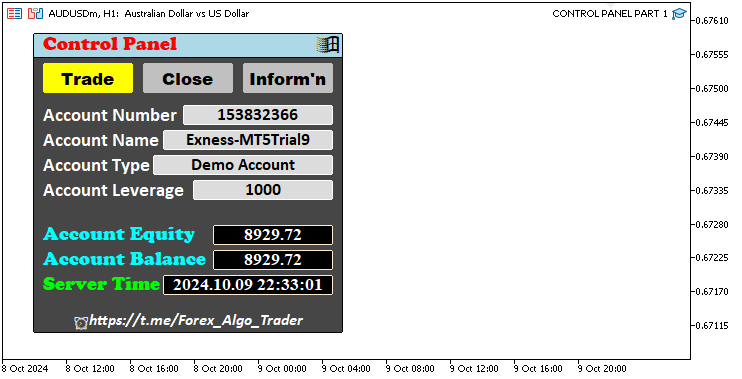
现在拥有了我们想要的完整面板工具组件。由于交易活动的按钮处于激活状态,我们现在可以恢复到原始的交易界面。因此,我们将注释掉关闭和信息部分的函数,但在需要时(即需要它们各自的视图字段时)仍然需要使用它们。因此,负责创建面板界面的最终初始化代码如下:
//+------------------------------------------------------------------+
//| Expert initialization function                                   |
//+------------------------------------------------------------------+
int OnInit() {
   //--- Start of the initialization function

   //--- MAIN BUTTON
   obj_Btn_MAIN.Create(0, Btn_MAIN, 0, 30, 30, 0, 0); //--- Create the main button at specified coordinates
   //obj_Btn_MAIN.Width(310); //--- (Commented out) Set width of the main button
   //obj_Btn_MAIN.Height(300); //--- (Commented out) Set height of the main button
   obj_Btn_MAIN.Size(310, 300); //--- Set size of the main button
   obj_Btn_MAIN.ColorBackground(C'070,070,070'); //--- Set background color of the main button
   obj_Btn_MAIN.ColorBorder(clrBlack); //--- Set border color of the main button

   //--- HEADER BUTTON
   obj_Btn_HEADER.Create(0, Btn_HEADER, 0, 30, 30, 0, 0); //--- Create the header button at specified coordinates
   obj_Btn_HEADER.Size(310, 25); //--- Set size of the header button
   obj_Btn_HEADER.ColorBackground(clrLightBlue); //--- Set background color of the header button
   obj_Btn_HEADER.ColorBorder(clrBlack); //--- Set border color of the header button

   //--- X BUTTON
   obj_Btn_X.Create(0, Btn_X, 0, 30 + 280, 30 + 1, 0, 0); //--- Create the close button (X) at specified coordinates
   obj_Btn_X.Size(30 - 1, 25 - 1 - 1); //--- Set size of the close button
   obj_Btn_X.ColorBackground(clrLightBlue); //--- Set background color of the close button
   obj_Btn_X.ColorBorder(clrLightBlue); //--- Set border color of the close button
   obj_Btn_X.Text(CharToString(255)); //--- Set the close button text to an "X" character
   obj_Btn_X.Color(clrBlack); //--- Set text color of the close button
   obj_Btn_X.Font("Wingdings"); //--- Set font of the close button to Wingdings
   obj_Btn_X.FontSize(17); //--- Set font size of the close button

   //--- HEADER LABEL
   obj_Lbl_HEADER.Create(0, Lbl_HEADER, 0, 40, 30, 0, 0); //--- Create the header label at specified coordinates
   obj_Lbl_HEADER.Text("Control Panel"); //--- Set text of the header label
   obj_Lbl_HEADER.Color(clrRed); //--- Set text color of the header label
   obj_Lbl_HEADER.Font("Cooper black"); //--- Set font of the header label to Cooper Black
   obj_Lbl_HEADER.FontSize(14); //--- Set font size of the header label

   //--- TRADE BUTTON
   obj_Btn_TRADE.Create(0, Btn_TRADE, 0, 40, 60, 0, 0); //--- Create the trade button at specified coordinates
   obj_Btn_TRADE.Size(90, 30); //--- Set size of the trade button
   obj_Btn_TRADE.ColorBackground(clrYellow); //--- Set background color of the trade button
   obj_Btn_TRADE.ColorBorder(clrYellow); //--- Set border color of the trade button
   obj_Btn_TRADE.Text("Trade"); //--- Set text of the trade button
   obj_Btn_TRADE.Color(clrBlack); //--- Set text color of the trade button
   obj_Btn_TRADE.Font("Arial Black"); //--- Set font of the trade button to Arial Black
   obj_Btn_TRADE.FontSize(13); //--- Set font size of the trade button

   //--- CLOSE BUTTON
   obj_Btn_CLOSE.Create(0, Btn_CLOSE, 0, 40 + obj_Btn_TRADE.Width() + 10, 60, 0, 0); //--- Create the close button at specified coordinates
   obj_Btn_CLOSE.Size(90, 30); //--- Set size of the close button
   obj_Btn_CLOSE.ColorBackground(clrSilver); //--- Set background color of the close button
   obj_Btn_CLOSE.ColorBorder(clrSilver); //--- Set border color of the close button
   obj_Btn_CLOSE.Text("Close"); //--- Set text of the close button
   obj_Btn_CLOSE.Color(clrBlack); //--- Set text color of the close button
   obj_Btn_CLOSE.Font("Arial Black"); //--- Set font of the close button to Arial Black
   obj_Btn_CLOSE.FontSize(13); //--- Set font size of the close button

   //--- INFO BUTTON
   obj_Btn_INFO.Create(0, Btn_INFO, 0, 40 + obj_Btn_TRADE.Width() + 10 + obj_Btn_CLOSE.Width() + 10, 60, 0, 0); //--- Create the info button at specified coordinates
   obj_Btn_INFO.Size(90, 30); //--- Set size of the info button
   obj_Btn_INFO.ColorBackground(clrSilver); //--- Set background color of the info button
   obj_Btn_INFO.ColorBorder(clrSilver); //--- Set border color of the info button
   obj_Btn_INFO.Text("Inform'n"); //--- Set text of the info button
   obj_Btn_INFO.Color(clrBlack); //--- Set text color of the info button
   obj_Btn_INFO.Font("Arial Black"); //--- Set font of the info button to Arial Black
   obj_Btn_INFO.FontSize(13); //--- Set font size of the info button

   // BODY OF THE PANEL
   createSection_Trade(); //--- Call function to create the trade section
   //createSection_Close(); //--- (Commented out) Call function to create the close section
   //createSection_Information(); //--- (Commented out) Call function to create the information section

   //--- FOOTER BUTTON
   obj_Btn_FOOTER.Create(0, Btn_FOOTER, 0, 30 + 1, 305 - 1, 0, 0); //--- Create the footer button at specified coordinates
   obj_Btn_FOOTER.Size(310 - 1 - 1, 25); //--- Set size of the footer button
   obj_Btn_FOOTER.ColorBackground(C'070,070,070'); //--- Set background color of the footer button
   obj_Btn_FOOTER.ColorBorder(C'070,070,070'); //--- Set border color of the footer button
   obj_Btn_FOOTER.Text(ShortToString(0x23F0) + "https://t.me/Forex_Algo_Trader"); //--- Set text of the footer button with a link
   obj_Btn_FOOTER.Color(clrWhite); //--- Set text color of the footer button
   obj_Btn_FOOTER.Font("Calibri bold italic"); //--- Set font of the footer button to Calibri bold italic
   obj_Btn_FOOTER.FontSize(12); //--- Set font size of the footer button

   ChartRedraw(0); //--- Redraw the chart to update the panel

   //--- End of initialization function
   return(INIT_SUCCEEDED); //--- Return initialization success status
}
最终输出如下:
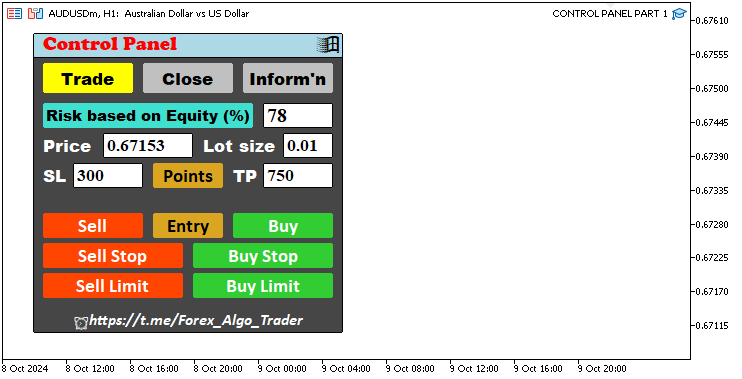
尽管我们已经创建了必要的组件,但在从图表中移除程序后,需要删除所有已创建的组件。实现这一点的最佳方式是为每个创建的部分创建函数,以便可以同时删除这些部分,并且可以重复使用这些函数。我们希望保持条理清晰。以建筑物拆除为例,先拆除外墙,然后是隔断,接着是上层楼层,最后才是基础部分,这是合理的。当然,也可以从任何部分开始拆除,但以专业的方式做事会更加专业。我们相信你会同意这一点。这些函数如下:
//--- Function to destroy main panel objects
void destroySection_Main_Panel() {
   obj_Btn_MAIN.Destroy(); //--- Destroy the main button
   obj_Btn_HEADER.Destroy(); //--- Destroy the header button
   obj_Btn_X.Destroy(); //--- Destroy the close (X) button
   obj_Lbl_HEADER.Destroy(); //--- Destroy the header label
   obj_Btn_TRADE.Destroy(); //--- Destroy the trade section button
   obj_Btn_CLOSE.Destroy(); //--- Destroy the close section button
   obj_Btn_INFO.Destroy(); //--- Destroy the information section button
   obj_Btn_FOOTER.Destroy(); //--- Destroy the footer button
}

//--- Function to destroy trade section objects
void destroySection_Trade() {
   obj_Btn_RISK.Destroy(); //--- Destroy the risk button
   obj_Edit_RISK.Destroy(); //--- Destroy the risk input field
   obj_Lbl_PRICE.Destroy(); //--- Destroy the price label
   obj_Edit_PRICE.Destroy(); //--- Destroy the price input field
   obj_Lbl_LOTS.Destroy(); //--- Destroy the lot size label
   obj_Edit_LOTS.Destroy(); //--- Destroy the lot size input field
   obj_Lbl_SL.Destroy(); //--- Destroy the stop loss label
   obj_Edit_SL.Destroy(); //--- Destroy the stop loss input field
   obj_Lbl_TP.Destroy(); //--- Destroy the take profit label
   obj_Edit_TP.Destroy(); //--- Destroy the take profit input field
   obj_Btn_POINTS.Destroy(); //--- Destroy the points button
   obj_Btn_SELL.Destroy(); //--- Destroy the sell button
   obj_Btn_ENTRY.Destroy(); //--- Destroy the entry button
   obj_Btn_BUY.Destroy(); //--- Destroy the buy button
   obj_Btn_SELLSTOP.Destroy(); //--- Destroy the sell stop button
   obj_Btn_BUYSTOP.Destroy(); //--- Destroy the buy stop button
   obj_Btn_SELLLIMIT.Destroy(); //--- Destroy the sell limit button
   obj_Btn_BUYLIMIT.Destroy(); //--- Destroy the buy limit button
}

//--- Function to destroy close section objects
void destroySection_Close() {
   obj_Btn_CLOSE_ALL.Destroy(); //--- Destroy the button to close all positions
   obj_Btn_CLOSE_ALL_SELL.Destroy(); //--- Destroy the button to close all sell positions
   obj_Btn_CLOSE_ALL_BUY.Destroy(); //--- Destroy the button to close all buy positions
   obj_Btn_CLOSE_LOSS_SELL.Destroy(); //--- Destroy the button to close losing sell positions
   obj_Btn_CLOSE_LOSS_BUY.Destroy(); //--- Destroy the button to close losing buy positions
   obj_Btn_CLOSE_PROFIT_SELL.Destroy(); //--- Destroy the button to close profitable sell positions
   obj_Btn_CLOSE_PROFIT_BUY.Destroy(); //--- Destroy the button to close profitable buy positions
   obj_Btn_CLOSE_ALL_LOSS.Destroy(); //--- Destroy the button to close all losing positions
   obj_Btn_CLOSE_ALL_PROFIT.Destroy(); //--- Destroy the button to close all profitable positions
   obj_Btn_CLOSE_PENDING.Destroy(); //--- Destroy the button to close pending orders
}

//--- Function to destroy information section objects
void destroySection_Information() {
   obj_Lbl_ACC_NUMBER.Destroy(); //--- Destroy the account number label
   obj_Btn_ACC_NUMBER.Destroy(); //--- Destroy the account number button
   obj_Lbl_ACC_NAME.Destroy(); //--- Destroy the account name label
   obj_Btn_ACC_NAME.Destroy(); //--- Destroy the account name button
   obj_Lbl_ACC_TYPE.Destroy(); //--- Destroy the account type label
   obj_Btn_ACC_TYPE.Destroy(); //--- Destroy the account type button
   obj_Lbl_ACC_LEVERAGE.Destroy(); //--- Destroy the account leverage label
   obj_Btn_ACC_LEVERAGE.Destroy(); //--- Destroy the account leverage button
   obj_Lbl_ACC_EQUITY.Destroy(); //--- Destroy the account equity label
   obj_Btn_ACC_EQUITY.Destroy(); //--- Destroy the account equity button
   obj_Lbl_ACC_BALANCE.Destroy(); //--- Destroy the account balance label
   obj_Btn_ACC_BALANCE.Destroy(); //--- Destroy the account balance button
   obj_Lbl_TIME.Destroy(); //--- Destroy the server time label
   obj_Btn_TIME.Destroy(); //--- Destroy the server time button
}
在这里,我们只需使用相应的对象并调用“Destroy”方法来移除特定的元素。之后,我们在OnDeinit事件处理程序中调用这些函数。
//+------------------------------------------------------------------+
//| Expert deinitialization function                                 |
//+------------------------------------------------------------------+
void OnDeinit(const int reason) {
   //--- Start of the deinitialization function

   destroySection_Main_Panel(); //--- Call function to destroy the main panel section
   destroySection_Trade(); //--- Call function to destroy the trade section
   destroySection_Close(); //--- Call function to destroy the close section
   destroySection_Information(); //--- Call function to destroy the information section

   ChartRedraw(0);

   //--- End of deinitialization function
}
成功了。我们已经创建了带有相应导航按钮和主体组件的面板,实现了我们想要的效果。因此,本系列文章第一部分的目标已经完成。接下来,我们需要让这些按钮具有交互性,能够响应点击操作,并在必要时自动更新,这些内容将在后续的章节中进行介绍。
结论
在本文中,我们专注于使用“Controls”类创建交互式MetaQuotes Language 5(MQL5)仪表板面板的基础结构。我们逐步介绍了按钮、标签和编辑字段等基本组件的创建过程,同时确保每个元素都清晰定义并具有视觉风格。此外,我们还强调了如何自定义文本、颜色和大小,以创建专业且协调一致的面板外观。通过这一结构化方法,我们已构建起一个功能完备界面的核心部分,该界面可根据具体交易需求进行扩展和调整。
在下一部分中,我们将为该面板增添响应性和交互性,使其能够动态响应用户在 MetaTrader 5 中的输入和交易操作。我们将探讨如何编写按钮点击事件的处理程序、管理实时数据更新,以及实施反馈机制,以提升面板的可用性。此次升级将把当前静态的界面转变为一个功能强大的实时交易助手,为用户提供无缝的交易体验。敬请期待。
本文由MetaQuotes Ltd译自英文
原文地址: https://www.mql5.com/en/articles/16084
注意: MetaQuotes Ltd.将保留所有关于这些材料的权利。全部或部分复制或者转载这些材料将被禁止。
本文由网站的一位用户撰写,反映了他们的个人观点。MetaQuotes Ltd 不对所提供信息的准确性负责,也不对因使用所述解决方案、策略或建议而产生的任何后果负责。
 您应当知道的 MQL5 向导技术(第 38 部分):布林带
 重构经典策略(第十部分):人工智能(AI)能否为MACD提供动力?


向作者致敬
B.V.多尔吉赫
当然,非常欢迎。谢谢。
"我们现在需要让按钮实时响应点击,并在必要时自动更新,这将在后续分期付款中完成"。
"分期付款 "这个词暗指的是第 2 部分,而第 2 部分自 2024 年 10 月第 1 部分创建以来就不存在了。
如果你不想等待,也不会编码点击事件,这里有另一位编码员的免费交易面板:
代码库
简单订单面板
Manuel Alejandro Cercos Perez, 2022.08.08 18:18
简单订单面板的源代码"现在,我们需要让按钮实时响应点击,并在需要时自动更新,这将在后面的部分中进行处理"。
"后续 "一词暗示了第二部分,而第二部分并不存在,自第一部分于 2024 年 10 月创建以来就不存在。
如果你不想等待,也不知道如何编写点击事件代码,这里有另一个编码员的免费交易板:
第二部分
https://www.mql5.com/zh/articles/16146
第二部分
https://www.mql5.com/zh/articles/16146