
Implementação do modelo de tabela em MQL5: Aplicação do conto MVC

Conteúdo
- Introdução
- Um pouco sobre o conceito MVC (Model-View-Controller)
- Escrevendo classes para construir o modelo de tabela
- Listas ligadas como base para armazenar dados tabulares
- Classe da célula da tabela
- Classe da linha da tabela
- Classe o modelo de tabela
- Vamos testar o resultado
- Considerações finais
Introdução
Na programação, a arquitetura de uma aplicação desempenha um papel importante para garantir confiabilidade, escalabilidade e facilidade de manutenção. Uma das abordagens que ajuda a alcançar esses objetivos é o uso do padrão arquitetônico MVC (Model-View-Controller).
A concepção MVC permite dividir a aplicação em três componentes inter-relacionados: o modelo (gerenciamento de dados e lógica), a visualização (exibição dos dados) e o controlador (tratamento das ações do usuário). Essa divisão simplifica o desenvolvimento, o teste e a manutenção do código, tornando-o mais estruturado e flexível.
Neste artigo, veremos como aplicar os princípios do MVC para implementar o modelo de tabela na linguagem MQL5. As tabelas são uma ferramenta importante para armazenar, processar e exibir dados, e sua organização correta pode simplificar significativamente o trabalho com as informações. Criaremos classes para trabalhar com tabelas: células da tabela, linhas e o modelo de tabela. Para armazenar as células nas linhas e as linhas no modelo de tabela, usaremos listas ligadas da Biblioteca Padrão do MQL5, que permitem guardar e utilizar dados de forma eficiente.
Um pouco sobre o conceito MVC: o que é e para que serve
Imagine uma aplicação como um teatro. Existe o roteiro, que descreve o que deve acontecer (este é o modelo). Existe o palco, que é o que o público vê (esta é a visualização). E, por fim, há o diretor, que administra todo o processo e conecta os demais elementos (este é o controlador). É assim que funciona o padrão arquitetônico MVC, Model-View-Controller.
Esse conceito ajuda a separar as responsabilidades dentro da aplicação. O modelo cuida dos dados e da lógica, a visualização, da aparência e da exibição, e o controlador, do tratamento das ações do usuário. Essa separação torna o código mais claro, flexível e apropriado para o trabalho em equipe.
Vamos supor que você esteja criando uma tabela. A modelo sabe quais linhas e células existem nela e é capaz de modificá-las. A visualização desenha a tabela na tela. E o controlador reage quando o usuário clica "Adicionar linha", pois repassa a tarefa para o modelo e, em seguida, informa à visualização que deve ser atualizada.
O MVC é especialmente útil quando a aplicação se torna mais complexa; novas funções são adicionadas, a interface muda e vários desenvolvedores trabalham no projeto. Graças a uma arquitetura bem definida, torna-se mais fácil fazer alterações, testar os componentes separadamente e reutilizar o código.
Claro que esse esquema também tem seus pontos negativos. Para projetos muito simples, o MVC pode acabar sendo excessivo, pois será preciso separar até aquilo que poderia caber em duas funções. Mas, em aplicações sérias e escaláveis, essa estrutura rapidamente se justifica.
Com base no que foi mencionado, fazemos um resumo:
MVC é um padrão arquitetônico poderoso que ajuda a organizar o código, tornando-o mais claro, testável e escalável. É especialmente útil para aplicações complexas, onde é importante separar a lógica dos dados, a interface do usuário e o controle. Para projetos pequenos, seu uso é desnecessário.
Vemos que o paradigma Model-View-Controller se encaixa muito bem na nossa tarefa. A tabela será composta por objetos independentes:
- A célula da tabela.
Um objeto que armazena um valor de um dos tipos, seja real, inteiro ou string, e que possui ferramentas para gerenciar esse valor, sua definição e obtenção; - A linha da tabela.
Um objeto que armazena uma lista de objetos de células da tabela, possuindo ferramentas para gerenciar as células, seu posicionamento, adição e remoção; - A modelo da tabela.
Um objeto que armazena uma lista de objetos de linhas da tabela, possuindo ferramentas para gerenciar as linhas e colunas da tabela, seu posicionamento, adição e remoção, e que também tem acesso aos elementos de controle das linhas e das células.
Na figura abaixo, a seguir, está representada de forma esquemática a estrutura do modelo de tabela no tamanho 4x4:
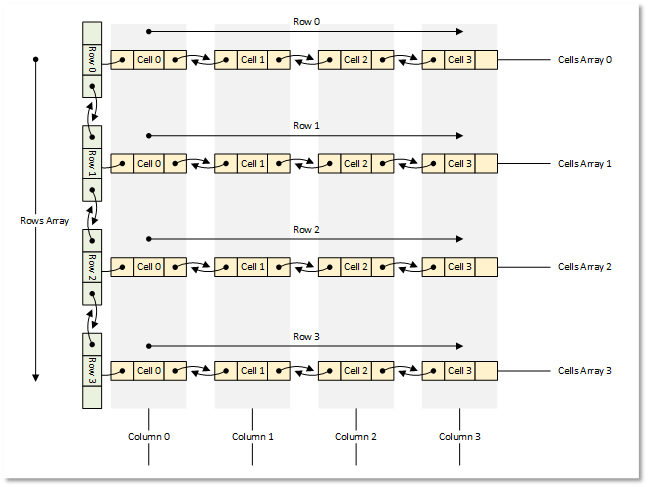
Fig.1 Modelo de tabela 4x4
Vamos passar da teoria para a implementação.
Escrevendo classes para construir o modelo de tabela
Para criar todos os objetos, usaremos a Biblioteca Padrão do MQL5.
Cada objeto será um descendente de uma classe base da biblioteca. Isso permitirá armazenar esses objetos em listas de objetos.
Escreveremos todas as classes em um único arquivo de script de teste, para que tudo fique em um só lugar, visível e de acesso rápido. Posteriormente, distribuiremos as classes escritas em seus próprios arquivos conectados separadamente.
1. Listas ligadas como base para armazenar dados tabulares
Para armazenar dados tabulares, o mais adequado é a lista ligada CList. Nela, ao contrário da lista semelhante CArrayObj, existem métodos de acesso aos objetos vizinhos da lista, localizados à esquerda e à direita do objeto atual. Isso permitirá implementar facilmente a movimentação das células na linha, ou a movimentação das linhas na tabela, sua adição e remoção; ao mesmo tempo, a própria lista cuidará da indexação correta dos objetos movidos, adicionados ou removidos na lista.
Mas aqui há um detalhe. Se analisarmos os métodos de carregamento e salvamento da lista em arquivo, veremos que, ao carregar a partir de um arquivo, a classe da lista deve criar um novo objeto no método virtual CreateElement().
Esse método, nessa classe, simplesmente retorna NULL:
   //--- method of creating an element of the list
   virtual CObject  *CreateElement(void) { return(NULL); }
E isso significa que, para trabalhar com listas ligadas, e levando em conta que precisaremos realizar operações com arquivos, devemos herdar da classe CList e implementar esse método na nossa própria classe.
Além disso, ao observar os métodos de salvamento de objetos da Biblioteca Padrão em arquivo, é possível notar o seguinte algoritmo de gravação das propriedades de um objeto:
- No arquivo, é gravado um marcador de início dos dados (-1),
- No arquivo, é gravado o tipo do objeto,
- No arquivo, são gravadas sucessivamente todas as propriedades do objeto.
O primeiro e o segundo pontos são característicos de todos os métodos de salvamento/carregamento implementados nos objetos da Biblioteca Padrão. Portanto, seguindo essa mesma lógica, precisamos conhecer o tipo do objeto salvo na lista, para que, ao ler a partir do arquivo, seja criado um objeto desse tipo no método virtual CreateElement() da classe da lista herdada de CList.
Além disso, todos os objetos que podem ser carregados na lista — isto é, seus respectivos classes, devem ser declarados ou criados antes da implementação da classe da lista. Nesse caso, a lista "saberá" de quais objetos "se trata" e quais precisam ser criados.
No diretório do terminal \MQL5\Scripts\ criaremos uma nova pasta TableModel, e nela, um novo arquivo de script de teste TableModelTest.mq5.
Conectaremos o arquivo da lista ligada e faremos a declaração prévia dos futuros classes do modelo de tabela:
//+------------------------------------------------------------------+
//|                                               TableModelTest.mq5 |
//|                                  Copyright 2025, MetaQuotes Ltd. |
//|                                             https://www.mql5.com |
//+------------------------------------------------------------------+
#property copyright "Copyright 2025, MetaQuotes Ltd."
#property link      "https://www.mql5.com"
#property version   "1.00"

//+------------------------------------------------------------------+
//| Include libraries                                                |
//+------------------------------------------------------------------+
#include <Arrays\List.mqh>

//--- Forward declaration of classes
class CTableCell;                   // Table cell class
class CTableRow;                    // Table row class
class CTableModel;                  // Table model class
A declaração antecipada dos futuros classes é necessária para que a classe da lista ligada, que será herdada de CList, conheça esses tipos de classes, assim como conheça os tipos de objetos que terá que criar. Para isso, escreveremos a enumeração dos tipos de objetos, os macros auxiliares e a enumeração das formas de ordenação das listas:
//+------------------------------------------------------------------+
//| Include libraries                                                |
//+------------------------------------------------------------------+
#include <Arrays\List.mqh>

//--- Forward declaration of classes
class CTableCell;                   // Table cell class
class CTableRow;                    // Table row class
class CTableModel;                  // Table model class

//+------------------------------------------------------------------+
//| Macros                                                           |
//+------------------------------------------------------------------+
#define  MARKER_START_DATA    -1    // Data start marker in a file
#define  MAX_STRING_LENGTH    128   // Maximum length of a string in a cell

//+------------------------------------------------------------------+
//| Enumerations                                                     |
//+------------------------------------------------------------------+
enum ENUM_OBJECT_TYPE               // Enumeration of object types
  {
   OBJECT_TYPE_TABLE_CELL=10000,    // Table cell
   OBJECT_TYPE_TABLE_ROW,           // Table row
   OBJECT_TYPE_TABLE_MODEL,         // Table model
  };

enum ENUM_CELL_COMPARE_MODE         // Table cell comparison modes
  {
   CELL_COMPARE_MODE_COL,           // Comparison by column number
   CELL_COMPARE_MODE_ROW,           // Comparison by string number
   CELL_COMPARE_MODE_ROW_COL,       // Comparison by row and column
  };

//+------------------------------------------------------------------+
//| Functions                                                        |
//+------------------------------------------------------------------+
//--- Return the object type as a string
string TypeDescription(const ENUM_OBJECT_TYPE type)
  {
   string array[];
   int total=StringSplit(EnumToString(type),StringGetCharacter("_",0),array);
   string result="";
   for(int i=2;i<total;i++)
     {
      array[i]+=" ";
      array[i].Lower();
      array[i].SetChar(0,ushort(array[i].GetChar(0)-0x20));
      result+=array[i];
     }
   result.TrimLeft();
   result.TrimRight();
   return result;
  }
//+------------------------------------------------------------------+
//| Classes                                                          |
//+------------------------------------------------------------------+
A função que retorna a descrição do tipo do objeto é construída com base no pressuposto de que todos os nomes das constantes de tipos de objetos começam com a substring "OBJECT_TYPE_". Então, é possível pegar a substring que segue essa parte, converter todos os caracteres da string obtida para minúsculas, transformar o primeiro caractere em maiúscula e, na string final, remover à esquerda e à direita todos os espaços e caracteres de controle.
Escreveremos nossa própria classe de lista ligada. Continuamos escrevendo o código no mesmo arquivo:
//+------------------------------------------------------------------+
//| Classes                                                          |
//+------------------------------------------------------------------+
//+------------------------------------------------------------------+
//| Linked object list class                                         |
//+------------------------------------------------------------------+
class CListObj : public CList
  {
protected:
   ENUM_OBJECT_TYPE  m_element_type;   // Created object type in CreateElement()
public:
//--- Virtual method (1) for loading a list from a file, (2) for creating a list element
   virtual bool      Load(const int file_handle);
   virtual CObject  *CreateElement(void);
  };
A classe CListObj é a nossa nova classe de lista ligada, herdada da classe CList da Biblioteca Padrão.
A única variável na classe será a variável na qual será registrado o tipo do objeto criado. Como o método CreateElement() é virtual e deve ter exatamente a mesma assinatura que o método da classe-pai, não podemos passar para ele o tipo do objeto criado. Mas podemos registrar esse tipo na variável declarada e, a partir dela, ler o tipo do objeto que deve ser criado.
Precisamos sobrescrever dois métodos virtuais da classe-pai: o método de carregamento a partir de arquivo e o método de criação de um novo objeto. Vamos examiná-los.
Método que carrega a lista a partir de arquivo:
//+------------------------------------------------------------------+
//| Load a list from the file                                        |
//+------------------------------------------------------------------+
bool CListObj::Load(const int file_handle)
  {
//--- Variables
   CObject *node;
   bool     result=true;
//--- Check the handle
   if(file_handle==INVALID_HANDLE)
      return(false);
//--- Load and check the list start marker - 0xFFFFFFFFFFFFFFFF
   if(::FileReadLong(file_handle)!=MARKER_START_DATA)
      return(false);
//--- Load and check the list type
   if(::FileReadInteger(file_handle,INT_VALUE)!=Type())
      return(false);
//--- Read the list size (number of objects)
   uint num=::FileReadInteger(file_handle,INT_VALUE);

//--- Sequentially recreate the list elements by calling the Load() method of node objects
   this.Clear();
   for(uint i=0; i<num; i++)
     {
      //--- Read and check the object data start marker - 0xFFFFFFFFFFFFFFFF
      if(::FileReadLong(file_handle)!=MARKER_START_DATA)
         return false;
      //--- Read the object type
      this.m_element_type=(ENUM_OBJECT_TYPE)::FileReadInteger(file_handle,INT_VALUE);
      node=this.CreateElement();
      if(node==NULL)
         return false;
      this.Add(node);
      //--- Now the file pointer is offset relative to the beginning of the object marker by 12 bytes (8 - marker, 4 - type)
      //--- Set the pointer to the beginning of the object data and load the object properties from the file using the Load() method of the node element.
      if(!::FileSeek(file_handle,-12,SEEK_CUR))
         return false;
      result &=node.Load(file_handle);
     }
//--- Result
   return result;
  }
Aqui, primeiro é verificado o início da lista, seu tipo e tamanho — isto é, a quantidade de elementos na lista; depois, em um loop pela quantidade de elementos, são lidos do arquivo os marcadores de início dos dados de cada objeto e seu tipo. O tipo obtido é registrado na variável m_element_type, e o método de criação de um novo elemento é chamado. Nesse método, é criado um novo elemento com o tipo obtido e ele é gravado na variável-ponteiro node, que, por sua vez, é adicionada à lista. Toda a lógica do método está descrita em detalhes nos comentários. Vamos analisar o método de criação de um novo elemento da lista.
Método que cria um elemento da lista:
//+------------------------------------------------------------------+
//| List element creation method                                     |
//+------------------------------------------------------------------+
CObject *CListObj::CreateElement(void)
  {
//--- Create a new object depending on the object type in m_element_type
   switch(this.m_element_type)
     {
      case OBJECT_TYPE_TABLE_CELL   :  return new CTableCell();
      case OBJECT_TYPE_TABLE_ROW    :  return new CTableRow();
      case OBJECT_TYPE_TABLE_MODEL  :  return new CTableModel();
      default                       :  return NULL;
     }
  }
Aqui, pressupõe-se que, antes da chamada do método, a variável m_element_type já contém o tipo do objeto sendo criado. Dependendo do tipo do elemento, é criado um novo objeto do tipo correspondente e retornado o ponteiro para ele. No futuro, ao desenvolver novos elementos de controle, seus tipos serão incluídos na enumeração ENUM_OBJECT_TYPE e, aqui, novos cases serão adicionados para criar novos tipos de objetos. A classe de lista ligada baseada no CList padrão está pronta. Agora ela pode armazenar todos os objetos de tipos conhecidos, salvar listas em arquivo, carregá-las de arquivo e restaurá-las corretamente.
2. A classe da célula da tabela
A célula da tabela é o elemento mais simples da tabela, armazenando algum valor. As células são reunidas em listas que representam as linhas da tabela. Uma lista corresponde a uma linha da tabela. Na nossa tabela, as células poderão armazenar simultaneamente apenas um valor de entre vários tipos — seja um valor real, inteiro ou de string.
Além do valor simples, a célula pode receber um objeto de um dos tipos conhecidos da enumeração ENUM_OBJECT_TYPE. Nesse caso, a célula pode armazenar um valor de qualquer um dos tipos listados, mais o ponteiro para um objeto cujo tipo é registrado em uma variável especial. Assim, no futuro, o componente View (a visualização) poderá ser instruído a exibir na célula esse objeto, para que seja possível interagir com ele por meio do componente Controller.
Como em uma única célula é possível armazenar vários tipos de valores diferentes, para registrá-los, armazená-los e retorná-los usaremos uma união (union), um tipo especial de dado que consiste em várias variáveis compartilhando a mesma área de memória. A união é semelhante a uma estrutura, mas aqui, diferentemente da estrutura, os diferentes membros da união se referem ao mesmo trecho de memória. Já na estrutura, para cada campo é reservado seu próprio espaço.
Continuamos escrevendo o código no arquivo já criado. Começamos a escrever a nova classe. Na seção protegida, escreveremos a união e declararemos as variáveis:
//+------------------------------------------------------------------+
//| Table cell class                                                 |
//+------------------------------------------------------------------+
class CTableCell : public CObject
  {
protected:
//--- Combining for storing cell values (double, long, string)
   union DataType
     {
      protected:
      double         double_value;
      long           long_value;
      ushort         ushort_value[MAX_STRING_LENGTH];

      public:
      //--- Set values
      void           SetValueD(const double value) { this.double_value=value;                   }
      void           SetValueL(const long value)   { this.long_value=value;                     }
      void           SetValueS(const string value) { ::StringToShortArray(value,ushort_value);  }

      //--- Return values
      double         ValueD(void) const { return this.double_value; }
      long           ValueL(void) const { return this.long_value; }
      string         ValueS(void) const
                       {
                        string res=::ShortArrayToString(this.ushort_value);
                        res.TrimLeft();
                        res.TrimRight();
                        return res;
                       }
     };
//--- Variables
   DataType          m_datatype_value;                      // Value
   ENUM_DATATYPE     m_datatype;                            // Data type
   CObject          *m_object;                              // Cell object
   ENUM_OBJECT_TYPE  m_object_type;                         // Object type in the cell
   int               m_row;                                 // Row index
   int               m_col;                                 // Column index
   int               m_digits;                              // Data representation accuracy
   uint              m_time_flags;                          // Date/time display flags
   bool              m_color_flag;                          // Color name display flag
   bool              m_editable;                            // Editable cell flag

public:
Na seção pública, escreveremos os métodos de acesso às variáveis protegidas, os métodos virtuais e os construtores da classe para os diferentes tipos de dados armazenados na célula:
public:
//--- Return cell coordinates and properties
   uint              Row(void)                           const { return this.m_row;                            }
   uint              Col(void)                           const { return this.m_col;                            }
   ENUM_DATATYPE     Datatype(void)                      const { return this.m_datatype;                       }
   int               Digits(void)                        const { return this.m_digits;                         }
   uint              DatetimeFlags(void)                 const { return this.m_time_flags;                     }
   bool              ColorNameFlag(void)                 const { return this.m_color_flag;                     }
   bool              IsEditable(void)                    const { return this.m_editable;                       }
//--- Return (1) double, (2) long and (3) string value
   double            ValueD(void)                        const { return this.m_datatype_value.ValueD();        }
   long              ValueL(void)                        const { return this.m_datatype_value.ValueL();        }
   string            ValueS(void)                        const { return this.m_datatype_value.ValueS();        }
//--- Return the value as a formatted string
   string            Value(void) const
                       {
                        switch(this.m_datatype)
                          {
                           case TYPE_DOUBLE  :  return(::DoubleToString(this.ValueD(),this.Digits()));
                           case TYPE_LONG    :  return(::IntegerToString(this.ValueL()));
                           case TYPE_DATETIME:  return(::TimeToString(this.ValueL(),this.m_time_flags));
                           case TYPE_COLOR   :  return(::ColorToString((color)this.ValueL(),this.m_color_flag));
                           default           :  return this.ValueS();
                          }
                       }
   string            DatatypeDescription(void) const
                       {
                        string type=::StringSubstr(::EnumToString(this.m_datatype),5);
                        type.Lower();
                        return type;
                       }
//--- Set variable values
   void              SetRow(const uint row)                    { this.m_row=(int)row;                          }
   void              SetCol(const uint col)                    { this.m_col=(int)col;                          }
   void              SetDatatype(const ENUM_DATATYPE datatype) { this.m_datatype=datatype;                     }
   void              SetDigits(const int digits)               { this.m_digits=digits;                         }
   void              SetDatetimeFlags(const uint flags)        { this.m_time_flags=flags;                      }
   void              SetColorNameFlag(const bool flag)         { this.m_color_flag=flag;                       }
   void              SetEditable(const bool flag)              { this.m_editable=flag;                         }
   void              SetPositionInTable(const uint row,const uint col)
                       {
                        this.SetRow(row);
                        this.SetCol(col);
                       }
//--- Assign an object to a cell
   void              AssignObject(CObject *object)
                       {
                        if(object==NULL)
                          {
                           ::PrintFormat("%s: Error. Empty object passed",__FUNCTION__);
                           return;
                          }
                        this.m_object=object;
                        this.m_object_type=(ENUM_OBJECT_TYPE)object.Type();
                       }
//--- Remove the object assignment
   void              UnassignObject(void)
                       {
                        this.m_object=NULL;
                        this.m_object_type=-1;
                       }

//--- Set double value
   void              SetValue(const double value)
                       {
                        this.m_datatype=TYPE_DOUBLE;
                        if(this.m_editable)
                           this.m_datatype_value.SetValueD(value);
                       }
//--- Set long value
   void              SetValue(const long value)
                       {
                        this.m_datatype=TYPE_LONG;
                        if(this.m_editable)
                           this.m_datatype_value.SetValueL(value);
                       }
//--- Set datetime value
   void              SetValue(const datetime value)
                       {
                        this.m_datatype=TYPE_DATETIME;
                        if(this.m_editable)
                           this.m_datatype_value.SetValueL(value);
                       }
//--- Set color value
   void              SetValue(const color value)
                       {
                        this.m_datatype=TYPE_COLOR;
                        if(this.m_editable)
                           this.m_datatype_value.SetValueL(value);
                       }
//--- Set string value
   void              SetValue(const string value)
                       {
                        this.m_datatype=TYPE_STRING;
                        if(this.m_editable)
                           this.m_datatype_value.SetValueS(value);
                       }
//--- Clear data
   void              ClearData(void)
                       {
                        if(this.Datatype()==TYPE_STRING)
                           this.SetValue("");
                        else
                           this.SetValue(0.0);
                       }
//--- (1) Return and (2) display the object description in the journal
   string            Description(void);
   void              Print(void);

//--- Virtual methods of (1) comparing, (2) saving to file, (3) loading from file, (4) object type
   virtual int       Compare(const CObject *node,const int mode=0) const;
   virtual bool      Save(const int file_handle);
   virtual bool      Load(const int file_handle);
   virtual int       Type(void)                          const { return(OBJECT_TYPE_TABLE_CELL);}


//--- Constructors/destructor
                     CTableCell(void) : m_row(0), m_col(0), m_datatype(-1), m_digits(0), m_time_flags(0), m_color_flag(false), m_editable(true), m_object(NULL), m_object_type(-1)
                       {
                        this.m_datatype_value.SetValueD(0);
                       }
                     //--- Accept a double value
                     CTableCell(const uint row,const uint col,const double value,const int digits) :
                        m_row((int)row), m_col((int)col), m_datatype(TYPE_DOUBLE), m_digits(digits), m_time_flags(0), m_color_flag(false), m_editable(true), m_object(NULL), m_object_type(-1)
                       {
                        this.m_datatype_value.SetValueD(value);
                       }
                     //--- Accept a long value
                     CTableCell(const uint row,const uint col,const long value) :
                        m_row((int)row), m_col((int)col), m_datatype(TYPE_LONG), m_digits(0), m_time_flags(0), m_color_flag(false), m_editable(true), m_object(NULL), m_object_type(-1)
                       {
                        this.m_datatype_value.SetValueL(value);
                       }
                     //--- Accept a datetime value
                     CTableCell(const uint row,const uint col,const datetime value,const uint time_flags) :
                        m_row((int)row), m_col((int)col), m_datatype(TYPE_DATETIME), m_digits(0), m_time_flags(time_flags), m_color_flag(false), m_editable(true), m_object(NULL), m_object_type(-1)
                       {
                        this.m_datatype_value.SetValueL(value);
                       }
                     //--- Accept color value
                     CTableCell(const uint row,const uint col,const color value,const bool color_names_flag) :
                        m_row((int)row), m_col((int)col), m_datatype(TYPE_COLOR), m_digits(0), m_time_flags(0), m_color_flag(color_names_flag), m_editable(true), m_object(NULL), m_object_type(-1)
                       {
                        this.m_datatype_value.SetValueL(value);
                       }
                     //--- Accept string value
                     CTableCell(const uint row,const uint col,const string value) :
                        m_row((int)row), m_col((int)col), m_datatype(TYPE_STRING), m_digits(0), m_time_flags(0), m_color_flag(false), m_editable(true), m_object(NULL), m_object_type(-1)
                       {
                        this.m_datatype_value.SetValueS(value);
                       }
                    ~CTableCell(void) {}
  };
Nos métodos para definir valores, foi feito de modo que primeiro seja definido o tipo do valor armazenado na célula, e depois, verificando o sinalizador que indica se a célula pode ser editada, o novo valor é salvo na célula somente se o sinalizador estiver ativado:
//--- Set double value
   void              SetValue(const double value)
                       {
                        this.m_datatype=TYPE_DOUBLE;
                        if(this.m_editable)
                           this.m_datatype_value.SetValueD(value);
                       }
Por que isso foi feito exatamente assim? Ao criar uma nova célula, ela é inicializada com o tipo de valor real. Se for necessário alterar o tipo de valor, mas a célula não for editável, é possível chamar o método de definição do valor apropriado com qualquer valor. O tipo do valor armazenado será alterado, mas o valor em si contido na célula não será afetado.
O método de limpeza dos dados define os valores numéricos como zero, e nas strings insere um espaço:
//--- Clear data
   void              ClearData(void)
                       {
                        if(this.Datatype()==TYPE_STRING)
                           this.SetValue("");
                        else
                           this.SetValue(0.0);
                       }
Mais adiante, faremos isso de outra forma, pois uma célula limpa não deve exibir nenhum dado; a célula deve ficar vazia. Faremos então um "valor vazio" para a célula, e, ao limpá-la, todos os valores registrados e exibidos nela serão apagados. Afinal, zero também é um valor válido, e no momento, ao limpar a célula, os dados numéricos são preenchidos com zeros. Isso não é correto.
Nos construtores paramétricos da classe, são passadas as coordenadas da célula na tabela, isto é, o número da linha e da coluna, e o valor do tipo requerido (double, long, datetime, color, string). Para alguns tipos de valores são necessárias informações adicionais:
- double — precisão do valor exibido (quantidade de casas decimais),
- datetime — sinalizadores de exibição de tempo (data/horas-minutos/segundos),
- color — sinalizador de exibição dos nomes das cores padrão conhecidas.
Nos construtores com esses tipos de valores armazenados nas células, são transmitidos parâmetros adicionais para definir o formato dos valores exibidos nas células:
 //--- Accept a double value
 CTableCell(const uint row,const uint col,const double value,const int digits) :
    m_row((int)row), m_col((int)col), m_datatype(TYPE_DOUBLE), m_digits(digits), m_time_flags(0), m_color_flag(false), m_editable(true), m_object(NULL), m_object_type(-1)
   {
    this.m_datatype_value.SetValueD(value);
   }
 //--- Accept a long value
 CTableCell(const uint row,const uint col,const long value) :
    m_row((int)row), m_col((int)col), m_datatype(TYPE_LONG), m_digits(0), m_time_flags(0), m_color_flag(false), m_editable(true), m_object(NULL), m_object_type(-1)
   {
    this.m_datatype_value.SetValueL(value);
   }
 //--- Accept a datetime value
 CTableCell(const uint row,const uint col,const datetime value,const uint time_flags) :
    m_row((int)row), m_col((int)col), m_datatype(TYPE_DATETIME), m_digits(0), m_time_flags(time_flags), m_color_flag(false), m_editable(true), m_object(NULL), m_object_type(-1)
   {
    this.m_datatype_value.SetValueL(value);
   }

 //--- Accept color value
 CTableCell(const uint row,const uint col,const color value,const bool color_names_flag) :
    m_row((int)row), m_col((int)col), m_datatype(TYPE_COLOR), m_digits(0), m_time_flags(0), m_color_flag(color_names_flag), m_editable(true), m_object(NULL), m_object_type(-1)
   {
    this.m_datatype_value.SetValueL(value);
   }
 //--- Accept string value
 CTableCell(const uint row,const uint col,const string value) :
    m_row((int)row), m_col((int)col), m_datatype(TYPE_STRING), m_digits(0), m_time_flags(0), m_color_flag(false), m_editable(true), m_object(NULL), m_object_type(-1)
   {
    this.m_datatype_value.SetValueS(value);
   }
O método de comparação de dois objetos:
//+------------------------------------------------------------------+
//| Compare two objects                                              |
//+------------------------------------------------------------------+
int CTableCell::Compare(const CObject *node,const int mode=0) const
  {
   const CTableCell *obj=node;
   switch(mode)
     {
      case CELL_COMPARE_MODE_COL :  return(this.Col()>obj.Col() ? 1 : this.Col()<obj.Col() ? -1 : 0);
      case CELL_COMPARE_MODE_ROW :  return(this.Row()>obj.Row() ? 1 : this.Row()<obj.Row() ? -1 : 0);
      //---CELL_COMPARE_MODE_ROW_COL
      default                    :  return
                                      (
                                       this.Row()>obj.Row() ? 1 : this.Row()<obj.Row() ? -1 :
                                       this.Col()>obj.Col() ? 1 : this.Col()<obj.Col() ? -1 : 0
                                      );
     }
  }
O método permite comparar os parâmetros de dois objetos por um dos três critérios de comparação, isto é, pelo número da coluna, pelo número da linha ou simultaneamente pelos números de linha e coluna.
Esse método é necessário para possibilitar a ordenação das linhas da tabela pelos valores das colunas. Essa tarefa será realizada pelo componente Controller nos artigos seguintes.
O método para salvar as propriedades da célula em arquivo:
//+------------------------------------------------------------------+
//| Save to file                                                     |
//+------------------------------------------------------------------+
bool CTableCell::Save(const int file_handle)
  {
//--- Check the handle
   if(file_handle==INVALID_HANDLE)
      return(false);
//--- Save data start marker - 0xFFFFFFFFFFFFFFFF
   if(::FileWriteLong(file_handle,MARKER_START_DATA)!=sizeof(long))
      return(false);
//--- Save the object type
   if(::FileWriteInteger(file_handle,this.Type(),INT_VALUE)!=INT_VALUE)
      return(false);

   //--- Save the data type
   if(::FileWriteInteger(file_handle,this.m_datatype,INT_VALUE)!=INT_VALUE)
      return(false);
   //--- Save the object type in the cell
   if(::FileWriteInteger(file_handle,this.m_object_type,INT_VALUE)!=INT_VALUE)
      return(false);
   //--- Save the row index
   if(::FileWriteInteger(file_handle,this.m_row,INT_VALUE)!=INT_VALUE)
      return(false);
   //--- Save the column index
   if(::FileWriteInteger(file_handle,this.m_col,INT_VALUE)!=INT_VALUE)
      return(false);
   //--- Maintain the accuracy of data representation
   if(::FileWriteInteger(file_handle,this.m_digits,INT_VALUE)!=INT_VALUE)
      return(false);
   //--- Save date/time display flags
   if(::FileWriteInteger(file_handle,this.m_time_flags,INT_VALUE)!=INT_VALUE)
      return(false);
   //--- Save the color name display flag
   if(::FileWriteInteger(file_handle,this.m_color_flag,INT_VALUE)!=INT_VALUE)
      return(false);
   //--- Save the edited cell flag
   if(::FileWriteInteger(file_handle,this.m_editable,INT_VALUE)!=INT_VALUE)
      return(false);
   //--- Save the value
   if(::FileWriteStruct(file_handle,this.m_datatype_value)!=sizeof(this.m_datatype_value))
      return(false);

//--- All is successful
   return true;
  }
Depois de escrever no arquivo o marcador inicial dos dados e o tipo do objeto, todas as propriedades da célula são salvas sucessivamente. A união deve ser salva como estrutura usando a função FileWriteStruct().
O método para carregar as propriedades da célula a partir de arquivo:
//+------------------------------------------------------------------+
//| Load from file                                                   |
//+------------------------------------------------------------------+
bool CTableCell::Load(const int file_handle)
  {
//--- Check the handle
   if(file_handle==INVALID_HANDLE)
      return(false);
//--- Load and check the data start marker - 0xFFFFFFFFFFFFFFFF
   if(::FileReadLong(file_handle)!=MARKER_START_DATA)
      return(false);
//--- Load the object type
   if(::FileReadInteger(file_handle,INT_VALUE)!=this.Type())
      return(false);

   //--- Load the data type
   this.m_datatype=(ENUM_DATATYPE)::FileReadInteger(file_handle,INT_VALUE);
   //--- Load the object type in the cell
   this.m_object_type=(ENUM_OBJECT_TYPE)::FileReadInteger(file_handle,INT_VALUE);
   //--- Load the row index
   this.m_row=::FileReadInteger(file_handle,INT_VALUE);
   //--- Load the column index
   this.m_col=::FileReadInteger(file_handle,INT_VALUE);
   //--- Load the precision of the data representation
   this.m_digits=::FileReadInteger(file_handle,INT_VALUE);
   //--- Load date/time display flags
   this.m_time_flags=::FileReadInteger(file_handle,INT_VALUE);
   //--- Load the color name display flag
   this.m_color_flag=::FileReadInteger(file_handle,INT_VALUE);
   //--- Load the edited cell flag
   this.m_editable=::FileReadInteger(file_handle,INT_VALUE);
   //--- Load the value
   if(::FileReadStruct(file_handle,this.m_datatype_value)!=sizeof(this.m_datatype_value))
      return(false);

//--- All is successful
   return true;
  }
Após a leitura e a verificação do marcador de início dos dados e do tipo do objeto, todas as propriedades do objeto são carregadas sucessivamente na mesma ordem em que foram salvas. A união é lida por meio de FileReadStruct().
O método que retorna a descrição do objeto:
//+------------------------------------------------------------------+
//| Return the object description                                    |
//+------------------------------------------------------------------+
string CTableCell::Description(void)
  {
   return(::StringFormat("%s: Row %u, Col %u, %s <%s>Value: %s",
                         TypeDescription((ENUM_OBJECT_TYPE)this.Type()),this.Row(),this.Col(),
                         (this.m_editable ? "Editable" : "Uneditable"),this.DatatypeDescription(),this.Value()));
  }
Aqui é criada uma string com alguns dos parâmetros da célula e ela é retornada, por exemplo, para double, no seguinte formato:
Table Cell: Row 2, Col 2, Uneditable <double>Value: 0.00
O método que imprime no diário a descrição do objeto:
//+------------------------------------------------------------------+
//| Display the object description in the journal                    |
//+------------------------------------------------------------------+
void CTableCell::Print(void)
  {
   ::Print(this.Description());
  }
Aqui simplesmente é impressa no diário a descrição do objeto.
//+------------------------------------------------------------------+
//| Table row class                                                  |
//+------------------------------------------------------------------+
class CTableRow : public CObject
  {
protected:
   CTableCell        m_cell_tmp;                            // Cell object to search in the list
   CListObj          m_list_cells;                          // List of cells
   uint              m_index;                               // Row index

//--- Add the specified cell to the end of the list
   bool              AddNewCell(CTableCell *cell);

public:
//--- (1) Set and (2) return the row index
   void              SetIndex(const uint index)                { this.m_index=index;  }
   uint              Index(void)                         const { return this.m_index; }
//--- Set the row and column positions to all cells
   void              CellsPositionUpdate(void);

//--- Create a new cell and add it to the end of the list
   CTableCell       *CreateNewCell(const double value);
   CTableCell       *CreateNewCell(const long value);
   CTableCell       *CreateNewCell(const datetime value);
   CTableCell       *CreateNewCell(const color value);
   CTableCell       *CreateNewCell(const string value);

//--- Return (1) the cell by index and (2) the number of cells
   CTableCell       *GetCell(const uint index)                 { return this.m_list_cells.GetNodeAtIndex(index);  }
   uint              CellsTotal(void)                    const { return this.m_list_cells.Total();                }

//--- Set the value to the specified cell
   void              CellSetValue(const uint index,const double value);
   void              CellSetValue(const uint index,const long value);
   void              CellSetValue(const uint index,const datetime value);
   void              CellSetValue(const uint index,const color value);
   void              CellSetValue(const uint index,const string value);
//--- (1) assign to a cell and (2) remove an assigned object from the cell
   void              CellAssignObject(const uint index,CObject *object);
   void              CellUnassignObject(const uint index);

//--- (1) Delete and (2) move the cell
   bool              CellDelete(const uint index);
   bool              CellMoveTo(const uint cell_index, const uint index_to);

//--- Reset the data of the row cells
   void              ClearData(void);

//--- (1) Return and (2) display the object description in the journal
   string            Description(void);
   void              Print(const bool detail, const bool as_table=false, const int cell_width=10);

//--- Virtual methods of (1) comparing, (2) saving to file, (3) loading from file, (4) object type
   virtual int       Compare(const CObject *node,const int mode=0) const;
   virtual bool      Save(const int file_handle);
   virtual bool      Load(const int file_handle);
   virtual int       Type(void)                          const { return(OBJECT_TYPE_TABLE_ROW); }

//--- Constructors/destructor
                     CTableRow(void) : m_index(0) {}
                     CTableRow(const uint index) : m_index(index) {}
                    ~CTableRow(void){}
  };
3. A classe da linha da tabela
A linha da tabela é, essencialmente, uma lista comum de células. A classe da linha deve ser capaz de adicionar novas células, remover e mover para outra posição as células já existentes na lista. A classe deve possuir um conjunto mínima e suficientemente completo de métodos para gerenciar as células da lista.
Continuamos escrevendo o código no mesmo arquivo. Nos parâmetros da classe há apenas uma variável, que é o índice da linha na tabela. Todo o restante são métodos para trabalhar com as propriedades da linha e com a lista de suas células.
Vamos analisar os métodos da classe.
O método para comparar duas linhas da tabela:
//+------------------------------------------------------------------+
//| Compare two objects                                              |
//+------------------------------------------------------------------+
int CTableRow::Compare(const CObject *node,const int mode=0) const
  {
   const CTableRow *obj=node;
   return(this.Index()>obj.Index() ? 1 : this.Index()<obj.Index() ? -1 : 0);
  }
Como as linhas só podem ser comparadas por seu único parâmetro, isto é, o índice da linha, essa comparação é exatamente o que é implementado aqui. O método será necessário para ordenar as linhas da tabela.
Métodos sobrecarregados para criar células com diferentes tipos de dados armazenados:
//+------------------------------------------------------------------+
//| Create a new double cell and add it to the end of the list       |
//+------------------------------------------------------------------+
CTableCell *CTableRow::CreateNewCell(const double value)
  {
//--- Create a new cell object storing a value of double type
   CTableCell *cell=new CTableCell(this.m_index,this.CellsTotal(),value,2);
   if(cell==NULL)
     {
      ::PrintFormat("%s: Error. Failed to create new cell in row %u at position %u",__FUNCTION__, this.m_index, this.CellsTotal());
      return NULL;
     }
//--- Add the created cell to the end of the list
   if(!this.AddNewCell(cell))
     {
      delete cell;
      return NULL;
     }
//--- Return the pointer to the object
   return cell;
  }
//+------------------------------------------------------------------+
//| Create a new long cell and add it to the end of the list         |
//+------------------------------------------------------------------+
CTableCell *CTableRow::CreateNewCell(const long value)
  {
//--- Create a new cell object storing a long value
   CTableCell *cell=new CTableCell(this.m_index,this.CellsTotal(),value);
   if(cell==NULL)
     {
      ::PrintFormat("%s: Error. Failed to create new cell in row %u at position %u",__FUNCTION__, this.m_index, this.CellsTotal());
      return NULL;
     }
//--- Add the created cell to the end of the list
   if(!this.AddNewCell(cell))
     {
      delete cell;
      return NULL;
     }
//--- Return the pointer to the object
   return cell;
  }
//+------------------------------------------------------------------+
//| Create a new datetime cell and add it to the end of the list     |
//+------------------------------------------------------------------+
CTableCell *CTableRow::CreateNewCell(const datetime value)
  {
//--- Create a new cell object storing a value of datetime type
   CTableCell *cell=new CTableCell(this.m_index,this.CellsTotal(),value,TIME_DATE|TIME_MINUTES|TIME_SECONDS);
   if(cell==NULL)
     {
      ::PrintFormat("%s: Error. Failed to create new cell in row %u at position %u",__FUNCTION__, this.m_index, this.CellsTotal());
      return NULL;
     }
//--- Add the created cell to the end of the list
   if(!this.AddNewCell(cell))
     {
      delete cell;
      return NULL;
     }
//--- Return the pointer to the object
   return cell;
  }
//+------------------------------------------------------------------+
//| Create a new color cell and add it to the end of the list        |
//+------------------------------------------------------------------+
CTableCell *CTableRow::CreateNewCell(const color value)
  {
//--- Create a new cell object storing a value of color type
   CTableCell *cell=new CTableCell(this.m_index,this.CellsTotal(),value,true);
   if(cell==NULL)
     {
      ::PrintFormat("%s: Error. Failed to create new cell in row %u at position %u",__FUNCTION__, this.m_index, this.CellsTotal());
      return NULL;
     }
//--- Add the created cell to the end of the list
   if(!this.AddNewCell(cell))
     {
      delete cell;
      return NULL;
     }
//--- Return the pointer to the object
   return cell;
  }
//+------------------------------------------------------------------+
//| Create a new string cell and add it to the end of the list       |
//+------------------------------------------------------------------+
CTableCell *CTableRow::CreateNewCell(const string value)
  {
//--- Create a new cell object storing a value of string type
   CTableCell *cell=new CTableCell(this.m_index,this.CellsTotal(),value);
   if(cell==NULL)
     {
      ::PrintFormat("%s: Error. Failed to create new cell in row %u at position %u",__FUNCTION__, this.m_index, this.CellsTotal());
      return NULL;
     }
//--- Add the created cell to the end of the list
   if(!this.AddNewCell(cell))
     {
      delete cell;
      return NULL;
     }
//--- Return the pointer to the object
   return cell;
  }
Cinco métodos para criar uma nova célula (double, long, datetime, color, string) e adicioná-la ao final da lista. Os parâmetros adicionais de formato de exibição dos dados da célula são definidos com valores padrão. Eles poderão ser alterados depois da criação da célula. Primeiro é criado o novo objeto da célula, depois ele é adicionado ao final da lista. Se o objeto não for criado, ele é excluído para evitar vazamentos de memória.
O método que adiciona uma célula ao final da lista:
//+------------------------------------------------------------------+
//| Add a cell to the end of the list                                |
//+------------------------------------------------------------------+
bool CTableRow::AddNewCell(CTableCell *cell)
  {
//--- If an empty object is passed, report it and return 'false'
   if(cell==NULL)
     {
      ::PrintFormat("%s: Error. Empty CTableCell object passed",__FUNCTION__);
      return false;
     }
//--- Set the cell index in the list and add the created cell to the end of the list
   cell.SetPositionInTable(this.m_index,this.CellsTotal());
   if(this.m_list_cells.Add(cell)==WRONG_VALUE)
     {
      ::PrintFormat("%s: Error. Failed to add cell (%u,%u) to list",__FUNCTION__,this.m_index,this.CellsTotal());
      return false;
     }
//--- Successful
   return true;
  }
Qualquer célula recém-criada sempre é adicionada ao final da lista. Depois, ela poderá ser movida para a posição necessária por meio dos métodos da classe do modelo de tabela, que será criada mais adiante.
Métodos sobrecarregados para definir o valor em uma célula indicada:
//+------------------------------------------------------------------+
//| Set the double value to the specified cell                       |
//+------------------------------------------------------------------+
void CTableRow::CellSetValue(const uint index,const double value)
  {
//--- Get the required cell from the list and set a new value into it
   CTableCell *cell=this.GetCell(index);
   if(cell!=NULL)
      cell.SetValue(value);
  }
//+------------------------------------------------------------------+
//| Set a long value to the specified cell                           |
//+------------------------------------------------------------------+
void CTableRow::CellSetValue(const uint index,const long value)
  {
//--- Get the required cell from the list and set a new value into it
   CTableCell *cell=this.GetCell(index);
   if(cell!=NULL)
      cell.SetValue(value);
  }
//+------------------------------------------------------------------+
//| Set the datetime value to the specified cell                     |
//+------------------------------------------------------------------+
void CTableRow::CellSetValue(const uint index,const datetime value)
  {
//--- Get the required cell from the list and set a new value into it
   CTableCell *cell=this.GetCell(index);
   if(cell!=NULL)
      cell.SetValue(value);
  }
//+------------------------------------------------------------------+
//| Set the color value to the specified cell                        |
//+------------------------------------------------------------------+
void CTableRow::CellSetValue(const uint index,const color value)
  {
//--- Get the required cell from the list and set a new value into it
   CTableCell *cell=this.GetCell(index);
   if(cell!=NULL)
      cell.SetValue(value);
  }
//+------------------------------------------------------------------+
//| Set a string value to the specified cell                         |
//+------------------------------------------------------------------+
void CTableRow::CellSetValue(const uint index,const string value)
  {
//--- Get the required cell from the list and set a new value into it
   CTableCell *cell=this.GetCell(index);
   if(cell!=NULL)
      cell.SetValue(value);
  }
Obtemos pelo índice a célula desejada da lista e definimos para ela o valor. Se a célula não for editável, o método SetValue() do objeto da célula definirá apenas o tipo do valor a ser configurado. O próprio valor não será definido.
Método que atribui um objeto à célula:
//+------------------------------------------------------------------+
//| Assign an object to the cell                                     |
//+------------------------------------------------------------------+
void CTableRow::CellAssignObject(const uint index,CObject *object)
  {
//--- Get the required cell from the list and set a pointer to the object into it
   CTableCell *cell=this.GetCell(index);
   if(cell!=NULL)
      cell.AssignObject(object);
  }
Obtemos pelo índice o objeto célula e, por meio do seu método AssignObject(), atribuímos à célula o ponteiro para o objeto.
Método que cancela o objeto atribuído à célula:
//+------------------------------------------------------------------+
//| Cancel the assigned object for the cell                          |
//+------------------------------------------------------------------+
void CTableRow::CellUnassignObject(const uint index)
  {
//--- Get the required cell from the list and cancel the pointer to the object and its type in it
   CTableCell *cell=this.GetCell(index);
   if(cell!=NULL)
      cell.UnassignObject();
  }
Obtemos pelo índice o objeto célula e, por meio do seu método UnassignObject(), removemos da célula o ponteiro anteriormente atribuído.
Método que exclui uma célula:
//+------------------------------------------------------------------+
//| Delete a cell                                                    |
//+------------------------------------------------------------------+
bool CTableRow::CellDelete(const uint index)
  {
//--- Delete a cell in the list by index
   if(!this.m_list_cells.Delete(index))
      return false;
//--- Update the indices for the remaining cells in the list
   this.CellsPositionUpdate();
   return true;
  }
Com o método Delete() da classe CList, removemos da lista a célula. Depois que a célula foi removida da lista, os índices das demais células são alterados. Com o método CellsPositionUpdate(), atualizamos os índices de todas as células restantes na lista.
Método que move a célula para a posição indicada:
//+------------------------------------------------------------------+
//| Moves the cell to the specified position                         |
//+------------------------------------------------------------------+
bool CTableRow::CellMoveTo(const uint cell_index,const uint index_to)
  {
//--- Select the desired cell by index in the list, turning it into the current one
   CTableCell *cell=this.GetCell(cell_index);
//--- Move the current cell to the specified position in the list
   if(cell==NULL || !this.m_list_cells.MoveToIndex(index_to))
      return false;
//--- Update the indices of all cells in the list
   this.CellsPositionUpdate();
   return true;
  }
Para que a classe CList possa operar com um objeto, esse objeto deve ser o atual na lista. Ele se torna atual, por exemplo, quando é selecionado. Portanto, aqui primeiro obtemos a célula pelo índice. A célula se torna atual e, em seguida, usando o método MoveToIndex() da classe CList, movemos o objeto para a posição requerida na lista. Após mover o objeto com sucesso para a nova posição, é necessário corrigir os índices dos demais objetos, o que é feito por meio do método CellsPositionUpdate().
Método que define as posições de linha e coluna para todas as células da lista:
//+------------------------------------------------------------------+
//| Set the row and column positions to all cells                    |
//+------------------------------------------------------------------+
void CTableRow::CellsPositionUpdate(void)
  {
//--- In the loop through all cells in the list
   for(int i=0;i<this.m_list_cells.Total();i++)
     {
      //--- get the next cell and set the row and column indices in it
      CTableCell *cell=this.GetCell(i);
      if(cell!=NULL)
         cell.SetPositionInTable(this.Index(),this.m_list_cells.IndexOf(cell));
     }
  }
A classe CList permite determinar o índice do objeto atual na lista. Para isso, o objeto deve estar selecionado. Aqui, percorremos em um loop todos os objetos célula da lista, selecionamos cada um e descobrimos seu índice com o método IndexOf() da classe CList. O índice da linha e o índice encontrado da célula são definidos no objeto célula usando o seu método SetPositionInTable().
Método que zera os dados das células da linha:
//+------------------------------------------------------------------+
//| Reset the cell data of a row                                     |
//+------------------------------------------------------------------+
void CTableRow::ClearData(void)
  {
//--- In the loop through all cells in the list
   for(uint i=0;i<this.CellsTotal();i++)
     {
      //--- get the next cell and set an empty value to it
      CTableCell *cell=this.GetCell(i);
      if(cell!=NULL)
         cell.ClearData();
     }
  }
Zeramos cada célula da lista em um loop por meio do método ClearData() do objeto célula. Para dados string, uma string vazia é escrita na célula, e para dados numéricos, o valor zero.
O método que retorna a descrição do objeto:
//+------------------------------------------------------------------+
//| Return the object description                                    |
//+------------------------------------------------------------------+
string CTableRow::Description(void)
  {
   return(::StringFormat("%s: Position %u, Cells total: %u",
                         TypeDescription((ENUM_OBJECT_TYPE)this.Type()),this.Index(),this.CellsTotal()));
  }
A partir das propriedades e dos dados do objeto, é montada uma string que é retornada, por exemplo, neste formato:
Table Row: Position 1, Cells total: 4:
O método que imprime no diário a descrição do objeto:
//+------------------------------------------------------------------+
//| Display the object description in the journal                    |
//+------------------------------------------------------------------+
void CTableRow::Print(const bool detail, const bool as_table=false, const int cell_width=10)
  {

//--- Number of cells
   int total=(int)this.CellsTotal();

//--- If the output is in tabular form
   string res="";
   if(as_table)
     {
      //--- create a table row from the values of all cells
      string head=" Row "+(string)this.Index();
      string res=::StringFormat("|%-*s |",cell_width,head);
      for(int i=0;i<total;i++)
        {
         CTableCell *cell=this.GetCell(i);
         if(cell==NULL)
            continue;
         res+=::StringFormat("%*s |",cell_width,cell.Value());
        }
      //--- Display a row in the journal
      ::Print(res);
      return;
     }

//--- Display the header as a row description
   ::Print(this.Description()+(detail ? ":" : ""));

//--- If detailed description
   if(detail)
     {

      //--- The output is not in tabular form
      //--- In the loop through the list of cells in the row
      for(int i=0; i<total; i++)
        {
         //--- get the current cell and add its description to the final row
         CTableCell *cell=this.GetCell(i);
         if(cell!=NULL)
            res+="  "+cell.Description()+(i<total-1 ? "\n" : "");
        }
      //--- Send the row created in the loop to the journal
      ::Print(res);
     }
  }
Para a saída não tabular de dados no diário, primeiro é impresso no diário o cabeçalho na forma de descrição da linha. Em seguida, se o sinalizador de saída detalhada estiver definido, em um laço sobre a lista de células são impressas no diário as descrições de cada célula.
Como resultado, a saída detalhada de uma linha de tabela no diário fica, por exemplo, assim (para o modo não tabular):
Table Row: Position 0, Cells total: 4:
  Table Cell: Row 0, Col 0, Editable <long>Value: 10
  Table Cell: Row 0, Col 1, Editable <long>Value: 21
  Table Cell: Row 0, Col 2, Editable <long>Value: 32
  Table Cell: Row 0, Col 3, Editable <long>Value: 43
Para a saída em formato tabular, o resultado será, por exemplo, o seguinte:
| Row 0 | 0 | 1 | 2 | 3 |
O método que salva a linha da tabela em arquivo:
//+------------------------------------------------------------------+
//| Save to file                                                     |
//+------------------------------------------------------------------+
bool CTableRow::Save(const int file_handle)
  {
//--- Check the handle
   if(file_handle==INVALID_HANDLE)
      return(false);
//--- Save data start marker - 0xFFFFFFFFFFFFFFFF
   if(::FileWriteLong(file_handle,MARKER_START_DATA)!=sizeof(long))
      return(false);
//--- Save the object type
   if(::FileWriteInteger(file_handle,this.Type(),INT_VALUE)!=INT_VALUE)
      return(false);

//--- Save the index
   if(::FileWriteInteger(file_handle,this.m_index,INT_VALUE)!=INT_VALUE)
      return(false);
//--- Save the list of cells
   if(!this.m_list_cells.Save(file_handle))
      return(false);

//--- Successful
   return true;
  }
Gravamos o marcador de início dos dados e, em seguida, o tipo do objeto. Esse é o cabeçalho padrão de cada objeto no arquivo. Depois disso, segue a gravação em arquivo das propriedades do objeto. Aqui são gravados em arquivo o índice da linha e, em seguida, a lista de células.
O método que carrega uma linha a partir de arquivo:
//+------------------------------------------------------------------+
//| Load from file                                                   |
//+------------------------------------------------------------------+
bool CTableRow::Load(const int file_handle)
  {
//--- Check the handle
   if(file_handle==INVALID_HANDLE)
      return(false);
//--- Load and check the data start marker - 0xFFFFFFFFFFFFFFFF
   if(::FileReadLong(file_handle)!=MARKER_START_DATA)
      return(false);
//--- Load the object type
   if(::FileReadInteger(file_handle,INT_VALUE)!=this.Type())
      return(false);

//--- Load the index
   this.m_index=::FileReadInteger(file_handle,INT_VALUE);
//--- Load the list of cells
   if(!this.m_list_cells.Load(file_handle))
      return(false);

//--- Successful
   return true;
  }
Aqui, tudo segue a mesma ordem usada na gravação. Primeiro é carregado e verificado o marcador de início dos dados e o tipo do objeto, depois é carregado o índice da linha e toda a lista de células por completo.
4. A classe do modelo de tabela
A modelo de tabela, em sua forma simples, representa uma lista ligada de linhas que, por sua vez, contêm listas ligadas de células. A nosso modelo, que criaremos hoje, receberá na entrada um array bidimensional de um dos cinco tipos (double, long, datetime, color, string) e criará a partir dele uma tabela virtual. Mais adiante ampliaremos essa classe para aceitar outros argumentos, a fim de criar tabelas a partir de outros dados de entrada. Esse próprio modelo será considerado o modelo padrão.
Continuamos escrevendo o código no mesmo arquivo \MQL5\Scripts\TableModel\TableModelTest.mq5.
A classe do modelo de tabela é, essencialmente, uma lista comum de linhas com métodos de gerenciamento de linhas, colunas e células. Escrevemos o corpo da classe com todas as variáveis e métodos e, em seguida, analisamos os métodos declarados da classe:
//+------------------------------------------------------------------+
//| Table model class                                                |
//+------------------------------------------------------------------+
class CTableModel : public CObject
  {
protected:
   CTableRow         m_row_tmp;                             // Row object to search in the list
   CListObj          m_list_rows;                           // List of table rows
//--- Create a table model from a two-dimensional array
template<typename T>
   void              CreateTableModel(T &array[][]);
//--- Return the correct data type
   ENUM_DATATYPE     GetCorrectDatatype(string type_name)
                       {
                        return
                          (
                           //--- Integer value
                           type_name=="bool" || type_name=="char"    || type_name=="uchar"   ||
                           type_name=="short"|| type_name=="ushort"  || type_name=="int"     ||
                           type_name=="uint" || type_name=="long"    || type_name=="ulong"   ?  TYPE_LONG      :
                           //--- Real value
                           type_name=="float"|| type_name=="double"                          ?  TYPE_DOUBLE    :
                           //--- Date/time value
                           type_name=="datetime"                                             ?  TYPE_DATETIME  :
                           //--- Color value
                           type_name=="color"                                                ?  TYPE_COLOR     :
                           /*--- String value */                                          TYPE_STRING    );
                       }

//--- Create and add a new empty string to the end of the list
   CTableRow        *CreateNewEmptyRow(void);
//--- Add a string to the end of the list
   bool              AddNewRow(CTableRow *row);
//--- Set the row and column positions to all table cells
   void              CellsPositionUpdate(void);

public:
//--- Return (1) cell, (2) row by index, number (3) of rows, cells (4) in the specified row and (5) in the table
   CTableCell       *GetCell(const uint row, const uint col);
   CTableRow        *GetRow(const uint index)                  { return this.m_list_rows.GetNodeAtIndex(index);   }
   uint              RowsTotal(void)                     const { return this.m_list_rows.Total();  }
   uint              CellsInRow(const uint index);
   uint              CellsTotal(void);

//--- Set (1) value, (2) precision, (3) time display flags and (4) color name display flag to the specified cell
template<typename T>
   void              CellSetValue(const uint row, const uint col, const T value);
   void              CellSetDigits(const uint row, const uint col, const int digits);
   void              CellSetTimeFlags(const uint row, const uint col, const uint flags);
   void              CellSetColorNamesFlag(const uint row, const uint col, const bool flag);
//--- (1) Assign and (2) cancel the object in the cell
   void              CellAssignObject(const uint row, const uint col,CObject *object);
   void              CellUnassignObject(const uint row, const uint col);
//--- (1) Delete and (2) move the cell
   bool              CellDelete(const uint row, const uint col);
   bool              CellMoveTo(const uint row, const uint cell_index, const uint index_to);

//--- (1) Return and (2) display the cell description and (3) the object assigned to the cell
   string            CellDescription(const uint row, const uint col);
   void              CellPrint(const uint row, const uint col);
   CObject          *CellGetObject(const uint row, const uint col);

public:
//--- Create a new string and (1) add it to the end of the list, (2) insert to the specified list position
   CTableRow        *RowAddNew(void);
   CTableRow        *RowInsertNewTo(const uint index_to);
//--- (1) Remove or (2) relocate the row, (3) clear the row data
   bool              RowDelete(const uint index);
   bool              RowMoveTo(const uint row_index, const uint index_to);
   void              RowResetData(const uint index);
//--- (1) Return and (2) display the row description in the journal
   string            RowDescription(const uint index);
   void              RowPrint(const uint index,const bool detail);

//--- (1) Remove or (2) relocate the column, (3) clear the column data
   bool              ColumnDelete(const uint index);
   bool              ColumnMoveTo(const uint row_index, const uint index_to);
   void              ColumnResetData(const uint index);

//--- (1) Return and (2) display the table description in the journal
   string            Description(void);
   void              Print(const bool detail);
   void              PrintTable(const int cell_width=10);

//--- (1) Clear the data, (2) destroy the model
   void              ClearData(void);
   void              Destroy(void);

//--- Virtual methods of (1) comparing, (2) saving to file, (3) loading from file, (4) object type
   virtual int       Compare(const CObject *node,const int mode=0) const;
   virtual bool      Save(const int file_handle);
   virtual bool      Load(const int file_handle);
   virtual int       Type(void)                          const { return(OBJECT_TYPE_TABLE_MODEL);  }

//--- Constructors/destructor
                     CTableModel(void){}
                     CTableModel(double &array[][])   { this.CreateTableModel(array); }
                     CTableModel(long &array[][])     { this.CreateTableModel(array); }
                     CTableModel(datetime &array[][]) { this.CreateTableModel(array); }
                     CTableModel(color &array[][])    { this.CreateTableModel(array); }
                     CTableModel(string &array[][])   { this.CreateTableModel(array); }
                    ~CTableModel(void){}
  };
Em essência, aqui há apenas um objeto de lista ligada de linhas da tabela e métodos para gerenciar linhas, células e colunas, além de construtores que aceitam diferentes tipos de arrays bidimensionais.
No construtor da classe é passado um array e é chamado o método para criar o modelo de tabela:
//+------------------------------------------------------------------+
//| Create the table model from a two-dimensional array              |
//+------------------------------------------------------------------+
template<typename T>
void CTableModel::CreateTableModel(T &array[][])
  {
//--- Get the number of table rows and columns from the array properties
   int rows_total=::ArrayRange(array,0);
   int cols_total=::ArrayRange(array,1);
//--- In a loop by row indices
   for(int r=0; r<rows_total; r++)
     {
      //--- create a new empty row and add it to the end of the list of rows
      CTableRow *row=this.CreateNewEmptyRow();
      //--- If a row is created and added to the list,
      if(row!=NULL)
        {
         //--- In the loop by the number of cells in a row,
         //--- create all the cells, adding each new one to the end of the list of cells in the row
         for(int c=0; c<cols_total; c++)
            row.CreateNewCell(array[r][c]);
        }
     }
  }
A lógica do método está totalmente descrita nos comentários. A primeira dimensão do array corresponde às linhas da tabela, a segunda dimensão corresponde às células de cada linha. Ao criar as células, é usado o tipo de dado do array que foi passado ao método.
Dessa forma, podemos criar vários modelos de tabela cujas células, inicialmente, armazenam tipos diferentes de dados (double, long, datetime, color e string). Posteriormente, após a criação do modelo de tabela, os tipos de dados armazenados nas células podem ser alterados.
O método que cria uma nova linha vazia e a adiciona ao final da lista:
//+------------------------------------------------------------------+
//| Create a new empty string and add it to the end of the list      |
//+------------------------------------------------------------------+
CTableRow *CTableModel::CreateNewEmptyRow(void)
  {
//--- Create a new row object
   CTableRow *row=new CTableRow(this.m_list_rows.Total());
   if(row==NULL)
     {
      ::PrintFormat("%s: Error. Failed to create new row at position %u",__FUNCTION__, this.m_list_rows.Total());
      return NULL;
     }
//--- If failed to add the row to the list, remove the newly created object and return NULL
   if(!this.AddNewRow(row))
     {
      delete row;
      return NULL;
     }

//--- Success - return the pointer to the created object
   return row;
  }
O método cria um novo objeto da classe CTableRow e o adiciona ao final da lista de linhas por meio do método AddNewRow(). Em caso de erro ao adicionar, o novo objeto criado é removido e é retornado NULL. Em caso de execução bem-sucedida, o método retorna o ponteiro para a linha recém-adicionada à lista.
O método que adiciona um objeto linha ao final da lista:
//+------------------------------------------------------------------+
//| Add a row to the end of the list                                 |
//+------------------------------------------------------------------+
bool CTableModel::AddNewRow(CTableRow *row)
  {
//--- If an empty object is passed, report this and return 'false'
   if(row==NULL)
     {
      ::PrintFormat("%s: Error. Empty CTableRow object passed",__FUNCTION__);
      return false;
     }
//--- Set the row index in the list and add it to the end of the list
   row.SetIndex(this.RowsTotal());
   if(this.m_list_rows.Add(row)==WRONG_VALUE)
     {
      ::PrintFormat("%s: Error. Failed to add row (%u) to list",__FUNCTION__,row.Index());
      return false;
     }

//--- Successful
   return true;
  }
Ambos os métodos analisados acima estão na seção protegida da classe, trabalham em conjunto e servem para uso interno ao adicionar novas linhas à tabela.
O método para criar uma nova linha e adicioná-la ao final da lista:
//+------------------------------------------------------------------+
//| Create a new string and add it to the end of the list            |
//+------------------------------------------------------------------+
CTableRow *CTableModel::RowAddNew(void)
  {
//--- Create a new empty row and add it to the end of the list of rows
   CTableRow *row=this.CreateNewEmptyRow();
   if(row==NULL)
      return NULL;

//--- Create cells equal to the number of cells in the first row
   for(uint i=0;i<this.CellsInRow(0);i++)
      row.CreateNewCell(0.0);
   row.ClearData();

//--- Success - return the pointer to the created object
   return row;
  }
Este é um método público. Ele é usado para adicionar à tabela uma nova linha com células. A quantidade de células da linha criada é obtida a partir da primeira linha da tabela.
O método para criar e adicionar uma nova linha em uma posição específica da lista:
//+------------------------------------------------------------------+
//| Create and add a new string to the specified position in the list|
//+------------------------------------------------------------------+
CTableRow *CTableModel::RowInsertNewTo(const uint index_to)
  {
//--- Create a new empty row and add it to the end of the list of rows
   CTableRow *row=this.CreateNewEmptyRow();
   if(row==NULL)
      return NULL;

//--- Create cells equal to the number of cells in the first row
   for(uint i=0;i<this.CellsInRow(0);i++)
      row.CreateNewCell(0.0);
   row.ClearData();

//--- Shift the row to index_to
   this.RowMoveTo(this.m_list_rows.IndexOf(row),index_to);

//--- Success - return the pointer to the created object
   return row;
  }
Às vezes é necessário inserir uma nova linha não ao final da lista de linhas, mas entre as já existentes. Esse método primeiro cria uma nova linha no final da lista, preenche essa linha com células, limpa as células e depois move a linha para a posição desejada.
O método que define o valor em uma célula indicada:
//+------------------------------------------------------------------+
//| Set the value to the specified cell                              |
//+------------------------------------------------------------------+
template<typename T>
void CTableModel::CellSetValue(const uint row,const uint col,const T value)
  {
//--- Get a cell by row and column indices
   CTableCell *cell=this.GetCell(row,col);
   if(cell==NULL)
      return;
//--- Get the correct type of the data being set (double, long, datetime, color, string)
   ENUM_DATATYPE type=this.GetCorrectDatatype(typename(T));
//--- Depending on the data type, we call the corresponding
//--- cell method for setting the value, explicitly specifying the required type
   switch(type)
     {
      case TYPE_DOUBLE  :  cell.SetValue((double)value);    break;
      case TYPE_LONG    :  cell.SetValue((long)value);      break;
      case TYPE_DATETIME:  cell.SetValue((datetime)value);  break;
      case TYPE_COLOR   :  cell.SetValue((color)value);     break;
      case TYPE_STRING  :  cell.SetValue((string)value);    break;
      default           :  break;
     }
  }
Primeiro obtemos o ponteiro para a célula desejada pelas coordenadas da sua linha e coluna e, em seguida, definimos nela o valor. Qualquer que seja o valor passado ao método para ser definido na célula, o método selecionará apenas o tipo correto para a definição — double, long, datetime, color ou string.
O método que define a precisãoda exibição dos dados na célula indicada:
//+------------------------------------------------------------------+
//| Set the precision of data display in the specified cell          |
//+------------------------------------------------------------------+
void CTableModel::CellSetDigits(const uint row,const uint col,const int digits)
  {
//--- Get a cell by row and column indices and
//--- call its corresponding method to set the value
   CTableCell *cell=this.GetCell(row,col);
   if(cell!=NULL)
      cell.SetDigits(digits);
  }
O método é relevante apenas para células que armazenam valores do tipo real. Ele serve para indicar a quantidade de casas decimais exibidas no valor mostrado pela célula.
O método que define os sinalizadores de exibição de tempo na célula indicada:
//+------------------------------------------------------------------+
//| Set the time display flags to the specified cell                 |
//+------------------------------------------------------------------+
void CTableModel::CellSetTimeFlags(const uint row,const uint col,const uint flags)
  {
//--- Get a cell by row and column indices and
//--- call its corresponding method to set the value
   CTableCell *cell=this.GetCell(row,col);
   if(cell!=NULL)
      cell.SetDatetimeFlags(flags);
  }
Relevante para células que exibem valores do tipo datetime. Define o formato de exibição da hora pela célula (um dos TIME_DATE|TIME_MINUTES|TIME_SECONDS, ou uma combinação deles).
TIME_DATE obtém o resultado no formato " yyyy.mm.dd ",
TIME_MINUTES obtém o resultado no formato " hh:mi ",
TIME_SECONDS obtém o resultado no formato " hh:mi:ss ".
O método que define o sinalizadorde exibição dos nomes das cores na célula indicada:
//+------------------------------------------------------------------+
//| Set the flag for displaying color names in the specified cell    |
//+------------------------------------------------------------------+
void CTableModel::CellSetColorNamesFlag(const uint row,const uint col,const bool flag)
  {
//--- Get a cell by row and column indices and
//--- call its corresponding method to set the value
   CTableCell *cell=this.GetCell(row,col);
   if(cell!=NULL)
      cell.SetColorNameFlag(flag);
  }
Relevante apenas para células que exibem valores do tipo color. Indica a necessidade de exibir os nomes das cores, caso a cor armazenada na célula esteja presente na tabela de cores.
O método que atribui um objeto à célula:
//+------------------------------------------------------------------+
//| Assign an object to a cell                                       |
//+------------------------------------------------------------------+
void CTableModel::CellAssignObject(const uint row,const uint col,CObject *object)
  {
//--- Get a cell by row and column indices and
//--- call its corresponding method to set the value
   CTableCell *cell=this.GetCell(row,col);
   if(cell!=NULL)
      cell.AssignObject(object);
  }
O método que cancela a atribuição do objeto na célula:
//+------------------------------------------------------------------+
//| Unassign an object from a cell                                   |
//+------------------------------------------------------------------+
void CTableModel::CellUnassignObject(const uint row,const uint col)
  {
//--- Get a cell by row and column indices and
//--- call its corresponding method to set the value
   CTableCell *cell=this.GetCell(row,col);
   if(cell!=NULL)
      cell.UnassignObject();
  }
Os dois métodos apresentados acima permitem atribuir algum objeto à célula ou remover essa atribuição. O objeto deve ser descendente da classe CObject. No contexto dos artigos sobre tabelas, o objeto pode ser, por exemplo, algum dos objetos conhecidos da enumeração ENUM_OBJECT_TYPE. No momento, na lista existem apenas os objetos da célula, da linha e do modelo de tabela. Atribuí-los a uma célula não faz sentido. Mas a enumeração será ampliada ao longo da escrita dos artigos sobre o componente View, onde serão criados elementos de controle. Estes sim serão apropriados para serem atribuídos a uma célula, como, por exemplo, um elemento de controle "lista suspensa".
O método que exclui a célula indicada:
//+------------------------------------------------------------------+
//| Delete a cell                                                    |
//+------------------------------------------------------------------+
bool CTableModel::CellDelete(const uint row,const uint col)
  {
//--- Get the row by index and return the result of deleting the cell from the list
   CTableRow *row_obj=this.GetRow(row);
   return(row_obj!=NULL ? row_obj.CellDelete(col) : false);
  }
O método obtém o objeto da linha pelo seu índice e chama o método dessa linha que exclui a célula indicada. Para uma única célula em uma única linha, esse método ainda não faz sentido, pois reduziria a quantidade de células apenas nessa linha da tabela. Isso causaria uma dessincronização das células com as linhas vizinhas. Ainda não existe tratamento para uma remoção desse tipo, na qual seria necessário "expandir" a célula vizinha à célula removida até o tamanho de duas células, para não violar a estrutura da tabela. Mas esse método é usado como parte do método de remoção de uma coluna inteira da tabela, onde as células são removidas simultaneamente em todas as linhas, sem violar a integridade de toda a tabela.
O método para mover uma célula da tabela:
//+------------------------------------------------------------------+
//| Move the cell                                                    |
//+------------------------------------------------------------------+
bool CTableModel::CellMoveTo(const uint row,const uint cell_index,const uint index_to)
  {
//--- Get the row by index and return the result of moving the cell to a new position
   CTableRow *row_obj=this.GetRow(row);
   return(row_obj!=NULL ? row_obj.CellMoveTo(cell_index,index_to) : false);
  }
Obtemos o objeto da linha pelo seu índice e chamamos seu método de remoção da célula indicada.
O método que retorna a quantidade de células na linha especificada:
//+------------------------------------------------------------------+
//| Return the number of cells in the specified row                  |
//+------------------------------------------------------------------+
uint CTableModel::CellsInRow(const uint index)
  {
   CTableRow *row=this.GetRow(index);
   return(row!=NULL ? row.CellsTotal() : 0);
  }
Obtemos a linha pelo índice e retornamos a quantidade de células nela, chamando o método CellsTotal() da linha.
O método que retorna a quantidadede células na tabela:
//+------------------------------------------------------------------+
//| Return the number of cells in the table                          |
//+------------------------------------------------------------------+
uint CTableModel::CellsTotal(void)
  {
//--- count cells in a loop by rows (slow with a large number of rows)
   uint res=0, total=this.RowsTotal();
   for(int i=0; i<(int)total; i++)
     {
      CTableRow *row=this.GetRow(i);
      res+=(row!=NULL ? row.CellsTotal() : 0);
     }
   return res;
  }
O método percorre todas as linhas da tabela e soma a quantidade de células de cada linha no resultado final, que é retornado. Em uma tabela com grande quantidade de linhas, essa contagem pode ser lenta. Depois que forem criados todos os métodos que influenciam a quantidade de células da tabela, faremos esse cálculo apenas no momento em que sua quantidade for alterada.
O método que retorna a célula indicadada tabela:
//+------------------------------------------------------------------+
//| Return the specified table cell                                  |
//+------------------------------------------------------------------+
CTableCell *CTableModel::GetCell(const uint row,const uint col)
  {
//--- get the row by index row and return the row cell by 'row' index by 'col' index
   CTableRow *row_obj=this.GetRow(row);
   return(row_obj!=NULL ? row_obj.GetCell(col) : NULL);
  }
Obtemos a linha pelo índice row e retornamos o ponteiro para o objeto da célula pelo índice col usando o método GetCell() da linha.
O método que retorna a descriçãode uma célula:
//+------------------------------------------------------------------+
//| Return the cell description                                      |
//+------------------------------------------------------------------+
string CTableModel::CellDescription(const uint row,const uint col)
  {
   CTableCell *cell=this.GetCell(row,col);
   return(cell!=NULL ? cell.Description() : "");
  }
Obtemos a linha pelo índice, obtemos a célula a partir da linha e retornamos a sua descrição.
O método que imprime no diário a descrição de uma célula:
//+------------------------------------------------------------------+
//| Display a cell description in the journal                        |
//+------------------------------------------------------------------+
void CTableModel::CellPrint(const uint row,const uint col)
  {
//--- Get a cell by row and column index and return its description
   CTableCell *cell=this.GetCell(row,col);
   if(cell!=NULL)
      cell.Print();
  }
Obtemos o ponteiro para a célula pelos índices da linha e da coluna e, usando o método Print() do objeto célula, imprimimos no diário a sua descrição.
O método que exclui a linha indicada:
//+------------------------------------------------------------------+
//| Delete a row                                                     |
//+------------------------------------------------------------------+
bool CTableModel::RowDelete(const uint index)
  {
//--- Remove a string from the list by index
   if(!this.m_list_rows.Delete(index))
      return false;
//--- After deleting a row, be sure to update all indices of all table cells
   this.CellsPositionUpdate();
   return true;
  }
Com o método Delete() da classe CList, excluímos pelo índice o objeto linha da lista. Após excluir a linha, os índices das linhas restantes e das células em cada uma delas deixam de ser corretos, e é necessário corrigi-los por meio do método CellsPositionUpdate().
O método que move uma linha para a posição indicada:
//+------------------------------------------------------------------+
//| Move a string to a specified position                            |
//+------------------------------------------------------------------+
bool CTableModel::RowMoveTo(const uint row_index,const uint index_to)
  {
//--- Get the row by index, turning it into the current one
   CTableRow *row=this.GetRow(row_index);
//--- Move the current string to the specified position in the list
   if(row==NULL || !this.m_list_rows.MoveToIndex(index_to))
      return false;
//--- After moving a row, it is necessary to update all indices of all table cells
   this.CellsPositionUpdate();
   return true;
  }
Na classe CList, muitos métodos trabalham com o objeto atual da lista. Obtemos o ponteiro para a linha desejada, tornando-a a linha atual, e a movemos para a posição necessária usando o método MoveToIndex() da classe CList. Depois de mover a linha para a nova posição, é necessário atualizar os índices das demais linhas, o que fazemos com o método CellsPositionUpdate().
O método que define as posições de linha e coluna para todas as células:
//+------------------------------------------------------------------+
//| Set the row and column positions to all cells                    |
//+------------------------------------------------------------------+
void CTableModel::CellsPositionUpdate(void)
  {
//--- In the loop by the list of rows
   for(int i=0;i<this.m_list_rows.Total();i++)
     {
      //--- get the next row
      CTableRow *row=this.GetRow(i);
      if(row==NULL)
         continue;
      //--- set the index, found by the IndexOf() method of the list, to the row
      row.SetIndex(this.m_list_rows.IndexOf(row));
      //--- Update the row cell position indices
      row.CellsPositionUpdate();
     }
  }
Percorremos a lista de todas as linhas da tabela, selecionamos cada linha seguinte e definimos para ela o índice correto, obtido pelo método IndexOf() da classe CList. Em seguida, chamamos o método CellsPositionUpdate() da linha, que define o índice correto para cada célula da linha.
O método que limpa os dados de todas as células da linha:
//+------------------------------------------------------------------+
//| Clear the row (only the data in the cells)                       |
//+------------------------------------------------------------------+
void CTableModel::RowResetData(const uint index)
  {
//--- Get a row from the list and clear the data of the row cells using the ClearData() method
   CTableRow *row=this.GetRow(index);
   if(row!=NULL)
      row.ClearData();
  }
Cada célula da linha é redefinida para um valor "vazio". Por enquanto, para simplificar, o valor vazio das células numéricas é zero, mas isso será modificado posteriormente, pois zero também é um valor que precisa ser exibido na célula. Já a redefinição do valor pressupõe a exibição de um campo vazio.
O método que limpa os dadosde todas as células da tabela:
//+------------------------------------------------------------------+
//| Clear the table (data of all cells)                              |
//+------------------------------------------------------------------+
void CTableModel::ClearData(void)
  {
//--- Clear the data of each row in the loop through all the table rows
   for(uint i=0;i<this.RowsTotal();i++)
      this.RowResetData(i);
  }
Percorremos todas as linhas da tabela e, para cada uma delas, chamamos o método RowResetData(), analisado anteriormente.
O método que retorna a descrição da linha:
//+------------------------------------------------------------------+
//| Return the row description                                       |
//+------------------------------------------------------------------+
string CTableModel::RowDescription(const uint index)
  {
//--- Get a row by index and return its description
   CTableRow *row=this.GetRow(index);
   return(row!=NULL ? row.Description() : "");
  }
Obtemos o ponteiro para a linha pelo índice e retornamos a sua descrição.
O método que imprime no diário a descrição da linha:
//+------------------------------------------------------------------+
//| Display the row description in the journal                       |
//+------------------------------------------------------------------+
void CTableModel::RowPrint(const uint index,const bool detail)
  {
   CTableRow *row=this.GetRow(index);
   if(row!=NULL)
      row.Print(detail);
  }
Obtemos o ponteiro para a linha e chamamos o método Print() do objeto obtido.
O método que exclui uma coluna da tabela:
//+------------------------------------------------------------------+
//| Remove the column                                                |
//+------------------------------------------------------------------+
bool CTableModel::ColumnDelete(const uint index)
  {
   bool res=true;
   for(uint i=0;i<this.RowsTotal();i++)
     {
      CTableRow *row=this.GetRow(i);
      if(row!=NULL)
         res &=row.CellDelete(index);
     }
   return res;
  }
Em um loop sobre todas as linhas da tabela, obtemos cada linha e excluímos nela a célula desejada pelo índice da coluna. Assim, são excluídas todas as células da tabela que possuem o mesmo índice de coluna.
O método que move uma coluna da tabela:
//+------------------------------------------------------------------+
//| Move the column                                                  |
//+------------------------------------------------------------------+
bool CTableModel::ColumnMoveTo(const uint col_index,const uint index_to)
  {
   bool res=true;
   for(uint i=0;i<this.RowsTotal();i++)
     {
      CTableRow *row=this.GetRow(i);
      if(row!=NULL)
         res &=row.CellMoveTo(col_index,index_to);
     }
   return res;
  }
Em um loop sobre todas as linhas da tabela, obtemos cada linha e movemos a célula desejada para a nova posição. Assim, são movidas todas as células da tabela que possuem o mesmo índice de coluna.
O método que limpa os dados das células de uma coluna:
//+------------------------------------------------------------------+
//| Clear the column data                                            |
//+------------------------------------------------------------------+
void CTableModel::ColumnResetData(const uint index)
  {
//--- In a loop through all table rows
   for(uint i=0;i<this.RowsTotal();i++)
     {
      //--- get the cell with the column index from each row and clear it
      CTableCell *cell=this.GetCell(i, index);
      if(cell!=NULL)
         cell.ClearData();
     }
  }
Em um loop sobre todas as linhas da tabela, obtemos cada linha e limpamos os dados da célula desejada. Assim, são limpas todas as células da tabela que possuem o mesmo índice de coluna.
O método que retorna a descrição do objeto:
//+------------------------------------------------------------------+
//| Return the object description                                    |
//+------------------------------------------------------------------+
string CTableModel::Description(void)
  {
   return(::StringFormat("%s: Rows %u, Cells in row %u, Cells Total %u",
                         TypeDescription((ENUM_OBJECT_TYPE)this.Type()),this.RowsTotal(),this.CellsInRow(0),this.CellsTotal()));
  }
É criada e retornada uma string a partir de alguns parâmetros do modelo de tabela nesse formato:
Table Model: Rows 4, Cells in row 4, Cells Total 16:
O método que imprime no diário a descrição do objeto:
//+------------------------------------------------------------------+
//| Display the object description in the journal                    |
//+------------------------------------------------------------------+
void CTableModel::Print(const bool detail)
  {
//--- Display the header in the journal
   ::Print(this.Description()+(detail ? ":" : ""));
//--- If detailed description,
   if(detail)
     {
      //--- In a loop through all table rows
      for(uint i=0; i<this.RowsTotal(); i++)
        {
         //--- get the next row and display its detailed description to the journal
         CTableRow *row=this.GetRow(i);
         if(row!=NULL)
            row.Print(true,false);
        }
     }
  }
Primeiro é impresso o cabeçalho na forma da descrição do modelo e, depois, se o sinalizador de saída detalhada estiver definido, são impressas em loop as descrições detalhadas de todas as linhas do modelo de tabela.
O método que imprime no diárioa descrição do objeto em formato tabular:
//+------------------------------------------------------------------+
//| Display the object description as a table in the journal         |
//+------------------------------------------------------------------+
void CTableModel::PrintTable(const int cell_width=10)
  {
//--- Get the pointer to the first row (index 0)
   CTableRow *row=this.GetRow(0);
   if(row==NULL)
      return;
   //--- Create a table header row based on the number of cells in the first row of the table
   uint total=row.CellsTotal();
   string head=" n/n";
   string res=::StringFormat("|%*s |",cell_width,head);
   for(uint i=0;i<total;i++)
     {
      if(this.GetCell(0, i)==NULL)
         continue;
      string cell_idx=" Column "+(string)i;
      res+=::StringFormat("%*s |",cell_width,cell_idx);
     }
   //--- Display the header row in the journal
   ::Print(res);

   //--- Iterate through all table rows and display them in tabular form
   for(uint i=0;i<this.RowsTotal();i++)
     {
      CTableRow *row=this.GetRow(i);
      if(row!=NULL)
         row.Print(true,true,cell_width);
     }
  }
Primeiro, pelo número de células da primeira linha da tabela, criamos e imprimimos no diário o cabeçalho da tabela com os nomes das colunas. Depois, percorremos em um loop todas as linhas da tabela e imprimimos cada uma delas em formato tabular.
O método que destrói o modelo de tabela:
//+------------------------------------------------------------------+
//| Destroy the model                                                |
//+------------------------------------------------------------------+
void CTableModel::Destroy(void)
  {
//--- Clear cell list
   m_list_rows.Clear();
  }
A lista de linhas da tabela é simplesmente limpo com destruição de todos os objetos usando o método Clear() da classe CList.
O método para salvar o modelo de tabela em arquivo:
//+------------------------------------------------------------------+
//| Save to file                                                     |
//+------------------------------------------------------------------+
bool CTableModel::Save(const int file_handle)
  {
//--- Check the handle
   if(file_handle==INVALID_HANDLE)
      return(false);
//--- Save data start marker - 0xFFFFFFFFFFFFFFFF
   if(::FileWriteLong(file_handle,MARKER_START_DATA)!=sizeof(long))
      return(false);
//--- Save the object type
   if(::FileWriteInteger(file_handle,this.Type(),INT_VALUE)!=INT_VALUE)
      return(false);

   //--- Save the list of rows
   if(!this.m_list_rows.Save(file_handle))
      return(false);

//--- Successful
   return true;
  }
Depois de salvar o marcador de início dos dados e o tipo da lista, salvamos no arquivo a lista de linhas por meio do método Save() da classe CList.
O método para carregar o modelo de tabela a partir de um arquivo:
//+------------------------------------------------------------------+
//| Load from file                                                   |
//+------------------------------------------------------------------+
bool CTableModel::Load(const int file_handle)
  {
//--- Check the handle
   if(file_handle==INVALID_HANDLE)
      return(false);
//--- Load and check the data start marker - 0xFFFFFFFFFFFFFFFF
   if(::FileReadLong(file_handle)!=MARKER_START_DATA)
      return(false);
//--- Load the object type
   if(::FileReadInteger(file_handle,INT_VALUE)!=this.Type())
      return(false);

   //--- Load the list of rows
   if(!this.m_list_rows.Load(file_handle))
      return(false);

//--- Successful
   return true;
  }
Depois de carregar e verificar o marcador de início dos dados e o tipo da lista, carregamos a lista de linhas do arquivo usando o método Load() da classe CListObj, analisado no início do artigo.
as classes para criar o modelo de tabela estão prontos. Agora escreveremos um script para testar o funcionamento do modelo.
Vamos testar o resultado
Continuamos escrevendo o código no mesmo arquivo. Escreveremos um script no qual criaremos um array bidimensional com dimensão 4x4 (4 linhas com 4 células em cada) com tipo, por exemplo, long. Em seguida, abrimos um arquivo para gravar nele os dados do modelo de tabela e para carregar dados da tabela a partir do arquivo. Criamos o modelo de tabela e verificamos o funcionamento de alguns de seus métodos.
Cada vez que a tabela for alterada, imprimiremos no diário o resultado obtido usando a função TableModelPrint(), onde é feita a escolha de como imprimir o modelo de tabela. Com o valor do macro PRINT_AS_TABLE igual a true, a impressão no diário é realizada pelo método PrintTable() da classe CTableModel; com o valor false , pelo método Print() da mesma classe.
No script, criaremos o modelo de tabela, a imprimiremos em formato tabular e salvaremos o modelo em arquivo. Depois adicionaremos linhas, removeremos colunas, mudaremos a permissão de edição...
Depois, novamente carregaremos do arquivo a versão original inicial da tabela e imprimiremos o resultado.
#define  PRINT_AS_TABLE    true  // Display the model as a table
//+------------------------------------------------------------------+
//| Script program start function                                    |
//+------------------------------------------------------------------+
void OnStart()
  {
//--- Declare and fill the 4x4 array
//--- Acceptable array types: double, long, datetime, color, string
   long array[4][4]={{ 1,  2,  3,  4},
                     { 5,  6,  7,  8},
                     { 9, 10, 11, 12},
                     {13, 14, 15, 16}};

//--- Create a table model from the 4x4 long array created above
   CTableModel *tm=new CTableModel(array);

//--- Leave if the model is not created
   if(tm==NULL)
      return;

//--- Print the model in tabular form
   Print("The table model has been successfully created:");
   tm.PrintTable();

//--- Delete the table model object
   delete tm;
  }
Como resultado, obteremos no diário algo assim:
The table model has been successfully created:
|       n/n |  Column 0 |  Column 1 |  Column 2 |  Column 3 |
| Row 0     |         1 |         2 |         3 |         4 |
| Row 1     |         5 |         6 |         7 |         8 |
| Row 2     |         9 |        10 |        11 |        12 |
| Row 3     |        13 |        14 |        15 |        16 |
Para verificar o funcionamento com o modelo de tabela, adição, remoção e movimentação de linhas e colunas, e o trabalho com arquivo, completaremos o script:
#define  PRINT_AS_TABLE    true  // Display the model as a table
//+------------------------------------------------------------------+
//| Script program start function                                    |
//+------------------------------------------------------------------+
void OnStart()
  {
//--- Declare and fill the 4x4 array
//--- Acceptable array types: double, long, datetime, color, string
   long array[4][4]={{ 1,  2,  3,  4},
                     { 5,  6,  7,  8},
                     { 9, 10, 11, 12},
                     {13, 14, 15, 16}};

//--- Create a table model from the 4x4 long array created above
   CTableModel *tm=new CTableModel(array);

//--- Leave if the model is not created
   if(tm==NULL)
      return;

//--- Print the model in tabular form
   Print("The table model has been successfully created:");
   tm.PrintTable();


//--- Check handling files and the functionality of the table model
//--- Open a file to write table model data into it
   int handle=FileOpen(MQLInfoString(MQL_PROGRAM_NAME)+".bin",FILE_READ|FILE_WRITE|FILE_BIN|FILE_COMMON);
   if(handle==INVALID_HANDLE)
      return;

   //--- Save the original created table to the file
   if(tm.Save(handle))
      Print("\nThe table model has been successfully saved to file.");

//--- Now insert a new row into the table at position 2
//--- Get the last cell of the created row and make it non-editable
//--- Print the modified table model in the journal
   if(tm.RowInsertNewTo(2))
     {
      Print("\nInsert a new row at position 2 and set cell 3 to non-editable");
      CTableCell *cell=tm.GetCell(2,3);
      if(cell!=NULL)
         cell.SetEditable(false);
      TableModelPrint(tm);
     }

//--- Now delete the table column with index 1 and
//--- print the resulting table model in the journal
   if(tm.ColumnDelete(1))
     {
      Print("\nRemove column from position 1");
      TableModelPrint(tm);
     }

//--- When saving table data, the file pointer was shifted to the last set data
//--- Place the pointer at the beginning of the file, load the previously saved original table and print it
   if(FileSeek(handle,0,SEEK_SET) && tm.Load(handle))
     {
      Print("\nLoad the original table view from the file:");
      TableModelPrint(tm);
     }

//--- Close the open file and delete the table model object
   FileClose(handle);
   delete tm;
  }
//+------------------------------------------------------------------+
//| Display the table model                                          |
//+------------------------------------------------------------------+
void TableModelPrint(CTableModel *tm)
  {
   if(PRINT_AS_TABLE)
      tm.PrintTable();  // Print the model as a table
   else
      tm.Print(true);   // Print detailed table data
  }
Obtemos então no diário o seguinte resultado:
The table model has been successfully created:
|       n/n |  Column 0 |  Column 1 |  Column 2 |  Column 3 |
| Row 0     |         1 |         2 |         3 |         4 |
| Row 1     |         5 |         6 |         7 |         8 |
| Row 2     |         9 |        10 |        11 |        12 |
| Row 3     |        13 |        14 |        15 |        16 |

The table model has been successfully saved to file.

Insert a new row at position 2 and set cell 3 to non-editable
|       n/n |  Column 0 |  Column 1 |  Column 2 |  Column 3 |
| Row 0     |         1 |         2 |         3 |         4 |
| Row 1     |         5 |         6 |         7 |         8 |
| Row 2     |      0.00 |      0.00 |      0.00 |      0.00 |
| Row 3     |         9 |        10 |        11 |        12 |
| Row 4     |        13 |        14 |        15 |        16 |

Remove column from position 1
|       n/n |  Column 0 |  Column 1 |  Column 2 |
| Row 0     |         1 |         3 |         4 |
| Row 1     |         5 |         7 |         8 |
| Row 2     |      0.00 |      0.00 |      0.00 |
| Row 3     |         9 |        11 |        12 |
| Row 4     |        13 |        15 |        16 |

Load the original table view from the file:
|       n/n |  Column 0 |  Column 1 |  Column 2 |  Column 3 |
| Row 0     |         1 |         2 |         3 |         4 |
| Row 1     |         5 |         6 |         7 |         8 |
| Row 2     |         9 |        10 |        11 |        12 |
| Row 3     |        13 |        14 |        15 |        16 |
Se for necessário imprimir no diário os dados do modelo de tabela não em formato tabular, basta definir o valor false no macro PRINT_AS_TABLE:
#define PRINT_AS_TABLE false // Display the model as a table
Nesse caso, obtemos no diário a seguinte saída:
The table model has been successfully created:
|       n/n |  Column 0 |  Column 1 |  Column 2 |  Column 3 |
| Row 0     |         1 |         2 |         3 |         4 |
| Row 1     |         5 |         6 |         7 |         8 |
| Row 2     |         9 |        10 |        11 |        12 |
| Row 3     |        13 |        14 |        15 |        16 |

The table model has been successfully saved to file.

Insert a new row at position 2 and set cell 3 to non-editable
Table Model: Rows 5, Cells in row 4, Cells Total 20:
Table Row: Position 0, Cells total: 4:
  Table Cell: Row 0, Col 0, Editable <long>Value: 1
  Table Cell: Row 0, Col 1, Editable <long>Value: 2
  Table Cell: Row 0, Col 2, Editable <long>Value: 3
  Table Cell: Row 0, Col 3, Editable <long>Value: 4
Table Row: Position 1, Cells total: 4:
  Table Cell: Row 1, Col 0, Editable <long>Value: 5
  Table Cell: Row 1, Col 1, Editable <long>Value: 6
  Table Cell: Row 1, Col 2, Editable <long>Value: 7
  Table Cell: Row 1, Col 3, Editable <long>Value: 8
Table Row: Position 2, Cells total: 4:
  Table Cell: Row 2, Col 0, Editable <double>Value: 0.00
  Table Cell: Row 2, Col 1, Editable <double>Value: 0.00
  Table Cell: Row 2, Col 2, Editable <double>Value: 0.00
  Table Cell: Row 2, Col 3, Uneditable <double>Value: 0.00
Table Row: Position 3, Cells total: 4:
  Table Cell: Row 3, Col 0, Editable <long>Value: 9
  Table Cell: Row 3, Col 1, Editable <long>Value: 10
  Table Cell: Row 3, Col 2, Editable <long>Value: 11
  Table Cell: Row 3, Col 3, Editable <long>Value: 12
Table Row: Position 4, Cells total: 4:
  Table Cell: Row 4, Col 0, Editable <long>Value: 13
  Table Cell: Row 4, Col 1, Editable <long>Value: 14
  Table Cell: Row 4, Col 2, Editable <long>Value: 15
  Table Cell: Row 4, Col 3, Editable <long>Value: 16

Remove column from position 1
Table Model: Rows 5, Cells in row 3, Cells Total 15:
Table Row: Position 0, Cells total: 3:
  Table Cell: Row 0, Col 0, Editable <long>Value: 1
  Table Cell: Row 0, Col 1, Editable <long>Value: 3
  Table Cell: Row 0, Col 2, Editable <long>Value: 4
Table Row: Position 1, Cells total: 3:
  Table Cell: Row 1, Col 0, Editable <long>Value: 5
  Table Cell: Row 1, Col 1, Editable <long>Value: 7
  Table Cell: Row 1, Col 2, Editable <long>Value: 8
Table Row: Position 2, Cells total: 3:
  Table Cell: Row 2, Col 0, Editable <double>Value: 0.00
  Table Cell: Row 2, Col 1, Editable <double>Value: 0.00
  Table Cell: Row 2, Col 2, Uneditable <double>Value: 0.00
Table Row: Position 3, Cells total: 3:
  Table Cell: Row 3, Col 0, Editable <long>Value: 9
  Table Cell: Row 3, Col 1, Editable <long>Value: 11
  Table Cell: Row 3, Col 2, Editable <long>Value: 12
Table Row: Position 4, Cells total: 3:
  Table Cell: Row 4, Col 0, Editable <long>Value: 13
  Table Cell: Row 4, Col 1, Editable <long>Value: 15
  Table Cell: Row 4, Col 2, Editable <long>Value: 16

Load the original table view from the file:
Table Model: Rows 4, Cells in row 4, Cells Total 16:
Table Row: Position 0, Cells total: 4:
  Table Cell: Row 0, Col 0, Editable <long>Value: 1
  Table Cell: Row 0, Col 1, Editable <long>Value: 2
  Table Cell: Row 0, Col 2, Editable <long>Value: 3
  Table Cell: Row 0, Col 3, Editable <long>Value: 4
Table Row: Position 1, Cells total: 4:
  Table Cell: Row 1, Col 0, Editable <long>Value: 5
  Table Cell: Row 1, Col 1, Editable <long>Value: 6
  Table Cell: Row 1, Col 2, Editable <long>Value: 7
  Table Cell: Row 1, Col 3, Editable <long>Value: 8
Table Row: Position 2, Cells total: 4:
  Table Cell: Row 2, Col 0, Editable <long>Value: 9
  Table Cell: Row 2, Col 1, Editable <long>Value: 10
  Table Cell: Row 2, Col 2, Editable <long>Value: 11
  Table Cell: Row 2, Col 3, Editable <long>Value: 12
Table Row: Position 3, Cells total: 4:
  Table Cell: Row 3, Col 0, Editable <long>Value: 13
  Table Cell: Row 3, Col 1, Editable <long>Value: 14
  Table Cell: Row 3, Col 2, Editable <long>Value: 15
  Table Cell: Row 3, Col 3, Editable <long>Value: 16
Essa saída fornece mais informações de depuração. Por exemplo, aqui vemos que a definição do sinalizador de proibição de edição em uma célula é refletida nos logs do programa.
Toda a funcionalidade declarada funciona como esperado; linhas são adicionadas, movidas, colunas são removidas, podemos alterar as propriedades das células e trabalhar com arquivos.
Considerações finais
Bem, esta é a primeira versão de um modelo de tabela simples, que permite criar uma tabela a partir de um array bidimensional de dados. Mais adiante, desenvolveremos outros modelos de tabela especializados, o componente View da tabela e o pleno trabalho com dados tabulares como um dos elementos do controle da interface gráfica do usuário.
Ao artigo está anexado o arquivo do script criado hoje com todas as classes incluídas. Você pode carregá-lo para estudo independente.
Traduzido do russo pela MetaQuotes Ltd.
Artigo original: https://www.mql5.com/ru/articles/17653
Aviso: Todos os direitos sobre esses materiais pertencem à MetaQuotes Ltd. É proibida a reimpressão total ou parcial.
Esse artigo foi escrito por um usuário do site e reflete seu ponto de vista pessoal. A MetaQuotes Ltd. não se responsabiliza pela precisão das informações apresentadas nem pelas possíveis consequências decorrentes do uso das soluções, estratégias ou recomendações descritas.

- Aplicativos de negociação gratuitos
- 8 000+ sinais para cópia
- Notícias econômicas para análise dos mercados financeiros
Você concorda com a política do site e com os termos de uso
Quando uma classe de SomeObject é carregada de um arquivo por meio da chamada do método Load() desse mesmo SomeObject, ele verifica "eu realmente me li do arquivo?" (é isso que você está perguntando). Se não, isso significa que algo deu errado e, portanto, não há motivo para continuar o carregamento.
O que tenho aqui é uma LISTA (CListObj) lendo um tipo de objeto de um arquivo. A lista não sabe o que está lá (qual objeto) no arquivo. Mas ela precisa conhecer esse tipo de objeto para criá-lo em seu método CreateElement(). É por isso que ela não verifica o tipo do objeto carregado do arquivo. Afinal de contas, haverá uma comparação com Type(), que nesse método retorna o tipo de uma lista, não de um objeto.
Obrigado, já resolvi, estou entendendo.
Eu li e depois reli novamente.
é algo diferente de um "modelo" em MVC. Algum ListStorage, por exemplo
Gostaria de saber. É possível obter algum análogo dos dataframes do Python e do R dessa forma? Essas tabelas são aquelas em que colunas diferentes podem conter dados de tipos diferentes (de um conjunto limitado de tipos, mas incluindo string).
É possível. Se estivermos falando de colunas diferentes de uma tabela, então, na implementação descrita, cada célula da tabela pode ter um tipo de dados diferente.