DoEasy. Controles (Parte 14): Novo algoritmo para nomear elementos gráficos. Continuando o trabalho no objeto WinForms TabControl

Conteúdo
- Ideia
- Modificando as classes da biblioteca
- Classe TabHeader: cabeçalho de guia do objeto TabControl
- Classe TabControl: desenvolvimento em andamento
- Teste
- O que virá a seguir?
Ideia
No último artigo, ao desenvolver o objeto WinForms TabControl, encontramos uma limitação no comprimento do nome do elemento gráfico, o que não nos permitiu trabalhar plenamente na criação do objeto, uma vez que o nome de cada elemento gráfico filho contido no elemento gráfico pai incluía uma referência a seu elemento pai na hierarquia de todos os controles gráficos vinculados, e o nome de cada objeto subsequente na cadeia era mais longo do que o nome do objeto anterior. Por isso, acabamos com um limite de 63 caracteres para o nome de recurso gráfico. Hoje elaboraremos um algoritmo de nomenclatura diferente para elementos gráficos, isento da desvantagem descrita acima: cada novo objeto do mesmo tipo conterá em seu nome o nome do programa, o nome do tipo de elemento gráfico e o número de elementos existentes deste tipo criados no programa ao construir os elementos da GUI.
Por exemplo, ao criar elementos da GUI para o programa de teste deste artigo, obtivemos a seguinte lista de elementos gráficos (apenas a primeira parte de todos os elementos construídos é visível, mas isso é suficiente para entender o conceito abordado):
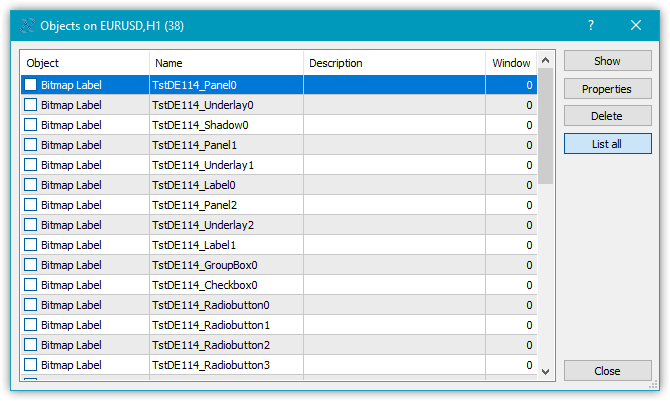
Desse modo, agora não teremos nenhuma restrição de aninhamento ao construir controles, porque em vez de exibir uma hierarquia no nome do elemento gráfico, simplesmente usaremos o número do elemento com o nome do programa e o tipo de controle.
Sem dúvida, o nome do elemento gráfico não nos permite compreender sua posição aproximada na hierarquia de cadeias de objetos vinculados, mas remove a limitação do comprimento do nome, e para compreender de alguma forma que tipo de objeto é, acrescentaremos outra propriedade às propriedades de string dos elementos gráficos - uma descrição do elemento gráfico. E isto resolverá a questão de entender a finalidade do elemento gráfico e como ele pode ser acessado em seu programa. Por exemplo, ao criar um elemento gráfico botão interruptor, colocamos algo como "botão de troca de direção" em sua descrição, e por esta descrição podemos acessar o controle diretamente no programa, o que é muito melhor do que acessá-lo por um nome confuso como "MyProgram_Elm00_Elm01_Elm00", como era feito antes...
Além de criar um novo algoritmo para nomear elementos gráficos, hoje continuaremos desenvolvendo o controle TabControl. Criaremos para ele um objeto TabHeader que descreve o cabeçalho da guia. Este objeto deverá ser capaz de trabalhar em grupo com outros objetos semelhantes - os cabeçalhos de outros objetos-guias. Quando este elemento é selecionado, deve ser capaz de aumentar ligeiramente de tamanho e, ao fazê-lo, deve levar em conta a posição do conjunto de cabeçalhos de todas as guias no controle TabControl - superior, inferior, esquerda ou direita - e, dependendo de sua posição, tem que desenhar uma moldura somente no lugar certo do objeto. Por exemplo, se o objeto-cabeçalho da guia estiver no topo do controle TabControl, a moldura que delineia o cabeçalho da guia só deve ser desenhada em três lados - esquerda, topo e direita. O lado inferior do cabeçalho da guia, por outro lado, estará em contato com o campo da guia onde os objetos da guia devem ser colocados. E o ponto de contato não deve ter uma borda, de modo que o cabeçalho e o campo da guia sejam um só, sem separação visível.
Hoje vamos fazer o manuseio de bordas descrito, dependendo de onde os cabeçalhos das guias estão localizados, apenas para objetos-cabeçalhos das guias, e começaremos a desenhar bordas de campo de guia e posicionar outros controles nela no próximo artigo.
Modificando as classes da biblioteca
Alguns controles usam controles já existentes para seu trabalho, por exemplo, ListBox usa controles Button para desenhar sua coleção (Items), mas com uma pequena melhoria na funcionalidade. Para implementá-lo, precisamos criar um novo objeto herdado do elemento Button e adicionar a funcionalidade necessária. E este, e alguns outros objetos semelhantes, é desejável colocá-los em uma categoria separada de objetos auxiliares, que não colocaremos nas pastas das categorias de controles, mas, sim, em seu diretório raiz.
No arquivo \MQL5\Include\DoEasy\Defines.mqh, na enumeração dos tipos de elementos gráficos, adicionamos um novo tipo de objeto-contêiner TabControl e adicionamos os dois controles auxiliares ListBoxItem e TabHeader na nova categoria:
//+------------------------------------------------------------------+
//| The list of graphical element types                              |
//+------------------------------------------------------------------+
enum ENUM_GRAPH_ELEMENT_TYPE
  {
   GRAPH_ELEMENT_TYPE_STANDARD,                       // Standard graphical object
   GRAPH_ELEMENT_TYPE_STANDARD_EXTENDED,              // Extended standard graphical object
   GRAPH_ELEMENT_TYPE_SHADOW_OBJ,                     // Shadow object
   GRAPH_ELEMENT_TYPE_ELEMENT,                        // Element
   GRAPH_ELEMENT_TYPE_FORM,                           // Form
   GRAPH_ELEMENT_TYPE_WINDOW,                         // Window
   //--- WinForms
   GRAPH_ELEMENT_TYPE_WF_UNDERLAY,                    // Panel object underlay
   GRAPH_ELEMENT_TYPE_WF_BASE,                        // Windows Forms Base
   //--- 'Container' object types are to be set below
   GRAPH_ELEMENT_TYPE_WF_CONTAINER,                   // Windows Forms container base object
   GRAPH_ELEMENT_TYPE_WF_PANEL,                       // Windows Forms Panel
   GRAPH_ELEMENT_TYPE_WF_GROUPBOX,                    // Windows Forms GroupBox
   GRAPH_ELEMENT_TYPE_WF_TAB_CONTROL,                 // Windows Forms TabControl
   //--- 'Standard control' object types are to be set below
   GRAPH_ELEMENT_TYPE_WF_COMMON_BASE,                 // Windows Forms base standard control
   GRAPH_ELEMENT_TYPE_WF_LABEL,                       // Windows Forms Label
   GRAPH_ELEMENT_TYPE_WF_BUTTON,                      // Windows Forms Button
   GRAPH_ELEMENT_TYPE_WF_CHECKBOX,                    // Windows Forms CheckBox
   GRAPH_ELEMENT_TYPE_WF_RADIOBUTTON,                 // Windows Forms RadioButton
   GRAPH_ELEMENT_TYPE_WF_ELEMENTS_LIST_BOX,           // Base list object of Windows Forms elements
   GRAPH_ELEMENT_TYPE_WF_LIST_BOX,                    // Windows Forms ListBox
   GRAPH_ELEMENT_TYPE_WF_CHECKED_LIST_BOX,            // Windows Forms CheckedListBox
   GRAPH_ELEMENT_TYPE_WF_BUTTON_LIST_BOX,             // Windows Forms ButtonListBox
   //--- Auxiliary elements of WinForms objects
   GRAPH_ELEMENT_TYPE_WF_LIST_BOX_ITEM,               // Windows Forms ListBoxItem
   GRAPH_ELEMENT_TYPE_WF_TAB_HEADER,                  // Windows Forms TabHeader
  };
//+------------------------------------------------------------------+
Na lista de propriedades de string do elemento gráfico na tela, adicionamos a nova propriedade descrição do elemento gráfico e aumentamos o número total de propriedades de string de 3 para 4:
//+------------------------------------------------------------------+
//| String properties of the graphical element on the canvas         |
//+------------------------------------------------------------------+
enum ENUM_CANV_ELEMENT_PROP_STRING
  {
   CANV_ELEMENT_PROP_NAME_OBJ = (CANV_ELEMENT_PROP_INTEGER_TOTAL+CANV_ELEMENT_PROP_DOUBLE_TOTAL), // Graphical element object name
   CANV_ELEMENT_PROP_NAME_RES,                        // Graphical resource name
   CANV_ELEMENT_PROP_TEXT,                            // Graphical element text
   CANV_ELEMENT_PROP_DESCRIPTION,                     // Graphical element description
  };
#define CANV_ELEMENT_PROP_STRING_TOTAL  (4)           // Total number of string properties
//+------------------------------------------------------------------+
Na lista de critérios possíveis para classificar elementos gráficos na tela, no final, adicionamos a classificação por nova propriedade:
//+------------------------------------------------------------------+
//| Possible sorting criteria of graphical elements on the canvas    |
//+------------------------------------------------------------------+
#define FIRST_CANV_ELEMENT_DBL_PROP  (CANV_ELEMENT_PROP_INTEGER_TOTAL-CANV_ELEMENT_PROP_INTEGER_SKIP)
#define FIRST_CANV_ELEMENT_STR_PROP  (CANV_ELEMENT_PROP_INTEGER_TOTAL-CANV_ELEMENT_PROP_INTEGER_SKIP+CANV_ELEMENT_PROP_DOUBLE_TOTAL-CANV_ELEMENT_PROP_DOUBLE_SKIP)
enum ENUM_SORT_CANV_ELEMENT_MODE
  {
//--- Sort by integer properties
   SORT_BY_CANV_ELEMENT_ID = 0,                       // Sort by element ID
   SORT_BY_CANV_ELEMENT_TYPE,                         // Sort by graphical element type
   //---...
   //---...
   SORT_BY_CANV_ELEMENT_TAB_ALIGNMENT,                // Sort by the location of tabs inside the control
   SORT_BY_CANV_ELEMENT_ALIGNMENT,                    // Sort by the location of the object inside the control
//--- Sort by real properties

//--- Sort by string properties
   SORT_BY_CANV_ELEMENT_NAME_OBJ = FIRST_CANV_ELEMENT_STR_PROP,// Sort by an element object name
   SORT_BY_CANV_ELEMENT_NAME_RES,                     // Sort by the graphical resource name
   SORT_BY_CANV_ELEMENT_TEXT,                         // Sort by graphical element text
   SORT_BY_CANV_ELEMENT_DESCRIPTION,                  // Sort by graphical element description
  };
//+------------------------------------------------------------------+
Agora poderemos selecionar, ordenar e filtrar os elementos gráficos pela nova propriedade.
No arquivo \MQL5\Include\DoEasy\Data.mqh, adicionamos os índices das novas mensagens e removemos o índice da mensagem desnecessária:
//--- WinForms standard
   MSG_GRAPH_ELEMENT_TYPE_WF_COMMON_BASE,             // WinForms base standard control
   MSG_GRAPH_ELEMENT_TYPE_WF_LABEL,                   // Label control
   MSG_GRAPH_ELEMENT_TYPE_WF_CHECKBOX,                // CheckBox control
   MSG_GRAPH_ELEMENT_TYPE_WF_RADIOBUTTON,             // RadioButton control
   MSG_GRAPH_ELEMENT_TYPE_WF_BUTTON,                  // Button control
   MSG_GRAPH_ELEMENT_TYPE_WF_ELEMENTS_LIST_BOX,       // Base list object of Windows Forms elements
   MSG_GRAPH_ELEMENT_TYPE_WF_LIST_BOX,                // ListBox control
   MSG_GRAPH_ELEMENT_TYPE_WF_LIST_BOX_ITEM,           // ListBox control collection object
   MSG_GRAPH_ELEMENT_TYPE_WF_CHECKED_LIST_BOX,        // CheckedListBox control
   MSG_GRAPH_ELEMENT_TYPE_WF_BUTTON_LIST_BOX,         // ButtonListBox control
   MSG_GRAPH_ELEMENT_TYPE_WF_TAB_HEADER,              // Tab header
   MSG_GRAPH_ELEMENT_TYPE_WF_TAB_PAGE,                // TabPage control
   MSG_GRAPH_ELEMENT_TYPE_WF_TAB_CONTROL,             // TabControl
   MSG_GRAPH_OBJ_BELONG_PROGRAM,                      // Graphical object belongs to a program
   MSG_GRAPH_OBJ_BELONG_NO_PROGRAM,                   // Graphical object does not belong to a program
...
//--- String properties of graphical elements
   MSG_CANV_ELEMENT_PROP_NAME_OBJ,                    // Graphical element object name
   MSG_CANV_ELEMENT_PROP_NAME_RES,                    // Graphical resource name
   MSG_CANV_ELEMENT_PROP_TEXT,                        // Graphical element text
   MSG_CANV_ELEMENT_PROP_DESCRIPTION,                 // Graphical element description
  };
//+------------------------------------------------------------------+
e escrevemos os textos das novas mensagens correspondentes aos índices adicionados recentemente. O texto do índice excluído, respectivamente, também será excluído:
//--- WinForms standard
   {"Базовый стандартный элемент управления WinForms","Basic Standard WinForms Control"},
   {"Элемент управления \"Label\"","Control element \"Label\""},
   {"Элемент управления \"CheckBox\"","Control element \"CheckBox\""},
   {"Элемент управления \"RadioButton\"","Control element \"RadioButton\""},
   {"Элемент управления \"Button\"","Control element \"Button\""},
   {"Базовый объект-список Windows Forms элементов","Basic Windows Forms List Object"},
   {"Элемент управления \"ListBox\"","Control element \"ListBox\""},
   {"Объект коллекции элемента управления ListBox","Collection object of the ListBox control"},
   {"Элемент управления \"CheckedListBox\"","Control element \"CheckedListBox\""},
   {"Элемент управления \"ButtonListBox\"","Control element \"ButtonListBox\""},
   {"Заголовок вкладки","Tab header"},

   {"Элемент управления \"TabControl\"","Control element \"TabControl\""},
   {"Графический объект принадлежит программе","The graphic object belongs to the program"},
   {"Графический объект не принадлежит программе","The graphic object does not belong to the program"},
...
//--- String properties of graphical elements
   {"Имя объекта-графического элемента","The name of the graphic element object"},
   {"Имя графического ресурса","Image resource name"},
   {"Текст графического элемента","Text of the graphic element"},
   {"Описание графического элемента","Description of the graphic element"},
  };
//+---------------------------------------------------------------------+
Para obter a descrição do tipo de elemento gráfico na forma aceitável para uso posterior na biblioteca, criaremos uma função no arquivo \MQL5\Include\DoEasy\Services\DELib.mqh de funções de serviço, que criará e retornará a descrição do tipo de elemento gráfico a partir do nome da constante de enumeração de tipos de elementos gráficos:
//+------------------------------------------------------------------+
//| Return the graphical object type as string                       |
//+------------------------------------------------------------------+
string TypeGraphElementAsString(const ENUM_GRAPH_ELEMENT_TYPE type)
  {
   ushort array[];
   int total=StringToShortArray(StringSubstr(::EnumToString(type),18),array);
   for(int i=0;i<total-1;i++)
     {
      if(array[i]==95)
        {
         i+=1;
         continue;
        }
      else
         array[i]+=0x20;
     }
   string txt=ShortArrayToString(array);
   StringReplace(txt,"_Wf_Base","WFBase");
   StringReplace(txt,"_Wf_","");
   StringReplace(txt,"_Obj","");
   StringReplace(txt,"_","");
   StringReplace(txt,"Groupbox","GroupBox");
   return txt;
  }
//+------------------------------------------------------------------+
A sequência aqui é a seguinte: passamos o tipo de elemento gráfico necessário para obter a descrição à função, e na linha
int total=StringToShortArray(StringSubstr(EnumToString(type),18),array);
obtemos o número de caracteres da substring extraída do nome da constante de enumeração do tipo.
Vamos dar uma olhada na constante GRAPH_ELEMENT_TYPE_WF_CHECKED_LIST_BOX como exemplo.
Vamos converter a constante de enumeração no texto "GRAPH_ELEMENT_TYPE_WF_CHECKED_LIST_BOX":
EnumToString(type) Do texto resultante "GRAPH_ELEMENT_TYPE_WF_CHECKED_LIST_BOX" selecionamos a string "_WF_CHECKED_LIST_BOX", começando pelo caractere 18:
StringSubstr(EnumToString(type),18)
e copiamos a string resultante "_WF_CHECKED_LIST_BOX", caractere por caractere em um array ushort e, ao fazer isso, obtemos o número de caracteres copiados:
int total=StringToShortArray(StringSubstr(EnumToString(type),18),array);
Como resultado, nosso array[] contém os códigos de cada caractere da string "_WF_CHECKED_LIST_BOX".
Agora precisamos deixar uma letra maiúscula (maiúscula) após cada caractere "_" e deixar todo o restante em minúsculas (pequenas).
Fazemos isso em um laço sobre o array de caracteres:
   for(int i=0;i<total-1;i++)
     {
      if(array[i]==95)
        {
         i+=1;
         continue;
        }
      else
         array[i]+=0x20;
     }
O primeiro caractere da string e, consequentemente, no array, temos "_", e assim que encontrarmos o código desse caractere (95) no array, precisamos definir o índice do laço para o próximo caractere após isso.
Na string "_WF_CHECKED_LIST_BOX" estes serão caracteres codificados por cores.
Depois de definir o índice do laço para o próximo código de caractere no array, vamos imediatamente para a próxima iteração, ignorando assim o caractere que precisa ser deixado inalterado. E chegamos ao operador else, onde adicionamos o valor 32 ao código do caractere no array, o que tornará esse caractere minúsculo.
Assim, após todo o laço, o array conterá os códigos dos caracteres da string "_Wf_ Checked_List_Box", que converteremos em uma string:
string txt=ShortArrayToString(array);
E então simplesmente substituímos as ocorrências especificadas de strings na string resultante pelas que precisamos e retornamos a string final:
   StringReplace(txt,"_Wf_Base","WFBase");
   StringReplace(txt,"_Wf_","");
   StringReplace(txt,"_Obj","");
   StringReplace(txt,"_","");
   StringReplace(txt,"Groupbox","GroupBox");
   return txt;
Usaremos esta nova função para obter o nome a partir do arquivo do tipo de elemento gráfico.
No arquivo de objeto gráfico base \MQL5\Include\DoEasy\Objects\Graph\GBaseObj.mqh, no método que retorna a descrição do tipo de elemento gráfico, adicionamos um novo tipo e removemos o desnecessário:
//+------------------------------------------------------------------+
//| Return the description of the graphical element type             |
//+------------------------------------------------------------------+
string CGBaseObj::TypeElementDescription(const ENUM_GRAPH_ELEMENT_TYPE type)
  {
   return
     (
      type==GRAPH_ELEMENT_TYPE_STANDARD               ? CMessage::Text(MSG_GRAPH_ELEMENT_TYPE_STANDARD)              :
      type==GRAPH_ELEMENT_TYPE_STANDARD_EXTENDED      ? CMessage::Text(MSG_GRAPH_ELEMENT_TYPE_STANDARD_EXTENDED)     :
      type==GRAPH_ELEMENT_TYPE_ELEMENT                ? CMessage::Text(MSG_GRAPH_ELEMENT_TYPE_ELEMENT)               :
      type==GRAPH_ELEMENT_TYPE_SHADOW_OBJ             ? CMessage::Text(MSG_GRAPH_ELEMENT_TYPE_SHADOW_OBJ)            :
      type==GRAPH_ELEMENT_TYPE_FORM                   ? CMessage::Text(MSG_GRAPH_ELEMENT_TYPE_FORM)                  :
      type==GRAPH_ELEMENT_TYPE_WINDOW                 ? CMessage::Text(MSG_GRAPH_ELEMENT_TYPE_WINDOW)                :
      //--- WinForms
      type==GRAPH_ELEMENT_TYPE_WF_UNDERLAY            ? CMessage::Text(MSG_GRAPH_ELEMENT_TYPE_WF_UNDERLAY)           :
      type==GRAPH_ELEMENT_TYPE_WF_BASE                ? CMessage::Text(MSG_GRAPH_ELEMENT_TYPE_WF_BASE)               :
      //--- Containers
      type==GRAPH_ELEMENT_TYPE_WF_CONTAINER           ? CMessage::Text(MSG_GRAPH_ELEMENT_TYPE_WF_CONTAINER)          :
      type==GRAPH_ELEMENT_TYPE_WF_GROUPBOX            ? CMessage::Text(MSG_GRAPH_ELEMENT_TYPE_WF_GROUPBOX)           :
      type==GRAPH_ELEMENT_TYPE_WF_PANEL               ? CMessage::Text(MSG_GRAPH_ELEMENT_TYPE_WF_PANEL)              :
      type==GRAPH_ELEMENT_TYPE_WF_TAB_HEADER          ? CMessage::Text(MSG_GRAPH_ELEMENT_TYPE_WF_TAB_HEADER)         :
      type==GRAPH_ELEMENT_TYPE_WF_TAB_PAGE            ? CMessage::Text(MSG_GRAPH_ELEMENT_TYPE_WF_TAB_PAGE)           :
      type==GRAPH_ELEMENT_TYPE_WF_TAB_CONTROL         ? CMessage::Text(MSG_GRAPH_ELEMENT_TYPE_WF_TAB_CONTROL)        :
      //--- Standard controls
      type==GRAPH_ELEMENT_TYPE_WF_COMMON_BASE         ? CMessage::Text(MSG_GRAPH_ELEMENT_TYPE_WF_COMMON_BASE)        :
      type==GRAPH_ELEMENT_TYPE_WF_LABEL               ? CMessage::Text(MSG_GRAPH_ELEMENT_TYPE_WF_LABEL)              :
      type==GRAPH_ELEMENT_TYPE_WF_CHECKBOX            ? CMessage::Text(MSG_GRAPH_ELEMENT_TYPE_WF_CHECKBOX)           :
      type==GRAPH_ELEMENT_TYPE_WF_RADIOBUTTON         ? CMessage::Text(MSG_GRAPH_ELEMENT_TYPE_WF_RADIOBUTTON)        :
      type==GRAPH_ELEMENT_TYPE_WF_BUTTON              ? CMessage::Text(MSG_GRAPH_ELEMENT_TYPE_WF_BUTTON)             :
      type==GRAPH_ELEMENT_TYPE_WF_ELEMENTS_LIST_BOX   ? CMessage::Text(MSG_GRAPH_ELEMENT_TYPE_WF_ELEMENTS_LIST_BOX)  :
      type==GRAPH_ELEMENT_TYPE_WF_LIST_BOX            ? CMessage::Text(MSG_GRAPH_ELEMENT_TYPE_WF_LIST_BOX)           :
      type==GRAPH_ELEMENT_TYPE_WF_LIST_BOX_ITEM       ? CMessage::Text(MSG_GRAPH_ELEMENT_TYPE_WF_LIST_BOX_ITEM)      :
      type==GRAPH_ELEMENT_TYPE_WF_CHECKED_LIST_BOX    ? CMessage::Text(MSG_GRAPH_ELEMENT_TYPE_WF_CHECKED_LIST_BOX)   :
      type==GRAPH_ELEMENT_TYPE_WF_BUTTON_LIST_BOX     ? CMessage::Text(MSG_GRAPH_ELEMENT_TYPE_WF_BUTTON_LIST_BOX)    :
      "Unknown"
     );
  }
//+------------------------------------------------------------------+
Para obter o nome do objeto, precisamos da função acima, que retornará o nome do elemento gráfico criado de acordo com seu tipo. Mas isto não é suficiente para criar todo o nome de um objeto. À string obtida a partir da função precisamos adicionar o número de elementos gráficos já existentes deste tipo no gráfico do símbolo e sua subjanela onde este objeto é construído.
No arquivo de classe de objeto-elemento gráfico \MQL5\Include\DoEasy\Objects\Graph\GCnvElement.mqh, em sua seção protegida, declararemos dois métodos: um que retorna o número de elementos gráficos por tipo e outro que cria e retorna o nome de elemento gráfico por tipo:
//--- Create (1) the object structure and (2) the object from the structure
   virtual bool      ObjectToStruct(void);
   virtual void      StructToObject(void);
//--- Copy the color array to the specified background color array
   void              CopyArraysColors(color &array_dst[],const color &array_src[],const string source);

//--- Return the number of graphical elements by type
   int               GetNumGraphElements(const ENUM_GRAPH_ELEMENT_TYPE type) const;
//--- Create and return the graphical element name by its type
   string            CreateNameGraphElement(const ENUM_GRAPH_ELEMENT_TYPE type);

private:
Vamos considerar a elaboração dos métodos um pouco mais tarde.
Na seção privada, adicionamos novos campos à estrutura do objeto:
private:
   int               m_shift_coord_x;                          // Offset of the X coordinate relative to the base object
   int               m_shift_coord_y;                          // Offset of the Y coordinate relative to the base object
   struct SData
     {
      //--- Object integer properties
      int            id;                                       // Element ID
      int            type;                                     // Graphical element type
      //---...
      //---...
      bool           button_toggle;                            // Toggle flag of the control featuring a button
      bool           button_state;                             // Status of the Toggle control featuring a button
      bool           button_group_flag;                        // Button group flag
      bool           multicolumn;                              // Horizontal display of columns in the ListBox control
      int            column_width;                             // Width of each ListBox control column
      bool           tab_multiline;                            // Several lines of tabs in TabControl
      int            tab_alignment;                            // Location of tabs inside the control
      int            alignment;                                // Location of the object inside the control
      //--- Object real properties

      //--- Object string properties
      uchar          name_obj[64];                             // Graphical element object name
      uchar          name_res[64];                             // Graphical resource name
      uchar          text[256];                                // Graphical element text
      uchar          descript[256];                            // Graphical element description
     };
   SData             m_struct_obj;                             // Object structure
   uchar             m_uchar_array[];                          // uchar array of the object structure
precisamos deles para salvar corretamente o objeto em um arquivo e ler a partir dele. Estas são as novas propriedades do elemento gráfico que adicionamos hoje ou antes, mas esquecemos de escrever aqui.
Da declaração do método que cria um novo elemento gráfico, retiramos o parâmetro formal, no qual o nome do objeto criado foi passado para o método:
//--- Create the element
   bool              Create(const long chart_id,
                            const int wnd_num,
                            const string name,
                            const int x,
                            const int y,
                            const int w,
                            const int h,
                            const bool redraw=false);
Agora o nome do objeto não será passado para o método, mas será criado nele, baseado no tipo do objeto que está sendo criado.
Absolutamente em todas as classes de objetos-elementos gráficos escritos por nós anteriormente, nos parâmetros formais de todos os seus construtores, as variáveis "name" já foram substituídas pelas variáveis "descript". Por exemplo, aqui neste arquivo é:
protected:
//--- Protected constructor
                     CGCnvElement(const ENUM_GRAPH_ELEMENT_TYPE element_type,
                                  const long    chart_id,
                                  const int     wnd_num,
                                  const string  descript,
                                  const int     x,
                                  const int     y,
                                  const int     w,
                                  const int     h);
public:
//--- (1) Set and (2) return the X coordinate shift relative to the base object
   void              SetCoordXRelative(const int value)                                { this.m_shift_coord_x=value;                }
   int               CoordXRelative(void)                                        const { return this.m_shift_coord_x;               }
//--- (1) Set and (2) return the Y coordinate shift relative to the base object
   void              SetCoordYRelative(const int value)                                { this.m_shift_coord_y=value;                }
   int               CoordYRelative(void)                                        const { return this.m_shift_coord_y;               }

//--- Event handler
   virtual void      OnChartEvent(const int id,const long& lparam,const double& dparam,const string& sparam);
//--- Parametric constructor
                     CGCnvElement(const ENUM_GRAPH_ELEMENT_TYPE element_type,
                                  const int     element_id,
                                  const int     element_num,
                                  const long    chart_id,
                                  const int     wnd_num,
                                  const string  descript,
                                  const int     x,
                                  const int     y,
                                  const int     w,
                                  const int     h,
                                  const color   colour,
                                  const uchar   opacity,
                                  const bool    movable=true,
                                  const bool    activity=true,
                                  const bool    redraw=false);
Agora não passamos o nome do objeto criado para o construtor da classe. A biblioteca vai então criar um novo nome para o novo objeto em si, com base em seu tipo. Portanto, em vez de passarmos o nome do objeto ao construtor, passaremos uma descrição do objeto, que podemos atribuir por conta própria, para que possamos acessar o objeto criado com base nessa descrição. Todas essas alterações já foram feitas em todas as classes de todos os objetos WinForms e não as consideraremos mais aqui, elas podem ser encontradas nos arquivos anexados ao artigo.
Da mesma forma, foi ajustada também a configuração do tipo de elemento gráfico. Anteriormente, em todos os construtores, escrevíamos o tipo de elemento duas vezes em cada construtor de cada classe de objetos WinForms. Primeiro, o tipo era escrito no objeto base dos elementos gráficos da biblioteca (na sua variável m_type_element):
void SetTypeElement(const ENUM_GRAPH_ELEMENT_TYPE type) { this.m_type_element=type; }
e então, na segunda linha, o mesmo tipo era escrito nas propriedades do objeto.
Vamos simplificar isso criando um método público para escrever (e retornar) o tipo de objeto para ambos os valores de uma só vez - para uma variável e para uma propriedade:
//--- Set the shift of the (1) left, (2) top, (3) right, (4) bottom edge of the active area relative to the element,
//--- (5) all shifts of the active area edges relative to the element, (6) opacity
   void              SetActiveAreaLeftShift(const int value)   { this.SetProperty(CANV_ELEMENT_PROP_ACT_SHIFT_LEFT,fabs(value));       }
   void              SetActiveAreaRightShift(const int value)  { this.SetProperty(CANV_ELEMENT_PROP_ACT_SHIFT_RIGHT,fabs(value));      }
   void              SetActiveAreaTopShift(const int value)    { this.SetProperty(CANV_ELEMENT_PROP_ACT_SHIFT_TOP,fabs(value));        }
   void              SetActiveAreaBottomShift(const int value) { this.SetProperty(CANV_ELEMENT_PROP_ACT_SHIFT_BOTTOM,fabs(value));     }
   void              SetActiveAreaShift(const int left_shift,const int bottom_shift,const int right_shift,const int top_shift);
   void              SetOpacity(const uchar value,const bool redraw=false);

//--- (1) Set and (2) return the graphical element type
   void              SetTypeElement(const ENUM_GRAPH_ELEMENT_TYPE type)
                       {
                        CGBaseObj::SetTypeElement(type);
                        this.SetProperty(CANV_ELEMENT_PROP_TYPE,type);
                       }
   ENUM_GRAPH_ELEMENT_TYPE TypeGraphElement(void)  const { return (ENUM_GRAPH_ELEMENT_TYPE)this.GetProperty(CANV_ELEMENT_PROP_TYPE);   }

//--- Set the main background color
Agora, em cada construtor de cada classe do objeto WinForms, em vez de duas linhas para definir uma propriedade em diferentes classes pai, inseriremos uma linha com uma chamada para este método para definir a propriedade - ele a gravará em ambas as classes pai .
Vamos adicionar dois métodos para retornar e definir a descrição do elemento gráfico em suas propriedades:
//--- Graphical object group
   virtual int       Group(void)                         const { return (int)this.GetProperty(CANV_ELEMENT_PROP_GROUP);                }
   virtual void      SetGroup(const int value)
                       {
                        CGBaseObj::SetGroup(value);
                        this.SetProperty(CANV_ELEMENT_PROP_GROUP,value);
                       }
//--- Graphical element description
   string            Description(void)                   const { return this.GetProperty(CANV_ELEMENT_PROP_DESCRIPTION);               }
   void              SetDescription(const string descr)        { this.SetProperty(CANV_ELEMENT_PROP_DESCRIPTION,descr);                }

//+------------------------------------------------------------------+
//| The methods of receiving raster data                             |
//+------------------------------------------------------------------+
Em ambos os construtores de classes, escrevemos o método para definir o tipo do elemento gráfico, chamamos o método para criar o nome do elemento por seu tipo e escrevemos a configuração das novas propriedades do elemento gráfico:
//+------------------------------------------------------------------+
//| Parametric constructor                                           |
//+------------------------------------------------------------------+
CGCnvElement::CGCnvElement(const ENUM_GRAPH_ELEMENT_TYPE element_type,
                           const int      element_id,
                           const int      element_num,
                           const long     chart_id,
                           const int      wnd_num,
                           const string   descript,
                           const int      x,
                           const int      y,
                           const int      w,
                           const int      h,
                           const color    colour,
                           const uchar    opacity,
                           const bool     movable=true,
                           const bool     activity=true,
                           const bool     redraw=false) : m_shadow(false)
  {
   this.SetTypeElement(element_type);
   this.m_type=OBJECT_DE_TYPE_GELEMENT;
   this.m_element_main=NULL;
   this.m_element_base=NULL;
   this.m_chart_color_bg=(color)::ChartGetInteger((chart_id==NULL ? ::ChartID() : chart_id),CHART_COLOR_BACKGROUND);
   this.m_name=this.CreateNameGraphElement(element_type);
   this.m_chart_id=(chart_id==NULL || chart_id==0 ? ::ChartID() : chart_id);
   this.m_subwindow=wnd_num;
   this.SetFont(DEF_FONT,DEF_FONT_SIZE);
   this.m_text_anchor=0;
   this.m_text_x=0;
   this.m_text_y=0;
   this.SetBackgroundColor(colour,true);
   this.SetOpacity(opacity);
   this.m_shift_coord_x=0;
   this.m_shift_coord_y=0;
   if(::ArrayResize(this.m_array_colors_bg,1)==1)
      this.m_array_colors_bg[0]=this.BackgroundColor();
   if(::ArrayResize(this.m_array_colors_bg_dwn,1)==1)
      this.m_array_colors_bg_dwn[0]=this.BackgroundColor();
   if(::ArrayResize(this.m_array_colors_bg_ovr,1)==1)
      this.m_array_colors_bg_ovr[0]=this.BackgroundColor();
   if(this.Create(chart_id,wnd_num,x,y,w,h,redraw))
     {
      this.SetProperty(CANV_ELEMENT_PROP_NAME_RES,this.m_canvas.ResourceName()); // Graphical resource name
      this.SetProperty(CANV_ELEMENT_PROP_CHART_ID,CGBaseObj::ChartID());         // Chart ID

      //---...
      //---...

      this.SetProperty(CANV_ELEMENT_PROP_CHECK_STATE,CANV_ELEMENT_CHEK_STATE_UNCHECKED);  // Status of a control having a checkbox
      this.SetProperty(CANV_ELEMENT_PROP_AUTOCHECK,true);                        // Auto change flag status when it is selected

      //---...
      //---...

      this.SetProperty(CANV_ELEMENT_PROP_BUTTON_TOGGLE,false);                                        // Toggle flag of the control featuring a button
      this.SetProperty(CANV_ELEMENT_PROP_BUTTON_STATE,false);                                         // Status of the Toggle control featuring a button
      this.SetProperty(CANV_ELEMENT_PROP_BUTTON_GROUP,false);                                         // Button group flag
      this.SetProperty(CANV_ELEMENT_PROP_LIST_BOX_MULTI_COLUMN,false);                                // Horizontal display of columns in the ListBox control
      this.SetProperty(CANV_ELEMENT_PROP_LIST_BOX_COLUMN_WIDTH,0);                                    // Width of each ListBox control column
      this.SetProperty(CANV_ELEMENT_PROP_TAB_MULTILINE,false);                                        // Several lines of tabs in TabControl
      this.SetProperty(CANV_ELEMENT_PROP_TAB_ALIGNMENT,CANV_ELEMENT_ALIGNMENT_TOP);                   // Location of tabs inside the control
      this.SetProperty(CANV_ELEMENT_PROP_ALIGNMENT,CANV_ELEMENT_ALIGNMENT_TOP);                       // Location of an object inside the control
      this.SetProperty(CANV_ELEMENT_PROP_TEXT,"");                                                    // Graphical element text
      this.SetProperty(CANV_ELEMENT_PROP_DESCRIPTION,descript);                                       // Graphical element description
     }
   else
     {
      ::Print(DFUN,CMessage::Text(MSG_LIB_SYS_FAILED_CREATE_ELM_OBJ),"\"",this.TypeElementDescription(element_type),"\" ",this.NameObj());
     }
  }
//+------------------------------------------------------------------+
No método que cria a estrutura do objeto, escrevemos o salvamento nos campos da estrutura das novas propriedades:
//+------------------------------------------------------------------+
//| Create the object structure                                      |
//+------------------------------------------------------------------+
bool CGCnvElement::ObjectToStruct(void)
  {
//--- Save integer properties
   this.m_struct_obj.id=(int)this.GetProperty(CANV_ELEMENT_PROP_ID);                               // Element ID
   this.m_struct_obj.type=(int)this.GetProperty(CANV_ELEMENT_PROP_TYPE);                           // Graphical element type

   //---...
   //---...

   this.m_struct_obj.button_toggle=(bool)this.GetProperty(CANV_ELEMENT_PROP_BUTTON_TOGGLE);                             // Toggle flag of the control featuring a button
   this.m_struct_obj.button_state=(bool)this.GetProperty(CANV_ELEMENT_PROP_BUTTON_STATE);                               // Status of the Toggle control featuring a button

   this.m_struct_obj.button_group_flag=(bool)this.GetProperty(CANV_ELEMENT_PROP_BUTTON_GROUP);                          // Button group flag
   this.m_struct_obj.multicolumn=(bool)this.GetProperty(CANV_ELEMENT_PROP_LIST_BOX_MULTI_COLUMN);                       // Horizontal display of columns in the ListBox control
   this.m_struct_obj.column_width=(int)this.GetProperty(CANV_ELEMENT_PROP_LIST_BOX_COLUMN_WIDTH);                       // Width of each ListBox control column
   this.m_struct_obj.tab_multiline=(bool)this.GetProperty(CANV_ELEMENT_PROP_TAB_MULTILINE);                             // Several lines of tabs in TabControl
   this.m_struct_obj.tab_alignment=(int)this.GetProperty(CANV_ELEMENT_PROP_TAB_ALIGNMENT);                              // Location of tabs inside the control
   this.m_struct_obj.alignment=(int)this.GetProperty(CANV_ELEMENT_PROP_ALIGNMENT);                                      // Location of an object inside the control
//--- Save real properties

//--- Save string properties
   ::StringToCharArray(this.GetProperty(CANV_ELEMENT_PROP_NAME_OBJ),this.m_struct_obj.name_obj);   // Graphical element object name
   ::StringToCharArray(this.GetProperty(CANV_ELEMENT_PROP_NAME_RES),this.m_struct_obj.name_res);   // Graphical resource name
   ::StringToCharArray(this.GetProperty(CANV_ELEMENT_PROP_TEXT),this.m_struct_obj.text);           // Graphical element text
   ::StringToCharArray(this.GetProperty(CANV_ELEMENT_PROP_DESCRIPTION),this.m_struct_obj.descript);// Graphical element description
   //--- Save the structure to the uchar array
   ::ResetLastError();
   if(!::StructToCharArray(this.m_struct_obj,this.m_uchar_array))
     {
      CMessage::ToLog(DFUN,MSG_LIB_SYS_FAILED_SAVE_OBJ_STRUCT_TO_UARRAY,true);
      return false;
     }
   return true;
  }
//+------------------------------------------------------------------+
No método que cria um objeto a partir de uma estrutura, escrevemos valores dos novos campos da estrutura nas novas propriedades do objeto:
//+------------------------------------------------------------------+
//| Create the object from the structure                             |
//+------------------------------------------------------------------+
void CGCnvElement::StructToObject(void)
  {
//--- Save integer properties
   this.SetProperty(CANV_ELEMENT_PROP_ID,this.m_struct_obj.id);                                    // Element ID
   this.SetProperty(CANV_ELEMENT_PROP_TYPE,this.m_struct_obj.type);                                // Graphical element type

   //---...
   //---...

   this.SetProperty(CANV_ELEMENT_PROP_BUTTON_TOGGLE,this.m_struct_obj.button_toggle);                             // Toggle flag of the control featuring a button
   this.SetProperty(CANV_ELEMENT_PROP_BUTTON_STATE,this.m_struct_obj.button_state);                               // Status of the Toggle control featuring a button

   this.SetProperty(CANV_ELEMENT_PROP_BUTTON_GROUP,this.m_struct_obj.button_group_flag);                          // Button group flag
   this.SetProperty(CANV_ELEMENT_PROP_LIST_BOX_MULTI_COLUMN,this.m_struct_obj.multicolumn);                       // Horizontal display of columns in the ListBox control
   this.SetProperty(CANV_ELEMENT_PROP_LIST_BOX_COLUMN_WIDTH,this.m_struct_obj.column_width);                      // Width of each ListBox control column
   this.SetProperty(CANV_ELEMENT_PROP_TAB_MULTILINE,this.m_struct_obj.tab_multiline);                             // Several lines of tabs in TabControl
   this.SetProperty(CANV_ELEMENT_PROP_TAB_ALIGNMENT,this.m_struct_obj.tab_alignment);                             // Location of tabs inside the control
   this.SetProperty(CANV_ELEMENT_PROP_ALIGNMENT,this.m_struct_obj.alignment);                                     // Location of an object inside the control
//--- Save real properties

//--- Save string properties
   this.SetProperty(CANV_ELEMENT_PROP_NAME_OBJ,::CharArrayToString(this.m_struct_obj.name_obj));   // Graphical element object name
   this.SetProperty(CANV_ELEMENT_PROP_NAME_RES,::CharArrayToString(this.m_struct_obj.name_res));   // Graphical resource name
   this.SetProperty(CANV_ELEMENT_PROP_TEXT,::CharArrayToString(this.m_struct_obj.text));           // Graphical element text
   this.SetProperty(CANV_ELEMENT_PROP_DESCRIPTION,::CharArrayToString(this.m_struct_obj.descript));// Graphical element description
  }
//+------------------------------------------------------------------+
No método que cria um objeto-elemento gráfico, agora não passamos para ele o nome do objeto que está sendo criado, que foi enviado como parâmetro para o método de criação de recurso gráfico vinculado ao objeto gráfico da classe CCanvas, mas, sim, passamos para ele o nome do objeto definido anteriormente:
//+------------------------------------------------------------------+
//| Create the graphical element object                              |
//+------------------------------------------------------------------+
bool CGCnvElement::Create(const long chart_id,     // Chart ID
                          const int wnd_num,       // Chart subwindow
                          const int x,             // X coordinate
                          const int y,             // Y coordinate
                          const int w,             // Width
                          const int h,             // Height
                          const bool redraw=false) // Flag indicating the need to redraw

  {
   ::ResetLastError();
   if(this.m_canvas.CreateBitmapLabel((chart_id==NULL ? ::ChartID() : chart_id),wnd_num,this.m_name,x,y,w,h,COLOR_FORMAT_ARGB_NORMALIZE))
     {
      this.Erase(CLR_CANV_NULL);
      this.m_canvas.Update(redraw);
      this.m_shift_y=(int)::ChartGetInteger((chart_id==NULL ? ::ChartID() : chart_id),CHART_WINDOW_YDISTANCE,wnd_num);
      return true;
     }
   CMessage::ToLog(DFUN_ERR_LINE,::GetLastError(),true);
   return false;
  }
//+------------------------------------------------------------------+
Método que retorna a quantidade de elementos gráficos por tipo:
//+------------------------------------------------------------------+
//| Return the number of graphical elements by type                  |
//+------------------------------------------------------------------+
int CGCnvElement::GetNumGraphElements(const ENUM_GRAPH_ELEMENT_TYPE type) const
  {
//--- Declare a variable with the number of graphical objects and
//--- get the total number of graphical objects on the chart and the subwindow where the graphical element is created
   int n=0, total=::ObjectsTotal(this.ChartID(),this.SubWindow());
//--- Create the name of a graphical object by its type
   string name=TypeGraphElementAsString(type);
//--- In the loop by all chart and subwindow objects,
   for(int i=0;i<total;i++)
     {
      //--- get the name of the next object
      string name_obj=::ObjectName(this.ChartID(),i,this.SubWindow());
      //--- if the object name does not contain the set prefix of the names of the library graphical objects, move on - this is not the object we are looking for
      if(::StringFind(name_obj,this.NamePrefix())==WRONG_VALUE)
         continue;
      //--- If the name of a graphical object selected in the loop has a substring with the created object name by its type,
      //--- then there is a graphical object of this type - increase the counter of objects of this type
      if(::StringFind(name_obj,name)>0)
         n++;
     }
//--- Return the number of found objects by their type
   return n;
  }
//+------------------------------------------------------------------+
Cada linha do método é comentada detalhadamente e a lógica do método deve ser clara. Em ressumo, precisamos descobrir quantos objetos gráficos do tipo especificado estão no gráfico e na subjanela, onde precisamos criar outro elemento de dado tipo. Já podemos criar um nome por tipo, porque a função para isso já foi escrita acima. Criamos imediatamente o nome do objeto por seu tipo e, em seguida, em um loop por todos os objetos gráficos no gráfico e sua subjanela, procuramos um objeto cujo nome inclua uma substring com o nome criado do objeto gráfico de acordo com seu tipo . Se esse nome for encontrado, um objeto desse tipo já existe e então precisamos aumentar o contador. Como resultado, ao final do loop, temos o número de objetos encontrados com o tipo que precisamos, e nós o devolvemos.
Método que cria e retorna o nome de um elemento gráfico baseado em seu tipo:
//+------------------------------------------------------------------+
//| Create and return the graphical element name by its type         |
//+------------------------------------------------------------------+
string CGCnvElement::CreateNameGraphElement(const ENUM_GRAPH_ELEMENT_TYPE type)
  {
   return this.NamePrefix()+TypeGraphElementAsString(type)+(string)this.GetNumGraphElements(type);
  }
//+------------------------------------------------------------------+
O método recebe o tipo do objeto para o qual desejamos criar um nome.
A seguir, ao prefixo dos objetos gráficos da biblioteca ("Program_name"+"_"), adicionamos o nome do objeto por seu tipo e a quantidade de objetos desse tipo.
O resultado é retornado desde o método.
Ambos os métodos usam uma chamada de método para obter o nome do objeto gráfico por seu tipo. Isso significa que eles podem ser otimizados removendo uma chamada para um método chamado duas vezes. Faremos isso no próximo artigo (lembre-se do princípio "do simples ao complexo").
Para que possamos indicar corretamente o tipo do objeto criado, precisamos entender como esse tipo "chega" à classe do elemento gráfico CGCnvElement, que é uma das classes pai dos objetos WinForms, e na qual esses objetos são criados. Precisamos "entregar-lhe" o tipo de elemento gráfico criado a esta classe. Agora, em todos os construtores de classes herdadas dela, o tipo ao qual a classe descendente pertence é explicitamente especificado. Assim, sempre criaremos apenas o tipo que está especificado na classe localizada na hierarquia de herança logo após a classe CGCnvElement. E esta é a classe de objeto-forma.
Como podemos enviar o tipo do objeto criado localizado na hierarquia de herança longe da classe CForm? A resposta é óbvia, cada uma dessas classes deve ter outro construtor que não especifique explicitamente o tipo de objeto sendo criado (como faz agora), mas que seja passado para a classe pai através de uma variável de construtor em sua lista de inicialização. E esse construtor deve ser protegido, para que só possa funcionar em classes herdadas e o acesso a ele de fora seja proibido. Bem, esses construtores já foram criados para cada objeto WinForms e, ao herdar um do outro, o tipo da classe filha é transferida para a classe pai. E isso acontece ao longo de toda a cadeia da hierarquia do objeto até o objeto CGCnvElement, no qual será criado o elemento gráfico requerido com o tipo que "encontrou" ao longo de toda a cadeia de herança seu pai.
E não se esqueça que em todos os arquivos de todas as classes de objetos WInForms, as variáveis formais "name" já foram renomeadas para "descript" nos construtores e métodos para criar elementos gráficos. Estou dando conta disso mais uma vez, para não voltar a este assunto e não descrever as mesmas mudanças já feitas para cada objeto WinForms entre todos os disponíveis.
No arquivo \MQL5\Include\DoEasy\Objects\Graph\Form.mqh do objeto-forma, removemos a declaração do método já desnecessário que retorna o nome do objeto dependente (todos os nomes agora são criados automaticamente na classe CGCnvElement ):
//--- Create a shadow object
   void              CreateShadowObj(const color colour,const uchar opacity);
//--- Return the name of the dependent object
   string            CreateNameDependentObject(const string base_name)  const
                       { return ::StringSubstr(this.NameObj(),::StringLen(::MQLInfoString(MQL_PROGRAM_NAME))+1)+"_"+base_name;   }
//--- Update coordinates of bound objects
   virtual bool      MoveDependentObj(const int x,const int y,const bool redraw=false);
Também removemos o código de implementação desse método da listagem de classes.
Antes de todos os construtores de classe, declaramos um novo construtor protegido:
//--- Last mouse event handler
   virtual void      OnMouseEventPostProcessing(void);

protected:
//--- Protected constructor with object type, chart ID and subwindow
                     CForm(const ENUM_GRAPH_ELEMENT_TYPE type,
                           const long chart_id,
                           const int subwindow,
                           const string descript,
                           const int x,
                           const int y,
                           const int w,
                           const int h);
public:
//--- Constructors
Ele, ao contrário de outros construtores, possui um parâmetro formal através do qual é indicado o tipo do objeto criado.
Vamos criá-lo fora do corpo da classe.
//+------------------------------------------------------------------+
//| Protected constructor with an object type,                       |
//| chart ID and subwindow                                           |
//+------------------------------------------------------------------+
CForm::CForm(const ENUM_GRAPH_ELEMENT_TYPE type,
             const long chart_id,
             const int subwindow,
             const string descript,
             const int x,
             const int y,
             const int w,
             const int h) : CGCnvElement(type,chart_id,subwindow,descript,x,y,w,h)
  {
   this.m_type=OBJECT_DE_TYPE_GFORM;
   this.Initialize();
   this.SetCoordXInit(x);
   this.SetCoordYInit(y);
   this.SetWidthInit(w);
   this.SetHeightInit(h);
  }
//+------------------------------------------------------------------+
A única diferença dos construtores públicos é que na lista de inicialização deste construtor, o tipo do objeto criado é passado para a classe pai, para seu construtor, que por sua vez é passado para este construtor a partir da classe herdada.
Assim, ao criar um construtor protegido semelhante para cada objeto WinForms, criamos uma cadeia ao longo da qual seu tipo é transferido de qualquer classe descendente para a classe pai CGCnvElement, na qual um objeto é criado com um tipo obtido ao longo de toda a cadeia da hierarquia de objetos herdados.
Do método que cria um novo objeto gráfico, retiramos a linha com a criação do nome do objeto dependente e ao criar novos objetos, passamos para eles não o nome, mas sim o parâmetro "descript" (descrição), passado no parâmetros formais do método:
//+------------------------------------------------------------------+
//| Create a new graphical object                                    |
//+------------------------------------------------------------------+
CGCnvElement *CForm::CreateNewGObject(const ENUM_GRAPH_ELEMENT_TYPE type,
                                      const int obj_num,
                                      const string descript,
                                      const int x,
                                      const int y,
                                      const int w,
                                      const int h,
                                      const color colour,
                                      const uchar opacity,
                                      const bool movable,
                                      const bool activity)
  {
   string name=this.CreateNameDependentObject(obj_name);
   CGCnvElement *element=NULL;
   //--- Depending on the created object type,
   switch(type)
     {
      //--- create a graphical element object
      case GRAPH_ELEMENT_TYPE_ELEMENT :
         element=new CGCnvElement(type,this.ID(),obj_num,this.ChartID(),this.SubWindow(),descript,x,y,w,h,colour,opacity,movable,activity);
        break;
      //--- create a form object
      case GRAPH_ELEMENT_TYPE_FORM :
         element=new CForm(type,this.ChartID(),this.SubWindow(),descript,x,y,w,h);
        break;
      default:
        break;
     }
   if(element==NULL)
      ::Print(DFUN,CMessage::Text(MSG_LIB_SYS_FAILED_CREATE_ELM_OBJ),this.TypeElementDescription(type));
   element.SetMovable(movable);
   element.SetCoordXRelative(element.CoordX()-this.CoordX());
   element.SetCoordYRelative(element.CoordY()-this.CoordY());
   return element;
  }
//+------------------------------------------------------------------+
Essas alterações foram feitas em todos os métodos semelhantes de outras classes de objetos WinForms e não as consideraremos mais aqui, já que tudo está nos arquivos anexados ao artigo.
Em um método que cria um novo elemento anexado e o adiciona à lista de objetos anexados, em vez das strings de criação para o nome do objeto gráfico
//--- Create a graphical element name
   string ns=(::StringLen((string)num)<2 ? ::IntegerToString(num,2,'0') : (string)num);
   string name="Elm"+ns;
incorporamos a criação do texto de descrição do objeto por padrão e passamos esse texto para o método de criação de um novo objeto gráfico:
//+------------------------------------------------------------------+
//| Create a new attached element                                    |
//| and add it to the list of bound objects                          |
//+------------------------------------------------------------------+
CGCnvElement *CForm::CreateAndAddNewElement(const ENUM_GRAPH_ELEMENT_TYPE element_type,
                                            const int x,
                                            const int y,
                                            const int w,
                                            const int h,
                                            const color colour,
                                            const uchar opacity,
                                            const bool activity)
  {
//--- If the type of a created graphical element is less than the "element", inform of that and return 'false'
   if(element_type<GRAPH_ELEMENT_TYPE_ELEMENT)
     {
      ::Print(DFUN,CMessage::Text(MSG_FORM_OBJECT_ERR_NOT_INTENDED),::StringSubstr(::EnumToString(element_type),19));
      return NULL;
     }
//--- Specify the element index in the list
   int num=this.m_list_elements.Total();
//--- Create a description of the default graphical element
   string descript=TypeGraphElementAsString(element_type);
//--- Get the screen coordinates of the object relative to the coordinate system of the base object
   int elm_x=x;
   int elm_y=y;
   this.GetCoords(elm_x,elm_y);
//--- Create a new graphical element
   CGCnvElement *obj=this.CreateNewGObject(element_type,num,descript,elm_x,elm_y,w,h,colour,opacity,false,activity);
   if(obj==NULL)
      return NULL;
//--- and add it to the list of bound graphical elements

//---...
//---...
//---...

   return obj;
  }
//+------------------------------------------------------------------+
No método que cria o objeto sombra, vamos inserir sua descrição padrão ao invés do nome do objeto:
//+------------------------------------------------------------------+
//| Create the shadow object                                         |
//+------------------------------------------------------------------+
void CForm::CreateShadowObj(const color colour,const uchar opacity)
  {
//--- If the shadow flag is disabled or the shadow object already exists, exit
   if(!this.m_shadow || this.m_shadow_obj!=NULL)
      return;

   //---...
   //---...
   //---...

//--- Create a new shadow object and set the pointer to it in the variable
   this.m_shadow_obj=new CShadowObj(this.ChartID(),this.SubWindow(),this.NameObj()+"Shadow",x,y,w,h);
   if(this.m_shadow_obj==NULL)
     {
      ::Print(DFUN,CMessage::Text(MSG_FORM_OBJECT_ERR_FAILED_CREATE_SHADOW_OBJ));
      return;
     }
   this.m_list_tmp.Add(this.m_shadow_obj);
//--- Set the properties for the created shadow object

   //---...
   //---...
   //---...

//--- Move the form object to the foreground
   this.BringToTop();
  }
//+------------------------------------------------------------------+
Em todos os métodos em que criamos automaticamente uma descrição de objeto padrão, você sempre pode alterar essa descrição em seu programa usando o método SetDescription().
No arquivo de classe do objeto WinForms base \MQL5\Include\DoEasy\Objects\Graph\WForms\WinFormBase.mqh, declararemos um construtor protegido e excluiremos um dos públicos — não é necessário aqui:
protected:
//--- Protected constructor with object type, chart ID and subwindow
                     CWinFormBase(const ENUM_GRAPH_ELEMENT_TYPE type,
                                  const long chart_id,
                                  const int subwindow,
                                  const string descript,
                                  const int x,
                                  const int y,
                                  const int w,
                                  const int h);
public:
//--- Constructors
                     CWinFormBase(const long chart_id,
                                  const int subwindow,
                                  const string descript,
                                  const int x,
                                  const int y,
                                  const int w,
                                  const int h);
                     CWinFormBase(const string name) : CForm(::ChartID(),0,name,0,0,0,0)
                       {
                        this.m_type=OBJECT_DE_TYPE_GWF_BASE;
                       }

//--- (1) Set and (2) return the default text color of all panel objects
A implementação do construtor protegido repete quase completamente a implementação do paramétrico público:
//+------------------------------------------------------------------+
//| Protected constructor with an object type,                       |
//| chart ID and subwindow                                           |
//+------------------------------------------------------------------+
CWinFormBase::CWinFormBase(const ENUM_GRAPH_ELEMENT_TYPE type,
                           const long chart_id,
                           const int subwindow,
                           const string descript,
                           const int x,
                           const int y,
                           const int w,
                           const int h) : CForm(type,chart_id,subwindow,descript,x,y,w,h)
  {
//--- Set the specified graphical element type for the object and assign the library object type to the current object
   this.SetTypeElement(type);
   this.m_type=OBJECT_DE_TYPE_GWF_BASE;
//--- Initialize all variables
   this.SetText("");
   this.SetForeColor(CLR_DEF_FORE_COLOR,true);
   this.SetForeStateOnColor(this.ForeColor(),true);
   this.SetForeStateOnColorMouseDown(this.ForeColor());
   this.SetForeStateOnColorMouseOver(this.ForeColor());
   this.SetForeColorOpacity(CLR_DEF_FORE_COLOR_OPACITY);
   this.SetFontBoldType(FW_TYPE_NORMAL);
   this.SetMarginAll(0);
   this.SetPaddingAll(0);
   this.SetBorderSizeAll(0);
   this.SetDockMode(CANV_ELEMENT_DOCK_MODE_NONE,false);
   this.SetBorderStyle(FRAME_STYLE_NONE);
   this.SetAutoSize(false,false);
   CForm::SetCoordXInit(x);
   CForm::SetCoordYInit(y);
   CForm::SetWidthInit(w);
   CForm::SetHeightInit(h);
   this.m_shadow=false;
   this.m_gradient_v=true;
   this.m_gradient_c=false;
  }
//+------------------------------------------------------------------+
A única diferença entre eles é que aqui passamos o tipo especificado nos parâmetros formais do construtor para o construtor da classe pai na lista de inicialização. A linha que escreve o tipo do objeto nas propriedades agora é feita chamando o novo método. E exatamente a mesma linha agora está escrita no construtor público:
//--- Set the specified graphical element type for the object and assign the library object type to the current object
   this.SetTypeElement(type);
   this.m_type=OBJECT_DE_TYPE_GWF_BASE;
//--- Initialize all variables
em vez dos dois previamente escritos nele e que faziam o mesmo:
//--- Set the graphical element and library object types as a base WinForms object
   CGBaseObj::SetTypeElement(GRAPH_ELEMENT_TYPE_WF_BASE);
   CGCnvElement::SetProperty(CANV_ELEMENT_PROP_TYPE,GRAPH_ELEMENT_TYPE_WF_BASE);
   this.m_type=OBJECT_DE_TYPE_GWF_BASE;
//--- Initialize all variables
Melhorias semelhantes foram feitas em todas as classes de todos os objetos WinForms e não serão mais consideradas.
No método que retorna a descrição da propriedade string do elemento, escrevemos o retorno da descrição da nova propriedade:
//+------------------------------------------------------------------+
//| Return the description of the control string property            |
//+------------------------------------------------------------------+
string CWinFormBase::GetPropertyDescription(ENUM_CANV_ELEMENT_PROP_STRING property,bool only_prop=false)
  {
   return
     (
      property==CANV_ELEMENT_PROP_NAME_OBJ      ?  CMessage::Text(MSG_CANV_ELEMENT_PROP_NAME_OBJ)+": \""+this.GetProperty(property)+"\""     :
      property==CANV_ELEMENT_PROP_NAME_RES      ?  CMessage::Text(MSG_CANV_ELEMENT_PROP_NAME_RES)+": \""+this.GetProperty(property)+"\""     :
      property==CANV_ELEMENT_PROP_TEXT          ?  CMessage::Text(MSG_CANV_ELEMENT_PROP_TEXT)+": \""+this.GetProperty(property)+"\""         :
      property==CANV_ELEMENT_PROP_DESCRIPTION   ?  CMessage::Text(MSG_CANV_ELEMENT_PROP_DESCRIPTION)+": \""+this.GetProperty(property)+"\""  :
      ""
     );
  }
//+------------------------------------------------------------------+
Todas as melhorias acima são feitas nas classes dos objetos WinForms nos arquivos:
\MQL5\Include\DoEasy\Objects\Graph\WForms\Common Controls\CommonBase.mqh,
\MQL5\Include\DoEasy\Objects\Graph\WForms\Common Controls\Label.mqh,
\MQL5\Include\DoEasy\Objects\Graph\WForms\Common Controls\CheckBox.mqh,
\MQL5\Include\DoEasy\Objects\Graph\WForms\Common Controls\RadioButton.mqh,
\MQL5\Include\DoEasy\Objects\Graph\WForms\Common Controls\CheckedListBox.mqh,
\MQL5\Include\DoEasy\Objects\Graph\WForms\Common Controls\ButtonListBox.mqh,
No arquivo do objeto-botão \MQL5\Include\DoEasy\Objects\Graph\WForms\Common Controls\Button.mqh, além das mesmas melhorias comuns a todos os objetos WinForms, faremos o método para definir o estado virtual, pois será necessário na substituição de classes herdadas:
   bool              Toggle(void)                        const { return (bool)this.GetProperty(CANV_ELEMENT_PROP_BUTTON_TOGGLE);                               }
//--- (1) Set and (2) return the Toggle control status
   virtual void      SetState(const bool flag)
                       {
                        this.SetProperty(CANV_ELEMENT_PROP_BUTTON_STATE,flag);
                        if(this.State())
                          {
                           this.SetBackgroundColor(this.BackgroundStateOnColor(),false);
                           this.SetForeColor(this.ForeStateOnColor(),false);
                           this.UnpressOtherAll();
                          }
                        else
                          {
                           this.SetBackgroundColor(this.BackgroundColorInit(),false);
                           this.SetForeColor(this.ForeColorInit(),false);
                           this.SetBorderColor(this.BorderColorInit(),false);
                          }
                       }
   bool              State(void)                         const { return (bool)this.GetProperty(CANV_ELEMENT_PROP_BUTTON_STATE);                                }
Na classe do objeto ListBox , usamos objetos-botões para exibir linhas. Mas para exibir texto em botões com a condição de que o texto seja sempre pressionado na borda esquerda do botão quando for alinhado à esquerda, precisamos introduzir um parâmetro indicando quantos caracteres deslocar o texto para a direita.
O objeto-botão não tem essa propriedade. Então, vamos criar um objeto ListBoxItem auxiliar.
Na pasta biblioteca \MQL5\Include\DoEasy\Objects\Graph\WForms\, criamos um novo arquivo WinFormBase.mqh da classe CWinFormBase. A classe deve ser herdada da classe objeto-botão, e seu arquivo deve ser anexado ao arquivo da classe que está sendo criada:
//+------------------------------------------------------------------+
//|                                                  ListBoxItem.mqh |
//|                                  Copyright 2022, MetaQuotes Ltd. |
//|                             https://mql5.com/en/users/artmedia70 |
//+------------------------------------------------------------------+
#property copyright "Copyright 2022, MetaQuotes Ltd."
#property link      "https://mql5.com/en/users/artmedia70"
#property version   "1.00"
#property strict    // Necessary for mql4
//+------------------------------------------------------------------+
//| Include files                                                    |
//+------------------------------------------------------------------+
#include "Common Controls\Button.mqh"
//+------------------------------------------------------------------+
//| Label object class of WForms controls                            |
//+------------------------------------------------------------------+
class CListBoxItem : public CButton
  {
  }
Na seção privada da classe, declararemos uma variável para armazenar o número de caracteres usado para o deslocamento do texto e uma variável de string que conterá a string de deslocamento. Vamos declarar um construtor protegido na seção protegida da classe e métodos para trabalhar com variáveis de classe e um construtor paramétrico na seção pública:
//+------------------------------------------------------------------+
//| Label object class of WForms controls                            |
//+------------------------------------------------------------------+
class CListBoxItem : public CButton
  {
private:
   uchar             m_text_shift;                          // Element text shift to the right from the left edge in characters
   string            m_shift_space;                         // Shift string
protected:
//--- Protected constructor with object type, chart ID and subwindow
                     CListBoxItem(const ENUM_GRAPH_ELEMENT_TYPE type,
                                  const long chart_id,
                                  const int subwindow,
                                  const string descript,
                                  const int x,
                                  const int y,
                                  const int w,
                                  const int h);
public:
//--- Return the element text shift to the right from the left edge in characters
   uchar             TextShift(void)                        const { return this.m_text_shift;   }
//--- (1) Create and (2) return the string consisting of the number of shift characters
   void              SetTextShiftSpace(const uchar value);
   string            GetTextShiftSpace(void)                const { return this.m_shift_space;  }
//--- Set the element text
   virtual void      SetText(const string text);
//--- Constructor
                     CListBoxItem(const long chart_id,
                                  const int subwindow,
                                  const string descript,
                                  const int x,
                                  const int y,
                                  const int w,
                                  const int h);
  };
//+------------------------------------------------------------------+
Construtores de classe:
//+------------------------------------------------------------------+
//| Protected constructor with an object type,                       |
//| chart ID and subwindow                                           |
//+------------------------------------------------------------------+
CListBoxItem::CListBoxItem(const ENUM_GRAPH_ELEMENT_TYPE type,
                           const long chart_id,
                           const int subwindow,
                           const string descript,
                           const int x,
                           const int y,
                           const int w,
                           const int h) : CButton(type,chart_id,subwindow,descript,x,y,w,h)
  {
//--- Set the specified graphical element type for the object and assign the library object type to the current object
   this.SetTypeElement(type);
   this.m_type=OBJECT_DE_TYPE_GWF_COMMON;
   this.SetTextAlign(ANCHOR_LEFT);
   this.SetTextShiftSpace(1);
  }
//+------------------------------------------------------------------+
//| Constructor                                                      |
//+------------------------------------------------------------------+
CListBoxItem::CListBoxItem(const long chart_id,
                           const int subwindow,
                           const string descript,
                           const int x,
                           const int y,
                           const int w,
                           const int h) : CButton(GRAPH_ELEMENT_TYPE_WF_LIST_BOX_ITEM,chart_id,subwindow,descript,x,y,w,h)
  {
   this.SetTypeElement(GRAPH_ELEMENT_TYPE_WF_LIST_BOX_ITEM);
   this.m_type=OBJECT_DE_TYPE_GWF_COMMON;
   this.SetTextAlign(ANCHOR_LEFT);
   this.SetTextShiftSpace(1);
  }
//+------------------------------------------------------------------+
Ambos os construtores são quase idênticos, exceto que o protegido tem um parâmetro formal que passa o tipo do objeto, e esse tipo é passado para o construtor da classe pai, enquanto no construtor paramétrico o tipo do objeto é definido exatamente como ListBoxItem. Agora temos todos os objetos WinForms da biblioteca organizados dessa maneira. Cada construtor define o deslocamento do texto à direita em um caractere.
Método que cria uma string composta a partir do número de caracteres de deslocamento:
//+------------------------------------------------------------------+
//| Create a string consisting of the number of shift characters     |
//+------------------------------------------------------------------+
void CListBoxItem::SetTextShiftSpace(const uchar value)
  {
   this.m_text_shift=value;
   this.m_shift_space="";
   switch(this.TextAlign())
     {
      case ANCHOR_LEFT        :
      case ANCHOR_LEFT_LOWER  :
      case ANCHOR_LEFT_UPPER  :
        for(int i=0;i<(int)this.m_text_shift;i++)
           this.m_shift_space+=" ";
        break;
      default:
        break;
     }
  }
//+------------------------------------------------------------------+
O método recebe o número de caracteres que indica quanto a string deve ser deslocada. Em seguida, o valor inicial da string de deslocamento é definido. Dependendo do alinhamento do texto, e se for da borda esquerda, no loop, de acordo com o número de caracteres de deslocamento passados, adicionamos um caractere de espaço à linha de deslocamento a cada iteração do loop. No final do loop, a string conterá o número necessário de caracteres de espaço.
Método que define o texto de um elemento:
//+------------------------------------------------------------------+
//| Set the element text                                             |
//+------------------------------------------------------------------+
void CListBoxItem::SetText(const string text)
  {
   this.SetProperty(CANV_ELEMENT_PROP_TEXT,this.GetTextShiftSpace()+text);
  }
//+------------------------------------------------------------------+
Aqui, o texto do objeto é inserido na propriedade do objeto, ao qual é adicionado o número de espaços à esquerda, definido pelo método SetTextShiftSpace(), que vimos acima.
Na classe do objeto ListBox no arquivo \MQL5\Include\DoEasy\Objects\Graph\WForms\Common Controls\ListBox.mqh, em sua seção privada, adicionamos uma variável que armazena o deslocamento do texto dos objetos-coleções deste elemento (da classe de objeto ListBoxItem discutida acima), na seção pública declaremos métodos para trabalhar com uma nova variável e na seção protegida declararemos um construtor protegido:
//+------------------------------------------------------------------+
//| ListBox object class of the WForms controls                      |
//+------------------------------------------------------------------+
class CListBox : public CElementsListBox
  {
private:
   uchar             m_text_shift;                       // ListBoxItem elements text shift to the right from the left edge in characters
//--- Create a new graphical object
   virtual CGCnvElement *CreateNewGObject(const ENUM_GRAPH_ELEMENT_TYPE type,
                                          const int element_num,
                                          const string descript,
                                          const int x,
                                          const int y,
                                          const int w,
                                          const int h,
                                          const color colour,
                                          const uchar opacity,
                                          const bool movable,
                                          const bool activity);
public:
//--- (1) Set and (2) return the element text shift to the right from the left edge in characters
   void              SetTextShift(const uchar value);
   uchar             TextShift(void)                  const { return this.m_text_shift;   }
//--- Create a list from the specified number of rows (Label objects)
   void              CreateList(const int line_count,const int new_column_width=0,const bool autosize=true);

protected:
//--- Protected constructor with object type, chart ID and subwindow
                     CListBox(const ENUM_GRAPH_ELEMENT_TYPE type,
                              const long chart_id,
                              const int subwindow,
                              const string descript,
                              const int x,
                              const int y,
                              const int w,
                              const int h);
public:
//--- Constructor
                     CListBox(const long chart_id,
                              const int subwindow,
                              const string descript,
                              const int x,
                              const int y,
                              const int w,
                              const int h);
  };
//+------------------------------------------------------------------+
Os construtores foram feitos e finalizados de forma idêntica aos demais objetos de outras classes já vistos, e não vamos repetir aqui.
Vamos modificar o método que cria uma lista com o número especificado de linhas (ListBoxItem).
Agora ao invés de um objeto da classe CButton, vamos trabalhar com a nova classe CListBoxItem, respectivamente, e vamos criar um objeto desta classe. Depois de criar o objeto, definimos imediatamente o deslocamento de seu texto e definimos o texto do elemento de coleção criado por padrão:
//+------------------------------------------------------------------+
//| Create the list from the specified number of rows (ListBoxItem)  |
//+------------------------------------------------------------------+
void CListBox::CreateList(const int count,const int new_column_width=0,const bool autosize=true)
  {
//--- Create the pointer to the CListBoxItem object
   CListBoxItem *obj=NULL;
//--- Calculate the width of the created object depending on the specified column width
   int width=(new_column_width>0 ? new_column_width : this.Width()-this.BorderSizeLeft()-this.BorderSizeRight());
//--- Create the specified number of ListBoxItem objects
   CElementsListBox::CreateElements(GRAPH_ELEMENT_TYPE_WF_LIST_BOX_ITEM,count,0,0,width,15,new_column_width,autosize);
//--- In the loop by the created number of objects
   for(int i=0;i<this.ElementsTotal();i++)
     {
      //--- Get the created object from the list by the loop index
      obj=this.GetElement(i);
      //--- If the object could not be obtained, send the appropriate message to the log and move on to the next one
      if(obj==NULL)
        {
         ::Print(DFUN,MSG_ELM_LIST_ERR_FAILED_GET_GRAPH_ELEMENT_OBJ,": ",this.TypeElementDescription(GRAPH_ELEMENT_TYPE_WF_LIST_BOX_ITEM));
         continue;
        }
      //--- Set left center text alignment
      obj.SetTextAlign(ANCHOR_LEFT);
      obj.SetTextShiftSpace(this.TextShift());
      //--- Set the object text
      obj.SetFontSize(8);
      obj.SetText(TypeGraphElementAsString(obj.TypeGraphElement())+string(i+1));
      //--- Set the background, text and frame color
      obj.SetBackgroundStateOnColor(clrDodgerBlue,true);
      obj.SetBackgroundStateOnColorMouseOver(obj.ChangeColorLightness(obj.BackgroundStateOnColor(),-5));
      obj.SetBackgroundStateOnColorMouseDown(obj.ChangeColorLightness(obj.BackgroundStateOnColor(),-10));
      obj.SetForeStateOnColor(this.BackgroundColor(),true);
      obj.SetForeStateOnColorMouseOver(obj.ChangeColorLightness(obj.ForeStateOnColor(),-5));
      obj.SetForeStateOnColorMouseDown(obj.ChangeColorLightness(obj.ForeStateOnColor(),-10));
      obj.SetBorderColor(obj.BackgroundColor(),true);
      obj.SetBorderColorMouseDown(obj.BackgroundColorMouseDown());
      obj.SetBorderColorMouseOver(obj.BackgroundColorMouseOver());
      //--- Set the flags of the toggle and group buttons
      obj.SetToggleFlag(true);
      obj.SetGroupButtonFlag(true);
     }
//--- If the flag of auto resizing the base object is passed to the method,
//--- set the auto resize mode to "increase and decrease"
   if(autosize)
      this.SetAutoSizeMode(CANV_ELEMENT_AUTO_SIZE_MODE_GROW_SHRINK,false);
  }
//+------------------------------------------------------------------+
Método que define o deslocamento do texto do elemento à direita da borda esquerda em caracteres:
//+------------------------------------------------------------------+
//| Set the element text shift                                       |
//| to the right from the left edge in characters                    |
//+------------------------------------------------------------------+
void CListBox::SetTextShift(const uchar value)
  {
   this.m_text_shift=value;
   for(int i=0;i<this.ElementsTotal();i++)
     {
      CListBoxItem *obj=this.GetElement(i);
      if(obj==NULL || obj.TextShift()==value)
         continue;
      obj.SetTextShiftSpace(value);
      obj.SetText(obj.Text());
      obj.Update(false);
     }
  }
//+------------------------------------------------------------------+
Aqui: escrevemos o número de caracteres de deslocamento passado para o método em uma variável e, em um loop pela lista de objetos vinculados, obtemos o próximo objeto e definimos o texto com um deslocamento para ele usando o método do objeto SetText(), que discutimos acima ao falar sobre os métodos da classe CListBoxItem.
Na classe do objeto contêiner base no arquivo MQL5\Include\DoEasy\Objects\Graph\WForms\Containers\Container.mqh, removemos o construtor extra:
                     CContainer(const string name) : CWinFormBase(::ChartID(),0,name,0,0,0,0)
                       {
                        CGBaseObj::SetTypeElement(GRAPH_ELEMENT_TYPE_WF_CONTAINER);
                        CGCnvElement::SetProperty(CANV_ELEMENT_PROP_TYPE,GRAPH_ELEMENT_TYPE_WF_CONTAINER);
                        this.m_type=OBJECT_DE_TYPE_GWF_CONTAINER;
                        this.SetForeColor(CLR_DEF_FORE_COLOR,true);
                        this.SetFontBoldType(FW_TYPE_NORMAL);
                        this.SetMarginAll(3);
                        this.SetPaddingAll(0);
                        this.SetDockMode(CANV_ELEMENT_DOCK_MODE_NONE,false);
                        this.SetBorderStyle(FRAME_STYLE_NONE);
                        this.SetAutoScroll(false,false);
                        this.SetAutoScrollMarginAll(0);
                        this.SetAutoSize(false,false);
                        this.SetAutoSizeMode(CANV_ELEMENT_AUTO_SIZE_MODE_GROW,false);
                        this.Initialize();
                       }
//--- Destructor
                    ~CContainer();
  };
//+------------------------------------------------------------------+
Na seção protegida, declaramos um construtor protegido:
protected:
//--- Protected constructor with object type, chart ID and subwindow
                     CContainer(const ENUM_GRAPH_ELEMENT_TYPE type,
                                const long chart_id,
                                const int subwindow,
                                const string descript,
                                const int x,
                                const int y,
                                const int w,
                                const int h);
public:
//--- Constructor
                     CContainer(const long chart_id,
                                const int subwindow,
                                const string descript,
                                const int x,
                                const int y,
                                const int w,
                                const int h);
A implementação do construtor protegido é idêntica a todos os construtores protegidos adicionados anteriormente em outras classes.
No método que define os parâmetros do objeto anexado, vamos adicionar o processamento do objeto ListBoxItem da mesma forma que para os objetos Button e TabHeader:
      //--- For "Label", "CheckBox" and "RadioButton" WinForms objects
      case GRAPH_ELEMENT_TYPE_WF_LABEL             :
      case GRAPH_ELEMENT_TYPE_WF_CHECKBOX          :
      case GRAPH_ELEMENT_TYPE_WF_RADIOBUTTON       :
        //--- set the object text color depending on the one passed to the method:
        //--- either the container text color, or the one passed to the method.
        //--- The frame color is set equal to the text color
        //--- Set the background color to transparent
        obj.SetForeColor(colour==clrNONE ? this.ForeColor() : colour,true);
        obj.SetBorderColor(obj.ForeColor(),true);
        obj.SetBackgroundColor(CLR_CANV_NULL,true);
        obj.SetOpacity(0,false);
        break;
      //--- For the Button, TabHeader and ListBoxItem WinForms objects
      case GRAPH_ELEMENT_TYPE_WF_BUTTON            :
      case GRAPH_ELEMENT_TYPE_WF_TAB_HEADER        :
      case GRAPH_ELEMENT_TYPE_WF_LIST_BOX_ITEM     :
        //--- set the object text color as a container text color depending on the one passed to the method:
        //--- set the background color depending on the one passed to the method:
        //--- either the default standard control background color, or the one passed to the method.
        //--- The frame color is set equal to the text color
        obj.SetForeColor(this.ForeColor(),true);
        obj.SetBackgroundColor(colour==clrNONE ? CLR_DEF_CONTROL_STD_BACK_COLOR : colour,true);
        obj.SetBorderColor(obj.ForeColor(),true);
        obj.SetBorderStyle(FRAME_STYLE_SIMPLE);
        break;
      //--- For "ListBox", "CheckedListBox" and "ButtonListBox" WinForms object
      case GRAPH_ELEMENT_TYPE_WF_LIST_BOX          :
      case GRAPH_ELEMENT_TYPE_WF_CHECKED_LIST_BOX  :
      case GRAPH_ELEMENT_TYPE_WF_BUTTON_LIST_BOX   :
        //--- set the object text color as a container text color depending on the one passed to the method:
        //--- set the background color depending on the one passed to the method:
        //--- either the default standard control background color, or the one passed to the method.
        //--- The frame color is set equal to the text color
        obj.SetBackgroundColor(colour==clrNONE ? CLR_DEF_CONTROL_STD_BACK_COLOR : colour,true);
        obj.SetBorderColor(CLR_DEF_BORDER_COLOR,true);
        obj.SetForeColor(CLR_DEF_FORE_COLOR,true);
        break;
Removemos a manipulação do objeto TabPage agora ausente do método:
        break;
      case GRAPH_ELEMENT_TYPE_WF_TAB_PAGE          :
        //--- set the object text color as a container text color depending on the one passed to the method:
        //--- set the background color depending on the one passed to the method:
        //--- either the default standard control background color, or the one passed to the method.
        //--- The frame color is set equal to the text color
        obj.SetBackgroundColor(colour==clrNONE ? CLR_DEF_CONTROL_TAB_PAGE_BACK_COLOR : colour,true);
        obj.SetBackgroundColorMouseDown(CLR_DEF_CONTROL_TAB_PAGE_MOUSE_DOWN);
        obj.SetBackgroundColorMouseOver(CLR_DEF_CONTROL_TAB_PAGE_MOUSE_OVER);
        obj.SetBorderColor(CLR_DEF_CONTROL_TAB_PAGE_BORDER_COLOR,true);
        obj.SetBorderColorMouseDown(CLR_DEF_CONTROL_TAB_PAGE_BORDER_MOUSE_DOWN);
        obj.SetBorderColorMouseOver(CLR_DEF_CONTROL_TAB_PAGE_BORDER_MOUSE_OVER);
        obj.SetForeColor(CLR_DEF_FORE_COLOR,true);
        obj.SetOpacity(CLR_DEF_CONTROL_TAB_PAGE_OPACITY);
        obj.SetBorderSizeAll(1);
        obj.SetBorderStyle(FRAME_STYLE_NONE);
        break;
      case GRAPH_ELEMENT_TYPE_WF_TAB_CONTROL       :
Vamos incluir o arquivo de classe CListBoxItem no arquivo de classe do objeto-lista base de controles \MQL5\Include\DoEasy\Objects\Graph\WForms\Common Controls\ElementsListBox.mqh:
//+------------------------------------------------------------------+
//| Include files                                                    |
//+------------------------------------------------------------------+
#include "..\Containers\Container.mqh"
#include "..\ListBoxItem.mqh"
//+------------------------------------------------------------------+
//| Class of the base object of the WForms control list              |
//+------------------------------------------------------------------+
Agora a classe de coleção da lista de controles estará disponível em outros objetos da biblioteca.
Assim como em outros objetos, declararemos um construtor protegido:
protected:
//--- Create the specified number of specified WinForms objects
   void              CreateElements(ENUM_GRAPH_ELEMENT_TYPE element_type,
                                    const int count,
                                    const int x,
                                    const int y,
                                    const int w,
                                    const int h,
                                    uint new_column_width=0,
                                    const bool autosize=true);

//--- Protected constructor with object type, chart ID and subwindow
                     CElementsListBox(const ENUM_GRAPH_ELEMENT_TYPE type,
                                      const long chart_id,
                                      const int subwindow,
                                      const string descript,
                                      const int x,
                                      const int y,
                                      const int w,
                                      const int h);
public:
//--- Constructor
A implementação do construtor protegido e a modificação do construtor paramétrico são idênticos a outros objetos WinForms.
Classe TabHeader: cabeçalho de guia do objeto TabControl
Vamos fazer o cabeçalho da guia do controle TabControl baseado no objeto-botão. O cabeçalho da guia, como o botão de alternância, deve estar ativado (guia selecionada) ou desativado (outra guia selecionada) e todos os cabeçalhos devem funcionar em um grupo, assim como os botões de grupo, isto é, se uma guia for selecionada, o restante deverá ser não selecionado. No entanto, não podemos desmarcar todas as guias, porque uma sempre deve permanecer selecionada.
Os botões podem fazer isso. Mas os botões não podem mudar de tamanho dependendo do estado. E os cabeçalhos das guias deveriam. A guia selecionada tem um cabeçalho um pouco maior do que a não selecionada. Ao mesmo tempo, há mais uma coisa: os cabeçalhos das guias podem ser colocados no controle, que tem quatro lados - superior, inferior, esquerdo e direito. Consequentemente, a moldura não deve ser desenhada do lado que está em contato com o campo da guia. Portanto, precisamos fazer um novo método de desenho do botão onde a borda é desenhada de acordo com a localização do cabeçalho no controle, e um novo método de pressionar onde o botão é redimensionado e deslocado para novas coordenadas para que fique sempre pressionado contra o campo da guia.
Na pasta biblioteca \MQL5\Include\DoEasy\Objects\Graph\WForms\, criamos um novo arquivo WinFormBase.mqh da classe CWinFormBase. A classe deve ser herdada da classe objeto-botão e seu arquivo deve ser anexado ao arquivo da classe que está sendo criada:
//+------------------------------------------------------------------+
//|                                                    TabHeader.mqh |
//|                                  Copyright 2022, MetaQuotes Ltd. |
//|                             https://mql5.com/en/users/artmedia70 |
//+------------------------------------------------------------------+
#property copyright "Copyright 2022, MetaQuotes Ltd."
#property link      "https://mql5.com/en/users/artmedia70"
#property version   "1.00"
#property strict    // Necessary for mql4
//+------------------------------------------------------------------+
//| Include files                                                    |
//+------------------------------------------------------------------+
#include "Common Controls\Button.mqh"
//+------------------------------------------------------------------+
//| TabHeader object class of WForms TabControl                      |
//+------------------------------------------------------------------+
class CTabHeader : public CButton
  {
  }
Nas seções privada, protegida e pública da classe, declararemos variáveis e métodos para que a classe funcione:
//+------------------------------------------------------------------+
//| TabHeader object class of WForms TabControl                      |
//+------------------------------------------------------------------+
class CTabHeader : public CButton
  {
private:
   int               m_width_off;                        // Object width in the released state
   int               m_height_off;                       // Object height in the released state
   int               m_width_on;                         // Object width in the selected state
   int               m_height_on;                        // Object height in the selected state
   int               m_col;                              // Header column index
   int               m_row;                              // Header row index
//--- Sets the width, height and shift of the element depending on the state
   void              SetWH(void);
//--- Adjust the size and location of the element depending on the state
   void              WHProcessStateOn(void);
   void              WHProcessStateOff(void);
//--- Draw the element frame depending on the location
   void              DrawFrame(void);

protected:
//--- 'The cursor is inside the active area, the left mouse button is clicked' event handler
   virtual void      MouseActiveAreaReleasedHandler(const int id,const long& lparam,const double& dparam,const string& sparam);

public:
//--- Set the control size in the (1) released and (2) selected state
   bool              SetSizeOff(void)  { return(CGCnvElement::SetWidth(this.m_width_off) && CGCnvElement::SetHeight(this.m_height_off) ? true : false);  }
   bool              SetSizeOn(void)   { return(CGCnvElement::SetWidth(this.m_width_on) && CGCnvElement::SetHeight(this.m_height_on)   ? true : false);  }
//--- Sets the size of the control element
   void              SetWidthOff(const int value)                                            { this.m_width_off=value;  }
   void              SetHeightOff(const int value)                                           { this.m_height_off=value; }
   void              SetWidthOn(const int value)                                             { this.m_width_on=value;   }
   void              SetHeightOn(const int value)                                            { this.m_height_on=value;  }
//--- Returns the control size
   int               WidthOff(void)                                                    const { return this.m_width_off; }
   int               HeightOff(void)                                                   const { return this.m_height_off;}
   int               WidthOn(void)                                                     const { return this.m_width_on;  }
   int               HeightOn(void)                                                    const { return this.m_height_on; }
//--- (1) Set and (2) return the index of the tab title row
   void              SetRow(const int value)                                                 { this.m_row=value;        }
   int               Row(void)                                                         const { return this.m_row;       }
//--- (1) Set and (2) return the index of the tab title column
   void              SetColumn(const int value)                                              { this.m_col=value;        }
   int               Column(void)                                                      const { return this.m_col;       }
//--- Set the tab location
   void              SetTabLocation(const int index,const int row,const int col)
                       {
                        this.SetRow(row);
                        this.SetColumn(col);
                       }
//--- (1) Sets and (2) return the location of the object on the control
   void              SetAlignment(const ENUM_CANV_ELEMENT_ALIGNMENT alignment)
                       {
                        this.SetProperty(CANV_ELEMENT_PROP_TAB_ALIGNMENT,alignment);
                        if(this.Alignment()==CANV_ELEMENT_ALIGNMENT_TOP)
                           this.SetBorderSize(1,1,1,0);
                        if(this.Alignment()==CANV_ELEMENT_ALIGNMENT_BOTTOM)
                           this.SetBorderSize(1,0,1,1);
                        if(this.Alignment()==CANV_ELEMENT_ALIGNMENT_LEFT)
                           this.SetBorderSize(1,1,0,1);
                        if(this.Alignment()==CANV_ELEMENT_ALIGNMENT_RIGHT)
                           this.SetBorderSize(0,1,1,1);
                       }
   ENUM_CANV_ELEMENT_ALIGNMENT Alignment(void)  const { return (ENUM_CANV_ELEMENT_ALIGNMENT)this.GetProperty(CANV_ELEMENT_PROP_TAB_ALIGNMENT);  }


//--- Sets the state of the control
   virtual void      SetState(const bool flag);

//--- Clear the element filling it with color and opacity
   virtual void      Erase(const color colour,const uchar opacity,const bool redraw=false);
//--- Clear the element with a gradient fill
   virtual void      Erase(color &colors[],const uchar opacity,const bool vgradient,const bool cycle,const bool redraw=false);

//--- Last mouse event handler
   virtual void      OnMouseEventPostProcessing(void);

protected:
//--- Protected constructor with object type, chart ID and subwindow
                     CTabHeader(const ENUM_GRAPH_ELEMENT_TYPE type,
                                const long chart_id,
                                const int subwindow,
                                const string descript,
                                const int x,
                                const int y,
                                const int w,
                                const int h);
public:
//--- Constructor
                     CTabHeader(const long chart_id,
                             const int subwindow,
                             const string descript,
                             const int x,
                             const int y,
                             const int w,
                             const int h);
  };
//+------------------------------------------------------------------+
As descrições das variáveis e métodos devem ser claras quanto ao seu propósito. Vamos olhá-los em detalhe.
Construtores de classe - protegidos e paramétricos. A implementação é quase idêntica e a lógica é exatamente a mesma do restante dos objetos da biblioteca: o construtor protegido passa o tipo especificado para o construtor da classe pai, enquanto o construtor paramétrico passa seu tipo de objeto para o pai:
//+------------------------------------------------------------------+
//| Protected constructor with an object type,                       |
//| chart ID and subwindow                                           |
//+------------------------------------------------------------------+
CTabHeader::CTabHeader(const ENUM_GRAPH_ELEMENT_TYPE type,
                       const long chart_id,
                       const int subwindow,
                       const string descript,
                       const int x,
                       const int y,
                       const int w,
                       const int h) : CButton(type,chart_id,subwindow,descript,x,y,w,h)
  {
   this.SetTypeElement(GRAPH_ELEMENT_TYPE_WF_TAB_HEADER);
   this.m_type=OBJECT_DE_TYPE_GWF_COMMON;
   this.SetAlignment(CANV_ELEMENT_ALIGNMENT_TOP);
   this.SetToggleFlag(true);
   this.SetGroupButtonFlag(true);
   this.SetText(TypeGraphElementAsString(this.TypeGraphElement()));
   this.SetForeColor(CLR_DEF_FORE_COLOR,true);
   this.SetOpacity(CLR_DEF_CONTROL_TAB_HEAD_OPACITY,true);
   this.SetBackgroundColor(CLR_DEF_CONTROL_TAB_HEAD_BACK_COLOR,true);
   this.SetBackgroundColorMouseDown(CLR_DEF_CONTROL_TAB_HEAD_MOUSE_DOWN);
   this.SetBackgroundColorMouseOver(CLR_DEF_CONTROL_TAB_HEAD_MOUSE_OVER);
   this.SetBackgroundStateOnColor(CLR_DEF_CONTROL_TAB_HEAD_BACK_COLOR_ON,true);
   this.SetBackgroundStateOnColorMouseDown(CLR_DEF_CONTROL_TAB_HEAD_BACK_DOWN_ON);
   this.SetBackgroundStateOnColorMouseOver(CLR_DEF_CONTROL_TAB_HEAD_BACK_OVER_ON);
   this.SetBorderStyle(FRAME_STYLE_SIMPLE);
   this.SetBorderColor(CLR_DEF_CONTROL_TAB_HEAD_BORDER_COLOR,true);
   this.SetBorderColorMouseDown(CLR_DEF_CONTROL_TAB_HEAD_BORDER_MOUSE_DOWN);
   this.SetBorderColorMouseOver(CLR_DEF_CONTROL_TAB_HEAD_BORDER_MOUSE_OVER);
   this.SetWidthOff(this.Width());
   this.SetHeightOff(this.Height());
   this.SetWidthOn(this.Width()+4);
   this.SetHeightOn(this.Height()+2);
   this.SetState(false);
  }
//+------------------------------------------------------------------+
//| Constructor                                                      |
//+------------------------------------------------------------------+
CTabHeader::CTabHeader(const long chart_id,
                       const int subwindow,
                       const string descript,
                       const int x,
                       const int y,
                       const int w,
                       const int h) : CButton(GRAPH_ELEMENT_TYPE_WF_TAB_HEADER,chart_id,subwindow,descript,x,y,w,h)
  {
   this.SetTypeElement(GRAPH_ELEMENT_TYPE_WF_TAB_HEADER);
   this.m_type=OBJECT_DE_TYPE_GWF_COMMON;
   this.SetAlignment(CANV_ELEMENT_ALIGNMENT_TOP);
   this.SetToggleFlag(true);
   this.SetGroupButtonFlag(true);
   this.SetText(TypeGraphElementAsString(this.TypeGraphElement()));
   this.SetForeColor(CLR_DEF_FORE_COLOR,true);
   this.SetOpacity(CLR_DEF_CONTROL_TAB_HEAD_OPACITY,true);
   this.SetBackgroundColor(CLR_DEF_CONTROL_TAB_HEAD_BACK_COLOR,true);
   this.SetBackgroundColorMouseDown(CLR_DEF_CONTROL_TAB_HEAD_MOUSE_DOWN);
   this.SetBackgroundColorMouseOver(CLR_DEF_CONTROL_TAB_HEAD_MOUSE_OVER);
   this.SetBackgroundStateOnColor(CLR_DEF_CONTROL_TAB_HEAD_BACK_COLOR_ON,true);
   this.SetBackgroundStateOnColorMouseDown(CLR_DEF_CONTROL_TAB_HEAD_BACK_DOWN_ON);
   this.SetBackgroundStateOnColorMouseOver(CLR_DEF_CONTROL_TAB_HEAD_BACK_OVER_ON);
   this.SetBorderStyle(FRAME_STYLE_SIMPLE);
   this.SetBorderColor(CLR_DEF_CONTROL_TAB_HEAD_BORDER_COLOR,true);
   this.SetBorderColorMouseDown(CLR_DEF_CONTROL_TAB_HEAD_BORDER_MOUSE_DOWN);
   this.SetBorderColorMouseOver(CLR_DEF_CONTROL_TAB_HEAD_BORDER_MOUSE_OVER);
   this.SetWidthOff(this.Width());
   this.SetHeightOff(this.Height());
   this.SetWidthOn(this.Width()+4);
   this.SetHeightOn(this.Height()+2);
   this.SetState(false);
  }
//+------------------------------------------------------------------+
No corpo do construtor são definidos valores padrão para cores de objetos em diferentes estados. Os sinalizadores do botão interruptor e do botão que está trabalhando no grupo são definidos imediatamente. Para o estado pressionado, o tamanho do objeto é ajustado para aumentar em cada lado, exceto na guia adjacente ao campo da guia, em dois pixels.
Método que define o estado do controle:
//+------------------------------------------------------------------+
//| Set the state of the control                                     |
//+------------------------------------------------------------------+
void CTabHeader::SetState(const bool flag)
  {
   bool state=this.State();
   CButton::SetState(flag);
   if(state!=flag)
      this.SetWH();
  }
//+------------------------------------------------------------------+
Primeiro, salvamos o estado atual, depois chamamos o método de classe pai para definir o estado e, se o estado anterior não era o definido agora, chamamos o método de redimensionamento do cabeçalho da guia.
Método que define a largura, a altura e o deslocamento de um elemento, dependendo de seu estado:
//+------------------------------------------------------------------+
//| Set the element width, height and shift                          |
//| depending on its state                                           |
//+------------------------------------------------------------------+
void CTabHeader::SetWH(void)
  {
   if(this.State())
      this.WHProcessStateOn();
   else
      this.WHProcessStateOff();
  }
//+------------------------------------------------------------------+
Se o estado for "ligado", então chamamos o método redimensionar e posicionar para o estado "ligado", caso contrário, chamamos o método redimensionar e posicionar para o estado "desligado".
Método que ajusta o tamanho e a posição de um elemento no estado "selecionado" dependendo de sua posição:
//+------------------------------------------------------------------+
//| Adjust the element size and location                             |
//| in the "selected" state depending on its location                |
//+------------------------------------------------------------------+
void CTabHeader::WHProcessStateOn(void)
  {
//--- If failed to get a new size, leave
   if(!this.SetSizeOn())
      return;
//--- Depending on the title location,
   switch(this.Alignment())
     {
      case CANV_ELEMENT_ALIGNMENT_TOP :
        //--- move it where necessary and set new relative coordinates
        if(this.Move(this.CoordX()-2,this.CoordY()-2))
          {
           this.SetCoordXRelative(this.CoordXRelative()-2);
           this.SetCoordYRelative(this.CoordYRelative()-2);
          }
        break;
      case CANV_ELEMENT_ALIGNMENT_BOTTOM :
        //--- move it where necessary and set new relative coordinates
        if(this.Move(this.CoordX()-2,this.CoordY()))
          {
           this.SetCoordXRelative(this.CoordXRelative()-2);
           this.SetCoordYRelative(this.CoordYRelative());
          }
        break;
      default:
        break;
     }
   this.Update(false);
  }
//+------------------------------------------------------------------+
A lógica do método é comentada no código. Dependendo de onde o cabeçalho está localizado (até agora apenas duas posições estão sendo processadas - superior e inferior), o cabeçalho é redimensionado e deslocado para novas coordenadas para que sua borda que está em contato com o campo da guia permaneça no lugar. Visualmente, será uma expansão do objeto em dois pixels em cada direção, exceto para o lado adjacente ao campo.
Método que ajusta o tamanho e a posição de um elemento no estado "não selecionado" dependendo de sua posição:
//+------------------------------------------------------------------+
//| Adjust the element size and location                             |
//| in the "released" state depending on its location                |
//+------------------------------------------------------------------+
void CTabHeader::WHProcessStateOff(void)
  {
//--- If failed to get a new size, leave
   if(!this.SetSizeOff())
      return;
//--- Depending on the title location,
   switch(this.Alignment())
     {
      case CANV_ELEMENT_ALIGNMENT_TOP :
        //--- move it where necessary and set new relative coordinates
        if(this.Move(this.CoordX()+2,this.CoordY()+2))
          {
           this.SetCoordXRelative(this.CoordXRelative()+2);
           this.SetCoordYRelative(this.CoordYRelative()+2);
          }
        break;
      case CANV_ELEMENT_ALIGNMENT_BOTTOM :
        //--- move it where necessary and set new relative coordinates
        if(this.Move(this.CoordX()+2,this.CoordY()))
          {
           this.SetCoordXRelative(this.CoordXRelative()+2);
           this.SetCoordYRelative(this.CoordYRelative());
          }
        break;
      default:
        break;
     }
   this.Update(false);
  }
//+------------------------------------------------------------------+
Dependendo de onde o cabeçalho está localizado (agora apenas duas posições estão sendo processadas - superior e inferior), o cabeçalho é redimensionado e deslocado para novas coordenadas para que sua borda que está em contato com o campo da guia permaneça no lugar. Visualmente, isso reduzirá o objeto em dois pixels de cada lado, exceto o adjacente ao campo.
Método que desenha a moldura de um elemento dependendo de sua localização:
//+------------------------------------------------------------------+
//| Draw the element frame depending on the location                 |
//+------------------------------------------------------------------+
void CTabHeader::DrawFrame(void)
  {
//--- Set initial coordinates
   int x1=0;
   int x2=this.Width()-1;
   int y1=0;
   int y2=this.Height()-1;
//--- Depending on the position of the header, draw a frame
//--- so that the edge of the drawn frame adjacent to the field goes beyond the object
//--- thus, visually the edge will not be drawn on the adjacent side
   switch(this.Alignment())
     {
      case CANV_ELEMENT_ALIGNMENT_TOP     :
        this.DrawRectangle(x1,y1,x2,y2+1,this.BorderColor(),this.Opacity());
        break;
      case CANV_ELEMENT_ALIGNMENT_BOTTOM  :
        this.DrawRectangle(x1,y1-1,x2,y2,this.BorderColor(),this.Opacity());
        break;
      case CANV_ELEMENT_ALIGNMENT_LEFT    :
        this.DrawRectangle(x1,y1,x2+1,y2,this.BorderColor(),this.Opacity());
        break;
      case CANV_ELEMENT_ALIGNMENT_RIGHT   :
        this.DrawRectangle(x1-1,y1,x2,y2,this.BorderColor(),this.Opacity());
        break;
      default:
        break;
     }
  }
//+------------------------------------------------------------------+
A lógica do método é comentada no código. Se desenharmos um retângulo sobre um objeto para que as coordenadas de um lado se estendam além do objeto, nada será desenhado nesse lado. É isto que usamos aqui, onde o cabeçalho deve ser adjacente ao campo da guia, especificamos conscientemente as coordenadas fora do objeto, e nenhuma moldura é desenhada neste lado.
Método que limpa um elemento, preenchendo-o com cor e opacidade:
//+------------------------------------------------------------------+
//| Clear the element filling it with color and opacity              |
//+------------------------------------------------------------------+
void CTabHeader::Erase(const color colour,const uchar opacity,const bool redraw=false)
  {
//--- Fill the element having the specified color and the redrawing flag
   CGCnvElement::Erase(colour,opacity,redraw);
//--- If the object has a frame, draw it
   if(this.BorderStyle()!=FRAME_STYLE_NONE && redraw)
      this.DrawFrame();
//--- Update the element having the specified redrawing flag
   this.Update(redraw);
  }
//+------------------------------------------------------------------+
O método virtual substitui o método do objeto pai, onde uma moldura é desenhada dentro do objeto. Aqui chamamos o método acima para desenhar uma moldura em apenas três lados do objeto.
Método que limpa um elemento com um preenchimento de gradiente:
//+------------------------------------------------------------------+
//| Clear the element with a gradient fill                           |
//+------------------------------------------------------------------+
void CTabHeader::Erase(color &colors[],const uchar opacity,const bool vgradient,const bool cycle,const bool redraw=false)
  {
//--- Fill the element having the specified color array and the redrawing flag
   CGCnvElement::Erase(colors,opacity,vgradient,cycle,redraw);
//--- If the object has a frame, draw it
   if(this.BorderStyle()!=FRAME_STYLE_NONE && redraw)
      this.DrawFrame();
//--- Update the element having the specified redrawing flag
   this.Update(redraw);
  }
//+------------------------------------------------------------------+
O método é idêntico ao anterior, mas preenche o fundo com uma cor gradiente a partir do array de cores passado para o método.
Manipulador do evento “Cursor dentro da área ativa, botão do mouse liberado (esquerdo)”:
//+------------------------------------------------------------------+
//| 'The cursor is inside the active area,                           |
//| left mouse button released                                       |
//+------------------------------------------------------------------+
void CTabHeader::MouseActiveAreaReleasedHandler(const int id,const long& lparam,const double& dparam,const string& sparam)
  {
//--- The mouse button released outside the element means refusal to interact with the element
   if(lparam<this.CoordX() || lparam>this.RightEdge() || dparam<this.CoordY() || dparam>this.BottomEdge())
     {
      //--- If this is a simple button, set the initial background and text color
      if(!this.Toggle())
        {
         this.SetBackgroundColor(this.BackgroundColorInit(),false);
         this.SetForeColor(this.ForeColorInit(),false);
        }
      //--- If this is the toggle button, set the initial background and text color depending on whether the button is pressed or not
      else
        {
         this.SetBackgroundColor(!this.State() ? this.BackgroundColorInit() : this.BackgroundStateOnColorInit(),false);
         this.SetForeColor(!this.State() ? this.ForeColorInit() : this.ForeStateOnColorInit(),false);
        }
      //--- Set the initial frame color
      this.SetBorderColor(this.BorderColorInit(),false);
      //--- Send the test message to the journal
      Print(DFUN_ERR_LINE,TextByLanguage("Отмена","Cancel"));
     }
//--- The mouse button released within the element means a  click on the control
   else
     {
      //--- If this is a simple button, set the background and text color for "The cursor is over the active area" status
      if(!this.Toggle())
        {
         this.SetBackgroundColor(this.BackgroundColorMouseOver(),false);
         this.SetForeColor(this.ForeColorMouseOver(),false);
        }
      //--- If this is the toggle button,
      else
        {
         //--- if the button does not work in the group, set its state to the opposite,
         if(!this.GroupButtonFlag())
            this.SetState(!this.State());
         //--- if the button is not pressed yet, set it to the pressed state
         else if(!this.State())
            this.SetState(true);
         //--- set the background and text color for "The cursor is over the active area" status depending on whether the button is clicked or not
         this.SetBackgroundColor(this.State() ? this.BackgroundStateOnColorMouseOver() : this.BackgroundColorMouseOver(),false);
         this.SetForeColor(this.State() ? this.ForeStateOnColorMouseOver() : this.ForeColorMouseOver(),false);
        }
      //--- Send the test message to the journal
      Print(DFUN_ERR_LINE,TextByLanguage("Щелчок","Click"),", this.State()=",this.State(),", ID=",this.ID(),", Group=",this.Group());
      //--- Set the frame color for "The cursor is over the active area" status
      this.SetBorderColor(this.BorderColorMouseOver(),false);
     }
//--- Redraw the object
   this.Redraw(false);
  }
//+------------------------------------------------------------------+
Último manipulador de eventos do mouse:
//+------------------------------------------------------------------+
//| Last mouse event handler                                         |
//+------------------------------------------------------------------+
void CTabHeader::OnMouseEventPostProcessing(void)
  {
   ENUM_MOUSE_FORM_STATE state=GetMouseState();
   switch(state)
     {
      //--- The cursor is outside the form, the mouse buttons are not clicked
      //--- The cursor is outside the form, any mouse button is clicked
      //--- The cursor is outside the form, the mouse wheel is being scrolled
      case MOUSE_FORM_STATE_OUTSIDE_FORM_NOT_PRESSED :
      case MOUSE_FORM_STATE_OUTSIDE_FORM_PRESSED     :
      case MOUSE_FORM_STATE_OUTSIDE_FORM_WHEEL       :
        if(this.MouseEventLast()==MOUSE_EVENT_INSIDE_ACTIVE_AREA_NOT_PRESSED || this.MouseEventLast()==MOUSE_EVENT_INSIDE_FORM_NOT_PRESSED)
          {
           this.SetBackgroundColor(this.State() ? this.BackgroundStateOnColor() : this.BackgroundColorInit(),false);
           this.SetForeColor(this.State() ? this.ForeStateOnColor() : this.ForeColorInit(),false);
           this.SetBorderColor(this.BorderColorInit(),false);
           this.m_mouse_event_last=ENUM_MOUSE_EVENT(state+MOUSE_EVENT_NO_EVENT);
           this.Redraw(false);
          }
        break;

      //--- The cursor is inside the form, the mouse buttons are not clicked
      //--- The cursor is inside the form, any mouse button is clicked
      //--- The cursor is inside the form, the mouse wheel is being scrolled
      //--- The cursor is inside the active area, the mouse buttons are not clicked
      //--- The cursor is inside the active area, any mouse button is clicked
      //--- The cursor is inside the active area, the mouse wheel is being scrolled
      //--- The cursor is inside the active area, left mouse button is released
      //--- The cursor is within the window scrolling area, the mouse buttons are not clicked
      //--- The cursor is within the window scrolling area, any mouse button is clicked
      //--- The cursor is within the window scrolling area, the mouse wheel is being scrolled
      case MOUSE_FORM_STATE_INSIDE_FORM_NOT_PRESSED :
      case MOUSE_FORM_STATE_INSIDE_FORM_PRESSED :
      case MOUSE_FORM_STATE_INSIDE_FORM_WHEEL :
      case MOUSE_FORM_STATE_INSIDE_ACTIVE_AREA_NOT_PRESSED :
      case MOUSE_FORM_STATE_INSIDE_ACTIVE_AREA_PRESSED :
      case MOUSE_FORM_STATE_INSIDE_ACTIVE_AREA_WHEEL :
      case MOUSE_FORM_STATE_INSIDE_ACTIVE_AREA_RELEASED :
      case MOUSE_FORM_STATE_INSIDE_SCROLL_AREA_NOT_PRESSED :
      case MOUSE_FORM_STATE_INSIDE_SCROLL_AREA_PRESSED :
      case MOUSE_FORM_STATE_INSIDE_SCROLL_AREA_WHEEL :
        break;
      //--- MOUSE_EVENT_NO_EVENT
      default:
        break;
     }
  }
//+------------------------------------------------------------------+
Ambos os métodos são idênticos aos métodos da classe pai.
Movido aqui para possível redefinição durante o desenvolvimento do objeto TabControl.
Classe TabControl: desenvolvimento em andamento
No último artigo, começamos a desenvolver o controle TabControl, mas encontramos uma limitação no comprimento dos nomes dos objetos gráficos criados. Depois de criar um novo algoritmo de nomenclatura para os elementos gráficos da biblioteca, vamos continuar trabalhando no arquivo \MQL5\Include\DoEasy\Objects\Graph\WForms\Containers\TabControl.mqh.
Vamos incluir o arquivo de classe do objeto de cabeçalho da guia no arquivo de controle:
//+------------------------------------------------------------------+
//| Include files                                                    |
//+------------------------------------------------------------------+
#include "Container.mqh"
#include "GroupBox.mqh"
#include "..\TabHeader.mqh"
//+------------------------------------------------------------------+
Na seção privada da classe, declararemos dois métodos para definir o estado da guia especificado pelo índice da mesma:
private:
   int                  m_item_width;                 // Fixed width of tab titles
   int                  m_item_height;                // Fixed height of tab titles
//--- Create a new graphical object
   virtual CGCnvElement *CreateNewGObject(const ENUM_GRAPH_ELEMENT_TYPE type,
                                          const int element_num,
                                          const string descript,
                                          const int x,
                                          const int y,
                                          const int w,
                                          const int h,
                                          const color colour,
                                          const uchar opacity,
                                          const bool movable,
                                          const bool activity);
//--- Set the tab as selected
   void              SetSelected(const int index);
//--- Set the tab as released
   void              SetUnselected(const int index);

public:
Vamos renomear o método público CreateTabPage() para CreateTabPages(), vamos torná-lo com um tipo de retorno bool e com um conjunto diferente de parâmetros formais e vamos adicionar dois métodos que retornam ponteiros para o cabeçalho e o campo da guia por índice:
public:
//--- Create the specified number of tabs
   bool              CreateTabPages(const int total,const int selected_page,const int tab_w=0,const int tab_h=0,const string header_text="");

//--- Return a pointer to the (1) title and (2) tab field
   CTabHeader       *GetHeader(const int index)          { return this.GetElementByType(GRAPH_ELEMENT_TYPE_WF_TAB_HEADER,index); }
   CContainer       *GetField(const int index)           { return this.GetElementByType(GRAPH_ELEMENT_TYPE_WF_CONTAINER,index);  }
Vamos fazer o método SetAlignment() para que ele não apenas defina o valor na propriedade do objeto, mas também o defina para todos os cabeçalhos de guia criados no controle:
//--- (1) Set and (2) return the location of tabs on the control
   void              SetAlignment(const ENUM_CANV_ELEMENT_ALIGNMENT alignment)
                       {
                        this.SetProperty(CANV_ELEMENT_PROP_TAB_ALIGNMENT,alignment);
                        CArrayObj *list=this.GetListElementsByType(GRAPH_ELEMENT_TYPE_WF_TAB_HEADER);
                        if(list==NULL)
                           return;
                        for(int i=0;i<list.Total();i++)
                          {
                           CTabHeader *header=list.At(i);
                           if(header==NULL)
                              continue;
                           header.SetAlignment(alignment);
                          }
                       }
Primeiro, definimos o valor nas propriedades do objeto, depois obtemos uma lista de todos os cabeçalhos de guias criados e, em um loop pela lista resultante para cada objeto, definimos o mesmo valor.
Vamos declarar mais três métodos públicos:
//--- Set a fixed tab size
   void              SetItemSize(const int w,const int h)
                       {
                        if(this.ItemWidth()!=w)
                           this.SetItemWidth(w);
                        if(this.ItemHeight()!=h)
                           this.SetItemHeight(h);
                       }
//--- Set the tab as selected/released
   void              Select(const int index,const bool flag);

//--- Set the title text (1) of the specified tab and (2) by index
   void              SetHeaderText(CTabHeader *header,const string text);
   void              SetHeaderText(const int index,const string text);

//--- Constructor
No construtor da classe, definimos todas as cores como transparentes , exceto a cor do texto e fazemos as alterações que fizemos com todos os objetos WinForms:
//+------------------------------------------------------------------+
//| Constructor indicating the chart and subwindow ID                |
//+------------------------------------------------------------------+
CTabControl::CTabControl(const long chart_id,
                   const int subwindow,
                   const string descript,
                   const int x,
                   const int y,
                   const int w,
                   const int h) : CContainer(GRAPH_ELEMENT_TYPE_WF_TAB_CONTROL,chart_id,subwindow,descript,x,y,w,h)
  {
   this.SetTypeElement(GRAPH_ELEMENT_TYPE_WF_TAB_CONTROL);
   this.m_type=OBJECT_DE_TYPE_GWF_CONTAINER;
   this.SetBorderSizeAll(0);
   this.SetBorderStyle(FRAME_STYLE_NONE);
   this.SetOpacity(0,true);
   this.SetBackgroundColor(CLR_CANV_NULL,true);
   this.SetBackgroundColorMouseDown(CLR_CANV_NULL);
   this.SetBackgroundColorMouseOver(CLR_CANV_NULL);
   this.SetBorderColor(CLR_CANV_NULL,true);
   this.SetBorderColorMouseDown(CLR_CANV_NULL);
   this.SetBorderColorMouseOver(CLR_CANV_NULL);
   this.SetForeColor(CLR_DEF_FORE_COLOR,true);
   this.SetAlignment(CANV_ELEMENT_ALIGNMENT_TOP);
   this.SetItemSize(58,18);
  }
//+------------------------------------------------------------------+
Este objeto tem como objetivo servir de contêiner e gerenciar as guias criadas dentro dele, por isso é totalmente transparente, mas ainda é possível exibir texto nele.
Método que cria o número especificado de guias:
//+------------------------------------------------------------------+
//| Create the specified number of tabs                              |
//+------------------------------------------------------------------+
bool CTabControl::CreateTabPages(const int total,const int selected_page,const int tab_w=0,const int tab_h=0,const string header_text="")
  {
//--- Calculate the size and initial coordinates of the tab title
   int w=(tab_w==0 ? this.ItemWidth()  : tab_w);
   int h=(tab_h==0 ? this.ItemHeight() : tab_h);

//--- In the loop by the number of tabs
   CTabHeader *header=NULL;
   for(int i=0;i<total;i++)
     {
      //--- Depending on the location of tab titles, set their initial coordinates
      int header_x=2;
      int header_y=0;
      if(this.Alignment()==CANV_ELEMENT_ALIGNMENT_TOP)
         header_y=0;
      if(this.Alignment()==CANV_ELEMENT_ALIGNMENT_BOTTOM)
         header_y=this.Height()-h;
      //--- Set the current X coordinate
      header_x=(header==NULL ? header_x : header.RightEdgeRelative());
      //--- Create the TabHeader object
      if(!this.CreateNewElement(GRAPH_ELEMENT_TYPE_WF_TAB_HEADER,header_x,header_y,w,h,clrNONE,255,this.Active(),false))
        {
         ::Print(DFUN,CMessage::Text(MSG_LIB_SYS_FAILED_CREATE_ELM_OBJ),this.TypeElementDescription(GRAPH_ELEMENT_TYPE_WF_TAB_HEADER),string(i+1));
         return false;
        }
      header=this.GetElementByType(GRAPH_ELEMENT_TYPE_WF_TAB_HEADER,i);
      if(header==NULL)
        {
         ::Print(DFUN,CMessage::Text(MSG_ELM_LIST_ERR_FAILED_GET_GRAPH_ELEMENT_OBJ),this.TypeElementDescription(GRAPH_ELEMENT_TYPE_WF_TAB_HEADER),string(i+1));
         return false;
        }
      header.SetBackgroundColor(CLR_DEF_CONTROL_TAB_HEAD_BACK_COLOR,true);
      header.SetBackgroundColorMouseDown(CLR_DEF_CONTROL_TAB_HEAD_MOUSE_DOWN);
      header.SetBackgroundColorMouseOver(CLR_DEF_CONTROL_TAB_HEAD_MOUSE_OVER);
      header.SetBackgroundStateOnColor(CLR_DEF_CONTROL_TAB_HEAD_BACK_COLOR_ON,true);
      header.SetBackgroundStateOnColorMouseDown(CLR_DEF_CONTROL_TAB_HEAD_BACK_DOWN_ON);
      header.SetBackgroundStateOnColorMouseOver(CLR_DEF_CONTROL_TAB_HEAD_BACK_OVER_ON);
      header.SetBorderStyle(FRAME_STYLE_SIMPLE);
      header.SetBorderColor(CLR_DEF_CONTROL_TAB_HEAD_BORDER_COLOR,true);
      header.SetBorderColorMouseDown(CLR_DEF_CONTROL_TAB_HEAD_BORDER_MOUSE_DOWN);
      header.SetBorderColorMouseOver(CLR_DEF_CONTROL_TAB_HEAD_BORDER_MOUSE_OVER);
      header.SetAlignment(this.Alignment());
      if(header_text!="" && header_text!=NULL)
         this.SetHeaderText(header,header_text+string(i+1));

      //--- Depending on the location of the tab headers, set the initial coordinates of the tab fields
      int field_x=0;
      int field_y=0;
      int field_h=this.Height()-header.Height();
      if(this.Alignment()==CANV_ELEMENT_ALIGNMENT_TOP)
         field_y=header.BottomEdgeRelative();
      if(this.Alignment()==CANV_ELEMENT_ALIGNMENT_BOTTOM)
         field_y=0;
      //--- Create the Container object (tab field)
      CContainer *field=NULL;
      if(!this.CreateNewElement(GRAPH_ELEMENT_TYPE_WF_CONTAINER,field_x,field_y,this.Width(),field_h,clrNONE,255,true,false))
        {
         ::Print(DFUN,CMessage::Text(MSG_LIB_SYS_FAILED_CREATE_ELM_OBJ),this.TypeElementDescription(GRAPH_ELEMENT_TYPE_WF_CONTAINER),string(i+1));
         return false;
        }
      field=this.GetElementByType(GRAPH_ELEMENT_TYPE_WF_CONTAINER,i);
      if(field==NULL)
        {
         ::Print(DFUN,CMessage::Text(MSG_ELM_LIST_ERR_FAILED_GET_GRAPH_ELEMENT_OBJ),this.TypeElementDescription(GRAPH_ELEMENT_TYPE_WF_CONTAINER),string(i+1));
         return false;
        }
      field.SetBorderSizeAll(1);
      field.SetBorderStyle(FRAME_STYLE_SIMPLE);
      field.SetOpacity(CLR_DEF_CONTROL_TAB_PAGE_OPACITY,true);
      field.SetBackgroundColor(CLR_DEF_CONTROL_TAB_PAGE_BACK_COLOR,true);
      field.SetBackgroundColorMouseDown(CLR_DEF_CONTROL_TAB_PAGE_MOUSE_DOWN);
      field.SetBackgroundColorMouseOver(CLR_DEF_CONTROL_TAB_PAGE_MOUSE_OVER);
      field.SetBorderColor(CLR_DEF_CONTROL_TAB_PAGE_BORDER_COLOR,true);
      field.SetBorderColorMouseDown(CLR_DEF_CONTROL_TAB_PAGE_BORDER_MOUSE_DOWN);
      field.SetBorderColorMouseOver(CLR_DEF_CONTROL_TAB_PAGE_BORDER_MOUSE_OVER);
      field.SetForeColor(CLR_DEF_FORE_COLOR,true);
      field.Hide();
   //---
     }
   this.Select(selected_page,true);
   return true;
  }
//+------------------------------------------------------------------+
Nossas guias consistem em dois objetos - o cabeçalho da guia e o campo da guia. O cabeçalho (botão) é usado para selecionar a guia ativa e o campo é usado para colocar outros controles nela. Os botões sempre devem ser exibidos e os campos da guia sempre ocultos, exceto o ativo.
Aqui, em um loop, primeiro criamos botões como cabeçalhos de guia e os definimos com seus valores padrão. Na mesma iteração do loop após a criação do botão, criamos um contêiner para o campo da guia e também definimos seus valores padrão. As coordenadas e tamanhos dos campos da guia dependem e são calculados com base na localização dos cabeçalhos no controle. Ao final do laço de criação dos objetos-guias, fazemos a guia especificada nos parâmetros de entrada selecionados.
Método que configura a guia selecionada:
//+------------------------------------------------------------------+
//| Set the tab as selected                                          |
//+------------------------------------------------------------------+
void CTabControl::SetSelected(const int index)
  {
   CTabHeader *header=this.GetElementByType(GRAPH_ELEMENT_TYPE_WF_TAB_HEADER,index);
   CContainer *field=this.GetElementByType(GRAPH_ELEMENT_TYPE_WF_CONTAINER,index);
   if(header==NULL || field==NULL)
      return;
   field.Show();
   field.BringToTop();
   header.SetState(true);
   header.BringToTop();
  }
//+------------------------------------------------------------------+
Obtemos ponteiros para o cabeçalho e o campo da guia por índice.
Exibimos o campo e o trazemos para a frente.
Definimos o cabeçalho selecionado e o trazemos para a frente.
Método para definir a guia não selecionada:
//+------------------------------------------------------------------+
//| Select the tab as released                                       |
//+------------------------------------------------------------------+
void CTabControl::SetUnselected(const int index)
  {
   CTabHeader *header=this.GetElementByType(GRAPH_ELEMENT_TYPE_WF_TAB_HEADER,index);
   CContainer *field=this.GetElementByType(GRAPH_ELEMENT_TYPE_WF_CONTAINER,index);
   if(header==NULL || field==NULL)
      return;
   field.Hide();
   header.SetState(false);
  }
//+------------------------------------------------------------------+
Obtemos ponteiros para o cabeçalho e o campo da guia por índice.
Ocultamos o campo e definimos o cabeçalho como não selecionado.
Método que define a guia selecionada/não selecionada:
//+------------------------------------------------------------------+
//| Set the tab as selected/released                                 |
//+------------------------------------------------------------------+
void CTabControl::Select(const int index,const bool flag)
  {
   if(flag)
      this.SetSelected(index);
   else
      this.SetUnselected(index);
  }
//+------------------------------------------------------------------+
O índice de guia e o sinalizador são passados para o método e, dependendo do valor do sinalizador, chamamos um dos dois métodos discutidos acima.
Método que define o texto do cabeçalho da guia especificada:
//+------------------------------------------------------------------+
//| Set the title text of the specified tab                          |
//+------------------------------------------------------------------+
void CTabControl::SetHeaderText(CTabHeader *header,const string text)
  {
   if(header==NULL)
      return;
   header.SetText(text);
  }
//+------------------------------------------------------------------+
Um ponteiro para um objeto é passado para o método, objeto esse onde o texto passado para o método é definido.
Método que define o texto do cabeçalho da guia por índice:
//+------------------------------------------------------------------+
//| Set the tab title text by index                                  |
//+------------------------------------------------------------------+
void CTabControl::SetHeaderText(const int index,const string text)
  {
   CTabHeader *header=this.GetElementByType(GRAPH_ELEMENT_TYPE_WF_TAB_HEADER,index);
   this.SetHeaderText(header,text);
  }
//+------------------------------------------------------------------+
O método recebe o índice do cabeçalho da guia no qual o texto deve ser definido.
Por índice, obtemos um objeto com o tipo de cabeçalho da guia e chamamos o método acima para definir o texto para o objeto especificado.
No método que cria um novo objeto gráfico, adicionamos a criação do objeto ListBoxItem e removemos o bloco para criar o agora ausente objeto TabPage:
//+------------------------------------------------------------------+
//| Create a new graphical object                                    |
//+------------------------------------------------------------------+
CGCnvElement *CTabControl::CreateNewGObject(const ENUM_GRAPH_ELEMENT_TYPE type,
                                         const int obj_num,
                                         const string descript,
                                         const int x,
                                         const int y,
                                         const int w,
                                         const int h,
                                         const color colour,
                                         const uchar opacity,
                                         const bool movable,
                                         const bool activity)
  {

   CGCnvElement *element=NULL;
   switch(type)
     {
      case GRAPH_ELEMENT_TYPE_ELEMENT              :
         element=new CGCnvElement(type,this.ID(),obj_num,this.ChartID(),this.SubWindow(),descript,x,y,w,h,colour,opacity,movable,activity);
        break;
      case GRAPH_ELEMENT_TYPE_FORM                 :
         element=new CForm(this.ChartID(),this.SubWindow(),descript,x,y,w,h);
        break;
      case GRAPH_ELEMENT_TYPE_WF_CONTAINER         :
         element=new CContainer(this.ChartID(),this.SubWindow(),descript,x,y,w,h);
        break;
      case GRAPH_ELEMENT_TYPE_WF_GROUPBOX          :
         element=new CGroupBox(this.ChartID(),this.SubWindow(),descript,x,y,w,h);
        break;
      case GRAPH_ELEMENT_TYPE_WF_PANEL             :
         element=new CPanel(this.ChartID(),this.SubWindow(),descript,x,y,w,h);
        break;
      case GRAPH_ELEMENT_TYPE_WF_LABEL             :
         element=new CLabel(this.ChartID(),this.SubWindow(),descript,x,y,w,h);
        break;
      case GRAPH_ELEMENT_TYPE_WF_CHECKBOX          :
         element=new CCheckBox(this.ChartID(),this.SubWindow(),descript,x,y,w,h);
        break;
      case GRAPH_ELEMENT_TYPE_WF_RADIOBUTTON       :
         element=new CRadioButton(this.ChartID(),this.SubWindow(),descript,x,y,w,h);
        break;
      case GRAPH_ELEMENT_TYPE_WF_BUTTON            :
         element=new CButton(this.ChartID(),this.SubWindow(),descript,x,y,w,h);
        break;
      case GRAPH_ELEMENT_TYPE_WF_LIST_BOX          :
         element=new CListBox(this.ChartID(),this.SubWindow(),descript,x,y,w,h);
        break;
      case GRAPH_ELEMENT_TYPE_WF_LIST_BOX_ITEM     :
         element=new CListBoxItem(this.ChartID(),this.SubWindow(),descript,x,y,w,h);
        break;
      case GRAPH_ELEMENT_TYPE_WF_CHECKED_LIST_BOX  :
         element=new CCheckedListBox(this.ChartID(),this.SubWindow(),descript,x,y,w,h);
        break;
      case GRAPH_ELEMENT_TYPE_WF_BUTTON_LIST_BOX   :
         element=new CButtonListBox(this.ChartID(),this.SubWindow(),descript,x,y,w,h);
        break;
      case GRAPH_ELEMENT_TYPE_WF_TAB_HEADER        :
         element=new CTabHeader(this.ChartID(),this.SubWindow(),descript,x,y,w,h);
        break;


      case GRAPH_ELEMENT_TYPE_WF_TAB_CONTROL       :
         element=new CTabControl(this.ChartID(),this.SubWindow(),descript,x,y,w,h);
        break;
      default:
        break;
     }
   if(element==NULL)
      ::Print(DFUN,CMessage::Text(MSG_LIB_SYS_FAILED_CREATE_ELM_OBJ),this.TypeElementDescription(type));
   return element;
  }
//+------------------------------------------------------------------+
Agora, em cada bloco de criação de objeto, passamos a descrição do objeto para o método, e não seu nome.
Nas classes do objeto Panel no arquivo \MQL5\Include\DoEasy\Objects\Graph\WForms\Containers\Panel.mqh e o objeto GroupBox no arquivo \MQL5\Include\DoEasy\Objects\Graph\WForms\Containers\GroupBox .mqh, fizemos melhorias semelhantes, como para objetos WinForms: adicionamos um novo construtor protegido, removemos o construtor paramétrico desnecessário e modificamos o método virtual CreateNewGObject() da mesma forma que acabamos de discutir acima.
Isso é tudo o que até agora foi necessário ajustar.
Teste
Para testar, vamos pegar o Expert Advisor do artigo anterior e salvá-lo na nova pasta \MQL5\Experts\TestDoEasy\Part114\ com o novo nome TstDE114.mq5.
Para exibir as descrições das constantes de enumeração em dois idiomas diferentes, nas configurações do EA criaremos uma enumeração adicional para o idioma de compilação inglês e russo, e nas configurações adicionaremos uma nova variável com o tipo dessa enumeração, que indicará em qual lateral - superior ou inferior (direita-esquerda ainda não funcionam) - os cabeçalhos das guias serão colocados:
//--- enumerations by compilation language
#ifdef COMPILE_EN
enum ENUM_AUTO_SIZE_MODE
  {
   AUTO_SIZE_MODE_GROW=CANV_ELEMENT_AUTO_SIZE_MODE_GROW,                // Grow
   AUTO_SIZE_MODE_GROW_SHRINK=CANV_ELEMENT_AUTO_SIZE_MODE_GROW_SHRINK   // Grow and Shrink
  };
enum ENUM_BORDER_STYLE
  {
   BORDER_STYLE_NONE=FRAME_STYLE_NONE,                                  // None
   BORDER_STYLE_SIMPLE=FRAME_STYLE_SIMPLE,                              // Simple
   BORDER_STYLE_FLAT=FRAME_STYLE_FLAT,                                  // Flat
   BORDER_STYLE_BEVEL=FRAME_STYLE_BEVEL,                                // Embossed (bevel)
   BORDER_STYLE_STAMP=FRAME_STYLE_STAMP,                                // Embossed (stamp)
  };
enum ENUM_CHEK_STATE
  {
   CHEK_STATE_UNCHECKED=CANV_ELEMENT_CHEK_STATE_UNCHECKED,              // Unchecked
   CHEK_STATE_CHECKED=CANV_ELEMENT_CHEK_STATE_CHECKED,                  // Checked
   CHEK_STATE_INDETERMINATE=CANV_ELEMENT_CHEK_STATE_INDETERMINATE,      // Indeterminate
  };
enum ENUM_ELEMENT_ALIGNMENT
  {
   ELEMENT_ALIGNMENT_TOP=CANV_ELEMENT_ALIGNMENT_TOP,                    // Top
   ELEMENT_ALIGNMENT_BOTTOM=CANV_ELEMENT_ALIGNMENT_BOTTOM,              // Bottom
   ELEMENT_ALIGNMENT_LEFT=CANV_ELEMENT_ALIGNMENT_LEFT,                  // Left
   ELEMENT_ALIGNMENT_RIGHT=CANV_ELEMENT_ALIGNMENT_RIGHT,                // Right
  };
#else
enum ENUM_AUTO_SIZE_MODE
  {
   AUTO_SIZE_MODE_GROW=CANV_ELEMENT_AUTO_SIZE_MODE_GROW,                // Increase only
   AUTO_SIZE_MODE_GROW_SHRINK=CANV_ELEMENT_AUTO_SIZE_MODE_GROW_SHRINK   // Increase and decrease
  };
enum ENUM_BORDER_STYLE
  {
   BORDER_STYLE_NONE=FRAME_STYLE_NONE,                                  // No frame
   BORDER_STYLE_SIMPLE=FRAME_STYLE_SIMPLE,                              // Simple frame
   BORDER_STYLE_FLAT=FRAME_STYLE_FLAT,                                  // Flat frame
   BORDER_STYLE_BEVEL=FRAME_STYLE_BEVEL,                                // Embossed (convex)
   BORDER_STYLE_STAMP=FRAME_STYLE_STAMP,                                // Embossed (concave)
  };
enum ENUM_CHEK_STATE
  {
   CHEK_STATE_UNCHECKED=CANV_ELEMENT_CHEK_STATE_UNCHECKED,              // Unchecked
   CHEK_STATE_CHECKED=CANV_ELEMENT_CHEK_STATE_CHECKED,                  // Checked
   CHEK_STATE_INDETERMINATE=CANV_ELEMENT_CHEK_STATE_INDETERMINATE,      // Undefined
  };
enum ENUM_ELEMENT_ALIGNMENT
  {
   ELEMENT_ALIGNMENT_TOP=CANV_ELEMENT_ALIGNMENT_TOP,                    // Top
   ELEMENT_ALIGNMENT_BOTTOM=CANV_ELEMENT_ALIGNMENT_BOTTOM,              // Bottom
   ELEMENT_ALIGNMENT_LEFT=CANV_ELEMENT_ALIGNMENT_LEFT,                  // Left
   ELEMENT_ALIGNMENT_RIGHT=CANV_ELEMENT_ALIGNMENT_RIGHT,                // Right
  };
#endif
//--- input parameters
sinput   bool                          InpMovable           =  true;                   // Panel Movable flag
sinput   ENUM_INPUT_YES_NO             InpAutoSize          =  INPUT_YES;              // Panel Autosize
sinput   ENUM_AUTO_SIZE_MODE           InpAutoSizeMode      =  AUTO_SIZE_MODE_GROW;    // Panel Autosize mode
sinput   ENUM_BORDER_STYLE             InpFrameStyle        =  BORDER_STYLE_SIMPLE;    // Label border style
sinput   ENUM_ANCHOR_POINT             InpTextAlign         =  ANCHOR_CENTER;          // Label text align
sinput   ENUM_INPUT_YES_NO             InpTextAutoSize      =  INPUT_NO;               // Label autosize
sinput   ENUM_ANCHOR_POINT             InpCheckAlign        =  ANCHOR_LEFT;            // Check flag align
sinput   ENUM_ANCHOR_POINT             InpCheckTextAlign    =  ANCHOR_LEFT;            // Check label text align
sinput   ENUM_CHEK_STATE               InpCheckState        =  CHEK_STATE_UNCHECKED;   // Check flag state
sinput   ENUM_INPUT_YES_NO             InpCheckAutoSize     =  INPUT_YES;              // CheckBox autosize
sinput   ENUM_BORDER_STYLE             InpCheckFrameStyle   =  BORDER_STYLE_NONE;      // CheckBox border style
sinput   ENUM_ANCHOR_POINT             InpButtonTextAlign   =  ANCHOR_CENTER;          // Button text align
sinput   ENUM_INPUT_YES_NO             InpButtonAutoSize    =  INPUT_YES;              // Button autosize
sinput   ENUM_AUTO_SIZE_MODE           InpButtonAutoSizeMode=  AUTO_SIZE_MODE_GROW;    // Button Autosize mode
sinput   ENUM_BORDER_STYLE             InpButtonFrameStyle  =  BORDER_STYLE_NONE;      // Button border style
sinput   bool                          InpButtonToggle      =  false;                  // Button toggle flag
//sinput   bool                          InpListBoxMColumn    =  false;                  // ListBox MultiColumn flag
sinput   bool                          InpButtListMSelect   =  false;                  // ButtonListBox Button MultiSelect flag
sinput   ENUM_ELEMENT_ALIGNMENT        InpHeaderAlignment   =  ELEMENT_ALIGNMENT_TOP;  // TabHeader Alignment
//--- global variables
CEngine        engine;
color          array_clr[];
//+------------------------------------------------------------------+
No manipulador OnInit() no bloco de criação de objetos gráficos, comentamos o bloco de criação do objeto TabControl do artigo anterior (vamos colocá-lo lá mais tarde) e o código para criar o objeto ListBox (vamos colocá-lo em as guias do futuro objeto TabControl). E após o bloco de código para criação do objeto ButtonListBox, vamos colocar o bloco de código para criação do objeto TabControl com três guias, sendo que a primeira será selecionada inicialmente:
      //--- If the attached GroupBox object is created
      if(pnl.CreateNewElement(GRAPH_ELEMENT_TYPE_WF_GROUPBOX,x,2,w,h,C'0x91,0xAA,0xAE',0,true,false))
        {
         //--- get the pointer to the GroupBox object by its index in the list of bound GroupBox type objects
         gbox2=pnl.GetElementByType(GRAPH_ELEMENT_TYPE_WF_GROUPBOX,1);
         if(gbox2!=NULL)
           {
            //--- set the "indented frame" type, the frame color matches the main panel background color,
            //--- while the text color is the background color of the last attached panel darkened by 1
            gbox2.SetBorderStyle(FRAME_STYLE_STAMP);
            gbox2.SetBorderColor(pnl.BackgroundColor(),true);
            gbox2.SetForeColor(gbox2.ChangeColorLightness(obj.BackgroundColor(),-1),true);
            gbox2.SetText("GroupBox2");

            //--- Create the TabControl object
//            gbox2.CreateNewElement(GRAPH_ELEMENT_TYPE_WF_TAB_CONTROL,4,12,gbox2.Width()-12,gbox2.Height()-20,clrNONE,255,true,false);
//            //--- get the pointer to the TabControl object by its index in the list of bound objects of the TabControl type
//            CTabControl *tctrl=gbox2.GetElementByType(GRAPH_ELEMENT_TYPE_WF_TAB_CONTROL,0);
//            if(tctrl!=NULL)
//              {
//               //--- get the pointer to the Container object by its index in the list of bound objects of the Container type
//               CContainer *page=tctrl.GetElementByType(GRAPH_ELEMENT_TYPE_WF_CONTAINER,0);
//               if(page!=NULL)
//                 {
//                  // Here we will create objects attached to the specified tab of the TabControl object
//                  // Unfortunately, in the current state of creating the names of graphical objects of the library,
//                  // their further creation is limited by the number of characters in the resource name in the CCanvas class
//                 }
//
//              }
            ///*
            //--- Create the CheckedListBox object
            gbox2.CreateNewElement(GRAPH_ELEMENT_TYPE_WF_CHECKED_LIST_BOX,4,12,160,20,clrNONE,255,true,false);
            //--- get the pointer to the CheckedListBox object by its index in the list of bound objects of the CheckBox type
            CCheckedListBox *clbox=gbox2.GetElementByType(GRAPH_ELEMENT_TYPE_WF_CHECKED_LIST_BOX,0);
            //--- If CheckedListBox is created and the pointer to it is received
            if(clbox!=NULL)
              {
               clbox.SetMultiColumn(true);
               clbox.SetColumnWidth(0);
               clbox.CreateCheckBox(4,66);
              }
            //--- Create the ButtonListBox object
            gbox2.CreateNewElement(GRAPH_ELEMENT_TYPE_WF_BUTTON_LIST_BOX,4,clbox.BottomEdgeRelative()+6,160,30,clrNONE,255,true,false);
            //--- get the pointer to the ButtonListBox object by its index in the list of attached objects of the Button type
            CButtonListBox *blbox=gbox2.GetElementByType(GRAPH_ELEMENT_TYPE_WF_BUTTON_LIST_BOX,0);
            //--- If ButtonListBox is created and the pointer to it is received
            if(blbox!=NULL)
              {
               blbox.SetMultiColumn(true);
               blbox.SetColumnWidth(0);
               blbox.CreateButton(4,66,16);
               blbox.SetMultiSelect(InpButtListMSelect);
               blbox.SetToggle(InpButtonToggle);
               for(int i=0;i<blbox.ElementsTotal();i++)
                 {
                  blbox.SetButtonGroup(i,(i % 2==0 ? blbox.Group()+1 : blbox.Group()+2));
                  blbox.SetButtonGroupFlag(i,(i % 2==0 ? true : false));
                 }
              }

            int lbx=6;
            int lby=blbox.BottomEdgeRelative()+6;
            int lbw=180;
            //--- Create the TabControl object
            gbox2.CreateNewElement(GRAPH_ELEMENT_TYPE_WF_TAB_CONTROL,lbx,lby,lbw,78,clrNONE,255,true,false);
            //--- get the pointer to the TabControl object by its index in the list of bound objects of the TabControl type
            CTabControl *tab_ctrl=gbox2.GetElementByType(GRAPH_ELEMENT_TYPE_WF_TAB_CONTROL,0);
            //--- If TabControl is created and the pointer to it is received
            if(tab_ctrl!=NULL)
              {
               //--- Set the location of the tab titles on the element and the tab text
               tab_ctrl.SetAlignment((ENUM_CANV_ELEMENT_ALIGNMENT)InpHeaderAlignment);
               tab_ctrl.CreateTabPages(3,0,56,16,TextByLanguage("Вкладка","TabPage"));
              }

            //--- Create the ListBox object
            //int lbx=4;
            //int lby=blbox.BottomEdgeRelative()+6;
            //int lbw=146;
            //if(!InpListBoxMColumn)
            //  {
            //   lbx=blbox.RightEdgeRelative()+6;
            //   lby=14;
            //   lbw=100;
            //  }
            //gbox2.CreateNewElement(GRAPH_ELEMENT_TYPE_WF_LIST_BOX,lbx,lby,lbw,60,clrNONE,255,true,false);
            ////--- get the pointer to the ListBox object by its index in the list of attached objects of ListBox type
            //CListBox *lbox=gbox2.GetElementByType(GRAPH_ELEMENT_TYPE_WF_LIST_BOX,0);
            ////--- If ListBox has been created and the pointer to it has been received
            //if(lbox!=NULL)
            //  {
            //   lbox.SetMultiColumn(true);
            //   lbox.CreateList(8,68);
            //  }
            //*/
           }
        }
Compilamos o Expert Advisor e o iniciamos no gráfico:
Agora as guias ganharam vida em comparação com o Expert Advisor do artigo anterior. Os cabeçalhos das guias podem estar localizados acima e abaixo do contêiner, mas também há falhas perceptíveis: se outros elementos se comportarem de maneira bastante tolerável ao interagir com o mouse, os cabeçalhos das guias "piscarão" visivelmente. Vamos lidar com isso. E mais uma coisa: no final, apontei com o cursor para a linha entre o cabeçalho e o campo da guia. Ela não deveria estar lá. Mas isto foi previsto no artigo, no próximo artigo faremos com que a guia, o cabeçalho e o campo sejam uma e a mesma coisa.
O que virá a seguir?
No próximo artigo, continuaremos o desenvolvimento do controle TabControl.
*Artigos desta série:
DoEasy. Controles (Parte 1): Primeiros passos
DoEasy. Controles (Parte 2): Continuamos trabalhando na classe CPanel
DoEasy. Controles (Parte 3): Criando controles vinculados
DoEasy. Controles (Parte 4): Controle "Painel", parâmetros Padding e Dock
DoEasy. Controles (Parte 5): Objeto base WinForms, controle Painel, parâmetro AutoSize
DoEasy. Controles (Parte 6): Controle "Painel", redimensionamento automático do contêiner para adequá-lo ao seu conteúdo
DoEasy. Controles (Parte 7): Controle "Rótulo de texto"
DoEasy. Controles (Parte 8): Objetos básicos do WinForms por categoria, controles GroupBox e CheckBox
DoEasy. Controles (Parte 9): Reorganizando métodos de objetos WinForms, controles "RadioButton" e "Button"
DoEasy. Controles (Parte 10): Objetos WinForms, dando vida à interface
DoEasy. Controles (Parte 11): Objetos WinForms - grupos, objeto WinForms CheckedListBox
DoEasy. Controles (Parte 12): Objeto base lista, objetos WinForms ListBox e ButtonListBox
DoEasy. Controles (Parte 13): Otimizando a interação de objetos WinForms com o mouse, dando início ao desenvolvimento do objeto WinForms TabControl
Traduzido do russo pela MetaQuotes Ltd.
Artigo original: https://www.mql5.com/ru/articles/11288
Aviso: Todos os direitos sobre esses materiais pertencem à MetaQuotes Ltd. É proibida a reimpressão total ou parcial.
Esse artigo foi escrito por um usuário do site e reflete seu ponto de vista pessoal. A MetaQuotes Ltd. não se responsabiliza pela precisão das informações apresentadas nem pelas possíveis consequências decorrentes do uso das soluções, estratégias ou recomendações descritas.

 Como desenvolver um sistema de negociação baseado no indicador Bear's Power
 Redes neurais de maneira fácil (Parte 24): Melhorando a ferramenta para transferência de aprendizado
 Redes neurais de maneira fácil (Parte 23): Criando uma ferramenta para transferência de aprendizado
- Aplicativos de negociação gratuitos
- 8 000+ sinais para cópia
- Notícias econômicas para análise dos mercados financeiros
Você concorda com a política do site e com os termos de uso