
DoEasy. Controles (Parte 7): Controle "Rótulo"

Conteúdo
- Conteúdo
- Ideia
- Modificando as classes da biblioteca
- Classe de controle "Rótulo"
- Teste
- O que virá a seguir?
Ideia
Em qualquer programa você sempre terá que exibir informações na tela. O MS Visual Studio utiliza, entre outros, o controle Label, um rótulo de texto, para mostrar textos. O terminal MetaTrader 5 também possui um objeto gráfico "Rótulo de texto". Além disso, todos os elementos gráficos que criamos, que são usados para criar interfaces gráficas ou design gráfico de programas no terminal, também possibilitam a exibição de texto em tela. Mas nem sempre é prático usá-los. Por isso, hoje faremos um controle "Rótulo" que será independente.
Tal objeto poderá ser posicionado em qualquer lugar de seu contêiner, e sua respectiva funcionalidade replicará parte da funcionalidade do rótulo de texto do MS Visual Studio, para que possamos definir parâmetros de fonte do texto exibido e sua posição. O tamanho do objeto pode ser definido com a largura e a altura especificadas ou ajustado automaticamente consoante o tamanho da fonte usada. Além disso, a moldura do objeto pode ser usada (retângulo que enquadra todo o objeto "rótulo de texto"). A moldura de um objeto pode ser plana ou tridimensional. Tudo isso nos dará um amplo leque para exibir texto com o visual apropriado dentro dos elementos GUI do programa.
Para que todos os parâmetros do novo objeto sejam exibidos em algum lugar ou possamos selecionar objetos pelo parâmetro necessário, adicionaremos todas as propriedades usadas pelo objeto "Rótulo" às enumerações das propriedades inteiras, reais e de string dos elementos gráficos da biblioteca. Em princípio, tentamos respeitar esse conceito em todos os objetos de biblioteca, pois nos permite usar os recursos que ela oferece para pesquisa, seleção e classificação rápidas de objetos de biblioteca com bastante flexibilidade.
Modificando as classes da biblioteca
Em primeiro lugar, vamos adicionar novas mensagens de texto à biblioteca.
Inserimos os índices das novas mensagens da biblioteca no arquivo \MQL5\Include\DoEasy\Data.mqh:
   MSG_GRAPH_ELEMENT_TYPE_WF_PANEL,                   // Panel control
   MSG_GRAPH_ELEMENT_TYPE_WF_LABEL,                   // Label control
   MSG_GRAPH_OBJ_BELONG_PROGRAM,                      // Graphical object belongs to a program
...
//--- CPanel
   MSG_PANEL_OBJECT_ERR_FAILED_CREATE_UNDERLAY_OBJ,   // Failed to create the underlay object
   MSG_PANEL_OBJECT_ERR_OBJ_MUST_BE_WFBASE,           // Error. The created object should be of WinForms Base type or be derived from it

  };
//+------------------------------------------------------------------+
e as mensagens de texto correspondentes aos índices recém-adicionados:
   {"Элемент управления \"Panel\"","Control element \"Panel\""},
   {"Элемент управления \"Label\"","Control element \"Label\""},
   {"Графический объект принадлежит программе","The graphic object belongs to the program"},
...
//--- CPanel
   {"Не удалось создать объект-подложку","Failed to create underlay object"},
   {"Ошибка. Создаваемый объект должен иметь тип WinForms Base или быть его наследником","Error. The object being created must be of type WinForms Base or be derived from it"},

  };
//+---------------------------------------------------------------------+
Além da cor do texto no controle "Rótulo", também usaremos opacidade, o que nos facilitará, por exemplo, criar o efeito de surgimento/desaparecimento suave do texto nos elementos GUI do programa. Também precisaremos indicar, nas propriedades, o texto exibido pelo objeto rótulo de texto, e definir alguns outros parâmetros necessários para construir objetos WinForms que não inserimos nas propriedades do elemento gráfico, mas que já foram criados anteriormente.
No arquivo \MQL5\Include\DoEasy\Defines.mqh, no bloco de parâmetros da tela, incluímos uma nova macro-substituição que especificará a opacidade do texto dos controles por padrão:
//--- Canvas parameters
#define PAUSE_FOR_CANV_UPDATE          (16)                       // Canvas update frequency
#define CLR_CANV_NULL                  (0x00FFFFFF)               // Zero for the canvas with the alpha channel
#define CLR_DEF_FORE_COLOR             (C'0x2D,0x43,0x48')        // Default color for texts of objects on canvas
#define CLR_DEF_FORE_COLOR_OPACITY     (255)                      // Default color non-transparency for canvas object texts
#define CLR_DEF_OPACITY                (200)                      // Default color non-transparency for canvas objects
#define CLR_DEF_SHADOW_COLOR           (C'0x6B,0x6B,0x6B')        // Default color for canvas object shadows
#define CLR_DEF_SHADOW_OPACITY         (127)                      // Default color non-transparency for canvas objects
#define DEF_SHADOW_BLUR                (4)                        // Default blur for canvas object shadows
#define DEF_FONT                       ("Calibri")                // Default font
#define DEF_FONT_SIZE                  (8)                        // Default font size
#define OUTER_AREA_SIZE                (16)                       // Size of one side of the outer area around the form workspace
#define DEF_FRAME_WIDTH_SIZE           (3)                        // Default form/panel/window frame width
//--- Graphical object parameters
Adicionamos um novo tipo à lista de tipos de objetos de biblioteca, especificamente um Rótulo de texto:
//+------------------------------------------------------------------+
//| List of library object types                                     |
//+------------------------------------------------------------------+
enum ENUM_OBJECT_DE_TYPE
  {
//--- Graphics
   OBJECT_DE_TYPE_GBASE =  COLLECTION_ID_LIST_END+1,              // "Base object of all library graphical objects" object type
   OBJECT_DE_TYPE_GELEMENT,                                       // "Graphical element" object type
   OBJECT_DE_TYPE_GFORM,                                          // Form object type
   OBJECT_DE_TYPE_GFORM_CONTROL,                                  // "Form for managing pivot points of graphical object" object type
   OBJECT_DE_TYPE_GSHADOW,                                        // Shadow object type
   //--- WinForms
   OBJECT_DE_TYPE_GWF_BASE,                                       // WinForms Base object type (base abstract WinForms object)
   OBJECT_DE_TYPE_GWF_PANEL,                                      // WinForms Panel object type
   OBJECT_DE_TYPE_GWF_LABEL,                                      // WinForms Label object type
//--- Animation
A lista de tipos de elementos gráficos também será complementada com um novo elemento, um rótulo de texto:
//+------------------------------------------------------------------+
//| The list of graphical element types                              |
//+------------------------------------------------------------------+
enum ENUM_GRAPH_ELEMENT_TYPE
  {
   GRAPH_ELEMENT_TYPE_STANDARD,                       // Standard graphical object
   GRAPH_ELEMENT_TYPE_STANDARD_EXTENDED,              // Extended standard graphical object
   GRAPH_ELEMENT_TYPE_SHADOW_OBJ,                     // Shadow object
   GRAPH_ELEMENT_TYPE_ELEMENT,                        // Element
   GRAPH_ELEMENT_TYPE_FORM,                           // Form
   GRAPH_ELEMENT_TYPE_WINDOW,                         // Window
   //--- WinForms
   GRAPH_ELEMENT_TYPE_WF_UNDERLAY,                    // Panel object underlay
   GRAPH_ELEMENT_TYPE_WF_BASE,                        // Windows Forms Base
   GRAPH_ELEMENT_TYPE_WF_PANEL,                       // Windows Forms Panel
   GRAPH_ELEMENT_TYPE_WF_LABEL,                       // Windows Forms Label
  };
//+------------------------------------------------------------------+
Na lista de propriedades inteiras do elemento gráfico na tela, inseriremos todas as novas constantes, nomeadamente aquelas que já foram adicionadas aos objetos WimForms, mas não colocadas nesta enumeração, e novas:
//+------------------------------------------------------------------+
//| Integer properties of the graphical element on the canvas        |
//+------------------------------------------------------------------+
enum ENUM_CANV_ELEMENT_PROP_INTEGER
  {
   //--- ...

   CANV_ELEMENT_PROP_FORE_COLOR,                      // Default text color for all control objects
   CANV_ELEMENT_PROP_FORE_COLOR_OPACITY,              // Default text color opacity for all control objects
   CANV_ELEMENT_PROP_BOLD_TYPE,                       // Font width type
   CANV_ELEMENT_PROP_BORDER_STYLE,                    // Control frame style
   CANV_ELEMENT_PROP_AUTOSIZE,                        // Flag of the element auto resizing depending on the content
   CANV_ELEMENT_PROP_AUTOSIZE_MODE,                   // Mode of the element auto resizing depending on the content
   CANV_ELEMENT_PROP_AUTOSCROLL,                      // Auto scrollbar flag
   CANV_ELEMENT_PROP_AUTOSCROLL_MARGIN_W,             // Width of the field inside the element during auto scrolling
   CANV_ELEMENT_PROP_AUTOSCROLL_MARGIN_H,             // Height of the field inside the element during auto scrolling
   CANV_ELEMENT_PROP_DOCK_MODE,                       // Mode of binding control borders to the container
   CANV_ELEMENT_PROP_MARGIN_TOP,                      // Top margin between the fields of this and another control

   //--- ...

   CANV_ELEMENT_PROP_PADDING_RIGHT,                   // Right margin inside the control
   CANV_ELEMENT_PROP_TEXT_ALIGN,                      // Text position within text label boundaries
  };
#define CANV_ELEMENT_PROP_INTEGER_TOTAL (44)          // Total number of integer properties
#define CANV_ELEMENT_PROP_INTEGER_SKIP  (0)           // Number of integer properties not used in sorting
//+------------------------------------------------------------------+
O número total de propriedades inteiras, respectivamente, será aumentado de 38 para 44.
Na lista de propriedades de string do elemento gráfico na tela, adicionamos a nova propriedade "Texto do elemento gráfico" e aumentamos o número total de propriedades de string de 2 para 3:
//+------------------------------------------------------------------+
//| String properties of the graphical element on the canvas         |
//+------------------------------------------------------------------+
enum ENUM_CANV_ELEMENT_PROP_STRING
  {
   CANV_ELEMENT_PROP_NAME_OBJ = (CANV_ELEMENT_PROP_INTEGER_TOTAL+CANV_ELEMENT_PROP_DOUBLE_TOTAL), // Graphical element object name
   CANV_ELEMENT_PROP_NAME_RES,                        // Graphical resource name
   CANV_ELEMENT_PROP_TEXT,                            // Graphical element text
  };
#define CANV_ELEMENT_PROP_STRING_TOTAL  (3)           // Total number of string properties
//+------------------------------------------------------------------+
Na lista de critérios para classificar elementos gráficos na tela, vamos adicionar a classificação por uma nova propriedade:
//+------------------------------------------------------------------+
//| Possible sorting criteria of graphical elements on the canvas    |
//+------------------------------------------------------------------+
#define FIRST_CANV_ELEMENT_DBL_PROP  (CANV_ELEMENT_PROP_INTEGER_TOTAL-CANV_ELEMENT_PROP_INTEGER_SKIP)
#define FIRST_CANV_ELEMENT_STR_PROP  (CANV_ELEMENT_PROP_INTEGER_TOTAL-CANV_ELEMENT_PROP_INTEGER_SKIP+CANV_ELEMENT_PROP_DOUBLE_TOTAL-CANV_ELEMENT_PROP_DOUBLE_SKIP)
enum ENUM_SORT_CANV_ELEMENT_MODE
  {
//--- Sort by integer properties
   SORT_BY_CANV_ELEMENT_ID = 0,                       // Sort by element ID

   //--- ...

   SORT_BY_CANV_ELEMENT_FORE_COLOR,                   // Sort by default text color for all control objects
   SORT_BY_CANV_ELEMENT_FORE_COLOR_OPACITY,           // Sort by default text color opacity for all control objects
   SORT_BY_CANV_ELEMENT_BOLD_TYPE,                    // Sort by font width type
   SORT_BY_CANV_ELEMENT_BORDER_STYLE,                 // Sort by control frame style
   SORT_BY_CANV_ELEMENT_AUTOSIZE,                     // Sort by the flag of the control auto resizing depending on the content
   SORT_BY_CANV_ELEMENT_AUTOSIZE_MODE,                // Sort by the mode of the control auto resizing depending on the content
   SORT_BY_CANV_ELEMENT_AUTOSCROLL,                   // Sort by auto scrollbar flag
   SORT_BY_CANV_ELEMENT_AUTOSCROLL_MARGIN_W,          // Sort by width of the field inside the element during auto scrolling
   SORT_BY_CANV_ELEMENT_AUTOSCROLL_MARGIN_H,          // Sort by height of the field inside the element during auto scrolling
   SORT_BY_CANV_ELEMENT_DOCK_MODE,                    // Sort by mode of binding control borders to the container

   //--- ...

   SORT_BY_CANV_ELEMENT_PADDING_RIGHT,                // Sort by right margin inside the control
   SORT_BY_CANV_ELEMENT_TEXT_ALIGN,                   // Sort by text position within text label boundaries
//--- Sort by real properties

//--- Sort by string properties
   SORT_BY_CANV_ELEMENT_NAME_OBJ = FIRST_CANV_ELEMENT_STR_PROP,// Sort by an element object name
   SORT_BY_CANV_ELEMENT_NAME_RES,                     // Sort by the graphical resource name
   SORT_BY_CANV_ELEMENT_TEXT,                         // Sort by graphical element text
  };
//+------------------------------------------------------------------+
Agora poderemos ordenar, selecionar e filtrar todos os elementos gráficos por novas propriedades.
A classe base de todos os objetos da biblioteca WinForms é a classe CWinFormBase, que, por sua vez, é herdada do objeto-forma, que gera a interação com o mouse. Algumas de suas variáveis privadas serão usadas por nós em classes herdadas. E como variáveis e métodos privados são visíveis apenas na classe em que são declarados, precisamos movê-los da seção privada para a protegida, só assim eles estarão disponíveis em classes herdadas.
No arquivo do objeto-forma \MQL5\Include\DoEasy\Objects\Graph\Form.mqh transferimos as variáveis desde a seção privada
//+------------------------------------------------------------------+
//| Form object class                                                |
//+------------------------------------------------------------------+
class CForm : public CGCnvElement
  {
private:
   CArrayObj         m_list_elements;                          // List of attached elements
   CAnimations      *m_animations;                             // Pointer to the animation object
   CShadowObj       *m_shadow_obj;                             // Pointer to the shadow object
   CMouseState       m_mouse;                                  // "Mouse status" class object
   ENUM_MOUSE_FORM_STATE m_mouse_form_state;                   // Mouse status relative to the form
   ushort            m_mouse_state_flags;                      // Mouse status flags
   color             m_color_frame;                            // Form frame color
   int               m_offset_x;                               // Offset of the X coordinate relative to the cursor
   int               m_offset_y;                               // Offset of the Y coordinate relative to the cursor
   int               m_init_x;                                 // Newly created form X coordinate
   int               m_init_y;                                 // Newly created form Y coordinate
   int               m_init_w;                                 // Newly created form width
   int               m_init_h;                                 // Newly created form height

//--- Reset the array size of (1) text, (2) rectangular and (3) geometric animation frames
para a seção protegido e tornamos alguns métodos virtuais para que possamos substituí-los em classes herdadas:
protected:
   CArrayObj         m_list_elements;                          // List of attached elements
   CAnimations      *m_animations;                             // Pointer to the animation object
   CShadowObj       *m_shadow_obj;                             // Pointer to the shadow object
   CMouseState       m_mouse;                                  // "Mouse status" class object
   ENUM_MOUSE_FORM_STATE m_mouse_form_state;                   // Mouse status relative to the form
   ushort            m_mouse_state_flags;                      // Mouse status flags
   color             m_color_frame;                            // Form frame color
   int               m_offset_x;                               // Offset of the X coordinate relative to the cursor
   int               m_offset_y;                               // Offset of the Y coordinate relative to the cursor
   CArrayObj         m_list_tmp;                               // List for storing the pointers
   int               m_frame_width_left;                       // Form frame width to the left
   int               m_frame_width_right;                      // Form frame width to the right
   int               m_frame_width_top;                        // Form frame width at the top
   int               m_frame_width_bottom;                     // Form frame width at the bottom
   int               m_init_x;                                 // Newly created form X coordinate
   int               m_init_y;                                 // Newly created form Y coordinate
   int               m_init_w;                                 // Newly created form width
   int               m_init_h;                                 // Newly created form height
//--- Initialize the variables
   virtual void      Initialize(void);
   void              Deinitialize(void);
//--- Create a shadow object
   void              CreateShadowObj(const color colour,const uchar opacity);
//--- Return the name of the dependent object
   string            CreateNameDependentObject(const string base_name)  const
                       { return ::StringSubstr(this.NameObj(),::StringLen(::MQLInfoString(MQL_PROGRAM_NAME))+1)+"_"+base_name;   }
//--- Update coordinates of bound objects
   virtual bool      MoveDependentObj(const int x,const int y,const bool redraw=false);
//--- Create a new bound element and add it to the list of bound objects
   virtual CGCnvElement *CreateAndAddNewElement(const ENUM_GRAPH_ELEMENT_TYPE element_type,
                                                CGCnvElement *main,
                                                const int x,
                                                const int y,
                                                const int w,
                                                const int h,
                                                const color colour,
                                                const uchar opacity,
                                                const bool activity);

public:
Como agora usaremos o conceito geral de construção de objetos de biblioteca para objetos WinForms, e já adicionamos (e continuaremos a adicionar) parâmetros de objetos WinForms às propriedades dos elementos gráficos, precisamos remover essas variáveis da classe base CWinFormBase que serviam para armazenar as propriedades de objetos, e reescrever todos os métodos para definir e obter essas propriedades.
No arquivo \MQL5\Include\DoEasy\Objects\Graph\WForms\WinFormBase.mqh, removemos variáveis desnecessárias da seção protegida
//+------------------------------------------------------------------+
//| Form object class                                                |
//+------------------------------------------------------------------+
class CWinFormBase : public CForm
  {
protected:
   color             m_fore_color;                                   // Default text color for all control objects
   ENUM_FW_TYPE      m_bold_type;                                    // Font width type
   ENUM_FRAME_STYLE  m_border_style;                                 // Control frame style
   bool              m_autosize;                                     // Flag of the element auto resizing depending on the content
   ENUM_CANV_ELEMENT_DOCK_MODE m_dock_mode;                          // Mode of binding control borders to the container
   int               m_margin[4];                                    // Array of gaps of all sides between the fields of the current and adjacent controls
   int               m_padding[4];                                   // Array of gaps of all sides inside controls

private:
Na seção pública da classe, reescrevemos os métodos para obter e gravar propriedades em enumerações de propriedades de objetos e adicionaremos novos métodos - tanto para trabalhar com o texto do objeto "Rótulo" quanto para definir e obter propriedades gerais de objetos WinForms:
public:
//--- ...

//--- ...

//--- Constructors
                     CWinFormBase(const long chart_id,
                                  const int subwindow,
                                  const string name,
                                  const int x,
                                  const int y,
                                  const int w,
                                  const int h);
                     CWinFormBase(const string name) : CForm(::ChartID(),0,name,0,0,0,0)
                       {
                        this.m_type=OBJECT_DE_TYPE_GWF_BASE;
                       }

//--- (1) Set and (2) return the default text color of all panel objects
   void              SetForeColor(const color clr)                   { this.SetProperty(CANV_ELEMENT_PROP_FORE_COLOR,clr);                               }
   color             ForeColor(void)                           const { return (color)this.GetProperty(CANV_ELEMENT_PROP_FORE_COLOR);                     }
//--- (1) Set and (2) return the default text color opacity of all panel objects
   void              SetForeColorOpacity(const uchar value)          { this.SetProperty(CANV_ELEMENT_PROP_FORE_COLOR_OPACITY,value);                     }
   uchar             ForeColorOpacity(void)                    const { return (uchar)this.GetProperty(CANV_ELEMENT_PROP_FORE_COLOR_OPACITY);             }
//--- (1) Set and (2) return the element text
   virtual void      SetText(const string text)                      { this.SetProperty(CANV_ELEMENT_PROP_TEXT,text);                                    }
   string            Text(void)                                const { return this.GetProperty(CANV_ELEMENT_PROP_TEXT);                                  }
//--- (1) Set and (2) return the element text location angle (alignment type)
   void              SetTextAlign(const ENUM_ANCHOR_POINT anchor)    { this.SetProperty(CANV_ELEMENT_PROP_TEXT_ALIGN,anchor);                            }
   ENUM_ANCHOR_POINT TextAlign(void)                           const { return (ENUM_ANCHOR_POINT)this.GetProperty(CANV_ELEMENT_PROP_TEXT_ALIGN);         }
//--- (1) Set and (2) return the Bold font flag
   void              SetBold(const bool flag);
   bool              Bold(void);
//--- (1) Set and (2) return the Italic font flag
   void              SetItalic(const bool flag);
   bool              Italic(void);
//--- (1) Set and (2) return the Strikeout font flag
   void              SetStrikeout(const bool flag);
   bool              Strikeout(void);
//--- (1) Set and (2) return the Underline font flag
   void              SetUnderline(const bool flag);
   bool              Underline(void);
//--- (1) Set and (2) return the font style
   void              SetFontDrawStyle(ENUM_FONT_STYLE style);
   ENUM_FONT_STYLE   FontDrawStyle(void);
//--- (1) Set and (2) return the font width type
   void              SetFontBoldType(ENUM_FW_TYPE type);
   ENUM_FW_TYPE      FontBoldType(void)                        const { return (ENUM_FW_TYPE)this.GetProperty(CANV_ELEMENT_PROP_BOLD_TYPE);               }
//--- (1) Set and (2) return the frame style
   void              SetBorderStyle(const ENUM_FRAME_STYLE style)    { this.SetProperty(CANV_ELEMENT_PROP_BORDER_STYLE,style);                           }
   ENUM_FRAME_STYLE  BorderStyle(void)                         const { return (ENUM_FRAME_STYLE)this.GetProperty(CANV_ELEMENT_PROP_BORDER_STYLE);        }

//--- (1) Set and (2) return the flag of the element auto resizing depending on the content
   virtual void      SetAutoSize(const bool flag,const bool redraw)  { this.SetProperty(CANV_ELEMENT_PROP_AUTOSIZE,flag);                                }
   bool              AutoSize(void)                                  { return (bool)this.GetProperty(CANV_ELEMENT_PROP_AUTOSIZE);                        }
//--- (1) Set and (2) return the auto scrollbar flag
   virtual void      SetAutoScroll(const bool flag,const bool redraw){ this.SetProperty(CANV_ELEMENT_PROP_AUTOSCROLL,flag);                              }
   bool              AutoScroll(void)                                { return (bool)this.GetProperty(CANV_ELEMENT_PROP_AUTOSCROLL);                      }

//--- (1) Set and (2) return the mode of binding element borders to the container
   virtual void      SetDockMode(const ENUM_CANV_ELEMENT_DOCK_MODE mode,const bool redraw)
                       {
                        this.SetProperty(CANV_ELEMENT_PROP_DOCK_MODE,mode);
                       }
   ENUM_CANV_ELEMENT_DOCK_MODE DockMode(void)                  const { return (ENUM_CANV_ELEMENT_DOCK_MODE)this.GetProperty(CANV_ELEMENT_PROP_DOCK_MODE);}

//--- Set the gap (1) to the left, (2) at the top, (3) to the right, (4) at the bottom and (5) on all sides between the fields of this and another control
   void              SetMarginLeft(const int value)                  { this.SetProperty(CANV_ELEMENT_PROP_MARGIN_LEFT,value);                            }
   void              SetMarginTop(const int value)                   { this.SetProperty(CANV_ELEMENT_PROP_MARGIN_TOP,value);                             }
   void              SetMarginRight(const int value)                 { this.SetProperty(CANV_ELEMENT_PROP_MARGIN_RIGHT,value);                           }
   void              SetMarginBottom(const int value)                { this.SetProperty(CANV_ELEMENT_PROP_MARGIN_BOTTOM,value);                          }
   void              SetMarginAll(const int value)
                       {
                        this.SetMarginLeft(value); this.SetMarginTop(value); this.SetMarginRight(value); this.SetMarginBottom(value);
                       }
   void              SetMargin(const int left,const int top,const int right,const int bottom)
                       {
                        this.SetMarginLeft(left); this.SetMarginTop(top); this.SetMarginRight(right); this.SetMarginBottom(bottom);
                       }
//--- Return the gap (1) to the left, (2) at the top, (3) to the right and (4) at the bottom between the fields of this and another control
   int               MarginLeft(void)                          const { return (int)this.GetProperty(CANV_ELEMENT_PROP_MARGIN_LEFT);                      }
   int               MarginTop(void)                           const { return (int)this.GetProperty(CANV_ELEMENT_PROP_MARGIN_TOP);                       }
   int               MarginRight(void)                         const { return (int)this.GetProperty(CANV_ELEMENT_PROP_MARGIN_RIGHT);                     }
   int               MarginBottom(void)                        const { return (int)this.GetProperty(CANV_ELEMENT_PROP_MARGIN_BOTTOM);                    }

//--- Set the gap (1) to the left, (2) at the top, (3) to the right, (4) at the bottom and (5) on all sides inside the control
   virtual void      SetPaddingLeft(const uint value)
                       {
                        int padding=((int)value<this.m_frame_width_left ? this.m_frame_width_left : (int)value);
                        this.SetProperty(CANV_ELEMENT_PROP_PADDING_LEFT,padding);
                       }
   virtual void      SetPaddingTop(const uint value)
                       {
                        int padding=((int)value<this.m_frame_width_top ? this.m_frame_width_top : (int)value);
                        this.SetProperty(CANV_ELEMENT_PROP_PADDING_TOP,padding);
                       }
   virtual void      SetPaddingRight(const uint value)
                       {
                        int padding=((int)value<this.m_frame_width_right ? this.m_frame_width_right : (int)value);
                        this.SetProperty(CANV_ELEMENT_PROP_PADDING_RIGHT,padding);
                       }
   virtual void      SetPaddingBottom(const uint value)
                       {
                        int padding=((int)value<this.m_frame_width_bottom ? this.m_frame_width_bottom : (int)value);
                        this.SetProperty(CANV_ELEMENT_PROP_PADDING_BOTTOM,padding);
                       }
   virtual void      SetPaddingAll(const uint value)
                       {
                        this.SetPaddingLeft(value); this.SetPaddingTop(value); this.SetPaddingRight(value); this.SetPaddingBottom(value);
                       }
   virtual void      SetPadding(const int left,const int top,const int right,const int bottom)
                       {
                        this.SetPaddingLeft(left); this.SetPaddingTop(top); this.SetPaddingRight(right); this.SetPaddingBottom(bottom);
                       }

//--- Set the width of the element frame (1) to the left, (2) at the top, (3) to the right and (4) at the bottom
   virtual void      SetFrameWidthLeft(const uint value)             { this.m_frame_width_left=(int)value;                                               }
   virtual void      SetFrameWidthTop(const uint value)              { this.m_frame_width_top=(int)value;                                                }
   virtual void      SetFrameWidthRight(const uint value)            { this.m_frame_width_right=(int)value;                                              }
   virtual void      SetFrameWidthBottom(const uint value)           { this.m_frame_width_bottom=(int)value;                                             }
   virtual void      SetFrameWidthAll(const uint value)
                       {
                        this.SetFrameWidthLeft(value); this.SetFrameWidthTop(value); this.SetFrameWidthRight(value); this.SetFrameWidthBottom(value);
                       }
   virtual void      SetFrameWidth(const uint left,const uint top,const uint right,const uint bottom)
                       {
                        this.SetFrameWidthLeft(left); this.SetFrameWidthTop(top); this.SetFrameWidthRight(right); this.SetFrameWidthBottom(bottom);
                       }

//--- Return the width of the element frame (1) to the left, (2) at the top, (3) to the right and (4) at the bottom
   int               FrameWidthLeft(void)                      const { return this.m_frame_width_left;                                                   }
   int               FrameWidthTop(void)                       const { return this.m_frame_width_top;                                                    }
   int               FrameWidthRight(void)                     const { return this.m_frame_width_right;                                                  }
   int               FrameWidthBottom(void)                    const { return this.m_frame_width_bottom;                                                 }

//--- Return the gap (1) to the left, (2) at the top, (3) to the right and (4) at the bottom between the fields inside the control
   int               PaddingLeft(void)                         const { return (int)this.GetProperty(CANV_ELEMENT_PROP_PADDING_LEFT);                     }
   int               PaddingTop(void)                          const { return (int)this.GetProperty(CANV_ELEMENT_PROP_PADDING_TOP);                      }
   int               PaddingRight(void)                        const { return (int)this.GetProperty(CANV_ELEMENT_PROP_PADDING_RIGHT);                    }
   int               PaddingBottom(void)                       const { return (int)this.GetProperty(CANV_ELEMENT_PROP_PADDING_BOTTOM);                   }

  };
//+------------------------------------------------------------------+
Em todos os métodos refeitos, agora escrevemos valores e os obtemos não em variáveis, mas em enumerações de propriedades de objetos usando os métodos SetProperty() e GetProperty(), conforme descrito originalmente no conceito de construção de objetos de biblioteca nesse primeiro artigo.
No construtor da classe, definimos o texto do objeto que está sendo criado como uma "string vazia" e definimos a cor e a opacidade do texto para os valores padrão escritos no arquivo Defines.mqh:
//+------------------------------------------------------------------+
//| Constructor                                                      |
//+------------------------------------------------------------------+
CWinFormBase::CWinFormBase(const long chart_id,
                           const int subwindow,
                           const string name,
                           const int x,
                           const int y,
                           const int w,
                           const int h) : CForm(chart_id,subwindow,name,x,y,w,h)
  {
//--- Set the graphical element and library object types as a base WinForms object
   CGBaseObj::SetTypeElement(GRAPH_ELEMENT_TYPE_WF_BASE);
   CGCnvElement::SetProperty(CANV_ELEMENT_PROP_TYPE,GRAPH_ELEMENT_TYPE_WF_BASE);
   this.m_type=OBJECT_DE_TYPE_GWF_BASE;
//--- Initialize all variables
   this.SetText("");
   this.SetForeColor(CLR_DEF_FORE_COLOR);
   this.SetForeColorOpacity(CLR_DEF_FORE_COLOR_OPACITY);
   this.SetFontBoldType(FW_TYPE_NORMAL);
   this.SetMarginAll(0);
   this.SetPaddingAll(0);
   this.SetDockMode(CANV_ELEMENT_DOCK_MODE_NONE,false);
   this.SetBorderStyle(FRAME_STYLE_NONE);
   this.SetAutoSize(false,false);
   CForm::SetCoordXInit(x);
   CForm::SetCoordYInit(y);
   CForm::SetWidthInit(w);
   CForm::SetHeightInit(h);
   this.m_shadow=false;
   this.m_frame_width_right=0;
   this.m_frame_width_left=0;
   this.m_frame_width_top=0;
   this.m_frame_width_bottom=0;
   this.m_gradient_v=true;
   this.m_gradient_c=false;
  }
//+------------------------------------------------------------------+
Nos métodos que definem o sinalizador de fonte Bold e a espessura da fonte, agora ao invés de escrever valores para variáveis, registramos valores nas propriedades do objeto:
//+------------------------------------------------------------------+
//| Set the Bold font flag                                           |
//+------------------------------------------------------------------+
void CWinFormBase::SetBold(const bool flag)
  {
   uint flags=this.GetFontFlags();
   if(flag)
     {
      this.SetFontBoldType(FW_TYPE_BOLD);
      CGCnvElement::SetFontFlags(flags | FW_BOLD);
     }
   else
      this.SetFontBoldType(FW_TYPE_NORMAL);
  }
//+------------------------------------------------------------------+

//+------------------------------------------------------------------+
//| Set the font width type                                          |
//+------------------------------------------------------------------+
void CWinFormBase::SetFontBoldType(ENUM_FW_TYPE type)
  {
   this.SetProperty(CANV_ELEMENT_PROP_BOLD_TYPE,type);
   uint flags=this.GetFontFlags();
   switch(type)
     {
      case FW_TYPE_DONTCARE   : CGCnvElement::SetFontFlags(flags | FW_DONTCARE);    break;
      case FW_TYPE_THIN       : CGCnvElement::SetFontFlags(flags | FW_THIN);        break;
      case FW_TYPE_EXTRALIGHT : CGCnvElement::SetFontFlags(flags | FW_EXTRALIGHT);  break;
      case FW_TYPE_ULTRALIGHT : CGCnvElement::SetFontFlags(flags | FW_ULTRALIGHT);  break;
      case FW_TYPE_LIGHT      : CGCnvElement::SetFontFlags(flags | FW_LIGHT);       break;
      case FW_TYPE_REGULAR    : CGCnvElement::SetFontFlags(flags | FW_REGULAR);     break;
      case FW_TYPE_MEDIUM     : CGCnvElement::SetFontFlags(flags | FW_MEDIUM);      break;
      case FW_TYPE_SEMIBOLD   : CGCnvElement::SetFontFlags(flags | FW_SEMIBOLD);    break;
      case FW_TYPE_DEMIBOLD   : CGCnvElement::SetFontFlags(flags | FW_DEMIBOLD);    break;
      case FW_TYPE_BOLD       : CGCnvElement::SetFontFlags(flags | FW_BOLD);        break;
      case FW_TYPE_EXTRABOLD  : CGCnvElement::SetFontFlags(flags | FW_EXTRABOLD);   break;
      case FW_TYPE_ULTRABOLD  : CGCnvElement::SetFontFlags(flags | FW_ULTRABOLD);   break;
      case FW_TYPE_HEAVY      : CGCnvElement::SetFontFlags(flags | FW_HEAVY);       break;
      case FW_TYPE_BLACK      : CGCnvElement::SetFontFlags(flags | FW_BLACK);       break;
      default                 : CGCnvElement::SetFontFlags(flags | FW_NORMAL);      break;
     }
  }
//+------------------------------------------------------------------+
Classe de controle "Rótulo"
No diretório de biblioteca \MQL5\Include\DoEasy\Objects\Graph\WForms\Common Controls\, criamos um novo arquivo Label.mqh da classe CLabel. A classe base deve ser a classe CWinFormBase, cujo arquivo deve estar incluído no arquivo da classe recém-criada:
//+------------------------------------------------------------------+
//|                                                        Label.mqh |
//|                                  Copyright 2022, MetaQuotes Ltd. |
//|                             https://mql5.com/en/users/artmedia70 |
//+------------------------------------------------------------------+
#property copyright "Copyright 2022, MetaQuotes Ltd."
#property link      "https://mql5.com/en/users/artmedia70"
#property version   "1.00"
#property strict    // Necessary for mql4
//+------------------------------------------------------------------+
//| Include files                                                    |
//+------------------------------------------------------------------+
#include "..\..\WForms\WinFormBase.mqh"
//+------------------------------------------------------------------+
//| Label object class of WForms controls                            |
//+------------------------------------------------------------------+
class CLabel : public CWinFormBase
  {
  }
Nas seções private, protected e public da classe, escrevemos as declarações dos métodos da classe:
//+------------------------------------------------------------------+
//| Label object class of WForms controls                            |
//+------------------------------------------------------------------+
class CLabel : public CWinFormBase
  {
private:
//--- Set the element width and height automatically
   void              AutoSetWH(void);
protected:
//--- Initialize the variables
   virtual void      Initialize(void);

public:
//--- Clear the element filling it with color and opacity
   virtual void      Erase(const color colour,const uchar opacity,const bool redraw=false);
//--- Clear the element with a gradient fill
   virtual void      Erase(color &colors[],const uchar opacity,const bool vgradient,const bool cycle,const bool redraw=false);
//--- Clear the element completely
   virtual void      Erase(const bool redraw=false);
//--- Redraw the object
   virtual void      Redraw(bool redraw);
//--- Set the element text
   virtual void      SetText(const string text)
                       {
                        CWinFormBase::SetText(text);
                        if(this.AutoSize())
                           this.AutoSetWH();
                       }

//--- Constructors
                     CLabel(const long chart_id,
                            const int subwindow,
                            const string name,
                            const int x,
                            const int y,
                            const int w,
                            const int h);
  };
//+------------------------------------------------------------------+
Como você pode ver, nas seções protected e public, declaramos métodos virtuais da classe base CWinFormBase, que aqui deve ter uma lógica um pouco diferente do base e, portanto, serão substituídos nesta classe.
Por exemplo, no método para definir o texto de um elemento, primeiro, é chamado o método da classe base, onde o novo valor passado para o método é simplesmente gravado na propriedade do objeto e, em seguida, se o sinalizador para redimensionar automaticamente o objeto estiver definido, é chamado o método privado para definir o novo tamanho segundo o tamanho do texto exibido na tela do objeto, que consideraremos mais adiante:
//--- Set the element text
   virtual void      SetText(const string text)
                       {
                        CWinFormBase::SetText(text);
                        if(this.AutoSize())
                           this.AutoSetWH();
                       }
A classe possui um construtor paramétrico e, portanto, um construtor e um destruidor padrão são criados automaticamente.
O identificador do gráfico e a subjanela onde o objeto é construído, o nome do objeto, suas coordenadas e dimensões são passados para o construtor paramétrico:
//+------------------------------------------------------------------+
//| Constructor                                                      |
//+------------------------------------------------------------------+
CLabel::CLabel(const long chart_id,
               const int subwindow,
               const string name,
               const int x,
               const int y,
               const int w,
               const int h) : CWinFormBase(chart_id,subwindow,name,x,y,w,h)
  {
   CGBaseObj::SetTypeElement(GRAPH_ELEMENT_TYPE_WF_LABEL);
   CGCnvElement::SetProperty(CANV_ELEMENT_PROP_TYPE,GRAPH_ELEMENT_TYPE_WF_LABEL);
   this.m_type=OBJECT_DE_TYPE_GWF_LABEL;
   this.SetCoordX(x);
   this.SetCoordY(y);
   this.SetWidth(w);
   this.SetHeight(h);
   this.Initialize();
   if(this.AutoSize())
      this.AutoSetWH();
   this.SetWidthInit(this.Width());
   this.SetHeightInit(this.Height());
   this.SetCoordXInit(x);
   this.SetCoordYInit(y);
   this.Redraw(false);
  }
//+------------------------------------------------------------------+
Primeiro, o tipo do elemento gráfico é atribuído a todas as classes pai, e o tipo de objeto da biblioteca "WinForms Label" é definido para o objeto.
Em seguida, definimos as coordenadas e dimensões do objeto e chamamos o método virtual para definir os principais parâmetros do elemento gráfico da biblioteca. Nesta classe, esse método é substituído, pois é um pouco diferente do mesmo método do objeto base. Vamos considerá-lo mais adiante.
Se o sinalizador de redimensionamento automático do objeto consoante o tamanho do texto estiver definido, chamamos o método apropriado para redimensionar o objeto (aqui, o sinalizador é sempre redefinido, mas isso pode ser alterado posteriormente).
Após o redimensionamento (com o sinalizador definido), anotamos as dimensões iniciais do objeto e suas coordenadas iniciais.
No final, redesenhamos todo o objeto.
Método virtual que inicializa variáveis:
//+------------------------------------------------------------------+
//| Initialize the variables                                         |
//+------------------------------------------------------------------+
void CLabel::Initialize(void)
  {
//--- Clear all object lists and set sorted list flags for them
   this.m_list_elements.Clear();
   this.m_list_elements.Sort();
   this.m_list_tmp.Clear();
   this.m_list_tmp.Sort();
//--- Text label has no shadow object
   this.m_shadow_obj=NULL;
   this.m_shadow=false;
//--- The width of the object frame on each side is 1 pixel by default
   this.m_frame_width_right=1;
   this.m_frame_width_left=1;
   this.m_frame_width_top=1;
   this.m_frame_width_bottom=1;
//--- The object does not have a gradient filling (neither vertical, nor horizontal)
   this.m_gradient_v=false;
   this.m_gradient_c=false;
//--- Reset all "working" flags and variables
   this.m_mouse_state_flags=0;
   this.m_offset_x=0;
   this.m_offset_y=0;
   CGCnvElement::SetInteraction(false);
//--- Create an animation object and add it to the list for storing such objects
   this.m_animations=new CAnimations(CGCnvElement::GetObject());
   this.m_list_tmp.Add(this.m_animations);
//--- Set the transparent color for the object background
   this.SetColorBackground(CLR_CANV_NULL);
   this.SetOpacity(0);
//--- Set the default color and text opacity, as well as the absence of the object frame
   this.SetForeColor(CLR_DEF_FORE_COLOR);
   this.SetForeColorOpacity(CLR_DEF_FORE_COLOR_OPACITY);
   this.SetBorderStyle(FRAME_STYLE_NONE);
//--- Set the default text parameters
   this.SetFont(DEF_FONT,DEF_FONT_SIZE);
   this.SetText("");
   this.SetTextAnchor(FRAME_ANCHOR_LEFT_TOP);
   this.SetTextAlign(ANCHOR_LEFT_UPPER);
//--- Set the default object parameters
   this.SetAutoSize(false,false);
   this.SetMargin(3,0,3,0);
   this.SetPaddingAll(0);
   this.SetEnabled(true);
   this.SetVisible(true,false);
  }
//+------------------------------------------------------------------+
Esse método virtual substitui o método do objeto base. Ele define diferentes valores padrão e adiciona a inicialização de valores de propriedade exclusivos do objeto Label.
Os métodos Virtual Erase que substituem os métodos do objeto base desenham a moldura do objeto com total opacidade:
//+------------------------------------------------------------------+
//| Clear the element filling it with color and opacity              |
//+------------------------------------------------------------------+
void CLabel::Erase(const color colour,const uchar opacity,const bool redraw=false)
  {
//--- Fill the element having the specified color and the redrawing flag
   CGCnvElement::Erase(colour,opacity,redraw);
//--- If the object has a frame, draw it
   if(this.BorderStyle()!=FRAME_STYLE_NONE && redraw)
      this.DrawFormFrame(this.FrameWidthTop(),this.FrameWidthBottom(),this.FrameWidthLeft(),this.FrameWidthRight(),this.ColorFrame(),255,this.BorderStyle());
//--- Update the element having the specified redrawing flag
   this.Update(redraw);
  }
//+------------------------------------------------------------------+
//| Clear the element with a gradient fill                           |
//+------------------------------------------------------------------+
void CLabel::Erase(color &colors[],const uchar opacity,const bool vgradient,const bool cycle,const bool redraw=false)
  {
//--- Fill the element having the specified color array and the redrawing flag
   CGCnvElement::Erase(colors,opacity,vgradient,cycle,redraw);
//--- If the object has a frame, draw it
   if(this.BorderStyle()!=FRAME_STYLE_NONE && redraw)
      this.DrawFormFrame(this.FrameWidthTop(),this.FrameWidthBottom(),this.FrameWidthLeft(),this.FrameWidthRight(),this.ColorFrame(),255,this.BorderStyle());
//--- Update the element having the specified redrawing flag
   this.Update(redraw);
  }
//+------------------------------------------------------------------+
//| Clear the element completely                                     |
//+------------------------------------------------------------------+
void CLabel::Erase(const bool redraw=false)
  {
//--- Fully clear the element with the redrawing flag
   CGCnvElement::Erase(redraw);
  }
//+------------------------------------------------------------------+
Método virtual que redesenha o objeto:
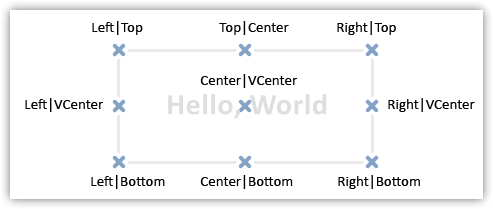
//+------------------------------------------------------------------+
//| Redraw the object                                                |
//+------------------------------------------------------------------+
void CLabel::Redraw(bool redraw)
  {
//--- Fill the object with the background color having full transparency
   this.Erase(this.ColorBackground(),0,true);
   int x=0;
   int y=0;
//--- Depending on the element text alignment type
   switch(this.TextAlign())
     {
      //--- The text is displayed in the upper left corner of the object
      case ANCHOR_LEFT_UPPER :
        //--- Set the text binding point coordinate
        x=this.FrameWidthLeft();
        y=this.FrameWidthTop();
        //--- Set the text binding point at the top left
        this.SetTextAnchor(FRAME_ANCHOR_LEFT_TOP);
        break;
      //--- The text is drawn vertically from the left side of the object in the center
      case ANCHOR_LEFT :
        //--- Set the text binding point coordinate
        x=this.FrameWidthLeft();
        y=this.Height()/2;
        //--- Set the text binding point at the center left
        this.SetTextAnchor(FRAME_ANCHOR_LEFT_CENTER);
        break;
      //--- The text is displayed in the lower left corner of the object
      case ANCHOR_LEFT_LOWER :
        //--- Set the text binding point coordinate
        x=this.FrameWidthLeft();
        y=this.Height()-this.FrameWidthBottom();
        //--- Set the text binding point at the bottom left
        this.SetTextAnchor(FRAME_ANCHOR_LEFT_BOTTOM);
        break;
      //--- The text is drawn at the center of the bottom edge of the object
      case ANCHOR_LOWER :
        //--- Set the text binding point coordinate
        x=this.Width()/2;
        y=this.Height()-this.FrameWidthBottom();
        //--- Set the text anchor point at the bottom center
        this.SetTextAnchor(FRAME_ANCHOR_CENTER_BOTTOM);
        break;
      //--- The text is displayed in the lower right corner of the object
      case ANCHOR_RIGHT_LOWER :
        //--- Set the text binding point coordinate
        x=this.Width()-this.FrameWidthRight();
        y=this.Height()-this.FrameWidthBottom();
        //--- Set the text binding point at the bottom right
        this.SetTextAnchor(FRAME_ANCHOR_RIGHT_BOTTOM);
        break;
      //--- The text is drawn vertically from the right side of the object in the center
      case ANCHOR_RIGHT :
        //--- Set the text binding point coordinate
        x=this.Width()-this.FrameWidthRight();
        y=this.Height()/2;
        //--- Set the text binding point at the center right
        this.SetTextAnchor(FRAME_ANCHOR_RIGHT_CENTER);
        break;
      //--- The text is displayed in the upper right corner of the object
      case ANCHOR_RIGHT_UPPER :
        //--- Set the text binding point coordinate
        x=this.Width()-this.FrameWidthRight();
        y=this.FrameWidthTop();
        //--- Set the text binding point at the top right
        this.SetTextAnchor(FRAME_ANCHOR_RIGHT_TOP);
        break;
      //--- The text is drawn at the center of the upper edge of the object
      case ANCHOR_UPPER :
        //--- Set the text binding point coordinate
        x=this.Width()/2;
        y=this.FrameWidthTop();
        //--- Set the text binding point at the center top
        this.SetTextAnchor(FRAME_ANCHOR_CENTER_TOP);
        break;
      //--- The text is drawn at the object center
      //---ANCHOR_CENTER
      default:
        //--- Set the text binding point coordinate
        x=this.Width()/2;
        y=this.Height()/2;
        //--- Set the text binding point at the center
        this.SetTextAnchor(FRAME_ANCHOR_CENTER);
        break;
     }
//--- Draw the text within the set coordinates of the object and the binding point of the text, and update the object
   this.Text(x,y,this.Text(),this.ForeColor(),this.ForeColorOpacity(),this.TextAnchor());
   this.Update(redraw);
  }
//+------------------------------------------------------------------+
O método substitui o método da classe base. Aqui, o fundo do objeto é primeiro apagado (preenchido com uma cor de fundo completamente transparente); o ponto de ancoragem do texto é determinado dependendo do alinhamento do texto dentro do elemento definido no objeto; as coordenadas do ponto de ancoragem do texto (origem das coordenadas) são calculadas; o texto é exibido nas coordenadas calculadas e o objeto é atualizado.
Os pontos de ancoragem de texto são claramente descritos e explicados na documentação da função TextOut():
Método que define automaticamente a largura e a altura do elemento:
//+------------------------------------------------------------------+
//| Set the element width and height automatically                   |
//+------------------------------------------------------------------+
void CLabel::AutoSetWH(void)
  {
//--- Define the variables for receiving the label width and height
   int w=0, h=0;
//--- Get the width and height depending on the object text
   CGCnvElement::TextSize(this.Text()!="" && this.Text()!=NULL ? this.Text() : " ",w,h);
//--- Add the Margin values of the object on the left and right to the resulting width
   w+=(this.MarginLeft()+this.MarginRight());
//--- If failed to get the width, set it to three pixels
   if(w==0)
      w=3;
//--- Add the Margin values of the object on the top and bottom to the resulting height
   h+=(this.MarginTop()+this.MarginBottom());
//--- If failed to get the height, set it as "font size" * ratio
   if(h==0)
      h=(int)ceil(FontSize()*1.625);
//--- Set the object width and height from the received values
   this.SetWidth(w);
   this.SetHeight(h);
  }
//+------------------------------------------------------------------+
A lógica do método é descrita nos comentários ao código. Primeiro, obtemos o tamanho do texto dependendo do texto definido para o objeto e das configurações de fonte. Se a legenda estiver "vazia", usaremos um espaço (" ") para a medição. Em seguida, os valores de margem do objeto à esquerda e à direita são adicionados à largura e os valores de margem na parte superior e inferior à altura. Se não for possível obter a altura do texto, você terá que calcular seu tamanho aproximado multiplicando o tamanho da fonte definido para o objeto por um coeficiente que selecionei empiricamente. Isso significa que comparei os valores do tamanho do objeto com o tamanho da fonte no MS Visual Studio e tirei o valor médio de várias medidas de tamanhos diferentes, obtendo um fator de 1,625. Para ser honesto, não conheço nenhuma outra maneira mais precisa. Pode ser que no futuro eu encontre a maneira correta de calcular o tamanho de um objeto dependendo do tamanho da fonte. Bem, após todos os cálculos, os valores obtidos da largura e altura são definidos para o objeto.
Assim concluímos a criação do objeto "Rótulo".
Como o objeto WinForms "Painel" é um contêiner para anexar outros objetos desse tipo, todos esses objetos criados devem ser visíveis. Para isso, o arquivo de cada objeto WinForms criado precisará estar conectado ao arquivo do objeto painel.
Vamos abrir o arquivo do objeto painel \MQL5\Include\DoEasy\Objects\Graph\WForms\Containers\Panel.mqh e incluir o arquivo do objeto rótulo de texto recém-criado:
//+------------------------------------------------------------------+
//|                                                        Panel.mqh |
//|                                  Copyright 2022, MetaQuotes Ltd. |
//|                             https://mql5.com/en/users/artmedia70 |
//+------------------------------------------------------------------+
#property copyright "Copyright 2022, MetaQuotes Ltd."
#property link      "https://mql5.com/en/users/artmedia70"
#property version   "1.00"
#property strict    // Necessary for mql4
//+------------------------------------------------------------------+
//| Include files                                                    |
//+------------------------------------------------------------------+
#include "..\..\WForms\WinFormBase.mqh"
#include "..\..\WForms\Common Controls\Label.mqh"
//+------------------------------------------------------------------+
Removemos as variáveis desnecessárias da seção privada da classe, pois agora elas estão registradas nas propriedades do objeto WinForms base:
//+------------------------------------------------------------------+
//| Panel object class of WForms controls                            |
//+------------------------------------------------------------------+
class CPanel : public CWinFormBase
  {
private:
   CGCnvElement     *m_obj_top;                                      // Pointer to the object whose coordinates the current upper object is bound to
   CGCnvElement     *m_obj_bottom;                                   // Pointer to the object whose coordinates the current bottom object is bound to
   CGCnvElement     *m_obj_left;                                     // Pointer to the object whose coordinates the current left object is bound to
   CGCnvElement     *m_obj_right;                                    // Pointer to the object whose coordinates the current right object is bound to
   CGCnvElement     *m_underlay;                                     // Underlay for placing elements
   bool              m_autoscroll;                                   // Auto scrollbar flag
   int               m_autoscroll_margin[2];                         // Array of fields around the control during an auto scroll
   ENUM_CANV_ELEMENT_AUTO_SIZE_MODE m_autosize_mode;                 // Mode of the element auto resizing depending on the content
//--- Create a new graphical object
Na seção pública da classe, declararemos dois novos métodos, isto é: um para obter uma lista de objetos WinForms anexados com o tipo especificado e outro para obter um ponteiro para o objeto WinForms especificado por índice na lista de objetos desse tipo:
public:
//--- Return the underlay
   CGCnvElement     *GetUnderlay(void)                               { return this.m_underlay;              }
//--- Return the list of bound objects with (1) any and (2) specified basic WinForms type and higher
   CArrayObj        *GetListWinFormsObj(void);
   CArrayObj        *GetListWinFormsObjByType(const ENUM_GRAPH_ELEMENT_TYPE type);
//--- Return the pointer to the specified WinForms object with the specified type by index
   CWinFormBase     *GetWinFormsObj(const ENUM_GRAPH_ELEMENT_TYPE type,const int index);

//--- Update the coordinates (shift the canvas)
Removemos os métodos SetAutoScroll() e AutoScroll() da classe, pois eles são membros da classe pai CWinFormBase, já foram refeitos para trabalhar com propriedades de objetos, não com variáveis de classe, e estão a mais aqui:
//--- Place bound objects in the order of their Dock binding
   bool              ArrangeObjects(const bool redraw);

//--- (1) Set and (2) return the auto scrollbar flag
   void              SetAutoScroll(const bool flag)                  { this.m_autoscroll=flag;              }
   bool              AutoScroll(void)                                { return this.m_autoscroll;            }
//--- Set the (1) field width, (2) height, (3) the height of all fields around the control during auto scrolling
Da mesma forma, reescrevemos alguns métodos de classe para trabalhar com propriedades de objetos e adicionamos um método para definir simultaneamente AutoScrollMargin em largura e altura:
//--- Set the (1) field width, (2) height, (3) the height of all fields around the control during auto scrolling
   void              SetAutoScrollMarginWidth(const int value)       { this.SetProperty(CANV_ELEMENT_PROP_AUTOSCROLL_MARGIN_W,value);  }
   void              SetAutoScrollMarginHeight(const int value)      { this.SetProperty(CANV_ELEMENT_PROP_AUTOSCROLL_MARGIN_H,value);  }
   void              SetAutoScrollMarginAll(const int value)
                       {
                        this.SetAutoScrollMarginWidth(value); this.SetAutoScrollMarginHeight(value);
                       }
   void              SetAutoScrollMargin(const int width,const int height)
                       {
                        this.SetAutoScrollMarginWidth(width); this.SetAutoScrollMarginHeight(height);
                       }
//--- Return the (1) field width and (2) height around the control during auto scrolling
   int               AutoScrollMarginWidth(void)               const { return (int)this.GetProperty(CANV_ELEMENT_PROP_AUTOSCROLL_MARGIN_W); }
   int               AutoScrollMarginHeight(void)              const { return (int)this.GetProperty(CANV_ELEMENT_PROP_AUTOSCROLL_MARGIN_H); }

//--- (1) Set the flag of the element auto resizing depending on the content
   virtual void      SetAutoSize(const bool flag,const bool redraw)
                       {
                        bool prev=this.AutoSize();
                        if(prev==flag)
                           return;
                        CWinFormBase::SetAutoSize(flag,redraw);
                        if(prev!=this.AutoSize() && this.ElementsTotal()>0)
                           this.AutoSizeProcess(redraw);
                       }
//--- (1) Set and (2) return the mode of the element auto resizing depending on the content
   void              SetAutoSizeMode(const ENUM_CANV_ELEMENT_AUTO_SIZE_MODE mode,const bool redraw)
                       {
                        ENUM_CANV_ELEMENT_AUTO_SIZE_MODE prev=this.AutoSizeMode();
                        if(prev==mode)
                           return;
                        this.SetProperty(CANV_ELEMENT_PROP_AUTOSIZE_MODE,mode);
                        if(prev!=this.AutoSizeMode() && this.ElementsTotal()>0)
                           this.AutoSizeProcess(redraw);
                       }
   ENUM_CANV_ELEMENT_AUTO_SIZE_MODE AutoSizeMode(void)   const { return (ENUM_CANV_ELEMENT_AUTO_SIZE_MODE)this.GetProperty(CANV_ELEMENT_PROP_AUTOSIZE_MODE); }

//--- (1) Set and (2) return the mode of binding element borders to the container
No método que cria um novo objeto gráfico, adicionamos um bloco de código para criar um objeto rótulo de texto:
//+------------------------------------------------------------------+
//| Create a new graphical object                                    |
//+------------------------------------------------------------------+
CGCnvElement *CPanel::CreateNewGObject(const ENUM_GRAPH_ELEMENT_TYPE type,
                                       const int obj_num,
                                       const string obj_name,
                                       const int x,
                                       const int y,
                                       const int w,
                                       const int h,
                                       const color colour,
                                       const uchar opacity,
                                       const bool movable,
                                       const bool activity)
  {
   string name=this.CreateNameDependentObject(obj_name);
   CGCnvElement *element=NULL;
   switch(type)
     {
      case GRAPH_ELEMENT_TYPE_ELEMENT :
         element=new CGCnvElement(type,this.ID(),obj_num,this.ChartID(),this.SubWindow(),name,x,y,w,h,colour,opacity,movable,activity);
        break;
      case GRAPH_ELEMENT_TYPE_FORM :
         element=new CForm(this.ChartID(),this.SubWindow(),name,x,y,w,h);
        break;
      case GRAPH_ELEMENT_TYPE_WF_PANEL :
         element=new CPanel(this.ChartID(),this.SubWindow(),name,x,y,w,h);
        break;
      case GRAPH_ELEMENT_TYPE_WF_LABEL :
         element=new CLabel(this.ChartID(),this.SubWindow(),name,x,y,w,h);
        break;
      default:
        break;
     }
   if(element==NULL)
      ::Print(DFUN,CMessage::Text(MSG_LIB_SYS_FAILED_CREATE_ELM_OBJ),": ",name);
   return element;
  }
//+------------------------------------------------------------------+
Acho que tudo aqui é claro e simples, e não precisa de explicação.
Vamos reescrever o método que cria um novo elemento anexado:
//+------------------------------------------------------------------+
//| Create a new attached element                                    |
//+------------------------------------------------------------------+
bool CPanel::CreateNewElement(const ENUM_GRAPH_ELEMENT_TYPE element_type,
                              CGCnvElement *main,
                              const int x,
                              const int y,
                              const int w,
                              const int h,
                              const color colour,
                              const uchar opacity,
                              const bool activity,
                              const bool redraw)
  {
//--- If the object type is less than the base WinForms object
   if(element_type<GRAPH_ELEMENT_TYPE_WF_BASE)
     {
      //--- report the error and return 'false'
      CMessage::ToLog(DFUN,MSG_PANEL_OBJECT_ERR_OBJ_MUST_BE_WFBASE);
      return false;
     }
//--- If failed to create a new graphical element, return 'false'
   CWinFormBase *obj=CForm::CreateAndAddNewElement(element_type,main,x,y,w,h,colour,opacity,activity);
   if(obj==NULL)
      return false;
//--- Set the text color of the created object as that of the base panel
   obj.SetForeColor(this.ForeColor());
//--- If the object type is a panel
   if(obj.TypeGraphElement()==GRAPH_ELEMENT_TYPE_WF_PANEL)
     {
      //--- set the frame color equal to the background color
      obj.SetColorFrame(obj.ColorBackground());
     }
//--- If the object type is a text label,
   if(obj.TypeGraphElement()==GRAPH_ELEMENT_TYPE_WF_LABEL)
     {
      //--- set the object text color depending on the one passed to the method
      //--- or the panel text color or the one passed to the method and the frame color equal to the text color
      obj.SetForeColor(colour==clrNONE ? this.ForeColor() : colour);
      obj.SetColorFrame(main!=NULL ? main.ColorBackground() : obj.ForeColor());
     }
//--- If the panel has auto resize enabled and features bound objects, call the resize method
   if(this.AutoSize() && this.ElementsTotal()>0)
      this.AutoSizeProcess(redraw);
//--- Redraw the panel and all added objects, and return 'true'
   this.Redraw(redraw);
   return true;
  }
//+------------------------------------------------------------------+
A lógica do método é descrita nos comentários ao código. Além de pequenas melhorias na lógica do próprio método, foi adicionado um bloco de código que trata da criação de um objeto rótulo de texto. Espero que tudo esteja claro aqui e não precise de explicações. Em qualquer caso, todas as perguntas podem ser colocadas na discussão do artigo.
Método que retorna uma lista de objetos anexados com o tipo especificado de objeto WinForms:
//+------------------------------------------------------------------+
//| Return the list of bound objects                                 |
//| with the specified WinForms object type                          |
//+------------------------------------------------------------------+
CArrayObj *CPanel::GetListWinFormsObjByType(const ENUM_GRAPH_ELEMENT_TYPE type)
  {
   return CSelect::ByGraphCanvElementProperty(this.GetListElements(),CANV_ELEMENT_PROP_TYPE,type,EQUAL);
  }
//+------------------------------------------------------------------+
Aqui nós simplesmente retornamos a lista obtida na classe CSelect com o tipo de objeto WinForms especificado. Se a lista não puder ser obtida ou não houver objetos com o tipo especificado, o método retornará NULL.
Método que retorna um ponteiro para um objeto WinForms anexado com o tipo especificado por índice:
//+------------------------------------------------------------------+
//| Return the pointer to the specified WinForms object              |
//| with the specified type by index                                 |
//+------------------------------------------------------------------+
CWinFormBase *CPanel::GetWinFormsObj(const ENUM_GRAPH_ELEMENT_TYPE type,const int index)
  {
   CArrayObj *list=this.GetListWinFormsObjByType(type);
   return(list!=NULL ? list.At(index) : NULL);
  }
//+------------------------------------------------------------------+
Aqui: obtemos uma lista de objetos com o tipo especificado e retornamos desde a lista um ponteiro para o objeto segundo o índice especificado.
Se a lista não puder ser obtida ou um índice inexistente for especificado, o método retornará NULL.
Agora estamos prontos para o teste.
Teste
Para testar, vamos pegar o Expert Advisor do artigo anterior e salvá-lo na nova pasta \MQL5\Experts\TestDoEasy\Part107\ com o novo nome TstDE107.mq5.
Como o nome de todos os objetos gráficos contém o nome do programa, e para criar um recurso de objeto gráfico no método Create() da classe CCanvas, o valor do identificador do gráfico + o número de tiques do processador decorridos desde o programa foi lançado + um número pseudo-aleatório é usado:
//+------------------------------------------------------------------+
//| Create dynamic resource                                          |
//+------------------------------------------------------------------+
bool CCanvas::Create(const string name,const int width,const int height,ENUM_COLOR_FORMAT clrfmt)
  {
   Destroy();
//--- prepare data array
   if(width>0 && height>0 && ArrayResize(m_pixels,width*height)>0)
     {
      //--- generate resource name
      m_rcname="::"+name+(string)ChartID()+(string)(GetTickCount()+MathRand());
      //--- initialize data with zeros
      ArrayInitialize(m_pixels,0);
      //--- create dynamic resource
      if(ResourceCreate(m_rcname,m_pixels,width,height,0,0,0,clrfmt))
        {
         //--- successfully created
         //--- complete initialization
         m_width =width;
         m_height=height;
         m_format=clrfmt;
         //--- succeed
         return(true);
        }
     }
//--- error - destroy object
   Destroy();
   return(false);
  }
//+------------------------------------------------------------------+
... como resultado, o nome do objeto gráfico pode exceder 63 caracteres, dando um erro na criação do recurso. Por isso, temos que (por enquanto) reduzir o comprimento do nome do programa, e depois teremos que decidir sobre a construção dos nomes dos objetos gráficos, pois cada objeto anexado herda o nome do objeto ao qual está anexado com a adição de uma terminação ao nome indicando um novo elemento na hierarquia. E quanto mais objetos aninhados na hierarquia de objetos anexados uns aos outros, mais longo será o nome do objeto. Este é um conceito errado, que eventualmente dará um erro na criação de um objeto gráfico por exceder o comprimento de seu nome. Mas, por enquanto, vamos apenas encurtar o nome do programa.
Como devemos testar... Criamos seis objetos-painéis no painel principal. Criamos um objeto rótulo de texto em cada um desses painéis. O tamanho do objeto será igual ao tamanho do painel menos dois pontos de cada lado. Nas configurações do Expert Advisor, exibimos o tipo de moldura do objeto rótulo de texto e o valor de alinhamento de texto dentro do objeto rótulo de texto, facilitando a visualização de onde e como o texto é exibido dentro do objeto.
No escopo global, criamos uma enumeração que descreva o tipo de moldura do objeto para compilação na versão em inglês do programa e na versão de compilação no idioma da biblioteca user, e escrevemos os novos parâmetros de entrada do programa:
//+------------------------------------------------------------------+
//|                                                     TstDE107.mq5 |
//|                                  Copyright 2022, MetaQuotes Ltd. |
//|                             https://mql5.com/en/users/artmedia70 |
//+------------------------------------------------------------------+
#property copyright "Copyright 2022, MetaQuotes Ltd."
#property link      "https://mql5.com/en/users/artmedia70"
#property version   "1.00"
//--- includes
#include <DoEasy\Engine.mqh>
//--- defines
#define  FORMS_TOTAL (3)   // Number of created forms
#define  START_X     (4)   // Initial X coordinate of the shape
#define  START_Y     (4)   // Initial Y coordinate of the shape
#define  KEY_LEFT    (65)  // (A) Left
#define  KEY_RIGHT   (68)  // (D) Right
#define  KEY_UP      (87)  // (W) Up
#define  KEY_DOWN    (88)  // (X) Down
#define  KEY_FILL    (83)  // (S) Filling
#define  KEY_ORIGIN  (90)  // (Z) Default
#define  KEY_INDEX   (81)  // (Q) By index

//--- enumerations by compilation language
#ifdef COMPILE_EN
enum ENUM_AUTO_SIZE_MODE
  {
   AUTO_SIZE_MODE_GROW=CANV_ELEMENT_AUTO_SIZE_MODE_GROW,                // Grow
   AUTO_SIZE_MODE_GROW_SHRINK=CANV_ELEMENT_AUTO_SIZE_MODE_GROW_SHRINK   // Grow and Shrink
  };
enum ENUM_BORDER_STYLE
  {
   BORDER_STYLE_NONE=FRAME_STYLE_NONE,                                  // None
   BORDER_STYLE_SIMPLE=FRAME_STYLE_SIMPLE,                              // Simple
   BORDER_STYLE_FLAT=FRAME_STYLE_FLAT,                                  // Flat
   BORDER_STYLE_BEVEL=FRAME_STYLE_BEVEL,                                // Embossed (bevel)
   BORDER_STYLE_STAMP=FRAME_STYLE_STAMP,                                // Embossed (stamp)
  };
#else
enum ENUM_AUTO_SIZE_MODE
  {
   AUTO_SIZE_MODE_GROW=CANV_ELEMENT_AUTO_SIZE_MODE_GROW,                // Increase only
   AUTO_SIZE_MODE_GROW_SHRINK=CANV_ELEMENT_AUTO_SIZE_MODE_GROW_SHRINK   // Increase and decrease
  };
enum ENUM_BORDER_STYLE
  {
   BORDER_STYLE_NONE=FRAME_STYLE_NONE,                                  // No frame
   BORDER_STYLE_SIMPLE=FRAME_STYLE_SIMPLE,                              // Simple frame
   BORDER_STYLE_FLAT=FRAME_STYLE_FLAT,                                  // Flat frame
   BORDER_STYLE_BEVEL=FRAME_STYLE_BEVEL,                                // Embossed (convex)
   BORDER_STYLE_STAMP=FRAME_STYLE_STAMP,                                // Embossed (concave)
  };
#endif
//--- input parameters
sinput   bool                 InpMovable        =  true;                // Movable forms flag
sinput   ENUM_INPUT_YES_NO    InpAutoSize       =  INPUT_YES;           // Autosize
sinput   ENUM_AUTO_SIZE_MODE  InpAutoSizeMode   =  AUTO_SIZE_MODE_GROW; // Autosize mode
sinput   ENUM_BORDER_STYLE    InpFrameStyle     =  BORDER_STYLE_NONE;   // Label border style
sinput   ENUM_ANCHOR_POINT    InpTextAlign      =  ANCHOR_LEFT_UPPER;   // Label text align
//--- global variables
CEngine        engine;
color          array_clr[];
//+------------------------------------------------------------------+
No manipulador OnInit() , vamos escrevemos um bloco de código para criar objetos rótulo de texto:
//+------------------------------------------------------------------+
//| Expert initialization function                                   |
//+------------------------------------------------------------------+
int OnInit()
  {
//--- Set EA global variables
   ArrayResize(array_clr,2);        // Array of gradient filling colors
   array_clr[0]=C'26,100,128';      // Original ≈Dark-azure color
   array_clr[1]=C'35,133,169';      // Lightened original color
//--- Create the array with the current symbol and set it to be used in the library
   string array[1]={Symbol()};
   engine.SetUsedSymbols(array);
   //--- Create the timeseries object for the current symbol and period, and show its description in the journal
   engine.SeriesCreate(Symbol(),Period());
   engine.GetTimeSeriesCollection().PrintShort(false); // Short descriptions
//--- Create WinForms Panel object
   CPanel *pnl=NULL;
   pnl=engine.CreateWFPanel("WFPanel",50,50,230,150,array_clr,200,true,true,false,-1,FRAME_STYLE_BEVEL,true,false);
   if(pnl!=NULL)
     {
      //--- Set Padding to 4
      pnl.SetPaddingAll(4);
      //--- Set the flags of relocation, auto resizing and auto changing mode from the inputs
      pnl.SetMovable(InpMovable);
      pnl.SetAutoSize(InpAutoSize,false);
      pnl.SetAutoSizeMode((ENUM_CANV_ELEMENT_AUTO_SIZE_MODE)InpAutoSizeMode,false);
      //--- In the loop, create 6 bound panel objects
      for(int i=0;i<6;i++)
        {
         //--- create the panel object with coordinates along the X axis in the center and 10 along the Y axis, the width of 80 and the height of 30
         CPanel *prev=pnl.GetElement(i-1);
         int xb=0, yb=0;
         int x=(i<3 ? (prev==NULL ? xb : prev.CoordXRelative()) : xb+prev.Width()+20);
         int y=(i<3 ? (prev==NULL ? yb : prev.BottomEdgeRelative()+16) : (i==3 ? yb : prev.BottomEdgeRelative()+16));
         if(pnl.CreateNewElement(GRAPH_ELEMENT_TYPE_WF_PANEL,pnl,x,y,90,40,C'0xCD,0xDA,0xD7',200,true,false))
           {
            CPanel *obj=pnl.GetElement(i);
            if(obj==NULL)
               continue;
            obj.SetFrameWidthAll(3);
            obj.SetBorderStyle(FRAME_STYLE_BEVEL);
            obj.SetColorBackground(obj.ChangeColorLightness(obj.ColorBackground(),4*i));
            obj.SetForeColor(clrRed);
            //--- Calculate the width and height of the future text label object
            int w=obj.Width()-obj.FrameWidthLeft()-obj.FrameWidthRight()-4;
            int h=obj.Height()-obj.FrameWidthTop()-obj.FrameWidthBottom()-4;
            //--- Create a text label object
            obj.CreateNewElement(GRAPH_ELEMENT_TYPE_WF_LABEL,pnl,2,2,w,h,clrNONE,255,false,false);
            //--- Get the pointer to a newly created object
            CLabel *lbl=obj.GetElement(0);
            if(lbl!=NULL)
              {
               //--- If the object has an even or zero index in the list, set the default text color for it
               if(i % 2==0)
                  lbl.SetForeColor(CLR_DEF_FORE_COLOR);
               //--- If the object index in the list is odd, set the object opacity to 127
               else
                  lbl.SetForeColorOpacity(127);
               //--- Set the font Black width type and
               //--- specify the text alignment from the EA settings
               lbl.SetFontBoldType(FW_TYPE_BLACK);
               lbl.SetTextAlign(InpTextAlign);
               //--- For an object with an even or zero index, specify the Bid price for the text, otherwise - the Ask price of the symbol
               lbl.SetText(GetPrice(i % 2==0 ? SYMBOL_BID : SYMBOL_ASK));
               //--- Set the frame width and type for a text label and update the modified object
               lbl.SetFrameWidthAll(1);
               lbl.SetBorderStyle((ENUM_FRAME_STYLE)InpFrameStyle);
               lbl.Update(true);
              }
           }
        }
      //--- Redraw all objects according to their hierarchy
      pnl.Redraw(true);
     }
//---
   return(INIT_SUCCEEDED);
  }
//+------------------------------------------------------------------+
Toda a lógica aqui é comentada em detalhes no código. Antes de criar objetos rótulos de texto, definimos a cor de fundo do texto para o painel ao qual o rótulo será anexado. Essa cor deve ser herdada pelo objeto rótulo de texto. Aqui vamos conferir. E depois vamos alterar sua cor no próprio objeto de texto conforme necessário.
No manipulador OnTick(), inseriremos os valores de preço Ask e Bid em cada rótulo de texto. Para objetos com índice par na lista, inseriremos o preço Bid, e para os ímpares, o preço Ask:
//+------------------------------------------------------------------+
//| Expert tick function                                             |
//+------------------------------------------------------------------+
void OnTick()
  {
   //--- Get the pointer to the panel object by name
   CPanel *pnl=engine.GetWFPanel("WFPanel");
   if(pnl!=NULL)
     {
      //--- Get the list of all bound panel objects
      CArrayObj *list=pnl.GetListWinFormsObjByType(GRAPH_ELEMENT_TYPE_WF_PANEL);
      //--- In the loop by bound panel objects,
      for(int i=0;i<list.Total();i++)
        {
         //--- get the pointer to the next panel object
         CPanel *obj=pnl.GetWinFormsObj(GRAPH_ELEMENT_TYPE_WF_PANEL,i);
         if(obj!=NULL)
           {
            //--- take the pointer to the first (and only) text label object from the received object
            CLabel *lbl=obj.GetWinFormsObj(GRAPH_ELEMENT_TYPE_WF_LABEL,0);
            if(lbl!=NULL)
              {
               //--- set the new text for the object and redraw it
               lbl.SetText(GetPrice(i % 2==0 ? SYMBOL_BID : SYMBOL_ASK));
               lbl.Redraw(false);
              }
           }
        }
     }
  }
//+------------------------------------------------------------------+
No final da listagem do EA, adicionamos uma função que retorne um valor de string do preço Bid ou Ask:
//+------------------------------------------------------------------+
//| Return Bid/Ask string value                                      |
//+------------------------------------------------------------------+
string GetPrice(const ENUM_SYMBOL_INFO_DOUBLE price)
  {
   return((price==SYMBOL_ASK ? "Ask: " : "Bid: ")+DoubleToString(SymbolInfoDouble(Symbol(),price),Digits()));
  }
//+------------------------------------------------------------------+
Dependendo do valor passado para a função, escolhemos o que escrever antes do valor do preço, "Ask" ou "Bid", e adicionamos a este texto o valor da string do preço com o tipo especificado.
Compilamos o Expert Advisor e o iniciamos no gráfico:
Como vemos, o texto é exibido nas posições corretas dentro do respectivo objeto, cujas dimensões podem ser vistas especificando uma moldura. O texto com preços dentro do objeto é atualizado de acordo com a atualização do preço correspondente.
Ao criar o próprio painel e os objetos sobre ele, há efeitos visuais desagradáveis óbvios, dos quais nos livramos mais tarde ao otimizar a visualização quando interagimos com os objetos no gráfico, quando os construímos, movemos e rearranjamos.
O que virá a seguir?
No próximo artigo, continuaremos desenvolvendo objetos WinForms.
*Artigos desta série:
DoEasy. Controles (Parte 1): Primeiros passos
DoEasy. Controles (Parte 2): Continuamos trabalhando na classe CPanel
DoEasy. Controles (Parte 3): Criando controles vinculados
DoEasy. Controles (Parte 4): Controle "Painel", parâmetros Padding e Dock
DoEasy. Controles (Parte 5): Objeto base WinForms, controle Painel, parâmetro AutoSize
DoEasy. Controles (Parte 6): Controle "Painel", redimensionamento automático do contêiner para adequá-lo ao seu conteúdo
Traduzido do russo pela MetaQuotes Ltd.
Artigo original: https://www.mql5.com/ru/articles/11045
Aviso: Todos os direitos sobre esses materiais pertencem à MetaQuotes Ltd. É proibida a reimpressão total ou parcial.
Esse artigo foi escrito por um usuário do site e reflete seu ponto de vista pessoal. A MetaQuotes Ltd. não se responsabiliza pela precisão das informações apresentadas nem pelas possíveis consequências decorrentes do uso das soluções, estratégias ou recomendações descritas.

 Como melhorar em aprendizado de máquina
 Indicadores com controles interativos no gráfico
 Negociação usando uma grade com ordens limitadas no MOEX
- Aplicativos de negociação gratuitos
- 8 000+ sinais para cópia
- Notícias econômicas para análise dos mercados financeiros
Você concorda com a política do site e com os termos de uso