
DoEasy. Elementos de control (Parte 7): Elemento de control "etiqueta de texto".

Contenido
- Contenido
- Concepto
- Mejorando las clases de la biblioteca
- Clase de control "Etiqueta de texto"
- Simulación
- ¿Qué es lo próximo?
Concepto
Sea cual sea el programa que utilizamos, no podremos apañarnos sin mostrar la información necesaria en la pantalla. Para mostrar textos, MS Visual Studio usa, entre otros, el control Label, la etiqueta de texto. El terminal MetaTrader 5 también tiene el objeto gráfico «Etiqueta de texto». Además, todos los elementos gráficos que creamos para generar interfaces gráficas o diseñar programas gráficos en el terminal también permiten mostrar el texto en el lienzo. Pero no siempre resulta cómodo. Así que hoy vamos a crear un control independiente llamado "Etiqueta de texto".
Dicho objeto podrá colocarse en cualquier lugar de su contenedor, y su propia funcionalidad replicará algunas de las funciones de las etiquetas de texto de MS Visual Studio: podremos establecer los parámetros de fuente para el texto mostrado y el posicionamiento de la inscripción dentro de los límites del objeto "etiqueta de texto". A su vez, el tamaño del objeto puede indicarse en anchura y altura o ajustarse automáticamente al tamaño de la fuente usada para la inscripción. Además, podremos usar un marco de objeto (un rectángulo que enmarque todo el objeto "etiqueta de texto" a lo largo de sus límites). El marco del objeto puede ser tanto plano como tridimensional. Todo esto nos ofrecerá un amplio margen para mostrar el texto en un diseño adecuado dentro de los elementos de la interfaz gráfica del programa.
Para que todos los parámetros del nuevo objeto puedan mostrarse en algún lugar, o podamos seleccionar los objetos según un parámetro requerido, añadiremos todas las propiedades usadas por el objeto "etiqueta de texto" a las listas de propiedades enteras, reales y string de los elementos gráficos de la biblioteca. En principio, este es el concepto al que tratamos de ceñirnos en todos los objetos de la biblioteca, pues proporciona la suficiente flexibilidad para usar las funciones ofrecidas para buscar, seleccionar y clasificar rápidamente los objetos de la biblioteca.
Mejorando las clases de la biblioteca
En primer lugar, vamos a añadir los nuevos mensajes de texto a la biblioteca.
En el archivo \MQL5\Include\DoEasy\Data.mqh, pondremos los índices de los nuevos mensajes de la biblioteca:
   MSG_GRAPH_ELEMENT_TYPE_WF_PANEL,                   // Panel control
   MSG_GRAPH_ELEMENT_TYPE_WF_LABEL,                   // Label control
   MSG_GRAPH_OBJ_BELONG_PROGRAM,                      // Graphical object belongs to a program
...
//--- CPanel
   MSG_PANEL_OBJECT_ERR_FAILED_CREATE_UNDERLAY_OBJ,   // Failed to create the underlay object
   MSG_PANEL_OBJECT_ERR_OBJ_MUST_BE_WFBASE,           // Error. The created object should be of WinForms Base type or be derived from it

  };
//+------------------------------------------------------------------+
y los mensajes de texto correspondientes a los nuevos índices añadidos:
   {"Элемент управления \"Panel\"","Control element \"Panel\""},
   {"Элемент управления \"Label\"","Control element \"Label\""},
   {"Графический объект принадлежит программе","The graphic object belongs to the program"},
...
//--- CPanel
   {"Не удалось создать объект-подложку","Failed to create underlay object"},
   {"Ошибка. Создаваемый объект должен иметь тип WinForms Base или быть его наследником","Error. The object being created must be of type WinForms Base or be derived from it"},

  };
//+---------------------------------------------------------------------+
Además del color del texto en el control «Etiqueta de texto», también usaremos su opacidad, lo cual nos permitirá, por ejemplo, crear un efecto de aparición/desaparición suave del texto en los elementos de la GUI del programa. También necesitaremos escribir el texto que muestra el objeto de etiqueta de texto en las propiedades, y algunos otros parámetros necesarios para construir objetos WinForms que no incluimos en las propiedades del elemento gráfico, pero que ya fueron creados antes.
En el archivo \MQL5\Include\DoEasy\Defines.mqh, en el bloque de parámetros del lienzo, incluimos una macrosustitución en la que se especificará la opacidad del texto para los controles por defecto:
//--- Canvas parameters
#define PAUSE_FOR_CANV_UPDATE          (16)                       // Canvas update frequency
#define CLR_CANV_NULL                  (0x00FFFFFF)               // Zero for the canvas with the alpha channel
#define CLR_DEF_FORE_COLOR             (C'0x2D,0x43,0x48')        // Default color for texts of objects on canvas
#define CLR_DEF_FORE_COLOR_OPACITY     (255)                      // Default color non-transparency for canvas object texts
#define CLR_DEF_OPACITY                (200)                      // Default color non-transparency for canvas objects
#define CLR_DEF_SHADOW_COLOR           (C'0x6B,0x6B,0x6B')        // Default color for canvas object shadows
#define CLR_DEF_SHADOW_OPACITY         (127)                      // Default color non-transparency for canvas objects
#define DEF_SHADOW_BLUR                (4)                        // Default blur for canvas object shadows
#define DEF_FONT                       ("Calibri")                // Default font
#define DEF_FONT_SIZE                  (8)                        // Default font size
#define OUTER_AREA_SIZE                (16)                       // Size of one side of the outer area around the form workspace
#define DEF_FRAME_WIDTH_SIZE           (3)                        // Default form/panel/window frame width
//--- Graphical object parameters
En la lista de tipos de los objetos de la biblioteca, añadimos el nuevo tipo, la etiqueta de texto:
//+------------------------------------------------------------------+
//| List of library object types                                     |
//+------------------------------------------------------------------+
enum ENUM_OBJECT_DE_TYPE
  {
//--- Graphics
   OBJECT_DE_TYPE_GBASE =  COLLECTION_ID_LIST_END+1,              // "Base object of all library graphical objects" object type
   OBJECT_DE_TYPE_GELEMENT,                                       // "Graphical element" object type
   OBJECT_DE_TYPE_GFORM,                                          // Form object type
   OBJECT_DE_TYPE_GFORM_CONTROL,                                  // "Form for managing pivot points of graphical object" object type
   OBJECT_DE_TYPE_GSHADOW,                                        // Shadow object type
   //--- WinForms
   OBJECT_DE_TYPE_GWF_BASE,                                       // WinForms Base object type (base abstract WinForms object)
   OBJECT_DE_TYPE_GWF_PANEL,                                      // WinForms Panel object type
   OBJECT_DE_TYPE_GWF_LABEL,                                      // WinForms Label object type
//--- Animation
La lista de tipos de elementos gráficos también se actualizará con el nuevo elemento, la etiqueta de texto:
//+------------------------------------------------------------------+
//| The list of graphical element types                              |
//+------------------------------------------------------------------+
enum ENUM_GRAPH_ELEMENT_TYPE
  {
   GRAPH_ELEMENT_TYPE_STANDARD,                       // Standard graphical object
   GRAPH_ELEMENT_TYPE_STANDARD_EXTENDED,              // Extended standard graphical object
   GRAPH_ELEMENT_TYPE_SHADOW_OBJ,                     // Shadow object
   GRAPH_ELEMENT_TYPE_ELEMENT,                        // Element
   GRAPH_ELEMENT_TYPE_FORM,                           // Form
   GRAPH_ELEMENT_TYPE_WINDOW,                         // Window
   //--- WinForms
   GRAPH_ELEMENT_TYPE_WF_UNDERLAY,                    // Panel object underlay
   GRAPH_ELEMENT_TYPE_WF_BASE,                        // Windows Forms Base
   GRAPH_ELEMENT_TYPE_WF_PANEL,                       // Windows Forms Panel
   GRAPH_ELEMENT_TYPE_WF_LABEL,                       // Windows Forms Label
  };
//+------------------------------------------------------------------+
En la lista de propiedades enteras del elemento gráfico en el lienzo, añadimos todas las nuevas constantes, las que hemos añadido previamente a los objetos WimForms, pero no hemos colocado en esta enumeración, y las nuevas constantes:
//+------------------------------------------------------------------+
//| Integer properties of the graphical element on the canvas        |
//+------------------------------------------------------------------+
enum ENUM_CANV_ELEMENT_PROP_INTEGER
  {
   //--- ...

   CANV_ELEMENT_PROP_FORE_COLOR,                      // Default text color for all control objects
   CANV_ELEMENT_PROP_FORE_COLOR_OPACITY,              // Default text color opacity for all control objects
   CANV_ELEMENT_PROP_BOLD_TYPE,                       // Font width type
   CANV_ELEMENT_PROP_BORDER_STYLE,                    // Control frame style
   CANV_ELEMENT_PROP_AUTOSIZE,                        // Flag of the element auto resizing depending on the content
   CANV_ELEMENT_PROP_AUTOSIZE_MODE,                   // Mode of the element auto resizing depending on the content
   CANV_ELEMENT_PROP_AUTOSCROLL,                      // Auto scrollbar flag
   CANV_ELEMENT_PROP_AUTOSCROLL_MARGIN_W,             // Width of the field inside the element during auto scrolling
   CANV_ELEMENT_PROP_AUTOSCROLL_MARGIN_H,             // Height of the field inside the element during auto scrolling
   CANV_ELEMENT_PROP_DOCK_MODE,                       // Mode of binding control borders to the container
   CANV_ELEMENT_PROP_MARGIN_TOP,                      // Top margin between the fields of this and another control

   //--- ...

   CANV_ELEMENT_PROP_PADDING_RIGHT,                   // Right margin inside the control
   CANV_ELEMENT_PROP_TEXT_ALIGN,                      // Text position within text label boundaries
  };
#define CANV_ELEMENT_PROP_INTEGER_TOTAL (44)          // Total number of integer properties
#define CANV_ELEMENT_PROP_INTEGER_SKIP  (0)           // Number of integer properties not used in sorting
//+------------------------------------------------------------------+
En consecuencia, el número total de propiedades enteras pasará de 38 a 44.
En la lista de propiedades de tipo string del elemento gráfico en el lienzo, añadimos la nueva propiedad "Texto del elemento gráfico" y aumentamos el número total de propiedades de tipo string de 2 a 3:
//+------------------------------------------------------------------+
//| String properties of the graphical element on the canvas         |
//+------------------------------------------------------------------+
enum ENUM_CANV_ELEMENT_PROP_STRING
  {
   CANV_ELEMENT_PROP_NAME_OBJ = (CANV_ELEMENT_PROP_INTEGER_TOTAL+CANV_ELEMENT_PROP_DOUBLE_TOTAL), // Graphical element object name
   CANV_ELEMENT_PROP_NAME_RES,                        // Graphical resource name
   CANV_ELEMENT_PROP_TEXT,                            // Graphical element text
  };
#define CANV_ELEMENT_PROP_STRING_TOTAL  (3)           // Total number of string properties
//+------------------------------------------------------------------+
Vamos a añadir todas las nuevas propiedades a la lista de posibles criterios de clasificación de los elementos gráficos en el lienzo:
//+------------------------------------------------------------------+
//| Possible sorting criteria of graphical elements on the canvas    |
//+------------------------------------------------------------------+
#define FIRST_CANV_ELEMENT_DBL_PROP  (CANV_ELEMENT_PROP_INTEGER_TOTAL-CANV_ELEMENT_PROP_INTEGER_SKIP)
#define FIRST_CANV_ELEMENT_STR_PROP  (CANV_ELEMENT_PROP_INTEGER_TOTAL-CANV_ELEMENT_PROP_INTEGER_SKIP+CANV_ELEMENT_PROP_DOUBLE_TOTAL-CANV_ELEMENT_PROP_DOUBLE_SKIP)
enum ENUM_SORT_CANV_ELEMENT_MODE
  {
//--- Sort by integer properties
   SORT_BY_CANV_ELEMENT_ID = 0,                       // Sort by element ID

   //--- ...

   SORT_BY_CANV_ELEMENT_FORE_COLOR,                   // Sort by default text color for all control objects
   SORT_BY_CANV_ELEMENT_FORE_COLOR_OPACITY,           // Sort by default text color opacity for all control objects
   SORT_BY_CANV_ELEMENT_BOLD_TYPE,                    // Sort by font width type
   SORT_BY_CANV_ELEMENT_BORDER_STYLE,                 // Sort by control frame style
   SORT_BY_CANV_ELEMENT_AUTOSIZE,                     // Sort by the flag of the control auto resizing depending on the content
   SORT_BY_CANV_ELEMENT_AUTOSIZE_MODE,                // Sort by the mode of the control auto resizing depending on the content
   SORT_BY_CANV_ELEMENT_AUTOSCROLL,                   // Sort by auto scrollbar flag
   SORT_BY_CANV_ELEMENT_AUTOSCROLL_MARGIN_W,          // Sort by width of the field inside the element during auto scrolling
   SORT_BY_CANV_ELEMENT_AUTOSCROLL_MARGIN_H,          // Sort by height of the field inside the element during auto scrolling
   SORT_BY_CANV_ELEMENT_DOCK_MODE,                    // Sort by mode of binding control borders to the container

   //--- ...

   SORT_BY_CANV_ELEMENT_PADDING_RIGHT,                // Sort by right margin inside the control
   SORT_BY_CANV_ELEMENT_TEXT_ALIGN,                   // Sort by text position within text label boundaries
//--- Sort by real properties

//--- Sort by string properties
   SORT_BY_CANV_ELEMENT_NAME_OBJ = FIRST_CANV_ELEMENT_STR_PROP,// Sort by an element object name
   SORT_BY_CANV_ELEMENT_NAME_RES,                     // Sort by the graphical resource name
   SORT_BY_CANV_ELEMENT_TEXT,                         // Sort by graphical element text
  };
//+------------------------------------------------------------------+
Ahora podremos clasificar, seleccionar y filtrar todos los elementos gráficos según las nuevas propiedades.
La clase básica de todos los objetos WinForms de la biblioteca es la clase CWinFormBase, que a su vez hereda el objeto de formulario en el que se organiza la interacción con el ratón. Vamos a necesitar algunas de sus variables privadas en las clases heredadas. Y como las variables y métodos privados solo resultan visibles en la clase donde se declaran, tendremos que moverlos de la sección privada a la sección protegida: entonces estarán también disponibles en las clases heredadas.
En el archivo de objetos de formulario \MQL5\Include\DoEasy\Objects\Graph\Form.mqh, trasladamos las variables de la sección privada
//+------------------------------------------------------------------+
//| Form object class                                                |
//+------------------------------------------------------------------+
class CForm : public CGCnvElement
  {
private:
   CArrayObj         m_list_elements;                          // List of attached elements
   CAnimations      *m_animations;                             // Pointer to the animation object
   CShadowObj       *m_shadow_obj;                             // Pointer to the shadow object
   CMouseState       m_mouse;                                  // "Mouse status" class object
   ENUM_MOUSE_FORM_STATE m_mouse_form_state;                   // Mouse status relative to the form
   ushort            m_mouse_state_flags;                      // Mouse status flags
   color             m_color_frame;                            // Form frame color
   int               m_offset_x;                               // Offset of the X coordinate relative to the cursor
   int               m_offset_y;                               // Offset of the Y coordinate relative to the cursor
   int               m_init_x;                                 // Newly created form X coordinate
   int               m_init_y;                                 // Newly created form Y coordinate
   int               m_init_w;                                 // Newly created form width
   int               m_init_h;                                 // Newly created form height

//--- Reset the array size of (1) text, (2) rectangular and (3) geometric animation frames
a la sección protegida, y hacemos que algunos métodos sean virtuales, para que podamos anularlos en las clases heredadas:
protected:
   CArrayObj         m_list_elements;                          // List of attached elements
   CAnimations      *m_animations;                             // Pointer to the animation object
   CShadowObj       *m_shadow_obj;                             // Pointer to the shadow object
   CMouseState       m_mouse;                                  // "Mouse status" class object
   ENUM_MOUSE_FORM_STATE m_mouse_form_state;                   // Mouse status relative to the form
   ushort            m_mouse_state_flags;                      // Mouse status flags
   color             m_color_frame;                            // Form frame color
   int               m_offset_x;                               // Offset of the X coordinate relative to the cursor
   int               m_offset_y;                               // Offset of the Y coordinate relative to the cursor
   CArrayObj         m_list_tmp;                               // List for storing the pointers
   int               m_frame_width_left;                       // Form frame width to the left
   int               m_frame_width_right;                      // Form frame width to the right
   int               m_frame_width_top;                        // Form frame width at the top
   int               m_frame_width_bottom;                     // Form frame width at the bottom
   int               m_init_x;                                 // Newly created form X coordinate
   int               m_init_y;                                 // Newly created form Y coordinate
   int               m_init_w;                                 // Newly created form width
   int               m_init_h;                                 // Newly created form height
//--- Initialize the variables
   virtual void      Initialize(void);
   void              Deinitialize(void);
//--- Create a shadow object
   void              CreateShadowObj(const color colour,const uchar opacity);
//--- Return the name of the dependent object
   string            CreateNameDependentObject(const string base_name)  const
                       { return ::StringSubstr(this.NameObj(),::StringLen(::MQLInfoString(MQL_PROGRAM_NAME))+1)+"_"+base_name;   }
//--- Update coordinates of bound objects
   virtual bool      MoveDependentObj(const int x,const int y,const bool redraw=false);
//--- Create a new bound element and add it to the list of bound objects
   virtual CGCnvElement *CreateAndAddNewElement(const ENUM_GRAPH_ELEMENT_TYPE element_type,
                                                CGCnvElement *main,
                                                const int x,
                                                const int y,
                                                const int w,
                                                const int h,
                                                const color colour,
                                                const uchar opacity,
                                                const bool activity);

public:
Como vamos a usar el concepto general de construcción de los objetos de la biblioteca también para los objetos WinForms, y ya hemos añadido (y seguiremos añadiendo) los parámetros de los objetos WinForms a las propiedades de los elementos gráficos, tendremos que eliminar las variables de la clase básica CWinFormBase que se utilizaban para guardar las propiedades de los objetos y reescribir todos los métodos para establecer y obtener dichas propiedades.
En el archivo \MQL5\Include\DoEasy\Objects\Graph\WForms\WinFormBase.mqh, eliminamos las variables de la sección protegida que ya no resultan necesarias
//+------------------------------------------------------------------+
//| Form object class                                                |
//+------------------------------------------------------------------+
class CWinFormBase : public CForm
  {
protected:
   color             m_fore_color;                                   // Default text color for all control objects
   ENUM_FW_TYPE      m_bold_type;                                    // Font width type
   ENUM_FRAME_STYLE  m_border_style;                                 // Control frame style
   bool              m_autosize;                                     // Flag of the element auto resizing depending on the content
   ENUM_CANV_ELEMENT_DOCK_MODE m_dock_mode;                          // Mode of binding control borders to the container
   int               m_margin[4];                                    // Array of gaps of all sides between the fields of the current and adjacent controls
   int               m_padding[4];                                   // Array of gaps of all sides inside controls

private:
En la sección pública de la clase, rehacemos los métodos para obtener y registrar las propiedades en la enumeración de propiedades del objeto y añadimos los nuevos métodos, tanto para trabajar con el texto del objeto «Etiqueta de texto», como para establecer y obtener las propiedades comunes de los objetos WinForms:
public:
//--- ...

//--- ...

//--- Constructors
                     CWinFormBase(const long chart_id,
                                  const int subwindow,
                                  const string name,
                                  const int x,
                                  const int y,
                                  const int w,
                                  const int h);
                     CWinFormBase(const string name) : CForm(::ChartID(),0,name,0,0,0,0)
                       {
                        this.m_type=OBJECT_DE_TYPE_GWF_BASE;
                       }

//--- (1) Set and (2) return the default text color of all panel objects
   void              SetForeColor(const color clr)                   { this.SetProperty(CANV_ELEMENT_PROP_FORE_COLOR,clr);                               }
   color             ForeColor(void)                           const { return (color)this.GetProperty(CANV_ELEMENT_PROP_FORE_COLOR);                     }
//--- (1) Set and (2) return the default text color opacity of all panel objects
   void              SetForeColorOpacity(const uchar value)          { this.SetProperty(CANV_ELEMENT_PROP_FORE_COLOR_OPACITY,value);                     }
   uchar             ForeColorOpacity(void)                    const { return (uchar)this.GetProperty(CANV_ELEMENT_PROP_FORE_COLOR_OPACITY);             }
//--- (1) Set and (2) return the element text
   virtual void      SetText(const string text)                      { this.SetProperty(CANV_ELEMENT_PROP_TEXT,text);                                    }
   string            Text(void)                                const { return this.GetProperty(CANV_ELEMENT_PROP_TEXT);                                  }
//--- (1) Set and (2) return the element text location angle (alignment type)
   void              SetTextAlign(const ENUM_ANCHOR_POINT anchor)    { this.SetProperty(CANV_ELEMENT_PROP_TEXT_ALIGN,anchor);                            }
   ENUM_ANCHOR_POINT TextAlign(void)                           const { return (ENUM_ANCHOR_POINT)this.GetProperty(CANV_ELEMENT_PROP_TEXT_ALIGN);         }
//--- (1) Set and (2) return the Bold font flag
   void              SetBold(const bool flag);
   bool              Bold(void);
//--- (1) Set and (2) return the Italic font flag
   void              SetItalic(const bool flag);
   bool              Italic(void);
//--- (1) Set and (2) return the Strikeout font flag
   void              SetStrikeout(const bool flag);
   bool              Strikeout(void);
//--- (1) Set and (2) return the Underline font flag
   void              SetUnderline(const bool flag);
   bool              Underline(void);
//--- (1) Set and (2) return the font style
   void              SetFontDrawStyle(ENUM_FONT_STYLE style);
   ENUM_FONT_STYLE   FontDrawStyle(void);
//--- (1) Set and (2) return the font width type
   void              SetFontBoldType(ENUM_FW_TYPE type);
   ENUM_FW_TYPE      FontBoldType(void)                        const { return (ENUM_FW_TYPE)this.GetProperty(CANV_ELEMENT_PROP_BOLD_TYPE);               }
//--- (1) Set and (2) return the frame style
   void              SetBorderStyle(const ENUM_FRAME_STYLE style)    { this.SetProperty(CANV_ELEMENT_PROP_BORDER_STYLE,style);                           }
   ENUM_FRAME_STYLE  BorderStyle(void)                         const { return (ENUM_FRAME_STYLE)this.GetProperty(CANV_ELEMENT_PROP_BORDER_STYLE);        }

//--- (1) Set and (2) return the flag of the element auto resizing depending on the content
   virtual void      SetAutoSize(const bool flag,const bool redraw)  { this.SetProperty(CANV_ELEMENT_PROP_AUTOSIZE,flag);                                }
   bool              AutoSize(void)                                  { return (bool)this.GetProperty(CANV_ELEMENT_PROP_AUTOSIZE);                        }
//--- (1) Set and (2) return the auto scrollbar flag
   virtual void      SetAutoScroll(const bool flag,const bool redraw){ this.SetProperty(CANV_ELEMENT_PROP_AUTOSCROLL,flag);                              }
   bool              AutoScroll(void)                                { return (bool)this.GetProperty(CANV_ELEMENT_PROP_AUTOSCROLL);                      }

//--- (1) Set and (2) return the mode of binding element borders to the container
   virtual void      SetDockMode(const ENUM_CANV_ELEMENT_DOCK_MODE mode,const bool redraw)
                       {
                        this.SetProperty(CANV_ELEMENT_PROP_DOCK_MODE,mode);
                       }
   ENUM_CANV_ELEMENT_DOCK_MODE DockMode(void)                  const { return (ENUM_CANV_ELEMENT_DOCK_MODE)this.GetProperty(CANV_ELEMENT_PROP_DOCK_MODE);}

//--- Set the gap (1) to the left, (2) at the top, (3) to the right, (4) at the bottom and (5) on all sides between the fields of this and another control
   void              SetMarginLeft(const int value)                  { this.SetProperty(CANV_ELEMENT_PROP_MARGIN_LEFT,value);                            }
   void              SetMarginTop(const int value)                   { this.SetProperty(CANV_ELEMENT_PROP_MARGIN_TOP,value);                             }
   void              SetMarginRight(const int value)                 { this.SetProperty(CANV_ELEMENT_PROP_MARGIN_RIGHT,value);                           }
   void              SetMarginBottom(const int value)                { this.SetProperty(CANV_ELEMENT_PROP_MARGIN_BOTTOM,value);                          }
   void              SetMarginAll(const int value)
                       {
                        this.SetMarginLeft(value); this.SetMarginTop(value); this.SetMarginRight(value); this.SetMarginBottom(value);
                       }
   void              SetMargin(const int left,const int top,const int right,const int bottom)
                       {
                        this.SetMarginLeft(left); this.SetMarginTop(top); this.SetMarginRight(right); this.SetMarginBottom(bottom);
                       }
//--- Return the gap (1) to the left, (2) at the top, (3) to the right and (4) at the bottom between the fields of this and another control
   int               MarginLeft(void)                          const { return (int)this.GetProperty(CANV_ELEMENT_PROP_MARGIN_LEFT);                      }
   int               MarginTop(void)                           const { return (int)this.GetProperty(CANV_ELEMENT_PROP_MARGIN_TOP);                       }
   int               MarginRight(void)                         const { return (int)this.GetProperty(CANV_ELEMENT_PROP_MARGIN_RIGHT);                     }
   int               MarginBottom(void)                        const { return (int)this.GetProperty(CANV_ELEMENT_PROP_MARGIN_BOTTOM);                    }

//--- Set the gap (1) to the left, (2) at the top, (3) to the right, (4) at the bottom and (5) on all sides inside the control
   virtual void      SetPaddingLeft(const uint value)
                       {
                        int padding=((int)value<this.m_frame_width_left ? this.m_frame_width_left : (int)value);
                        this.SetProperty(CANV_ELEMENT_PROP_PADDING_LEFT,padding);
                       }
   virtual void      SetPaddingTop(const uint value)
                       {
                        int padding=((int)value<this.m_frame_width_top ? this.m_frame_width_top : (int)value);
                        this.SetProperty(CANV_ELEMENT_PROP_PADDING_TOP,padding);
                       }
   virtual void      SetPaddingRight(const uint value)
                       {
                        int padding=((int)value<this.m_frame_width_right ? this.m_frame_width_right : (int)value);
                        this.SetProperty(CANV_ELEMENT_PROP_PADDING_RIGHT,padding);
                       }
   virtual void      SetPaddingBottom(const uint value)
                       {
                        int padding=((int)value<this.m_frame_width_bottom ? this.m_frame_width_bottom : (int)value);
                        this.SetProperty(CANV_ELEMENT_PROP_PADDING_BOTTOM,padding);
                       }
   virtual void      SetPaddingAll(const uint value)
                       {
                        this.SetPaddingLeft(value); this.SetPaddingTop(value); this.SetPaddingRight(value); this.SetPaddingBottom(value);
                       }
   virtual void      SetPadding(const int left,const int top,const int right,const int bottom)
                       {
                        this.SetPaddingLeft(left); this.SetPaddingTop(top); this.SetPaddingRight(right); this.SetPaddingBottom(bottom);
                       }

//--- Set the width of the element frame (1) to the left, (2) at the top, (3) to the right and (4) at the bottom
   virtual void      SetFrameWidthLeft(const uint value)             { this.m_frame_width_left=(int)value;                                               }
   virtual void      SetFrameWidthTop(const uint value)              { this.m_frame_width_top=(int)value;                                                }
   virtual void      SetFrameWidthRight(const uint value)            { this.m_frame_width_right=(int)value;                                              }
   virtual void      SetFrameWidthBottom(const uint value)           { this.m_frame_width_bottom=(int)value;                                             }
   virtual void      SetFrameWidthAll(const uint value)
                       {
                        this.SetFrameWidthLeft(value); this.SetFrameWidthTop(value); this.SetFrameWidthRight(value); this.SetFrameWidthBottom(value);
                       }
   virtual void      SetFrameWidth(const uint left,const uint top,const uint right,const uint bottom)
                       {
                        this.SetFrameWidthLeft(left); this.SetFrameWidthTop(top); this.SetFrameWidthRight(right); this.SetFrameWidthBottom(bottom);
                       }

//--- Return the width of the element frame (1) to the left, (2) at the top, (3) to the right and (4) at the bottom
   int               FrameWidthLeft(void)                      const { return this.m_frame_width_left;                                                   }
   int               FrameWidthTop(void)                       const { return this.m_frame_width_top;                                                    }
   int               FrameWidthRight(void)                     const { return this.m_frame_width_right;                                                  }
   int               FrameWidthBottom(void)                    const { return this.m_frame_width_bottom;                                                 }

//--- Return the gap (1) to the left, (2) at the top, (3) to the right and (4) at the bottom between the fields inside the control
   int               PaddingLeft(void)                         const { return (int)this.GetProperty(CANV_ELEMENT_PROP_PADDING_LEFT);                     }
   int               PaddingTop(void)                          const { return (int)this.GetProperty(CANV_ELEMENT_PROP_PADDING_TOP);                      }
   int               PaddingRight(void)                        const { return (int)this.GetProperty(CANV_ELEMENT_PROP_PADDING_RIGHT);                    }
   int               PaddingBottom(void)                       const { return (int)this.GetProperty(CANV_ELEMENT_PROP_PADDING_BOTTOM);                   }

  };
//+------------------------------------------------------------------+
En todos los métodos rediseñados, ahora escribiremos y obtendremos los valores no en variables, sino en enumeraciones de propiedades de objetos usando los métodos SetProperty() y GetProperty(), como describimos originalmente en el concepto de construcción de los objetos de la biblioteca en el primer artículo de su descripción.
En el constructor de la clase, establecemos el texto para el objeto que se va a crear como una «cadena vacía» y establecemos el color del texto y la opacidad en los valores por defecto registrados en Defines.mqh:
//+------------------------------------------------------------------+
//| Constructor                                                      |
//+------------------------------------------------------------------+
CWinFormBase::CWinFormBase(const long chart_id,
                           const int subwindow,
                           const string name,
                           const int x,
                           const int y,
                           const int w,
                           const int h) : CForm(chart_id,subwindow,name,x,y,w,h)
  {
//--- Set the graphical element and library object types as a base WinForms object
   CGBaseObj::SetTypeElement(GRAPH_ELEMENT_TYPE_WF_BASE);
   CGCnvElement::SetProperty(CANV_ELEMENT_PROP_TYPE,GRAPH_ELEMENT_TYPE_WF_BASE);
   this.m_type=OBJECT_DE_TYPE_GWF_BASE;
//--- Initialize all variables
   this.SetText("");
   this.SetForeColor(CLR_DEF_FORE_COLOR);
   this.SetForeColorOpacity(CLR_DEF_FORE_COLOR_OPACITY);
   this.SetFontBoldType(FW_TYPE_NORMAL);
   this.SetMarginAll(0);
   this.SetPaddingAll(0);
   this.SetDockMode(CANV_ELEMENT_DOCK_MODE_NONE,false);
   this.SetBorderStyle(FRAME_STYLE_NONE);
   this.SetAutoSize(false,false);
   CForm::SetCoordXInit(x);
   CForm::SetCoordYInit(y);
   CForm::SetWidthInit(w);
   CForm::SetHeightInit(h);
   this.m_shadow=false;
   this.m_frame_width_right=0;
   this.m_frame_width_left=0;
   this.m_frame_width_top=0;
   this.m_frame_width_bottom=0;
   this.m_gradient_v=true;
   this.m_gradient_c=false;
  }
//+------------------------------------------------------------------+
En los métodos que establecen la bandera de la fuente en negrita y el tipo de grosor de la fuente, en lugar de escribir los valores en las variables, ahora escribiremos los valores en las propiedades de los objetos:
//+------------------------------------------------------------------+
//| Set the Bold font flag                                           |
//+------------------------------------------------------------------+
void CWinFormBase::SetBold(const bool flag)
  {
   uint flags=this.GetFontFlags();
   if(flag)
     {
      this.SetFontBoldType(FW_TYPE_BOLD);
      CGCnvElement::SetFontFlags(flags | FW_BOLD);
     }
   else
      this.SetFontBoldType(FW_TYPE_NORMAL);
  }
//+------------------------------------------------------------------+

//+------------------------------------------------------------------+
//| Set the font width type                                          |
//+------------------------------------------------------------------+
void CWinFormBase::SetFontBoldType(ENUM_FW_TYPE type)
  {
   this.SetProperty(CANV_ELEMENT_PROP_BOLD_TYPE,type);
   uint flags=this.GetFontFlags();
   switch(type)
     {
      case FW_TYPE_DONTCARE   : CGCnvElement::SetFontFlags(flags | FW_DONTCARE);    break;
      case FW_TYPE_THIN       : CGCnvElement::SetFontFlags(flags | FW_THIN);        break;
      case FW_TYPE_EXTRALIGHT : CGCnvElement::SetFontFlags(flags | FW_EXTRALIGHT);  break;
      case FW_TYPE_ULTRALIGHT : CGCnvElement::SetFontFlags(flags | FW_ULTRALIGHT);  break;
      case FW_TYPE_LIGHT      : CGCnvElement::SetFontFlags(flags | FW_LIGHT);       break;
      case FW_TYPE_REGULAR    : CGCnvElement::SetFontFlags(flags | FW_REGULAR);     break;
      case FW_TYPE_MEDIUM     : CGCnvElement::SetFontFlags(flags | FW_MEDIUM);      break;
      case FW_TYPE_SEMIBOLD   : CGCnvElement::SetFontFlags(flags | FW_SEMIBOLD);    break;
      case FW_TYPE_DEMIBOLD   : CGCnvElement::SetFontFlags(flags | FW_DEMIBOLD);    break;
      case FW_TYPE_BOLD       : CGCnvElement::SetFontFlags(flags | FW_BOLD);        break;
      case FW_TYPE_EXTRABOLD  : CGCnvElement::SetFontFlags(flags | FW_EXTRABOLD);   break;
      case FW_TYPE_ULTRABOLD  : CGCnvElement::SetFontFlags(flags | FW_ULTRABOLD);   break;
      case FW_TYPE_HEAVY      : CGCnvElement::SetFontFlags(flags | FW_HEAVY);       break;
      case FW_TYPE_BLACK      : CGCnvElement::SetFontFlags(flags | FW_BLACK);       break;
      default                 : CGCnvElement::SetFontFlags(flags | FW_NORMAL);      break;
     }
  }
//+------------------------------------------------------------------+
Clase de control «Etiqueta de texto»
En el directorio de la biblioteca \MQL5\Include\DoEasy\Objects\Graph\WForms\Common Controls\, crearemos el nuevo archivo Label.mqh de la clase CLabel. La clase básica deberá ser la clase CWinFormBase, cuyo archivo deberá adjuntarse al archivo de la clase recién creada:
//+------------------------------------------------------------------+
//|                                                        Label.mqh |
//|                                  Copyright 2022, MetaQuotes Ltd. |
//|                             https://mql5.com/en/users/artmedia70 |
//+------------------------------------------------------------------+
#property copyright "Copyright 2022, MetaQuotes Ltd."
#property link      "https://mql5.com/en/users/artmedia70"
#property version   "1.00"
#property strict    // Necessary for mql4
//+------------------------------------------------------------------+
//| Include files                                                    |
//+------------------------------------------------------------------+
#include "..\..\WForms\WinFormBase.mqh"
//+------------------------------------------------------------------+
//| Label object class of WForms controls                            |
//+------------------------------------------------------------------+
class CLabel : public CWinFormBase
  {
  }
En las secciones private, protected y public de la clase, escribimos las declaraciones de los métodos de la clase para su funcionamiento:
//+------------------------------------------------------------------+
//| Label object class of WForms controls                            |
//+------------------------------------------------------------------+
class CLabel : public CWinFormBase
  {
private:
//--- Set the element width and height automatically
   void              AutoSetWH(void);
protected:
//--- Initialize the variables
   virtual void      Initialize(void);

public:
//--- Clear the element filling it with color and opacity
   virtual void      Erase(const color colour,const uchar opacity,const bool redraw=false);
//--- Clear the element with a gradient fill
   virtual void      Erase(color &colors[],const uchar opacity,const bool vgradient,const bool cycle,const bool redraw=false);
//--- Clear the element completely
   virtual void      Erase(const bool redraw=false);
//--- Redraw the object
   virtual void      Redraw(bool redraw);
//--- Set the element text
   virtual void      SetText(const string text)
                       {
                        CWinFormBase::SetText(text);
                        if(this.AutoSize())
                           this.AutoSetWH();
                       }

//--- Constructors
                     CLabel(const long chart_id,
                            const int subwindow,
                            const string name,
                            const int x,
                            const int y,
                            const int w,
                            const int h);
  };
//+------------------------------------------------------------------+
Como podemos ver, hemos declarado los métodos virtuales de la clase básica CWinFormBase en las secciones protected y public, que deberán tener una lógica ligeramente distinta a la de la clase básica y, por tanto, serán sobrescritos en esta clase.
Por ejemplo, en el método para establecer el texto de un elemento, primero llamaremos al método de la clase básica, donde el nuevo valor transmitido al método será simplemente escrito en la propiedad del elemento y luego, si la bandera de cambio de tamaño automático está activada, llamaremos al método privado para establecer el nuevo tamaño, correspondiente al tamaño del texto mostrado en el lienzo del elemento, que discutiremos más adelante:
//--- Set the element text
   virtual void      SetText(const string text)
                       {
                        CWinFormBase::SetText(text);
                        if(this.AutoSize())
                           this.AutoSetWH();
                       }
La clase tiene un constructor paramétrico y, en consecuencia, el constructor y el destructor predeterminados se crearán automáticamente.
Al constructor paramétrico se le transmiten el identificador del gráfico y la subventana del mismo donde se construirá el objeto, el nombre del objeto, sus coordenadas y dimensiones:
//+------------------------------------------------------------------+
//| Constructor                                                      |
//+------------------------------------------------------------------+
CLabel::CLabel(const long chart_id,
               const int subwindow,
               const string name,
               const int x,
               const int y,
               const int w,
               const int h) : CWinFormBase(chart_id,subwindow,name,x,y,w,h)
  {
   CGBaseObj::SetTypeElement(GRAPH_ELEMENT_TYPE_WF_LABEL);
   CGCnvElement::SetProperty(CANV_ELEMENT_PROP_TYPE,GRAPH_ELEMENT_TYPE_WF_LABEL);
   this.m_type=OBJECT_DE_TYPE_GWF_LABEL;
   this.SetCoordX(x);
   this.SetCoordY(y);
   this.SetWidth(w);
   this.SetHeight(h);
   this.Initialize();
   if(this.AutoSize())
      this.AutoSetWH();
   this.SetWidthInit(this.Width());
   this.SetHeightInit(this.Height());
   this.SetCoordXInit(x);
   this.SetCoordYInit(y);
   this.Redraw(false);
  }
//+------------------------------------------------------------------+
En primer lugar, escribimos en todas las clases padre el tipo de elemento gráfico y asignamos al objeto el tipo de objeto de la biblioteca "WinForms Label".
A continuación, establecemos las coordenadas y dimensiones del objeto y llamamos al método virtual para establecer los parámetros básicos del elemento gráfico de la biblioteca. Este método se sobrescribe en esta clase, puesto que es ligeramente distinto del mismo método del objeto básico. Lo analizaremos a continuación.
Si hemos establecido la bandera de cambio de tamaño automático del objeto para que se ajuste al tamaño del texto, entonces llamaremos al método correspondiente para redimensionar el objeto (aquí la bandera estará siempre desactivada por ahora, pero esto podría cambiarse más adelante).
Después de cambiar el tamaño (con la bandera activada), escribiremos las dimensiones iniciales del objeto y sus coordenadas iniciales.
Al final, redibujaremos todo el objeto.
Método virtual que inicializa las variables:
//+------------------------------------------------------------------+
//| Initialize the variables                                         |
//+------------------------------------------------------------------+
void CLabel::Initialize(void)
  {
//--- Clear all object lists and set sorted list flags for them
   this.m_list_elements.Clear();
   this.m_list_elements.Sort();
   this.m_list_tmp.Clear();
   this.m_list_tmp.Sort();
//--- Text label has no shadow object
   this.m_shadow_obj=NULL;
   this.m_shadow=false;
//--- The width of the object frame on each side is 1 pixel by default
   this.m_frame_width_right=1;
   this.m_frame_width_left=1;
   this.m_frame_width_top=1;
   this.m_frame_width_bottom=1;
//--- The object does not have a gradient filling (neither vertical, nor horizontal)
   this.m_gradient_v=false;
   this.m_gradient_c=false;
//--- Reset all "working" flags and variables
   this.m_mouse_state_flags=0;
   this.m_offset_x=0;
   this.m_offset_y=0;
   CGCnvElement::SetInteraction(false);
//--- Create an animation object and add it to the list for storing such objects
   this.m_animations=new CAnimations(CGCnvElement::GetObject());
   this.m_list_tmp.Add(this.m_animations);
//--- Set the transparent color for the object background
   this.SetColorBackground(CLR_CANV_NULL);
   this.SetOpacity(0);
//--- Set the default color and text opacity, as well as the absence of the object frame
   this.SetForeColor(CLR_DEF_FORE_COLOR);
   this.SetForeColorOpacity(CLR_DEF_FORE_COLOR_OPACITY);
   this.SetBorderStyle(FRAME_STYLE_NONE);
//--- Set the default text parameters
   this.SetFont(DEF_FONT,DEF_FONT_SIZE);
   this.SetText("");
   this.SetTextAnchor(FRAME_ANCHOR_LEFT_TOP);
   this.SetTextAlign(ANCHOR_LEFT_UPPER);
//--- Set the default object parameters
   this.SetAutoSize(false,false);
   this.SetMargin(3,0,3,0);
   this.SetPaddingAll(0);
   this.SetEnabled(true);
   this.SetVisible(true,false);
  }
//+------------------------------------------------------------------+
Este método virtual anula el método del objeto básico: establece diferentes valores por defecto y añade la inicialización de los valores de las propiedades que son únicas para el objeto Label.
Los métodos virtuales Erase, encargados de sobrescribir los métodos del objeto básico, dibujan el marco del objeto con opacidad total:
//+------------------------------------------------------------------+
//| Clear the element filling it with color and opacity              |
//+------------------------------------------------------------------+
void CLabel::Erase(const color colour,const uchar opacity,const bool redraw=false)
  {
//--- Fill the element having the specified color and the redrawing flag
   CGCnvElement::Erase(colour,opacity,redraw);
//--- If the object has a frame, draw it
   if(this.BorderStyle()!=FRAME_STYLE_NONE && redraw)
      this.DrawFormFrame(this.FrameWidthTop(),this.FrameWidthBottom(),this.FrameWidthLeft(),this.FrameWidthRight(),this.ColorFrame(),255,this.BorderStyle());
//--- Update the element having the specified redrawing flag
   this.Update(redraw);
  }
//+------------------------------------------------------------------+
//| Clear the element with a gradient fill                           |
//+------------------------------------------------------------------+
void CLabel::Erase(color &colors[],const uchar opacity,const bool vgradient,const bool cycle,const bool redraw=false)
  {
//--- Fill the element having the specified color array and the redrawing flag
   CGCnvElement::Erase(colors,opacity,vgradient,cycle,redraw);
//--- If the object has a frame, draw it
   if(this.BorderStyle()!=FRAME_STYLE_NONE && redraw)
      this.DrawFormFrame(this.FrameWidthTop(),this.FrameWidthBottom(),this.FrameWidthLeft(),this.FrameWidthRight(),this.ColorFrame(),255,this.BorderStyle());
//--- Update the element having the specified redrawing flag
   this.Update(redraw);
  }
//+------------------------------------------------------------------+
//| Clear the element completely                                     |
//+------------------------------------------------------------------+
void CLabel::Erase(const bool redraw=false)
  {
//--- Fully clear the element with the redrawing flag
   CGCnvElement::Erase(redraw);
  }
//+------------------------------------------------------------------+
Método virtual que redibuja el objeto:
//+------------------------------------------------------------------+
//| Redraw the object                                                |
//+------------------------------------------------------------------+
void CLabel::Redraw(bool redraw)
  {
//--- Fill the object with the background color having full transparency
   this.Erase(this.ColorBackground(),0,true);
   int x=0;
   int y=0;
//--- Depending on the element text alignment type
   switch(this.TextAlign())
     {
      //--- The text is displayed in the upper left corner of the object
      case ANCHOR_LEFT_UPPER :
        //--- Set the text binding point coordinate
        x=this.FrameWidthLeft();
        y=this.FrameWidthTop();
        //--- Set the text binding point at the top left
        this.SetTextAnchor(FRAME_ANCHOR_LEFT_TOP);
        break;
      //--- The text is drawn vertically from the left side of the object in the center
      case ANCHOR_LEFT :
        //--- Set the text binding point coordinate
        x=this.FrameWidthLeft();
        y=this.Height()/2;
        //--- Set the text binding point at the center left
        this.SetTextAnchor(FRAME_ANCHOR_LEFT_CENTER);
        break;
      //--- The text is displayed in the lower left corner of the object
      case ANCHOR_LEFT_LOWER :
        //--- Set the text binding point coordinate
        x=this.FrameWidthLeft();
        y=this.Height()-this.FrameWidthBottom();
        //--- Set the text binding point at the bottom left
        this.SetTextAnchor(FRAME_ANCHOR_LEFT_BOTTOM);
        break;
      //--- The text is drawn at the center of the bottom edge of the object
      case ANCHOR_LOWER :
        //--- Set the text binding point coordinate
        x=this.Width()/2;
        y=this.Height()-this.FrameWidthBottom();
        //--- Set the text anchor point at the bottom center
        this.SetTextAnchor(FRAME_ANCHOR_CENTER_BOTTOM);
        break;
      //--- The text is displayed in the lower right corner of the object
      case ANCHOR_RIGHT_LOWER :
        //--- Set the text binding point coordinate
        x=this.Width()-this.FrameWidthRight();
        y=this.Height()-this.FrameWidthBottom();
        //--- Set the text binding point at the bottom right
        this.SetTextAnchor(FRAME_ANCHOR_RIGHT_BOTTOM);
        break;
      //--- The text is drawn vertically from the right side of the object in the center
      case ANCHOR_RIGHT :
        //--- Set the text binding point coordinate
        x=this.Width()-this.FrameWidthRight();
        y=this.Height()/2;
        //--- Set the text binding point at the center right
        this.SetTextAnchor(FRAME_ANCHOR_RIGHT_CENTER);
        break;
      //--- The text is displayed in the upper right corner of the object
      case ANCHOR_RIGHT_UPPER :
        //--- Set the text binding point coordinate
        x=this.Width()-this.FrameWidthRight();
        y=this.FrameWidthTop();
        //--- Set the text binding point at the top right
        this.SetTextAnchor(FRAME_ANCHOR_RIGHT_TOP);
        break;
      //--- The text is drawn at the center of the upper edge of the object
      case ANCHOR_UPPER :
        //--- Set the text binding point coordinate
        x=this.Width()/2;
        y=this.FrameWidthTop();
        //--- Set the text binding point at the center top
        this.SetTextAnchor(FRAME_ANCHOR_CENTER_TOP);
        break;
      //--- The text is drawn at the object center
      //---ANCHOR_CENTER
      default:
        //--- Set the text binding point coordinate
        x=this.Width()/2;
        y=this.Height()/2;
        //--- Set the text binding point at the center
        this.SetTextAnchor(FRAME_ANCHOR_CENTER);
        break;
     }
//--- Draw the text within the set coordinates of the object and the binding point of the text, and update the object
   this.Text(x,y,this.Text(),this.ForeColor(),this.ForeColorOpacity(),this.TextAnchor());
   this.Update(redraw);
  }
//+------------------------------------------------------------------+
El método anula el método de la clase básica. Aquí primero se borra el fondo del objeto (se rellena con un color de fondo completamente transparente); luego se determina el punto de anclaje del texto según la alineación del texto establecida en el objeto dentro del elemento, se calculan las coordenadas donde debe ubicarse el punto de anclaje del texto (el inicio de las coordenadas de inscripción), se muestra el texto en las coordenadas calculadas y se actualiza el objeto.
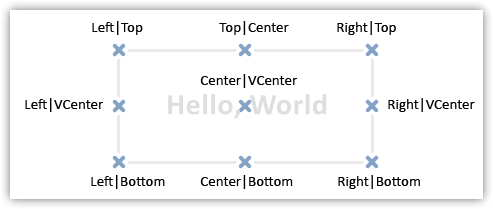
Los puntos de anclaje del texto están claramente descritos y explicados en la guía de ayuda de TextOut():
Método que establece automáticamente la anchura y la altura de un elemento:
//+------------------------------------------------------------------+
//| Set the element width and height automatically                   |
//+------------------------------------------------------------------+
void CLabel::AutoSetWH(void)
  {
//--- Define the variables for receiving the label width and height
   int w=0, h=0;
//--- Get the width and height depending on the object text
   CGCnvElement::TextSize(this.Text()!="" && this.Text()!=NULL ? this.Text() : " ",w,h);
//--- Add the Margin values of the object on the left and right to the resulting width
   w+=(this.MarginLeft()+this.MarginRight());
//--- If failed to get the width, set it to three pixels
   if(w==0)
      w=3;
//--- Add the Margin values of the object on the top and bottom to the resulting height
   h+=(this.MarginTop()+this.MarginBottom());
//--- If failed to get the height, set it as "font size" * ratio
   if(h==0)
      h=(int)ceil(FontSize()*1.625);
//--- Set the object width and height from the received values
   this.SetWidth(w);
   this.SetHeight(h);
  }
//+------------------------------------------------------------------+
La lógica del método se explica en los comentarios del código. En primer lugar, obtenemos el tamaño del texto según los parámetros de texto y la fuente establecidos para el objeto. Si la inscripción está «en blanco», utilizaremos un espacio (" ") para medir. A continuación, añadiremos a la anchura los valores Margin del objeto de la izquierda y la derecha, añadiendo asimismo a la altura los valores Margin de la parte superior e inferior. Si no podemos obtener la altura del texto, tendremos que calcular la altura aproximada del mismo multiplicando el tamaño de la fuente establecida para el objeto por un coeficiente que hemos elegido empíricamente. Es decir, hemos comparado las magnitudes del valor del objeto del tamaño de la fuente en MS Visual Studio y hemos tomado el valor medio de varias mediciones de diferentes tamaños, obteniendo un coeficiente de 1,625. A decir verdad, desconocemos otra forma más precisa. Es posible que en el futuro hallemos una forma adecuada de calcular el tamaño del objeto en función del tamaño de la fuente. Una vez realizados todos los cálculos, el objeto obtendrá una anchura y una altura.
Con esto, podemos dar por completa la creación del objeto «Etiqueta de texto».
Como el objeto «Panel» de WinForms es un contenedor para otros objetos de este tipo que se le adjuntan después, todos los objetos creados de este tipo deberán ser visibles para él. Para ello, el archivo de cada objeto WinForms subsiguiente que creemos deberá estar conectado a un archivo de objeto de panel.
Abrimos el archivo \MQL5\Include\DoEasy\Objects\Graph\WForms\Containers\Panel.mqh y añadimos el objeto de etiqueta de texto recién creado:
//+------------------------------------------------------------------+
//|                                                        Panel.mqh |
//|                                  Copyright 2022, MetaQuotes Ltd. |
//|                             https://mql5.com/en/users/artmedia70 |
//+------------------------------------------------------------------+
#property copyright "Copyright 2022, MetaQuotes Ltd."
#property link      "https://mql5.com/en/users/artmedia70"
#property version   "1.00"
#property strict    // Necessary for mql4
//+------------------------------------------------------------------+
//| Include files                                                    |
//+------------------------------------------------------------------+
#include "..\..\WForms\WinFormBase.mqh"
#include "..\..\WForms\Common Controls\Label.mqh"
//+------------------------------------------------------------------+
A continuación, eliminamos las variables innecesarias de la sección privada de la clase, ya que ahora están escritas en las propiedades del objeto WinForms básico:
//+------------------------------------------------------------------+
//| Panel object class of WForms controls                            |
//+------------------------------------------------------------------+
class CPanel : public CWinFormBase
  {
private:
   CGCnvElement     *m_obj_top;                                      // Pointer to the object whose coordinates the current upper object is bound to
   CGCnvElement     *m_obj_bottom;                                   // Pointer to the object whose coordinates the current bottom object is bound to
   CGCnvElement     *m_obj_left;                                     // Pointer to the object whose coordinates the current left object is bound to
   CGCnvElement     *m_obj_right;                                    // Pointer to the object whose coordinates the current right object is bound to
   CGCnvElement     *m_underlay;                                     // Underlay for placing elements
   bool              m_autoscroll;                                   // Auto scrollbar flag
   int               m_autoscroll_margin[2];                         // Array of fields around the control during an auto scroll
   ENUM_CANV_ELEMENT_AUTO_SIZE_MODE m_autosize_mode;                 // Mode of the element auto resizing depending on the content
//--- Create a new graphical object
En la sección pública de la clase, declaramos dos nuevos métodos: uno para obtener la lista de objetos WinForms adjuntos del tipo especificado y otro para obtener el puntero al objeto WinForms especificado por un índice en la lista de objetos de este tipo:
public:
//--- Return the underlay
   CGCnvElement     *GetUnderlay(void)                               { return this.m_underlay;              }
//--- Return the list of bound objects with (1) any and (2) specified basic WinForms type and higher
   CArrayObj        *GetListWinFormsObj(void);
   CArrayObj        *GetListWinFormsObjByType(const ENUM_GRAPH_ELEMENT_TYPE type);
//--- Return the pointer to the specified WinForms object with the specified type by index
   CWinFormBase     *GetWinFormsObj(const ENUM_GRAPH_ELEMENT_TYPE type,const int index);

//--- Update the coordinates (shift the canvas)
Ahora, eliminamos los métodos SetAutoScroll() y AutoScroll() de la clase, ya que son miembros de la clase padre CWinFormBase y ya han sido convertidos para trabajar con propiedades de objetos, no con variables de clase, y aquí nos sobran:
//--- Place bound objects in the order of their Dock binding
   bool              ArrangeObjects(const bool redraw);

//--- (1) Set and (2) return the auto scrollbar flag
   void              SetAutoScroll(const bool flag)                  { this.m_autoscroll=flag;              }
   bool              AutoScroll(void)                                { return this.m_autoscroll;            }
//--- Set the (1) field width, (2) height, (3) the height of all fields around the control during auto scrolling
Del mismo modo, reharemos algunos métodos de la clase para trabajar con las propiedades del objeto y añadiremos un método para establecer a la vez AutoScrollMargin en anchura y altura:
//--- Set the (1) field width, (2) height, (3) the height of all fields around the control during auto scrolling
   void              SetAutoScrollMarginWidth(const int value)       { this.SetProperty(CANV_ELEMENT_PROP_AUTOSCROLL_MARGIN_W,value);  }
   void              SetAutoScrollMarginHeight(const int value)      { this.SetProperty(CANV_ELEMENT_PROP_AUTOSCROLL_MARGIN_H,value);  }
   void              SetAutoScrollMarginAll(const int value)
                       {
                        this.SetAutoScrollMarginWidth(value); this.SetAutoScrollMarginHeight(value);
                       }
   void              SetAutoScrollMargin(const int width,const int height)
                       {
                        this.SetAutoScrollMarginWidth(width); this.SetAutoScrollMarginHeight(height);
                       }
//--- Return the (1) field width and (2) height around the control during auto scrolling
   int               AutoScrollMarginWidth(void)               const { return (int)this.GetProperty(CANV_ELEMENT_PROP_AUTOSCROLL_MARGIN_W); }
   int               AutoScrollMarginHeight(void)              const { return (int)this.GetProperty(CANV_ELEMENT_PROP_AUTOSCROLL_MARGIN_H); }

//--- (1) Set the flag of the element auto resizing depending on the content
   virtual void      SetAutoSize(const bool flag,const bool redraw)
                       {
                        bool prev=this.AutoSize();
                        if(prev==flag)
                           return;
                        CWinFormBase::SetAutoSize(flag,redraw);
                        if(prev!=this.AutoSize() && this.ElementsTotal()>0)
                           this.AutoSizeProcess(redraw);
                       }
//--- (1) Set and (2) return the mode of the element auto resizing depending on the content
   void              SetAutoSizeMode(const ENUM_CANV_ELEMENT_AUTO_SIZE_MODE mode,const bool redraw)
                       {
                        ENUM_CANV_ELEMENT_AUTO_SIZE_MODE prev=this.AutoSizeMode();
                        if(prev==mode)
                           return;
                        this.SetProperty(CANV_ELEMENT_PROP_AUTOSIZE_MODE,mode);
                        if(prev!=this.AutoSizeMode() && this.ElementsTotal()>0)
                           this.AutoSizeProcess(redraw);
                       }
   ENUM_CANV_ELEMENT_AUTO_SIZE_MODE AutoSizeMode(void)   const { return (ENUM_CANV_ELEMENT_AUTO_SIZE_MODE)this.GetProperty(CANV_ELEMENT_PROP_AUTOSIZE_MODE); }

//--- (1) Set and (2) return the mode of binding element borders to the container
En el método que crea un nuevo objeto gráfico, añadimos un bloque de código para crear el objeto de etiqueta de texto:
//+------------------------------------------------------------------+
//| Create a new graphical object                                    |
//+------------------------------------------------------------------+
CGCnvElement *CPanel::CreateNewGObject(const ENUM_GRAPH_ELEMENT_TYPE type,
                                       const int obj_num,
                                       const string obj_name,
                                       const int x,
                                       const int y,
                                       const int w,
                                       const int h,
                                       const color colour,
                                       const uchar opacity,
                                       const bool movable,
                                       const bool activity)
  {
   string name=this.CreateNameDependentObject(obj_name);
   CGCnvElement *element=NULL;
   switch(type)
     {
      case GRAPH_ELEMENT_TYPE_ELEMENT :
         element=new CGCnvElement(type,this.ID(),obj_num,this.ChartID(),this.SubWindow(),name,x,y,w,h,colour,opacity,movable,activity);
        break;
      case GRAPH_ELEMENT_TYPE_FORM :
         element=new CForm(this.ChartID(),this.SubWindow(),name,x,y,w,h);
        break;
      case GRAPH_ELEMENT_TYPE_WF_PANEL :
         element=new CPanel(this.ChartID(),this.SubWindow(),name,x,y,w,h);
        break;
      case GRAPH_ELEMENT_TYPE_WF_LABEL :
         element=new CLabel(this.ChartID(),this.SubWindow(),name,x,y,w,h);
        break;
      default:
        break;
     }
   if(element==NULL)
      ::Print(DFUN,CMessage::Text(MSG_LIB_SYS_FAILED_CREATE_ELM_OBJ),": ",name);
   return element;
  }
//+------------------------------------------------------------------+
Parece bastante claro y sencillo, y no requiere de explicaciones adicionales.
Vamos a rehacer el método que crea un nuevo elemento vinculado:
//+------------------------------------------------------------------+
//| Create a new attached element                                    |
//+------------------------------------------------------------------+
bool CPanel::CreateNewElement(const ENUM_GRAPH_ELEMENT_TYPE element_type,
                              CGCnvElement *main,
                              const int x,
                              const int y,
                              const int w,
                              const int h,
                              const color colour,
                              const uchar opacity,
                              const bool activity,
                              const bool redraw)
  {
//--- If the object type is less than the base WinForms object
   if(element_type<GRAPH_ELEMENT_TYPE_WF_BASE)
     {
      //--- report the error and return 'false'
      CMessage::ToLog(DFUN,MSG_PANEL_OBJECT_ERR_OBJ_MUST_BE_WFBASE);
      return false;
     }
//--- If failed to create a new graphical element, return 'false'
   CWinFormBase *obj=CForm::CreateAndAddNewElement(element_type,main,x,y,w,h,colour,opacity,activity);
   if(obj==NULL)
      return false;
//--- Set the text color of the created object as that of the base panel
   obj.SetForeColor(this.ForeColor());
//--- If the object type is a panel
   if(obj.TypeGraphElement()==GRAPH_ELEMENT_TYPE_WF_PANEL)
     {
      //--- set the frame color equal to the background color
      obj.SetColorFrame(obj.ColorBackground());
     }
//--- If the object type is a text label,
   if(obj.TypeGraphElement()==GRAPH_ELEMENT_TYPE_WF_LABEL)
     {
      //--- set the object text color depending on the one passed to the method
      //--- or the panel text color or the one passed to the method and the frame color equal to the text color
      obj.SetForeColor(colour==clrNONE ? this.ForeColor() : colour);
      obj.SetColorFrame(main!=NULL ? main.ColorBackground() : obj.ForeColor());
     }
//--- If the panel has auto resize enabled and features bound objects, call the resize method
   if(this.AutoSize() && this.ElementsTotal()>0)
      this.AutoSizeProcess(redraw);
//--- Redraw the panel and all added objects, and return 'true'
   this.Redraw(redraw);
   return true;
  }
//+------------------------------------------------------------------+
La lógica del método se explica en los comentarios del código. Además de pequeñas modificaciones realizadas en la lógica del propio método, hemos añadido un bloque de código que se encarga de crear el objeto etiqueta de texto. Esperamos que el lector comprenda todo sin necesidad de aclaraciones. En cualquier caso, podrá plantear cualquier duda en los comentarios al artículo.
Método que retorna la lista de objetos vinculados con el tipo de objeto WinForms indicado:
//+------------------------------------------------------------------+
//| Return the list of bound objects                                 |
//| with the specified WinForms object type                          |
//+------------------------------------------------------------------+
CArrayObj *CPanel::GetListWinFormsObjByType(const ENUM_GRAPH_ELEMENT_TYPE type)
  {
   return CSelect::ByGraphCanvElementProperty(this.GetListElements(),CANV_ELEMENT_PROP_TYPE,type,EQUAL);
  }
//+------------------------------------------------------------------+
Aquí, simplemente retornamos la lista obtenida en la clase CSelect con el tipo de objeto WinForms indicado. Si no hemos podido obtener la lista, o no hay objetos del tipo especificado, el método retornará NULL.
Método que retorna el puntero al objeto WinForms vinculado del tipo especificado según el índice:
//+------------------------------------------------------------------+
//| Return the pointer to the specified WinForms object              |
//| with the specified type by index                                 |
//+------------------------------------------------------------------+
CWinFormBase *CPanel::GetWinFormsObj(const ENUM_GRAPH_ELEMENT_TYPE type,const int index)
  {
   CArrayObj *list=this.GetListWinFormsObjByType(type);
   return(list!=NULL ? list.At(index) : NULL);
  }
//+------------------------------------------------------------------+
Aquí, obtenemos una lista de objetos del tipo especificado y retornamos el puntero al objeto según el índice especificado de la lista.
Si no ha sido posible obtener la lista, o se ha especificado un índice inexistente, el método retornará NULL.
Ya estamos preparados para las pruebas.
Simulación
Para la prueba, vamos a tomar el Asesor Experto del artículo anterior y guardarlo en la nueva carpeta \MQL5\Experts\TestDoEasy\Part107\ con el nuevo nombre TstDE107.mq5.
Como el nombre de todos los objetos gráficos contiene el nombre del programa, y para crear el recurso del objeto gráfico en el método Create() de la clase CCanvas se utiliza el valor del identificador del gráfico + el número de ticks del procesador que han pasado desde que se inició el programa + un número pseudo-aleatorio:
//+------------------------------------------------------------------+
//| Create dynamic resource                                          |
//+------------------------------------------------------------------+
bool CCanvas::Create(const string name,const int width,const int height,ENUM_COLOR_FORMAT clrfmt)
  {
   Destroy();
//--- prepare data array
   if(width>0 && height>0 && ArrayResize(m_pixels,width*height)>0)
     {
      //--- generate resource name
      m_rcname="::"+name+(string)ChartID()+(string)(GetTickCount()+MathRand());
      //--- initialize data with zeros
      ArrayInitialize(m_pixels,0);
      //--- create dynamic resource
      if(ResourceCreate(m_rcname,m_pixels,width,height,0,0,0,clrfmt))
        {
         //--- successfully created
         //--- complete initialization
         m_width =width;
         m_height=height;
         m_format=clrfmt;
         //--- succeed
         return(true);
        }
     }
//--- error - destroy object
   Destroy();
   return(false);
  }
//+------------------------------------------------------------------+
... el nombre del objeto gráfico podrá acabar superando los 63 caracteres, lo cual provoca un error de creación de recursos. Así que tenemos que reducir la longitud del nombre del programa (por ahora), y ya más adelante nos ocuparemos de la denominación de los objetos gráficos, puesto que hacemos que cada objeto vinculado herede el nombre del objeto al que está anclado con una terminación añadida al nombre, indicando el nuevo elemento en la jerarquía. Y cuantos más objetos anidados haya en una jerarquía de objetos vinculados entre sí, más largo será el nombre del objeto. Este es un concepto incorrecto y está condenado a provocar eventualmente un error en la creación del objeto gráfico, debido a que se supera la longitud de su nombre. No obstante, por el momento, vamos a acortar la longitud del propio nombre del programa.
¿Cómo vamos a realizar la prueba? En el panel principal, creamos seis objetos de panel. En cada uno de estos paneles, creamos un objeto de etiqueta de texto. El tamaño del objeto será el tamaño del panel menos dos puntos en cada lado. En los ajustes del asesor, mostraremos el tipo de marco del objeto de etiqueta de texto y el valor de alineación del texto dentro del objeto de etiqueta de texto, lo cual nos permitirá ver claramente dónde y cómo se muestra el texto dentro del objeto.
En el área global, crearemos una enumeración que describa el tipo de marco de objeto a compilar en la versión inglesa del programa y en la versión de compilación en el lenguaje de usuario de la biblioteca, y escribiremos los nuevos parámetros de entrada para el programa:
//+------------------------------------------------------------------+
//|                                                     TstDE107.mq5 |
//|                                  Copyright 2022, MetaQuotes Ltd. |
//|                             https://mql5.com/en/users/artmedia70 |
//+------------------------------------------------------------------+
#property copyright "Copyright 2022, MetaQuotes Ltd."
#property link      "https://mql5.com/en/users/artmedia70"
#property version   "1.00"
//--- includes
#include <DoEasy\Engine.mqh>
//--- defines
#define  FORMS_TOTAL (3)   // Number of created forms
#define  START_X     (4)   // Initial X coordinate of the shape
#define  START_Y     (4)   // Initial Y coordinate of the shape
#define  KEY_LEFT    (65)  // (A) Left
#define  KEY_RIGHT   (68)  // (D) Right
#define  KEY_UP      (87)  // (W) Up
#define  KEY_DOWN    (88)  // (X) Down
#define  KEY_FILL    (83)  // (S) Filling
#define  KEY_ORIGIN  (90)  // (Z) Default
#define  KEY_INDEX   (81)  // (Q) By index

//--- enumerations by compilation language
#ifdef COMPILE_EN
enum ENUM_AUTO_SIZE_MODE
  {
   AUTO_SIZE_MODE_GROW=CANV_ELEMENT_AUTO_SIZE_MODE_GROW,                // Grow
   AUTO_SIZE_MODE_GROW_SHRINK=CANV_ELEMENT_AUTO_SIZE_MODE_GROW_SHRINK   // Grow and Shrink
  };
enum ENUM_BORDER_STYLE
  {
   BORDER_STYLE_NONE=FRAME_STYLE_NONE,                                  // None
   BORDER_STYLE_SIMPLE=FRAME_STYLE_SIMPLE,                              // Simple
   BORDER_STYLE_FLAT=FRAME_STYLE_FLAT,                                  // Flat
   BORDER_STYLE_BEVEL=FRAME_STYLE_BEVEL,                                // Embossed (bevel)
   BORDER_STYLE_STAMP=FRAME_STYLE_STAMP,                                // Embossed (stamp)
  };
#else
enum ENUM_AUTO_SIZE_MODE
  {
   AUTO_SIZE_MODE_GROW=CANV_ELEMENT_AUTO_SIZE_MODE_GROW,                // Increase only
   AUTO_SIZE_MODE_GROW_SHRINK=CANV_ELEMENT_AUTO_SIZE_MODE_GROW_SHRINK   // Increase and decrease
  };
enum ENUM_BORDER_STYLE
  {
   BORDER_STYLE_NONE=FRAME_STYLE_NONE,                                  // No frame
   BORDER_STYLE_SIMPLE=FRAME_STYLE_SIMPLE,                              // Simple frame
   BORDER_STYLE_FLAT=FRAME_STYLE_FLAT,                                  // Flat frame
   BORDER_STYLE_BEVEL=FRAME_STYLE_BEVEL,                                // Embossed (convex)
   BORDER_STYLE_STAMP=FRAME_STYLE_STAMP,                                // Embossed (concave)
  };
#endif
//--- input parameters
sinput   bool                 InpMovable        =  true;                // Movable forms flag
sinput   ENUM_INPUT_YES_NO    InpAutoSize       =  INPUT_YES;           // Autosize
sinput   ENUM_AUTO_SIZE_MODE  InpAutoSizeMode   =  AUTO_SIZE_MODE_GROW; // Autosize mode
sinput   ENUM_BORDER_STYLE    InpFrameStyle     =  BORDER_STYLE_NONE;   // Label border style
sinput   ENUM_ANCHOR_POINT    InpTextAlign      =  ANCHOR_LEFT_UPPER;   // Label text align
//--- global variables
CEngine        engine;
color          array_clr[];
//+------------------------------------------------------------------+
En el manejador OnInit(), escribiremos un bloque de código para crear las etiquetas de texto:
//+------------------------------------------------------------------+
//| Expert initialization function                                   |
//+------------------------------------------------------------------+
int OnInit()
  {
//--- Set EA global variables
   ArrayResize(array_clr,2);        // Array of gradient filling colors
   array_clr[0]=C'26,100,128';      // Original ≈Dark-azure color
   array_clr[1]=C'35,133,169';      // Lightened original color
//--- Create the array with the current symbol and set it to be used in the library
   string array[1]={Symbol()};
   engine.SetUsedSymbols(array);
   //--- Create the timeseries object for the current symbol and period, and show its description in the journal
   engine.SeriesCreate(Symbol(),Period());
   engine.GetTimeSeriesCollection().PrintShort(false); // Short descriptions
//--- Create WinForms Panel object
   CPanel *pnl=NULL;
   pnl=engine.CreateWFPanel("WFPanel",50,50,230,150,array_clr,200,true,true,false,-1,FRAME_STYLE_BEVEL,true,false);
   if(pnl!=NULL)
     {
      //--- Set Padding to 4
      pnl.SetPaddingAll(4);
      //--- Set the flags of relocation, auto resizing and auto changing mode from the inputs
      pnl.SetMovable(InpMovable);
      pnl.SetAutoSize(InpAutoSize,false);
      pnl.SetAutoSizeMode((ENUM_CANV_ELEMENT_AUTO_SIZE_MODE)InpAutoSizeMode,false);
      //--- In the loop, create 6 bound panel objects
      for(int i=0;i<6;i++)
        {
         //--- create the panel object with coordinates along the X axis in the center and 10 along the Y axis, the width of 80 and the height of 30
         CPanel *prev=pnl.GetElement(i-1);
         int xb=0, yb=0;
         int x=(i<3 ? (prev==NULL ? xb : prev.CoordXRelative()) : xb+prev.Width()+20);
         int y=(i<3 ? (prev==NULL ? yb : prev.BottomEdgeRelative()+16) : (i==3 ? yb : prev.BottomEdgeRelative()+16));
         if(pnl.CreateNewElement(GRAPH_ELEMENT_TYPE_WF_PANEL,pnl,x,y,90,40,C'0xCD,0xDA,0xD7',200,true,false))
           {
            CPanel *obj=pnl.GetElement(i);
            if(obj==NULL)
               continue;
            obj.SetFrameWidthAll(3);
            obj.SetBorderStyle(FRAME_STYLE_BEVEL);
            obj.SetColorBackground(obj.ChangeColorLightness(obj.ColorBackground(),4*i));
            obj.SetForeColor(clrRed);
            //--- Calculate the width and height of the future text label object
            int w=obj.Width()-obj.FrameWidthLeft()-obj.FrameWidthRight()-4;
            int h=obj.Height()-obj.FrameWidthTop()-obj.FrameWidthBottom()-4;
            //--- Create a text label object
            obj.CreateNewElement(GRAPH_ELEMENT_TYPE_WF_LABEL,pnl,2,2,w,h,clrNONE,255,false,false);
            //--- Get the pointer to a newly created object
            CLabel *lbl=obj.GetElement(0);
            if(lbl!=NULL)
              {
               //--- If the object has an even or zero index in the list, set the default text color for it
               if(i % 2==0)
                  lbl.SetForeColor(CLR_DEF_FORE_COLOR);
               //--- If the object index in the list is odd, set the object opacity to 127
               else
                  lbl.SetForeColorOpacity(127);
               //--- Set the font Black width type and
               //--- specify the text alignment from the EA settings
               lbl.SetFontBoldType(FW_TYPE_BLACK);
               lbl.SetTextAlign(InpTextAlign);
               //--- For an object with an even or zero index, specify the Bid price for the text, otherwise - the Ask price of the symbol
               lbl.SetText(GetPrice(i % 2==0 ? SYMBOL_BID : SYMBOL_ASK));
               //--- Set the frame width and type for a text label and update the modified object
               lbl.SetFrameWidthAll(1);
               lbl.SetBorderStyle((ENUM_FRAME_STYLE)InpFrameStyle);
               lbl.Update(true);
              }
           }
        }
      //--- Redraw all objects according to their hierarchy
      pnl.Redraw(true);
     }
//---
   return(INIT_SUCCEEDED);
  }
//+------------------------------------------------------------------+
Toda la lógica de aquí está comentada con detalle en el código. Antes de crear las etiquetas de texto, estableceremos el color de fondo del texto para el panel al que se vinculará la etiqueta. Este color deberá ser heredado por el objeto de etiqueta de texto. Precisamente aquí lo comprobaremos. Y luego, en el propio objeto de texto, cambiaremos su color según lo necesitemos.
En el manejador OnTick(), escribiremos los precios de compra y venta en cada etiqueta de texto. Para los objetos con índice par, introduciremos en la lista el precio Bid, y para los objetos con índice impar, introduciremos el precio Ask:
//+------------------------------------------------------------------+
//| Expert tick function                                             |
//+------------------------------------------------------------------+
void OnTick()
  {
   //--- Get the pointer to the panel object by name
   CPanel *pnl=engine.GetWFPanel("WFPanel");
   if(pnl!=NULL)
     {
      //--- Get the list of all bound panel objects
      CArrayObj *list=pnl.GetListWinFormsObjByType(GRAPH_ELEMENT_TYPE_WF_PANEL);
      //--- In the loop by bound panel objects,
      for(int i=0;i<list.Total();i++)
        {
         //--- get the pointer to the next panel object
         CPanel *obj=pnl.GetWinFormsObj(GRAPH_ELEMENT_TYPE_WF_PANEL,i);
         if(obj!=NULL)
           {
            //--- take the pointer to the first (and only) text label object from the received object
            CLabel *lbl=obj.GetWinFormsObj(GRAPH_ELEMENT_TYPE_WF_LABEL,0);
            if(lbl!=NULL)
              {
               //--- set the new text for the object and redraw it
               lbl.SetText(GetPrice(i % 2==0 ? SYMBOL_BID : SYMBOL_ASK));
               lbl.Redraw(false);
              }
           }
        }
     }
  }
//+------------------------------------------------------------------+
Al final del listado del asesor, escribiremos una función que retornará un valor de tipo string con el precio Bid o Ask:
//+------------------------------------------------------------------+
//| Return Bid/Ask string value                                      |
//+------------------------------------------------------------------+
string GetPrice(const ENUM_SYMBOL_INFO_DOUBLE price)
  {
   return((price==SYMBOL_ASK ? "Ask: " : "Bid: ")+DoubleToString(SymbolInfoDouble(Symbol(),price),Digits()));
  }
//+------------------------------------------------------------------+
Dependiendo del valor transmitido a la función, elegiremos qué escribir delante del valor del precio ("Ask" o "Bid") y añadiremos a este texto un valor de tipo string con el precio y con el tipo indicado.
Vamos a compilar el asesor y ejecutarlo en el gráfico:
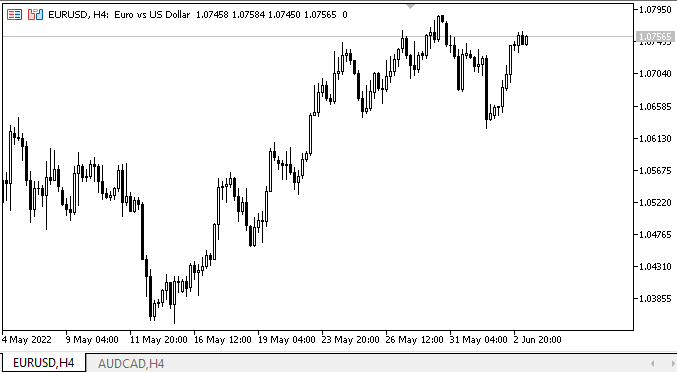
Como podemos ver, el texto se muestra en las posiciones correctas dentro de su objeto, cuyas dimensiones se pueden ver especificando el marco para el mismo. El texto con los precios dentro del objeto se actualiza según la actualización del precio correspondiente en el gráfico.
Al crear el propio panel y los objetos en el mismo, existen efectos visuales evidentes y desagradables; nos desharemos de ellos más tarde, cuando optimicemos la representación visual al interactuar con los objetos en el gráfico, y también al construir, mover y reorganizar estos.
¿Qué es lo próximo?
En el próximo artículo, continuaremos desarrollando los objetos WinForms.
*Artículos de esta serie:
DoEasy. Controles (Parte 1): Primeros pasos
DoEasy. Elementos de control (Parte 2): Continuamos trabajando con la clase CPanel
DoEasy. Elementos de control (Parte 3): Creando controles vinculados
DoEasy. Elementos de control (Parte 4): Elemento de control "Panel", parámetros Padding y Dock
DoEasy. Elementos de control (Parte 5): Objeto básico WinForms, control «Panel», parámetro AutoSize
DoEasy. Elementos de control (Parte 6): Control «Panel», cambio automático del tamaño del contenedor según el contenido interno
Traducción del ruso hecha por MetaQuotes Ltd.
Artículo original: https://www.mql5.com/ru/articles/11045
Advertencia: todos los derechos de estos materiales pertenecen a MetaQuotes Ltd. Queda totalmente prohibido el copiado total o parcial.
Este artículo ha sido escrito por un usuario del sitio web y refleja su punto de vista personal. MetaQuotes Ltd. no se responsabiliza de la exactitud de la información ofrecida, ni de las posibles consecuencias del uso de las soluciones, estrategias o recomendaciones descritas.

 El modelo de movimiento de precios y sus principales disposiciones (Parte 1): La versión del modelo más simple y sus aplicaciones
 Vídeo: Configuramos MetaTrader 5 y MQL5 para el comercio automatizado sencillo
 Aprendiendo a diseñar un sistema de trading con MFI
 Aprendiendo a diseñar un sistema de trading con el indicador de Acumulación/Distribución
- Aplicaciones de trading gratuitas
- 8 000+ señales para copiar
- Noticias económicas para analizar los mercados financieros
Usted acepta la política del sitio web y las condiciones de uso