
Step-by-step guide: How to start trading with Owl Smart Levels and make a profit

If you are just starting to work with Owl Smart Levels, it is important to establish the correct sequence of actions from the very beginning. Below is a simple step-by-step plan that will help you understand the system faster and start using the indicator consciously.
Step 1. Understanding the basic principles
The first thing to start with is understanding how the system works. The Owl Smart Levels indicator is not a set of random signals — it is built on fundamental market principles: trend, price structure, and corrections.
If you skip this stage, signals will look like random entry points. Once you understand the basics, it becomes clear why the price moves the way it does and why a signal appears at a specific level.
Before getting started, it is important to read the main article:
👉 Basic Principles of the Market
Step 2. Getting familiar with the indicator and its elements
After understanding the core logic of the system, it is important to learn the indicator itself: how it looks on the chart and what each element represents.
At this stage, there is no need to look for trades yet. The main goal is to understand:
- how fractals are displayed
- how the ZigZag is formed
- where Fibonacci levels are built
- what the price structure looks like on the chart
The indicator combines several tools into one system, so it is important to get used to its visual layout and learn how to read the chart correctly.
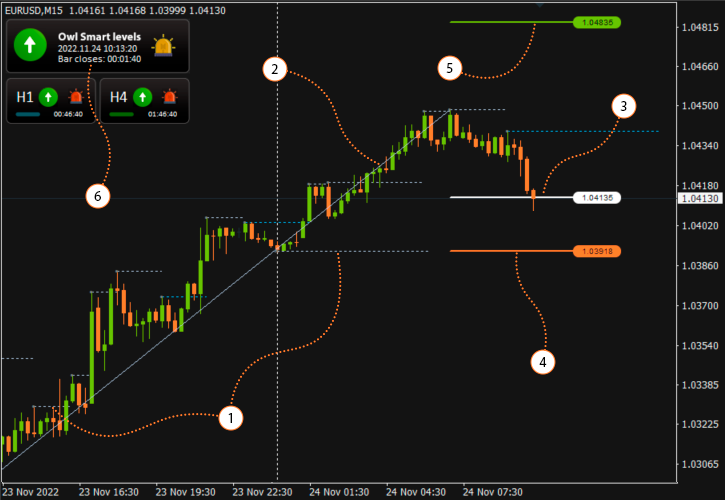
Fig. 1. Chart structure using the Owl Smart Levels indicator
👉 Detailed Guide on how to set up and use the indicator >>
Step 3. First trades with minimal risk
Once you understand the basics and are familiar with the indicator, you can move on to your first trades. At this stage, the goal should not be immediate profit. It is much more important to get used to the system logic and calmly observe how Owl Smart Levels signals behave on a real chart.
That is why the first trades should be opened either on a demo account or with minimal risk. This approach allows you to understand, without pressure, how the price reacts after a signal, how the movement towards targets develops, and how you behave during the trade.
This is where the first practical understanding of the system appears. You begin not just to see a signal on the chart, but to observe how it plays out in real market conditions.
Step 4. Learning to distinguish strong signals from weak ones
After your first trades, it becomes clear that no two entries in the market are the same. Formally, a signal may be present, but the conditions in which it appears are always different.
At this stage, it is important to learn to see the difference between strong and weak setups. Some signals appear within a clean structure, after a correction, and in a clear context, while others form before news releases, at the end of the trading day, or after the main move has already passed.
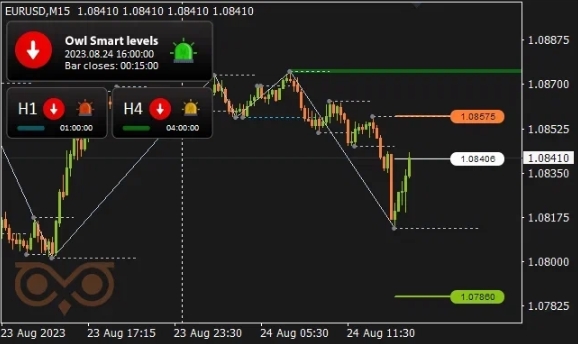
Fig. 2. Example of a higher-probability signal
Two separate articles have already been published to explore this topic in more detail: “Don't miss these signals from the Owl Smart Levels indicator!” and “When to Ignore Signals from the Owl indicator”. They show examples of strong and weak entries that you can later try to find on a real chart.
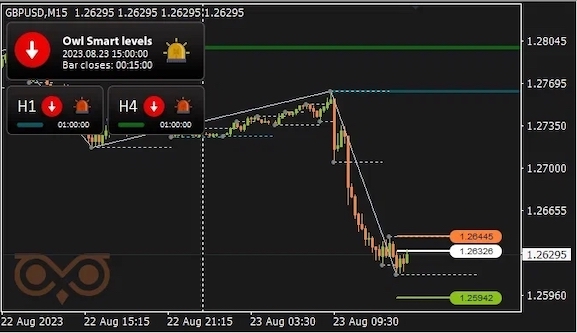
Fig. 3. Example of a lower-probability signal
This stage helps you stop treating all signals equally and gradually start selecting only the highest-quality setups. As a result, your overall trading performance improves significantly.
Step 5. Adding automation with Owl Helper
Once the basic principles are clear, the first trades are done, and you can visually distinguish between strong and weak signals, you can move to the next stage — adding automation with Owl Helper.
At this stage, automation is no longer seen as a replacement for the trader. On the contrary, the Expert Advisor starts working exactly as intended — as an assistant that speeds up trading and simplifies execution.
In practice, it looks like this: Owl Smart Levels and Owl Helper are installed on a VPS server, after which notifications are configured. When a signal appears, the trader logs into the VPS, evaluates the market situation, checks the quality of the setup, reviews the news, and only then decides whether to open a trade.
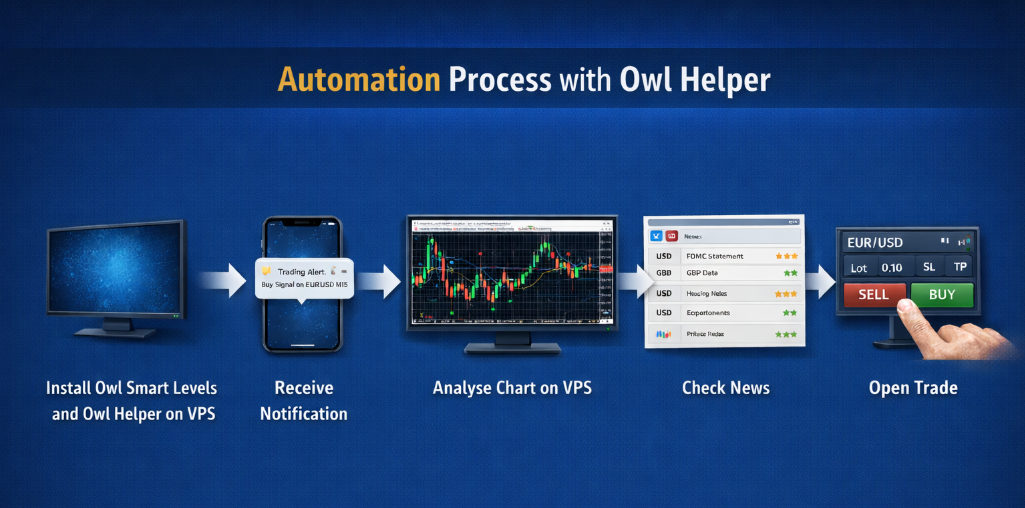
Fig. 4. Automation process with Owl Helper
This approach allows you not to stay at the terminal all the time while still maintaining control over trade quality. In this format, automation delivers the best results: good signals are not missed, and weak trades can be filtered out in advance.
In this way, working with Owl Smart Levels is not about trying to get quick results, but about gradually mastering the system: from understanding the basics and getting familiar with the indicator to practice, signal filtering, and automation.
This step-by-step approach allows you not just to install the indicator, but to truly use it as a полноценный working tool. First comes understanding the system logic, then experience in observing signals, and only after that does automation with Owl Helper help speed up trading and make the process more convenient.
If you want to dive deeper into the Owl Smart Levels system, we recommend taking a look at the following articles:
Recommended for reading
- Creating a comprehensive Owl trading strategy
- XAUUSD Trading Review Using the Owl Smart Levels System: March 30 – April 3, 2026
- Automating trading with the Owl Smart Levels Indicator
I'm Sergei Ermolov, follow me and don't miss more useful tools for profitable trading on the Forex market.


 Trading Guide")
