
创建 MQL5-Telegram 集成 EA 交易(第 5 部分):从 Telegram 向 MQL5 发送命令并接收实时响应
概述
在本系列文章的第 5 部分中,我们继续将 MetaQuotes Language 5 (MQL5) 与 Telegram 进行集成,重点是完善 MetaTrader 5 (MT5) 与 Telegram 之间的交互。此前,在该系列的第 4 部分中,我们为从 MQL5 向 Telegram 发送复杂消息和图表图像奠定了基础,建立了这些平台之间的通信桥梁。现在,我们的目标是在此基础上进行扩展,使 EA 交易能够直接从 Telegram 用户接收和解释命令。EA 交易不是通过生成信号、开设市场头寸以及将预定义消息发送到我们的 Telegram 聊天室来控制自己,而是通过将命令传递给 EA,从 Telegram 聊天室来控制它,EA 将依次解码命令、解释命令,并发回合理的、适当的请求答复和响应。
我们将首先建立必要的环境来促进这种沟通,确保一切就绪,实现无缝互动。本文的核心将涉及创建从 JavaScript 对象表示法(JSON) 数据自动检索聊天更新的类,在本例中是 Telegram 命令和请求,这将允许 EA 交易理解和处理来自 Telegram 的用户命令。这一步对于建立动态双向通信至关重要,在这种通信中,机器人不仅发送消息,而且智能地响应用户输入。
此外,我们将专注于解码和解释传入的数据,确保 EA 交易可以有效地管理来自 Telegram 应用程序编程接口(API) 的各种类型的命令。为了演示此过程,我们提供了详细的可视化指南,说明了 Telegram、MetaTrader 5 和 MQL5 代码编辑器之间的通信流程,从而更容易理解这些组件如何协同工作。
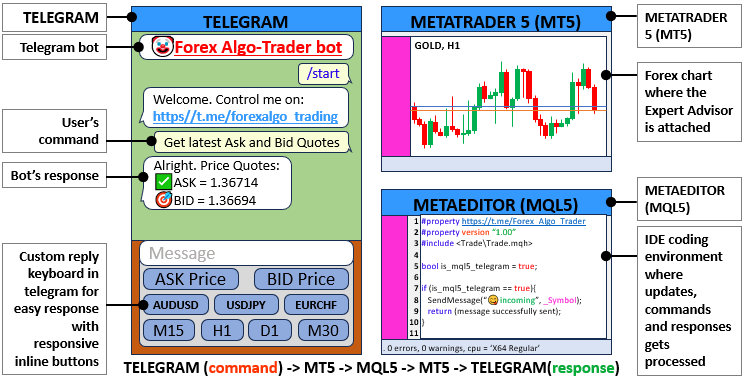
所提供的插图应该清晰地展示了集成组件。因此,流程如下:Telegram 将命令发送到连接 EA 交易的交易终端,该 EA 交易将命令发送到 MQL5,MQL5 解码、解释消息并准备相应的响应,然后将它们作为响应发送到交易终端和 Telegram 。为了便于理解,我们将整个过程细分为以下主题:
- 设置环境
- 创建类以从 JSON 获取聊天更新
- 解码并解析来自 Telegram API 的数据
- 处理响应
- 测试实现
- 结论
在本文结束时,我们将拥有一个完全集成的 EA 交易,它可以从 Telegram 向 MQL5 发送命令和请求,并在 Telegram 聊天中获得受监督的回复。那我们就开始吧。
设置环境
在开始创建类和函数的实际工作之前,建立一个允许我们的 EA 交易与 Telegram 交互的环境是至关重要的。我们的 EA 需要访问几个基本库,这些库有助于在 MQL5 中管理交易、数组和字符串。通过提供这些基本库,我们确保我们的 EA 可以访问内容丰富的函数和类库,这大大为我们的 EA 的实施铺平了道路。如下所示:
#include <Trade/Trade.mqh>
#include <Arrays/List.mqh>
#include <Arrays/ArrayString.mqh>
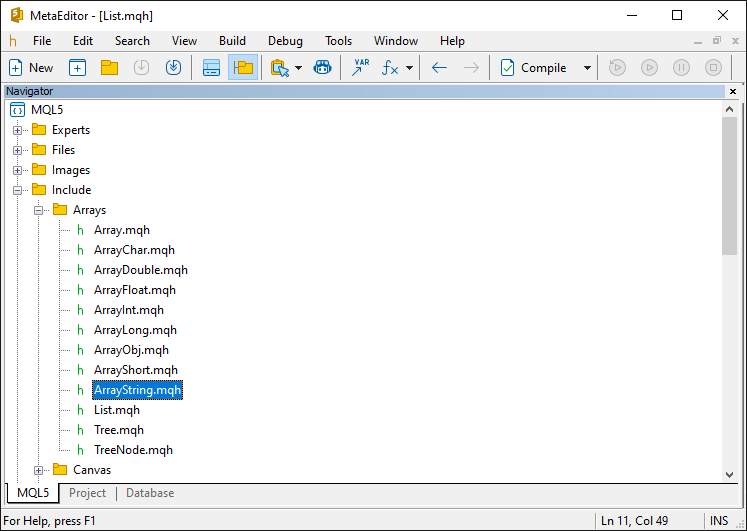
这里,库“< Trade/Trade.mqh >”提供了一套完整的交易函数。该库允许 EA 执行交易、管理仓位以及执行其他与交易相关的任务。它是任何旨在与市场互动的 EA 的关键组成部分。随后包含的库 “< Arrays/List.mqh >”和“< Arrays/ArrayString.mqh >” 有助于管理数据结构。这两个库中的第一个用于管理动态列表。第二个用于处理字符串数组。在处理我们从 Telegram 收到的交易信号时,这两个库都特别有用。我们知道,这里面有很多行话。接下来的章节将对此进行一些解读,我们将尝试更详细地解释所有这些组件的作用。要访问 “Arrays” 库,请打开导航器,展开 include 文件夹,然后选中其中任意一项,如下图所示。
最后,我们需要定义 Telegram 基础 URL、超时和机器人的令牌,如下所示。
#define TELEGRAM_BASE_URL  "https://api.telegram.org"
#define WEB_TIMEOUT        5000
//#define InpToken "7456439661:AAELUurPxI1jloZZl3Rt-zWHRDEvBk2venc"
#define InpToken "7456439661:AAELUurPxI1jloZZl3Rt-zWHRDEvBk2venc"
在包含库并编译程序后,您就已经具备了处理从 Telegram 命令收到的复杂数据结构所需的必要环境,我们现在可以继续实施了。
创建类以从 JSON 获取聊天更新
在这一部分,我们专注于开发核心功能,使我们的 EA 交易能够实时从 Telegram 接收更新。具体来说,我们需要创建类来解析 Telegram API 返回的 JSON 数据并提取必要的信息,例如聊天更新和用户命令。此步骤对于在 Telegram 和 MetaTrader 5 之间建立响应式通信循环至关重要。首先,让我们模拟这个过程。我们将在浏览器中再次加载默认函数以获取聊天更新,如下所示,以便我们获得实现类所需的数据结构。

加载后,我们返回 true,表示该过程成功但数据结构为空。这是因为在过去的 24 小时内,Telegram 聊天没有发送任何消息。因此,我们需要发送一条消息以获取更新。为此,我们从 Telegram 聊天发送初始化消息,如下所示。
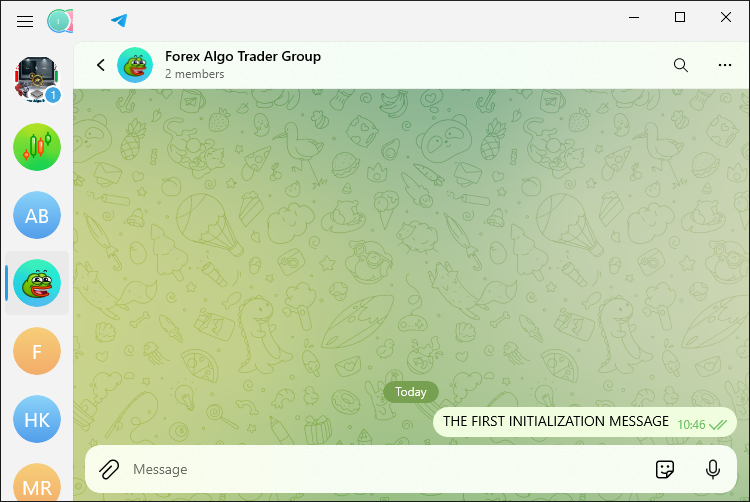
一旦我们发送了消息,我们现在有一个更新,我们可以重新加载浏览器链接以获取发送的数据结构。
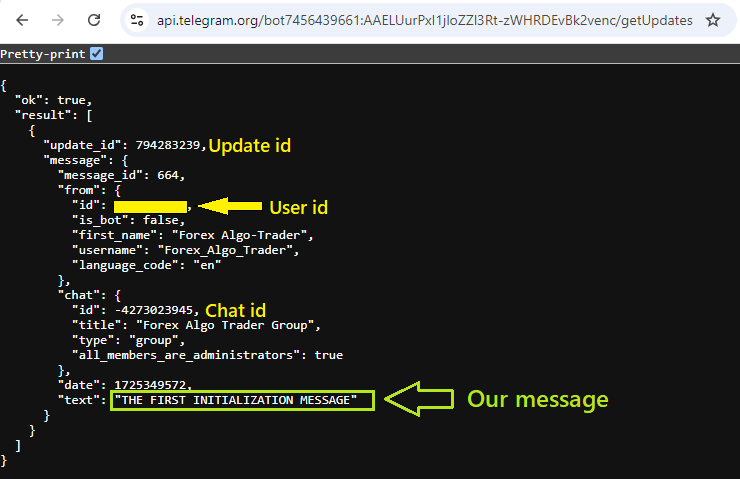
从上图中,我们可以看到由我们发送的消息构建的数据结构中的正确细节。这正是我们需要复制到类中并在每次发送新消息更新时循环的数据。因此,让我们构造一个包含所有成员变量的类。让我们首先构建通用的类的蓝图。
//+------------------------------------------------------------------+
//|        Class_Message                                             |
//+------------------------------------------------------------------+
class Class_Message : public CObject{//Defines a class named Class_Message that inherits from CObject.
   public:
      Class_Message(); // constructor
      ~Class_Message(){}; // Declares a destructor for the class, which is empty.
};
让我们专注于上面声明的类原型,以便稍后顺利进行。要声明一个类,我们使用关键字 “class” 后跟类名,在我们的例子中是 “Class_Message”。由于我们会得到很多类似的数据结构,我们继承了另一个名为 “CObject” 的类,并使用关键字 “public” 将继承的外部类成员设置为公共。然后我们将该类的第一个成员声明为 “public”。在我们继续之前,让我们详细解释一下所有这些意味着什么。该关键字是 4 个限定符之一,通常称为访问说明符,它们定义编译器如何访问变量、结构或类的成员。其中四个是:public(公有), protected(受保护), private(私有), 和 virtual(虚拟)。
让我们把它们分解并分别解释一下。
- Public:在 “public” (公有)访问说明符下声明的成员可以从类可见的任何代码部分访问。这意味着类外的函数、变量或其他对象可以直接访问和使用公共成员。它们通常用于需要由其他类、函数或脚本访问的函数或变量。
- Protected:在“protected”(受保护)访问说明符下声明的成员不能从类外部访问,但可以在类内部、派生类(即从此类继承的子类)和朋友类(friend class)/函数中访问。这对于封装应该可用于子类但不可用于程序其余部分的数据非常有用。它们通常用于允许子类访问或修改基类的某些变量或函数,同时仍然对程序的其余部分隐藏这些成员。
- Private:使用 “private” (私有)访问说明符声明的成员只能在类本身内访问。派生类和程序的任何其他部分都不能直接访问或修改私有成员。这是最严格的访问级别,通常用于不应从类外部访问或修改的变量和辅助函数。它们通常用于实现数据隐藏,确保对象的内部状态只能通过定义良好的公共接口(方法)进行修改。
- Virtual:仅适用于类方法(但不适用于结构的方法),并告诉编译器该方法应放在类的虚函数表中。
从上面提供的语法中,只有前三种是常用的。现在回到我们的类原型,让我们分解一下每件事的功能。
- 类声明:
class Class_Message : public CObject{...};:在这里,我们声明名为 “Class_Message” 的新类。该类源自 “CObject”,它是 MQL5 中的基类,用于创建自定义对象。因此,“Class_Message” 可以使用 MQL5 框架提供的功能,例如内存管理和面向对象编程的其他优势,在我们的程序中方便地显示消息。
- 构造函数:
Class_Message();:“Class_Message” 类的构造函数在这里声明。构造函数是一个特殊的函数,当创建类的实例(或对象)时会自动调用。构造函数的工作是初始化类的成员变量,并执行创建对象时必须完成的任何设置。在 Class_Message 的例子中,它初始化成员变量。
- 析构函数:
~Class_Message(){};:“Class_Message” 类声明了一个析构函数。当一个类的实例被显式删除或超出作用域时,会自动调用析构函数。通常,析构函数被定义为执行清理,在概念上与构造函数相反,构造函数在创建类的实例时被调用。在这种情况下,“Class_Message” 类的析构函数不执行任何操作(它不执行任何清理任务),因为目前没有必要。
请注意,构造函数和析构函数都包含与基类相同的名称,只是析构函数以波浪号 (~) 作为前缀。有了这个,我们现在可以继续定义类的成员。这些成员与我们的数据结构中收到的成员相同,因此,我们将如下可视化数据结构和需要从中提取的成员。
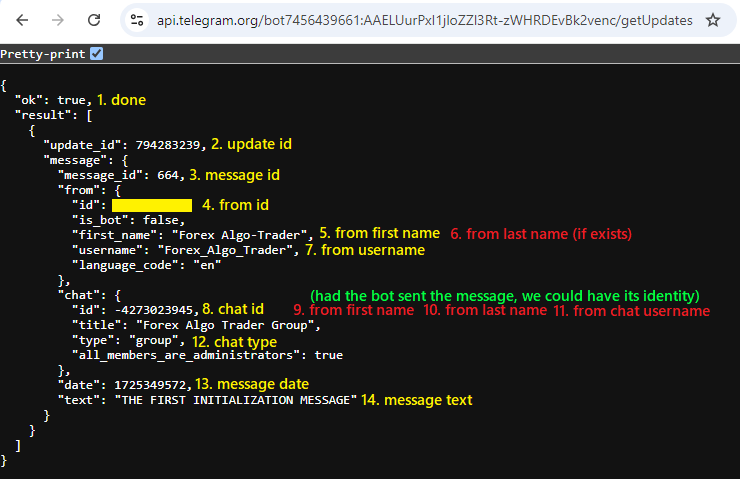
从上图我们可以看出,我们的类中至少需要 14 个成员。我们将它们定义如下:
      bool              done; //A boolean member variable TO INDICATE if a message has been processed.
      long              update_id; //Store the update ID from Telegram.
      long              message_id;//Stores the message ID.
      //---
      long              from_id;//Stores the sender’s ID.
      string            from_first_name;
      string            from_last_name;
      string            from_username;
      //---
      long              chat_id;
      string            chat_first_name;
      string            chat_last_name;
      string            chat_username;
      string            chat_type;
      //---
      datetime          message_date;
      string            message_text;
现在我们已经拥有了所需的全部类成员。最终的类结构如下所示。我们添加了注释,以使整个过程中的所有内容都一目了然。
//+------------------------------------------------------------------+
//|        Class_Message                                             |
//+------------------------------------------------------------------+
class Class_Message : public CObject{//--- Defines a class named Class_Message that inherits from CObject.
   public:
      Class_Message(); //--- Constructor declaration.
      ~Class_Message(){}; //--- Declares an empty destructor for the class.

      //--- Member variables to track the status of the message.
      bool              done; //--- Indicates if a message has been processed.
      long              update_id; //--- Stores the update ID from Telegram.
      long              message_id; //--- Stores the message ID.

      //--- Member variables to store sender-related information.
      long              from_id; //--- Stores the sender’s ID.
      string            from_first_name; //--- Stores the sender’s first name.
      string            from_last_name; //--- Stores the sender’s last name.
      string            from_username; //--- Stores the sender’s username.

      //--- Member variables to store chat-related information.
      long              chat_id; //--- Stores the chat ID.
      string            chat_first_name; //--- Stores the chat first name.
      string            chat_last_name; //--- Stores the chat last name.
      string            chat_username; //--- Stores the chat username.
      string            chat_type; //--- Stores the chat type.

      //--- Member variables to store message-related information.
      datetime          message_date; //--- Stores the date of the message.
      string            message_text; //--- Stores the text of the message.
};
定义消息类后,我们需要初始化其成员,以便它们准备接收数据。我们通过调用类构造函数来实现这一点。
//+------------------------------------------------------------------+
//|      Constructor to initialize class members                     |
//+------------------------------------------------------------------+
Class_Message::Class_Message(void){
   //--- Initialize the boolean 'done' to false, indicating the message is not processed.
   done = false;

   //--- Initialize message-related IDs to zero.
   update_id = 0;
   message_id = 0;

   //--- Initialize sender-related information.
   from_id = 0;
   from_first_name = NULL;
   from_last_name = NULL;
   from_username = NULL;

   //--- Initialize chat-related information.
   chat_id = 0;
   chat_first_name = NULL;
   chat_last_name = NULL;
   chat_username = NULL;
   chat_type = NULL;

   //--- Initialize the message date and text.
   message_date = 0;
   message_text = NULL;
}
我们首先调用基类并使用“作用域运算符”(::)定义构造函数。然后我们将成员变量初始化为其默认值。“done” 的布尔值设置为 “false”,表示消息尚未被处理。“message_id” 和 “update_id”均初始化为 0,代表消息和更新的默认ID。对于发信人相关信息,“from_id” 设置为 0,变量 “from_first_name”、“from_last_name” 和 “from_username” 初始化为 NULL ,表示未设置发件人的详细信息。类似地,与聊天相关的变量,即 “chat_id”,“chat_first_name”,“chat_last_name”,“chat_username” 和 “chat_type”,也被初始化为 0 或 NULL ,这意味着聊天信息尚不可用。最后,“message_date” 设置为 0,并且 “message_text” 初始化为NULL ,这意味着消息的内容和消息的日期尚未指定。从技术上讲,我们将“整数”数据类型变量初始化为 0,将“字符串”初始化为 NULL 。
类似地,我们需要定义另一个类的实例,用于保存单独的 Telegram 聊天。我们将使用这些数据对解析的数据和从 Telegram 接收的数据进行比较。例如,当我们发送“获取卖价”命令时,我们将解析数据,从 JSON 中获取更新,并检查 JSON 中存储的任何接收到的数据是否与我们的命令匹配,如果匹配,则采取必要的行动。我们希望这能澄清一些事情,但随着我们的继续,情况会越来越清楚。类代码片段如下:
//+------------------------------------------------------------------+
//|        Class_Chat                                                |
//+------------------------------------------------------------------+
class Class_Chat : public CObject{
   public:
      Class_Chat(){}; //Declares an empty constructor.
      ~Class_Chat(){}; // deconstructor
      long              member_id;//Stores the chat ID.
      int               member_state;//Stores the state of the chat.
      datetime          member_time;//Stores the time related to the chat.
      Class_Message     member_last;//An instance of Class_Message to store the last message.
      Class_Message     member_new_one;//An instance of Class_Message to store the new message.
};
我们定义一个名为 “Class_Chat” 的类来处理和保存单个 Telegram 聊天的信息。该类包含一个空的构造函数和析构函数,以及几个成员:“member_id” 存储聊天的唯一 ID;“member_state” 表示聊天的状态;“member_time” 保存与聊天时间相关的所有信息。该类有两个我们已经定义的基类 “Class_Message” 的实例,分别保存最后一条消息和新消息。我们需要这些来存储消息,并在用户发送多个命令时单独处理它们。为了说明这一点,我们将发送如下初始化消息:
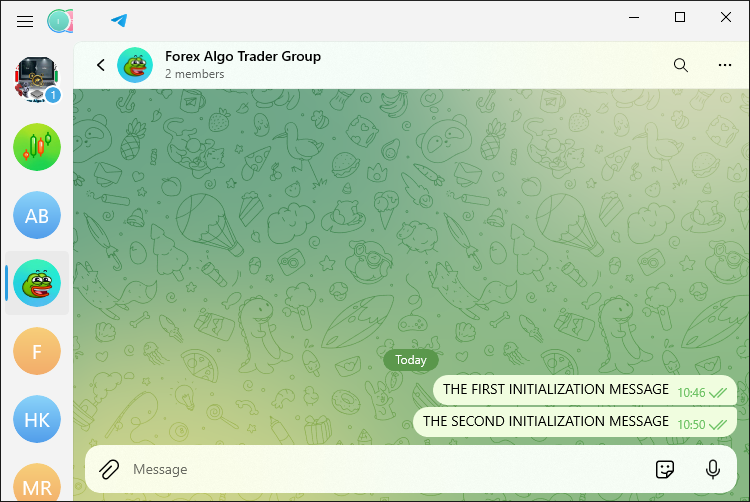
在阅读我们的聊天更新后,我们得到以下数据结构。
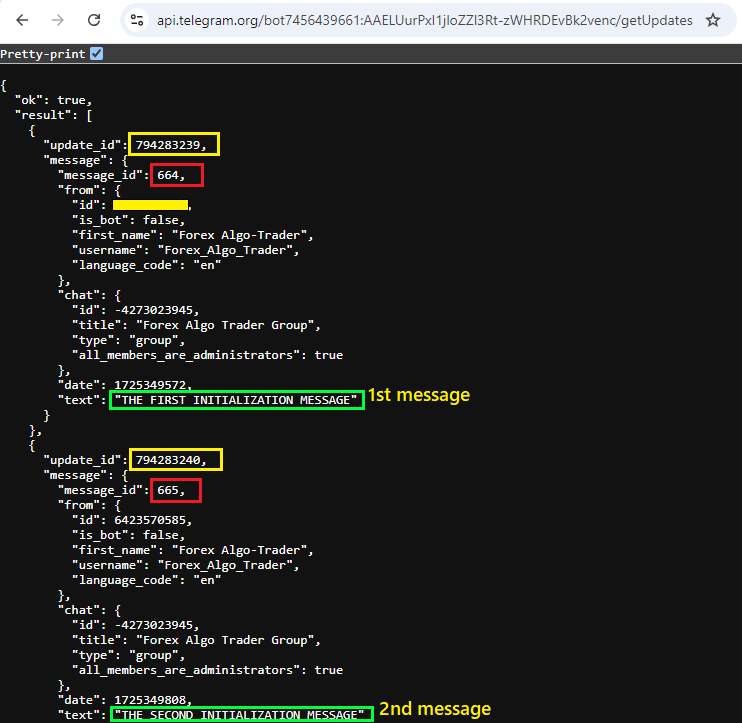
从收到的第二个消息数据结构中,我们可以看到第一条消息的更新和消息 ID 分别为 794283239 和 664,而第二条消息的更新和消息 ID 分别为 794283240 和 665,差值为 1。我们希望这能够阐明对不同类的需求。现在,我们可以继续创建最后一个默认类,用于无缝控制交互流。其结构如下。
//+------------------------------------------------------------------+
//|   Class_Bot_EA                                                    |
//+------------------------------------------------------------------+
class Class_Bot_EA{
   private:
      string            member_token;         //--- Stores the bot’s token.
      string            member_name;          //--- Stores the bot’s name.
      long              member_update_id;     //--- Stores the last update ID processed by the bot.
      CArrayString      member_users_filter;  //--- An array to filter users.
      bool              member_first_remove;  //--- A boolean to indicate if the first message should be removed.

   protected:
      CList             member_chats;         //--- A list to store chat objects.

   public:
      void Class_Bot_EA();   //--- Declares the constructor.
      ~Class_Bot_EA(){};    //--- Declares the destructor.
      int getChatUpdates(); //--- Declares a function to get updates from Telegram.
      void ProcessMessages(); //--- Declares a function to process incoming messages.
};
我们定义了一个名为 “Class_Bot_EA” 的类来管理 Telegram 机器人和 MQL5 环境之间的交互。它有几个私有成员,如 “member_token”,用于存储机器人的身份验证令牌,以及 “member_name”,其中包含机器人的名称。另一个成员是 “member_update_id”,它跟踪最后处理的更新。其他几个成员负责管理和过滤用户交互。该类有一个受保护的成员 “member_chats”,它维护一个聊天对象列表。在其公有成员中,最值得注意的是构造函数和析构函数,它们执行实例的必要初始化和清理。公共成员中还有两个值得注意的函数:“getChatUpdates”,用于从 Telegram 获取更新,以及“ProcessMessages”,用于处理传入消息。这是我们用来获取聊天更新和处理收到的命令的最重要的函数。我们将使用与第一个类类似的格式来初始化这些成员,如下所示。
void Class_Bot_EA::Class_Bot_EA(void){ //--- Constructor
   member_token=NULL; //--- Initialize the bot's token as NULL.
   member_token=getTrimmedToken(InpToken); //--- Assign the trimmed bot token from InpToken.
   member_name=NULL; //--- Initialize the bot's name as NULL.
   member_update_id=0; //--- Initialize the last update ID to 0.
   member_first_remove=true; //--- Set the flag to remove the first message to true.
   member_chats.Clear(); //--- Clear the list of chat objects.
   member_users_filter.Clear(); //--- Clear the user filter array.
}
在这里,我们调用 “Class_Bot_EA” 类的构造函数并初始化成员变量来设置机器人的环境。最初,“member_token” 被设置为 NULL 作为占位符。然后我们为其分配 “InpToken” 的修剪版本。此值非常重要,因为它控制着机器人的身份验证。如果代码中保留了修剪后的占位符,机器人将无法工作。“member_name” 也被初始化为 NULL ,并且 “member_update_id” 设置为 0,这表示尚未处理任何更新。“member_first_remove” 变量设置为true。这意味着该机器人被配置为删除它处理的第一条消息。最后,“member_chats” 和 “member_users_filter” 都被清除,以确保它们启动时为空。您可能已经注意到我们使用了不同的函数来获取机器人的令牌。函数如下。
//+------------------------------------------------------------------+
//|        Function to get the Trimmed Bot's Token                   |
//+------------------------------------------------------------------+
string getTrimmedToken(const string bot_token){
   string token=getTrimmedString(bot_token); //--- Trim the bot_token using getTrimmedString function.
   if(token==""){ //--- Check if the trimmed token is empty.
      Print("ERR: TOKEN EMPTY"); //--- Print an error message if the token is empty.
      return("NULL"); //--- Return "NULL" if the token is empty.
   }
   return(token); //--- Return the trimmed token.
}

//+------------------------------------------------------------------+
//|        Function to get a Trimmed string                          |
//+------------------------------------------------------------------+
string getTrimmedString(string text){
   StringTrimLeft(text); //--- Remove leading whitespace from the string.
   StringTrimRight(text); //--- Remove trailing whitespace from the string.
   return(text); //--- Return the trimmed string.
}
在这里,我们定义了两个携手工作的函数来清理和验证机器人的令牌字符串。第一个函数 “getTrimmedToken” 访问 “bot_token”作为输入。然后,它调用另一个函数 “getTrimmedString” 来删除令牌中的任何前导或尾随空格。修剪后,函数检查令牌是否为空。如果修剪后令牌为空,则会打印错误消息,并且函数返回 “NULL” 以指示机器人无法继续使用此令牌。另一方面,如果令牌不为空,则将其作为有效的修剪令牌返回。
第二个函数 “getTrimmedString” 实际负责修剪给定字符串两端的空格。它使用 StringTrimLeft 删除前导空格,使用 StringTrimRight 删除尾随空格,然后返回修剪后的字符串作为通过有效性测试的标记。
到目前为止,我们已经拥有了组织接收到的元数据所需的数据结构。然后,我们需要继续获取聊天更新并同时处理它们。为了确保清晰的通信,我们将首先调用类函数。首先,要访问类成员,我们必须基于类创建一个对象,以提供所需的访问权限。这是通过以下方式实现的:
Class_Bot_EA obj_bot; //--- Create an instance of the Class_Bot_EA class
将类对象声明为 “obj_bot” 后,我们可以使用点运算符访问该类的成员。我们需要检查更新,并在指定的时间间隔内处理消息。因此,我们没有使用 OnTick 事件处理程序,因为该处理程序会耗费时间来计算可能占用计算机资源的分时报价数,而是选择使用 OnTimer 函数来自动为我们进行计数。要使用事件处理程序,我们需要在 OnInit 事件处理程序上设置并初始化它,如下所示。
//+------------------------------------------------------------------+
//| Expert initialization function                                   |
//+------------------------------------------------------------------+
int OnInit(){
   EventSetMillisecondTimer(3000); //--- Set a timer event to trigger every 3000 milliseconds (3 seconds)
   OnTimer(); //--- Call OnTimer() immediately to get the first update
   return(INIT_SUCCEEDED); //--- Return initialization success
}
在这里,我们通过使用 EventSetMillisecondTimer 函数设置一个计时器事件来初始化 EA 交易,该事件每 3000 毫秒(3 秒)触发一次。这可确保 EA 交易定期持续检查更新。然后,我们立即调用 OnTimer 事件处理程序以在初始化后立即获取第一个更新,确保该过程立即启动。最后我们返回 “INIT_SUCCEEDED” 表示初始化成功。然后,由于我们设置了计时器,一旦程序被取消初始化,我们需要销毁设置的计时器以释放计算机资源。
//+------------------------------------------------------------------+
//| Expert deinitialization function                                 |
//+------------------------------------------------------------------+
void OnDeinit(const int reason){
   EventKillTimer(); //--- Kill the timer event to stop further triggering
   ChartRedraw(); //--- Redraw the chart to reflect any changes
}
在这里,当 EA 交易被移除或暂停时,我们在 OnDeinit 事件处理程序中做的第一件事就是停止计时器事件。这是使用 EventKillTimer 函数完成的,该函数是 EventSetMillisecondTimer 的逻辑对应函数。如果 EA 交易不再运行,我们不希望计时器继续运行。停止计时器后,我们调用 ChartRedraw 函数。调用此函数并非绝对必要,但在某些情况下,当您需要刷新图表以应用所做的更改时,它可能会有所帮助。最后,我们调用计时器事件处理程序来处理计数过程。
//+------------------------------------------------------------------+
//| Timer function                                                   |
//+------------------------------------------------------------------+
void OnTimer(){
   obj_bot.getChatUpdates(); //--- Call the function to get chat updates from Telegram
   obj_bot.ProcessMessages(); //--- Call the function to process incoming messages
}
最后,我们调用 OnTimer 事件处理程序。在其中,我们调用两个关键函数,这两个函数分别是获取图表更新和处理消息所必需的,方法是使用我们创建的对象 “obj_bot” 并使用 “点运算符” 来访问类函数。到目前为止,一切都很成功,我们现在可以专注于函数。这将在下一节中完成。
解码并解析来自 Telegram API 的数据
我们需要做的第一件事是获取聊天更新,我们将使用这些更新与从 Telegram 收到的文本进行比较,如果匹配,则做出必要的回应。因此,我们将在负责获取更新的函数上执行此操作。
//+------------------------------------------------------------------+
int Class_Bot_EA::getChatUpdates(void){

//--- ....

}
调用函数后,我们要做的第一件事是确保我们有一个有效的令牌,如果没有,我们会在日志中打印一条错误消息并返回 -1,表示没有令牌我们无法继续。如下所示。
   //--- Check if the bot token is NULL
   if(member_token==NULL){
      Print("ERR: TOKEN EMPTY"); //--- Print an error message if the token is empty
      return(-1); //--- Return with an error code
   }
如果令牌不为空,我们可以准备一个请求发送到 Telegram API,用于从指定聊天中获取更新。
   string out; //--- Variable to store the response from the request
   string url=TELEGRAM_BASE_URL+"/bot"+member_token+"/getUpdates"; //--- Construct the URL for the Telegram API request
   string params="offset="+IntegerToString(member_update_id); //--- Set the offset parameter to get updates after the last processed ID

   //--- Send a POST request to get updates from Telegram
   int res=postRequest(out, url, params, WEB_TIMEOUT);
我们首先声明一个名为 “out” 的变量来保存从 API 请求返回的响应。为了构建请求的 URL,我们结合了基础 API URL(“TELEGRAM_BASE_URL”)、机器人的令牌(“member_token”)以及我们想要调用的方法(“/getUpdates”)。此方法获取用户发送给机器人的更新,使我们能够了解自上次检查更新以来发生的情况。然后我们在请求中包含一个参数。参数 “offset” 确保我们只获得上次获取到的更新之后发生的更新。最后,我们向 API 发出 POST 请求,请求的结果存储在 “out”变量中,并由响应中的 “res” 字段指示。我们确实使用了自定义函数 “postRequest”。这是它的代码片段和分解。它类似于我们在前面部分中所做的工作,但我们添加了注释来解释所使用的变量。
//+------------------------------------------------------------------+
//| Function to send a POST request and get the response             |
//+------------------------------------------------------------------+
int postRequest(string &response, const string url, const string params,
                const int timeout=5000){
   char data[]; //--- Array to store the data to be sent in the request
   int data_size=StringLen(params); //--- Get the length of the parameters
   StringToCharArray(params, data, 0, data_size); //--- Convert the parameters string to a char array

   uchar result[]; //--- Array to store the response data
   string result_headers; //--- Variable to store the response headers

   //--- Send a POST request to the specified URL with the given parameters and timeout
   int response_code=WebRequest("POST", url, NULL, NULL, timeout, data, data_size, result, result_headers);
   if(response_code==200){ //--- If the response code is 200 (OK)
      //--- Remove Byte Order Mark (BOM) if present
      int start_index=0; //--- Initialize the starting index for the response
      int size=ArraySize(result); //--- Get the size of the response data array
      // Loop through the first 8 bytes of the 'result' array or the entire array if it's smaller
      for(int i=0; i<fmin(size,8); i++){
         // Check if the current byte is part of the BOM
         if(result[i]==0xef || result[i]==0xbb || result[i]==0xbf){
            // Set 'start_index' to the byte after the BOM
            start_index=i+1;
         }
         else {break;}
      }
      //--- Convert the response data from char array to string, skipping the BOM
      response=CharArrayToString(result, start_index, WHOLE_ARRAY, CP_UTF8);
      //Print(response); //--- Optionally print the response for debugging

      return(0); //--- Return 0 to indicate success
   }
   else{
      if(response_code==-1){ //--- If there was an error with the WebRequest
         return(_LastError); //--- Return the last error code
      }
      else{
         //--- Handle HTTP errors
         if(response_code>=100 && response_code<=511){
            response=CharArrayToString(result, 0, WHOLE_ARRAY, CP_UTF8); //--- Convert the result to string
            Print(response); //--- Print the response for debugging
            Print("ERR: HTTP"); //--- Print an error message indicating an HTTP error
            return(-1); //--- Return -1 to indicate an HTTP error
         }
         return(response_code); //--- Return the response code for other errors
      }
   }
   return(0); //--- Return 0 in case of an unexpected error
}
在这里,我们负责发送 POST 请求并处理回复。我们首先获取输入参数并将其转换为可以发送的形式 — 使用 StringToCharArray 从参数字符串创建字符数组。然后,我们定义两个数组来捕获响应数据和响应头。最后,我们使用 WebRequest 函数将 POST 请求发送到必须到达的 URL,并附带必须使用的参数和超时设置。
当我们的请求成功时(我们根据收到 200 响应代码来确定),我们确保没有任何东西会干扰响应数据一开始的处理。具体来说,我们检查任何字节顺序标记(BOM,Byte Order Mark)。如果我们找到一个,我们会将其视为不应该存在的子字符串,并采取措施避免将其包含在我们最终使用的数据中。之后,我们将数据从字符数组转换为字符串。如果我们顺利完成了所有这些步骤,没有遇到任何障碍,我们将返回 0 表示一切顺利。
当我们的请求不成功时,我们通过检查响应返回的代码来处理错误。如果问题出在 WebRequest 函数上,我们会告诉用户最后设置了哪个错误代码 — 这是我们找出问题的唯一方法。如果我们正在处理 HTTP 错误,我们会尽力解释 HTTP 响应附带的错误消息,并告诉用户我们发现了什么。最后,对于我们可能得到的任何其他响应代码,我们只需发回代码。
在我们继续之前,我们可以通过检查响应并打印数据来验证发送的数据。我们通过使用以下逻辑来实现这一点。
   //--- If the request was successful
   if(res==0){
      Print(out); //--- Optionally print the response
   }
在这里,我们检查 POST 的结果是否等于零,如果是,我们打印数据进行调试和验证。运行后,我们得到以下结果。
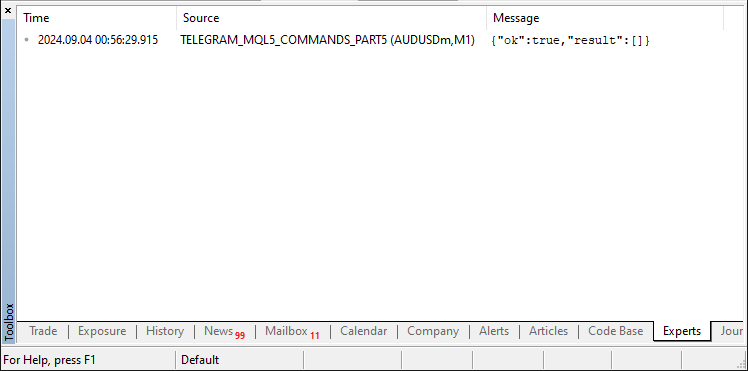
在这里,我们可以看到响应是 true,这意味着获取更新的过程是成功的。现在我们需要获取数据响应并检索它,我们需要使用 JSON 解析。我们不会深入到负责解析的代码中,但我们会将其作为文件包含在内,并将其添加到程序的全局范围内。添加后,我们继续创建一个 JSON 对象,如下所示。
      //--- Create a JSON object to parse the response
      CJSONValue obj_json(NULL, jv_UNDEF);
创建对象后,我们使用它对响应进行反序列化,如下所示。
      //--- Deserialize the JSON response
      bool done=obj_json.Deserialize(out);
我们声明一个布尔变量 “done” 来存储结果。这是我们存储是否正确解析的响应标志的地方。我们可以打印它以进行调试,如下所示。
Print(done);
打印输出后,我们得到以下响应。

在这里,我们可以看到我们正确解析了响应。我们需要相应为 true 才能继续。如果答案是其他,我们需要停止该过程并返回,因为我们将无法访问其余的消息更新。因此,我们确保如果答复是否定的,我们将终止该过程。
      if(!done){
         Print("ERR: JSON PARSING"); //--- Print an error message if parsing fails
         return(-1); //--- Return with an error code
      }
在这里,我们通过评估布尔变量 “done” 来检查 JSON 解析是否成功。如果解析失败(即“done”为 false),我们会打印一条错误消息“ERR:JSON PARSING” 表示在解释 JSON 响应时存在问题。接下来,我们返回 -1 来表示 JSON 解析过程中发生了错误。接下来,我们通过以下逻辑确保响应被成功处理。
      //--- Check if the 'ok' field in the JSON is true
      bool ok=obj_json["ok"].ToBool();
      //--- If 'ok' is false, there was an error in the response
      if(!ok){
         Print("ERR: JSON NOT OK"); //--- Print an error message if 'ok' is false
         return(-1); //--- Return with an error code
      }
首先,我们验证从响应中检索到的 JSON 中的 “ok” 字段的值。这让我们知道请求是否已成功处理。我们提取该字段并将其存储在名为 “ok” 的布尔值中。如果 “ok” 的值为 false,则表示即使请求本身成功,响应也出现错误或某种问题。在这种情况下,我们打印 “ERR:JSON NOT OK” 来表示存在某种问题,并返回 -1 来表明在处理 JSON 响应时也存在某种问题。如果一切顺利,这意味着我们有消息更新,我们可以继续检索它们。因此,我们需要根据消息类声明一个对象,如下所示:
      //--- Create a message object to store message details
      Class_Message obj_msg;
我们现在可以循环查看所有消息更新,并使用创建的对象将它们存储在类中。首先,我们需要获得更新的总数,这是通过以下逻辑实现的。
      //--- Get the total number of updates in the JSON array 'result'
      int total=ArraySize(obj_json["result"].m_elements);
      //--- Loop through each update
      for(int i=0; i<total; i++){

      }
在每次迭代中,我们需要从我们处理的 JSON 响应中检索一个单独的更新项。
         //--- Get the individual update item as a JSON object
         CJSONValue obj_item=obj_json["result"].m_elements[i];
然后,我们可以继续获取个人聊天更新。首先,让我们更新一下消息。
         //--- Extract message details from the JSON object
         obj_msg.update_id=obj_item["update_id"].ToInt(); //--- Get the update ID
         obj_msg.message_id=obj_item["message"]["message_id"].ToInt(); //--- Get the message ID
         obj_msg.message_date=(datetime)obj_item["message"]["date"].ToInt(); //--- Get the message date

         obj_msg.message_text=obj_item["message"]["text"].ToStr(); //--- Get the message text
         obj_msg.message_text=decodeStringCharacters(obj_msg.message_text); //--- Decode any HTML entities in the message text
在这里,我们从 “obj_item” 指示的更新项中获取单个消息的详细信息。我们首先从 JSON 对象中提取更新 ID 并将其存储在 “obj_msg.update_id” 中。之后,我们提取消息 ID 并将其存放在 “obj_msg.message_id” 中。消息的日期以一种不太人类可读的格式出现,也包含在该项中,我们将其存储为 “obj_msg.message_date” 中的 “datetime” 对象,并将其“类型转换”为人类可读格式。然后我们查看消息的文本。大多数情况下,我们可以抓取文本并将其放入 “obj_msg.message_text” 中。然而,有时其 HTML 实体会被编码;其他时候,它也有编码的特殊字符。对于这些实例,我们在一个名为 “decodeStringCharacters” 的函数中处理它们。这是我们之前解释过的一个函数,我们将调用它来完成它的任务。然后,以类似的格式,我们提取发件人详细信息。
         //--- Extract sender details from the JSON object
         obj_msg.from_id=obj_item["message"]["from"]["id"].ToInt(); //--- Get the sender's ID
         obj_msg.from_first_name=obj_item["message"]["from"]["first_name"].ToStr(); //--- Get the sender's first name
         obj_msg.from_first_name=decodeStringCharacters(obj_msg.from_first_name); //--- Decode the first name
         obj_msg.from_last_name=obj_item["message"]["from"]["last_name"].ToStr(); //--- Get the sender's last name
         obj_msg.from_last_name=decodeStringCharacters(obj_msg.from_last_name); //--- Decode the last name
         obj_msg.from_username=obj_item["message"]["from"]["username"].ToStr(); //--- Get the sender's username
         obj_msg.from_username=decodeStringCharacters(obj_msg.from_username); //--- Decode the username
在提取发件人详细信息后,我们也以类似的方式提取聊天详细信息。
         //--- Extract chat details from the JSON object
         obj_msg.chat_id=obj_item["message"]["chat"]["id"].ToInt(); //--- Get the chat ID
         obj_msg.chat_first_name=obj_item["message"]["chat"]["first_name"].ToStr(); //--- Get the chat's first name
         obj_msg.chat_first_name=decodeStringCharacters(obj_msg.chat_first_name); //--- Decode the first name
         obj_msg.chat_last_name=obj_item["message"]["chat"]["last_name"].ToStr(); //--- Get the chat's last name
         obj_msg.chat_last_name=decodeStringCharacters(obj_msg.chat_last_name); //--- Decode the last name
         obj_msg.chat_username=obj_item["message"]["chat"]["username"].ToStr(); //--- Get the chat's username
         obj_msg.chat_username=decodeStringCharacters(obj_msg.chat_username); //--- Decode the username
         obj_msg.chat_type=obj_item["message"]["chat"]["type"].ToStr(); //--- Get the chat type
到目前为止,您应该已经注意到,该结构与我们在浏览器的数据结构上提供的结构完全相同。然后,我们可以继续更新更新 ID,以确保 Telegram 的下一个更新请求在正确的时间点开始。
         //--- Update the ID for the next request
         member_update_id=obj_msg.update_id+1;
在这里,我们更新 “member_update_id” 以确保下一个来自 Telegram 的更新请求从正确的位置开始。通过分配值 “obj_msg.update_id + 1”,我们设置偏移量,以便下一个请求不包括当前更新,并且实际上只获取在此 ID 之后发生的新的更新。这很重要,因为我们不想多次处理同一个更新,我们还想让机器人尽可能地保持响应。接下来,我们检查是否有新的更新。
         //--- If it's the first update, skip processing
         if(member_first_remove){
            continue;
         }
在这里,我们通过检查标志 “member_first_remove” 来确定当前更新是否是正在处理的第一个初始化后更新。如果 “member_first_remove” 为 true,则表示我们正在处理第一次更新 - 初始更新 - 在一切初始化之后。然后,我们跳过处理此更新,直接继续处理下一个更新。最后,我们根据是否应用了用户名过滤器来过滤和管理聊天消息。
         //--- Filter messages based on username
         if(member_users_filter.Total()==0 || //--- If no filter is applied, process all messages
            (member_users_filter.Total()>0 && //--- If a filter is applied, check if the username is in the filter
            member_users_filter.SearchLinear(obj_msg.from_username)>=0)){

            //--- Find the chat in the list of chats
            int index=-1;
            for(int j=0; j<member_chats.Total(); j++){
               Class_Chat *chat=member_chats.GetNodeAtIndex(j);
               if(chat.member_id==obj_msg.chat_id){ //--- Check if the chat ID matches
                  index=j;
                  break;
               }
            }

            //--- If the chat is not found, add a new chat to the list
            if(index==-1){
               member_chats.Add(new Class_Chat); //--- Add a new chat to the list
               Class_Chat *chat=member_chats.GetLastNode();
               chat.member_id=obj_msg.chat_id; //--- Set the chat ID
               chat.member_time=TimeLocal(); //--- Set the current time for the chat
               chat.member_state=0; //--- Initialize the chat state
               chat.member_new_one.message_text=obj_msg.message_text; //--- Set the new message text
               chat.member_new_one.done=false; //--- Mark the new message as not processed
            }
            //--- If the chat is found, update the chat message
            else{
               Class_Chat *chat=member_chats.GetNodeAtIndex(index);
               chat.member_time=TimeLocal(); //--- Update the chat time
               chat.member_new_one.message_text=obj_msg.message_text; //--- Update the message text
               chat.member_new_one.done=false; //--- Mark the new message as not processed
            }
         }
首先,我们通过检查 “member_users_filter.Total()” 来确定用户名过滤器是否处于活动状态。如果没有过滤器(“Total() == 0”),我们会照常处理所有消息。如果存在过滤器(“Total() > 0”),我们使用 “member_users_filter.SearchLinear()” 确定发件人的用户名(“obj_msg.from_username”)是否在过滤器中。如果我们找到用户名,我们就继续处理消息。
然后,我们通过遍历 “member_chats” 列表并比较聊天 ID(“obj_msg.chat_id”)来搜索其中的聊天。如果未找到聊天(index == -1),我们会向列表中添加一个新的 “Class_Chat” 对象。我们用聊天 ID、当前时间、初始状态 0 和新消息的文本初始化该对象。我们还将新消息标记为未完成(done = false)。
如果聊天已在列表中,我们将使用消息的新文本和当前时间更新现有聊天对象,将消息标记为未处理。这保证了每个聊天中的最新消息都被正确记录和更新。一切完成后,我们将第一个更新标志设置为 false。
      //--- After the first update, set the flag to false
      member_first_remove=false;
最后我们返回 post 请求的结果。
   //--- Return the result of the POST request
   return(res);
有了这个函数,我们可以确保在每个设定的时间间隔检索聊天更新并存储它们,从而可以在需要时随时处理它们。消息的处理在下一节完成。
处理响应
获取聊天更新后,我们可以继续访问检索到的消息,进行比较,并将回复发送回 Telegram 。这是通过使用类的 “ProcessMessages” 函数实现的。
void Class_Bot_EA::ProcessMessages(void){

//---

}
我们需要做的第一件事是处理个人聊天。
   //--- Loop through all chats
   for(int i=0; i<member_chats.Total(); i++){
      Class_Chat *chat=member_chats.GetNodeAtIndex(i); //--- Get the current chat
      if(!chat.member_new_one.done){ //--- Check if the message has not been processed yet
         chat.member_new_one.done=true; //--- Mark the message as processed
         string text=chat.member_new_one.message_text; //--- Get the message text

         //---

      }
   }
在这里,我们遍历 “member_chats” 集合,并使用索引变量 “i” 从 “member_chats” 中检索每个聊天对应的聊天对象。对于每个聊天,我们通过评估 “member_new_one” 结构中的完成标志来检查当前聊天的相关消息是否已被处理。如果消息尚未处理,我们将此标志设置为 true,将消息标记为已处理,以防止重复处理。最后,我们从 “member_new_one” 结构中提取消息文本。我们将利用文本来确定应根据信息内容采取何种回应或行动(如果有的话)。首先,让我们定义一个实例,用户从 Telegram 发送问候文本 “Hello”。
         //--- Process the command based on the message text

         //--- If the message is "Hello"
         if(text=="Hello"){
            string message="Hello world! You just sent a 'Hello' text to MQL5 and has been processed successfully.";

         }
在这里,我们验证消息文本是否为“Hello”。如果是,我们会制作一个响应,让用户知道系统已收到并处理 “Hello” 文本。此回复可确认输入已由 MQL5 代码正确处理。然后,我们将此确认发送回用户,让他们知道他们的输入已成功处理。为了发送响应,我们需要创建另一个函数来处理回复。
//+------------------------------------------------------------------+
//| Send a message to Telegram                                      |
//+------------------------------------------------------------------+
int sendMessageToTelegram(const long chat_id,const string text,
                const string reply_markup=NULL){
   string output; //--- Variable to store the response from the request
   string url=TELEGRAM_BASE_URL+"/bot"+getTrimmedToken(InpToken)+"/sendMessage"; //--- Construct the URL for the Telegram API request

   //--- Construct parameters for the API request
   string params="chat_id="+IntegerToString(chat_id)+"&text="+UrlEncode(text); //--- Set chat ID and message text
   if(reply_markup!=NULL){ //--- If a reply markup is provided
      params+="&reply_markup="+reply_markup; //--- Add reply markup to parameters
   }
   params+="&parse_mode=HTML"; //--- Set parse mode to HTML (can also be Markdown)
   params+="&disable_web_page_preview=true"; //--- Disable web page preview in the message

   //--- Send a POST request to the Telegram API
   int res=postRequest(output,url,params,WEB_TIMEOUT); //--- Call postRequest to send the message
   return(res); //--- Return the response code from the request
}
这里我们定义了函数 “sendMessageToTelegram”,它使用 Telegram Bot API 向指定的 Telegram 聊天发送消息。首先,我们通过组合 Telegram 的基础 URL、机器人令牌(使用 “getTrimmedToken” 获取)和发送消息的特定方法(“sendMessage”)来构建 API 请求的 URL。此 URL 对于将 API 请求定向到正确的端点至关重要。接下来,我们为请求构建查询参数。这些参数包括:
- chat_id:将发送消息的聊天的 ID。
- text:消息的内容,经过 URL 编码以确保正确传输。
如果提供了自定义回复键盘标记(“reply_markup”),则将其附加到参数。这允许在消息中使用交互式按钮。其他参数包括:
- parse_mode=HTML:指定消息应解释为 HTML,允许格式化文本。
- disable_web_page_preview=true:确保消息中的任何网页预览都被禁用。
最后,该函数使用 “postRequest” 函数发送请求,该函数处理与 Telegram API 的实际通信。返回此请求的响应代码,以指示消息是否已成功发送或是否发生错误。
然后,我们可以使用下面的相应参数调用此函数来发送响应。
            //--- Send the response message
            sendMessageToTelegram(chat.member_id,message,NULL);
            continue;
在这里,我们首先利用 “sendMessageToTelegram” 函数将响应消息发送到对应的 Telegram 聊天。我们使用 “chat.member_id” 调用该函数,以正确的聊天为目标发送正确的内容消息。“reply_markup” 参数设置为 NULL,表示发送的消息没有附带键盘或交互元素。发送消息后,我们使用 “continue” 语句。它跳过当前正在处理的循环中的任何剩余代码,并移动到该循环的下一次迭代。这里的逻辑很简单:我们处理并转发对当前消息的响应。之后,我们几乎继续前进,在当前迭代中不再处理当前聊天或消息的任何进一步代码。编译后,我们得到的结果如下。
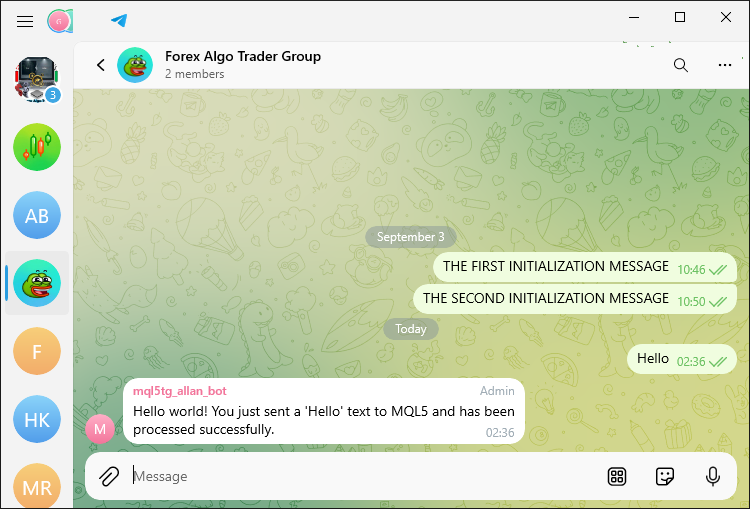
我们可以看到消息在几秒钟内被接收和处理。然后,让我们继续向我们的函数添加一个自定义回复键盘。
//+------------------------------------------------------------------+
//| Create a custom reply keyboard markup for Telegram               |
//+------------------------------------------------------------------+
string customReplyKeyboardMarkup(const string keyboard, const bool resize,
                           const bool one_time){
   // Construct the JSON string for the custom reply keyboard markup.
   // 'keyboard' specifies the layout of the custom keyboard.
   // 'resize' determines whether the keyboard should be resized to fit the screen.
   // 'one_time' specifies if the keyboard should disappear after being used once.

   // 'resize' > true: Resize the keyboard to fit the screen.
   // 'one_time' > true: The keyboard will disappear after the user has used it once.
   // 'selective' > false: The keyboard will be shown to all users, not just specific ones.

   string result = "{"
                   "\"keyboard\": " + UrlEncode(keyboard) + ", " //--- Encode and set the keyboard layout
                   "\"one_time_keyboard\": " + convertBoolToString(one_time) + ", " //--- Set whether the keyboard should disappear after use
                   "\"resize_keyboard\": " + convertBoolToString(resize) + ", " //--- Set whether the keyboard should be resized to fit the screen
                   "\"selective\": false" //--- Keyboard will be shown to all users
                   "}";

   return(result); //--- Return the JSON string for the custom reply keyboard
}
这里我们定义了函数 “customReplyKeyboardMarkup”,为 Telegram 创建一个自定义的回复键盘。该函数接受三个参数:keyboard、resize 和 one_time。keyboard 参数以 JSON 格式指定自定义键盘的布局。resize 参数决定是否调整键盘的大小以适应用户设备的屏幕。如果 resize 参数设置为 true,键盘将调整大小以适应用户设备的屏幕。one_time 参数指定键盘是否将成为“一次性”键盘,在用户与其交互后消失。
在函数中,构造了一个 JSON 字符串,表示自定义回复键盘标记。为了确保键盘参数对于 API 请求的格式正确,我们使用 “UrlEncode” 函数对其进行编码。接下来,我们依靠 “convertBoolToString” 函数将 resize 和 one_time 的布尔值(确定这些值是否应被视为 true 或 false)更改为它们的字符串表示形式。最后,构造的字符串从函数返回,并可用于对 Telegram 的 API 请求。我们使用的自定义函数如下。
//+------------------------------------------------------------------+
//| Convert boolean value to string                                 |
//+------------------------------------------------------------------+
string convertBoolToString(const bool _value){
   if(_value)
      return("true"); //--- Return "true" if the boolean value is true
   return("false"); //--- Return "false" if the boolean value is false
}
最后,为了在自定义键盘上隐藏和强制回复,我们使用以下函数。
//+------------------------------------------------------------------+
//| Create JSON for hiding custom reply keyboard                    |
//+------------------------------------------------------------------+
string hideCustomReplyKeyboard(){
   return("{\"hide_keyboard\": true}"); //--- JSON to hide the custom reply keyboard
}

//+------------------------------------------------------------------+
//| Create JSON for forcing a reply to a message                    |
//+------------------------------------------------------------------+
string forceReplyCustomKeyboard(){
   return("{\"force_reply\": true}"); //--- JSON to force a reply to the message
}
这里,“hideCustomReplyKeyboard” 和 “forceReplyCustomKeyboard” 函数生成 JSON 字符串,指定 Telegram 自定义键盘功能要采取的特定操作。
对于函数 “hideCustomReplyKeyboard”,它生成的JSON字符串为:“{\"hide_keyboard\": true}”。此 JSON 配置告诉 Telegram 在用户发送消息后隐藏回复键盘。本质上,此函数的作用是使键盘在消息发送后消失。
对于函数 “forceReplyCustomKeyboard”,其生成的JSON字符串为:“{\"force_reply\": true}”。这个字符串告诉 Telegram 在用户可以与聊天中的任何其他 UI 元素交互之前,需要用户的响应。此字符串用于让用户与刚刚发送的消息进行单独交互。
有了自定义回复键盘的函数,接下来我们来调用该函数在 Telegram 中构建回复键盘。
         //--- If the message is "Hello"
         if(text=="Hello"){
            string message="Hello world! You just sent a 'Hello' text to MQL5 and has been processed successfully.";

            //--- Send the response message
            sendMessageToTelegram(chat.member_id,message,customReplyKeyboardMarkup("[[\"Hello\"]]",false,false));
            continue;
         }
当我们在 Telegram 中发送消息时,我们得到以下结果。
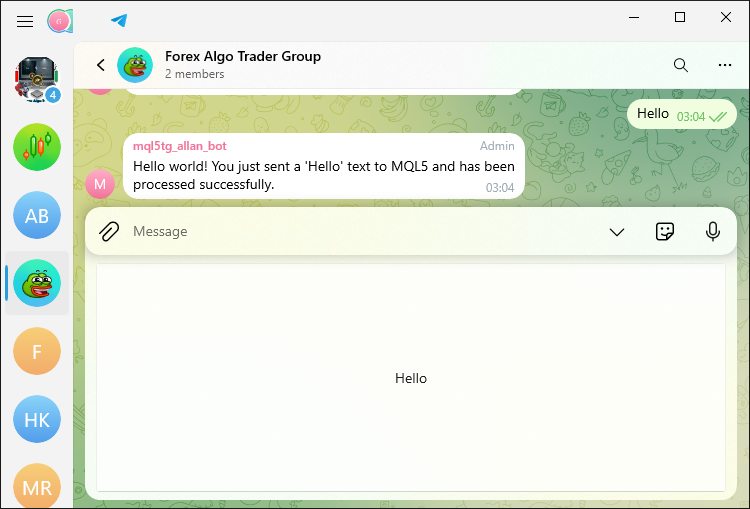
我们可以看到,这是成功的。现在,我们只需点击按钮即可发送消息。然而,它相当大。我们现在可以添加几个按钮。首先,让我们以行格式添加按钮。
            string message="Hello world! You just sent a 'Hello' text to MQL5 and has been processed successfully.";
            string buttons_rows = "[[\"Hello 1\"],[\"Hello 2\"],[\"Hello 3\"]]";
            //--- Send the response message
            sendMessageToTelegram(chat.member_id,message,customReplyKeyboardMarkup(buttons_rows,false,false));
            continue;
在这里,我们使用变量 “buttons_rows” 定义自定义回复键盘布局。此字符串 “[[\"Hello 1\"],[\"Hello 2\"],[\"Hello 3\"]]” 表示一个带有三个按钮的键盘,每个按钮分别标记为 “Hello 1”、“Hello 2” 和 “Hello 3”。这个字符串的格式是 JSON,Telegram 使用它来渲染键盘。运行后,我们得到以下结果。
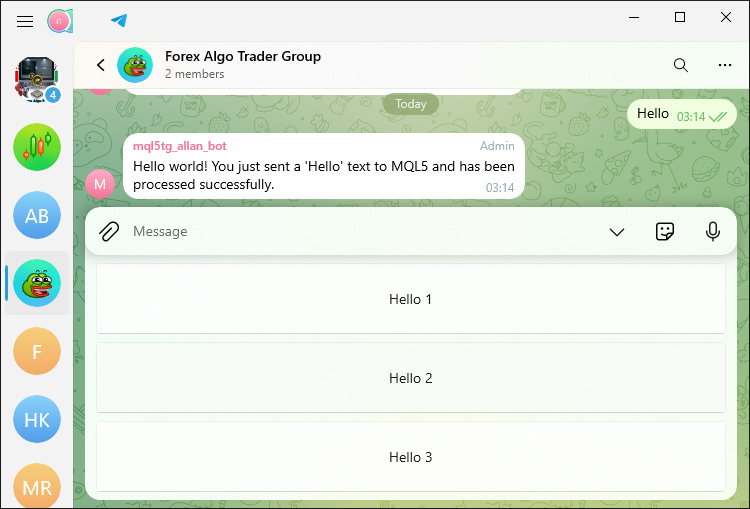
为了以列格式可视化键盘布局,我们实现了以下逻辑。
            string message="Hello world! You just sent a 'Hello' text to MQL5 and has been processed successfully.";
            string buttons_rows = "[[\"Hello 1\",\"Hello 2\",\"Hello 3\"]]";
            //--- Send the response message
            sendMessageToTelegram(chat.member_id,message,customReplyKeyboardMarkup(buttons_rows,false,false));
运行程序后,我们收到以下输出。
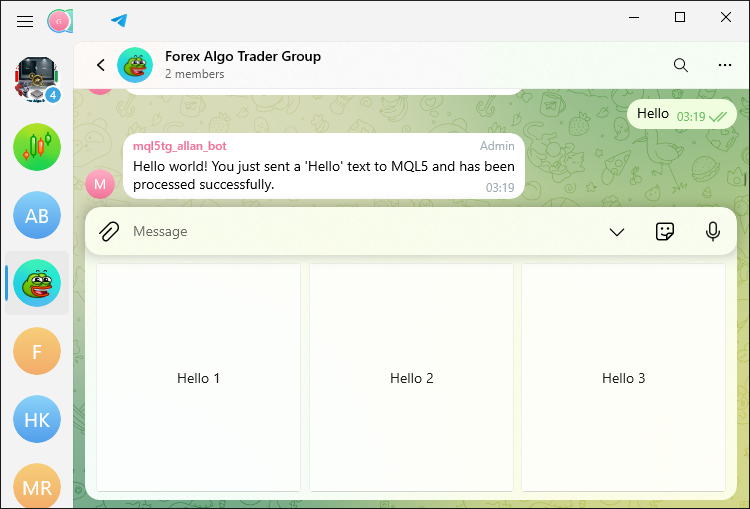
我们可以看到,我们收到的布局是柱状的,这意味着这个过程是成功的。我们现在可以继续创建更复杂的命令。首先,让我们有一个用户可以快速处理的自定义命令列表。
         //--- If the message is "/start", "/help", "Start", or "Help"
         if(text=="/start" || text=="/help" || text=="Start" || text=="Help"){
            //chat.member_state=0; //--- Reset the chat state
            string message="I am a BOT \xF680 and I work with your MT5 Forex trading account.\n";
            message+="You can control me by sending these commands \xF648 :\n";
            message+="\nInformation\n";
            message+="/name - get EA name\n";
            message+="/info - get account information\n";
            message+="/quotes - get quotes\n";
            message+="/screenshot - get chart screenshot\n";
            message+="\nTrading Operations\n";
            message+="/buy - open buy position\n";
            message+="/close - close a position\n";
            message+="\nMore Options\n";
            message+="/contact - contact developer\n";
            message+="/join - join our MQL5 community\n";

            //--- Send the response message with the main keyboard
            sendMessageToTelegram(chat.member_id,message,customReplyKeyboardMarkup(KEYB_MAIN,false,false));
            continue;
         }
在这里,我们验证传入的消息是否属于预定的命令 “/start”、“/help”、“Start” 和 “Help”。如果是这些命令之一,我们会准备一封欢迎信,向用户介绍机器人,并提供可以发送给机器人与之交互的命令列表。我们省略了此列表的部分内容,并对其他部分进行了分类,以便用户了解他们可以使用机器人做什么。最后,我们将此消息与自定义键盘一起发送回用户,该键盘比命令行更适合与机器人交互。我们还定义了自定义键盘如下。
   #define EMOJI_CANCEL "\x274C" //--- Cross mark emoji
   #define KEYB_MAIN    "[[\"Name\"],[\"Account Info\"],[\"Quotes\"],[\"More\",\"Screenshot\",\""+EMOJI_CANCEL+"\"]]" //--- Main keyboard layout
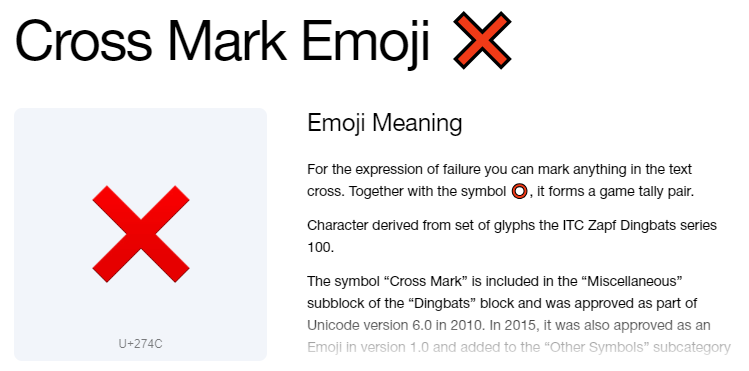
我们使用宏 #define 来定义将在 Telegram 机器人的用户界面中使用的两个元素。首先,我们将 “EMOJI_CANCEL” 定义为十字标记表情符号,使用其 Unicode 表示形式 “\x274C”。我们将在键盘布局中使用此表情符号来表示“取消”选项。表情符号的 Unicode 表示如下所示:
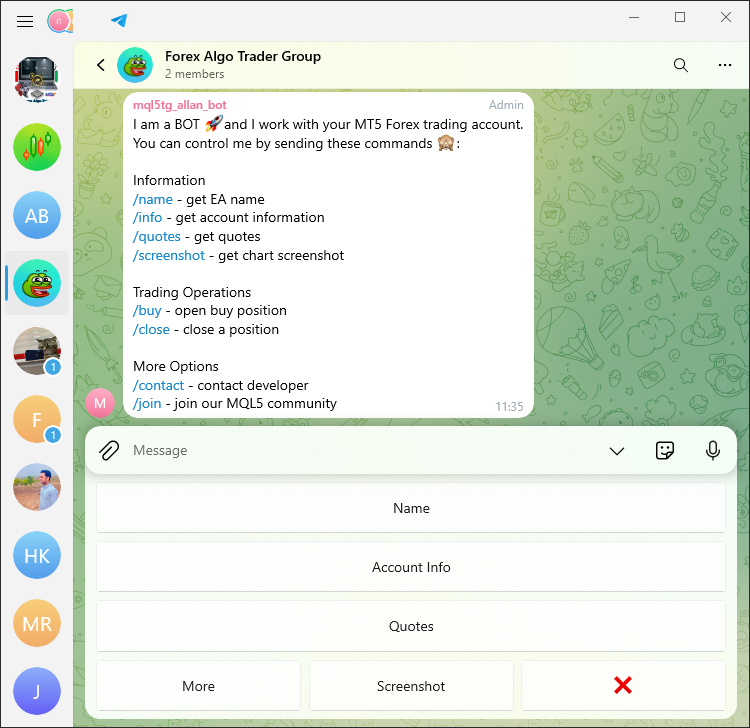
接下来,我们定义 “KEYB_MAIN”,它表示机器人的主键盘布局。键盘的结构是一个带有按钮行的 JSON 数组。布局包括命令列表中的选项,即“名称”、“帐户信息”、“报价”以及一行“更多”、“屏幕截图”和 “EMOJI_CANCEL”表示的“取消”按钮。该键盘将显示给用户,允许他们通过按下这些按钮而不是手动键入命令与机器人进行交互。当我们运行程序时,我们得到以下输出。
我们现在有 JSON 格式的自定义键盘和可以发送给机器人的命令列表。现在剩下的就是根据从 Telegram 收到的命令制作相应的响应。我们将首先回复 “/name” 命令。
         //--- If the message is "/name" or "Name"
         if (text=="/name" || text=="Name"){
            string message = "The file name of the EA that I control is:\n";
            message += "\xF50B"+__FILE__+" Enjoy.\n";
            sendMessageToTelegram(chat.member_id,message,NULL);
         }
在这里,我们验证从用户收到的消息是 “/name” 还是 “Name”。如果此检查得出肯定结果,我们就会着手构建对用户的回复,其中包含当前正在使用的 EA 交易文件的名称。我们初始化一个名为 “message” 的字符串变量,它以文本“我控制的 EA 的文件名是:\n”开头。我们在这个初始声明后面加上一本书的表情符号(用代码“\xF50B”表示)和 EA 文件的名称。
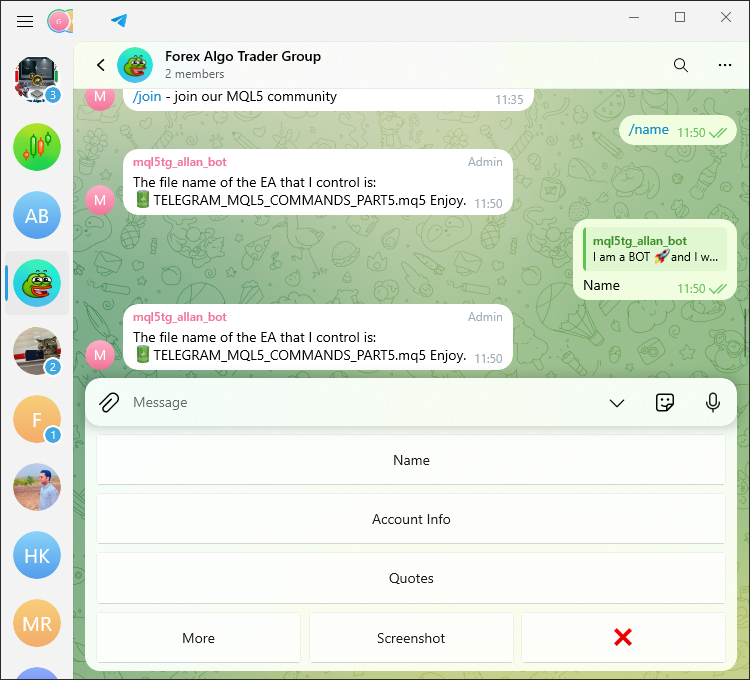
我们使用内置的 MQL5 宏“__FILE__”来获取文件的名称。这个宏返回文件的名称和路径。然后,我们构造一条要发送给用户的消息。该消息由 EA 文件的名称及其路径组成。我们使用 “sendMessageToTelegram” 函数发送构造的消息。此函数有三个参数:第一个参数是我们要向其发送消息的用户的聊天 ID;第二个参数是消息本身;第三个参数设置为“NULL”,表示我们不会随消息发送任何自定义键盘或按钮命令。这很重要,因为我们不想创建额外的键盘。当我们点击“/name”命令或其按钮时,我们会收到如下所示的相应响应。
成功了,同样,我们设计了对账户信息和报价命令的相应响应。这是通过以下代码片段实现的。
         //--- If the message is "/info" or "Account Info"
         ushort MONEYBAG = 0xF4B0; //--- Define money bag emoji
         string MONEYBAGcode = ShortToString(MONEYBAG); //--- Convert emoji to string
         if(text=="/info" || text=="Account Info"){
            string currency=AccountInfoString(ACCOUNT_CURRENCY); //--- Get the account currency
            string message="\x2733\Account No: "+(string)AccountInfoInteger(ACCOUNT_LOGIN)+"\n";
            message+="\x23F0\Account Server: "+AccountInfoString(ACCOUNT_SERVER)+"\n";
            message+=MONEYBAGcode+"Balance: "+(string)AccountInfoDouble(ACCOUNT_BALANCE)+" "+currency+"\n";
            message+="\x2705\Profit: "+(string)AccountInfoDouble(ACCOUNT_PROFIT)+" "+currency+"\n";

            //--- Send the response message
            sendMessageToTelegram(chat.member_id,message,NULL);
            continue;
         }

         //--- If the message is "/quotes" or "Quotes"
         if(text=="/quotes" || text=="Quotes"){
            double Ask = SymbolInfoDouble(_Symbol,SYMBOL_ASK); //--- Get the current ask price
            double Bid = SymbolInfoDouble(_Symbol,SYMBOL_BID); //--- Get the current bid price
            string message="\xF170 Ask: "+(string)Ask+"\n";
            message+="\xF171 Bid: "+(string)Bid+"\n";

            //--- Send the response message
            sendMessageToTelegram(chat.member_id,message,NULL);
            continue;
         }
对于交易操作命令,特别是开立买入头寸,我们使用以下逻辑。
         //--- If the message is "/buy" or "Buy"
         if (text=="/buy" || text=="Buy"){
            CTrade obj_trade; //--- Create a trade object
            double Ask = SymbolInfoDouble(_Symbol,SYMBOL_ASK); //--- Get the current ask price
            double Bid = SymbolInfoDouble(_Symbol,SYMBOL_BID); //--- Get the current bid price
            obj_trade.Buy(0.01,NULL,0,Bid-300*_Point,Bid+300*_Point); //--- Open a buy position
            double entry=0,sl=0,tp=0,vol=0;
            ulong ticket = obj_trade.ResultOrder(); //--- Get the ticket number of the new order
            if (ticket > 0){
               if (PositionSelectByTicket(ticket)){ //--- Select the position by ticket
                  entry=PositionGetDouble(POSITION_PRICE_OPEN); //--- Get the entry price
                  sl=PositionGetDouble(POSITION_SL); //--- Get the stop loss price
                  tp=PositionGetDouble(POSITION_TP); //--- Get the take profit price
                  vol=PositionGetDouble(POSITION_VOLUME); //--- Get the volume
               }
            }
            string message="\xF340\Opened BUY Position:\n";
            message+="Ticket: "+(string)ticket+"\n";
            message+="Open Price: "+(string)entry+"\n";
            message+="Lots: "+(string)vol+"\n";
            message+="SL: "+(string)sl+"\n";
            message+="TP: "+(string)tp+"\n";

            //--- Send the response message
            sendMessageToTelegram(chat.member_id,message,NULL);
            continue;
         }
这里我们处理用户发送消息“/buy”或者“Buy”的场景。我们的第一步是创建一个名为 “obj_trade” 的 CTrade 对象,我们将使用它来执行交易操作。然后,我们通过调用 SymbolInfoDouble 函数获取当前的卖价和买价。为了建立买入仓位,我们使用 CTrade 对象的 Buy 函数。我们将交易量设定为 0.01 手。对于我们的 SL(止损)和 TP(止盈),我们分别设置买入价减 300 点和买入价加 300 点。
一旦开仓,我们通过 “ResultOrder” 函数确定新订单的单号。有了单号,我们使用 PositionGetInteger 函数按单号选择位置。然后,我们获取重要统计数据,例如入场价、交易量、止损和止盈。使用这些数字,我们构建一条消息,通知用户他们已经开设了买入仓位。为了处理仓位关闭和联系命令,我们使用以下类似的逻辑。
         //--- If the message is "/close" or "Close"
         if (text=="/close" || text=="Close"){
            CTrade obj_trade; //--- Create a trade object
            int totalOpenBefore = PositionsTotal(); //--- Get the total number of open positions before closing
            obj_trade.PositionClose(_Symbol); //--- Close the position for the symbol
            int totalOpenAfter = PositionsTotal(); //--- Get the total number of open positions after closing
            string message="\xF62F\Closed Position:\n";
            message+="Total Positions (Before): "+(string)totalOpenBefore+"\n";
            message+="Total Positions (After): "+(string)totalOpenAfter+"\n";

            //--- Send the response message
            sendMessageToTelegram(chat.member_id,message,NULL);
            continue;
         }

         //--- If the message is "/contact" or "Contact"
         if (text=="/contact" || text=="Contact"){
            string message="Contact the developer via link below:\n";
            message+="https://t.me/Forex_Algo_Trader";

            //--- Send the contact message
            sendMessageToTelegram(chat.member_id,message,NULL);
            continue;
         }
现在很明显,我们可以响应 Telegram 发送的命令。到目前为止,我们只发送纯文本消息。让我们更花哨一点,使用 HTML 实体来格式化我们的文本消息,它也可以是 Markdown 。您可以选择!
         //--- If the message is "/join" or "Join"
         if (text=="/join" || text=="Join"){
            string message="You want to be part of our MQL5 Community?\n";
            message+="Welcome! <a href=\"https://t.me/forexalgo_trading\">Click me</a> to join.\n";
            message+="<s>Civil Engineering</s> Forex AlgoTrading\n";//strikethrough
            message+="<pre>This is a sample of our MQL5 code</pre>\n";//preformat
            message+="<u><i>Remember to follow community guidelines!\xF64F\</i></u>\n";//italic, underline
            message+="<b>Happy Trading!</b>\n";//bold

            //--- Send the join message
            sendMessageToTelegram(chat.member_id,message,NULL);
            continue;
         }
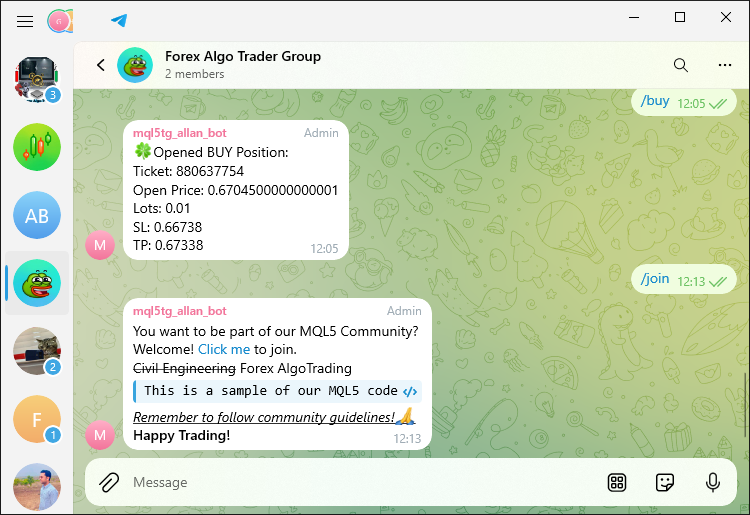
在这里,当用户发送消息 “/join” 或 “Join” 时,我们会对其进行回应。我们首先制作一条消息,邀请用户加入 MQL5 社区。该消息包含一个超链接,用户可以点击该超链接加入社区,以及如何使用 Telegram 中的 HTML 标签格式化文本的几个示例:
- 删除线文本:我们使用 <s> 标签删除“土木工程”字样,并强调我们专注于“外汇算法交易”。
- 预格式化文本:<pre> 标签用于在预格式化的文本块中显示 MQL5 代码示例。
- 斜体和下划线文本:<u> 和 <i> 标记组合在一起,以下划线和斜体提醒用户遵守社区准则,并添加 Unicode 表情符号进行强调。
- 粗体文字:<b> 标签用于加粗结尾语句“交易愉快!”
最后,我们使用 “sendMessageToTelegram” 函数通过 Telegram 将此格式化的消息发送给用户,确保用户收到格式良好且引人入胜的邀请,加入 MQL5 社区。运行后,我们得到以下输出。
现在我们已经用完了命令列表,让我们继续修改回复键盘,并在单击“更多”按钮后生成一个新的回复键盘。实现了如下逻辑。
         //--- If the message is "more" or "More"
         if (text=="more" || text=="More"){
            chat.member_state=1; //--- Update chat state to show more options
            string message="Choose More Options Below:";

            //--- Send the more options message with the more options keyboard
            sendMessageToTelegram(chat.member_id,message,customReplyKeyboardMarkup(KEYB_MORE,false,true));
            continue;
         }
当我们收到用户的 “more” 或 “More” 消息时,我们将其视为更新当前对话上下文的信号。在聊天机器人的世界里,这条消息表明用户对当前的选项数量不满意,或者到目前为止还没有找到他们想要的东西。因此,我们对用户的回应必须提供不同的选择。实际上,这意味着我们向用户发送一条具有新键盘布局的新消息。“KEYB_MORE” 如下图所示:
   #define EMOJI_UP    "\x2B06" //--- Upwards arrow emoji
   #define KEYB_MORE "[[\""+EMOJI_UP+"\"],[\"Buy\",\"Close\",\"Next\"]]" //--- More options keyboard layout
当我们运行程序时,我们得到以下输出。
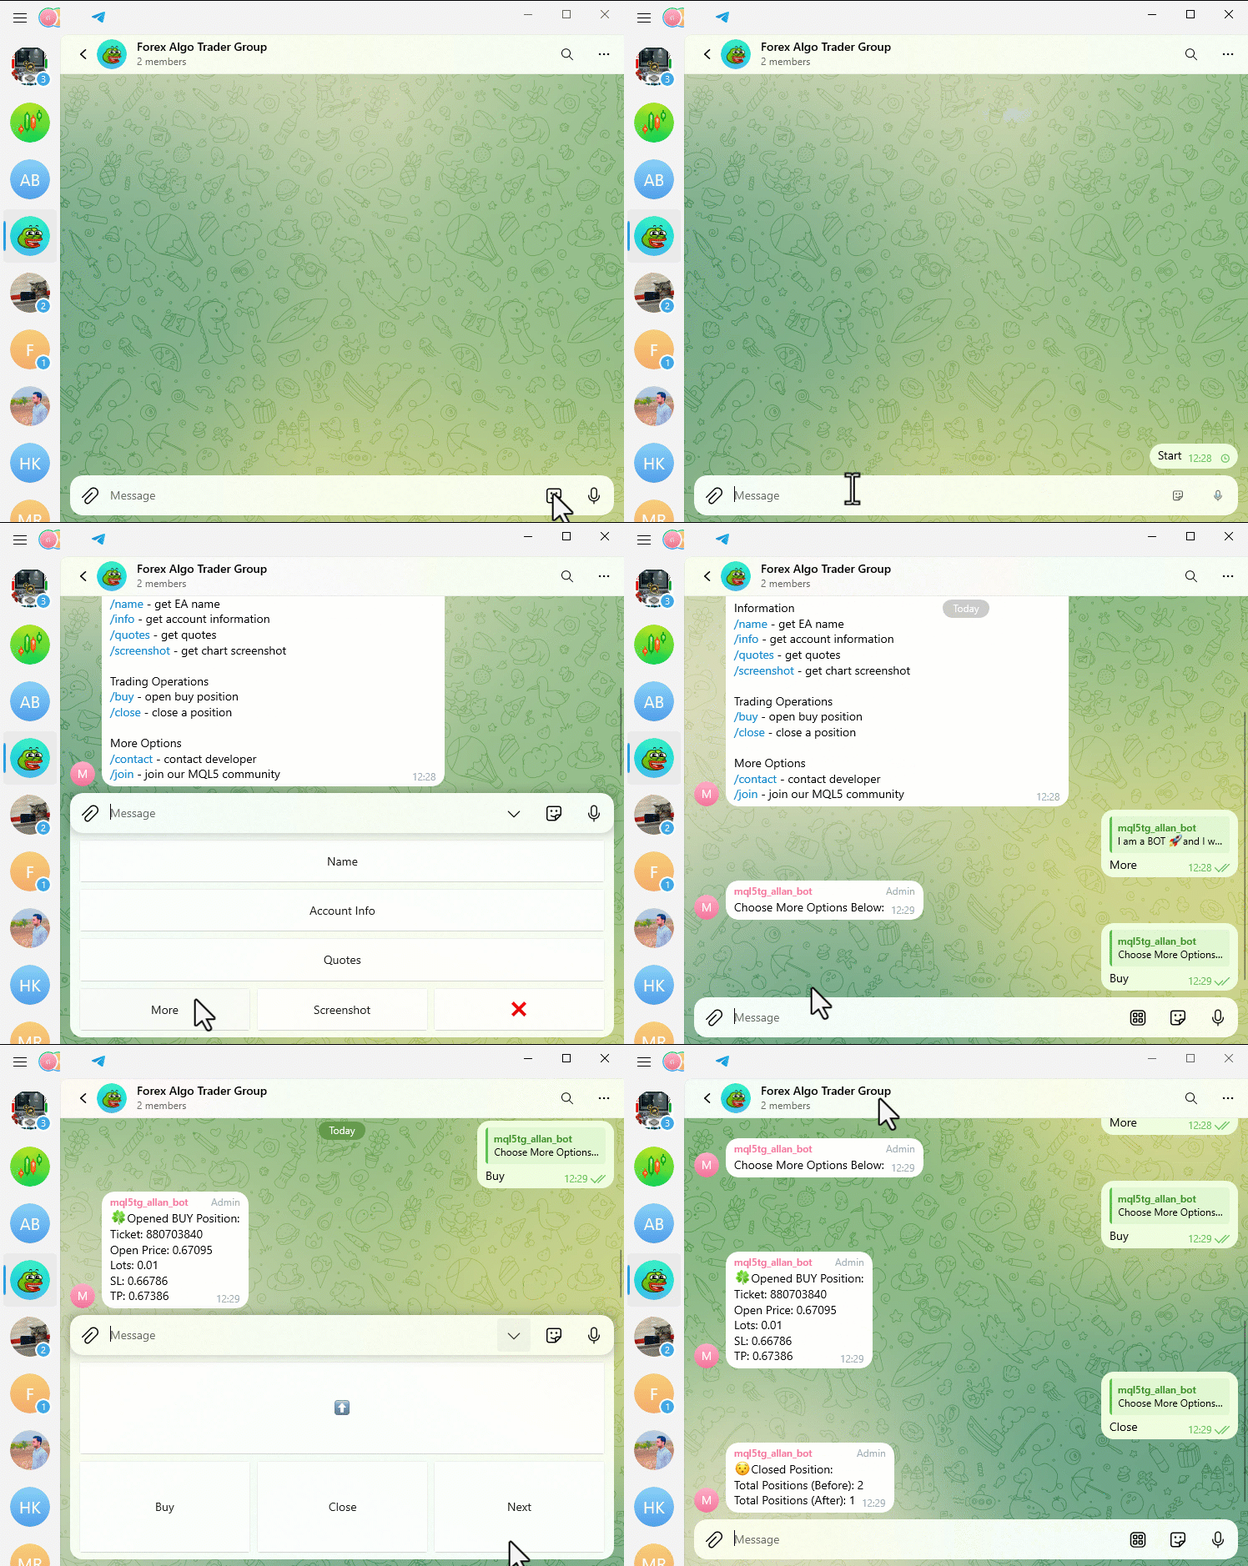
成功了,我们同样可以处理其他命令。
         //--- If the message is the up emoji
         if(text==EMOJI_UP){
            chat.member_state=0; //--- Reset chat state
            string message="Choose a menu item:";

            //--- Send the message with the main keyboard
            sendMessageToTelegram(chat.member_id,message,customReplyKeyboardMarkup(KEYB_MAIN,false,false));
            continue;
         }

         //--- If the message is "next" or "Next"
         if(text=="next" || text=="Next"){
            chat.member_state=2; //--- Update chat state to show next options
            string message="Choose Still More Options Below:";

            //--- Send the next options message with the next options keyboard
            sendMessageToTelegram(chat.member_id,message,customReplyKeyboardMarkup(KEYB_NEXT,false,true));
            continue;
         }

         //--- If the message is the pistol emoji
         if (text==EMOJI_PISTOL){
            if (chat.member_state==2){
               chat.member_state=1; //--- Change state to show more options
               string message="Choose More Options Below:";

               //--- Send the message with the more options keyboard
               sendMessageToTelegram(chat.member_id,message,customReplyKeyboardMarkup(KEYB_MORE,false,true));
            }
            else {
               chat.member_state=0; //--- Reset chat state
               string message="Choose a menu item:";

               //--- Send the message with the main keyboard
               sendMessageToTelegram(chat.member_id,message,customReplyKeyboardMarkup(KEYB_MAIN,false,false));
            }
            continue;
         }

         //--- If the message is the cancel emoji
         if (text==EMOJI_CANCEL){
            chat.member_state=0; //--- Reset chat state
            string message="Choose /start or /help to begin.";

            //--- Send the cancel message with hidden custom reply keyboard
            sendMessageToTelegram(chat.member_id,message,hideCustomReplyKeyboard());
            continue;
         }
在这里,我们处理不同的用户消息来控制聊天界面。当用户发送向上表情符号时,我们将其作为一个信号,并将聊天状态重置为 0,提示用户再次选择菜单项,并伴随主键盘布局。当用户发送 “next” 或 “Next” 时,我们会将聊天状态更新为 2,并指示用户再次选择菜单项,这次是从显示其他选项的键盘布局中选择。
对于手枪表情符号,我们根据其当前值调整聊天状态:如果状态为 2,我们将其切换为 1,并显示更多选项键盘;如果状态不同,我们将其切换到 0 并显示主菜单键盘。对于取消表情符号,我们将聊天状态重置为 0,并向用户发送一条消息,告诉他们选择 “/start” 或 “/help” 开始。我们使用隐藏的自定义回复键盘发送此消息,以清除用户的任何活动自定义键盘。使用的额外自定义布局如下:
   #define EMOJI_PISTOL   "\xF52B" //--- Pistol emoji
   #define KEYB_NEXT "[[\""+EMOJI_UP+"\",\"Contact\",\"Join\",\""+EMOJI_PISTOL+"\"]]" //--- Next options keyboard layout
到目前为止,一切都已完成。我们只需处理截图命令,仅此而已。实现以下逻辑来处理图表图像的接收模式。键盘布局将用于此目的,而不必手动键入。
         //--- If the message is "/screenshot" or "Screenshot"
         static string symbol = _Symbol; //--- Default symbol
         static ENUM_TIMEFRAMES period = _Period; //--- Default period
         if (text=="/screenshot" || text=="Screenshot"){
            chat.member_state = 10; //--- Set state to screenshot request
            string message="Provide a symbol like 'AUDUSDm'";

            //--- Send the message with the symbols keyboard
            sendMessageToTelegram(chat.member_id,message,customReplyKeyboardMarkup(KEYB_SYMBOLS,false,false));
            continue;
         }

         //--- Handle state 10 (symbol selection for screenshot)
         if (chat.member_state==10){
            string user_symbol = text; //--- Get the user-provided symbol
            if (SymbolSelect(user_symbol,true)){ //--- Check if the symbol is valid
               chat.member_state = 11; //--- Update state to period request
               string message = "CORRECT: Symbol is found\n";
               message += "Now provide a Period like 'H1'";
               symbol = user_symbol; //--- Update symbol

               //--- Send the message with the periods keyboard
               sendMessageToTelegram(chat.member_id,message,customReplyKeyboardMarkup(KEYB_PERIODS,false,false));
            }
            else {
               string message = "WRONG: Symbol is invalid\n";
               message += "Provide a correct symbol name like 'AUDUSDm' to proceed.";

               //--- Send the invalid symbol message with the symbols keyboard
               sendMessageToTelegram(chat.member_id,message,customReplyKeyboardMarkup(KEYB_SYMBOLS,false,false));
            }
            continue;
         }

         //--- Handle state 11 (period selection for screenshot)
         if (chat.member_state==11){
            bool found=false; //--- Flag to check if period is valid
            int total=ArraySize(periods); //--- Get the number of defined periods
            for(int k=0; k<total; k++){
               string str_tf=StringSubstr(EnumToString(periods[k]),7); //--- Convert period enum to string
               if(StringCompare(str_tf,text,false)==0){ //--- Check if period matches
                  ENUM_TIMEFRAMES user_period=periods[k]; //--- Set user-selected period
                  period = user_period; //--- Update period
                  found=true;
                  break;
               }
            }
            if (found){
               string message = "CORRECT: Period is valid\n";
               message += "Screenshot sending process initiated \xF60E";

               //--- Send the valid period message with the periods keyboard
               sendMessageToTelegram(chat.member_id,message,customReplyKeyboardMarkup(KEYB_PERIODS,false,false));
               string caption = "Screenshot of Symbol: "+symbol+
                                " ("+EnumToString(ENUM_TIMEFRAMES(period))+
                                ") @ Time: "+TimeToString(TimeCurrent());

               //--- Send the screenshot to Telegram
               sendScreenshotToTelegram(chat.member_id,symbol,period,caption);
            }
            else {
               string message = "WRONG: Period is invalid\n";
               message += "Provide a correct period like 'H1' to proceed.";

               //--- Send the invalid period message with the periods keyboard
               sendMessageToTelegram(chat.member_id,message,customReplyKeyboardMarkup(KEYB_PERIODS,false,false));
            }
            continue;
         }
在这里,我们通过管理聊天流的不同状态来处理用户对图表截图的请求。当用户发送命令 “/screenshot” 或 “Screenshot” 时,我们将聊天状态设置为 10,并通过显示带有可用符号的键盘提示用户输入符号。这里需要注意的是,聊天状态可以是任何数字,甚至是1000。它只是作为一个标识符或量词来存储我们在响应处理过程中记住的状态。如果用户提供了一个交易品种,我们会检查它的有效性。如果有效,我们会通过显示带有可用周期选项的键盘来向用户询问时段(图表的有效“时间”)。如果用户提供了无效交易品种,我们会通知他们并提示他们提供有效的交易品种。
当用户输入时间范围时,我们会检查它是否有效。如果时间范围是预定义的有效选项之一,我们将继续更新聊天状态并转发用户对最后一个有效标题中给出的交易品种的屏幕截图的请求,以及我们开始的隐含 “if-then” 语句所需的即时履行详细信息 - 并在我们的后端启动屏幕截图过程。另一方面,如果用户提供的时间范围与有效的预定义选项之一不匹配,我们只会让用户知道输入是错误的,重复我们根据初始输入请求显示的有效选项。我们使用的交易品种和周期以及时间范围数组的自定义回复键盘定义如下。
   #define KEYB_SYMBOLS "[[\""+EMOJI_UP+"\",\"AUDUSDm\",\"AUDCADm\"],[\"EURJPYm\",\"EURCHFm\",\"EURUSDm\"],[\"USDCHFm\",\"USDCADm\",\""+EMOJI_PISTOL+"\"]]" //--- Symbol selection keyboard layout
   #define KEYB_PERIODS "[[\""+EMOJI_UP+"\",\"M1\",\"M15\",\"M30\"],[\""+EMOJI_CANCEL+"\",\"H1\",\"H4\",\"D1\"]]" //--- Period selection keyboard layout

   //--- Define timeframes array for screenshot requests
   const ENUM_TIMEFRAMES periods[] = {PERIOD_M1,PERIOD_M15,PERIOD_M30,PERIOD_H1,PERIOD_H4,PERIOD_D1};
到目前为止,我们已经准备好了完全定制的键盘和回复。为了确定这一点,我们运行该程序。以下是我们得到的输出结果。
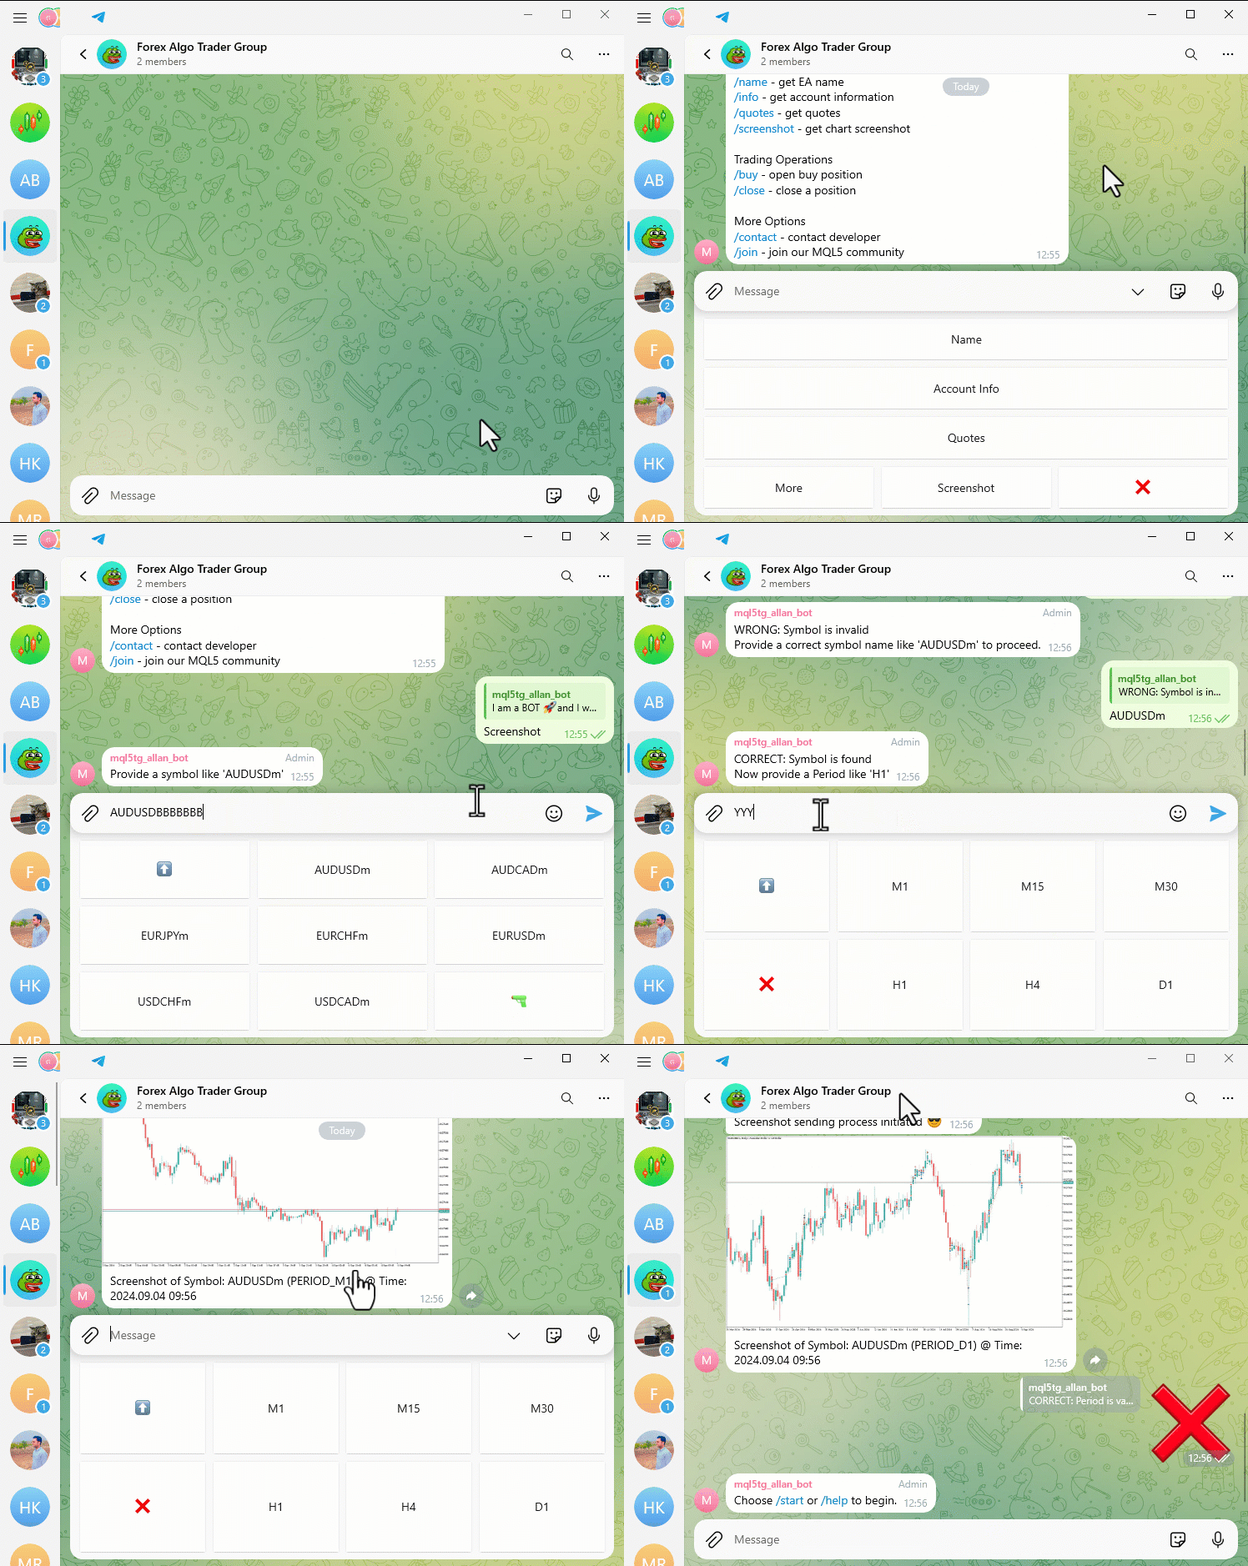
在这里,我们可以看到屏幕截图发送过程已经启动并完成。任何无效的命令或输入都会以一种确保用户只发送有效命令的方式进行处理。为了确保一切按预期进行,并找出任何由此产生的局限性,我们需要彻底测试实现。这将在下一节中完成。
测试实现
测试是验证我们创建的程序是否按预期运行的关键阶段。因此,我们需要检查它是否正常工作。我们做的第一件事是在链接响应中启用网页预览。允许在链接中预览网页,使用户在点击之前可以预览内容。他们看到的标题和图片通常能很好地传达链接页面的内容。从用户体验的角度来看,这是很好的,尤其是当你考虑到通常很难仅从链接本身的文本来判断链接的质量时。因此,我们将禁用预览设置为 false,如下所示。
//+------------------------------------------------------------------+
//| Send a message to Telegram                                      |
//+------------------------------------------------------------------+
int sendMessageToTelegram( ... ){

   //--- ...

   params+="&disable_web_page_preview=false"; //--- Enable web page preview in the message

   //--- ...

}
一旦我们运行了这个,我们就会得到以下输出。
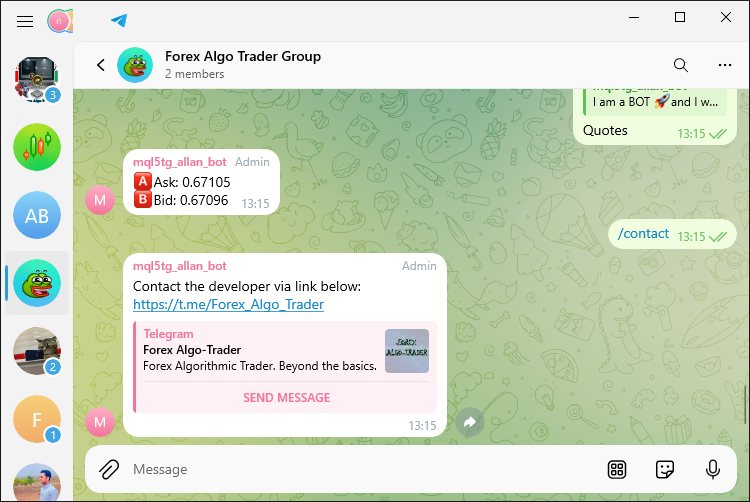
我们现在可以接收网页预览,如图所示。成功了,然后,我们可以将格式实体或解析模式从超文本标记语言(HTML)更改为 Markdown,如下所示:
//+------------------------------------------------------------------+
//| Send a message to Telegram                                      |
//+------------------------------------------------------------------+
int sendMessageToTelegram( ... ){

   //--- ...

   params+="&parse_mode=Markdown"; //--- Set parse mode to Markdown (can also be HTML)

   //--- ...

}
在 markdown 解析模式下,我们需要用 markdown 实体改变我们初始代码的整个格式结构。正确的形式如下。
      //--- If the message is "/join" or "Join"
      if (text=="/join" || text=="Join"){
         string message = "You want to be part of our MQL5 Community?\n";
         message += "Welcome! [Click me](https://t.me/forexalgo_trading) to join.\n"; // Link
         message += "~Civil Engineering~ Forex AlgoTrading\n"; // Strikethrough
         message += "```\nThis is a sample of our MQL5 code\n```"; // Preformatted text
         message += "*_Remember to follow community guidelines! \xF64F_*"; // Italic and underline
         message += "**Happy Trading!**\n"; // Bold

         //--- Send the join message
         sendMessageToTelegram(chat.member_id, message, NULL);
         continue;
      }
以下是我们所做的更改:
- 链接:在 Markdown 中,链接是用 [text](URL) 而不是 <a href="URL">text</a> 创建的。
- 删除线:使用 ~text~ 代替 <s>text</s> 来添加删除线。
- 预格式化的文本:使用三重反引号(```)来格式化预格式化的文本,而不是 <pre>text</pre>。
- 斜体和下划线:Markdown 本身不支持下划线。您能获得的最接近的结果是带有 *text* 或 _text_ 的斜体。Markdown 不直接支持 HTML 的下划线效果,因此如果需要,可以将其包含在占位符中。
- 粗体:使用双星号 **text** 表示粗体,而不是 <b>text</b>。
当我们运行程序时,我们收到以下输出。
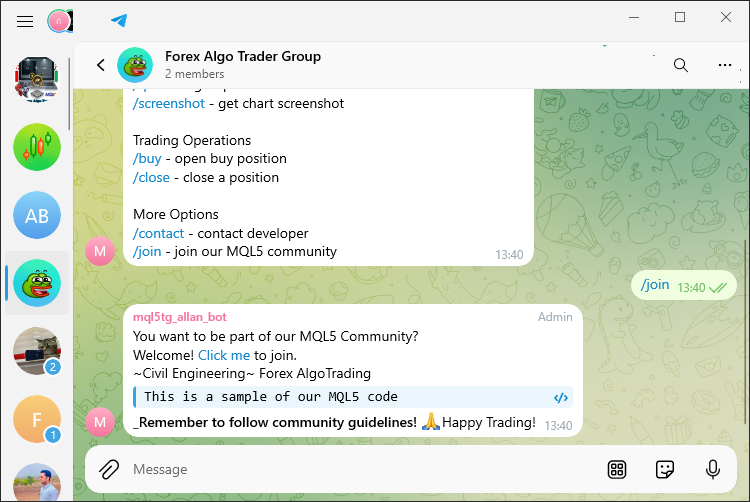
为了演示测试过程,我们准备了一段视频来展示该程序的实际应用。这段视频说明了我们运行的不同测试用例,并强调了程序如何响应各种输入,以及它执行必要任务的情况。当你观看此视频时,你会对测试过程有一个非常清晰的了解,毫无疑问,你会看到实现符合预期的要求。视频如下。
总之,如所附视频所示,成功执行和验证实现确认了该计划按预期运行。
结论
总而言之,我们创建的 EA 交易将 MetaQuotes Language 5 (MQL5) 语言(以及 MetaTrader 5 交易平台)与 Telegram 消息应用程序集成在一起,使用户可以与他们的交易机器人进行对话。为什么不呢?Telegram 已经成为一种强大的、用户友好的控制自动交易系统的方式。使用它,可以实时发送命令并从系统接收响应。
在我们的案例中,我们确保不是等待 EA 交易与将通信中继给用户的 Telegram 机器人进行通信,而是连接两个机器人并随时与 EA 交易进行通信,而不必等待信号生成。我们在用户和机器人之间建立了一系列对话。我们确保用户通过 Telegram 发送的 MQL5 命令被正确解释。经过大量测试后,我们可以自信地说,我们的 EA 交易既可靠又强大。
本文由MetaQuotes Ltd译自英文
原文地址: https://www.mql5.com/en/articles/15750
注意: MetaQuotes Ltd.将保留所有关于这些材料的权利。全部或部分复制或者转载这些材料将被禁止。
本文由网站的一位用户撰写,反映了他们的个人观点。MetaQuotes Ltd 不对所提供信息的准确性负责,也不对因使用所述解决方案、策略或建议而产生的任何后果负责。
 在MQL5中创建交易管理员面板(第四部分):登录安全层
 重构经典策略(第十部分):人工智能(AI)能否为MACD提供动力?
 开发回放系统(第 63 部分):玩转服务(四)
 您应当知道的 MQL5 向导技术(第 38 部分):布林带
令人印象深刻的作品
这使得以下功能得以实现:
向电报发送交易视图警报
电传至 MQL5
THX!
你好,Allan,感谢你写了这篇很棒的文章。
遗憾的是,在从 JSON 对象中提取消息详细信息时,代码似乎从第 1384 行开始就中断了。第 1383 行的第一段代码
但消息 ID、消息日期和所有其他实例都返回空值。由于这些问题,代码中似乎没有任何预期的功能。
您能帮助解决这个问题吗?
再次感谢您花时间提供这篇文章。
你好,艾伦,感谢你的精彩文章。
遗憾的是,在从 JSON 对象中提取消息详细信息时,代码似乎从第 1384 行开始就中断了。第 1383 行的第一段代码
但消息 ID、消息日期和所有其他实例都返回空值。由于这些问题,代码中似乎没有任何预期的功能。
能否请您帮助解决这些问题?
再次感谢您花时间提供这篇文章。
你好,Allan,我终于找到了问题所在。感谢您提供这篇出色的文章!
你好,艾伦,我终于找到了问题所在。感谢您的精彩文章!
我在编译时出现了以下错误:
----------------------------------------------------------------------------------------------------------------------------
ArrayAdd'--没有一个重载可以应用于函数调用 TELEGRAM_MQL5_COMMANDS_PART5.mq5 1151 4
可能是 2 个函数之一 TELEGRAM_MQL5_COMMANDS_PART5.mq5 1151 4
void ArrayAdd(uchar&[],const uchar&[]) TELEGRAM_MQL5_COMMANDS_PART5.mq5 1186 6
void ArrayAdd(char&[],const string) TELEGRAM_MQL5_COMMANDS_PART5.mq5 1200 6
ArrayAdd'--没有一个重载可以应用于函数调用 TELEGRAM_MQL5_COMMANDS_PART5.mq5 1223 7
可能是 2 个函数之一 TELEGRAM_MQL5_COMMANDS_PART5.mq5 1223 7
void ArrayAdd(uchar&[],const uchar&[]) TELEGRAM_MQL5_COMMANDS_PART5.mq5 1186 6
void ArrayAdd(char&[],const string) TELEGRAM_MQL5_COMMANDS_PART5.mq5 1200 6
2 个错误,0 个警告 2 0