
Gráficos en la biblioteca DoEasy (Parte 77): Clase de objeto Sombra

Contenido
- Concepto
- Mejorando las clases de la biblioteca
- Clase de objeto de sombra
- Simulación
- ¿Qué es lo próximo?
Concepto
Al crear el objeto de formulario del artículo anterior, tocamos de refilón el tema de la creación de la sombra para este objeto. Además, creamos una plantilla de prueba del objeto, donde construiremos las sombras. En el artículo de hoy, vamos a desarrollar y perfeccionar este concepto para usarlo junto con el objeto de formulario como su componente constante. El objeto de formulario tendrá la capacidad de usar la sombra del objeto tan pronto como sea necesario crear el mismo, dibujando la forma de la sombra y mostrándolo en la pantalla.
Hemos analizado dos variantes para dibujar las sombras de los objetos:
- directamente en el lienzo del objeto de formulario en sí,
- sobre un objeto separado "que yace" debajo del objeto de formulario.
Hemos elegido la segunda opción, porque su implementación es más simple. La desventaja del método es que tenemos que administrar un objeto adicional. La ventaja del método es que podemos implementar rápidamente cualquier cambio (por ejemplo, la modificación de las coordenadas de ubicación de la sombra) simplemente recolocando el elemento gráfico sobre el que se dibuja la sombra.
Su tuviéramos que dibujar una sombra sobre un objeto de formulario, deberíamos redibujar toda la forma junto con la sombra (bueno, o borrar la sombra dibujada, recalcular sus nuevas coordenadas y volver a dibujar la sombra), y esto requiere mayores recursos. Además, la sombra debe aplicarse a los objetos que se encuentran debajo de ella, recalculando la combinación de colores y la transparencia en los lugares donde la sombra se superponga a los objetos y redibujando píxel a píxel el fondo sobre el que se encuentra la sombra del objeto. Si usamos un objeto aparte para la sombra, ya no tendremos que hacer esto: la sombra dibujada en un objeto aparte tendrá ya su propio color y transparencia que se superpondrán sin nuestra participación a los objetos subyacentes, pues el terminal calculará estos por nosotros.
Sin duda, existen ventajas en el método para dibujar sombras directamente en el lienzo del formulario, pero aún así elegiremos la segunda opción porque resulta más fácil de implementar y controlar. En la primera implementación del objeto de sombra, usaremos el método de desenfoque gaussiano con la ayuda de la biblioteca de análisis numérico ALGLIB. Algunos matices de su uso en la construcción de sombras han sido descritos en el artículo: "Estudiamos la clase CCanvas. Suavizado y sombras." de Vladimir Karputov. Vamos a usar los métodos de desenfoque gaussiano descritos en su artículo.
El objeto de sombra supondrá una nueva clase heredada de la clase de objeto de elemento gráfico de la misma manera que creamos el objeto de formulario; todos estos objetos son herederos del elemento gráfico base, como muchos otros. En el objeto de formulario, implementaremos los métodos necesarios para crear rápidamente un objeto de sombra y cambiar sus propiedades. Pero antes, como viene siendo habitual, modificaremos las clases de la biblioteca ya escritas.
Mejorando las clases de la biblioteca
Comenzaremos introduciendo en el archivo \MQL5\Include\DoEasy\Data.mqh los índices de los nuevos mensajes de la biblioteca:
   MSG_LIB_SYS_FAILED_DRAWING_ARRAY_RESIZE,           // Failed to change the array size of drawn buffers
   MSG_LIB_SYS_FAILED_COLORS_ARRAY_RESIZE,            // Failed to change the color array size
   MSG_LIB_SYS_FAILED_ARRAY_RESIZE,                   // Failed to change the array size
   MSG_LIB_SYS_FAILED_ADD_BUFFER,                     // Failed to add buffer object to the list
   MSG_LIB_SYS_FAILED_CREATE_BUFFER_OBJ,              // Failed to create \"Indicator buffer\" object
...
//--- CChartObjCollection
   MSG_CHART_COLLECTION_TEXT_CHART_COLLECTION,        // Chart collection
   MSG_CHART_COLLECTION_ERR_FAILED_CREATE_CHART_OBJ,  // Failed to create a new chart object
   MSG_CHART_COLLECTION_ERR_FAILED_ADD_CHART,         // Failed to add a chart object to the collection
   MSG_CHART_COLLECTION_ERR_CHARTS_MAX,               // Cannot open new chart. Number of open charts at maximum
   MSG_CHART_COLLECTION_CHART_OPENED,                 // Chart opened
   MSG_CHART_COLLECTION_CHART_CLOSED,                 // Chart closed
   MSG_CHART_COLLECTION_CHART_SYMB_CHANGED,           // Chart symbol changed
   MSG_CHART_COLLECTION_CHART_TF_CHANGED,             // Chart timeframe changed
   MSG_CHART_COLLECTION_CHART_SYMB_TF_CHANGED,        // Chart symbol and timeframe changed

//--- CForm
   MSG_FORM_OBJECT_TEXT_NO_SHADOW_OBJ_FIRST_CREATE_IT,// No shadow object. Create it using the CreateShadowObj() method
   MSG_FORM_OBJECT_ERR_FAILED_CREATE_SHADOW_OBJ,      // Failed to create new shadow object

//--- CShadowObj
   MSG_SHADOW_OBJ_IMG_SMALL_BLUR_LARGE,               // Error! Image size too small or blur too extensive

  };
//+------------------------------------------------------------------+
y escribiendo los textos de los mensajes que se corresponden con los índices nuevamente añadidos:
   {"Не удалось изменить размер массива рисуемых буферов","Failed to resize drawing buffers array"},
   {"Не удалось изменить размер массива цветов","Failed to resize color array"},
   {"Не удалось изменить размер массива ","Failed to resize array "},
   {"Не удалось добавить объект-буфер в список","Failed to add buffer object to list"},
   {"Не удалось создать объект \"Индикаторный буфер\"","Failed to create object \"Indicator buffer\""},
...
//--- CChartObjCollection
   {"Коллекция чартов","Chart collection"},
   {"Не удалось создать новый объект-чарт","Failed to create new chart object"},
   {"Не удалось добавить объект-чарт в коллекцию","Failed to add chart object to collection"},
   {"Нельзя открыть новый график, так как количество открытых графиков уже максимальное","You cannot open a new chart, since the number of open charts is already maximum"},
   {"Открыт график","Open chart"},
   {"Закрыт график","Closed chart"},
   {"Изменён символ графика","Changed chart symbol"},
   {"Изменён таймфрейм графика","Changed chart timeframe"},
   {"Изменён символ и таймфрейм графика","Changed the symbol and timeframe of the chart"},

//--- CForm
   {"Отсутствует объект тени. Необходимо сначала его создать при помощи метода CreateShadowObj()","There is no shadow object. You must first create it using the CreateShadowObj () method"},
   {"Не удалось создать новый объект для тени","Failed to create new object for shadow"},

//--- CShadowObj
   {"Ошибка! Размер изображения очень маленький или очень большое размытие","Error! Image size is very small or very large blur"},

  };
//+---------------------------------------------------------------------+
En el último artículo, dejamos un espacio vacío alrededor del objeto de formulario con un tamaño de cinco píxeles en cada lado para dibujar la sombra. Pero resulta que necesitamos más espacio para un desenfoque gaussiano normal. Empíricamente, hemos descubierto que con un radio de desenfoque de 4 píxeles, debemos dejar 16 píxeles de espacio vacío en cada lado. Menos píxeles al desenfocar provoca la aparición de artefactos (contaminación del fondo donde la sombra ya es completamente transparente y realmente está ausente) a lo largo de los bordes del lienzo en el que se dibuja la sombra.
En el archivo \MQL5\Include\DoEasy\Defines.mqh, introducimos 16 píxeles como tamaño del espacio libre predeterminado para la sombra (en lugar de los 5 anteriores):
//--- Canvas parameters
#define PAUSE_FOR_CANV_UPDATE          (16)                       // Canvas update frequency
#define NULL_COLOR                     (0x00FFFFFF)               // Zero for the canvas with the alpha channel
#define OUTER_AREA_SIZE                (16)                       // Size of one side of the outer area around the workspace
//+------------------------------------------------------------------+
Y añadimos a la enumeración con los tipos de elementos gráficos un nuevo tipo, el objeto de sombra:
//+------------------------------------------------------------------+
//| The list of graphical element types                              |
//+------------------------------------------------------------------+
enum ENUM_GRAPH_ELEMENT_TYPE
  {
   GRAPH_ELEMENT_TYPE_ELEMENT,                        // Element
   GRAPH_ELEMENT_TYPE_SHADOW_OBJ,                     // Shadow object
   GRAPH_ELEMENT_TYPE_FORM,                           // Form
   GRAPH_ELEMENT_TYPE_WINDOW,                         // Window
  };
//+------------------------------------------------------------------+
Al crear un nuevo objeto para la sombra, indicaremos este tipo, lo cual nos permitirá en el futuro elegir rápidamente todos los objetos de sombra y realizar varias manipulaciones con ellos al mismo tiempo.
Como hoy vamos a crear un objeto de sombra, este tendrá sus propias propiedades que influirán en el aspecto de la sombra proyectada por el objeto de formulario.
Añadiremos estos parámetros a la configuración del estilo de los formularios en el archivo \MQL5\Include\DoEasy\GraphINI.mqh:
//+------------------------------------------------------------------+
//| List of form style parameter indices                             |
//+------------------------------------------------------------------+
enum ENUM_FORM_STYLE_PARAMS
  {
   FORM_STYLE_FRAME_WIDTH_LEFT,                 // Form frame width to the left
   FORM_STYLE_FRAME_WIDTH_RIGHT,                // Form frame width to the right
   FORM_STYLE_FRAME_WIDTH_TOP,                  // Form frame width on top
   FORM_STYLE_FRAME_WIDTH_BOTTOM,               // Form frame width below
   FORM_STYLE_FRAME_SHADOW_OPACITY,             // Shadow opacity
   FORM_STYLE_FRAME_SHADOW_BLUR,                // Shadow blur
   FORM_STYLE_DARKENING_COLOR_FOR_SHADOW,       // Form shadow color darkening
   FORM_STYLE_FRAME_SHADOW_X_SHIFT,             // Shadow X axis shift
   FORM_STYLE_FRAME_SHADOW_Y_SHIFT,             // Shadow Y axis shift
  };
#define TOTAL_FORM_STYLE_PARAMS        (9)      // Number of form style parameters
//+------------------------------------------------------------------+
//| Array containing form style parameters                           |
//+------------------------------------------------------------------+
int array_form_style[TOTAL_FORM_STYLES][TOTAL_FORM_STYLE_PARAMS]=
  {
//--- "Flat form" style parameters
   {
      3,                                        // Form frame width to the left
      3,                                        // Form frame width to the right
      3,                                        // Form frame width on top
      3,                                        // Form frame width below
      80,                                       // Shadow opacity
      4,                                        // Shadow blur
      80,                                       // Form shadow color darkening
      2,                                        // Shadow X axis shift
      2,                                        // Shadow Y axis shift
   },
//--- "Embossed form" style parameters
   {
      4,                                        // Form frame width to the left
      4,                                        // Form frame width to the right
      4,                                        // Form frame width on top
      4,                                        // Form frame width below
      80,                                       // Shadow opacity
      4,                                        // Shadow blur
      80,                                       // Form shadow color darkening
      2,                                        // Shadow X axis shift
      2,                                        // Shadow Y axis shift
   },
  };
//+------------------------------------------------------------------+
Desenfoque de la sombra: el parámetro establecerá el radio de desenfoque de la imagen.
Oscuridad del color de la sombra del formulario: el parámetro indicará en cuántos puntos se debe oscurecer el color de la sombra. Este parámetro es importante si el color de la sombra depende de color del fondo del gráfico. En este caso, el color de fondo del gráfico se pasará a gris, y luego se oscurecerá aquí en la cantidad especificada.
Los desplazamientos de X e Y de la sombra indican cuánto se desplazará la sombra desde el centro del objeto que la proyecta. Cero indica una sombra alrededor del objeto. Los valores positivos sirven para el desplazamiento de la sombra hacia la derecha y hacia abajo en relación con el objeto; los negativos, para el desplazamiento de la sombra hacia la izquierda y hacia arriba.
Como hemos cambiado el número de parámetros, deberemos indicarlo de forma explícita. Introducimos el nuevo número, 9, en lugar del anterior, 5.
Y luego añadimos un parámetro más a la configuración del esquema de color: "Color del rectángulo de contorno de la forma".
Para visualizar las formas con mayor claridad, dibujaremos su marco alrededor del formulario (que no debe confundirse con el marco del formulario): un rectángulo simple que resaltará el formulario contra el fondo externo con su propio color. Precisamente el color de este rectángulo se establecerá en esta configuración.
//+------------------------------------------------------------------+
//| List of indices of color scheme parameters                       |
//+------------------------------------------------------------------+
enum ENUM_COLOR_THEME_COLORS
  {
   COLOR_THEME_COLOR_FORM_BG,                   // Form background color
   COLOR_THEME_COLOR_FORM_FRAME,                // Form frame color
   COLOR_THEME_COLOR_FORM_RECT_OUTER,           // Form outline rectangle color
   COLOR_THEME_COLOR_FORM_SHADOW,               // Form shadow color
  };
#define TOTAL_COLOR_THEME_COLORS       (4)      // Number of parameters in the color theme
//+------------------------------------------------------------------+
//| The array containing color schemes                               |
//+------------------------------------------------------------------+
color array_color_themes[TOTAL_COLOR_THEMES][TOTAL_COLOR_THEME_COLORS]=
  {
//--- Parameters of the "Blue steel" color scheme
   {
      C'134,160,181',                           // Form background color
      C'134,160,181',                           // Form frame color
      clrDimGray,                               // Form outline rectangle color
      clrGray,                                  // Form shadow color
   },
//--- Parameters of the "Light cyan gray" color scheme
   {
      C'181,196,196',                           // Form background color
      C'181,196,196',                           // Form frame color
      clrGray,                                  // Form outline rectangle color
      clrGray,                                  // Form shadow color
   },
  };
//+------------------------------------------------------------------+
Mejoramos la clase del elemento gráfico en el archivo \MQL5\Include\DoEasy\Objects\Graph\GCnvElement.mqh.
En la sección pública de la clase, tenemos el método ChangeColorLightness(), que cambia el brillo del color en la magnitud especificada.
El color a cambiar es transmitido al método en formato ARGB. Esto no siempre resulta conveniente, así que declaramos un método sobrecargado en el que transmitiremos el color en el formato de color y la opacidad:
//--- Update the coordinates (shift the canvas)
   bool              Move(const int x,const int y,const bool redraw=false);

//--- Change the brightness of (1) ARGB and (2) COLOR by a specified amount
   uint              ChangeColorLightness(const uint clr,const double change_value);
   color             ChangeColorLightness(const color colour,const uchar opacity,const double change_value);
También necesitaremos los métodos necesarios para cambiar la saturación del color. Por ejemplo, para conseguir un color gris a partir de cualquier color, necesitaremos desplazar su componente Saturation (S en los formatos HSL, HSI, HSV, HSB) hacia la izquierda, es decir, hacia el cero. Por consiguiente, el color quedará completamente desaturado: será un tono de gris, que es lo que necesitamos para pintar la sombra.
Declaremos los dos métodos sobrecargados que cambian la saturación del color:
//--- Change the brightness of (1) ARGB and (2) COLOR by a specified amount
   uint              ChangeColorLightness(const uint clr,const double change_value);
   color             ChangeColorLightness(const color colour,const double change_value);
//--- Change the saturation of (1) ARGB and (2) COLOR by a specified amount
   uint              ChangeColorSaturation(const uint clr,const double change_value);
   color             ChangeColorSaturation(const color colour,const double change_value);

protected:
Implementamos fuera del cuerpo de la clase los métodos declarados:
Método que cambia la saturación de un color ARGB en la magnitud indicada:
//+------------------------------------------------------------------+
//| Change the ARGB color saturation by a specified amount           |
//+------------------------------------------------------------------+
uint CGCnvElement::ChangeColorSaturation(const uint clr,const double change_value)
  {
   if(change_value==0.0)
      return clr;
   double a=GETRGBA(clr);
   double r=GETRGBR(clr);
   double g=GETRGBG(clr);
   double b=GETRGBB(clr);
   double h=0,s=0,l=0;
   CColors::RGBtoHSL(r,g,b,h,s,l);
   double ns=s+change_value*0.01;
   if(ns>1.0) ns=1.0;
   if(ns<0.0) ns=0.0;
   CColors::HSLtoRGB(h,ns,l,r,g,b);
   return ARGB(a,r,g,b);
  }
//+------------------------------------------------------------------+
Aquí, descomponemos el color obtenido como un valor uint en componentes: el canal alfa, rojo, verde y azul.
Con la ayuda del método RGBtoHSL() de la clase CColors, que describimos en el artículo 75, convertimos el color RGB al modelo de color HSL, en el que necesitamos su componente S, la saturación del color. A continuación, calculamos la nueva saturación, sumando simplemente al valor de saturación del color el valor transmitido al método y multiplicado por 0.01. Luego, comprobamos si el resultado obtenido se sale del rango de valores aceptables (de 0 a 1) y nuevamente, usando la clase CColors y su método HSLtoRGB, convertimos los componentes del color H, S nuevo y L al formato RGB.
Retornamos el color RGB resultante añadiendo además el canal alfa del color original añadido.
¿Por qué multiplicamos por 0.01 el valor por el que necesitamos cambiar la saturación transmitida al método? Solo por comodidad. Como en el modelo de color HSL, los valores de los componentes cambian en el rango de 0 a 1; entonces, en primer lugar, resultará más conveniente transmitir estos valores en múltiplos de 100 (1 en lugar de 0.01, 10 en lugar de 0.1, 100 en lugar de 1) y, en segundo lugar, en los estilos de los formularios donde puede haber valores para el cambio en la saturación de color para cualquier formulario o texto, todos los valores se escribirán en valores enteros, y esta razón es mucho más significativa que la primera.
Método que cambia la saturación del COLOR en una magnitud específica:
//+------------------------------------------------------------------+
//| Change the COLOR saturation by a specified amount                |
//+------------------------------------------------------------------+
color CGCnvElement::ChangeColorSaturation(const color colour,const double change_value)
  {
   if(change_value==0.0)
      return colour;
   uint clr=::ColorToARGB(colour,0);
   double r=GETRGBR(clr);
   double g=GETRGBG(clr);
   double b=GETRGBB(clr);
   double h=0,s=0,l=0;
   CColors::RGBtoHSL(r,g,b,h,s,l);
   double ns=s+change_value*0.01;
   if(ns>1.0) ns=1.0;
   if(ns<0.0) ns=0.0;
   CColors::HSLtoRGB(h,ns,l,r,g,b);
   return CColors::RGBToColor(r,g,b);
  }
//+------------------------------------------------------------------+
En cuanto a su lógica, el método es similar al analizado anteriormente. La única diferencia es que aquí solo necesitamos el parámetro de opacidad para convertir el color y su opacidad a un color ARGB, y en ningún otro lugar se usa el canal alfa. Por consiguiente, al realizar la conversión, podemos ignorarlo y transmitir cero. A continuación, extraemos los componentes R, G y B del color ARGB, los convertimos al modelo de color HSL, ajustamos el componente S al valor transmitido al método, convertimos el modelo HSL de nuevo a RGB y retornamos el modelo RGB del color convertido a un color en el formato "color".
Método que cambia el brillo de un color COLOR en la magnitud indicada:
//+------------------------------------------------------------------+
//| Change the COLOR brightness by a specified amount                |
//+------------------------------------------------------------------+
color CGCnvElement::ChangeColorLightness(const color colour,const double change_value)
  {
   if(change_value==0.0)
      return colour;
   uint clr=::ColorToARGB(colour,0);
   double r=GETRGBR(clr);
   double g=GETRGBG(clr);
   double b=GETRGBB(clr);
   double h=0,s=0,l=0;
   CColors::RGBtoHSL(r,g,b,h,s,l);
   double nl=l+change_value*0.01;
   if(nl>1.0) nl=1.0;
   if(nl<0.0) nl=0.0;
   CColors::HSLtoRGB(h,s,nl,r,g,b);
   return CColors::RGBToColor(r,g,b);
  }
//+------------------------------------------------------------------+
El método es idéntico al anterior, salvo que aquí estamos cambiando el componente L del modelo de color HSL.
Y, como en todos los métodos analizados multiplicamos por 0.01 el valor por el que necesitamos cambiar el componente de color, necesitaremos realizar la corrección en el método que cambia el brillo del color ARGB por el valor especificado, que hemos escrito anteriormente:
//+------------------------------------------------------------------+
//| Change the ARGB color brightness by a specified value            |
//+------------------------------------------------------------------+
uint CGCnvElement::ChangeColorLightness(const uint clr,const double change_value)
  {
   if(change_value==0.0)
      return clr;
   double a=GETRGBA(clr);
   double r=GETRGBR(clr);
   double g=GETRGBG(clr);
   double b=GETRGBB(clr);
   double h=0,s=0,l=0;
   CColors::RGBtoHSL(r,g,b,h,s,l);
   double nl=l+change_value*0.01;
   if(nl>1.0) nl=1.0;
   if(nl<0.0) nl=0.0;
   CColors::HSLtoRGB(h,s,nl,r,g,b);
   return ARGB(a,r,g,b);
  }
//+------------------------------------------------------------------+
En la sección pública de la clase, en el bloque de métodos de acceso simplificado a las propiedades del objeto, hemos declarado un método que establece la bandera que indica la necesidad de utilizar una sombra para el formulario. Pero, por alguna razón, no existe la implementación de este método. Vamos a corregir esta omisión:
//--- Set the flag of (1) object moveability, (2) activity, (3) element ID, (4) element index in the list and (5) shadow presence
   void              SetMovable(const bool flag)               { this.SetProperty(CANV_ELEMENT_PROP_MOVABLE,flag);                     }
   void              SetActive(const bool flag)                { this.SetProperty(CANV_ELEMENT_PROP_ACTIVE,flag);                      }
   void              SetID(const int id)                       { this.SetProperty(CANV_ELEMENT_PROP_ID,id);                            }
   void              SetNumber(const int number)               { this.SetProperty(CANV_ELEMENT_PROP_NUM,number);                       }
   void              SetShadow(const bool flag)                { this.m_shadow=flag;                                                   }

//--- Return the shift (1) of the left, (2) right, (3) top and (4) bottom edge of the element active area
Todos los objetos de formulario que hemos implementado en este momento, aunque tienen cierta apariencia de tridimensionalidad gracias a los marcos que se les añaden (con reflejos en los bordes iluminados y oscurecimiento en los apagados, lo cual crea la ilusión de tridimensionalidad), no resultarán suficientes para el diseño. Vamos a seguir. A continuación, añadiremos la capacidad de crear un fondo con la ilusión de tridimensionalidad. Para conseguirlo, necesitaremos un rellenado en gradiente para el fondo con al menos dos colores, de más oscuro a más claro. Bastará con un pequeño cambio en el brillo del color original y una transición suave del color original hacia el claro, más una sombra, y la apariencia de la forma "brillará con nuevos colores":

Ya hemos implementado dos métodos para limpiar el formulario y llenarlo de color. Para rellenar el fondo con un color degradado, declararemos otro método Erase():
//+------------------------------------------------------------------+
//| The methods of filling, clearing and updating raster data        |
//+------------------------------------------------------------------+
//--- Clear the element filling it with color and opacity
   void              Erase(const color colour,const uchar opacity,const bool redraw=false);
//--- Clear the element with a gradient fill
   void              Erase(color &colors[],const uchar opacity,const bool vgradient=true,const bool cycle=false,const bool redraw=false);
//--- Clear the element completely
   void              Erase(const bool redraw=false);
//--- Update the element
   void              Update(const bool redraw=false)           { this.m_canvas.Update(redraw);                                         }
Y lo implementaremos fuera del cuerpo de la clase:
//+------------------------------------------------------------------+
//| Clear the element with a gradient fill                           |
//+------------------------------------------------------------------+
void CGCnvElement::Erase(color &colors[],const uchar opacity,const bool vgradient=true,const bool cycle=false,const bool redraw=false)
  {
//--- Check the size of the color array
   int size=::ArraySize(colors);
//--- If there are less than two colors in the array
   if(size<2)
     {
      //--- if the array is empty, erase the background completely and leave
      if(size==0)
        {
         this.Erase(redraw);
         return;
        }
      //--- in case of one color, fill the background with this color and opacity, and leave
      this.Erase(colors[0],opacity,redraw);
      return;
     }
//--- Declare the receiver array
   color out[];
//--- Set the gradient size depending on the filling direction (vertical/horizontal)
   int total=(vgradient ? this.Height() : this.Width());
//--- and get the set of colors in the receive array
   CColors::Gradient(colors,out,total,cycle);
   total=::ArraySize(out);
//--- In the loop by the number of colors in the array
   for(int i=0;i<total;i++)
     {
      //--- depending on the filling direction
      switch(vgradient)
        {
         //--- Horizontal gradient - draw vertical segments from left to right with the color from the array
         case false :
            DrawLineVertical(i,0,this.Height()-1,out[i],opacity);
           break;
         //--- Vertical gradient - draw horizontal segments downwards with the color from the array
         default:
            DrawLineHorizontal(0,this.Width()-1,i,out[i],opacity);
           break;
        }
     }
//--- If specified, update the canvas
   this.Update(redraw);
  }
//+------------------------------------------------------------------+
Lógica completa del método se describe en los comentarios del listado. Después, transmitimos al método una matriz rellena de colores, el valor de opacidad, la bandera del gradiente vertical (si tenemos true, el rellenado se hará de arriba a abajo, si tenemos false, de izquierda a derecha), la bandera de ciclo (si se establece, el rellenado terminará con el mismo color con el que comenzó) y la bandera que indica la necesidad de redibujar el lienzo después del rellenado. Para obtener una matriz de colores, usaremos el método Gradient() de la clase CColors.
Ya hemos terminado los cambios y adiciones a las clases de la biblioteca. Ahora, escribiremos una nueva clase para el objeto de sombra, que heredará la clase de objeto de elemento gráfico.
Clase de objeto de sombra
En el directorio de objetos gráficos de la biblioteca \MQL5\Include\DoEasy\Objects\Graph\, creamos el nuevo archivo ShadowObj.mqh de la clase CShadowObj.
El archivo debe contener el archivo de la clase de elemento gráfico y el archivo de la biblioteca de análisis numérico ALGLIB. La clase debe heredarse de la clase de objeto de elemento gráfico:
//+------------------------------------------------------------------+
//|                                                    ShadowObj.mqh |
//|                                  Copyright 2021, MetaQuotes Ltd. |
//|                             https://mql5.com/en/users/artmedia70 |
//+------------------------------------------------------------------+
#property copyright "Copyright 2021, MetaQuotes Ltd."
#property link      "https://mql5.com/en/users/artmedia70"
#property version   "1.00"
#property strict    // Necessary for mql4
//+------------------------------------------------------------------+
//| Include files                                                    |
//+------------------------------------------------------------------+
#include "GCnvElement.mqh"
#include <Math\Alglib\alglib.mqh>
//+------------------------------------------------------------------+
//| Shadow object class                                              |
//+------------------------------------------------------------------+
class CShadowObj : public CGCnvElement
  {
  }
En la sección privada de la clase, declaramos las variables para almacenar el color y la opacidad de la sombra y los métodos para que la clase funcione:
//+------------------------------------------------------------------+
//| Shadow object class                                              |
//+------------------------------------------------------------------+
class CShadowObj : public CGCnvElement
  {
private:
   color             m_color_shadow;                  // Shadow color
   uchar             m_opacity_shadow;                // Shadow opacity

//--- Gaussian blur
   bool              GaussianBlur(const uint radius);
//--- Return the array of weight ratios
   bool              GetQuadratureWeights(const double mu0,const int n,double &weights[]);
//--- Draw the object shadow form
   void              DrawShadowFigureRect(const int w,const int h);

public:
Aquí, el método DrawShadowFigureRect() dibuja una forma no borrosa según las dimensiones del objeto de formulario que proyecta la sombra dibujada por este objeto.
El método GetQuadratureWeights() utiliza la biblioteca ALGLIB para calcular y retornar la matriz de pesos usada para difuminar la forma dibujada con el método DrawShadowFigureRect().
El desenfoque de esta forma se realiza mediante el método GaussianBlur().
Analizaremos todos los métodos más tarde.
En la sección pública de la clase, declaramos el constructor paramétrico, los métodos que retornan los indicadores para mantener las propiedades del objeto (mientras que ambos métodos retornen true), el método para dibujar sombras, y también vamos a escribir los métodos de acceso simplificado a las propiedades del objeto de sombra:
public:
                     CShadowObj(const long chart_id,
                                const int subwindow,
                                const string name,
                                const int x,
                                const int y,
                                const int w,
                                const int h);

//--- Supported object properties (1) integer and (2) string ones
   virtual bool      SupportProperty(ENUM_CANV_ELEMENT_PROP_INTEGER property) { return true; }
   virtual bool      SupportProperty(ENUM_CANV_ELEMENT_PROP_STRING property)  { return true; }

//--- Draw an object shadow
   void              DrawShadow(const int shift_x,const int shift_y,const uchar blur_value);

//+------------------------------------------------------------------+
//| Methods of simplified access to object properties                |
//+------------------------------------------------------------------+
//--- (1) Set and (2) return the shadow color
   void              SetColorShadow(const color colour)                       { this.m_color_shadow=colour;    }
   color             ColorShadow(void)                                  const { return this.m_color_shadow;    }
//--- (1) Set and (2) return the shadow opacity
   void              SetOpacityShadow(const uchar opacity)                    { this.m_opacity_shadow=opacity; }
   uchar             OpacityShadow(void)                                const { return this.m_opacity_shadow;  }
  };
//+------------------------------------------------------------------+
Vamos a analizar con más detalle la construcción de los métodos de la clase.
Constructor paramétrico:
//+------------------------------------------------------------------+
//| Constructor                                                      |
//+------------------------------------------------------------------+
CShadowObj::CShadowObj(const long chart_id,
                       const int subwindow,
                       const string name,
                       const int x,
                       const int y,
                       const int w,
                       const int h) : CGCnvElement(GRAPH_ELEMENT_TYPE_SHADOW_OBJ,chart_id,subwindow,name,x,y,w,h)
  {
   CGCnvElement::SetColorBackground(clrNONE);
   CGCnvElement::SetOpacity(0);
   CGCnvElement::SetActive(false);
   this.m_opacity_shadow=127;
   color gray=CGCnvElement::ChangeColorSaturation(ChartColorBackground(),-100);
   this.m_color_shadow=CGCnvElement::ChangeColorLightness(gray,255,-50);
   this.m_shadow=false;
   this.m_visible=true;
   CGCnvElement::Erase();
  }
//+------------------------------------------------------------------+
Transmitimos al constructor el identificador del gráfico, el número de la subventana en la que se crea el objeto de sombra, el nombre del objeto, sus coordenadas de la esquina superior izquierda y las dimensiones. En la lista de inicialización, en el constructor protegido de la clase de elemento gráfico, transmitimos el tipo de elemento, objeto de sombra y otros parámetros transmitidos en los argumentos del método.
En el cuerpo del constructor, establecemos el color de fondo que falta al objeto, su transparencia total y la bandera inactiva del objeto (el objeto de sombra no debe reaccionar de ninguna manera a las influencias externas sobre él). Establecemos una opacidad predeterminada para la sombra que se dibujará en el lienzo igual a 127: se trata de una sombra semitransparente. Luego, calculamos el color de sombra predeterminado. Este será el color de fondo del gráfico, sombreado en 50 unidades de cada cien. Aquí, primero convertimos el color de fondo del gráfico a gris y luego oscurecemos este color resultante. El objeto sobre el que se dibuja la sombra, a su vez, no deberá proyectarla, por lo tanto, estableceremos la bandera de la sombra en false, ajustaremos la bandera de visibilidad del objeto como true y borraremos el lienzo.
Método que dibuja la sombra de un objeto:
//+------------------------------------------------------------------+
//| Draw the object shadow                                           |
//+------------------------------------------------------------------+
void CShadowObj::DrawShadow(const int shift_x,const int shift_y,const uchar blur_value)
  {
//--- Calculate the height and width of the drawn rectangle
   int w=this.Width()-OUTER_AREA_SIZE*2;
   int h=this.Height()-OUTER_AREA_SIZE*2;
//--- Draw a filled rectangle with calculated dimensions
   this.DrawShadowFigureRect(w,h);
//--- Calculate the blur radius, which cannot exceed a quarter of the OUTER_AREA_SIZE constant
   int radius=(blur_value>OUTER_AREA_SIZE/4 ? OUTER_AREA_SIZE/4 : blur_value);
//--- If failed to blur the shape, exit the method (GaussianBlur() displays the error on the journal)
   if(!this.GaussianBlur(radius))
      return;
//--- Shift the shadow object by X/Y offsets specified in the method arguments and update the canvas
   CGCnvElement::Move(this.CoordX()+shift_x,this.CoordY()+shift_y);
   CGCnvElement::Update();
  }
//+------------------------------------------------------------------+
La lógica completa del método se describe en los comentarios al código. El método primero dibuja en el lienzo un rectángulo regular relleno con el color de la sombra. La anchura y la altura de este rectángulo se calculan de forma que tengan el tamaño del objeto de formulario que proyecta esta sombra. A continuación, difuminamos el rectángulo dibujado con el método gaussiano, trasladamos el objeto de sombra según el desplazamiento especificado en relación al objeto de formulario que proyecta esta sombra y actualizamos el lienzo del objeto de sombra.
Método que dibuja la forma de la sombra del objeto:
//+------------------------------------------------------------------+
//| Draw the object shadow form                                      |
//+------------------------------------------------------------------+
void CShadowObj::DrawShadowFigureRect(const int w,const int h)
  {
   CGCnvElement::DrawRectangleFill(OUTER_AREA_SIZE,OUTER_AREA_SIZE,OUTER_AREA_SIZE+w-1,OUTER_AREA_SIZE+h-1,this.m_color_shadow,this.m_opacity_shadow);
   CGCnvElement::Update();
  }
//+------------------------------------------------------------------+
Aquí, dibujamos un rectángulo con las coordenadas X e Y igual al valor de la constante OUTER_AREA_SIZE. La segunda coordenada X e Y se calcula como el desplazamiento respecto a la primera coordenada + la anchura (altura) menos 1. Después de dibujar la figura, el lienzo se actualiza.
Método para difuminar la forma dibujada según Gauss:
//+------------------------------------------------------------------+
//| Gaussian blur                                                    |
//| https://www.mql5.com/en/articles/1612#chapter4                   |
//+------------------------------------------------------------------+
bool CShadowObj::GaussianBlur(const uint radius)
  {
//---
   int n_nodes=(int)radius*2+1;
   uint res_data[];              // Array for storing graphical resource data
   uint res_w=this.Width();      // Graphical resource width
   uint res_h=this.Height();     // Graphical resource height

//--- Read graphical resource data. If failed, return false
   ::ResetLastError();
   if(!::ResourceReadImage(this.NameRes(),res_data,res_w,res_h))
     {
      CMessage::OutByID(MSG_LIB_SYS_FAILED_GET_DATA_GRAPH_RES);
      return false;
     }
//--- Check the blur amount. If the blur radius exceeds half of the width or height, return 'false'
   if(radius>=res_w/2 || radius>=res_h/2)
     {
      ::Print(DFUN,CMessage::Text(MSG_SHADOW_OBJ_IMG_SMALL_BLUR_LARGE));
      return false;
     }

//--- Decompose image data from the resource into a, r, g, b color components
   int  size=::ArraySize(res_data);
//--- arrays for storing A, R, G and B color components
//--- for horizontal and vertical blur
   uchar a_h_data[],r_h_data[],g_h_data[],b_h_data[];
   uchar a_v_data[],r_v_data[],g_v_data[],b_v_data[];

//--- Change the size of component arrays according to the array size of the graphical resource data
   if(::ArrayResize(a_h_data,size)==-1)
     {
      CMessage::OutByID(MSG_LIB_SYS_FAILED_ARRAY_RESIZE);
      ::Print(DFUN_ERR_LINE,": \"a_h_data\"");
      return false;
     }
   if(::ArrayResize(r_h_data,size)==-1)
     {
      CMessage::OutByID(MSG_LIB_SYS_FAILED_ARRAY_RESIZE);
      ::Print(DFUN_ERR_LINE,": \"r_h_data\"");
      return false;
     }
   if(::ArrayResize(g_h_data,size)==-1)
     {
      CMessage::OutByID(MSG_LIB_SYS_FAILED_ARRAY_RESIZE);
      ::Print(DFUN_ERR_LINE,": \"g_h_data\"");
      return false;
     }
   if(ArrayResize(b_h_data,size)==-1)
     {
      CMessage::OutByID(MSG_LIB_SYS_FAILED_ARRAY_RESIZE);
      ::Print(DFUN_ERR_LINE,": \"b_h_data\"");
      return false;
     }
   if(::ArrayResize(a_v_data,size)==-1)
     {
      CMessage::OutByID(MSG_LIB_SYS_FAILED_ARRAY_RESIZE);
      ::Print(DFUN_ERR_LINE,": \"a_v_data\"");
      return false;
     }
   if(::ArrayResize(r_v_data,size)==-1)
     {
      CMessage::OutByID(MSG_LIB_SYS_FAILED_ARRAY_RESIZE);
      ::Print(DFUN_ERR_LINE,": \"r_v_data\"");
      return false;
     }
   if(::ArrayResize(g_v_data,size)==-1)
     {
      CMessage::OutByID(MSG_LIB_SYS_FAILED_ARRAY_RESIZE);
      ::Print(DFUN_ERR_LINE,": \"g_v_data\"");
      return false;
     }
   if(::ArrayResize(b_v_data,size)==-1)
     {
      CMessage::OutByID(MSG_LIB_SYS_FAILED_ARRAY_RESIZE);
      ::Print(DFUN_ERR_LINE,": \"b_v_data\"");
      return false;
     }
//--- Declare the array for storing blur weight ratios and,
//--- if failed to get the array of weight ratios, return 'false'
   double weights[];
   if(!this.GetQuadratureWeights(1,n_nodes,weights))
      return false;

//--- Set components of each image pixel to the color component arrays
   for(int i=0;i<size;i++)
     {
      a_h_data[i]=GETRGBA(res_data[i]);
      r_h_data[i]=GETRGBR(res_data[i]);
      g_h_data[i]=GETRGBG(res_data[i]);
      b_h_data[i]=GETRGBB(res_data[i]);
     }

//--- Blur the image horizontally (along the X axis)
   uint XY; // Pixel coordinate in the array
   double a_temp=0.0,r_temp=0.0,g_temp=0.0,b_temp=0.0;
   int coef=0;
   int j=(int)radius;
   //--- Loop by the image width
   for(uint Y=0;Y<res_h;Y++)
     {
      //--- Loop by the image height
      for(uint X=radius;X<res_w-radius;X++)
        {
         XY=Y*res_w+X;
         a_temp=0.0; r_temp=0.0; g_temp=0.0; b_temp=0.0;
         coef=0;
         //--- Multiply each color component by the weight ratio corresponding to the current image pixel
         for(int i=-1*j;i<j+1;i=i+1)
           {
            a_temp+=a_h_data[XY+i]*weights[coef];
            r_temp+=r_h_data[XY+i]*weights[coef];
            g_temp+=g_h_data[XY+i]*weights[coef];
            b_temp+=b_h_data[XY+i]*weights[coef];
            coef++;
           }
         //--- Save each rounded color component calculated according to the ratios to the component arrays
         a_h_data[XY]=(uchar)::round(a_temp);
         r_h_data[XY]=(uchar)::round(r_temp);
         g_h_data[XY]=(uchar)::round(g_temp);
         b_h_data[XY]=(uchar)::round(b_temp);
        }
      //--- Remove blur artifacts to the left by copying adjacent pixels
      for(uint x=0;x<radius;x++)
        {
         XY=Y*res_w+x;
         a_h_data[XY]=a_h_data[Y*res_w+radius];
         r_h_data[XY]=r_h_data[Y*res_w+radius];
         g_h_data[XY]=g_h_data[Y*res_w+radius];
         b_h_data[XY]=b_h_data[Y*res_w+radius];
        }
      //--- Remove blur artifacts to the right by copying adjacent pixels
      for(uint x=res_w-radius;x<res_w;x++)
        {
         XY=Y*res_w+x;
         a_h_data[XY]=a_h_data[(Y+1)*res_w-radius-1];
         r_h_data[XY]=r_h_data[(Y+1)*res_w-radius-1];
         g_h_data[XY]=g_h_data[(Y+1)*res_w-radius-1];
         b_h_data[XY]=b_h_data[(Y+1)*res_w-radius-1];
        }
     }

//--- Blur vertically (along the Y axis) the image already blurred horizontally
   int dxdy=0;
   //--- Loop by the image height
   for(uint X=0;X<res_w;X++)
     {
      //--- Loop by the image width
      for(uint Y=radius;Y<res_h-radius;Y++)
        {
         XY=Y*res_w+X;
         a_temp=0.0; r_temp=0.0; g_temp=0.0; b_temp=0.0;
         coef=0;
         //--- Multiply each color component by the weight ratio corresponding to the current image pixel
         for(int i=-1*j;i<j+1;i=i+1)
           {
            dxdy=i*(int)res_w;
            a_temp+=a_h_data[XY+dxdy]*weights[coef];
            r_temp+=r_h_data[XY+dxdy]*weights[coef];
            g_temp+=g_h_data[XY+dxdy]*weights[coef];
            b_temp+=b_h_data[XY+dxdy]*weights[coef];
            coef++;
           }
         //--- Save each rounded color component calculated according to the ratios to the component arrays
         a_v_data[XY]=(uchar)::round(a_temp);
         r_v_data[XY]=(uchar)::round(r_temp);
         g_v_data[XY]=(uchar)::round(g_temp);
         b_v_data[XY]=(uchar)::round(b_temp);
        }
      //--- Remove blur artifacts at the top by copying adjacent pixels
      for(uint y=0;y<radius;y++)
        {
         XY=y*res_w+X;
         a_v_data[XY]=a_v_data[X+radius*res_w];
         r_v_data[XY]=r_v_data[X+radius*res_w];
         g_v_data[XY]=g_v_data[X+radius*res_w];
         b_v_data[XY]=b_v_data[X+radius*res_w];
        }
      //--- Remove blur artifacts at the bottom by copying adjacent pixels
      for(uint y=res_h-radius;y<res_h;y++)
        {
         XY=y*res_w+X;
         a_v_data[XY]=a_v_data[X+(res_h-1-radius)*res_w];
         r_v_data[XY]=r_v_data[X+(res_h-1-radius)*res_w];
         g_v_data[XY]=g_v_data[X+(res_h-1-radius)*res_w];
         b_v_data[XY]=b_v_data[X+(res_h-1-radius)*res_w];
        }
     }

//--- Set the twice blurred (horizontally and vertically) image pixels to the graphical resource data array
   for(int i=0;i<size;i++)
      res_data[i]=ARGB(a_v_data[i],r_v_data[i],g_v_data[i],b_v_data[i]);
//--- Display the image pixels on the canvas in a loop by the image height and width from the graphical resource data array
   for(uint X=0;X<res_w;X++)
     {
      for(uint Y=radius;Y<res_h-radius;Y++)
        {
         XY=Y*res_w+X;
         CGCnvElement::GetCanvasObj().PixelSet(X,Y,res_data[XY]);
        }
     }
//--- Done
   return true;
  }
//+------------------------------------------------------------------+
La lógica del método se describe en los comentarios al código. Podemos leer más sobre este punto en el artículo del que hemos tomado el método.
Método que retorna la matriz de coeficientes de peso:
//+------------------------------------------------------------------+
//| Return the array of weight ratios                                |
//| https://www.mql5.com/en/articles/1612#chapter3_2                 |
//+------------------------------------------------------------------+
bool CShadowObj::GetQuadratureWeights(const double mu0,const int n,double &weights[])
  {
   CAlglib alglib;
   double  alp[];
   double  bet[];
   ::ArrayResize(alp,n);
   ::ArrayResize(bet,n);
   ::ArrayInitialize(alp,1.0);
   ::ArrayInitialize(bet,1.0);
//---
   double out_x[];
   int    info=0;
   alglib.GQGenerateRec(alp,bet,mu0,n,info,out_x,weights);
   if(info!=1)
     {
      string txt=(info==-3 ? "internal eigenproblem solver hasn't converged" : info==-2 ? "Beta[i]<=0" : "incorrect N was passed");
      ::Print("Call error in CGaussQ::GQGenerateRec: ",txt);
      return false;
     }
   return true;
  }
//+------------------------------------------------------------------+
El método calcula los pesos de desenfoque usando la biblioteca de análisis numérico ALGLIB y los escribe en la matriz weights que se le transmite por referencia. Podrá leer más sobre el método en esta sección del artículo.
Con esto, podemos dar por finalizada la creación de la primera versión de la clase de objeto de sombra.
Ahora, necesitaremos implementar la posibilidad de crear y dibujar rápidamente una sombra directamente desde el objeto de formulario.
Abrimos el archivo \MQL5\Include\DoEasy\Objects\Graph\Form.mqh de la clase de objeto de formulario y le hacemos las modificaciones necesarias.
Para conseguir que la clase de objeto de formulario vea la clase de objeto de sombra, incluiremos el archivo de la clase de sombra recién creada:
//+------------------------------------------------------------------+
//|                                                         Form.mqh |
//|                                  Copyright 2021, MetaQuotes Ltd. |
//|                             https://mql5.com/en/users/artmedia70 |
//+------------------------------------------------------------------+
#property copyright "Copyright 2021, MetaQuotes Ltd."
#property link      "https://mql5.com/en/users/artmedia70"
#property version   "1.00"
#property strict    // Necessary for mql4
//+------------------------------------------------------------------+
//| Include files                                                    |
//+------------------------------------------------------------------+
#include "GCnvElement.mqh"
#include "ShadowObj.mqh"
//+------------------------------------------------------------------+
//| Form object class                                                |
//+------------------------------------------------------------------+
Eliminamos de la sección privada de la clase la variable que almacena el color de la sombra del formulario:
color m_color_shadow; // Form shadow color
El color de la sombra ahora se almacena en la clase de objeto de sombra.
Como resultado, nuestro objeto de formulario permitirá crear nuevos objetos de elementos gráficos directamente dentro de sí mismo y adjuntarlos a su lista de objetos dependientes, es decir, estos objetos recién creados dependerán completamente del objeto de formulario, y pertenecerán plenamente a este. El objeto formulario podrá controlarlos. Para crear dichos objetos, también deberemos crear su nombre, que deberá contener el nombre del objeto de formulario con una adición con su propio nombre al final. Para hacer esto, añadiremos a la sección privada de la clase un método que creará el nombre del objeto dependiente:
//--- Initialize the variables
   void              Initialize(void);
//--- Return the name of the dependent object
   string            CreateNameDependentObject(const string base_name)  const
                       { return ::StringSubstr(this.NameObj(),::StringLen(::MQLInfoString(MQL_PROGRAM_NAME))+1)+"_"+base_name;   }

//--- Create a new graphical object
En el último artículo, ya implementamos dicha creación del nombre para un objeto al describir el objeto de formulario:
... extraemos la terminación del nombre del objeto (el nombre consta del nombre del programa y el nombre del objeto al crear el mismo). Necesitaremos extraer el nombre del objeto al crear este, y luego añadir el nombre transmitido al método.
Así, por ejemplo, de este nombre "Nombre_del_programa_Formulario01", extraemos la sublínea "Formulario01" y añadiremos a esta línea el nombre transmitido al método. Si creamos un objeto de sombra y transmitimos el nombre "Sombra", entonces el nombre del objeto será "Formulario01_ Sombra", y el nombre final del objeto creado será así: "Nombre_del_programa_Formulario01_Sombra" ...
Ahora, esto se realizará en un método aparte, ya que será necesario más de una vez.
Además, en el mismo lugar, en la sección privada, declaramos el método para crear un objeto sombra:
//--- Create a new graphical object
   CGCnvElement     *CreateNewGObject(const ENUM_GRAPH_ELEMENT_TYPE type,
                                      const int element_num,
                                      const string name,
                                      const int x,
                                      const int y,
                                      const int w,
                                      const int h,
                                      const color colour,
                                      const uchar opacity,
                                      const bool movable,
                                      const bool activity);
//--- Create a shadow object
   void              CreateShadowObj(const color colour,const uchar opacity);

public:
Eliminamos la declaración de este método de la sección pública de la clase:
//--- Create a new attached element
   bool              CreateNewElement(const int element_num,
                                      const string name,
                                      const int x,
                                      const int y,
                                      const int w,
                                      const int h,
                                      const color colour,
                                      const uchar opacity,
                                      const bool movable,
                                      const bool activity);

//--- Create a shadow object
   void              CreateShadow(const uchar opacity);
//--- Draw an object shadow
Ahora, este método no estará disponible públicamente, y se le transmitirá de forma adicional el color de la sombra junto con su opacidad.
El método público encargado de dibujar la sombra del objeto ahora también tendrá más argumentos:
//--- Create a new attached element
   bool              CreateNewElement(const int element_num,
                                      const string name,
                                      const int x,
                                      const int y,
                                      const int w,
                                      const int h,
                                      const color colour,
                                      const uchar opacity,
                                      const bool movable,
                                      const bool activity);


//--- Draw an object shadow
   void              DrawShadow(const int shift_x,const int shift_y,const color colour,const uchar opacity=127,const uchar blur=4);

//--- Draw the form frame
Esto se hace así para que, en lugar de la creación preliminar del objeto de sombra (y ya después de su dibujado), podamos llamar inmediatamente al método de dibujado de la sombra. La lógica aquí es simple: si llamamos al método para dibujar la sombra, entonces la necesitamos. Y si aún no hemos creado un objeto de sombra, el nuevo método primero creará este objeto y luego dibujará una sombra sobre él y mostrará todo esto en la pantalla.
En el bloque de métodos para el acceso simplificado a las propiedades del objeto, eliminamos la implementación de los métodos para configurar y retornar el color de la sombra:
//+------------------------------------------------------------------+
//| Methods of simplified access to object properties                |
//+------------------------------------------------------------------+
//--- (1) Set and (2) get the form frame color
   void              SetColorFrame(const color colour)                        { this.m_color_frame=colour;  }
   color             ColorFrame(void)                                   const { return this.m_color_frame;  }
//--- (1) Set and (2) return the form shadow color
   void              SetColorShadow(const color colour)                       { this.m_color_shadow=colour; }
   color             ColorShadow(void)                                  const { return this.m_color_shadow; }
Ahora, estos métodos se moverán fuera del cuerpo de la clase (allí se necesita la verificación de la presencia del objeto de sombra), mientras que aquí solo quedará su declaración. Además, añadiremos la declaración de los métodos de configuración y retorno de la opacidad de la sombra:
//+------------------------------------------------------------------+
//| Methods of simplified access to object properties                |
//+------------------------------------------------------------------+
//--- (1) Set and (2) get the form frame color
   void              SetColorFrame(const color colour)                        { this.m_color_frame=colour;     }
   color             ColorFrame(void)                                   const { return this.m_color_frame;     }
//--- (1) Set and (2) return the form shadow color
   void              SetColorShadow(const color colour);
   color             ColorShadow(void) const;
//--- (1) Set and (2) return the form shadow opacity
   void              SetOpacityShadow(const uchar opacity);
   uchar             OpacityShadow(void) const;

  };
//+------------------------------------------------------------------+
En el método para crear un nuevo elemento gráfico, reemplazamos estas líneas
   int pos=::StringLen(::MQLInfoString(MQL_PROGRAM_NAME));
   string pref=::StringSubstr(NameObj(),pos+1);
   string name=pref+"_"+obj_name;
con la llamada de la creación del nombre del objeto dependiente:
//+------------------------------------------------------------------+
//| Create a new graphical object                                    |
//+------------------------------------------------------------------+
CGCnvElement *CForm::CreateNewGObject(const ENUM_GRAPH_ELEMENT_TYPE type,
                                      const int obj_num,
                                      const string obj_name,
                                      const int x,
                                      const int y,
                                      const int w,
                                      const int h,
                                      const color colour,
                                      const uchar opacity,
                                      const bool movable,
                                      const bool activity)
  {
   string name=this.CreateNameDependentObject(obj_name);
   CGCnvElement *element=new CGCnvElement(type,this.ID(),obj_num,this.ChartID(),this.SubWindow(),name,x,y,w,h,colour,opacity,movable,activity);
   if(element==NULL)
      ::Print(DFUN,CMessage::Text(MSG_LIB_SYS_FAILED_CREATE_ELM_OBJ),": ",name);
   return element;
  }
//+------------------------------------------------------------------+
Después de crear el objeto de sombra, este necesitará que establezcamos inmediatamente sus parámetros por defecto.
Para ello, mejoraremos ligeramente el método de creación del objeto de sombra:
//+------------------------------------------------------------------+
//| Create the shadow object                                         |
//+------------------------------------------------------------------+
void CForm::CreateShadowObj(const color colour,const uchar opacity)
  {
//--- If the shadow flag is disabled or the shadow object already exists, exit
   if(!this.m_shadow || this.m_shadow_obj!=NULL)
      return;
//--- Calculate the shadow object coordinates according to the offset from the top and left
   int x=this.CoordX()-OUTER_AREA_SIZE;
   int y=this.CoordY()-OUTER_AREA_SIZE;
//--- Calculate the width and height in accordance with the top, bottom, left and right offsets
   int w=this.Width()+OUTER_AREA_SIZE*2;
   int h=this.Height()+OUTER_AREA_SIZE*2;
//--- Create a new shadow object and set the pointer to it in the variable
   this.m_shadow_obj=new CShadowObj(this.ChartID(),this.SubWindow(),this.CreateNameDependentObject("Shadow"),x,y,w,h);
   if(this.m_shadow_obj==NULL)
     {
      ::Print(DFUN,CMessage::Text(MSG_FORM_OBJECT_ERR_FAILED_CREATE_SHADOW_OBJ));
      return;
     }
//--- Set the properties for the created shadow object
   this.m_shadow_obj.SetID(this.ID());
   this.m_shadow_obj.SetNumber(-1);
   this.m_shadow_obj.SetOpacityShadow(opacity);
   this.m_shadow_obj.SetColorShadow(colour);
   this.m_shadow_obj.SetMovable(true);
   this.m_shadow_obj.SetActive(false);
   this.m_shadow_obj.SetVisible(false);
//--- Move the form object to the foreground
   this.BringToTop();
  }
//+------------------------------------------------------------------+
Mejoramos el método que dibuja la sombra para que, en ausencia de un objeto de sombra, primero se cree y luego se dibuje una sombra sobre él:
//+------------------------------------------------------------------+
//| Draw the shadow                                                  |
//+------------------------------------------------------------------+
void CForm::DrawShadow(const int shift_x,const int shift_y,const color colour,const uchar opacity=127,const uchar blur=4)
  {
//--- If the shadow flag is disabled, exit
   if(!this.m_shadow)
      return;
//--- If there is no shadow object, create it
   if(this.m_shadow_obj==NULL)
      this.CreateShadowObj(colour,opacity);
//--- If the shadow object exists, draw the shadow on it,
//--- set the shadow object visibility flag and
//--- move the form object to the foreground
   if(this.m_shadow_obj!=NULL)
     {
      this.m_shadow_obj.DrawShadow(shift_x,shift_y,blur);
      this.m_shadow_obj.SetVisible(true);
      this.BringToTop();
     }
  }
//+------------------------------------------------------------------+
Hemos descrito la lógica del método en los comentarios al código, por lo que no debería causar ninguna dificultad de comprensión.
En el método que establece el esquema de color, añadimos la comprobación de la bandera para el uso de la sombra y la presencia del objeto de sombra creado antes de asignar al objeto de sombra su color de dibujado:
//+------------------------------------------------------------------+
//| Set a color scheme                                               |
//+------------------------------------------------------------------+
void CForm::SetColorTheme(const ENUM_COLOR_THEMES theme,const uchar opacity)
  {
   this.SetOpacity(opacity);
   this.SetColorBackground(array_color_themes[theme][COLOR_THEME_COLOR_FORM_BG]);
   this.SetColorFrame(array_color_themes[theme][COLOR_THEME_COLOR_FORM_FRAME]);
   if(this.m_shadow && this.m_shadow_obj!=NULL)
      this.SetColorShadow(array_color_themes[theme][COLOR_THEME_COLOR_FORM_SHADOW]);
  }
//+------------------------------------------------------------------+
En el método que establece el estilo del formulario, añadimos un nuevo parámetro de entrada, indicando que es necesario utilizar el color de fondo del gráfico para crear el color de la sombra, y también le añadimos el dibujado de las sombras:
//+------------------------------------------------------------------+
//| Set the form style                                               |
//+------------------------------------------------------------------+
void CForm::SetFormStyle(const ENUM_FORM_STYLE style,
                         const ENUM_COLOR_THEMES theme,
                         const uchar opacity,
                         const bool shadow=false,
                         const bool use_bg_color=true,
                         const bool redraw=false)
  {
//--- Set opacity parameters and the size of the form frame side
   this.m_shadow=shadow;
   this.m_frame_width_top=array_form_style[style][FORM_STYLE_FRAME_WIDTH_TOP];
   this.m_frame_width_bottom=array_form_style[style][FORM_STYLE_FRAME_WIDTH_BOTTOM];
   this.m_frame_width_left=array_form_style[style][FORM_STYLE_FRAME_WIDTH_LEFT];
   this.m_frame_width_right=array_form_style[style][FORM_STYLE_FRAME_WIDTH_RIGHT];

//--- Create the shadow object
   this.CreateShadowObj(clrNONE,(uchar)array_form_style[style][FORM_STYLE_FRAME_SHADOW_OPACITY]);

//--- Set a color scheme
   this.SetColorTheme(theme,opacity);
//--- Calculate a shadow color with color darkening
   color clr=array_color_themes[theme][COLOR_THEME_COLOR_FORM_SHADOW];
   color gray=CGCnvElement::ChangeColorSaturation(ChartColorBackground(),-100);
   color color_shadow=CGCnvElement::ChangeColorLightness((use_bg_color ? gray : clr),-fabs(array_form_style[style][FORM_STYLE_DARKENING_COLOR_FOR_SHADOW]));
   this.SetColorShadow(color_shadow);

//--- Draw a rectangular shadow
   int shift_x=array_form_style[style][FORM_STYLE_FRAME_SHADOW_X_SHIFT];
   int shift_y=array_form_style[style][FORM_STYLE_FRAME_SHADOW_Y_SHIFT];
   this.DrawShadow(shift_x,shift_y,color_shadow,this.OpacityShadow(),(uchar)array_form_style[style][FORM_STYLE_FRAME_SHADOW_BLUR]);

//--- Fill in the form background with color and opacity
   this.Erase(this.ColorBackground(),this.Opacity());
//--- Depending on the selected form style, draw the corresponding form frame and the outer bounding frame
   switch(style)
     {
      case FORM_STYLE_BEVEL   :
        this.DrawFormFrame(this.m_frame_width_top,this.m_frame_width_bottom,this.m_frame_width_left,this.m_frame_width_right,this.ColorFrame(),this.Opacity(),FRAME_STYLE_BEVEL);

        break;
      //---FORM_STYLE_FLAT
      default:
        this.DrawFormFrame(this.m_frame_width_top,this.m_frame_width_bottom,this.m_frame_width_left,this.m_frame_width_right,this.ColorFrame(),this.Opacity(),FRAME_STYLE_FLAT);

        break;
     }
   this.DrawRectangle(0,0,Width()-1,Height()-1,array_color_themes[theme][COLOR_THEME_COLOR_FORM_RECT_OUTER],this.Opacity());
  }
//+------------------------------------------------------------------+
La lógica del método se describe en los comentarios. Resumiendo: primero creamos un objeto de sombra. Después de configurar la paleta de colores, calculamos el color necesario para dibujar la sombra. Si establecemos la bandera de uso del color de fondo, entonces para dibujar la sombra utilizaremos el color de fondo del gráfico convertido a monocromo y oscurecido según el valor del parámetro de sombreado escrito en el estilo del formulario en el archivo GraphINI.mqh. Si la bandera no ha sido establecida, usaremos el color sombreado de la misma manera, configurado en los esquemas de color de los formularios en el archivo GraphINI.mqh. A continuación, llamamos al método para dibujar una sombra, que dibujará una sombra solo si establecemos la bandera de uso de la sombra en el objeto de formulario.
En todos los métodos donde se usa el aclaramiento/oscurecimiento de los marcos del formulario, reemplazamos los valores especificados en los números reales
      //--- Darken the horizontal sides of the frame
      for(int i=0;i<width;i++)
        {
         this.m_canvas.PixelSet(x+i,y,CGCnvElement::ChangeColorLightness(this.GetPixel(x+i,y),-0.05));
         this.m_canvas.PixelSet(x+i,y+height-1,CGCnvElement::ChangeColorLightness(this.GetPixel(x+i,y+height-1),-0.07));
        }
por los valores enteros correspondientes, pero cien veces mayores (en los métodos llamados en estas líneas, introducimos la división del valor transmitido por 100):
      //--- Darken the horizontal sides of the frame
      for(int i=0;i<width;i++)
        {
         this.m_canvas.PixelSet(x+i,y,CGCnvElement::ChangeColorLightness(this.GetPixel(x+i,y),-5));
         this.m_canvas.PixelSet(x+i,y+height-1,CGCnvElement::ChangeColorLightness(this.GetPixel(x+i,y+height-1),-7));
        }
Ya hemos hecho esto en todos los métodos en los que era necesario reemplazar estos valores, por lo que no repetiremos el mismo tipo de cambios aquí; el lector podrá encontrar los códigos en los archivos adjuntos al artículo.
Método para establecer el color de la sombra del formulario:
//+------------------------------------------------------------------+
//| Set the form shadow color                                        |
//+------------------------------------------------------------------+
void CForm::SetColorShadow(const color colour)
  {
   if(this.m_shadow_obj==NULL)
     {
      ::Print(DFUN,CMessage::Text(MSG_FORM_OBJECT_TEXT_NO_SHADOW_OBJ_FIRST_CREATE_IT));
      return;
     }
   this.m_shadow_obj.SetColorShadow(colour);
  }
//+------------------------------------------------------------------+
Aquí, primero verificamos la existencia del objeto de sombra, y solo si hay uno, establecemos el color de la sombra. De lo contrario, enviamos un mensaje al diario sobre la ausencia del objeto de sombra y la propuesta de crearlo primero.
Método que retorna el color de la sombra del formulario:
//+------------------------------------------------------------------+
//| Return the form shadow color                                     |
//+------------------------------------------------------------------+
color CForm::ColorShadow(void) const
  {
   if(this.m_shadow_obj==NULL)
     {
      ::Print(DFUN,CMessage::Text(MSG_FORM_OBJECT_TEXT_NO_SHADOW_OBJ_FIRST_CREATE_IT));
      return clrNONE;
     }
   return this.m_shadow_obj.ColorShadow();
  }
//+------------------------------------------------------------------+
En este lugar, primero verificamos exactamente de la misma forma la existencia del objeto, y solo luego retornamos desde este el color de la sombra.
Métodos para configurar y retornar la opacidad de la sombra:
//+------------------------------------------------------------------+
//| Set the form shadow opacity                                      |
//+------------------------------------------------------------------+
void CForm::SetOpacityShadow(const uchar opacity)
  {
   if(this.m_shadow_obj==NULL)
     {
      ::Print(DFUN,CMessage::Text(MSG_FORM_OBJECT_TEXT_NO_SHADOW_OBJ_FIRST_CREATE_IT));
      return;
     }
   this.m_shadow_obj.SetOpacityShadow(opacity);
  }
//+------------------------------------------------------------------+
//| Return the form shadow opacity                                   |
//+------------------------------------------------------------------+
uchar CForm::OpacityShadow(void) const
  {
   if(this.m_shadow_obj==NULL)
     {
      ::Print(DFUN,CMessage::Text(MSG_FORM_OBJECT_TEXT_NO_SHADOW_OBJ_FIRST_CREATE_IT));
      return 0;
     }
   return this.m_shadow_obj.OpacityShadow();
  }
//+------------------------------------------------------------------+
En cuanto a su lógica, estos métodos son idénticos a los dos anteriores.
Ya estamos listos para poner a prueba la creación de un objeto de sombra para los formularios.
Simulación
Vamos a comprobar la creación de sombras para los objetos de formulario. Para ello, crearemos dos formularios con parámetros escritos en los estilos de los formularios y los esquemas de color (todo lo que hemos hecho en el artículo anterior); el tercer formulario se creará "a mano", y será otro ejemplo sobre cómo dibujar nuestro formulario. Como los objetos de sombra para los formularios se dibujan después de crear el formulario en sí, comprobaremos cuál de los objetos reacciona al clic sobre él con el ratón: si el objeto de formulario se encuentra por encima del objeto en el que se dibuja su sombra, entonces el clic sobre el formulario mostrará el nombre del formulario en el diario. Si el objeto de sombra sigue estando más alto que el formulario, en el diario veremos el nombre del objeto de sombra del formulario.
Para la simulación, vamos a tomar el asesor del artículo anterior y guardarlo en la nueva carpeta \MQL5\Experts\TestDoEasy\Part77\ con el nuevo nombre TestDoEasyPart77.mq5.
Asimismo, añadiremos a la lista de parámetros de entrada del asesor un ajuste que nos permitirá elegir qué color utilizaremos para la sombra: el color de fondo del gráfico, o el color especificado, que podemos indicar en el siguiente parámetro de entrada. Después, añadimos a la lista de variables globalesuna matriz que almacenará los colores para rellenar el formulario con un gradiente:
//+------------------------------------------------------------------+
//|                                             TestDoEasyPart77.mq5 |
//|                                  Copyright 2021, MetaQuotes Ltd. |
//|                             https://mql5.com/en/users/artmedia70 |
//+------------------------------------------------------------------+
#property copyright "Copyright 2021, MetaQuotes Ltd."
#property link      "https://mql5.com/en/users/artmedia70"
#property version   "1.00"
//--- includes
#include <Arrays\ArrayObj.mqh>
#include <DoEasy\Services\Select.mqh>
#include <DoEasy\Objects\Graph\Form.mqh>
//--- defines
#define        FORMS_TOTAL (3)   // Number of created forms
//--- input parameters
sinput   bool              InpMovable     =  true;          // Movable forms flag
sinput   ENUM_INPUT_YES_NO InpUseColorBG  =  INPUT_YES;     // Use chart background color to calculate shadow color
sinput   color             InpColorForm3  =  clrCadetBlue;  // Third form shadow color (if not background color)
//--- global variables
CArrayObj      list_forms;
color          array_clr[];
//+------------------------------------------------------------------+
Añadimos al manejador OnInit() la creación del tercer objeto de formulario:
//+------------------------------------------------------------------+
//| Expert initialization function                                   |
//+------------------------------------------------------------------+
int OnInit()
  {
//--- Set the permissions to send cursor movement and mouse scroll events
   ChartSetInteger(ChartID(),CHART_EVENT_MOUSE_MOVE,true);
   ChartSetInteger(ChartID(),CHART_EVENT_MOUSE_WHEEL,true);
//--- Set EA global variables
   ArrayResize(array_clr,2);
   array_clr[0]=C'26,100,128';      // Original ≈Dark-azure color
   array_clr[1]=C'35,133,169';      // Lightened original color
//--- Create the specified number of form objects
   list_forms.Clear();
   int total=FORMS_TOTAL;
   for(int i=0;i<total;i++)
     {
      //--- When creating an object, pass all the required parameters to it
      CForm *form=new CForm("Form_0"+(string)(i+1),300,40+(i*80),100,(i<2 ? 70 : 30));
      if(form==NULL)
         continue;
      //--- Set activity and moveability flags for the form
      form.SetActive(true);
      form.SetMovable(false);
      //--- Set the form ID equal to the loop index and the index in the list of objects
      form.SetID(i);
      form.SetNumber(0);   // (0 - main form object) Auxiliary objects may be attached to the main one. The main object is able to manage them
      //--- Set the partial opacity for the middle form and the full one for the rest
      uchar opacity=(i==1 ? 250 : 255);
      //--- Set the form style and its color theme depending on the loop index
      if(i<2)
        {
         ENUM_FORM_STYLE style=(ENUM_FORM_STYLE)i;
         ENUM_COLOR_THEMES theme=(ENUM_COLOR_THEMES)i;
         //--- Set the form style and theme
         form.SetFormStyle(style,theme,opacity,true,false);
        }
      //--- If this is the first (top) form
      if(i==0)
        {
         //--- Draw a concave field slightly shifted from the center of the form downwards
         form.DrawFieldStamp(3,10,form.Width()-6,form.Height()-13,form.ColorBackground(),form.Opacity());
         form.Update(true);
        }
      //--- If this is the second (middle) form
      if(i==1)
        {
         //--- Draw a concave semi-transparent "tainted glass" field in the center
         form.DrawFieldStamp(10,10,form.Width()-20,form.Height()-20,clrWheat,200);
         form.Update(true);
        }
      //--- If this is the third (bottom) form
      if(i==2)
        {
         //--- Set the opacity of 200
         form.SetOpacity(200);
         //--- The form background color is set as the first color from the color array
         form.SetColorBackground(array_clr[0]);
         //--- Form outlining frame color
         form.SetColorFrame(clrDarkBlue);
         //--- Draw the shadow drawing flag
         form.SetShadow(true);
         //--- Calculate the shadow color as the chart background color converted to the monochrome one
         color clrS=form.ChangeColorSaturation(form.ColorBackground(),-100);
         //--- If the settings specify the usage of the chart background color, replace the monochrome color with 20 units
         //--- Otherwise, use the color specified in the settings for drawing the shadow
         color clr=(InpUseColorBG ? form.ChangeColorLightness(clrS,255,-20) : InpColorForm3);
         //--- Draw the form shadow with the right-downwards offset from the form by three pixels along all axes
         //--- Set the shadow opacity to 200, while the blur radius is equal to 4
         form.DrawShadow(3,3,clr,200,4);
         //--- Fill the form background with a vertical gradient
         form.Erase(array_clr,form.Opacity());
         //--- Draw an outlining rectangle at the edges of the form
         form.DrawRectangle(0,0,form.Width()-1,form.Height()-1,form.ColorFrame(),form.Opacity());
         //--- Display the text describing the gradient type and update the form
         form.Text(form.Width()/2,form.Height()/2,TextByLanguage("V-Градиент","V-Gradient"),C'211,233,149',255,TEXT_ANCHOR_CENTER);
         form.Update(true);
        }
      //--- Add objects to the list
      if(!list_forms.Add(form))
        {
         delete form;
         continue;
        }
     }
//---
   return(INIT_SUCCEEDED);
  }
//+------------------------------------------------------------------+
La lógica completa de la creación del formulario se describe en los comentarios al código. Este es otro ejemplo de cómo podemos crear nuestros propios objetos de formulario.
Escribimos en el manejador OnChartEvent() la muestra en el diario del nombre del objeto gráfico cuando cliquemos sobre él:
//+------------------------------------------------------------------+
//| ChartEvent function                                              |
//+------------------------------------------------------------------+
void OnChartEvent(const int id,
                  const long &lparam,
                  const double &dparam,
                  const string &sparam)
  {
//--- If clicking on an object
   if(id==CHARTEVENT_OBJECT_CLICK)
     {
      Print(sparam);
     }
  }
//+------------------------------------------------------------------+
Compilamos el asesor, lo ejecutamos en el gráfico y cambiamos la configuración de la sombra predeterminada:
Desafortunadamente, la imagen GIF no nos permite ver la paleta de colores completa.
Así es como se ve un formulario con un fondo degradado en formato de imagen PNG:
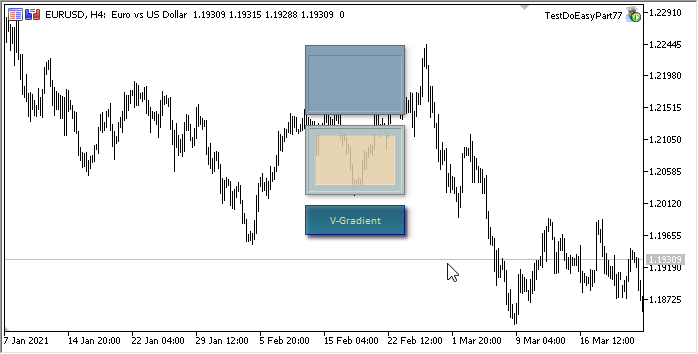
Cuando clicamos en cada uno de los formularios, en la historia se muestran los nombres de los formularios, no sus objetos de sombra:
TestDoEasyPart77_Form_01
TestDoEasyPart77_Form_02
TestDoEasyPart77_Form_03
Esto nos indica que el objeto de sombra, después de ser creado a partir de un objeto de formulario, todavía se desplaza hacia al fondo para no "interferir" con el trabajo del formulario que lo ha creado.
¿Qué es lo próximo?
En el próximo artículo, continuaremos desarrollando el objeto de formulario, y también comenzaremos a "darle vida" paulatinamente a nuestras imágenes, por ahora estáticas.
Más abajo se adjuntan todos los archivos de la versión actual de la biblioteca y el archivo del asesor de prueba para MQL5. Puede descargarlo todo y ponerlo a prueba por sí mismo.
Si tiene preguntas, observaciones o sugerencias, podrá concretarlas en los comentarios al artículo.
*Artículos de esta serie:
Gráficos en la biblioteca DoEasy (Parte 73): Objeto de formulario del elemento gráfico
Gráficos en la biblioteca DoEasy (Parte 74): Elemento gráfico básico sobre la clase CCanvas
Gráficos en la biblioteca DoEasy (Parte 75): Métodos de trabajo con primitivas y texto en el elemento gráfico básico.
Gráficos en la biblioteca DoEasy (Parte 76): Objeto de formulario y temas de color predeterminados
Traducción del ruso hecha por MetaQuotes Ltd.
Artículo original: https://www.mql5.com/ru/articles/9575
Advertencia: todos los derechos de estos materiales pertenecen a MetaQuotes Ltd. Queda totalmente prohibido el copiado total o parcial.
Este artículo ha sido escrito por un usuario del sitio web y refleja su punto de vista personal. MetaQuotes Ltd. no se responsabiliza de la exactitud de la información ofrecida, ni de las posibles consecuencias del uso de las soluciones, estrategias o recomendaciones descritas.

 Patrones con ejemplos (Parte I): Pico múltiple
- Aplicaciones de trading gratuitas
- 8 000+ señales para copiar
- Noticias económicas para analizar los mercados financieros
Usted acepta la política del sitio web y las condiciones de uso
¿Es DoEasy una librería que aún estáis desarrollando o ya está desarrollada? ¿Dónde podemos tener acceso a toda esta biblioteca, github? Gracias
Estos artículos son un tutorial de desarrollo. Describen el proceso de desarrollo de esta librería "en vivo". Por lo tanto, el acceso a la misma es sólo en cada artículo posterior.