
Gráficos en la biblioteca DoEasy (Parte 78): Fundamentos de animación en la biblioteca. Cortando las imágenes

Contenido
- Concepto
- Mejorando las clases de la biblioteca
- Clases para copiar y pegar partes de una imagen
- Simulación
- ¿Qué es lo próximo?
Concepto
A priori, una interfaz gráfica presupone la presencia de imágenes no estáticas. Cualquier dato mostrado (por ejemplo, los presentados en recuadros) puede cambiar con el tiempo. Los elementos de la GUI pueden reaccionar a las acciones del usuario con la ayuda de varios efectos visuales, etcétera.
Hoy, vamos a crear algunos métodos para organizar varios efectos visuales, y también ofreceremos a la biblioteca de la posibilidad de trabajar con animación de sprites. La animación se basa en el uso de una secuencia cambiante (fotograma por fotograma) de imágenes estáticas.
La clase CCanvas permite dibujar imágenes en el lienzo. A partir de una serie de imágenes dibujadas y guardadas en matrices de imágenes, podemos construir una determinada secuencia que eventualmente resultará una imagen animada. Pero si solo dibujamos una a una las imágenes de forma secuencial en el lienzo, estas simplemente se superpondrán entre sí y eventualmente se acumularán en un caótico montón de píxeles, como vemos en la imagen de abajo (aquí simplemente mostramos el texto en diferentes ubicaciones del objeto de formulario):
![]()
Para evitar esto, necesitaremos eliminar completamente la imagen anterior, volver a dibujar el fondo y mostrar el texto en este (lo hemos hecho en uno de los artículos anteriores al ubicar el texto describiendo el método de anclaje del texto en el formulario). Esta opción solo resulta posible cuando el tamaño y la complejidad del formulario redibujado son pequeños. Otra opción consiste en guardar la parte del fondo sobre la que se superpondrá el texto en la memoria (en la matriz) y luego añadir el texto. Al reubicar este en las nuevas coordenadas, sobrescribiremos el texto dibujado usando la imagen de fondo previamente guardada de la matriz (para restaurar el fondo) y dibujaremos el texto en la nueva ubicación (guardando preliminarmente la parte del fondo de la ubicación a donde desplazaremos el texto a trasladar). Por consiguiente, el fondo de la ubicación sobre la que vamos a superponer la imagen se guarda constantemente en la memoria y se restaura si fuera necesario cambiar la imagen.
Este es el elemento mínimo del concepto de animación de sprites que vamos a introducir en la biblioteca:
- Guardar un fondo con las coordenadas necesarias
- Visualización de una imagen usando las coordenadas
- Restaurar el fondo al volver a dibujar la imagen
Para conseguir todo esto, crearemos una pequeña clase que almacenará las coordenadas y el tamaño de la imagen. Dicha clase también contendrá un método que guardará la parte de la imagen de fondo que posee estas coordenadas, así como el tamaño de esta imagen. Además, necesitaremos un segundo método que almacenará el fondo guardado en la matriz (el tamaño y las coordenadas se almacenarán en las variables de clase al guardar el fondo en la matriz).
¿Por qué estamos construyendo una clase en lugar de crear dos de estos métodos para el objeto de formulario? La respuesta es simple: si necesitamos mostrar solo texto o una sola imagen animada, entonces dos métodos resultarán suficientes. Pero si necesitamos mostrar varios textos en diferentes ubicaciones del formulario, la clase será más adecuada. Cada imagen animada recibe sus propias instancias de clase que se pueden gestionar por separado.
Este concepto permite dibujar algo usando una imagen previamente dibujada como fondo; guardaremos tanto el fondo como la imagen dibujada, que a su vez se puede eliminar del fondo.
Usaremos este concepto para desarrollar una clase encargada de crear, almacenar y mostrar varias animaciones de sprites en el objeto de formulario; cada instancia de clase contendrá una secuencia de imágenes que podrá añadirse dinámicamente a la lista, gestionarse, etc.
Mejorando las clases de la biblioteca
Como de costumbre, añadiremos al inicio del archivo \MQL5\Include\DoEasy\Data.mqh los índices de los nuevos mensajes:
//--- CChartObjCollection
   MSG_CHART_COLLECTION_TEXT_CHART_COLLECTION,        // Chart collection
   MSG_CHART_COLLECTION_ERR_FAILED_CREATE_CHART_OBJ,  // Failed to create a new chart object
   MSG_CHART_COLLECTION_ERR_FAILED_ADD_CHART,         // Failed to add a chart object to the collection
   MSG_CHART_COLLECTION_ERR_CHARTS_MAX,               // Cannot open new chart. Number of open charts at maximum
   MSG_CHART_COLLECTION_CHART_OPENED,                 // Chart opened
   MSG_CHART_COLLECTION_CHART_CLOSED,                 // Chart closed
   MSG_CHART_COLLECTION_CHART_SYMB_CHANGED,           // Chart symbol changed
   MSG_CHART_COLLECTION_CHART_TF_CHANGED,             // Chart timeframe changed
   MSG_CHART_COLLECTION_CHART_SYMB_TF_CHANGED,        // Chart symbol and timeframe changed

//--- CGCnvElement
   MSG_CANV_ELEMENT_ERR_EMPTY_ARRAY,                  // Error! Empty array

//--- CForm
   MSG_FORM_OBJECT_TEXT_NO_SHADOW_OBJ_FIRST_CREATE_IT,// No shadow object. Create it using the CreateShadowObj() method
   MSG_FORM_OBJECT_ERR_FAILED_CREATE_SHADOW_OBJ,      // Failed to create new shadow object
   MSG_FORM_OBJECT_ERR_FAILED_CREATE_PC_OBJ,          // Failed to create new pixel copier object
   MSG_FORM_OBJECT_PC_OBJ_ALREADY_IN_LIST,            // Pixel copier object with ID already present in the list
   MSG_FORM_OBJECT_PC_OBJ_NOT_EXIST_LIST,             // No pixel copier object with ID in the list

//--- CShadowObj
   MSG_SHADOW_OBJ_IMG_SMALL_BLUR_LARGE,               // Error! Image size too small or blur too extensive

  };
//+------------------------------------------------------------------+
y los textos de los mensajes que se corresponden con los índices nuevamente añadidos:
//--- CChartObjCollection
   {"Коллекция чартов","Chart collection"},
   {"Не удалось создать новый объект-чарт","Failed to create new chart object"},
   {"Не удалось добавить объект-чарт в коллекцию","Failed to add chart object to collection"},
   {"Нельзя открыть новый график, так как количество открытых графиков уже максимальное","You cannot open a new chart, since the number of open charts is already maximum"},
   {"Открыт график","Open chart"},
   {"Закрыт график","Closed chart"},
   {"Изменён символ графика","Changed chart symbol"},
   {"Изменён таймфрейм графика","Changed chart timeframe"},
   {"Изменён символ и таймфрейм графика","Changed the symbol and timeframe of the chart"},

//--- CGCnvElement
   {"Ошибка! Пустой массив","Error! Empty array"},

//--- CForm
   {"Отсутствует объект тени. Необходимо сначала его создать при помощи метода CreateShadowObj()","There is no shadow object. You must first create it using the CreateShadowObj () method"},
   {"Не удалось создать новый объект для тени","Failed to create new object for shadow"},
   {"Не удалось создать новый объект-копировщик пикселей","Failed to create new pixel copier object"},
   {"В списке уже есть объект-копировщик пикселей с идентификатором ","There is already a pixel copier object in the list with ID "},
   {"В списке нет объекта-копировщика пикселей с идентификатором ","No pixel copier object with ID "},

//--- CShadowObj
   {"Ошибка! Размер изображения очень маленький или очень большое размытие","Error! Image size is very small or very large blur"},

  };
//+---------------------------------------------------------------------+
Como más adelante dibujaremos cualquier imagen o texto en objetos de formulario prefabricados heredados de un elemento gráfico, o cualquier otro objeto de la interfaz gráfica de nuestros programas, siempre necesitaremos "tener a mano" el aspecto inicial de este objeto, para que en cualquier momento podamos restaurarlo a su forma original.
Claro que podríamos redibujarlo, pero resultará mucho más rápido copiar una matriz en otra.
Para hacerlo, necesitamos realizar algunas modificaciones y ediciones en el archivo \MQL5\Include\DoEasy\Objects\Graph\GCnvElement.mqh de la clase del objeto de elemento gráfico.
En la sección protegida de la clase, declaramos la matriz en la que se guardarán todos los píxeles del objeto creado inicialmente (su aspecto) inmediatamente después de su creación, y el método que guardará el recurso gráfico de la instancia de la clase CCanvas en esta matriz:
//+------------------------------------------------------------------+
//| Class of the graphical element object                            |
//+------------------------------------------------------------------+
class CGCnvElement : public CGBaseObj
  {
protected:
   CCanvas           m_canvas;                                 // CCanvas class object
   CPause            m_pause;                                  // Pause class object
   bool              m_shadow;                                 // Shadow presence
   color             m_chart_color_bg;                         // Chart background color
   uint              m_data_array[];                           // Array for storing resource data copy
//--- Return the cursor position relative to the (1) entire element and (2) the element's active area
   bool              CursorInsideElement(const int x,const int y);
   bool              CursorInsideActiveArea(const int x,const int y);
//--- Create (1) the object structure and (2) the object from the structure
   virtual bool      ObjectToStruct(void);
   virtual void      StructToObject(void);

//--- Save the graphical resource to the array
   bool              ResourceCopy(const string source);

private:
Por consiguiente, sacrificando una pequeña cantidad de memoria, podremos (si fuera necesario) restaurar rápidamente el aspecto de cualquier elemento de la interfaz del programa a su forma original: bastará con copiar una matriz en otra.
Para que sepamos siempre en qué coordenadas se ha mostrado el último texto dibujado (lo cual nos facilitará encontrar las coordenadas en las que debemos introducir el fondo original sobrescrito por este texto), declararemos en la sección privada del clase las dos variables encargadas de almacenar la coordenadas X e Y del último texto dibujado:
   long              m_long_prop[ORDER_PROP_INTEGER_TOTAL];    // Integer properties
   double            m_double_prop[ORDER_PROP_DOUBLE_TOTAL];   // Real properties
   string            m_string_prop[ORDER_PROP_STRING_TOTAL];   // String properties

   ENUM_TEXT_ANCHOR  m_text_anchor;                            // Current text alignment
   int               m_text_x;                                 // Text last X coordinate
   int               m_text_y;                                 // Text last Y coordinate
   color             m_color_bg;                               // Element background color
   uchar             m_opacity;                                // Element opacity

//--- Return the index of the array the order's (1) double and (2) string properties are located at
En la sección pública de la clase, escribimos un método que retornará el puntero a la instancia actual de la clase, y declararemos otro método para almacenar la imagen en la matriz especificada:
//--- Return the flag of the object supporting this property
   virtual bool      SupportProperty(ENUM_CANV_ELEMENT_PROP_INTEGER property)          { return true;    }
   virtual bool      SupportProperty(ENUM_CANV_ELEMENT_PROP_DOUBLE property)           { return false;   }
   virtual bool      SupportProperty(ENUM_CANV_ELEMENT_PROP_STRING property)           { return true;    }

//--- Return itself
   CGCnvElement     *GetObject(void)                                                   { return &this;   }

//--- Compare CGCnvElement objects with each other by all possible properties (for sorting the lists by a specified object property)
   virtual int       Compare(const CObject *node,const int mode=0) const;
//--- Compare CGCnvElement objects with each other by all properties (to search equal objects)
   bool              IsEqual(CGCnvElement* compared_obj) const;

//--- (1) Save the object to file and (2) upload the object from the file
   virtual bool      Save(const int file_handle);
   virtual bool      Load(const int file_handle);

//--- Create the element
   bool              Create(const long chart_id,
                            const int wnd_num,
                            const string name,
                            const int x,
                            const int y,
                            const int w,
                            const int h,
                            const color colour,
                            const uchar opacity,
                            const bool redraw=false);

//--- Return the pointer to a canvas object
   CCanvas          *GetCanvasObj(void)                                                { return &this.m_canvas;                        }
//--- Set the canvas update frequency
   void              SetFrequency(const ulong value)                                   { this.m_pause.SetWaitingMSC(value);            }
//--- Update the coordinates (shift the canvas)
   bool              Move(const int x,const int y,const bool redraw=false);

//--- Save an image to the array
   bool              ImageCopy(const string source,uint &array[]);
Necesitaremos un método que permita que la clase retorne un puntero a sí misma para transmitir el puntero a esta clase a la clase que copia los píxeles, que analizaremos a continuación. El método que copia el recurso gráfico de la instancia de CCANVAS podría ser necesario para copiar rápidamente el aspecto del formulario a la matriz deseada en un programa creado usando como base esta biblioteca.
En el bloque de código de los métodos para trabajar con texto, añadimos los dos métodos para retornar las coordenadas X e Y del último texto dibujado:
//+------------------------------------------------------------------+
//| Methods of working with text                                     |
//+------------------------------------------------------------------+
//--- Return (1) alignment type (anchor method), the last (2) X and (3) Y text coordinate
   ENUM_TEXT_ANCHOR  TextAnchor(void)                       const { return this.m_text_anchor;                                         }
   int               TextLastX(void)                        const { return this.m_text_x;                                              }
   int               TextLastY(void)                        const { return this.m_text_y;                                              }
//--- Set the current font
Los métodos simplemente retornan los valores de las variables correspondientes.
Para que estos valores estén siempre actualizados, en el método que muestra el texto en la fuente actual, escribiremos en estas variables las coordenadas transmitidas en los argumentos del método:
//--- Display the text in the current font
   void              Text(int         x,                          // X coordinate of the text anchor point
                          int         y,                          // Y coordinate of the text anchor point
                          string      text,                       // Display text
                          const color clr,                        // Color
                          const uchar opacity=255,                // Opacity
                          uint        alignment=0)                // Text anchoring method
                       {
                        this.m_text_anchor=(ENUM_TEXT_ANCHOR)alignment;
                        this.m_text_x=x;
                        this.m_text_y=y;
                        this.m_canvas.TextOut(x,y,text,::ColorToARGB(clr,opacity),alignment);
                       }
El texto dibujado puede tener nueve puntos de anclaje:
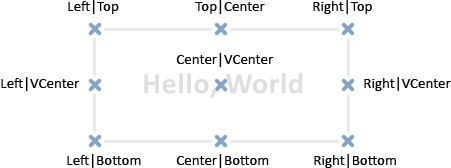
Por ejemplo, si el punto de anclaje del texto está en la parte inferior derecha (Right|Bottom), esta será la coordenada inicial XY. En nuestra biblioteca, las coordenadas iniciales siempre se corresponden con la esquina superior izquierda del rectángulo (Left|Top). Y si guardamos la imagen con las coordenadas iniciales del texto, el texto se encontrará en la parte inferior derecha de la imagen guardada, lo cual no nos permitirá almacenar correctamente el área del fondo sobre la que estará el texto superpuesto.
Por consiguiente, necesitaremos calcular los desplazamientos de las coordenadas del rectángulo dibujado del texto donde deberemos guardar el fondo en una matriz para su posterior restauración. Por otro lado, podemos calcular de antemano la anchura y la altura del futuro texto antes de dibujarlo. Solo necesitamos indicar el texto en sí, y el método TextSize() de la clase CCanvas nos retornará la anchura y la altura del rectángulo dibujado.
En la sección pública de la clase, declaramos el método que retorna el desplazamiento de las coordenadas X e Y, dependiendo de cómo esté alineado el texto:
//--- Return coordinate offsets relative to the text anchor point
   void              TextGetShiftXY(const string text,            // Text for calculating the size of its outlining rectangle
                                    const ENUM_TEXT_ANCHOR anchor,// Text anchor point, relative to which the offsets are calculated
                                    int &shift_x,                 // X coordinate of the rectangle upper left corner
                                    int &shift_y);                // Y coordinate of the rectangle upper left corner

  };
//+------------------------------------------------------------------+
//| Parametric constructor                                           |
//+------------------------------------------------------------------+
Analizaremos el método a continuación.
En el constructor paramétrico de la clase, inicializamos las coordenadas del último texto dibujado:
//+------------------------------------------------------------------+
//| Parametric constructor                                           |
//+------------------------------------------------------------------+
CGCnvElement::CGCnvElement(const ENUM_GRAPH_ELEMENT_TYPE element_type,
                           const int      element_id,
                           const int      element_num,
                           const long     chart_id,
                           const int      wnd_num,
                           const string   name,
                           const int      x,
                           const int      y,
                           const int      w,
                           const int      h,
                           const color    colour,
                           const uchar    opacity,
                           const bool     movable=true,
                           const bool     activity=true,
                           const bool     redraw=false) : m_shadow(false)
  {
   this.m_chart_color_bg=(color)::ChartGetInteger(chart_id,CHART_COLOR_BACKGROUND);
   this.m_name=this.m_name_prefix+name;
   this.m_chart_id=chart_id;
   this.m_subwindow=wnd_num;
   this.m_type=element_type;
   this.SetFont("Calibri",8);
   this.m_text_anchor=0;
   this.m_text_x=0;
   this.m_text_y=0;
   this.m_color_bg=colour;
   this.m_opacity=opacity;
   if(this.Create(chart_id,wnd_num,this.m_name,x,y,w,h,colour,opacity,redraw))
     {
      this.SetProperty(CANV_ELEMENT_PROP_NAME_RES,this.m_canvas.ResourceName()); // Graphical resource name
      this.SetProperty(CANV_ELEMENT_PROP_CHART_ID,CGBaseObj::ChartID());         // Chart ID
      this.SetProperty(CANV_ELEMENT_PROP_WND_NUM,CGBaseObj::SubWindow());        // Chart subwindow index
      this.SetProperty(CANV_ELEMENT_PROP_NAME_OBJ,CGBaseObj::Name());            // Element object name
      this.SetProperty(CANV_ELEMENT_PROP_TYPE,element_type);                     // Graphical element type
      this.SetProperty(CANV_ELEMENT_PROP_ID,element_id);                         // Element ID
      this.SetProperty(CANV_ELEMENT_PROP_NUM,element_num);                       // Element index in the list
      this.SetProperty(CANV_ELEMENT_PROP_COORD_X,x);                             // Element's X coordinate on the chart
      this.SetProperty(CANV_ELEMENT_PROP_COORD_Y,y);                             // Element's Y coordinate on the chart
      this.SetProperty(CANV_ELEMENT_PROP_WIDTH,w);                               // Element width
      this.SetProperty(CANV_ELEMENT_PROP_HEIGHT,h);                              // Element height
      this.SetProperty(CANV_ELEMENT_PROP_ACT_SHIFT_LEFT,0);                      // Active area offset from the left edge of the element
      this.SetProperty(CANV_ELEMENT_PROP_ACT_SHIFT_TOP,0);                       // Active area offset from the upper edge of the element
      this.SetProperty(CANV_ELEMENT_PROP_ACT_SHIFT_RIGHT,0);                     // Active area offset from the right edge of the element
      this.SetProperty(CANV_ELEMENT_PROP_ACT_SHIFT_BOTTOM,0);                    // Active area offset from the bottom edge of the element
      this.SetProperty(CANV_ELEMENT_PROP_MOVABLE,movable);                       // Element moveability flag
      this.SetProperty(CANV_ELEMENT_PROP_ACTIVE,activity);                       // Element activity flag
      this.SetProperty(CANV_ELEMENT_PROP_RIGHT,this.RightEdge());                // Element right border
      this.SetProperty(CANV_ELEMENT_PROP_BOTTOM,this.BottomEdge());              // Element bottom border
      this.SetProperty(CANV_ELEMENT_PROP_COORD_ACT_X,this.ActiveAreaLeft());     // X coordinate of the element active area
      this.SetProperty(CANV_ELEMENT_PROP_COORD_ACT_Y,this.ActiveAreaTop());      // Y coordinate of the element active area
      this.SetProperty(CANV_ELEMENT_PROP_ACT_RIGHT,this.ActiveAreaRight());      // Right border of the element active area
      this.SetProperty(CANV_ELEMENT_PROP_ACT_BOTTOM,this.ActiveAreaBottom());    // Bottom border of the element active area
     }
   else
     {
      ::Print(CMessage::Text(MSG_LIB_SYS_FAILED_CREATE_ELM_OBJ),this.m_name);
     }
  }
//+------------------------------------------------------------------+
En el constructor protegido de la clase, inicializamos de la misma forma estas variables:
//+------------------------------------------------------------------+
//| Protected constructor                                            |
//+------------------------------------------------------------------+
CGCnvElement::CGCnvElement(const ENUM_GRAPH_ELEMENT_TYPE element_type,
                           const long    chart_id,
                           const int     wnd_num,
                           const string  name,
                           const int     x,
                           const int     y,
                           const int     w,
                           const int     h) : m_shadow(false)
  {
   this.m_chart_color_bg=(color)::ChartGetInteger(chart_id,CHART_COLOR_BACKGROUND);
   this.m_name=this.m_name_prefix+name;
   this.m_chart_id=chart_id;
   this.m_subwindow=wnd_num;
   this.m_type=element_type;
   this.SetFont("Calibri",8);
   this.m_text_anchor=0;
   this.m_text_x=0;
   this.m_text_y=0;
   this.m_color_bg=NULL_COLOR;
   this.m_opacity=0;
   if(this.Create(chart_id,wnd_num,this.m_name,x,y,w,h,this.m_color_bg,this.m_opacity,false))
     {
      ...
Ahora, vamos a ver la implementación de los métodos anteriores.
Implementación del método que guarda la imagen en una matriz:
//+------------------------------------------------------------------+
//| Save the image to the array                                      |
//+------------------------------------------------------------------+
bool CGCnvElement::ImageCopy(const string source,uint &array[])
  {
   ::ResetLastError();
   int w=0,h=0;
   if(!::ResourceReadImage(this.NameRes(),array,w,h))
     {
      CMessage::ToLog(source,MSG_LIB_SYS_FAILED_GET_DATA_GRAPH_RES,true);
      return false;
     }
   return true;
  }
//+------------------------------------------------------------------+
Transmitimos al método el nombre del método o función desde el que ha sido llamado (esto es necesario para entender dónde ha sucedido el error, si lo hubiera), así como el enlace a la matriz en la que se deben introducir los datos del recurso gráfico (píxeles de la imagen) escrito.
Usando la función ResourceReadImage(), leemos en la matriz los datos del recurso gráfico creado por la clase CCanvas, que contiene la imagen del formulario. Si ha habido un error al leer el recurso, mostraremos un mensaje sobre esto y retornaremos false. Si todo ha salido bien, retornaremos true, y todos los píxeles de la imagen almacenados en el recurso se escribirán en la matriz transmitida al método.
Método que guarda un recurso gráfico en una matriz:
//+------------------------------------------------------------------+
//| Save the graphical resource to the array                         |
//+------------------------------------------------------------------+
bool CGCnvElement::ResourceCopy(const string source)
  {
   return this.ImageCopy(DFUN,this.m_data_array);
  }
//+------------------------------------------------------------------+
El método retorna el resultado de la llamada al método anterior, es decir, no se distingue en nada de él, salvo que aquí los datos del recurso gráfico no se escriben en la matriz transmitida según el enlace, sino en la matriz especial que declaramos anteriormente para almacenar una copia de la imagen del objeto de forma completa.
Método que retorna el desplazamiento de las coordenadas respecto al punto de anclaje del texto:
//+------------------------------------------------------------------+
//| Return coordinate offsets relative to the text anchor point      |
//+------------------------------------------------------------------+
void CGCnvElement::TextGetShiftXY(const string text,const ENUM_TEXT_ANCHOR anchor,int &shift_x,int &shift_y)
  {
   int tw=0,th=0;
   this.TextSize(text,tw,th);
   switch(anchor)
     {
      case TEXT_ANCHOR_LEFT_TOP :
        shift_x=0; shift_y=0;
        break;
      case TEXT_ANCHOR_LEFT_CENTER :
        shift_x=0; shift_y=-th/2;
        break;
      case TEXT_ANCHOR_LEFT_BOTTOM :
        shift_x=0; shift_y=-th;
        break;
      case TEXT_ANCHOR_CENTER_TOP :
        shift_x=-tw/2; shift_y=0;
        break;
      case TEXT_ANCHOR_CENTER :
        shift_x=-tw/2; shift_y=-th/2;
        break;
      case TEXT_ANCHOR_CENTER_BOTTOM :
        shift_x=-tw/2; shift_y=-th;
        break;
      case TEXT_ANCHOR_RIGHT_TOP :
        shift_x=-tw; shift_y=0;
        break;
      case TEXT_ANCHOR_RIGHT_CENTER :
        shift_x=-tw; shift_y=-th/2;
        break;
      case TEXT_ANCHOR_RIGHT_BOTTOM :
        shift_x=-tw; shift_y=-th;
        break;
      default:
        shift_x=0; shift_y=0;
        break;
     }
  }
//+------------------------------------------------------------------+
Aquí, primero obtenemos las dimensiones del texto transmitido al método (escribiremos las dimensiones en las variables declaradas), y luego calculamos cuántos píxeles debemos desplazar las coordenadas X e Y respecto a las coordenadas iniciales del texto, dependiendo del modo de anclado de texto transmitido al método.
Ahora, podemos modificar la clase de objeto de sombra. Como acabamos de añadir los métodos para leer el recurso gráfico y una matriz constante en la que podemos almacenar una copia del mismo, deberíamos eliminar cualquier variable, matriz y bloque de código innecesario de la clase de objeto de sombra.
Vamos a realizar algunas mejoras en el archivo \MQL5\Include\DoEasy\Objects\Graph\ShadowObj.mqh.
Eliminamos del método de desenfoque gaussiano la matriz y las variables innecesarias:
//+------------------------------------------------------------------+
//| Gaussian blur                                                    |
//| https://www.mql5.com/en/articles/1612#chapter4                   |
//+------------------------------------------------------------------+
bool CShadowObj::GaussianBlur(const uint radius)
  {
//---
   int n_nodes=(int)radius*2+1;
   uint res_data[];              // Array for storing graphical resource data
   uint res_w=this.Width();      // Graphical resource width
   uint res_h=this.Height();     // Graphical resource height

//--- Read graphical resource data. If failed, return false
En el bloque para leer los datos del recurso gráfico, sustituimos las líneas por la llamada al método que hemos escrito anteriormente:
//--- Read graphical resource data. If failed, return false
   ::ResetLastError();
   if(!::ResourceReadImage(this.NameRes(),res_data,res_w,res_h))
     {
      CMessage::OutByID(MSG_LIB_SYS_FAILED_GET_DATA_GRAPH_RES);
      return false;
     }
//--- Check the blur amount. If the blur radius exceeds half of the width or height, return 'false'

//--- Read graphical resource data. If failed, return false
   if(!CGCnvElement::ResourceCopy(DFUN))
      return false;
En todo el código, en lugar de las variables remotas res_w y res_h, usaremos los métodos de la clase de elemento gráfico del objeto Width() y Height(), y en lugar de la matriz res_data, usaremos la matriz m_data_array, que ahora se utiliza para almacenar las copias del recurso gráfico.
En general, todas las mejoras ha consistido simplemente en sustituir las variables innecesarias y eliminadas por los métodos de clase del objeto de elemento gráfico:
//+------------------------------------------------------------------+
//| Gaussian blur                                                    |
//| https://www.mql5.com/en/articles/1612#chapter4                   |
//+------------------------------------------------------------------+
bool CShadowObj::GaussianBlur(const uint radius)
  {
//---
   int n_nodes=(int)radius*2+1;
//--- Read graphical resource data. If failed, return false
   if(!CGCnvElement::ResourceCopy(DFUN))
      return false;

//--- Check the blur amount. If the blur radius exceeds half of the width or height, return 'false'
   if((int)radius>=this.Width()/2 || (int)radius>=this.Height()/2)
     {
      ::Print(DFUN,CMessage::Text(MSG_SHADOW_OBJ_IMG_SMALL_BLUR_LARGE));
      return false;
     }

//--- Decompose image data from the resource into a, r, g, b color components
   int  size=::ArraySize(this.m_data_array);
//--- arrays for storing A, R, G and B color components
//--- for horizontal and vertical blur
   uchar a_h_data[],r_h_data[],g_h_data[],b_h_data[];
   uchar a_v_data[],r_v_data[],g_v_data[],b_v_data[];

//--- Change the size of component arrays according to the array size of the graphical resource data
   if(::ArrayResize(a_h_data,size)==-1)
     {
      CMessage::ToLog(DFUN,MSG_LIB_SYS_FAILED_ARRAY_RESIZE);
      ::Print(DFUN_ERR_LINE,": \"a_h_data\"");
      return false;
     }
   if(::ArrayResize(r_h_data,size)==-1)
     {
      CMessage::ToLog(DFUN,MSG_LIB_SYS_FAILED_ARRAY_RESIZE);
      ::Print(DFUN_ERR_LINE,": \"r_h_data\"");
      return false;
     }
   if(::ArrayResize(g_h_data,size)==-1)
     {
      CMessage::ToLog(DFUN,MSG_LIB_SYS_FAILED_ARRAY_RESIZE);
      ::Print(DFUN_ERR_LINE,": \"g_h_data\"");
      return false;
     }
   if(ArrayResize(b_h_data,size)==-1)
     {
      CMessage::ToLog(DFUN,MSG_LIB_SYS_FAILED_ARRAY_RESIZE);
      ::Print(DFUN_ERR_LINE,": \"b_h_data\"");
      return false;
     }
   if(::ArrayResize(a_v_data,size)==-1)
     {
      CMessage::ToLog(DFUN,MSG_LIB_SYS_FAILED_ARRAY_RESIZE);
      ::Print(DFUN_ERR_LINE,": \"a_v_data\"");
      return false;
     }
   if(::ArrayResize(r_v_data,size)==-1)
     {
      CMessage::ToLog(DFUN,MSG_LIB_SYS_FAILED_ARRAY_RESIZE);
      ::Print(DFUN_ERR_LINE,": \"r_v_data\"");
      return false;
     }
   if(::ArrayResize(g_v_data,size)==-1)
     {
      CMessage::ToLog(DFUN,MSG_LIB_SYS_FAILED_ARRAY_RESIZE);
      ::Print(DFUN_ERR_LINE,": \"g_v_data\"");
      return false;
     }
   if(::ArrayResize(b_v_data,size)==-1)
     {
      CMessage::ToLog(DFUN,MSG_LIB_SYS_FAILED_ARRAY_RESIZE);
      ::Print(DFUN_ERR_LINE,": \"b_v_data\"");
      return false;
     }
//--- Declare the array for storing blur weight ratios and,
//--- if failed to get the array of weight ratios, return 'false'
   double weights[];
   if(!this.GetQuadratureWeights(1,n_nodes,weights))
      return false;

//--- Set components of each image pixel to the color component arrays
   for(int i=0;i<size;i++)
     {
      a_h_data[i]=GETRGBA(this.m_data_array[i]);
      r_h_data[i]=GETRGBR(this.m_data_array[i]);
      g_h_data[i]=GETRGBG(this.m_data_array[i]);
      b_h_data[i]=GETRGBB(this.m_data_array[i]);
     }

//--- Blur the image horizontally (along the X axis)
   uint XY; // Pixel coordinate in the array
   double a_temp=0.0,r_temp=0.0,g_temp=0.0,b_temp=0.0;
   int coef=0;
   int j=(int)radius;
   //--- Loop by the image width
   for(int Y=0;Y<this.Height();Y++)
     {
      //--- Loop by the image height
      for(uint X=radius;X<this.Width()-radius;X++)
        {
         XY=Y*this.Width()+X;
         a_temp=0.0; r_temp=0.0; g_temp=0.0; b_temp=0.0;
         coef=0;
         //--- Multiply each color component by the weight ratio corresponding to the current image pixel
         for(int i=-1*j;i<j+1;i=i+1)
           {
            a_temp+=a_h_data[XY+i]*weights[coef];
            r_temp+=r_h_data[XY+i]*weights[coef];
            g_temp+=g_h_data[XY+i]*weights[coef];
            b_temp+=b_h_data[XY+i]*weights[coef];
            coef++;
           }
         //--- Save each rounded color component calculated according to the ratios to the component arrays
         a_h_data[XY]=(uchar)::round(a_temp);
         r_h_data[XY]=(uchar)::round(r_temp);
         g_h_data[XY]=(uchar)::round(g_temp);
         b_h_data[XY]=(uchar)::round(b_temp);
        }
      //--- Remove blur artifacts to the left by copying adjacent pixels
      for(uint x=0;x<radius;x++)
        {
         XY=Y*this.Width()+x;
         a_h_data[XY]=a_h_data[Y*this.Width()+radius];
         r_h_data[XY]=r_h_data[Y*this.Width()+radius];
         g_h_data[XY]=g_h_data[Y*this.Width()+radius];
         b_h_data[XY]=b_h_data[Y*this.Width()+radius];
        }
      //--- Remove blur artifacts to the right by copying adjacent pixels
      for(int x=int(this.Width()-radius);x<this.Width();x++)
        {
         XY=Y*this.Width()+x;
         a_h_data[XY]=a_h_data[(Y+1)*this.Width()-radius-1];
         r_h_data[XY]=r_h_data[(Y+1)*this.Width()-radius-1];
         g_h_data[XY]=g_h_data[(Y+1)*this.Width()-radius-1];
         b_h_data[XY]=b_h_data[(Y+1)*this.Width()-radius-1];
        }
     }

//--- Blur vertically (along the Y axis) the image already blurred horizontally
   int dxdy=0;
   //--- Loop by the image height
   for(int X=0;X<this.Width();X++)
     {
      //--- Loop by the image width
      for(uint Y=radius;Y<this.Height()-radius;Y++)
        {
         XY=Y*this.Width()+X;
         a_temp=0.0; r_temp=0.0; g_temp=0.0; b_temp=0.0;
         coef=0;
         //--- Multiply each color component by the weight ratio corresponding to the current image pixel
         for(int i=-1*j;i<j+1;i=i+1)
           {
            dxdy=i*(int)this.Width();
            a_temp+=a_h_data[XY+dxdy]*weights[coef];
            r_temp+=r_h_data[XY+dxdy]*weights[coef];
            g_temp+=g_h_data[XY+dxdy]*weights[coef];
            b_temp+=b_h_data[XY+dxdy]*weights[coef];
            coef++;
           }
         //--- Save each rounded color component calculated according to the ratios to the component arrays
         a_v_data[XY]=(uchar)::round(a_temp);
         r_v_data[XY]=(uchar)::round(r_temp);
         g_v_data[XY]=(uchar)::round(g_temp);
         b_v_data[XY]=(uchar)::round(b_temp);
        }
      //--- Remove blur artifacts at the top by copying adjacent pixels
      for(uint y=0;y<radius;y++)
        {
         XY=y*this.Width()+X;
         a_v_data[XY]=a_v_data[X+radius*this.Width()];
         r_v_data[XY]=r_v_data[X+radius*this.Width()];
         g_v_data[XY]=g_v_data[X+radius*this.Width()];
         b_v_data[XY]=b_v_data[X+radius*this.Width()];
        }
      //--- Remove blur artifacts at the bottom by copying adjacent pixels
      for(int y=int(this.Height()-radius);y<this.Height();y++)
        {
         XY=y*this.Width()+X;
         a_v_data[XY]=a_v_data[X+(this.Height()-1-radius)*this.Width()];
         r_v_data[XY]=r_v_data[X+(this.Height()-1-radius)*this.Width()];
         g_v_data[XY]=g_v_data[X+(this.Height()-1-radius)*this.Width()];
         b_v_data[XY]=b_v_data[X+(this.Height()-1-radius)*this.Width()];
        }
     }

//--- Set the twice blurred (horizontally and vertically) image pixels to the graphical resource data array
   for(int i=0;i<size;i++)
      this.m_data_array[i]=ARGB(a_v_data[i],r_v_data[i],g_v_data[i],b_v_data[i]);
//--- Display the image pixels on the canvas in a loop by the image height and width from the graphical resource data array
   for(int X=0;X<this.Width();X++)
     {
      for(uint Y=radius;Y<this.Height()-radius;Y++)
        {
         XY=Y*this.Width()+X;
         this.m_canvas.PixelSet(X,Y,this.m_data_array[XY]);
        }
     }
//--- Done
   return true;
  }
//+------------------------------------------------------------------+
Bien, ahora ya estamos listos para crear una clase cuyo objeto nos permitirá controlar el dibujado de cualquier elemento gráfico en el lienzo, para que luego podamos restaurar fácilmente el fondo de la imagen sobre la que se ha superpuesto el nuevo dibujo. Y este será el enlace desde el que podremos crear una clase para trabajar con la animación de sprites.
Clases para copiar y pegar partes de una imagen
El objeto más pequeño en la jerarquía de herencia sobre el que podemos trabajar con animaciones es la clase del objeto de formulario.
Y como la clase para guardar y restaurar una parte de la imagen será pequeña, la colocaremos directamente en el archivo de la clase de objeto de formulario \MQL5\Include\DoEasy\Objects\Graph\Form.mqh. Vamos a llamar a la clase "copiador de píxeles", lo cual describe claramente su esencia.
Cada objeto de la clase de copiador de píxeles tendrá su propio identificador; este permitirá determinar con qué dibujo está trabajando el objeto dado, y también hará posible acceder al objeto de clase necesario según su identificador, para que podamos trabajar por separado con cada objeto animado. Por ejemplo, si necesitamos administrar y cambiar simultáneamente tres imágenes, dos de las cuales son texto y una es una imagen, entonces, al crear un objeto de copiador para cada imagen, bastará con asignarles identificadores distintos: texto1 = ID0, texto2 = ID1, image = ID2, y luego todos los demás parámetros para trabajar con él se almacenarán en cada uno de los objetos, a saber:
- una matriz de píxeles en la que se guardará la parte de la imagen de fondo sobre la que se superpone la imagen,
- las coordenadas X e Y de la esquina superior izquierda del área rectangular de la parte del fondo sobre la que se superpone la imagen,
- la anchura y la altura de este área rectangular,
- y la anchura y la altura calculadas de este área.
Necesitamos la anchura y la altura calculadas para saber exactamente qué anchura y altura tendrá el área rectangular de copiado si este rectángulo se sale del área del formulario cuyos píxeles debemos almacenar. Además, al restaurar el fondo, ya no necesitaremos recalcular la anchura y la altura del área rectangular de fondo realmente copiada: simplemente usaremos los valores ya calculados almacenados en las variables del objeto.
En la sección privada de la clase, declaramos el puntero a la clase del elemento gráfico (lo transmitiremos al objeto recién creado de la clase de copiador de píxeles para que podamos utilizar los datos del formulario en el que crearemos una instancia del objeto de copiador), la matriz en la que escribiremos la parte de la imagen del formulario que necesita ser guardada y restaurada, y todas las variables anteriores:
//+------------------------------------------------------------------+
//|                                                         Form.mqh |
//|                                  Copyright 2021, MetaQuotes Ltd. |
//|                             https://mql5.com/en/users/artmedia70 |
//+------------------------------------------------------------------+
#property copyright "Copyright 2021, MetaQuotes Ltd."
#property link      "https://mql5.com/en/users/artmedia70"
#property version   "1.00"
#property strict    // Necessary for mql4
//+------------------------------------------------------------------+
//| Include files                                                    |
//+------------------------------------------------------------------+
#include "GCnvElement.mqh"
#include "ShadowObj.mqh"
//+------------------------------------------------------------------+
//| Pixel copier class                                               |
//+------------------------------------------------------------------+
class CPixelCopier : public CObject
  {
private:
   CGCnvElement     *m_element;                             // Pointer to the graphical element
   uint              m_array[];                             // Pixel array
   int               m_id;                                  // ID
   int               m_x;                                   // X coordinate of the upper left corner
   int               m_y;                                   // Y coordinate of the upper left corner
   int               m_w;                                   // Copied image width
   int               m_h;                                   // Copied image height
   int               m_wr;                                  // Calculated copied image width
   int               m_hr;                                  // Calculated copied image height
public:
En la sección pública de la clase, escribimos el método para comparar los dos objetos de copiador, los métodos para configurar y obtener las propiedades de objeto, los constructores de clase (por defecto y paramétrico), y declaramos otros dos métodos para guardar la parte del fondo y restaurarla:
public:
//--- Compare CPixelCopier objects by a specified property (to sort the list by an object property)
   virtual int       Compare(const CObject *node,const int mode=0) const
                       {
                        const CPixelCopier *obj_compared=node;
                        return(mode==0 ? (this.ID()>obj_compared.ID() ? 1 : this.ID()<obj_compared.ID() ? -1 : 0) : WRONG_VALUE);
                       }

//--- Set the properties
   void              SetID(const int id)                       { this.m_id=id;      }
   void              SetCoordX(const int value)                { this.m_x=value;    }
   void              SetCoordY(const int value)                { this.m_y=value;    }
   void              SetWidth(const int value)                 { this.m_w=value;    }
   void              SetHeight(const int value)                { this.m_h=value;    }
//--- Get the properties
   int               ID(void)                            const { return this.m_id;  }
   int               CoordX(void)                        const { return this.m_x;   }
   int               CoordY(void)                        const { return this.m_y;   }
   int               Width(void)                         const { return this.m_w;   }
   int               Height(void)                        const { return this.m_h;   }
   int               WidthReal(void)                     const { return this.m_wr;  }
   int               HeightReal(void)                    const { return this.m_hr;  }

//--- Copy the part or the entire image to the array
   bool              CopyImgDataToArray(const uint x_coord,const uint y_coord,uint width,uint height);
//--- Copy the part or the entire image from the array to the canvas
   bool              CopyImgDataToCanvas(const int x_coord,const int y_coord);

//--- Constructors
                     CPixelCopier (void){;}
                     CPixelCopier (const int id,
                                   const int x,
                                   const int y,
                                   const int w,
                                   const int h,
                                   CGCnvElement *element) : m_id(id), m_x(x),m_y(y),m_w(w),m_wr(w),m_h(h),m_hr(h) { this.m_element=element; }
                    ~CPixelCopier (void){;}
  };
//+------------------------------------------------------------------+
Vamos a analizar los métodos con más detalle.
Método que compara dos objetos de copiador entre sí:
//--- Compare CPixelCopier objects by a specified property (to sort the list by an object property)
   virtual int       Compare(const CObject *node,const int mode=0) const
                       {
                        const CPixelCopier *obj_compared=node;
                        return(mode==0 ? (this.ID()>obj_compared.ID() ? 1 : this.ID()<obj_compared.ID() ? -1 : 0) : WRONG_VALUE);
                       }
Todo parece bastante estándar aquí, al igual que en las otras clases de la biblioteca. Si el modo de comparación (mode) es 0 (por defecto), se compararán los identificadores de los dos objetos: el actual y aquel cuyo puntero ha sido transmitido al método. Si el identificador del objeto actual es mayor que el del objeto comparado, se retornará 1; si es menor, se retornará -1, y si es igual, 0. En todos los demás casos (si mode != 0) se retornará -1, es decir, actualmente, este método solo puede comparar los identificadores de los objetos.
En el constructor paramétrico de la clase, en su lista de inicialización, asignamos a todas las variables de miembro de clase los valores transmitidos en los argumentos, y en el cuerpo de la clase, asignamos a la variable de puntero a la clase del objeto de elemento gráfico el valor del puntero también transmitido en los argumentos:
CPixelCopier (const int id,
              const int x,
              const int y,
              const int w,
              const int h,
              CGCnvElement *element) : m_id(id), m_x(x),m_y(y),m_w(w),m_wr(w),m_h(h),m_hr(h) { this.m_element=element; }
Ahora, el objeto de copiador recién creado "sabrá" qué objeto lo ha creado y tendrá acceso a sus métodos y parámetros.
Método que copia una parte o toda la imagen en una matriz:
//+------------------------------------------------------------------+
//| Copy part or all of the image to the array                       |
//+------------------------------------------------------------------+
bool CPixelCopier::CopyImgDataToArray(const uint x_coord,const uint y_coord,uint width,uint height)
  {
//--- Assign coordinate values, passed to the method, to the variables
   int x1=(int)x_coord;
   int y1=(int)y_coord;
//--- If X coordinates goes beyond the form on the right or Y coordinate goes beyond the form at the bottom,
//--- there is nothing to copy, the copied area is outside the form. Return 'false'
   if(x1>this.m_element.Width()-1 || y1>this.m_element.Height()-1)
      return false;
//--- Assign the width and height values of the copied area to the variables
//--- If the passed width and height are equal to zero, assign the form width and height to them
   this.m_wr=int(width==0  ? this.m_element.Width()  : width);
   this.m_hr=int(height==0 ? this.m_element.Height() : height);
//--- If X and Y coordinates are equal to zero (the upper left corner of the form), as well as the width and height are equal to the form width and height,
//--- the copied area is equal to the entire form area. Copy the entire form (returning it from the method) using the ImageCopy() method
   if(x1==0 && y1==0 && this.m_wr==this.m_element.Width() && this.m_hr==this.m_element.Height())
      return this.m_element.ImageCopy(DFUN,this.m_array);

//--- Calculate the right X coordinate and lower Y coordinate of the rectangle area
   int x2=int(x1+this.m_wr-1);
   int y2=int(y1+this.m_hr-1);
//--- If the calculated X coordinate goes beyond the form, the right edge of the form will be used as the coordinate
   if(x2>=this.m_element.Width()-1)
      x2=this.m_element.Width()-1;
//--- If the calculated Y coordinate goes beyond the form, the bottom edge of the form will be used as the coordinate
   if(y2>=this.m_element.Height()-1)
      y2=this.m_element.Height()-1;
//--- Calculate the copied width and height
   this.m_wr=x2-x1+1;
   this.m_hr=y2-y1+1;
//--- Define the necessary size of the array, which is to store all image pixels with calculated width and height
   int size=this.m_wr*this.m_hr;
//--- If failed to set the array size, inform of that and return 'false'
   if(::ArrayResize(this.m_array,size)!=size)
     {
      CMessage::ToLog(DFUN,MSG_LIB_SYS_FAILED_ARRAY_RESIZE,true);
      return false;
     }
//--- Set the index in the array for recording the image pixel
   int n=0;
//--- In a loop by the calculated height of the copied area, starting from the specified Y coordinate
   for(int y=y1;y<y1+this.m_hr;y++)
     {
      //--- in a loop by the calculated width of the copied area, starting from the specified X coordinate
      for(int x=x1;x<x1+this.m_wr;x++)
        {
         //--- Copy the next image pixel to the array and increase the array index
         this.m_array[n]=this.m_element.GetCanvasObj().PixelGet(x,y);
         n++;
        }
     }
//--- Successful - return 'true'
   return true;
  }
//+------------------------------------------------------------------+
Cada línea del método se describe con detalle en los comentarios al código. En resumen: si las coordenadas iniciales del área copiada están fuera del formulario, no habrá nada que copiar; retornaremos false. Si las coordenadas iniciales del área copiada coinciden con las coordenadas del formulario, y la anchura y la altura del área copiada son iguales a cero o coinciden con la anchura y la altura del formulario, copiaremos la imagen completa del formulario. Si solo tenemos que guardar una parte de la imagen, primero calcurelamos la anchura y la altura copiadas para que no se salgan del formulario, y luego copiaremos todos los píxeles de la imagen del formulario que entran en el área copiada.
Método que copia en el lienzo una parte o toda la imagen de la matriz:
//+------------------------------------------------------------------+
//| Copy the part or the entire image from the array to the canvas   |
//+------------------------------------------------------------------+
bool CPixelCopier::CopyImgDataToCanvas(const int x_coord,const int y_coord)
  {
//--- If the array of saved pixels is empty, inform of that and return 'false'
   int size=::ArraySize(this.m_array);
   if(size==0)
     {
      CMessage::ToLog(DFUN,MSG_CANV_ELEMENT_ERR_EMPTY_ARRAY,true);
      return false;
     }
//--- Set the index of the array for reading the image pixel
   int n=0;
//--- In a loop by the previously calculated height of the copied area, starting from the specified Y coordinate
   for(int y=y_coord;y<y_coord+this.m_hr;y++)
     {
      //--- in a loop by the previously calculated width of the copied area, starting from the specified X coordinate
      for(int x=x_coord;x<x_coord+this.m_wr;x++)
        {
         //--- Restore the next image pixel from the array and increase the array index
         this.m_element.GetCanvasObj().PixelSet(x,y,this.m_array[n]);
         n++;
        }
     }
   return true;
  }
//+------------------------------------------------------------------+
La lógica del método también se describe con detalle en los comentarios al código. Aquí, a diferencia del método que almacena una parte de la imagen, ya no necesitamos calcular las coordenadas y tamaños del área copiada; todos se guardan en las variables de clase después de ejecutar el primer método. Aquí, solo necesitaremos copiar en el lienzo cada línea del área restaurada píxel a píxel en un ciclo según la altura, restaurando así la parte de la imagen que hemos guardado con el método anterior.
Ahora, necesitaremos acceder a la clase recién escrita desde la clase del objeto de formulario.
Como crearemos dinámicamente el número requerido de objetos de copiador, necesitaremos declarar una lista de dichos objetos en la clase de objeto de formulario. Cada objeto de copiador recién creado se añadirá a esta lista, y ya desde ella podremos obtener los punteros a los objetos requeridos y trabajar con ellos.
En la sección privada de la clase, declaramos la siguiente lista:
//+------------------------------------------------------------------+
//| Form object class                                                |
//+------------------------------------------------------------------+
class CForm : public CGCnvElement
  {
private:
   CArrayObj         m_list_elements;                          // List of attached elements
   CArrayObj         m_list_pc_obj;                            // List of pixel copier objects
   CShadowObj       *m_shadow_obj;                             // Pointer to the shadow object
   color             m_color_frame;                            // Form frame color
   int               m_frame_width_left;                       // Form frame width to the left
   int               m_frame_width_right;                      // Form frame width to the right
   int               m_frame_width_top;                        // Form frame width at the top
   int               m_frame_width_bottom;                     // Form frame width at the bottom
Como no podemos tener varios objetos de copiador con los mismos identificadores, necesitaremos un método que retorne la bandera sobre la presencia de un objeto en la lista con el identificador especificado. Declaremos este método:
//--- Create a shadow object
   void              CreateShadowObj(const color colour,const uchar opacity);

//--- Return the flag indicating the presence of the copier object with the specified ID in the list
   bool              IsPresentPC(const int id);

public:
En la sección pública de la clase, escribiremos un método que retorna el puntero al objeto de formulario actual y un método que retorna la lista de objetos de copiador:
public:
   //--- Constructors
                     CForm(const long chart_id,
                           const int subwindow,
                           const string name,
                           const int x,
                           const int y,
                           const int w,
                           const int h);
                     CForm(const int subwindow,
                           const string name,
                           const int x,
                           const int y,
                           const int w,
                           const int h);
                     CForm(const string name,
                           const int x,
                           const int y,
                           const int w,
                           const int h);
                     CForm() { this.Initialize(); }
//--- Destructor
                    ~CForm();

//--- Supported form properties (1) integer and (2) string ones
   virtual bool      SupportProperty(ENUM_CANV_ELEMENT_PROP_INTEGER property) { return true;                   }
   virtual bool      SupportProperty(ENUM_CANV_ELEMENT_PROP_STRING property)  { return true;                   }

//--- Return (1) itself, the list of (2) attached objects, (3) pixel copier objects and (4) the shadow object
   CForm            *GetObject(void)                                          { return &this;                  }
   CArrayObj        *GetList(void)                                            { return &this.m_list_elements;  }
   CArrayObj        *GetListPC(void)                                          { return &this.m_list_pc_obj;    }
   CGCnvElement     *GetShadowObj(void)                                       { return this.m_shadow_obj;      }
A continuación, declaramos el método que crea un nuevo objeto de copiador de píxeles de una imagen:
//--- Create a new pixel copier object
   CPixelCopier     *CreateNewPixelCopier(const int id,const int x_coord,const int y_coord,const int width,const int height);

//--- Draw an object shadow
   void              DrawShadow(const int shift_x,const int shift_y,const color colour,const uchar opacity=127,const uchar blur=4);
Antes del bloque de código con los métodos de acceso simplificado a las propiedades del objeto, escribiremos el bloque de código para trabajar con los píxeles de una imagen:
//+------------------------------------------------------------------+
//| Methods of working with image pixels                             |
//+------------------------------------------------------------------+
//--- Return the pixel copier object by ID
   CPixelCopier     *GetPixelCopier(const int id);
//--- Copy the part or the entire image to the array
   bool              ImageCopy(const int id,const uint x_coord,const uint y_coord,uint &width,uint &height);
//--- Copy the part or the entire image from the array to the canvas
   bool              ImagePaste(const int id,const uint x_coord,const uint y_coord);

//+------------------------------------------------------------------+
Implementamos fuera del cuerpo de la clase los métodos declarados:
Método que retorna la bandera sobre la presencia en la lista del objeto de copiador con el identificador especificado:
//+------------------------------------------------------------------+
//| Return the flag indicating the presence                          |
//| of the copier object with the specified ID in the list           |
//+------------------------------------------------------------------+
bool CForm::IsPresentPC(const int id)
  {
   for(int i=0;i<this.m_list_pc_obj.Total();i++)
     {
      CPixelCopier *pc=this.m_list_pc_obj.At(i);
      if(pc==NULL)
         continue;
      if(pc.ID()==id)
         return true;
     }
   return false;
  }
//+------------------------------------------------------------------+
Aquí, en un ciclo simple a través de la lista de objetos de copiador, obtenemos el siguiente objeto y, si su identificador es igual al transmitido al método, retornaremos true. Al final del ciclo, retornaremos false.
Método que crea un nuevo objeto de copiador de píxeles de una imagen:
//+------------------------------------------------------------------+
//| Create a new pixel copier object                                 |
//+------------------------------------------------------------------+
CPixelCopier *CForm::CreateNewPixelCopier(const int id,const int x_coord,const int y_coord,const int width,const int height)
  {
//--- If the object with such an ID is already present, inform of that in the journal and return NULL
   if(this.IsPresentPC(id))
     {
      ::Print(DFUN,CMessage::Text(MSG_FORM_OBJECT_PC_OBJ_ALREADY_IN_LIST),(string)id);
      return NULL;
     }
//--- Create a new copier object with the specified parameters
   CPixelCopier *pc=new CPixelCopier(id,x_coord,y_coord,width,height,CGCnvElement::GetObject());
//--- If failed to create an object, inform of that and return NULL
   if(pc==NULL)
     {
      ::Print(DFUN,CMessage::Text(MSG_FORM_OBJECT_ERR_FAILED_CREATE_PC_OBJ));
      return NULL;
     }
//--- If failed to add the created object to the list, inform of that, remove the object and return NULL
   if(!this.m_list_pc_obj.Add(pc))
     {
      ::Print(DFUN,CMessage::Text(MSG_LIB_SYS_FAILED_OBJ_ADD_TO_LIST)," ID: ",id);
      delete pc;
      return NULL;
     }
//--- Return the pointer to a newly created object
   return pc;
  }
//+------------------------------------------------------------------+
La lógica completa del método se describe en los comentarios al código y, esperamos, no planteará ninguna pregunta. En cualquier caso, el lector podrá escribir cualquier duda en los comentarios al artículo.
Método que retorna el puntero a un objeto de copiador de píxeles según su identificador:
//+------------------------------------------------------------------+
//| Return the pixel copier object by ID                             |
//+------------------------------------------------------------------+
CPixelCopier *CForm::GetPixelCopier(const int id)
  {
   for(int i=0;i<this.m_list_pc_obj.Total();i++)
     {
      CPixelCopier *pc=m_list_pc_obj.At(i);
      if(pc==NULL)
         continue;
      if(pc.ID()==id)
         return pc;
     }
   return NULL;
  }
//+------------------------------------------------------------------+
Aquí, todo es también muy simple: en un ciclo a través de la lista de objetos de copiador, obtenemos el puntero al siguiente objeto y, si su identificador coincide con el necesario, retornaremos el puntero. Al final del ciclo, retornaremos NULL: el objeto con el identificador especificado no se ha encontrado en la lista.
Método que copia una parte o toda la imagen en una matriz:
//+------------------------------------------------------------------+
//| Copy part or all of the image to the array                       |
//+------------------------------------------------------------------+
bool CForm::ImageCopy(const int id,const uint x_coord,const uint y_coord,uint &width,uint &height)
  {
   CPixelCopier *pc=this.GetPixelCopier(id);
   if(pc==NULL)
     {
      pc=this.CreateNewPixelCopier(id,x_coord,y_coord,width,height);
      if(pc==NULL)
         return false;
     }
   return pc.CopyImgDataToArray(x_coord,y_coord,width,height);
  }
//+------------------------------------------------------------------+
Aquí, obtenemos el puntero a un objeto de copiador según su identificador. Si no se encuentra el objeto, informamos sobre ello y retornamos false. Si el puntero al objeto se obtiene con éxito, retornamos el resultado del método CopyImgDataToArray() de la clase de objeto de copiador que hemos analizado anteriormente.
Método que copia en el lienzo una parte o toda la imagen de la matriz:
//+------------------------------------------------------------------+
//| Copy the part or the entire image from the array to the canvas   |
//+------------------------------------------------------------------+
bool CForm::ImagePaste(const int id,const uint x_coord,const uint y_coord)
  {
   CPixelCopier *pc=this.GetPixelCopier(id);
   if(pc==NULL)
     {
      ::Print(DFUN,CMessage::Text(MSG_FORM_OBJECT_PC_OBJ_NOT_EXIST_LIST),(string)id);
      return false;
     }
   return pc.CopyImgDataToCanvas(x_coord,y_coord);
  }
//+------------------------------------------------------------------+
La lógica del método resulta idéntica a la del anterior, salvo que ahora no guardamos el área en una matriz: esta se restaura desde la matriz.
Ya estamos listos para poner a prueba el funcionamiento del objeto de copiador de píxeles de una imagen.
Simulación
Necesitaremos realizar una prueba y asegurarnos de que el objeto de copiador de píxeles funcione correctamente. Al comienzo del artículo, mostramos una imagen GIF que indica claramente cómo cada imagen posterior dibujada sobre el fondo de un objeto de formulario se superpone a las previamente dibujadas. Ahora, necesitaremos utilizar la copiador de píxeles para guardar en primer lugar el fondo sobre el que se superpondrá el texto y, antes de dibujar un nuevo texto (moviendo visualmente el texto dibujado a un nuevo lugar), restaurar primero el fondo en el que se ha dibujado este (sobrescribiéndolo), para a continuación guardar la parte de la imagen del fondo en las nuevas coordenadas y generar allí el siguiente texto. Y así lo haremos para cada uno de los nueve textos mostrados, que tendrán diferentes puntos de anclaje y se mostrarán en aquellos lados del formulario que se correspondan con los puntos de anclaje del texto. Por consiguiente, verificaremos también la exactitud del cálculo de los desplazamientos de las coordenadas de la parte guardada de la imagen debajo del texto.
Para la simulación, vamos a tomar el asesor del artículo anterior y guardarlo en la nueva carpeta \MQL5\Experts\TestDoEasy\Part78\ con el nuevo nombre TestDoEasyPart78.mq5.
El asesor muestra tres formularios en el gráfico. El formulario de la parte inferior dibuja un fondo con un relleno de gradiente vertical. Aquí dibujaremos otro formulario, el cuarto; en él también crearemos un relleno de gradiente, pero esta vez horizontal. Vamos a mostrar los textos de prueba en este formulario.
En el área de las variables globales del asesor, indicaremos la necesidad de crear cuatro objetos de formulario:
//+------------------------------------------------------------------+
//|                                             TestDoEasyPart78.mq5 |
//|                                  Copyright 2021, MetaQuotes Ltd. |
//|                             https://mql5.com/en/users/artmedia70 |
//+------------------------------------------------------------------+
#property copyright "Copyright 2021, MetaQuotes Ltd."
#property link      "https://mql5.com/en/users/artmedia70"
#property version   "1.00"
//--- includes
#include <Arrays\ArrayObj.mqh>
#include <DoEasy\Services\Select.mqh>
#include <DoEasy\Objects\Graph\Form.mqh>
//--- defines
#define        FORMS_TOTAL (4)   // Number of created forms
//--- input parameters
sinput   bool              InpMovable     =  true;          // Movable forms flag
sinput   ENUM_INPUT_YES_NO InpUseColorBG  =  INPUT_YES;     // Use chart background color to calculate shadow color
sinput   color             InpColorForm3  =  clrCadetBlue;  // Third form shadow color (if not background color)
//--- global variables
CArrayObj      list_forms;
color          array_clr[];
//+------------------------------------------------------------------+
En el manejador OnInit(), al crear los formularios, calcularemos las coordenadas del nuevo formulario según las coordenadas del anterior. Después de crear cada formulario subsiguiente, no será en absoluto necesario redibujar el gráfico completo como un todo, por lo que eliminaremos en las líneas especificadas la transmisión a los métodos de actualización de formularios (antes transmitíamos explícitamente el valor true). Ahora, vamos a transmitir este valor al final, después de crear por completo el último formulario, en el nuevo bloque de código para crear el cuarto formulario:
//+------------------------------------------------------------------+
//| Expert initialization function                                   |
//+------------------------------------------------------------------+
int OnInit()
  {
//--- Set the permissions to send cursor movement and mouse scroll events
   ChartSetInteger(ChartID(),CHART_EVENT_MOUSE_MOVE,true);
   ChartSetInteger(ChartID(),CHART_EVENT_MOUSE_WHEEL,true);
//--- Set EA global variables
   ArrayResize(array_clr,2);
   array_clr[0]=C'26,100,128';      // Original ≈Dark-azure color
   array_clr[1]=C'35,133,169';      // Lightened original color
//--- Create the specified number of form objects
   list_forms.Clear();
   int total=FORMS_TOTAL;
   for(int i=0;i<total;i++)
     {
      int y=40;
      if(i>0)
        {
         CForm *form_prev=list_forms.At(i-1);
         if(form_prev==NULL)
            continue;
         y=form_prev.BottomEdge()+10;
        }
      //--- When creating an object, pass all the required parameters to it
      CForm *form=new CForm("Form_0"+(string)(i+1),300,y,100,(i<2 ? 70 : 30));
      if(form==NULL)
         continue;
      //--- Set activity and moveability flags for the form
      form.SetActive(true);
      form.SetMovable(false);
      //--- Set the form ID equal to the loop index and the index in the list of objects
      form.SetID(i);
      form.SetNumber(0);   // (0 - main form object) Auxiliary objects may be attached to the main one. The main object is able to manage them
      //--- Set the partial opacity for the middle form and the full one for the rest
      uchar opacity=(i==1 ? 250 : 255);
      //--- Set the form style and its color theme depending on the loop index
      if(i<2)
        {
         ENUM_FORM_STYLE style=(ENUM_FORM_STYLE)i;
         ENUM_COLOR_THEMES theme=(ENUM_COLOR_THEMES)i;
         //--- Set the form style and theme
         form.SetFormStyle(style,theme,opacity,true,false);
        }
      //--- If this is the first (top) form
      if(i==0)
        {
         //--- Draw a concave field slightly shifted from the center of the form downwards
         form.DrawFieldStamp(3,10,form.Width()-6,form.Height()-13,form.ColorBackground(),form.Opacity());
         form.Update();
        }
      //--- If this is the second form
      if(i==1)
        {
         //--- Draw a concave semi-transparent "tainted glass" field in the center
         form.DrawFieldStamp(10,10,form.Width()-20,form.Height()-20,clrWheat,200);
         form.Update();
        }
      //--- If this is the third form
      if(i==2)
        {
         //--- Set the opacity of 200
         form.SetOpacity(200);
         //--- The form background color is set as the first color from the color array
         form.SetColorBackground(array_clr[0]);
         //--- Form outlining frame color
         form.SetColorFrame(clrDarkBlue);
         //--- Draw the shadow drawing flag
         form.SetShadow(true);
         //--- Calculate the shadow color as the chart background color converted to the monochrome one
         color clrS=form.ChangeColorSaturation(form.ColorBackground(),-100);
         //--- If the settings specify the usage of the chart background color, replace the monochrome color with 20 units
         //--- Otherwise, use the color specified in the settings for drawing the shadow
         color clr=(InpUseColorBG ? form.ChangeColorLightness(clrS,-20) : InpColorForm3);
         //--- Draw the form shadow with the right-downwards offset from the form by three pixels along all axes
         //--- Set the shadow opacity to 200, while the blur radius is equal to 4
         form.DrawShadow(3,3,clr,200,4);
         //--- Fill the form background with a vertical gradient
         form.Erase(array_clr,form.Opacity());
         //--- Draw an outlining rectangle at the edges of the form
         form.DrawRectangle(0,0,form.Width()-1,form.Height()-1,form.ColorFrame(),form.Opacity());
         //--- Display the text describing the gradient type and update the form
         form.Text(form.Width()/2,form.Height()/2,TextByLanguage("V-Градиент","V-Gradient"),C'211,233,149',255,TEXT_ANCHOR_CENTER);
         form.Update();
        }
      //--- If this is the fourth (bottom - tested) form
      if(i==3)
        {
         //--- Set the opacity of 200
         form.SetOpacity(200);
         //--- The form background color is set as the first color from the color array
         form.SetColorBackground(array_clr[0]);
         //--- Form outlining frame color
         form.SetColorFrame(clrDarkBlue);
         //--- Draw the shadow drawing flag
         form.SetShadow(true);
         //--- Calculate the shadow color as the chart background color converted to the monochrome one
         color clrS=form.ChangeColorSaturation(form.ColorBackground(),-100);
         //--- If the settings specify the usage of the chart background color, replace the monochrome color with 20 units
         //--- Otherwise, use the color specified in the settings for drawing the shadow
         color clr=(InpUseColorBG ? form.ChangeColorLightness(clrS,-20) : InpColorForm3);
         //--- Draw the form shadow with the right-downwards offset from the form by three pixels along all axes
         //--- Set the shadow opacity to 200, while the blur radius is equal to 4
         form.DrawShadow(3,3,clr,200,4);
         //--- Fill the form background with a horizontal gradient
         form.Erase(array_clr,form.Opacity(),false);
         //--- Draw an outlining rectangle at the edges of the form
         form.DrawRectangle(0,0,form.Width()-1,form.Height()-1,form.ColorFrame(),form.Opacity());

         //--- Display the text describing the gradient type and update the form
         //--- Specify the text parameters (text coordinates in the center of the form) and the anchor point (located at the center as well)
         string text=TextByLanguage("H-Градиент","H-Gradient");
         int text_x=form.Width()/2;
         int text_y=form.Height()/2;
         ENUM_TEXT_ANCHOR anchor=TEXT_ANCHOR_CENTER;

         //--- Find out the width and height of the outlining text rectangle (to be used as the size of the saved area)
         int text_w=0,text_h=0;
         form.TextSize(text,text_w,text_h);
         //--- Calculate coordinate offsets for the saved area depending on the text anchor point
         int shift_x=0,shift_y=0;
         form.TextGetShiftXY(text,anchor,shift_x,shift_y);

         //--- If a background area with calculated coordinates and size under the future text is successfully saved
         if(form.ImageCopy(0,text_x+shift_x,text_y+shift_y,text_w,text_h))
           {
            //--- Draw the text and update the form together with redrawing a chart
            form.Text(text_x,text_y,text,C'211,233,149',255,anchor);
            form.Update(true);
           }
        }
      //--- Add objects to the list
      if(!list_forms.Add(form))
        {
         delete form;
         continue;
        }
     }
//---
   return(INIT_SUCCEEDED);
  }
//+------------------------------------------------------------------+
Aquí, cada línea de código para crear un nuevo formulario se comenta con detalle. El asunto es que, después de crear el formulario y antes de dibujar el texto en el mismo, necesitaremos guardar la parte del fondo en la que se ubicará este texto. Y luego, en otro manejador, primero restauraremos el fondo del formulario sobrescribiendo el texto con él, y solo entonces mostraremos los textos en las nuevas ubicaciones, conservando el fondo debajo de ellos de la misma forma, y restaurándolo con cada nuevo desplazamiento del texto a las nuevas coordenadas.
Haremos todo esto en el manejador OnChartEvent(), en un nuevo bloque de código:
//+------------------------------------------------------------------+
//| ChartEvent function                                              |
//+------------------------------------------------------------------+
void OnChartEvent(const int id,
                  const long &lparam,
                  const double &dparam,
                  const string &sparam)
  {
//--- If clicking on an object
   if(id==CHARTEVENT_OBJECT_CLICK)
     {
      //--- If the clicked object belongs to the EA
      if(StringFind(sparam,MQLInfoString(MQL_PROGRAM_NAME))==0)
        {
         //--- Get the object ID from it
         int form_id=(int)StringToInteger(StringSubstr(sparam,StringLen(sparam)-1))-1;
         //--- Find this form object in the loop by all forms created in the EA
         for(int i=0;i<list_forms.Total();i++)
           {
            CForm *form=list_forms.At(i);
            if(form==NULL)
               continue;
            //--- If the clicked object has the ID of 3 and the form has the same ID
            if(form_id==3 && form.ID()==3)
              {
               //--- Set the text parameters
               string text=TextByLanguage("H-Градиент","H-Gradient");
               //--- Get the size of the future text
               int text_w=0,text_h=0;
               form.TextSize(text,text_w,text_h);
               //--- Get the anchor point of the last drawn text (this is the form which contained the last drawn text)
               ENUM_TEXT_ANCHOR anchor=form.TextAnchor();
               //--- Get the coordinates of the last drawn text
               int text_x=form.TextLastX();
               int text_y=form.TextLastY();
               //--- Calculate the coordinate offset of the saved rectangle area depending on the text anchor point
               int shift_x=0,shift_y=0;
               form.TextGetShiftXY(text,anchor,shift_x,shift_y);
               //--- Set the text anchor initial point (0 = LEFT_TOP) out of nine possible ones
               static int n=0;
               //--- If the previously copied form background image is successfully restored when creating the form object in OnInit()
               if(form.ImagePaste(0,text_x+shift_x,text_y+shift_y))
                 {
                  //--- Depending on the n variable, set the new text anchor point
                  switch(n)
                    {
                     case 0 : anchor=TEXT_ANCHOR_LEFT_TOP;     text_x=1;               text_y=1;               break;
                     case 1 : anchor=TEXT_ANCHOR_CENTER_TOP;   text_x=form.Width()/2;  text_y=1;               break;
                     case 2 : anchor=TEXT_ANCHOR_RIGHT_TOP;    text_x=form.Width()-2;  text_y=1;               break;
                     case 3 : anchor=TEXT_ANCHOR_LEFT_CENTER;  text_x=1;               text_y=form.Height()/2; break;
                     case 4 : anchor=TEXT_ANCHOR_CENTER;       text_x=form.Width()/2;  text_y=form.Height()/2; break;
                     case 5 : anchor=TEXT_ANCHOR_RIGHT_CENTER; text_x=form.Width()-2;  text_y=form.Height()/2; break;
                     case 6 : anchor=TEXT_ANCHOR_LEFT_BOTTOM;  text_x=1;               text_y=form.Height()-2; break;
                     case 7 : anchor=TEXT_ANCHOR_CENTER_BOTTOM;text_x=form.Width()/2;  text_y=form.Height()-2; break;
                     case 8 : anchor=TEXT_ANCHOR_RIGHT_BOTTOM; text_x=form.Width()-2;  text_y=form.Height()-2; break;
                     default: anchor=TEXT_ANCHOR_CENTER;       text_x=form.Width()/2;  text_y=form.Height()/2; break;
                    }
                  //--- According to the new anchor point, get the new offsets of the saved area coordinates
                  form.TextGetShiftXY(text,anchor,shift_x,shift_y);
                  //--- If the background area is successfully saved at new coordinates
                  if(form.ImageCopy(0,text_x+shift_x,text_y+shift_y,text_w,text_h))
                    {
                     //--- Draw the text in new coordinates and update the form
                     form.Text(text_x,text_y,text,C'211,233,149',255,anchor);
                     form.Update();
                    }
                  //--- Increase the object click counter (and also the pointer to the text anchor point),
                  //--- and if the value exceeds 8, reset the value to zero (from 0 to 8 = nine anchor points)
                  n++;
                  if(n>8) n=0;
                 }
              }
           }
        }
     }
  }
//+------------------------------------------------------------------+
En este lugar, todo se describe con suficiente detalle en los comentarios al código. El lector siempre podrá escribir cualquier duda en los comentarios al artículo.
Compilamos el asesor y lo iniciamos en el gráfico.
Clicamos en el formulario inferior con el ratón y nos aseguramos de que todo funcione según lo previsto:
¿Qué es lo próximo?
En el próximo artículo, continuaremos desarrollando el concepto de animación en la biblioteca y empezaremos a trabajar en la animación de sprites.
Más abajo se adjuntan todos los archivos de la versión actual de la biblioteca y el archivo del asesor de prueba para MQL5. Puede descargarlo todo y ponerlo a prueba por sí mismo.
Si tiene preguntas, observaciones o sugerencias, podrá concretarlas en los comentarios al artículo.
*Artículos de esta serie:
Gráficos en la biblioteca DoEasy (Parte 73): Objeto de formulario del elemento gráfico
Gráficos en la biblioteca DoEasy (Parte 74): Elemento gráfico básico sobre la clase CCanvas
Gráficos en la biblioteca DoEasy (Parte 75): Métodos de trabajo con primitivas y texto en el elemento gráfico básico.
Gráficos en la biblioteca DoEasy (Parte 76): Objeto de formulario y temas de color predeterminados
Gráficos en la biblioteca DoEasy (Parte 77): Clase de objeto Sombra
Traducción del ruso hecha por MetaQuotes Ltd.
Artículo original: https://www.mql5.com/ru/articles/9612
Advertencia: todos los derechos de estos materiales pertenecen a MetaQuotes Ltd. Queda totalmente prohibido el copiado total o parcial.
Este artículo ha sido escrito por un usuario del sitio web y refleja su punto de vista personal. MetaQuotes Ltd. no se responsabiliza de la exactitud de la información ofrecida, ni de las posibles consecuencias del uso de las soluciones, estrategias o recomendaciones descritas.

 Cómo ser un mejor programador (parte 01): 5 cosas que evitar para convertirse en un programador exitoso de MQL5
 Patrones con ejemplos (Parte I): Pico múltiple
- Aplicaciones de trading gratuitas
- 8 000+ señales para copiar
- Noticias económicas para analizar los mercados financieros
Usted acepta la política del sitio web y las condiciones de uso