
DoEasyライブラリのグラフィックス(第77部): 影オブジェクトクラス

内容
概念
前回の記事でフォームオブジェクトを開発しているときに影を作成するためのテストオブジェクトワークピースを作成して、オブジェクトの影を作成することについて少し触れました。今日は、この概念を拡張し、フォームオブジェクトを定数コンポーネントとして使用できるように改訂します。フォームオブジェクトは、オブジェクトを作成してその上に影フォームを描画して画面に表示することにより、必要に応じてすぐにオブジェクトの影を使用できるようにする必要があります。
オブジェクトの影を描く2つの方法を検討しました。
- フォームオブジェクト自体のキャンバスに直接描く
- フォームオブジェクトの下にある別のオブジェクトに描く
実装が簡単なため、2番目のオプションを選択しました。このメソッドの欠点は、追加のオブジェクトを管理する必要があることです。この方法の利点は、影が描かれているグラフィック要素を再配置するだけで、あらゆる変更(たとえば、影の位置座標の変更)をすばやく実装できることです。
フォームオブジェクトに影を描画した場合、影を使用してフォーム全体を完全に再描画する必要がある(または、影を消去し、新しい座標を再計算して再描画する)ため、計算量が多くなります。さらに、影はその下にあるオブジェクトに適用する必要があります。これは、影がオブジェクトと重なる場所での色の結合と透明度の再計算、およびオブジェクトの影が投影される背景のピクセルごとの再描画を意味します。影に別のオブジェクトを使用する場合、これを行う必要はなくなります。別のオブジェクトに描かれた影は、独自の色と透明度を備えており、私たちが介入せずに、その下にあるオブジェクトに重ねられます。ターミナルが私たちのためにすべてを計算します。
もちろん、フォームキャンバスに直接影を描く方法には利点がありますが、実装と制御が簡単なため、2番目のオプションを使用します。最初の影オブジェクトの実装では、ALGLIB数値解析ライブラリを使用したガウスぼかし法を使用します。影を構築するためのその使用法のいニュアンスのいくつかは、「キャンバスクラスの学習。アンチエイリアスと影」稿(Vladimir Karputov著)で説明されています。彼の記事で説明されているガウスぼかし法を適用してみましょう。
影オブジェクトは、フォームオブジェクトを作成するときと同じ方法でグラフィック要素オブジェクトクラスから継承された新しいクラスになります。これらのオブジェクトはすべて、他の多くのオブジェクトと同様に、基本的なグラフィック要素の子孫です。フォームオブジェクトでは、影オブジェクトをすばやく作成し、そのプロパティを変更するためのメソッドを作成します。いつものように、すでに書かれたライブラリクラスを変更しましょう。
ライブラリクラスの改善
\MQL5\Include\DoEasy\Data.mqhで、新しいメッセージのインデックスを追加します。
   MSG_LIB_SYS_FAILED_DRAWING_ARRAY_RESIZE,           // Failed to change the array size of drawn buffers
   MSG_LIB_SYS_FAILED_COLORS_ARRAY_RESIZE,            // Failed to change the color array size
   MSG_LIB_SYS_FAILED_ARRAY_RESIZE,                   // Failed to change the array size
   MSG_LIB_SYS_FAILED_ADD_BUFFER,                     // Failed to add buffer object to the list
   MSG_LIB_SYS_FAILED_CREATE_BUFFER_OBJ,              // Failed to create \"Indicator buffer\" object
...
//--- CChartObjCollection
   MSG_CHART_COLLECTION_TEXT_CHART_COLLECTION,        // Chart collection
   MSG_CHART_COLLECTION_ERR_FAILED_CREATE_CHART_OBJ,  // Failed to create a new chart object
   MSG_CHART_COLLECTION_ERR_FAILED_ADD_CHART,         // Failed to add a chart object to the collection
   MSG_CHART_COLLECTION_ERR_CHARTS_MAX,               // Cannot open new chart. Number of open charts at maximum
   MSG_CHART_COLLECTION_CHART_OPENED,                 // Chart opened
   MSG_CHART_COLLECTION_CHART_CLOSED,                 // Chart closed
   MSG_CHART_COLLECTION_CHART_SYMB_CHANGED,           // Chart symbol changed
   MSG_CHART_COLLECTION_CHART_TF_CHANGED,             // Chart timeframe changed
   MSG_CHART_COLLECTION_CHART_SYMB_TF_CHANGED,        // Chart symbol and timeframe changed

//--- CForm
   MSG_FORM_OBJECT_TEXT_NO_SHADOW_OBJ_FIRST_CREATE_IT,// No shadow object. Create it using the CreateShadowObj() method
   MSG_FORM_OBJECT_ERR_FAILED_CREATE_SHADOW_OBJ,      // Failed to create a new shadow object

//--- CShadowObj
   MSG_SHADOW_OBJ_IMG_SMALL_BLUR_LARGE,               // Error! Image size too small or blur too extensive

  };
//+------------------------------------------------------------------+
また、新しく追加したインデックスに対応するメッセージテキストも追加します。
   {"Не удалось изменить размер массива рисуемых буферов","Failed to resize drawing buffers array"},
   {"Не удалось изменить размер массива цветов","Failed to resize color array"},
   {"Не удалось изменить размер массива ","Failed to resize array "},
   {"Не удалось добавить объект-буфер в список","Failed to add buffer object to list"},
   {"Не удалось создать объект \"Индикаторный буфер\"","Failed to create object \"Indicator buffer\""},
...
//--- CChartObjCollection
   {"Коллекция чартов","Chart collection"},
   {"Не удалось создать новый объект-чарт","Failed to create new chart object"},
   {"Не удалось добавить объект-чарт в коллекцию","Failed to add chart object to collection"},
   {"Нельзя открыть новый график, так как количество открытых графиков уже максимальное","You cannot open a new chart, since the number of open charts is already maximum"},
   {"Открыт график","Open chart"},
   {"Закрыт график","Closed chart"},
   {"Изменён символ графика","Changed chart symbol"},
   {"Изменён таймфрейм графика","Changed chart timeframe"},
   {"Изменён символ и таймфрейм графика","Changed the symbol and timeframe of the chart"},

//--- CForm
   {"Отсутствует объект тени. Необходимо сначала его создать при помощи метода CreateShadowObj()","There is no shadow object. You must first create it using the CreateShadowObj () method"},
   {"Не удалось создать новый объект для тени","Failed to create new object for shadow"},

//--- CShadowObj
   {"Ошибка! Размер изображения очень маленький или очень большое размытие","Error! Image size is very small or very large blur"},

  };
//+---------------------------------------------------------------------+
前回の記事では、影を描くために、フォームオブジェクトの周囲に各辺に5ピクセルのサイズの空のスペースを残しました。結局のところ、通常のガウスぼかしにはより多くのスペースが必要です。経験的に、ぼかし半径が4ピクセルの場合、両側に16ピクセルの空きスペースを残す必要があることがわかりました。ピクセルが少ないと、影が描画されるキャンバスのエッジに沿ってアーティファクト(影がすでに完全に透明で実際には存在しない背景の汚染)が発生します。
\MQL5\Include\DoEasy\Defines.mqhで、影のデフォルトのフリースペースのサイズを16に設定します(以前の設定値である5ではなく)。
//--- Canvas parameters
#define PAUSE_FOR_CANV_UPDATE          (16)                       // Canvas update frequency
#define NULL_COLOR                     (0x00FFFFFF)               // Zero for the canvas with the alpha channel
#define OUTER_AREA_SIZE                (16)                       // Size of one side of the outer area around the workspace
//+------------------------------------------------------------------+
新しい型(Shadowオブジェクト)をグラフィック要素タイプの列挙に追加します。
//+------------------------------------------------------------------+
//| The list of graphical element types                              |
//+------------------------------------------------------------------+
enum ENUM_GRAPH_ELEMENT_TYPE
  {
   GRAPH_ELEMENT_TYPE_ELEMENT,                        // Element
   GRAPH_ELEMENT_TYPE_SHADOW_OBJ,                     // Shadow object
   GRAPH_ELEMENT_TYPE_FORM,                           // Form
   GRAPH_ELEMENT_TYPE_WINDOW,                         // Window
  };
//+------------------------------------------------------------------+
新しい影オブジェクトを作成するときにはこの型を指定します。これにより、後ですべての影オブジェクトを選択し、それらを同時に処理できるようになります。
ここで作成する影オブジェクトは、フォームオブジェクトによって投影される影の外観に影響を与える独自のプロパティを備えています。
これらのパラメータを\MQL5\Include\DoEasy\GraphINI.mqhのフォームスタイル設定に追加しましょう。
//+------------------------------------------------------------------+
//| List of form style parameter indices                             |
//+------------------------------------------------------------------+
enum ENUM_FORM_STYLE_PARAMS
  {
   FORM_STYLE_FRAME_WIDTH_LEFT,                 // Form frame width to the left
   FORM_STYLE_FRAME_WIDTH_RIGHT,                // Form frame width to the right
   FORM_STYLE_FRAME_WIDTH_TOP,                  // Form frame width on top
   FORM_STYLE_FRAME_WIDTH_BOTTOM,               // Form frame width below
   FORM_STYLE_FRAME_SHADOW_OPACITY,             // Shadow opacity
   FORM_STYLE_FRAME_SHADOW_BLUR,                // Shadow blur
   FORM_STYLE_DARKENING_COLOR_FOR_SHADOW,       // Form shadow color darkening
   FORM_STYLE_FRAME_SHADOW_X_SHIFT,             // Shadow X axis shift
   FORM_STYLE_FRAME_SHADOW_Y_SHIFT,             // Shadow Y axis shift
  };
#define TOTAL_FORM_STYLE_PARAMS        (9)      // Number of form style parameters
//+------------------------------------------------------------------+
//| Array containing form style parameters                           |
//+------------------------------------------------------------------+
int array_form_style[TOTAL_FORM_STYLES][TOTAL_FORM_STYLE_PARAMS]=
  {
//--- "Flat form" style parameters
   {
      3,                                        // Form frame width to the left
      3,                                        // Form frame width to the right
      3,                                        // Form frame width on top
      3,                                        // Form frame width below
      80,                                       // Shadow opacity
      4,                                        // Shadow blur
      80,                                       // Form shadow color darkening
      2,                                        // Shadow X axis shift
      2,                                        // Shadow Y axis shift
   },
//--- "Embossed form" style parameters
   {
      4,                                        // Form frame width to the left
      4,                                        // Form frame width to the right
      4,                                        // Form frame width on top
      4,                                        // Form frame width below
      80,                                       // Shadow opacity
      4,                                        // Shadow blur
      80,                                       // Form shadow color darkening
      2,                                        // Shadow X axis shift
      2,                                        // Shadow Y axis shift
   },
  };
//+------------------------------------------------------------------+
Shadow blurは、画像のぼかしの半径を設定します。
Form shadow color darkeningは、影の色を暗くするポイントの数を設定します。これは、影の色がチャートの背景色に依存する場合に必要です。この場合、チャートの背景色は灰色に変換され、ここで指定された量だけ暗くなります。
Shadow X/Y axis shiftsは、影をキャストするオブジェクトの中心から影がどれだけシフトするかを示します。ゼロは、影がオブジェクトの周囲にあることを意味します。正の値は、影がオブジェクトに対して右下にシフトすることを示し、負の値は、影が左上にシフトすることを示します。
パラメータの数を変更したので、これを明示的に示す必要があります。以前に使用した5ではなく、新しく 9を設定します。
また、配色設定にさらに別のパラメータ「Form outline rectangle color」を追加します。
フォームをより明確に表示するために、フォームの周囲のフレームを完成させます(フォームフレームと混同しないでください)。これは、外部の背景に対してフォームをその色で強調表示する単純な長方形です。この設定では、長方形の色を指定します。
//+------------------------------------------------------------------+
//| List of indices of color scheme parameters                       |
//+------------------------------------------------------------------+
enum ENUM_COLOR_THEME_COLORS
  {
   COLOR_THEME_COLOR_FORM_BG,                   // Form background color
   COLOR_THEME_COLOR_FORM_FRAME,                // Form frame color
   COLOR_THEME_COLOR_FORM_RECT_OUTER,           // Form outline rectangle color
   COLOR_THEME_COLOR_FORM_SHADOW,               // Form shadow color
  };
#define TOTAL_COLOR_THEME_COLORS       (4)      // Number of parameters in the color theme
//+------------------------------------------------------------------+
//| The array containing color schemes                               |
//+------------------------------------------------------------------+
color array_color_themes[TOTAL_COLOR_THEMES][TOTAL_COLOR_THEME_COLORS]=
  {
//--- Parameters of the "Blue steel" color scheme
   {
      C'134,160,181',                           // Form background color
      C'134,160,181',                           // Form frame color
      clrDimGray,                               // Form outline rectangle color
      clrGray,                                  // Form shadow color
   },
//--- Parameters of the "Light cyan gray" color scheme
   {
      C'181,196,196',                           // Form background color
      C'181,196,196',                           // Form frame color
      clrGray,                                  // Form outline rectangle color
      clrGray,                                  // Form shadow color
   },
  };
//+------------------------------------------------------------------+
\MQL5\Include\DoEasy\Objects\Graph\GCnvElement.mqhのグラフィック要素クラスを改善しましょう。
クラスのpublicセクションには、指定された量だけ色の明度を変更するChangeColorLightness()メソッドがあります。
このメソッドは、変更される色をARGB形式で受け取ります。これは不便な場合があるので、「color」形式の色と不透明度を受け取るオーバーロードされたメソッドを宣言しましょう。
//--- Update the coordinates (shift the canvas)
   bool              Move(const int x,const int y,const bool redraw=false);

//--- Change the brightness of (1) ARGB and (2) COLOR by a specified amount
   uint              ChangeColorLightness(const uint clr,const double change_value);
   color             ChangeColorLightness(const color colour,const uchar opacity,const double change_value);
また、彩度を変更するメソッドも必要です。たとえば、任意の色から灰色を作成するには、彩度コンポーネント(HSL、HSI、HSV、HSB形式のS)を左(ゼロ)にシフトする必要があります。色は完全に不飽和化され、影を描くために必要な灰色の色合いになります。
彩度を変更する2つのオーバーロードされたメソッドを宣言します。
//--- Change the brightness of (1) ARGB and (2) COLOR by a specified amount
   uint              ChangeColorLightness(const uint clr,const double change_value);
   color             ChangeColorLightness(const color colour,const double change_value);
//--- Change the saturation of (1) ARGB and (2) COLOR by a specified amount
   uint              ChangeColorSaturation(const uint clr,const double change_value);
   color             ChangeColorSaturation(const color colour,const double change_value);

protected:
宣言されたメソッドをクラス本体の外側に実装します。
The method changing the ARGB color saturation by a specified amount:
//+------------------------------------------------------------------+
//| Change the ARGB color saturation by a specified amount           |
//+------------------------------------------------------------------+
uint CGCnvElement::ChangeColorSaturation(const uint clr,const double change_value)
  {
   if(change_value==0.0)
      return clr;
   double a=GETRGBA(clr);
   double r=GETRGBR(clr);
   double g=GETRGBG(clr);
   double b=GETRGBB(clr);
   double h=0,s=0,l=0;
   CColors::RGBtoHSL(r,g,b,h,s,l);
   double ns=s+change_value*0.01;
   if(ns>1.0) ns=1.0;
   if(ns<0.0) ns=0.0;
   CColors::HSLtoRGB(h,ns,l,r,g,b);
   return ARGB(a,r,g,b);
  }
//+------------------------------------------------------------------+
ここで、 uint値として取得された色をそのコンポーネント(アルファチャネル、赤、緑、青)に分解します。
第75部で説明されているCColorsクラスのRGBtoHSL()メソッドを使用して、RGBカラーをHSLカラーモデルに変換します。このモデルでは、Sコンポーネント(彩度)が必要です。次に、メソッドに追加された値を加算し、飽和値に0.01を掛けるだけで、新しい飽和度が計算できます。得られた結果が許容値の範囲(0~1)を超えているかどうかを確認します。次に、CColorsクラスとそのHSLtoRGBメソッドを使用して、Hカラーコンポーネントである新しいSとLをRGB形式に変換します。
取得したRGBカラーを元のカラーのアルファチャネルで返します。
メソッドに渡される彩度を変更するために使用される値に0.01を掛けるのはなぜでしょうか。便利だからです。HSLカラーモデルでは、コンポーネントの値が0から1に変わります。したがって、これらの値を100の倍数で渡す方が便利です(0.01の代わりに1、0.1の代わりに10、1の代わりに100)。さらに重要なことに、すべての値は、さまざまなフォームまたはテキストの彩度の変化の値が存在する可能性があるフォームスタイルの整数として設定されます。
以下は、指定された量だけCOLORの彩度を変更するメソッドです。
//+------------------------------------------------------------------+
//| Change the COLOR saturation by a specified amount                |
//+------------------------------------------------------------------+
color CGCnvElement::ChangeColorSaturation(const color colour,const double change_value)
  {
   if(change_value==0.0)
      return colour;
   uint clr=::ColorToARGB(colour,0);
   double r=GETRGBR(clr);
   double g=GETRGBG(clr);
   double b=GETRGBB(clr);
   double h=0,s=0,l=0;
   CColors::RGBtoHSL(r,g,b,h,s,l);
   double ns=s+change_value*0.01;
   if(ns>1.0) ns=1.0;
   if(ns<0.0) ns=0.0;
   CColors::HSLtoRGB(h,ns,l,r,g,b);
   return CColors::RGBToColor(r,g,b);
  }
//+------------------------------------------------------------------+
メソッドのロジックは、上記で説明したものと似ています。唯一の違いは、ここでは不透明度パラメータが色とその不透明度をARGB色に変換するためにのみ必要なことです。アルファチャンネルは他の場所では使用されていないので、変換中には無視して、ゼロを渡すことができます。次に、ARGBカラーからR、G、Bコンポーネントを抽出し、それらをHSLカラーモデルに変換し、メソッドに渡された値でSコンポーネントを変更し、HSLモデルをRGBに戻し、「color」形式の色に変換されたRGBカラーモデルを返します。
以下は、指定された量だけCOLORの明るさを変更するメソッドです。
//+------------------------------------------------------------------+
//| Change the COLOR brightness by a specified amount                |
//+------------------------------------------------------------------+
color CGCnvElement::ChangeColorLightness(const color colour,const double change_value)
  {
   if(change_value==0.0)
      return colour;
   uint clr=::ColorToARGB(colour,0);
   double r=GETRGBR(clr);
   double g=GETRGBG(clr);
   double b=GETRGBB(clr);
   double h=0,s=0,l=0;
   CColors::RGBtoHSL(r,g,b,h,s,l);
   double nl=l+change_value*0.01;
   if(nl>1.0) nl=1.0;
   if(nl<0.0) nl=0.0;
   CColors::HSLtoRGB(h,s,nl,r,g,b);
   return CColors::RGBToColor(r,g,b);
  }
//+------------------------------------------------------------------+
このメソッドは、HSLカラーモデルのLコンポーネントを変更することを除いて、上記で検討したメソッドと同じです。
検討したすべてのメソッドで、色成分を変更する値に0.01を乗算するので、以前に開発したARGB色の明るさを指定した値で変更するメソッドを変更する必要があります。
//+------------------------------------------------------------------+
//| Change the ARGB color brightness by a specified value            |
//+------------------------------------------------------------------+
uint CGCnvElement::ChangeColorLightness(const uint clr,const double change_value)
  {
   if(change_value==0.0)
      return clr;
   double a=GETRGBA(clr);
   double r=GETRGBR(clr);
   double g=GETRGBG(clr);
   double b=GETRGBB(clr);
   double h=0,s=0,l=0;
   CColors::RGBtoHSL(r,g,b,h,s,l);
   double nl=l+change_value*0.01;
   if(nl>1.0) nl=1.0;
   if(nl<0.0) nl=0.0;
   CColors::HSLtoRGB(h,s,nl,r,g,b);
   return ARGB(a,r,g,b);
  }
//+------------------------------------------------------------------+
クラスのpublicセクションのオブジェクトプロパティへの簡略化されたアクセスのためのメソッドのブロックは、フォームの影を使用する必要性を示すフラグを設定する宣言されたメソッドを備えています。ただし、何らかの理由でメソッドが実装されていないので、これを修正しましょう。
//--- Set the flag of (1) object moveability, (2) activity, (3) element ID, (4) element index in the list and (5) shadow presence
   void              SetMovable(const bool flag)               { this.SetProperty(CANV_ELEMENT_PROP_MOVABLE,flag);                     }
   void              SetActive(const bool flag)                { this.SetProperty(CANV_ELEMENT_PROP_ACTIVE,flag);                      }
   void              SetID(const int id)                       { this.SetProperty(CANV_ELEMENT_PROP_ID,id);                            }
   void              SetNumber(const int number)               { this.SetProperty(CANV_ELEMENT_PROP_NUM,number);                       }
   void              SetShadow(const bool flag)                { this.m_shadow=flag;                                                   }

//--- Return the shift (1) of the left, (2) right, (3) top and (4) bottom edge of the element active area
現在作成しているすべてのフォームオブジェクトは、フレームが追加されているため、立体感があります。フレームは、照らされたエッジがきらめき、照らされていないエッジが暗くなるので、立体感が生まれますが、これだけでは不十分です。先に進んで、3次元の錯覚で背景を作成する機能を追加しましょう。これを実現するには、背景を少なくとも2色(暗い色から明るい色まで)のグラデーションで塗りつぶす必要があります。フォームを新鮮な色で再生させるのには、元の色の明るさのわずかな変化、元の色と明るい色の滑らかなブレンド、そして影で十分です。

フォームをクリアして色で塗りつぶす2つのメソッドはすでに実装しています。背景をグラデーションカラーで塗りつぶすには、別のErase()メソッドを宣言します。
//+------------------------------------------------------------------+
//| The methods of filling, clearing and updating raster data        |
//+------------------------------------------------------------------+
//--- Clear the element filling it with color and opacity
   void              Erase(const color colour,const uchar opacity,const bool redraw=false);
//--- Clear the element with a gradient fill
   void              Erase(color &colors[],const uchar opacity,const bool vgradient=true,const bool cycle=false,const bool redraw=false);
//--- Clear the element completely
   void              Erase(const bool redraw=false);
//--- Update the element
   void              Update(const bool redraw=false)           { this.m_canvas.Update(redraw);                                         }
クラス本体の外側で実装しましょう。
//+------------------------------------------------------------------+
//| Clear the element with a gradient fill                           |
//+------------------------------------------------------------------+
void CGCnvElement::Erase(color &colors[],const uchar opacity,const bool vgradient=true,const bool cycle=false,const bool redraw=false)
  {
//--- Check the size of the color array
   int size=::ArraySize(colors);
//--- If there are less than two colors in the array
   if(size<2)
     {
      //--- if the array is empty, erase the background completely and leave
      if(size==0)
        {
         this.Erase(redraw);
         return;
        }
      //--- in case of one color, fill the background with this color and opacity, and leave
      this.Erase(colors[0],opacity,redraw);
      return;
     }
//--- Declare the receiver array
   color out[];
//--- Set the gradient size depending on the filling direction (vertical/horizontal)
   int total=(vgradient ? this.Height() : this.Width());
//--- and get the set of colors in the receive array
   CColors::Gradient(colors,out,total,cycle);
   total=::ArraySize(out);
//--- In the loop by the number of colors in the array
   for(int i=0;i<total;i++)
     {
      //--- depending on the filling direction
      switch(vgradient)
        {
         //--- Horizontal gradient - draw vertical segments from left to right with the color from the array
         case false :
            DrawLineVertical(i,0,this.Height()-1,out[i],opacity);
           break;
         //--- Vertical gradient - draw horizontal segments downwards with the color from the array
         default:
            DrawLineHorizontal(0,this.Width()-1,i,out[i],opacity);
           break;
        }
     }
//--- If specified, update the canvas
   this.Update(redraw);
  }
//+------------------------------------------------------------------+
メソッドロジック全体は、コードのコメントで説明されています。このメソッドは、塗りつぶされた色の配列、不透明度の値、垂直方向のグラデーションフラグ( true の場合、塗りつぶしは下向きに実行されます。 false の場合、左から右へ)、ループフラグ( 設定されている場合、塗りつぶしは開始時と同じ色で終了します)と、塗りつぶし後にキャンバスを再描画する必要があることを示すフラグ。カラー配列を取得するには、CColorsクラスのGradient()メソッドを使用します。
これで、ライブラリクラスの変更と追加が完了しました。次に、グラフィック要素オブジェクトクラスの子孫となる影オブジェクトの新しいクラスを作成しましょう。
影オブジェクトクラス
\MQL5\Include\DoEasy\Objects\Graph\ディレクトリで、CShadowObjクラスの新しいファイルShadowObj.mqhを作成します。
グラフィック要素のファイルとALGLIB数値解析のライブラリファイルをファイルに含める必要があります。クラスはグラフィック要素オブジェクトクラスから継承する必要があります。
//+------------------------------------------------------------------+
//|                                                    ShadowObj.mqh |
//|                                  Copyright 2021, MetaQuotes Ltd. |
//|                             https://mql5.com/en/users/artmedia70 |
//+------------------------------------------------------------------+
#property copyright "Copyright 2021, MetaQuotes Ltd."
#property link      "https://mql5.com/en/users/artmedia70"
#property version   "1.00"
#property strict    // Necessary for mql4
//+------------------------------------------------------------------+
//| Include files                                                    |
//+------------------------------------------------------------------+
#include "GCnvElement.mqh"
#include <Math\Alglib\alglib.mqh>
//+------------------------------------------------------------------+
//| Shadow object class                                              |
//+------------------------------------------------------------------+
class CShadowObj : public CGCnvElement
  {
  }
クラスのprivateセクションで、色と影の不透明度を格納するための変数と、クラス操作のメソッドを宣言します。
//+------------------------------------------------------------------+
//| Shadow object class                                              |
//+------------------------------------------------------------------+
class CShadowObj : public CGCnvElement
  {
private:
   color             m_color_shadow;                  // Shadow color
   uchar             m_opacity_shadow;                // Shadow opacity

//--- Gaussian blur
   bool              GaussianBlur(const uint radius);
//--- Return the array of weight ratios
   bool              GetQuadratureWeights(const double mu0,const int n,double &weights[]);
//--- Draw the object shadow form
   void              DrawShadowFigureRect(const int w,const int h);

public:
ここで、DrawShadowFigureRect()メソッドは、このオブジェクトによって描画された影を落とすフォームオブジェクトの寸法に従って、ぼやけていない形状を描画します。
GetQuadratureWeights()メソッドは、ALGLIBライブラリを適用して、DrawShadowFigureRect()メソッドによって描画された形状をぼかすために使用される重み比の配列を計算して返します。
形状のぼかしは、GaussianBlur()メソッドによって実行されます。
すべてのメソッドは以下で検討されています。
クラスのpublicセクションで、パラメータコンストラクタ、オブジェクトプロパティをサポートするためのフラグを返すメソッド(両方のメソッドがtrueを返すまで) 、影を描画するためのメソッドを宣言し、影オブジェクトのプロパティへの簡略化されたアクセスのメソッドを記述します。
public:
                     CShadowObj(const long chart_id,
                                const int subwindow,
                                const string name,
                                const int x,
                                const int y,
                                const int w,
                                const int h);

//--- Supported object properties (1) integer and (2) string ones
   virtual bool      SupportProperty(ENUM_CANV_ELEMENT_PROP_INTEGER property) { return true; }
   virtual bool      SupportProperty(ENUM_CANV_ELEMENT_PROP_STRING property)  { return true; }

//--- Draw an object shadow
   void              DrawShadow(const int shift_x,const int shift_y,const uchar blur_value);

//+------------------------------------------------------------------+
//| Methods of simplified access to object properties                |
//+------------------------------------------------------------------+
//--- (1) Set and (2) return the shadow color
   void              SetColorShadow(const color colour)                       { this.m_color_shadow=colour;    }
   color             ColorShadow(void)                                  const { return this.m_color_shadow;    }
//--- (1) Set and (2) return the shadow opacity
   void              SetOpacityShadow(const uchar opacity)                    { this.m_opacity_shadow=opacity; }
   uchar             OpacityShadow(void)                                const { return this.m_opacity_shadow;  }
  };
//+------------------------------------------------------------------+
クラスメソッドの構造について詳しく見ていきましょう。
以下は、パラメトリックコンストラクタです。
//+------------------------------------------------------------------+
//| Constructor                                                      |
//+------------------------------------------------------------------+
CShadowObj::CShadowObj(const long chart_id,
                       const int subwindow,
                       const string name,
                       const int x,
                       const int y,
                       const int w,
                       const int h) : CGCnvElement(GRAPH_ELEMENT_TYPE_SHADOW_OBJ,chart_id,subwindow,name,x,y,w,h)
  {
   CGCnvElement::SetColorBackground(clrNONE);
   CGCnvElement::SetOpacity(0);
   CGCnvElement::SetActive(false);
   this.m_opacity_shadow=127;
   color gray=CGCnvElement::ChangeColorSaturation(ChartColorBackground(),-100);
   this.m_color_shadow=CGCnvElement::ChangeColorLightness(gray,255,-50);
   this.m_shadow=false;
   this.m_visible=true;
   CGCnvElement::Erase();
  }
//+------------------------------------------------------------------+
コンストラクタは、グラフのID、影オブジェクトの作成に使用されるサブウィンドウのインデックス、その名前、左上のフォーム角度の座標、およびそのサイズを受け取ります。初期化リストで、要素の型(影オブジェクト)およびメソッド引数で渡されたその他のパラメータを、グラフィック要素クラスのprotectedコンストラクタに渡します。
コンストラクタ本体で、オブジェクトの背景の不在、完全な透明度、オブジェクトの非アクティブフラグを設定します(影オブジェクトは外部の影響に反応してはなりません)。キャンバスに描画される影のデフォルトの不透明度は127に設定されています。これは半透明の影です。次に、デフォルトの影の色を計算します。チャートの背景色が100のうち50単位暗くされています。ここでは、最初にチャートの背景色を灰色の色合いに変換してから、結果の色を暗くします。影が描かれているオブジェクトはそれをキャストしてはならないため、影フラグをfalseに設定し、オブジェクトの可視性フラグをtrueに設定し、キャンバスをクリアします。
以下は、影オブジェクトを描画するメソッドです。
//+------------------------------------------------------------------+
//| Draw the object shadow                                           |
//+------------------------------------------------------------------+
void CShadowObj::DrawShadow(const int shift_x,const int shift_y,const uchar blur_value)
  {
//--- Calculate the height and width of the drawn rectangle
   int w=this.Width()-OUTER_AREA_SIZE*2;
   int h=this.Height()-OUTER_AREA_SIZE*2;
//--- Draw a filled rectangle with calculated dimensions
   this.DrawShadowFigureRect(w,h);
//--- Calculate the blur radius, which cannot exceed a quarter of the OUTER_AREA_SIZE constant
   int radius=(blur_value>OUTER_AREA_SIZE/4 ? OUTER_AREA_SIZE/4 : blur_value);
//--- If failed to blur the shape, exit the method (GaussianBlur() displays the error on the journal)
   if(!this.GaussianBlur(radius))
      return;
//--- Shift the shadow object by X/Y offsets specified in the method arguments and update the canvas
   CGCnvElement::Move(this.CoordX()+shift_x,this.CoordY()+shift_y);
   CGCnvElement::Update();
  }
//+------------------------------------------------------------------+
メソッドロジック全体は、コードへのコメントで説明されています。このメソッドでは、最初に影の色で塗りつぶされた通常の長方形を描画します。長方形の幅と高さは、影を落とすフォームオブジェクトのサイズになるように計算されます。次に、ガウスの方法を使用して描画された長方形をぼかし、この影を投影する形状オブジェクトに対して指定されたオフセットだけ影オブジェクトをシフトし、影オブジェクトのキャンバスを更新します。
以下は、オブジェクトの影の形を描くメソッドです。
//+------------------------------------------------------------------+
//| Draw the object shadow form                                      |
//+------------------------------------------------------------------+
void CShadowObj::DrawShadowFigureRect(const int w,const int h)
  {
   CGCnvElement::DrawRectangleFill(OUTER_AREA_SIZE,OUTER_AREA_SIZE,OUTER_AREA_SIZE+w-1,OUTER_AREA_SIZE+h-1,this.m_color_shadow,this.m_opacity_shadow);
   CGCnvElement::Update();
  }
//+------------------------------------------------------------------+
ここでは、OUTER_AREA_SIZE定数値に等しいX/Y座標で長方形を描画します。2番目のX/Y座標は、最初の座標からのオフセット+幅(高さ)から1を引いたものとして計算されます。形状を描画した後、キャンバスが更新されます。
以下は、ガウスの方法を使用して描画された形状をぼかすメソッドです。
//+------------------------------------------------------------------+
//| Gaussian blur                                                    |
//| https://www.mql5.com/ja/articles/1612#chapter4                   |
//+------------------------------------------------------------------+
bool CShadowObj::GaussianBlur(const uint radius)
  {
//---
   int n_nodes=(int)radius*2+1;
   uint res_data[];              // Array for storing graphical resource data
   uint res_w=this.Width();      // Graphical resource width
   uint res_h=this.Height();     // Graphical resource height

//--- Read graphical resource data. If failed, return false
   ::ResetLastError();
   if(!::ResourceReadImage(this.NameRes(),res_data,res_w,res_h))
     {
      CMessage::OutByID(MSG_LIB_SYS_FAILED_GET_DATA_GRAPH_RES);
      return false;
     }
//--- Check the blur amount. If the blur radius exceeds half of the width or height, return 'false'
   if(radius>=res_w/2 || radius>=res_h/2)
     {
      ::Print(DFUN,CMessage::Text(MSG_SHADOW_OBJ_IMG_SMALL_BLUR_LARGE));
      return false;
     }

//--- Decompose image data from the resource into a, r, g, b color components
   int  size=::ArraySize(res_data);
//--- arrays for storing A, R, G and B color components
//--- for horizontal and vertical blur
   uchar a_h_data[],r_h_data[],g_h_data[],b_h_data[];
   uchar a_v_data[],r_v_data[],g_v_data[],b_v_data[];

//--- Change the size of component arrays according to the array size of the graphical resource data
   if(::ArrayResize(a_h_data,size)==-1)
     {
      CMessage::OutByID(MSG_LIB_SYS_FAILED_ARRAY_RESIZE);
      ::Print(DFUN_ERR_LINE,": \"a_h_data\"");
      return false;
     }
   if(::ArrayResize(r_h_data,size)==-1)
     {
      CMessage::OutByID(MSG_LIB_SYS_FAILED_ARRAY_RESIZE);
      ::Print(DFUN_ERR_LINE,": \"r_h_data\"");
      return false;
     }
   if(::ArrayResize(g_h_data,size)==-1)
     {
      CMessage::OutByID(MSG_LIB_SYS_FAILED_ARRAY_RESIZE);
      ::Print(DFUN_ERR_LINE,": \"g_h_data\"");
      return false;
     }
   if(ArrayResize(b_h_data,size)==-1)
     {
      CMessage::OutByID(MSG_LIB_SYS_FAILED_ARRAY_RESIZE);
      ::Print(DFUN_ERR_LINE,": \"b_h_data\"");
      return false;
     }
   if(::ArrayResize(a_v_data,size)==-1)
     {
      CMessage::OutByID(MSG_LIB_SYS_FAILED_ARRAY_RESIZE);
      ::Print(DFUN_ERR_LINE,": \"a_v_data\"");
      return false;
     }
   if(::ArrayResize(r_v_data,size)==-1)
     {
      CMessage::OutByID(MSG_LIB_SYS_FAILED_ARRAY_RESIZE);
      ::Print(DFUN_ERR_LINE,": \"r_v_data\"");
      return false;
     }
   if(::ArrayResize(g_v_data,size)==-1)
     {
      CMessage::OutByID(MSG_LIB_SYS_FAILED_ARRAY_RESIZE);
      ::Print(DFUN_ERR_LINE,": \"g_v_data\"");
      return false;
     }
   if(::ArrayResize(b_v_data,size)==-1)
     {
      CMessage::OutByID(MSG_LIB_SYS_FAILED_ARRAY_RESIZE);
      ::Print(DFUN_ERR_LINE,": \"b_v_data\"");
      return false;
     }
//--- Declare the array for storing blur weight ratios and,
//--- if failed to get the array of weight ratios, return 'false'
   double weights[];
   if(!this.GetQuadratureWeights(1,n_nodes,weights))
      return false;

//--- Set components of each image pixel to the color component arrays
   for(int i=0;i<size;i++)
     {
      a_h_data[i]=GETRGBA(res_data[i]);
      r_h_data[i]=GETRGBR(res_data[i]);
      g_h_data[i]=GETRGBG(res_data[i]);
      b_h_data[i]=GETRGBB(res_data[i]);
     }

//--- Blur the image horizontally (along the X axis)
   uint XY; // Pixel coordinate in the array
   double a_temp=0.0,r_temp=0.0,g_temp=0.0,b_temp=0.0;
   int coef=0;
   int j=(int)radius;
   //--- Loop by the image width
   for(uint Y=0;Y<res_h;Y++)
     {
      //--- Loop by the image height
      for(uint X=radius;X<res_w-radius;X++)
        {
         XY=Y*res_w+X;
         a_temp=0.0; r_temp=0.0; g_temp=0.0; b_temp=0.0;
         coef=0;
         //--- Multiply each color component by the weight ratio corresponding to the current image pixel
         for(int i=-1*j;i<j+1;i=i+1)
           {
            a_temp+=a_h_data[XY+i]*weights[coef];
            r_temp+=r_h_data[XY+i]*weights[coef];
            g_temp+=g_h_data[XY+i]*weights[coef];
            b_temp+=b_h_data[XY+i]*weights[coef];
            coef++;
           }
         //--- Save each rounded color component calculated according to the ratios to the component arrays
         a_h_data[XY]=(uchar)::round(a_temp);
         r_h_data[XY]=(uchar)::round(r_temp);
         g_h_data[XY]=(uchar)::round(g_temp);
         b_h_data[XY]=(uchar)::round(b_temp);
        }
      //--- Remove blur artifacts to the left by copying adjacent pixels
      for(uint x=0;x<radius;x++)
        {
         XY=Y*res_w+x;
         a_h_data[XY]=a_h_data[Y*res_w+radius];
         r_h_data[XY]=r_h_data[Y*res_w+radius];
         g_h_data[XY]=g_h_data[Y*res_w+radius];
         b_h_data[XY]=b_h_data[Y*res_w+radius];
        }
      //--- Remove blur artifacts to the right by copying adjacent pixels
      for(uint x=res_w-radius;x<res_w;x++)
        {
         XY=Y*res_w+x;
         a_h_data[XY]=a_h_data[(Y+1)*res_w-radius-1];
         r_h_data[XY]=r_h_data[(Y+1)*res_w-radius-1];
         g_h_data[XY]=g_h_data[(Y+1)*res_w-radius-1];
         b_h_data[XY]=b_h_data[(Y+1)*res_w-radius-1];
        }
     }

//--- Blur vertically (along the Y axis) the image already blurred horizontally
   int dxdy=0;
   //--- Loop by the image height
   for(uint X=0;X<res_w;X++)
     {
      //--- Loop by the image width
      for(uint Y=radius;Y<res_h-radius;Y++)
        {
         XY=Y*res_w+X;
         a_temp=0.0; r_temp=0.0; g_temp=0.0; b_temp=0.0;
         coef=0;
         //--- Multiply each color component by the weight ratio corresponding to the current image pixel
         for(int i=-1*j;i<j+1;i=i+1)
           {
            dxdy=i*(int)res_w;
            a_temp+=a_h_data[XY+dxdy]*weights[coef];
            r_temp+=r_h_data[XY+dxdy]*weights[coef];
            g_temp+=g_h_data[XY+dxdy]*weights[coef];
            b_temp+=b_h_data[XY+dxdy]*weights[coef];
            coef++;
           }
         //--- Save each rounded color component calculated according to the ratios to the component arrays
         a_v_data[XY]=(uchar)::round(a_temp);
         r_v_data[XY]=(uchar)::round(r_temp);
         g_v_data[XY]=(uchar)::round(g_temp);
         b_v_data[XY]=(uchar)::round(b_temp);
        }
      //--- Remove blur artifacts at the top by copying adjacent pixels
      for(uint y=0;y<radius;y++)
        {
         XY=y*res_w+X;
         a_v_data[XY]=a_v_data[X+radius*res_w];
         r_v_data[XY]=r_v_data[X+radius*res_w];
         g_v_data[XY]=g_v_data[X+radius*res_w];
         b_v_data[XY]=b_v_data[X+radius*res_w];
        }
      //--- Remove blur artifacts at the bottom by copying adjacent pixels
      for(uint y=res_h-radius;y<res_h;y++)
        {
         XY=y*res_w+X;
         a_v_data[XY]=a_v_data[X+(res_h-1-radius)*res_w];
         r_v_data[XY]=r_v_data[X+(res_h-1-radius)*res_w];
         g_v_data[XY]=g_v_data[X+(res_h-1-radius)*res_w];
         b_v_data[XY]=b_v_data[X+(res_h-1-radius)*res_w];
        }
     }

//--- Set the twice blurred (horizontally and vertically) image pixels to the graphical resource data array
   for(int i=0;i<size;i++)
      res_data[i]=ARGB(a_v_data[i],r_v_data[i],g_v_data[i],b_v_data[i]);
//--- Display the image pixels on the canvas in a loop by the image height and width from the graphical resource data array
   for(uint X=0;X<res_w;X++)
     {
      for(uint Y=radius;Y<res_h-radius;Y++)
        {
         XY=Y*res_w+X;
         CGCnvElement::GetCanvasObj().PixelSet(X,Y,res_data[XY]);
        }
     }
//--- Done
   return true;
  }
//+------------------------------------------------------------------+
メソッドのロジックは、コードのコメントで説明されています。詳細については、メソッドの取得元である記事をご覧ください。
以下は、重み比の配列を返すメソッドです。
//+------------------------------------------------------------------+
//| Return the array of weight ratios                                |
//| https://www.mql5.com/ja/articles/1612#chapter3_2                 |
//+------------------------------------------------------------------+
bool CShadowObj::GetQuadratureWeights(const double mu0,const int n,double &weights[])
  {
   CAlglib alglib;
   double  alp[];
   double  bet[];
   ::ArrayResize(alp,n);
   ::ArrayResize(bet,n);
   ::ArrayInitialize(alp,1.0);
   ::ArrayInitialize(bet,1.0);
//---
   double out_x[];
   int    info=0;
   alglib.GQGenerateRec(alp,bet,mu0,n,info,out_x,weights);
   if(info!=1)
     {
      string txt=(info==-3 ?"internal eigenproblem solver hasn't converged" : info==-2 ?"Beta[i]<=0" : "incorrect N was passed");
      ::Print("Call error in CGaussQ::GQGenerateRec: ",txt);
      return false;
     }
   return true;
  }
//+------------------------------------------------------------------+
このメソッドは、ALGLIB数値解析ライブラリを使用してぼかし率を計算し、リンクから渡された重み配列に設定します。詳細については、次の記事セクションをご覧ください。
これで、影オブジェクトクラスの最初のバージョンの開発が完了しました。
次に、フォームオブジェクトから直接影をすばやく作成および描画する機能を実装します。
フォームオブジェクトクラスの\MQL5\Include\DoEasy\Objects\Graph\Form.mqhを開き、必要な改善を行います。
フォームオブジェクトクラスに影オブジェクトクラスを表示させるには、最近作成した影クラスのファイルをそれに含めます。
//+------------------------------------------------------------------+
//|                                                         Form.mqh |
//|                                  Copyright 2021, MetaQuotes Ltd. |
//|                             https://mql5.com/en/users/artmedia70 |
//+------------------------------------------------------------------+
#property copyright "Copyright 2021, MetaQuotes Ltd."
#property link      "https://mql5.com/en/users/artmedia70"
#property version   "1.00"
#property strict    // Necessary for mql4
//+------------------------------------------------------------------+
//| Include files                                                    |
//+------------------------------------------------------------------+
#include "GCnvElement.mqh"
#include "ShadowObj.mqh"
//+------------------------------------------------------------------+
//| Form object class                                                |
//+------------------------------------------------------------------+
クラスのprivateセクションから、フォームの影の色を格納している変数を削除します。
color m_color_shadow; // Form shadow color
これで、影の色が影オブジェクトクラスに保存されるようになります。
その結果、フォームオブジェクトを使用すると、その中に新しいグラフィック要素オブジェクトを作成し、それらを依存オブジェクトのリストに添付できます。つまり、これらの新しく作成されたオブジェクトは、形状オブジェクトに完全に依存し、属します。フォームオブジェクトはそれらを管理できるようになります。このようなオブジェクトを作成するには、名前を作成する必要があります。名前には、フォームオブジェクト名が含まれ、最後に独自の名前が追加されている必要があります。これを実現するには、依存オブジェクトの名前を作成するメソッドをクラスのprivateセクションに追加します。
//--- Initialize the variables
   void              Initialize(void);
//--- Return the name of the dependent object
   string            CreateNameDependentObject(const string base_name)  const
                       { return ::StringSubstr(this.NameObj(),::StringLen(::MQLInfoString(MQL_PROGRAM_NAME))+1)+"_"+base_name;   }

//--- Create a new graphical object
前回の記事でフォームオブジェクトを説明したときに、以前の記事でオブジェクトにそのような名前を作成することをすでに実装しました。
...名前オブジェクトから末尾を取得します(名前は、プログラム名とその作成時に割り当てられたオブジェクト名で構成されます)。作成中にオブジェクト名を取得し、メソッドに渡された名前を追加する必要があります。
たとえば、名前がProgram_name_Form01の場合、Form01部分文字列を取得し、メソッドに渡された名前を追加します。影オブジェクトを作成してShadowという名前を渡すと、オブジェクト名はForm01_ Shadowになり、作成されたオブジェクトの最終的な名前はProgram_name_Form01_Shadowになります。
これは、複数回必要になるため、別のメソッドで実行されます。
また、privateセクションで、影オブジェクトを作成するためのメソッドを宣言します。
//--- Create a new graphical object
   CGCnvElement     *CreateNewGObject(const ENUM_GRAPH_ELEMENT_TYPE type,
                                      const int element_num,
                                      const string name,
                                      const int x,
                                      const int y,
                                      const int w,
                                      const int h,
                                      const color colour,
                                      const uchar opacity,
                                      const bool movable,
                                      const bool activity);
//--- Create a shadow object
   void              CreateShadowObj(const color colour,const uchar opacity);

public:
クラスのpublicセクションから、メソッドの宣言を削除します。
//--- Create a new attached element
   bool              CreateNewElement(const int element_num,
                                      const string name,
                                      const int x,
                                      const int y,
                                      const int w,
                                      const int h,
                                      const color colour,
                                      const uchar opacity,
                                      const bool movable,
                                      const bool activity);

//--- Create a shadow object
   void              CreateShadow(const uchar opacity);
//--- Draw an object shadow
このメソッドは公開されておらず、影の色とその不透明度が追加で転送されます。
オブジェクトの影を描画するpublicメソッドにも、次の引数が追加されます。
//--- Create a new attached element
   bool              CreateNewElement(const int element_num,
                                      const string name,
                                      const int x,
                                      const int y,
                                      const int w,
                                      const int h,
                                      const color colour,
                                      const uchar opacity,
                                      const bool movable,
                                      const bool activity);


//--- Draw an object shadow
   void              DrawShadow(const int shift_x,const int shift_y,const color colour,const uchar opacity=127,const uchar blur=4);

//--- Draw the form frame
これは、影オブジェクトを事前に作成する代わりに、レンダリング後にすぐに影描画メソッドを呼び出すことができるようにするためです。ここでのロジックは単純です。影描画メソッドを呼び出す場合は必要ありません。影オブジェクトを作成していない場合、新しいメソッドはまずオブジェクトを作成してその上に影を描画して、画面に表示します。
メソッドのブロックから影の色を設定および返すためのメソッドの実装を削除 して、オブジェクトのプロパティへのアクセスを簡素化します。
//+------------------------------------------------------------------+
//| Methods of simplified access to object properties                |
//+------------------------------------------------------------------+
//--- (1) Set and (2) get the form frame color
   void              SetColorFrame(const color colour)                        { this.m_color_frame=colour;  }
   color             ColorFrame(void)                                   const { return this.m_color_frame;  }
//--- (1) Set and (2) return the form shadow color
   void              SetColorShadow(const color colour)                       { this.m_color_shadow=colour; }
   color             ColorShadow(void)                                  const { return this.m_color_shadow; }
これで、これらのメソッドはクラス本体の外に移動され(そこで影オブジェクトの存在を確認する必要があります)が、ここには宣言のみが残ります。また、影の不透明度を設定して返すメソッドの宣言を追加します。
//+------------------------------------------------------------------+
//| Methods of simplified access to object properties                |
//+------------------------------------------------------------------+
//--- (1) Set and (2) get the form frame color
   void              SetColorFrame(const color colour)                        { this.m_color_frame=colour;     }
   color             ColorFrame(void)                                   const { return this.m_color_frame;     }
//--- (1) Set and (2) return the form shadow color
   void              SetColorShadow(const color colour);
   color             ColorShadow(void) const;
//--- (1) Set and (2) return the form shadow opacity
   void              SetOpacityShadow(const uchar opacity);
   uchar             OpacityShadow(void) const;

  };
//+------------------------------------------------------------------+
新しいグラフィック要素を作成するメソッドで次の文字列を
   int pos=::StringLen(::MQLInfoString(MQL_PROGRAM_NAME));
   string pref=::StringSubstr(NameObj(),pos+1);
   string name=pref+"_"+obj_name;
依存オブジェクト名を作成するメソッドの呼び出しで置き換えます。
//+------------------------------------------------------------------+
//| Create a new graphical object                                    |
//+------------------------------------------------------------------+
CGCnvElement *CForm::CreateNewGObject(const ENUM_GRAPH_ELEMENT_TYPE type,
                                      const int obj_num,
                                      const string obj_name,
                                      const int x,
                                      const int y,
                                      const int w,
                                      const int h,
                                      const color colour,
                                      const uchar opacity,
                                      const bool movable,
                                      const bool activity)
  {
   string name=this.CreateNameDependentObject(obj_name);
   CGCnvElement *element=new CGCnvElement(type,this.ID(),obj_num,this.ChartID(),this.SubWindow(),name,x,y,w,h,colour,opacity,movable,activity);
   if(element==NULL)
      ::Print(DFUN,CMessage::Text(MSG_LIB_SYS_FAILED_CREATE_ELM_OBJ),": ",name);
   return element;
  }
//+------------------------------------------------------------------+
影オブジェクトを作成したら、デフォルトのパラメータをすぐに設定する必要があります。
これを実現するために、 影オブジェクトを作成するメソッドを少し改善しましょう。
//+------------------------------------------------------------------+
//| Create the shadow object                                         |
//+------------------------------------------------------------------+
void CForm::CreateShadowObj(const color colour,const uchar opacity)
  {
//--- If the shadow flag is disabled or the shadow object already exists, exit
   if(!this.m_shadow || this.m_shadow_obj!=NULL)
      return;
//--- Calculate the shadow object coordinates according to the offset from the top and left
   int x=this.CoordX()-OUTER_AREA_SIZE;
   int y=this.CoordY()-OUTER_AREA_SIZE;
//--- Calculate the width and height in accordance with the top, bottom, left and right offsets
   int w=this.Width()+OUTER_AREA_SIZE*2;
   int h=this.Height()+OUTER_AREA_SIZE*2;
//--- Create a new shadow object and set the pointer to it in the variable
   this.m_shadow_obj=new CShadowObj(this.ChartID(),this.SubWindow(),this.CreateNameDependentObject("Shadow"),x,y,w,h);
   if(this.m_shadow_obj==NULL)
     {
      ::Print(DFUN,CMessage::Text(MSG_FORM_OBJECT_ERR_FAILED_CREATE_SHADOW_OBJ));
      return;
     }
//--- Set the properties for the created shadow object
   this.m_shadow_obj.SetID(this.ID());
   this.m_shadow_obj.SetNumber(-1);
   this.m_shadow_obj.SetOpacityShadow(opacity);
   this.m_shadow_obj.SetColorShadow(colour);
   this.m_shadow_obj.SetMovable(true);
   this.m_shadow_obj.SetActive(false);
   this.m_shadow_obj.SetVisible(false);
//--- Move the form object to the foreground
   this.BringToTop();
  }
//+------------------------------------------------------------------+
影を描画するメソッドを改善して、オブジェクトがない状態では最初に作成され、後で影が描画されるようにします。
//+------------------------------------------------------------------+
//| Draw the shadow                                                  |
//+------------------------------------------------------------------+
void CForm::DrawShadow(const int shift_x,const int shift_y,const color colour,const uchar opacity=127,const uchar blur=4)
  {
//--- If the shadow flag is disabled, exit
   if(!this.m_shadow)
      return;
//--- If there is no shadow object, create it
   if(this.m_shadow_obj==NULL)
      this.CreateShadowObj(colour,opacity);
//--- If the shadow object exists, draw the shadow on it,
//--- set the shadow object visibility flag and
//--- move the form object to the foreground
   if(this.m_shadow_obj!=NULL)
     {
      this.m_shadow_obj.DrawShadow(shift_x,shift_y,blur);
      this.m_shadow_obj.SetVisible(true);
      this.BringToTop();
     }
  }
//+------------------------------------------------------------------+
メソッドロジックはコードコメントで説明されており、問題ないはずです。
配色を設定するメソッドでは、影オブジェクトの描画色を設定する前に、影を使用するフラグと作成された影オブジェクトの存在を確認します。
//+------------------------------------------------------------------+
//| Set a color scheme                                               |
//+------------------------------------------------------------------+
void CForm::SetColorTheme(const ENUM_COLOR_THEMES theme,const uchar opacity)
  {
   this.SetOpacity(opacity);
   this.SetColorBackground(array_color_themes[theme][COLOR_THEME_COLOR_FORM_BG]);
   this.SetColorFrame(array_color_themes[theme][COLOR_THEME_COLOR_FORM_FRAME]);
   if(this.m_shadow && this.m_shadow_obj!=NULL)
      this.SetColorShadow(array_color_themes[theme][COLOR_THEME_COLOR_FORM_SHADOW]);
  }
//+------------------------------------------------------------------+
フォームスタイルを設定するメソッドは、影カラーを作成するためにチャートの背景色を使用する必要があることを示す新しい入力を受け取り、影の描画を追加します。
//+------------------------------------------------------------------+
//| Set the form style                                               |
//+------------------------------------------------------------------+
void CForm::SetFormStyle(const ENUM_FORM_STYLE style,
                         const ENUM_COLOR_THEMES theme,
                         const uchar opacity,
                         const bool shadow=false,
                         const bool use_bg_color=true,
                         const bool redraw=false)
  {
//--- Set opacity parameters and the size of the form frame side
   this.m_shadow=shadow;
   this.m_frame_width_top=array_form_style[style][FORM_STYLE_FRAME_WIDTH_TOP];
   this.m_frame_width_bottom=array_form_style[style][FORM_STYLE_FRAME_WIDTH_BOTTOM];
   this.m_frame_width_left=array_form_style[style][FORM_STYLE_FRAME_WIDTH_LEFT];
   this.m_frame_width_right=array_form_style[style][FORM_STYLE_FRAME_WIDTH_RIGHT];

//--- Create the shadow object
   this.CreateShadowObj(clrNONE,(uchar)array_form_style[style][FORM_STYLE_FRAME_SHADOW_OPACITY]);

//--- Set a color scheme
   this.SetColorTheme(theme,opacity);
//--- Calculate a shadow color with color darkening
   color clr=array_color_themes[theme][COLOR_THEME_COLOR_FORM_SHADOW];
   color gray=CGCnvElement::ChangeColorSaturation(ChartColorBackground(),-100);
   color color_shadow=CGCnvElement::ChangeColorLightness((use_bg_color ? gray : clr),-fabs(array_form_style[style][FORM_STYLE_DARKENING_COLOR_FOR_SHADOW]));
   this.SetColorShadow(color_shadow);

//--- Draw a rectangular shadow
   int shift_x=array_form_style[style][FORM_STYLE_FRAME_SHADOW_X_SHIFT];
   int shift_y=array_form_style[style][FORM_STYLE_FRAME_SHADOW_Y_SHIFT];
   this.DrawShadow(shift_x,shift_y,color_shadow,this.OpacityShadow(),(uchar)array_form_style[style][FORM_STYLE_FRAME_SHADOW_BLUR]);

//--- Fill in the form background with color and opacity
   this.Erase(this.ColorBackground(),this.Opacity());
//--- Depending on the selected form style, draw the corresponding form frame and the outer bounding frame
   switch(style)
     {
      case FORM_STYLE_BEVEL   :
        this.DrawFormFrame(this.m_frame_width_top,this.m_frame_width_bottom,this.m_frame_width_left,this.m_frame_width_right,this.ColorFrame(),this.Opacity(),FRAME_STYLE_BEVEL);

        break;
      //---FORM_STYLE_FLAT
      default:
        this.DrawFormFrame(this.m_frame_width_top,this.m_frame_width_bottom,this.m_frame_width_left,this.m_frame_width_right,this.ColorFrame(),this.Opacity(),FRAME_STYLE_FLAT);

        break;
     }
   this.DrawRectangle(0,0,Width()-1,Height()-1,array_color_themes[theme][COLOR_THEME_COLOR_FORM_RECT_OUTER],this.Opacity());
  }
//+------------------------------------------------------------------+
メソッドロジックはコメントで説明されています。つまり、まず影オブジェクトを作成します。カラーパレットを設定した後、影を描くために必要な色を計算します。背景色使用フラグが設定されている場合、グラフの背景色をモノクロに変換し、GraphINI.mqhファイルのフォームスタイルでパラメータ値を暗くするように設定して暗くします。フラグが設定されていない場合は、同じように暗くした色を使用します。色は、GraphINI.mqhファイルのフォームの配色で設定されます。次に、影を描画するメソッドを呼び出します。このメソッドは、フォームオブジェクトの影使用フラグが設定されている場合にのみ影を描画します。
フォームフレームの明暗を適用するすべてのメソッドで、実数で指定された値
      //--- Darken the horizontal sides of the frame
      for(int i=0;i<width;i++)
        {
         this.m_canvas.PixelSet(x+i,y,CGCnvElement::ChangeColorLightness(this.GetPixel(x+i,y),-0.05));
         this.m_canvas.PixelSet(x+i,y+height-1,CGCnvElement::ChangeColorLightness(this.GetPixel(x+i,y+height-1),-0.07));
        }
を100倍大きい適切な整数値(これらの文字列で呼び出されるメソッドでは、渡された値を100での除算を追加しました)で<s1>置き換えます</s1> 。
      //--- Darken the horizontal sides of the frame
      for(int i=0;i<width;i++)
        {
         this.m_canvas.PixelSet(x+i,y,CGCnvElement::ChangeColorLightness(this.GetPixel(x+i,y),-5));
         this.m_canvas.PixelSet(x+i,y+height-1,CGCnvElement::ChangeColorLightness(this.GetPixel(x+i,y+height-1),-7));
        }
これは、値の置換が必要なすべてのメソッドですでに実行されています。ここでは同じタイプの変更を繰り返しません。コードは以下に添付されているファイルにあります。
以下は、フォームの影の色を設定するメソッドです。
//+------------------------------------------------------------------+
//| Set the form shadow color                                        |
//+------------------------------------------------------------------+
void CForm::SetColorShadow(const color colour)
  {
   if(this.m_shadow_obj==NULL)
     {
      ::Print(DFUN,CMessage::Text(MSG_FORM_OBJECT_TEXT_NO_SHADOW_OBJ_FIRST_CREATE_IT));
      return;
     }
   this.m_shadow_obj.SetColorShadow(colour);
  }
//+------------------------------------------------------------------+
ここでは、影オブジェクトの存在を確認し、オブジェクトが存在する場合にのみその影の色を設定します。それ以外の場合は、影オブジェクトが存在しないことを通知し、最初に作成するように求める操作ログメッセージを表示します。
以下は、フォームの影の色を返すメソッドです。
//+------------------------------------------------------------------+
//| Return the form shadow color                                     |
//+------------------------------------------------------------------+
color CForm::ColorShadow(void) const
  {
   if(this.m_shadow_obj==NULL)
     {
      ::Print(DFUN,CMessage::Text(MSG_FORM_OBJECT_TEXT_NO_SHADOW_OBJ_FIRST_CREATE_IT));
      return clrNONE;
     }
   return this.m_shadow_obj.ColorShadow();
  }
//+------------------------------------------------------------------+
ここでは、まずオブジェクトが存在するかどうかを確認し、そこから影の色を返します。
以下は、影の不透明度を設定して返すメソッドです。
//+------------------------------------------------------------------+
//| Set the form shadow opacity                                      |
//+------------------------------------------------------------------+
void CForm::SetOpacityShadow(const uchar opacity)
  {
   if(this.m_shadow_obj==NULL)
     {
      ::Print(DFUN,CMessage::Text(MSG_FORM_OBJECT_TEXT_NO_SHADOW_OBJ_FIRST_CREATE_IT));
      return;
     }
   this.m_shadow_obj.SetOpacityShadow(opacity);
  }
//+------------------------------------------------------------------+
//| Return the form shadow opacity                                   |
//+------------------------------------------------------------------+
uchar CForm::OpacityShadow(void) const
  {
   if(this.m_shadow_obj==NULL)
     {
      ::Print(DFUN,CMessage::Text(MSG_FORM_OBJECT_TEXT_NO_SHADOW_OBJ_FIRST_CREATE_IT));
      return 0;
     }
   return this.m_shadow_obj.OpacityShadow();
  }
//+------------------------------------------------------------------+
これらのメソッドのロジックは、上記で検討した2つのメソッドのロジックと同じです。
これで、フォームの影オブジェクトの作成をテストする準備が整いました。
検証
フォームオブジェクトでの影の作成を確認しましょう。2つのフォームは、フォームスタイルと配色で記述されたパラメータを使用して作成されます(前の記事で行ったのと同様)。3番目のフォームは「手動」で作成されます。これは、カスタムフォームを描画する方法のさらに別の例です。フォームの影オブジェクトはフォーム自体の作成後に描画されるため、どのオブジェクトがクリックに反応するかを確認します。フォームオブジェクトがその影が描画されるオブジェクトの上にある場合、フォームをクリックすると操作ログでフォーム名が表示されます。 影オブジェクトがまだフォームよりも上にある場合、操作ログにはフォームの影オブジェクトの名前が表示されます。
テストを実行するには、前の記事のEAを使用して、\MQL5\Experts\TestDoEasy\Part77\にTestDoEasyPart77.mq5として保存します。
EA入力のリストで、チャートの背景色または次の入力で指定できる指定された色で影の色を選択できるようにする設定を追加します。グローバル変数のリストで、フォームにグラデーションをつけるするための色を格納する配列を追加します。
//+------------------------------------------------------------------+
//|                                             TestDoEasyPart77.mq5 |
//|                                  Copyright 2021, MetaQuotes Ltd. |
//|                             https://mql5.com/en/users/artmedia70 |
//+------------------------------------------------------------------+
#property copyright "Copyright 2021, MetaQuotes Ltd."
#property link      "https://mql5.com/en/users/artmedia70"
#property version   "1.00"
//--- includes
#include <Arrays\ArrayObj.mqh>
#include <DoEasy\Services\Select.mqh>
#include <DoEasy\Objects\Graph\Form.mqh>
//--- defines
#define        FORMS_TOTAL (3)   // Number of created forms
//--- input parameters
sinput   bool              InpMovable     =  true;          // Movable forms flag
sinput   ENUM_INPUT_YES_NO InpUseColorBG  =  INPUT_YES;     // Use chart background color to calculate shadow color
sinput   color             InpColorForm3  =  clrCadetBlue;  // Third form shadow color (if not background color)
//--- global variables
CArrayObj      list_forms;
color          array_clr[];
//+------------------------------------------------------------------+
OnInit()ハンドラで、 3番目のフォームオブジェクトの作成を追加します。
//+------------------------------------------------------------------+
//| Expert initialization function                                   |
//+------------------------------------------------------------------+
int OnInit()
  {
//--- Set the permissions to send cursor movement and mouse scroll events
   ChartSetInteger(ChartID(),CHART_EVENT_MOUSE_MOVE,true);
   ChartSetInteger(ChartID(),CHART_EVENT_MOUSE_WHEEL,true);
//--- Set EA global variables
   ArrayResize(array_clr,2);
   array_clr[0]=C'26,100,128';      // Original ≈Dark-azure color
   array_clr[1]=C'35,133,169';      // Lightened original color
//--- Create the specified number of form objects
   list_forms.Clear();
   int total=FORMS_TOTAL;
   for(int i=0;i<total;i++)
     {
      //--- When creating an object, pass all the required parameters to it
      CForm *form=new CForm("Form_0"+(string)(i+1),300,40+(i*80),100,(i<2 ? 70 : 30));
      if(form==NULL)
         continue;
      //--- Set activity and moveability flags for the form
      form.SetActive(true);
      form.SetMovable(false);
      //--- Set the form ID equal to the loop index and the index in the list of objects
      form.SetID(i);
      form.SetNumber(0);   // (0 - main form object) Auxiliary objects may be attached to the main one. The main object is able to manage them
      //--- Set the partial opacity for the middle form and the full one for the rest
      uchar opacity=(i==1 ? 250 : 255);
      //--- Set the form style and its color theme depending on the loop index
      if(i<2)
        {
         ENUM_FORM_STYLE style=(ENUM_FORM_STYLE)i;
         ENUM_COLOR_THEMES theme=(ENUM_COLOR_THEMES)i;
         //--- Set the form style and theme
         form.SetFormStyle(style,theme,opacity,true,false);
        }
      //--- If this is the first (top) form
      if(i==0)
        {
         //--- Draw a concave field slightly shifted from the center of the form downwards
         form.DrawFieldStamp(3,10,form.Width()-6,form.Height()-13,form.ColorBackground(),form.Opacity());
         form.Update(true);
        }
      //--- If this is the second (middle) form
      if(i==1)
        {
         //--- Draw a concave semi-transparent "tainted glass" field in the center
         form.DrawFieldStamp(10,10,form.Width()-20,form.Height()-20,clrWheat,200);
         form.Update(true);
        }
      //--- If this is the third (bottom) form
      if(i==2)
        {
         //--- Set the opacity of 200
         form.SetOpacity(200);
         //--- The form background color is set as the first color from the color array
         form.SetColorBackground(array_clr[0]);
         //--- Form outlining frame color
         form.SetColorFrame(clrDarkBlue);
         //--- Draw the shadow drawing flag
         form.SetShadow(true);
         //--- Calculate the shadow color as the chart background color converted to the monochrome one
         color clrS=form.ChangeColorSaturation(form.ColorBackground(),-100);
         //--- If the settings specify the usage of the chart background color, replace the monochrome color with 20 units
         //--- Otherwise, use the color specified in the settings for drawing the shadow
         color clr=(InpUseColorBG ? form.ChangeColorLightness(clrS,255,-20) : InpColorForm3);
         //--- Draw the form shadow with the right-downwards offset from the form by three pixels along all axes
         //--- Set the shadow opacity to 200, while the blur radius is equal to 4
         form.DrawShadow(3,3,clr,200,4);
         //--- Fill the form background with a vertical gradient
         form.Erase(array_clr,form.Opacity());
         //--- Draw an outlining rectangle at the edges of the form
         form.DrawRectangle(0,0,form.Width()-1,form.Height()-1,form.ColorFrame(),form.Opacity());
         //--- Display the text describing the gradient type and update the form
         form.Text(form.Width()/2,form.Height()/2,TextByLanguage("V-Градиент","V-Gradient"),C'211,233,149',255,TEXT_ANCHOR_CENTER);
         form.Update(true);
        }
      //--- Add objects to the list
      if(!list_forms.Add(form))
        {
         delete form;
         continue;
        }
     }
//---
   return(INIT_SUCCEEDED);
  }
//+------------------------------------------------------------------+
フォーム作成ロジック全体は、コードコメントで設定されます。これは、カスタムフォームオブジェクトを作成するためのさらに別のオプションです。
OnChartEvent()ハンドラで、グラフィカルオブジェクトをクリックすると、操作ログでグラフィカルオブジェクト名が表示されるようにします。
//+------------------------------------------------------------------+
//| ChartEvent function                                              |
//+------------------------------------------------------------------+
void OnChartEvent(const int id,
                  const long &lparam,
                  const double &dparam,
                  const string &sparam)
  {
//--- If clicking on an object
   if(id==CHARTEVENT_OBJECT_CLICK)
     {
      Print(sparam);
     }
  }
//+------------------------------------------------------------------+
EAをコンパイルし、チャート上で起動して、デフォルトの影の設定を変更します。
残念ながら、GIF画像ではカラーパレット全体を表示することはできません。
以下に、画像PNG形式のグラデーションの背景を持つフォームの外観を示します。
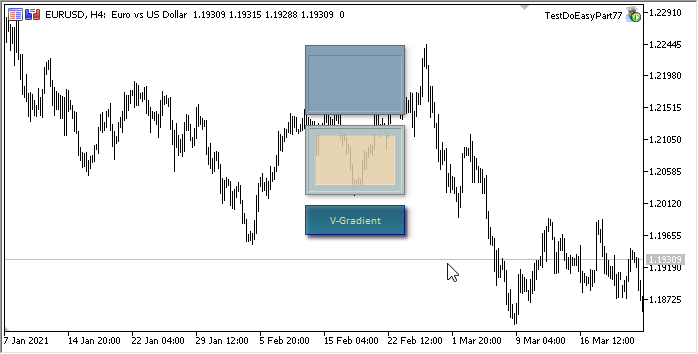
各フォームをクリックすると、(影オブジェクトの名前ではなく)フォームの名前が操作ログに表示されます。
TestDoEasyPart77_Form_01
TestDoEasyPart77_Form_02
TestDoEasyPart77_Form_03
これは、影オブジェクトをフォームオブジェクトから作成した後でも、それを作成したフォームとの干渉を回避するために、影オブジェクトを背景に移動できることを意味します。
次の段階
次の記事では、フォームオブジェクトクラスの開発を続け、徐々に静止画像の「アニメーション化」を開始します。
ライブラリの現在のバージョンのすべてのファイルは、テストおよびダウンロードできるように、MQL5のテストEAファイルと一緒に以下に添付されています。
質問や提案はコメント欄にお願いします。
**連載のこれまでの記事:
DoEasyライブラリのグラフィックス(第73部): グラフィック要素のフォームオブジェクト
DoEasyライブラリのグラフィックス(第74部): CCanvasクラスを使用した基本的グラフィック要素
DoEasyライブラリのグラフィックス(第75部): 基本的なグラフィック要素でプリミティブとテキストを処理するメソッド
DoEasyライブラリのグラフィックス(第76部): フォームオブジェクトと事前定義されたカラースキーム
MetaQuotes Ltdによってロシア語から翻訳されました。
元の記事: https://www.mql5.com/ru/articles/9575
警告: これらの資料についてのすべての権利はMetaQuotes Ltd.が保有しています。これらの資料の全部または一部の複製や再プリントは禁じられています。
この記事はサイトのユーザーによって執筆されたものであり、著者の個人的な見解を反映しています。MetaQuotes Ltdは、提示された情報の正確性や、記載されているソリューション、戦略、または推奨事項の使用によって生じたいかなる結果についても責任を負いません。

 取引のための組合せ論と確率論(第II部): ユニバーサルフラクタル
- 無料取引アプリ
- 8千を超えるシグナルをコピー
- 金融ニュースで金融マーケットを探索
DoEasyはまだ開発中のライブラリですか、それともすでに開発されたものですか?githubなど、どこでこのライブラリ全体にアクセスできるのでしょうか?ありがとうございます。
これらの記事は開発チュートリアルです。このライブラリを「ライブ」で開発するプロセスを説明しています。そのため、このライブラリへのアクセスは、この後の各記事でのみ可能です。