Gold Swing Auto XAUUSD with Graded Signals MT5
- Experts
- Version: 2.56
- Updated: 29 August 2026
- Activations: 5

Can your EA explain WHY it lost?
Most EAs only give you an outcome. Won, lost, balance up, balance down. Why it entered, why it is not entering right now, which kind of signal actually works in YOUR account — you never find out. You keep it running and hope.
KURAMA GOLD SWING AUTO was built the other way round.
[The one thing that makes this EA different]
It tracks which signals work in YOUR account — and tells you.
Every signal is auto-graded A / B / Star. Every signal is also classified by target depth: Quick / Short / Mid / Long. That is a 12-cell matrix, and the EA keeps win rate, trade count and P/L for every cell, rebuilt from your own account history.
One button prints the whole matrix to the Experts log. You see which cells carry your account and which cells drag it. You can then size each cell individually — thin out what does not work, keep what does.
The EA also watches the matrix for you. When a cell has accumulated enough trades but shows a low win rate and negative P/L, it flags that cell automatically. You do not have to notice it yourself.
This is not an EA that is "finished" on the day you buy it. It is one you tune with your own account's data.
[Fixed lots only — sizing never grows on its own]
Let me be straight about a change from earlier versions: the percentage-risk auto-lot, which sized every trade from the balance, has been removed.
The reason is simple. Sizing that scales with the balance grows exactly when you least want it to. After a winning streak the lot is at its largest, and the one bad trade that follows takes back the whole run. On gold that is a common way to break an account.
So this EA is fixed-lot only.
- The lot you configure always acts as a ceiling
- It never increases with your balance
- No martingale, no grid, no averaging down
- Every position carries a Stop Loss from the moment it opens
If a configured lot is clearly excessive for the account, the EA reduces it or skips the order. The clamp only ever works downwards.
It is not exciting. Money management should not be.
[Nothing to configure to get started]
The recommended sizing is built into the EA as per-timeframe defaults. There is no SET file to load and nothing to calculate.
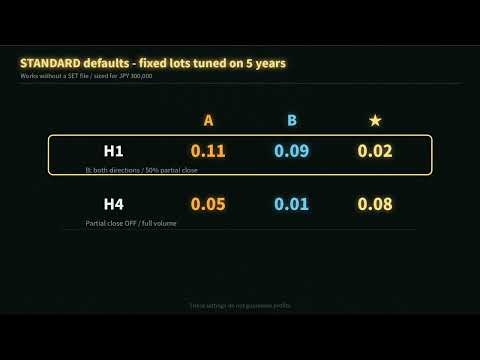
- STANDARD (built-in): H1 = A 0.11 / B 0.09 / Star 0.02, H4 = A 0.05 / B 0.01 / Star 0.08
Those values were tuned on a five-year validation window (August 2021 to August 2026), on a basis of about USD 2,000 / JPY 300,000 at 1:400 leverage.
A slightly higher-risk set, ACTIVE, is also documented (H1 = 0.11 / 0.10 / 0.02, H4 = 0.06 / 0.01 / 0.08). If you want it, you type three values into the Inputs screen.
Higher leverage lowers the required margin. It does not lower the loss of the same price move, so the lots are not multiplied to match it.
[What the five-year test actually showed]
These are historical backtest facts under the stated conditions — not a forward expectation, and not live trading results.
- Window: 2021-08-14 to 2026-08-14, model: 1-minute OHLC, 1:400
- Actual entries: 1,654 (H1 1,234 / H4 420)
- Weekly average: about 6.33 entries, H1 and H4 combined
- 240 of 260 weeks produced 5 or more entries
- Maximum equity drawdown: 37.59% (STANDARD), 38.51% (ACTIVE)
- Worst full month: -27.92% (STANDARD), -29.34% (ACTIVE)
- Minimum margin level 1181.7%; the safety lot clamp never triggered
Read the drawdown and the worst month together with anything else you see. A test window that contained a 37% drawdown will contain one again.
Past and simulated performance do not guarantee future results.
[About one entry every trading day, on average]
Roughly 6.33 entries per week across H1 and H4, averaged over five years. That is an average, not a floor — quiet days are normal, and this EA does not trade every day.
It is not a scalper. Positions are held for hours to days on H1 and H4.
[Grade B now manages its own risk]
Earlier versions recommended switching B off. That is no longer the case.
B trades both directions, and the EA checks the daily regime on every B signal: the last completed D1 close against the D1 MA75. A B signal aligned with that regime uses its configured lot. A B signal against it is automatically cut to about one eighth, rounded down to the lot step and never below the broker minimum.
No switch to flip. The EA decides each time.
[Exit management, not just entries]
Automating the entry is the easy half.
- H1 closes about 50% once at the configured trigger, then moves the remaining stop near break-even, keeping the original TP for the remainder
- The partial volume is rounded down to the broker lot step; if no valid volume can be produced, nothing is sent
- Close and modify return codes are verified, failures are logged and retried safely
- H4 runs without the split and manages the full volume with its SL/TP
[When you are unsure, the EA gives you something to work with]
The hardest moment in semi-discretionary trading is deciding whether to cut. While a position is open, an exit hint sits on the chart:
- Wait for TP — moving in your favour
- Close now — no favourable movement after the configured number of bars
- Close half — pulled back from the peak of the unrealized profit
- Can extend — TP is close and momentum is strong
It is display only. The EA never acts on it by itself. You keep the decision; you just stop guessing in the dark.
[Your real fills, drawn on your chart]
Plenty of EAs draw signal arrows. An arrow is a display, not evidence that anything was filled.
This EA rebuilds only what actually executed, from your account history: the real entry price, the real TP and SL as stored in the order history, partial exits, final exits and their results. Missing values are never invented.
The default look-back is 365 days and roughly the latest 120 markers are kept on the chart.
[It also tells you why it is NOT entering]
The most stressful moment in EA trading is not a loss. It is staring at a setup and wondering why nothing happened.
The STATUS line answers it on the chart: spread too wide, auto trading off, grade disabled, position limit reached, unsupported timeframe. The panel also shows P/L (total / today / week / month), win rate, profit factor, maximum drawdown, open positions, floating P/L, spread and equity. Run several charts and the combined figure is shown too.
[Automated discipline, human veto]
Automatic by default, with one-tap intervention at any time:
- Close All — flat instantly
- Close Half — bank part, keep the rest running
- Break-even — SL to entry, spread-adjusted; skipped while the position is in loss
- Pause New — stop new entries while open positions stay managed
Each button acts only on the positions belonging to the chart you clicked. An H1 panel never touches H4 positions.
You can also close any EA position by hand from the terminal. A signal you closed is excluded from re-entry, so the EA never undoes your decision.
[Timeframes and position limits]
H1 and H4 are the recommended setup — one chart each, running as independent engines with their own signals and their own statistics. M30 still works but is not recommended and is excluded from the validation figures above.
The base rule is one position per timeframe. Two exceptions exist: grade A may take a second slot on H1, and one Star position may be added alongside a non-Star position. The maximum per timeframe is therefore 2, and up to 4 account-wide on the recommended two-chart setup. Size for the combined risk, not for one trade.
[Protection]
- Spread guard — abnormal spreads are skipped automatically
- Order retry — safe re-attempt when the broker rejects
- Netting-account detection — new entries are disabled and a warning is shown
- Duplicate-entry guard — signal key plus deal history, so one signal is never traded twice
- Minimum TP risk-reward, and an optional realized-RR gate that skips a fill degraded by slippage
- Optional daily loss limit, session filter (Japan-time hours), alerts, push, e-mail and a CSV trade log — all off by default
No equity-curve cosmetics built on hidden floating losses.
[Try it in the tester first]
Use the Free Demo button and run it in the Strategy Tester: signals, TP/SL placement, the panel, the 12-cell report. Backtesting does not consume an activation. Verify it yourself before you decide.
I would rather you test it and walk away than buy it on a promise.
[Who this suits]
- Traders who already trade gold and are unsure about sizing
- Traders who want an EA to enter, but want the option to cut by hand
- Traders who want to see which signal types work in their own account
[Who this does not suit]
- Anyone who wants many trades a day — this averages about 6 per week
- Anyone who cannot sit through a 30%+ drawdown
- Anyone looking for guaranteed monthly returns
[Specifications]
- Symbol: Gold (XAUUSD / GOLD / GOLD# / suffix variants), MT5 only
- Timeframes: H1 and H4 recommended; M30 supported but not recommended
- Account: hedging mode required (new entries auto-disabled on netting accounts)
- Validation basis: about USD 2,000 / JPY 300,000 at 1:400
- Sizing: fixed lots only, built in — no SET file required
- Permissions: no DLL permission required
- Backtest: unlimited, no activation used
- Manual: 17-page English PDF
[After purchase]
Send me a message on MQL5 after purchase and I will send you the full English PDF manual: quick start, the illustrated panel guide, how to read the 12-cell report, exit management, operating rules, VPS setup, tester settings, the complete parameter reference with defaults, FAQ and glossary.
[About the price]
This is the early-release price, and it increases as copies sell. Updates are free for existing buyers.
[The KURAMA line-up]
More gold tools from the same developer — each is a standalone product with its own logic:
-
Gold Signal Swing Pro (M30/H1/H4) — swing signal indicator for manual trading: https://www.mql5.com/en/market/product/177643
-
Gold Signal Pro (M5/M15) — scalping signal indicator: https://www.mql5.com/en/market/product/170916
-
All products and buyer reviews: https://www.mql5.com/en/users/abcd2104abcd/seller
[Risk disclosure]
Trading FX/CFDs involves substantial risk of loss. This product does not guarantee investment results. All performance figures shown above are historical backtest results under the stated conditions; past and simulated performance do not guarantee future results, trade frequency, loss limits or account survival. Live outcomes differ with spread, slippage, gaps and each broker's gold contract specification. Verify on a demo environment first and trade only with funds you can afford to lose, at your own judgement and responsibility.