

From Basic to Intermediate: Random Access (II)
 1 321
1 321
 0
0

Introduction
In the previous article, From Basic to Intermediate: Random Access (I), we briefly introduced the random-access model for reading and writing data in files. However, in that article, in order not to present too much information at once, we did not explain one of the issues that most strongly affects anyone implementing file-related functionality.
However, pay very close attention to what follows, because understanding this point correctly is far more important than understanding everything else that will be presented in this article. It is not always necessary to know in advance what data type will be stored in a file. Most of the time, files are structured in some particular way, whatever that structure may be. A file's structure largely determines—or, if you prefer, enables—the data types we use, without forcing us to think about every low-level read or write operation.
This may sound somewhat strange, but in practice this is usually exactly how things work. Except in very specific situations, we rarely need to know the exact data type stored at a particular file position. But when such a situation does arise, knowing and understanding what needs to be done becomes far more important than it may seem. This is because, depending on how well you understand how these mechanisms work, you, as a programmer, may encounter serious difficulties when solving certain file-related problems. For this reason, I ask you, my dear reader, to pay close attention to every point explained in this article, because understanding the material presented here can make the difference between reading a file correctly and being completely unable to understand anything in its contents.
Random Access to Files (Part 2)
When we talk about unions, in previous articles in this same series I showed that we need to pay close attention to the data type and to the number of bytes each type contains. Without this knowledge, it is very difficult to understand what is actually represented by any given data type.
Many developers tend to ignore unions or avoid using them altogether. However, when it comes to structures and arrays, the situation is completely different. In this case, it is often very difficult, if not almost impossible, to create certain data models without a real understanding of these programming concepts, because structures and arrays are far more common in everyday code than unions.
However, many developers eventually encounter a more difficult problem. In this case, things can become much more complicated, because some data models combine structures, arrays, and unions. When this happens, you must understand how these concepts interact, or the implementation quickly becomes confusing. Among other things, this kind of modelling may involve random-access files.
"Are you trying to scare me? I do not think files can be as complex as you say." That is not quite the case, my dear reader. You may not yet appreciate the level of complexity involved. Files are, without a doubt, the most complex way of organizing data that a programmer can create and design. This statement is so true that, whenever a new file format appears, it is usually accompanied by documentation explaining how the format must be interpreted.
Without documentation describing a file's internal structure, opening it may reveal almost nothing about its contents, unless the file is purely text-based. This is perhaps the only case in which documentation of the internal format is not essential. To illustrate this, let us take the simplest example: the bitmap (BMP) format. This format is described in various documents available across the web, and it is a very simple and fairly practical format designed precisely for storing images without complex compression.
Although in some cases there is minor compression, this is just a detail that we can ignore for now. The important issue is different. In this case, the question is whether we understand exactly what is stored in a file. For example, if you open an image in a hexadecimal editor, you will see something similar to what is shown in the following figure:
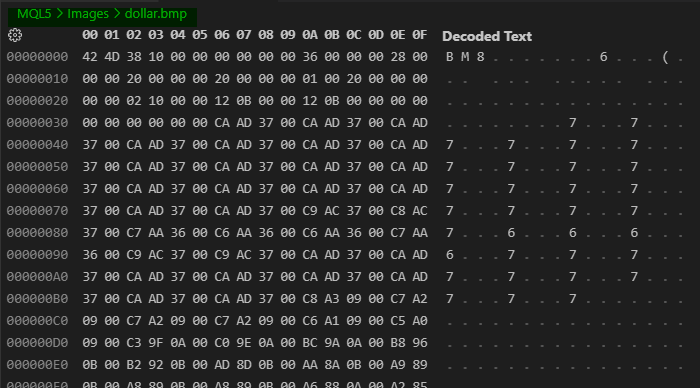
Figure 01
Look at Figure 01. There is something quite curious here, my dear reader. Notice that the file contents are highlighted in green. However, by looking at this data, you certainly cannot determine exactly what this file contains, except for the fact that certain markers may help identify the format. For example, the first three values present in this file. Obviously, another programmer—or another application—could use the same three values to represent an entirely different file type. Although this is not common, there is nothing preventing someone from doing so.
However, assuming that this is not happening, we can reasonably infer that this is a bitmap file. As such, it should be read as a bitmap. Now I ask you: do you know how to extract data from this file without having documentation explaining its structure? Most likely not. This is because, apart from the fact that the first three values point us to the bitmap (BMP) format, nothing else in the raw data tells us how the file is internally structured. Therefore, if you do not know which program should be used to visualize the actual contents of the file, you will not be able to know what information is contained in that file.
This is essentially how file associations work. It seems like magic, but the operating system checks the file header. Depending on the header or signature, the file may be associated with a specific application. If it is associated, then when you request to view the file contents, the operating system launches the application associated with that header or signature. Although many people believe this is related to other issues. Sometimes it is. But that does not matter right now.
All right, but where am I going with this? Well, in the previous article we looked at how data can be read from and written to a file in a completely random manner, using calls such as FileSeek and other helper functions. There, however, we read one byte at a time, and each byte read or written advanced the file position by one byte. But is this always the case? To answer this question, we need to touch on another point that was discussed in other articles, for example when we talked about unions, structures, and arrays. Although we studied these topics separately and gradually, here we will use all of these concepts simultaneously. This is done so that we can understand how the file position advances with each read or write operation we perform.
All right, now let us forget what was shown in Figure 01, because at the moment it will not help us. We need to start with something simpler, but still appropriate for what will be explained. To do this, we will use the following code:
01. //+------------------------------------------------------------------+
02. #property copyright "Daniel Jose"
03. //+------------------------------------------------------------------+
04. void OnStart(void)
05. {
06.     int handle;
07.     const datetime dt = D'31.10.2024 15:30:10';
08.     const int i32 = 356248;
09.
10.     if ((handle = FileOpen("Hello World.txt", FILE_WRITE| FILE_READ | FILE_ANSI)) == INVALID_HANDLE)
11.     {
12.         Print("Error...");
13.         return;
14.     };
15.
16.     FileWrite(handle, i32, "Info", dt);
17.
18.     FileFlush(handle);
19.
20.     FileSeek(handle, 0, SEEK_SET);
21.     while (!FileIsEnding(handle))
22.         Print(FileTell(handle), " >> ", FileReadString(handle));
23.
24.     FileClose(handle);
25. }
26. //+------------------------------------------------------------------+
Code 01
All right, when Code 01 is executed, it will create a file whose contents are shown below:

Figure 02
But this same Code 01 will also produce the following output in the terminal:
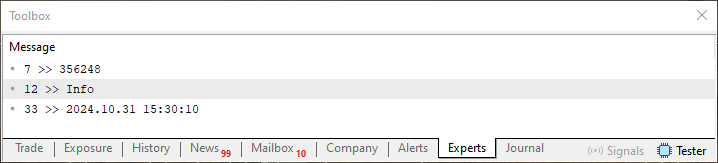
Figure 03
Now we reach the part that matters most. Notice that in Figure 03, before each value read from the file, there is a numeric value. Well, this numeric value that we see before the information is the position at which the current value ends and the next one begins. Therefore, if we know the previous value of the file read or write position, we can determine how many units were read or written. "But wait, would it not be more correct to say bytes read or bytes written?" No, my dear reader, and you will soon understand why.
All right, let us modify the code to understand how many units are read in a single operation, and by analogy, written as well. Here we are reading only, but the same principle applies to writing. So we have the following code:
01. //+------------------------------------------------------------------+
02. #property copyright "Daniel Jose"
03. //+------------------------------------------------------------------+
04. void OnStart(void)
05. {
06.     int     handle;
07.     ulong   old;
08.
09.     const datetime dt = D'31.10.2024 15:30:10';
10.     const int i32 = 356248;
11.
12.     if ((handle = FileOpen("Hello World.txt", FILE_WRITE| FILE_READ | FILE_ANSI)) == INVALID_HANDLE)
13.     {
14.         Print("Error...");
15.         return;
16.     };
17.
18.     FileWrite(handle, i32, "Info", dt);
19.
20.     FileFlush(handle);
21.
22.     FileSeek(handle, 0, SEEK_SET);
23.     while (!FileIsEnding(handle))
24.     {
25.         old = FileTell(handle);
26.         Print(FileTell(handle) - old, " || ", FileTell(handle), " >> ", FileReadString(handle));
27.     }
28.
29.     FileClose(handle);
30. }
31. //+------------------------------------------------------------------+
Code 02
When executed, Code 02 will produce the following result:
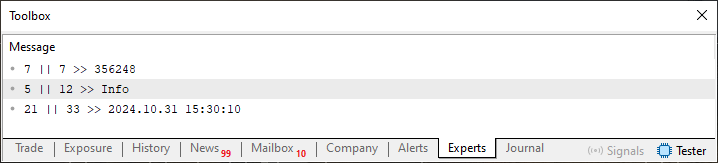
Figure 04
Since Code 02 and its output are straightforward, we can move on to the next level. But I want you to understand the following, my dear reader. At this point, the reading we are performing causes the system to read one value at a time using the delimiter stored in the file. Here, the delimiter is the tab character, as can be seen in the following figure:

Figure 05
Figure 05 highlights that tab character. But what happens if we change the code a little? Well, to see this, we will use the following code:
01. //+------------------------------------------------------------------+
02. #property copyright "Daniel Jose"
03. //+------------------------------------------------------------------+
04. void OnStart(void)
05. {
06.     int     handle;
07.     ulong   old;
08.
09.     const datetime dt = D'31.10.2024 15:30:10';
10.     const int i32 = 356248;
11.
12.     if ((handle = FileOpen("Hello World.txt", FILE_WRITE| FILE_READ | FILE_ANSI | FILE_TXT)) == INVALID_HANDLE)
13.     {
14.         Print("Error...");
15.         return;
16.     };
17.
18.     FileWrite(handle, i32, "Info", dt);
19.
20.     FileFlush(handle);
21.
22.     FileSeek(handle, 0, SEEK_SET);
23.     while (!FileIsEnding(handle))
24.     {
25.         old = FileTell(handle);
26.         Print(FileTell(handle) - old, " || ", FileTell(handle), " >> ", FileReadString(handle));
27.     }
28.
29.     FileClose(handle);
30. }
31. //+------------------------------------------------------------------+
Code 03
When Code 03 is executed, you will see what is shown in the following image:
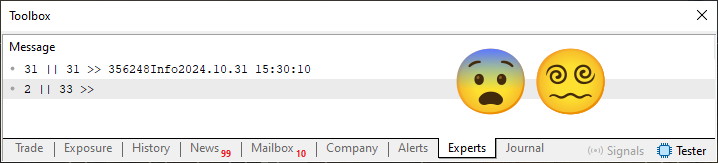
Figure 06
"What kind of mess is this? I did not understand what changed in the code that caused this result." Well, I will not tell you. You will have to study the code yourself to find what was changed. However, if you look at the binary contents of the file, you will see what is shown below:

Figure 07
"What have you done? Tell me where you made the change." Once again, my dear reader, you will have to look at the code to understand what I changed. In any case, you can see that the result is no longer the same as before. This is because we changed the format of the file itself. Since the application no longer knows how to read the file so as to recover the data correctly, the result is this complete mess of output.
Now pay attention: to interpret this output, we need somehow to tell the program where one value ends and the next begins. This can be done in various ways. Here we will consider just one of the many possible ways to do it. Since each case is unique, there is no universal solution. But let us not rush, because I want you to understand how to do this properly.
First, we will change the code to something similar to what is shown below:
01. //+------------------------------------------------------------------+
02. #property copyright "Daniel Jose"
03. //+------------------------------------------------------------------+
04. void OnStart(void)
05. {
06.     int     handle;
07.     ulong   old;
08.
09.     const datetime dt = D'31.10.2024 15:30:10';
10.     const int i32 = 356248;
11.
12.     if ((handle = FileOpen("Hello World.txt", FILE_WRITE | FILE_READ | FILE_ANSI | FILE_BIN)) == INVALID_HANDLE)
13.     {
14.         Print("Error...");
15.         return;
16.     };
17.     FileWriteString(handle, (string)i32);
18.     FileWriteString(handle, "info");
19.     FileWriteString(handle, StringFormat("%s", TimeToString(dt, TIME_DATE | TIME_SECONDS)));
20.
21.     FileFlush(handle);
22.
23.     FileSeek(handle, 0, SEEK_SET);
24.     while (!FileIsEnding(handle))
25.     {
26.         old = FileTell(handle);
27.         Print(FileTell(handle) - old, " || ", FileTell(handle), " >> ", FileReadString(handle));
28.     }
29.
30.     FileClose(handle);
31. }
32. //+------------------------------------------------------------------+
Code 04
Excellent. Although the terminal output is the same as that produced by Code 03, Code 04 generates a slightly different file, shown below:

Figure 08
So, pay attention, my dear reader. As already mentioned, there are different ways to do the same thing. But here we will use a method very similar to one that used to exist in the BASIC programming language and has since fallen out of use. Thus, the next step is shown below:
01. //+------------------------------------------------------------------+
02. #property copyright "Daniel Jose"
03. //+------------------------------------------------------------------+
04. void OnStart(void)
05. {
06.     int     handle;
07.     ulong   old;
08.
09.     const datetime dt = D'31.10.2024 15:30:10';
10.     const int i32 = 356248;
11.
12.     if ((handle = FileOpen("Hello World.txt", FILE_WRITE | FILE_READ | FILE_ANSI | FILE_BIN)) == INVALID_HANDLE)
13.     {
14.         Print("Error...");
15.         return;
16.     };
17.     FileWriteInteger(handle, 0, CHAR_VALUE);
18.     FileWriteString(handle, (string)i32);
19.     FileWriteInteger(handle, 0, CHAR_VALUE);
20.     FileWriteString(handle, "info");
21.     FileWriteInteger(handle, 0, CHAR_VALUE);
22.     FileWriteString(handle, StringFormat("%s", TimeToString(dt, TIME_DATE | TIME_SECONDS)));
23.
24.     FileFlush(handle);
25.
26.     FileSeek(handle, 0, SEEK_SET);
27.     while (!FileIsEnding(handle))
28.     {
29.         old = FileTell(handle);
30.         Print(FileTell(handle) - old, " || ", FileTell(handle), " >> ", FileReadString(handle));
31.     }
32.
33.     FileClose(handle);
34. }
35. //+------------------------------------------------------------------+
Code 05
Now, pay very close attention. Code 05 will create a file similar to the one shown in the following image:

Figure 09
When analyzing Figure 09, you can notice that I mark certain points where the hexadecimal value is zero. Why? The reason is that we use the exact position where these values are located to tell the application how to read the string correctly. This is done so that the application knows how to read the string correctly and can therefore print the proper text directly to the terminal. If you look at the terminal when Code 05 is executed, you will notice something strange, although it is perfectly understandable to those who have followed what has been explained and shown in these articles. This happens because, when we try to print something to the terminal, the first character in the file is a value equal to zero. Therefore, we will get a result that may initially seem rather unusual.
However, even in Code 05, if you change the value used in the FileSeek function on line 26 so that it skips this first zero value appearing at the very beginning of the file, you will notice that certain data will be displayed in the terminal. Test this later so that you can see and understand how the program behaves. So this remains as a suggested experiment that you can carry out later. However, we will not do it here in the article, because I want you to see for yourself how the results can be controlled as the code changes. But let us return to our main question.
Since the file we are now generating must be treated as binary, the FileReadString function needs to know how many characters, in this representation, bytes, should be read. This is necessary in order to obtain the correct and complete text that will be printed in the terminal. To do this, we will modify the code again, as shown below.
01. //+------------------------------------------------------------------+
02. #property copyright "Daniel Jose"
03. //+------------------------------------------------------------------+
04. void OnStart(void)
05. {
06.     int     handle;
07.
08.     const datetime dt = D'31.10.2024 15:30:10';
09.     const int i32 = 356248;
10.
11.     if ((handle = FileOpen("Hello World.txt", FILE_WRITE | FILE_READ | FILE_ANSI | FILE_BIN)) == INVALID_HANDLE)
12.     {
13.         Print("Error...");
14.         return;
15.     };
16.     FWriteString(handle, (string)i32);
17.     FWriteString(handle, "info");
18.     FWriteString(handle, StringFormat("%s", TimeToString(dt, TIME_DATE | TIME_SECONDS)));
19.
20.     FileFlush(handle);
21.
22.     FileSeek(handle, 0, SEEK_SET);
23.     while (!FileIsEnding(handle))
24.     {
25.         uchar old = (uchar) FileReadInteger(handle, CHAR_VALUE);
26.         Print(old, " || ", FileTell(handle), " >> ", FileReadString(handle, old));
27.     }
28.
29.     FileClose(handle);
30. }
31. //+------------------------------------------------------------------+
32. void FWriteString(int &handle, const string szArg)
33. {
34.     long offs = (long) FileWriteInteger(handle, 0, CHAR_VALUE);
35.     long size = (long) FileWriteString(handle, szArg);
36.     ulong ftell = FileTell(handle);
37.     FileSeek(handle, (size + offs) * -1, SEEK_CUR);
38.     FileWriteInteger(handle, (uchar)size, CHAR_VALUE);
39.     FileSeek(handle, ftell, SEEK_SET);
40. }
41. //+------------------------------------------------------------------+
Code 06
Excellent. Now we really have code that will produce an interesting result in the terminal. When this code is executed, you will see the result shown in the following image:
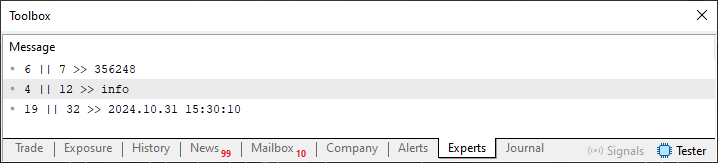
Figure 10
Now let us move on to the file. If you open it in a hexadecimal editor, you will see something similar to what is shown below.

Figure 11
Notice that in this case, as shown in Figure 11, several values are highlighted. They are essential to the format. This is because they indicate the number of characters that the FileReadString function should read. In other words, each highlighted value specifies how many characters must be read next. In fact, you can quite clearly see that these same values are also displayed in Figure 10. Why, then, did Code 06 work, while the others merely generated a file that did not produce any plausible result in the terminal?
To understand this, we need to examine the procedure carefully that was created on line 32 of this Code 06. This procedure is, in a sense, the heart of our application, because it will perform random access to the file to construct the portion of data that will be written. However, this same procedure works with one type—or, more precisely, with values of a fixed byte width, so everything depends largely on the type of data that we will store in the file.
Now pay attention to a few points, because they are important. On line 34, we write one byte. That same byte will later be used to adjust the offset. This offset is the key point here. But we will get to that without rushing. First of all, let us understand how the subroutine from line 32 works. So, once space has been reserved for the length byte, we write the string contents to the file. This happens on line 35. Note: the string MUST NOT CONTAIN MORE THAN 255 characters, because this is the limit imposed by the byte written earlier. Now, on line 36, we temporarily save the current file position. This happens because we return to the byte that stores the message length and modify the contents of that byte. This happens on line 37. The actual writing is performed on line 38. Notice that all these disk accesses could be replaced by a single array operation. But for now we will leave everything as it is, simply to make it easy to understand exactly what we are doing.
All right, once the data has been written, line 20 forces any buffered data to be written immediately in case there is still any data left in the buffer. Then line 22 points to the beginning of the file, and at this point we enter the loop on line 23, where the reading process begins: first, we read the byte that specifies the number of characters to follow. Then, using line 26, we read and display those same characters.
Notice that we need lines 25 and 34 to be consistent. This ensures that the application interprets the length field using the same byte width with which it was written. This is exactly where the offset issue comes in. Excellent. But the same data layout can be implemented differently, which, in my opinion, greatly simplifies code development, as well as maintenance and improvement.
Now pause and think for a moment, my dear reader. What we are doing in the file we are creating here is exactly what we already covered in another article in this same series. However, at that time we did not yet have enough information to explain some points that we could apply in practice here. What I mean is that, by looking at how all this is implemented, we are actually working with a data structure. Therefore, it is important not to focus only on the code, but rather to try to understand the concepts being used and think about the possibilities for obtaining a similar result. Some of them are simpler, others are more efficient. In any case, understanding the concept is more important than memorizing code and reproducing it without understanding.
All right, to show that we can work in different ways and still always obtain the same result, let us experiment a little with what we have examined so far. To do this, we will work with code that differs in some respects. This code can be seen below:
01. //+------------------------------------------------------------------+
02. #property copyright "Daniel Jose"
03. //+------------------------------------------------------------------+
04. void OnStart(void)
05. {
06.     int     handle,
07.             start = 1;
08.     uchar   arr[];
09.
10.     const datetime dt = D'31.10.2024 15:30:10';
11.     const int i32 = 356248;
12.
13.     if ((handle = FileOpen("Hello World.txt", FILE_WRITE | FILE_READ | FILE_BIN)) == INVALID_HANDLE)
14.     {
15.         Print("Error...");
16.         return;
17.     };
18.
19.     start += arr[start - 1] = (uchar) StringToCharArray((string)i32, arr, start);
20.     start += arr[start - 1] = (uchar) StringToCharArray("info", arr, start);
21.     start += arr[start - 1] = (uchar) StringToCharArray(StringFormat("%s", TimeToString(dt, TIME_DATE | TIME_SECONDS)), arr, start);
22.
23.     FileWriteArray(handle, arr, 0, start - 1);
24.     FileFlush(handle);
25.
26.     ArrayFree(arr);
27.
28.     FileSeek(handle, 0, SEEK_SET);
29.     FileReadArray(handle, arr);
30.
31.     FileClose(handle);
32.
33.     for (uint i = 0; i < arr.Size(); i+= arr[i])
34.         Print(i, " >> ", CharArrayToString(arr, i + 1, arr[i]));
35. }
36. //+------------------------------------------------------------------+
Code 07
When Code 07 is executed, the terminal result will be as follows:
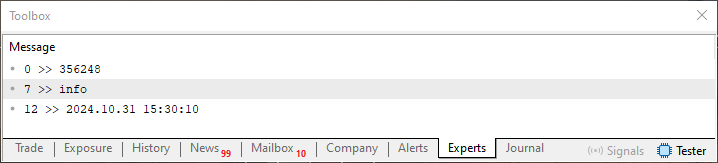
Figure 12
Now there is something we need to understand, my dear reader. Unlike the other code examples examined so far, here we perform some operations in a slightly different way. This is because we replace numerous disk accesses with operations performed directly in RAM. This is clearly visible here in Code 07. What effect does this have on the code and on application performance? Ultimately, both the purpose and the result appear to remain unchanged.
Thus, eliminating repeated disk accesses and moving most operations into memory makes the application faster and also reduces delays and avoids unnecessary degradation in MetaTrader 5 performance caused by continuous disk write requests. In fact, the actual write to disk is performed only in this part of the code. However, there are some things in Code 07 that may not be entirely clear to a beginner programmer. Although the previous articles help explain a significant part of the code, I think I need to briefly explain why Code 07 works and produces the same result as the previous examples.
To begin with, note that on line 07 a variable is initialized that will be very useful to us. In addition, on line 08 we declare a dynamic array. This array will represent our file in memory. Now pay attention to what happens on lines 19, 20, and 21. In these lines of Code 07, we do the same thing that we did on lines 16, 17, and 18 of Code 06. However, in Code 07, those same three lines also perform an operation equivalent to the FWriteString procedure that also appears in Code 06.
"But wait a second. Now Code 07 is confusing me a little. Are you saying that lines 19, 20, and 21 replace everything we did in Code 06 to write data to the file?" Yes, that is possible, my dear reader. "But in my view, those lines in Code 07 do not do that. At least, I do not see it right now. Could you explain this in more detail?" Of course I can explain it. So, let us examine what one of the code lines does, since the others work in the same way.
Perhaps the confusion comes from the fact that these lines are compressed. So let us see how line 19 works. First, remember that the start variable already has a value at the moment the StringToCharArray function is executed. Therefore, the value contained in start tells us from which position in the array the characters present in the string should begin to be inserted. For more details about the StringToCharArray function, refer to the documentation. After all characters have been added to the array, the function returns the number of characters added. Thus, we use the start value to place the number of characters at the beginning of the array. In this way, it gives us exactly the same type of data layout that was implemented in Code 06.
However, there is a difference here. StringToCharArray counts every character, including the terminating NULL character. In other words, the returned count will differ from the value obtained in Code 06. Pay very close attention to this point. However, the final step of this line, in this case line 19, will be to update the position indicated by the start variable.
Now let us move on to the interesting part of the code, namely line 23. If you understood what happened on lines 19, 20, and 21, you have probably noticed that the start variable always points to the terminating NULL character in the array. This character is the last one in the array. However, since this character is of no interest to us, we use the FileWriteArray function to save all characters to disk except for the final NULL character. As a result, we obtain a binary file very similar to the one that Code 06 creates. Nevertheless, it will be incompatible with the file generated by Code 06 precisely because the leading length byte is calculated differently. For this reason, we also changed the reading algorithm to the one shown on line 29. There, we read the entire file in a single operation. But in order to display it properly and thus obtain the expected result, we use the loop on line 33.
Final Thoughts
In this article, we examined how a random-access system can be implemented for writing data to a file. This allows us to define a simple protocol for storing data. However, doing this directly in the file is not always a good idea.
Often, the best approach is to create the file in memory as an array. Only after all values have been placed in the array do we write the data to disk. This makes the process more efficient, because RAM is much faster than storage devices. Even solid-state drives (SSDs) are slower than random-access memory (RAM). In addition, reading a file byte by byte is generally not very practical. A better approach is to read a large block directly into memory and process it there, where we can search byte by byte for specific data.
Although here we worked only with one-byte types, you can extend everything shown to work with larger or more complex types. This can be done without any difficulty, since the same approach can be extended through structures or unions. These have already been discussed here in this series of articles.
| MQ5 file | Description |
|---|---|
| Code 01 | File access demonstration |
| Code 02 | File access demonstration |
| Code 03 | File access demonstration |
| Code 04 | File access demonstration |
| Code 05 | File access demonstration |
| Code 06 | File access demonstration |
| Code 07 | File access demonstration |
Translated from Portuguese by MetaQuotes Ltd.
Original article: https://www.mql5.com/pt/articles/16271
Warning: All rights to these materials are reserved by MetaQuotes Ltd. Copying or reprinting of these materials in whole or in part is prohibited.
This article was written by a user of the site and reflects their personal views. MetaQuotes Ltd is not responsible for the accuracy of the information presented, nor for any consequences resulting from the use of the solutions, strategies or recommendations described.

 Market Microstructure in MQL5 (Part 8): Micro-Trend Strength
 MetaTrader 5 Machine Learning Blueprint (Part 19): Bagging Regimes
 Detecting Structural Breakpoints in Price Series Using CUSUM in MQL5 (Part 1): From Statistical Theory to a Working MQL5 Indicator
 Building an Interactive AnchorFlow Volume Profile Indicator (MTF) in MQL5

- Free trading apps
- Over 8,000 signals for copying
- Economic news for exploring financial markets
You agree to website policy and terms of use