

From Basic to Intermediate: Navigating the Sandbox
 922
922
 0
0

Introduction
In the previous article, From Basic to Intermediate Level: Random Access (II), it was shown how we can work with files while ensuring random access to the data or information they contain. It was also explained and demonstrated that the same concept does not always produce the same result when we looking only at a file’s internal contents. However, when looking at the results displayed in the terminal, there will be no differences between one implementation and another, since the implementation itself will essentially take care of adjusting and adapting the results to match the expected ones.
The way you work with files does not change much overall, and it is assumed that you understand that each file is, internally, a structured content, but without any explicit indication of the type of data that will be visible when viewing the file's contents. So, we can now wrap up the first part, which covers accessing and working with files. In practice, you'll need to review the documentation for each specific language in order to make the most effective use of the functions and procedures available in that language.
Please don't get me wrong, dear reader. You'll probably be interested in seeing how each of the MQL5 functions and procedures is used, but, in my opinion, that won't be very helpful. On the contrary, such an approach would confine the content of the articles to a rigid framework, making them boring and monotonous. The point is that even though I say we can consider this initial introduction to files complete, we still haven't finished discussing this topic. This is because everything we've covered so far is limited to the sandboxes supported by MetaTrader 5. Essentially, we are still operating at the user-access level.
However, there is another level of access: application-level access. We'll discuss this later. Therefore, when drawing this distinction between user access and application-level access, some rather complex issues arise that go far beyond the rules imposed by the use of sandboxes. That's where things start to get complicated. That is, assuming you don't understand how the sandbox system works in MetaTrader 5. We already touched on this in previous articles.
Before we move on to this issue—which will significantly complicate matters for some of you—we need to explain certain procedures and functions. This is because they are extremely useful when it comes to working with files, as they allow us to perform operations that would otherwise be impossible. To properly understand this issue, let's move on to the main topic of this article.
Navigating Files and Directories
Although many may consider this search task unnecessary—and for most applications it certainly is—there are very specific situations in programming, both here when developing for MetaTrader 5 and in other environments, where we need to implement a search through a directory tree and its files. Understanding how to do this will likely be one of the most routine and formulaic tasks you might encounter. This is because in many cases it is very monotonous and, in a sense, boring. However, it is still important to know how to tackle tasks of this kind.
Due to certain characteristics of programming for MetaTrader 5, we can perform a search in two different ways. One operates in interactive mode, while the other operates automatically, so to speak. In interactive mode, a dialog box similar to a small file browser is used. The automated method, on the other hand, relies on the functions provided by MQL5 to access OS procedures for searching the file system.
To start, we'll modify one of the scripts we looked at in the previous article in a very simple and straightforward way. This will help us understand how interactive access and searching for files and directories will work. The modified code is shown in full below:
01. //+------------------------------------------------------------------+
02. #property copyright "Daniel Jose"
03. //+------------------------------------------------------------------+
04. void OnStart(void)
05. {
06.     int handle;
07.     const datetime dt = D'31.10.2024 15:30:10';
08.     const int i32 = 356248;
09.     string filenames[];
10.
11.     if (FileSelectDialog("Save as...", NULL, "All files (*.*)|*.*", FSD_WRITE_FILE, filenames, "Hello Word.txt") <= 0)
12.         return;
13.
14.     if ((handle = FileOpen(filenames[0], FILE_WRITE| FILE_READ | FILE_ANSI)) == INVALID_HANDLE)
15.     {
16.         Print("Error...");
17.         return;
18.     };
19.
20.     FileWrite(handle, i32, "Info", dt);
21.
22.     FileFlush(handle);
23.
24.     FileSeek(handle, 0, SEEK_SET);
25.     while (!FileIsEnding(handle))
26.         Print(FileTell(handle), " >> ", FileReadString(handle));
27.
28.     FileClose(handle);
29. }
30. //+------------------------------------------------------------------+
Code 01
"I don't understand. Where exactly in the code were the changes made? At first glance, this is exactly the same as the code examples we discussed in the previous article." The changes are very minor and, at first glance, do not have a significant impact on the code. Many people believe that developing new code requires a radical overhaul, but in practice, that’s not always what we do. Basically, the change here is very easy to understand, and it's on line 11. However, even though the change affects only line 11, something different will happen when this code is executed. To begin with, the FileSelectDialog function will open a window, as shown below:
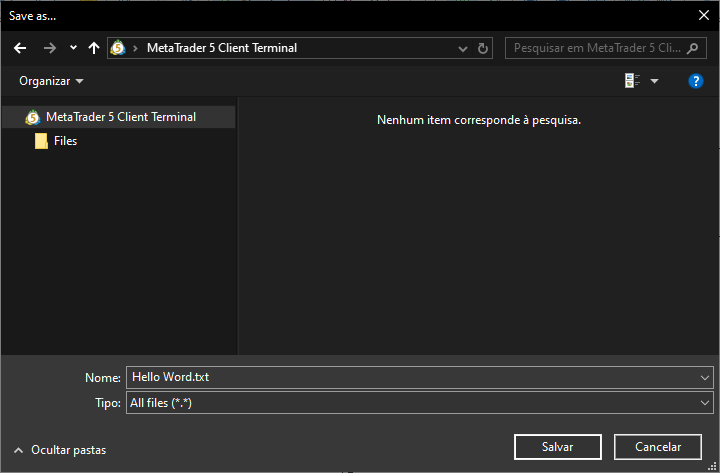
Figure 01
In the window we see in Figure 01, which is provided and managed by the operating system, we can easily identify certain elements. First, the window title. As you can see, this is the very same title we specified as the first argument of the FileSelectDialog function. Since the second argument passed to the function is NULL, we'll start from the sandbox's root directory. Attention, dear reader: since we are inside the sandbox, WE CANNOT leave the directory—or, more precisely, the current root directory. In other words, you will not be able to freely navigate through all the directories on the drive where MetaTrader 5 is installed. Thus, we will be restricted to the directory structure of the current sandbox.
As the third argument to the function, we pass a filter that can be used to narrow the search results in the search window. You can select only the filters listed here on line 11. Therefore, you shouldn't expect the operating system to allow the use of filters not listed here, because that won't happen. The next argument to the function is the selection flags. It's important to practice a little with the other flags here to understand what results they produce and what they are intended for, since we can do much more than just specify a filename or something similar. Refer to the documentation to find out which values can be used for the flags here.
All right, now we need to take a look at the last two arguments of the FileSelectDialog function. This section may vary slightly depending on the type of implementation you are working on. But, essentially, the fifth argument must always be a dynamic array of type string. This is because the function will populate this array with data about the user's interaction with the dialog box shown in Figure 01. The last argument, in turn, does not necessarily have to look like it does in Code 01. However, if you plan to use a specific file name, you must specify it here. This way, we will finally have an idea of the default name our application will expect. It's important to remember that the user can change this name.
All right, if everything goes smoothly, the function will return a value greater than zero. If that doesn't happen, it means an error has occurred, and we’ll have to stop the script. This is done on line 12. If we succeed, and since we want to save the file, we move on to line 14, where the code will again work the same way as in the previous article. However, note that when creating or opening a file using the FileOpen function, the first argument passed is precisely the first value contained in the array. This array can be used to store multiple files selected by the user. The files will be selected by the user when the call on line 11 is made. As mentioned earlier, you'll need to practice to better understand how to use the FileSelectDialog function in your MetaTrader 5 applications.
All right, I think this brief explanation already gives you some idea of how to understand and practice interactive navigation through the file and directory tree. So, to keep the topics separate, let's look at how non-interactive navigation works in a separate section.
Code-Based Navigation
In some situations, we don't want the user to interact directly with the search mechanism. However, at the same time, for some reason, we want to know how the directory tree is organized—both in terms of the files and the directory structure itself. But to achieve this, we're setting aside what we saw in Code 01 and implementing a different solution. We do this with a very specific goal in mind.
Since the goal here is to be as didactic as possible—without aiming to create any specific application—it is quite difficult to explain why we might want to navigate a directory tree. However, I would like you, dear reader, to try to broaden your horizons and see the world beyond what will be presented here in the form of code. Try to imagine an application that would be interested in knowing how the file structure is organized. With that in mind, think about how you could apply this in practice.
Great. To get started—and to help you understand how this type of navigation works—we'll assume that the MQL5\Files sandbox directory is empty. In other words, there are currently no files or directories inside the sandbox. It's important to start with this principle so that everything makes sense. With that in mind, we'll start with the code shown below:
01. //+------------------------------------------------------------------+
02. #property copyright "Daniel Jose"
03. //+------------------------------------------------------------------+
04. void OnStart(void)
05. {
06.     long    handle;
07.     string  szFileName;
08.
09.     if ((handle = FileFindFirst("*", szFileName)) == INVALID_HANDLE)
10.     {
11.         Print("Failed...");
12.         return;
13.     }
14.     do
15.     {
16.         Print(szFileName, " is a ", FileIsExist(szFileName) ? "file ..." : "directory...");
17.     }while (FileFindNext(handle, szFileName));
18.     FileFindClose(handle);
19.
20.     Print("Search in directory completed successfully.");
21. }
22. //+------------------------------------------------------------------+
Code 02
Remember: all our actions will be limited to the sandbox we're working in. In principle, it is not possible to browse files or directories outside the sandbox. Don't forget that. Thus, when we execute Code 02, we will get the following result:
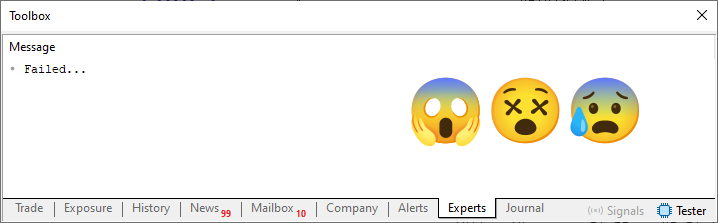
Figure 02
"My God, what happened here? How could the code have failed? What did I do to deserve this? This can only be divine punishment." (LAUGHTER) Calm down, dear reader; let's not rush into things. There are no errors in the code; everything works perfectly. "How is that possible? Can't you see that an error occurred?" Again, let's not rush. Do you remember what was said before we started? So, in principle, should the MQL5\Files directory, which we're using here as a sandbox, be completely empty?
Since the FileFindFirst function did not find anything in the sandbox, it returns an invalid handle value. In other words, since no match was found for the filter, FileFindFirst returns a value indicating that the search was unsuccessful. That is precisely why we see the result shown in Figure 02. The thing is, if you run Code 01 again right now, you'll see the following.
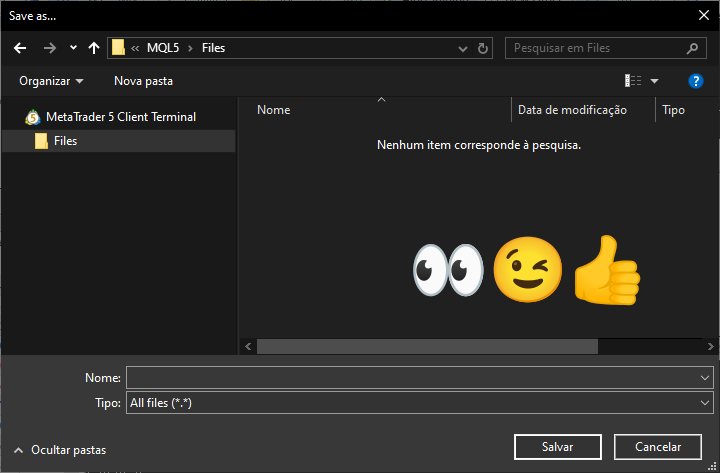
Figure 03
"Right, I think I understand. But what if there is some content inside the sandbox? What will happen?" That depends on how our code is structured to handle the contents of the sandbox. Since we are dealing with something very simple and straightforward, the result at this point will be just as simple and straightforward. However, depending on the specific situation, a slightly more advanced solution may be required. In any case, let's first see what happens if there is any content in the sandbox. To do this, we created several files and folders solely for testing purposes. We can verify this by running Code 01 again. In this case, the result is shown in the following figure:
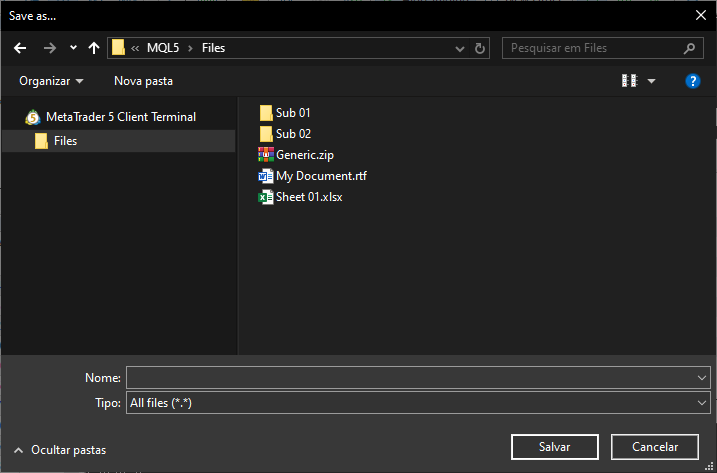
Figure 04
So, now we have something to show. When we run Code 02 again, we'll get the result shown below:
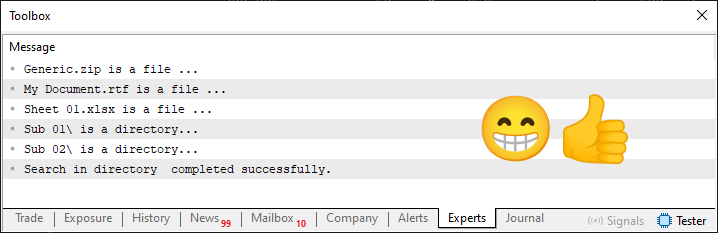
Figure 05
Please note that we didn't change anything in the code at all; we only added content to the sandbox. However, this is where things start to get a little more complicated. Of course, that depends on exactly what you want to implement. Although Code 02 works, as you can see in the previous Figures, there is one small detail. Code 02 applies only to the initial search directory. It cannot descend into other directories in the tree to report their contents. You must specify that you want to access a specific directory. This happens even before the search begins, which starts on line 09. In some cases, this limits the possibilities somewhat.
Let’s pause for a moment and consider why that is. The reason is that the solution for navigating the directory tree lies within Code 02 itself. However, in order for everything to work the way we want it to, we need to make a few small changes to the code. In other words, the code must be able to report all the files that exist in every directory in the sandbox directory tree.
Great, we know that when specifying a filter for the FileFindFirst function, we can include a path within the sandbox. What if we convert this same Code 02 into recursive code? Will we get the behavior we want? Thus, line 16 of Code 02 can tell us the name of each file and its location. So, this is the main question we need to answer right now. It's worth remembering that there are several ways to do what I'm about to show you here. Each case is different.
So, the first thing you need to do is change the code to something like what's shown below:
01. //+------------------------------------------------------------------+
02. #property copyright "Daniel Jose"
03. //+------------------------------------------------------------------+
04. void OnStart(void)
05. {
06.     SearchIn("");
07.
08.     Print("== Research completed. ==");
09. }
10. //+------------------------------------------------------------------+
11. void SearchIn(const string szDir)
12. {
13.     long    handle;
14.     string  szFileName;
15.
16.     Print("[",szDir,"]");
17.     if ((handle = FileFindFirst(szDir + "*", szFileName)) == INVALID_HANDLE)
18.         return;
19.     do
20.     {
21.         if (FileIsExist(szFileName)) Print(szFileName);
22.     }while (FileFindNext(handle, szFileName));
23.     FileFindClose(handle);
24. }
25. //+------------------------------------------------------------------+
Code 03
This is the first step. So, now pay close attention, dear reader. When you run this code, the result will be different from the one shown above. This is because we are now focusing solely on displaying file names. It is very important that you understand this clearly. You were probably expecting to see something similar to what appears in the File Explorer address bar, where we can see both the directory path and the file name. But what you see is simply the way the operating system or program displays the contents. Internally, within the folder and file structure stored on disk, it is organized differently.
In fact, the file system is very much like a list or a phone book. Perhaps the problem and all this confusion began with the release of Windows 95. Around that time, people began talking about using the directory tree as part of the file name. In practice, things don't quite work that way. However, an explanation of this is beyond the scope of this article. Let's get back to our main topic. The result of executing Code 03 is shown in the following figure:
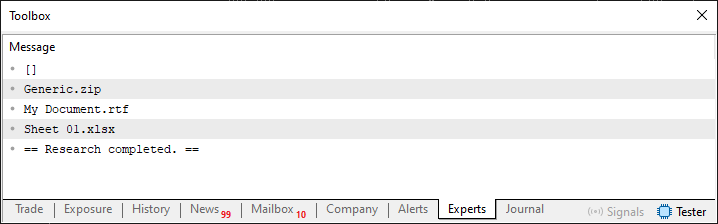
Figure 06
Please note that only the file names are displayed here. These directories are not displayed precisely because we are not interested in them at the moment. However, assuming that the directories shown in Figure 05 contain some content, how could we view it? This is the easiest part. But before we get into that, note that when specifying a directory, the last character will be a slash. This is very important for what we'll see next.
In other words, if the szFileName string refers to a directory, the string will contain a slash. Therefore, we do not need to use the FileIsExist function to determine whether it is a directory or a file. Just check whether there is a slash in the string. If it is present, then it is a directory. Otherwise, it is a file. It's that simple.
However, I want you to pay attention to another detail here, in Code 03. Note that the procedure on line 11 takes a string as an argument. This will be the initial directory in which we will perform the search. However, on line 06, we do not pass any parameters to the procedure on line 11. This means that the search will start from the sandbox's root directory. It is very important to understand this, because this is where the recursive part of the code begins.
Remember that when we check for a slash in a string, we are checking whether the string refers to a directory. What if we change the code so that it uses this information? In other words, instead of ignoring the information that the string contains a directory name, we would change the call to SearchIn on line 11 so that it uses the contents of this string, which we know in this case is a directory. What's going on? All right, let's see how this works in practice. Based on this idea, we can modify Code 03 as shown below:
01. //+------------------------------------------------------------------+
02. #property copyright "Daniel Jose"
03. //+------------------------------------------------------------------+
04. void OnStart(void)
05. {
06.     SearchIn("");
07.
08.     Print("== Research completed. ==");
09. }
10. //+------------------------------------------------------------------+
11. void SearchIn(const string szDir)
12. {
13.     long    handle;
14.     string  szFileName;
15.
16.     Print("[",szDir,"]");
17.     if ((handle = FileFindFirst(szDir + "*", szFileName)) == INVALID_HANDLE)
18.         return;
19.     do
20.     {
21.         if (StringFind(szFileName, "\\") > 0)
22.             SearchIn(szFileName);
23.         else
24.             Print(szFileName);
25.     }while (FileFindNext(handle, szFileName));
26.     FileFindClose(handle);
27. }
28. //+------------------------------------------------------------------+
Code 04
Great. In Code 04, we can see the changes that were made to the code to implement what was explained earlier. Therefore, when we run Code 04, we will get a completely different result from the one we saw in Figure 06. But even so, the result will be very similar to what can be seen in Figure 06. Some people will find the result clear, while others may be confused. For clarity, you can look at Figure 07 below:
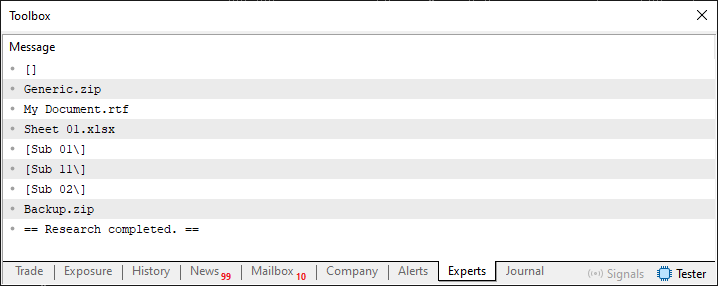
Figure 07
So, what's the catch? All right, looking at Figure 07, could you tell which folder the Backup.zip file belongs to? You could say it is the Sub 02 folder. However, upon closer inspection, you can see that something similar happened with the Sub 01 and Sub 11 folders as well. "But wait a second. This turned out to be much more complicated than I had imagined. Looking at Figure 04, I notice that the Sub 02 folder is located in the root directory, just like the Sub 01 folder. But when I see it presented as shown in Figure 07, I get the impression that the Backup.zip file should actually be located at the path Sub 01\Sub 11\Sub 02. That doesn't seem right. Now I'm a little confused."
With this approach, it becomes somewhat difficult to understand exactly how the directory tree in the sandbox is structured. So, now I'll show you how it is structured. This will help you understand how the result should be represented. The following animation demonstrates this:
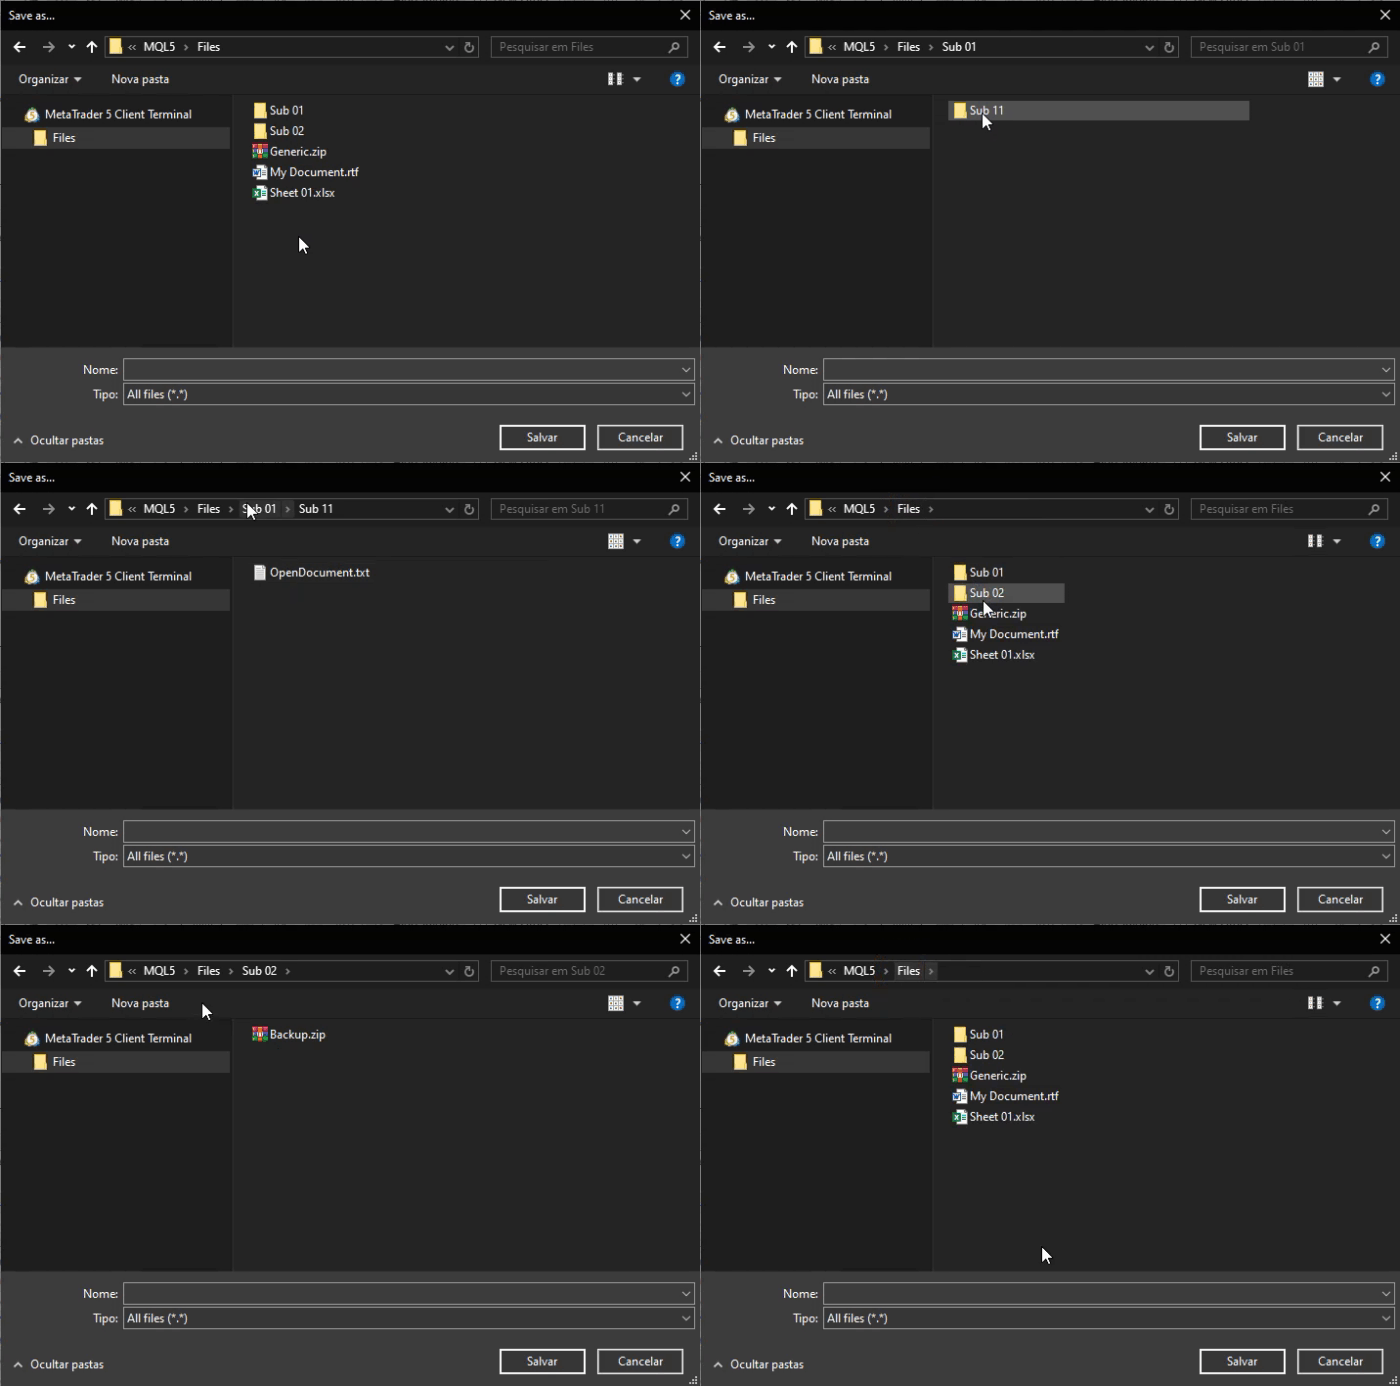
Animation 01
Animation 01 clearly shows a very simple folder structure, as well as a file that does not appear in Figure 07. At first glance, this seems rather strange. Figure 07 shows that the Backup.zip file is displayed even though it is located inside a directory. So what's the mistake? The error is that on line 22 of Code 04, we ignore the directory structure. In reality, we access only the directories themselves, without taking the tree structure into account. The solution to problems like this is very simple—and even somewhat trivial, if you think about it.
However, we'll make one more change to the code. When outputting the file name, we'll add the path where the file was found. This way, we'll get a structure that is generally easier to understand. As a result, we get the following code:
01. //+------------------------------------------------------------------+
02. #property copyright "Daniel Jose"
03. //+------------------------------------------------------------------+
04. void OnStart(void)
05. {
06.     SearchIn("");
07.
08.     Print("== Research completed. ==");
09. }
10. //+------------------------------------------------------------------+
11. void SearchIn(const string szDir)
12. {
13.     long    handle;
14.     string  szFileName;
15.
16.     Print("[",szDir,"]");
17.     if ((handle = FileFindFirst(szDir + "*", szFileName)) == INVALID_HANDLE)
18.         return;
19.     do
20.     {
21.         if (StringFind(szFileName, "\\") > 0)
22.             SearchIn(szDir + szFileName);
23.         else
24.             Print(szDir, szFileName);
25.     }while (FileFindNext(handle, szFileName));
26.     FileFindClose(handle);
27. }
28. //+------------------------------------------------------------------+
Code 05
Now let's run the new code shown above. The result is as follows.
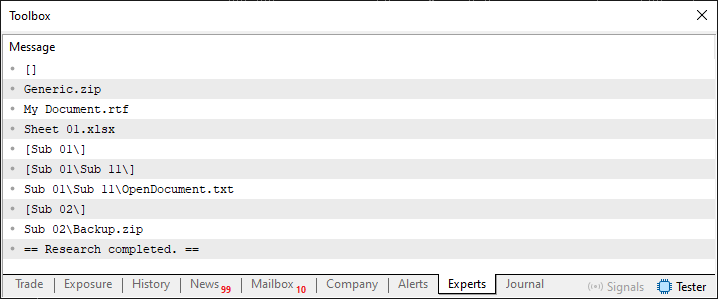
Figure 08
Now we've achieved something quite interesting. Note that by making a simple change in Code 04 to obtain the result shown in Code 05, we ended up with a completely different—and even much more interesting—result. In fact, if you wish, you can even remove line 16 from the code and still understand how the directory structure is organized and visualize where each file is located. That's interesting. However, there is, so to speak, a small but rather annoying problem with Code 05. The code itself works, as you can clearly see. However, there is a very specific type of situation in which directories and files may appear mixed together. This is not an error in the code or a software defect. This is a different kind of problem.
It is specifically related to the way the FileFindFirst and FileFindNext functions interact. The point is that when the FileFindFirst function is called, the system requests a result from the operating system that matches the specified filter. The result can be a file or a directory. In theory there is no control over which will be returned first. This is determined by the operating system. But the problem arises when we again ask what the next element is. This is done using the FileFindNext function. So what's the problem? All right, let's say we want to go through all the files before moving on to the directories, or vice versa. How could you do that? Keep in mind that we have no control over what type of item the operating system will return to us. We'll get only that item and decide for ourselves what to do with it.
Well, dear reader, to solve problems like these, we’ll need to take a different approach. We'll begin exploring this issue in the next article.
Final Thoughts
In today's article, we looked at a simple, easy, and practical way to view the contents of the sandbox using MetaTrader 5. Although, at first glance, what we see here may not seem especially meaningful or purpose-driven, at least at this initial stage. Knowing—and, more importantly, understanding—how to use code to display the contents of a folder or the entire root directory can help us quickly find specific data buried among countless files and folders.
The main goal of learning how to work with what we see is to understand another topic, which we’ll discuss in the next article. So, carefully and calmly review what you've already read in this article so you can understand what we'll cover in the next one. Next, we'll move on to a very interesting topic, although it may seem intimidating to those who are just starting to learn programming. See you in the next article.
| File | Description |
|---|---|
| Code 01 | Demonstrates how to navigate between folders. |
| Code 02 | Demonstrates how to navigate between folders. |
| Code 03 | Demonstrates how to navigate between folders. |
Translated from Portuguese by MetaQuotes Ltd.
Original article: https://www.mql5.com/pt/articles/16322
Warning: All rights to these materials are reserved by MetaQuotes Ltd. Copying or reprinting of these materials in whole or in part is prohibited.
This article was written by a user of the site and reflects their personal views. MetaQuotes Ltd is not responsible for the accuracy of the information presented, nor for any consequences resulting from the use of the solutions, strategies or recommendations described.

 Combining LLM, CatBoost, and Quantum Computing into a Unified Trading System
 MetaTrader 5 Machine Learning Blueprint (Part 20): Denoising, Detoning, and Clustering the Feature Correlation Matrix
 Market Simulation: Position View (VII)
 Building a Hull Moving Average Momentum Oscillator in MQL5

- Free trading apps
- Over 8,000 signals for copying
- Economic news for exploring financial markets
You agree to website policy and terms of use