

From Basic to Intermediate: Object Events (IV)
 1 037
1 037
 0
0

Introduction
In the previous article, From Basic to Intermediate: Object Events (III), we showed the first part of something larger, which we will continue here and bring to completion in this article.
Since the purpose of these articles is to show you, dear reader, how you can control MetaTrader 5 to implement any application, I hope you are studying and practising what is shown here. The point is that none of the code discussed in these articles should ever be treated as a finished application or used without proper caution and common sense.
Many people might consider what we are discussing here to be a kind of nonsense on my part, because many do not believe that an application could even be intended to do what I am showing here. But the beauty of programming lies not in doing what is obvious, but in discovering new possibilities where few people can see them. That is why I decided to create this sequence, whose purpose is precisely to show that almost anything can be achieved if you understand certain concepts. So now it is time to make everything shown in the previous article really start to make sense.
Improving Interactivity
What we saw in the previous article is still far from a logically complete solution, at least if we look only at the current code in the attachment. However, it was left there for practice, to show how such interaction can be created with a minimum amount of code.
The attached file from the previous article has not yet fully matured. Although we have already shown several things we can implement for a rather curious primary objective, and in a very simple way, it still does not allow us to interact with objects in the way we want. In short, this code creates only what can be seen in Animation 01 below.
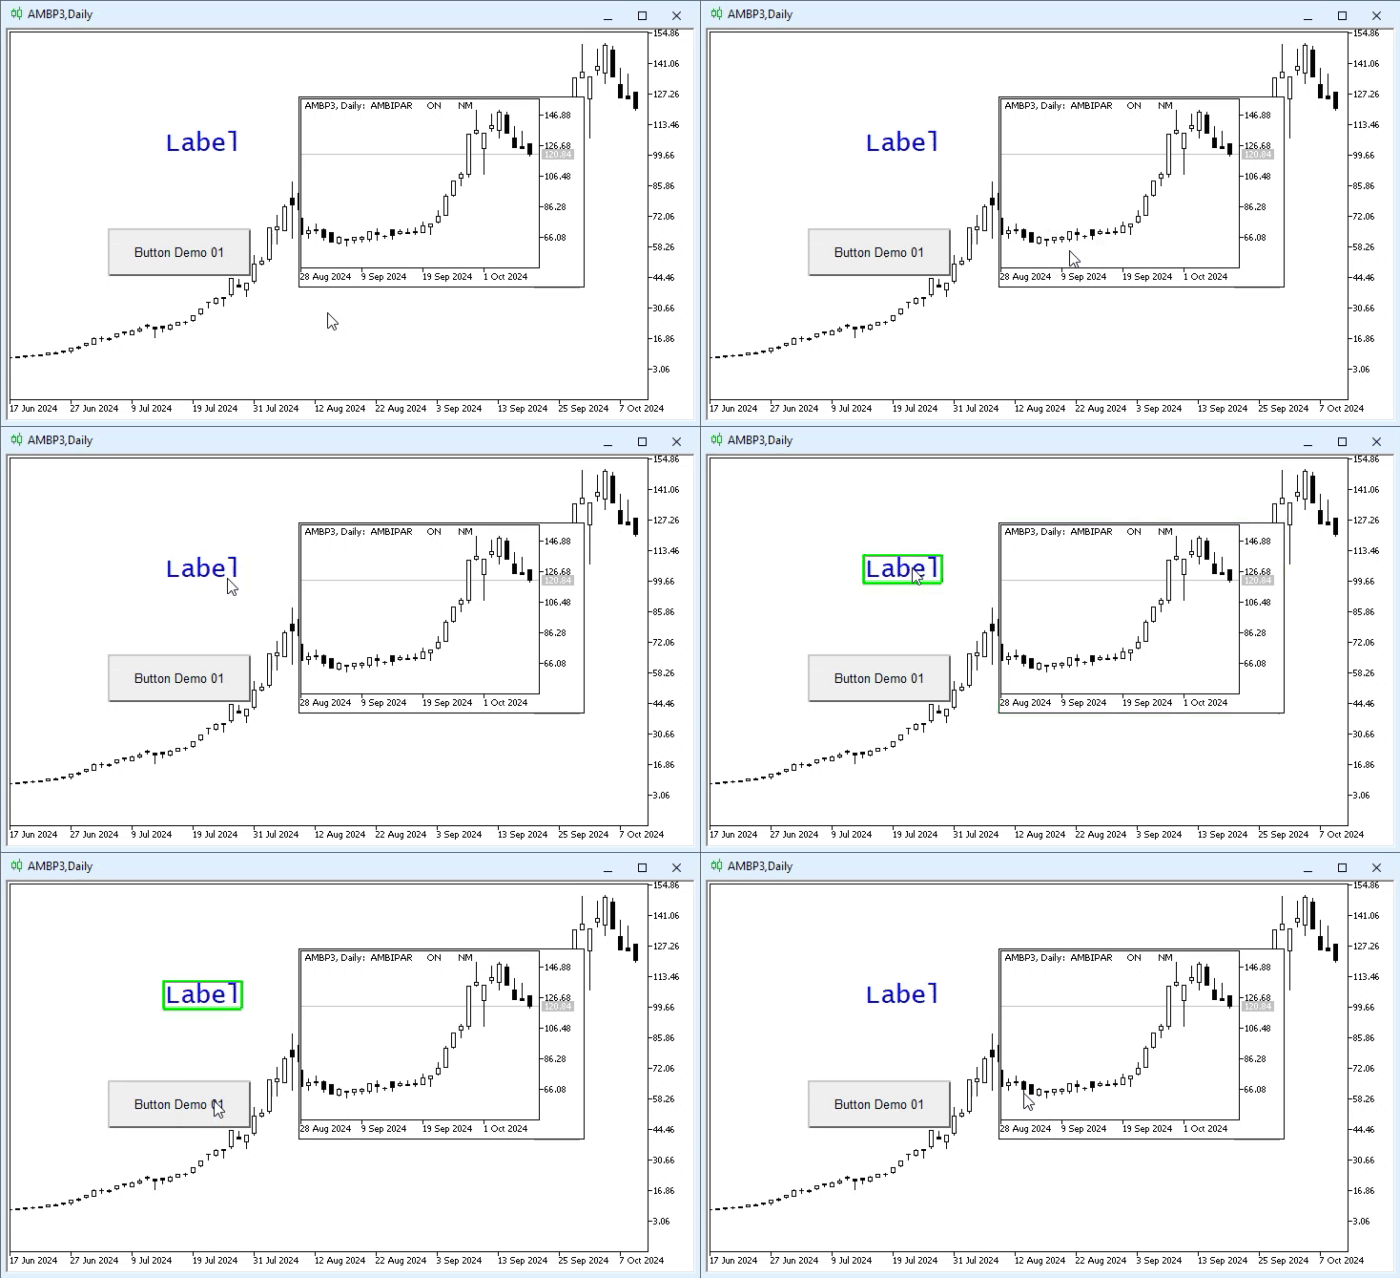
Animation 01
Although this may seem like something silly and not particularly useful, this animation shows us the potential already built into this code, since it allows us to create an outline around the selected object. However, our goal is not only to create such an outline, but also to change the size of the selected object. This is where some confusion begins. This is exactly where some difficulties appear, especially for those who have not practised and studied what was shown in the previous articles.
In my articles so far, we have shown that we can interact with MetaTrader 5 to achieve certain results. However, most of the work was delegated to MetaTrader 5, while we performed only part of it when implementing the code. Here, however, we have a small problem. It can be summarized as follows: MetaTrader 5 can do most of the work our application needs in order to handle resizing of the selected object, but—and this is the key point—we cannot do this without additional work. I say this because, when using the source code shown in full below, WE WILL NOT GET 100% CORRECT INTERACTION, as the execution result is shown in Animation 01.
01. //+------------------------------------------------------------------+
02. #property copyright "Daniel Jose"
03. //+------------------------------------------------------------------+
04. #define def_Prefix  "Demo"
05. //+------------------------------------------------------------------+
06. #define macro_NameObject  def_Prefix + (string)(ObjectsTotal(0) + 1)
07. //+------------------------------------------------------------------+
08. struct st_BoxResize
09. {
10.     private :
11.         ushort  x, y, w, h;
12.         bool    isBack;
13.         string  szObjects[4];
14. //+----------------+
15.         void CreateEdge(const char what)
16.         {
17.             ushort p1 = x, p2 = y, p3 = w, p4 = h;
18.
19.             switch (what)
20.             {
21.                 case 0: p4 = 1; break;
22.                 case 1: p3 = 1; break;
23.                 case 2: p2 = y + h; p4 = 1; break;
24.                 case 3: p1 = x + w; p3 = 1; break;
25.             }
26.             szObjects[what] = macro_NameObject;
27.             ObjectCreate(0, szObjects[what], OBJ_RECTANGLE_LABEL, 0, 0, 0);
28.             ObjectSetInteger(0, szObjects[what], OBJPROP_BGCOLOR, clrLime);
29.             ObjectSetInteger(0, szObjects[what], OBJPROP_XDISTANCE, p1);
30.             ObjectSetInteger(0, szObjects[what], OBJPROP_YDISTANCE, p2);
31.             ObjectSetInteger(0, szObjects[what], OBJPROP_XSIZE, p3);
32.             ObjectSetInteger(0, szObjects[what], OBJPROP_YSIZE, p4);
33.         }
34. //+----------------+
35.     public  :
36.         void CreateBoxResize(const string szArg, const uchar adjust = 2)
37.         {
38.             isBack = (bool)ObjectGetInteger(0, szArg, OBJPROP_BACK);
39.             ObjectSetInteger(0, szArg, OBJPROP_BACK, true);
40.             ObjectSetInteger(0, szArg, OBJPROP_SELECTED, false);
41.             x = (ushort)ObjectGetInteger(0, szArg, OBJPROP_XDISTANCE) - adjust;
42.             y = (ushort)ObjectGetInteger(0, szArg, OBJPROP_YDISTANCE) - adjust;
43.             w = (ushort)ObjectGetInteger(0, szArg, OBJPROP_XSIZE) + adjust;
44.             h = (ushort)ObjectGetInteger(0, szArg, OBJPROP_YSIZE) + adjust;
45.             for (uchar c = 0; c < 4; c++)
46.                 CreateEdge(c);
47.         }
48. //+----------------+
49.         void RemoveBoxResize(const string szArg)
50.         {
51.             ObjectSetInteger(0, szArg, OBJPROP_BACK, isBack);
52.             ObjectSetInteger(0, szArg, OBJPROP_SELECTED, false);
53.             ObjectsDeleteAll(0, def_Prefix);
54.         }
55. //+----------------+
56. }gl_RZ;
57. //+------------------------------------------------------------------+
58. int OnInit()
59. {
60.     IndicatorSetString(INDICATOR_SHORTNAME, def_Prefix);
61.
62.     return INIT_SUCCEEDED;
63. };
64. //+------------------------------------------------------------------+
65. int OnCalculate(const int rates_total, const int prev_calculated, const int begin, const double &price[])
66. {
67.     return rates_total;
68. };
69. //+------------------------------------------------------------------+
70. void OnChartEvent(const int id, const long &lparam, const double &dparam, const string &sparam)
71. {
72.     static string szNameObj = NULL;
73.
74.     switch (id)
75.     {
76.         case CHARTEVENT_KEYDOWN         :
77.             if ((szNameObj != NULL) && (TerminalInfoInteger(TERMINAL_KEYSTATE_ESCAPE)))
78.             {
79.                 gl_RZ.RemoveBoxResize(szNameObj);
80.                 szNameObj = NULL;
81.             }
82.             break;
83.         case CHARTEVENT_OBJECT_CLICK    :
84.             if (StringFind(sparam, def_Prefix) != INVALID_HANDLE) break;
85.             if (szNameObj != NULL) gl_RZ.RemoveBoxResize(szNameObj);
86.             if (szNameObj != sparam) gl_RZ.CreateBoxResize(szNameObj = sparam); else szNameObj = NULL;
87.             break;
88.         case CHARTEVENT_OBJECT_DRAG     :
89.             break;
90.     }
91.     ChartRedraw();
92. };
93. //+------------------------------------------------------------------+
94. void OnDeinit(const int reason)
95. {
96.     ObjectsDeleteAll(0, def_Prefix);
97.     ChartRedraw();
98. };
99. //+------------------------------------------------------------------+
Code 01
"But why do you say that the interaction will not be 100% correct? That makes no sense to me, since the mechanism apparently works." Indeed, dear reader, the mechanism works. However, there is a small problem, which is shown in the following figure.
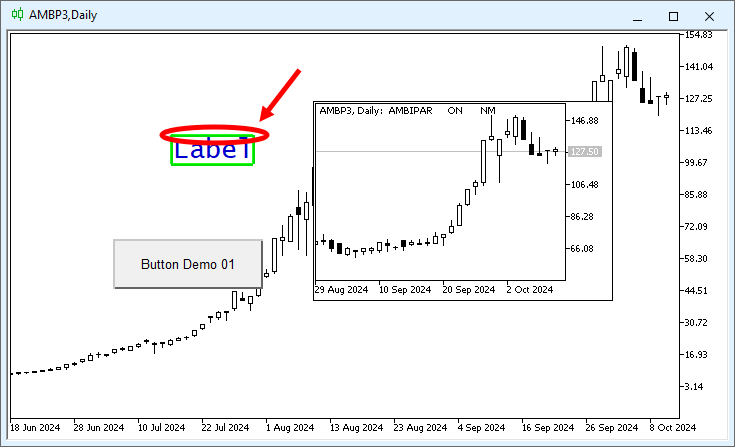
Figure 01
Figure 01 may not tell you anything by itself. But I am highlighting one point in it precisely to draw your attention to one detail. The outline has no interactive elements, so neither MetaTrader 5 nor the user has any clear interaction points for moving it. Now pay attention: in Code 01, line 84 is there precisely to prevent the user from selecting any object whose name has the prefix specified in line 04 of the same code. And what does this mean? Well, this explains why we cannot select the OBJ_BUTTON object, since this object has that prefix in its name. You can see this in Figure 02 below.
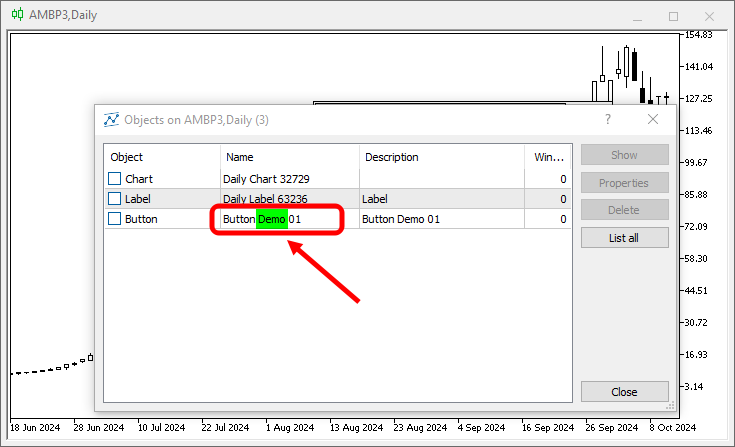
Figure 02
Please note that we have highlighted in green precisely the prefix that prevents us from selecting this object. Although at first glance this may not seem so significant, this simple detail is already enough for the check on line 84 to prevent us from selecting it. Fine, but we do not need to select the green lines used as the outline. We can do better if we select the OBJ_RECTANGLE_LABEL object itself and let MetaTrader 5 do the rest for us. Yes, this is partly true. This requires a simple change to Code 01. You can see it in the code fragment below:
                   .
                   .
                   .
034. //+----------------+
035.     public  :
036.         void CreateBoxResize(const string szArg, const uchar adjust = 2)
037.         {
038.             isBack = (bool)ObjectGetInteger(0, szArg, OBJPROP_BACK);
039.             ObjectSetInteger(0, szArg, OBJPROP_BACK, true);
040.             ObjectSetInteger(0, szArg, OBJPROP_SELECTED, false);
041.             x = (ushort)ObjectGetInteger(0, szArg, OBJPROP_XDISTANCE) - adjust;
042.             y = (ushort)ObjectGetInteger(0, szArg, OBJPROP_YDISTANCE) - adjust;
043.             w = (ushort)ObjectGetInteger(0, szArg, OBJPROP_XSIZE) + adjust;
044.             h = (ushort)ObjectGetInteger(0, szArg, OBJPROP_YSIZE) + adjust;
045.             for (uchar c = 0; c < 4; c++)
046.             {
047.                 CreateEdge(c);
048.                 ObjectSetInteger(0, szObjects[c], OBJPROP_WIDTH, 3);
049.                 ObjectSetInteger(0, szObjects[c], OBJPROP_SELECTABLE, true);
050.                 ObjectSetInteger(0, szObjects[c], OBJPROP_SELECTED, true);
051.             }
052.         }
053. //+----------------+
                   .
                   .
                   .
Code 02
What this fragment of Code 02 will create in Code 01 is shown in Animation 02 below:
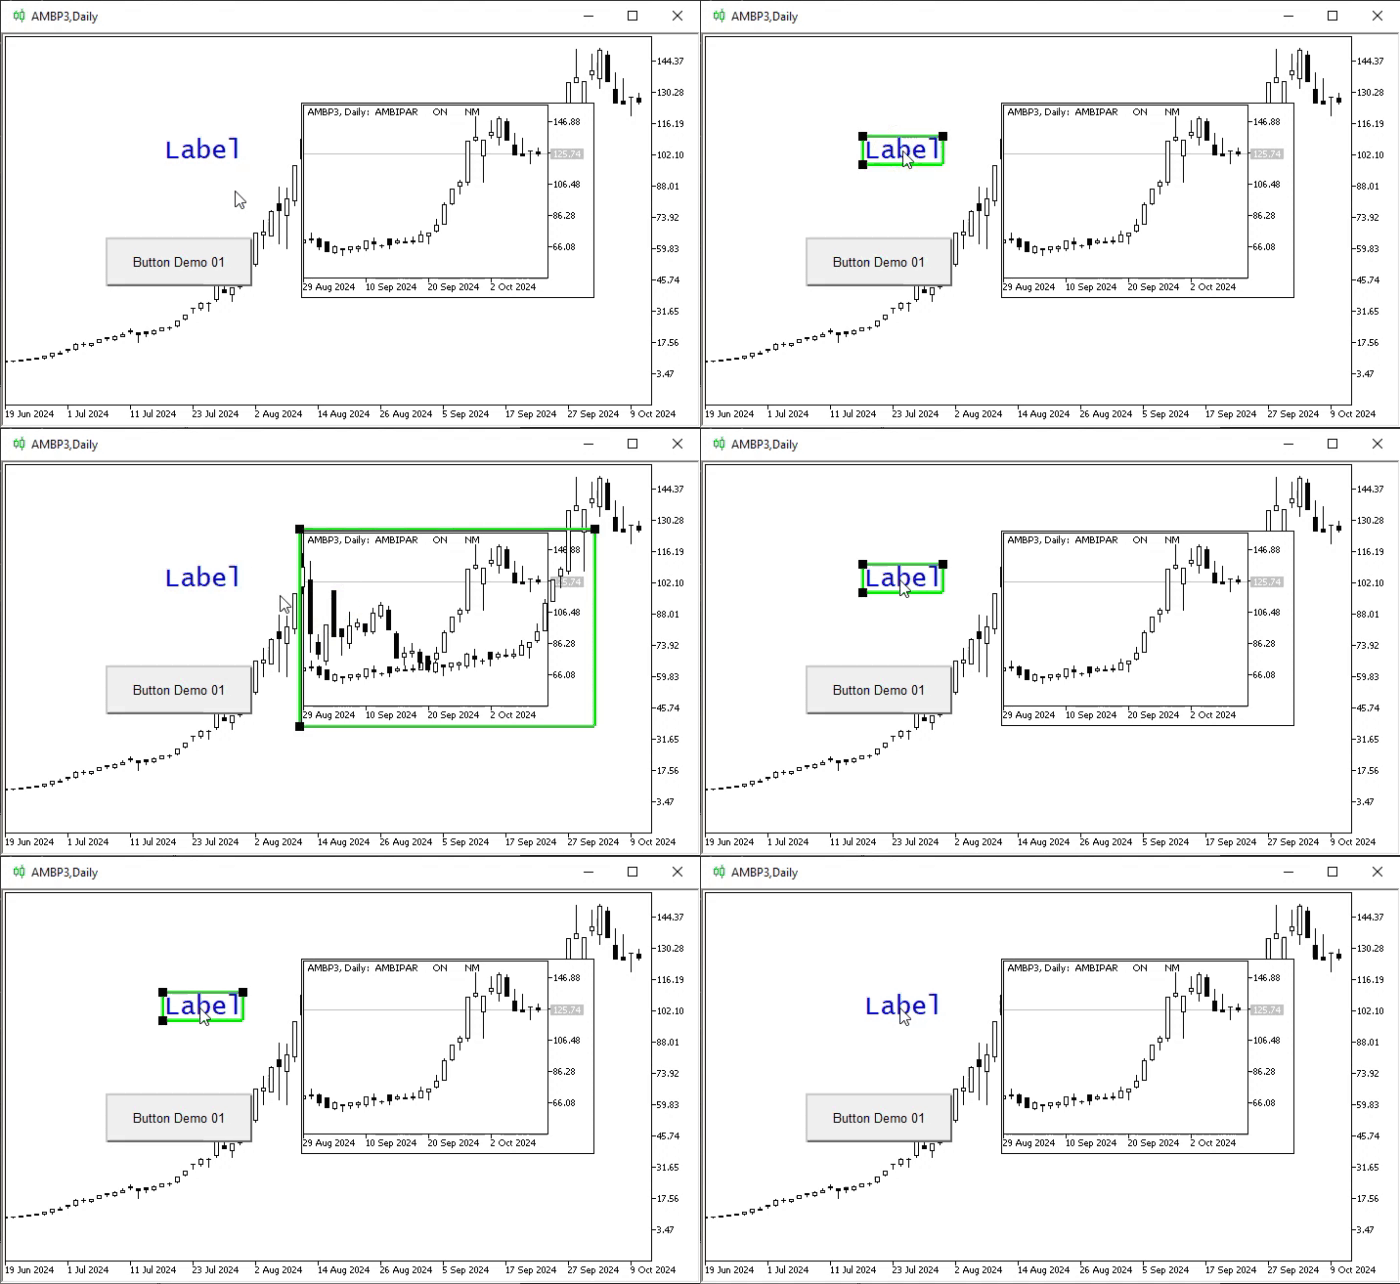
Animation 02
All right, in Animation 02 we can see something. Let us examine it calmly. Look at Figure 03:
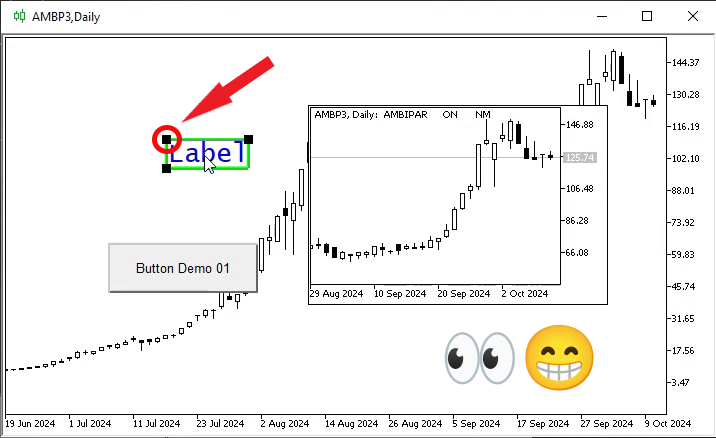
Figure 03
The point highlighted in Figure 03 is exactly the anchor point we can use to drag the object on the chart. For this, we use MetaTrader 5 without worrying about anything else. However, if you look closely, you will notice that only three points are visible. Where is the fourth one? Well, this is our first problem. The fourth point is next to another point, precisely in the place highlighted in Figure 03. If this were the only real problem, it would not be a big deal. There would be little we could do about it. Nevertheless, there is a slightly more annoying problem than this one. It is shown in the animation below:
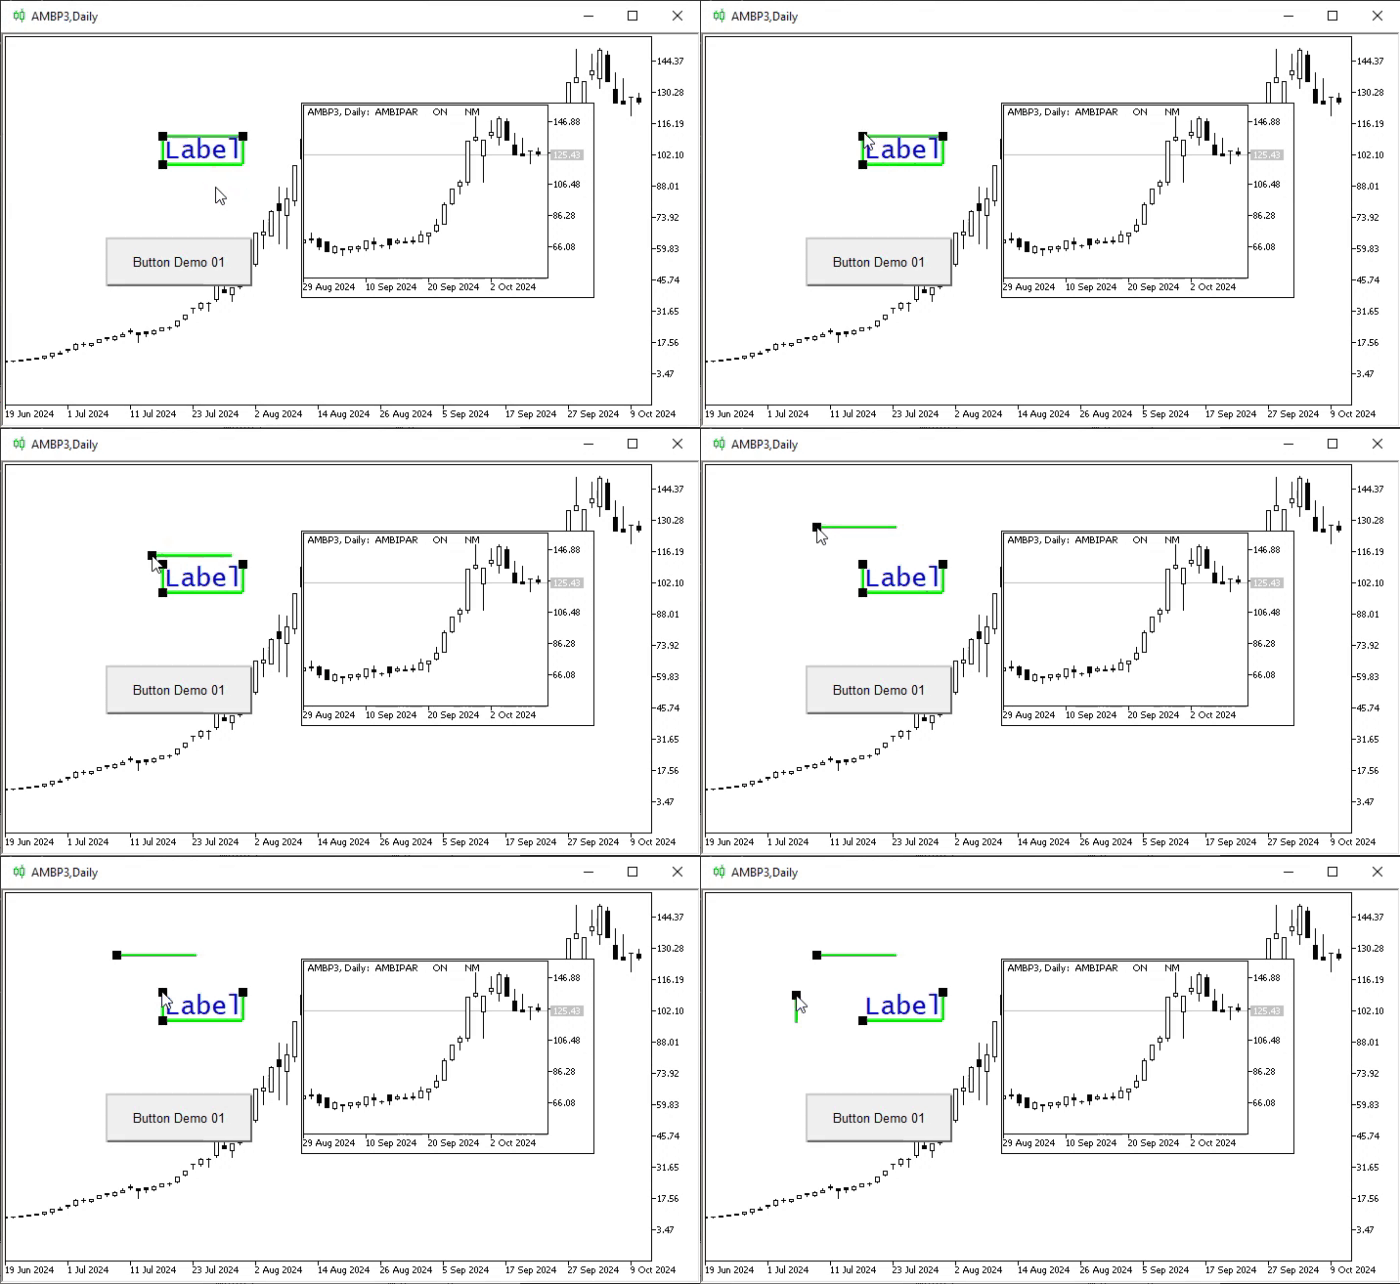
Animation 03
"Now I do not understand anything. Why should what we see in Animation 03 be a problem if it is part of the normal operation of MetaTrader 5?" Well, dear reader, I think you have not understood exactly what we want to do. Let me clarify the situation a little. What we are trying to do would be similar to what is shown in Animation 03, but without the green lines losing their connection to one another. In other words, when an anchor point is moved, any line connected to it must also move accordingly, so as to bound the new area and thus show what the new dimensions of the selected object will be. That is our goal, not what can be seen in Animation 03. Do you now understand the problem?
All right, at this point many people would give up and start saying: "What you want to do is impossible." Is that really true, dear reader? Well, think about it for a moment. We know how MetaTrader 5 passes information to our application about events that occur with objects. We have also seen how certain decisions made during implementation can affect the type of result we can achieve. So I ask:
Is what I want to do really impossible?
The answer is no. However, due to limited knowledge and experience, most people eventually believe that it is impossible, since, as shown in Animation 03, things do not work as expected. But once again, we must emphasize the following:
Do not get too attached to the code. Always try to understand the concepts involved and how they were used.
This is exactly what programmers do. They take a problem and, using their programming knowledge, find and develop a solution. The way each developer creates that solution will certainly differ from one programmer to another. However, what truly matters is the final result. Therefore, different applications may be more or less interactive, and learning how to work with them may be more or less simple. But in all cases, what really matters and interests us is the final result.
All right, let us stop and think about this for a moment. We know that we CANNOT SELECT any of the objects whose names have the prefix defined in the code. This happens precisely because of line 84 in Code 01. But now we know that we do not need to select these objects. During object creation, we can tell MetaTrader 5 that the object will already be selected. This is related to lines 49 and 50, which are visible in the fragment of Code 02 and represent exactly the modification we implemented in Code 01.
Thanks to this, we managed to make MetaTrader 5 give the user the ability to move objects that previously could not be moved, because we could not select them. I do not know whether you are following what I am trying to show you, dear reader. If not, try rereading the material already explained in the previous articles. What I am trying to show you is precisely the concept we will use to achieve our goal. I am talking about a fully interactive way to resize an object present on the chart.
All right, let us do the following: since many people may not know how to incorporate the fragment from Code 02 into Code 01 in order to obtain what is shown in Animation 03, we will create new code so that the attachment gives us access to the full Code 02. This way, you can study it calmly and learn how to integrate one piece of code into an existing one. Well, we will be doing this many times. Knowing how to do this will help you study and practise things that would otherwise be impossible.
All right, then we will create new code based on Code 01 with the modification shown in the fragment of Code 02. You can see it below:
                   .
                   .
                   .
013.         string  szObjects[6];
014. //+----------------+
015.         void CreateEdge(const char what)
016.         {
017.             ushort p1 = x, p2 = y, p3 = w, p4 = h;
018.
019.             switch (what)
020.             {
021.                 case 0: p4 = 1; break;
022.                 case 1: p3 = 1; break;
023.                 case 2: p2 = y + h; p4 = 1; break;
024.                 case 3: p1 = x + w; p3 = 1; break;
025.                 case 5: p1 += p3; p2 += p4;
026.                 case 4: p3 = p4 = 1; break;
027.             }
                   .
                   .
                   .
035.         }
036. //+----------------+
037.     public  :
038.         void CreateBoxResize(const string szArg, const uchar adjust = 2)
039.         {
                   .
                   .
                   .
047.             for (uchar c = 0; c < szObjects.Size(); c++)
048.             {
049.                 CreateEdge(c);
050.                 if (c > 3)
051.                 {
052.                     ObjectSetInteger(0, szObjects[c], OBJPROP_WIDTH, 3);
053.                     ObjectSetInteger(0, szObjects[c], OBJPROP_SELECTABLE, true);
054.                     ObjectSetInteger(0, szObjects[c], OBJPROP_SELECTED, true);
055.                 }
056.             }
057.         }
058. //+----------------+
                   .
                   .
                   .
Code 03
Now look at the following, dear reader: in this fragment of Code 03, there is one simple change. However, it is very significant. Please note that on line 13 we changed the number of elements in the array. In the switch statement on line 19, there are also two more interesting points, which can be seen on lines 25 and 26. Now let us pause for a moment so that we can explain something else that is very important.
In the article From Basic to Intermediate: The SWITCH Operator there was an image that mentioned some red lines. You can see that image again below:
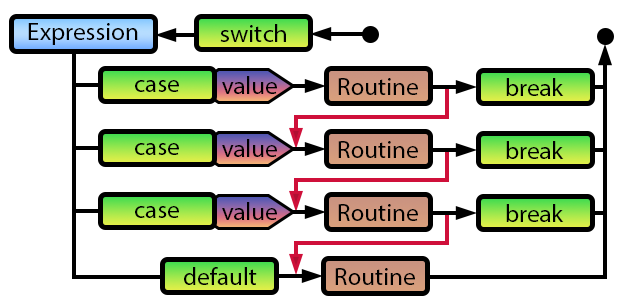
Figure 04
The point here is precisely those red lines visible in Figure 04. This switch statement on line 19 uses exactly those red lines. This is important because it allows execution to fall through to the next case. "Wow, and I thought things simply could not get any more confusing! And now you are telling me that execution can move into another block of code? And that this is done intentionally? It seems to me that programming is much more difficult than I imagined. Now I am thinking about giving everything up and doing something else."
Calm down, dear reader, there is no reason to give up. Are you really going to give up just when things are about to become even more interesting? No, let us work together to understand what this step I am talking about actually involves.
Look at the sequence of case statements. You will notice that they go almost in order until the order suddenly changes: from the third to the fifth, and then to the fourth. "How strange. I did not notice that. Now that you mention it, it really does seem strange. But why are you doing this?" The reason is that I did it intentionally. Why? Precisely to explain the red line that can be seen in Figure 04.
So pay attention: although this may seem simple, it usually seriously confuses many good programmers, not only beginners. Notice that every line between 21 and 26 in the fragment from Code 03 has a break statement at the end. Every line except line 25. Why? The reason is that when the case on line 25 matches, that line will be executed. But this is exactly where the question of moving to the next case arises, I DO NOT WANT EXECUTION TO END HERE. I want the procedure present in the next case to be executed without evaluating that case beforehand.
"Good heavens! I did not understand anything you just said. But wait a moment, let me think calmly about your words. As far as I understand, when line 25 is checked and the case-handling procedure is executed, you also want the case-handling procedure from line 26 to be executed. Is that what you mean?" Yes, and that is possible, dear reader. "But there is something I did not understand. How will the code in the case on line 26 be executed without checking that case? That makes no sense.
This is exactly when the fall-through to the next case occurs." Pay close attention now, dear reader. Since a case statement always ends with a break statement, as shown in Figure 04, if we do NOT have a BREAK statement, execution continues in the branch of the next case, WITHOUT CHECKING THE NEXT CASE. And this is where the red line comes into play.
Please note that when creating object number 04, we set its dimensions to one. When creating object number 05, we also set its dimensions to one. However, in the case of object number 05, we change its initial position so that it is located in the lower-right corner, unlike object number 04, which is located in the upper-left corner. All this is achieved by using the possibility of falling through to the next case, which can be seen in the switch statement on line 19.
However, note the following: on line 50 we check which object we are creating. After drawing the square that bounds the selected object, we move on to drawing the last two objects in the same way as in the fragment shown in Code 02. Nevertheless, this time it is done with a different purpose and a different result, as you can see in the following figure.
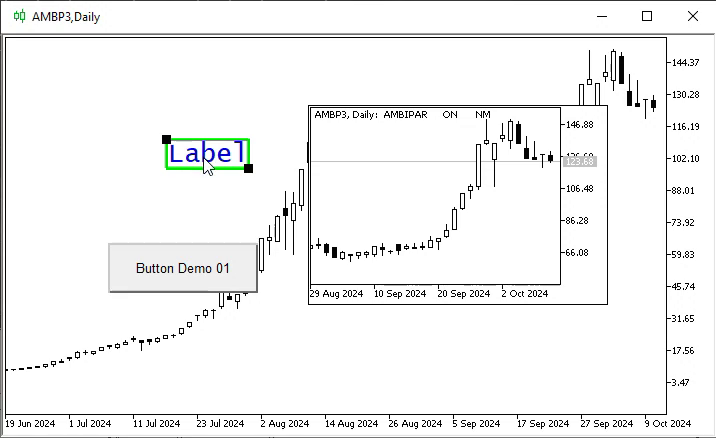
Figure 05
Please note that in this case we have two points, and that is all we need. However, we are not finished yet. The point is that, although the points have already been created, it is worth seeing what happens when we interact with them. This can be seen in the animation below:
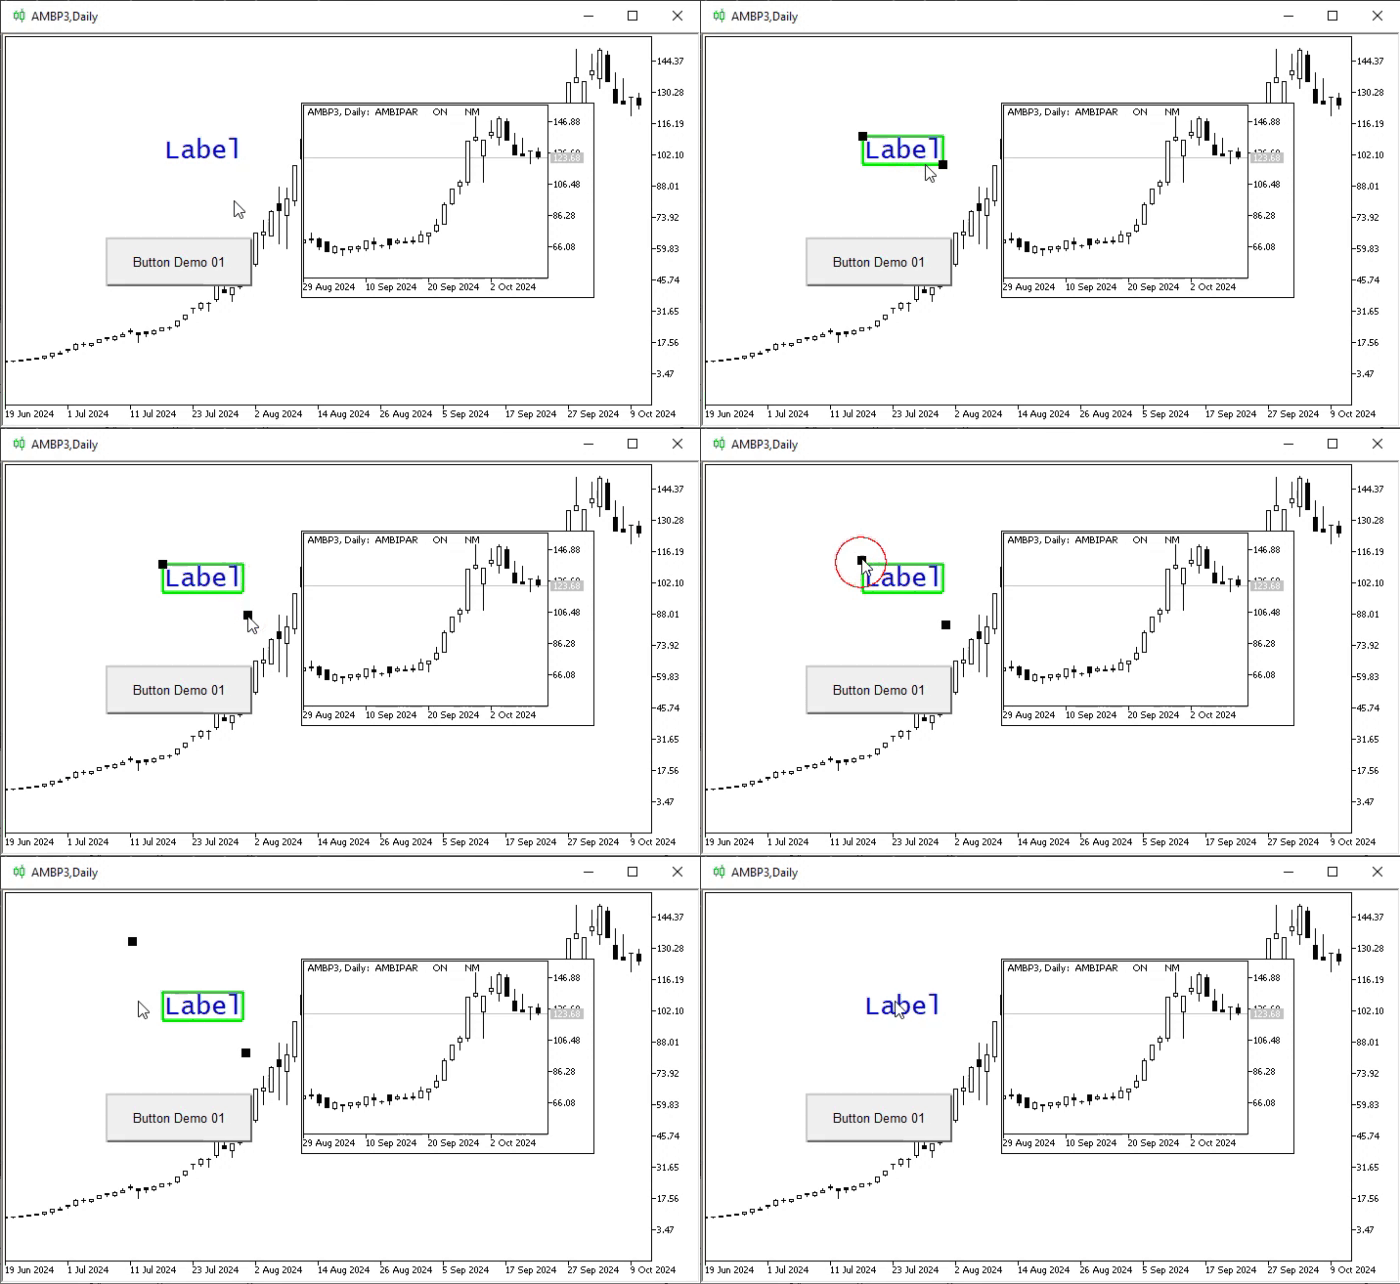
Animation 04
"Hmm, interesting. In a sense, I think we now have relatively promising prospects. So what will our next step be?" Well, dear reader, things are not always that simple. The question here is not what the next step will be. The main thing—and this is what I need from you—is that you understand exactly what we are doing here. This type of manipulation that we are showing requires a certain amount of care and the creation of tests to ensure that everything does not get out of control. Without this, we risk making a mistake that could turn our day into something very unpleasant.
So I will repeat once again: do not get too attached to the code. Try to understand the applicable concepts and create a solution that is clear to you. Only in this way will you be able to solve the problems that arise during the life cycle of your application.
After this warning, which I never get tired of repeating, we can move on to the next point. In this case, we will have to modify the event-handling code, as well as something else that we will discuss later. But first, the event-handling code. You can see it below:
                   .
                   .
                   .
079. //+------------------------------------------------------------------+
080. void OnChartEvent(const int id, const long &lparam, const double &dparam, const string &sparam)
081. {
082.     static string szNameObj = NULL;
083.
084.     switch (id)
085.     {
086.         case CHARTEVENT_KEYDOWN         :
087.             if ((szNameObj != NULL) && (TerminalInfoInteger(TERMINAL_KEYSTATE_ESCAPE)))
088.             {
089.                 gl_RZ.RemoveBoxResize(szNameObj);
090.                 szNameObj = NULL;
091.             }
092.             break;
093.         case CHARTEVENT_OBJECT_CLICK    :
094.             Print((ushort)lparam, " x ", (ushort)dparam, " ->> ", sparam);
095.             if (StringFind(sparam, def_Prefix) != INVALID_HANDLE) break;
096.             if (szNameObj != NULL) gl_RZ.RemoveBoxResize(szNameObj);
097.             if (szNameObj != sparam) gl_RZ.CreateBoxResize(szNameObj = sparam); else szNameObj = NULL;
098.             break;
099.         case CHARTEVENT_OBJECT_DRAG     :
100.             Print("CHARTEVENT_OBJECT_DRAG ->> ", sparam);
101.             break;
102.     }
103.     ChartRedraw();
104. };
105. //+------------------------------------------------------------------+
                   .
                   .
                   .
Code 04
In the fragment shown in Code 04, we make a simple change to show you something that, in my opinion, is important, although it has already been shown in previous articles. Nevertheless, it is always useful to reinforce certain concepts until you truly understand them.
Notice that on lines 94 and 100 we indicate that some message should be printed to the terminal. So let us look at the result of the first, so to speak, normal execution of the code. It can be seen in the animation below:
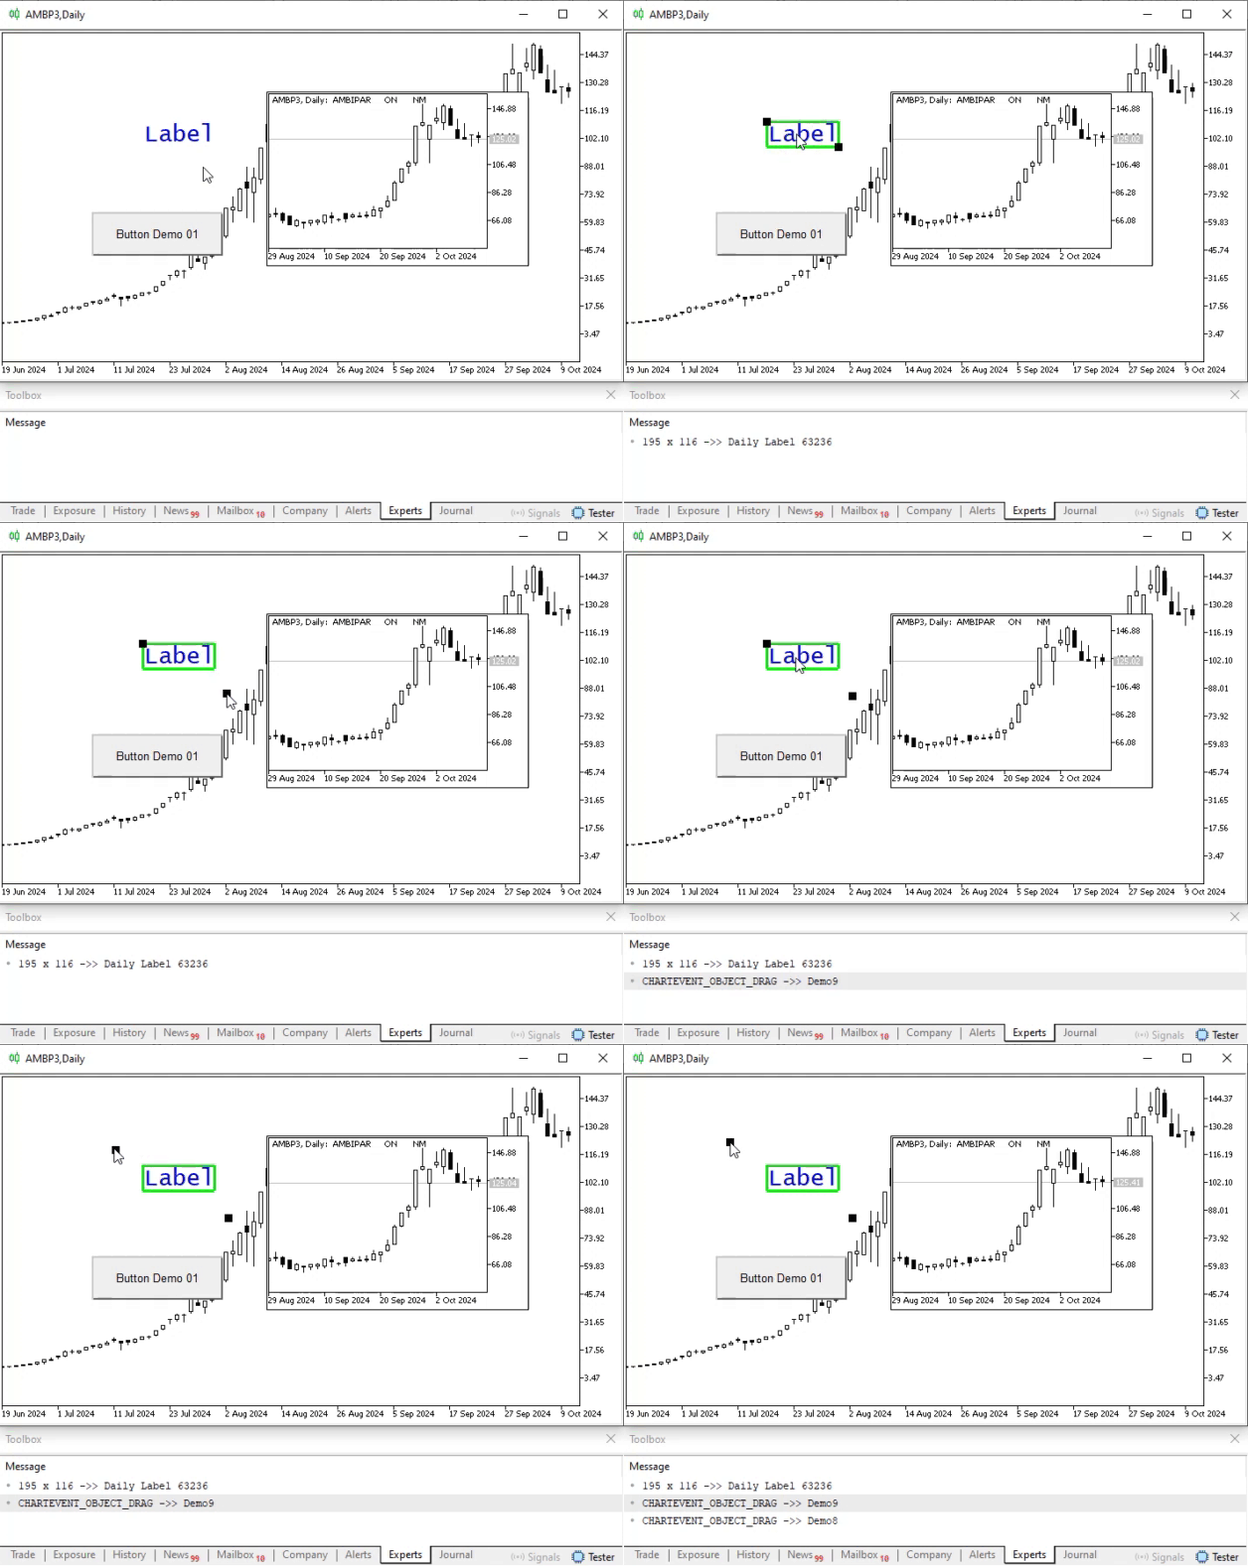
Animation 05
Now let us observe the behavior we want to avoid. This is shown in Animation 06 below:
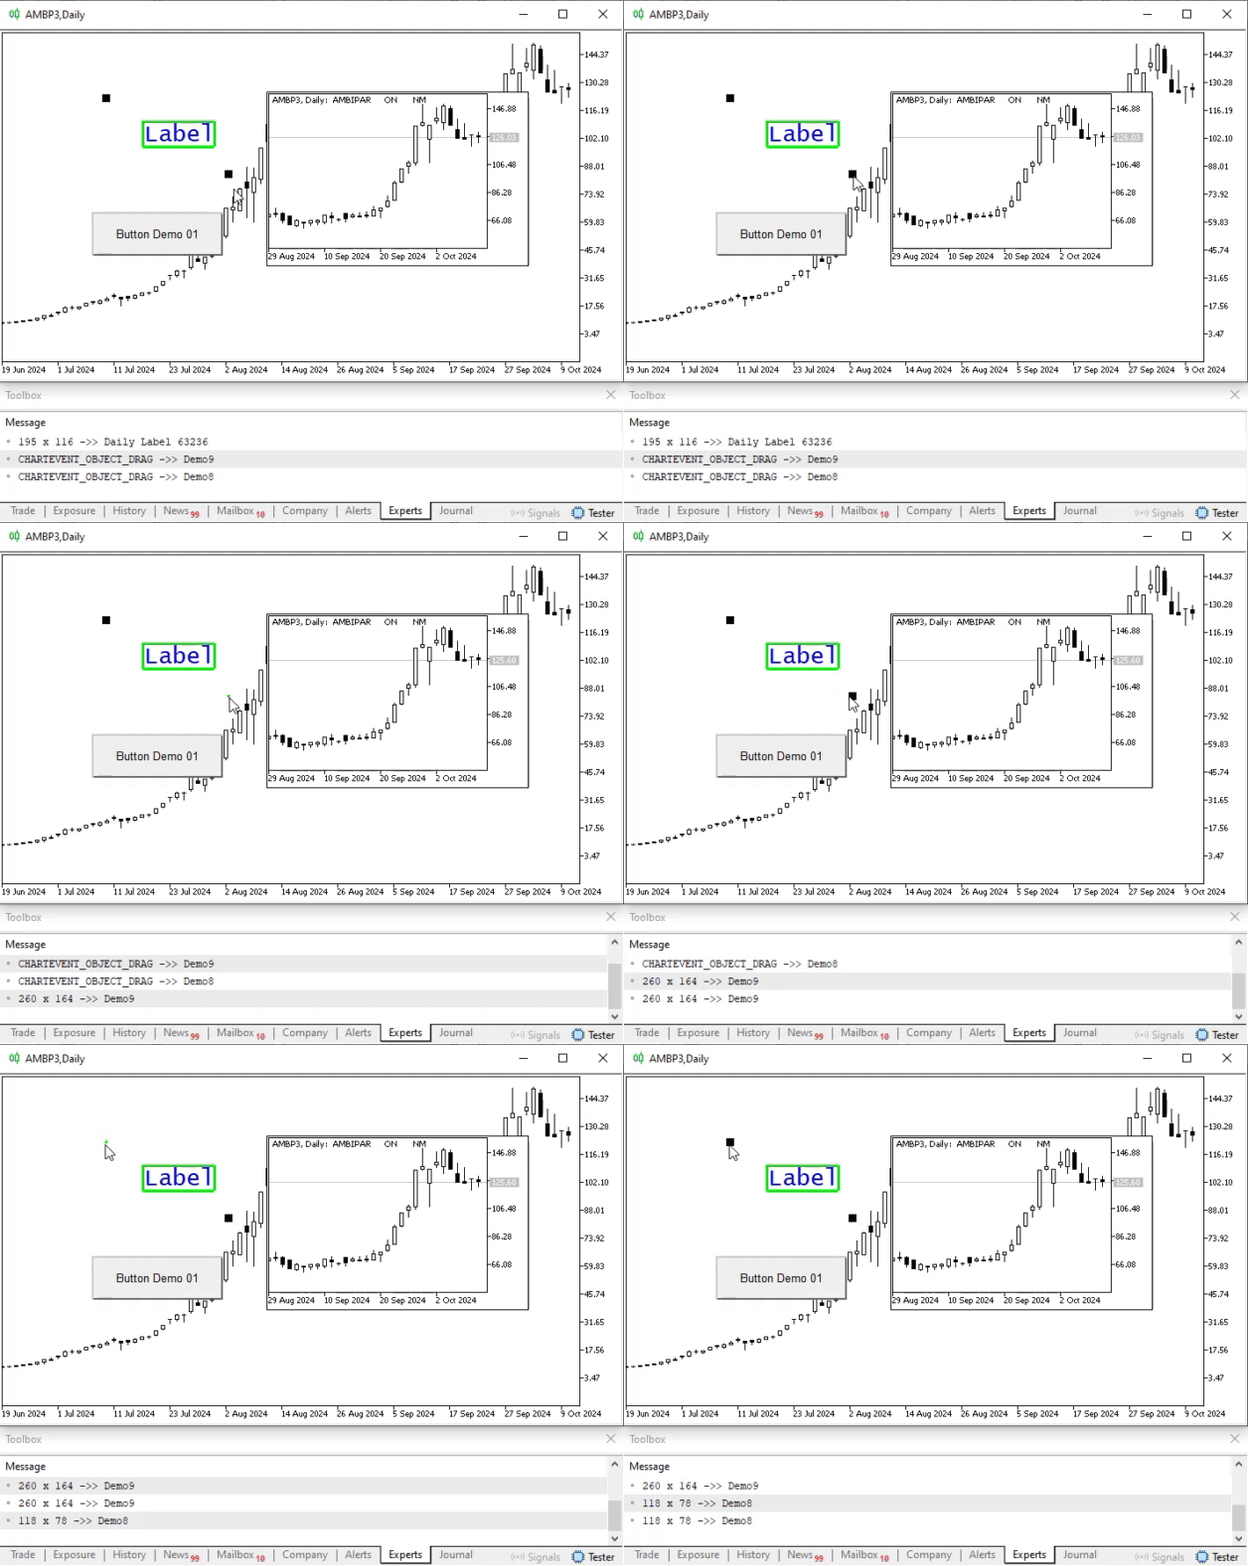
Animation 06
In Animations 05 and 06, we see the standard MetaTrader 5 behavior in action. However, we can live with the behavior shown in Animation 05, but not with the behavior shown in Animation 06. In Animation 06, the user turns object selection on and off for an object that they should not be able to select. We should only be able to move the object. However, we should not be able to enable or disable the object's selected state.
So let us solve this task step by step. The first step is to prevent the selected state of the object from changing when the user simply clicks on it. This can be done using the code below:
                   .
                   .
                   .
007. //+------------------------------------------------------------------+
008. struct st_BoxResize
009. {
                   .
                   .
                   .
036. //+----------------+
037.     public  :
                   .
                   .
                   .
065. //+----------------+
066.         void Block(const string szArg)
067.         {
068.             for (uchar c = 0; c < szObjects.Size(); c++)
069.                 if (szObjects[c] == szArg)
070.                     ObjectSetInteger(0, szObjects[c], OBJPROP_SELECTED, true);
071.         }
072. //+----------------+
073. }gl_RZ;
074. //+------------------------------------------------------------------+
                   .
                   .
                   .
086. //+------------------------------------------------------------------+
087. void OnChartEvent(const int id, const long &lparam, const double &dparam, const string &sparam)
088. {
089.     static string szNameObj = NULL;
090.
091.     switch (id)
092.     {
093.         case CHARTEVENT_KEYDOWN         :
094.             if ((szNameObj != NULL) && (TerminalInfoInteger(TERMINAL_KEYSTATE_ESCAPE)))
095.             {
096.                 gl_RZ.RemoveBoxResize(szNameObj);
097.                 szNameObj = NULL;
098.             }
099.             break;
100.         case CHARTEVENT_OBJECT_CLICK    :
101.             Print((ushort)lparam, " x ", (ushort)dparam, " ->> ", sparam);
102.             if (StringFind(sparam, def_Prefix) != INVALID_HANDLE)
103.             {
104.                 gl_RZ.Block(sparam);
105.                 break;
106.             }
107.             if (szNameObj != NULL) gl_RZ.RemoveBoxResize(szNameObj);
108.             if (szNameObj != sparam) gl_RZ.CreateBoxResize(szNameObj = sparam); else szNameObj = NULL;
109.             break;
110.         case CHARTEVENT_OBJECT_DRAG     :
111.             Print("CHARTEVENT_OBJECT_DRAG ->> ", sparam);
112.             break;
113.     }
114.     ChartRedraw();
115. };
116. //+------------------------------------------------------------------+
                   .
                   .
                   .
Code 05
Notice how easy it is to implement the solution to the first problem. The only thing we need to do is add a new procedure to the structure, as can be seen on line 66. Then we need to add a call to this new procedure, which is done on line 104. And what is the result? You can see for yourself by looking at the animation below:
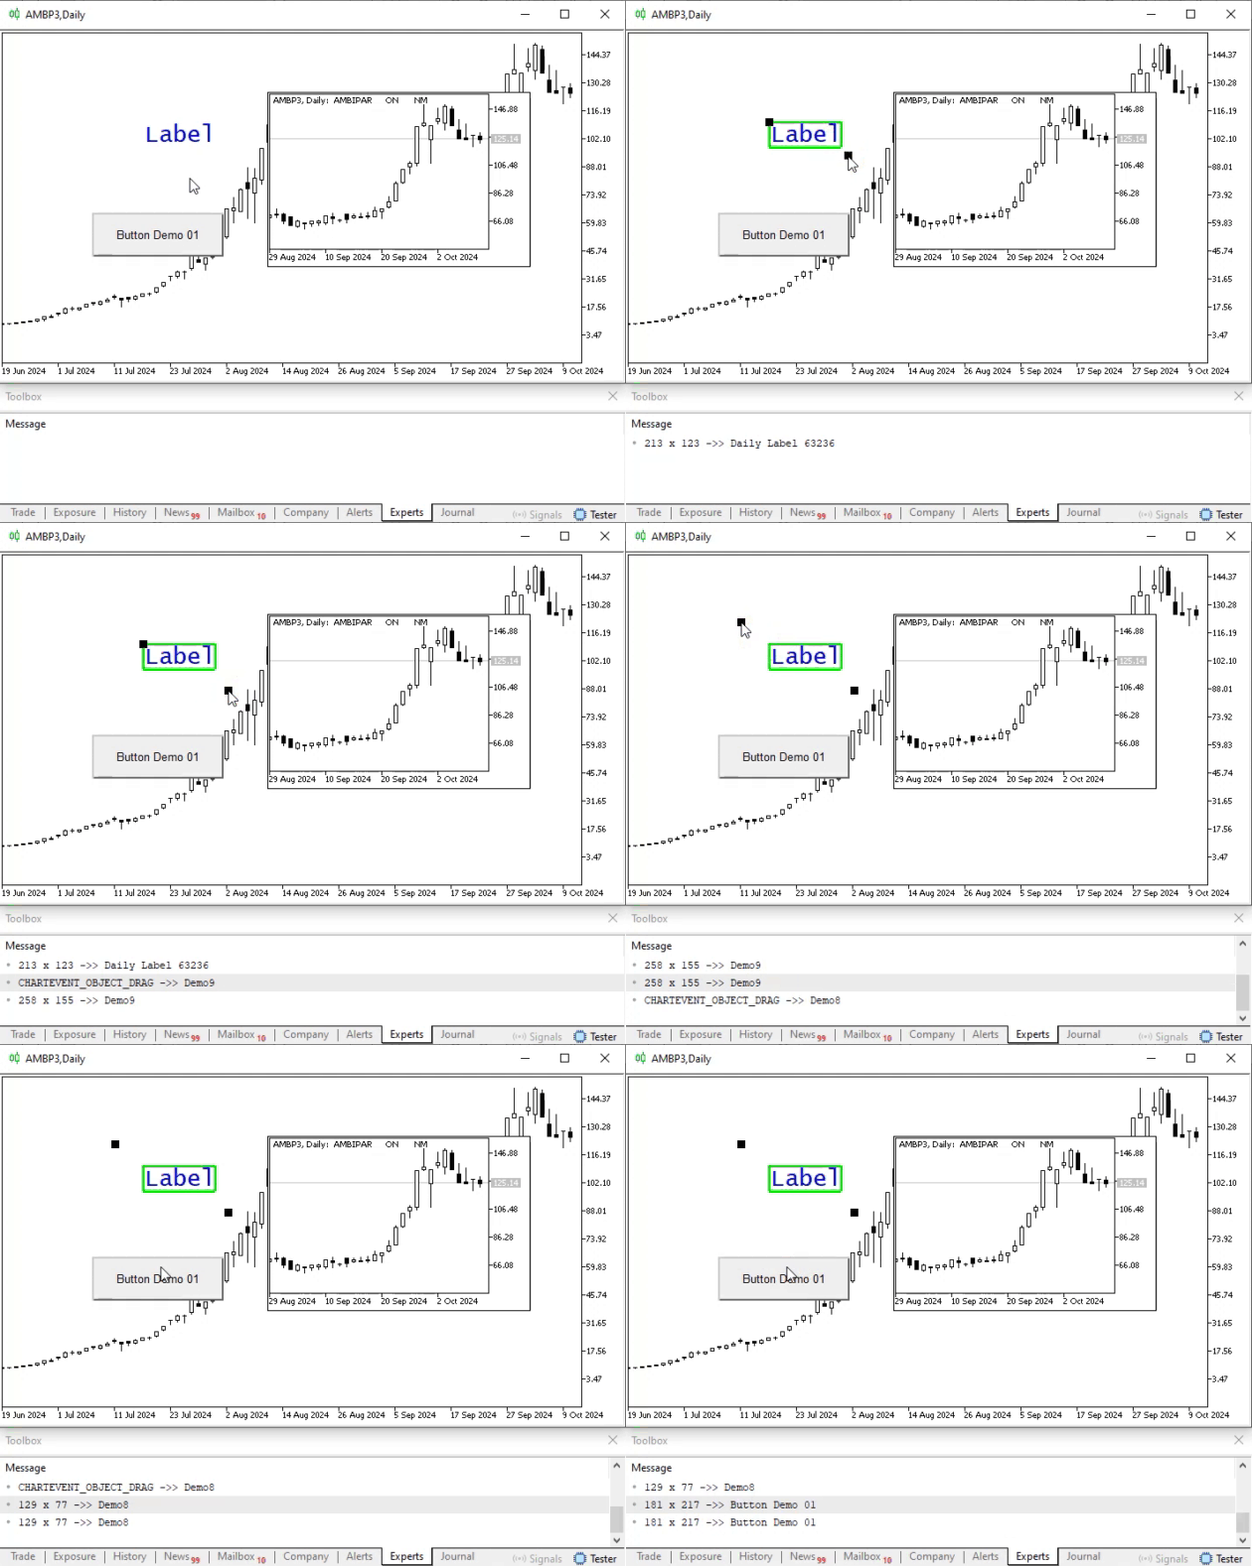
Animation 07
Now let us move on to the second part of the problem we need to solve. But first, I want to remind you that the solution we will show here is intended purely for educational purposes. It is not necessarily the only option we can implement. However, precisely because of the purpose of these articles, we will show the simplest solution of all.
Nevertheless, nothing prevents you from implementing a much more suitable solution. It could even be a solution in which every mouse movement made to change the size is immediately reflected in the dimensions of the object we are trying to scale interactively. Perhaps later I will show you how to do this. In principle, this can also be very educational and even interesting in various cases that you may plan to implement in the future.
In any case, let us stay with the simplest solution. Basically, it consists of two stages, the first of which can be seen in the following fragment.
001. //+------------------------------------------------------------------+
002. #property copyright "Daniel Jose"
003. //+------------------------------------------------------------------+
004. #define def_Prefix  "Demo"
005. //+------------------------------------------------------------------+
006. #define macro_NameObject  def_Prefix + (string)(ObjectsTotal(0) + 1)
007. //+------------------------------------------------------------------+
008. enum E_Elment   {
009.                     TOP,
010.                     LEFT,
011.                     BOTTOM,
012.                     RIGHT,
013.                     TL,
014.                     BR
015.                 };
016. //+------------------------------------------------------------------+
017. struct st_BoxResize
018. {
019.     private :
020.         ushort  x, y, w, h;
021.         bool    isBack;
022.         string  szObjects[6];
023. //+----------------+
024.         void SetPosition(const E_Elment what)
025.         {
026.             ushort p1 = x, p2 = y, p3 = w, p4 = h;
027.
028.             switch (what)
029.             {
030.                 case TOP: p4 = 1; break;
031.                 case LEFT: p3 = 1; break;
032.                 case BOTTOM: p2 = y + h; p4 = 1; break;
033.                 case RIGHT: p1 = x + w; p3 = 1; break;
034.                 case BR: p1 += p3; p2 += p4;
035.                 case TL: p3 = p4 = 1; break;
036.             }
037.             ObjectSetInteger(0, szObjects[what], OBJPROP_XDISTANCE, p1);
038.             ObjectSetInteger(0, szObjects[what], OBJPROP_YDISTANCE, p2);
039.             ObjectSetInteger(0, szObjects[what], OBJPROP_XSIZE, p3);
040.             ObjectSetInteger(0, szObjects[what], OBJPROP_YSIZE, p4);
041.         }
042. //+----------------+
043.         void CreateEdge(const E_Elment what)
044.         {
045.             szObjects[what] = macro_NameObject;
046.             ObjectCreate(0, szObjects[what], OBJ_RECTANGLE_LABEL, 0, 0, 0);
047.             ObjectSetInteger(0, szObjects[what], OBJPROP_BGCOLOR, clrLime);
048.             SetPosition(what);
049.         }
050. //+----------------+
051.     public  :
                   .
                   .
                   .
072. //+----------------+
073.         void UpdateBoxSize(const string szArg)
074.         {
075.             for (E_Elment c = 0; c < (E_Elment)szObjects.Size(); c++)
076.                 if (szObjects[c] == szArg)
077.                 {
078.                     x = (ushort)ObjectGetInteger(0, szObjects[TL], OBJPROP_XDISTANCE);
079.                     y = (ushort)ObjectGetInteger(0, szObjects[TL], OBJPROP_YDISTANCE);
080.                     w = (ushort)ObjectGetInteger(0, szObjects[BR], OBJPROP_XDISTANCE) - x;
081.                     h = (ushort)ObjectGetInteger(0, szObjects[BR], OBJPROP_YDISTANCE) - y;
082.                     for (E_Elment i = 0; i < (E_Elment)4; i++)
083.                         SetPosition(i);
084.                 }
085.         }
086. //+----------------+
                   .
                   .
                   .
100. //+----------------+
101. }gl_RZ;
102. //+------------------------------------------------------------------+
                   .
                   .
                   .
114. //+------------------------------------------------------------------+
115. void OnChartEvent(const int id, const long &lparam, const double &dparam, const string &sparam)
116. {
117.     static string szNameObj = NULL;
118.
119.     switch (id)
120.     {
                   .
                   .
                   .
137.         case CHARTEVENT_OBJECT_DRAG     :
138.             if (StringFind(sparam, def_Prefix) != INVALID_HANDLE)
139.                 gl_RZ.UpdateBoxSize(sparam);
140.             break;
141.     }
142.     ChartRedraw();
143. };
144. //+------------------------------------------------------------------+
                   .
                   .
                   .
Code 06
I know that Code 06 is quite fragmented, but we did this intentionally because we want to highlight only the parts that actually need to be implemented. Note that, to simplify a number of things, we created an enumeration on line 08. This, in turn, will make it easier to implement the last two steps. We also split the part related to creating the objects that form the bounding rectangle into two blocks. One of them is the SetPosition procedure, which can be seen on line 24. The other stage is the direct creation of the sides of the bounding rectangle. In this case, that procedure is on line 43.
What matters here is the appearance of the UpdateBoxSize procedure, located on line 73. This procedure will essentially rebuild the bounding rectangle in the new position when the CHARTEVENT_OBJECT_DRAG event calls the function shown on line 139.
In any case, the goal we want to achieve can ultimately be seen below.
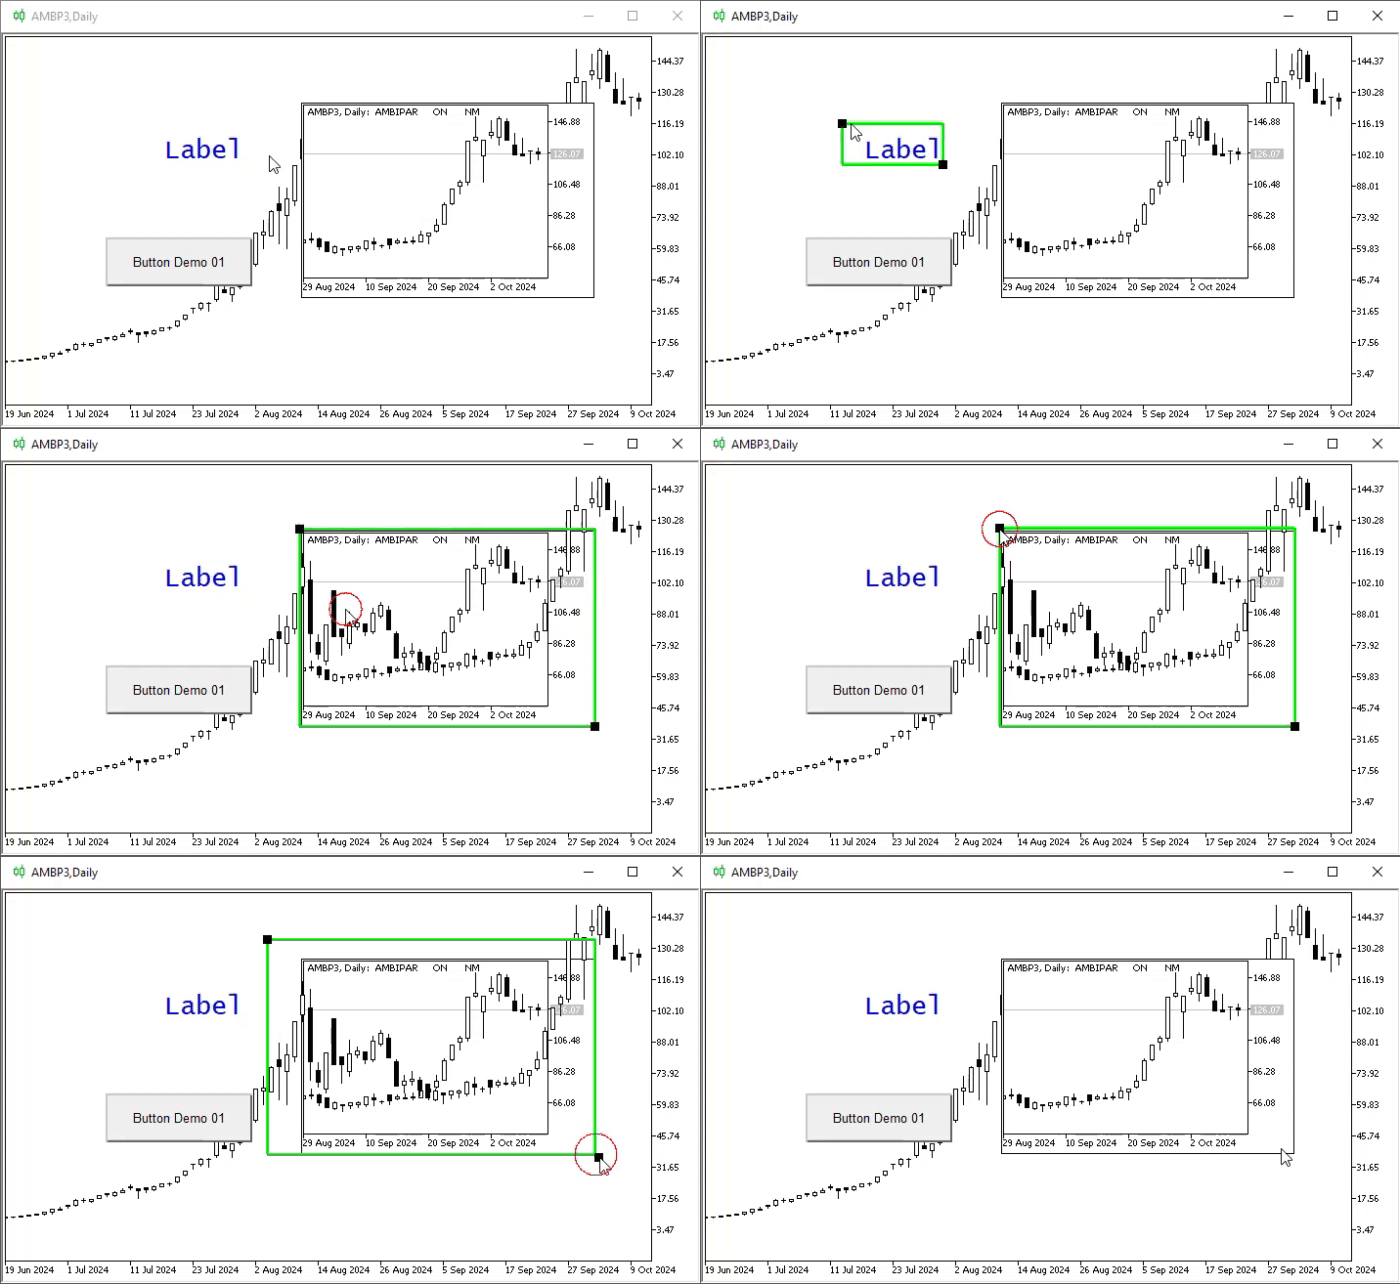
Animation 08
This code fragment, as shown in Animation 08, is the key point. Here, the way the result shown in Animation 08 is obtained can be changed. What matters, however, is that it works exactly as shown in Animation 08. Yet besides this goal, Animation 08 contains something we can change depending on what each particular programmer considers necessary or desirable. We could consider the resizing process complete at this stage, as shown in Animation 08, or we could do it differently—and that is the path we will follow. The reason is simple: to keep the teaching approach as close as possible to what I consider ideal.
Thus, the next step can be seen in the code below. In this case, however, I will leave the full code so that you can appreciate all the beauty that can be created using a very simple and basic level of programming, while correctly applying the various concepts and knowledge demonstrated so far. Just admire and enjoy the result. You have earned it, dear reader, after so much waiting and so many assumptions about what the solution to the problem of interactively resizing an object on the chart would be.
001. //+------------------------------------------------------------------+
002. #property copyright "Daniel Jose"
003. //+------------------------------------------------------------------+
004. #define def_Prefix  "Demo"
005. //+------------------------------------------------------------------+
006. #define macro_NameObject  def_Prefix + (string)(ObjectsTotal(0) + 1)
007. //+------------------------------------------------------------------+
008. enum E_Elment   {
009.                     TOP,
010.                     LEFT,
011.                     BOTTOM,
012.                     RIGHT,
013.                     TL,
014.                     BR
015.                 };
016. //+------------------------------------------------------------------+
017. struct st_BoxResize
018. {
019.     private :
020.         ushort  x, y, w, h;
021.         bool    isBack;
022.         string  szObjects[6];
023. //+----------------+
024.         void SetPosition(const E_Elment what)
025.         {
026.             ushort p1 = x, p2 = y, p3 = w, p4 = h;
027.
028.             switch (what)
029.             {
030.                 case TOP: p4 = 1; break;
031.                 case LEFT: p3 = 1; break;
032.                 case BOTTOM: p2 = y + h; p4 = 1; break;
033.                 case RIGHT: p1 = x + w; p3 = 1; break;
034.                 case BR: p1 += p3; p2 += p4;
035.                 case TL: p3 = p4 = 1; break;
036.             }
037.             ObjectSetInteger(0, szObjects[what], OBJPROP_XDISTANCE, p1);
038.             ObjectSetInteger(0, szObjects[what], OBJPROP_YDISTANCE, p2);
039.             ObjectSetInteger(0, szObjects[what], OBJPROP_XSIZE, p3);
040.             ObjectSetInteger(0, szObjects[what], OBJPROP_YSIZE, p4);
041.         }
042. //+----------------+
043.         void CreateEdge(const E_Elment what)
044.         {
045.             szObjects[what] = macro_NameObject;
046.             ObjectCreate(0, szObjects[what], OBJ_RECTANGLE_LABEL, 0, 0, 0);
047.             ObjectSetInteger(0, szObjects[what], OBJPROP_BGCOLOR, clrLime);
048.             SetPosition(what);
049.         }
050. //+----------------+
051.     public  :
052.         void CreateBoxResize(const string szArg, const uchar adjust = 2)
053.         {
054.             isBack = (bool)ObjectGetInteger(0, szArg, OBJPROP_BACK);
055.             ObjectSetInteger(0, szArg, OBJPROP_BACK, true);
056.             ObjectSetInteger(0, szArg, OBJPROP_SELECTED, false);
057.             x = (ushort)ObjectGetInteger(0, szArg, OBJPROP_XDISTANCE) - adjust;
058.             y = (ushort)ObjectGetInteger(0, szArg, OBJPROP_YDISTANCE) - adjust;
059.             w = (ushort)ObjectGetInteger(0, szArg, OBJPROP_XSIZE) + adjust;
060.             h = (ushort)ObjectGetInteger(0, szArg, OBJPROP_YSIZE) + adjust;
061.             for (E_Elment c = 0; c < (E_Elment)szObjects.Size(); c++)
062.             {
063.                 CreateEdge(c);
064.                 if ((c == TL) || (c == BR))
065.                 {
066.                     ObjectSetInteger(0, szObjects[c], OBJPROP_WIDTH, 3);
067.                     ObjectSetInteger(0, szObjects[c], OBJPROP_SELECTABLE, true);
068.                     ObjectSetInteger(0, szObjects[c], OBJPROP_SELECTED, true);
069.                 }
070.             }
071.         }
072. //+----------------+
073.         void UpdateBoxSize(const string szArg)
074.         {
075.             for (E_Elment c = 0; c < (E_Elment)szObjects.Size(); c++)
076.                 if (szObjects[c] == szArg)
077.                 {
078.                     x = (ushort)ObjectGetInteger(0, szObjects[TL], OBJPROP_XDISTANCE);
079.                     y = (ushort)ObjectGetInteger(0, szObjects[TL], OBJPROP_YDISTANCE);
080.                     w = (ushort)ObjectGetInteger(0, szObjects[BR], OBJPROP_XDISTANCE) - x;
081.                     h = (ushort)ObjectGetInteger(0, szObjects[BR], OBJPROP_YDISTANCE) - y;
082.                     for (E_Elment i = 0; i < (E_Elment)4; i++)
083.                         SetPosition(i);
084.                 }
085.         }
086. //+----------------+
087.         void RemoveBoxResize(const string szArg, const bool update)
088.         {
089.             ObjectSetInteger(0, szArg, OBJPROP_BACK, isBack);
090.             ObjectSetInteger(0, szArg, OBJPROP_SELECTED, false);
091.             if (update)
092.             {
093.                 ObjectSetInteger(0, szArg, OBJPROP_XDISTANCE, x);
094.                 ObjectSetInteger(0, szArg, OBJPROP_YDISTANCE, y);
095.                 ObjectSetInteger(0, szArg, OBJPROP_XSIZE, w);
096.                 ObjectSetInteger(0, szArg, OBJPROP_YSIZE, h);
097.             }
098.             ObjectsDeleteAll(0, def_Prefix);
099.         }
100. //+----------------+
101.         void Block(const string szArg)
102.         {
103.             for (uchar c = 0; c < szObjects.Size(); c++)
104.                 if (szObjects[c] == szArg)
105.                     ObjectSetInteger(0, szObjects[c], OBJPROP_SELECTED, true);
106.         }
107. //+----------------+
108. }gl_RZ;
109. //+------------------------------------------------------------------+
110. int OnInit()
111. {
112.     IndicatorSetString(INDICATOR_SHORTNAME, def_Prefix);
113.
114.     return INIT_SUCCEEDED;
115. };
116. //+------------------------------------------------------------------+
117. int OnCalculate(const int rates_total, const int prev_calculated, const int begin, const double &price[])
118. {
119.     return rates_total;
120. };
121. //+------------------------------------------------------------------+
122. void OnChartEvent(const int id, const long &lparam, const double &dparam, const string &sparam)
123. {
124.     static string szNameObj = NULL;
125.
126.     switch (id)
127.     {
128.         case CHARTEVENT_KEYDOWN         :
129.             if ((szNameObj != NULL) && (TerminalInfoInteger(TERMINAL_KEYSTATE_ESCAPE)))
130.             {
131.                 gl_RZ.RemoveBoxResize(szNameObj, false);
132.                 szNameObj = NULL;
133.             }
134.             break;
135.         case CHARTEVENT_OBJECT_CLICK    :
136.             if (StringFind(sparam, def_Prefix) != INVALID_HANDLE)
137.             {
138.                 gl_RZ.Block(sparam);
139.                 break;
140.             }
141.             if (szNameObj != NULL) gl_RZ.RemoveBoxResize(szNameObj, true);
142.             if (szNameObj != sparam) gl_RZ.CreateBoxResize(szNameObj = sparam); else szNameObj = NULL;
143.             break;
144.         case CHARTEVENT_OBJECT_DRAG     :
145.             if (StringFind(sparam, def_Prefix) != INVALID_HANDLE)
146.                 gl_RZ.UpdateBoxSize(sparam);
147.             break;
148.     }
149.     ChartRedraw();
150. };
151. //+------------------------------------------------------------------+
152. void OnDeinit(const int reason)
153. {
154.     ObjectsDeleteAll(0, def_Prefix);
155.     ChartRedraw();
156. };
157. //+------------------------------------------------------------------+
Code 07
In this case, I will not explain what happens in Code 07. I want you to try to study it and thereby understand how this code, which at first glance seems meaningless and is perceived by many as the product of some brilliant madman's imagination, manages to do what is shown in the animations below. First, standard resizing:
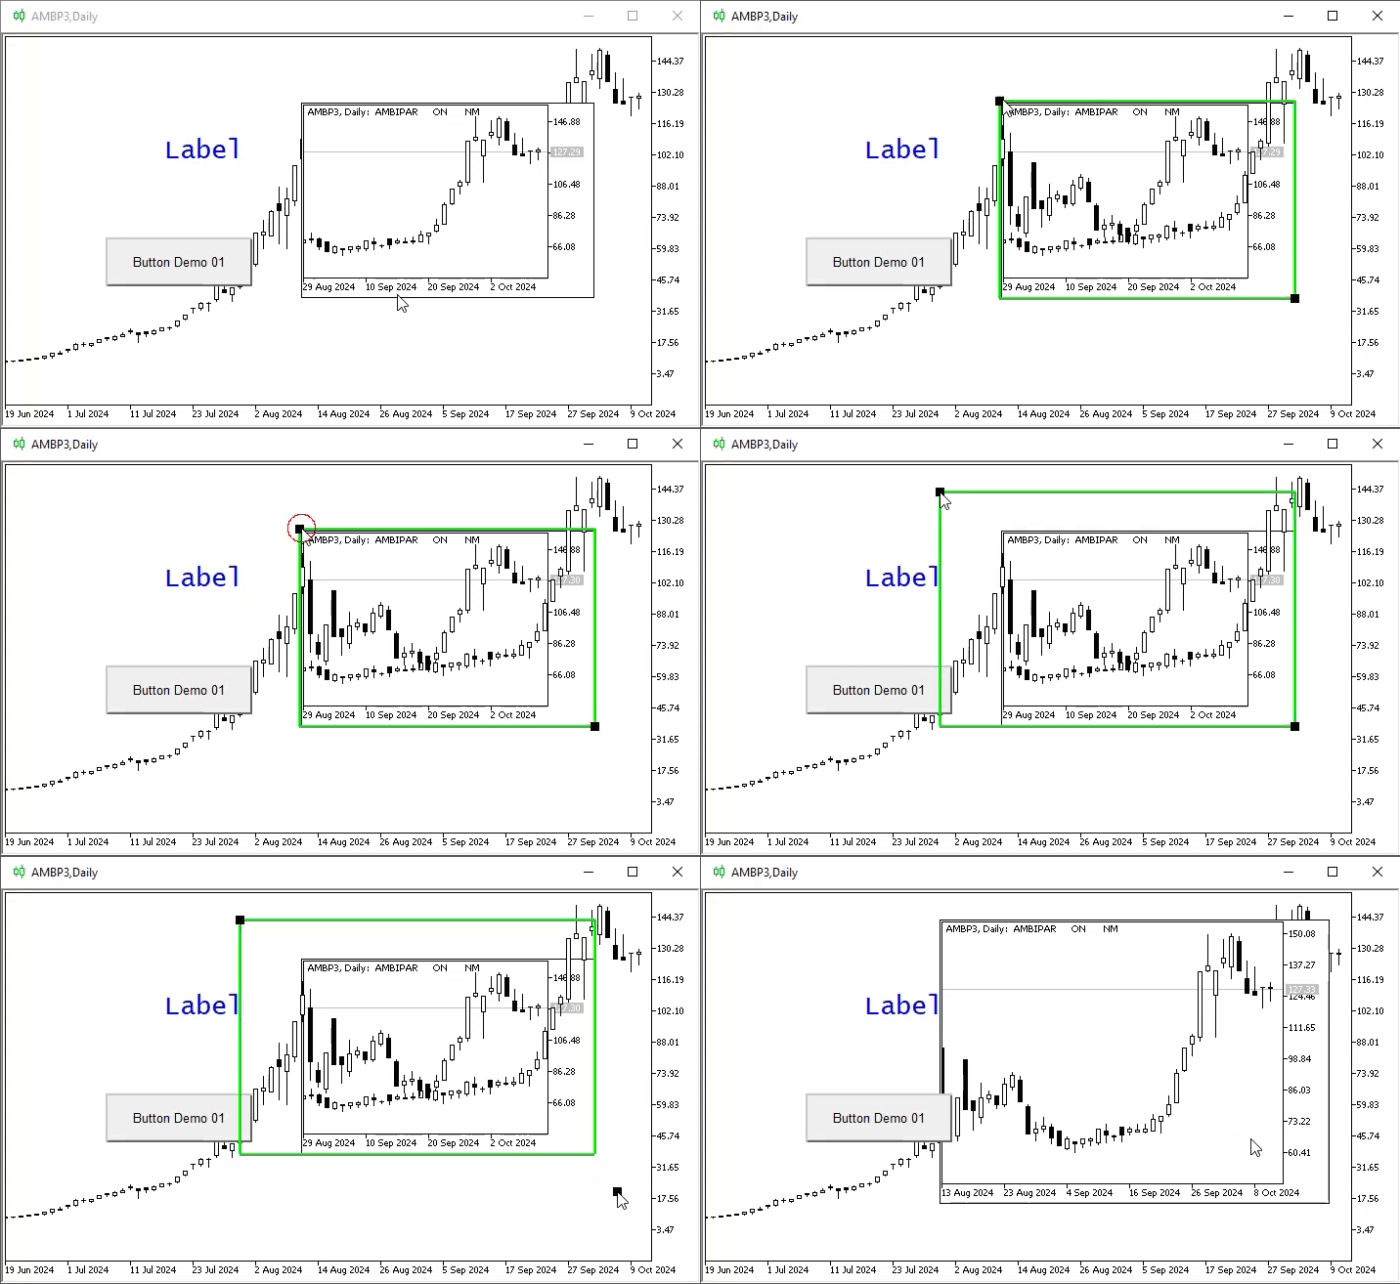
Animation 09
Now, combined resizing with another one that will subsequently be cancelled.
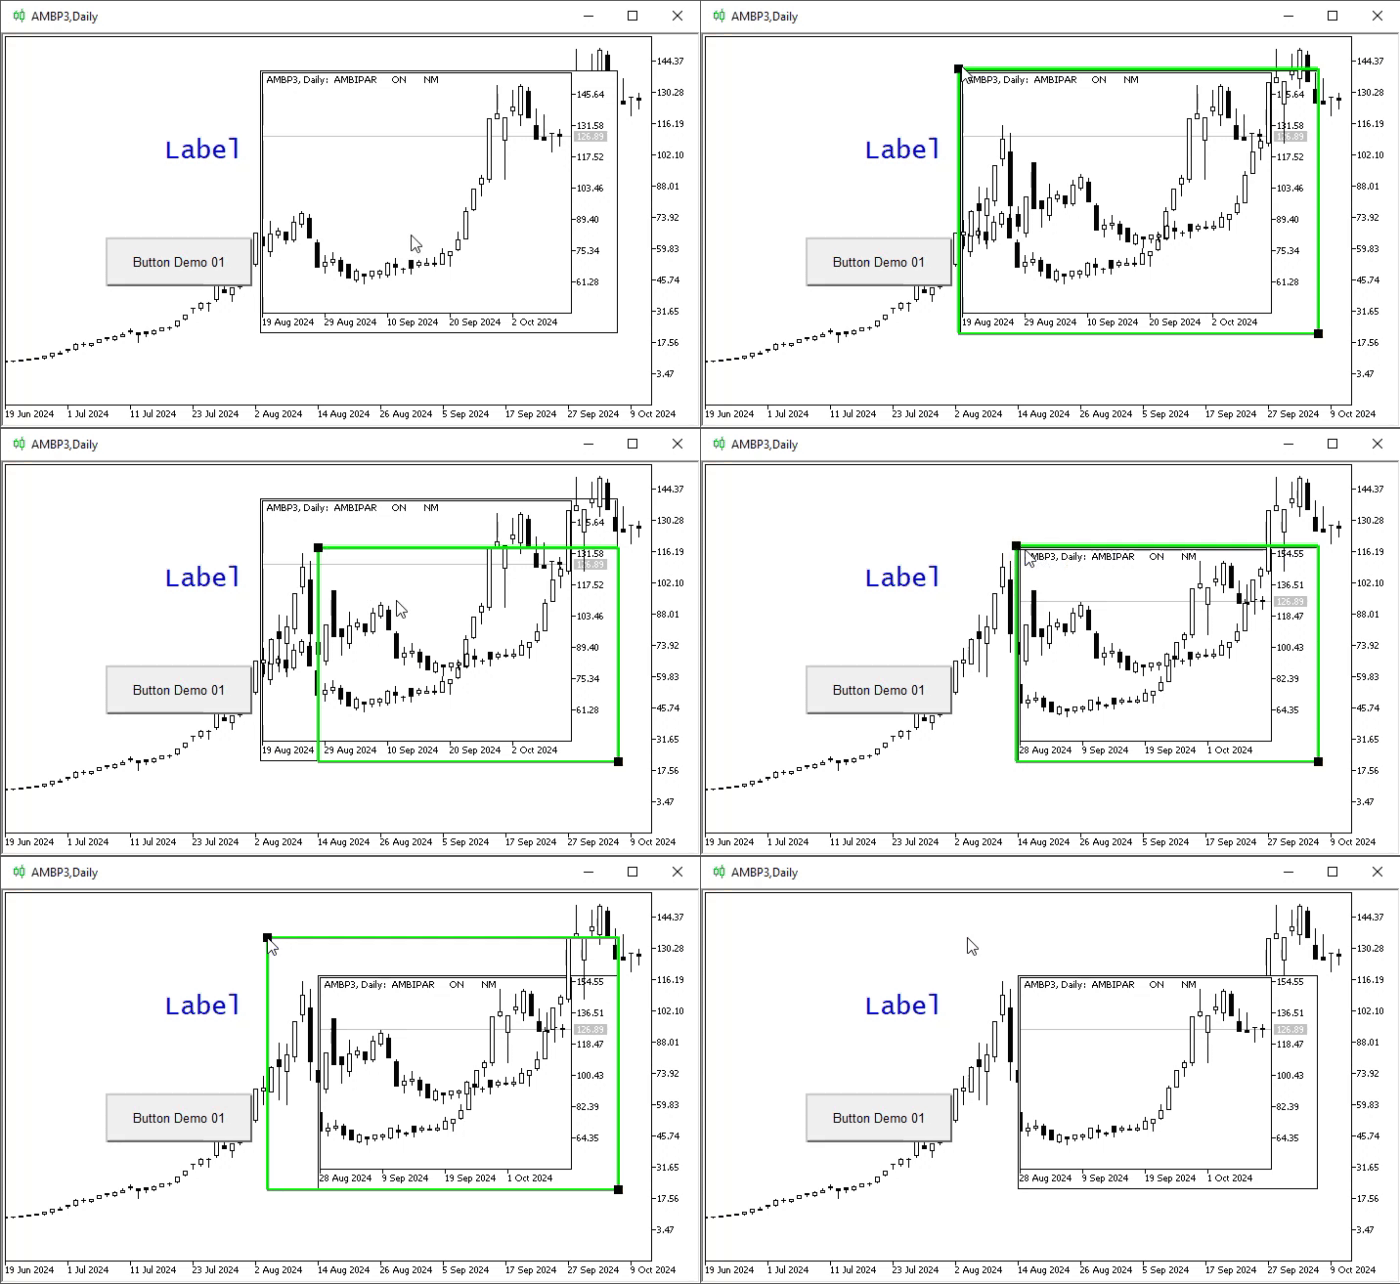
Animation 10
Final Thoughts
Programming is not something boring, difficult, or exhausting. In fact, it is enjoyable, exciting, and fun. The key point is this: do you understand what you want to do? Are you able to understand the basic concepts and apply them in a logical set of instructions, where you tell the machine what to do, when to do it and why? Or are you simply sitting there typing a bunch of completely meaningless things, hoping that the machine will figure out what you want from it?
Many people believe that programming is something only great and talented professionals can do. I do not deny that this may even be true, but nothing prevents you, dear reader, from coming up with a way to solve a problem, putting it on paper, analyzing which concepts should be used, and then implementing it as code.
Talent belongs to the few, but effort, determination, study and discipline belong to those who truly know where they want to go and look for ways to achieve their goals.
Think about it. Use the materials available to you for learning and practice. Do not put off until tomorrow what could have been done yesterday. In any case, it is never too late to start and devote yourself to something that gives you pleasure.
Perhaps in the next article we will show other ways to further improve the code discussed here, which will be available in the attached file. Everything will depend on whether the material presented adds something to what was covered here or not. In any case, do not expect me to show you how to improve things. You must find the solution yourself, and if you cannot implement everything from the start, try studying what has already been covered up to this point. Mastering this material takes time and practice.
| MQ5 file | Description |
|---|---|
| Code 01 | Demonstration of events in objects |
| Code 02 | Demonstration of events in objects |
Translated from Portuguese by MetaQuotes Ltd.
Original article: https://www.mql5.com/pt/articles/16094
Warning: All rights to these materials are reserved by MetaQuotes Ltd. Copying or reprinting of these materials in whole or in part is prohibited.
This article was written by a user of the site and reflects their personal views. MetaQuotes Ltd is not responsible for the accuracy of the information presented, nor for any consequences resulting from the use of the solutions, strategies or recommendations described.

 Market Simulation (Part 24): Position View (II)
 Building a Divergence System (Part II): Adaptive SuperTrend Custom Indicator
 Beyond GARCH (Part VIII): The MMAR Library And Putting it to Work in an Expert Advisor
 Implementing a Circular Buffer Class in MQL5: Fixed-Memory Rolling Windows for Real-Time Indicator Calculations

- Free trading apps
- Over 8,000 signals for copying
- Economic news for exploring financial markets
You agree to website policy and terms of use