Crear paneles gráficos en MQL5 es ahora más fácil

Introducción
MQL5 ofrece a los desarrolladores muchas herramientas útiles que facilitan la escritura de código. En particular, MQL5 contiene una gran cantidad de bibliotecas o clases que se pueden usar para escribir muchas aplicaciones, como paneles y bibliotecas, sin tener que codificarlas desde cero. En este artículo, aprenderemos a usar estas clases y a crear aplicaciones que las utilicen y también introduciremos dos métodos diferentes para crear la misma aplicación.
Este artículo puede servir como material práctico para mejorar las habilidades de programación de los desarrolladores novatos creando una aplicación desde cero. Además, el presente material puede considerarse una guía sencilla para desarrollar herramientas que simplifiquen el trabajo de los tráders. Si usted es un desarrollador principiante de MQL5, podrá utilizarlo como guía para crear paneles gráficos en el terminal MetaTrader 5.
El artículo abarcará los siguientes temas:
- Identificación gráfica del panel
- Clases de panel y de ventana de diálogo
- Panel gráfico simple
- Conclusión
Le recomiendo que se familiarice con la programación orientada a objetos en MQL5 para comprender mejor el tema del artículo. En particular, puede leer mi artículo "Programación orientada a objetos (POO) en MQL5".
Identificación gráfica del panel
En esta sección, aprenderemos qué es un panel gráfico y cómo puede resultarnos útil en la industria comercial. El panel puede ser simplemente una interfaz gráfica con funciones o información útiles, como un panel para abrir y gestionar transacciones, ofrecer información sobre la cuenta o el día comercial, etc. Dichos paneles nos ahorran tiempo a la hora de realizar cualquier acción u obtener la información necesaria, lo cual puede permitirnos centrarnos más en el comercio y el análisis de mercado.
Podemos crear un panel personalizado dependiendo de los objetos y tareas a gestionar, o de la naturaleza de la interacción entre el usuario y dicho panel. En particular, los objetos incluyen:
- Números,
- Líneas,
- Figuras,
- Colores,
- Botones,
- etc.
Hay dos métodos para crear y desarrollar estos paneles. Podemos escribir código desde cero: requiere mucho tiempo y esfuerzo, pero si usted es desarrollador, debe entender cómo hacer esto, pues así mejorará sus habilidades de programación. El segundo método consiste en usar clases o bibliotecas ya preparadas para realizar el trabajo de forma rápida y eficiente sin gastar mucho tiempo y esfuerzo. En este artículo, exploraremos las clases que se pueden utilizar para crear paneles. Además, crearemos una aplicación sencilla utilizando ambos métodos. Esto confirmará los utilidad de las clases.
Clases de panel y de ventana de diálogo
Veamos las clases que nos ayudarán a crear fácilmente un panel gráfico. Recurriremos a las clases de panel y de ventana de diálogo. Encontrará información más detallada sobre ellas en la documentación de MQL5. En este artículo veremos solo algunas.
Ahora vamos a definir las clases necesarias para crear los paneles de control y las ventanas de diálogo. Estas suponen una biblioteca con código listo para crear o desarrollar paneles o aplicaciones interactivas, incluidos indicadores y asesores. La podemos encontrar en la carpeta de datos del terminal > carpeta Include > carpeta Controls. Existen clases auxiliares, básicas, simples y complejas que se pueden utilizar para diversas operaciones. Ejemplos de clases de este tipo:
| Clase | Nombre del archivo (carpeta Controls) | Descripción |
|---|---|---|
| CLabel | Label.mqh | Es una clase de control simple para crear etiquetas de texto simples no editables |
| CButton | Button.mqh | Es una clase de control simple para crear botones simples. |
| CEdit | Edit.mqh | Es una clase de control simple que permite al usuario introducir texto. |
| CPanel | Panel.mqh | Es una clase de control simple que permite combinar controles con otras funciones similares en un grupo |
| CCheckBox | CheckBox.mqh | Es una clase de control compleja para mostrar una casilla de verificación (true/false) |
| CSpinEdit | SpinEdit.mqh | Una clase de control compleja que le permite editar un valor entero. |
| CDialog | Dialog.mqh | Es una clase de control compleja que permite combinar los controles con otras funciones de un grupo. |
Como vemos, podemos usar las clases para realizar muchas tareas que de otro modo requerirían mucho tiempo y esfuerzo. En la siguiente sección, compararemos la creación de una aplicación desde cero y el uso de las clases.
Panel gráfico simple
Ahora crearemos un panel comercial simple para abrir órdenes de compra y venta después de determinar el tamaño del lote. Primero, escribiremos el código desde cero sin usar clases para entrenar nuestras habilidades de programación, y luego usaremos clases para comprobar lo cómodo que es.
Panel gráfico sin clases
Los siguientes pasos describirán cómo crear un panel de órdenes simple para abrir órdenes de compra y venta tras determinar el tamaño del lote, sin usar clases distintas a la clase Trade:
Utilice #include para incluir el archivo Trade y crear un objeto comercial que se utilizará para las órdenes abiertas
#include <Trade\Trade.mqh>
CTrade trade;
Crearemos una función lógica trade para establecer la variable de tipo de orden ENUM_ORDER_TYPE y una variable double de tamaño de lote. Estos son los parámetros de la función que se está creando. Para el cuerpo de la función:
- Crearemos una variable double de precio.
- Luego estableceremos una condición para determinar el tipo de precio (ask o bid) según el tipo de orden usando la condición if:
- Si el tipo de orden es Buy, el precio de apertura de la orden será Ask.
- Si el tipo de orden es Sell, entonces el precio será Bid.
- Como resultado, se abrirá una posición con el símbolo actual, el tipo de orden, el tamaño del lote, el tipo de precio, un valor cero de stop loss y take profit y un comentario vacío.
bool openTrade(ENUM_ORDER_TYPE type, double vol)
  {
   double price;
   if(type==ORDER_TYPE_BUY)
   {
      price=SymbolInfoDouble(Symbol(),SYMBOL_ASK);
   }
   else price=SymbolInfoDouble(Symbol(),SYMBOL_BID);

   return trade.PositionOpen(Symbol(),type,vol,price,0,0,"");
  }
Luego configuraremos la ubicación del panel seleccionando la esquina superior izquierda después de crear la variable const ENUM_BASE_CORNER PanelLoc.
const ENUM_BASE_CORNER panelLoc=CORNER_LEFT_UPPER;
A continuación, estableceremos xMargin y yMargin después de crear variables enteras constantes x e y,
const int xMargin=20;
const int yMargin=20;
estableciendo acto seguido el espacio entre los elementos para xey después de crear otra variable entera constante.
const int xSpace=10;
const int ySpace=10;
Después estableceremos el tamaño de los elementos que son los botones y el texto tras crear cuatro variables enteras constantes btnWidth para la anchura del botón, btnHeight para la altura del botón, txtWidth para la anchura del texto y txtHeight para la altura del texto.
const int btnWidth=50;
const int btnHeight=20;
const int txtWidth=(btnWidth*2)+xSpace;
const int txtHeight=20;
Luego estableceremos la ubicación del texto y los botones: tendremos text x, text y, buy button x, buy button y, sell button x y sell y. Después de ello, declararemos variables enteras constantes para todos y asignemos valores a cada uno de ellos.
const int txtX=3;
const int txtY=yMargin+txtHeight;
const int buyX=3;
const int buyY=txtY+ySpace+btnHeight;
const int sellX=buyX+xSpace+btnWidth;
const int sellY=txtY+ySpace+btnHeight;
Una vez hecho esto, asignaremos un nombre a los botones de compra y venta después de crear variables de cadena constantes para ellos.
const string txtName="txttVol";
const string buyName="buyBtn";
const string sellName="sellBtn";
Y crearemos una variable de tamaño de lote double con el valor inicial.
double lotSize=0.01;
En la parte OnInit(), llamaremos a la función createPanel(), que crearemos más adelante.
createPanel();
En OnDeinit eliminaremos los objetos por sus nombres.
   ObjectDelete(0,txtName);
   ObjectDelete(0,buyName);
   ObjectDelete(0,sellName);
En el área global crearemos una función que nos permitirá interactuar con el panel completando los siguientes pasos.
Usaremos la función OnChartEven y sus parámetros:
- const int id - para identificador de evento
- const long &lparam - para el parámetro de evento long
- const double &dparam - para un parámetro de evento de tipo doble
- const string &sparam - para el parámetro de evento string
Luego estableceremos las condiciones para la interacción con el texto del objeto (tamaño de lote), y los botones de compra y venta.
//+------------------------------------------------------------------+
//| Interaction function                                             |
//+------------------------------------------------------------------+
void OnChartEvent(const int id, const long &lparam, const double &dparam, const string &sparam)
  {
//--- If the event id is equal to the end of text editing in the panel and the string type event is equal to the text name
   if(id==CHARTEVENT_OBJECT_ENDEDIT && sparam==txtName)
     {
      //--- lotTxt string variable will be equal to the returned property value by using the ObjectGetString function
      string lotTxt=ObjectGetString(0, txtName, OBJPROP_TEXT);
      //--- call setLot function that we will create later with the lotTxt value
      setLot(lotTxt);
      //Setting the property value by using the ObjectSetString
      ObjectSetString(0, txtName, OBJPROP_TEXT, string(lotSize));
      //--- Use return
      return;
     }
//--- If the event id is equal to the object click to check if we click the buy button
   else
      if(id==CHARTEVENT_OBJECT_CLICK)
        {
         //We will check if the string param is equal to buyname
         if(sparam==buyName)
           {
            //--- Setting the value of the property by using the ObjectSetInteger
            ObjectSetInteger(0, buyName, OBJPROP_STATE, false);
            //Calling the created openTrade to open a buy order.
            openTrade(ORDER_TYPE_BUY, lotSize);
            //--- Use return
            return;
           }
         //--- If the event id is equal to the object click to check if we click the sell button
         //--- We will check if the string param is equal to sellname
         else
            if(sparam==sellName)
              {
               //--- Setting the value of the property by using the ObjectSetInteger
               ObjectSetInteger(0, sellName, OBJPROP_STATE, false);
               //Calling the created openTrade to open a sell order
               openTrade(ORDER_TYPE_SELL, lotSize);
               //--- Use return
               return;
              }
        }
  }
A continuación, crearemos la función void createPanel que llamamos anteriormente en la parte OnInit() siguiendo estos pasos:
- Eliminamos los objetos txtName, buyName y SellName.
- Llamamos a la función EditCreate.
- Llamamos a la función ButtonCreate para el botón de compra.
- Llamamos a la función ButtonCreate para el botón de venta.
//+------------------------------------------------------------------+
//|createPanel function                                              |
//+------------------------------------------------------------------+
void createPanel()
  {
//--- Delete objects of txtName, buyName, and sellName
   ObjectDelete(0, txtName);
   ObjectDelete(0, buyName);
   ObjectDelete(0, sellName);
//--- calling the EditCreate function
   EditCreate(             // Parameters:
      0,                   // const long (chart_ID): to specify the chart's ID, we will use (0).
      txtName,             // const string (name): to specify the button name,  we will use (txtName)
      0,                   // const int (sub_window): to specify the subwindow index, we will use (0) for the main window
      txtX,                // const int (x): to specify the X coordinate, we will use (txtX)
      txtY,                // const int (y): to specify the Y coordinate, we will use (txtY)
      txtWidth,            // const int (width):to specify the button width, we will use (txtWidth)
      txtHeight,           // const int (height): to specify the button height, we will use (txtHeight)
      string(lotSize),     // const string (text): to specify the text, we will use (lotSize)
      "Arial",             // const string (font): to specify the font, we will use "Arial"
      10,                  // const int (font_size): to specify the font size, we will use (10)
      ALIGN_LEFT,          // const ENUM_ALIGN_MODE (align_mode): to specify the position of text, we will use (ALIGN_LEFT)
      false,               // const bool (read_only=false): to specify the ability to edit, we will be (false)
      panelLoc,            // const ENUM_BASE_CORNER (corner): to specify the chart corner for anchoring, we will call panelLoc function
      clrBlack,            // const color (clr): to specify the text color, we will specify clrBlack
      clrWhite,            // const color (back_clr): to specify the background color, we will specify clrWhite
      clrBlack,            // const color (border_clr): to specify the border color, we will specify clrBlack
      false,               // const bool (back=false): in the background, we will set false
      false,               // const bool (selection=false): highlight to move, we will set false
      false,               // const bool (hidden): hidden in the object list, we will set false
      0);                  // const long (z_order=0): priority for a mouse click, we will use (0)
//--- calling the ButtonCreate function for the buy
   ButtonCreate(           // Parameters:
      0,                   // const long (chart_ID): to specify the chart's ID, we will use (0)
      buyName,             // const string (name): to specify the button name, we will use (buyName) for the buy button
      0,                   // const int (sub_window): to specify the subwindow index, we will use (0) for the main window
      buyX,                // const int (x): to specify the X coordinate, we will use (buyX) for buy
      buyY,                // const int (y): to specify the Y coordinate, we will use (buyY) for buy
      btnWidth,            // const int (width): to specify the button width, we will use (btnWidth) for buy
      btnHeight,           // const int (height): to specify the button height, we will use (btnHeight) for buy
      panelLoc,            // const ENUM_BASE_CORNER (corner): to specify the chart corner for anchoring, we will call panelLoc function for buy button
      "Buy",               // const string (text): to specify the text, we will use ("Buy") for the buy button
      "Arial",             // const string (font): to specify the font, we will use "Arial"
      10,                  // const int (font_size): to specify the font size, we will use (10)
      clrBlack,            // const color (clr): to specify the text color, we will specify clrBlack
      clrGreen,            // const color (back_clr): to specify the background color, we will specify clrGreen for the buy button
      clrBlack,            // const color (border_clr): to specify the border color, we will specify clrBlack
      false,               // const bool (state): to specify if the object is pressed or released, we will specify false
      false,               // const bool (back=false): in the background, we will set false
      false,               // const bool (selection=false): highlight to move, we will set false
      false,               // const bool (hidden): hidden in the object list, we will set false
      0);                  // const long (z_order=0): priority for mouse click, we will use (0) for buy button
//--- calling the ButtonCreate function for the sell
   ButtonCreate(          //Parameters:
      0,                   //const long (chart_ID): to specify the chart's ID, we will use (0)
      sellName,            //const string (name): to specify the button name, we will use (sellName) for the sell button
      0,                   //const int (sub_window): to specify the subwindow index, we will use (0) for the main window
      sellX,               //const int (x): to specify the X coordinate, we will use (sellX) for sell
      sellY,               //const int (y): to specify the Y coordinate, we will use (sellY)
      btnWidth,            //const int (width): to specify the button width, we will use (btnWidth) for sell
      btnHeight,           //const int (height): to specify the button height, we will use (btnHeight) for sell
      panelLoc,            //const ENUM_BASE_CORNER (corner): to specify the chart corner for anchoring, we will call panelLoc function for sell button
      "Sell",              //const string (text): to specify the text, we will use ("Sell") for the sell button
      "Arial",             //const string (font): to specify the font, we will use "Arial"
      10,                  //const int (font_size): to specify the font size, we will use (10)
      clrBlack,            //const color (clr): to specify the text color, we will specify clrBlack
      clrRed,              //const color (back_clr): to specify the background color, we will specify clrRed for the sell button
      clrBlack,            //const color (border_clr): to specify the border color, we will specify clrBlack
      false,               //const bool (state): to specify if the object is pressed or released, we will specify false
      false,               //const bool (back=false): in the background, we will set false
      false,               //const bool (selection=false): highlight to move, we will set false
      false,               //const bool (hidden): hidden in the object list, we will set false
      0);                  //const long (z_order=0): priority for mouse click, we will use (0) for sell button
  }
Después crearemos una función setLot vacía con un parámetro - lotTxt, que se usa para lotSize. A continuación, podemos ver el cuerpo de la función:
- Luego crearemos la variable double newLot y la asignaremos a lotTxt tras convertirla de string a double usando la función StringToDouble,
- y nos aseguraremos de que el valor de la variable newLot sea inferior a 0. Asimismo, imprimiremos el mensaje "Invalid Volume Specified" (Volumen especificado no válido) y luego usaremos retern.
- Después retornaremos el valor de newLot que coincida con lotSize
void setLot(string lotTxt)
  {
   double newLot=StringToDouble(lotTxt);
   if(newLot<0)
     {
      Print("Invaid Volume Specified");
      return;
     }
   lotSize=newLot;
  }
La creación de la función EditCreate constará de los siguientes pasos:
//+------------------------------------------------------------------+
//|EditCreate function                                               |
//+------------------------------------------------------------------+
bool EditCreate(const long             chart_ID=0,
                const string           name="Edit",
                const int              sub_window=0,
                const int              x=0,
                const int              y=0,
                const int              width=50,
                const int              height=18,
                const string           text="Text",
                const string           font="Arial",
                const int              font_size=10,
                const ENUM_ALIGN_MODE  align=ALIGN_CENTER,
                const bool             read_only=false,
                const ENUM_BASE_CORNER corner=CORNER_LEFT_UPPER,
                const color            clr=clrBlack,
                const color            back_clr=clrWhite,
                const color            border_clr=clrNONE,
                const bool             back=false,
                const bool             selection=false,
                const bool             hidden=true,
                const long             z_order=0)
  {
//--- Reset the error value by using ResetLastError()
   ResetLastError();
//--- Create an edit field
   if(!ObjectCreate(chart_ID, name, OBJ_EDIT, sub_window, 0, 0))
     {
      Print(__FUNCTION__,
            ": failed to create \"Edit\" object! Error code = ", GetLastError());
      return(false);
     }
//--- Setting the object coordinates x and y by using the ObjectSetInteger
   ObjectSetInteger(chart_ID, name, OBJPROP_XDISTANCE, x);
   ObjectSetInteger(chart_ID, name, OBJPROP_YDISTANCE, y);
//--- Setting the object size by using the ObjectSetInteger function also
   ObjectSetInteger(chart_ID, name, OBJPROP_XSIZE, width);
   ObjectSetInteger(chart_ID, name, OBJPROP_YSIZE, height);
//--- Setting the text by using ObjectSetString function
   ObjectSetString(chart_ID, name, OBJPROP_TEXT, text);
//--- Setting the text font by using the ObjectSetString function also
   ObjectSetString(chart_ID, name, OBJPROP_FONT, font);
//--- Setting the font size by using the ObjectSetInteger function
   ObjectSetInteger(chart_ID, name, OBJPROP_FONTSIZE, font_size);
//--- Setting the type of text alignment in the object
   ObjectSetInteger(chart_ID, name, OBJPROP_ALIGN, align);
//--- Setting the ability to edit, enable if it is (true) or cancel (false) if you need a read-only mode
   ObjectSetInteger(chart_ID, name, OBJPROP_READONLY, read_only);
//--- Setting the chart's corner, relative to which object coordinates are defined to set the location of the object.
   ObjectSetInteger(chart_ID, name, OBJPROP_CORNER, corner);
//--- Setting the text color
   ObjectSetInteger(chart_ID, name, OBJPROP_COLOR, clr);
//--- Setting the background color
   ObjectSetInteger(chart_ID, name, OBJPROP_BGCOLOR, back_clr);
//--- Setting the border color of the object
   ObjectSetInteger(chart_ID, name, OBJPROP_BORDER_COLOR, border_clr);
//--- Displaying in the foreground by (false) or in the background by (true)
   ObjectSetInteger(chart_ID, name, OBJPROP_BACK, back);
//--- Setting (true) to enable or (false) to disable the mode of moving the label by mouse
   ObjectSetInteger(chart_ID, name, OBJPROP_SELECTABLE, selection);
   ObjectSetInteger(chart_ID, name, OBJPROP_SELECTED, selection);
//--- Setting (true) if you need hiding or (false) if you need the display of graphical object name in the object list
   ObjectSetInteger(chart_ID, name, OBJPROP_HIDDEN, hidden);
//--- Setting the priority for receiving the event of a mouse click in the chart
   ObjectSetInteger(chart_ID, name, OBJPROP_ZORDER, z_order);
//--- Returning (true) if successful execution
   return(true);
  }
Creamos una función ButtonCreate similar a los parámetros anteriores de la función EditCreate con una ligera diferencia:
bool ButtonCreate(const long              chart_ID=0,
                  const string            name="Button",
                  const int               sub_window=0,
                  const int               x=0,
                  const int               y=0,
                  const int               width=50,
                  const int               height=18,
                  const ENUM_BASE_CORNER  corner=CORNER_LEFT_UPPER,
                  const string            text="Button",
                  const string            font="Arial",
                  const int               font_size=10,
                  const color             clr=clrBlack,
                  const color             back_clr=C'236,233,216',
                  const color             border_clr=clrNONE,
                  const bool              state=false,
                  const bool              back=false,
                  const bool              selection=false,
                  const bool              hidden=true,
                  const long              z_order=0)
  {
   ResetLastError();
   if(!ObjectCreate(chart_ID,name,OBJ_BUTTON,sub_window,0,0))
     {
      Print(__FUNCTION__,
            ": failed to create the button! Error code = ",GetLastError());
      return(false);
     }
   ObjectSetInteger(chart_ID,name,OBJPROP_XDISTANCE,x);
   ObjectSetInteger(chart_ID,name,OBJPROP_YDISTANCE,y);
   ObjectSetInteger(chart_ID,name,OBJPROP_XSIZE,width);
   ObjectSetInteger(chart_ID,name,OBJPROP_YSIZE,height);
   ObjectSetInteger(chart_ID,name,OBJPROP_CORNER,corner);
   ObjectSetString(chart_ID,name,OBJPROP_TEXT,text);
   ObjectSetString(chart_ID,name,OBJPROP_FONT,font);
   ObjectSetInteger(chart_ID,name,OBJPROP_FONTSIZE,font_size);
   ObjectSetInteger(chart_ID,name,OBJPROP_COLOR,clr);
   ObjectSetInteger(chart_ID,name,OBJPROP_BGCOLOR,back_clr);
   ObjectSetInteger(chart_ID,name,OBJPROP_BORDER_COLOR,border_clr);
   ObjectSetInteger(chart_ID,name,OBJPROP_BACK,back);
   ObjectSetInteger(chart_ID,name,OBJPROP_STATE,state);
   ObjectSetInteger(chart_ID,name,OBJPROP_SELECTABLE,selection);
   ObjectSetInteger(chart_ID,name,OBJPROP_SELECTED,selection);
   ObjectSetInteger(chart_ID,name,OBJPROP_HIDDEN,hidden);
   ObjectSetInteger(chart_ID,name,OBJPROP_ZORDER,z_order);
   return(true);
  }
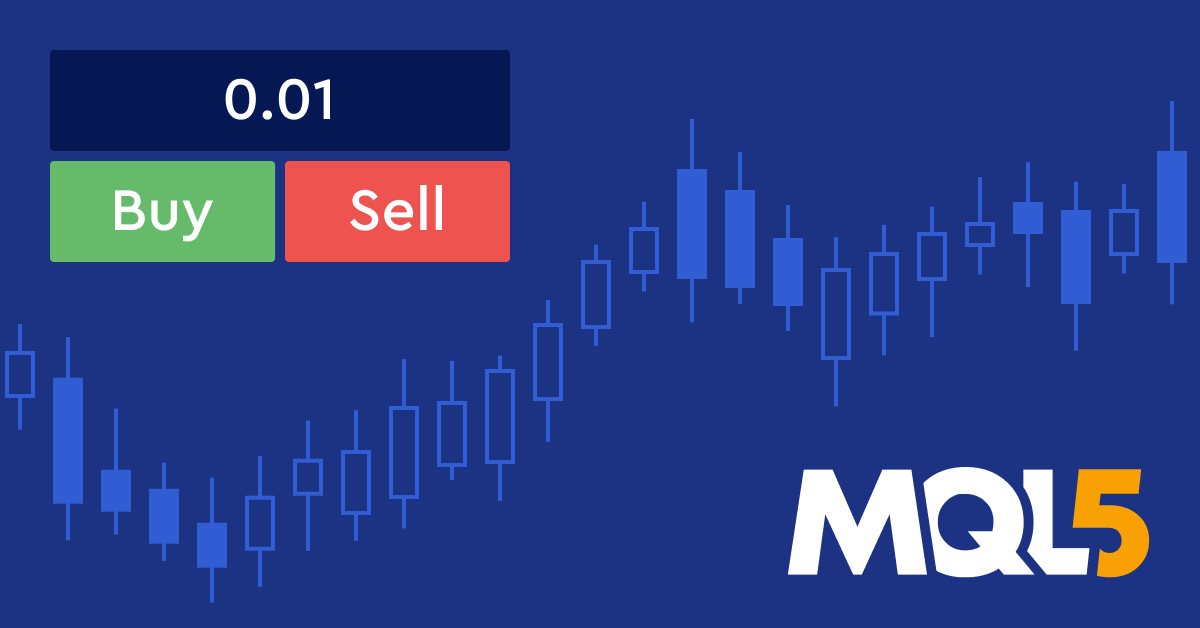
Tras compilar el código y ejecutarlo, el panel se verá así:

Como podemos ver, en la esquina superior izquierda tenemos un panel con el tamaño de lote y dos botones Buy y Sell y podemos especificar el tamaño de lote que necesitamos y colocar una orden clicando en el botón Buy o Sell. Ahora, a modo de comparación, crearemos el mismo panel usando las clases Panels y Dialogs.
Panel gráfico con uso de clases
Para crear un panel, seguiremos estos pasos.
Incluimos los archivos o clases necesarios: Dialog, Button, Edit и Trade. Como sabemos, esto se puede hacer usando el comando #include.
#include <Controls\Dialog.mqh>
#include <Controls\Button.mqh>
#include <Controls\Edit.mqh>
#include <Trade\Trade.mqh>
Usamos la macrosustitución #define, que es una directiva de preprocesador para asignar nombres mnemónicos a las constantes:
- PANEL_NAME "Order Panel"
- PANEL_WIDTH 116
- PANEL_HIEIGHT 100
- ROW_HEIGHT 20
- BUY_BTN_NAME "Buy BTN"
- SELL_BTN_NAME "Sell BTN"
- CLOSE_BTN_NAME "Close BTN"
- EDIT_NAME "Lot Size"
#define PANEL_NAME "Order Panel"
#define PANEL_WIDTH 116
#define PANEL_HIEIGHT 100
#define ROW_HEIGHT 20
#define BUY_BTN_NAME "Buy BTN"
#define SELL_BTN_NAME "Sell BTN"
#define CLOSE_BTN_NAME "Close BTN"
#define EDIT_NAME "Lot Size"
Luego creamos los objetos a partir de las clases.
CAppDialog panel;
CButton buyBtn;
CButton sellBtn;
CButton closeBtn;
CEdit lotSize;
CTrade trade;
En la parte OnInit(), necesitaremos crear un objeto de panel usando el objeto Panel.Create que hemos creado y sus parámetros:
- const long chart - estableceremos 0 para que el panel se muestre en el gráfico principal.
- const string name - estableceremos PANEL_NAME
- const int subwin - estableceremos 0
- constante int x1 - estableceremos 10
- const int y1 - estableceremos 20
- constante int x2 - usaremos 10+PANEL_WIDTH+8
- const int y2 - usaremos 20+PANEL_HIEIGHT
panel.Create(0,PANEL_NAME,0,10,20,10+PANEL_WIDTH+8,20+PANEL_HIEIGHT);
Luego crearemos y configuraremos los botones de compra y venta:
- Crearemos los objetos usando object.Create.
- Ajustaremos la anchura de los objetos buy y sell usando object.Width.
- Ajustaremos la altura de la compra y la venta de los objetos usando object.Height.
- Configuraremos el color de fondo de los objetos usando object.Height.
- Ajustaremos el texto de los objetosusando object.Text.
- Configuremos la fuente del objetousando object.Font.
- Ajustaremos el tamaño de fuente de los objetos usando object.FontSize.
- Estableceremos el color de los objetos usando object.Color.
- Configuraremos el borde de color de los objetos usando object.ColorBorder.
- Colocaremos el objeto de objetos en el panel.
- Iniciaremos el panel
int OnInit()
  {
   //buy button
   panel.Create(0,PANEL_NAME,0,10,20,10+PANEL_WIDTH+8,20+PANEL_HIEIGHT);
   buyBtn.Create(0,BUY_BTN_NAME,0,3,40,0,0);
   buyBtn.Width(50);
   buyBtn.Height(ROW_HEIGHT);
   buyBtn.ColorBackground(clrGreen);
   buyBtn.Text("Buy");
   buyBtn.Font("Arial");
   buyBtn.FontSize(10);
   buyBtn.Color(clrBlack);
   buyBtn.ColorBorder(clrBlack);
   panel.Add(buyBtn);
   //sell button
   sellBtn.Create(0,SELL_BTN_NAME,0,63,40,0,0);
   sellBtn.Width(50);
   sellBtn.Height(ROW_HEIGHT);
   sellBtn.ColorBackground(clrRed);
   sellBtn.Text("Sell");
   sellBtn.Font("Arial");
   sellBtn.FontSize(10);
   sellBtn.Color(clrBlack);
   sellBtn.ColorBorder(clrBlack);
   panel.Add(sellBtn);
   //lotSize
   lotSize.Create(0,EDIT_NAME,0,4,10,0,0);
   lotSize.Width(108);
   lotSize.Height(ROW_HEIGHT);
   lotSize.Text("0.01");
   lotSize.Font("Arial");
   lotSize.FontSize(10);
   lotSize.ColorBackground(clrWhite);
   lotSize.Color(clrBlack);
   lotSize.ColorBorder(clrBlack);
   panel.Add(lotSize);
   //run the panel
   panel.Run();
   return(INIT_SUCCEEDED);
  }
En OnDeinit(const int Reason), usaremos Destroy como función de desinicialización, como se muestra a continuación.
void OnDeinit(const int reason)
  {
   panel.Destroy();
  }
Luego habilitaremos la interacción con el panel usando la función OnChartEvent y estableceremos las condiciones para el comportamiento de los botones de compra y venta:
- Después crearemos la función OnChartEvent
- Cuerpo de la función
- Usaremos object.ChartEvent con los parámetros id para el evento, lparam para el tipo de evento long, dparam para el tipo double y sparam para el tipo string.
- Luego comprobaremos si el identificador es igual al clic en el gráfico (Chart Click),
- y comprobaremos si sparam es igual a los nombres buyBtn o SellBtn.
- A continuación, crearemos una variable de lote double y la asignaremos a StringToDouble (tamaño de lote).
- Después abriremos una orden de compra o venta según el tipo de evento, utilizando el valor del lote.
void  OnChartEvent(const int id, const long &lparam, const double &dparam, const string &sparam)
  {
   panel.ChartEvent(id,lparam,dparam,sparam);
   if(id==CHARTEVENT_OBJECT_CLICK)
     {
      if(sparam==buyBtn.Name())
        {
         double lot=StringToDouble(lotSize.Text());
         trade.Buy(lot);
        }
      else
         if(sparam==sellBtn.Name())
           {
            double lot=StringToDouble(lotSize.Text());
            trade.Sell(lot);
           }
     }
  }
Tras compilar y ejecutar el código, veremos el panel en el gráfico:

En la esquina superior izquierda se mostrará un panel con el tamaño del lote, objetos de compra y venta. Podemos editar el tamaño del lote y abrir órdenes.
Después del trabajo realizado, veremos que crear un panel usando clases es más fácil y cómodo. Entonces las clases serán muy útiles y nos ahorrarán mucho tiempo. Sin embargo, si usted es un programador principiante, le aconsejamos estudiar y comprender cómo se crean. Esta es una forma muy buena de mejorar sus habilidades de programación.
Puede mejorar la aplicación creada añadiéndole más funciones.
Conclusión
Las clases son una herramienta valiosa y útil en general, especialmente a la hora de crear paneles que se puedan utilizar en MetaTrader 5. Esto permite a los tráders centrarse más en el comercio. Hoy hemos aprendido qué son los paneles y hemos analizado sus tipos, y también hemos creado un panel simple de dos maneras, asegurándonos de que el uso de las clases Panels y Dialog acelere y simplifique el trabajo.
Espero que el artículo le resulte útil y que la información presentada sea fácil de entender e implementar. También espero que haya obtenido más información sobre el desarrollo de aplicaciones, incluidos los paneles de control, que pueda resultarle útil para sus operaciones.
Para obtener más información sobre clases y objetos, le recomiendo leer uno de mis artículos anteriores , “Programación orientada a objetos (POO) en MQL5”. Si le ha gustado este artículo y lo encuentra útil, lea mis artículos anteriores para aprender cómo desarrollar sistemas comerciales basados en varios indicadores técnicos populares.
Traducción del inglés realizada por MetaQuotes Ltd.
Artículo original: https://www.mql5.com/en/articles/12903
Advertencia: todos los derechos de estos materiales pertenecen a MetaQuotes Ltd. Queda totalmente prohibido el copiado total o parcial.
Este artículo ha sido escrito por un usuario del sitio web y refleja su punto de vista personal. MetaQuotes Ltd. no se responsabiliza de la exactitud de la información ofrecida, ni de las posibles consecuencias del uso de las soluciones, estrategias o recomendaciones descritas.

- Aplicaciones de trading gratuitas
- 8 000+ señales para copiar
- Noticias económicas para analizar los mercados financieros
Usted acepta la política del sitio web y las condiciones de uso
Muchas gracias por tu buen trabajo!
Pero no pude hacerlo funcionar en la "Depuración con datos históricos". -- ¿me he dejado alguna casilla?
encuentra algo:
Debes comprobar el estado del botón en OnTick() porque OnChartEvent() no funciona para EA's en el probador de estrategias.
https://www.mql5.com/en/forum/170896
encuentra algo:
Debes comprobar el estado del botón en OnTick() porque OnChartEvent() no funciona para EA's en el probador de estrategias.
https://www.mql5.com/en/forum/170896
Gracias por tu comentario.
El objetivo principal en este artículo para aclarar cómo se hizo fácil crear un panel simple mediante el uso de clases.
código: "buyBtn.ToolTip ("Haga clic en abrir orden de compra")"
sin éxito
código: "buyBtn.ToolTip ("Haga clic en abrir orden de compra")"
sin éxito