使用MQL5轻松创建图形面板

概述
MQL5为开发人员提供了许多有用的工具,这些工具可以用来简化编码过程,并在节省时间和精力的情况下有效地完成任务。这些有用工具的一个例子是,我们在MQL5中有许多库或类,这些库或类可以用于编写许多应用程序,而无需从头开始构建这些应用程序的代码。例如这些库或类中,就有面板(Panels)和对话框(Dialogs)。在这篇文章中,我们将学习如何使用这些类并使用它们创建应用程序,在阐明使用mql5类在创建MetaTrader5软件时的有用的工具后,我们还将学习,因为我们将介绍创建同一应用程序的两种不同方法。
除此之外,作为一名初学者开发人员,通过从头开始创建应用程序来提高您的编码技能,并通过使用自己的代码编码现成的东西来增强和提高编程逻辑技能,这可能是一个很好的实用内容。如果你是一名交易员,它也可以用作创建一些简单的指导步骤,这些步骤可以用来避免你在交易时分心。如果您是初学mql5的开发人员,它可以作为一个有用的指南来学习如何在MetaTrader 5终端中创建图形面板。在这个简单的指南中,我们将尝试简化事情,以便能够创建简单的图形面板,或者作为开发人员甚至交易员,能够越来越多地深入到这个主题中来创建复杂的面板。
我们将尝试通过以下几点来介绍主题:
我建议您了解MQL5中面向对象编程的主题,因为这将有助于理解本文的主题,如果您想这样做,您可以阅读我关于理解MQL5面向对象编程(OOP)的文章。
图形面板标识
在这一部分中,我们将确定图形面板的含义以及它对我们的交易领域有怎样的作用。面板可以简单地是具有有用功能或信息的图形界面,例如可以用于开立和管理交易、提供有关账户或交易日的信息等的面板。这些面板非常有用,因为它在做事情时节省了时间,或者可以在不以通常的方式进行操作的情况下轻松获得您需要的东西,这可以让我们在交易时更加专注于交易和市场分析。
根据这一点,我们可以根据这些面板和任务上的对象或用户与该面板之间的交互性质来创建或拥有一个自定义面板,我们可以提到其中一些对象,如下所示:
- 数字,
- 字符串,
- 形状,
- 颜色,
- 按钮,
- 等等。
如果你问我们如何自己开发或编码这些类型的面板,我可以回答有两种方法来创建和开发这些面板。第一种方法是困难的方法,因为我们将从头开始编码所有内容,这种方法需要大量的时间和精力,但如果你是一名开发人员,你需要能够并理解如何做到这一点,因为这将提高你的编码技能,即使你不会在工作中使用这种方法,但至少能够理解并自己完成任务。另一种方法是最简单、最流畅的方法,因为您将使用现成的类或库快速有效地完成工作,而不需要花费大量时间和精力。在本文的其余部分中,我们将了解有关可用于创建这些面板的类的更多信息。除此之外,我们将使用上述两种方法创建一个简单的应用程序,以便能够决定并确认使用类是一件有价值的事情。
面板和对话框类
在这一部分中,我们将介绍可以帮助我们轻松创建图形面板的类,我们将参考面板和对话框类,您可以查看MQL5参考了解更多信息,因为我们在本文中只会参考其中的一部分。
现在,让我们确定用于创建控制面板和对话框的类,我们可以说它们是一个库,具有现成的代码来创建或开发交互式面板或应用程序,包括指标和EA交易。它可以在终端数据文件夹中的include文件夹下Controls文件夹中找到。有可用于不同操作的辅助类、基本类、简单类和复杂类。这些类的示例:
| 类 | 包含文件名 (Controls 文件夹) | 描述 |
|---|---|---|
| CLabel | Label.mqh | 它是一个简单的控件类,用于创建简单的不可编辑文本标签 |
| CButton | Button.mqh | 它是一个简单的控件类,用于创建简单的按钮 |
| CEdit | Edit.mqh | 它是一个简单的控件类,使用户可以输入文本 |
| CPanel | Panel.mqh | 它是一个简单的控件类,用于将控件与组中的其他类似功能组合 |
| CCheckBox | CheckBox.mqh | 它是一个复杂的控件类,用于显示复选框,并使用户可以选择它是true还是false |
| CSpinEdit | SpinEdit.mqh | 它是一个复杂的控制类,允许通过递增和递减字段编辑整数值 |
| CDialog | Dialog.mqh | 它是一个复杂的控件类,用于将控件与组中的其他类似功能组合 |
正如我们通过提到的类和其他类所看到的那样,如果我们试图通过普通代码或不使用类来完成这些任务,我们可以使用它们来完成许多任务,这些任务可能需要花费大量的时间和精力。我们可以将同一观点扩展到其他类,哪些可以帮助完成除面板之外的其他任务。如果我们想通过一个简单的例子或应用程序来了解其中的区别,这就是我们在下一部分中要做的。
简单图形面板应用程序
在这一部分中,我们将学习如何创建一个简单的交易面板,该面板可用于在确定手数大小后打开买卖订单。我们将使用两种方法创建这个面板,第一种方法在不使用类的情况下创建我们自己的代码,第二种方法通过使用类来确保和比较使用类的程度将帮助我们顺利轻松地实现目标,并通过不使用类而使用自己的代码创建面板进行学习,因为这将提高我们的编程逻辑和编码技能。
不使用类的图形面板
以下步骤用于创建一个简单的订单面板,以便在确定手数大小后打开买卖订单,而不使用除了“Trade”类之外的其它类,因为我们在本文中关注的是学习创建面板:
使用#include包括Trade 的包含文件,并以trade的名称创建一个用于未结订单的对象
#include <Trade\Trade.mqh>
CTrade trade;
创建一个布尔型打开交易函数,设置订单类型ENUM_ORDR_TYPE变量和交易手数大小双变量。这些是我们将创建的该函数的参数,函数体为:
- 为价格创建一个double型变量
- 设置条件以使用if条件根据订单类型确定价格类型(询价或出价):
- 如果订单类型为买入(buy),则用于打开订单的价格为询价(ask)。
- 如果订单类型为卖出(sell),则价格将为出价(bid)。
- 返回将是用当前交易品种、订单类型、手数大小、价格类型、值为零的止损和获利以及空注释打开仓位。
bool openTrade(ENUM_ORDER_TYPE type, double vol)
  {
   double price;
   if(type==ORDER_TYPE_BUY)
   {
      price=SymbolInfoDouble(Symbol(),SYMBOL_ASK);
   }
   else price=SymbolInfoDouble(Symbol(),SYMBOL_BID);

   return trade.PositionOpen(Symbol(),type,vol,price,0,0,"");
  }
通过在创建类型为枚举 ENUM_BASE_CORNER 的 panelLoc 变量后选择左上角来设置面板位置
const ENUM_BASE_CORNER panelLoc=CORNER_LEFT_UPPER;
在创建x和y的常量整数型变量后设置x和y边距
const int xMargin=20;
const int yMargin=20;
在创建另一个常量整数型变量后,设为x和y设置元件之间的空隙大小
const int xSpace=10;
const int ySpace=10;
在创建四个常量整数变量btnWidth表示按钮宽度、btnHeight表示按钮高度、txtWidth表示文本宽度和txtHeight表示文本高度后,设置作为按钮和文本的元素的大小
const int btnWidth=50;
const int btnHeight=20;
const int txtWidth=(btnWidth*2)+xSpace;
const int txtHeight=20;
设置文本和按钮的位置,我们有文本x、文本y、购买按钮x、购买按钮y、出售按钮x和出售按钮y。我们将为所有这些变量声明const整数型变量,并为每个变量赋值
const int txtX=3;
const int txtY=yMargin+txtHeight;
const int buyX=3;
const int buyY=txtY+ySpace+btnHeight;
const int sellX=buyX+xSpace+btnWidth;
const int sellY=txtY+ySpace+btnHeight;
在为文本、买入按钮、卖出按钮元件创建常量字符串变量后,指定它们的名称
const string txtName="txttVol";
const string buyName="buyBtn";
const string sellName="sellBtn";
创建表示手数大小的double型变量并赋予初值
double lotSize=0.01;
在 OnInit() 部分,我们将会调用随后会创建的 createPanel() 函数
createPanel();
在 OnDeinit 部分,我们将根据名称删除对象
   ObjectDelete(0,txtName);
   ObjectDelete(0,buyName);
   ObjectDelete(0,sellName);
在全局范围内,我们将按照以下步骤创建启用与面板交互的功能
使用 OnChartEvent 函数,它的参数是:
- const int id: 用于事件 ID
- const long &lparam: 用于long型的事件参数
- const double &dparam: 用于 double 型的事件参数
- const string &sparam: 用于 string 类型的事件参数
设置与对象交互的条件文本(手数大小)、购买按钮和出售按钮
//+------------------------------------------------------------------+
//| Interaction function                                             |
//+------------------------------------------------------------------+
void OnChartEvent(const int id, const long &lparam, const double &dparam, const string &sparam)
  {
//--- If the event id is equal to the end of text editing in the panel and the string type event is equal to the text name
   if(id==CHARTEVENT_OBJECT_ENDEDIT && sparam==txtName)
     {
      //--- lotTxt string variable will be equal to the returned property value by using the ObjectGetString function
      string lotTxt=ObjectGetString(0, txtName, OBJPROP_TEXT);
      //--- call setLot function that we will create later with the lotTxt value
      setLot(lotTxt);
      //Setting the property value by using the ObjectSetString
      ObjectSetString(0, txtName, OBJPROP_TEXT, string(lotSize));
      //--- Use return
      return;
     }
//--- If the event id is equal to the object click to check if we click the buy button
   else
      if(id==CHARTEVENT_OBJECT_CLICK)
        {
         //We will check if the string param is equal to buyname
         if(sparam==buyName)
           {
            //--- Setting the value of the property by using the ObjectSetInteger
            ObjectSetInteger(0, buyName, OBJPROP_STATE, false);
            //Calling the created openTrade to open a buy order.
            openTrade(ORDER_TYPE_BUY, lotSize);
            //--- Use return
            return;
           }
         //--- If the event id is equal to the object click to check if we click the sell button
         //--- We will check if the string param is equal to sellname
         else
            if(sparam==sellName)
              {
               //--- Setting the value of the property by using the ObjectSetInteger
               ObjectSetInteger(0, sellName, OBJPROP_STATE, false);
               //Calling the created openTrade to open a sell order
               openTrade(ORDER_TYPE_SELL, lotSize);
               //--- Use return
               return;
              }
        }
  }
通过以下步骤创建我们之前在OnInit()部分中调用的void createPanel函数:
- 删除名称为 txtName, buyName, 和 sellName 的对象。
- 调用 EditCreate 函数。
- 调用 ButtonCreate 函数用于买入按钮。
- 调用 ButtonCreate 函数用于卖出按钮。
//+------------------------------------------------------------------+
//|createPanel function                                              |
//+------------------------------------------------------------------+
void createPanel()
  {
//--- Delete objects of txtName, buyName, and sellName
   ObjectDelete(0, txtName);
   ObjectDelete(0, buyName);
   ObjectDelete(0, sellName);
//--- calling the EditCreate function
   EditCreate(             // Parameters:
      0,                   // const long (chart_ID): to specify the chart's ID, we will use (0).
      txtName,             // const string (name): to specify the button name,  we will use (txtName)
      0,                   // const int (sub_window): to specify the subwindow index, we will use (0) for the main window
      txtX,                // const int (x): to specify the X coordinate, we will use (txtX)
      txtY,                // const int (y): to specify the Y coordinate, we will use (txtY)
      txtWidth,            // const int (width):to specify the button width, we will use (txtWidth)
      txtHeight,           // const int (height): to specify the button height, we will use (txtHeight)
      string(lotSize),     // const string (text): to specify the text, we will use (lotSize)
      "Arial",             // const string (font): to specify the font, we will use "Arial"
      10,                  // const int (font_size): to specify the font size, we will use (10)
      ALIGN_LEFT,          // const ENUM_ALIGN_MODE (align_mode): to specify the position of text, we will use (ALIGN_LEFT)
      false,               // const bool (read_only=false): to specify the ability to edit, we will be (false)
      panelLoc,            // const ENUM_BASE_CORNER (corner): to specify the chart corner for anchoring, we will call panelLoc function
      clrBlack,            // const color (clr): to specify the text color, we will specify clrBlack
      clrWhite,            // const color (back_clr): to specify the background color, we will specify clrWhite
      clrBlack,            // const color (border_clr): to specify the border color, we will specify clrBlack
      false,               // const bool (back=false): in the background, we will set false
      false,               // const bool (selection=false): highlight to move, we will set false
      false,               // const bool (hidden): hidden in the object list, we will set false
      0);                  // const long (z_order=0): priority for a mouse click, we will use (0)
//--- calling the ButtonCreate function for the buy
   ButtonCreate(           // Parameters:
      0,                   // const long (chart_ID): to specify the chart's ID, we will use (0)
      buyName,             // const string (name): to specify the button name, we will use (buyName) for the buy button
      0,                   // const int (sub_window): to specify the subwindow index, we will use (0) for the main window
      buyX,                // const int (x): to specify the X coordinate, we will use (buyX) for buy
      buyY,                // const int (y): to specify the Y coordinate, we will use (buyY) for buy
      btnWidth,            // const int (width): to specify the button width, we will use (btnWidth) for buy
      btnHeight,           // const int (height): to specify the button height, we will use (btnHeight) for buy
      panelLoc,            // const ENUM_BASE_CORNER (corner): to specify the chart corner for anchoring, we will call panelLoc function for buy button
      "Buy",               // const string (text): to specify the text, we will use ("Buy") for the buy button
      "Arial",             // const string (font): to specify the font, we will use "Arial"
      10,                  // const int (font_size): to specify the font size, we will use (10)
      clrBlack,            // const color (clr): to specify the text color, we will specify clrBlack
      clrGreen,            // const color (back_clr): to specify the background color, we will specify clrGreen for the buy button
      clrBlack,            // const color (border_clr): to specify the border color, we will specify clrBlack
      false,               // const bool (state): to specify if the object is pressed or released, we will specify false
      false,               // const bool (back=false): in the background, we will set false
      false,               // const bool (selection=false): highlight to move, we will set false
      false,               // const bool (hidden): hidden in the object list, we will set false
      0);                  // const long (z_order=0): priority for mouse click, we will use (0) for buy button
//--- calling the ButtonCreate function for the sell
   ButtonCreate(          //Parameters:
      0,                   //const long (chart_ID): to specify the chart's ID, we will use (0)
      sellName,            //const string (name): to specify the button name, we will use (sellName) for the sell button
      0,                   //const int (sub_window): to specify the subwindow index, we will use (0) for the main window
      sellX,               //const int (x): to specify the X coordinate, we will use (sellX) for sell
      sellY,               //const int (y): to specify the Y coordinate, we will use (sellY)
      btnWidth,            //const int (width): to specify the button width, we will use (btnWidth) for sell
      btnHeight,           //const int (height): to specify the button height, we will use (btnHeight) for sell
      panelLoc,            //const ENUM_BASE_CORNER (corner): to specify the chart corner for anchoring, we will call panelLoc function for sell button
      "Sell",              //const string (text): to specify the text, we will use ("Sell") for the sell button
      "Arial",             //const string (font): to specify the font, we will use "Arial"
      10,                  //const int (font_size): to specify the font size, we will use (10)
      clrBlack,            //const color (clr): to specify the text color, we will specify clrBlack
      clrRed,              //const color (back_clr): to specify the background color, we will specify clrRed for the sell button
      clrBlack,            //const color (border_clr): to specify the border color, we will specify clrBlack
      false,               //const bool (state): to specify if the object is pressed or released, we will specify false
      false,               //const bool (back=false): in the background, we will set false
      false,               //const bool (selection=false): highlight to move, we will set false
      false,               //const bool (hidden): hidden in the object list, we will set false
      0);                  //const long (z_order=0): priority for mouse click, we will use (0) for sell button
  }
使用一个参数创建void setLot函数,该参数是用于lotSize的lotTxt,函数的主体如下所示:
- 创建一个 double 型 newLot变量,并在使用StringToDouble函数将其从字符串转换为双后将其分配给lotTxt。
- 检查newLot变量是否小于0,我们需要一条打印消息“Invalid Volume Specified”(指定的交易量无效),然后使用return。
- 返回与lotSize相同的newLot值。
void setLot(string lotTxt)
  {
   double newLot=StringToDouble(lotTxt);
   if(newLot<0)
     {
      Print("Invaid Volume Specified");
      return;
     }
   lotSize=newLot;
  }
通过以下步骤创建EditCreate函数:
//+------------------------------------------------------------------+
//|EditCreate function                                               |
//+------------------------------------------------------------------+
bool EditCreate(const long             chart_ID=0,
                const string           name="Edit",
                const int              sub_window=0,
                const int              x=0,
                const int              y=0,
                const int              width=50,
                const int              height=18,
                const string           text="Text",
                const string           font="Arial",
                const int              font_size=10,
                const ENUM_ALIGN_MODE  align=ALIGN_CENTER,
                const bool             read_only=false,
                const ENUM_BASE_CORNER corner=CORNER_LEFT_UPPER,
                const color            clr=clrBlack,
                const color            back_clr=clrWhite,
                const color            border_clr=clrNONE,
                const bool             back=false,
                const bool             selection=false,
                const bool             hidden=true,
                const long             z_order=0)
  {
//--- Reset the error value by using ResetLastError()
   ResetLastError();
//--- Create an edit field
   if(!ObjectCreate(chart_ID, name, OBJ_EDIT, sub_window, 0, 0))
     {
      Print(__FUNCTION__,
            ": failed to create \"Edit\" object! Error code = ", GetLastError());
      return(false);
     }
//--- Setting the object coordinates x and y by using the ObjectSetInteger
   ObjectSetInteger(chart_ID, name, OBJPROP_XDISTANCE, x);
   ObjectSetInteger(chart_ID, name, OBJPROP_YDISTANCE, y);
//--- Setting the object size by using the ObjectSetInteger function also
   ObjectSetInteger(chart_ID, name, OBJPROP_XSIZE, width);
   ObjectSetInteger(chart_ID, name, OBJPROP_YSIZE, height);
//--- Setting the text by using ObjectSetString function
   ObjectSetString(chart_ID, name, OBJPROP_TEXT, text);
//--- Setting the text font by using the ObjectSetString function also
   ObjectSetString(chart_ID, name, OBJPROP_FONT, font);
//--- Setting the font size by using the ObjectSetInteger function
   ObjectSetInteger(chart_ID, name, OBJPROP_FONTSIZE, font_size);
//--- Setting the type of text alignment in the object
   ObjectSetInteger(chart_ID, name, OBJPROP_ALIGN, align);
//--- Setting the ability to edit, enable if it is (true) or cancel (false) if you need a read-only mode
   ObjectSetInteger(chart_ID, name, OBJPROP_READONLY, read_only);
//--- Setting the chart's corner, relative to which object coordinates are defined to set the location of the object.
   ObjectSetInteger(chart_ID, name, OBJPROP_CORNER, corner);
//--- Setting the text color
   ObjectSetInteger(chart_ID, name, OBJPROP_COLOR, clr);
//--- Setting the background color
   ObjectSetInteger(chart_ID, name, OBJPROP_BGCOLOR, back_clr);
//--- Setting the border color of the object
   ObjectSetInteger(chart_ID, name, OBJPROP_BORDER_COLOR, border_clr);
//--- Displaying in the foreground by (false) or in the background by (true)
   ObjectSetInteger(chart_ID, name, OBJPROP_BACK, back);
//--- Setting (true) to enable or (false) to disable the mode of moving the label by mouse
   ObjectSetInteger(chart_ID, name, OBJPROP_SELECTABLE, selection);
   ObjectSetInteger(chart_ID, name, OBJPROP_SELECTED, selection);
//--- Setting (true) if you need hiding or (false) if you need the display of graphical object name in the object list
   ObjectSetInteger(chart_ID, name, OBJPROP_HIDDEN, hidden);
//--- Setting the priority for receiving the event of a mouse click in the chart
   ObjectSetInteger(chart_ID, name, OBJPROP_ZORDER, z_order);
//--- Returning (true) if successful execution
   return(true);
  }
通过与EditCreate函数前面的参数相同的方法创建ButtonCreate函数,只是略有不同
bool ButtonCreate(const long              chart_ID=0,
                  const string            name="Button",
                  const int               sub_window=0,
                  const int               x=0,
                  const int               y=0,
                  const int               width=50,
                  const int               height=18,
                  const ENUM_BASE_CORNER  corner=CORNER_LEFT_UPPER,
                  const string            text="Button",
                  const string            font="Arial",
                  const int               font_size=10,
                  const color             clr=clrBlack,
                  const color             back_clr=C'236,233,216',
                  const color             border_clr=clrNONE,
                  const bool              state=false,
                  const bool              back=false,
                  const bool              selection=false,
                  const bool              hidden=true,
                  const long              z_order=0)
  {
   ResetLastError();
   if(!ObjectCreate(chart_ID,name,OBJ_BUTTON,sub_window,0,0))
     {
      Print(__FUNCTION__,
            ": failed to create the button! Error code = ",GetLastError());
      return(false);
     }
   ObjectSetInteger(chart_ID,name,OBJPROP_XDISTANCE,x);
   ObjectSetInteger(chart_ID,name,OBJPROP_YDISTANCE,y);
   ObjectSetInteger(chart_ID,name,OBJPROP_XSIZE,width);
   ObjectSetInteger(chart_ID,name,OBJPROP_YSIZE,height);
   ObjectSetInteger(chart_ID,name,OBJPROP_CORNER,corner);
   ObjectSetString(chart_ID,name,OBJPROP_TEXT,text);
   ObjectSetString(chart_ID,name,OBJPROP_FONT,font);
   ObjectSetInteger(chart_ID,name,OBJPROP_FONTSIZE,font_size);
   ObjectSetInteger(chart_ID,name,OBJPROP_COLOR,clr);
   ObjectSetInteger(chart_ID,name,OBJPROP_BGCOLOR,back_clr);
   ObjectSetInteger(chart_ID,name,OBJPROP_BORDER_COLOR,border_clr);
   ObjectSetInteger(chart_ID,name,OBJPROP_BACK,back);
   ObjectSetInteger(chart_ID,name,OBJPROP_STATE,state);
   ObjectSetInteger(chart_ID,name,OBJPROP_SELECTABLE,selection);
   ObjectSetInteger(chart_ID,name,OBJPROP_SELECTED,selection);
   ObjectSetInteger(chart_ID,name,OBJPROP_HIDDEN,hidden);
   ObjectSetInteger(chart_ID,name,OBJPROP_ZORDER,z_order);
   return(true);
  }
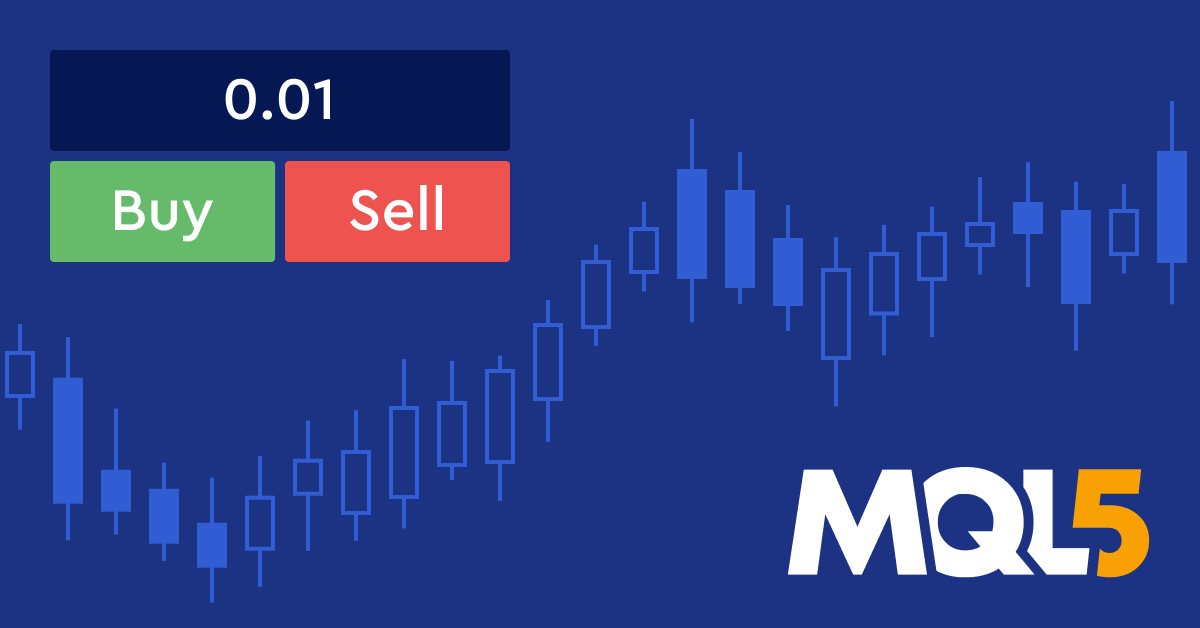
编译代码并执行后,我们可以发现面板显示如下:

正如我们在左上角的前一张图片中所看到的,我们有一个面板,上面有手数大小和两个按钮,即买入和卖出,我们可以指定我们需要的手数大小,并根据我们需要的类型按下买入或卖出下订单。这是我们说过的第一种方法,我们将在不使用Panels或Dialogs类的情况下创建这个面板,因为我们发现这个方法需要很多行代码,现在,我们需要使用Panels和Dialogs类创建同一个面板,通过比较这两种方法来评估和检查复杂性或长代码。
使用类的图形面板
下面是使用所需类创建同一面板的第二种方法,以下是创建同一个面板的步骤。
包括我们需要在程序中使用其组件的文件或类,它们是Dialog、Button、Edit和Trade。正如我们所知,这可以通过使用#include命令来完成。
#include <Controls\Dialog.mqh>
#include <Controls\Button.mqh>
#include <Controls\Edit.mqh>
#include <Trade\Trade.mqh>
使用 #define 宏替换(预处理器指令)为常量分配助记符名称,这些名称与以下内容相同:
- PANEL_NAME "Order Panel"
- PANEL_WIDTH 116
- PANEL_HIEIGHT 100
- ROW_HEIGHT 20
- BUY_BTN_NAME "Buy BTN"
- SELL_BTN_NAME "Sell BTN"
- CLOSE_BTN_NAME "Close BTN"
- EDIT_NAME "Lot Size"
#define PANEL_NAME "Order Panel"
#define PANEL_WIDTH 116
#define PANEL_HIEIGHT 100
#define ROW_HEIGHT 20
#define BUY_BTN_NAME "Buy BTN"
#define SELL_BTN_NAME "Sell BTN"
#define CLOSE_BTN_NAME "Close BTN"
#define EDIT_NAME "Lot Size"
根据与以下相同的类创建对象
CAppDialog panel;
CButton buyBtn;
CButton sellBtn;
CButton closeBtn;
CEdit lotSize;
CTrade trade;
在OnInit()部分中,我们需要使用创建的对象面板来创建面板对象, panel.Create及其参数为:
- const long chart, 我们将使用 0,这样面板就出现在主图表上
- const string name, 我们将使用 PANEL_NAME
- const int subwin, 我们将使用 0
- const int x1, 我们将使用 10
- const int y1, 我们将使用 20
- const int x2, 我们将使用 10+PANEL_WIDTH+8
- const int y2, 我们将使用 20+PANEL_HIEIGHT
panel.Create(0,PANEL_NAME,0,10,20,10+PANEL_WIDTH+8,20+PANEL_HIEIGHT);
按照以下步骤创建和设置买入和卖出按钮:
- 使用 object.Create 来创建对象
- 使用 object.Width 来设置买入和卖出对象的宽度
- 使用 object.Height 来设置买入和卖出对象的高度。
- 使用object.ColorBackground 来设置对象的背景颜色。
- 使用 object.Text 来设置对象的文本
- 使用 object.Font 来设置对象的字体。
- 使用 object.FontSize 来设置对象的字体大小。
- 使用 object.Color 来设置对象的颜色。
- 使用 object.ColorBorder 来设置对象的边框颜色。
- 把对象放置在面板上,
- 然后运行面板。
int OnInit()
  {
   //buy button
   panel.Create(0,PANEL_NAME,0,10,20,10+PANEL_WIDTH+8,20+PANEL_HIEIGHT);
   buyBtn.Create(0,BUY_BTN_NAME,0,3,40,0,0);
   buyBtn.Width(50);
   buyBtn.Height(ROW_HEIGHT);
   buyBtn.ColorBackground(clrGreen);
   buyBtn.Text("Buy");
   buyBtn.Font("Arial");
   buyBtn.FontSize(10);
   buyBtn.Color(clrBlack);
   buyBtn.ColorBorder(clrBlack);
   panel.Add(buyBtn);
   //sell button
   sellBtn.Create(0,SELL_BTN_NAME,0,63,40,0,0);
   sellBtn.Width(50);
   sellBtn.Height(ROW_HEIGHT);
   sellBtn.ColorBackground(clrRed);
   sellBtn.Text("Sell");
   sellBtn.Font("Arial");
   sellBtn.FontSize(10);
   sellBtn.Color(clrBlack);
   sellBtn.ColorBorder(clrBlack);
   panel.Add(sellBtn);
   //lotSize
   lotSize.Create(0,EDIT_NAME,0,4,10,0,0);
   lotSize.Width(108);
   lotSize.Height(ROW_HEIGHT);
   lotSize.Text("0.01");
   lotSize.Font("Arial");
   lotSize.FontSize(10);
   lotSize.ColorBackground(clrWhite);
   lotSize.Color(clrBlack);
   lotSize.ColorBorder(clrBlack);
   panel.Add(lotSize);
   //run the panel
   panel.Run();
   return(INIT_SUCCEEDED);
  }
在 OnDeinit(const int reason)部分,我们使用Destroy作为去初始化函数,如下所示
void OnDeinit(const int reason)
  {
   panel.Destroy();
  }
通过使用 OnChartEvent 功能启用与面板的交互,并设置买入和卖出按钮行为的条件,如下所示:
- 创建 OnChartEvent 函数
- 函数体
- 使用 object.ChartEvent 方法,参数为:id为事件, lparam是事件的long型参数,dparam是事件的double型参数,sparam是事件的string型参数。
- 检查id是否等于点击了图表
- 检查sparam是否等于buyBtn或者sellBtn的名称
- 创建一个表示手数的double型变量并把它赋予 StringToDouble(手数大小值)
- 使用手数大小值根据事件类型打开买入或卖出订单
void  OnChartEvent(const int id, const long &lparam, const double &dparam, const string &sparam)
  {
   panel.ChartEvent(id,lparam,dparam,sparam);
   if(id==CHARTEVENT_OBJECT_CLICK)
     {
      if(sparam==buyBtn.Name())
        {
         double lot=StringToDouble(lotSize.Text());
         trade.Buy(lot);
        }
      else
         if(sparam==sellBtn.Name())
           {
            double lot=StringToDouble(lotSize.Text());
            trade.Sell(lot);
           }
     }
  }
编译代码并执行其可执行文件后,我们可以发现面板附在图表上,如下图所示:

正如我们在左上角的前一张图片中所看到的,我们有一个面板,上面有手数大小、购买和出售对象,我们可以编辑手数大小和打开的订单。
在用两种不同的方法学习和创建同一个面板后,我们可以注意到,我们使用类创建面板比不使用类创建更容易、更流畅。因此,类非常有帮助,可以让我们轻松地编写代码并节省大量时间,但我给你的建议是,如果你是一名开发人员,你可以尝试学习和理解如何在任何编程语言中创建现成的东西,如这些类或内置函数,因为这是提高你的编码和编程技能以及逻辑的一个非常好的方法,当你编写代码时,你可以使用类,因为这将帮助你更流畅、更容易地编写代码,同时节省你做重复任务的时间。
在学习了如何创建这种类型的面板后,值得一提的是,正如我们所说,这是一个简单的应用程序,您可以通过使用它可以完成的更多功能来越来越多地开发它。因为面板可以像我们提到的那样简单,也可以非常复杂,并且有更多的工具和功能。这里的目标是在确定这些类的重要性和价值后,了解如何使用它们。
结论
在本文的最后,我们可以得出结论,使用类通常是一件有价值和有帮助的事情,特别是在创建可在MetaTrader 5中使用的面板时,这对交易员来说很有用,因为它在很多事情上都有帮助,使他们能够专注于交易本身和市场,而无需执行许多基本任务。我们还了解了哪些面板及其类型的示例,了解了可用于轻松创建这些面板的面板和对话框类,并通过在不使用Panels和Dialog类的情况下使用普通代码通过两种不同的方法创建一个简单的面板作为应用程序,以及通过使用它们来查看不使用类时可以消耗多少时间和精力,来确认这些类的有用性。
我希望你能发现这篇文章对你有用,并发现所提供的信息易于理解和实现。我也希望你能对如何开发更多提到的应用程序有更多的见解,或者如何开发和深入研究,创建对你的交易有用的更有用的面板,或者如果你是一个初学mql5的开发人员,我希望你能学到一些新的东西,并对如何使用类这一重要主题有更多的了解。
如果你想了解和了解更多关于类和对象的信息,我建议你阅读我之前的文章了解MQL5中的面向对象编程(OOP),它可以帮助你开始掌握这个主题。如果你想了解如何使用最流行的技术指标创建交易系统,你可以通过我的出版物部分阅读我以前的文章,我希望你觉得它们有用。
本文由MetaQuotes Ltd译自英文
原文地址: https://www.mql5.com/en/articles/12903
注意: MetaQuotes Ltd.将保留所有关于这些材料的权利。全部或部分复制或者转载这些材料将被禁止。
本文由网站的一位用户撰写,反映了他们的个人观点。MetaQuotes Ltd 不对所提供信息的准确性负责,也不对因使用所述解决方案、策略或建议而产生的任何后果负责。

非常感谢你的出色代码工作!
但我无法在 "调试历史数据 "中正常工作。-- 我是不是漏掉了一些复选框?
您必须在 OnTick() 中检查按钮状态,因为 OnChartEvent() 在策略测试器中 对 EA 无效。
https://www.mql5.com/en/forum/170896
您必须在 OnTick() 中检查按钮状态,因为 OnChartEvent() 在策略测试器中 对 EA 无效。
https://www.mql5.com/en/forum/170896
感谢您的评论。
本文的主要目的是阐明如何通过使用类来轻松创建一个简单的面板。
代码: "buyBtn.ToolTip ("Click open buy order")"
不成功
代码:"buyBtn.ToolTip ("Click open buy order")"
不成功