MQL5에서 더욱 쉬워진 그래픽 패널 제작

소개
MQL5는 개발자에게 코딩 프로세스를 간소화하고 시간과 노력을 절약하여 효과적으로 작업을 수행하는 데 사용할 수 있는 많은 유용한 도구를 제공합니다. MQL5에서 이러한 유용한 도구의 예를 들자면 애플리케이션의 코드를 처음부터 작성하지 않고도 많은 애플리케이션을 코딩하는 데 사용할 수 있는 많은 라이브러리와 클래스가 있습니다. 패널 및 대화 상자를 그 예로 들어 보겠습니다. 이 기사에서는 이러한 클래스를 사용하는 방법과 이를 사용하여 애플리케이션을 만드는 방법에 대해 알아보고 동일한 애플리케이션을 만드는데 사용되는 두 가지의 방법을 제시함으로써 mql5 클래스를 사용하는 것이 MetaTrader5 소프트웨어를 만들 때 얼마나 유용한지 배우게 될 것입니다.
또한 이 글을 통해 나만의 코드로 기성 제품을 코딩하여 프로그래밍 논리 능력을 향상시킬 수 있는 애플리케이션을 만들어 봄으로써 초보 개발자로서 여러분의 코딩 능력을 향상시킬 수 있는 기회를 가져볼 것입니다. 또한 트레이딩 중 주의가 산만해지는 것을 방지하는 데에도 사용될 수 있을 것입니다. 초급 mql5 개발자라면 MetaTrader 5 터미널에서 그래픽 패널을 만드는 방법을 배우는 가이드로도 사용할 수 있습니다. 이 간단한 가이드에서는 간단한 그래픽 패널을 만들거나 좀더 복잡한 패널을 만들는 과정 각각에 대해 더 자세히 알아볼 수 있도록 작업을 단순화하려고 노력할 것입니다.
우리는 다음 사항을 통해 주제를 다루려고 합니다:
이 글의 주제를 이해하는 데 도움이 될 것이므로 MQL5의 객체 지향 프로그래밍 주제에 대한 지식이 있는 것이 좋으며, 그렇게 하려면 MQL5 객체 지향 프로그래밍(OOP)의 이해란 제목의 제 글을 읽어 보시기 바랍니다.
그래픽 패널 식별
이 부분에서는 그래픽 패널이 무엇을 의미하는지 그리고 트레이딩에서 어떻게 유용하게 사용할 수 있는지 알아볼 것입니다. 패널은 단순히 거래를 개시하고 관리하는 데 사용할 수 있는 패널, 계좌 또는 거래일에 대한 정보를 제공하는 패널 등 유용한 기능이나 정보가 있는 그래픽 인터페이스입니다. 패널은 개별 과정을 뛰어넘어 필요한 정보를 쉽게 얻을 수 있어 매우 유용하여 시간을 절약하게 하고 거래하는 동안 트레이딩과 시장 분석에 더 집중할 수 있게 해줍니다.
이러한 패널의 객체와 작업 또는 사용자와 패널 간의 상호 작용의 특성에 따라 사용자 지정 패널을 만들 수 있으며 이러한 객체는 다음과 같습니다.
- 숫자,
- 문자열,
- 도형,
- 색상,
- 버튼,
- 기타
여러분이 이러한 유형의 패널을 직접 개발하거나 코딩하는 방법을 묻는다면 저는 두 가지 방법이 있다고 답할 수 있습니다. 첫 번째 방법은 모든 것을 처음부터 코딩하는 것입니다. 이는 어려운 방법이며 이 방법은 많은 시간과 노력이 필요하지만 개발자라면 이 방법을 실제 사용하지 않더라도 자신의 코딩 기술을 향상시킬 수 있습니다. 적어도 혼자서 그 작업을 이해하고 수행할 수 있어야 합니다. 다른 방법은 기성품의 클래스나 라이브러리를 사용하여 많은 시간과 노력을 들이지 않고도 빠르고 효과적으로 작업을 수행하는 것입니다. 이 방법은 가장 쉬운 방법입니다. 이 글의 나머지 부분에서는 이러한 패널을 만드는 데 사용할 수 있는 클래스에 대해 자세히 알아보겠습니다. 그 외에도 앞서 언급한 두 가지 방법을 사용하여 클래스를 사용하는 것이 어떠한지를 보여주는 간단한 애플리케이션을 만들어 보겠습니다.
패널 및 대화 상자 클래스
이 부분에서는 그래픽 패널을 쉽게 생성하는 데 도움이 되는 클래스에 대해 설명할 것입니다. 우리는 또한 패널 및 대화 상자 클래스를 참조할 것입니다. 이에 대해서는 이 글에서는 일부만 언급하므로 자세한 내용은 MQL5 참조에서 확인하실 수 있습니다.
이제 제어 패널 및 대화 상자를 만들기 위한 클래스에 대해 우리는 지표 및 EA를 포함한 대화형 패널 또는 애플리케이션을 만들거나 개발할 수 있는 기성 코드가 있는 라이브러리라고 말할 수 있습니다. 클래스는 include 폴더의 컨트롤 폴더에 있는 터미널 데이터 폴더에서 찾을 수 있으며 다양한 작업에 사용할 수 있는 보조, 기본, 단순, 복합 클래스가 있습니다. 이러한 클래스의 예입니다:
| 클래스 | 파일 이름 포함(컨트롤 폴더) | 설명 |
|---|---|---|
| CLabel | Label.mqh | 편집할 수 없는 간단한 텍스트 레이블을 만드는 간단한 컨트롤 클래스입니다. |
| CButton | Button.mqh | 간단한 버튼을 만드는 간단한 컨트롤 클래스입니다. |
| CEdit | Edit.mqh | 사용자가 텍스트를 입력할 수 있는 간단한 컨트롤 클래스입니다. |
| CPanel | Panel.mqh | 컨트롤을 그룹 내 다른 유사한 함수와 결합하는 간단한 컨트롤 클래스입니다. |
| CCheckBox | CheckBox.mqh | 확인란을 표시하고 사용자가 참인지 거짓인지 선택할 수 있는 복잡한 컨트롤 클래스입니다. |
| CSpinEdit | SpinEdit.mqh | 증가 및 감소 필드로 정수 값을 편집할 수 있는 복잡한 컨트롤 클래스입니다. |
| CDialog | Dialog.mqh | 컨트롤을 그룹에 있는 다른 여러 함수와 결합하는 복잡한 컨트롤 클래스입니다. |
앞서 언급한 클래스 등을 통해 알 수 있듯이 클래스를 사용하면 많은 시간과 노력이 필요한 작업을 쉽게 수행할 수 있으며 이는 패널을 제외한 다른 작업을 수행하는 데 도움이 될 수 있는 다른 클래스도 마찬가지입니다. 간단한 예제나 애플리케이션을 통해 그 차이에 대해 다음 파트에서 살펴보도록 하겠습니다.
간단한 그래픽 패널 애플리케이션
이 파트에서는 랏 크기를 결정한 후 매수 및 매도 주문을 여는 데 사용할 수 있는 간단한 트레이딩 패널을 만드는 방법을 알아보겠습니다. 첫 번째는 클래스를 사용하지 않고 직접 코드를 작성하는 방법, 두 번째는 클래스를 사용하여 패널을 작성하는 방법 이 두 가지 방법을 살펴보며 클래스를 사용하는 것이 얼마나 쉽고 원활하게 목적을 달성하는 데 도움이 되는지 확인하고 클래스를 사용하지 않고 직접 코드를 통해 패널을 작성하는 것은 프로그래밍 로직과 코딩 실력을 향상시킬 수 있다는 것을 배워보도록 하겠습니다.
클래스가 없는 그래픽 패널
우리는 "Trade" 클래스를 사용하지 않은 채 랏 크기를 결정한 후 매수 및 매도 주문을 하는 간단한 주문 패널을 만드는 단계를 알아볼 것입니다.
#include를 사용하여 Trade 인클루드 파일을 포함하고 진입에 사용할 거래라는 이름으로 객체를 만듭니다.
#include <Trade\Trade.mqh>
CTrade trade;
ENUM_ORDER_TYPE 변수와 거래의 랏 크기 더블 변수를 설정하기 위한 주문 유형을 설정하는 부울 오픈 거래 함수를 만듭니다. 이는 우리가 생성할 함수이자 함수의 본문이 될 것입니다:
- 가격의 더블 변수 만들기
- if 조건문을 사용하여 주문 유형에 따라 호가 유형(매도 또는 매수)을 결정하도록 조건을 설정합니다:
- 주문 유형이 매수인 경우 주문을 하는 데 사용되는 가격은 ask입니다.
- 주문 유형이 매도인 경우 가격은 bid가 됩니다.
- 반환은 현재 심볼, 주문 유형, 랏 크기, 가격 유형, 손절 및 익절의 제로값, 빈 코멘트로 포지션을 개시합니다.
bool openTrade(ENUM_ORDER_TYPE type, double vol)
  {
   double price;
   if(type==ORDER_TYPE_BUY)
   {
      price=SymbolInfoDouble(Symbol(),SYMBOL_ASK);
   }
   else price=SymbolInfoDouble(Symbol(),SYMBOL_BID);

   return trade.PositionOpen(Symbol(),type,vol,price,0,0,"");
  }
생성자 ENUM_BASE_CORNER panelLoc 변수를 생성한 후 왼쪽 상단 모서리를 선택하여 패널 위치를 설정합니다.
const ENUM_BASE_CORNER panelLoc=CORNER_LEFT_UPPER;
x와 y의 정수 변수를 생성한 후 x와 y 여백 설정하기
const int xMargin=20;
const int yMargin=20;
다른 정수 변수를 생성한 후 x와 y의 요소 사이에 공백 설정하기
const int xSpace=10;
const int ySpace=10;
버튼 너비인 btnWidth, 버튼 높이인 btnHeight, 텍스트 너비인 txtWidth, 텍스트 높이인 txtHight의 정수 변수 4개를 생성한 후 버튼과 텍스트인 요소의 크기를 설정합니다.
const int btnWidth=50;
const int btnHeight=20;
const int txtWidth=(btnWidth*2)+xSpace;
const int txtHeight=20;
텍스트와 버튼의 위치 설정에는 텍스트 x, 텍스트 y, 매수 버튼 x, 매수 버튼 y, 매도 버튼 x, 매도 버튼 y가 있습니다. 모든 변수에 대해 const 정수 변수를 선언하고 각각에 값을 할당합니다.
const int txtX=3;
const int txtY=yMargin+txtHeight;
const int buyX=3;
const int buyY=txtY+ySpace+btnHeight;
const int sellX=buyX+xSpace+btnWidth;
const int sellY=txtY+ySpace+btnHeight;
텍스트, 매수 버튼 및 매도 버튼 요소에 대한 const 문자열 변수를 생성한 후 해당 요소의 이름을 할당합니다.
const string txtName="txttVol";
const string buyName="buyBtn";
const string sellName="sellBtn";
초기 값으로 랏 크기 이중 변수 만들기
double lotSize=0.01;
OnInit() 부분에서는 나중에 생성할 createPanel() 함수를 호출합니다.
createPanel();
OnDeinit 부분에서는 객체명을 사용하여 객체를 삭제합니다.
   ObjectDelete(0,txtName);
   ObjectDelete(0,buyName);
   ObjectDelete(0,sellName);
글로벌 범위에서 아래 단계에 따라 패널과 상호 작용할 수 있는 함수를 만들 것입니다.
OnChartEven 함수와 그 매개변수를 사용하는 방법은 다음과 같습니다:
- const int id: 이벤트 ID
- const long &lparam: 롱 타입 이벤트의 매개변수입니다.
- const double &dparam: 더블 타입 이벤트의 매개변수입니다.
- const string &sparam: 문자열 유형 이벤트의 매개변수입니다.
객체 텍스트(랏 크기), 매수 버튼, 매도 버튼과 상호 작용하는 조건 설정
//+------------------------------------------------------------------+
//| Interaction function                                             |
//+------------------------------------------------------------------+
void OnChartEvent(const int id, const long &lparam, const double &dparam, const string &sparam)
  {
//--- If the event id is equal to the end of text editing in the panel and the string type event is equal to the text name
   if(id==CHARTEVENT_OBJECT_ENDEDIT && sparam==txtName)
     {
      //--- lotTxt string variable will be equal to the returned property value by using the ObjectGetString function
      string lotTxt=ObjectGetString(0, txtName, OBJPROP_TEXT);
      //--- call setLot function that we will create later with the lotTxt value
      setLot(lotTxt);
      //Setting the property value by using the ObjectSetString
      ObjectSetString(0, txtName, OBJPROP_TEXT, string(lotSize));
      //--- Use return
      return;
     }
//--- If the event id is equal to the object click to check if we click the buy button
   else
      if(id==CHARTEVENT_OBJECT_CLICK)
        {
         //We will check if the string param is equal to buyname
         if(sparam==buyName)
           {
            //--- Setting the value of the property by using the ObjectSetInteger
            ObjectSetInteger(0, buyName, OBJPROP_STATE, false);
            //Calling the created openTrade to open a buy order.
            openTrade(ORDER_TYPE_BUY, lotSize);
            //--- Use return
            return;
           }
         //--- If the event id is equal to the object click to check if we click the sell button
         //--- We will check if the string param is equal to sellname
         else
            if(sparam==sellName)
              {
               //--- Setting the value of the property by using the ObjectSetInteger
               ObjectSetInteger(0, sellName, OBJPROP_STATE, false);
               //Calling the created openTrade to open a sell order
               openTrade(ORDER_TYPE_SELL, lotSize);
               //--- Use return
               return;
              }
        }
  }
다음 단계를 통해 앞서 OnInit() 부분에서 호출했던 void createPanel 함수를 생성합니다:
- txtName, buyName 및 sellName의 객체 삭제
- EditCreate 함수를 호출합니다.
- 매도 버튼을 위한 ButtonCreate 함수를 호출합니다.
- 매수 버튼을 위한 ButtonCreate 함수를 호출합니다.
//+------------------------------------------------------------------+
//|createPanel function                                              |
//+------------------------------------------------------------------+
void createPanel()
  {
//--- Delete objects of txtName, buyName, and sellName
   ObjectDelete(0, txtName);
   ObjectDelete(0, buyName);
   ObjectDelete(0, sellName);
//--- calling the EditCreate function
   EditCreate(             // Parameters:
      0,                   // const long (chart_ID): to specify the chart's ID, we will use (0).
      txtName,             // const string (name): to specify the button name,  we will use (txtName)
      0,                   // const int (sub_window): to specify the subwindow index, we will use (0) for the main window
      txtX,                // const int (x): to specify the X coordinate, we will use (txtX)
      txtY,                // const int (y): to specify the Y coordinate, we will use (txtY)
      txtWidth,            // const int (width):to specify the button width, we will use (txtWidth)
      txtHeight,           // const int (height): to specify the button height, we will use (txtHeight)
      string(lotSize),     // const string (text): to specify the text, we will use (lotSize)
      "Arial",             // const string (font): to specify the font, we will use "Arial"
      10,                  // const int (font_size): to specify the font size, we will use (10)
      ALIGN_LEFT,          // const ENUM_ALIGN_MODE (align_mode): to specify the position of text, we will use (ALIGN_LEFT)
      false,               // const bool (read_only=false): to specify the ability to edit, we will be (false)
      panelLoc,            // const ENUM_BASE_CORNER (corner): to specify the chart corner for anchoring, we will call panelLoc function
      clrBlack,            // const color (clr): to specify the text color, we will specify clrBlack
      clrWhite,            // const color (back_clr): to specify the background color, we will specify clrWhite
      clrBlack,            // const color (border_clr): to specify the border color, we will specify clrBlack
      false,               // const bool (back=false): in the background, we will set false
      false,               // const bool (selection=false): highlight to move, we will set false
      false,               // const bool (hidden): hidden in the object list, we will set false
      0);                  // const long (z_order=0): priority for a mouse click, we will use (0)
//--- calling the ButtonCreate function for the buy
   ButtonCreate(           // Parameters:
      0,                   // const long (chart_ID): to specify the chart's ID, we will use (0)
      buyName,             // const string (name): to specify the button name, we will use (buyName) for the buy button
      0,                   // const int (sub_window): to specify the subwindow index, we will use (0) for the main window
      buyX,                // const int (x): to specify the X coordinate, we will use (buyX) for buy
      buyY,                // const int (y): to specify the Y coordinate, we will use (buyY) for buy
      btnWidth,            // const int (width): to specify the button width, we will use (btnWidth) for buy
      btnHeight,           // const int (height): to specify the button height, we will use (btnHeight) for buy
      panelLoc,            // const ENUM_BASE_CORNER (corner): to specify the chart corner for anchoring, we will call panelLoc function for buy button
      "Buy",               // const string (text): to specify the text, we will use ("Buy") for the buy button
      "Arial",             // const string (font): to specify the font, we will use "Arial"
      10,                  // const int (font_size): to specify the font size, we will use (10)
      clrBlack,            // const color (clr): to specify the text color, we will specify clrBlack
      clrGreen,            // const color (back_clr): to specify the background color, we will specify clrGreen for the buy button
      clrBlack,            // const color (border_clr): to specify the border color, we will specify clrBlack
      false,               // const bool (state): to specify if the object is pressed or released, we will specify false
      false,               // const bool (back=false): in the background, we will set false
      false,               // const bool (selection=false): highlight to move, we will set false
      false,               // const bool (hidden): hidden in the object list, we will set false
      0);                  // const long (z_order=0): priority for mouse click, we will use (0) for buy button
//--- calling the ButtonCreate function for the sell
   ButtonCreate(          //Parameters:
      0,                   //const long (chart_ID): to specify the chart's ID, we will use (0)
      sellName,            //const string (name): to specify the button name, we will use (sellName) for the sell button
      0,                   //const int (sub_window): to specify the subwindow index, we will use (0) for the main window
      sellX,               //const int (x): to specify the X coordinate, we will use (sellX) for sell
      sellY,               //const int (y): to specify the Y coordinate, we will use (sellY)
      btnWidth,            //const int (width): to specify the button width, we will use (btnWidth) for sell
      btnHeight,           //const int (height): to specify the button height, we will use (btnHeight) for sell
      panelLoc,            //const ENUM_BASE_CORNER (corner): to specify the chart corner for anchoring, we will call panelLoc function for sell button
      "Sell",              //const string (text): to specify the text, we will use ("Sell") for the sell button
      "Arial",             //const string (font): to specify the font, we will use "Arial"
      10,                  //const int (font_size): to specify the font size, we will use (10)
      clrBlack,            //const color (clr): to specify the text color, we will specify clrBlack
      clrRed,              //const color (back_clr): to specify the background color, we will specify clrRed for the sell button
      clrBlack,            //const color (border_clr): to specify the border color, we will specify clrBlack
      false,               //const bool (state): to specify if the object is pressed or released, we will specify false
      false,               //const bool (back=false): in the background, we will set false
      false,               //const bool (selection=false): highlight to move, we will set false
      false,               //const bool (hidden): hidden in the object list, we will set false
      0);                  //const long (z_order=0): priority for mouse click, we will use (0) for sell button
  }
lotSize에 사용되는 lotTxt라는 매개변수와 함수 본문이 있는 void setLot 함수를 생성하는 방법은 다음과 같습니다:
- 이중 newLot 변수를 생성하고 StringToDouble 함수를 사용하여 문자열에서 이중으로 변환한 후 lotTxt에 할당합니다.
- newLot 변수가 0보다 작은지 확인하려면 "잘못된 볼륨이 지정되었습니다"라는 출력 메시지가 표시된 다음 반환을 사용해야 합니다.
- lotSize인 newLot 값을 반환합니다.
void setLot(string lotTxt)
  {
   double newLot=StringToDouble(lotTxt);
   if(newLot<0)
     {
      Print("Invaid Volume Specified");
      return;
     }
   lotSize=newLot;
  }
다음 단계를 통해 EditCreate 함수를 생성합니다:
//+------------------------------------------------------------------+
//|EditCreate function                                               |
//+------------------------------------------------------------------+
bool EditCreate(const long             chart_ID=0,
                const string           name="Edit",
                const int              sub_window=0,
                const int              x=0,
                const int              y=0,
                const int              width=50,
                const int              height=18,
                const string           text="Text",
                const string           font="Arial",
                const int              font_size=10,
                const ENUM_ALIGN_MODE  align=ALIGN_CENTER,
                const bool             read_only=false,
                const ENUM_BASE_CORNER corner=CORNER_LEFT_UPPER,
                const color            clr=clrBlack,
                const color            back_clr=clrWhite,
                const color            border_clr=clrNONE,
                const bool             back=false,
                const bool             selection=false,
                const bool             hidden=true,
                const long             z_order=0)
  {
//--- Reset the error value by using ResetLastError()
   ResetLastError();
//--- Create an edit field
   if(!ObjectCreate(chart_ID, name, OBJ_EDIT, sub_window, 0, 0))
     {
      Print(__FUNCTION__,
            ": failed to create \"Edit\" object! Error code = ", GetLastError());
      return(false);
     }
//--- Setting the object coordinates x and y by using the ObjectSetInteger
   ObjectSetInteger(chart_ID, name, OBJPROP_XDISTANCE, x);
   ObjectSetInteger(chart_ID, name, OBJPROP_YDISTANCE, y);
//--- Setting the object size by using the ObjectSetInteger function also
   ObjectSetInteger(chart_ID, name, OBJPROP_XSIZE, width);
   ObjectSetInteger(chart_ID, name, OBJPROP_YSIZE, height);
//--- Setting the text by using ObjectSetString function
   ObjectSetString(chart_ID, name, OBJPROP_TEXT, text);
//--- Setting the text font by using the ObjectSetString function also
   ObjectSetString(chart_ID, name, OBJPROP_FONT, font);
//--- Setting the font size by using the ObjectSetInteger function
   ObjectSetInteger(chart_ID, name, OBJPROP_FONTSIZE, font_size);
//--- Setting the type of text alignment in the object
   ObjectSetInteger(chart_ID, name, OBJPROP_ALIGN, align);
//--- Setting the ability to edit, enable if it is (true) or cancel (false) if you need a read-only mode
   ObjectSetInteger(chart_ID, name, OBJPROP_READONLY, read_only);
//--- Setting the chart's corner, relative to which object coordinates are defined to set the location of the object.
   ObjectSetInteger(chart_ID, name, OBJPROP_CORNER, corner);
//--- Setting the text color
   ObjectSetInteger(chart_ID, name, OBJPROP_COLOR, clr);
//--- Setting the background color
   ObjectSetInteger(chart_ID, name, OBJPROP_BGCOLOR, back_clr);
//--- Setting the border color of the object
   ObjectSetInteger(chart_ID, name, OBJPROP_BORDER_COLOR, border_clr);
//--- Displaying in the foreground by (false) or in the background by (true)
   ObjectSetInteger(chart_ID, name, OBJPROP_BACK, back);
//--- Setting (true) to enable or (false) to disable the mode of moving the label by mouse
   ObjectSetInteger(chart_ID, name, OBJPROP_SELECTABLE, selection);
   ObjectSetInteger(chart_ID, name, OBJPROP_SELECTED, selection);
//--- Setting (true) if you need hiding or (false) if you need the display of graphical object name in the object list
   ObjectSetInteger(chart_ID, name, OBJPROP_HIDDEN, hidden);
//--- Setting the priority for receiving the event of a mouse click in the chart
   ObjectSetInteger(chart_ID, name, OBJPROP_ZORDER, z_order);
//--- Returning (true) if successful execution
   return(true);
  }
약간의 차이점을 제외하고는 이전 EditCreate 함수의 파라미터와 동일하게 ButtonCreate 함수를 생성합니다.
bool ButtonCreate(const long              chart_ID=0,
                  const string            name="Button",
                  const int               sub_window=0,
                  const int               x=0,
                  const int               y=0,
                  const int               width=50,
                  const int               height=18,
                  const ENUM_BASE_CORNER  corner=CORNER_LEFT_UPPER,
                  const string            text="Button",
                  const string            font="Arial",
                  const int               font_size=10,
                  const color             clr=clrBlack,
                  const color             back_clr=C'236,233,216',
                  const color             border_clr=clrNONE,
                  const bool              state=false,
                  const bool              back=false,
                  const bool              selection=false,
                  const bool              hidden=true,
                  const long              z_order=0)
  {
   ResetLastError();
   if(!ObjectCreate(chart_ID,name,OBJ_BUTTON,sub_window,0,0))
     {
      Print(__FUNCTION__,
            ": failed to create the button! Error code = ",GetLastError());
      return(false);
     }
   ObjectSetInteger(chart_ID,name,OBJPROP_XDISTANCE,x);
   ObjectSetInteger(chart_ID,name,OBJPROP_YDISTANCE,y);
   ObjectSetInteger(chart_ID,name,OBJPROP_XSIZE,width);
   ObjectSetInteger(chart_ID,name,OBJPROP_YSIZE,height);
   ObjectSetInteger(chart_ID,name,OBJPROP_CORNER,corner);
   ObjectSetString(chart_ID,name,OBJPROP_TEXT,text);
   ObjectSetString(chart_ID,name,OBJPROP_FONT,font);
   ObjectSetInteger(chart_ID,name,OBJPROP_FONTSIZE,font_size);
   ObjectSetInteger(chart_ID,name,OBJPROP_COLOR,clr);
   ObjectSetInteger(chart_ID,name,OBJPROP_BGCOLOR,back_clr);
   ObjectSetInteger(chart_ID,name,OBJPROP_BORDER_COLOR,border_clr);
   ObjectSetInteger(chart_ID,name,OBJPROP_BACK,back);
   ObjectSetInteger(chart_ID,name,OBJPROP_STATE,state);
   ObjectSetInteger(chart_ID,name,OBJPROP_SELECTABLE,selection);
   ObjectSetInteger(chart_ID,name,OBJPROP_SELECTED,selection);
   ObjectSetInteger(chart_ID,name,OBJPROP_HIDDEN,hidden);
   ObjectSetInteger(chart_ID,name,OBJPROP_ZORDER,z_order);
   return(true);
  }
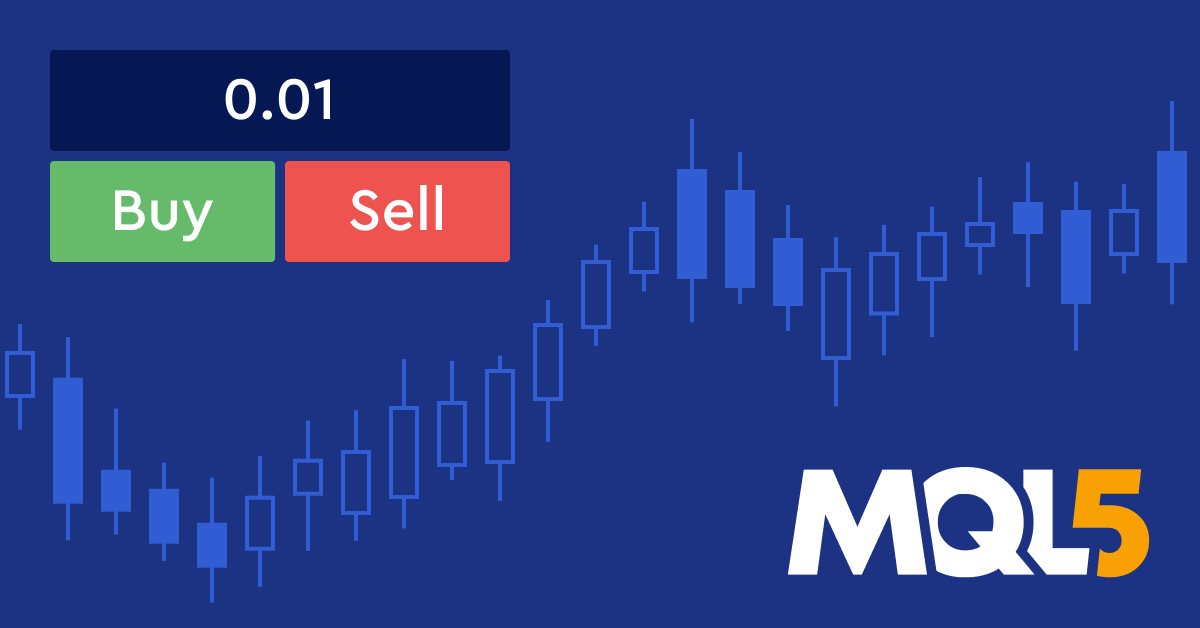
코드를 컴파일하고 실행하면 다음과 같이 패널이 표시되는 것을 확인할 수 있습니다:

이전의 왼쪽 상단의 그림에서 볼 수 있듯이 랏 사이즈와 매수 및 매도 버튼 두 개가 있는 패널이 있으며 필요한 랏 사이즈를 지정하고 필요한 유형에 따라 매수 또는 매도를 눌러 주문할 수 있습니다. 이 방법은 패널이나 다이얼로그 클래스를 사용하지 않고 이 패널을 만드는 첫 번째 방법으로 이 방법은 많은 코드 줄이 필요하므로 이제 패널과 다이얼로그 클래스를 사용하여 동일한 패널을 만들어 이 두 가지 방법을 비교하여 복잡성이나 긴 코드를 평가하고 확인해야 합니다.
클래스를 사용한 그래픽 패널
다음은 필요한 클래스를 사용하여 동일한 패널을 만드는 두 번째 방법입니다. 이 동일한 패널을 만드는 단계는 다음과 같습니다.
프로그램에서 해당 구성 요소를 사용하는 데 필요한 인클루드 파일 또는 클래스는 다음과 같습니다; 대화 상자, 버튼, 편집 및 거래 이 작업은 #include 명령을 사용하여 수행할 수 있습니다.
#include <Controls\Dialog.mqh>
#include <Controls\Button.mqh>
#include <Controls\Edit.mqh>
#include <Trade\Trade.mqh>
상수에 mnemonic 이름을 지정하는 전처리기 지시어인 #define 매크로 치환을 사용하면 다음과 같습니다:
- PANEL_NAME "Order Panel"
- PANEL_WIDTH 116
- PANEL_HIEIGHT 100
- ROW_HEIGHT 20
- BUY_BTN_NAME "Buy BTN"
- SELL_BTN_NAME "Sell BTN"
- CLOSE_BTN_NAME "Close BTN"
- EDIT_NAME "Lot Size"
#define PANEL_NAME "Order Panel"
#define PANEL_WIDTH 116
#define PANEL_HIEIGHT 100
#define ROW_HEIGHT 20
#define BUY_BTN_NAME "Buy BTN"
#define SELL_BTN_NAME "Sell BTN"
#define CLOSE_BTN_NAME "Close BTN"
#define EDIT_NAME "Lot Size"
다음과 같은 클래스에서 객체를 생성합니다.
CAppDialog panel;
CButton buyBtn;
CButton sellBtn;
CButton closeBtn;
CEdit lotSize;
CTrade trade;
OnInit() 부분에서는 생성된 객체 panel.Create를 사용하여 패널 객체를 생성해야 하며 그 매개 변수는 다음과 같습니다:
- const long 차트를 사용하면 0을 사용하여 기본 차트에 패널을 표시합니다.
- const 문자열 이름, 우리는 PANEL_NAME을 사용합니다.
- const int subwin, 0을 사용합니다.
- const int x1, 10을 사용합니다.
- const int y1, 20
- const int x2, 10+PANEL_WIDTH+8을 사용합니다.
- const int y2 20+PANEL_HIEIGHT를 사용합니다.
panel.Create(0,PANEL_NAME,0,10,20,10+PANEL_WIDTH+8,20+PANEL_HIEIGHT);
다음 단계와 같이 매수 및 매도 버튼을 생성하고 설정합니다:
- object.Create를 사용하여 객체를 만듭니다.
- object.Width를 사용하여 매수 및 매도 객체의 너비 설정
- object.Height를 사용하여 매수 및 매도 객체의 높이를 설정
- object.ColorBackground를 사용하여 객체의 배경색을 설정
- object.Text를 사용하여 객체의 텍스트를 설정
- object.Font를 사용하여 객체의 글꼴을 설정
- object.FontSize를 사용하여 객체의 글꼴 크기를 설정
- object.Color를 사용하여 객체의 색상을 설정
- object.ColorBorder를 사용하여 객체의 색상 테두리를 설정
- 패널에 객체 오브젝트를 배치합니다.
- 그런 다음 패널을 실행합니다.
int OnInit()
  {
   //buy button
   panel.Create(0,PANEL_NAME,0,10,20,10+PANEL_WIDTH+8,20+PANEL_HIEIGHT);
   buyBtn.Create(0,BUY_BTN_NAME,0,3,40,0,0);
   buyBtn.Width(50);
   buyBtn.Height(ROW_HEIGHT);
   buyBtn.ColorBackground(clrGreen);
   buyBtn.Text("Buy");
   buyBtn.Font("Arial");
   buyBtn.FontSize(10);
   buyBtn.Color(clrBlack);
   buyBtn.ColorBorder(clrBlack);
   panel.Add(buyBtn);
   //sell button
   sellBtn.Create(0,SELL_BTN_NAME,0,63,40,0,0);
   sellBtn.Width(50);
   sellBtn.Height(ROW_HEIGHT);
   sellBtn.ColorBackground(clrRed);
   sellBtn.Text("Sell");
   sellBtn.Font("Arial");
   sellBtn.FontSize(10);
   sellBtn.Color(clrBlack);
   sellBtn.ColorBorder(clrBlack);
   panel.Add(sellBtn);
   //lotSize
   lotSize.Create(0,EDIT_NAME,0,4,10,0,0);
   lotSize.Width(108);
   lotSize.Height(ROW_HEIGHT);
   lotSize.Text("0.01");
   lotSize.Font("Arial");
   lotSize.FontSize(10);
   lotSize.ColorBackground(clrWhite);
   lotSize.Color(clrBlack);
   lotSize.ColorBorder(clrBlack);
   panel.Add(lotSize);
   //run the panel
   panel.Run();
   return(INIT_SUCCEEDED);
  }
OnDeinit(const int reason) 부분에서는 초기화 함수로 다음과 같이 Destroy를 사용합니다.
void OnDeinit(const int reason)
  {
   panel.Destroy();
  }
OnChartEvent 함수를 사용하여 패널과의 상호 작용을 활성화하고 매수 및 매도 버튼의 동작 조건을 다음과 같이 설정합니다:
- OnChartEvent 함수 만들기
- 함수 본문
- 이벤트의 경우 id, 이벤트의 롱 유형은 lparam, 이중 유형은 dparam, 문자열 유형은 sparam의 매개 변수와 함께 object.ChartEvent를 사용합니다.
- ID가 차트 클릭과 동일한지 확인
- 스팸이 이름으로 buyBtn 또는 sellBtn과 같은지 확인하기
- 랏의 더블 변수를 생성하고 이를 StringToDouble(랏 크기 값)에 할당합니다.
- 랏 값을 사용하여 이벤트 유형에 따라 매수 또는 매도 주문을 엽니다.
void  OnChartEvent(const int id, const long &lparam, const double &dparam, const string &sparam)
  {
   panel.ChartEvent(id,lparam,dparam,sparam);
   if(id==CHARTEVENT_OBJECT_CLICK)
     {
      if(sparam==buyBtn.Name())
        {
         double lot=StringToDouble(lotSize.Text());
         trade.Buy(lot);
        }
      else
         if(sparam==sellBtn.Name())
           {
            double lot=StringToDouble(lotSize.Text());
            trade.Sell(lot);
           }
     }
  }
코드를 컴파일하고 실행 파일을 실행하면 다음 그림과 같이 패널이 차트에 첨부된 것을 확인할 수 있습니다:

왼쪽 상단의 이전 그림에서 볼 수 있듯이 랏 크기, 매수 및 매도 객체가 있는 패널이 있으며 랏 크기와 미체결 주문을 편집할 수 있습니다.
동일한 패널을 두 가지 방법으로 학습하고 생성한 결과를 비교해 보면 클래스를 사용하지 않고 생성하는 것보다 클래스를 사용하여 생성한 패널이 더 쉽고 매끄럽다는 것을 알 수 있습니다. 클래스는 매우 유용하고 쉽게 코딩하고 많은 시간을 절약할 수 있습니다. 개발자라면 코딩 및 프로그래밍 기술과 논리를 향상시키는 매우 좋은 방법으로써 이러한 클래스 또는 기본 제공 함수와 같은 기성품을 만드는 방법을 배우고 이해하려고 노력하는 것이 코딩 및 프로그래밍 기술 및 논리를 향상시키는 매우 좋은 방법이며 반복 작업을 수행하는 시간을 절약할 뿐만 아니라 더 부드럽고 쉽게 코드화 하는 데 도움이 될 수 있습니다.
이러한 유형의 패널을 만드는 방법을 배웠으니 응용 프로그램을 만들때 더 많은 함수를 사용하여 더 많이 개발할 수 있습니다. 패널은 앞서 살펴본 것처럼 단순할 수도 있고 매우 복잡하고 더 많은 도구와 기능을 포함할 수도 있습니다. 여기서 목표는 이러한 클래스의 중요성과 가치를 파악한 후 사용 방법을 이해하는 것입니다.
결론
클래스를 사용하는 것은 트레이더가 이러한 패널을 사용하는 데 필요한 많은 필수 작업을 수행하지 않게 됨으로써 거래 자체와 시장에 집중할 수 있도록 많은 도움을 준다는 결론을 내릴 수 있습니다. 우리는 패널이란 무엇이며 그 종류에 대한 예시를 알아보고 이러한 패널을 쉽게 만들 수 있는 패널과 다이얼로그 클래스에 대해 알아보고 패널과 다이얼로그 클래스를 사용하지 않고 일반 코드로 두 가지 방법으로 간단한 패널을 애플리케이션으로 만들어서 이 클래스가 얼마나 유용할 수 있는지, 클래스를 사용하지 않을 때 얼마나 많은 시간과 노력이 소모되는지 확인해 보았습니다.
이 글이 도움이 되셨기를 바라며 제공된 정보를 여러분이 쉽게 이해하고 사용할 수 있기를 바랍니다. 또한 살펴본 애플리케이션을 더 많이 개발할 수 있는 방법이나 거래에 유용할 수 있는 더 유용한 패널을 개발하고 깊이 파고드는 방법에 대해 더 많은 통찰력을 얻으셨기를 바랍니다. 초보 mql5 개발자라면 클래스를 다룬 이 글의 주제를 통해 새로운 것을 배우고 방법에 대해 더 많은 통찰력을 얻었기를 바랍니다.
클래스와 객체에 대해 더 자세히 알고 싶다면 이전 글인 'MQL5의 객체 지향 프로그래밍(OOP) 이해'를 읽어보시면 이 주제를 마스터하는 데 도움이 될 것입니다. 가장 인기있는 기술 지표를 사용하여 거래 시스템을 만드는 방법에 대해 읽고 싶으시면 이에 대한 간행물 섹션에서 이전 기사들을 읽을 수 있습니다. 유용하게 사용하시기 바랍니다.
MetaQuotes 소프트웨어 사를 통해 영어가 번역됨
원본 기고글: https://www.mql5.com/en/articles/12903
경고: 이 자료들에 대한 모든 권한은 MetaQuotes(MetaQuotes Ltd.)에 있습니다. 이 자료들의 전부 또는 일부에 대한 복제 및 재출력은 금지됩니다.
이 글은 사이트 사용자가 작성했으며 개인의 견해를 반영합니다. Metaquotes Ltd는 제시된 정보의 정확성 또는 설명 된 솔루션, 전략 또는 권장 사항의 사용으로 인한 결과에 대해 책임을 지지 않습니다.

멋진 코드 작업에 감사드립니다!
하지만 "기록 데이터로 디버깅"에서 작동하도록 할 수 없습니다. -- 제가 체크박스를 놓쳤나요?
뭔가를 찾아보세요:
전략 테스터의 EA에서는 OnChartEvent()가 작동하지 않으므로 OnTick()에서 버튼 상태를 확인해야 합니다.
https://www.mql5.com/en/forum/170896
뭔가를 찾아보세요:
전략 테스터의 EA에서는 OnChartEvent()가 작동하지 않으므로 OnTick()에서 버튼 상태를 확인해야 합니다.
https://www.mql5.com/en/forum/170896
의견 주셔서 감사합니다.
이 글의 주요 목적은 클래스를 사용하여 간단한 패널을 쉽게 만들 수 있게 된 방법을 설명하는 것입니다.
코드:"buyBtn.ToolTip ("구매 주문 열기 클릭")"
실패했습니다.
코드:"buyBtn.ToolTip ("구매 주문 열기 클릭")"
실패했습니다.