DoEasy. Elementos de control (Parte 17): Recortando partes invisibles de objetos, objetos WinForms auxiliares de botón con flechas

Contenido
- Concepto
- Mejorando las clases de la biblioteca
- Clases de objetos auxiliares de botón con flechas
- Simulación
- ¿Qué es lo próximo?
Concepto
Cada elemento gráfico adjunto a su contenedor solo se puede ver dentro del mismo. Si alguna parte del elemento sobresale más allá del contenedor, dicha parte deberá ocultarse. No todo el objeto (si va parcialmente más allá de su contenedor), sino solo la parte que se encuentre fuera de los límites de visibilidad del objeto principal al que está adjunto. Normalmente, los límites de la visibilidad de los objetos adjuntos en el contenedor suelen ser sus bordes, pero si el objeto tiene un marco, este marco no deberá quedar cubierto por el objeto adjunto, y el límite de visibilidad para el objeto que sobresale en este caso será el borde interior del marco del contenedor.
En MQL, para implementar el recorte de elementos gráficos creados a partir de una imagen bmp (OBJ_BITMAP_LABEL y OBJ_BITMAP), existen propiedades especiales de los objetos gráficos que permiten representar solo una parte de la imagen sombreada por una zona de visibilidad rectangular:
Desafortunadamente, este recorte y posicionamiento de la parte visible del objeto dentro de la zona de visibilidad rectangular no funcionará al usar un lienzo. Aunque los recursos para el lienzo se crean como imágenes de mapa de bits en la memoria, "algo nos impide" usar esta tecnología creada para objetos basados en archivos bmp físicos con imágenes construidas en la memoria como recurso.
Por lo tanto, seguiremos nuestro propio camino, para ello, crearemos una zona de visibilidad de este tipo nosotros mismos y cortaremos de forma independiente las partes del objeto (lea las imágenes) que vayan más allá de la zona de visibilidad de nuestro contenedor. Inicialmente, la zona de visibilidad rectangular será igual a la anchura y la altura del contenedor, o se encontrará dentro del borde de este objeto (si tiene un borde). Dotaremos a cada elemento gráfico de un método que leerá la propia posición en relación con su contenedor y cortará su parte visible sobrante (simplemente se pintará sobre su fondo con un color transparente de transparencia total).
Además de implementar la mencionada funcionalidad de los elementos gráficos, hoy crearemos varias clases de elementos gráficos auxiliares, concretamente, hablaremos de los objetos de botón con flechas. Necesitaremos estos botones para implementar los controles, como, por ejemplo, barras de desplazamiento, listas desplegables y otros controles similares.
Si hablamos del control TabControl desarrollado, necesitaremos dichos botones para organizar el desplazamiento de los encabezados de las pestañas si están colocados en una fila y estos son demasiados para que quepan todos en el control. Las pestañas que van más allá del control deben estar ocultas (que es lo que estamos implementando hoy), y solo se usarán dos botones con flechas de izquierda a derecha para desplazar la fila de encabezados para encontrar y mostrar el encabezado de pestaña deseado. Por ello, hoy, tras crear dichos objetos de botón con flechas, crearemos dos objetos más, con dos botones "izquierda-derecha" y "arriba-abajo". Usaremos dichos objetos para encontrar la pestaña oculta en el objeto TabControl en el siguiente artículo.
Mejorando las clases de la biblioteca
En el archivo \MQL5\Include\DoEasy\Defines.mqh, añadiremos una macrosustitución que indicará el tamaño de los lados de los botones con flechas por defecto:
#define DEF_FONT                       ("Calibri")                // Default font
#define DEF_FONT_SIZE                  (8)                        // Default font size
#define DEF_CHECK_SIZE                 (12)                       // Verification flag default size
#define DEF_ARROW_BUTTON_SIZE          (15)                       // Default arrow button size
#define OUTER_AREA_SIZE                (16)                       // Size of one side of the outer area around the form workspace
#define DEF_FRAME_WIDTH_SIZE           (3)                        // Default form/panel/window frame width
Al crear un objeto de botón de este tipo, siempre podemos especificar cualquier otro tamaño para sus lados, pero el tamaño de lado predeterminado será de 15 píxeles.
En la lista de tipos de objetos de biblioteca, en la sección de objetos WinForms, añadiremos un nuevo tipo: el objeto auxiliar:
//+------------------------------------------------------------------+
//| List of library object types                                     |
//+------------------------------------------------------------------+
enum ENUM_OBJECT_DE_TYPE
  {
//--- Graphics
   OBJECT_DE_TYPE_GBASE =  COLLECTION_ID_LIST_END+1,              // "Base object of all library graphical objects" object type
   OBJECT_DE_TYPE_GELEMENT,                                       // "Graphical element" object type
   OBJECT_DE_TYPE_GFORM,                                          // Form object type
   OBJECT_DE_TYPE_GFORM_CONTROL,                                  // "Form for managing pivot points of graphical object" object type
   OBJECT_DE_TYPE_GSHADOW,                                        // Shadow object type
   //--- WinForms
   OBJECT_DE_TYPE_GWF_BASE,                                       // WinForms Base object type (base abstract WinForms object)
   OBJECT_DE_TYPE_GWF_CONTAINER,                                  // WinForms container object type
   OBJECT_DE_TYPE_GWF_COMMON,                                     // WinForms standard control object type
   OBJECT_DE_TYPE_GWF_HELPER,                                     // WinForms auxiliary control object type
//--- Animation
   //---...
   //---...
  }
Posteriormente, según este tipo de objetos gráficos de la biblioteca, podremos elegir únicamente objetos auxiliares para realizar cualquier acción con ellos.
Vamos a añadir a la lista de tipos de elementos gráficos los nuevos tiposcuyas clases de objetos crearemos hoy:
//+------------------------------------------------------------------+
//| The list of graphical element types                              |
//+------------------------------------------------------------------+
enum ENUM_GRAPH_ELEMENT_TYPE
  {
   GRAPH_ELEMENT_TYPE_STANDARD,                       // Standard graphical object
   GRAPH_ELEMENT_TYPE_STANDARD_EXTENDED,              // Extended standard graphical object
   GRAPH_ELEMENT_TYPE_SHADOW_OBJ,                     // Shadow object
   GRAPH_ELEMENT_TYPE_ELEMENT,                        // Element
   GRAPH_ELEMENT_TYPE_FORM,                           // Form
   GRAPH_ELEMENT_TYPE_WINDOW,                         // Window
   //--- WinForms
   GRAPH_ELEMENT_TYPE_WF_UNDERLAY,                    // Panel object underlay
   GRAPH_ELEMENT_TYPE_WF_BASE,                        // Windows Forms Base
   //--- 'Container' object types are to be set below
   GRAPH_ELEMENT_TYPE_WF_CONTAINER,                   // Windows Forms container base object
   GRAPH_ELEMENT_TYPE_WF_PANEL,                       // Windows Forms Panel
   GRAPH_ELEMENT_TYPE_WF_GROUPBOX,                    // Windows Forms GroupBox
   GRAPH_ELEMENT_TYPE_WF_TAB_CONTROL,                 // Windows Forms TabControl
   //--- 'Standard control' object types are to be set below
   GRAPH_ELEMENT_TYPE_WF_COMMON_BASE,                 // Windows Forms base standard control
   GRAPH_ELEMENT_TYPE_WF_LABEL,                       // Windows Forms Label
   GRAPH_ELEMENT_TYPE_WF_BUTTON,                      // Windows Forms Button
   GRAPH_ELEMENT_TYPE_WF_CHECKBOX,                    // Windows Forms CheckBox
   GRAPH_ELEMENT_TYPE_WF_RADIOBUTTON,                 // Windows Forms RadioButton
   GRAPH_ELEMENT_TYPE_WF_ELEMENTS_LIST_BOX,           // Base list object of Windows Forms elements
   GRAPH_ELEMENT_TYPE_WF_LIST_BOX,                    // Windows Forms ListBox
   GRAPH_ELEMENT_TYPE_WF_CHECKED_LIST_BOX,            // Windows Forms CheckedListBox
   GRAPH_ELEMENT_TYPE_WF_BUTTON_LIST_BOX,             // Windows Forms ButtonListBox
   //--- Auxiliary elements of WinForms objects
   GRAPH_ELEMENT_TYPE_WF_LIST_BOX_ITEM,               // Windows Forms ListBoxItem
   GRAPH_ELEMENT_TYPE_WF_TAB_HEADER,                  // Windows Forms TabHeader
   GRAPH_ELEMENT_TYPE_WF_TAB_FIELD,                   // Windows Forms TabField
   GRAPH_ELEMENT_TYPE_WF_ARROW_BUTTON,                // Windows Forms ArrowButton
   GRAPH_ELEMENT_TYPE_WF_ARROW_BUTTON_UP,             // Windows Forms UpArrowButton
   GRAPH_ELEMENT_TYPE_WF_ARROW_BUTTON_DOWN,           // Windows Forms DownArrowButton
   GRAPH_ELEMENT_TYPE_WF_ARROW_BUTTON_LEFT,           // Windows Forms LeftArrowButton
   GRAPH_ELEMENT_TYPE_WF_ARROW_BUTTON_RIGHT,          // Windows Forms RightArrowButton
   GRAPH_ELEMENT_TYPE_WF_ARROW_BUTTONS_UD_BOX,        // Windows Forms UpDownArrowButtonsBox
   GRAPH_ELEMENT_TYPE_WF_ARROW_BUTTONS_LR_BOX,        // Windows Forms LeftRightArrowButtonsBox
  };
//+------------------------------------------------------------------+
Así, añadiremos a la lista de propiedades enteras del elemento gráfico en el lienzo cuatro nuevas propiedades para especificar las coordenadas y los tamaños de la zona de visibilidad del elemento gráfico y aumentaremos el número total de propiedades enteras de 92 a 96:
//+------------------------------------------------------------------+
//| Integer properties of the graphical element on the canvas        |
//+------------------------------------------------------------------+
enum ENUM_CANV_ELEMENT_PROP_INTEGER
  {
   CANV_ELEMENT_PROP_ID = 0,                          // Element ID
   CANV_ELEMENT_PROP_TYPE,                            // Graphical element type

   //---...
   //---...

   CANV_ELEMENT_PROP_ACT_RIGHT,                       // Right border of the element active area
   CANV_ELEMENT_PROP_ACT_BOTTOM,                      // Bottom border of the element active area
   CANV_ELEMENT_PROP_VISIBLE_AREA_X,                  // Visibility scope X coordinate
   CANV_ELEMENT_PROP_VISIBLE_AREA_Y,                  // Visibility scope Y coordinate
   CANV_ELEMENT_PROP_VISIBLE_AREA_WIDTH,              // Visibility scope width
   CANV_ELEMENT_PROP_VISIBLE_AREA_HEIGHT,             // Visibility scope height
   CANV_ELEMENT_PROP_GROUP,                           // Group the graphical element belongs to
   CANV_ELEMENT_PROP_ZORDER,                          // Priority of a graphical object for receiving the event of clicking on a chart

   //---...
   //---...

  };
#define CANV_ELEMENT_PROP_INTEGER_TOTAL (96)          // Total number of integer properties
#define CANV_ELEMENT_PROP_INTEGER_SKIP  (0)           // Number of integer properties not used in sorting
//+------------------------------------------------------------------+
Asimismo, agregaremos las nuevas propiedades a la lista de posibles criterios para clasificar los elementos gráficos en el lienzo:
//+------------------------------------------------------------------+
//| Possible sorting criteria of graphical elements on the canvas    |
//+------------------------------------------------------------------+
#define FIRST_CANV_ELEMENT_DBL_PROP  (CANV_ELEMENT_PROP_INTEGER_TOTAL-CANV_ELEMENT_PROP_INTEGER_SKIP)
#define FIRST_CANV_ELEMENT_STR_PROP  (CANV_ELEMENT_PROP_INTEGER_TOTAL-CANV_ELEMENT_PROP_INTEGER_SKIP+CANV_ELEMENT_PROP_DOUBLE_TOTAL-CANV_ELEMENT_PROP_DOUBLE_SKIP)
enum ENUM_SORT_CANV_ELEMENT_MODE
  {
//--- Sort by integer properties
   SORT_BY_CANV_ELEMENT_ID = 0,                       // Sort by element ID
   SORT_BY_CANV_ELEMENT_TYPE,                         // Sort by graphical element type

   //---...
   //---...

   SORT_BY_CANV_ELEMENT_ACT_RIGHT,                    // Sort by the right border of the element active area
   SORT_BY_CANV_ELEMENT_ACT_BOTTOM,                   // Sort by the bottom border of the element active area
   SORT_BY_CANV_ELEMENT_VISIBLE_AREA_X,               // Sort by visibility scope X coordinate
   SORT_BY_CANV_ELEMENT_VISIBLE_AREA_Y,               // Sort by visibility scope Y coordinate
   SORT_BY_CANV_ELEMENT_VISIBLE_AREA_WIDTH,           // Sort by visibility scope width
   SORT_BY_CANV_ELEMENT_VISIBLE_AREA_HEIGHT,          // Sort by visibility scope height
   SORT_BY_CANV_ELEMENT_GROUP,                        // Sort by a group the graphical element belongs to
   SORT_BY_CANV_ELEMENT_ZORDER,                       // Sort by the priority of a graphical object for receiving the event of clicking on a chart

   //---...
   //---...

   SORT_BY_CANV_ELEMENT_TAB_PAGE_COLUMN,              // Sort by tab column index
   SORT_BY_CANV_ELEMENT_ALIGNMENT,                    // Sort by the location of the object inside the control
//--- Sort by real properties

//--- Sort by string properties
   SORT_BY_CANV_ELEMENT_NAME_OBJ = FIRST_CANV_ELEMENT_STR_PROP,// Sort by an element object name
   SORT_BY_CANV_ELEMENT_NAME_RES,                     // Sort by the graphical resource name
   SORT_BY_CANV_ELEMENT_TEXT,                         // Sort by graphical element text
   SORT_BY_CANV_ELEMENT_DESCRIPTION,                  // Sort by graphical element description
  };
//+------------------------------------------------------------------+
Ahora podremos seleccionar, clasificar y filtrar los elementos gráficos según las propiedades recién añadidas.
En el archivo \MQL5\Include\DoEasy\Data.mqh, escribiremos los índices de los nuevos mensajes:
   MSG_GRAPH_ELEMENT_TYPE_WF_TAB_FIELD,               // TabControl tab field
   MSG_GRAPH_ELEMENT_TYPE_WF_TAB_CONTROL,             // TabControl
   MSG_GRAPH_ELEMENT_TYPE_WF_ARROW_BUTTON,            // ArrowButton control
   MSG_GRAPH_ELEMENT_TYPE_WF_ARROW_BUTTON_UP,         // UpArrowButton control
   MSG_GRAPH_ELEMENT_TYPE_WF_ARROW_BUTTON_DOWN,       // DownArrowButton control
   MSG_GRAPH_ELEMENT_TYPE_WF_ARROW_BUTTON_LEFT,       // LeftArrowButton control
   MSG_GRAPH_ELEMENT_TYPE_WF_ARROW_BUTTON_RIGHT,      // RightArrowButton control
   MSG_GRAPH_ELEMENT_TYPE_WF_ARROW_BUTTONS_UD_BOX,    // UpDownArrowBox control
   MSG_GRAPH_ELEMENT_TYPE_WF_ARROW_BUTTONS_LR_BOX,    // LeftRightArrowBox control
   MSG_GRAPH_OBJ_BELONG_PROGRAM,                      // Graphical object belongs to a program
   MSG_GRAPH_OBJ_BELONG_NO_PROGRAM,                   // Graphical object does not belong to a program
...
   MSG_CANV_ELEMENT_PROP_ACT_RIGHT,                   // Right border of the element active area
   MSG_CANV_ELEMENT_PROP_ACT_BOTTOM,                  // Bottom border of the element active area
   MSG_CANV_ELEMENT_PROP_VISIBLE_AREA_X,              // Visibility scope X coordinate
   MSG_CANV_ELEMENT_PROP_VISIBLE_AREA_Y,              // Visibility scope Y coordinate
   MSG_CANV_ELEMENT_PROP_VISIBLE_AREA_WIDTH,          // Visibility scope width
   MSG_CANV_ELEMENT_PROP_VISIBLE_AREA_HEIGHT,         // Visibility scope height
   MSG_CANV_ELEMENT_PROP_ENABLED,                     // Element availability flag
   MSG_CANV_ELEMENT_PROP_FORE_COLOR,                  // Default text color for all control objects
y los mensajes de texto correspondientes a los nuevos índices añadidos:
   {"Поле вкладки элемента управления \"TabControl\"","Tab field of the Control element \"TabControl\""},
   {"Элемент управления \"TabControl\"","Control element \"TabControl\""},
   {"Элемент управления \"ArrowButton\"","Control element \"ArrowButton\""},
   {"Элемент управления \"UpArrowButton\"","Control element \"UpArrowButton\""},
   {"Элемент управления \"DownArrowButton\"","Control element \"DownArrowButton\""},
   {"Элемент управления \"LeftArrowButton\"","Control element \"LeftArrowButton\""},
   {"Элемент управления \"RightArrowButton\"","Control element \"RightArrowButton\""},
   {"Элемент управления \"UpDownArrowBox\"","Control element \"UpDownArrowBox\""},
   {"Элемент управления \"LeftRightArrowBox\"","Control element \"LeftRightArrowBox\""},
   {"Графический объект принадлежит программе","The graphic object belongs to the program"},
   {"Графический объект не принадлежит программе","The graphic object does not belong to the program"},
...
   {"Правая граница активной зоны элемента","Right border of the element's active area"},
   {"Нижняя граница активной зоны элемента","Bottom border of the element's active area"},
   {"Координата X области видимости","X-coordinate of object visibility area"},
   {"Координата Y области видимости","Y-coordinate of object visibility area"},
   {"Ширина области видимости","Width of object visibility area"},
   {"Высота области видимости","Height of object visibility area"},
   {"Флаг доступности элемента","Element Availability Flag"},
   {"Цвет текста по умолчанию для всех объектов элемента управления","Default text color for all objects in the control"},
En el archivo de funciones de servicio de la biblioteca \MQL5\Include\DoEasy\Services\DELib.mqh, en la función que retorna como cadena el tipo del objeto gráfico, introduciremos algunas mejoras menores:
//+------------------------------------------------------------------+
//| Return the graphical object type as string                       |
//+------------------------------------------------------------------+
string TypeGraphElementAsString(const ENUM_GRAPH_ELEMENT_TYPE type)
  {
   ushort array[];
   int total=StringToShortArray(StringSubstr(EnumToString(type),18),array);
   for(int i=0;i<total-1;i++)
     {
      if(array[i]==95)
        {
         i+=1;
         continue;
        }
      else
         array[i]+=0x20;
     }
   string txt=ShortArrayToString(array);
   StringReplace(txt,"_Wf_Base","WFBase");
   StringReplace(txt,"_Wf_","");
   StringReplace(txt,"_Obj","");
   StringReplace(txt,"_","");
   StringReplace(txt,"Groupbox","GroupBox");
   StringReplace(txt,"ButtonsUdBox","ButtonsUDBox");
   StringReplace(txt,"ButtonsLrBox","ButtonsLRBox");
   return txt;
  }
//+------------------------------------------------------------------+
Como crearemos nuevos elementos gráficos, para crear el nombre de un objeto gráfico, deberemos cambiar ligeramente su nombre generado automáticamente. Al crear la cadena del nombre, la función inicialmente no permite dos o más caracteres en mayúscula consecutivos, y el nombre del objeto deberá contener tres de esos caracteres. Por ello, simplemente reemplazaremos la cadena del nombre generada automáticamente por la que necesitemos.
Así, los nombres de los nuevos objetos que crearemos hoy serán correctos.
En los constructores de clases del objeto ListBoxItem auxiliar, en el archivo \MQL5\Include\DoEasy\Objects\Graph\WForms\ListBoxItem.mqh, añadiremos el tipo de objeto gráfico de la biblioteca como "objeto WinForms auxiliar":
//+------------------------------------------------------------------+
//| Protected constructor with an object type,                       |
//| chart ID and subwindow                                           |
//+------------------------------------------------------------------+
CListBoxItem::CListBoxItem(const ENUM_GRAPH_ELEMENT_TYPE type,
                           const long chart_id,
                           const int subwindow,
                           const string descript,
                           const int x,
                           const int y,
                           const int w,
                           const int h) : CButton(type,chart_id,subwindow,descript,x,y,w,h)
  {
//--- Set the specified graphical element type for the object and assign the library object type to the current object
   this.SetTypeElement(type);
   this.m_type=OBJECT_DE_TYPE_GWF_HELPER;
   this.SetTextAlign(ANCHOR_LEFT);
   this.SetTextShiftSpace(1);
  }
//+------------------------------------------------------------------+
//| Constructor                                                      |
//+------------------------------------------------------------------+
CListBoxItem::CListBoxItem(const long chart_id,
                           const int subwindow,
                           const string descript,
                           const int x,
                           const int y,
                           const int w,
                           const int h) : CButton(GRAPH_ELEMENT_TYPE_WF_LIST_BOX_ITEM,chart_id,subwindow,descript,x,y,w,h)
  {
   this.SetTypeElement(GRAPH_ELEMENT_TYPE_WF_LIST_BOX_ITEM);
   this.m_type=OBJECT_DE_TYPE_GWF_HELPER;
   this.SetTextAlign(ANCHOR_LEFT);
   this.SetTextShiftSpace(1);
  }
//+------------------------------------------------------------------+
Al trabajar con lienzo, pueden surgir problemas al usar los medios estándar para mostrar solo la parte visible de un objeto gráfico dibujado por una zona de visibilidad rectangular. Así que vamos a implementar esto nosotros mismos. Sin embargo, los objetos gráficos aún tienen tales propiedades y, por lo tanto, necesitaremos crear una funcionalidad para configurar y obtener estas propiedades en un objeto gráfico. Esta funcionalidad también se usará para crear una zona de visibilidad para los elementos gráficos en el lienzo.
En el archivo del objeto gráfico básico de la biblioteca \MQL5\Include\DoEasy\Objects\Graph\GBaseObj.mqh, añadiremos métodos virtuales para configurar y obtener las nuevas propiedades de objetos gráficos, mientras que el método para establecer la bandera de visibilidad lo renombraremos de forma que quede claro que él establece la bandera:
//--- Set the priority of a graphical object for receiving the event of clicking on a chart
   virtual bool      SetZorder(const long value,const bool only_prop)
                       {
                        ::ResetLastError();
                        if((!only_prop && ::ObjectSetInteger(this.m_chart_id,this.m_name,OBJPROP_ZORDER,value)) || only_prop)
                          {
                           this.m_zorder=value;
                           return true;
                          }
                        else
                           CMessage::ToLog(DFUN,::GetLastError(),true);
                        return false;
                       }

//--- (1) Set and (2) return the X coordinate of the upper left corner of the rectangle visibility scope of the OBJ_BITMAP_LABEL and OBJ_BITMAP graphical object
   virtual bool      SetXOffset(const long value)
                       {
                        ::ResetLastError();
                        if(!::ObjectSetInteger(this.m_chart_id,this.m_name,OBJPROP_XOFFSET,value))
                          {
                           CMessage::ToLog(DFUN,::GetLastError(),true);
                           return false;
                          }
                        return true;
                       }
   virtual int       XOffset(void)  const { return (int)::ObjectGetInteger(this.m_chart_id,this.m_name,OBJPROP_XOFFSET);   }
//--- (1) Set and (2) return the Y coordinate of the upper left corner of the rectangle visibility scope of the OBJ_BITMAP_LABEL and OBJ_BITMAP graphical object
   virtual bool      SetYOffset(const long value)
                       {
                        ::ResetLastError();
                        if(!::ObjectSetInteger(this.m_chart_id,this.m_name,OBJPROP_YOFFSET,value))
                          {
                           CMessage::ToLog(DFUN,::GetLastError(),true);
                           return false;
                          }
                        return true;
                       }
   virtual int       YOffset(void)  const { return (int)::ObjectGetInteger(this.m_chart_id,this.m_name,OBJPROP_YOFFSET);   }
//--- (1) Set and (2) return the width of OBJ_LABEL (read only), OBJ_BUTTON, OBJ_CHART, OBJ_BITMAP, OBJ_BITMAP_LABEL, OBJ_EDIT, OBJ_RECTANGLE_LABEL
   virtual bool      SetXSize(const long value)
                       {
                        ::ResetLastError();
                        if(!::ObjectSetInteger(this.m_chart_id,this.m_name,OBJPROP_XSIZE,value))
                          {
                           CMessage::ToLog(DFUN,::GetLastError(),true);
                           return false;
                          }
                        return true;
                       }
   virtual int       XSize(void)    const { return (int)::ObjectGetInteger(this.m_chart_id,this.m_name,OBJPROP_XSIZE);     }
//--- (1) Set and (2) return the height of OBJ_LABEL (read only), OBJ_BUTTON, OBJ_CHART, OBJ_BITMAP, OBJ_BITMAP_LABEL, OBJ_EDIT and OBJ_RECTANGLE_LABEL objects
   virtual bool      SetYSize(const long value)
                       {
                        ::ResetLastError();
                        if(!::ObjectSetInteger(this.m_chart_id,this.m_name,OBJPROP_YSIZE,value))
                          {
                           CMessage::ToLog(DFUN,::GetLastError(),true);
                           return false;
                          }
                        return true;
                       }
   virtual int       YSize(void)    const { return (int)::ObjectGetInteger(this.m_chart_id,this.m_name,OBJPROP_YSIZE);     }

//--- Set object visibility on all timeframes
   bool              SetVisibleFlag(const bool flag,const bool only_prop)
                       {
                        long value=(flag ? OBJ_ALL_PERIODS : OBJ_NO_PERIODS);
                        ::ResetLastError();
                        if((!only_prop && ::ObjectSetInteger(this.m_chart_id,this.m_name,OBJPROP_TIMEFRAMES,value)) || only_prop)
                          {
                           this.m_visible=flag;
                           return true;
                          }
                        else
                           CMessage::ToLog(DFUN,::GetLastError(),true);
                        return false;
                       }
Los métodos para establecer las propiedades retornan un indicador de ubicación exitosa del valor de propiedad especificado del objeto gráfico en la cola del gráfico, es decir, la función es asíncrona y solo retorna la bandera de configuración exitosa del comando en la cola, y no el éxito del establecimiento de la propiedad necesaria. Para realizar la comprobación, deberemos leer la propiedad modificada del objeto y verificar su valor. Esto se hace así para todas las funciones de ObjectSetXXX, pero al usar la biblioteca, no hemos notado retrasos en la ejecución de la cola de comandos, por lo que por ahora usaremos esa construcción para configurar las propiedades de los objetos gráficos.
En el método que retorna la descripción del tipo de elemento gráfico, escribiremos el retorno de la descripción de los nuevos objetos, los botones con flechas, que precisamente implementaremos hoy:
//+------------------------------------------------------------------+
//| Return the description of the graphical element type             |
//+------------------------------------------------------------------+
string CGBaseObj::TypeElementDescription(const ENUM_GRAPH_ELEMENT_TYPE type)
  {
   return
     (
      type==GRAPH_ELEMENT_TYPE_STANDARD                  ? CMessage::Text(MSG_GRAPH_ELEMENT_TYPE_STANDARD)                 :
      type==GRAPH_ELEMENT_TYPE_STANDARD_EXTENDED         ? CMessage::Text(MSG_GRAPH_ELEMENT_TYPE_STANDARD_EXTENDED)        :
      type==GRAPH_ELEMENT_TYPE_ELEMENT                   ? CMessage::Text(MSG_GRAPH_ELEMENT_TYPE_ELEMENT)                  :
      type==GRAPH_ELEMENT_TYPE_SHADOW_OBJ                ? CMessage::Text(MSG_GRAPH_ELEMENT_TYPE_SHADOW_OBJ)               :
      type==GRAPH_ELEMENT_TYPE_FORM                      ? CMessage::Text(MSG_GRAPH_ELEMENT_TYPE_FORM)                     :
      type==GRAPH_ELEMENT_TYPE_WINDOW                    ? CMessage::Text(MSG_GRAPH_ELEMENT_TYPE_WINDOW)                   :
      //--- WinForms
      type==GRAPH_ELEMENT_TYPE_WF_UNDERLAY               ? CMessage::Text(MSG_GRAPH_ELEMENT_TYPE_WF_UNDERLAY)              :
      type==GRAPH_ELEMENT_TYPE_WF_BASE                   ? CMessage::Text(MSG_GRAPH_ELEMENT_TYPE_WF_BASE)                  :
      //--- Containers
      type==GRAPH_ELEMENT_TYPE_WF_CONTAINER              ? CMessage::Text(MSG_GRAPH_ELEMENT_TYPE_WF_CONTAINER)             :
      type==GRAPH_ELEMENT_TYPE_WF_GROUPBOX               ? CMessage::Text(MSG_GRAPH_ELEMENT_TYPE_WF_GROUPBOX)              :
      type==GRAPH_ELEMENT_TYPE_WF_PANEL                  ? CMessage::Text(MSG_GRAPH_ELEMENT_TYPE_WF_PANEL)                 :
      type==GRAPH_ELEMENT_TYPE_WF_TAB_CONTROL            ? CMessage::Text(MSG_GRAPH_ELEMENT_TYPE_WF_TAB_CONTROL)           :
      //--- Standard controls
      type==GRAPH_ELEMENT_TYPE_WF_COMMON_BASE            ? CMessage::Text(MSG_GRAPH_ELEMENT_TYPE_WF_COMMON_BASE)           :
      type==GRAPH_ELEMENT_TYPE_WF_LABEL                  ? CMessage::Text(MSG_GRAPH_ELEMENT_TYPE_WF_LABEL)                 :
      type==GRAPH_ELEMENT_TYPE_WF_CHECKBOX               ? CMessage::Text(MSG_GRAPH_ELEMENT_TYPE_WF_CHECKBOX)              :
      type==GRAPH_ELEMENT_TYPE_WF_RADIOBUTTON            ? CMessage::Text(MSG_GRAPH_ELEMENT_TYPE_WF_RADIOBUTTON)           :
      type==GRAPH_ELEMENT_TYPE_WF_BUTTON                 ? CMessage::Text(MSG_GRAPH_ELEMENT_TYPE_WF_BUTTON)                :
      type==GRAPH_ELEMENT_TYPE_WF_ELEMENTS_LIST_BOX      ? CMessage::Text(MSG_GRAPH_ELEMENT_TYPE_WF_ELEMENTS_LIST_BOX)     :
      type==GRAPH_ELEMENT_TYPE_WF_LIST_BOX               ? CMessage::Text(MSG_GRAPH_ELEMENT_TYPE_WF_LIST_BOX)              :
      type==GRAPH_ELEMENT_TYPE_WF_LIST_BOX_ITEM          ? CMessage::Text(MSG_GRAPH_ELEMENT_TYPE_WF_LIST_BOX_ITEM)         :
      type==GRAPH_ELEMENT_TYPE_WF_CHECKED_LIST_BOX       ? CMessage::Text(MSG_GRAPH_ELEMENT_TYPE_WF_CHECKED_LIST_BOX)      :
      type==GRAPH_ELEMENT_TYPE_WF_BUTTON_LIST_BOX        ? CMessage::Text(MSG_GRAPH_ELEMENT_TYPE_WF_BUTTON_LIST_BOX)       :
      //--- Auxiliary control objects
      type==GRAPH_ELEMENT_TYPE_WF_TAB_HEADER             ? CMessage::Text(MSG_GRAPH_ELEMENT_TYPE_WF_TAB_HEADER)            :
      type==GRAPH_ELEMENT_TYPE_WF_TAB_FIELD              ? CMessage::Text(MSG_GRAPH_ELEMENT_TYPE_WF_TAB_FIELD)             :
      type==GRAPH_ELEMENT_TYPE_WF_ARROW_BUTTON           ? CMessage::Text(MSG_GRAPH_ELEMENT_TYPE_WF_ARROW_BUTTON)          :
      type==GRAPH_ELEMENT_TYPE_WF_ARROW_BUTTON_UP        ? CMessage::Text(MSG_GRAPH_ELEMENT_TYPE_WF_ARROW_BUTTON_UP)       :
      type==GRAPH_ELEMENT_TYPE_WF_ARROW_BUTTON_DOWN      ? CMessage::Text(MSG_GRAPH_ELEMENT_TYPE_WF_ARROW_BUTTON_DOWN)     :
      type==GRAPH_ELEMENT_TYPE_WF_ARROW_BUTTON_LEFT      ? CMessage::Text(MSG_GRAPH_ELEMENT_TYPE_WF_ARROW_BUTTON_LEFT)     :
      type==GRAPH_ELEMENT_TYPE_WF_ARROW_BUTTON_RIGHT     ? CMessage::Text(MSG_GRAPH_ELEMENT_TYPE_WF_ARROW_BUTTON_RIGHT)    :
      type==GRAPH_ELEMENT_TYPE_WF_ARROW_BUTTONS_UD_BOX   ? CMessage::Text(MSG_GRAPH_ELEMENT_TYPE_WF_ARROW_BUTTONS_UD_BOX)  :
      type==GRAPH_ELEMENT_TYPE_WF_ARROW_BUTTONS_LR_BOX   ? CMessage::Text(MSG_GRAPH_ELEMENT_TYPE_WF_ARROW_BUTTONS_LR_BOX)  :
      "Unknown"
     );
  }
//+------------------------------------------------------------------+
Ahora podemos obtener las descripciones de los nuevos tipos de objetos auxiliares cuando estén listos y podamos crearlos.
En el archivo de objeto básico de los objetos gráficos estándar de la biblioteca \MQL5\Include\DoEasy\Objects\Graph\Standard\GStdGraphObj.mqh, corregiremos la llamada al método de configuración de la bandera de visibilidad, ya que este método ahora ha sido renombrado:
//--- Object visibility on timeframes
   bool              Visible(void)                 const { return (bool)this.GetProperty(GRAPH_OBJ_PROP_TIMEFRAMES,0);                    }
   bool              SetFlagVisible(const bool flag,const bool only_prop)
                       {
                        if(!CGBaseObj::SetVisibleFlag(flag,only_prop))
                           return false;
                        this.SetProperty(GRAPH_OBJ_PROP_TIMEFRAMES,0,flag);
                        return true;
                       }
//--- Background object
En el archivo de objeto de elemento gráfico en el lienzo MQL5\Include\DoEasy\Objects\Graph\GCnvElement.mqh, en la estructura privada del objeto, añadiremos las nuevas propiedades de tipo entero:
private:
   int               m_shift_coord_x;                          // Offset of the X coordinate relative to the base object
   int               m_shift_coord_y;                          // Offset of the Y coordinate relative to the base object
   struct SData
     {
      //--- Object integer properties
      int            id;                                       // Element ID
      int            type;                                     // Graphical element type

      //---...
      //---...

      int            tab_alignment;                            // Location of tabs inside the control
      int            alignment;                                // Location of the object inside the control
      int            visible_area_x;                           // Visibility scope X coordinate
      int            visible_area_y;                           // Visibility scope Y coordinate
      int            visible_area_w;                           // Visibility scope width
      int            visible_area_h;                           // Visibility scope height
      //--- Object real properties

      //--- Object string properties
      uchar          name_obj[64];                             // Graphical element object name
      uchar          name_res[64];                             // Graphical resource name
      uchar          text[256];                                // Graphical element text
      uchar          descript[256];                            // Graphical element description
     };
   SData             m_struct_obj;                             // Object structure
Necesitaremos la estructura de propiedades del objeto para guardar y leer correctamente las propiedades del objeto desde el archivo.
Todos los métodos que hacen referencia al método previamente renombrado en el archivo del objeto gráfico básico ahora deberán hacer referencia a ese método según su nuevo nombre:
//--- Set the object above all
   virtual void      BringToTop(void)                          { CGBaseObj::SetVisibleFlag(false,false); CGBaseObj::SetVisibleFlag(true,false);}
//--- (1) Show and (2) hide the element
   virtual void      Show(void)                                { CGBaseObj::SetVisibleFlag(true,false);                                }
   virtual void      Hide(void)                                { CGBaseObj::SetVisibleFlag(false,false);                               }

//--- Priority of a graphical object for receiving the event of clicking on a chart
Así, escribiremos los métodos virtuales para trabajar con las nuevas propiedades del elemento gráfico:
//--- Graphical object group
   virtual int       Group(void)                         const { return (int)this.GetProperty(CANV_ELEMENT_PROP_GROUP);                }
   virtual void      SetGroup(const int value)
                       {
                        CGBaseObj::SetGroup(value);
                        this.SetProperty(CANV_ELEMENT_PROP_GROUP,value);
                       }
//--- Visibility scope X coordinate
   virtual int       XOffset(void)                       const { return (int)this.GetProperty(CANV_ELEMENT_PROP_VISIBLE_AREA_X);       }
   virtual bool      SetXOffset(const int value,const bool only_prop)
                       {
                        ::ResetLastError();
                        if((!only_prop && CGBaseObj::SetXOffset(value)) || only_prop)
                          {
                           this.SetProperty(CANV_ELEMENT_PROP_VISIBLE_AREA_X,value);
                           return true;
                          }
                        else
                           CMessage::ToLog(DFUN,::GetLastError(),true);
                        return false;
                       }
//--- Visibility scope Y coordinate
   virtual int       YOffset(void)                       const { return (int)this.GetProperty(CANV_ELEMENT_PROP_VISIBLE_AREA_Y);       }
   virtual bool      SetYOffset(const int value,const bool only_prop)
                       {
                        ::ResetLastError();
                        if((!only_prop && CGBaseObj::SetYOffset(value)) || only_prop)
                          {
                           this.SetProperty(CANV_ELEMENT_PROP_VISIBLE_AREA_Y,value);
                           return true;
                          }
                        else
                           CMessage::ToLog(DFUN,::GetLastError(),true);
                        return false;
                       }
//--- Visibility scope width
   virtual int       XSize(void)                         const { return (int)this.GetProperty(CANV_ELEMENT_PROP_VISIBLE_AREA_WIDTH);   }
   virtual bool      SetXSize(const int value,const bool only_prop)
                       {
                        ::ResetLastError();
                        if((!only_prop && CGBaseObj::SetXSize(value)) || only_prop)
                          {
                           this.SetProperty(CANV_ELEMENT_PROP_VISIBLE_AREA_WIDTH,value);
                           return true;
                          }
                        else
                           CMessage::ToLog(DFUN,::GetLastError(),true);
                        return false;
                       }
//--- Visibility scope height
   virtual int       YSize(void)                         const { return (int)this.GetProperty(CANV_ELEMENT_PROP_VISIBLE_AREA_HEIGHT);  }
   virtual bool      SetYSize(const int value,const bool only_prop)
                       {
                        ::ResetLastError();
                        if((!only_prop && CGBaseObj::SetYSize(value)) || only_prop)
                          {
                           this.SetProperty(CANV_ELEMENT_PROP_VISIBLE_AREA_HEIGHT,value);
                           return true;
                          }
                        else
                           CMessage::ToLog(DFUN,::GetLastError(),true);
                        return false;
                       }

//--- Visibility scope X coordinate
   virtual int       VisibleAreaX(void)                  const { return this.XOffset();                                                }
   virtual bool      SetVisibleAreaX(const int value,const bool only_prop)
                       {
                        ::ResetLastError();
                        if((!only_prop && CGBaseObj::SetXOffset(value)) || only_prop)
                          {
                           this.SetProperty(CANV_ELEMENT_PROP_VISIBLE_AREA_X,value);
                           return true;
                          }
                        else
                           CMessage::ToLog(DFUN,::GetLastError(),true);
                        return false;
                       }
//--- Visibility scope Y coordinate
   virtual int       VisibleAreaY(void)                  const { return this.YOffset();                                                }
   virtual bool      SetVisibleAreaY(const int value,const bool only_prop)
                       {
                        ::ResetLastError();
                        if((!only_prop && CGBaseObj::SetYOffset(value)) || only_prop)
                          {
                           this.SetProperty(CANV_ELEMENT_PROP_VISIBLE_AREA_Y,value);
                           return true;
                          }
                        else
                           CMessage::ToLog(DFUN,::GetLastError(),true);
                        return false;
                       }
//--- Visibility scope width
   virtual int       VisibleAreaWidth(void)              const { return this.XSize();                                                  }
   virtual bool      SetVisibleAreaWidth(const int value,const bool only_prop)
                       {
                        ::ResetLastError();
                        if((!only_prop && CGBaseObj::SetXSize(value)) || only_prop)
                          {
                           this.SetProperty(CANV_ELEMENT_PROP_VISIBLE_AREA_WIDTH,value);
                           return true;
                          }
                        else
                           CMessage::ToLog(DFUN,::GetLastError(),true);
                        return false;
                       }
//--- Visibility scope height
   virtual int       VisibleAreaHeight(void)             const { return this.YSize();                                                  }
   virtual bool      SetVisibleAreaHeight(const int value,const bool only_prop)
                       {
                        ::ResetLastError();
                        if((!only_prop && CGBaseObj::SetYSize(value)) || only_prop)
                          {
                           this.SetProperty(CANV_ELEMENT_PROP_VISIBLE_AREA_HEIGHT,value);
                           return true;
                          }
                        else
                           CMessage::ToLog(DFUN,::GetLastError(),true);
                        return false;
                       }

//--- Return the (1) X coordinate, (2) right border, (3) Y coordinate, (4) bottom border of the visible area
   int               CoordXVisibleArea(void)             const { return this.CoordX()+this.VisibleAreaX();                             }
   int               RightEdgeVisibleArea(void)          const { return this.CoordXVisibleArea()+this.VisibleAreaWidth();              }
   int               RightEdgeVisibleAreaRelative(void)  const { return this.VisibleAreaX()+this.VisibleAreaWidth();                   }
   int               CoordYVisibleArea(void)             const { return this.CoordY()+this.VisibleAreaY();                             }
   int               BottomEdgeVisibleArea(void)         const { return this.CoordYVisibleArea()+this.VisibleAreaHeight();             }
   int               BottomEdgeVisibleAreaRelative(void) const { return this.VisibleAreaY()+this.VisibleAreaHeight();                  }

//--- Graphical element description
Los métodos para establecer el valor de la propiedad primero establecen la propiedad directamente en el propio objeto gráfico y, si la operación tiene éxito, establecen el valor en la propiedad de la clase del objeto. Los valores se retornan desde las propiedades del objeto que se han establecido previamente allí usando los métodos de establecimiento de propiedades.
Los métodos auxiliares retornan el valor calculado del borde deseado o la coordenada de la esquina superior izquierda de la zona de visibilidad del objeto y simplifican el acceso a la lectura de las propiedades requeridas de los bordes de la zona de visibilidad, ya que se nombran según los métodos similares de los elementos gráficos, y retornan los valores requeridos sin necesidad de calcularlos de forma independiente.
Al crear un objeto de elemento gráfico, deberá rellenarse con el conjunto de colores para él; además, en este se deberán dibujar las inscripciones o imágenes necesarias y luego el objeto deberá calcular su ubicación dentro del contenedor y recortar las partes de sí mismo que sobresalgan fuera del contenedor. El recorte se realizará rellenando con un color transparente las áreas que deben ocultarse. Entonces, primero deberemos llamar al método Erase(), que rellena el fondo con un color; además, en este se dibuja algo más en el objeto, y luego borra las partes invisibles de la imagen. Todo esto debe colocarse nuevamente en el método Erase(). Esto significa que la primera vez que se rellene con color, debería hacerse sin recortar las zonas ocultas. Llamaremos a este método EraseNoCrop(). Vamos a crear el método Crop() para recortar zonas ocultas. En el método Erase() existente, llamaremos secuencialmente a estos métodos.
Así, declararemos los nuevos métodos en las secciones protegidas y públicas de la clase:
//+------------------------------------------------------------------+
//| The methods of filling, clearing and updating raster data        |
//+------------------------------------------------------------------+
//--- Clear the element filling it with color and opacity
   virtual void      Erase(const color colour,const uchar opacity,const bool redraw=false);
//--- Clear the element with a gradient fill
   virtual void      Erase(color &colors[],const uchar opacity,const bool vgradient,const bool cycle,const bool redraw=false);
//--- Clear the element completely
   virtual void      Erase(const bool redraw=false);
protected:
//--- Clear the element filling it with color and opacity without cropping and updating
   virtual void      EraseNoCrop(const color colour,const uchar opacity,const bool redraw=false);
//--- Clears the element with a gradient fill without cropping and updating
   virtual void      EraseNoCrop(color &colors[],const uchar opacity,const bool vgradient,const bool cycle,const bool redraw=false);
public:
//--- Crops the image outlined by (1) the specified and (2) previously set rectangular visibility scope
   void              Crop(const uint coord_x,const uint coord_y,const uint width,const uint height);
   virtual void      Crop(void);
//--- Update the element
   void              Update(const bool redraw=false)           { this.m_canvas.Update(redraw);                                         }

//+------------------------------------------------------------------+
En ambos constructores de clase, estableceremos los valores predeterminados para las coordenadas y los tamaños de la zona de visibilidad del objeto para que la zona de visibilidad rectangular sea del tamaño de todo el objeto y, después de configurar todas las propiedades, estableceremos la bandera de visibilidad del objeto como "oculta": esto nos permitirá no observar cómo se construyen gradualmente en el gráfico todos los objetos de los elementos de la GUI del programa (además de ocultar el objeto de formulario principal y su visualización posterior después de construir todos los objetos gráficos en él en el propio programa al construir su componente gráfico):
//+------------------------------------------------------------------+
//| Parametric constructor                                           |
//+------------------------------------------------------------------+
CGCnvElement::CGCnvElement(const ENUM_GRAPH_ELEMENT_TYPE element_type,
                           const int      element_id,
                           const int      element_num,
                           const long     chart_id,
                           const int      wnd_num,
                           const string   descript,
                           const int      x,
                           const int      y,
                           const int      w,
                           const int      h,
                           const color    colour,
                           const uchar    opacity,
                           const bool     movable=true,
                           const bool     activity=true,
                           const bool     redraw=false) : m_shadow(false)
  {
   this.SetTypeElement(element_type);
   this.m_type=OBJECT_DE_TYPE_GELEMENT;
   this.m_element_main=NULL;
   this.m_element_base=NULL;
   this.m_chart_color_bg=(color)::ChartGetInteger((chart_id==NULL ? ::ChartID() : chart_id),CHART_COLOR_BACKGROUND);
   this.m_name=this.CreateNameGraphElement(element_type);
   this.m_chart_id=(chart_id==NULL || chart_id==0 ? ::ChartID() : chart_id);
   this.m_subwindow=wnd_num;
   this.SetFont(DEF_FONT,DEF_FONT_SIZE);
   this.m_text_anchor=0;
   this.m_text_x=0;
   this.m_text_y=0;
   this.SetBackgroundColor(colour,true);
   this.SetOpacity(opacity);
   this.m_shift_coord_x=0;
   this.m_shift_coord_y=0;
   if(::ArrayResize(this.m_array_colors_bg,1)==1)
      this.m_array_colors_bg[0]=this.BackgroundColor();
   if(::ArrayResize(this.m_array_colors_bg_dwn,1)==1)
      this.m_array_colors_bg_dwn[0]=this.BackgroundColor();
   if(::ArrayResize(this.m_array_colors_bg_ovr,1)==1)
      this.m_array_colors_bg_ovr[0]=this.BackgroundColor();
   if(this.Create(chart_id,wnd_num,x,y,w,h,redraw))
     {
      this.SetProperty(CANV_ELEMENT_PROP_NAME_RES,this.m_canvas.ResourceName()); // Graphical resource name
      this.SetProperty(CANV_ELEMENT_PROP_CHART_ID,CGBaseObj::ChartID());         // Chart ID

      //---...
      //---...

      this.SetProperty(CANV_ELEMENT_PROP_ACT_RIGHT,this.ActiveAreaRight());      // Right border of the element active area
      this.SetProperty(CANV_ELEMENT_PROP_ACT_BOTTOM,this.ActiveAreaBottom());    // Bottom border of the element active area
      this.SetProperty(CANV_ELEMENT_PROP_VISIBLE_AREA_X,0);                      // Visibility scope X coordinate
      this.SetProperty(CANV_ELEMENT_PROP_VISIBLE_AREA_Y,0);                      // Visibility scope Y coordinate
      this.SetProperty(CANV_ELEMENT_PROP_VISIBLE_AREA_WIDTH,w);                  // Visibility scope width
      this.SetProperty(CANV_ELEMENT_PROP_VISIBLE_AREA_HEIGHT,h);                 // Visibility scope height

      //---...
      //---...

      this.SetProperty(CANV_ELEMENT_PROP_BELONG,ENUM_GRAPH_OBJ_BELONG::GRAPH_OBJ_BELONG_PROGRAM);  // Graphical element affiliation
      this.SetProperty(CANV_ELEMENT_PROP_ZORDER,0);                              // Priority of a graphical object for receiving the event of clicking on a chart

      //---...
      //---...

      this.SetProperty(CANV_ELEMENT_PROP_ALIGNMENT,CANV_ELEMENT_ALIGNMENT_TOP);                       // Location of an object inside the control
      this.SetProperty(CANV_ELEMENT_PROP_TEXT,"");                                                    // Graphical element text
      this.SetProperty(CANV_ELEMENT_PROP_DESCRIPTION,descript);                                       // Graphical element description
      this.SetVisibleFlag(false,false);
     }
   else
     {
      ::Print(DFUN,CMessage::Text(MSG_LIB_SYS_FAILED_CREATE_ELM_OBJ),"\"",this.TypeElementDescription(element_type),"\" ",this.NameObj());
     }
  }
//+------------------------------------------------------------------+
//| Protected constructor                                            |
//+------------------------------------------------------------------+
CGCnvElement::CGCnvElement(const ENUM_GRAPH_ELEMENT_TYPE element_type,
                           const long    chart_id,
                           const int     wnd_num,
                           const string  descript,
                           const int     x,
                           const int     y,
                           const int     w,
                           const int     h) : m_shadow(false)
  {
   this.m_type=OBJECT_DE_TYPE_GELEMENT;
   this.m_element_main=NULL;
   this.m_element_base=NULL;
   this.m_chart_color_bg=(color)::ChartGetInteger((chart_id==NULL ? ::ChartID() : chart_id),CHART_COLOR_BACKGROUND);
   this.m_name=this.CreateNameGraphElement(element_type);
   this.m_chart_id=(chart_id==NULL || chart_id==0 ? ::ChartID() : chart_id);
   this.m_subwindow=wnd_num;
   this.m_type_element=element_type;
   this.SetFont(DEF_FONT,DEF_FONT_SIZE);
   this.m_text_anchor=0;
   this.m_text_x=0;
   this.m_text_y=0;
   this.SetBackgroundColor(CLR_CANV_NULL,true);
   this.SetOpacity(0);
   this.m_shift_coord_x=0;
   this.m_shift_coord_y=0;
   if(::ArrayResize(this.m_array_colors_bg,1)==1)
      this.m_array_colors_bg[0]=this.BackgroundColor();
   if(::ArrayResize(this.m_array_colors_bg_dwn,1)==1)
      this.m_array_colors_bg_dwn[0]=this.BackgroundColor();
   if(::ArrayResize(this.m_array_colors_bg_ovr,1)==1)
      this.m_array_colors_bg_ovr[0]=this.BackgroundColor();
   if(this.Create(chart_id,wnd_num,x,y,w,h,false))
     {
      this.SetProperty(CANV_ELEMENT_PROP_NAME_RES,this.m_canvas.ResourceName()); // Graphical resource name
      this.SetProperty(CANV_ELEMENT_PROP_CHART_ID,CGBaseObj::ChartID());         // Chart ID

      //---...
      //---...

      this.SetProperty(CANV_ELEMENT_PROP_ACT_RIGHT,this.ActiveAreaRight());      // Right border of the element active area
      this.SetProperty(CANV_ELEMENT_PROP_ACT_BOTTOM,this.ActiveAreaBottom());    // Bottom border of the element active area
      this.SetProperty(CANV_ELEMENT_PROP_VISIBLE_AREA_X,0);                      // Visibility scope X coordinate
      this.SetProperty(CANV_ELEMENT_PROP_VISIBLE_AREA_Y,0);                      // Visibility scope Y coordinate
      this.SetProperty(CANV_ELEMENT_PROP_VISIBLE_AREA_WIDTH,w);                  // Visibility scope width
      this.SetProperty(CANV_ELEMENT_PROP_VISIBLE_AREA_HEIGHT,h);                 // Visibility scope height

      //---...
      //---...

      this.SetProperty(CANV_ELEMENT_PROP_TAB_ALIGNMENT,CANV_ELEMENT_ALIGNMENT_TOP);                   // Location of tabs inside the control
      this.SetProperty(CANV_ELEMENT_PROP_ALIGNMENT,CANV_ELEMENT_ALIGNMENT_TOP);                       // Location of an object inside the control

      //---...
      //---...

      this.SetProperty(CANV_ELEMENT_PROP_TEXT,"");                                                    // Graphical element text
      this.SetProperty(CANV_ELEMENT_PROP_DESCRIPTION,descript);                                       // Graphical element description
      this.SetVisibleFlag(false,false);
     }
   else
     {
      ::Print(DFUN,CMessage::Text(MSG_LIB_SYS_FAILED_CREATE_ELM_OBJ),"\"",this.TypeElementDescription(element_type),"\" ",this.NameObj());
     }
  }
//+------------------------------------------------------------------+
En el método que crea la estructura del objeto, escribiremos la configuración de las propiedades de la zona de visibilidad:
//+------------------------------------------------------------------+
//| Create the object structure                                      |
//+------------------------------------------------------------------+
bool CGCnvElement::ObjectToStruct(void)
  {
//--- Save integer properties
   this.m_struct_obj.id=(int)this.GetProperty(CANV_ELEMENT_PROP_ID);                               // Element ID
   this.m_struct_obj.type=(int)this.GetProperty(CANV_ELEMENT_PROP_TYPE);                           // Graphical element type

   //---...
   //---...

   this.m_struct_obj.coord_act_y=(int)this.GetProperty(CANV_ELEMENT_PROP_COORD_ACT_Y);             // Y coordinate of the element active area
   this.m_struct_obj.coord_act_right=(int)this.GetProperty(CANV_ELEMENT_PROP_ACT_RIGHT);           // Right border of the element active area
   this.m_struct_obj.coord_act_bottom=(int)this.GetProperty(CANV_ELEMENT_PROP_ACT_BOTTOM);         // Bottom border of the element active area
   this.m_struct_obj.visible_area_x=(int)this.GetProperty(CANV_ELEMENT_PROP_VISIBLE_AREA_X);       // Visibility scope X coordinate
   this.m_struct_obj.visible_area_y=(int)this.GetProperty(CANV_ELEMENT_PROP_VISIBLE_AREA_Y);       // Visibility scope Y coordinate
   this.m_struct_obj.visible_area_w=(int)this.GetProperty(CANV_ELEMENT_PROP_VISIBLE_AREA_WIDTH);   // Visibility scope width
   this.m_struct_obj.visible_area_h=(int)this.GetProperty(CANV_ELEMENT_PROP_VISIBLE_AREA_HEIGHT);  // Visibility scope height
   this.m_struct_obj.zorder=this.GetProperty(CANV_ELEMENT_PROP_ZORDER);                            // Priority of a graphical object for receiving the on-chart mouse click event
   this.m_struct_obj.enabled=(bool)this.GetProperty(CANV_ELEMENT_PROP_ENABLED);                    // Element availability flag

   //---...
   //---...

   this.m_struct_obj.tab_alignment=(int)this.GetProperty(CANV_ELEMENT_PROP_TAB_ALIGNMENT);                              // Location of tabs inside the control
   this.m_struct_obj.alignment=(int)this.GetProperty(CANV_ELEMENT_PROP_ALIGNMENT);                                      // Location of an object inside the control
//--- Save real properties

//--- Save string properties
   ::StringToCharArray(this.GetProperty(CANV_ELEMENT_PROP_NAME_OBJ),this.m_struct_obj.name_obj);   // Graphical element object name
   ::StringToCharArray(this.GetProperty(CANV_ELEMENT_PROP_NAME_RES),this.m_struct_obj.name_res);   // Graphical resource name
   ::StringToCharArray(this.GetProperty(CANV_ELEMENT_PROP_TEXT),this.m_struct_obj.text);           // Graphical element text
   ::StringToCharArray(this.GetProperty(CANV_ELEMENT_PROP_DESCRIPTION),this.m_struct_obj.descript);// Graphical element description
   //--- Save the structure to the uchar array
   ::ResetLastError();
   if(!::StructToCharArray(this.m_struct_obj,this.m_uchar_array))
     {
      CMessage::ToLog(DFUN,MSG_LIB_SYS_FAILED_SAVE_OBJ_STRUCT_TO_UARRAY,true);
      return false;
     }
   return true;
  }
//+------------------------------------------------------------------+
En el método que crea un objeto a partir de una estructura, escribiremos un registro con los valores de las propiedades de la zona de visibilidad en las propiedades del objeto:
//+------------------------------------------------------------------+
//| Create the object from the structure                             |
//+------------------------------------------------------------------+
void CGCnvElement::StructToObject(void)
  {
//--- Save integer properties
   this.SetProperty(CANV_ELEMENT_PROP_ID,this.m_struct_obj.id);                                    // Element ID
   this.SetProperty(CANV_ELEMENT_PROP_TYPE,this.m_struct_obj.type);                                // Graphical element type

   //---...
   //---...

   this.SetProperty(CANV_ELEMENT_PROP_ACT_RIGHT,this.m_struct_obj.coord_act_right);                // Right border of the element active area
   this.SetProperty(CANV_ELEMENT_PROP_ACT_BOTTOM,this.m_struct_obj.coord_act_bottom);              // Bottom border of the element active area
   this.SetProperty(CANV_ELEMENT_PROP_VISIBLE_AREA_X,this.m_struct_obj.visible_area_x);            // Visibility scope X coordinate
   this.SetProperty(CANV_ELEMENT_PROP_VISIBLE_AREA_Y,this.m_struct_obj.visible_area_y);            // Visibility scope Y coordinate
   this.SetProperty(CANV_ELEMENT_PROP_VISIBLE_AREA_WIDTH,this.m_struct_obj.visible_area_w);        // Visibility scope width
   this.SetProperty(CANV_ELEMENT_PROP_VISIBLE_AREA_HEIGHT,this.m_struct_obj.visible_area_h);       // Visibility scope height
   this.SetProperty(CANV_ELEMENT_PROP_ZORDER,this.m_struct_obj.zorder);                            // Priority of a graphical object for receiving the event of clicking on a chart
   this.SetProperty(CANV_ELEMENT_PROP_ENABLED,this.m_struct_obj.enabled);                          // Element availability flag

   //---...
   //---...

   this.SetProperty(CANV_ELEMENT_PROP_FORE_COLOR,this.m_struct_obj.fore_color);                    // Default text color for all control objects
   this.SetProperty(CANV_ELEMENT_PROP_FORE_COLOR_OPACITY,this.m_struct_obj.fore_color_opacity);    // Opacity of the default text color for all control objects

   //---...
   //---...

   this.SetProperty(CANV_ELEMENT_PROP_TAB_ALIGNMENT,this.m_struct_obj.tab_alignment);                             // Location of tabs inside the control
   this.SetProperty(CANV_ELEMENT_PROP_ALIGNMENT,this.m_struct_obj.alignment);                                     // Location of an object inside the control
//--- Save real properties

//--- Save string properties
   this.SetProperty(CANV_ELEMENT_PROP_NAME_OBJ,::CharArrayToString(this.m_struct_obj.name_obj));   // Graphical element object name
   this.SetProperty(CANV_ELEMENT_PROP_NAME_RES,::CharArrayToString(this.m_struct_obj.name_res));   // Graphical resource name
   this.SetProperty(CANV_ELEMENT_PROP_TEXT,::CharArrayToString(this.m_struct_obj.text));           // Graphical element text
   this.SetProperty(CANV_ELEMENT_PROP_DESCRIPTION,::CharArrayToString(this.m_struct_obj.descript));// Graphical element description
  }
//+------------------------------------------------------------------+
En los métodos para configurar la anchura y la altura del elemento, introduciremos la configuración de las propiedades de la zona de visibilidad rectangular:
//+------------------------------------------------------------------+
//| Set a new width                                                  |
//+------------------------------------------------------------------+
bool CGCnvElement::SetWidth(const int width)
  {
   if(this.GetProperty(CANV_ELEMENT_PROP_WIDTH)==width)
      return true;
   if(!this.m_canvas.Resize(width,this.m_canvas.Height()))
     {
      CMessage::ToLog(DFUN+this.TypeElementDescription()+": width="+(string)width+": ",MSG_CANV_ELEMENT_ERR_FAILED_SET_WIDTH);
      return false;
     }
   this.SetProperty(CANV_ELEMENT_PROP_WIDTH,width);
   this.SetVisibleAreaX(0,true);
   this.SetVisibleAreaWidth(width,true);
   return true;
  }
//+------------------------------------------------------------------+
//| Set a new height                                                 |
//+------------------------------------------------------------------+
bool CGCnvElement::SetHeight(const int height)
  {
   if(this.GetProperty(CANV_ELEMENT_PROP_HEIGHT)==height)
      return true;
   if(!this.m_canvas.Resize(this.m_canvas.Width(),height))
     {
      CMessage::ToLog(DFUN+this.TypeElementDescription()+": height="+(string)height+": ",MSG_CANV_ELEMENT_ERR_FAILED_SET_HEIGHT);
      return false;
     }
   this.SetProperty(CANV_ELEMENT_PROP_HEIGHT,height);
   this.SetVisibleAreaY(0,true);
   this.SetVisibleAreaHeight(height,true);
   return true;
  }
//+------------------------------------------------------------------+
Si el tamaño del elemento gráfico cambia, la zona de visibilidad deberá cambiar en consecuencia para abarcar todo el objeto, que es lo que estamos haciendo aquí: después de cada cambio en el tamaño del objeto, estableceremos un nuevo tamaño correspondiente de la zona de visibilidad con su coordenada inicial igual a cero: en la esquina superior izquierda del objeto gráfico.
Ahora los métodos Erase() serán como vemos a continuación:
//+------------------------------------------------------------------+
//| Clear the element filling it with color and opacity              |
//+------------------------------------------------------------------+
void CGCnvElement::Erase(const color colour,const uchar opacity,const bool redraw=false)
  {
   this.EraseNoCrop(colour,opacity,false);
   this.Crop();
   this.Update(redraw);
  }
//+------------------------------------------------------------------+
//| Clear the element with a gradient fill                           |
//+------------------------------------------------------------------+
void CGCnvElement::Erase(color &colors[],const uchar opacity,const bool vgradient,const bool cycle,const bool redraw=false)
  {
   this.EraseNoCrop(colors,opacity,vgradient,cycle,false);
   this.Crop();
//--- If specified, update the canvas
   this.Update(redraw);
  }
//+------------------------------------------------------------------+
En primer lugar, llamaremos al método EraseNoCrop(), en el que el se realizará la limpieza del elemento con el color especificado, con la actualización deshabilitada, luego llamaremos al método Crop(), que recortará las zonas ocultas, y luego se actualizará el lienzo con el color especificado, con la bandera de actualización del gráfico.
Métodos para rellenar el lienzo con color sin recortar las zonas ocultas:
//+------------------------------------------------------------------+
//| Clear the element filling it with color and opacity              |
//| without cropping and with the chart update by flag               |
//+------------------------------------------------------------------+
void CGCnvElement::EraseNoCrop(const color colour,const uchar opacity,const bool redraw=false)
  {
   color arr[1];
   arr[0]=colour;
   this.SaveColorsBG(arr);
   this.m_canvas.Erase(::ColorToARGB(colour,opacity));
   this.Update(redraw);
  }
//+------------------------------------------------------------------+
//| Clear the element with a gradient fill without cropping          |
//| but with updating the chart by flag                              |
//+------------------------------------------------------------------+
void CGCnvElement::EraseNoCrop(color &colors[],const uchar opacity,const bool vgradient,const bool cycle,const bool redraw=false)
  {
//--- Set the vertical and cyclic gradient filling flags
   this.m_gradient_v=vgradient;
   this.m_gradient_c=cycle;
//--- Check the size of the color array
   int size=::ArraySize(colors);
//--- If there are less than two colors in the array
   if(size<2)
     {
      //--- if the array is empty, erase the background completely and leave
      if(size==0)
        {
         this.Erase(redraw);
         return;
        }
      //--- in case of one color, fill the background with this color and opacity, and leave
      this.EraseNoCrop(colors[0],opacity,redraw);
      return;
     }
//--- Declare the receiver array
   color out[];
//--- Set the gradient size depending on the filling direction (vertical/horizontal)
   int total=(vgradient ? this.Height() : this.Width());
//--- and get the set of colors in the receiver array
   CColors::Gradient(colors,out,total,cycle);
   total=::ArraySize(out);
//--- In the loop by the number of colors in the array
   for(int i=0;i<total;i++)
     {
      //--- depending on the filling direction
      switch(vgradient)
        {
         //--- Horizontal gradient - draw vertical segments from left to right with the color from the array
         case false :
            DrawLineVertical(i,0,this.Height()-1,out[i],opacity);
           break;
         //--- Vertical gradient - draw horizontal segments downwards with the color from the array
         default:
            DrawLineHorizontal(0,this.Width()-1,i,out[i],opacity);
           break;
        }
     }
//--- Save the background color array
   this.SaveColorsBG(colors);
   this.Update(redraw);
  }
//+------------------------------------------------------------------+
De hecho, estos son los métodos Erase () anteriores, que ahora se complementan con un método para recortar zonas ocultas, y en los nuevos métodos Erase (), añadiremos las llamadas a estos métodos y el recorte de las zonas que vayan más allá del contenedor.
Método que recorta la imagen dibujada según la zona de visibilidad rectangular especificada:
//+--------------------------------------------------------------------+
//| Crop the image outlined by a specified rectangular visibility scope|
//+--------------------------------------------------------------------+
void CGCnvElement::Crop(const uint coord_x,const uint coord_y,const uint width,const uint height)
  {
//--- If the passed coordinates and the size of the visibility scope match the size of the object, leave
   if(coord_x==0 && coord_y==0 && width==this.Width() && height==this.Height())
      return;
//--- Set the coordinates and size of the visibility scope in the object properties
   this.SetVisibleAreaX(coord_x,true);
   this.SetVisibleAreaY(coord_y,true);
   this.SetVisibleAreaWidth(width,true);
   this.SetVisibleAreaHeight(height,true);
//--- If the object in the current state has not yet been saved,
//--- save its bitmap to the array for subsequent restoration
   if(::ArraySize(this.m_duplicate_res)==0)
      this.ResourceStamp(DFUN);
//--- In the loop through the image lines of the graphical object
   for(int y=0;y<this.Height();y++)
     {
      //--- go through each pixel of the current line
      for(int x=0;x<this.Width();x++)
        {
         //--- If the string and its pixel are in the visibility scope, skip the pixel
         if(y>=this.VisibleAreaY() && y<=this.BottomEdgeVisibleAreaRelative() && x>=this.VisibleAreaX() && x<=this.RightEdgeVisibleAreaRelative())
            continue;
         //--- If the line pixel is outside the visibility scope, set a transparent color for it
         this.SetPixel(x,y,CLR_CANV_NULL,0);
        }
     }
  }
//+------------------------------------------------------------------+
Las coordenadas iniciales de la zona visible del objeto en relación con su contenedor y el tamaño de esta zona se transmitirán al método. Los valores transmitidos se ajustan a las propiedades del objeto y luego, en dos ciclos, se produce el borrado (rellenado con un color transparente) de aquellos píxeles de la imagen que vayan más allá de la zona visible configurada.
Método que recorta la imagen dibujada por la zona de visibilidad rectangular calculada:
//+------------------------------------------------------------------+
//| Crop the image outlined by the calculated                        |
//| rectangular visibility scope                                     |
//+------------------------------------------------------------------+
void CGCnvElement::Crop(void)
  {
//--- Get the pointer to the base object
   CGCnvElement *base=this.GetBase();
//--- If the object does not have a base object it is attached to, then there is no need to crop the hidden areas - leave
   if(base==NULL)
      return;
//--- Set the initial coordinates and size of the visibility scope to the entire object
   int vis_x=0;
   int vis_y=0;
   int vis_w=this.Width();
   int vis_h=this.Height();
//--- Set the size of the top, bottom, left and right areas that go beyond the container
   int crop_top=0;
   int crop_bottom=0;
   int crop_left=0;
   int crop_right=0;
//--- Calculate the boundaries of the container area, inside which the object is fully visible
   int top=fmax(base.CoordY()+(int)base.GetProperty(CANV_ELEMENT_PROP_BORDER_SIZE_TOP),base.CoordYVisibleArea());
   int bottom=fmin(base.BottomEdge()-(int)base.GetProperty(CANV_ELEMENT_PROP_BORDER_SIZE_BOTTOM),base.BottomEdgeVisibleArea()+1);
   int left=fmax(base.CoordX()+(int)base.GetProperty(CANV_ELEMENT_PROP_BORDER_SIZE_LEFT),base.CoordXVisibleArea());
   int right=fmin(base.RightEdge()-(int)base.GetProperty(CANV_ELEMENT_PROP_BORDER_SIZE_RIGHT),base.RightEdgeVisibleArea()+1);
//--- Calculate the values of the top, bottom, left and right areas, at which the object goes beyond
//--- the boundaries of the container area, inside which the object is fully visible
   crop_top=this.CoordY()-top;
   if(crop_top<0)
      vis_y=-crop_top;
   crop_bottom=bottom-this.BottomEdge()-1;
   if(crop_bottom<0)
      vis_h=this.Height()+crop_bottom-vis_y;
   crop_left=this.CoordX()-left;
   if(crop_left<0)
      vis_x=-crop_left;
   crop_right=right-this.RightEdge()-1;
   if(crop_right<0)
      vis_w=this.Width()+crop_right-vis_x;
//--- If there are areas that need to be hidden, call the cropping method with the calculated size of the object visibility scope
   if(crop_top<0 || crop_bottom<0 || crop_left<0 || crop_right<0)
      this.Crop(vis_x,vis_y,vis_w,vis_h);
  }
//+------------------------------------------------------------------+
La lógica del método se detalla en los comentarios al código. Primero, obtendremos el puntero al objeto contenedor al que se adjunta este elemento gráfico. Según el tamaño del contenedor y los bordes de la zona en la que se ven los objetos adjuntos, calcularemos cuánto va el objeto adjunto al contenedor más allá de los límites de esta zona de su contenedor. Si el objeto va más allá de los límites de cualquier lado, llamaremos al método para recortar las zonas de la imagen que deben estar ocultas.
Vamos a introducir algunas mejoras en el archivo de la clase de objeto de sombra \MQL5\Include\DoEasy\Objects\Graph\ShadowObj.mqh .
En el constructor de clases, al crear un objeto, estableceremos su bandera de visibilidad como "oculto":
//+------------------------------------------------------------------+
//| Constructor                                                      |
//+------------------------------------------------------------------+
CShadowObj::CShadowObj(const long chart_id,
                       const int subwindow,
                       const string name,
                       const int x,
                       const int y,
                       const int w,
                       const int h) : CGCnvElement(GRAPH_ELEMENT_TYPE_SHADOW_OBJ,chart_id,subwindow,name,x,y,w,h)
  {
   this.m_type=OBJECT_DE_TYPE_GSHADOW;
   CGCnvElement::SetBackgroundColor(clrNONE,true);
   CGCnvElement::SetOpacity(0);
   CGCnvElement::SetActive(false);
   this.m_opacity=CLR_DEF_SHADOW_OPACITY;
   this.m_blur=DEF_SHADOW_BLUR;
   color gray=CGCnvElement::ChangeColorSaturation(this.ChartBackgroundColor(),-100);
   this.m_color=CGCnvElement::ChangeColorLightness(gray,-50);
   this.m_shadow=false;
   this.SetVisibleFlag(false,false);
   CGCnvElement::Erase();
  }
//+------------------------------------------------------------------+
En el método de dibujado de sombras, primero verificaremos la visibilidad del objeto, y si el objeto está oculto, entonces no habrá nada que dibujar, así que saldremos:
//+------------------------------------------------------------------+
//| Draw the object shadow                                           |
//+------------------------------------------------------------------+
void CShadowObj::Draw(const int shift_x,const int shift_y,const uchar blur_value,const bool redraw)
  {
   if(!this.IsVisible())
      return;
//--- Set the shadow shift values to the variables by X and Y axes
   this.SetCoordXRelative(shift_x);
   this.SetCoordYRelative(shift_y);
//--- Calculate the height and width of the drawn rectangle
   int w=this.Width()-OUTER_AREA_SIZE*2;
   int h=this.Height()-OUTER_AREA_SIZE*2;
//--- Draw a filled rectangle with calculated dimensions
   this.DrawShadowFigureRect(w,h);
//--- Calculate the blur radius, which cannot exceed a quarter of the OUTER_AREA_SIZE constant
   this.m_blur=(blur_value>OUTER_AREA_SIZE/4 ? OUTER_AREA_SIZE/4 : blur_value);
//--- If failed to blur the shape, exit the method (GaussianBlur() displays the error on the journal)
   if(!this.GaussianBlur(this.m_blur))
      return;
//--- Shift the shadow object by X/Y offsets specified in the method arguments and update the canvas
   CGCnvElement::Move(this.CoordX()+this.CoordXRelative(),this.CoordY()+this.CoordYRelative(),redraw);
   CGCnvElement::Update(redraw);
  }
//+------------------------------------------------------------------+
En el archivo de clase del objeto de formulario \MQL5\Include\DoEasy\Objects\Graph\Form.mqh, en el método que crea un nuevo elemento adjunto y lo añade a la lista de objetos adjuntos, corregiremos el nombre del anterior método renombrado:
//+------------------------------------------------------------------+
//| Create a new attached element                                    |
//| and add it to the list of bound objects                          |
//+------------------------------------------------------------------+
CGCnvElement *CForm::CreateAndAddNewElement(const ENUM_GRAPH_ELEMENT_TYPE element_type,
                                            const int x,
                                            const int y,
                                            const int w,
                                            const int h,
                                            const color colour,
                                            const uchar opacity,
                                            const bool activity)
  {
//--- If the type of a created graphical element is less than the "element", inform of that and return 'false'
   if(element_type<GRAPH_ELEMENT_TYPE_ELEMENT)
     {
      ::Print(DFUN,CMessage::Text(MSG_FORM_OBJECT_ERR_NOT_INTENDED),::StringSubstr(::EnumToString(element_type),19));
      .return NULL;
     }
//--- Specify the element index in the list
   int num=this.m_list_elements.Total();
//--- Create a description of the default graphical element
   string descript=TypeGraphElementAsString(element_type);
//--- Get the screen coordinates of the object relative to the coordinate system of the base object
   int elm_x=x;
   int elm_y=y;
   this.GetCoords(elm_x,elm_y);
//--- Create a new graphical element
   CGCnvElement *obj=this.CreateNewGObject(element_type,num,descript,elm_x,elm_y,w,h,colour,opacity,false,activity);
   if(obj==NULL)
      .return NULL;
//--- and add it to the list of bound graphical elements
   if(!this.AddNewElement(obj,elm_x,elm_y))
     {
      delete obj;
      .return NULL;
     }
//--- Set the minimum properties for a bound graphical element
   obj.SetBackgroundColor(colour,true);
   obj.SetOpacity(opacity);
   obj.SetActive(activity);
   obj.SetMain(this.GetMain()==NULL ? this.GetObject() : this.GetMain());
   obj.SetBase(this.GetObject());
   obj.SetID(this.GetMaxIDAll()+1);
   obj.SetNumber(num);
   obj.SetCoordXRelative(obj.CoordX()-this.CoordX());
   obj.SetCoordYRelative(obj.CoordY()-this.CoordY());
   obj.SetZorder(this.Zorder(),false);
   obj.SetCoordXRelativeInit(obj.CoordXRelative());
   obj.SetCoordYRelativeInit(obj.CoordYRelative());
   obj.SetVisibleFlag(this.IsVisible(),false);
   obj.SetActive(this.Active());
   obj.SetEnabled(this.Enabled());
   return obj;
  }
//+------------------------------------------------------------------+
Como ahora la sombra se dibuja solo si la bandera de visibilidad está configurada para ella, en el método para dibujar la sombra, intercambiaremos el lugar del dibujado de la sombra y configuraremos la bandera de visibilidad para ella:
//+------------------------------------------------------------------+
//| Draw the shadow                                                  |
//+------------------------------------------------------------------+
void CForm::DrawShadow(const int shift_x,const int shift_y,const color colour,const uchar opacity=127,const uchar blur=DEF_SHADOW_BLUR)
  {
//--- If the shadow flag is disabled, exit
   if(!this.m_shadow)
      return;
//--- If there is no shadow object, create it
   if(this.m_shadow_obj==NULL)
      this.CreateShadowObj(colour,opacity);
//--- If the shadow object exists, draw the shadow on it,
//--- set the shadow object visibility flag and
//--- move the form object to the foreground
   if(this.m_shadow_obj!=NULL)
     {
      this.m_shadow_obj.SetVisibleFlag(true,false);
      this.m_shadow_obj.Draw(shift_x,shift_y,blur,true);
      this.BringToTop();
     }
  }
//+------------------------------------------------------------------+
Antes, estos métodos se llamaban en orden inverso y no se dibujaba la sombra.
En el archivo de la clase de objeto básico de todos los objetos WinForms \MQL5\Include\DoEasy\Objects\Graph\WForms\WinFormBase.mqh, mejoraremos los métodos Erase():
//+------------------------------------------------------------------+
//| Clear the element filling it with color and opacity              |
//+------------------------------------------------------------------+
void CWinFormBase::Erase(const color colour,const uchar opacity,const bool redraw=false)
  {
//--- Fill the element having the specified color and the redrawing flag
   CGCnvElement::EraseNoCrop(colour,opacity,false);
//--- If the object has a frame, draw it
   if(this.BorderStyle()!=FRAME_STYLE_NONE)
      this.DrawFormFrame(this.BorderSizeTop(),this.BorderSizeBottom(),this.BorderSizeLeft(),this.BorderSizeRight(),this.BorderColor(),this.Opacity(),this.BorderStyle());
//--- Update the element having the specified redrawing flag
   this.Crop();
   this.Update(redraw);
  }
//+------------------------------------------------------------------+
//| Clear the element with a gradient fill                           |
//+------------------------------------------------------------------+
void CWinFormBase::Erase(color &colors[],const uchar opacity,const bool vgradient,const bool cycle,const bool redraw=false)
  {
//--- Fill the element having the specified color array and the redrawing flag
   CGCnvElement::EraseNoCrop(colors,opacity,vgradient,cycle,false);
//--- If the object has a frame, draw it
   if(this.BorderStyle()!=FRAME_STYLE_NONE)
      this.DrawFormFrame(this.BorderSizeTop(),this.BorderSizeBottom(),this.BorderSizeLeft(),this.BorderSizeRight(),this.BorderColor(),this.Opacity(),this.BorderStyle());
//--- Update the element having the specified redrawing flag
   this.Crop();
   this.Update(redraw);
  }
//+------------------------------------------------------------------+
Ahora primero llamaremos al método EraseNoCrop() del objeto de elemento gráfico, luego dibujaremos el marco y recortaremos las zonas ocultas.
En el método que retorna la descripción de la propiedad entera del elemento, añadiremos un bloque de código para devolver la descripción de las nuevas propiedades del objeto, es decir, las coordenadas y las dimensiones de la zona de visibilidad:
//+------------------------------------------------------------------+
//| Return the description of the control integer property           |
//+------------------------------------------------------------------+
string CWinFormBase::GetPropertyDescription(ENUM_CANV_ELEMENT_PROP_INTEGER property,bool only_prop=false)
  {
   return
     (
      property==CANV_ELEMENT_PROP_ID                           ?  CMessage::Text(MSG_CANV_ELEMENT_PROP_ID)+
         (only_prop ? "" : !this.SupportProperty(property)     ?  ": "+CMessage::Text(MSG_LIB_PROP_NOT_SUPPORTED) :
          ": "+(string)this.GetProperty(property)
         )  :
      property==CANV_ELEMENT_PROP_TYPE                         ?  CMessage::Text(MSG_CANV_ELEMENT_PROP_TYPE)+
         (only_prop ? "" : !this.SupportProperty(property)     ?  ": "+CMessage::Text(MSG_LIB_PROP_NOT_SUPPORTED) :
          ": "+this.TypeElementDescription()
         )  :

      //---...
      //---...

      property==CANV_ELEMENT_PROP_ACT_RIGHT                    ?  CMessage::Text(MSG_CANV_ELEMENT_PROP_ACT_RIGHT)+
         (only_prop ? "" : !this.SupportProperty(property)     ?  ": "+CMessage::Text(MSG_LIB_PROP_NOT_SUPPORTED) :
          ": "+(string)this.GetProperty(property)
         )  :
      property==CANV_ELEMENT_PROP_ACT_BOTTOM                   ?  CMessage::Text(MSG_CANV_ELEMENT_PROP_ACT_BOTTOM)+
         (only_prop ? "" : !this.SupportProperty(property)     ?  ": "+CMessage::Text(MSG_LIB_PROP_NOT_SUPPORTED) :
          ": "+(string)this.GetProperty(property)
         )  :
      property==CANV_ELEMENT_PROP_VISIBLE_AREA_X               ?  CMessage::Text(MSG_CANV_ELEMENT_PROP_VISIBLE_AREA_X)+
         (only_prop ? "" : !this.SupportProperty(property)     ?  ": "+CMessage::Text(MSG_LIB_PROP_NOT_SUPPORTED) :
          ": "+(string)this.GetProperty(property)
         )  :
      property==CANV_ELEMENT_PROP_VISIBLE_AREA_Y               ?  CMessage::Text(MSG_CANV_ELEMENT_PROP_VISIBLE_AREA_Y)+
         (only_prop ? "" : !this.SupportProperty(property)     ?  ": "+CMessage::Text(MSG_LIB_PROP_NOT_SUPPORTED) :
          ": "+(string)this.GetProperty(property)
         )  :
      property==CANV_ELEMENT_PROP_VISIBLE_AREA_WIDTH           ?  CMessage::Text(MSG_CANV_ELEMENT_PROP_VISIBLE_AREA_WIDTH)+
         (only_prop ? "" : !this.SupportProperty(property)     ?  ": "+CMessage::Text(MSG_LIB_PROP_NOT_SUPPORTED) :
          ": "+(string)this.GetProperty(property)
         )  :
      property==CANV_ELEMENT_PROP_VISIBLE_AREA_HEIGHT          ?  CMessage::Text(MSG_CANV_ELEMENT_PROP_VISIBLE_AREA_HEIGHT)+
         (only_prop ? "" : !this.SupportProperty(property)     ?  ": "+CMessage::Text(MSG_LIB_PROP_NOT_SUPPORTED) :
          ": "+(string)this.GetProperty(property)
         )  :
      property==CANV_ELEMENT_PROP_GROUP                        ?  CMessage::Text(MSG_GRAPH_OBJ_PROP_GROUP)+
         (only_prop ? "" : !this.SupportProperty(property)     ?  ": "+CMessage::Text(MSG_LIB_PROP_NOT_SUPPORTED) :
          ": "+(string)this.GetProperty(property)
         )  :
      property==CANV_ELEMENT_PROP_ZORDER                       ?  CMessage::Text(MSG_GRAPH_OBJ_PROP_ZORDER)+
         (only_prop ? "" : !this.SupportProperty(property)     ?  ": "+CMessage::Text(MSG_LIB_PROP_NOT_SUPPORTED) :
          ": "+(string)this.GetProperty(property)
         )  :

      //---...
      //---...

      property==CANV_ELEMENT_PROP_TAB_PAGE_COLUMN              ?  CMessage::Text(MSG_CANV_ELEMENT_PROP_TAB_PAGE_COLUMN)+
         (only_prop ? "" : !this.SupportProperty(property)     ?  ": "+CMessage::Text(MSG_LIB_PROP_NOT_SUPPORTED) :
          ": "+(string)this.GetProperty(property)
         )  :
      property==CANV_ELEMENT_PROP_ALIGNMENT                    ?  CMessage::Text(MSG_CANV_ELEMENT_PROP_ALIGNMENT)+
         (only_prop ? "" : !this.SupportProperty(property)     ?  ": "+CMessage::Text(MSG_LIB_PROP_NOT_SUPPORTED) :
          ": "+AlignmentDescription((ENUM_CANV_ELEMENT_ALIGNMENT)this.GetProperty(property))
         )  :
      ""
     );
  }
//+------------------------------------------------------------------+
El objeto ahora podrá generar el nombre de las nuevas propiedades creadas hoy.
En el archivo de la clase de objeto básico de los controles estándar \MQL5\Include\DoEasy\Objects\Graph\WForms\Common Controls\CommonBase.mqh, mejoraremos los métodos Erase() según su nuevo concepto de construcción:
//+------------------------------------------------------------------+
//| Clear the element filling it with color and opacity              |
//+------------------------------------------------------------------+
void CCommonBase::Erase(const color colour,const uchar opacity,const bool redraw=false)
  {
//--- Fill the element having the specified color and the redrawing flag
   CGCnvElement::EraseNoCrop(colour,opacity,false);
//--- If the object has a frame, draw it
   if(this.BorderStyle()!=FRAME_STYLE_NONE)
      this.DrawFormFrame(this.BorderSizeTop(),this.BorderSizeBottom(),this.BorderSizeLeft(),this.BorderSizeRight(),this.BorderColor(),255,this.BorderStyle());
//--- Update the element having the specified redrawing flag
   this.Crop();
   this.Update(redraw);
  }
//+------------------------------------------------------------------+
//| Clear the element with a gradient fill                           |
//+------------------------------------------------------------------+
void CCommonBase::Erase(color &colors[],const uchar opacity,const bool vgradient,const bool cycle,const bool redraw=false)
  {
//--- Fill the element having the specified color array and the redrawing flag
   CGCnvElement::EraseNoCrop(colors,opacity,vgradient,cycle,false);
//--- If the object has a frame, draw it
   if(this.BorderStyle()!=FRAME_STYLE_NONE)
      this.DrawFormFrame(this.BorderSizeTop(),this.BorderSizeBottom(),this.BorderSizeLeft(),this.BorderSizeRight(),this.BorderColor(),255,this.BorderStyle());
//--- Update the element having the specified redrawing flag
   this.Crop();
   this.Update(redraw);
  }
//+------------------------------------------------------------------+
Aquí, primero llamaremos al método EraseNoCrop() del objeto de elemento gráfico, luego dibujaremos el marco y recortaremos las zonas ocultas.
En el archivo de la clase de objeto WinForms CheckBox \MQL5\Include\DoEasy\Objects\Graph\WForms\Common Controls\CheckBox.mqh, mejoraremos el método Redraw():
//+------------------------------------------------------------------+
//| Redraw the object                                                |
//+------------------------------------------------------------------+
void CCheckBox::Redraw(bool redraw)
  {
//--- Fill the object with the background color having full transparency
   this.EraseNoCrop(this.BackgroundColor(),this.Opacity(),true);
//--- Set corrected text coordinates relative to the checkbox
   this.SetCorrectTextCoords();
//--- Draw the text and checkbox within the set coordinates of the object and the binding point, and update the object
   this.Text(this.m_text_x,this.m_text_y,this.Text(),this.ForeColor(),this.ForeColorOpacity(),this.TextAnchor());
   this.ShowControlFlag(this.CheckState());
   this.Crop();
   this.Update(redraw);
  }
//+------------------------------------------------------------------+
Aquí, primero borraremos la imagen con el color del objeto sin recortar las zonas ocultas, luego dibujaremos todo lo que necesitemos en el lienzo (como hicimos antes), y antes de actualizar, llamaremos al método para recortar las zonas ocultas de la imagen..
En el archivo de clase del objeto WinForms Label \MQL5\Include\DoEasy\Objects\Graph\WForms\Common Controls\Label.mqh, en el método para configurar el texto de un elemento después de configurarlo, llamaremos al método para recortar las zonas ocultaspara que el texto dibujado se corte en los límites de la zona visible:
//--- Set the element text
   virtual void      SetText(const string text)
                       {
                        CWinFormBase::SetText(text);
                        if(this.AutoSize())
                           this.AutoSetWH();
                        this.Crop();
                       }
En el método que redibuja el objeto, reemplazaremos la llamada al método Erase() por la llamada al método EraseNoCrop(), y después de realizar todas las manipulaciones necesarias con la creación del aspecto del objeto, llamaremos al método de recorte de zonas ocultas de la imagen:
//+------------------------------------------------------------------+
//| Redraw the object                                                |
//+------------------------------------------------------------------+
void CLabel::Redraw(bool redraw)
  {
//--- Fill the object with the background color having full transparency
   this.EraseNoCrop(this.BackgroundColor(),0,redraw);
//--- Declare the variables for X and Y coordinates and set their values depending on the text alignment
   int x=0,y=0;
   this.SetTextParamsByAlign(x,y);
//--- Draw the text within the set coordinates of the object and the binding point of the text, and update the object
   this.Text(x,y,this.Text(),this.ForeColor(),this.ForeColorOpacity(),this.TextAnchor());
   this.Crop();
   this.Update(redraw);
  }
//+------------------------------------------------------------------+
En el archivo del objeto WinForms Button \MQL5\Include\DoEasy\Objects\Graph\WForms\Common Controls\Button.mqh, modificaremos de forma similar el método de redibujado de objetos:
//+------------------------------------------------------------------+
//| Redraw the object                                                |
//+------------------------------------------------------------------+
void CButton::Redraw(bool redraw)
  {
//--- Fill the object with the background color
   this.EraseNoCrop(this.BackgroundColor(),this.Opacity(),redraw);
//--- Declare the variables for X and Y coordinates and set their values depending on the text alignment
   int x=0,y=0;
   CLabel::SetTextParamsByAlign(x,y);
//--- Draw the text within the set coordinates of the object and the binding point of the text, and update the object
   this.Text(x,y,this.Text(),this.ForeColor(),this.ForeColorOpacity(),this.TextAnchor());
   this.Crop();
   this.Update(redraw);
  }
//+------------------------------------------------------------------+
Clases de objetos auxiliares de botón con flechas
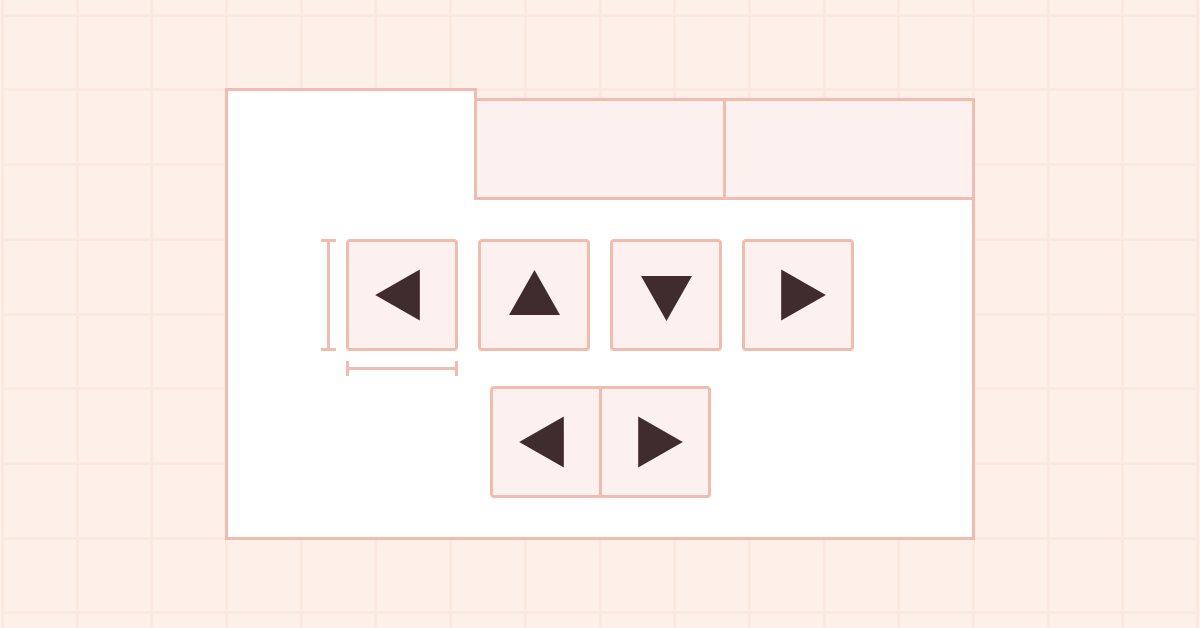
Si en el objeto WinForms se ha elegido el modo de ubicación de encabezados de las pestañas en una línea y hay más pestañas de las que caben en la anchura o la altura del objeto, los encabezados de las pestañas que vayan más allá de su contenedor se ocultarán. Para que podamos mover la fila de encabezados, necesitaremos crear botones con flechas; al clicar en ellos, se moverá la fila de encabezados de izquierda a derecha o de arriba a abajo. Necesitaremos dichos botones en otros controles, por lo que se encontrarán en la lista de objetos WinForms auxiliares; no son controles independientes, sino que se utilizan para crear otros.
Dichos objetos de botón con flechas se organizarán de la siguiente manera: crearemos un objeto básico de todos esos botones que contendrá los métodos para configurar sus propiedades, mientras que los objetos descendientes crearán un botón específico: con una flecha a la izquierda, derecha, arriba o abajo .
Además, usando como base los objetos creados, crearemos dos objetos más que se utilizarán para construir el objeto WinForms TabControl, es decir, estos serán objetos con dos botones: el primero tendrá dos botones ubicados horizontalmente con flechas izquierda-derecha, mientras que el segundo tendrá dos botones dispuestos verticalmente con flechas hacia arriba y hacia abajo. Estos objetos servirán para el desplazamiento horizontal y vertical de la fila de encabezados de la pestaña.
En la carpeta de la biblioteca \MQL5\Include\DoEasy\Objects\Graph\WForms\, crearemos el nuevo archivo ArrowButton.mqh de la clase CArrowButton.
La clase deberá ser heredada de la clase de objeto de botón, y su archivo deberá estar conectado al archivo de la clase generada:
//+------------------------------------------------------------------+
//|                                                  ArrowButton.mqh |
//|                                  Copyright 2022, MetaQuotes Ltd. |
//|                             https://mql5.com/en/users/artmedia70 |
//+------------------------------------------------------------------+
#property copyright "Copyright 2022, MetaQuotes Ltd."
#property link      "https://mql5.com/en/users/artmedia70"
#property version   "1.00"
#property strict    // Necessary for mql4
//+------------------------------------------------------------------+
//| Include files                                                    |
//+------------------------------------------------------------------+
#include "Common Controls\Button.mqh"
//+------------------------------------------------------------------+
//| Arrow Button object class of WForms controls                     |
//+------------------------------------------------------------------+
class CArrowButton : public CButton
  {
  }
En la sección privada, declararemos una variable para guardar el color de la flecha, y en la sección protegida, declararemos un método virtual para dibujar la flecha y un constructor protegido. En la sección pública, declararemos los métodos para configurar y retornar el color de la flecha, un constructor paramétrico y los métodos para redibujar el objeto y dibujar su marco:
//+------------------------------------------------------------------+
//| Arrow Button object class of WForms controls                     |
//+------------------------------------------------------------------+
class CArrowButton : public CButton
  {
private:
   color             m_arrow_color;                      // Arrow color
protected:
   //--- Draw the arrow
   virtual void      DrawArrow(void){return;}
//--- Protected constructor with object type, chart ID and subwindow
                     CArrowButton(const ENUM_GRAPH_ELEMENT_TYPE type,
                                  const long chart_id,
                                  const int subwindow,
                                  const string descript,
                                  const int x,
                                  const int y,
                                  const int w,
                                  const int h);
public:
//--- (1) Set and (2) return the arrow color
   void              SetArrowColor(const color clr)      { this.m_arrow_color=clr;     }
   color             ArrowColor(void)              const { return this.m_arrow_color;  }
//--- Constructor
                     CArrowButton(const long chart_id,
                                  const int subwindow,
                                  const string descript,
                                  const int x,
                                  const int y,
                                  const int w,
                                  const int h);
//--- Redraw the object
   virtual void      Redraw(bool redraw);
//--- Clear the element filling it with color and opacity
   virtual void      Erase(const color colour,const uchar opacity,const bool redraw=false);
//--- Clear the element with a gradient fill
   virtual void      Erase(color &colors[],const uchar opacity,const bool vgradient,const bool cycle,const bool redraw=false);
//--- Draw the button frame
   virtual void      DrawFrame(void);
  };
//+------------------------------------------------------------------+
El método virtual DrawArrow() de esta clase no dibuja nada y, como es virtual, se redefinirá en las clases heredadas, cada una de las cuales creará su propio método para dibujar las flechas: hacia la izquierda, la derecha, arriba y abajo.
A nuestro juicio, el propósito de los otros métodos queda claro: todos están en otros objetos de la biblioteca y los hemos analizado muchas veces.
Constructor protegido que especifica el tipo de objeto, el identificador del gráfico y la subventana:
//+------------------------------------------------------------------+
//| Protected constructor with an object type,                       |
//| chart ID and subwindow                                           |
//+------------------------------------------------------------------+
CArrowButton::CArrowButton(const ENUM_GRAPH_ELEMENT_TYPE type,
                           const long chart_id,
                           const int subwindow,
                           const string descript,
                           const int x,
                           const int y,
                           const int w,
                           const int h) : CButton(type,chart_id,subwindow,descript,x,y,w,h)
  {
//--- Set the specified graphical element type for the object and assign the library object type to the current object
   this.SetTypeElement(type);
   this.m_type=OBJECT_DE_TYPE_GWF_HELPER;
   this.SetPaddingAll(0);
   this.SetMarginAll(0);
   this.SetBorderSizeAll(1);
   this.SetArrowColor(CLR_DEF_FORE_COLOR);
  }
//+------------------------------------------------------------------+
El tipo del objeto creado es transmitido al constructor, que a su vez es transmitido a lo largo de la cadena al resto de los objetos principales. El cuerpo del constructor establece el tipo de elemento gráfico, el tipo de objeto gráfico de la biblioteca, los valores cero de Padding y Margin, el tamaño del marco en un píxel y el color de la flecha como color del texto de los controles por defecto.
Después de crear un objeto, todos estos parámetros (excepto los tipos de objetos) se podrán cambiar.
En el constructor paramétrico, haremos todo igual, salvo que no le transmitiremos el tipo del objeto a crear, y en la línea de inicialización, transmitiremos el tipo "Botón con flecha" al constructor del objeto principal:
//+------------------------------------------------------------------+
//| Constructor                                                      |
//+------------------------------------------------------------------+
CArrowButton::CArrowButton(const long chart_id,
                           const int subwindow,
                           const string descript,
                           const int x,
                           const int y,
                           const int w,
                           const int h) : CButton(GRAPH_ELEMENT_TYPE_WF_ARROW_BUTTON,chart_id,subwindow,descript,x,y,w,h)
  {
   this.SetTypeElement(GRAPH_ELEMENT_TYPE_WF_ARROW_BUTTON);
   this.m_type=OBJECT_DE_TYPE_GWF_HELPER;
   this.SetPaddingAll(0);
   this.SetMarginAll(0);
   this.SetBorderSizeAll(1);
   this.SetArrowColor(CLR_DEF_FORE_COLOR);
  }
//+------------------------------------------------------------------+
Método virtual que redibuja un objeto:
//+------------------------------------------------------------------+
//| Redraw the object                                                |
//+------------------------------------------------------------------+
void CArrowButton::Redraw(bool redraw)
  {
//--- Fill the object with background color having transparency
   this.Erase(this.BackgroundColor(),this.Opacity(),true);
  }
//+------------------------------------------------------------------+
Aquí, simplemente llamaremos al método Erase(), en el que se lleva a cabo el redibujado:
//+------------------------------------------------------------------+
//| Clear the element filling it with color and opacity              |
//+------------------------------------------------------------------+
void CArrowButton::Erase(const color colour,const uchar opacity,const bool redraw=false)
  {
//--- Fill the element having the specified color and the redrawing flag
   CGCnvElement::EraseNoCrop(colour,opacity,false);
//--- If the object has a frame, draw it
   if(this.BorderStyle()!=FRAME_STYLE_NONE)
      this.DrawFrame();
   this.DrawArrow();
//--- Update the element having the specified redrawing flag
   this.Crop();
   this.Update(redraw);
  }
//+------------------------------------------------------------------+
Todo aquí resulta exactamente igual que en todos los demás objetos según el nuevo concepto de recorte de las zonas ocultas de una imagen: en primer lugar, llamaremos al método EraseNoCrop(), en cual se rellena el objeto con el color de fondo, luego dibujaremos el marcoy la flecha y recortaremos las zonas ocultas.
Método que limpia el elemento con un relleno de gradiente:
//+------------------------------------------------------------------+
//| Clear the element with a gradient fill                           |
//+------------------------------------------------------------------+
void CArrowButton::Erase(color &colors[],const uchar opacity,const bool vgradient,const bool cycle,const bool redraw=false)
  {
//--- Fill the element having the specified color array and the redrawing flag
   CGCnvElement::EraseNoCrop(colors,opacity,vgradient,cycle,false);
//--- If the object has a frame, draw it
   if(this.BorderStyle()!=FRAME_STYLE_NONE)
      this.DrawFrame();
   this.DrawArrow();
//--- Update the element having the specified redrawing flag
   this.Crop();
   this.Update(redraw);
  }
//+------------------------------------------------------------------+
Todo es exactamente igual que en el método anterior. Aquí llamaremos al método EraeNoCrop() sobrecargado, que rellena el fondo con un color de gradiente.
Método que dibuja el borde de un elemento:
//+------------------------------------------------------------------+
//| Draw the element border                                          |
//+------------------------------------------------------------------+
void CArrowButton::DrawFrame(void)
  {
   this.DrawRectangle(0,0,this.Width()-1,this.Height()-1,this.BorderColor(),this.Opacity());
  }
//+------------------------------------------------------------------+
Aquí simplemente dibujaremos un rectángulo alrededor de los bordes del objeto con el color de fondo y la opacidad establecidos.
Si creamos este objeto, simplemente se dibujará un botón normal sin etiquetas ni flechas. Las flechas se dibujarán en los objetos herederos de esta clase.
Objeto de botón con flecha a la izquierda.
En la carpeta de la biblioteca \MQL5\Include\DoEasy\Objects\Graph\WForms\, crearemos el nuevo archivo ArrowLeftButton.mqh de la clase CArrowLeftButton. La clase deberá derivarse de la clase básica del botón con flecha que acabamos de crear, y su archivo deberá incluirse en el archivo de clase generado:
//+------------------------------------------------------------------+
//|                                              ArrowLeftButton.mqh |
//|                                  Copyright 2022, MetaQuotes Ltd. |
//|                             https://mql5.com/en/users/artmedia70 |
//+------------------------------------------------------------------+
#property copyright "Copyright 2022, MetaQuotes Ltd."
#property link      "https://mql5.com/en/users/artmedia70"
#property version   "1.00"
#property strict    // Necessary for mql4
//+------------------------------------------------------------------+
//| Include files                                                    |
//+------------------------------------------------------------------+
#include "ArrowButton.mqh"
//+------------------------------------------------------------------+
//| Left Arrow Button object class of WForms controls                |
//+------------------------------------------------------------------+
class CArrowLeftButton : public CArrowButton
  {
  }
En la sección protegida de la clase, declararemos un método para dibujar una flecha y un constructor protegido, y en la sección pública, un constructor paramétrico:
//+------------------------------------------------------------------+
//| Left Arrow Button object class of WForms controls                |
//+------------------------------------------------------------------+
class CArrowLeftButton : public CArrowButton
  {
private:

protected:
   //--- Draw the arrow
   virtual void      DrawArrow(void);
//--- Protected constructor with object type, chart ID and subwindow
                     CArrowLeftButton(const ENUM_GRAPH_ELEMENT_TYPE type,
                                      const long chart_id,
                                      const int subwindow,
                                      const string descript,
                                      const int x,
                                      const int y,
                                      const int w,
                                      const int h);
public:
//--- Constructor
                     CArrowLeftButton(const long chart_id,
                                      const int subwindow,
                                      const string descript,
                                      const int x,
                                      const int y,
                                      const int w,
                                      const int h);
  };
//+------------------------------------------------------------------+
En el constructor protegido, estableceremos el tipo del elemento gráfico transmitido al método, y en el constructor paramétrico, en la línea de inicialización, transmitiremos el tipo de objeto al constructor de la clase principal como "botón con una flecha hacia la izquierda" y estableceremos este objeto en el mismo tipo:
//+------------------------------------------------------------------+
//| Protected constructor with an object type,                       |
//| chart ID and subwindow                                           |
//+------------------------------------------------------------------+
CArrowLeftButton::CArrowLeftButton(const ENUM_GRAPH_ELEMENT_TYPE type,
                                   const long chart_id,
                                   const int subwindow,
                                   const string descript,
                                   const int x,
                                   const int y,
                                   const int w,
                                   const int h) : CArrowButton(type,chart_id,subwindow,descript,x,y,w,h)
  {
//--- Set the specified graphical element type for the object and assign the library object type to the current object
   this.SetTypeElement(type);
  }
//+------------------------------------------------------------------+
//| Constructor                                                      |
//+------------------------------------------------------------------+
CArrowLeftButton::CArrowLeftButton(const long chart_id,
                                   const int subwindow,
                                   const string descript,
                                   const int x,
                                   const int y,
                                   const int w,
                                   const int h) : CArrowButton(GRAPH_ELEMENT_TYPE_WF_ARROW_BUTTON_LEFT,chart_id,subwindow,descript,x,y,w,h)
  {
   this.SetTypeElement(GRAPH_ELEMENT_TYPE_WF_ARROW_BUTTON_LEFT);
  }
//+------------------------------------------------------------------+
Método para dibujar la flecha:
//+------------------------------------------------------------------+
//| Draw the arrow                                                   |
//+------------------------------------------------------------------+
void CArrowLeftButton::DrawArrow(void)
  {
//--- Create X and Y coordinate arrays for drawing a triangle
   double x=(double)this.Width()/2;
   double y=(double)this.Height()/2;
   double w=(double)this.Width();
   double h=(double)this.Height();
//--- Calculate coordinates as double values and write them to arrays as integers
   int array_x[]={int(w*0.7), int(w*0.7), int(w*0.3)};
   int array_y[]={int(h*0.3), int(h*0.7), int(h*0.5)};
//--- Draw a filled triangle followed by a smoothed one on top of it
   this.DrawTriangleFill(array_x[0],array_y[0],array_x[1],array_y[1],array_x[2],array_y[2],this.ArrowColor());
   this.DrawTriangleWu(array_x[0],array_y[0],array_x[1],array_y[1],array_x[2],array_y[2],this.ArrowColor());
  }
//+------------------------------------------------------------------+
Este método virtual será distinto para cada uno de los objetos que dibujan flechas en distintas direcciones, pero diferirán solo en los valores de las coordenadas de los vértices de los triángulos dibujados. La diferencia entre esta clase y las otras que dibujan flechas en los botones en otras direcciones reside solo en el tipo de elemento gráfico y el método virtual que dibuja una flecha según sus coordenadas individuales, para cada flecha, las suyas.
Los veremos en su totalidad sin explicación adicional, ya que la clase anterior resulta completamente idéntica a las demás, y todas estas clases se encuentran en la misma carpeta de la biblioteca \MQL5\Include\DoEasy\Objects\Graph\WForms\.
La clase de objeto de botón con flecha hacia la derecha se encuentra en el archivo ArrowRightButton.mqh:
//+------------------------------------------------------------------+
//|                                             ArrowRightButton.mqh |
//|                                  Copyright 2022, MetaQuotes Ltd. |
//|                             https://mql5.com/en/users/artmedia70 |
//+------------------------------------------------------------------+
#property copyright "Copyright 2022, MetaQuotes Ltd."
#property link      "https://mql5.com/en/users/artmedia70"
#property version   "1.00"
#property strict    // Necessary for mql4
//+------------------------------------------------------------------+
//| Include files                                                    |
//+------------------------------------------------------------------+
#include "ArrowButton.mqh"
//+------------------------------------------------------------------+
//| Right Arrow Button object class of WForms controls               |
//+------------------------------------------------------------------+
class CArrowRightButton : public CArrowButton
  {
private:

protected:
   //--- Draw the arrow
   virtual void      DrawArrow(void);
//--- Protected constructor with object type, chart ID and subwindow
                     CArrowRightButton(const ENUM_GRAPH_ELEMENT_TYPE type,
                                       const long chart_id,
                                       const int subwindow,
                                       const string descript,
                                       const int x,
                                       const int y,
                                       const int w,
                                       const int h);
public:
//--- Constructor
                     CArrowRightButton(const long chart_id,
                                       const int subwindow,
                                       const string descript,
                                       const int x,
                                       const int y,
                                       const int w,
                                       const int h);
  };
//+------------------------------------------------------------------+
//| Protected constructor with an object type,                       |
//| chart ID and subwindow                                           |
//+------------------------------------------------------------------+
CArrowRightButton::CArrowRightButton(const ENUM_GRAPH_ELEMENT_TYPE type,
                                   const long chart_id,
                                   const int subwindow,
                                   const string descript,
                                   const int x,
                                   const int y,
                                   const int w,
                                   const int h) : CArrowButton(type,chart_id,subwindow,descript,x,y,w,h)
  {
//--- Set the specified graphical element type for the object and assign the library object type to the current object
   this.SetTypeElement(type);
  }
//+------------------------------------------------------------------+
//| Constructor                                                      |
//+------------------------------------------------------------------+
CArrowRightButton::CArrowRightButton(const long chart_id,
                                   const int subwindow,
                                   const string descript,
                                   const int x,
                                   const int y,
                                   const int w,
                                   const int h) : CArrowButton(GRAPH_ELEMENT_TYPE_WF_ARROW_BUTTON_RIGHT,chart_id,subwindow,descript,x,y,w,h)
  {
   this.SetTypeElement(GRAPH_ELEMENT_TYPE_WF_ARROW_BUTTON_RIGHT);
  }
//+------------------------------------------------------------------+
//| Draw the arrow                                                   |
//+------------------------------------------------------------------+
void CArrowRightButton::DrawArrow(void)
  {
//--- Create X and Y coordinate arrays for drawing a triangle
   double x=(double)this.Width()/2;
   double y=(double)this.Height()/2;
   double w=(double)this.Width();
   double h=(double)this.Height();
//--- Calculate coordinates as double values and write them to arrays as integers
   int array_x[]={int(w*0.3), int(w*0.7), int(w*0.3)};
   int array_y[]={int(h*0.3), int(h*0.5), int(h*0.7)};
//--- Draw a filled triangle followed by a smoothed one on top of it
   this.DrawTriangleFill(array_x[0],array_y[0],array_x[1],array_y[1],array_x[2],array_y[2],this.ArrowColor());
   this.DrawTriangleWu(array_x[0],array_y[0],array_x[1],array_y[1],array_x[2],array_y[2],this.ArrowColor());
  }
//+------------------------------------------------------------------+
La clase de objeto de botón con flecha hacia arriba se encuentra en el archivo ArrowUpButton.mqh:
//+------------------------------------------------------------------+
//|                                                ArrowUpButton.mqh |
//|                                  Copyright 2022, MetaQuotes Ltd. |
//|                             https://mql5.com/en/users/artmedia70 |
//+------------------------------------------------------------------+
#property copyright "Copyright 2022, MetaQuotes Ltd."
#property link      "https://mql5.com/en/users/artmedia70"
#property version   "1.00"
#property strict    // Necessary for mql4
//+------------------------------------------------------------------+
//| Include files                                                    |
//+------------------------------------------------------------------+
#include "ArrowButton.mqh"
//+------------------------------------------------------------------+
//| Up Arrow Button object class of WForms controls                  |
//+------------------------------------------------------------------+
class CArrowUpButton : public CArrowButton
  {
private:

protected:
   //--- Draw the arrow
   virtual void      DrawArrow(void);
//--- Protected constructor with object type, chart ID and subwindow
                     CArrowUpButton(const ENUM_GRAPH_ELEMENT_TYPE type,
                                    const long chart_id,
                                    const int subwindow,
                                    const string descript,
                                    const int x,
                                    const int y,
                                    const int w,
                                    const int h);
public:
//--- Constructor
                     CArrowUpButton(const long chart_id,
                                    const int subwindow,
                                    const string descript,
                                    const int x,
                                    const int y,
                                    const int w,
                                    const int h);
  };
//+------------------------------------------------------------------+
//| Protected constructor with an object type,                       |
//| chart ID and subwindow                                           |
//+------------------------------------------------------------------+
CArrowUpButton::CArrowUpButton(const ENUM_GRAPH_ELEMENT_TYPE type,
                               const long chart_id,
                               const int subwindow,
                               const string descript,
                               const int x,
                               const int y,
                               const int w,
                               const int h) : CArrowButton(type,chart_id,subwindow,descript,x,y,w,h)
  {
//--- Set the specified graphical element type for the object and assign the library object type to the current object
   this.SetTypeElement(type);
  }
//+------------------------------------------------------------------+
//| Constructor                                                      |
//+------------------------------------------------------------------+
CArrowUpButton::CArrowUpButton(const long chart_id,
                               const int subwindow,
                               const string descript,
                               const int x,
                               const int y,
                               const int w,
                               const int h) : CArrowButton(GRAPH_ELEMENT_TYPE_WF_ARROW_BUTTON_UP,chart_id,subwindow,descript,x,y,w,h)
  {
   this.SetTypeElement(GRAPH_ELEMENT_TYPE_WF_ARROW_BUTTON_UP);
  }
//+------------------------------------------------------------------+
//| Draw the arrow                                                   |
//+------------------------------------------------------------------+
void CArrowUpButton::DrawArrow(void)
  {
//--- Create X and Y coordinate arrays for drawing a triangle
   double x=(double)this.Width()/2;
   double y=(double)this.Height()/2;
   double w=(double)this.Width();
   double h=(double)this.Height();
//--- Calculate coordinates as double values and write them to arrays as integers
   int array_x[]={int(w*0.3), int(w*0.5), int(w*0.7)};
   int array_y[]={int(h*0.7), int(h*0.3), int(h*0.7)};
//--- Draw a filled triangle followed by a smoothed one on top of it
   this.DrawTriangleFill(array_x[0],array_y[0],array_x[1],array_y[1],array_x[2],array_y[2],this.ArrowColor());
   this.DrawTriangleWu(array_x[0],array_y[0],array_x[1],array_y[1],array_x[2],array_y[2],this.ArrowColor());
  }
//+------------------------------------------------------------------+
La clase de objeto de botón con flecha hacia abajo se encuentra en el archivo ArrowDownButton.mqh:
//+------------------------------------------------------------------+
//|                                              ArrowDownButton.mqh |
//|                                  Copyright 2022, MetaQuotes Ltd. |
//|                             https://mql5.com/en/users/artmedia70 |
//+------------------------------------------------------------------+
#property copyright "Copyright 2022, MetaQuotes Ltd."
#property link      "https://mql5.com/en/users/artmedia70"
#property version   "1.00"
#property strict    // Necessary for mql4
//+------------------------------------------------------------------+
//| Include files                                                    |
//+------------------------------------------------------------------+
#include "ArrowButton.mqh"
//+------------------------------------------------------------------+
//| Down Arrow Button object class of WForms controls                |
//+------------------------------------------------------------------+
class CArrowDownButton : public CArrowButton
  {
private:

protected:
   //--- Draw the arrow
   virtual void      DrawArrow(void);
//--- Protected constructor with object type, chart ID and subwindow
                     CArrowDownButton(const ENUM_GRAPH_ELEMENT_TYPE type,
                                      const long chart_id,
                                      const int subwindow,
                                      const string descript,
                                      const int x,
                                      const int y,
                                      const int w,
                                      const int h);
public:
//--- Constructor
                     CArrowDownButton(const long chart_id,
                                      const int subwindow,
                                      const string descript,
                                      const int x,
                                      const int y,
                                      const int w,
                                      const int h);
  };
//+------------------------------------------------------------------+
//| Protected constructor with an object type,                       |
//| chart ID and subwindow                                           |
//+------------------------------------------------------------------+
CArrowDownButton::CArrowDownButton(const ENUM_GRAPH_ELEMENT_TYPE type,
                                   const long chart_id,
                                   const int subwindow,
                                   const string descript,
                                   const int x,
                                   const int y,
                                   const int w,
                                   const int h) : CArrowButton(type,chart_id,subwindow,descript,x,y,w,h)
  {
//--- Set the specified graphical element type for the object and assign the library object type to the current object
   this.SetTypeElement(type);
  }
//+------------------------------------------------------------------+
//| Constructor                                                      |
//+------------------------------------------------------------------+
CArrowDownButton::CArrowDownButton(const long chart_id,
                                   const int subwindow,
                                   const string descript,
                                   const int x,
                                   const int y,
                                   const int w,
                                   const int h) : CArrowButton(GRAPH_ELEMENT_TYPE_WF_ARROW_BUTTON_DOWN,chart_id,subwindow,descript,x,y,w,h)
  {
   this.SetTypeElement(GRAPH_ELEMENT_TYPE_WF_ARROW_BUTTON_DOWN);
  }
//+------------------------------------------------------------------+
//| Draw the arrow                                                   |
//+------------------------------------------------------------------+
void CArrowDownButton::DrawArrow(void)
  {
//--- Create X and Y coordinate arrays for drawing a triangle
   double x=(double)this.Width()/2;
   double y=(double)this.Height()/2;
   double w=(double)this.Width();
   double h=(double)this.Height();
//--- Calculate coordinates as double values and write them to arrays as integers
   int array_x[]={int(w*0.3), int(w*0.5), int(w*0.7)};
   int array_y[]={int(h*0.3), int(h*0.7), int(h*0.3)};
//--- Draw a filled triangle followed by a smoothed one on top of it
   this.DrawTriangleFill(array_x[0],array_y[0],array_x[1],array_y[1],array_x[2],array_y[2],this.ArrowColor());
   this.DrawTriangleWu(array_x[0],array_y[0],array_x[1],array_y[1],array_x[2],array_y[2],this.ArrowColor());
  }
//+------------------------------------------------------------------+
Todas las clases mencionadas son idénticas. Podrá notar la diferencia solo en los tipos de objetos establecidos en los constructores de las clases, así como en los valores de las coordenadas de los vértices en los métodos DrawArrow().
Usando como base las clases creadas de objetos de botón con flechas, crearemos dos clases auxiliares más. Cada una de ellas tendrá un contenedor al que se unirán dos botones. En la primera clase se encontrarán el botón a la izquierda y el botón a la derecha, ubicados horizontalmente, en la segunda clase, el botón hacia arriba y el botón hacia abajo, colocados verticalmente.
En la carpeta de la biblioteca \MQL5\Include\DoEasy\Objects\Graph\WForms\, crearemos el nuevo archivo ArrowLeftRightBox.mqh de la clase CArrowLeftRightBox.
La clase se deberá heredar de la clase del objeto WinForms del objeto contenedor y el archivo de clase CPanel se deberá conectar al archivo de clase generado:
//+------------------------------------------------------------------+
//|                                            ArrowLeftRightBox.mqh |
//|                                  Copyright 2022, MetaQuotes Ltd. |
//|                             https://mql5.com/en/users/artmedia70 |
//+------------------------------------------------------------------+
#property copyright "Copyright 2022, MetaQuotes Ltd."
#property link      "https://mql5.com/en/users/artmedia70"
#property version   "1.00"
#property strict    // Necessary for mql4
//+------------------------------------------------------------------+
//| Include files                                                    |
//+------------------------------------------------------------------+
#include "Containers\Panel.mqh"
//+------------------------------------------------------------------+
//| ArrowLeftRightBox object class of WForms controls                |
//+------------------------------------------------------------------+
class CArrowLeftRightBox : public CContainer
  {
  }
En la sección privada de la clase, declararemos un método virtual para crear un objeto gráfico y un método para crear dos botones con flechas. En la sección protegida de la clase, declararemos un constructor protegido y en la sección pública escribiremos dos métodos para obtener los punteros a los objetos de botón con flechas y declarar un constructor paramétrico:
//+------------------------------------------------------------------+
//| ArrowLeftRightBox object class of WForms controls                |
//+------------------------------------------------------------------+
class CArrowLeftRightBox : public CContainer
  {
private:
//--- Create a new graphical object
   virtual CGCnvElement *CreateNewGObject(const ENUM_GRAPH_ELEMENT_TYPE type,
                                          const int element_num,
                                          const string descript,
                                          const int x,
                                          const int y,
                                          const int w,
                                          const int h,
                                          const color colour,
                                          const uchar opacity,
                                          const bool movable,
                                          const bool activity);
//--- Create ArrowButton Up and Down objects
   void              CreateArrowButtons(const int width,const int height);

protected:
//--- Protected constructor with object type, chart ID and subwindow
                     CArrowLeftRightBox(const ENUM_GRAPH_ELEMENT_TYPE type,
                                        const long chart_id,
                                        const int subwindow,
                                        const string descript,
                                        const int x,
                                        const int y,
                                        const int w,
                                        const int h);
public:
//--- Return the pointer to the (1) up and (2) down arrow button
   CArrowLeftButton *GetArrowUpButton(void)     { return this.GetElementByType(GRAPH_ELEMENT_TYPE_WF_ARROW_BUTTON_LEFT,0);    }
   CArrowRightButton*GetArrowDownButton(void)   { return this.GetElementByType(GRAPH_ELEMENT_TYPE_WF_ARROW_BUTTON_RIGHT,0);   }
//--- Constructor
                     CArrowLeftRightBox(const long chart_id,
                                        const int subwindow,
                                        const string descript,
                                        const int x,
                                        const int y,
                                        const int w,
                                        const int h);
  };
//+------------------------------------------------------------------+
Vamos a ver la implementación de los métodos declarados.
Constructor protegido que especifica el tipo de objeto, el identificador del gráfico y la subventana:
//+------------------------------------------------------------------+
//| Protected constructor with an object type,                       |
//| chart ID and subwindow                                           |
//+------------------------------------------------------------------+
CArrowLeftRightBox::CArrowLeftRightBox(const ENUM_GRAPH_ELEMENT_TYPE type,
                                       const long chart_id,
                                       const int subwindow,
                                       const string descript,
                                       const int x,
                                       const int y,
                                       const int w,
                                       const int h) : CContainer(type,chart_id,subwindow,descript,x,y,w,h)
  {
//--- Set the specified graphical element type for the object and assign the library object type to the current object
   this.SetTypeElement(type);
   this.m_type=OBJECT_DE_TYPE_GWF_HELPER;
   this.SetBorderSizeAll(1);
   this.SetBorderStyle(FRAME_STYLE_SIMPLE);
   this.SetBorderColor(CLR_DEF_BORDER_COLOR,true);
   this.SetForeColor(CLR_DEF_FORE_COLOR,true);
   this.CreateArrowButtons((w<DEF_ARROW_BUTTON_SIZE ? w : DEF_ARROW_BUTTON_SIZE),(h<DEF_ARROW_BUTTON_SIZE ? h : DEF_ARROW_BUTTON_SIZE));
  }
//+------------------------------------------------------------------+
Aquí, estableceremos el tipo del elemento gráfico transmitido al constructor y el tipo del objeto gráfico de la biblioteca como "objeto auxiliar"; asimismo, estableceremos el tamaño del marco del objeto en un píxel, el tipo de marco como plano, el color del marco por defecto, el color predeterminado de las flechas como el color de texto predeterminado de los objetos WinForms y también llamaremos al método para crear dos botones con flechas. En este caso, si la anchura y la altura transmitidas al constructor son menores que el tamaño especificado del objeto de botón con flechas por defecto, el objeto se construirá con las dimensiones indicadas; de lo contrario, con las dimensiones predeterminadas. Por ello, la magnitud de los botones establecida por defecto será el valor máximo posible para los objetos de botón con flechas.
Constructor paramétrico con indicación del identificador del gráfico y la subventana:
//+------------------------------------------------------------------+
//| Constructor indicating the chart and subwindow ID                |
//+------------------------------------------------------------------+
CArrowLeftRightBox::CArrowLeftRightBox(const long chart_id,
                                       const int subwindow,
                                       const string descript,
                                       const int x,
                                       const int y,
                                       const int w,
                                       const int h) : CContainer(GRAPH_ELEMENT_TYPE_WF_ARROW_BUTTONS_LR_BOX,chart_id,subwindow,descript,x,y,w,h)
  {
   this.SetTypeElement(GRAPH_ELEMENT_TYPE_WF_ARROW_BUTTONS_LR_BOX);
   this.m_type=OBJECT_DE_TYPE_GWF_HELPER;
   this.SetBorderSizeAll(1);
   this.SetBorderStyle(FRAME_STYLE_SIMPLE);
   this.SetBorderColor(CLR_DEF_BORDER_COLOR,true);
   this.SetForeColor(CLR_DEF_FORE_COLOR,true);
   this.CreateArrowButtons((w<DEF_ARROW_BUTTON_SIZE ? w : DEF_ARROW_BUTTON_SIZE),(h<DEF_ARROW_BUTTON_SIZE ? h : DEF_ARROW_BUTTON_SIZE));
  }
//+------------------------------------------------------------------+
Aquí todo resulta igual que en el constructor protegido, salvo que el tipo del elemento gráfico no es transmitido al constructor, sino que se codifica como ArrowLeftRightButtonBox.
Método que crea los objetos ArrowButton Left y Right:
//+------------------------------------------------------------------+
//| Create ArrowButton Left and Right objects                        |
//+------------------------------------------------------------------+
void CArrowLeftRightBox::CreateArrowButtons(const int width,const int height)
  {
//--- Calculate the width of the object from the width of two buttons plus the size of the frame on the left and right
//--- and the height of the object from the height of the button plus the top and bottom frame sizes
   int w=width*2+this.BorderSizeLeft()+this.BorderSizeRight();
   int h=height+this.BorderSizeTop()+this.BorderSizeBottom();
//--- If the received width or height is greater than the width or height of the object, resize it
   if(w>this.Width() || h>this.Height())
      this.Resize((w>this.Width() ? w : this.Width()),(h>this.Height() ? h : this.Height()),false);
//--- Create two buttons next to each other starting from the 0 : 0 coordinate of the container
   this.CreateNewElement(GRAPH_ELEMENT_TYPE_WF_ARROW_BUTTON_LEFT,0,0,width,height,clrNONE,255,true,false);
   this.CreateNewElement(GRAPH_ELEMENT_TYPE_WF_ARROW_BUTTON_RIGHT,width,0,width,height,clrNONE,255,true,false);
  }
//+------------------------------------------------------------------+
A continuación, transmitiremos al método los tamaños de los botones a crear. Según el tamaño de los botones, calcularemos la anchura del contenedor como el tamaño de la anchura de dos botones considerando el tamaño del marco del objeto, mientras que la altura del contenedor se tomará de la altura del botón teniendo en cuenta el tamaño del marco del contenedor. Si el tamaño calculado de los botones resulta superior al tamaño del contenedor, incrementaremos su tamaño hasta alcanzar los tamaños calculados y llamaremos a los métodos necesarios para crear los botones dispuestos horizontalmente, uno al lado del otro.
Método que crea un nuevo objeto gráfico:
//+------------------------------------------------------------------+
//| Create a new graphical object                                    |
//+------------------------------------------------------------------+
CGCnvElement *CArrowLeftRightBox::CreateNewGObject(const ENUM_GRAPH_ELEMENT_TYPE type,
                                                   const int obj_num,
                                                   const string descript,
                                                   const int x,
                                                   const int y,
                                                   const int w,
                                                   const int h,
                                                   const color colour,
                                                   const uchar opacity,
                                                   const bool movable,
                                                   const bool activity)
  {
   CGCnvElement *element=NULL;
   switch(type)
     {
      case GRAPH_ELEMENT_TYPE_WF_ARROW_BUTTON_LEFT    :
         element=new CArrowLeftButton(this.ChartID(),this.SubWindow(),descript,x,y,w,h);
        break;
      case GRAPH_ELEMENT_TYPE_WF_ARROW_BUTTON_RIGHT   :
         element=new CArrowRightButton(this.ChartID(),this.SubWindow(),descript,x,y,w,h);
        break;
      default:
        break;
     }
   if(element==NULL)
      ::Print(DFUN,CMessage::Text(MSG_LIB_SYS_FAILED_CREATE_ELM_OBJ),this.TypeElementDescription(type));
   return element;
  }
//+------------------------------------------------------------------+
El método virtual permite crear solo dos objetos, un botón de flecha a la izquierda y un botón de flecha a la derecha.
La clase para crear un contenedor con dos botones verticales resulta idéntica a la discutida anteriormente.
En la carpeta de la biblioteca \MQL5\Include\DoEasy\Objects\Graph\WForms\, crearemos el nuevo archivo ArrowUpDownBox.mqh de la clase CArrowUpDownBox.
La clase se deberá heredar de la clase WinForms del objeto contenedor, mientras que el archivo de clase CPanel se deberá conectar al archivo de clase generado:
//+------------------------------------------------------------------+
//|                                               ArrowUpDownBox.mqh |
//|                                  Copyright 2022, MetaQuotes Ltd. |
//|                             https://mql5.com/en/users/artmedia70 |
//+------------------------------------------------------------------+
#property copyright "Copyright 2022, MetaQuotes Ltd."
#property link      "https://mql5.com/en/users/artmedia70"
#property version   "1.00"
#property strict    // Necessary for mql4
//+------------------------------------------------------------------+
//| Include files                                                    |
//+------------------------------------------------------------------+
#include "Containers\Panel.mqh"
//+------------------------------------------------------------------+
//| ArrowUpDownBox object class of the WForms controls               |
//+------------------------------------------------------------------+
class CArrowUpDownBox : public CContainer
  {
private:
//--- Create a new graphical object
   virtual CGCnvElement *CreateNewGObject(const ENUM_GRAPH_ELEMENT_TYPE type,
                                          const int element_num,
                                          const string descript,
                                          const int x,
                                          const int y,
                                          const int w,
                                          const int h,
                                          const color colour,
                                          const uchar opacity,
                                          const bool movable,
                                          const bool activity);
//--- Create ArrowButton Up and Down objects
   void              CreateArrowButtons(const int width,const int height);

protected:
//--- Protected constructor with object type, chart ID and subwindow
                     CArrowUpDownBox(const ENUM_GRAPH_ELEMENT_TYPE type,
                                     const long chart_id,
                                     const int subwindow,
                                     const string descript,
                                     const int x,
                                     const int y,
                                     const int w,
                                     const int h);
public:
//--- Return the pointer to the (1) up and (2) down arrow button
   CArrowUpButton   *GetArrowUpButton(void)     { return this.GetElementByType(GRAPH_ELEMENT_TYPE_WF_ARROW_BUTTON_UP,0);   }
   CArrowDownButton *GetArrowDownButton(void)   { return this.GetElementByType(GRAPH_ELEMENT_TYPE_WF_ARROW_BUTTON_DOWN,0); }
//--- Constructor
                     CArrowUpDownBox(const long chart_id,
                                     const int subwindow,
                                     const string descript,
                                     const int x,
                                     const int y,
                                     const int w,
                                     const int h);
  };
//+------------------------------------------------------------------+
//| Protected constructor with an object type,                       |
//| chart ID and subwindow                                           |
//+------------------------------------------------------------------+
CArrowUpDownBox::CArrowUpDownBox(const ENUM_GRAPH_ELEMENT_TYPE type,
                                 const long chart_id,
                                 const int subwindow,
                                 const string descript,
                                 const int x,
                                 const int y,
                                 const int w,
                                 const int h) : CContainer(type,chart_id,subwindow,descript,x,y,w,h)
  {
//--- Set the specified graphical element type for the object and assign the library object type to the current object
   this.SetTypeElement(type);
   this.m_type=OBJECT_DE_TYPE_GWF_HELPER;
   this.SetBorderSizeAll(1);
   this.SetBorderStyle(FRAME_STYLE_SIMPLE);
   this.SetBorderColor(CLR_DEF_BORDER_COLOR,true);
   this.SetForeColor(CLR_DEF_FORE_COLOR,true);
   this.CreateArrowButtons((w<DEF_ARROW_BUTTON_SIZE ? w : DEF_ARROW_BUTTON_SIZE),(h<DEF_ARROW_BUTTON_SIZE ? h : DEF_ARROW_BUTTON_SIZE));
  }
//+------------------------------------------------------------------+
//| Constructor indicating the chart and subwindow ID                |
//+------------------------------------------------------------------+
CArrowUpDownBox::CArrowUpDownBox(const long chart_id,
                                 const int subwindow,
                                 const string descript,
                                 const int x,
                                 const int y,
                                 const int w,
                                 const int h) : CContainer(GRAPH_ELEMENT_TYPE_WF_ARROW_BUTTONS_UD_BOX,chart_id,subwindow,descript,x,y,w,h)
  {
   this.SetTypeElement(GRAPH_ELEMENT_TYPE_WF_ARROW_BUTTONS_UD_BOX);
   this.m_type=OBJECT_DE_TYPE_GWF_HELPER;
   this.SetBorderSizeAll(1);
   this.SetBorderStyle(FRAME_STYLE_SIMPLE);
   this.SetBorderColor(CLR_DEF_BORDER_COLOR,true);
   this.SetForeColor(CLR_DEF_FORE_COLOR,true);
   this.CreateArrowButtons((w<DEF_ARROW_BUTTON_SIZE ? w : DEF_ARROW_BUTTON_SIZE),(h<DEF_ARROW_BUTTON_SIZE ? h : DEF_ARROW_BUTTON_SIZE));
  }
//+------------------------------------------------------------------+
//| Create ArrowButton Up and Down objects                           |
//+------------------------------------------------------------------+
void CArrowUpDownBox::CreateArrowButtons(const int width,const int height)
  {
//--- Calculate the width of the object from the width of the button plus the size of the frame on the left and right
//--- and the height of the object from the height of two buttons plus the top and bottom frame sizes
   int w=width+this.BorderSizeLeft()+this.BorderSizeRight();
   int h=height*2+this.BorderSizeTop()+this.BorderSizeBottom();
//--- If the received width or height is greater than the width or height of the object, resize it
   if(w>this.Width() || h>this.Height())
      this.Resize((w>this.Width() ? w : this.Width()),(h>this.Height() ? h : this.Height()),false);
//--- Create two buttons one above the other starting from the 0 : 0 coordinate of the container
   this.CreateNewElement(GRAPH_ELEMENT_TYPE_WF_ARROW_BUTTON_UP,0,0,width,height,clrNONE,255,true,false);
   this.CreateNewElement(GRAPH_ELEMENT_TYPE_WF_ARROW_BUTTON_DOWN,0,height,width,height,clrNONE,255,true,false);
  }
//+------------------------------------------------------------------+
//| Create a new graphical object                                    |
//+------------------------------------------------------------------+
CGCnvElement *CArrowUpDownBox::CreateNewGObject(const ENUM_GRAPH_ELEMENT_TYPE type,
                                                const int obj_num,
                                                const string descript,
                                                const int x,
                                                const int y,
                                                const int w,
                                                const int h,
                                                const color colour,
                                                const uchar opacity,
                                                const bool movable,
                                                const bool activity)
  {
   CGCnvElement *element=NULL;
   switch(type)
     {
      case GRAPH_ELEMENT_TYPE_WF_ARROW_BUTTON_UP      :
         element=new CArrowUpButton(this.ChartID(),this.SubWindow(),descript,x,y,w,h);
        break;
      case GRAPH_ELEMENT_TYPE_WF_ARROW_BUTTON_DOWN    :
         element=new CArrowDownButton(this.ChartID(),this.SubWindow(),descript,x,y,w,h);
        break;
      default:
        break;
     }
   if(element==NULL)
      ::Print(DFUN,CMessage::Text(MSG_LIB_SYS_FAILED_CREATE_ELM_OBJ),this.TypeElementDescription(type));
   return element;
  }
//+------------------------------------------------------------------+
La diferencia entre las dos clases anteriores reside solo en los tipos de elementos gráficos establecidos en los constructores de las clases y en sus métodos para crear dos botones. En la segunda clase, el método creará botones colocados verticalmente y cambiará el tamaño del contenedor para que coincida con la altura de los dos botones. En la lista hemos comentado ambos métodos al completo, así que esperamos que no necesiten explicaciones adicionales.
Ambos objetos se usarán en el próximo artículo para desplazar la fila de encabezados de las pestañas cuando estén dispuestas horizontal y verticalmente en una fila y vayan más allá del control y, en consecuencia, queden ocultas.
Ahora que hemos creado los nuevos elementos gráficos, necesitaremos mejorar los objetos contenedores para que conozcan los nuevos objetos y puedan crearlos.
En el archivo de clase del objeto contenedor \MQL5\Include\DoEasy\Objects\Graph\WForms\Containers\Container.mqh, cambiaremos el nombre de los métodos que retornan los tamaños y las coordenadas del área de trabajo para que sus nombres se correspondan con los nombres de los métodos similares, así que eliminaremos el prefijo "Get":
public:
//--- Return the size and coordinates of the working area
   int               WidthWorkspace(void)          const
                       {
                        return this.Width()-::fmax(this.BorderSizeLeft(),this.PaddingLeft())-::fmax(this.BorderSizeRight(),this.PaddingRight());
                       }
   int               HeightWorkspace(void)         const
                       {
                        return this.Height()-::fmax(this.BorderSizeTop(),this.PaddingTop())-::fmax(this.BorderSizeBottom(),this.PaddingBottom());
                       }
   int               CoordXWorkspace(void)         const
                       {
                        return this.CoordX()+::fmax(this.BorderSizeLeft(),this.PaddingLeft());
                       }
   int               CoordYWorkspace(void)         const
                       {
                        return this.CoordY()+::fmax(this.BorderSizeTop(),this.PaddingTop());
                       }
   int               RightEdgeWorkspace(void)      const
                       {
                        return this.RightEdge()-::fmax(this.BorderSizeRight(),this.PaddingRight());
                       }
   int               BottomEdgeWorkspace(void)     const
                       {
                        return this.BottomEdge()-::fmax(this.BorderSizeBottom(),this.PaddingBottom());
                       }

//--- Return the list of bound WinForms objects with (1) any and (2) specified WinForms object type (from the base one and higher)
Después declararemos un método virtual para recortar las zonas ocultas del objeto:
   virtual void      SetBorderSizeBottom(const uint value)
                       {
                        CForm::SetBorderSizeBottom(value);
                        if(this.PaddingBottom()<this.BorderSizeBottom())
                           this.SetPaddingBottom(this.BorderSizeBottom());
                       }

//--- Crop the image outlined by the specified rectangular visibility area
   virtual void      Crop(void);

protected:
Dichos métodos deberán estar en todos los objetos WinForms clave de la biblioteca.
En el método que crea el nuevo elemento adjunto, añadiremos una llamada al método Crop() en el objeto recién creado:
//+------------------------------------------------------------------+
//| Create a new attached element                                    |
//+------------------------------------------------------------------+
bool CContainer::CreateNewElement(const ENUM_GRAPH_ELEMENT_TYPE element_type,
                                  const int x,
                                  const int y,
                                  const int w,
                                  const int h,
                                  const color colour,
                                  const uchar opacity,
                                  const bool activity,
                                  const bool redraw)
  {
//--- If the object type is less than the base WinForms object
   if(element_type<GRAPH_ELEMENT_TYPE_WF_BASE)
     {
      //--- report the error and return 'false'
      CMessage::ToLog(DFUN,MSG_PANEL_OBJECT_ERR_OBJ_MUST_BE_WFBASE);
      return false;
     }
//--- If failed to create a new graphical element, return 'false'
   CWinFormBase *obj=CForm::CreateAndAddNewElement(element_type,x,y,w,h,colour,opacity,activity);
   if(obj==NULL)
      return false;
//--- Set parameters for the created object
   this.SetObjParams(obj,colour);
//--- If the panel has auto resize enabled and features bound objects, call the resize method
   if(this.AutoSize() && this.ElementsTotal()>0)
      this.AutoSizeProcess(redraw);
//--- Crop along the edges of the visible part
   obj.Crop();
//--- return 'true'
   return true;
  }
//+------------------------------------------------------------------+
Después de crear un nuevo objeto y cambiar el tamaño del contenedor para que se ajuste a los objetos creados dentro de él (con el indicador de cambio de tamaño automático del contenedor activado), deberemos verificar que el objeto recién creado vaya más allá de la zona del contenedor dentro de la cual los objetos deberán ser visibles, y recorte aquellas partes de la imagen del nuevo objeto que quedan fuera de esta zona.
En el método que establece los parámetros del objeto adjunto, añadiremos el establecimiento de los punteros a los objetos básico y principal en el objeto adjunto, y también escribiremos un bloque de código para establecer los parámetros de los objetos de botón con flechas creados y adjuntos al contenedor:
//+------------------------------------------------------------------+
//| Set parameters for the attached object                           |
//+------------------------------------------------------------------+
void CContainer::SetObjParams(CWinFormBase *obj,const color colour)
  {
   obj.SetMain(this.GetMain()==NULL ? this.GetObject() : this.GetMain());
   obj.SetBase(this.GetObject());
//--- Set the text color of the object to be the same as that of the base container
   obj.SetForeColor(this.ForeColor(),true);
//--- If the created object is not a container, set the same group for it as the one for its base object
   if(obj.TypeGraphElement()<GRAPH_ELEMENT_TYPE_WF_CONTAINER || obj.TypeGraphElement()>GRAPH_ELEMENT_TYPE_WF_GROUPBOX)
      obj.SetGroup(this.Group());
//--- Depending on the object type
   switch(obj.TypeGraphElement())
     {
      //--- For the Container, Panel and GroupBox WinForms objects
      case GRAPH_ELEMENT_TYPE_WF_CONTAINER            :
      case GRAPH_ELEMENT_TYPE_WF_PANEL                :
      case GRAPH_ELEMENT_TYPE_WF_GROUPBOX             :
        //--- set the frame color equal to the background color
        obj.SetBorderColor(obj.BackgroundColor(),true);
        break;
      //--- For "Label", "CheckBox" and "RadioButton" WinForms objects
      case GRAPH_ELEMENT_TYPE_WF_LABEL                :
      case GRAPH_ELEMENT_TYPE_WF_CHECKBOX             :
      case GRAPH_ELEMENT_TYPE_WF_RADIOBUTTON          :
        //--- set the object text color depending on the one passed to the method:
        //--- either the container text color, or the one passed to the method.
        //--- The frame color is set equal to the text color
        //--- Set the background color to transparent
        obj.SetForeColor(colour==clrNONE ? this.ForeColor() : colour,true);
        obj.SetBorderColor(obj.ForeColor(),true);
        obj.SetBackgroundColor(CLR_CANV_NULL,true);
        obj.SetOpacity(0,false);
        break;
      //--- For "Button", "TabHeader", TabField and "ListBoxItem" WinForms objects
      case GRAPH_ELEMENT_TYPE_WF_BUTTON               :
      case GRAPH_ELEMENT_TYPE_WF_TAB_HEADER           :
      case GRAPH_ELEMENT_TYPE_WF_TAB_FIELD            :
      case GRAPH_ELEMENT_TYPE_WF_LIST_BOX_ITEM        :
        //--- set the object text color as a container text color depending on the one passed to the method:
        //--- set the background color depending on the one passed to the method:
        //--- either the default standard control background color, or the one passed to the method.
        //--- The frame color is set equal to the text color
        obj.SetForeColor(this.ForeColor(),true);
        obj.SetBackgroundColor(colour==clrNONE ? CLR_DEF_CONTROL_STD_BACK_COLOR : colour,true);
        obj.SetBorderColor(obj.ForeColor(),true);
        obj.SetBorderStyle(FRAME_STYLE_SIMPLE);
        break;
      //--- For "ListBox", "CheckedListBox" and "ButtonListBox" WinForms object
      case GRAPH_ELEMENT_TYPE_WF_LIST_BOX             :
      case GRAPH_ELEMENT_TYPE_WF_CHECKED_LIST_BOX     :
      case GRAPH_ELEMENT_TYPE_WF_BUTTON_LIST_BOX      :
        //--- set the object text color as a container text color depending on the one passed to the method:
        //--- set the background color depending on the one passed to the method:
        //--- either the default standard control background color, or the one passed to the method.
        //--- The frame color is set equal to the text color
        obj.SetBackgroundColor(colour==clrNONE ? CLR_DEF_CONTROL_STD_BACK_COLOR : colour,true);
        obj.SetBorderColor(CLR_DEF_BORDER_COLOR,true);
        obj.SetForeColor(CLR_DEF_FORE_COLOR,true);
        break;
      //--- For the "TabControl", "ArrowButton" WinForms object
      case GRAPH_ELEMENT_TYPE_WF_TAB_CONTROL          :
        //--- set the object text color as a container text color depending on the one passed to the method:
        //--- set the background color depending on the one passed to the method:
        //--- either the default standard control background color, or the one passed to the method.
        //--- The frame color is set equal to the text color
        obj.SetBackgroundColor(colour==clrNONE ? CLR_DEF_CONTROL_TAB_BACK_COLOR : colour,true);
        obj.SetBorderColor(CLR_DEF_CONTROL_TAB_BORDER_COLOR,true);
        obj.SetForeColor(CLR_DEF_FORE_COLOR,true);
        obj.SetOpacity(CLR_DEF_CONTROL_TAB_OPACITY);
        break;
      //--- For the "ArrowButton" WinForms object
      case GRAPH_ELEMENT_TYPE_WF_ARROW_BUTTON         :
      case GRAPH_ELEMENT_TYPE_WF_ARROW_BUTTON_UP      :
      case GRAPH_ELEMENT_TYPE_WF_ARROW_BUTTON_DOWN    :
      case GRAPH_ELEMENT_TYPE_WF_ARROW_BUTTON_LEFT    :
      case GRAPH_ELEMENT_TYPE_WF_ARROW_BUTTON_RIGHT   :
        //--- set the object text color as a container text color depending on the one passed to the method:
        //--- set the background color depending on the one passed to the method:
        //--- either the default standard control background color, or the one passed to the method.
        //--- The frame color is set equal to the text color
        obj.SetBorderColor(CLR_DEF_CONTROL_TAB_HEAD_BORDER_COLOR,true);
        obj.SetBorderStyle(FRAME_STYLE_SIMPLE);
        break;
      default:
        break;
     }
   obj.Crop();
  }
//+------------------------------------------------------------------+
Al final del método, recortaremos las zonas ocultas del objeto creado.
Es probable que resulte redundante llamar a los métodos Crop() al crear el elemento adjunto en un método anterior y después de establecer las propiedades predeterminadas en ese método. Las pruebas posteriores mostrarán desde qué método será posible eliminar la llamada al método Crop().
Vamos a escribir una implementación del método que recortará la imagen dibujada por la zona de visibilidad rectangular calculada:
//+------------------------------------------------------------------+
//| Crop the image outlined by the calculated                        |
//| rectangular visibility scope                                     |
//+------------------------------------------------------------------+
void CContainer::Crop(void)
  {
//--- Get the pointer to the base object
   CContainer *base=this.GetBase();
//--- If the object does not have a base object it is attached to, then there is no need to crop the hidden areas - leave
   if(base==NULL)
      return;
//--- Set the initial coordinates and size of the visibility scope to the entire object
   int vis_x=0;
   int vis_y=0;
   int vis_w=this.Width();
   int vis_h=this.Height();
//--- Set the size of the top, bottom, left and right areas that go beyond the container
   int crop_top=0;
   int crop_bottom=0;
   int crop_left=0;
   int crop_right=0;
//--- Calculate the boundaries of the container area, inside which the object is fully visible
   int top=fmax(base.CoordYWorkspace(),base.CoordYVisibleArea());
   int bottom=fmin(base.BottomEdgeWorkspace(),base.BottomEdgeVisibleArea()+1);
   int left=fmax(base.CoordXWorkspace(),base.CoordXVisibleArea());
   int right=fmin(base.RightEdgeWorkspace(),base.RightEdgeVisibleArea()+1);
//--- Calculate the values of the top, bottom, left and right areas, at which the object goes beyond
//--- the boundaries of the container area, inside which the object is fully visible
   crop_top=this.CoordY()-top;
   if(crop_top<0)
      vis_y=-crop_top;
   crop_bottom=bottom-this.BottomEdge()-1;
   if(crop_bottom<0)
      vis_h=this.Height()+crop_bottom-vis_y;
   crop_left=this.CoordX()-left;
   if(crop_left<0)
      vis_x=-crop_left;
   crop_right=right-this.RightEdge()-1;
   if(crop_right<0)
      vis_w=this.Width()+crop_right-vis_x;
//--- If there are areas that need to be hidden, call the cropping method with the calculated size of the object visibility scope
   if(crop_top<0 || crop_bottom<0 || crop_left<0 || crop_right<0)
      this.Crop(vis_x,vis_y,vis_w,vis_h);
  }
//+------------------------------------------------------------------+
El método resulta idéntico al que escribimos en la clase de objeto de elemento gráfico CGCnvElement, pero en lugar de obtener el tipo de objeto básico como CGCnvElement, obtendremos el objeto básico con el tipo de objeto contenedor CContainer, y para calcular los límites de la zona del contenedor dentro la cual el objeto resulta completamente visible, usaremos los métodos que retornan los límites de la zona de trabajo del contenedor que no existen en el elemento gráfico básico.
En el método ArrangeObjects(), ya hemos reemplazado los métodos anteriormente renombrados (de los cuales hemos eliminado el prefijo "Get") por sus nombres actuales.
Por ejemplo:
//+------------------------------------------------------------------+
//| Place bound objects in the order of their Dock binding           |
//+------------------------------------------------------------------+
bool CContainer::ArrangeObjects(const bool redraw)
  {
//--- Get the list of bound objects with WinForms type basic and higher
   CArrayObj *list=this.GetListWinFormsObj();
   CWinFormBase *prev=NULL, *obj=NULL, *elm=NULL;
//--- In the loop by all bound objects,
   for(int i=0;i<list.Total();i++)
     {
      //--- Get the current and previous elements from the list
      obj=list.At(i);
      prev=list.At(i-1);
      //--- If the object is not received, move on
      if(obj==NULL)
         continue;
      int x=0, y=0; // Object binding coordinates
      //--- Depending on the current object binding mode...
      //--- Top
      if(obj.DockMode()==CANV_ELEMENT_DOCK_MODE_TOP)
        {
         //--- If failed to change the object size (for the entire working area width and by the initial object height), move on to the next one
         if(!obj.Resize(this.WidthWorkspace(),obj.GetHeightInit(),false))
            continue;
         //--- Get the object binding coordinates
         x=this.CoordXWorkspace();
         y=(prev!=NULL ? prev.BottomEdge()+1 : this.CoordYWorkspace());
         //--- If failed to move the object to the obtained coordinates, move on to the next one
         if(!obj.Move(x,y,false))
            continue;
        }
      //--- Bottom
Existen muchos reemplazos similares en el método (ya los hemos realizado todos, por lo que no tendrá sentido describirlos aquí); hablamos solo de mejoras como la usabilidad de Intellisense al escribir código, y no afectan su lógica.
Vamos a mejorar la clase del objeto de panel en el archivo \MQL5\Include\DoEasy\Objects\Graph\WForms\Containers\Panel.mqh.
Así, añadiremos a esta los archivos con todas las nuevas clases creadas hoy:
//+------------------------------------------------------------------+
//| Include files                                                    |
//+------------------------------------------------------------------+
#include "Container.mqh"
#include "..\TabField.mqh"
#include "..\ArrowButton.mqh"
#include "..\ArrowUpButton.mqh"
#include "..\ArrowDownButton.mqh"
#include "..\ArrowLeftButton.mqh"
#include "..\ArrowRightButton.mqh"
#include "..\ArrowUpDownBox.mqh"
#include "..\ArrowLeftRightBox.mqh"
#include "GroupBox.mqh"
#include "TabControl.mqh"
#include "..\..\WForms\Common Controls\ListBox.mqh"
#include "..\..\WForms\Common Controls\CheckedListBox.mqh"
#include "..\..\WForms\Common Controls\ButtonListBox.mqh"
//+------------------------------------------------------------------+
Ahora estas clases resultarán visibles en todos los objetos gráficos de la biblioteca donde se puedan crear.
En el método que crea un nuevo objeto gráfico, añadiremos bloques de código para crear todos los nuevos objetos creados:
//+------------------------------------------------------------------+
//| Create a new graphical object                                    |
//+------------------------------------------------------------------+
CGCnvElement *CPanel::CreateNewGObject(const ENUM_GRAPH_ELEMENT_TYPE type,
                                       const int obj_num,
                                       const string descript,
                                       const int x,
                                       const int y,
                                       const int w,
                                       const int h,
                                       const color colour,
                                       const uchar opacity,
                                       const bool movable,
                                       const bool activity)
  {
   CGCnvElement *element=NULL;
   switch(type)
     {
      case GRAPH_ELEMENT_TYPE_ELEMENT :
         element=new CGCnvElement(type,this.ID(),obj_num,this.ChartID(),this.SubWindow(),descript,x,y,w,h,colour,opacity,movable,activity);
        break;
      case GRAPH_ELEMENT_TYPE_FORM :
         element=new CForm(this.ChartID(),this.SubWindow(),descript,x,y,w,h);
        break;
      case GRAPH_ELEMENT_TYPE_WF_CONTAINER            :
         element=new CContainer(this.ChartID(),this.SubWindow(),descript,x,y,w,h);
        break;
      case GRAPH_ELEMENT_TYPE_WF_GROUPBOX             :
         element=new CGroupBox(this.ChartID(),this.SubWindow(),descript,x,y,w,h);
        break;
      case GRAPH_ELEMENT_TYPE_WF_PANEL                :
         element=new CPanel(this.ChartID(),this.SubWindow(),descript,x,y,w,h);
        break;
      case GRAPH_ELEMENT_TYPE_WF_LABEL                :
         element=new CLabel(this.ChartID(),this.SubWindow(),descript,x,y,w,h);
        break;
      case GRAPH_ELEMENT_TYPE_WF_CHECKBOX             :
         element=new CCheckBox(this.ChartID(),this.SubWindow(),descript,x,y,w,h);
        break;
      case GRAPH_ELEMENT_TYPE_WF_RADIOBUTTON          :
         element=new CRadioButton(this.ChartID(),this.SubWindow(),descript,x,y,w,h);
        break;
      case GRAPH_ELEMENT_TYPE_WF_BUTTON               :
         element=new CButton(this.ChartID(),this.SubWindow(),descript,x,y,w,h);
        break;
      case GRAPH_ELEMENT_TYPE_WF_LIST_BOX             :
         element=new CListBox(this.ChartID(),this.SubWindow(),descript,x,y,w,h);
        break;
      case GRAPH_ELEMENT_TYPE_WF_LIST_BOX_ITEM        :
         element=new CListBoxItem(this.ChartID(),this.SubWindow(),descript,x,y,w,h);
        break;
      case GRAPH_ELEMENT_TYPE_WF_CHECKED_LIST_BOX     :
         element=new CCheckedListBox(this.ChartID(),this.SubWindow(),descript,x,y,w,h);
        break;
      case GRAPH_ELEMENT_TYPE_WF_BUTTON_LIST_BOX      :
         element=new CButtonListBox(this.ChartID(),this.SubWindow(),descript,x,y,w,h);
        break;
      case GRAPH_ELEMENT_TYPE_WF_TAB_HEADER           :
         element=new CTabHeader(this.ChartID(),this.SubWindow(),descript,x,y,w,h);
        break;
      case GRAPH_ELEMENT_TYPE_WF_TAB_FIELD            :
         element=new CTabField(this.ChartID(),this.SubWindow(),descript,x,y,w,h);
        break;
      case GRAPH_ELEMENT_TYPE_WF_TAB_CONTROL          :
         element=new CTabControl(this.ChartID(),this.SubWindow(),descript,x,y,w,h);
        break;
      case GRAPH_ELEMENT_TYPE_WF_ARROW_BUTTON         :
         element=new CArrowButton(this.ChartID(),this.SubWindow(),descript,x,y,w,h);
        break;
      case GRAPH_ELEMENT_TYPE_WF_ARROW_BUTTON_UP      :
         element=new CArrowUpButton(this.ChartID(),this.SubWindow(),descript,x,y,w,h);
        break;
      case GRAPH_ELEMENT_TYPE_WF_ARROW_BUTTON_DOWN    :
         element=new CArrowDownButton(this.ChartID(),this.SubWindow(),descript,x,y,w,h);
        break;
      case GRAPH_ELEMENT_TYPE_WF_ARROW_BUTTON_LEFT    :
         element=new CArrowLeftButton(this.ChartID(),this.SubWindow(),descript,x,y,w,h);
        break;
      case GRAPH_ELEMENT_TYPE_WF_ARROW_BUTTON_RIGHT   :
         element=new CArrowRightButton(this.ChartID(),this.SubWindow(),descript,x,y,w,h);
        break;
      case GRAPH_ELEMENT_TYPE_WF_ARROW_BUTTONS_UD_BOX :
         element=new CArrowUpDownBox(this.ChartID(),this.SubWindow(),descript,x,y,w,h);
        break;
      case GRAPH_ELEMENT_TYPE_WF_ARROW_BUTTONS_LR_BOX :
         element=new CArrowLeftRightBox(this.ChartID(),this.SubWindow(),descript,x,y,w,h);
        break;
      default:
        break;
     }
   if(element==NULL)
      ::Print(DFUN,CMessage::Text(MSG_LIB_SYS_FAILED_CREATE_ELM_OBJ),this.TypeElementDescription(type));
   return element;
  }
//+------------------------------------------------------------------+
En el método que crea el objeto de sustrato, cambiaremos los nombres de los métodos renombrados anteriormente llamados:
//+------------------------------------------------------------------+
//| Create the underlay object                                       |
//+------------------------------------------------------------------+
bool CPanel::CreateUnderlayObj(void)
  {
   this.m_underlay=new CGCnvElement(GRAPH_ELEMENT_TYPE_WF_UNDERLAY,this.ID(),this.Number(),this.ChartID(),this.SubWindow(),this.NameObj()+"Underlay",
                                    this.CoordXWorkspace(),this.CoordYWorkspace(),this.WidthWorkspace(),this.HeightWorkspace(),
                                    CLR_CANV_NULL,0,false,false);
   if(m_underlay==NULL)
     {
      CMessage::ToLog(DFUN,MSG_PANEL_OBJECT_ERR_FAILED_CREATE_UNDERLAY_OBJ);
      return false;
     }
   if(!this.m_list_tmp.Add(this.m_underlay))
     {
      CMessage::ToLog(DFUN,MSG_LIB_SYS_FAILED_OBJ_ADD_TO_LIST);
      delete this.m_underlay;
      return false;
     }
   this.SetUnderlayParams();
   return true;
  }
//+------------------------------------------------------------------+
En el archivo de la clase de control GroupBox \MQL5\Include\DoEasy\Objects\Graph\WForms\Containers\GroupBox.mqh, en el método que crea un nuevo objeto gráfico, al igual que en la clase anterior, añadiremos los bloques de código necesarios para crear todos nuevos objetos creados por nosotros hoy:
//+------------------------------------------------------------------+
//| Create a new graphical object                                    |
//+------------------------------------------------------------------+
CGCnvElement *CGroupBox::CreateNewGObject(const ENUM_GRAPH_ELEMENT_TYPE type,
                                          const int obj_num,
                                          const string descript,
                                          const int x,
                                          const int y,
                                          const int w,
                                          const int h,
                                          const color colour,
                                          const uchar opacity,
                                          const bool movable,
                                          const bool activity)
  {
   CGCnvElement *element=NULL;
   switch(type)
     {
      case GRAPH_ELEMENT_TYPE_ELEMENT                 :
         element=new CGCnvElement(type,this.ID(),obj_num,this.ChartID(),this.SubWindow(),descript,x,y,w,h,colour,opacity,movable,activity);
        break;
      case GRAPH_ELEMENT_TYPE_FORM                    :
         element=new CForm(this.ChartID(),this.SubWindow(),descript,x,y,w,h);
        break;
      case GRAPH_ELEMENT_TYPE_WF_CONTAINER            :
         element=new CContainer(this.ChartID(),this.SubWindow(),descript,x,y,w,h);
        break;
      case GRAPH_ELEMENT_TYPE_WF_GROUPBOX             :
         element=new CGroupBox(this.ChartID(),this.SubWindow(),descript,x,y,w,h);
        break;
      case GRAPH_ELEMENT_TYPE_WF_PANEL                :
         element=new CPanel(this.ChartID(),this.SubWindow(),descript,x,y,w,h);
        break;
      case GRAPH_ELEMENT_TYPE_WF_LABEL                :
         element=new CLabel(this.ChartID(),this.SubWindow(),descript,x,y,w,h);
        break;
      case GRAPH_ELEMENT_TYPE_WF_CHECKBOX             :
         element=new CCheckBox(this.ChartID(),this.SubWindow(),descript,x,y,w,h);
        break;
      case GRAPH_ELEMENT_TYPE_WF_RADIOBUTTON          :
         element=new CRadioButton(this.ChartID(),this.SubWindow(),descript,x,y,w,h);
        break;
      case GRAPH_ELEMENT_TYPE_WF_BUTTON               :
         element=new CButton(this.ChartID(),this.SubWindow(),descript,x,y,w,h);
        break;
      case GRAPH_ELEMENT_TYPE_WF_LIST_BOX             :
         element=new CListBox(this.ChartID(),this.SubWindow(),descript,x,y,w,h);
        break;
      case GRAPH_ELEMENT_TYPE_WF_LIST_BOX_ITEM        :
         element=new CListBoxItem(this.ChartID(),this.SubWindow(),descript,x,y,w,h);
        break;
      case GRAPH_ELEMENT_TYPE_WF_CHECKED_LIST_BOX     :
         element=new CCheckedListBox(this.ChartID(),this.SubWindow(),descript,x,y,w,h);
        break;
      case GRAPH_ELEMENT_TYPE_WF_BUTTON_LIST_BOX      :
         element=new CButtonListBox(this.ChartID(),this.SubWindow(),descript,x,y,w,h);
        break;
      case GRAPH_ELEMENT_TYPE_WF_TAB_HEADER           :
         element=new CTabHeader(this.ChartID(),this.SubWindow(),descript,x,y,w,h);
        break;
      case GRAPH_ELEMENT_TYPE_WF_TAB_FIELD            :
         element=new CTabField(this.ChartID(),this.SubWindow(),descript,x,y,w,h);
        break;
      case GRAPH_ELEMENT_TYPE_WF_TAB_CONTROL          :
         element=new CTabControl(this.ChartID(),this.SubWindow(),descript,x,y,w,h);
        break;
      case GRAPH_ELEMENT_TYPE_WF_ARROW_BUTTON         :
         element=new CArrowButton(this.ChartID(),this.SubWindow(),descript,x,y,w,h);
        break;
      case GRAPH_ELEMENT_TYPE_WF_ARROW_BUTTON_UP      :
         element=new CArrowUpButton(this.ChartID(),this.SubWindow(),descript,x,y,w,h);
        break;
      case GRAPH_ELEMENT_TYPE_WF_ARROW_BUTTON_DOWN    :
         element=new CArrowDownButton(this.ChartID(),this.SubWindow(),descript,x,y,w,h);
        break;
      case GRAPH_ELEMENT_TYPE_WF_ARROW_BUTTON_LEFT    :
         element=new CArrowLeftButton(this.ChartID(),this.SubWindow(),descript,x,y,w,h);
        break;
      case GRAPH_ELEMENT_TYPE_WF_ARROW_BUTTON_RIGHT   :
         element=new CArrowRightButton(this.ChartID(),this.SubWindow(),descript,x,y,w,h);
        break;
      case GRAPH_ELEMENT_TYPE_WF_ARROW_BUTTONS_UD_BOX :
         element=new CArrowUpDownBox(this.ChartID(),this.SubWindow(),descript,x,y,w,h);
        break;
      case GRAPH_ELEMENT_TYPE_WF_ARROW_BUTTONS_LR_BOX :
         element=new CArrowLeftRightBox(this.ChartID(),this.SubWindow(),descript,x,y,w,h);
        break;
      default:
        break;
     }
   if(element==NULL)
      ::Print(DFUN,CMessage::Text(MSG_LIB_SYS_FAILED_CREATE_ELM_OBJ),this.TypeElementDescription(type));
   return element;
  }
//+------------------------------------------------------------------+
Hemos mejorado los métodos para eliminar un elemento según los mismos métodos de otras clases mejorados anteriormente:
//+------------------------------------------------------------------+
//| Clear the element filling it with color and opacity              |
//+------------------------------------------------------------------+
void CGroupBox::Erase(const color colour,const uchar opacity,const bool redraw=false)
  {
//--- Fill the element having the specified color and the redrawing flag
   CGCnvElement::EraseNoCrop(colour,opacity,false);
//--- Draw a frame encasing a group of objects
   this.DrawFrame();
//--- Draw a header above the frame
   CGCnvElement::Text(6,0,this.Text(),this.ForeColor(),this.ForeColorOpacity());
//--- Update the element having the specified redrawing flag
   this.Crop();
   this.Update(redraw);
  }
//+------------------------------------------------------------------+
//| Clear the element with a gradient fill                           |
//+------------------------------------------------------------------+
void CGroupBox::Erase(color &colors[],const uchar opacity,const bool vgradient,const bool cycle,const bool redraw=false)
  {
//--- Fill the element having the specified color array and the redrawing flag
   CGCnvElement::EraseNoCrop(colors,opacity,vgradient,cycle,false);
//--- Draw a frame encasing a group of objects
   this.DrawFrame();
//--- Draw a header above the frame
   CGCnvElement::Text(6,0,this.Text(),this.ForeColor(),this.ForeColorOpacity());
//--- Update the element having the specified redrawing flag
   this.Crop();
   this.Update(redraw);
  }
//+------------------------------------------------------------------+
Todo es igual que antes: rellenaremos con el color de fondo, dibujaremos los elementos de diseño necesarios y recortaremos el exceso que vaya más allá de la zona visible.
Vamos a mejorar la clase del objeto de encabezado de la pestaña del control TabControl en el archivo \MQL5\Include\DoEasy\Objects\Graph\WForms\TabHeader.mqh.
En la sección pública de la clase, declararemos el método para redibujar el objeto:
//--- Sets the state of the control
   virtual void      SetState(const bool flag);

//--- Redraw the object
   virtual void      Redraw(bool redraw);
//--- Clear the element filling it with color and opacity
En los constructores de clases, estableceremos el tipo del objeto gráfico de la biblioteca para el elemento como "objeto WinForms auxiliar":
//+------------------------------------------------------------------+
//| Protected constructor with an object type,                       |
//| chart ID and subwindow                                           |
//+------------------------------------------------------------------+
CTabHeader::CTabHeader(const ENUM_GRAPH_ELEMENT_TYPE type,
                       const long chart_id,
                       const int subwindow,
                       const string descript,
                       const int x,
                       const int y,
                       const int w,
                       const int h) : CButton(type,chart_id,subwindow,descript,x,y,w,h)
  {
   this.SetTypeElement(GRAPH_ELEMENT_TYPE_WF_TAB_HEADER);
   this.m_type=OBJECT_DE_TYPE_GWF_HELPER;
   this.SetAlignment(CANV_ELEMENT_ALIGNMENT_TOP);
   this.SetToggleFlag(true);

   //---...
   //---...

   this.SetSizes(w,h);
   this.SetState(false);
  }
//+------------------------------------------------------------------+
//| Constructor                                                      |
//+------------------------------------------------------------------+
CTabHeader::CTabHeader(const long chart_id,
                       const int subwindow,
                       const string descript,
                       const int x,
                       const int y,
                       const int w,
                       const int h) : CButton(GRAPH_ELEMENT_TYPE_WF_TAB_HEADER,chart_id,subwindow,descript,x,y,w,h)
  {
   this.SetTypeElement(GRAPH_ELEMENT_TYPE_WF_TAB_HEADER);
   this.m_type=OBJECT_DE_TYPE_GWF_HELPER;
   this.SetAlignment(CANV_ELEMENT_ALIGNMENT_TOP);
   this.SetToggleFlag(true);

   //---...
   //---...

   this.SetSizes(w,h);
   this.SetState(false);
  }
//+------------------------------------------------------------------+
En el método que establece el estado del control, añadiremos el encabezado al primer plano solo si el objeto está visible. Exactamente de la misma forma procesaremos el objeto de campo de la pestaña: lo mostraremos, lo traeremos al primer plano, dibujaremos los elementos de diseño en él y lo recortaremos solo si el objeto es visible:
//+------------------------------------------------------------------+
//| Set the state of the control                                     |
//+------------------------------------------------------------------+
void CTabHeader::SetState(const bool flag)
  {
//--- Get the button state and set the new one passed to the method
   bool state=this.State();
   CButton::SetState(flag);
//--- If the previous state of the button does not match the set
   if(state!=this.State())
     {
      //--- If the button is pressed
      if(this.State())
        {
         //--- Call the button resizing method and bring it to the foreground
         this.WHProcessStateOn();
         if(this.IsVisible())
            this.BringToTop();
         //--- Get the base object the tab title is attached to (TabControl)
         CWinFormBase *base=this.GetBase();
         if(base==NULL)
            return;
         //--- Set the index of the selected tab to the TabControl object
         base.SetProperty(CANV_ELEMENT_PROP_TAB_PAGE_NUMBER,this.PageNumber());
         //--- Get the list of tab field objects from the base object
         CArrayObj *list=base.GetListElementsByType(GRAPH_ELEMENT_TYPE_WF_TAB_FIELD);
         if(list==NULL)
            return;
         //--- In the loop through the received list, hide all fields that do not match the header
         for(int i=0;i<list.Total();i++)
           {
            //--- get the next tab field object
            CWinFormBase *obj=list.At(i);
            //--- If the object is not received or corresponds to the selected header, move on
            if(obj==NULL || obj.GetProperty(CANV_ELEMENT_PROP_TAB_PAGE_NUMBER)==this.PageNumber())
               continue;
            //--- Set the ZOrder tab field as the base object and hide the field
            obj.SetZorder(base.Zorder(),false);
            obj.Hide();
           }
         //--- Get the field object corresponding to the field header (this object)
         CWinFormBase *field=this.GetFieldObj();
         if(field==NULL)
            return;
         //--- Display the field and set its ZOrder higher than other fields of the TabControl object,
         //--- draw the frame of the field object and bring it to the foreground

         field.SetZorder(base.Zorder()+1,false);
         if(this.IsVisible())
           {
            field.Show();
            field.DrawFrame();
            field.Crop();
            field.BringToTop();
           }
        }
      //--- If the button is not pressed, call the method to restore the title size
      else
        {
         this.WHProcessStateOff();
         CWinFormBase *field=this.GetFieldObj();
         field.Hide();
        }
     }
  }
//+------------------------------------------------------------------+
Si no se presiona el botón, el objeto de campo de pestaña se ocultará.
Asimismo, hemos mejorado los métodos para limpiar los elementos según el nuevo concepto para todos los elementos gráficos:
//+------------------------------------------------------------------+
//| Clear the element filling it with color and opacity              |
//+------------------------------------------------------------------+
void CTabHeader::Erase(const color colour,const uchar opacity,const bool redraw=false)
  {
//--- Fill the element having the specified color and the redrawing flag
   CGCnvElement::EraseNoCrop(colour,opacity,false);
//--- If the object has a frame, draw it
   if(this.BorderStyle()!=FRAME_STYLE_NONE)
      this.DrawFrame();
//--- Update the element having the specified redrawing flag
   this.Crop();
   this.Update(redraw);
  }
//+------------------------------------------------------------------+
//| Clear the element with a gradient fill                           |
//+------------------------------------------------------------------+
void CTabHeader::Erase(color &colors[],const uchar opacity,const bool vgradient,const bool cycle,const bool redraw=false)
  {
//--- Fill the element having the specified color array and the redrawing flag
   CGCnvElement::EraseNoCrop(colors,opacity,vgradient,cycle,false);
//--- If the object has a frame, draw it
   if(this.BorderStyle()!=FRAME_STYLE_NONE)
      this.DrawFrame();
//--- Update the element having the specified redrawing flag
   this.Crop();
   this.Update(redraw);
  }
//+------------------------------------------------------------------+
Así, los rellenaremos con color, dibujaremos los elementos de diseño y recortaremos la parte sobrante.
Método virtual que redibuja un objeto:
//+------------------------------------------------------------------+
//| Redraw the object                                                |
//+------------------------------------------------------------------+
void CTabHeader::Redraw(bool redraw)
  {
//--- Fill the object with the background color
   this.Erase(this.BackgroundColor(),this.Opacity(),false);
//--- Declare the variables for X and Y coordinates and set their values depending on the text alignment
   int x=0,y=0;
   CLabel::SetTextParamsByAlign(x,y);
//--- Draw the text within the set coordinates of the object and the binding point of the text, and update the object
   this.Text(x,y,this.Text(),this.ForeColor(),this.ForeColorOpacity(),this.TextAnchor());
   this.Crop();
   this.Update(redraw);
  }
//+------------------------------------------------------------------+
Aquí llamaremos al método de rellenado del objeto con color, estableceremos los parámetros de muestra del texto y dibujaremos el texto, luego recortaremos las zonas de la imagen que vayan más allá del contenedor.
En el manejador del evento "El cursor está dentro del área activa, el botón del ratón (izquierdo) está sin pulsar" (método MouseActiveAreaReleasedHandler())
añadiremos el recorte del campo de la pestaña al mostrar este en un elemento tras clicar en el encabezado de la pestaña:
      //--- If this is the toggle button,
      else
        {
         //--- if the button does not work in the group, set its state to the opposite,
         if(!this.GroupButtonFlag())
            this.SetState(!this.State());
         //--- if the button is not pressed yet, set it to the pressed state
         else if(!this.State())
            this.SetState(true);
         //--- set the background and text color for "The cursor is over the active area" status depending on whether the button is clicked or not
         this.SetBackgroundColor(this.State() ? this.BackgroundStateOnColorMouseOver() : this.BackgroundColorMouseOver(),false);
         this.SetForeColor(this.State() ? this.ForeStateOnColorMouseOver() : this.ForeColorMouseOver(),false);

         //--- Get the field object corresponding to the header
         CWinFormBase *field=this.GetFieldObj();
         if(field!=NULL)
           {
            //--- Display the field, bring it to the front and draw a frame
            field.Show();
            field.BringToTop();
            field.DrawFrame();
            field.Crop();
           }
         //--- Redraw an object and a chart
         this.Redraw(true);
        }
      //--- Send the test message to the journal
      Print(DFUN_ERR_LINE,TextByLanguage("Щелчок","Click"),", this.State()=",this.State(),", ID=",this.ID(),", Group=",this.Group());
      //--- Set the frame color for "The cursor is over the active area" status
      this.SetBorderColor(this.BorderColorMouseOver(),false);
     }
  }
//+------------------------------------------------------------------+
Vamos a mejorar la clase de objeto de campo de la pestaña en el archivo \MQL5\Include\DoEasy\Objects\Graph\WForms\TabField.mqh.
En los constructores de la clase, estableceremos el tipo del objeto gráfico de la biblioteca como "objeto WinForms auxiliar":
//+------------------------------------------------------------------+
//| Protected constructor with an object type,                       |
//| chart ID and subwindow                                           |
//+------------------------------------------------------------------+
CTabField::CTabField(const ENUM_GRAPH_ELEMENT_TYPE type,
                     const long chart_id,
                     const int subwindow,
                     const string descript,
                     const int x,
                     const int y,
                     const int w,
                     const int h) : CContainer(type,chart_id,subwindow,descript,x,y,w,h)
  {
   this.SetTypeElement(GRAPH_ELEMENT_TYPE_WF_TAB_FIELD);
   this.m_type=OBJECT_DE_TYPE_GWF_HELPER;
   this.SetBorderSizeAll(1);
   this.SetBorderStyle(FRAME_STYLE_SIMPLE);

   //---...
   //---...

   this.SetForeColor(CLR_DEF_FORE_COLOR,true);
   this.SetPaddingAll(3);
  }
//+------------------------------------------------------------------+
//| Constructor                                                      |
//+------------------------------------------------------------------+
CTabField::CTabField(const long chart_id,
                     const int subwindow,
                     const string descript,
                     const int x,
                     const int y,
                     const int w,
                     const int h) : CContainer(GRAPH_ELEMENT_TYPE_WF_TAB_FIELD,chart_id,subwindow,descript,x,y,w,h)
  {
   this.SetTypeElement(GRAPH_ELEMENT_TYPE_WF_TAB_FIELD);
   this.m_type=OBJECT_DE_TYPE_GWF_HELPER;
   this.SetBorderSizeAll(1);
   this.SetBorderStyle(FRAME_STYLE_SIMPLE);

   //---...
   //---...

   this.SetForeColor(CLR_DEF_FORE_COLOR,true);
   this.SetPaddingAll(3);
  }
//+------------------------------------------------------------------+
Hemos mejorado los métodos de borrado de elementos de la misma forma que en todas las clases anteriores de los objetos WinForms:
//+------------------------------------------------------------------+
//| Clear the element filling it with color and opacity              |
//+------------------------------------------------------------------+
void CTabField::Erase(const color colour,const uchar opacity,const bool redraw=false)
  {
//--- Fill the element having the specified color and the redrawing flag
   CGCnvElement::EraseNoCrop(colour,opacity,false);
//--- If the object has a frame, draw it
   if(this.BorderStyle()!=FRAME_STYLE_NONE)
      this.DrawFrame();
//--- Update the element having the specified redrawing flag
   this.Crop();
   this.Update(redraw);
  }
//+------------------------------------------------------------------+
//| Clear the element with a gradient fill                           |
//+------------------------------------------------------------------+
void CTabField::Erase(color &colors[],const uchar opacity,const bool vgradient,const bool cycle,const bool redraw=false)
  {
//--- Fill the element having the specified color array and the redrawing flag
   CGCnvElement::EraseNoCrop(colors,opacity,vgradient,cycle,false);
//--- If the object has a frame, draw it
   if(this.BorderStyle()!=FRAME_STYLE_NONE)
      this.DrawFrame();
//--- Update the element having the specified redrawing flag
   this.Crop();
   this.Update(redraw);
  }
//+------------------------------------------------------------------+
En el método que crea un nuevo objeto gráfico, añadiremos bloques de código para crear todos los nuevos objetos que hemos hecho hoy:
//+------------------------------------------------------------------+
//| Create a new graphical object                                    |
//+------------------------------------------------------------------+
CGCnvElement *CTabField::CreateNewGObject(const ENUM_GRAPH_ELEMENT_TYPE type,
                                          const int obj_num,
                                          const string descript,
                                          const int x,
                                          const int y,
                                          const int w,
                                          const int h,
                                          const color colour,
                                          const uchar opacity,
                                          const bool movable,
                                          const bool activity)
  {
   CGCnvElement *element=NULL;
   switch(type)
     {
      case GRAPH_ELEMENT_TYPE_ELEMENT                 :
         element=new CGCnvElement(type,this.ID(),obj_num,this.ChartID(),this.SubWindow(),descript,x,y,w,h,colour,opacity,movable,activity);
        break;
      case GRAPH_ELEMENT_TYPE_FORM                    :
         element=new CForm(this.ChartID(),this.SubWindow(),descript,x,y,w,h);
        break;
      case GRAPH_ELEMENT_TYPE_WF_CONTAINER            :
         element=new CContainer(this.ChartID(),this.SubWindow(),descript,x,y,w,h);
        break;
      case GRAPH_ELEMENT_TYPE_WF_GROUPBOX             :
         element=new CGroupBox(this.ChartID(),this.SubWindow(),descript,x,y,w,h);
        break;
      case GRAPH_ELEMENT_TYPE_WF_PANEL                :
         element=new CPanel(this.ChartID(),this.SubWindow(),descript,x,y,w,h);
        break;
      case GRAPH_ELEMENT_TYPE_WF_LABEL                :
         element=new CLabel(this.ChartID(),this.SubWindow(),descript,x,y,w,h);
        break;
      case GRAPH_ELEMENT_TYPE_WF_CHECKBOX             :
         element=new CCheckBox(this.ChartID(),this.SubWindow(),descript,x,y,w,h);
        break;
      case GRAPH_ELEMENT_TYPE_WF_RADIOBUTTON          :
         element=new CRadioButton(this.ChartID(),this.SubWindow(),descript,x,y,w,h);
        break;
      case GRAPH_ELEMENT_TYPE_WF_BUTTON               :
         element=new CButton(this.ChartID(),this.SubWindow(),descript,x,y,w,h);
        break;
      case GRAPH_ELEMENT_TYPE_WF_LIST_BOX             :
         element=new CListBox(this.ChartID(),this.SubWindow(),descript,x,y,w,h);
        break;
      case GRAPH_ELEMENT_TYPE_WF_LIST_BOX_ITEM        :
         element=new CListBoxItem(this.ChartID(),this.SubWindow(),descript,x,y,w,h);
        break;
      case GRAPH_ELEMENT_TYPE_WF_CHECKED_LIST_BOX     :
         element=new CCheckedListBox(this.ChartID(),this.SubWindow(),descript,x,y,w,h);
        break;
      case GRAPH_ELEMENT_TYPE_WF_BUTTON_LIST_BOX      :
         element=new CButtonListBox(this.ChartID(),this.SubWindow(),descript,x,y,w,h);
        break;
      case GRAPH_ELEMENT_TYPE_WF_TAB_HEADER           :
         element=new CTabHeader(this.ChartID(),this.SubWindow(),descript,x,y,w,h);
        break;
      case GRAPH_ELEMENT_TYPE_WF_TAB_FIELD            :
         element=new CTabField(this.ChartID(),this.SubWindow(),descript,x,y,w,h);
        break;
      case GRAPH_ELEMENT_TYPE_WF_TAB_CONTROL          :
         element=new CTabControl(this.ChartID(),this.SubWindow(),descript,x,y,w,h);
        break;
      case GRAPH_ELEMENT_TYPE_WF_ARROW_BUTTON         :
         element=new CArrowButton(this.ChartID(),this.SubWindow(),descript,x,y,w,h);
        break;
      case GRAPH_ELEMENT_TYPE_WF_ARROW_BUTTON_UP      :
         element=new CArrowUpButton(this.ChartID(),this.SubWindow(),descript,x,y,w,h);
        break;
      case GRAPH_ELEMENT_TYPE_WF_ARROW_BUTTON_DOWN    :
         element=new CArrowDownButton(this.ChartID(),this.SubWindow(),descript,x,y,w,h);
        break;
      case GRAPH_ELEMENT_TYPE_WF_ARROW_BUTTON_LEFT    :
         element=new CArrowLeftButton(this.ChartID(),this.SubWindow(),descript,x,y,w,h);
        break;
      case GRAPH_ELEMENT_TYPE_WF_ARROW_BUTTON_RIGHT   :
         element=new CArrowRightButton(this.ChartID(),this.SubWindow(),descript,x,y,w,h);
        break;
      case GRAPH_ELEMENT_TYPE_WF_ARROW_BUTTONS_UD_BOX :
         element=new CArrowUpDownBox(this.ChartID(),this.SubWindow(),descript,x,y,w,h);
        break;
      case GRAPH_ELEMENT_TYPE_WF_ARROW_BUTTONS_LR_BOX :
         element=new CArrowLeftRightBox(this.ChartID(),this.SubWindow(),descript,x,y,w,h);
        break;
      default:
        break;
     }
   if(element==NULL)
      ::Print(DFUN,CMessage::Text(MSG_LIB_SYS_FAILED_CREATE_ELM_OBJ),this.TypeElementDescription(type));
   return element;
  }
//+------------------------------------------------------------------+
Luego finalizaremos la clase de objeto WinForms TabControl en el archivo \MQL5\Include\DoEasy\Objects\Graph\WForms\Containers\TabControl.mqh.
Para este objeto, deberemos crear nuestros propios métodos para traerlo al primer plano y mostrarlo. Dichos métodos de clases principales se desplazan en un ciclo a través de todos los objetos adjuntos al contenedor, llevándolos al primer plano y mostrándolos a todos. Para el control TabControl, dicha lógica no resultará adecuada, pues contiene campos ocultos que se muestran y se ponen en primer plano usando los métodos de las clases principales, lo cual es inaceptable. Aquí primero deberemos verificar que el campo pertenezca a la pestaña seleccionada, y solo este campo deberá mostrarse y traerse al frente, dejando todos los demás ocultos.
Vamos a declarar estos dos métodos virtuales en la sección pública de la clase:
//--- Returns the (1) index, (2) the pointer to the selected tab
   int               SelectedTabPageNum(void)      const { return (int)this.GetProperty(CANV_ELEMENT_PROP_TAB_PAGE_NUMBER);}
   CWinFormBase     *SelectedTabPage(void)               { return this.GetTabField(this.SelectedTabPageNum());             }

//--- Set the object above all
   virtual void      BringToTop(void);
//--- Show the control
   virtual void      Show(void);

//--- Constructor
En el constructor de clases, nos aseguraremos de establecer el valor de Padding en cero, de lo contrario, el tamaño del área dentro de la cual deberían verse los objetos adjuntos se reducirá en tres píxeles a cada lado (Padding se estableció en tres píxeles de forma predeterminada) y los márgenes de las pestañas se cortarán donde no deberían, por el contorno del contenedor, de tres píxeles de tamaño:
//+------------------------------------------------------------------+
//| Constructor indicating the chart and subwindow ID                |
//+------------------------------------------------------------------+
CTabControl::CTabControl(const long chart_id,
                         const int subwindow,
                         const string descript,
                         const int x,
                         const int y,
                         const int w,
                         const int h) : CContainer(GRAPH_ELEMENT_TYPE_WF_TAB_CONTROL,chart_id,subwindow,descript,x,y,w,h)
  {
   this.SetTypeElement(GRAPH_ELEMENT_TYPE_WF_TAB_CONTROL);
   this.m_type=OBJECT_DE_TYPE_GWF_CONTAINER;
   this.SetBorderSizeAll(0);
   this.SetBorderStyle(FRAME_STYLE_NONE);
   this.SetOpacity(0,true);
   this.SetBackgroundColor(CLR_CANV_NULL,true);
   this.SetBackgroundColorMouseDown(CLR_CANV_NULL);
   this.SetBackgroundColorMouseOver(CLR_CANV_NULL);
   this.SetBorderColor(CLR_CANV_NULL,true);
   this.SetBorderColorMouseDown(CLR_CANV_NULL);
   this.SetBorderColorMouseOver(CLR_CANV_NULL);
   this.SetForeColor(CLR_DEF_FORE_COLOR,true);
   this.SetAlignment(CANV_ELEMENT_ALIGNMENT_TOP);
   this.SetItemSize(58,18);
   this.SetTabSizeMode(CANV_ELEMENT_TAB_SIZE_MODE_NORMAL);
   this.SetPaddingAll(0);
   this.SetHeaderPadding(6,3);
   this.SetFieldPadding(3,3,3,3);
  }
//+------------------------------------------------------------------+
En el método que crea el número indicado de pestañas, deberemos ajustar las coordenadas de los encabezados y el tamaño de los márgenes de las pestañas en dos píxeles. Además, deberemos configurar el indicador de visibilidad para el encabezado de la pestaña de la misma forma que para el control; en este caso, los encabezados de la pestaña no se mostrarán para el objeto oculto:
//+------------------------------------------------------------------+
//| Create the specified number of tabs                              |
//+------------------------------------------------------------------+
bool CTabControl::CreateTabPages(const int total,const int selected_page,const int tab_w=0,const int tab_h=0,const string header_text="")
  {
//--- Calculate the size and initial coordinates of the tab title
   int w=(tab_w==0 ? this.ItemWidth()  : tab_w);
   int h=(tab_h==0 ? this.ItemHeight() : tab_h);

//--- In the loop by the number of tabs
   CTabHeader *header=NULL;
   CTabField  *field=NULL;
   for(int i=0;i<total;i++)
     {
      //--- Depending on the location of tab titles, set their initial coordinates
      int header_x=2;
      int header_y=2;
      int header_w=w;
      int header_h=h;

      //--- Set the current X and Y coordinate depending on the location of the tab headers
      switch(this.Alignment())
        {
         case CANV_ELEMENT_ALIGNMENT_TOP     :
           header_w=w;
           header_h=h;
           header_x=(header==NULL ? 2 : header.RightEdgeRelative());
           header_y=2;
           break;
         case CANV_ELEMENT_ALIGNMENT_BOTTOM  :
           header_w=w;
           header_h=h;
           header_x=(header==NULL ? 2 : header.RightEdgeRelative());
           header_y=this.Height()-header_h;
           break;
         case CANV_ELEMENT_ALIGNMENT_LEFT    :
           header_w=h;
           header_h=w;
           header_x=2;
           header_y=(header==NULL ? this.Height()-header_h-2 : header.CoordYRelative()-header_h);
           break;
         case CANV_ELEMENT_ALIGNMENT_RIGHT   :
           header_w=h;
           header_h=w;
           header_x=this.Width()-header_w-2;
           header_y=(header==NULL ? 2 : header.BottomEdgeRelative());
           break;
         default:
           break;
        }
      //--- Create the TabHeader object
      if(!this.CreateNewElement(GRAPH_ELEMENT_TYPE_WF_TAB_HEADER,header_x,header_y,header_w,header_h,clrNONE,255,this.Active(),false))
        {
         ::Print(DFUN,CMessage::Text(MSG_LIB_SYS_FAILED_CREATE_ELM_OBJ),this.TypeElementDescription(GRAPH_ELEMENT_TYPE_WF_TAB_HEADER),string(i+1));
         return false;
        }
      header=this.GetElementByType(GRAPH_ELEMENT_TYPE_WF_TAB_HEADER,i);
      if(header==NULL)
        {
         ::Print(DFUN,CMessage::Text(MSG_ELM_LIST_ERR_FAILED_GET_GRAPH_ELEMENT_OBJ),this.TypeElementDescription(GRAPH_ELEMENT_TYPE_WF_TAB_HEADER),string(i+1));
         return false;
        }
      header.SetBase(this.GetObject());
      header.SetPageNumber(i);
      header.SetGroup(this.Group()+1);
      header.SetBackgroundColor(CLR_DEF_CONTROL_TAB_HEAD_BACK_COLOR,true);
      header.SetBackgroundColorMouseDown(CLR_DEF_CONTROL_TAB_HEAD_MOUSE_DOWN);
      header.SetBackgroundColorMouseOver(CLR_DEF_CONTROL_TAB_HEAD_MOUSE_OVER);
      header.SetBackgroundStateOnColor(CLR_DEF_CONTROL_TAB_HEAD_BACK_COLOR_ON,true);
      header.SetBackgroundStateOnColorMouseDown(CLR_DEF_CONTROL_TAB_HEAD_BACK_DOWN_ON);
      header.SetBackgroundStateOnColorMouseOver(CLR_DEF_CONTROL_TAB_HEAD_BACK_OVER_ON);
      header.SetBorderStyle(FRAME_STYLE_SIMPLE);
      header.SetBorderColor(CLR_DEF_CONTROL_TAB_HEAD_BORDER_COLOR,true);
      header.SetBorderColorMouseDown(CLR_DEF_CONTROL_TAB_HEAD_BORDER_MOUSE_DOWN);
      header.SetBorderColorMouseOver(CLR_DEF_CONTROL_TAB_HEAD_BORDER_MOUSE_OVER);
      header.SetAlignment(this.Alignment());
      header.SetPadding(this.HeaderPaddingWidth(),this.HeaderPaddingHeight(),this.HeaderPaddingWidth(),this.HeaderPaddingHeight());
      if(header_text!="" && header_text!=NULL)
         this.SetHeaderText(header,header_text+string(i+1));
      else
         this.SetHeaderText(header,"TabPage"+string(i+1));
      if(this.Alignment()==CANV_ELEMENT_ALIGNMENT_LEFT)
         header.SetFontAngle(90);
      if(this.Alignment()==CANV_ELEMENT_ALIGNMENT_RIGHT)
         header.SetFontAngle(270);
      header.SetTabSizeMode(this.TabSizeMode());

      //--- Save the initial height of the header and set its size in accordance with the header size setting mode
      int h_prev=header_h;
      header.SetSizes(header_w,header_h);
      //--- Get the Y offset of the header position after changing its height and
      //--- shift it by the calculated value only for headers on the left
      int y_shift=header.Height()-h_prev;
      if(header.Move(header.CoordX(),header.CoordY()-(this.Alignment()==CANV_ELEMENT_ALIGNMENT_LEFT ? y_shift : 0)))
        {
         header.SetCoordXRelative(header.CoordX()-this.CoordX());
         header.SetCoordYRelative(header.CoordY()-this.CoordY());
        }
      header.SetVisibleFlag(this.IsVisible(),false);

      //--- Depending on the location of the tab headers, set the initial coordinates of the tab fields
      int field_x=0;
      int field_y=0;
      int field_w=this.Width();
      int field_h=this.Height()-header.Height()-2;
      int header_shift=0;

      switch(this.Alignment())
        {
         case CANV_ELEMENT_ALIGNMENT_TOP     :
           field_x=0;
           field_y=header.BottomEdgeRelative();
           field_w=this.Width();
           field_h=this.Height()-header.Height()-2;
           break;
         case CANV_ELEMENT_ALIGNMENT_BOTTOM  :
           field_x=0;
           field_y=0;
           field_w=this.Width();
           field_h=this.Height()-header.Height();
           break;
         case CANV_ELEMENT_ALIGNMENT_LEFT    :
           field_x=header.RightEdgeRelative();
           field_y=0;
           field_h=this.Height();
           field_w=this.Width()-header.Width()-2;
           break;
         case CANV_ELEMENT_ALIGNMENT_RIGHT   :
           field_x=0;
           field_y=0;
           field_h=this.Height();
           field_w=this.Width()-header.Width()-2;
           break;
         default:
           break;
        }

      //--- Create the TabField object (tab field)
      if(!this.CreateNewElement(GRAPH_ELEMENT_TYPE_WF_TAB_FIELD,field_x,field_y,field_w,field_h,clrNONE,255,true,false))
        {
         ::Print(DFUN,CMessage::Text(MSG_LIB_SYS_FAILED_CREATE_ELM_OBJ),this.TypeElementDescription(GRAPH_ELEMENT_TYPE_WF_TAB_FIELD),string(i+1));
         return false;
        }
      field=this.GetElementByType(GRAPH_ELEMENT_TYPE_WF_TAB_FIELD,i);
      if(field==NULL)
        {
         ::Print(DFUN,CMessage::Text(MSG_ELM_LIST_ERR_FAILED_GET_GRAPH_ELEMENT_OBJ),this.TypeElementDescription(GRAPH_ELEMENT_TYPE_WF_TAB_FIELD),string(i+1));
         return false;
        }
      field.SetBase(this.GetObject());
      field.SetPageNumber(i);
      field.SetGroup(this.Group()+1);
      field.SetBorderSizeAll(1);
      field.SetBorderStyle(FRAME_STYLE_SIMPLE);
      field.SetOpacity(CLR_DEF_CONTROL_TAB_PAGE_OPACITY,true);
      field.SetBackgroundColor(CLR_DEF_CONTROL_TAB_PAGE_BACK_COLOR,true);
      field.SetBackgroundColorMouseDown(CLR_DEF_CONTROL_TAB_PAGE_MOUSE_DOWN);
      field.SetBackgroundColorMouseOver(CLR_DEF_CONTROL_TAB_PAGE_MOUSE_OVER);
      field.SetBorderColor(CLR_DEF_CONTROL_TAB_PAGE_BORDER_COLOR,true);
      field.SetBorderColorMouseDown(CLR_DEF_CONTROL_TAB_PAGE_BORDER_MOUSE_DOWN);
      field.SetBorderColorMouseOver(CLR_DEF_CONTROL_TAB_PAGE_BORDER_MOUSE_OVER);
      field.SetForeColor(CLR_DEF_FORE_COLOR,true);
      field.SetPadding(this.FieldPaddingLeft(),this.FieldPaddingTop(),this.FieldPaddingRight(),this.FieldPaddingBottom());
      field.Hide();
     }
//--- Arrange all titles in accordance with the specified display modes and select the specified tab
   this.ArrangeTabHeaders();
   this.Select(selected_page,true);
   return true;
  }
//+------------------------------------------------------------------+
El desplazamiento de los encabezados en dos píxeles los coloca dentro del contenedor, ya que el encabezado seleccionado aumenta en dos píxeles, por lo que sale del contenedor, cortándose luego de forma segura, ya que su parte expandida en dos píxeles va más allá de su contenedor y debería volverse invisible. El desplazamiento de las coordenadas del encabezado resuelve este problema, pero al mismo tiempo, el campo de la pestaña también deberá reducirse en dos píxeles para que quepa dentro del contenedor, ya que el campo de la pestaña tomará sus coordenadas de las coordenadas del encabezado, ahora desplazado en dos píxeles.
En el método que expande los encabezados de las pestañas según la anchura del control (StretchHeadersByWidth()), cambiaremos el cálculo de la anchura de los encabezados; ahora su anchura se calculará redondeado al entero más cercano, lo cual hará que su alineación en la fila un poco más agradable de ver:
      //--- Get the width of the container, as well as the number of headers in a row, and calculate the width of each header
      int base_size=this.Width()-4;
      int num=list_row.Total();
      int w=(int)round((double)base_size/double(num>0 ? num : 1));
      //--- In the loop by row headers
      for(int j=0;j<list_row.Total();j++)
        {
En el método que establece la pestaña seleccionada, asignaremos forzosamente a las pestañas restantes el estado "no seleccionado":
//+------------------------------------------------------------------+
//| Set the tab as selected                                          |
//+------------------------------------------------------------------+
void CTabControl::SetSelected(const int index)
  {
//--- Get the header by index and
   CTabHeader *header=this.GetTabHeader(index);
   if(header==NULL)
      return;
//--- set it to the "selected" state
   if(!header.State())
     {
      CArrayObj *list=this.GetListHeaders();
      if(list==NULL)
         return;
      for(int i=0;i<list.Total();i++)
        {
         if(i==index)
            continue;
         this.SetUnselected(i);
        }
      header.SetState(true);
     }
//--- save the index of the selected tab
   this.SetSelectedTabPageNum(index);
  }
//+------------------------------------------------------------------+
El índice de la pestaña seleccionada será transmitido al método. En un ciclo a través de la lista de todos los encabezados de las pestañas, verificaremos el índice del ciclo y, si es igual al índice de la pestaña seleccionada, el ciclo pasará a la siguiente iteración. Si el índice de ciclo no es igual al índice de la pestaña seleccionada, llamaremos al método encargado de establecer la pestaña especificada según el índice del ciclo en el estado «no seleccionado».
En el método que establece el texto del encabezado de la pestaña especificada, después de configurar el texto, llamaremos al método para recortar las zonas ocultas del título:
//+------------------------------------------------------------------+
//| Set the title text of the specified tab                          |
//+------------------------------------------------------------------+
void CTabControl::SetHeaderText(CTabHeader *header,const string text)
  {
   if(header==NULL)
      return;
   header.SetText(text);
   header.Crop();
  }
//+------------------------------------------------------------------+
Esto recortará el texto dibujado en el encabezado en el caso de que el encabezado esté parcialmente fuera de la zona de visibilidad.
En el método que crea un nuevo objeto gráfico, añadiremos los bloques de código necesarios para crear los nuevos objetos que hemos escrito hoy:
//+------------------------------------------------------------------+
//| Create a new graphical object                                    |
//+------------------------------------------------------------------+
CGCnvElement *CTabControl::CreateNewGObject(const ENUM_GRAPH_ELEMENT_TYPE type,
                                         const int obj_num,
                                         const string descript,
                                         const int x,
                                         const int y,
                                         const int w,
                                         const int h,
                                         const color colour,
                                         const uchar opacity,
                                         const bool movable,
                                         const bool activity)
  {
   CGCnvElement *element=NULL;
   switch(type)
     {
      case GRAPH_ELEMENT_TYPE_ELEMENT                 :
         element=new CGCnvElement(type,this.ID(),obj_num,this.ChartID(),this.SubWindow(),descript,x,y,w,h,colour,opacity,movable,activity);
        break;
      case GRAPH_ELEMENT_TYPE_FORM                    :
         element=new CForm(this.ChartID(),this.SubWindow(),descript,x,y,w,h);
        break;
      case GRAPH_ELEMENT_TYPE_WF_CONTAINER            :
         element=new CContainer(this.ChartID(),this.SubWindow(),descript,x,y,w,h);
        break;
      case GRAPH_ELEMENT_TYPE_WF_GROUPBOX             :
         element=new CGroupBox(this.ChartID(),this.SubWindow(),descript,x,y,w,h);
        break;
      case GRAPH_ELEMENT_TYPE_WF_PANEL                :
         element=new CPanel(this.ChartID(),this.SubWindow(),descript,x,y,w,h);
        break;
      case GRAPH_ELEMENT_TYPE_WF_LABEL                :
         element=new CLabel(this.ChartID(),this.SubWindow(),descript,x,y,w,h);
        break;
      case GRAPH_ELEMENT_TYPE_WF_CHECKBOX             :
         element=new CCheckBox(this.ChartID(),this.SubWindow(),descript,x,y,w,h);
        break;
      case GRAPH_ELEMENT_TYPE_WF_RADIOBUTTON          :
         element=new CRadioButton(this.ChartID(),this.SubWindow(),descript,x,y,w,h);
        break;
      case GRAPH_ELEMENT_TYPE_WF_BUTTON               :
         element=new CButton(this.ChartID(),this.SubWindow(),descript,x,y,w,h);
        break;
      case GRAPH_ELEMENT_TYPE_WF_LIST_BOX             :
         element=new CListBox(this.ChartID(),this.SubWindow(),descript,x,y,w,h);
        break;
      case GRAPH_ELEMENT_TYPE_WF_LIST_BOX_ITEM        :
         element=new CListBoxItem(this.ChartID(),this.SubWindow(),descript,x,y,w,h);
        break;
      case GRAPH_ELEMENT_TYPE_WF_CHECKED_LIST_BOX     :
         element=new CCheckedListBox(this.ChartID(),this.SubWindow(),descript,x,y,w,h);
        break;
      case GRAPH_ELEMENT_TYPE_WF_BUTTON_LIST_BOX      :
         element=new CButtonListBox(this.ChartID(),this.SubWindow(),descript,x,y,w,h);
        break;
      case GRAPH_ELEMENT_TYPE_WF_TAB_HEADER           :
         element=new CTabHeader(this.ChartID(),this.SubWindow(),descript,x,y,w,h);
        break;
      case GRAPH_ELEMENT_TYPE_WF_TAB_FIELD            :
         element=new CTabField(this.ChartID(),this.SubWindow(),descript,x,y,w,h);
        break;
      case GRAPH_ELEMENT_TYPE_WF_TAB_CONTROL          :
         element=new CTabControl(this.ChartID(),this.SubWindow(),descript,x,y,w,h);
        break;
      case GRAPH_ELEMENT_TYPE_WF_ARROW_BUTTON         :
         element=new CArrowButton(this.ChartID(),this.SubWindow(),descript,x,y,w,h);
        break;
      case GRAPH_ELEMENT_TYPE_WF_ARROW_BUTTON_UP      :
         element=new CArrowUpButton(this.ChartID(),this.SubWindow(),descript,x,y,w,h);
        break;
      case GRAPH_ELEMENT_TYPE_WF_ARROW_BUTTON_DOWN    :
         element=new CArrowDownButton(this.ChartID(),this.SubWindow(),descript,x,y,w,h);
        break;
      case GRAPH_ELEMENT_TYPE_WF_ARROW_BUTTON_LEFT    :
         element=new CArrowLeftButton(this.ChartID(),this.SubWindow(),descript,x,y,w,h);
        break;
      case GRAPH_ELEMENT_TYPE_WF_ARROW_BUTTON_RIGHT   :
         element=new CArrowRightButton(this.ChartID(),this.SubWindow(),descript,x,y,w,h);
        break;
      case GRAPH_ELEMENT_TYPE_WF_ARROW_BUTTONS_UD_BOX :
         element=new CArrowUpDownBox(this.ChartID(),this.SubWindow(),descript,x,y,w,h);
        break;
      case GRAPH_ELEMENT_TYPE_WF_ARROW_BUTTONS_LR_BOX :
         element=new CArrowLeftRightBox(this.ChartID(),this.SubWindow(),descript,x,y,w,h);
        break;
      default:
        break;
     }
   if(element==NULL)
      ::Print(DFUN,CMessage::Text(MSG_LIB_SYS_FAILED_CREATE_ELM_OBJ),this.TypeElementDescription(type));
   return element;
  }
//+------------------------------------------------------------------+
Método que muestra el control:
//+------------------------------------------------------------------+
//| Show the control                                                 |
//+------------------------------------------------------------------+
void CTabControl::Show(void)
  {
//--- Get the list of all tab headers
   CArrayObj *list=this.GetListHeaders();
   if(list==NULL)
      return;
//--- If the object has a shadow, display it
   if(this.m_shadow_obj!=NULL)
      this.m_shadow_obj.Show();
//--- Display the container
   CGCnvElement::Show();
//--- Move all elements of the object to the foreground
   this.BringToTop();
  }
//+------------------------------------------------------------------+
Primero, se mostrará el contenedor del objeto (en el estado normal tiene un color transparente, pero el usuario puede asignarle cualquier otro color), y luego se llamará al método que trae todos los elementos del objeto al primer plano, lo cual discutiremos a continuación.
Método que coloca un objeto por encima de los demás (en el primer plano):
//+------------------------------------------------------------------+
//| Set the object above all the rest                                |
//+------------------------------------------------------------------+
void CTabControl::BringToTop(void)
  {
//--- Move all elements of the object to the foreground
   CForm::BringToTop();
//--- Get the index of the selected tab
   int selected=this.SelectedTabPageNum();
//--- Declare the pointers to tab header objects and tab fields
   CTabHeader *header=NULL;
   CTabField  *field=NULL;
//--- Get the list of all tab headers
   CArrayObj *list=this.GetListHeaders();
   if(list==NULL)
      return;
//--- In a loop by the list of tab headers,
   for(int i=0;i<list.Total();i++)
     {
      //--- get the next header, and if failed to get the object,
      //--- or this is the header of the selected tab, skip it
      header=list.At(i);
      if(header==NULL || header.PageNumber()==selected)
         continue;
      //--- bring the header to the foreground
      header.BringToTop();
      //--- get the tab field corresponding to the current header
      field=header.GetFieldObj();
      if(field==NULL)
         continue;
      //--- Hide the tab field
      field.Hide();
     }
//--- Get the pointer to the title of the selected tab
   header=this.GetTabHeader(selected);
   if(header!=NULL)
     {
      //--- bring the header to the front
      header.BringToTop();
      //--- get the tab field corresponding to the selected tab header
      field=header.GetFieldObj();
      //--- Display the tab field on the foreground
      if(field!=NULL)
         field.BringToTop();
     }
  }
//+------------------------------------------------------------------+
La lógica del método se aclara en los comentarios al código. En resumen, deberemos resaltar todos los encabezados de las pestañas y solo el campo de la pestaña que está seleccionada actualmente. Para hacer esto, en un ciclo, sacaremos a primer plano todos los encabezados, salvo el encabezado de la pestaña seleccionada, y ocultaremos los campos de estas pestañas.
Al final, sacaremos al primer plano el encabezado de la pestaña seleccionada y su campo.
Con estos ajustes, TabControl funcionará sin cambiar erróneamente los campos de las pestañas no seleccionadas de estado oculto a primer plano, y se mostrará correctamente cuando cambie de estado oculto a estado visible.
En la clase de colección de elementos gráficos, en el archivo \MQL5\Include\DoEasy\Collections\GraphElementsCollection.mqh, en el método que retorna el puntero al formulario debajo del cursor, añadiremos la bandera de visibilidad del objeto para evitar seleccionar objetos ocultos:
//+------------------------------------------------------------------+
//| Return the pointer to the form located under the cursor          |
//+------------------------------------------------------------------+
CForm *CGraphElementsCollection::GetFormUnderCursor(const int id,
                                                    const long &lparam,
                                                    const double &dparam,
                                                    const string &sparam,
                                                    ENUM_MOUSE_FORM_STATE &mouse_state,
                                                    long &obj_ext_id,
                                                    int &form_index)
  {
//--- Set the ID of the extended standard graphical object to -1
//--- and the index of the anchor point managed by the form to -1
   obj_ext_id=WRONG_VALUE;
   form_index=WRONG_VALUE;
//--- Initialize the mouse status relative to the form
   mouse_state=MOUSE_FORM_STATE_NONE;
//--- Declare the pointers to graphical element collection class objects
   CGCnvElement *elm=NULL;
   CForm *form=NULL;
//--- Get the list of objects the interaction flag is set for (there should be only one object)
   CArrayObj *list=CSelect::ByGraphCanvElementProperty(GetListCanvElm(),CANV_ELEMENT_PROP_INTERACTION,true,EQUAL);
//--- If managed to obtain the list and it is not empty,
   if(list!=NULL && list.Total()>0)
     {
      //--- Get the only graphical element there
      elm=list.At(0);
      //--- If the element is a form object or its descendants
      if(elm.TypeGraphElement()>=GRAPH_ELEMENT_TYPE_WF_BASE && elm.IsVisible())
        {
         //--- Assign the pointer to the element for the form object pointer
         form=elm;
         //--- Get the mouse status relative to the form
         mouse_state=form.MouseFormState(id,lparam,dparam,sparam);
         //--- If the cursor is inside the form,
         if(mouse_state>MOUSE_FORM_STATE_OUTSIDE_FORM_WHEEL)
           {
            //--- Find the interaction object.
            //--- This will be either the found object or the same form
            form=this.SearchInteractObj(form,id,lparam,dparam,sparam);
            //--- Return the form object
            //Comment(form.TypeElementDescription()," ",form.Name());
            return form;
           }
        }
     }
//--- If there is no a single form object with a specified interaction flag,
//--- in the loop by all graphical element collection class objects
   int total=this.m_list_all_canv_elm_obj.Total();
   for(int i=0;i<total;i++)
     {
      //--- get the next element
      elm=this.m_list_all_canv_elm_obj.At(i);
      if(elm==NULL || !elm.IsVisible() || !elm.Enabled())
         continue;
      //--- if the obtained element is a form object or its descendants
      if(elm.TypeGraphElement()>=GRAPH_ELEMENT_TYPE_WF_BASE)
        {
         //--- Assign the pointer to the element for the form object pointer
         form=elm;
         //--- Get the mouse status relative to the form
         mouse_state=form.MouseFormState(id,lparam,dparam,sparam);
         //--- If the cursor is within the form, return the pointer to the form
         if(mouse_state>MOUSE_FORM_STATE_OUTSIDE_FORM_WHEEL)
           {
            //--- Find the interaction object.
            //--- This will be either the found object or the same form
            form=this.SearchInteractObj(form,id,lparam,dparam,sparam);
            //--- Return the form object
            //Comment(form.TypeElementDescription()," ",form.Name());
            return form;
           }
        }
     }
//--- ...
//--- ...

//---...
//--- Nothing is found - return NULL
   .return NULL;
  }
//+------------------------------------------------------------------+
En el método de procesamiento posterior del formulario activo anterior debajo del cursor, también añadiremos una verificación para el indicador de visibilidad y el procesamiento del objeto TabControl:
//+------------------------------------------------------------------+
//| Post-processing of the former active form under the cursor       |
//+------------------------------------------------------------------+
void CGraphElementsCollection::FormPostProcessing(CForm *form,const int id, const long &lparam, const double &dparam, const string &sparam)
  {
//--- Get the main object the form is attached to
   CForm *main=form.GetMain();
   if(main==NULL)
      main=form;
//--- Get all the elements attached to the form
   CArrayObj *list=main.GetListElements();
   if(list==NULL)
      return;
   //--- In the loop by the list of received elements
   int total=list.Total();
   for(int i=0;i<total;i++)
     {
      //--- get the pointer to the object
      CForm *obj=list.At(i);
      //--- if failed to get the pointer, move on to the next one in the list
      if(obj==NULL || !obj.IsVisible() || !obj.Enabled())
         continue;
      obj.OnMouseEventPostProcessing();
      //--- Create the list of interaction objects and get their number
      int count=obj.CreateListInteractObj();
      //--- In the loop by the obtained list
      for(int j=0;j<count;j++)
        {
         //--- get the next object
         CWinFormBase *elm=obj.GetInteractForm(j);
         if(elm==NULL || !elm.IsVisible() || !elm.Enabled())
            continue;
         if(elm.TypeGraphElement()==GRAPH_ELEMENT_TYPE_WF_TAB_CONTROL)
           {
            CTabControl *tab_ctrl=elm;
            CForm *selected=tab_ctrl.SelectedTabPage();
            if(selected!=NULL)
               elm=selected;
           }
         //--- determine the location of the cursor relative to the object
         //--- and call the mouse event handling method for the object
         elm.MouseFormState(id,lparam,dparam,sparam);
         elm.OnMouseEventPostProcessing();
        }
     }
   ::ChartRedraw(main.ChartID());
  }
//+------------------------------------------------------------------+
Si el objeto actual en el ciclo es un TabControl, entonces, para realizar su procesamiento, necesitaremos encontrar solo su pestaña seleccionada. Después de encontrarla y asignarle un puntero, el manejador de eventos del ratón solo procesará la pestaña seleccionada.
Por hoy, estas son todas la mejoras y cambios en las clases de la biblioteca.
Simulación
Para la prueba, tomaremos el asesor del artículo anterior y lo guardaremos en la nueva carpeta \MQL5\Experts\TestDoEasy\Part117\ con el nuevo nombre TestDoEasy117.mq5.
¿Qué pondremos a prueba? Vamos a crear el control TabControl en el panel principal. En su primera pestaña, colocaremos todos los objetos de las clases de objeto de botón con flechas creadas hoy. Las flechas horizontales dobles izquierda-derecha serán más pequeñas que la anchura predeterminada para ver si podemos cambiarlas de tamaño. Para las coordenadas de ubicación del control TabControl, añadiremos dos variables de entrada. Luego podremos establecer las coordenadas iniciales para que el objeto creado pueda salir de su contenedor, con el fin de probar los métodos para recortar una imagen que se salga de la zona de visibilidad. No obstante, esto ya se verá por los encabezados de las pestañas, que serán 11 piezas, y no encajarán en el tamaño del control cuando se coloquen en una fila.
A continuación, declararemos dos nuevas variables en el bloque de variables de entrada:
//--- input parameters
sinput   bool                          InpMovable           =  true;                   // Panel Movable flag
sinput   ENUM_INPUT_YES_NO             InpAutoSize          =  INPUT_YES;              // Panel Autosize
sinput   ENUM_AUTO_SIZE_MODE           InpAutoSizeMode      =  AUTO_SIZE_MODE_GROW;    // Panel Autosize mode
sinput   ENUM_BORDER_STYLE             InpFrameStyle        =  BORDER_STYLE_SIMPLE;    // Label border style
sinput   ENUM_ANCHOR_POINT             InpTextAlign         =  ANCHOR_CENTER;          // Label text align
sinput   ENUM_INPUT_YES_NO             InpTextAutoSize      =  INPUT_NO;               // Label autosize
sinput   ENUM_ANCHOR_POINT             InpCheckAlign        =  ANCHOR_LEFT;            // Check flag align
sinput   ENUM_ANCHOR_POINT             InpCheckTextAlign    =  ANCHOR_LEFT;            // Check label text align
sinput   ENUM_CHEK_STATE               InpCheckState        =  CHEK_STATE_UNCHECKED;   // Check flag state
sinput   ENUM_INPUT_YES_NO             InpCheckAutoSize     =  INPUT_YES;              // CheckBox autosize
sinput   ENUM_BORDER_STYLE             InpCheckFrameStyle   =  BORDER_STYLE_NONE;      // CheckBox border style
sinput   ENUM_ANCHOR_POINT             InpButtonTextAlign   =  ANCHOR_CENTER;          // Button text align
sinput   ENUM_INPUT_YES_NO             InpButtonAutoSize    =  INPUT_YES;              // Button autosize
sinput   ENUM_AUTO_SIZE_MODE           InpButtonAutoSizeMode=  AUTO_SIZE_MODE_GROW;    // Button Autosize mode
sinput   ENUM_BORDER_STYLE             InpButtonFrameStyle  =  BORDER_STYLE_NONE;      // Button border style
sinput   bool                          InpButtonToggle      =  true ;                  // Button toggle flag
sinput   bool                          InpButtListMSelect   =  false;                  // ButtonListBox Button MultiSelect flag
sinput   bool                          InpListBoxMColumn    =  true;                   // ListBox MultiColumn flag
sinput   bool                          InpTabCtrlMultiline  =  true;                   // Tab Control Multiline flag
sinput   ENUM_ELEMENT_ALIGNMENT        InpHeaderAlignment   =  ELEMENT_ALIGNMENT_TOP;  // TabHeader Alignment
sinput   ENUM_ELEMENT_TAB_SIZE_MODE    InpTabPageSizeMode   =  ELEMENT_TAB_SIZE_MODE_NORMAL; // TabHeader Size Mode
sinput   int                           InpTabControlX       =  10;                     // TabControl X coord
sinput   int                           InpTabControlY       =  20;                     // TabControl Y coord
//--- global variables
CEngine        engine;
color          array_clr[];
//+------------------------------------------------------------------+
En el controlador OnInit() del asesor experto, escribiremos el siguiente código para crear un panel y adjuntarle el control TabControl:
//+------------------------------------------------------------------+
//| Expert initialization function                                   |
//+------------------------------------------------------------------+
int OnInit()
  {
//--- Set EA global variables
   ArrayResize(array_clr,2);        // Array of gradient filling colors
   array_clr[0]=C'26,100,128';      // Original ≈Dark-azure color
   array_clr[1]=C'35,133,169';      // Lightened original color
//--- Create the array with the current symbol and set it to be used in the library
   string array[1]={Symbol()};
   engine.SetUsedSymbols(array);
   //--- Create the timeseries object for the current symbol and period, and show its description in the journal
   engine.SeriesCreate(Symbol(),Period());
   engine.GetTimeSeriesCollection().PrintShort(false); // Short descriptions

//--- Create WinForms Panel object
   CPanel *pnl=NULL;
   pnl=engine.CreateWFPanel("WFPanel",50,50,410,200,array_clr,200,true,true,false,-1,FRAME_STYLE_BEVEL,true,false);
   if(pnl!=NULL)
     {
      pnl.Hide();
      Print(DFUN,"Panel visibility: ",pnl.IsVisible(),": ",pnl.TypeElementDescription()," ",pnl.Name());
      //--- Set Padding to 4
      pnl.SetPaddingAll(3);
      //--- Set the flags of relocation, auto resizing and auto changing mode from the inputs
      pnl.SetMovable(InpMovable);
      pnl.SetAutoSize(InpAutoSize,false);
      pnl.SetAutoSizeMode((ENUM_CANV_ELEMENT_AUTO_SIZE_MODE)InpAutoSizeMode,false);

      pnl.CreateNewElement(GRAPH_ELEMENT_TYPE_WF_TAB_CONTROL,InpTabControlX,InpTabControlY,pnl.Width()-30,pnl.Height()-40,clrNONE,255,true,false);
      CTabControl *tc=pnl.GetElementByType(GRAPH_ELEMENT_TYPE_WF_TAB_CONTROL,0);
      if(tc!=NULL)
        {
         tc.SetTabSizeMode((ENUM_CANV_ELEMENT_TAB_SIZE_MODE)InpTabPageSizeMode);
         tc.SetAlignment((ENUM_CANV_ELEMENT_ALIGNMENT)InpHeaderAlignment);
         tc.SetMultiline(InpTabCtrlMultiline);
         tc.SetHeaderPadding(6,0);
         tc.CreateTabPages(11,0,56,16,TextByLanguage("Вкладка","TabPage"));
         //---
         tc.CreateNewElement(0,GRAPH_ELEMENT_TYPE_WF_ARROW_BUTTON_LEFT,10,10,15,15,clrNONE,255,true,false);
         tc.CreateNewElement(0,GRAPH_ELEMENT_TYPE_WF_ARROW_BUTTON_UP,30,10,15,15,clrNONE,255,true,false);
         tc.CreateNewElement(0,GRAPH_ELEMENT_TYPE_WF_ARROW_BUTTON_DOWN,50,10,15,15,clrNONE,255,true,false);
         tc.CreateNewElement(0,GRAPH_ELEMENT_TYPE_WF_ARROW_BUTTON_RIGHT,70,10,15,15,clrNONE,255,true,false);
         tc.CreateNewElement(0,GRAPH_ELEMENT_TYPE_WF_ARROW_BUTTONS_UD_BOX,10,30,13,13,clrNONE,255,true,false);
         tc.CreateNewElement(0,GRAPH_ELEMENT_TYPE_WF_ARROW_BUTTONS_LR_BOX,40,30,9,13,clrNONE,255,true,false);
        }

      //--- Redraw all objects according to their hierarchy
      pnl.Show();
      pnl.Redraw(true);
     }
//---
   return(INIT_SUCCEEDED);
  }
//+------------------------------------------------------------------+
Inmediatamente después de crear el panel, lo ocultaremos, y todas las demás construcciones en él ocurrirán en el modo oculto: crearemos un control TabControl en el panel, crearemos 11 pestañas, y en su primera pestaña crearemos todos los objetos de botón con flechas, las clases de las que hablamos hoy. Después de añadir todos los elementos necesarios, mostraremos el panel y lo redibujaremos.
Vamos a compilar el asesor y ejecutarlo en el gráfico:
¿Qué es lo que vemos? El recorte de las zonas que van más allá del alcance de la zona de visibilidad funciona correctamente, los encabezados que van más allá del contenedor se recortan a lo largo de su borde, y si configuramos las coordenadas de TabControl para que el elemento vaya más allá del contenedor a la izquierda, aquí todo se recortará igualmente bien: el elemento en sí se recorta a lo largo de los bordes del panel, y los botones ubicados en el control también se recortan en el borde de la zona de visibilidad del panel, no en su contenedor. Todo funciona bien aquí. Los botones horizontales de izquierda a derecha tienen una anchura menor a la predeterminada (9 píxeles) y, al mismo tiempo, se muestran correctamente.
¿Qué es lo que está mal por ahora? El objeto de sombra aparece antes del panel que lo proyecta. Nos ocuparemos de esto conforme desarrollemos la biblioteca.
¿Qué es lo próximo?
En el próximo artículo, continuaremos trabajando con el control TabControl e implementaremos el desplazamiento de los encabezados de las pestañas que se extiendan más allá del control.
*Artículos de esta serie:
DoEasy. Elementos de control (Parte 10): Objetos WinForms: dando vida a la interfaz
DoEasy. Elementos de control (Parte 11): Objetos WinForms: grupos, el objeto WinForms CheckedListBox
DoEasy. Elementos de control (Parte 12): Objeto de lista básico, objetos WinForms ListBox y ButtonListBox
DoEasy. Elementos de control (Parte 13): Optimizando la interacción de los objetos WinForms con el ratón. Comenzamos el desarrollo del objeto WinForms TabControl
DoEasy. Elementos de control (Parte 14): Nuevo algoritmo de denominación de los elementos gráficos. Continuamos trabajando con el objeto WinForms TabControl
DoEasy. Elementos de control (Parte 15): Objeto WinForms TabControl - múltiples filas de encabezados de pestañas, métodos de trabajo con pestañas
DoEasy. Elementos de control (Parte 16): Objeto WinForms TabControl - múltiples filas de encabezados de pestañas, modo de expansión de encabezados para ajustarse al tamaño del contenedor
Traducción del ruso hecha por MetaQuotes Ltd.
Artículo original: https://www.mql5.com/ru/articles/11408
Advertencia: todos los derechos de estos materiales pertenecen a MetaQuotes Ltd. Queda totalmente prohibido el copiado total o parcial.
Este artículo ha sido escrito por un usuario del sitio web y refleja su punto de vista personal. MetaQuotes Ltd. no se responsabiliza de la exactitud de la información ofrecida, ni de las posibles consecuencias del uso de las soluciones, estrategias o recomendaciones descritas.

 Gráfico de montaña o gráfico de iceberg
 Aprendiendo a diseñar un sistema de trading con DeMarker
 Aprendiendo a diseñar un sistema de trading con Relative Vigor Index
 Redes neuronales: así de sencillo (Parte 28): Algoritmo de gradiente de políticas
- Aplicaciones de trading gratuitas
- 8 000+ señales para copiar
- Noticias económicas para analizar los mercados financieros
Usted acepta la política del sitio web y las condiciones de uso
Necesitaba crear una interfaz, pero no había ni una sola biblioteca con eventos bien elaborados, gestión correcta de ventanas en cuanto a su ubicación mutua, solapamientos y restricciones de ámbito. Si en algún lugar existían las cosas anteriores con diversos grados de elaboración, había problemas con la creación, eliminación de ventanas y cambio de propiedades en un punto arbitrario en el tiempo.
Todo esto debería ser la columna vertebral de las interfaces gráficas de usuario. No está claro por qué se ponen a "dibujar" enseguida.
Hice algunos cambios menores en el código fuente del artículo actual en el Asesor de Expertos:
Jugué un poco con los paneles, el resultado es el siguiente:
La ventana pasa a primer plano cuando se pulsa el ratón, aunque debería estar pulsado.
La recepción de eventos se realiza a través del indicador, probablemente para el tester, sin él los eventos no funcionan, en el tester también, incluso al cargar el indicador a través de la plantilla....
¿Para qué sirven los eventos de otros gráficos?
Hice clic en mi aplicación visual, su Asesor Experto se está ejecutando en paralelo, y esto está escrito en los registros:
No entiendo el propósito de esto.
Es muy lento de contar. ¿Qué pasará con la tabla con un gran número de celdas?
Medir la velocidad de actualización de los objetos gráficos:
Clic con el botón izquierdo del ratón en el centro del panel: 5ms
Clic en la cabecera de una pestaña activa: 7 ms.
Clic en la cabecera de una pestaña inactiva: 20 ms
¿Para qué sirven los eventos de las otras cartas?
Hice clic en mi aplicación visual, su Asesor Experto se está ejecutando en paralelo, los registros muestran esto:
No entiendo el propósito de esto.
Es muy lento para contar. ¿Qué pasará con la tabla con un gran número de células?
Medir la velocidad de actualización de los objetos gráficos:
Clic con el botón izquierdo del ratón en el centro del panel: 5 ms
Clic en el título de la pestaña activa: 7 ms
Clic en la cabecera de una pestaña inactiva: 20 ms
La librería escanea todo el entorno y muestra mensajes sobre los eventos registrados. Por el momento son sólo mensajes de depuración - la biblioteca está en desarrollo. Cuando sea completamente funcional, se podrá elegir lo que se necesita y lo que no.
Gracias, Anatoly, por tus comentarios. Por supuesto, todo será finalizado.
Las necesidades mínimas están cubiertas con EasyAndFastGUI. Tal vez liberar la última versión en el mercado por una pequeña cuota, ya que no hay mucho tiempo para el apoyo gratuito.
Tal como está, este tema se puede desarrollar sin fin. Hay tantas opciones diferentes, donde todo esto podría llevar, que es fantástico. )
Volveremos sobre este tema otra vez. Por ahora estamos muy ocupados. Seguid así, ¡es muy emocionante! 👍
Tengo mis necesidades mínimas cubiertas con EasyAndFastGUI. Probablemente libere la última versión en el marketplace por un módico precio, ya que no hay mucho tiempo para soporte gratuito.
Tal y como está, este tema puede desarrollarse sin fin. Hay tantas opciones diferentes, donde todo esto podría llevar, que es fantástico. )
Volveremos de nuevo sobre esta cuestión. Por ahora estoy muy ocupado. Seguid así, ¡es muy emocionante! 👍
Dobro 👌