DoEasy. Elementos de control (Parte 12): Objeto de lista básico, objetos WinForms ListBox y ButtonListBox

Contenido
- Concepto
- Mejorando las clases de la biblioteca
- Clase básica de lista de objetos WinForms
- Clases de objetos WinForms ListBox y ButtonListBox
- Simulación
- ¿Qué es lo próximo?
Concepto
Continuamos la creación de objetos WinForms en la biblioteca. En el último artículo, creamos el objeto CheckedListBox, que es esencialmente una lista de objetos CheckBox. No obstante, como más adelante crearemos otras Listas de objetos WinForms, ahora tendrá sentido crear una clase de objeto básico para la lista de objetos WinForms y usarla como base para crear todas las demás clases de objetos. La clase contendrá la funcionalidad básica para trabajar con las listas de objetos WinForms, y posteriormente con diversos datos vinculados al control (DataBindings en MS Visual Studio), cuyos datos se utilizarán para representar listas de elementos en líneas, lo cual permitirá mostrar en las listas datos absolutamente diferentes del entorno tanto de la propia biblioteca como del terminal y sus bases de datos, y por supuesto acceder a ellas a través de estas listas.
Basándonos en esta clase básica, hoy crearemos otro objeto WinForms ListBox, una simple lista que muestra una colección de datos. Por ahora, la lista solo mostrará los nombres de los puntos de la misma (creados al construir la lista) que permitan interactuar con el ratón (cambiar el color de fondo al colocar el cursor del ratón y seleccionar). Pero este objeto todavía no tendrá ninguna utilidad práctica (solo será una representación visual de la futura funcionalidad del objeto), ya que todavía tendremos que crear un cierto número de objetos WinForms orientados a eventos para determinar qué datos deben transmitirse a qué manejadores de eventos. Y, cuantos más objetos diferentes creemos, mejor idea tendremos de los datos y estructuras que necesitaremos para crear correctamente la funcionalidad de eventos de los objetos WinForms.
Hoy también crearemos un objeto de lista de botones. Como ListBox: sus líneas precisamente se crean basándose en la clase de objeto CButton; tendría sentido crear un objeto adicional que muestre en su lista un conjunto de botones (similar al objeto CheckedListBox, que representa objetos CheckBox en su lista). Sí, este objeto no estará en la lista de controles estándar de MS Visual Studio, pero ¿qué nos impide experimentar?
Mejorando las clases de la biblioteca
Después de las últimas actualizaciones del terminal de cliente, la clase CTrading de la biblioteca dejó de funcionar: el acceso a sus métodos privados OpenPosition() y PlaceOrder() desde las clases heredadas se interrumpió.
Por eso, en el archivo \MQL5\Include\DoEasy\Trading.mqh, estableceremos para estos métodos una sección privada de clase:
//--- Return the error handling method
   ENUM_ERROR_CODE_PROCESSING_METHOD   ResultProccessingMethod(const uint result_code);
//--- Correct errors
   ENUM_ERROR_CODE_PROCESSING_METHOD   RequestErrorsCorrecting(MqlTradeRequest &request,const ENUM_ORDER_TYPE order_type,const uint spread_multiplier,CSymbol *symbol_obj,CTradeObj *trade_obj);

//--- (1) Open a position, (2) place a pending order
protected:
   template<typename SL,typename TP>
   bool                 OpenPosition(const ENUM_POSITION_TYPE type,
                                    const double volume,
                                    const string symbol,
                                    const ulong magic=ULONG_MAX,
                                    const SL sl=0,
                                    const TP tp=0,
                                    const string comment=NULL,
                                    const ulong deviation=ULONG_MAX,
                                    const ENUM_ORDER_TYPE_FILLING type_filling=WRONG_VALUE);
   template<typename PR,typename PL,typename SL,typename TP>
   bool                 PlaceOrder( const ENUM_ORDER_TYPE order_type,
                                    const double volume,
                                    const string symbol,
                                    const PR price,
                                    const PL price_limit=0,
                                    const SL sl=0,
                                    const TP tp=0,
                                    const ulong magic=ULONG_MAX,
                                    const string comment=NULL,
                                    const datetime expiration=0,
                                    const ENUM_ORDER_TYPE_TIME type_time=WRONG_VALUE,
                                    const ENUM_ORDER_TYPE_FILLING type_filling=WRONG_VALUE);
private:
//--- Return the request object index in the list by (1) ID,
//--- (2) order ticket, (3) position ticket in the request
   int                  GetIndexPendingRequestByID(const uchar id);
   int                  GetIndexPendingRequestByOrder(const ulong ticket);
   int                  GetIndexPendingRequestByPosition(const ulong ticket);

public:
Aquí, dentro de la sección privada de la clase, hemos creado una sección protegida, y después hemos retornado la privada.
En el archivo \MQL5\Include\DoEasy\Defines.mqh, en la enumeración de los tipos de elementos gráficos, añadiremos tres nuevos tipos:
//+------------------------------------------------------------------+
//| The list of graphical element types                              |
//+------------------------------------------------------------------+
enum ENUM_GRAPH_ELEMENT_TYPE
  {
   GRAPH_ELEMENT_TYPE_STANDARD,                       // Standard graphical object
   GRAPH_ELEMENT_TYPE_STANDARD_EXTENDED,              // Extended standard graphical object
   GRAPH_ELEMENT_TYPE_SHADOW_OBJ,                     // Shadow object
   GRAPH_ELEMENT_TYPE_ELEMENT,                        // Element
   GRAPH_ELEMENT_TYPE_FORM,                           // Form
   GRAPH_ELEMENT_TYPE_WINDOW,                         // Window
   //--- WinForms
   GRAPH_ELEMENT_TYPE_WF_UNDERLAY,                    // Panel object underlay
   GRAPH_ELEMENT_TYPE_WF_BASE,                        // Windows Forms Base
   //--- 'Container' object types are to be set below
   GRAPH_ELEMENT_TYPE_WF_CONTAINER,                   // Windows Forms container base object
   GRAPH_ELEMENT_TYPE_WF_PANEL,                       // Windows Forms Panel
   GRAPH_ELEMENT_TYPE_WF_GROUPBOX,                    // Windows Forms GroupBox
   //--- 'Standard control' object types are to be set below
   GRAPH_ELEMENT_TYPE_WF_COMMON_BASE,                 // Windows Forms base standard control
   GRAPH_ELEMENT_TYPE_WF_LABEL,                       // Windows Forms Label
   GRAPH_ELEMENT_TYPE_WF_BUTTON,                      // Windows Forms Button
   GRAPH_ELEMENT_TYPE_WF_CHECKBOX,                    // Windows Forms CheckBox
   GRAPH_ELEMENT_TYPE_WF_RADIOBUTTON,                 // Windows Forms RadioButton
   GRAPH_ELEMENT_TYPE_WF_ELEMENTS_LIST_BOX,           // Base list object of Windows Forms elements
   GRAPH_ELEMENT_TYPE_WF_LIST_BOX,                    // Windows Forms ListBox
   GRAPH_ELEMENT_TYPE_WF_CHECKED_LIST_BOX,            // Windows Forms CheckedListBox
   GRAPH_ELEMENT_TYPE_WF_BUTTON_LIST_BOX,             // Windows Forms ButtonListBox
  };
//+------------------------------------------------------------------+
Al final de la lista de propiedades de tipo entero del elemento gráfico en el lienzo, añadiremos dos nuevas propiedades y aumentaremos el número de propiedades de tipo entero de 83 a 85:
//+------------------------------------------------------------------+
//| Integer properties of the graphical element on the canvas        |
//+------------------------------------------------------------------+
enum ENUM_CANV_ELEMENT_PROP_INTEGER
  {
   CANV_ELEMENT_PROP_ID = 0,                          // Element ID
   CANV_ELEMENT_PROP_TYPE,                            // Graphical element type
   //---...
   //---...
   CANV_ELEMENT_PROP_CHECK_FLAG_COLOR_MOUSE_DOWN,     // Color of control checkbox when clicking on the control
   CANV_ELEMENT_PROP_CHECK_FLAG_COLOR_MOUSE_OVER,     // Color of control checkbox when hovering the mouse over the control
   CANV_ELEMENT_PROP_LIST_BOX_MULTI_COLUMN,           // Horizontal display of columns in the ListBox control
   CANV_ELEMENT_PROP_LIST_BOX_COLUMN_WIDTH,           // Width of each ListBox control column
  };
#define CANV_ELEMENT_PROP_INTEGER_TOTAL (85)          // Total number of integer properties
#define CANV_ELEMENT_PROP_INTEGER_SKIP  (0)           // Number of integer properties not used in sorting
//+------------------------------------------------------------------+
Vamos a añadir estas nuevas propiedades a la enumeración de posibles criterios de clasificación de los objetos gráficos en el lienzo:
//+------------------------------------------------------------------+
//| Possible sorting criteria of graphical elements on the canvas    |
//+------------------------------------------------------------------+
#define FIRST_CANV_ELEMENT_DBL_PROP  (CANV_ELEMENT_PROP_INTEGER_TOTAL-CANV_ELEMENT_PROP_INTEGER_SKIP)
#define FIRST_CANV_ELEMENT_STR_PROP  (CANV_ELEMENT_PROP_INTEGER_TOTAL-CANV_ELEMENT_PROP_INTEGER_SKIP+CANV_ELEMENT_PROP_DOUBLE_TOTAL-CANV_ELEMENT_PROP_DOUBLE_SKIP)
enum ENUM_SORT_CANV_ELEMENT_MODE
  {
//--- Sort by integer properties
   SORT_BY_CANV_ELEMENT_ID = 0,                       // Sort by element ID
   SORT_BY_CANV_ELEMENT_TYPE,                         // Sort by graphical element type
   //---...
   //---...
   SORT_BY_CANV_ELEMENT_CHECK_FLAG_COLOR_MOUSE_DOWN,  // Sort by color of control checkbox when clicking on the control
   SORT_BY_CANV_ELEMENT_CHECK_FLAG_COLOR_MOUSE_OVER,  // Sort by color of control checkbox when hovering the mouse over the control
   SORT_BY_CANV_ELEMENT_LIST_BOX_MULTI_COLUMN,        // Sort by horizontal column display flag in the ListBox control
   SORT_BY_CANV_ELEMENT_LIST_BOX_COLUMN_WIDTH,        // Sort by the width of each ListBox control column
//--- Sort by real properties

//--- Sort by string properties
   SORT_BY_CANV_ELEMENT_NAME_OBJ = FIRST_CANV_ELEMENT_STR_PROP,// Sort by an element object name
   SORT_BY_CANV_ELEMENT_NAME_RES,                     // Sort by the graphical resource name
   SORT_BY_CANV_ELEMENT_TEXT,                         // Sort by graphical element text
  };
//+------------------------------------------------------------------+
Ahora podremos clasificar y filtrar las listas, así como seleccionar los objetos según estas nuevas propiedades. En principio, no existe necesidad particular de que esto funcione con objetos gráficos para construir una GUI (no veo opciones para usar la búsqueda por estas propiedades), pero introduciremos absolutamente todas las propiedades de los objetos de GUI en estas listas para que luego podamos construir en nuestro programa una interfaz gráfica para el programa que nos permita crear de forma visual un envoltorio gráfico directamente en la ventana del gráfico y luego trabajar con él; ahí es donde necesitaremos obtener y cambiar absolutamente todas las propiedades de los elementos gráficos.
En el archivo \MQL5\Include\DoEasy\Data.mqh, añadimos los índices de los nuevos mensajes de la biblioteca, cambiamos el nombre del índice MSG_CHECKED_LIST_ERR_FAILED_CREATE_CHECK_BOX_OBJ al nuevo y eliminamos el índice MSG_CHECKED_LIST_ERR_FAILED_GET_CHECK_BOX_OBJ:
//--- WinForms standard
   MSG_GRAPH_ELEMENT_TYPE_WF_COMMON_BASE,             // WinForms base standard control
   MSG_GRAPH_ELEMENT_TYPE_WF_LABEL,                   // Label control
   MSG_GRAPH_ELEMENT_TYPE_WF_CHECKBOX,                // CheckBox control
   MSG_GRAPH_ELEMENT_TYPE_WF_RADIOBUTTON,             // RadioButton control
   MSG_GRAPH_ELEMENT_TYPE_WF_BUTTON,                  // Button control
   MSG_GRAPH_ELEMENT_TYPE_WF_ELEMENTS_LIST_BOX,       // Base list object of Windows Forms elements
   MSG_GRAPH_ELEMENT_TYPE_WF_LIST_BOX,                // ListBox control
   MSG_GRAPH_ELEMENT_TYPE_WF_CHECKED_LIST_BOX,        // CheckedListBox control
   MSG_GRAPH_ELEMENT_TYPE_WF_BUTTON_LIST_BOX,         // ButtonListBox control

   MSG_GRAPH_OBJ_BELONG_PROGRAM,                      // Graphical object belongs to a program
   MSG_GRAPH_OBJ_BELONG_NO_PROGRAM,                   // Graphical object does not belong to a program
...
//--- CPanel
   MSG_PANEL_OBJECT_ERR_FAILED_CREATE_UNDERLAY_OBJ,   // Failed to create the underlay object
   MSG_PANEL_OBJECT_ERR_OBJ_MUST_BE_WFBASE,           // Error. The created object should be of WinForms Base type or be derived from it

//--- ElementsListBox
   MSG_ELM_LIST_ERR_FAILED_GET_GRAPH_ELEMENT_OBJ,     // Failed to get a graphical element


//--- CButtonListBox
   MSG_BUTT_LIST_ERR_FAILED_SET_GROUP_BUTTON,         // Failed to set the group for the button with the index
   MSG_BUTT_LIST_ERR_FAILED_SET_TOGGLE_BUTTON,        // Failed to set the Toggle flag to the button with the index

//--- Integer properties of graphical elements
...
   MSG_CANV_ELEMENT_PROP_CHECK_FLAG_COLOR_MOUSE_DOWN, // Color of control checkbox when clicking on the control
   MSG_CANV_ELEMENT_PROP_CHECK_FLAG_COLOR_MOUSE_OVER, // Color of control checkbox when hovering the mouse over the control
   MSG_CANV_ELEMENT_PROP_LIST_BOX_MULTI_COLUMN,       // Horizontal display of columns in the ListBox control
   MSG_CANV_ELEMENT_PROP_LIST_BOX_COLUMN_WIDTH,       // Width of each ListBox control column
//--- Real properties of graphical elements

//--- String properties of graphical elements
   MSG_CANV_ELEMENT_PROP_NAME_OBJ,                    // Graphical element object name
   MSG_CANV_ELEMENT_PROP_NAME_RES,                    // Graphical resource name
   MSG_CANV_ELEMENT_PROP_TEXT,                        // Graphical element text

  };
//+------------------------------------------------------------------+
y los mensajes de texto correspondientes a los nuevos índices añadidos:
//--- WinForms standard
   {"Базовый стандартный элемент управления WinForms","Basic Standard WinForms Control"},
   {"Элемент управления \"Label\"","Control element \"Label\""},
   {"Элемент управления \"CheckBox\"","Control element \"CheckBox\""},
   {"Элемент управления \"RadioButton\"","Control element \"RadioButton\""},
   {"Элемент управления \"Button\"","Control element \"Button\""},
   {"Базовый объект-список Windows Forms элементов","Basic Windows Forms List Object"},
   {"Элемент управления \"ListBox\"","Control element \"ListBox\""},
   {"Элемент управления \"CheckedListBox\"","Control element \"CheckedListBox\""},
   {"Элемент управления \"ButtonListBox\"","Control element \"ButtonListBox\""},

   {"Графический объект принадлежит программе","The graphic object belongs to the program"},
   {"Графический объект не принадлежит программе","The graphic object does not belong to the program"},
...
//--- CPanel
   {"Не удалось создать объект-подложку","Failed to create underlay object"},
   {"Ошибка. Создаваемый объект должен иметь тип WinForms Base или быть его наследником","Error. The object being created must be of type WinForms Base or be derived from it"},

//--- ElementsListBox
   {"Не удалось получить графический элемент ","Failed to get graphic element "},

//--- CButtonListBox
   {"Не удалось установить группу кнопке с индексом ","Failed to set group for button with index "},
   {"Не удалось установить флаг \"Переключатель\" кнопке с индексом ","Failed to set the \"Toggle\" flag on the button with index "},

//--- Integer properties of graphical elements
...
   {"Цвет флажка проверки элемента управления при нажатии мышки на элемент управления","Control Checkbox Colorl when the mouse is pressed on the control"},
   {"Цвет флажка проверки элемента управления при наведении мышки на элемент управления","Control Checkbox Colorl when hovering the mouse over the control"},
   {"Горизонтальное отображение столбцов в элементе управления ListBox","Display columns horizontally in a ListBox control"},
   {"Ширина каждого столбца элемента управления ListBox","The width of each column of the ListBox control"},

//--- String properties of graphical elements
   {"Имя объекта-графического элемента","The name of the graphic element object"},
   {"Имя графического ресурса","Image resource name"},
   {"Текст графического элемента","Text of the graphic element"},

  };
//+---------------------------------------------------------------------+
Tendremos que retornar la descripción del tipo de elemento gráfico especificado. Actualmente, la clase de objeto gráfico básico de la biblioteca tiene un método TypeElementDescription() que retorna la descripción del tipo del objeto gráfico actual, es decir, una descripción del tipo en sí. No obstante, necesitaremos retornar una descripción del elemento gráfico especificado en los parámetros de entrada del método. Por eso, añadiremos al método existente un parámetro formal en el que transmitiremos el tipo del objeto, y escribiremos un método sobrecargado que retorne el tipo del objeto actual.
Haremos los cambios necesarios en el archivo \MQL5\Include\DoEasy\Objects\Graph\GBaseObj.mqh.
En la sección pública, declararemos un nuevo método sobrecargado en el que transmitiremos al mismo el tipo de objeto, mientras que el método anterior transmitirá el tipo de objeto actual al nuevo método:
//--- Return the graphical object type (ENUM_OBJECT) calculated from the object type (ENUM_OBJECT_DE_TYPE) passed to the method
   ENUM_OBJECT       GraphObjectType(const ENUM_OBJECT_DE_TYPE obj_type) const
                       {
                        return ENUM_OBJECT(obj_type-OBJECT_DE_TYPE_GSTD_OBJ-1);
                       }

//--- Return the description of the type of the graphical object (1) type, (2, 3) element, (4) affiliation and (5) species
string               TypeGraphObjectDescription(void);
string               TypeElementDescription(const ENUM_GRAPH_ELEMENT_TYPE type);
string               TypeElementDescription(void);
string               BelongDescription(void);
string               SpeciesDescription(void);
y mejoraremos ambos métodos fuera del cuerpo de la clase.
En el método con el parámetro formal, añadiremos una descripción de los nuevos tipos de elementos gráficos de la biblioteca según el tipo especificado:
//+------------------------------------------------------------------+
//| Return the description of the graphical element type             |
//+------------------------------------------------------------------+
string CGBaseObj::TypeElementDescription(const ENUM_GRAPH_ELEMENT_TYPE type)
  {
   return
     (
      type==GRAPH_ELEMENT_TYPE_STANDARD               ? CMessage::Text(MSG_GRAPH_ELEMENT_TYPE_STANDARD)              :
      type==GRAPH_ELEMENT_TYPE_STANDARD_EXTENDED      ? CMessage::Text(MSG_GRAPH_ELEMENT_TYPE_STANDARD_EXTENDED)     :
      type==GRAPH_ELEMENT_TYPE_ELEMENT                ? CMessage::Text(MSG_GRAPH_ELEMENT_TYPE_ELEMENT)               :
      type==GRAPH_ELEMENT_TYPE_SHADOW_OBJ             ? CMessage::Text(MSG_GRAPH_ELEMENT_TYPE_SHADOW_OBJ)            :
      type==GRAPH_ELEMENT_TYPE_FORM                   ? CMessage::Text(MSG_GRAPH_ELEMENT_TYPE_FORM)                  :
      type==GRAPH_ELEMENT_TYPE_WINDOW                 ? CMessage::Text(MSG_GRAPH_ELEMENT_TYPE_WINDOW)                :
      //--- WinForms
      type==GRAPH_ELEMENT_TYPE_WF_UNDERLAY            ? CMessage::Text(MSG_GRAPH_ELEMENT_TYPE_WF_UNDERLAY)           :
      type==GRAPH_ELEMENT_TYPE_WF_BASE                ? CMessage::Text(MSG_GRAPH_ELEMENT_TYPE_WF_BASE)               :
      //--- Containers
      type==GRAPH_ELEMENT_TYPE_WF_CONTAINER           ? CMessage::Text(MSG_GRAPH_ELEMENT_TYPE_WF_CONTAINER)          :
      type==GRAPH_ELEMENT_TYPE_WF_GROUPBOX            ? CMessage::Text(MSG_GRAPH_ELEMENT_TYPE_WF_GROUPBOX)           :
      type==GRAPH_ELEMENT_TYPE_WF_PANEL               ? CMessage::Text(MSG_GRAPH_ELEMENT_TYPE_WF_PANEL)              :
      //--- Standard controls
      type==GRAPH_ELEMENT_TYPE_WF_COMMON_BASE         ? CMessage::Text(MSG_GRAPH_ELEMENT_TYPE_WF_COMMON_BASE)        :
      type==GRAPH_ELEMENT_TYPE_WF_LABEL               ? CMessage::Text(MSG_GRAPH_ELEMENT_TYPE_WF_LABEL)              :
      type==GRAPH_ELEMENT_TYPE_WF_CHECKBOX            ? CMessage::Text(MSG_GRAPH_ELEMENT_TYPE_WF_CHECKBOX)           :
      type==GRAPH_ELEMENT_TYPE_WF_RADIOBUTTON         ? CMessage::Text(MSG_GRAPH_ELEMENT_TYPE_WF_RADIOBUTTON)        :
      type==GRAPH_ELEMENT_TYPE_WF_BUTTON              ? CMessage::Text(MSG_GRAPH_ELEMENT_TYPE_WF_BUTTON)             :
      type==GRAPH_ELEMENT_TYPE_WF_ELEMENTS_LIST_BOX   ? CMessage::Text(MSG_GRAPH_ELEMENT_TYPE_WF_ELEMENTS_LIST_BOX)  :
      type==GRAPH_ELEMENT_TYPE_WF_LIST_BOX            ? CMessage::Text(MSG_GRAPH_ELEMENT_TYPE_WF_LIST_BOX)           :
      type==GRAPH_ELEMENT_TYPE_WF_CHECKED_LIST_BOX    ? CMessage::Text(MSG_GRAPH_ELEMENT_TYPE_WF_CHECKED_LIST_BOX)   :
      type==GRAPH_ELEMENT_TYPE_WF_BUTTON_LIST_BOX     ? CMessage::Text(MSG_GRAPH_ELEMENT_TYPE_WF_BUTTON_LIST_BOX)    :
      "Unknown"
     );
  }
//+------------------------------------------------------------------+
Y el método anterior, que retornaba el tipo del objeto actual, ahora retornará el resultado de la llamada a su método sobrecargado, que transmite el tipo del objeto actual:
//+------------------------------------------------------------------+
//| Return the description of the graphical element type             |
//+------------------------------------------------------------------+
string CGBaseObj::TypeElementDescription(void)
  {
   return this.TypeElementDescription(this.TypeGraphElement());
  }
//+------------------------------------------------------------------+
Como el funcionamiento de los botones pertenecientes a un grupo depende directamente del grupo en el que se encuentre el botón, implementaremos la muestra del número de grupo en un mensaje de registro de prueba para controlar la correcta selección del grupo de botones.
En el archivo \MQL5\Include\DoEasy\Objects\Graph\WForms\Common Controls\Button.mqh, en el manejador de eventos "Cursor dentro del área activa, botón del ratón pulsado (izquierda)", añadiremos el procesamiento de botón de trabajo en el grupo y también añadiremos el número de grupo a la línea encargada de mostrar los datos del botón en el diario de registro:
//+------------------------------------------------------------------+
//| 'The cursor is inside the active area,                           |
//| left mouse button released                                       |
//+------------------------------------------------------------------+
void CButton::MouseActiveAreaReleasedHandler(const int id,const long& lparam,const double& dparam,const string& sparam)
  {
//--- The mouse button released outside the element means refusal to interact with the element
   if(lparam<this.CoordX() || lparam>this.RightEdge() || dparam<this.CoordY() || dparam>this.BottomEdge())
     {
      //--- If this is a simple button, set the initial background color
      if(!this.Toggle())
         this.SetBackgroundColor(this.BackgroundColorInit(),false);
      //--- If this is the toggle button, set the initial color depending on whether the button is pressed or not
      else
         this.SetBackgroundColor(!this.State() ? this.BackgroundColorInit() : this.BackgroundColorToggleONInit(),false);
      //--- Set the initial frame color
      this.SetBorderColor(this.BorderColorInit(),false);
      //--- Send the test message to the journal
      Print(DFUN_ERR_LINE,TextByLanguage("Отмена","Cancel"));
     }
//--- The mouse button released within the element means a  click on the control
   else
     {
      //--- If this is a simple button, set the color for "The cursor is over the active area" status
      if(!this.Toggle())
         this.SetBackgroundColor(this.BackgroundColorMouseOver(),false);
      //--- If this is the toggle button,
      else
        {
         //--- if the button does not work in the group, set its state to the opposite,
         if(!this.GroupButtonFlag())
            this.SetState(!this.State());
         //--- if the button is not pressed yet, set it to the pressed state
         else if(!this.State())
            this.SetState(true);
         //--- set the background color for "The cursor is over the active area" status depending on whether the button is clicked or not
         this.SetBackgroundColor(this.State() ? this.BackgroundColorToggleONMouseOver() : this.BackgroundColorMouseOver(),false);
        }
      //--- Send the test message to the journal
      Print(DFUN_ERR_LINE,TextByLanguage("Щелчок","Click"),", this.State()=",this.State(),", ID=",this.ID(),", Group=",this.Group());
      //--- Set the frame color for "The cursor is over the active area" status
      this.SetBorderColor(this.BorderColorMouseOver(),false);
     }
//--- Redraw the object
   this.Redraw(false);
  }
//+------------------------------------------------------------------+
Para los botones de interruptor, tendremos varios modos de funcionamiento. Un botón de interruptor único puede estar pulsado o no pulsado. Si hay varios botones de interruptor situados en el mismo contenedor y con el mismo grupo, dichos botones funcionarán de tal forma que, al pulsar uno, se pulsarán los demás botones de ese grupo. Si volvemos a pulsar un botón ya pulsado, este se soltará.
Si añadimos una bandera de botón de grupo para cada grupo de botones y cada uno de ellos tiene el mismo grupo, dichos botones funcionarán de forma un poco diferente. Del mismo modo, si pulsamos uno, esto hará que se pulsen los otros, pero pulsar un botón que ya ha sido pulsado no liberará este. Es decir, en este caso, uno de los botones estará siempre pulsado.
La muestra del número de grupo es un mensaje de depuración: después de la depuración, este será eliminado, pero para entender el funcionamiento correcto a veces necesitaremos ver a qué grupo pertenece el botón pulsado.
Ahora, renombramos el método GroupButton(), que retorna la bandera de botón de grupo, para que resulte comprensible que el método retorna precisamente la bandera, y no el número de grupo:
   bool              State(void)                         const { return (bool)this.GetProperty(CANV_ELEMENT_PROP_BUTTON_STATE);                                }

//--- (1) Set and (2) return the group flag
   void              SetGroupButtonFlag(const bool flag)       { this.SetProperty(CANV_ELEMENT_PROP_BUTTON_GROUP,flag);                                        }
   bool              GroupButtonFlag(void)               const { return (bool)this.GetProperty(CANV_ELEMENT_PROP_BUTTON_GROUP);                                }

//--- (1,2) Set and (3) return the main background color for the 'enabled' status
   void              SetBackgroundColorToggleON(const color colour,const bool set_init_color)
Clase básica de lista de objetos WinForms
Los objetos de lista WinForms tienen una funcionalidad similar, por lo que será razonable crear un objeto básico para ellos que disponga de una funcionalidad común para sus descendientes, del que heredarán todos los demás objetos, y que ya creará su propia funcionalidad única inherente a la clase heredera.
En la carpeta de la biblioteca \MQL5\Include\DoEasy\Objects\Graph\WForms\Common Controls\, crearemos el nuevo archivo ElementsListBox.mqh de la clase CElementsListBox.
La clase deberá ser heredada de la clase contenedor básico, y a esta se le deberá añadir un archivo de esta clase:
//+------------------------------------------------------------------+
//|                                              ElementsListBox.mqh |
//|                                  Copyright 2022, MetaQuotes Ltd. |
//|                             https://mql5.com/en/users/artmedia70 |
//+------------------------------------------------------------------+
#property copyright "Copyright 2022, MetaQuotes Ltd."
#property link      "https://mql5.com/en/users/artmedia70"
#property version   "1.00"
#property strict    // Necessary for mql4
//+------------------------------------------------------------------+
//| Include files                                                    |
//+------------------------------------------------------------------+
#include "..\Containers\Container.mqh"
//+------------------------------------------------------------------+
//| Class of the base object of the WForms control list              |
//+------------------------------------------------------------------+
class CElementsListBox : public CContainer
  {
  }
En la sección privada de la clase, declararemos un método que retornará las coordenadas del siguiente objeto a crear en la lista. En la sección protegida, declararemos un método que creará el número especificado de objetos WinForms. En la sección pública de la clase, declararemos un constructor paramétrico y los métodos necesarios para establecer y retornar el permiso para colocar objetos en la lista en múltiples columnas y un método para establecer la anchura de cada columna:
//+------------------------------------------------------------------+
//| Class of the base object of the WForms control list              |
//+------------------------------------------------------------------+
class CElementsListBox : public CContainer
  {
private:
//--- Return the coordinates of the next object placed in the list
   void              GetCoordsObj(CWinFormBase *obj,int &x,int &y);
protected:
//--- Create the specified number of specified WinForms objects
   void              CreateElements(ENUM_GRAPH_ELEMENT_TYPE element_type,
                                    const int count,
                                    const int x,
                                    const int y,
                                    const int w,
                                    const int h,
                                    uint new_column_width=0,
                                    const bool autosize=true);
public:
//--- Constructor
                     CElementsListBox(const long chart_id,
                                      const int subwindow,
                                      const string name,
                                      const int x,
                                      const int y,
                                      const int w,
                                      const int h);
//--- (1) Set and (2) return the flag of horizontal display of columns
   void              SetMultiColumn(const bool flag)        { this.SetProperty(CANV_ELEMENT_PROP_LIST_BOX_MULTI_COLUMN,flag);          }
   bool              MultiColumn(void)                const { return (bool)this.GetProperty(CANV_ELEMENT_PROP_LIST_BOX_MULTI_COLUMN);  }
//--- (1) Set and (2) return the width of each column
   void              SetColumnWidth(const uint value)       { this.SetProperty(CANV_ELEMENT_PROP_LIST_BOX_COLUMN_WIDTH,value);         }
   uint              ColumnWidth(void)                const { return (uint)this.GetProperty(CANV_ELEMENT_PROP_LIST_BOX_COLUMN_WIDTH);  }

  };
//+------------------------------------------------------------------+
Echemos un vistazo a los métodos declarados.
En el constructor de la clase, especificaremos el tipo de elemento gráfico y el tipo de objeto gráfico de la biblioteca, indicaremos el tamaño del marco simple en un píxel, estableceremos los colores por defecto para el marco y los textos dentro del objeto y estableceremos la prohibición de la disposición en las columnas de la lista; asimismo, pondremos la anchura de las columnas a cero:
//+------------------------------------------------------------------+
//| Constructor indicating the chart and subwindow ID                |
//+------------------------------------------------------------------+
CElementsListBox::CElementsListBox(const long chart_id,
                                   const int subwindow,
                                   const string name,
                                   const int x,
                                   const int y,
                                   const int w,
                                   const int h) : CContainer(chart_id,subwindow,name,x,y,w,h)
  {
   CGBaseObj::SetTypeElement(GRAPH_ELEMENT_TYPE_WF_ELEMENTS_LIST_BOX);
   CGCnvElement::SetProperty(CANV_ELEMENT_PROP_TYPE,GRAPH_ELEMENT_TYPE_WF_ELEMENTS_LIST_BOX);
   this.m_type=OBJECT_DE_TYPE_GWF_COMMON;
   this.SetBorderSizeAll(1);
   this.SetBorderStyle(FRAME_STYLE_SIMPLE);
   this.SetBorderColor(CLR_DEF_BORDER_COLOR,true);
   this.SetForeColor(CLR_DEF_FORE_COLOR,true);
   this.SetMultiColumn(false);
   this.SetColumnWidth(0);
  }
//+------------------------------------------------------------------+
Método que crea el número especificado de objetos WinForms:
//+------------------------------------------------------------------+
//| Create the specified number of certain WinForms objects          |
//+------------------------------------------------------------------+
void CElementsListBox::CreateElements(ENUM_GRAPH_ELEMENT_TYPE element_type,
                                      const int count,
                                      const int x,
                                      const int y,
                                      const int w,
                                      const int h,
                                      uint new_column_width=0,
                                      const bool autosize=true)
  {
//--- Set the width of columns if the value greater than zero has been passed
   if(new_column_width>0)
     {
      if(this.ColumnWidth()!=new_column_width)
         this.SetColumnWidth(new_column_width);
     }
//--- Create a pointer to the created WinFormBase object
   CWinFormBase *obj=NULL;
//--- In the loop through the specified number of objects
   for(int i=0;i<count;i++)
     {
      //--- Get the coordinates of the created object
      int coord_x=x, coord_y=y;
      this.GetCoordsObj(obj,coord_x,coord_y);
      //--- If the object could not be created, send the appropriate message to the log and move on to the next one
      if(!this.CreateNewElement(element_type,coord_x,coord_y,w,h,clrNONE,255,true,false))
        {
         ::Print(DFUN,MSG_LIB_SYS_FAILED_CREATE_ELM_OBJ,this.TypeElementDescription(element_type));
         continue;
        }
      //--- Get the created object from the list by the loop index
      obj=this.GetElement(i);
      //--- If the object could not be obtained, send the appropriate message to the log and move on to the next one
      if(obj==NULL)
        {
         ::Print(DFUN,MSG_ELM_LIST_ERR_FAILED_GET_GRAPH_ELEMENT_OBJ,this.TypeElementDescription(element_type));
         continue;
        }
      //--- Set the frame size of the created object to zero
      obj.SetBorderSizeAll(0);
      //--- Set the opacity of the base object and the default background color
      obj.SetOpacity(this.Opacity());
      obj.SetBackgroundColor(this.BackgroundColor(),true);
      obj.SetBackgroundColorMouseOver(CLR_DEF_CONTROL_STD_MOUSE_OVER);
      obj.SetBackgroundColorMouseDown(CLR_DEF_CONTROL_STD_MOUSE_DOWN);
     }
//--- If the flag of auto resizing the base object is passed to the method,
//--- set the auto resize mode to "increase and decrease"
   if(autosize)
      this.SetAutoSizeMode(CANV_ELEMENT_AUTO_SIZE_MODE_GROW_SHRINK,false);
  }
//+------------------------------------------------------------------+
La lógica del método se describe en los comentarios al código, por lo que esperamos que todo esté claro. El cambio de tamaño automático del panel en el que se alinean los objetos creados resulta necesario para alinear las dimensiones del panel con los elementos creados. Algunas clases no requerirán esto, por lo que hemos introducido una bandera que indicará que el panel deberá estar alineado con su contenido.
Método que retorna las coordenadas del siguiente objeto a colocar en la lista:
//+------------------------------------------------------------------+
//| Return the coordinates of the next object placed in the list     |
//+------------------------------------------------------------------+
void CElementsListBox::GetCoordsObj(CWinFormBase *obj,int &x,int &y)
  {
//--- Save the coordinates passed to the method in the variables
   int coord_x=x;
   int coord_y=y;
//--- If the flag of using multiple columns is not set,
   if(!this.MultiColumn())
     {
      //--- set the X coordinate the same as the one passed to the method,
      //--- set the Y coordinate for the first object in the list to be equal to the one passed to the method,
      //--- set the rest 4 pixels lower than the bottom edge of the previous object located above.
      //--- After setting the coordinates to the variables, leave the method
      x=coord_x;
      y=(obj==NULL ? coord_y : obj.BottomEdgeRelative()+4);
      return;
     }
//--- If multiple columns can be used
//--- If this is the first object in the list,
   if(obj==NULL)
     {
      //--- set the coordinates the same as those passed to the method and leave
      x=coord_x;
      y=coord_y;
      return;
     }
//--- If this is not the first object in the list
//--- If (the bottom border of the previous object + 4 pixels) is below the bottom border of the ListBox panel (the next object will go beyond the borders),
   if(obj.BottomEdge()+4>this.BottomEdge())
     {
      //--- If the columns width is zero, then the X coordinate of the created object will be the right border of the previous object + 6 pixels
      //--- Otherwise, if the width of the columns is greater than zero, then the X coordinate of the created object will be the X coordinate of the previous one + the column width
      //--- The Y coordinate will be the value passed to the method (start placing objects in a new column)
      x=(this.ColumnWidth()==0 ? obj.RightEdgeRelative()+6 : int(obj.CoordXRelative()+this.ColumnWidth()));
      y=coord_y;
     }
//--- If the created object is placed within the ListBox panel,
   else
     {
      //--- the X coordinate of the created object will be the offset of the previous one from the panel edge minus the width of its frame,
      //--- the Y coordinate will be the lower border of the previous object located above plus 4 pixels
      x=obj.CoordXRelative()-this.BorderSizeLeft();
      y=obj.BottomEdgeRelative()+4;
     }
  }
//+------------------------------------------------------------------+
La lógica del método se aclara en los comentarios al código. El método calculará la coordenada del siguiente objeto basándose en las coordenadas iniciales en las que deberá situarse el primer objeto de la lista y en las coordenadas de los objetos (anteriormente) situados en la lista. Además, si establecemos una bandera para permitir que los objetos se coloquen en varias columnas, el método calculará si el siguiente objeto que vamos a crear cabe en el área de su panel (solo cuenta su coordenada de ubicación, no el objeto completo). Si un objeto (su coordenada Y) se coloca dentro del panel, se construirá debajo del anterior. Si la coordenada cae fuera del panel, el objeto se dibujará a la derecha del borde derecho del objeto anterior en la coordenada Y inicial: esto marcará el comienzo de una nueva columna. Una vez los objetos han sido ubicados dentro de un panel, sus dimensiones se ajustarán para que coincidan con el contenido interno en el método desde el que se llama a este. Así se corregirá cualquier imprecisión en la localización de los objetos más bajos. Pueden producirse imprecisiones (la coordenada Y del objeto inferior está dentro del panel y el resto fuera del panel) porque la altura de un objeto de la lista puede resultar diferente a la de otro, ya que posteriormente podremos colocar diferentes objetos en las listas. Por lo tanto, en lugar de calcular las dimensiones del futuro objeto y considerar si encajará por entero en el área del panel y si la distancia desde su borde inferior hasta el borde inferior del panel será la correcta, será mucho más fácil simplemente ajustar las dimensiones del panel para que encaje el contenido ya creado dentro de él.
Como ahora tenemos un objeto básico para los objetos de lista WinForms, necesitaremos modificar el objeto de lista CheckedListBox que ya hemos creado.
Vamos a corregir la clase de este objeto en \MQL5\Include\DoEasy\Objects\Graph\WForms\Common Controls\CheckedListBox.mqh.
En lugar de adjuntar el archivo de la clase de objeto de panel a este archivo de clase
#include "..\Containers\Panel.mqh" incluiremos el archivo de la clase que acabamos de crear. En consecuencia, ahora heredaremos de él:
//+------------------------------------------------------------------+
//|                                               CheckedListBox.mqh |
//|                                  Copyright 2022, MetaQuotes Ltd. |
//|                             https://mql5.com/en/users/artmedia70 |
//+------------------------------------------------------------------+
#property copyright "Copyright 2022, MetaQuotes Ltd."
#property link      "https://mql5.com/en/users/artmedia70"
#property version   "1.00"
#property strict    // Necessary for mql4
//+------------------------------------------------------------------+
//| Include files                                                    |
//+------------------------------------------------------------------+
#include "ElementsListBox.mqh"
//+------------------------------------------------------------------+
//| CheckedListBox object class of the WForms controls               |
//+------------------------------------------------------------------+
class CCheckedListBox : public CElementsListBox
  {
En la declaración del método que crea el número indicado de objetos CheckBox, añadiremos los parámetros formales para especificar la anchura del objeto a crear y el nuevo valor de la anchura de la columna:
public:
//--- Create the specified number of CheckBox objects
   void              CreateCheckBox(const int count,const int width,const int new_column_width=0);
//--- Constructor
En el constructor de la clase, en su lista de inicialización, transmitimos los parámetros a la nueva clase padre:
//+------------------------------------------------------------------+
//| Constructor indicating the chart and subwindow ID                |
//+------------------------------------------------------------------+
CCheckedListBox::CCheckedListBox(const long chart_id,
                                 const int subwindow,
                                 const string name,
                                 const int x,
                                 const int y,
                                 const int w,
                                 const int h) : CElementsListBox(chart_id,subwindow,name,x,y,w,h)
  {
   CGBaseObj::SetTypeElement(GRAPH_ELEMENT_TYPE_WF_CHECKED_LIST_BOX);
   CGCnvElement::SetProperty(CANV_ELEMENT_PROP_TYPE,GRAPH_ELEMENT_TYPE_WF_CHECKED_LIST_BOX);
   this.m_type=OBJECT_DE_TYPE_GWF_COMMON;
   this.SetBorderSizeAll(1);
   this.SetBorderStyle(FRAME_STYLE_SIMPLE);
   this.SetBorderColor(CLR_DEF_BORDER_COLOR,true);
   this.SetForeColor(CLR_DEF_FORE_COLOR,true);
  }
//+------------------------------------------------------------------+
El método que crea el número especificado de objetos CheckBox ha sido rediseñado, ya que la nueva clase padre tiene un método para crear el número indicado de objetos con el tipo especificado:
//+------------------------------------------------------------------+
//| Create the specified number of CheckBox objects                  |
//+------------------------------------------------------------------+
void CCheckedListBox::CreateCheckBox(const int count,const int width,const int new_column_width=0)
  {
//--- Create a pointer to the CheckBox object
   CCheckBox *obj=NULL;
//--- Create the specified number of CheckBox objects
   CElementsListBox::CreateElements(GRAPH_ELEMENT_TYPE_WF_CHECKBOX,count,2,2,width,DEF_CHECK_SIZE+1,new_column_width);
//--- In the loop by the created number of objects
   for(int i=0;i<this.ElementsTotal();i++)
     {
      //--- Get the created object from the list by the loop index
      obj=this.GetElement(i);
      //--- If the object could not be obtained, send the appropriate message to the log and move on to the next one
      if(obj==NULL)
        {
         ::Print(DFUN,MSG_ELM_LIST_ERR_FAILED_GET_GRAPH_ELEMENT_OBJ,this.TypeElementDescription(GRAPH_ELEMENT_TYPE_WF_CHECKBOX));
         continue;
        }
      //--- Set the left center alignment of the checkbox and the text
      obj.SetCheckAlign(ANCHOR_LEFT);
      obj.SetTextAlign(ANCHOR_LEFT);
      //--- Set the object text
      obj.SetText("CheckBox"+string(i+1));
     }
  }
//+------------------------------------------------------------------+
Así que ahora primero crearemos una lista de objetos, y luego estableceremos los parámetros necesarios para cada objeto en un ciclo por el número de objetos creados.
El método ahora resulta más corto y legible.
Clases de objetos WinForms ListBox y ButtonListBox
Vamos a crear la nueva clase de objeto Winforms ListBox.
Este objeto será una simple lista de texto en la que podremos seleccionar un elemento de una lista. Como necesitamos que las filas de la lista puedan interactuar con el ratón, y el objeto etiqueta de texto (clase de la biblioteca CLabel) no tiene esa funcionalidad, será lógico utilizar la clase de objetos de botón para representar la lista. Estos pueden responder al pasar el ratón por encima y ser seleccionados (pulsando un botón).
Simplemente, para que los botones parezcan elementos de una lista de texto, deberemos hacer que el color de su marco sea igual al color de fondo. En este caso, el botón se fundirá con el fondo y solo será visible el texto que contiene. Al mover el puntero sobre el área del botón (visualmente en el rótulo), el color de fondo del rótulo cambiará. Y cuando cliquemos en el rótulo (botón), este quedará resaltado (botón pulsado).
Para que una lista creada a partir de botones se comporte como un ListBox en MS Visual Studio, deberemos hacer que todos los botones de la lista se agrupen (establecer una bandera de grupo para ellos) y hacerlos botones de radio (con posibilidad de tener dos estados - on/off). A cada botón (fila de la lista) se le asignará un número de grupo correspondiente al número de grupo del panel, y la bandera del grupo establecido para cada uno de los botones de la lista impedirá que se deseleccione el elemento de la lista seleccionado.
En el directorio de la biblioteca \MQL5\Include\DoEasy\Objects\Graph\WForms\Common Controls\ crearemos el nuevo archivo Button.mqh de la clase CButton.
La clase deberá heredar de la clase CCheckBox y su archivo deberá incluirse en el archivo de la clase que estamos creando:
//+------------------------------------------------------------------+
//|                                                      ListBox.mqh |
//|                                  Copyright 2022, MetaQuotes Ltd. |
//|                             https://mql5.com/en/users/artmedia70 |
//+------------------------------------------------------------------+
#property copyright "Copyright 2022, MetaQuotes Ltd."
#property link      "https://mql5.com/en/users/artmedia70"
#property version   "1.00"
#property strict    // Necessary for mql4
//+------------------------------------------------------------------+
//| Include files                                                    |
//+------------------------------------------------------------------+
#include "ElementsListBox.mqh"
//+------------------------------------------------------------------+
//| Class of the base object of the WForms control list              |
//+------------------------------------------------------------------+
class CListBox : public CElementsListBox
  {
  }
En la sección privada de la clase, declararemos un método virtual para crear el nuevo objeto gráfico, y en la sección pública, el método para crear la lista y el constructor paramétrico:
//+------------------------------------------------------------------+
//| Class of the base object of the WForms control list              |
//+------------------------------------------------------------------+
class CListBox : public CElementsListBox
  {
private:
//--- Create a new graphical object
   virtual CGCnvElement *CreateNewGObject(const ENUM_GRAPH_ELEMENT_TYPE type,
                                          const int element_num,
                                          const string name,
                                          const int x,
                                          const int y,
                                          const int w,
                                          const int h,
                                          const color colour,
                                          const uchar opacity,
                                          const bool movable,
                                          const bool activity);
public:
//--- Create a list from the specified number of rows (Label objects)
   void              CreateList(const int line_count);
//--- Constructor
                     CListBox(const long chart_id,
                              const int subwindow,
                              const string name,
                              const int x,
                              const int y,
                              const int w,
                              const int h);
  };
//+------------------------------------------------------------------+
En el constructor paramétrico, indicaremos el tipo de elemento gráfico y el tipo de objeto de la biblioteca, y estableceremos los valores por defecto para el marco del objeto, el color del marco y el texto, además de prohibir la creación de varias columnas y establecer la anchura de la columna en cero:
//+------------------------------------------------------------------+
//| Constructor indicating the chart and subwindow ID                |
//+------------------------------------------------------------------+
CListBox::CListBox(const long chart_id,
                   const int subwindow,
                   const string name,
                   const int x,
                   const int y,
                   const int w,
                   const int h) : CElementsListBox(chart_id,subwindow,name,x,y,w,h)
  {
   CGBaseObj::SetTypeElement(GRAPH_ELEMENT_TYPE_WF_LIST_BOX);
   CGCnvElement::SetProperty(CANV_ELEMENT_PROP_TYPE,GRAPH_ELEMENT_TYPE_WF_LIST_BOX);
   this.m_type=OBJECT_DE_TYPE_GWF_COMMON;
   this.SetBorderSizeAll(1);
   this.SetBorderStyle(FRAME_STYLE_SIMPLE);
   this.SetBorderColor(CLR_DEF_BORDER_COLOR,true);
   this.SetForeColor(CLR_DEF_FORE_COLOR,true);
   this.SetMultiColumn(false);
   this.SetColumnWidth(0);
  }
//+------------------------------------------------------------------+
Método que crea una lista con un número determinado de filas:
//+--------------------------------------------------------------------+
//| Create the list from the specified number of rows (Button objects) |
//+--------------------------------------------------------------------+
void CListBox::CreateList(const int count)
  {
//--- Create the pointer to the Button object
   CButton *obj=NULL;
//--- Create the specified number of Button objects
   CElementsListBox::CreateElements(GRAPH_ELEMENT_TYPE_WF_BUTTON,count,2,2,this.Width()-4,12,0,false);
//--- In the loop by the created number of objects
   for(int i=0;i<this.ElementsTotal();i++)
     {
      //--- Get the created object from the list by the loop index
      obj=this.GetElement(i);
      //--- If the object could not be obtained, send the appropriate message to the log and move on to the next one
      if(obj==NULL)
        {
         ::Print(DFUN,MSG_ELM_LIST_ERR_FAILED_GET_GRAPH_ELEMENT_OBJ,this.TypeElementDescription(GRAPH_ELEMENT_TYPE_WF_BUTTON));
         continue;
        }
      //--- Set left center text alignment
      obj.SetTextAlign(ANCHOR_LEFT);
      //--- Set the object text
      obj.SetFontSize(8);
      obj.SetText("ListBoxItem"+string(i+1));
      //--- Set the frame colors equal to the background colors and the flag of the toggle button
      obj.SetBorderColor(obj.BackgroundColor(),true);
      obj.SetBorderColorMouseDown(obj.BackgroundColorMouseDown());
      obj.SetBorderColorMouseOver(obj.BackgroundColorMouseOver());
      obj.SetToggleFlag(true);
      obj.SetGroupButtonFlag(true);
     }
  }
//+------------------------------------------------------------------+
El método es idéntico al método del objeto CheckedListBox rediseñado que hemos comentado anteriormente. En él, los objetos botón se crearán como filas, y el color del marco se establecerá para que se mezcle con el color de fondo. Para cada botón creado, se establecerá la bandera del botón de interruptor y la bandera del botón que opera en el grupo. El número de grupo de cada botón se heredará del panel en el que están colocados.
Método virtual para crear un nuevo objeto gráfico:
//+------------------------------------------------------------------+
//| Create a new graphical object                                    |
//+------------------------------------------------------------------+
CGCnvElement *CListBox::CreateNewGObject(const ENUM_GRAPH_ELEMENT_TYPE type,
                                         const int obj_num,
                                         const string obj_name,
                                         const int x,
                                         const int y,
                                         const int w,
                                         const int h,
                                         const color colour,
                                         const uchar opacity,
                                         const bool movable,
                                         const bool activity)
  {
   string name=this.CreateNameDependentObject(obj_name);
//--- create the Button object
   CGCnvElement *element=new CButton(this.ChartID(),this.SubWindow(),name,x,y,w,h);
   if(element==NULL)
      ::Print(DFUN,CMessage::Text(MSG_LIB_SYS_FAILED_CREATE_ELM_OBJ),": ",name);
//--- set the object relocation flag and relative coordinates
   element.SetMovable(movable);
   element.SetCoordXRelative(element.CoordX()-this.CoordX());
   element.SetCoordYRelative(element.CoordY()-this.CoordY());
   return element;
  }
//+------------------------------------------------------------------+
El método crea un objeto botón y establece los parámetros mínimos para el mismo: la bandera de desplazamiento y las coordenadas relativas del objeto.
Ahora mismo, eso todo lo que se necesita para que esta clase funcione. Naturalmente, ampliaremos nuestras clases de objetos de lista con la funcionalidad necesaria para recuperar los objetos seleccionados y enviar mensajes, pero lo haremos un poco más adelante.
Ahora vamos a crear la clase de objeto de lista de los objetos de botón. Dicho objeto combinará los botones creados en el panel. Podremos asignar los botones a diferentes grupos, y también establecer las banderas de grupo y otras propiedades para ellos. De este modo, podremos crear diferentes grupos de botones en el mismo objeto (en el mismo panel).
En la carpeta de la biblioteca \MQL5\Include\DoEasy\Objects\Graph\WForms\Common Controls\, crearemos el nuevo archivo Button.mqh de la clase CButton
La clase deberá heredar de la clase CCheckBox y su archivo deberá incluirse en el archivo de la clase que estamos creando:
//+------------------------------------------------------------------+
//|                                                ButtonListBox.mqh |
//|                                  Copyright 2022, MetaQuotes Ltd. |
//|                             https://mql5.com/en/users/artmedia70 |
//+------------------------------------------------------------------+
#property copyright "Copyright 2022, MetaQuotes Ltd."
#property link      "https://mql5.com/en/users/artmedia70"
#property version   "1.00"
#property strict    // Necessary for mql4
//+------------------------------------------------------------------+
//| Include files                                                    |
//+------------------------------------------------------------------+
#include "ElementsListBox.mqh"
//+------------------------------------------------------------------+
//| ButtonListBox object class of WForms controls                    |
//+------------------------------------------------------------------+
class CButtonListBox : public CElementsListBox
  {
  }
En la sección privada de la clase, declaramos el método para crear un nuevo objeto gráfico, y en la sección pública, declaramos el método para crear el número especificado de botones, un constructor paramétrico y los métodos para trabajar con los botones creados en el panel:
//+------------------------------------------------------------------+
//| ButtonListBox object class of WForms controls                    |
//+------------------------------------------------------------------+
class CButtonListBox : public CElementsListBox
  {
private:
//--- Create a new graphical object
   virtual CGCnvElement *CreateNewGObject(const ENUM_GRAPH_ELEMENT_TYPE type,
                                          const int element_num,
                                          const string name,
                                          const int x,
                                          const int y,
                                          const int w,
                                          const int h,
                                          const color colour,
                                          const uchar opacity,
                                          const bool movable,
                                          const bool activity);
public:
//--- Create the specified number of CheckBox objects
   void              CreateButton(const int count,const int width,const int height,const int new_column_width=0);
//--- Constructor
                     CButtonListBox(const long chart_id,
                                    const int subwindow,
                                    const string name,
                                    const int x,
                                    const int y,
                                    const int w,
                                    const int h);

//--- (1) Set and (2) return the group of the button specified by index
   void              SetButtonGroup(const int index,const int group);
   int               ButtonGroup(const int index);
//--- (1) Set and (2) return the flag of the group button specified by the button index
   void              SetButtonGroupFlag(const int index,const bool flag);
   bool              ButtonGroupFlag(const int index);
//--- Sets the specified button "multiselect" mode
   void              SetMultiSelect(const bool flag);
//--- (1) Set and (2) return the "Toggle button" flag of the button specified by index
   void              SetButtonToggle(const int index,const bool flag);
   bool              ButtonToggle(const int index);
//--- Set the "Toggle button" flag for all buttons of the object
   void              SetToggle(const bool flag);

  };
//+------------------------------------------------------------------+
Echemos un vistazo a los métodos declarados.
En el constructor paramétrico, indicaremos el tipo de elemento gráfico, el tipo de objeto de la biblioteca, y estableceremos los valores por defecto para el marco del panel, su color y estilo, y el color para los textos de los objetos en el panel:
//+------------------------------------------------------------------+
//| Constructor indicating the chart and subwindow ID                |
//+------------------------------------------------------------------+
CButtonListBox::CButtonListBox(const long chart_id,
                               const int subwindow,
                               const string name,
                               const int x,
                               const int y,
                               const int w,
                               const int h) : CElementsListBox(chart_id,subwindow,name,x,y,w,h)
  {
   CGBaseObj::SetTypeElement(GRAPH_ELEMENT_TYPE_WF_BUTTON_LIST_BOX);
   CGCnvElement::SetProperty(CANV_ELEMENT_PROP_TYPE,GRAPH_ELEMENT_TYPE_WF_BUTTON_LIST_BOX);
   this.m_type=OBJECT_DE_TYPE_GWF_COMMON;
   this.SetBorderSizeAll(1);
   this.SetBorderStyle(FRAME_STYLE_SIMPLE);
   this.SetBorderColor(CLR_DEF_BORDER_COLOR,true);
   this.SetForeColor(CLR_DEF_FORE_COLOR,true);
  }
//+------------------------------------------------------------------+
Método que crea el número indicado de objetos Button:
//+------------------------------------------------------------------+
//| Create the specified number of Button objects                    |
//+------------------------------------------------------------------+
void CButtonListBox::CreateButton(const int count,const int width,const int height,const int new_column_width=0)
  {
//--- Create the pointer to the Button object
   CButton *obj=NULL;
//--- Create the specified number of Button objects
   CElementsListBox::CreateElements(GRAPH_ELEMENT_TYPE_WF_BUTTON,count,2,2,width,height,new_column_width);
//--- In the loop by the created number of objects
   for(int i=0;i<this.ElementsTotal();i++)
     {
      //--- Get the created object from the list by the loop index
      obj=this.GetElement(i);
      //--- If the object could not be obtained, send the appropriate message to the log and move on to the next one
      if(obj==NULL)
        {
         ::Print(DFUN,MSG_ELM_LIST_ERR_FAILED_GET_GRAPH_ELEMENT_OBJ,this.TypeElementDescription(GRAPH_ELEMENT_TYPE_WF_BUTTON));
         continue;
        }
      //--- Set left center text alignment
      obj.SetTextAlign(ANCHOR_CENTER);
      //--- Set the object text
      obj.SetText("Button"+string(i+1));
     }
  }
//+------------------------------------------------------------------+
El método resulta idéntico al método de los objetos de lista que hemos comentado anteriormente. Primero se crea un número determinado de objetos de botón y luego, en un ciclo por el número de objetos creados, se establecen sus valores por defecto.
Método virtual para crear un nuevo objeto gráfico:
//+------------------------------------------------------------------+
//| Create a new graphical object                                    |
//+------------------------------------------------------------------+
CGCnvElement *CButtonListBox::CreateNewGObject(const ENUM_GRAPH_ELEMENT_TYPE type,
                                               const int obj_num,
                                               const string obj_name,
                                               const int x,
                                               const int y,
                                               const int w,
                                               const int h,
                                               const color colour,
                                               const uchar opacity,
                                               const bool movable,
                                               const bool activity)
  {
   string name=this.CreateNameDependentObject(obj_name);
//--- create the CButton object
   CGCnvElement *element=new CButton(this.ChartID(),this.SubWindow(),name,x,y,w,h);
   if(element==NULL)
      ::Print(DFUN,CMessage::Text(MSG_LIB_SYS_FAILED_CREATE_ELM_OBJ),": ",name);
//--- set the object relocation flag and relative coordinates
   element.SetMovable(movable);
   element.SetCoordXRelative(element.CoordX()-this.CoordX());
   element.SetCoordYRelative(element.CoordY()-this.CoordY());
   return element;
  }
//+------------------------------------------------------------------+
Esto se da exactamente igual que en los métodos similares de las clases de los objetos de lista.
Método que establece el grupo en el botón especificado según el índice:
//+------------------------------------------------------------------+
//| Set the group of the button specified by index                   |
//+------------------------------------------------------------------+
void CButtonListBox::SetButtonGroup(const int index,const int group)
  {
   CButton *butt=this.GetElement(index);
   if(butt==NULL)
     {
      ::Print(DFUN,CMessage::Text(MSG_BUTT_LIST_ERR_FAILED_SET_GROUP_BUTTON),(string)index);
      return;
     }
   butt.SetGroup(group);
  }
//+------------------------------------------------------------------+
Recuperamos un objeto de la lista según el índice especificado. Si el objeto no ha podido ser recuperado, informaremos sobre ello en el registro y saldremos del método.
A continuación, asignaremos a este objeto el número de grupo transmitido al método.
Método que retorna el grupo del botón especificado según el índice:
//+------------------------------------------------------------------+
//| Return the group of the button specified by index                |
//+------------------------------------------------------------------+
int CButtonListBox::ButtonGroup(const int index)
  {
   CButton *butt=this.GetElement(index);
   return(butt!=NULL ? butt.Group() : WRONG_VALUE);
  }
//+------------------------------------------------------------------+
Después recuperaremos un objeto según un índice de la lista. Si obtenemos el objeto, retornaremos su grupo, en caso contrario, retornaremos -1.
Método que establece la bandera del botón de grupo en el botón especificado según el índice:
//+------------------------------------------------------------------+
//| Set the flag of the group button specified by the button index   |
//+------------------------------------------------------------------+
void CButtonListBox::SetButtonGroupFlag(const int index,const bool flag)
  {
   CButton *butt=this.GetElement(index);
   if(butt==NULL)
     {
      ::Print(DFUN,CMessage::Text(MSG_BUTT_LIST_ERR_FAILED_SET_GROUP_BUTTON),(string)index);
      return;
     }
   butt.SetGroupButtonFlag(flag);
  }
//+------------------------------------------------------------------+
Recuperamos un objeto de la lista según el índice especificado. Si el objeto no ha podido ser recuperado, informaremos sobre ello en el registro y saldremos del método.
Luego, asignaremos al objeto recibido la bandera transmitida al método.
Método que retorna la bandera del botón del grupo especificado por el índice del botón:
//+------------------------------------------------------------------+
//| Return the flag of the group button specified by the button index|
//+------------------------------------------------------------------+
bool CButtonListBox::ButtonGroupFlag(const int index)
  {
   CButton *butt=this.GetElement(index);
   return(butt!=NULL ? butt.GroupButtonFlag() : false);
  }
//+------------------------------------------------------------------+
Recuperamos un objeto de la lista según el índice especificado. Si obtenemos el objeto, retornaremos la bandera del botón de grupo, en caso contrario, retornaremos false.
Método que establece para los botones el modo "multiselección":
//+------------------------------------------------------------------+
//| Set the "multiselect" mode of the buttons                        |
//+------------------------------------------------------------------+
void CButtonListBox::SetMultiSelect(const bool flag)
  {
   int group=this.Group()+(flag ? 1 : 0);
   for(int i=0;i<this.ElementsTotal();i++)
      this.SetButtonGroup(i,group+(flag ? i : 0));
  }
//+------------------------------------------------------------------+
Este método permite que los botones del panel funcionen de forma independiente, de modo que cada uno de ellos pueda ser pulsado/soltado independientemente de los demás botones del panel. Para ello, deberemos asignar a cada botón su propio grupo.
En primer lugar, estableceremos el valor inicial del primer grupo de botones como el grupo de paneles más 1 si deseamos permitir la multiselección de los botones, o 0 si los botones deben ser dependientes entre sí. A continuación, en el ciclo por todos los botones creados, estableceremos un nuevo grupo para cada botón subsiguiente calculado como el número de grupo del panel más el índice del ciclo, lo cual significará que cada botón tendrá un grupo igual a la posición del botón en la lista+1, o añadiremos cero al número de grupo del panel, lo cual significará que todos los botones tendrán un grupo igual al grupo del panel.
Método que asigna la bandera "Botón de interruptor" al botón indicado según el índice:
//+------------------------------------------------------------------+
//| Set the "Toggle button" flag                                     |
//| button specified by index                                        |
//+------------------------------------------------------------------+
void CButtonListBox::SetButtonToggle(const int index,const bool flag)
  {
   CButton *butt=this.GetElement(index);
   if(butt==NULL)
     {
      ::Print(DFUN,CMessage::Text(MSG_BUTT_LIST_ERR_FAILED_SET_TOGGLE_BUTTON),(string)index);
      return;
     }
   butt.SetToggleFlag(flag);
  }
//+------------------------------------------------------------------+
A continuación, obtendremos el botón según el índice especificado de la lista. Si no se puede obtener el botón, lo notificaremos al diario de registro y abandonaremos el método.
Luego, estableceremos una bandera para el botón transmitido al método.
Método que retorna la bandera "Botón de interruptor" al botón indicado según el índice:
//| Return the "Toggle button" flag                                  |
//| button specified by index                                        |
//+------------------------------------------------------------------+
bool CButtonListBox::ButtonToggle(const int index)
  {
   CButton *butt=this.GetElement(index);
   return(butt!=NULL ? butt.Toggle() : false);
  }
//+------------------------------------------------------------------+
A continuación, obtendremos el botón según el índice especificado de la lista. Si obtenemos el botón, retornaremos su bandera de botón de interruptor, en caso contrario, retornaremos false.
Método que establece la bandera "Botón de interruptor" para todos los botones del objeto:
//+------------------------------------------------------------------+
//| Set the "Toggle button" flag to all buttons of the object        |
//+------------------------------------------------------------------+
void CButtonListBox::SetToggle(const bool flag)
  {
   for(int i=0;i<this.ElementsTotal();i++)
      this.SetButtonToggle(i,flag);
  }
//+------------------------------------------------------------------+
En un ciclo por todos los objetos de la lista, estableceremos para cada botón la bandera especificada usando el método SetButtonToggle() anteriormente analizado.
Ya hemos creado todos los objetos previstos para hoy.
Ahora tenemos que hacer que la biblioteca los "reconozca" para poder crearlos desde nuestros programas.
En el archivo \MQL5\Include\DoEasy\Objects\Graph\WForms\Containers\Container.mqh del contenedor de objetos básico, escribiremos pequeñas modificaciones: no necesitaremos crear nuevos objetos directamente dentro del contenedor más adelante, sino añadirle los objetos ya creados. Para simplificar esta acción, necesitaremos dividir el método que crea el nuevo objeto adjunto en dos: un método creará el nuevo objeto, y el otro establecerá algunas propiedades por defecto para el mismo. Al añadir un objeto, no crearemos uno nuevo, sino que añadiremos el objeto especificado a la lista y modificaremos sus parámetros si fuera necesario.
En la sección protegida de la clase, declararemos un nuevo método para asignar los parámetros al objeto creado:
protected:
//--- Adjust the element size to fit its content
   bool              AutoSizeProcess(const bool redraw);
//--- Set parameters for the attached object
   void              SetObjParams(CWinFormBase *obj,const color colour);

public:
Escribiremos su implementación fuera del cuerpo de la clase:
//+------------------------------------------------------------------+
//| Set parameters for the attached object                           |
//+------------------------------------------------------------------+
void CContainer::SetObjParams(CWinFormBase *obj,const color colour)
  {
//--- Set the text color of the object to be the same as that of the base container
   obj.SetForeColor(this.ForeColor(),true);
//--- If the created object is not a container, set the same group for it as the one for its base object
   if(obj.TypeGraphElement()<GRAPH_ELEMENT_TYPE_WF_CONTAINER || obj.TypeGraphElement()>GRAPH_ELEMENT_TYPE_WF_GROUPBOX)
      obj.SetGroup(this.Group());
//--- Depending on the object type
   switch(obj.TypeGraphElement())
     {
      //--- For the Container, Panel and GroupBox WinForms objects
      case GRAPH_ELEMENT_TYPE_WF_CONTAINER         :
      case GRAPH_ELEMENT_TYPE_WF_PANEL             :
      case GRAPH_ELEMENT_TYPE_WF_GROUPBOX          :
        //--- set the frame color equal to the background color
        obj.SetBorderColor(obj.BackgroundColor(),true);
        break;
      //--- For "Label", "CheckBox" and "RadioButton" WinForms objects
      case GRAPH_ELEMENT_TYPE_WF_LABEL             :
      case GRAPH_ELEMENT_TYPE_WF_CHECKBOX          :
      case GRAPH_ELEMENT_TYPE_WF_RADIOBUTTON       :
        //--- set the object text color depending on the one passed to the method:
        //--- either the container text color, or the one passed to the method.
        //--- The frame color is set equal to the text color
        //--- Set the background color to transparent
        obj.SetForeColor(colour==clrNONE ? this.ForeColor() : colour,true);
        obj.SetBorderColor(obj.ForeColor(),true);
        obj.SetBackgroundColor(CLR_CANV_NULL,true);
        obj.SetOpacity(0,false);
        break;
      //--- For the Button WinForms object
      case GRAPH_ELEMENT_TYPE_WF_BUTTON            :
        //--- set the object text color as a container text color depending on the one passed to the method:
        //--- set the background color depending on the one passed to the method:
        //--- either the default standard control background color, or the one passed to the method.
        //--- The frame color is set equal to the text color
        obj.SetForeColor(this.ForeColor(),true);
        obj.SetBackgroundColor(colour==clrNONE ? CLR_DEF_CONTROL_STD_BACK_COLOR : colour,true);
        obj.SetBorderColor(obj.ForeColor(),true);
        obj.SetBorderStyle(FRAME_STYLE_SIMPLE);
        break;
      //--- For "ListBox", "CheckedListBox" and "ButtonListBox" WinForms object
      case GRAPH_ELEMENT_TYPE_WF_LIST_BOX          :
      case GRAPH_ELEMENT_TYPE_WF_CHECKED_LIST_BOX  :
      case GRAPH_ELEMENT_TYPE_WF_BUTTON_LIST_BOX   :
        //--- set the object text color as a container text color depending on the one passed to the method:
        //--- set the background color depending on the one passed to the method:
        //--- either the default standard control background color, or the one passed to the method.
        //--- The frame color is set equal to the text color
        obj.SetBackgroundColor(colour==clrNONE ? CLR_DEF_CONTROL_STD_BACK_COLOR : colour,true);
        obj.SetBorderColor(CLR_DEF_BORDER_COLOR,true);
        obj.SetForeColor(CLR_DEF_FORE_COLOR,true);
        break;
      default:
        break;
     }
  }
//+------------------------------------------------------------------+
Aquí simplemente hemos trasladado el bloque de código que establece los parámetros para el objeto desde el método CreateNewElement(). Luego transmitiremos el puntero al objeto creado, así como el color transmitido al método CreateNewElement(). Aquí también hemos añadido el procesamiento de los nuevos objetos, que coincidirá con el procesamiento del objeto CheckedListBox creado anteriormente. Así que no hemos tenido que escribir nada extra: solo hemos especificado que estos objetos se procesan de forma similar al objeto CheckedListBox, en el mismo caso del interruptor switch.
Vamos a rehacer el método que crea un nuevo elemento vinculado:
//+------------------------------------------------------------------+
//| Create a new attached element                                    |
//+------------------------------------------------------------------+
bool CContainer::CreateNewElement(const ENUM_GRAPH_ELEMENT_TYPE element_type,
                                  const int x,
                                  const int y,
                                  const int w,
                                  const int h,
                                  const color colour,
                                  const uchar opacity,
                                  const bool activity,
                                  const bool redraw)
  {
//--- If the object type is less than the base WinForms object
   if(element_type<GRAPH_ELEMENT_TYPE_WF_BASE)
     {
      //--- report the error and return 'false'
      CMessage::ToLog(DFUN,MSG_PANEL_OBJECT_ERR_OBJ_MUST_BE_WFBASE);
      return false;
     }
//--- If failed to create a new graphical element, return 'false'
   CWinFormBase *obj=CForm::CreateAndAddNewElement(element_type,x,y,w,h,colour,opacity,activity);
   if(obj==NULL)
      return false;
//--- Set parameters for the created object
   this.SetObjParams(obj,colour);
//--- If the panel has auto resize enabled and features bound objects, call the resize method
   if(this.AutoSize() && this.ElementsTotal()>0)
      this.AutoSizeProcess(redraw);
//--- Redraw the panel and all added objects, and return 'true'
   this.Redraw(redraw);
   return true;
  }
//+------------------------------------------------------------------+
En lugar del bloque de código que trasladamos al nuevo método, ahora tenemos una llamada a este nuevo método. En consecuencia, el código será más corto, sencillo y claro, y ahora podremos usar esta división de un método en dos para unir los objetos ya creados a la lista.
Vamos a mejorar la clase del objeto de panel en el archivo \MQL5\Include\DoEasy\Objects\Graph\WForms\Containers\Panel.mqh.
En la lista de objetos a incluir, añadiremos los archivos de los nuevos objetos creados hoy:
//+------------------------------------------------------------------+
//| Include files                                                    |
//+------------------------------------------------------------------+
#include "Container.mqh"
#include "GroupBox.mqh"
#include "..\..\WForms\Common Controls\ListBox.mqh"
#include "..\..\WForms\Common Controls\CheckedListBox.mqh"
#include "..\..\WForms\Common Controls\ButtonListBox.mqh"
//+------------------------------------------------------------------+
En el método que crea un nuevo objeto gráfico, añadiremos un bloque de código para crear el objeto de etiqueta de texto:
//+------------------------------------------------------------------+
//| Create a new graphical object                                    |
//+------------------------------------------------------------------+
CGCnvElement *CPanel::CreateNewGObject(const ENUM_GRAPH_ELEMENT_TYPE type,
                                       const int obj_num,
                                       const string obj_name,
                                       const int x,
                                       const int y,
                                       const int w,
                                       const int h,
                                       const color colour,
                                       const uchar opacity,
                                       const bool movable,
                                       const bool activity)
  {
   string name=this.CreateNameDependentObject(obj_name);
   CGCnvElement *element=NULL;
   switch(type)
     {
      case GRAPH_ELEMENT_TYPE_ELEMENT :
         element=new CGCnvElement(type,this.ID(),obj_num,this.ChartID(),this.SubWindow(),name,x,y,w,h,colour,opacity,movable,activity);
        break;
      case GRAPH_ELEMENT_TYPE_FORM :
         element=new CForm(this.ChartID(),this.SubWindow(),name,x,y,w,h);
        break;
      case GRAPH_ELEMENT_TYPE_WF_CONTAINER         :
         element=new CContainer(this.ChartID(),this.SubWindow(),name,x,y,w,h);
        break;
      case GRAPH_ELEMENT_TYPE_WF_GROUPBOX          :
         element=new CGroupBox(this.ChartID(),this.SubWindow(),name,x,y,w,h);
        break;
      case GRAPH_ELEMENT_TYPE_WF_PANEL             :
         element=new CPanel(this.ChartID(),this.SubWindow(),name,x,y,w,h);
        break;
      case GRAPH_ELEMENT_TYPE_WF_LABEL             :
         element=new CLabel(this.ChartID(),this.SubWindow(),name,x,y,w,h);
        break;
      case GRAPH_ELEMENT_TYPE_WF_CHECKBOX          :
         element=new CCheckBox(this.ChartID(),this.SubWindow(),name,x,y,w,h);
        break;
      case GRAPH_ELEMENT_TYPE_WF_RADIOBUTTON       :
         element=new CRadioButton(this.ChartID(),this.SubWindow(),name,x,y,w,h);
        break;
      case GRAPH_ELEMENT_TYPE_WF_BUTTON            :
         element=new CButton(this.ChartID(),this.SubWindow(),name,x,y,w,h);
        break;
      case GRAPH_ELEMENT_TYPE_WF_LIST_BOX          :
         element=new CCheckedListBox(this.ChartID(),this.SubWindow(),name,x,y,w,h);
        break;
      case GRAPH_ELEMENT_TYPE_WF_CHECKED_LIST_BOX  :
         element=new CCheckedListBox(this.ChartID(),this.SubWindow(),name,x,y,w,h);
        break;
      case GRAPH_ELEMENT_TYPE_WF_BUTTON_LIST_BOX   :
         element=new CButtonListBox(this.ChartID(),this.SubWindow(),name,x,y,w,h);
        break;
      default:
        break;
     }
   if(element==NULL)
      ::Print(DFUN,CMessage::Text(MSG_LIB_SYS_FAILED_CREATE_ELM_OBJ),": ",name);
   return element;
  }
//+------------------------------------------------------------------+
Hemos añadido cambios idénticos para crear nuevos objetos al mismo método CreateNewGObject() de la clase de objeto de contenedor GroupBox
en el archivo \MQL5\Include\DoEasy\Objects\Graph\WForms\Containers\GroupBox.mqh. No los vamos a analizar aquí: podrá encontrar estos cambios en los archivos adjuntos al artículo.
Vamos a incluir el archivo de la clase de objeto ButtonListBox en el archivo \MQL5\Include\DoEasy\Collections\GraphElementsCollection.mqh de la clase de colección de elementos gráficos:
//+------------------------------------------------------------------+
//| Include files                                                    |
//+------------------------------------------------------------------+
#include "ListObj.mqh"
#include "..\Services\Select.mqh"
#include "..\Objects\Graph\WForms\Containers\GroupBox.mqh"
#include "..\Objects\Graph\WForms\Containers\Panel.mqh"
#include "..\Objects\Graph\WForms\Common Controls\CheckedListBox.mqh"
#include "..\Objects\Graph\WForms\Common Controls\ButtonListBox.mqh"
#include "..\Objects\Graph\Standard\GStdVLineObj.mqh"
Todos los demás objetos creados hoy serán visibles en los programas creados a partir de la biblioteca.
Eso es todo, ya hemos implementado todos los objetos y mejoras previstos para hoy.
Simulación
Para la prueba, tomaremos el asesor del artículo anterior y lo guardaremos en la nueva carpeta \MQL5\Experts\TestDoEasy\Part112\ con el nuevo nombre TstDE112.mq5.
¿Cómo realizaremos la prueba? En el segundo grupo de objetos GroupBox2, crearemos los nuevos objetos de lista ButtonListBox y ListBox. El último objeto y sus coordenadas de ubicación en el contenedor dependerán del aspecto de los objetos CheckedListBox y ButtonListBox. Si la opción que permite construir listas en múltiples columnas está activada para ellos, el objeto ListBox se encontrará en la parte inferior, de lo contrario, estará a la derecha de los dos primeros.
Asimismo, comprobaremos el funcionamiento de los botones de grupo, es decir, la posibilidad de accionarlos en diferentes grupos y la posibilidad de que un botón quede libre después de ser pulsado nuevamente.
Vamos a añadir a las variables de entrada del asesor dos nuevos parámetros:
//--- input parameters
sinput   bool                          InpMovable           =  true;                   // Panel Movable flag
sinput   ENUM_INPUT_YES_NO             InpAutoSize          =  INPUT_YES;              // Panel Autosize
sinput   ENUM_AUTO_SIZE_MODE           InpAutoSizeMode      =  AUTO_SIZE_MODE_GROW;    // Panel Autosize mode
sinput   ENUM_BORDER_STYLE             InpFrameStyle        =  BORDER_STYLE_SIMPLE;    // Label border style
sinput   ENUM_ANCHOR_POINT             InpTextAlign         =  ANCHOR_CENTER;          // Label text align
sinput   ENUM_INPUT_YES_NO             InpTextAutoSize      =  INPUT_NO;               // Label autosize
sinput   ENUM_ANCHOR_POINT             InpCheckAlign        =  ANCHOR_LEFT;            // Check flag align
sinput   ENUM_ANCHOR_POINT             InpCheckTextAlign    =  ANCHOR_LEFT;            // Check label text align
sinput   ENUM_CHEK_STATE               InpCheckState        =  CHEK_STATE_UNCHECKED;   // Check flag state
sinput   ENUM_INPUT_YES_NO             InpCheckAutoSize     =  INPUT_YES;              // CheckBox autosize
sinput   ENUM_BORDER_STYLE             InpCheckFrameStyle   =  BORDER_STYLE_NONE;      // CheckBox border style
sinput   ENUM_ANCHOR_POINT             InpButtonTextAlign   =  ANCHOR_CENTER;          // Button text align
sinput   ENUM_INPUT_YES_NO             InpButtonAutoSize    =  INPUT_YES;              // Button autosize
sinput   ENUM_AUTO_SIZE_MODE           InpButtonAutoSizeMode=  AUTO_SIZE_MODE_GROW;    // Button Autosize mode
sinput   ENUM_BORDER_STYLE             InpButtonFrameStyle  =  BORDER_STYLE_NONE;      // Button border style
sinput   bool                          InpButtonToggle      =  false;                  // Button toggle flag
sinput   bool                          InpListBoxMColumn    =  false;                  // ListBox MultiColumn flag
sinput   bool                          InpButtListMSelect   =  false;                  // ButtonListBox Button MultiSelect flag
//--- global variables
CEngine        engine;
color          array_clr[];
//+------------------------------------------------------------------+
El primero indicará la posibilidad de crear una lista en varias columnas (si todos los objetos no caben en la altura del panel); el segundo especificará la posibilidad de realizar la selección múltiple de botones en el grupo.
En el manejador OnInit() del asesor, añadiremos un bloque de código para crear nuevos objetos (solo se mostrará parte del código):
      if(pnl.CreateNewElement(GRAPH_ELEMENT_TYPE_WF_GROUPBOX,x,2,w,h,C'0x91,0xAA,0xAE',0,true,false))
        {
         //--- get the pointer to the GroupBox object by its index in the list of bound GroupBox type objects
         gbox2=pnl.GetElementByType(GRAPH_ELEMENT_TYPE_WF_GROUPBOX,1);
         if(gbox2!=NULL)
           {
            //--- set the "indented frame" type, the frame color matches the main panel background color,
            //--- while the text color is the background color of the last attached panel darkened by 1
            gbox2.SetBorderStyle(FRAME_STYLE_STAMP);
            gbox2.SetBorderColor(pnl.BackgroundColor(),true);
            gbox2.SetForeColor(gbox2.ChangeColorLightness(obj.BackgroundColor(),-1),true);
            gbox2.SetText("GroupBox2");
            //--- Create the CheckedListBox object
            gbox2.CreateNewElement(GRAPH_ELEMENT_TYPE_WF_CHECKED_LIST_BOX,4,12,160,20,clrNONE,255,true,false);
            //--- get the pointer to the CheckedListBox object by its index in the list of bound objects of the CheckBox type
            CCheckedListBox *clbox=gbox2.GetElementByType(GRAPH_ELEMENT_TYPE_WF_CHECKED_LIST_BOX,0);
            //--- If CheckedListBox is created and the pointer to it is received
            if(clbox!=NULL)
              {
               clbox.SetMultiColumn(InpListBoxMColumn);
               clbox.SetColumnWidth(0);
               clbox.CreateCheckBox(4,66);
              }
            //--- Create the ButtonListBox object
            gbox2.CreateNewElement(GRAPH_ELEMENT_TYPE_WF_BUTTON_LIST_BOX,4,clbox.BottomEdgeRelative()+6,160,30,clrNONE,255,true,false);
            //--- get the pointer to the ButtonListBox object by its index in the list of attached objects of the Button type
            CButtonListBox *blbox=gbox2.GetElementByType(GRAPH_ELEMENT_TYPE_WF_BUTTON_LIST_BOX,0);
            //--- If ButtonListBox is created and the pointer to it is received
            if(blbox!=NULL)
              {
               blbox.SetMultiColumn(InpListBoxMColumn);
               blbox.SetColumnWidth(0);
               blbox.CreateButton(4,66,16);
               blbox.SetMultiSelect(InpButtListMSelect);
               blbox.SetToggle(InpButtonToggle);
               for(int i=0;i<blbox.ElementsTotal();i++)
                 {
                  blbox.SetButtonGroup(i,(i % 2==0 ? blbox.Group()+1 : blbox.Group()+2));
                  blbox.SetButtonGroupFlag(i,(i % 2==0 ? true : false));
                 }
              }
            //--- Create the ListBox object
            int lbx=4;
            int lby=blbox.BottomEdgeRelative()+6;
            int lbw=146;
            if(!InpListBoxMColumn)
              {
               lbx=blbox.RightEdgeRelative()+6;
               lby=14;
               lbw=100;
              }
            gbox2.CreateNewElement(GRAPH_ELEMENT_TYPE_WF_LIST_BOX,lbx,lby,lbw,70,clrNONE,255,true,false);
            //--- get the pointer to the ListBox object by its index in the list of attached objects of Button type
            CListBox *lbox=gbox2.GetElementByType(GRAPH_ELEMENT_TYPE_WF_LIST_BOX,0);
            //--- If ListBox has been created and the pointer to it has been received
            if(lbox!=NULL)
              {
               lbox.CreateList(4);
              }
           }
        }
      //--- Redraw all objects according to their hierarchy
      pnl.Redraw(true);
     }
//---
   return(INIT_SUCCEEDED);
  }
//+------------------------------------------------------------------+
Aquí crearemos dos nuevos objetos de lista en un objeto GroupBox2, y si se crean con éxito, crearemos cuatro objetos en cada uno de ellos.
El código completo del manejador OnInit() para el asesor se puede encontrar en los archivos adjuntos al artículo.
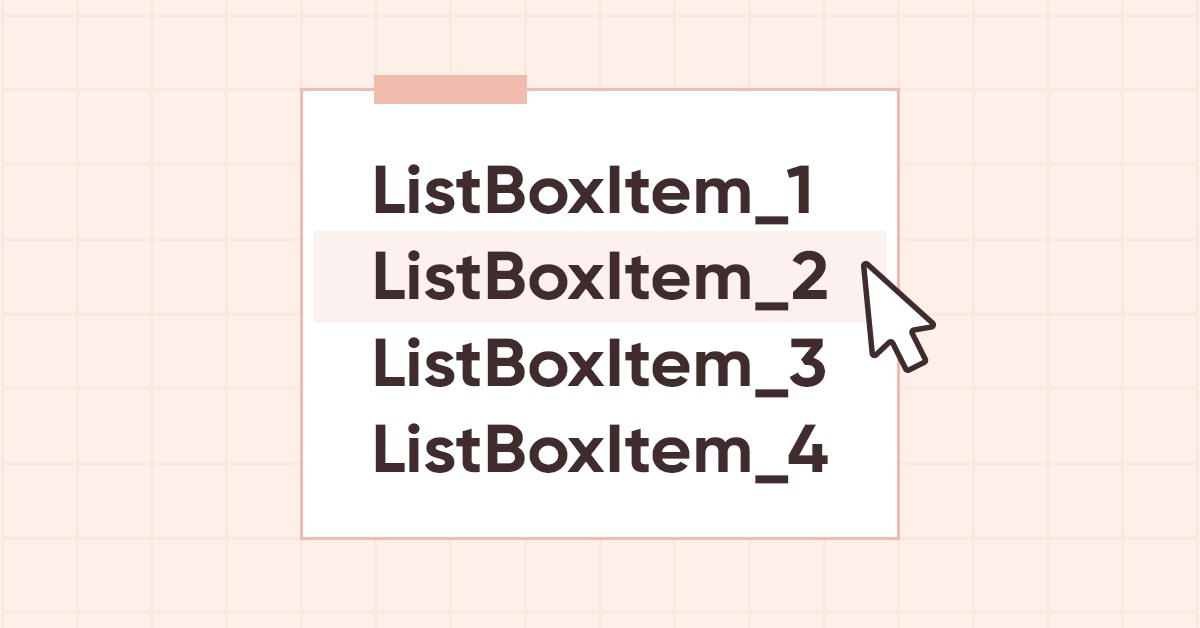
Vamos a compilar el asesor y ejecutarlo en el gráfico:

Aquí vemos que los dos botones superiores del objeto ButtonListBox funcionan de forma ligeramente diferente a los dos botones inferiores. Esto depende de las banderas establecidas. En el primer caso, se prohíbe que los botones se desactiven al volver a pulsarlos. Un botón solo se puede desactivar pulsando el segundo botón. En el segundo caso, sin embargo, el botón se puede desactivar pulsando el segundo botón o volviendo a pulsar el botón ya activado. Sobre esto influye la bandera del botón de grupo. Si se ha establecido, los botones serán completamente dependientes unos de otros, ya que funcionarán en grupo.
El objeto de lista funciona correctamente, pero su aspecto deja mucho que desear: en el MS Visual Studio original la lista está más comprimida, y los objetos están más juntos. Sin embargo, lo que nos impide hacer esto aquí es el hecho de que si colocamos los objetos más juntos, el color de fondo del objeto no siempre funcionará correctamente al interactuar con el ratón. Una vez que hayamos encontrado y corregido este "fallo", podremos retocar el aspecto de los objetos creados.
¿Qué es lo próximo?
En el próximo artículo, continuaremos desarrollando los elementos gráficos de la GUI de los programas creados a partir de la biblioteca.
*Artículos de esta serie:
DoEasy. Controles (Parte 1): Primeros pasos
DoEasy. Elementos de control (Parte 2): Continuamos trabajando con la clase CPanel
DoEasy. Elementos de control (Parte 3): Creando controles vinculados
DoEasy. Elementos de control (Parte 4): Elemento de control "Panel", parámetros Padding y Dock
DoEasy. Elementos de control (Parte 5): Objeto básico WinForms, control «Panel», parámetro AutoSize
DoEasy. Elementos de control (Parte 6): Control «Panel», cambio automático del tamaño del contenedor según el contenido interno
DoEasy. Elementos de control (Parte 7): Elemento de control «etiqueta de texto»
DoEasy. Elementos de control (Parte 8): Objetos básicos WinForms por categorías, controles "GroupBox" y "CheckBox
DoEasy. Elementos de control (Parte 9): Reorganizando los métodos de los objetos WinForms, los controles "RadioButton" y "Button"
DoEasy. Elementos de control (Parte 10): Objetos WinForms: dando vida a la interfaz
DoEasy. Elementos de control (Parte 11): Objetos WinForms: grupos, el objeto WinForms CheckedListBox
Traducción del ruso hecha por MetaQuotes Ltd.
Artículo original: https://www.mql5.com/ru/articles/11228
Advertencia: todos los derechos de estos materiales pertenecen a MetaQuotes Ltd. Queda totalmente prohibido el copiado total o parcial.
Este artículo ha sido escrito por un usuario del sitio web y refleja su punto de vista personal. MetaQuotes Ltd. no se responsabiliza de la exactitud de la información ofrecida, ni de las posibles consecuencias del uso de las soluciones, estrategias o recomendaciones descritas.

 Indicador CCI. Tres pasos para la transformación
 Experimentos con redes neuronales (Parte 2): Optimización inteligente de una red neuronal
 Redes neuronales: así de sencillo (Parte 22): Aprendizaje no supervisado de modelos recurrentes
- Aplicaciones de trading gratuitas
- 8 000+ señales para copiar
- Noticias económicas para analizar los mercados financieros
Usted acepta la política del sitio web y las condiciones de uso