
Distance modes (Fixed Distance, ATR, Moving Average, Bollinger Bands, Time, Manual) are the shared set written in the Trail guide. This page is Recovery Zone: hedge channel, Profit, TPx/SLx. Grid, Martingale, and Recovery cannot run together on the same ticket, and any of them turns off Trail, Breakeven, and Partial.
Recovery (Manage Sub-Tab)
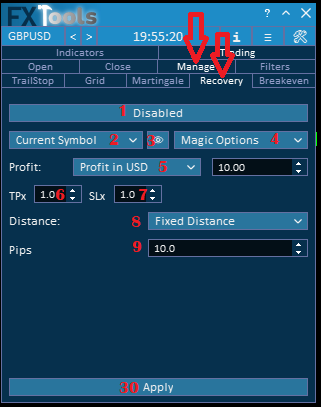
The fourth sub-tab of the Manage tab is Recovery (Recovery Zone Strategy).
What is Recovery Zone?
Recovery Zone in this dashboard creates a channel of Buy and Sell orders:
Buy orders are always placed at the top line of the channel
Sell orders are always placed at the bottom line of the channel
How it works:
First order is a Buy at the top line
If price goes down into loss, you open a Sell at the bottom line (with a larger lot size)
Now you have one Buy and one Sell. If price goes down, the Sell makes more profit than the Buy's loss → total profit
If price goes back up, you open a second Buy at the top line
If price goes up, you make profit. If it goes down again, you open another Sell
This continues until price spikes out of the channel and all orders close at a profit
This strategy creates a hedging effect where opposing positions work together to achieve overall profit.
⚠️ Warning: This is a complex hedging strategy that requires careful risk management. It can tie up significant margin and may lead to large drawdowns if the market moves in a strong trend without reversing.
1. Disabled / Enabled Button
Disabled – The Recovery Zone strategy will not work.
Enabled – The dashboard is ready to Apply this method to matching trades. Enabling Recovery on a ticket turns off Grid, Martingale, Trail, Breakeven, and Partial on that ticket.
________________________________________
2. Symbol Dropdown
Use this dropdown to choose which market symbols you want the Recovery Zone strategy to apply to.
All Symbols – Recovery Zone will apply to every symbol in your account.
Current Symbol – Recovery Zone will apply only to the symbol selected on the shortcut bar.
________________________________________
3. Show next RZ (Eye Button)
Label Show next RZ plus the eye 👁️. When pressed, future Recovery Zone levels draw on the chart for the symbol, magic filter, and For order: dropdown on this same row.
________________________________________
4. Magic Number Filter
This menu lets you select which Magic Numbers should be included for the Recovery Zone strategy.
You can select multiple options at the same time. Default is FxTools Orders.
________________________________________
5. Profit type
How much total profit you want from the Recovery Zone basket. Dropdown values are Profit in USD and Profit in Percentage (of account balance).
________________________________________
6. Profit value
The number next to Profit. Currency amount or percent, matching item 5.
________________________________________
7. TPx and SLx
There is no TP-type dropdown on Recovery (that list belongs to Martingale). Recovery has two spins: TPx and SLx. They multiply the Recovery distance when the engine places the next basket take-profit and stop (same-side vs opposite-side legs).
________________________________________
8. Distance – Recovery Zone Order Spacing
This setting determines the distance between Recovery Zone levels (the channel width between top and bottom lines). Same six modes as Martingale and Grid. Extra fields appear under the mode you select.
Magic Number Options Table
| Option | Meaning |
|---|---|
| FxTools Orders (default) | Trades opened with this dashboard magic number |
| All Bot Orders | Trades from EAs (non-zero magics). Excludes manual (magic 0) |
| Manual Orders | Trades with magic 0 |
| All Orders | Every matching trade |
Profit Type Options Table
| Type | Meaning |
|---|---|
| Profit in USD | A fixed currency amount (account currency) |
| Profit in Percentage | A percentage of account balance |
9. Option 1 – Fixed Distance
When you select Fixed Distance, you set the Recovery Zone channel to have a fixed distance between the top and bottom lines.
Pips: You adjust the fixed distance by entering a value in pips (e.g., 20 means 20 pips between each Recovery Zone order level).
________________________________________
After you change values, click Apply Settings. The new settings apply to matching open trades immediately.
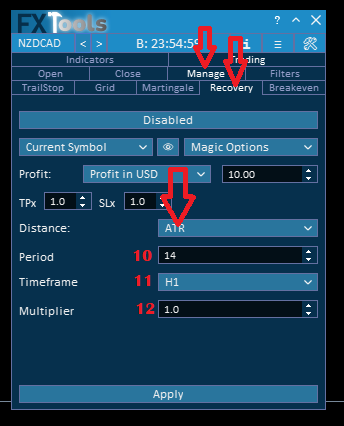
Option 2 – ATR (Average True Range)
The second option is ATR. The distance between Recovery Zone orders is calculated based on the ATR indicator value (volatility-based channel width).
When you select this option, 3 more options appear:
Setting Meaning 10. Period The period of the ATR indicator (e.g., 14 for 14 bars) 11. Timeframe The timeframe on which the ATR is calculated (e.g., H1, M15) 12. Multiplier The multiplier of the ATR value. Example: 2 = 2x ATR, 0.5 = half the ATR value
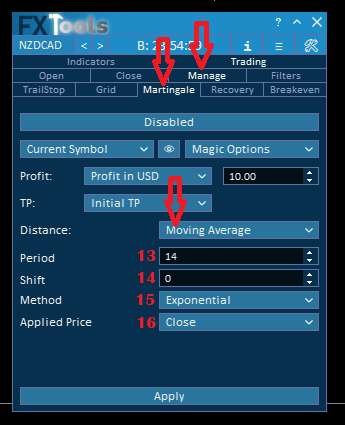
Option 3 – Moving Average (MA)
The third option is Moving Average. The distance between Recovery Zone orders is calculated based on the MA indicator value.
When you select this option, 5 more options appear:
Setting Meaning 13. Period The period of the MA indicator 14. Shift The shift of the MA (move forward or backward) 15. Timeframe The timeframe on which the MA is calculated 16. Method Simple, Exponential, Smoothed, Linear Weighted 17. Applied Price Open, High, low, Close, Median, Typical, Weighted
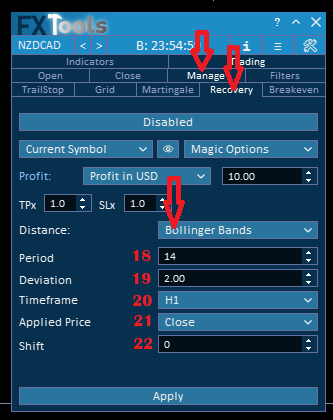
Option 4 – Bollinger Bands (BB)
The fourth option is Bollinger Bands. The distance between Recovery Zone orders is calculated based on the distance from the current lower or upper band (whichever is closest) to the open price of the previous order.
When you select this option, 5 more options appear:
Setting Meaning 18. Period The period of the Bollinger Bands indicator 19. Deviation The standard deviation multiplier (typically 2) 20. Timeframe The timeframe on which the BB is calculated 21. Applied Price The price type used for BB calculation 22. Shift The shift of the BB indicator
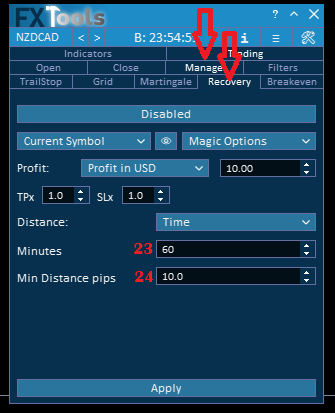
Option 5 – Time
The fifth option is Time. The distance between Recovery Zone orders is based on time intervals, regardless of price movement.
Example: Every 30 minutes, a new Recovery Zone order opens automatically.
Setting Meaning 23. Minutes The time interval in minutes between each Recovery Zone order 24. Min Distance pips The minimum price distance required between the current order and the previous order. If price hasn't moved enough, the time-based order will not open.
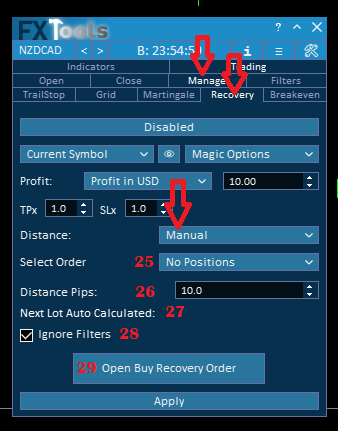
Option 6 – Manual
The sixth option is Manual. This means instead of automatic opening, you must manually click a button to open the next Recovery Zone order.
The lot size of the next order will be automatically calculated based on your settings.
________________________________________
25. Select Order
The For order: dropdown (same row as the eye). The next order is based on the ticket you select.
________________________________________
26. Distance Pips
The minimum distance required between the last order and the new order (in pips).
________________________________________
27. Next Lot Auto Calculated
When an order is selected, this field shows the automatically calculated lot size for the next Recovery Zone order.
________________________________________
28. Ignore Filters
If this checkbox is selected, the system will ignore all filters inside the Filter tab and open the order regardless. On Recovery this checkbox starts on.
________________________________________
29. Open Buy/Sell Recovery Order Button
This button opens the next order.
The order type (Buy or Sell) will be determined automatically based on the order you selected from the dropdown menu (item 25). Caption starts as Open Buy Recovery Order.
Other surfaces: on Easy Position Manager, tick Enable on Apply then Apply for this ticket only.
Links
- Part 0 Overall Guide — four work places (dashboard, shortcut bar, overlays, chart)
- Part 1 Shortcut bar — shortcut bar and min mode
- Part 2 Overlays — Info and Settings
- Part 3 Indicators — watch table and add indicator
- Part 4 Open — Instant, Pending, By Time (coming soon)
- Part 5 Close — Manual, Auto, Partial
- Part 6 Filters — News, Prop firm, Time
- Part 7 Trail — TrailStop and shared distance modes
- Part 8 Grid — same-direction legs after price moves in favor
- Part 9 Martingale — extra legs as the trade moves into loss
- Part 10 Recovery — Recovery Zone hedge channel
- Part 11 Breakeven — move SL toward the open once in profit
- Part 12 Chart — Easy Position Manager and Easy Trade Deck
- Part 13 Expert Advisors — strategy cards by magic, live vs backtest