

Developing a Terminal Manager (Part 3): Getting Account Information and Adding Configuration
 1 744
1 744
 3
3

Introduction
In the previous part, we laid the foundation for the project by creating a minimum viable web server capable of starting and stopping of multiple MetaTrader 5 terminal instances through a simple web interface. FastAPI was chosen as the foundation for the server-side logic, and Jinja2 for HTML generation, while process management was implemented using psutil and subprocess. The project was structured as follows: the management logic was moved to a separate module, templates and static files were added, and routes were configured to start, stop, and display the status of the terminals. We tested the functionality — using the web interface, we were able to successfully start and stop the terminals located in the specified folders.
Now it is time to expand the functionality and user-facing capabilities. In this part, we will add support for selecting a configuration file at application startup, and prepare the groundwork for working with configuration, and we will also implement the display of key characteristics for each terminal — such as account number, balance, profit, and other data — on the main page. To retrieve this data, we will use the MetaTrader5 Python library, which allows Python programs to communicate with running terminals. We will also devote some attention to architectural details and the appearance of the interface by integrating the powerful jQuery and Bootstrap libraries. This will already be a significant step toward a full-fledged terminal manager.
Charting the Course
Last time, we left off having created three fixed folders containing terminals and specified the paths to them directly in our application's source code. Specifically, the full paths were built from two constant values — the path to the terminals' root folder, stored in the MT5_FOLDER constant, and the name of the terminal executable, stored in the MT5_EXE constant — along with a list of folder names for different terminal instances located inside a single root folder.
But it was clear that hard-coding these parameters would be very inconvenient once the project was used for its intended purpose. Therefore, we need to decide which information will be needed when the web application starts and will change or be updated relatively infrequently. Once we have determined its contents, we will need to structure it and ensure it is passed to the web application. On the other hand, this information will need to be properly received and used in the web application.
Once the terminals are up and running, we will collect data from them. Since our web application is written in Python, we can use the MetaTrader integration module for Python (the MetaTrader5 Python library). Using it, we will programmatically connect to each terminal, retrieve all trading account data from it, and use that data to respond to the corresponding requests from the web server's clients. This will require extending our web application's API commands.
We also need to consider implementing automatic updates for information about all terminals on the web application’s main page, so that users do not have to manually press F5 every time to refresh the page in their browser. There are various ways to implement interaction between the browser and the web application, but for now we'll stick with the simplest one.
And, of course, to make the web application being developed easy to use, we will need to think about a sensible layout for the information blocks on the main page and what they contain.
Test Accounts
Previously, we created three terminal instances and connected them to new demo accounts. To make it easier for us to distinguish between them, we chose different initial deposit amounts: $100,000, $200,000, and $300,000. When testing the terminal startup and shutdown processes, it did not matter to us whether any trading was taking place on them. Therefore, while we were working on the previous part, the balances of these demo accounts remained equal to their initial values. But now it is time to move on.
Now we will set up some Expert Advisors to run on these terminals so we can see the balance, profit, and equity values changing over time. That will certainly be more interesting than just watching trading accounts with no trades at all. We will run the Expert Advisors on different groups of symbols so that their results do not all look the same.
We will connect the fourth separate terminal to the same demo account as the first terminal. We will not install any Expert Advisor on it for now. This terminal will come in handy for further debugging the process of stopping and starting a terminal, so that we do not unnecessarily interfere with the terminals on which the Expert Advisors will be running.
The Expert Advisors were started on October 17, 2025. For technical reasons, the terminals were shut down for one week (from October 26 to November 4), leaving all open positions to their fate. Their operation was then resumed. Let's keep this note here, as it may come in handy later when the ability to work with trade history is added.
After preparing the test environment this way, let's proceed with the planned implementation.
New Route
Let's start by creating a new route designed to handle requests for information about a single terminal instance. Let's add it to our route table.
| # | Method | URL | Description, parameters | Response format |
|---|---|---|---|---|
| 1 | GET | / | Displays the main page with a web interface for managing MetaTrader 5 instances. For now, it should display only the heading with the project name. | HTML |
| 2 | POST | /start/{name} | Starts a MetaTrader 5 terminal instance named {name} | JSON |
| 3 | POST | /stop/{name} | Stops the running MetaTrader 5 process named {name} | JSON |
| 4 | POST | /instances/{name} | Retrieves information about the terminal instance named {name} | JSON |
In accordance with the convention we have adopted, we will move all the request-processing logic for each route into separate functions. Furthermore, these functions will now be methods of a new class that we will add to organize all handler functions in a separate namespace.
If an object named control exists at the global level, then by adding the instance_info() method to its class, we can write a handler for the new route roughly like this:
@app.post('/instances/{name}')
async def info_instance(name: str = Path(..., description="Instance data",
                                         example="MetaTrader5.1")):
    '''Get terminal instance data'''
    result = control.instance_info(name)
    return JSONResponse(result)
We will look at the detailed implementation of this method below. At the route handling level, our project does not need anything else for now.
MetaTrader5 Module for Python
So, we've reached the point where we need to start focusing on retrieving information from the terminal. The MetaTrader 5 module for integration with Python will help us with this. As stated in the documentation:
In addition to market data (prices, positions, orders), this module allows you to retrieve all information about the trading account to which the terminal is connected. It can also be used to connect to different terminals installed on a computer. But let's take it one step at a time.
First, we need to install this module on the computer that will serve as the terminal server, since this module is not installed automatically when the terminal is installed. There is a perfectly understandable reason for this: it can only be used in Python programs, and not every computer on which a terminal is installed has a Python interpreter.
We already have a Python interpreter (since part of our web application's code has already been written in Python), so to use this module we only need to install it using the pip package manager by running the following command in the console:
pip install MetaTrader5
Unfortunately, at the time of writing, installing this module for the latest Python version, v. 3.14 was not possible, so we had to switch to using an earlier Python version, v. 3.12. There is nothing wrong with that, since our project is unlikely to require any specific features added in the latest version. Most likely, we could have used even earlier versions of Python just as successfully. Over time, MetaQuotes will update this module so that it can also be installed with later versions of Python.
Module Workflow
No matter which program we decide to use the integration module in, the workflow for working with it will include three mandatory steps:
- Importing the module. Using Python's standard module import mechanism, we import the MetaTrader 5 module into the program under the short name mt5:
import MetaTrader5 as mt5After that, all functions of this module become available in the Python program with the mt5 prefix.
- Connecting to the terminal. Ultimately, all actions will be performed by a MetaTrader 5 terminal, so we need to establish a connection to it from the Python program. The initialize() function is intended for this: mt5.initialize()This function can also accept additional parameters, the use of which we will discuss below. As a result, it returns a boolean value indicating whether the connection to the terminal was successful. Depending on the result, we can either perform the necessary next steps or report the connection error in some way.
- Disconnecting from the terminal. Once the necessary actions have been completed, the established connection must be closed. The shutdown() function is designed for this purpose:
mt5.shutdown()It can also be called if the connection failed in the previous step.
Therefore, in general, a code template that uses the integration module would look something like this:
# 1. Import the module
import MetaTrader5 as mt5

# 2. Connect to the MetaTrader 5 terminal
if mt5.initialize():
    # Connection successful
    # Performing the main work
    # ...
    pass
else:
    # No connection established
    # Error handling
    print("initialize() failed")

# 3. Disconnect from the terminal
mt5.shutdown()
As a Python program grows larger, the second and third steps are usually not placed in the global scope, but inside separate functions or class methods.
Connecting to the Terminal
Let's take a closer look at the initialize() function for connecting to the terminal in the context of our task.
If it is called without any parameters, the terminal to connect to is selected automatically. This means that this call format can be used safely and predictably only when there is just one terminal installed on the computer and it has already been connected to the required trading account with the connection settings saved.
If multiple terminals have been installed on the computer, there is no guarantee that calling this function will connect to the intended terminal. Therefore, in our case — when we plan from the outset to work with multiple terminals on a single computer — we must explicitly specify, using additional parameters, which terminal we want to connect to at any given time.
We will do this by using the first positional parameter of the initialize() function, to which we can pass the full path to the executable file for the desired terminal instance. Since these paths are stored in a separate list in our program, there are no issues with passing them to the connection function. If we first assign the desired path to the path variable, the call to the connection function will look like this:
# 2. Connect to the MetaTrader 5 terminal
if mt5.initialize(path):
    # Connection successful
    # Performing the main work
    # ...
    pass
We should also note the difference in this function’s behavior depending on whether the terminal it should connect to is already running or not. In the first case (the terminal is already running), you will be connected to the running terminal almost instantly. In the second case (when the terminal is not yet running), calling this function will first start the terminal and only then attempt to connect to it.
It usually takes a little while (a few seconds) for the terminal to start up. The Python program will wait during this time, because the call to the initialize() function continues executing while waiting for the terminal to start. However, once the terminal has started, or if it was already running, the wait does not end there. At the next stage, the call to the initialize() function will wait until a connection to the trading account is established. Only after the terminal has successfully connected to the broker's server and the connection to the trading account has also been established successfully will the initialize() function consider its task complete and return true.
This behavior can also, in principle, be used for launching a terminal instance. However, this method offers fewer options than launching the terminal by running a console command, as implemented in the previous parts. Therefore, we will leave the existing scheme for starting/stopping terminals unchanged, and use the integration module only to access terminal instances that are already running.
If something goes wrong at any stage, the initialize() function returns false. However, if the cause is no connection to the broker's server, we will not get this result immediately, but only after the timeout, which is 60 seconds by default. In the planned architecture, this response latency is unacceptably high, so we'll use the named parameter timeout, which allows us to specify the maximum wait time for a connection:
# 2. Connect to the MetaTrader 5 terminal
if mt5.initialize(path, timeout=200):
    # Connection successful
    # Performing the main work
    # ...
    pass
On the one hand, this short wait time (200 ms = 0.2 s) is long enough to connect to a running terminal that already has an established connection to a trading account; on the other hand, it is short enough to determine, without waiting too long, that something has gone wrong and that a full connection to this terminal is not yet possible.
The last parameter we'll use when connecting to the terminal is portable. It allows you to specify that the terminal to connect to must be launched, or already running, in Portable mode. This is exactly what we need, since we'll be working with the terminals' working directories (MQL5 data folders) later on. To do this, we'll need to know exactly where they are located on the computer.
# 2. Connect to the MetaTrader 5 terminal
if mt5.initialize(path, timeout=200, portable=True):
    # Connection successful
    # Performing the main work
    # ...
    pass
The connection function also allows you to specify trading account connection details (login, password, and server) in additional named parameters. If these parameters are not specified, the data saved by the terminal instance during the last connection will be used. We have not yet reached the point of switching trading accounts, so this behavior suits us just fine.
Disconnecting from the Terminal
Compared with the connection function, the shutdown() function, which performs the opposite operation, is much simpler. It has no parameters and only performs a software-level disconnection of the previously established communication channel with the terminal. The terminal itself remains running, which means you cannot use the shutdown() function to stop the terminal.
The documentation does not explicitly state whether this function must be called when a connection to the terminal fails, but in many examples it is called in both cases: when the connection is successful and when it fails. Therefore, we will proceed in the same way by placing the call to the shutdown function after the conditional statement that handles both cases.
Main Work
If we successfully connect to the desired terminal instance, we can call any of the available functions described in the documentation. For the purposes of this task, we will use only three of them.
Using the function terminal_info(), we will retrieve the status and settings of the connected MetaTrader 5 client terminal as a named tuple — that is, a set of values, each of which is assigned a specific name. This tuple can then easily be converted into a dictionary — that is, a data structure consisting of a set of pairs in the form <key>=<value>. In this form, the data can already be saved in JSON format and sent as part of the web server's response to client requests.
Using the function account_info(), we will retrieve information about the current trading account to which the terminal is connected. The return value format for this function is the same as that of terminal_info().
If any errors occur, you can get more information about what happened using the function last_error(). This function returns a tuple containing two values: a numeric error code and a string description of the error. If there are no errors, a tuple of the form (0, 'Success') is returned, so we will also always include the result of this function in the data returned to the client by the web server.
Other functions in the integration module allow you to retrieve prices for various trading instruments, lists of open positions, and trade history, as well as execute trades directly in the terminal's trading account. In fact, this module makes it possible to build fully functional trading automation by implementing the decision-making logic for trading operations in the Python program and sending only commands to open and close positions to the terminal. However, for the purposes of this article, we won't need these features just yet.
Changes to the Main Page
Last time, we generated the HTML code for the main page, immediately including information about all registered terminals in it. This information included only the terminal status (running/stopped) and the PID (the identifier of the terminal's running process). Now we will modify this approach as follows. Separate blocks will be shown on the main page, and information about each terminal will be added to them later. To retrieve it, separate requests will be sent to the /instances/{name} route with different terminal names. The JavaScript code on the main page will generate and send these requests every 10 seconds. The information from the responses to these requests will be processed by another piece of JavaScript code, which will insert the retrieved data into the appropriate places within the blocks on the main page.
Thus, whereas we previously had to manually refresh the main page to see changes in the set of running terminal instances, this will now happen automatically at specified intervals without refreshing the main page.
A 10-second interval between consecutive updates was chosen so that, on the one hand, it is not too long and updates terminal data frequently enough, and on the other hand, it is not too short, so as not to place a heavy load on the server and to allow it to keep up with processing all incoming requests.
We will place the JS code mentioned above in the /static/script.js file.
MT5_Control Class
To improve code organization, we decided to consolidate the separate functions from the mt5_control.py file as methods of a single class named MT5_Control. We made the parameters that we previously had as constants or global variables attributes of this class and added their initialization in the constructor:
class MT5_Control:
    def __init__(self, terminals: dict, mt5_folder: str, mt5_exe: str = 'terminal64.exe'):
        '''
        Initialize the MT5_Control class instance.

        Args:
            terminals (dict): Terminal data dictionary.
            mt5_folder (str): Path to the terminal instances folder.
            mt5_exe (str): Terminal executable file name (default 'terminal64.exe').
        '''
        # Path to the folder containing the terminal instances
        self.mt5_folder = mt5_folder

        # Name of the terminal executable
        self.mt5_exe = mt5_exe

        # List of terminal instance names
        self.instances_folders = list(terminals.keys())

        # Name-to-path mapping dictionary
        self.instanсes_paths = {folder: self.instance_path(
            folder) for folder in self.instances_folders}

        # Path-to-name mapping dictionary
        self.paths_instanсes = {self.instance_path(
            folder): folder for folder in self.instances_folders}

        self.instances = terminals.copy()
We will save the code for this class in the existing mt5_control.py file. It will also contain several other methods, but we will cover those later.
Creating the Configuration
So, we needed to store certain information as a configuration — that is, a set of parameters required every time the application is launched. What does the FastAPI framework have to offer for this? Unfortunately, FastAPI does not provide a built-in mechanism for storing and loading configuration, but it works well with popular Python configuration solutions. Since FastAPI is a web framework rather than an application with a "rigid" configuration architecture, we can use any tools we find convenient for these purposes.
The only thing we will need from FastAPI is the ability to assign a specific function as a lifecycle event handler for the web application (lifespan). This function must contain a yield statement, which serves as a separator for the code that runs before the web application starts and after it stops. Therefore, we will read the configuration and initialize an object of the MT5_Control class there.
The configuration itself in this project will exist in several forms. First, it will be stored in a JSON file. Until the web application is started, the configuration exists only in this form. Second, when the web application starts, a special config object of the Config class will be created, whose sole purpose is to read the configuration from a JSON file and create a data structure to store the loaded data. Third, after the app web application object of the FastAPI class is created, the configuration data will be transferred to its state field. From there, the configuration data can be accessed as needed by any of the route handlers. After that, the config object is no longer needed.
Let's go through all the items mentioned one by one.
JSON Configuration File
We choose the structure of the JSON file ourselves, based on the information we have and would like to store in it. After several iterations, we arrived at the following configuration, which was saved in a file named config.json:
{
  "terminals": {
    "MetaTrader5.1": {
      "name": "MetaTrader5.1",
      "login": 12345671,
      "server": "MetaQuotes-Demo"
    },
    "MetaTrader5.2": {
      "name": "MetaTrader5.2",
      "login": 12345672,
      "server": "MetaQuotes-Demo"
    },
    "MetaTrader5.3": {
      "name": "MetaTrader5.3",
      "login": 12345673,
      "server": "MetaQuotes-Demo"
    },
    "MetaTrader5.4": {
      "name": "MetaTrader5.4",
      "login": 12345671,
      "server": "MetaQuotes-Demo"
    }
  },
  "mt5_folder": "C:/MT5",
  "mt5_exe": "terminal64.exe"
}
As you can see, this file stores a dictionary (referred to as an "object" in JSON notation). It contains three entries with the keys terminals, mt5_folder, and mt5_exe. The terminals element, in turn, is also a dictionary that contains all the information about terminal instances. It currently contains four entries with keys that correspond to the folder names of the terminal instances.
Each such element stores information about one terminal instance located in the corresponding folder and includes three elements with the keys name, login, and server. The name field is intended for the name that will be displayed for this terminal instance on the web page. In the simplest case, it may be the same as the folder name. The purpose of the two remaining fields is clear from their names — they store the trading account number and the broker's server name. However, these parameters will not be used in the code just yet; their processing will be added later. In the future, we will definitely expand the list of parameters stored for each terminal instance. But let's not get ahead of ourselves.
The mt5_folder and mt5_exe elements now contain the values that were previously declared in the code as the constants MT5_FOLDER and MT5_EXE. They store the name of the root folder for all terminal instances and the name of the MetaTrader 5 terminal executable file.
The config.json file has been added to the project repository, so it can only be used as an example configuration file. To create your own custom configuration, you can make a copy of the config.json file and name it, for example, config.server1.json or something similar. Next, we will add the ability to specify, when starting the application, the name of the configuration file from which the data should be read.
We added the following ignore pattern to .gitignore:
config.*.json
Therefore, filenames that match this pattern will be ignored by the version control system. Such a file can safely remain in the repository folder without interfering with future updates. You will need to make changes to it only if the format of the configuration information changes in some way.
The Config Object
To read a JSON configuration file, we will use the features provided by a Python module called Pydantic Settings. In the simplest case, we could create our own Config class by inheriting from the provided BaseSettings class and listing, among the class attributes, the names, types, and values of the information we would like to use as configuration. For example:
from pydantic_settings import BaseSettings

class Config(BaseSettings):
    folders: list[str] = ["MetaTrader5.1", "MetaTrader5.2"]
    mt5_folder: str = "C:/MT5/"
    mt5_exe: str = "terminal64.exe"
In our case, the Config class turned out to be a bit more complex, since we needed to support reading data from a specific JSON file rather than simply specifying it in the source code:
from pydantic_settings import BaseSettings, JsonConfigSettingsSource, SettingsConfigDict
import os


class Config(BaseSettings):
    terminals: dict
    mt5_folder: str
    mt5_exe: str

    model_config = SettingsConfigDict()

    @classmethod
    def settings_customise_sources(
        cls,
        settings_cls,
        init_settings,
        env_settings,
        dotenv_settings,
        file_secret_settings,
    ):
        # Get the path to the file from an environment variable
        config_file = os.getenv("MT5_MANAGER_CONFIG_FILE", "config.json")
        return (
            init_settings,
            JsonConfigSettingsSource(settings_cls, json_file=config_file),
            env_settings,
            dotenv_settings,
            file_secret_settings,
        )
It was added to the project as the config.py file.
Passing the Configuration to the Web Application Object
For the final step in loading the configuration, we will import our new Config and MT5_Manager classes in the main web application file, main.py:
from config import Config
from mt5_control import MT5_Control
Next, we'll create a lifespan() function that takes an object of the FastAPI class as a parameter. This parameter will be used to pass our web application object app to it. By adding the @asynccontextmanager decorator to this function, we turn it into the web application lifecycle event handler mentioned above. Inside it, we'll create a config object that reads the configuration from a JSON file, put the loaded data in the appropriate places, and create a global control object for managing the terminals:
@asynccontextmanager
async def lifespan(app: FastAPI):
    # Create an object that reads the configuration from a JSON file
    config = Config(_env_file=None)

    # Transfer the loaded data to the app object
    app.state.terminals = config.terminals
    app.state.instances = {}

    # Ensure the terminal instance has a name.
    # If it is not specified in the configuration, the folder name is used
    for folder in app.state.terminals:
        app.state.terminals[folder]['name'] = app.state.terminals[folder].get(
            'name', folder)

    # Create a global terminal management object
    global control
    control = MT5_Control(app.state.terminals,
                          config.mt5_folder, config.mt5_exe)
    yield
All that remains is to make a small addition to the process of creating the web application object app. We need to pass the name of the function that will act as the lifecycle event handler to the constructor via the lifespan parameter. We have also named it lifespan, so the creation line will now look like this:
# Create the application object
app = FastAPI(lifespan=lifespan)
Let's save the changes we have made to the main.py file.
Adding External Startup
The next step was to add another way to launch our web application. Previously, we used the following command:
uvicorn main:app --reload --no-use-colors
In other words, we ran a separate uvicorn application that handled our Python source code. When we launched it, we could only pass it the set of parameters supported by this application. To be able to pass our own parameters, we'll create a new Python script that will accept the required parameters and start the uvicorn application web server from within the script:
import argparse
import uvicorn
import os


def main():
    parser = argparse.ArgumentParser()
    parser.add_argument("--config-file", default="config.json",
                        help="Path to config file")
    parser.add_argument("--host", default="0.0.0.0", help="Server IP address")
    parser.add_argument("--port", default=8000,
                        help="Server port", type=int)
    args = parser.parse_args()

    # Set the environment variable
    os.environ["MT5_MANAGER_CONFIG_FILE"] = args.config_file

    # Start uvicorn
    uvicorn.run("main:app", reload=True, host=args.host, port=args.port)


if __name__ == "__main__":
    main()
This way, we added the ability to specify the name of a JSON configuration file, which will be stored in the MT5_MANAGER_CONFIG_FILE environment variable. The config object will be able to retrieve this name from there when it is created:
# Get the path to the file from an environment variable
config_file = os.getenv("MT5_MANAGER_CONFIG_FILE", "config.json")
As a result, our web application will be able to start using the desired configuration with the following command:
python run.py --config-file=config.json --host=0.0.0.0 --port=8000
Instead of the specified values, you can substitute your own if you want to run the web server not on all IP addresses available on the computer or if you want to use a different port number.
Method for Retrieving Information
After this lengthy digression, let's return to the MT5_Control class and examine the method responsible for retrieving information about a terminal instance. First, let's look at what the result of this method should be, and then at the method itself.
Every request to the /instances/{name} route will return data in the form of a JSON representation of a dictionary (a set of key-value pairs). The pairs in this dictionary can be divided into several groups, depending on the source from which each piece of data is obtained.
The first block will contain data about a specific terminal instance, which is essentially obtained from our application's configuration: the instance name, the trading account login, and the broker server name.
{
  "name": "MetaTrader5.1",
  "login": 1234567,
  "server": "MetaQuotes-Demo",
  ...
}
For now, the specified login is not used at all, since we agreed to connect only to terminals where the procedure for connecting to the desired trading account has already been completed, and the information about these connections has been saved for subsequent launches of the terminals. Therefore, the login value shown here does not match the one actually in use, but we will resolve this discrepancy shortly.
The following block contains information about the PID value and the status of the terminal process on the computer. If the PID is not 0, it means that this terminal is running, and the status value simply confirms this.
{

    ...
  "pid": 11560,
  "status": "running",
  ...
}
Next, the error information will be provided as a nested dictionary containing a numeric code and an error description. In most cases, this will be a message confirming that data has been successfully received from the terminal:
{
  ...
  "last_error": {
    "code": 1,
    "description": "Success"
  },
  ...
}
The following blocks contain all the information that the MetaTrader 5 integration module provides about the running terminal and the connected trading account:
{
  ...
  "terminal": {
    "community_account": true,
    "community_connection": true,
    "connected": true,
    // ...
  },
  "account": {
    "login": 5041102414,
    "trade_mode": 0,
    "leverage": 100,
    // ...
  },

    ...
}
And finally, the time when all the preceding information was received is specified:
{
  ...
  "last_update": "2025-11-18 09:46:14.076863"
}
The complete server response looks something like this:
{
  "name": "MetaTrader5.1",
  "login": 1234567,
  "server": "MetaQuotes-Demo",
  "pid": 11560,
  "status": "running",
  "last_error": {
    "code": 1,
    "description": "Success"
  },
  "terminal": {
    "community_account": true,
    "community_connection": true,
    "connected": true,
    // ...
  },
  "account": {
    "login": 5041102414,
    "trade_mode": 0,
    "leverage": 100,
    // ...
  },
  "last_update": "2025-11-18 09:46:14.076863"
}
To generate this response, we will first check that the terminal with the requested name exists and is running. If everything is in order, we connect to it using the Python integration module, following the procedure described above. Once the connection is established successfully, we request the necessary data from the terminal and store it in a dictionary. Information about errors, the current time, and the terminal status will also be added there. The populated dictionary is returned as the result of this method.
def instance_info(self, folder: str) -> dict:
        '''
        Get terminal data by terminal instance name

        Args:
            folder (str): Terminal instance name.

        Returns:
            info (dict): Data on the terminal or detected errors
        '''
        # Dictionary for the results
        info = {}

        # If a terminal with this folder name is present in the configuration, then
        if folder in self.instances:
            # Save the initial existing information from the configuration
            info = self.instances[folder]

            # Build the full path to the terminal
            path = self.instanсes_paths[folder]

            # If the specified terminal is running, then
            if 'pid' in self.instances[folder] and self.instances[folder]['pid']:
                # print(f'Start mt5.initialize[{folder}]')
                # If the connection is successful, then
                if mt5.initialize(path, timeout=200, portable=True):
                    # Add information about the terminal status to the result
                    terminal_info = mt5.terminal_info()
                    if terminal_info != None:
                        info['terminal'] = terminal_info._asdict()

                    # Add information about the trading account to the result
                    account_info = mt5.account_info()
                    if account_info != None:
                        info['account'] = account_info._asdict()

                    # Add the current time
                    info['last_update'] = str(datetime.now())

                    # Record the error code, message, and current status
                    code, description = mt5.last_error()
                    status = 'running'

                else:
                    # If the connection could not be established quickly, then
                    # if the terminal is marked as starting up
                    if info['status'] == 'starting':
                        # Record the error code, message, and current status
                        # for a terminal that is starting up
                        code, description = 0, 'Starting'
                        status = 'starting'
                    else:
                        # Otherwise, record the error code, message, and current status
                        # for a running terminal
                        code, description = mt5.last_error()
                        status = 'running'

                mt5.shutdown()
                # print(f'End mt5.initialize[{folder}]')
            else:
                # Otherwise, record the error code, message, and current status
                # for a stopped terminal
                code, description = 0, 'Stopped'
                status = 'stopped'
        else:
            # Otherwise, set the error code, message, and current status
            # for a missing terminal
            code, description = -1, 'Manager: Terminal not found'
            status = 'not found'

        # Add error information and the current status to the result
        info['last_error'] = {'code': code, 'description': description}
        info['status'] = status

        return info
The other changes made to this class are not as significant, so we will not describe them in detail here. As always, the complete project code is available in the attached file and can also be viewed in the public repository.
Testing
Let's take a look at how information about running terminal instances is displayed now. We made some minor changes to the appearance of the main page and its information blocks. A main menu has been added; later, it will allow you to navigate to the configuration editing page directly in the browser.
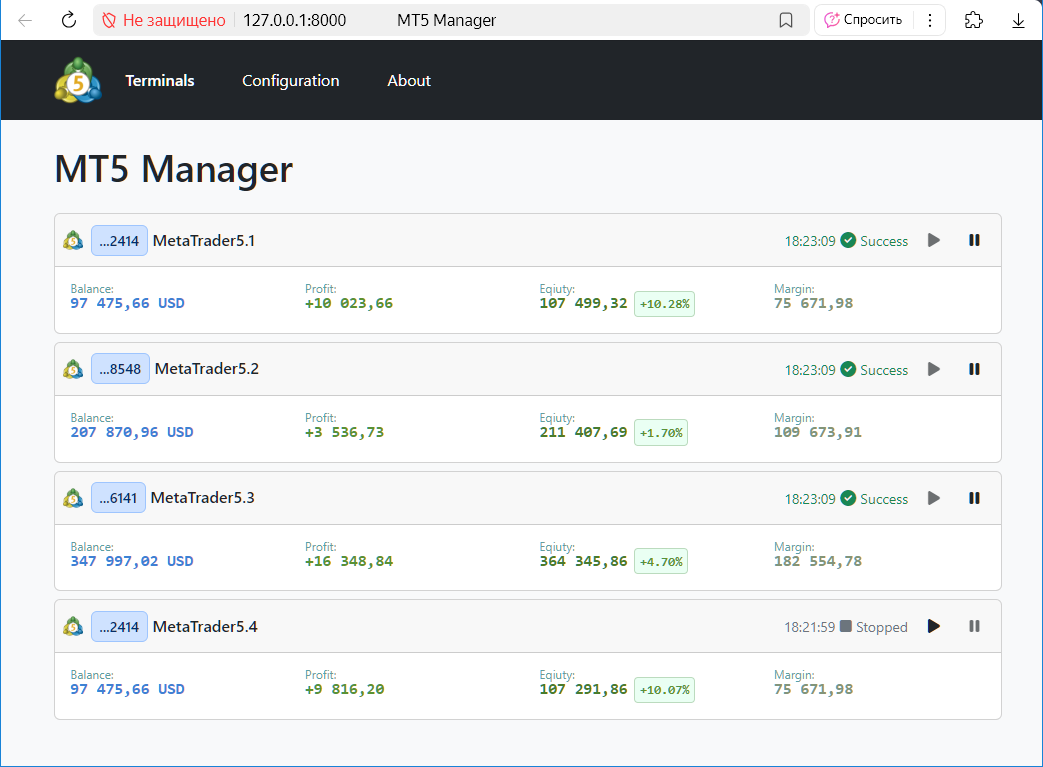
Fig. 1. The web application's main page, displaying information about four MetaTrader 5 terminal instances
Let's take a closer look at a separate block for one terminal instance. As you can see, it displays the broker server icon, the last few digits of the trading account number and its name. The icon library has not been populated yet, so if there is no icon for a particular broker server, the default icon will be displayed (as with MetaQuotes-Demo).
The date and time when information was last received, as well as the status, are shown below. In normal mode, only the time of the last connection is displayed, since it should be relatively recent: assuming there are no connection issues and requests are sent every 10 seconds, this time differs from the current time by no more than 10 seconds. Therefore, there is no need to display today's date alongside it. But if a terminal has been stopped, this time stops changing and essentially shows the moment it was stopped. If that moment no longer falls on the current day, the date starts to be displayed before the time.
In Fig. 1, we intentionally stopped the last MetaTrader5.4 terminal. At the time the screenshot was taken (2025-11-06 18:23:10), just over a minute had passed since the terminal was stopped, so the next day had not yet begun, and the time is displayed without a date. The next day (2025-11-07), this page will look like this:
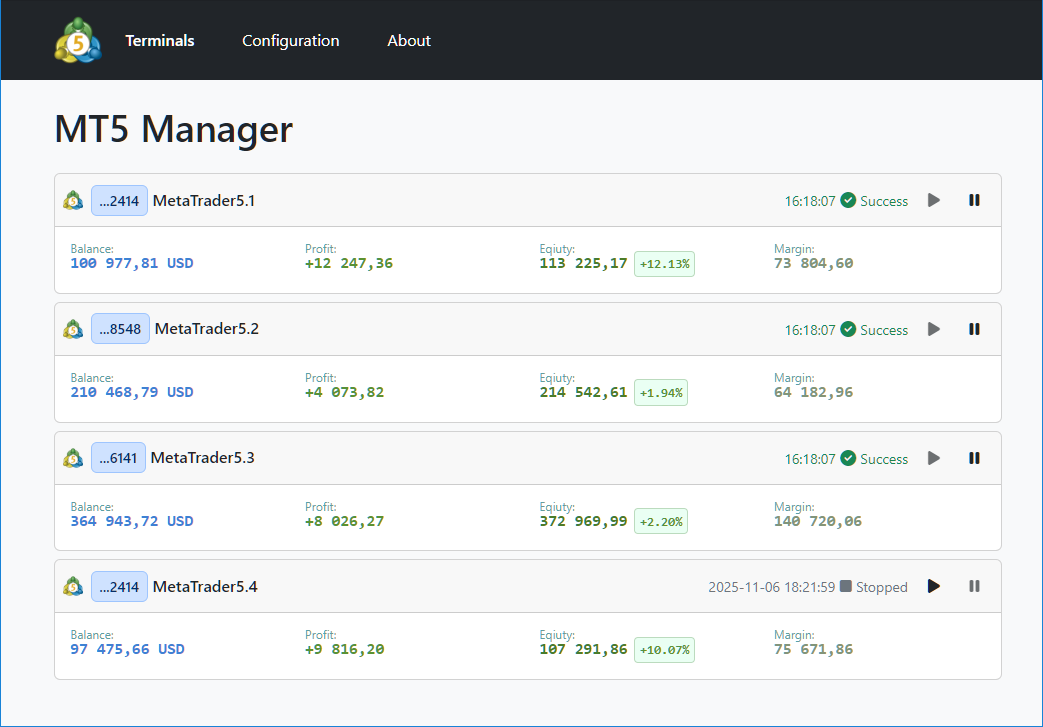
Fig. 2. The web application's main page on the next day
As you can see, the first three terminals still display only the time, since they are running and regularly update their data, while the last terminal now displays both the date and the time (2025-11-06 18:21:59).
In the upper-right corner of the terminal instance information panel are the buttons to start and stop that terminal. Depending on the current status, only one of these two buttons will be enabled. Below are the current trading account balance for this terminal, the profit on open positions, the equity value with its percentage difference from the balance, and the margin used. We are not displaying anything else for now.
But even with this set of displayed information, we have already ended up with a fairly powerful and useful tool that makes it easier to monitor multiple trading accounts at the same time without having to be right next to the computer where the corresponding terminals are running.
Conclusion
In this part, we have significantly expanded the capabilities of our application. Using the MetaTrader 5 Python integration library, we learned how to retrieve trading account information and display it on the main page of the web interface. A flexible configuration system was also implemented, allowing application settings to be managed via an external JSON file. The implementation of asynchronous client-side data updates using JavaScript has made the interface more interactive and user-friendly. This already makes it possible to use the system for convenient monitoring of multiple trading accounts.
In the following parts, we will continue to expand its functionality. For example, we will add more detailed information about each terminal instance, improve the configuration editing process, add support for multiple servers, provide the ability to group trading accounts with aggregate metric calculations, and further improve the user interface. All in all, this opens up quite a wide range of opportunities for further development.
Thank you for your attention, and see you next time!
Warning. It is important to emphasize the need for caution when using this project. At this stage, it is in an early phase of implementation, so it does not yet address potential risks of sensitive information leaks when the web application under development is operated in a publicly accessible mode. For security reasons, the application should only be run in a secure or local environment. In its current form, it does not include traffic encryption, user authentication, or protection against unauthorized access. Therefore, for now, ensuring the privacy of transmitted information — as with any other form of protection — is the responsibility of the user and must be provided by means external to the project.
Archive Contents
| # | Name | Version | Description | Latest changes |
|---|---|---|---|---|
| mt5-manager/ | Project working directory for the terminal web server | |||
| ├─ config.py | 0.1.0 | Class for working with the application configuration | Part 3 | |
| 1 | ├─ main.py | 0.2.0 | Web application for the terminal web server | Part 3 |
| 2 | ├─ mt5_control.py | 0.2.0 | Logic for managing terminal startup and shutdown | Part 3 |
| ├─ run.py | 0.1.0 | Startup file for the terminal web server's web application with the specified configuration and parameters | Part 3 | |
| ├─ templates/ | ||||
| 3 | │ └─ index.html | 0.2.0 | Main page template | Part 3 |
| └─ static/ | ||||
| ├─ ... | Additional files for styles and icons | |||
| 4 | ├─ styles.css | 0.2.0 | CSS styles | Part 3 |
| 5 | └─ script.js | 0.2.0 | JavaScript code for the main page | Part 3 |
The project's source code is also available in the mt5-manager repository.
Translated from Russian by MetaQuotes Ltd.
Original article: https://www.mql5.com/ru/articles/19946
Warning: All rights to these materials are reserved by MetaQuotes Ltd. Copying or reprinting of these materials in whole or in part is prohibited.
This article was written by a user of the site and reflects their personal views. MetaQuotes Ltd is not responsible for the accuracy of the information presented, nor for any consequences resulting from the use of the solutions, strategies or recommendations described.

 Making Custom Indicators for Beginners (Part 1): SuperTrend Indicator
 Feature Engineering for ML (Part 13): Trend-Scanning Features in Python
 Foundation Models for Trading (Part II): Decoding, Autoregression, and an Exact KV-Cache
 Neural Networks in Trading: Adaptive Periodic Segmentation (Conclusion)

- Free trading apps
- Over 8,000 signals for copying
- Economic news for exploring financial markets
You agree to website policy and terms of use
An article has been published: ‘Developing a Terminal Manager (Part 3): Retrieving account details and adding configuration’:
Author: Yuriy Bykov
Initially, this will be a tool solely for monitoring terminals, with the ability to start and stop them. However, looking ahead, I see no obstacles to expanding its functionality to include the execution of trading operations. For example, it will be possible to issue a command to open a BUY EURUSD 1.00 position simultaneously across all accounts in a specified group. Or to close open positions directly from the browser on any monitored terminal.
But that’s not all. It will be possible to upload your own expert advisor via the browser (i.e. not from the Market) and issue a command to run it on the desired terminal, or conversely, to remove an expert advisor that is currently running. Admittedly, it is not yet clear how easy this will be to do, but I think we’ll sort it out in time.
There are also plans to display logs from all terminals in the browser, either separately or consolidated into a single log.
All in all, there’s plenty of scope to add more features here.