

Developing a Terminal Manager (Part 2): Running Multiple Terminal Instances
 2 023
2 023
 0
0

Introduction
In the first part of the series, we set out to create a web interface for managing the starting and stopping of MetaTrader 5 instances on a local computer. We defined the system architecture by starting with the development of a minimum viable product (MVP) — a web server capable of handling HTTP requests and managing a single terminal instance. While we were at it, we covered key concepts such as APIs, REST, HTTP requests, and decorators.
Python was chosen for this project because of its rich ecosystem of libraries and its ease of integration with external APIs — in this case, with the MetaTrader 5 library.
The FastAPI framework lets you build web applications with minimal code, providing out-of-the-box support for type annotations, asynchronous operations, and automatic documentation via Swagger UI.
It is used in conjunction with Uvicorn, a lightweight and fast ASGI server that delivers high performance even with a large number of concurrent requests.
The psutil and subprocess libraries are used to work with terminal processes, making it easy to retrieve information about running terminal instances and manage them.
In the future, we plan to add support for SQLite or another database to store instance state, as well as a front-end layer built with JavaScript or Vue.js to create a more interactive interface.
Now it is time to expand the functionality and move on to the next stages — implementing more complex features, such as managing multiple terminal instances, state persistence, integration with the MetaTrader 5 API, and a web interface with comprehensive information about the terminals.
Planning our route
Let's try to outline the approximate scope of the next part of the implementation. First, since we have not yet actually split the overall functionality between two different web servers, we will have to add the interface components — in some minimal form — to the web server we have already started building. This work will not be in vain, since we will be able to migrate the existing code to another web server with a few tweaks down the road. So let's start by creating additional files to house the different parts of the project code, giving the project a bit more structure.
Second, let's take the next obvious step by adding the ability to work with multiple MetaTrader 5 terminal instances. In other words, we will implement registering, starting, stopping, and retrieving the current set of running instances. We will leave retrieving detailed information about the trading account for later.
This will require making certain architectural decisions in advance, which is not as simple as it might seem at first glance. We are now responsible for the future development of the project. The ease of future implementation and the potential limits of functionality expansion depend on how effective the decisions made now turn out to be. We really would not want to reach a certain stage of the project only to find out that, in order to move forward, we have to go back to the beginning and redo everything. Yes, of course, that does happen sometimes, but we will try to avoid it by being more thoughtful about the choices we make.
On the other hand, it is important not to get lost in a sea of possibilities. That is why, when it comes to certain issues, it is better to make at least some kind of decision right now than to spend endless time wondering how a particular choice will play out in the future. And in some cases, it is actually more effective to choose something simple right now. Something that will definitely be reworked later at a different, more complex implementation level. But at least we will not get bogged down in implementing the ideal architecture for a single part of the project, and we will be able to move the project forward more quickly as a whole.
Code separation
Let's add a few new files to our project. In the mt5_control.py file, we will move all the functions from main.py that handle the terminal management logic. Thus, the main application file will now contain only the endpoint (route) handler functions and the code to create a FastAPI object with the necessary settings.
To store HTML templates for pages that need to be generated when processing certain endpoints, let's create a templates folder. For now, we will place a single index.html file in it to generate the HTML code for the home page (GET / route).
To store static code that will always be sent to the browser without any processing by the web server, we will create a static folder. Examples of such files include CSS stylesheets or JavaScript code files that are referenced from the HTML code of web pages. Let's go ahead and add a couple of these empty files for the home page.
After that, the project file tree will look like this:
mt5_manager/
│
├── main.py # Main FastAPI file
├── mt5_control.py # Logic for starting and stopping terminals
├── templates/
│ └── index.html # Template for the main page
└── static/
├── styles.css # CSS styles
└── script.js # JavaScript code
Going forward, we will follow the established conventions for the project file layout. If necessary, new subfolders can be created within existing ones if doing so helps organize the code.
To use templates and static files in our app, we need to import the appropriate libraries in the main.py file:
from fastapi.staticfiles import StaticFiles
from fastapi.templating import Jinja2Templates
Next, after creating the application object (app), we add a new endpoint, GET /static; when it handles a request, any names that come in the URL after static/ will be treated as a file from our project's static folder:
# Creating an Application Object
app = FastAPI()

# Mounting Static Files
app.mount("/static", StaticFiles(directory="static"), name="static")
Note that in this case, we are not creating a separate handler function for the GET /static route; instead, we are calling a method of the application object, which will itself create the necessary function with the appropriate content.
Now let's create an object that will be used when we need to return HTML code generated from a specific template in the templates folder:
# Creating an Object for Working with HTML Templates
templates = Jinja2Templates(directory="templates")
We will rewrite the GET / route handler as follows:
@app.get('/', response_class=HTMLResponse)
async def index(request: Request):
    '''GET handler / (root directory)'''
    instances = load_instances()
    return templates.TemplateResponse("index.html", {"request": request, "instances": instances})
In it, we get an instances dictionary containing information about registered terminal instances and their current status (running/stopped). Next, we return a template response generated from the index.html file using the information from the instances dictionary. We will look a little later at exactly what information will be included in the instances dictionary and how it will be converted into HTML code.
We will also make some minor changes to the two remaining route handlers. The changes will be similar; in other words, we will do the same thing for the instance-start handler as we do for the instance-stop handler. These changes are needed because we now need to pass information to the handler about which instance we want to start or stop. When there was only one instance, this problem did not arise.
Let's add a variable part to the URLs of these routes, designated as {name}. This requires us to add a new argument with the name name and the type str to the handler function's argument list (since the instance name is a string):
@app.post('/start/{name}')
async def start_instance(name: str):
    '''POST handler /start - terminal launch'''
    result = start_mt5(name)
    return JSONResponse(result)


@app.post('/stop/{name}')
async def stop_instance(name: str):
    '''POST handler /stop - terminal stop'''
    result = stop_mt5(name)
    return JSONResponse(result)
This will cause a string extracted from the part of the URL that corresponds to the position of {name} to be passed to the handler as an argument. And then we can work with that string inside the handler functions.
Let's update our route table to reflect the changes that have been made:
| # | Method | URL | Description, parameters | Response format |
|---|---|---|---|---|
| 1 | GET | / | Displays the main page with a web interface for managing MetaTrader 5 terminal instances. For now, let it display only the heading with the project name. | HTML |
| 2 | POST | /start/{name} | Launches a MetaTrader 5 terminal instance named {name} | JSON |
| 3 | POST | /stop/{name} | Stops the running MetaTrader 5 process named {name} | JSON |
Even though the project is still under active development, it is important to establish a robust architecture from the outset. Ideally, the application code should be easy to extend, so that adding new features, routes, or management logic does not require rewriting existing parts of the code.
That is precisely why it makes sense to adhere to the principles of separation of concerns and clean architecture, where:
- The mt5_control.py module is responsible solely for managing terminal processes.
- The main.py file focuses on routes and the web interface.
- The templates and static folders keep the application's visual layer separate.
This separation makes the project more resilient to change and makes testing easier. In the future, if necessary, these components could be moved into separate microservices.
Terminal instances
To run multiple MetaTrader 5 terminal instances on a server, they must physically be present on that server. In other words, there must be several folders on the server, each containing the terminal executable. There are various ways to achieve this, but for the sake of simplicity, let's assume for now that the user will perform this part of the work manually.
Let's carry out this operation. If you do not yet have the terminal installed on your computer, you need to download it from your broker's website or www.metatrader5.com and install it. We will create an MT5 folder with three subfolders named in the format MetaTrader5.x, and copy into them the executables for the terminal (terminal64.exe) and the editor (metaeditor64.exe) from any existing installed copy of MetaTrader 5:
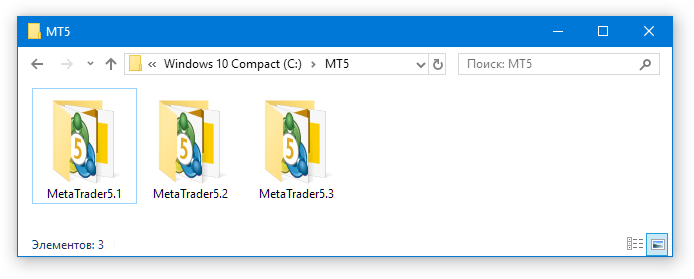
The specific names chosen for the terminal folders and their root folder do not matter. We chose these names specifically because they are short enough and easy to understand.
In each terminal's folder, run the terminal64.exe file in portable mode and connect to a trading account. Here, we will be using demo accounts provided by MetaQuotes. If updates need to be installed, wait for the process to finish. So, we now have three terminal instances installed in folders with the following full paths:
C:/MT5/MetaTrader5.1/terminal64.exe
C:/MT5/MetaTrader5.2/terminal64.exe
C:/MT5/MetaTrader5.3/terminal64.exe
These are the ones we will start and stop through the web server we are creating. For now, we will also not address switching the trading accounts that the terminals are connected to; in other words, we will focus solely on starting and stopping them.
In the future, what we have just done manually will be automated in some way. But for now, we do not need to get distracted by the implementation: once we have done this preparatory work, we will not have to revisit it for a long time focusing our efforts on the core part of the project instead.
Building the list of terminals
Last time, we implemented starting and stopping a single terminal instance located at a fixed path on our server. Now let's proceed to implement selectively starting and stopping each instance from a fixed list. As mentioned earlier, we have moved this code and will continue writing it in the new file, mt5_control.py.
We do not need any new libraries yet, apart from subprocess and psutil, which have already been added. We created three folders with terminal instances that differ only in the name of the last folder in the path to the terminal64.exe file. So let's declare two constants containing the parts of the path that are the same for all instances:
# Path to the folder containing terminal instances
MT5_FOLDER = 'C:/MT5'

# Name of the terminal executable file
MT5_EXE = 'terminal64.exe'
Now we can write a function that uses the name to build the full path to the executable file for the required terminal instance. For now, we will simply combine the three parts of the full path: the shared folder, the instance name, and the executable file name:
def instance_path(name: str) -> str:
    '''
    Build the full path from the terminal instance name

    Args:
        name (str): Terminal instance name.

    Returns:
        path (str): Full path to the terminal instance executable file.
    '''
    return f'{MT5_FOLDER}/{name}/{MT5_EXE}'
For now, we will use a regular list to store the instance names; it will contain the folder names we have chosen:
# List of instance names (fixed for now)
instances_names = ['MetaTrader5.1', 'MetaTrader5.2', 'MetaTrader5.3']
Using the list of names we have, we can unambiguously determine the full paths to the terminal executable for each terminal instance. Since these will also be fixed for now, we can create two auxiliary dictionaries in advance: one to get the path for a given name, and one to get the name for a given path:
# Name-to-path mapping dictionary
instances_paths = {name: instance_path(name) for name in instances_names}

# Path-to-name mapping dictionary
paths_instances = {instance_path(name): name for name in instances_names}
After much consideration, we decided not to reuse the information about the state of the instances that was obtained when the server started. Instead, we will update the set of running instances with each operation. To do this, we will write a load_instances() function that will create the instances dictionary. In this dictionary, the key will be the instance name, and the value will be another dictionary with two keys: pid and status. In these fields, we will store the unique identifier (PID) of the running process and the status of the instance with the specified name.
It is possible that storing these two types of information is redundant, since, in principle, we can determine whether a given instance is running or not based on the PID value. If PID > 0, then the process is running. But right now, it's not entirely clear what the best approach is, so let's keep both of these fields for now. Later, we will most likely extend the dictionary that contains information about a single instance.
First, we initialize the instances dictionary for the instances with identical values:
{'pid': 0, 'status': 'stopped'} which corresponds to an instance that is not running. Next, using the psutil library, we iterate through all the processes running on the computer. For each of them, we will check whether the process in question is one of our terminal instances. If so, we determine its name and PID, and store them in the corresponding entry of the instances dictionary.
def load_instances() -> dict:
    '''Get MetaTrader 5 instance status info
    from the specified folders.

    Returns:
        instances (dict): Terminal instance info.
    '''

    # Create a dictionary for all instances from the list of names
    instances = {name: {'pid': 0, 'status': 'stopped'}
                 for name in instances_names}

    # Iterate through all running processes
    for proc in psutil.process_iter(['pid', 'name', 'exe']):
        try:
            # Get the path to the process executable
            exe_path = str(proc.info['exe']).replace('\\', '/')

            # If it is among the terminal instance paths
            if exe_path and exe_path in paths_instanses:
                # Determine the instance name for this path
                name = paths_instanses[exe_path]

                # Get the required instance
                instance = instances[name]

                # Store the process ID and status
                instance['pid'] = proc.info['pid']
                instance['status'] = 'running'
        except (psutil.NoSuchProcess, psutil.AccessDenied):
            continue

    return instances
This function will be used in the GET / route handler to build the current state of all registered instances. It will also be used for every start and stop operation. With it, we can avoid starting an instance that is already running and avoid stopping one that has already been stopped.
Launching terminals
Let's now look at the implementation of the function that launches a terminal instance with a specific name passed as an argument. First, we obtain up-to-date information about the state of all registered terminals. If the provided name is found among the existing names, check whether there is a running process for that instance.
If not, then we start a new process using the Popen() function from the subprocess library. As its argument, you need to pass a list of command-line arguments for the executable file you want to run. The first item in this list is the full path to the executable file, followed by the /portable switch to use the current terminal folder as the working directory.
After a successful launch, we retrieve the unique process identifier (PID) from the operating system and store it, along with the "running" status, in the dictionary entry for the instance to return from the function:
def start_mt5(name: str) -> dict:
    '''
    Terminal instance launch

    Args:
        name (str): Terminal instance name.

    Returns:
        instance (dict): Info on launched terminal.
    '''

    # Getting information about terminal instances
    instances = load_instances()

    # If the instance name is in the list of available names
    if name in instances:
        # Get the required instance
        instance = instances[name]

        # If there is no running process for it, then
        if not instance['pid']:
            # Start a new process
            process = subprocess.Popen([instanсes_paths[name], '/portable'])

            # ID of the running process
            pid = process.pid

            # Save the process ID and status
            instance['pid'] = pid
            instance['status'] = 'running'

        # Return the result: started successfully
        return {name: instance}

    # Return the result: name not found
    return {name: {'status': 'not found'}}
If, however, the request contains the name of an instance that is not in the list of registered names, we do nothing and return information indicating that the instance was not found.
Stopping terminals
The function for stopping a terminal instance works in a similar way. It is also passed the instance name obtained from the request. A list of all registered instances, along with their current status, is also generated. If the instance name is valid, we retrieve its PID and create an object that allows us to manage the process with that identifier. We send a stop command to the process and wait up to 10 seconds for it to terminate:def stop_mt5(name: str) -> dict: ''' Stop terminal Args: name (str): Terminal instance name. Returns: instance (dict): Info on launched terminal. ''' # Retrieving information about terminal instances instances = load_instances() # If the instance name is in the list of available names if name in instances: # Get the required instance instance = instances[name] # Get its process ID pid = instance['pid'] # If the terminal was previously started if pid: try: # Get the terminal process object p = psutil.Process(pid) # Stop the process p.terminate() p.wait(10) except psutil.NoSuchProcess: pass # Clear the information about the previously running process instance['pid'] = 0 instance['status'] = 'stopped' # Return the result: stopped successfully return {name: instance} # Return the result: process not found return {name: {'status': 'not found'}}
If the process terminates successfully, we return a message indicating this. If not, we still consider it terminated. Under the current conditions, we have not encountered any issues with terminating processes yet, so we leave this function exactly as it is for now. When problems do arise, we will think about further refinements then.
And if it turns out that we're trying to stop a process that has already terminated (for example, we may have manually closed the running terminal window), then the function will simply return a ‘process not found’ message.
Home page
Now it is time to work on the HTML template for the home page. There are a few things we need to do in it. First, let's include the external static files containing CSS and JavaScript code. Second, let's add an unordered list to the page, with each item containing information about a single terminal instance.
To build it, we use the Jinja2 template engine. In the GET / route handler, we passed our constructed dictionary containing information about the registered terminal instances to the template object. It looks something like this:
{
    "MetaTrader5.1": {
        "pid": 23820,
        "status": "running"
    },
    "MetaTrader5.2": {
        "pid": 24888,
        "status": "running"
    },
    "MetaTrader5.3": {
        "pid": 0,
        "status": "stopped"
    }
}
By using the construct {% for name, data in instances.items() %} ... {% endfor %}, we can set up a loop that generates similar snippets of HTML code, inserting the values of the loop variables into the appropriate places. In this case, the variable name will sequentially receive the names of our terminal instances: 'MetaTrader5.1', 'MetaTrader5.2', 'MetaTrader5.3'. And the data variable will receive a dictionary with the keys pid and status for each instance from the instances dictionary.
We can also use the conditional statement construct {% if data.pid > 0 %} ... {% else %} ... {% endif %} when necessary. Thanks to this, we display only one button for each instance to perform the appropriate action: "Start" for a stopped instance and "Stop" for a running one.
<!DOCTYPE html>
<html>

<head>
  <title>MT5 Manager</title>
  <link rel="stylesheet" href="/static/styles.css">
</head>

<body>
  <h1>MT5 Manager</h1>
  <div class="instances">
    <h2>Instances</h2>
    <ul id="instanceList">
      {% for name, data in instances.items() %}
      <li class="{{ data.status }}">
        <strong>{{ name }}</strong>
        {% if data.pid > 0 %}
        (PID: {{ data.pid }})
        <button onclick="stopInstance('{{ name }}')">Stop</button>
        {% else %}
        <button onclick="startInstance('{{ name }}')">Start</button>
        {% endif %}
      </li>
      {% endfor %}
    </ul>
  </div>

  <script src="/static/script.js"></script>
</body>

</html>
Clicking the buttons on the home page, the JavaScript code in the startInstance() and stopInstance() functions will be executed.
Handling clicks
The event handlers for the Start and Stop buttons will be located in a separate file, script.js, which we have placed in the /static folder. Their code is almost identical and differs only in which endpoint the function sends the POST request to. The terminal instance name passed as an argument is substituted into the request URL, and we then expect to receive a response from our own web server. Once a response is received, it is displayed in the browser's JavaScript console, and the current page is reloaded:
/**
 * Terminal launch
 * @param {string} name - Instance name
 */
async function startInstance(name) {
  // Send a request to the required route
  const res = await fetch(`/start/${name}`, { method: "POST" });

  // Get the response
  const data = await res.json();

  // You can add additional actions here
  console.log(data);

  // Reload the page
  location.reload();
}
/**
 * Terminal stop
 * @param {string} name - Instance name
 */
async function stopInstance(name) {
  // Send a request to the required route
  const res = await fetch(`/stop/${name}`, { method: "POST" });

  // Get the response
  const data = await res.json();

  // You can add additional actions here
  console.log(data);

  // Reload the page
  location.reload();
}
Later on, the information received in the `data` variable can be used to display additional messages or update the page content without a full reload. But since our home page currently displays very little information, we can reload it completely.
To improve the appearance of the home page, let's add some styles to the styles.css file located in the /static folder. We will hold off on incorporating powerful HTML styling frameworks like Bootstrap for now; we can always use them once the project takes on a clearer shape. For now, we are just figuring out what the user interface might look like, so there's no need to focus too much on its appearance just yet.
Still, adding a small amount of styling is perfectly fine. For example, we added an additional CSS class to each list item that corresponds to the instance's status. In the styles.css file, we added rules that set a different background color for the element depending on whether it has the running class:
.instances li.running {
    background: #d1ffd1;
    border: 1px solid #89fd85;
}
Now, running and non-running instances will be clearly distinguishable from one another.
Testing
Let's start the web server by running the following command from the project's working directory:
uvicorn main:app --reload --no-use-colors
and open the page at http://127.0.0.1:8000 in your browser.
While no terminal instances are running, we can see something like this:
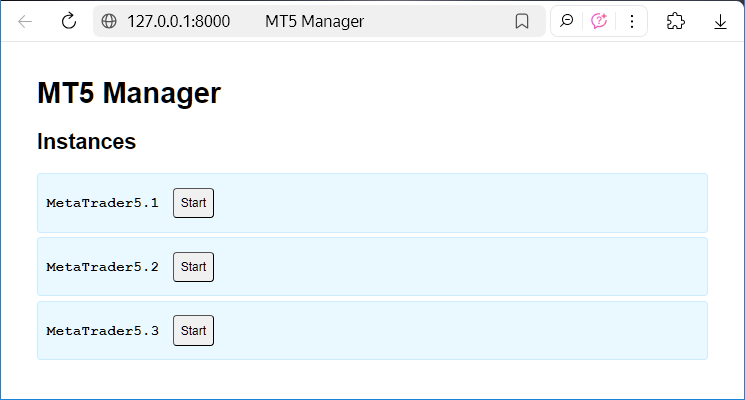
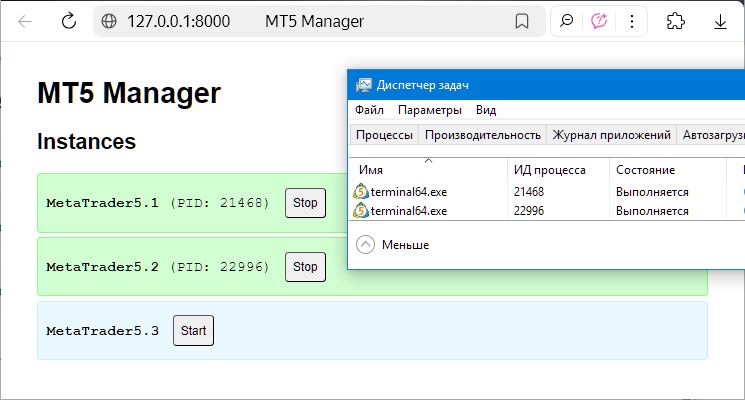
Let's click the Start button for the first and second instances. In a moment, we will see that they have transitioned to the running state, as confirmed by the Windows Task Manager, where we see two processes with the same IDs as those on the main page of our web interface:
You can also verify that the automated documentation system has captured the comments and clarifications we provided regarding the routes and their parameters:
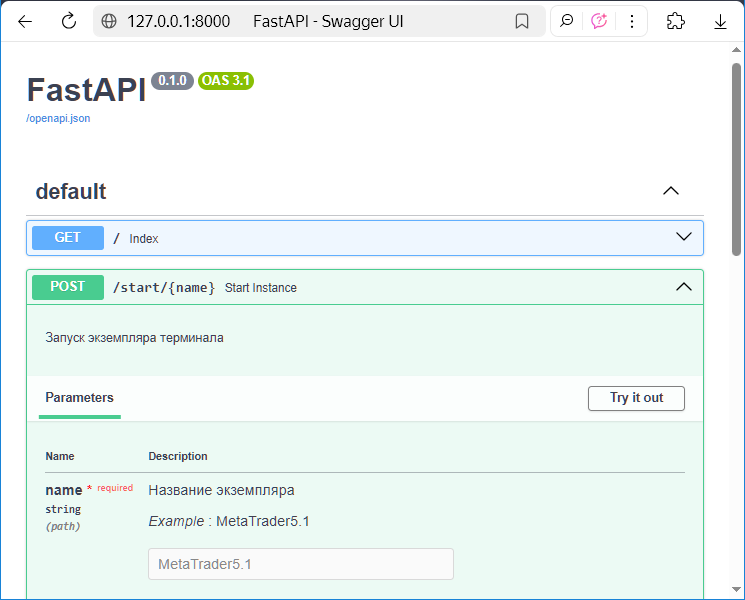
As you can see, for the POST /start/{name} route, there is a description of both the route itself and the {name} parameter, along with an example of a possible value.
Conclusion
At this stage, the MetaTrader 5 Manager project has evolved from an idea and a simple prototype into a full-fledged application that is already capable of managing multiple MetaTrader 5 terminal instances via a user-friendly web interface. Step by step, we separated the process-handling logic from the server side, added routes for managing instances, implemented a simple visualization of terminal statuses, and took our first steps toward structuring the project code.
Although the current solution is still far from final, even in its current form it already fulfills its primary purpose — it allows terminals to be started and stopped centrally, and provides information about their current status. Thus, we now have a solid foundation on which to build more complex levels of functionality.
Going forward, we will develop the project in several areas:
- automating the registration of new terminal instances and storing information about them in a database;
- expanding integration with the Python MetaTrader 5 API to retrieve statistics, orders, and trade history;
- improving the user interface — adding dynamic updates without reloading the page and visual controls;
- possibly separating the interface component into a separate front-end service.
It is also necessary to design an access control system. To do this, you can add basic authentication or use a secure HTTPS channel.
In addition, it is advisable to keep a log of operations: when and by whom the terminals were started or stopped. This data may be useful for auditing and analyzing system usage.
But the main thing that is already clear is this: the chosen architecture and technology stack (Python + FastAPI + Jinja2 + psutil) make it possible to develop the project flexibly without losing control over the system or code clarity. This is a great example of how a simple REST API can be developed, step by step, into a full-fledged system for managing real-world trading processes.
Thank you for your attention, and see you next time!
Archive contents
| # | Name | Version | Description | Latest Changes |
|---|---|---|---|---|
| mt5-manager/ | Working directory for the terminal web server project | |||
| 1 | ├─ main.py | 0.1.0 | Web application for the terminal web server | Part 2 |
| 2 | ├─ mt5_control.py | 0.1.0 | Logic for starting and stopping terminals | Part 2 |
| ├─ templates/ | ||||
| 3 | │ └─ index.html | 0.1.0 | Main page template | Part 2 |
| └─ static/ | ||||
| 4 | ├─ styles.css | 0.1.0 | CSS styles | Part 2 |
| 5 | └─ script.js | 0.1.0 | JavaScript code | Part 2 |
The project's source code is also available in the mt5-manager repository.
Translated from Russian by MetaQuotes Ltd.
Original article: https://www.mql5.com/ru/articles/19852
Warning: All rights to these materials are reserved by MetaQuotes Ltd. Copying or reprinting of these materials in whole or in part is prohibited.
This article was written by a user of the site and reflects their personal views. MetaQuotes Ltd is not responsible for the accuracy of the information presented, nor for any consequences resulting from the use of the solutions, strategies or recommendations described.

 Neural Networks in Trading: Generalizing Time Series Without Data-Specific Dependence (Core Model Modules)
 Developing a Terminal Manager (Part 1): Problem Statement
 From One Price to Four: Range-Based Volatility Estimators for MetaTrader 5
 The Blue Monkey (BM) Algorithm

- Free trading apps
- Over 8,000 signals for copying
- Economic news for exploring financial markets
You agree to website policy and terms of use