

Developing a Terminal Manager (Part 1): Problem Statement
 1 302
1 302
 0
0

Introduction
If we want to use a single Expert Advisor on our trading account, it is no problem — we just launch the terminal, set it up, and wait for the results. Let's imagine a situation where trading is going well and we want to try adding one or more Expert Advisors. If they can work without getting in each other's way, that is fine. If not, you will need to run separate terminal instances for them. Separate instances will also be needed if you want to trade on different accounts.
This is where organizational and technical challenges gradually begin to arise. How can you make your life easier by conveniently managing and monitoring multiple terminals on which Expert Advisors are running? Furthermore, the terminals can be physically located on different computers (servers). What can we do to address this?
In the past, you could use MultiTerminal for something like this. However, it only supported manual trading across multiple accounts on MetaTrader 4. Eventually, it was no longer supported at all, and its MetaTrader 5 counterpart was never released. Currently available third-party tools offer only monitoring, not full-fledged control.
Therefore, we want to create a web interface for managing MetaTrader 5 trading terminals on the available computers. Through the local website we develop, you will be able to view a list of running instances, see more detailed information about the operation of each instance, and add new instances or remove existing ones. Potentially, this list could be expanded quite significantly. This will not only make life easier, but also improve the reliability of the entire trading system as a whole.
Architecture
To create a system for managing distributed terminals, we need a modular and scalable architecture. It can be broken down into three key components that interact with one another.
- Main web server. This is the core of the system, which provides the user with an interface and coordinates operations. It will handle user commands (start, stop, monitoring), send these commands to the appropriate terminal web servers, and aggregate all available information for display on a single dashboard.
- Terminal web server(s). This is a component that runs directly on every computer where trading terminals are installed. To execute commands received from the main web server, monitor the status of locally running MetaTrader 5 terminals, and provide up-to-date information, we will use Python with the MetaTrader 5 library.
- Data storage. To store information about servers, terminals, accounts, and their configurations, we will use SQLite initially. It's a lightweight database that's ideal for prototyping and simple deployments. In addition, it can be accessed from both Python and MQL5 programs, which opens up opportunities for integration. In the future, as the load grows and the system becomes more distributed, SQLite can be replaced with a more powerful DBMS, such as PostgreSQL, but we still have to get to that point first.
We may also need an auxiliary agent in the terminals themselves — an Expert Advisor or a service; it is not entirely clear yet.
We will host all the code as a public project or projects in the MQL5 Algo Forge repository.
Mapping out the path
This is, of course, a very large-scale task, and therefore it requires a certain amount of effort just to begin working on a solution. But we have already used this simple principle many times, and it works well in situations like this. One way to describe it is: "How do you eat an elephant? — One bite at a time." This means that any complex task should be broken down into small, manageable parts and tackled one at a time until the overall goal is achieved. This will help you avoid overload, stay motivated, and achieve results faster.
So let's start by developing a simplified web server for terminals. For now, it will perform a simple task: start and stop the terminal on the server that is connected to a specific trading account, based on client requests. Between these requests, the client can send requests to receive up-to-date information about the account status. Who is a "client" in this context? For now, we will primarily act as the client, using a browser or other tools that allow us to send HTTP requests to the web server. Going forward, the main web server will be able to act as the client if we stick to the architecture we outlined at the beginning.
Let's take a look at what we will need for this and how we can use it to create a minimum viable product (MVP).
Let's recall the concepts
We mentioned that we would be developing a web server. This term can be used for an application that waits for certain types of requests over a network and can respond to them by sending back the required data. The collection of requests our web server can handle forms its API. More strictly speaking, an API (Application Programming Interface) is a set of defined rules that allow one application to interact with another. It defines how and what data can be requested or sent between programs, services, or system components. Simply put, an API is a set of rules that allows one program to communicate with another in order to exchange data.
To make this set of rules easy to use, requests and responses must follow a specific format that is clearly documented. In other words, the developers describe which requests are available, which parameters are accepted, and what is returned in the responses.In our project, we will send HTTP requests to a web server and receive either data in JSON format or web page text in HTML format in response.
Every HTTP request consists of the following parts:
- Method (e.g., GET, POST, PUT, DELETE) — defines the action. It may also be called a "verb";
- URL — the address of a resource on the server (for example, /start);
- Headers — request metadata (e.g., Content-Type, Authorization);
- Request body — data sent to the server (for example, JSON or data from a form on a web page).
Although we usually say that a method "defines an action," in reality, the specific actions performed when a request is received are determined by the web server. Since we are developing this web server ourselves, we can implement any response when processing a request with any method. But as a rule, developers adhere to certain generally accepted conventions.
For example, requests whose primary purpose is to retrieve certain information from the server usually begin with the word GET. That's why they're called GET requests. If, on the other hand, a request needs to send data to the server to be stored there, the POST or PUT verb is typically used. However, we would like to emphasize once again that the choice is up to the developer. For example, you could use only the GET method to handle all requests. Or only POST.
The next part — the URL — specifies the request, allowing the web server to understand what is being requested of it. URLs intended for a specific web server are usually specified without the name of that web server — that is, they begin with a slash "/", which denotes the root folder in the resource tree. A URL can consist of several parts separated by forward slashes "/".
If we agree that, to perform a specific action on the web server, we will send it a request with a specific verb and URL, we say that we have defined an "endpoint" or a "route."
For example, this is what an endpoint might look like if it should make the web server return an HTML page with the project name and a brief description:
And this is how we can choose an endpoint for retrieving a JSON-formatted list of all MetaTrader 5 instances running on the web server:
GET /instances
For some endpoints, we may need to pass additional parameters. In this case, a description of the names and possible values for each parameter must be provided somewhere. Parameters can be passed as part of the URL, in the headers, or in the request body.
For example, we can select the following endpoint to obtain summary information about a single running instance of MetaTrader 5:
GET /instance/<name>
Here, <name> is the variable part of the request, into which the name of the desired instance is substituted before the request is sent.
The collection of all selected endpoints (routes), along with their detailed descriptions, will constitute our web server's API.
There are different types of APIs. The one we plan to use in this project is called a REST API (short for Representational State Transfer Application Programming Interface). This is an architectural style for client-server interaction over the Internet using standard HTTP requests. It has exactly the properties we are going to use:
-
State is not stored on the server. Each request contains all the information needed to generate a response, so the server does not need to "remember" the chain of previous requests. However, this does not mean that the server cannot store any information obtained while processing previous requests. This is the main distinguishing feature of this type of API.
-
HTTP methods as an action type. In a REST API, different HTTP request methods are typically used for different operations on data items on the server: GET for retrieving data, POST for creating new records, PUT or PATCH for updating existing ones, and DELETE for deleting them. But this is just a recommendation.
-
Resource structure. All data held by the server is represented as resources with unique URLs. For example, as we mentioned above:
- /instances — a list of all terminals,
- /instance/4428341 — information about a specific terminal named 4428341.
The list of resources may expand over time; in other words, you can start the project by providing information on a small number of resources and then gradually add new ones.
In short, the REST API for our project is a set of endpoints (HTTP routes) that will allow us to manage MetaTrader 5 instances (start and stop them, and retrieve their status) on the server (computer) where the web server we are developing will run. Therefore, to create such a web server, we need to define a set of endpoints and write a program that can properly handle the corresponding requests.
When creating this program, we will also make use of two ready-made solutions:
- Uvicorn is a Python server that processes HTTP requests quickly and efficiently, with support for asynchronous operation. It is used to run web applications, including those built with FastAPI;
- FastAPI is a framework that helps you define your application's logic (request handling for all endpoints).
A framework is typically ready-made source code that contains implementations of common actions developers may need when working on their projects. How does a framework differ from a library? Perhaps the only difference is that using code from a framework is more limited in terms of scenarios; that is, a framework sets clearer boundaries for how development should be carried out.
Using FastAPI
The general principles of development using the FastAPI framework can be summarized as follows:
- A web application consists of a set of functions — request handlers for each endpoint. They can be either synchronous or asynchronous. The developer writes only these functions.
- Each handler is accompanied by a decorator that binds that function to a specific endpoint. It (the decorator) specifies the appropriate HTTP method, URL, and other necessary parameters.
- Within a function, you can retrieve parameters from the request body, headers, URL, etc., using special types from the FastAPI framework (such as Form, Query, Path, and Body).
- The function returns a response that FastAPI automatically converts to JSON or HTML.
In addition to solving the main task, the FastAPI framework lets you automatically validate the types and presence of parameters in requests, generate documentation for all endpoints, and handle errors by returning JSON with their descriptions. We'll take a look at this in action a little later.
Creating the first version of the web server
To work on the project, we created a new empty repository named mt5-manager on MQL5 Algo Forge. Let's clone it to any convenient folder and add a new file for our web application, main.py:
mt5-manager/
│
└── main.py # FastAPI main file
To work with the selected framework and server, we'll need to install the necessary Python modules using the pip package manager:
pip install fastapi uvicorn jinja2 psutil
Let's start making a list of the required endpoints (routes). For now, let's add one route to it:
| # | Method | URL | Description, parameters | Response format |
|---|---|---|---|---|
| 1 | GET | / | Displays the main page with a web interface for managing MetaTrader 5 instances. For now, it should display only a heading with the project name. | HTML |
Let's create a minimal web application that handles this route. To do this, we will start by importing the main application class from the FastAPI framework. This class is called FastAPI:
from fastapi import FastAPI
Next, let's create an object of this class. This will be our web application object. We will call it, say, app:
app = FastAPI()
Let's add a function called index() that will return a first-level heading with the project name. Let's make it asynchronous by adding the async keyword:
async def index():
    return '<h1>MT5 Manager</h1>'
Now there's just one final, but very important, step left: adding the decorator that ties everything together. But first, let's explain in a little more detail what this is.
Decorators in Python are functions that modify the behavior of other functions (or classes) without directly changing their code. The modification is achieved by creating a new function that internally uses the original function in some way. If this new function is then saved under the same name as the original, all subsequent calls will be directed to the modified function. This allows you to add additional logic (such as validation, logging, or caching) before or after executing the code of the original main function.
To apply a decorator to a function, you need to either call it directly:
# Original function
def my_function():
    pass

# We call the decorator function, passing it the original function
# We store the new function returned under the same name
my_function = my_decorator(my_function)
Alternatively — and this is what is always used in practice — you can simply specify the name of the required decorator before the function header, preceded by the @ symbol:
# Creating a new function with the my_decorator decorator applied
@my_decorator
def my_function():
    pass
Now let's add the decorator we need:
@app.get('/')
async def index():
    return '<h1>MT5 Manager</h1>'
In other words, @app.get('/') is a decorator that tells FastAPI that the index() function should handle GET requests to the / path.
Let's put it all together in the main.py file:
# Import the necessary classes from the libraries
from fastapi import FastAPI

# Creating an application object
app = FastAPI()

# GET request handler for / (the root directory)
@app.get('/')
async def index():
    return '<h1>MT5 Manager</h1>'
The minimal web application is ready to launch. Now we need to start the Uvicorn server from the console, specifying our web application as the source of the request-handling rules:
uvicorn main:app --reload --no-use-colors
Here, main:app means that our web application is located in a file named main.py in the current folder, and the application object in the source code is called app. The --reload option forces the server to restart automatically when changes are made to the web application's source code. The --no-use-colors option disables colored text output in the console (needed if the server is run in a console that does not support this feature).
Once the server starts, we will see something like this:
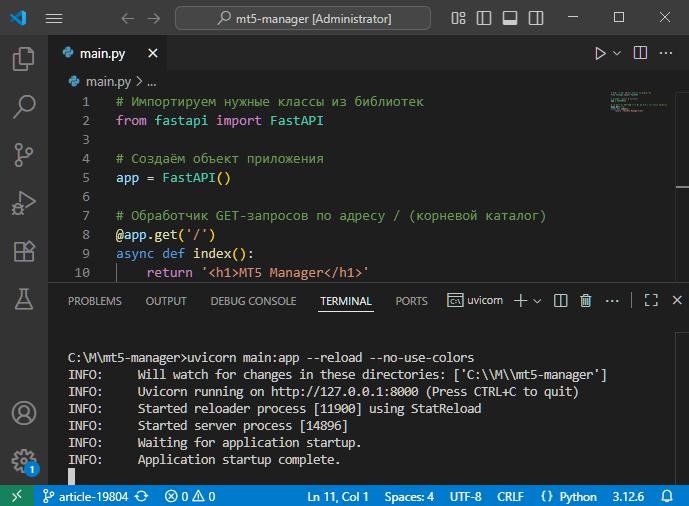
By default, the web server will use port 8000, so to see it in action, open your browser and go to http://127.0.0.1:8000. Here's what you'll get:
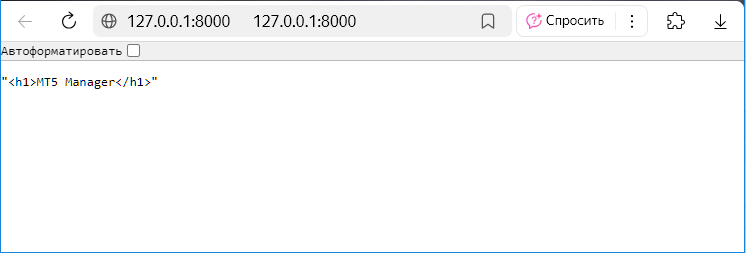
As you can see, the page does indeed display the text that we return from the index() function. But for some reason, the browser doesn't interpret the HTML heading tags, displaying them simply as part of the page text. Everything is fine; that is how it should be. The thing is, by default, the server returns the result along with information indicating that the result is JSON code. That is why the browser did not parse the received text as HTML code. We will fix that right now.
Let's import another class from FastAPI; it represents the server response in HTML format. In the line where the decorator is applied, we will add an additional response_class parameter, where we pass the HTMLResponse class via the response_class parameter.
# Let's import the necessary classes from the libraries
from fastapi import FastAPI
from fastapi.responses import HTMLResponse

# Creating an application object
app = FastAPI()

# GET request handler at / (the root directory)
@app.get('/', response_class=HTMLResponse)
async def index():
    return '<h1>MT5 Manager</h1>'
Now, the string returned by our original function will be used to create an object of the HTMLResponse class. It is an object of this class that will be returned when the decorated function is called.
After saving these changes, the previously running Uvicorn server will automatically restart, and we'll see the expected view in the browser:
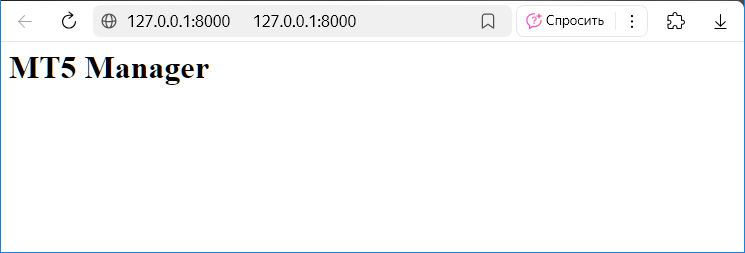
The first version is ready; now we can start thinking about expanding the list of handled routes.
Adding terminal start/stop
Let's not rush things; first, we will work through starting and stopping a single specified terminal instance. We will assume that the computer on which we plan to run our web server has a terminal installed at
C:/Program Files/MetaTrader 5/terminal64.exe
Let's try to make it so that it can be started and stopped when the corresponding requests are sent to the web server. To do this, we will add two new routes to the route table:
| # | Method | URL | Description, parameters | Response format |
|---|---|---|---|---|
| 1 | GET | / | Displays the main page with a web interface for managing MetaTrader 5 instances. For now, it should display only the heading with the project name. | HTML |
| 2 | POST | /start | Starts an instance of the MetaTrader 5 terminal from the configured path. | JSON |
| 3 | POST | /stop | Stops a running MetaTrader 5 process | JSON |
We set the response format for these routes to JSON because we do not want their processing to produce some HTML page that the browser would display. Conceptually, this should be a page with a message about the startup result, but in the future we will be able to see these results on the main page returned after processing the first route. To make the code clearer, we can explicitly specify that the result will be a response object in JSON format.
Let's import another class from the framework:
from fastapi.responses import HTMLResponse, JSONResponse
Now it can be used in the same way we used the HTMLResponse class, or by explicitly creating an object of the desired class when returning a value from a route handler. Below, we'll show what the second option looks like.
It is good practice to minimize the amount of code inside route handlers. This is achieved by moving almost all operations into separate external functions. Here's how you could write the code for two new route handlers, taking the above into account:
# POST /start handler: starting the terminal
@app.post('/start')
async def start_instance():
    result = start_mt5()
    return JSONResponse(result)

# POST /stop handler: stopping the terminal
@app.post('/stop', response_class=JSONResponse)
async def stop_instance():
    result = stop_mt5()
    return JSONResponse(result)
We will write the start_mt5() and stop_mt5() functions a little later. As their names suggest, these are the functions that will contain the code responsible for directly starting or stopping the MetaTrader 5 terminal.
But first, we will create a constant containing the full path to the terminal executable file and a dictionary to store information about the running process:
# Path to the terminal executable file
MT5_PATH = 'C:/Program Files/MetaTrader 5/terminal64.exe'

# A dictionary for storing information about a running terminal
instances = {}
We will need the subprocess library for the terminal launch function, so let's import it first, and then implement the start_mt5() function itself. For now, we'll implement startup by calling the Popen() function, to which we need to pass a list of command-line arguments. In our case, this list will consist of a single item — the full path to the MetaTrader 5 terminal executable file.
import subprocess

# Starting the terminal
def start_mt5():
    # Start a new process
    process = subprocess.Popen([MT5_PATH])

    # ID of the running process
    pid = process.pid

    # Save the process ID and status
    instances['default'] = {'pid': pid, 'status': 'running'}

    # Return the result: successful launch
    return {'instance': 'default', 'pid': pid}
Using this startup method makes it easier to implement the function for stopping the terminal. Since we store the new process ID (PID) at startup, we can use the psutil library, which includes a class for representing running processes, to stop it. In the stop_mt5() function, we create an object of this class using the identifier of the required process and then stop it by calling the terminate() method.
If everything is okay, we return a message indicating that the process was successfully stopped; otherwise, we return a message indicating that the process was not found.
import psutil

# Stopping the terminal
def stop_mt5():
    # If the terminal was previously started
    if 'default' in instances:
        # Get its process ID
        pid = instances['default']['pid']
        try:
            # Get the terminal process object
            p = psutil.Process(pid)

            # Stop the process
            p.terminate()

            # Remove information about the previously started process
            del instances['default']

            # Return the result: successful stop
            return {'status': 'stopped', 'instance': 'default'}
        except psutil.NoSuchProcess:
            # If the process is not found, then
            # remove information about the previously started process
            del instances['default']

    # Return the result: process not found
    return {'status': 'not found', 'instance': 'default'}
Let's save the changes we have made to the main.py file and see how we can test the new functionality.
Documentation and testing
While we can easily test the first route by simply entering the desired URL in the address bar, we cannot test the second and third routes that way. This is because when a request is sent from the browser's address bar, the browser always uses GET requests. Now we need to check how the endpoints work — the ones that can only be accessed via a POST request. Fortunately, the framework will help us in this case as well.
FastAPI automatically generates interactive API documentation based on decorators and type annotations in the code. FastAPI also includes built-in support for Swagger UI (Swagger/OpenAPI is a standard for describing REST APIs), which lets you view and test all endpoints directly in the browser. This is very convenient, especially if we plan to use this API in other web applications later on.
To access this tool, simply open http://127.0.0.1:8000/docs after starting the web server application. Although we did not add this endpoint ourselves, it is available in any web application built using the FastAPI framework.
When you visit this page, you will see a list of all the endpoints (routes) of our web server that were added in our web application:
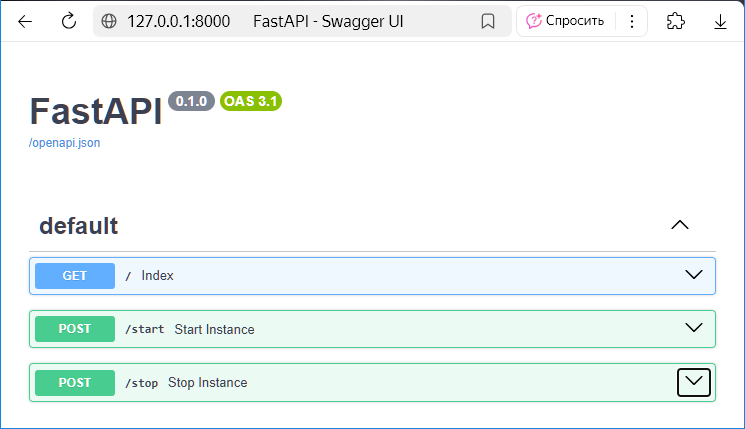
You can expand each route to view a list of parameters with descriptions and the response format. Our routes do not have any parameters yet, so for now we only see "No parameters":
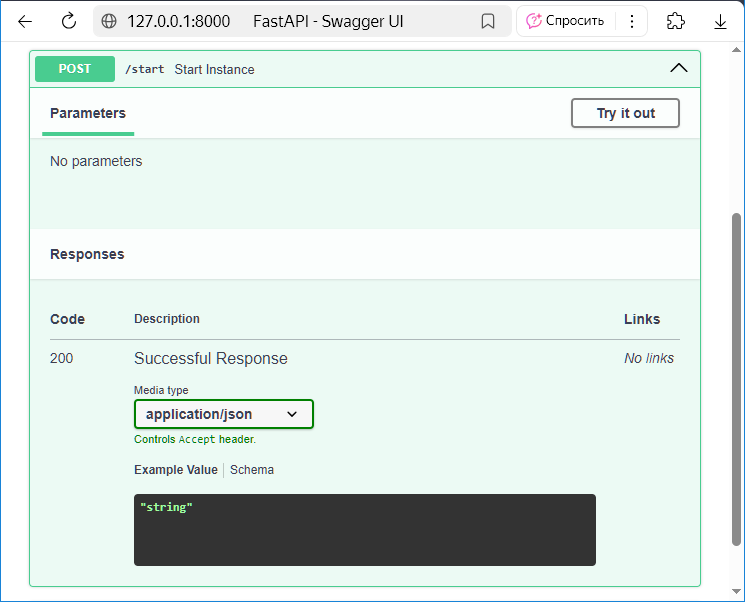
But the most interesting part, of course, is the ability to manually send a request to each endpoint and see the result. To do this, click the "Try it out" button in the open route, and then click the "Execute" button that appears.
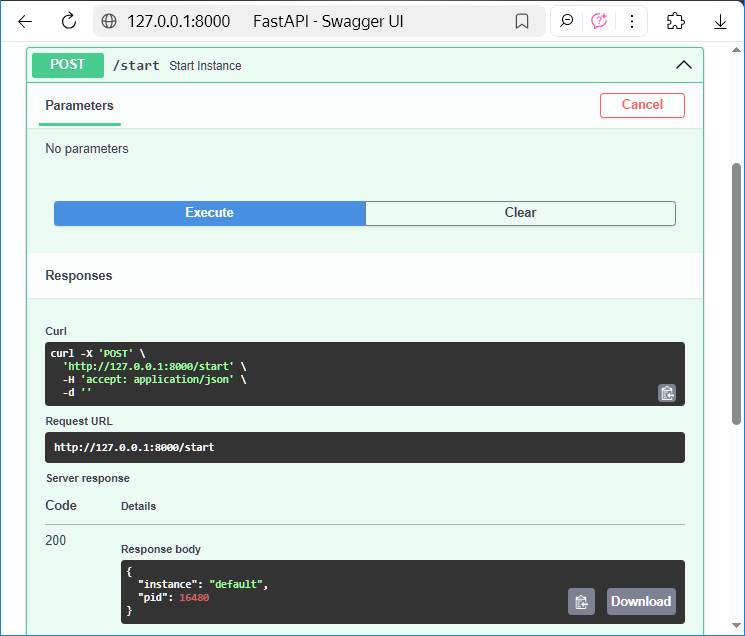
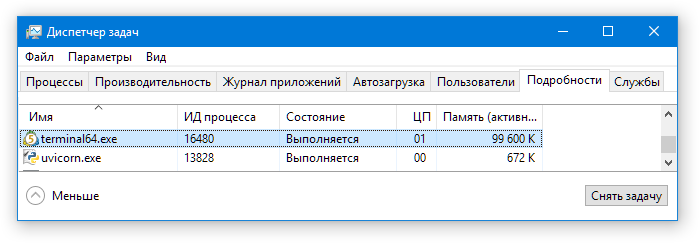
As a result, we will see a response from the web server with a 200 (OK) status code and information about the running instance of the MetaTrader 5 terminal with the process ID pid=16480. If you open the Windows Task Manager on your computer, you can verify that this process actually exists and that it is indeed the MetaTrader 5 terminal:
If you now do the same thing for the POST /stop route, the running terminal will stop, and the web server will send a confirmation in response:
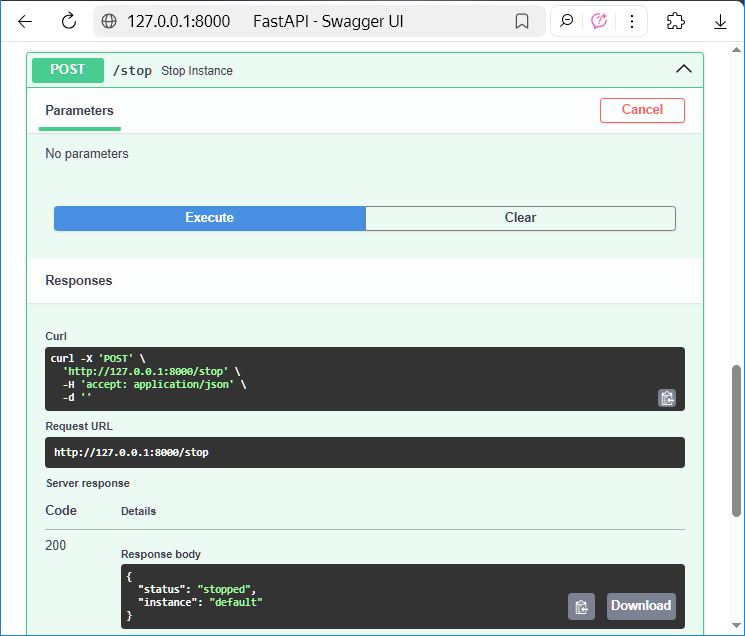
So, using this tool, we verified that our web server correctly processes requests to all endpoints and performs the necessary actions.
Conclusion
We will pause here and take a look at what we have accomplished so far on our way to achieving our goal. We have successfully developed a working prototype of the MetaTrader 5 terminal management system. Our minimal web server built with FastAPI can already start and stop the terminal using a standard HTTP request. Not only did we implement the basic logic, but we also verified that it works.
This MVP is a critically important first step that confirms we are on the right track. We have "taken the first bite of the elephant" and built a foundation on which we can build further functionality. The next logical steps will be:
- Adding the ability to register multiple computers with terminals.
- Creating an interface to link trading accounts to specific servers and terminals.
- Extending the API to retrieve detailed information about account status, open positions, and the operation of Expert Advisors.
We have a long road ahead of us, but we've already taken the first step.
Thank you for your attention. See you next time!
Archive Contents
| # | Name | Version | Description | Latest Changes |
|---|---|---|---|---|
| mt5-manager | Working folder for the terminal web server project | |||
| 1 | main.py | 1.00 | Web application for a terminal web server | Part 1 |
Translated from Russian by MetaQuotes Ltd.
Original article: https://www.mql5.com/ru/articles/19804
Warning: All rights to these materials are reserved by MetaQuotes Ltd. Copying or reprinting of these materials in whole or in part is prohibited.
This article was written by a user of the site and reflects their personal views. MetaQuotes Ltd is not responsible for the accuracy of the information presented, nor for any consequences resulting from the use of the solutions, strategies or recommendations described.

 Developing a Terminal Manager (Part 2): Running Multiple Terminal Instances
 The Blue Monkey (BM) Algorithm
 Neural Networks in Trading: Generalizing Time Series Without Data-Specific Dependence (Core Model Modules)
 Building Your Personal Expert Advisor (Part 1): From Fragile Script to Working EA

- Free trading apps
- Over 8,000 signals for copying
- Economic news for exploring financial markets
You agree to website policy and terms of use