Smc Session Killzone and Breakout
- Индикаторы
-
Enechojo Victor Ayegba
 Hello, Welcome to my page
I am just your regular everyday 26year old programmer [ 7years experience ] / Day Trader [5years of Trading Experiences] with a very big heart for automation processes with python, c# and mql5 ..
Stay Tuned. - Версия: 1.10
Smc Session Killzone and Breakout
The Smc Session Killzone and Breakout indicator automates the institutional session trading model for MetaTrader 5. It draws the Asian, London, and New York session ranges as labelled boxes on the chart, detects when price sweeps beyond the Asian session high or low, and fires a non-repainting entry signal after a Market Structure Shift is confirmed. All signals are based on closed bars and do not repaint.
The underlying model follows the sequence that institutional traders use daily. During the Asian session, price accumulates in a range while stop orders build up on both sides of that range. During the London session or New York open, one side of the Asian range is swept to collect those orders. After the sweep, price shifts structure in the opposite direction and the indicator signals a high-probability entry in line with the real move.
COMPREHENSIVE INSTALLATION & USER GUIDE
How the detection works
The indicator records the Asian session range each day between the configured start and end hours in UTC. The range must fall within a minimum and maximum pip threshold to qualify. Very narrow ranges lack sufficient liquidity. Very wide ranges typically indicate overnight news events rather than clean accumulation, and are excluded automatically.
A sweep is detected when price wicks beyond the Asian high or low by a minimum number of pips and then closes back inside the range. After a sweep is detected, the indicator looks for a Market Structure Shift: the price must close beyond the swing high or low of the preceding bars in the opposite direction to confirm the reversal. An optional Fibonacci pullback entry is available which waits for price to retrace before the signal fires, improving the risk/reward ratio of the setup.
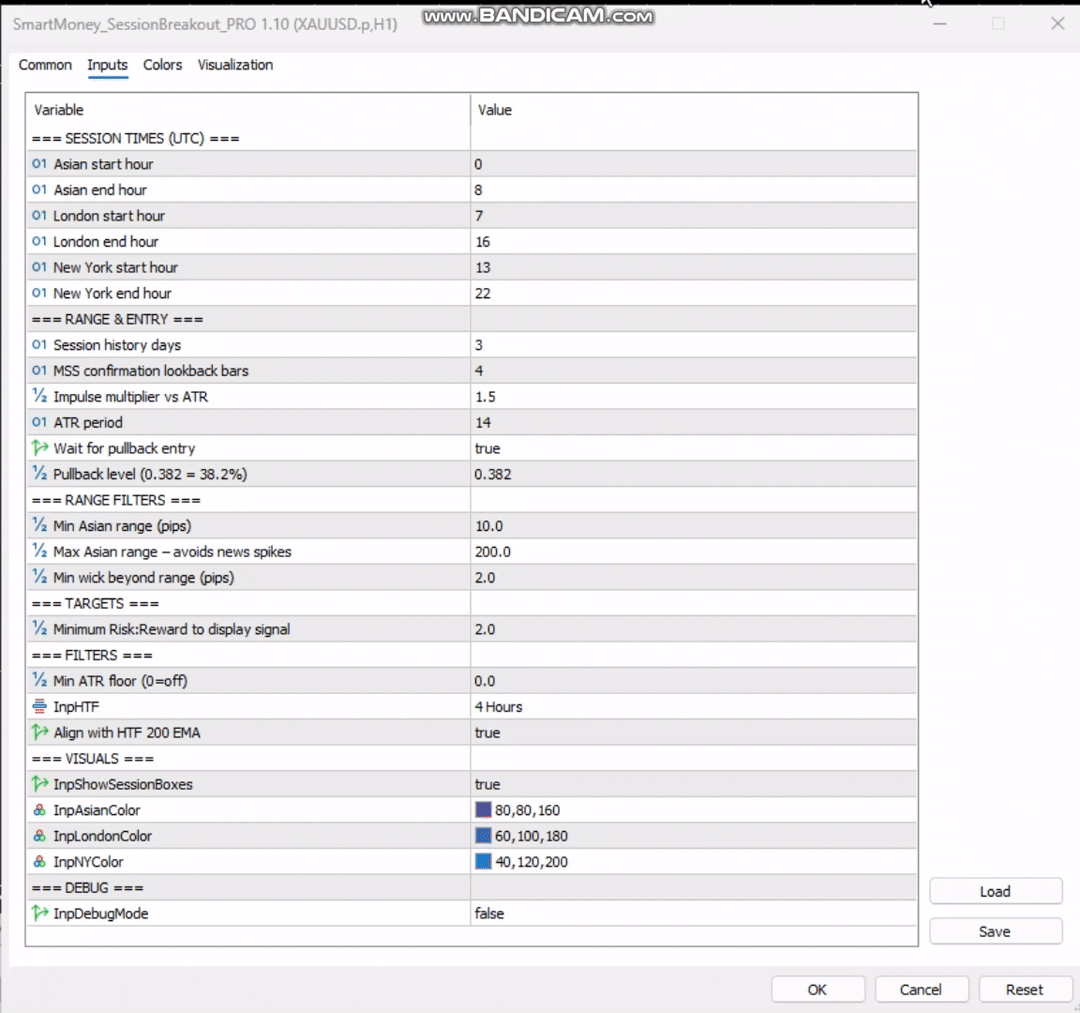
Key settings
| Setting | Default | Purpose |
|---|---|---|
| Asian session hours (UTC) | 00:00 to 08:00 | Defines the range-building session. Adjust by 1 hour during DST periods. |
| London session hours (UTC) | 07:00 to 16:00 | London becomes 06:00-15:00 UTC during British Summer Time. |
| New York session hours (UTC) | 13:00 to 22:00 | New York becomes 12:00-21:00 UTC during US EDT. |
| Min/Max range pips | 10 / 200 | Filters out days with abnormal Asian session ranges |
| Wait for pullback | On | When on, entry waits for a Fibonacci retrace after the MSS |
| Minimum risk/reward | 2.0 | Signals below this ratio are not shown |
| Higher timeframe bias | H4 EMA 200 | Long signals only above HTF EMA. Short signals only below. |
What appears on the chart
Three session boxes are drawn each day showing the Asian, London, and New York ranges with their pip sizes labelled. When the Asian high is swept, the box is tagged to indicate it. When the Asian low is swept, the same applies. A sweep marker arrow appears at the bar where the sweep occurred. After the full sequence is confirmed, an entry arrow appears, and the stop loss and take profit levels are calculated from the session structure automatically.
Compatibility
Suitable for all currency pairs, indices, and metals traded in MetaTrader 5. Recommended timeframes are M15 and M30. All session times are in UTC. No DLL imports required.
I would greatly appreciate a positive review if you are happy with your indicator. Please contact me to find a solution if you are not. | MQL5 |
Your feedback helps improve the tool for every trader in the community.