Creating a Trading Administrator Panel in MQL5 (Part XII): Integration of a Forex Values Calculator

Contents:
- Introduction
- Overview
- Forex Calculations and Formulas
- Implementation:
- (1) Adjusting the Pending Orders section to create space for new controls.
- (2) Developing the Forex Values Calculator control class.
- (3) Integrating the Forex Values Calculator into the Trade Management Panel.
- (4) Adjustments to the New Admin Panel EA for responsiveness to the new updates.
- Testing
- Conclusion
Introduction
Today’s discussion focuses on solving the problem of manually or externally calculating trading values by integrating a Forex Calculator directly into the Trade Management Panel—a sub-panel of the New Admin Panel EA.
In the past, many traders relied on external websites to perform these calculations. These tools have been incredibly helpful, and credit is due to the developers of such platforms for offering valuable services. Even today, some traders continue to use these online calculators—it's ultimately a matter of preference.
However, with the power of MQL5 and its GUI capabilities, we now have the opportunity to build more efficient, integrated solutions directly within the trading terminal. This approach eliminates the need to switch between applications and enhances workflow by keeping all essential tools in one place.
Thanks to MetaTrader 5 for providing a robust API that allows seamless access to market news and data feeds within the terminal. Although third-party APIs exist for calculators and news feeds, we aim to develop a native calculator algorithm tailored specifically for our panel.
This project does not undermine existing solutions, but rather expands the range of choices available to traders. It promotes a more in-depth understanding of MetaTrader 5’s capabilities and encourages users to engage with the platform more effectively. By offering a fully integrated tool set within the terminal, we aim to support a smoother, more productive trading experience—demonstrating how advancements in trading technologies continue to revolutionize the industry.
Some of the values to be calculated are:
- Position Size
- Risk Amount
- Pip Value
- Margin Requirement
- Profit/Loss Estimation
- Swap/Overnight Fees
- Risk-to-Reward Ratio
- Margin Level
- Spread Cost
- Break-Even Price
- Expected Payoff
- Leverage Impact etc.
These calculations are vital for Forex traders because they provide a structured framework for managing risk, optimizing trade setups, and maintaining account sustainability. Position size and amount of risk, calculations, ensure traders risk only a small, predefined portion of their capital, protecting against significant losses. Pip value and profit/loss estimations enable precise trade planning, helping traders set realistic targets and stop-loss levels. Margin requirements and margin level calculations prevent over-leveraging, which could lead to margin calls or account blowouts. Swap fees are critical for long-term traders, especially those employing carry trades, as they impact holding costs.
The risk-to-reward ratio guides trade selection, ensuring potential rewards justify risks. Additional metrics like spread cost, break-even price, expected payoff, and leverage impact enhance decision-making by accounting for transaction costs, strategy viability, and overall risk exposure. Together, these tools empower traders to make informed, disciplined decisions, aligning trades with their financial goals and market conditions, ultimately improving consistency and profitability.
In the next section, I will provide a summarized outline of how we will approach today’s development.
Overview
Since we introduced modular design into this series, we've gained the ability to focus on individual sections of the program without disrupting other components. This flexibility now allows us to upgrade the Trade Management Panel to make space for the integration of calculation tools.
To achieve this, we'll leverage additional classes from the MQL5 Standard Library. Instead of maintaining separate input sections for each order type, we will implement a drop-down menu for order selection, accompanied by a single input row. This streamlined layout will free up space for our calculator components.
While not all trading values need to be displayed, certain key values are essential for informed decision-making and must be made available. Some of these values do not need to be calculated at all, as they are already accessible via live market data in MQL5.
We will begin with a detailed exploration of the key forex terms and values, including their definitions, formulas, and how they are represented within MQL5. From there, we’ll move into the implementation phase, starting with adjusting the Orders section of the Trade Management Panel to accommodate the calculator’s front-end interface.

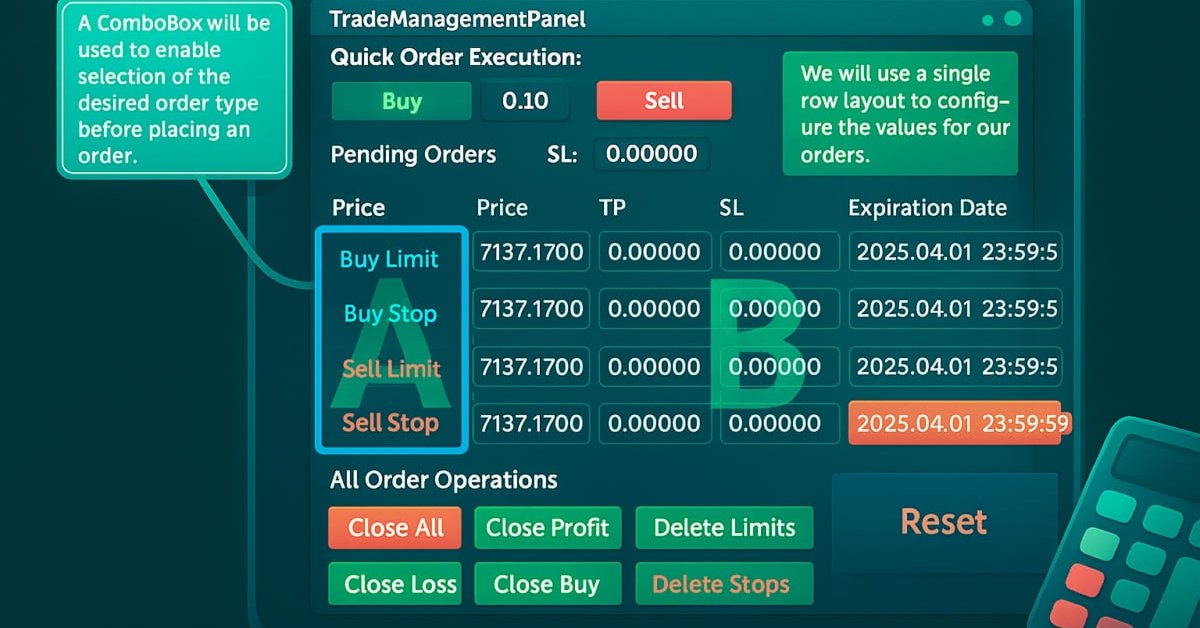
Enhancement of the TradeManagementPanel
In the section labelled A in the above illustration, we will use the ComboBox class to list and select the order type. Section B will be adjusted to a single-row layout, with the expiration date, C, enhanced using a DatePicker for better usability.
Following the layout adjustments, we will integrate both the calculation logic and the GUI input logic, which typically requires fewer than three input fields per calculation.
Finally, I’ll share the testing process and results, and we’ll conclude with an evaluation of the new functionality.
Forex Calculations and Formulas
In the table below, I present some common forex terms that typically require calculation, along with the corresponding formulas and custom MQL5 functions used to compute them. These examples are not exhaustive; as a trader, you may need to perform additional calculations depending on the specific strategy you are implementing. The formulas in the table below are the result of extensive research, and combining mathematical insights from various online sources. For further study or verification, you are encouraged to explore additional information using Google or other reputable resources.
| Forex term and description | General Formula | MQL5 coded formula |
|---|---|---|
| Position Size Calculates the number of lots to trade based on account balance, risk percentage, and stop loss, ensuring risk aligns with the trader’s strategy. |  | double CalculatePositionSize(double accountBalance, double riskPercent, double stopLossPips, string symbol) { if (accountBalance <= 0 || riskPercent <= 0 || stopLossPips <= 0) return 0.0; double pipValue = CalculatePipValue(symbol, 1.0, AccountCurrency()); if (pipValue == 0) return 0.0; double positionSize = (accountBalance * (riskPercent / 100.0)) / (stopLossPips * pipValue); double lotStep = MarketInfo(symbol, MODE_LOTSTEP); double minLot = MarketInfo(symbol, MODE_MINLOT); double maxLot = MarketInfo(symbol, MODE_MAXLOT); return NormalizeDouble( MathMax(minLot, MathMin(maxLot, positionSize)), (int)-MathLog10(lotStep)); } |
| Risk Amount Quantifies the monetary amount at risk on a trade, based on position size and stop loss, ensuring losses stay within acceptable limits. | | double CalculateRiskAmount(double positionSize, double stopLossPips, string symbol) { if (positionSize <= 0 || stopLossPips <= 0) return 0.0; double pipValue = CalculatePipValue(symbol, positionSize, AccountCurrency()); return NormalizeDouble(positionSize * stopLossPips * pipValue, 2); } |
| Pip Value Calculates the monetary value of a one-pip movement for a given lot size, essential for risk and profit calculations. |  | double CalculatePipValue(string symbol, double lotSize, string accountCurrency) { double tickSize = MarketInfo(symbol, MODE_TICKSIZE); double tickValue = MarketInfo(symbol, MODE_TICKVALUE); double pipSize = StringFind(symbol, "JPY") >= 0 ? 0.01 : 0.0001; double conversionRate = 1.0; if (accountCurrency != SymbolInfoString(symbol, SYMBOL_CURRENCY_PROFIT)) { string conversionPair = SymbolInfoString( symbol, SYMBOL_CURRENCY_PROFIT) + accountCurrency; if (SymbolSelect(conversionPair, true)) { conversionRate = MarketInfo(conversionPair, MODE_BID); } else { Print("Warning: Conversion pair ", conversionPair, " not found, using 1.0"); } } if (tickSize == 0) return 0.0; return NormalizeDouble((tickValue / tickSize) * pipSize * lotSize * conversionRate, 2); } |
| Margin Requirement Determines the funds needed to open a position, based on lot size, contract size, and leverage, to avoid over-leveraging. |  | double CalculateMarginRequirement(double lotSize, string symbol) { double marginRequired = MarketInfo(symbol, MODE_MARGINREQUIRED); if (marginRequired == 0) { Print("Error: Margin requirement not available ", symbol); return 0.0; } return NormalizeDouble(lotSize * marginRequired, 2); } |
| Profit/Loss Estimation Estimates potential profit or loss based on entry and exit prices, aiding in setting realistic trade targets. |  | double CalculateProfitLoss(double entryPrice, double exitPrice, double lotSize, string symbol) { if (lotSize <= 0 || entryPrice <= 0 || exitPrice <= 0) return 0.0; double contractSize = MarketInfo(symbol, MODE_LOTSIZE); double conversionRate = 1.0; if (AccountCurrency() != SymbolInfoString(symbol, SYMBOL_CURRENCY_PROFIT)) { string conversionPair = SymbolInfoString( symbol, SYMBOL_CURRENCY_PROFIT) + AccountCurrency(); if (SymbolSelect(conversionPair, true)) { conversionRate = MarketInfo(conversionPair, MODE_BID); } } double priceDiff = exitPrice - entryPrice; double pips = priceDiff / (StringFind(symbol, "JPY") >= 0 ? 0.01 : 0.0001); return NormalizeDouble(pips * CalculatePipValue(symbol, lotSize, AccountCurrency()), 2); } |
| Swap/Overnight Fees Calculates interest charged or earned for holding positions overnight, important for long-term trades. | | double CalculateSwap(double lotSize, string symbol, bool isBuy, int days = 1) { double swapLong = MarketInfo(symbol, MODE_SWAPLONG); double swapShort = MarketInfo(symbol, MODE_SWAPSHORT); if (swapLong == 0 && swapShort == 0) { Print("Error: Swap rates not available ", symbol); return 0.0; } double swap = isBuy ? swapLong : swapShort; datetime currentTime = TimeCurrent(); if (TimeDayOfWeek(currentTime) == 3) days *= 3; double totalSwap = lotSize * swap * days; return NormalizeDouble(totalSwap, 2); } |
| Risk-to-Reward Ratio Measures potential profit relative to potential loss, guiding trade selection for positive expectancy. |  | double CalculateRiskRewardRatio(double takeProfitPips, double stopLossPips) { if (stopLossPips <= 0 || takeProfitPips <= 0) return 0.0; return NormalizeDouble(takeProfitPips / stopLossPips, 2); } |
| Margin Level Shows the percentage ratio of account equity to used margin, monitoring account health to avoid margin calls. | 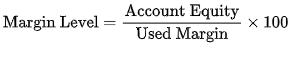 | double CalculateMarginLevel() { double equity = AccountEquity(); double margin = AccountMargin(); if (margin == 0) return 0.0; return NormalizeDouble((equity / margin) * 100, 2); } |
| Spread Cost Calculates the monetary cost of the bid-ask spread for a trade, critical for short-term trading strategies. | | double CalculateSpreadCost(double lotSize, string symbol) { double spreadPips = MarketInfo(symbol, MODE_SPREAD) / 10.0; double pipValue = CalculatePipValue(symbol, lotSize, AccountCurrency()); return NormalizeDouble(spreadPips * pipValue * lotSize, 2); } |
| Leverage Impact Measures the effective leverage used in a trade, highlighting risk exposure relative to account equity. |  | double CalculateLeverageImpact(double positionSize, string symbol, double accountEquity) { if (positionSize <= 0 || accountEquity <= 0) return 0.0; double contractSize = MarketInfo(symbol, MODE_LOTSIZE); double marketPrice = MarketInfo(symbol, MODE_BID); return NormalizeDouble((positionSize * contractSize * marketPrice) / accountEquity, 2); } |
In the next implementation section, we will leverage the MQL5 Standard Library’s CComboBox to optimize space usage for the calculator controls that will be integrated into the TradeManagementPanel. This approach offers valuable lessons in efficient UI design and control management. Additionally, we will incorporate a DatePicker component to improve the user experience when selecting an order expiration date.
Implementation
To ensure steady progress, we will break down our development into four main stages:
- (1) Adjusting the Pending Orders section to create space for new controls.
- (2) Developing the Forex Values Calculator control class.
- (3) Integrating the Forex Values Calculator into the TradeManagementPanel.
- (4) Adjustments to the New Admin Panel EA for responsiveness to the new updates.
Once these steps are completed, we will update the NewAdminPanel EA to support the new features and run tests. It is important to pay close attention throughout the process to avoid missing critical details—especially when working with the ComboBox and DatePicker components.
(1) Adjusting the Pending Orders section to create space for new controls
Now, we will extract the Pending Orders section from the TradeManagementPanel header to isolate it for easier implementation of the ComboBox and DatePicker components. Additionally, we will add an order placement button, which will be pressed once the order has been fully configured.
Member Declarations for Pending Orders
These member variables live under “Pending Orders section” in the CTradeManagementPanel class. We begin by declaring one label, which appears above the pending-order controls as a section heading (“Pending Orders:”).
//  Pending Orders
CLabel      m_secPendingLabel;    // “Pending Orders:” header
CLabel      m_pendingPriceHeader; // “Price:” column header
CLabel      m_pendingTPHeader;    // “TP:” column header
CLabel      m_pendingSLHeader;    // “SL:” column header
CLabel      m_pendingExpHeader;   // “Expiration:” column header

CComboBox   m_pendingOrderType;   // Combobox for “Buy Limit / Buy Stop / Sell Limit / Sell Stop”
CEdit       m_pendingPriceEdit;   // Edit box for pending‐order price
CEdit       m_pendingTPEdit;      // Edit box for pending‐order take‐profit
CEdit       m_pendingSLEdit;      // Edit box for pending‐order stop‐loss
CDatePicker m_pendingDatePicker;  // DatePicker for expiration date
CButton     m_placePendingButton; // “Place Order” button for pending orders
Immediately beneath it, four more labels serve as column headers—“Price:”, “TP:”, “SL:”, and “Expiration:”. Below the labels, we introduce a ComboBox to allow the user to choose among four pending-order types: Buy Limit, Buy Stop, Sell Limit, and Sell Stop. To the right of that ComboBox, three edit controls enable the user to type in the pending-order price, take-profit (TP), and stop-loss (SL), respectively. Next to these edit boxes sits a date picker, which simplifies choosing an expiration date. Finally, we declare a button labelled Place Order; when pressed, it will trigger the actual placement of the pending order with the parameters provided.
By grouping these six controls and five labels under this section, we isolate everything needed to build and manage pending orders. This separation makes it easier to explain or refactor just the pending-order logic without touching the rest of the panel.
Creating Pending-Order Controls in Create(...)
Within the Create(...) method, we build the entire Pending Orders section immediately after drawing a separator line under the Forex Calculator. First, we add a small vertical gap to visually separate it from the calculator above. Then, a section header label (“Pending Orders:”) is created and styled in bold to set it apart from other sections.
Next, the ComboBox for selecting order type is placed to the right of this header. After adding the ComboBox and advancing the vertical position, we create four column headers: Price:, TP:, L:, and Expiration: Each header is positioned horizontally with equal spacing so that they line up above the input row.
// In CTradeManagementPanel::Create(...), after Section separator:

// 10px vertical offset before “Section 3” header
curY += 10;
if(!CreateLabelEx(m_secPendingLabel, curX, curY, DEFAULT_LABEL_HEIGHT,
                  "SecPend", "Pending Orders:", clrNavy))
   return(false);
m_secPendingLabel.Font("Arial Bold");
m_secPendingLabel.FontSize(10);

// Create the Combobox for order types
if(!CreateComboBox(m_pendingOrderType, "PendingOrderType",
                   curX + SECTION_LABEL_WIDTH + GAP, curY, DROPDOWN_WIDTH, EDIT_HEIGHT))
   return(false);
curY += EDIT_HEIGHT + GAP;

// Column headers: Price, TP, SL, Expiration
int headerX = curX;
if(!CreateLabelEx(m_pendingPriceHeader, headerX, curY, DEFAULT_LABEL_HEIGHT,
                  "PendPrice", "Price:", clrBlack))
   return(false);
if(!CreateLabelEx(m_pendingTPHeader, headerX + EDIT_WIDTH + GAP, curY, DEFAULT_LABEL_HEIGHT,
                  "PendTP", "TP:", clrBlack))
   return(false);
if(!CreateLabelEx(m_pendingSLHeader, headerX + 2 * (EDIT_WIDTH + GAP), curY, DEFAULT_LABEL_HEIGHT,
                  "PendSL", "SL:", clrBlack))
   return(false);
if(!CreateLabelEx(m_pendingExpHeader, headerX + 3 * (EDIT_WIDTH + GAP), curY, DEFAULT_LABEL_HEIGHT,
                  "PendExp", "Expiration:", clrBlack))
   return(false);
curY += DEFAULT_LABEL_HEIGHT + GAP;

// Pending orders inputs row:
//  • Pending Price
int inputX = curX;
if(!CreateEdit(m_pendingPriceEdit, "PendingPrice", inputX, curY, EDIT_WIDTH, EDIT_HEIGHT))
   return(false);
double ask = SymbolInfoDouble(Symbol(), SYMBOL_ASK);
m_pendingPriceEdit.Text(DoubleToString(ask, 5));

//  • Pending TP
int input2X = inputX + EDIT_WIDTH + GAP;
if(!CreateEdit(m_pendingTPEdit, "PendingTP", input2X, curY, EDIT_WIDTH, EDIT_HEIGHT))
   return(false);
m_pendingTPEdit.Text("0.00000");

//  • Pending SL
int input3X = input2X + EDIT_WIDTH + GAP;
if(!CreateEdit(m_pendingSLEdit, "PendingSL", input3X, curY, EDIT_WIDTH, EDIT_HEIGHT))
   return(false);
m_pendingSLEdit.Text("0.00000");

//  • Pending Expiration (DatePicker)
int input4X = input3X + EDIT_WIDTH + GAP;
if(!CreateDatePicker(m_pendingDatePicker, "PendingExp",
                     input4X, curY, DATEPICKER_WIDTH + 20, EDIT_HEIGHT))
   return(false);
datetime now = TimeCurrent();
datetime endOfDay = now - (now % 86400) + 86399;
m_pendingDatePicker.Value(endOfDay);

//  • Place Order button
int buttonX = input4X + DATEPICKER_WIDTH + GAP;
if(!CreateButton(m_placePendingButton, "Place Order",
                 buttonX + 20, curY, BUTTON_WIDTH, BUTTON_HEIGHT, clrBlue))
   return(false);
curY += BUTTON_HEIGHT + GAP * 2;
Once the headers are in place, we move the vertical position down and begin the input row. First comes an edit field for the pending order’s price, which we immediately populate with the current ask price to give the user a valid default. To its right, we place the TP edit (initialized to “0.00000”) and then the SL edit (also initialized to “0.00000”). Next to these, the date picker is created and set to “end of day” (23:59:59) by default.
Finally, a “Place Order” button is created and positioned next to the date picker so it does not crowd the other controls. Once every control has been successfully created, we advance the vertical cursor to leave room below. Together, these steps lay out every control needed for a user to set up a pending order—type, price, TP, SL, expiration date—and then press a button to place it.
Event Handlers for Pending Orders
These methods respond to user interactions within the Pending Orders section:
void CTradeManagementPanel::OnChangePendingOrderType()
{
   string selected = m_pendingOrderType.Select();
   int    index    = (int)m_pendingOrderType.Value();
   Print("OnChangePendingOrderType: Selected='", selected, "', Index=", index);

   double price = 0.0;
   if(selected == "Buy Limit" || selected == "Buy Stop")
      price = SymbolInfoDouble(Symbol(), SYMBOL_ASK);
   else
      price = SymbolInfoDouble(Symbol(), SYMBOL_BID);

   m_pendingPriceEdit.Text(DoubleToString(price, 5));
   ChartRedraw();
}

void CTradeManagementPanel::OnChangePendingDatePicker()
{
   datetime selected = m_pendingDatePicker.Value();
   Print("OnChangePendingDatePicker: Selected='",
         TimeToString(selected, TIME_DATE|TIME_MINUTES), "'");
   ChartRedraw();
}
On selecting a different order type: Whenever the user picks a new order type from the ComboBox (for example, switching from “Buy Limit” to “Sell Limit”), we read the newly selected text and inspect whether it begins with “Buy” or “Sell.” If it begins with “Buy,” we fetch the current ask price; otherwise, we fetch the current bid price. We then immediately fill the price-field edit with that market value. This ensures the user always sees a valid, up-to-date default price that corresponds to their chosen order type. Finally, we redraw the chart UI, so the new price appears at once.
On changing the expiration date: Whenever the user selects or modifies the expiration date in the date picker, we retrieve the new date and log it for debugging. We then redraw the chart UI to immediately reflect any changes if, for instance, other parts of the panel visually depend on the chosen expiration date. No further validation occurs at this stage; any valid calendar date is accepted.
By keeping these handlers small and focused, we ensure the ComboBox and Date Picker remain in sync with current market conditions, preventing the user from accidentally placing an order with an invalid price or unknowingly selecting an expired date.
Validation Helper for Pending Orders
Before a pending order is actually sent to the broker, we validate that the user’s inputs make sense. This single helper function enforces three rules:
- Volume must be positive. If the lot size is zero or negative, we log an error and reject the order.
- The price must be positive. A non-positive price cannot form a valid pending order.
bool CTradeManagementPanel::ValidatePendingParameters(double volume, double price, string orderType)
{
   if(volume <= 0)
   {
      Print("Invalid volume for pending order");
      return(false);
   }
   if(price <= 0)
   {
      Print("Invalid price for pending order");
      return(false);
   }
   double ask = SymbolInfoDouble(Symbol(), SYMBOL_ASK);
   double bid = SymbolInfoDouble(Symbol(), SYMBOL_BID);

   if(orderType == "Buy Limit" && price >= ask)
   {
      Print("Buy Limit price must be below Ask");
      return(false);
   }
   if(orderType == "Buy Stop" && price <= ask)
   {
      Print("Buy Stop price must be above Ask");
      return(false);
   }
   if(orderType == "Sell Limit" && price <= bid)
   {
      Print("Sell Limit price must be above Bid");
      return(false);
   }
   if(orderType == "Sell Stop" && price >= bid)
   {
      Print("Sell Stop price must be below Bid");
      return(false);
   }
   return(true);
}
Market-condition checks:
for example,
- For a “Buy Limit,” ensure the limit price is strictly below the current ask.
- If it's a “Buy Stop,” ensure the stop price is strictly above the current ask.
If all checks pass, the helper returns true, indicating the order can proceed. By structuring validation in this way, we prevent common mistakes—such as placing a Buy Limit above market or a Sell Stop at or above the bid—and provide immediate, clear feedback when the inputs are invalid.
“Place Pending” Button Handler
void CTradeManagementPanel::OnClickPlacePending()
{
   Print("OnClickPlacePending called");
   string     orderType = m_pendingOrderType.Select();
   double     price     = StringToDouble(m_pendingPriceEdit.Text());
   double     tp        = StringToDouble(m_pendingTPEdit.Text());
   double     sl        = StringToDouble(m_pendingSLEdit.Text());
   double     volume    = StringToDouble(m_volumeEdit.Text());      // reuse market‐order volume
   datetime   expiry    = m_pendingDatePicker.Value();
   ENUM_ORDER_TYPE_TIME type_time = (expiry == 0) ? ORDER_TIME_GTC : ORDER_TIME_SPECIFIED;

   // Validate inputs
   if(!ValidatePendingParameters(volume, price, orderType))
      return;

   // Place the correct type of pending order
   if(orderType == "Buy Limit")
      m_trade.BuyLimit(volume, price, Symbol(), sl, tp, type_time, expiry, "");
   else if(orderType == "Buy Stop")
      m_trade.BuyStop(volume, price, Symbol(), sl, tp, type_time, expiry, "");
   else if(orderType == "Sell Limit")
      m_trade.SellLimit(volume, price, Symbol(), sl, tp, type_time, expiry, "");
   else if(orderType == "Sell Stop")
      m_trade.SellStop(volume, price, Symbol(), sl, tp, type_time, expiry, "");
}
When the user clicks the “Place Order” button, this handler gathers all needed inputs:
- The selected order type from the ComboBox.
- The pending-order price from the corresponding edit.
- Take-profit and stop-loss values from their edits.
- Trade volume, reused from the Quick Execution section’s volume edit.
- Expiration date from the date picker.
We then determine whether to use GTC (Good Till Canceled) or a specified expiration mode based on whether the chosen expiry datetime equals zero. Next, we call our validation helper. If any check fails, we exit without taking action.
If validation succeeds, we call exactly one of four CTrade methods—BuyLimit, BuyStop, SellLimit, or SellStop—passing volume, price, symbol, SL, TP, time mode, and expiry. Each call uses the user’s inputs, so by the time this handler finishes, the broker has received the correct pending-order request. If any parameter was invalid, we simply return, relying on logged diagnostics to signal the failure.
OnEvent(…) Routing for Pending Orders
bool CTradeManagementPanel::OnEvent(const int id, const long &lparam,
                                    const double &dparam, const string &sparam)
{
   // 1) Forward all events to the calculator first
   if(m_calculator.OnEvent(id, lparam, dparam, sparam))
      return(true);

   // 2) Dispatch Pending‐section events
   if(id == CHARTEVENT_OBJECT_CLICK)
   {
      if(sparam == m_placePendingButton.Name())
      {
         OnClickPlacePending();
         return(true);
      }
   }
   else if(id == CHARTEVENT_OBJECT_CHANGE)
   {
      if(sparam == m_pendingOrderType.Name())
      {
         OnChangePendingOrderType();
         return(true);
      }
      else if(sparam == m_pendingDatePicker.Name())
      {
         OnChangePendingDatePicker();
         return(true);
      }
   }

   // 3) Fallback to the base class for any other events
   return CAppDialog::OnEvent(id, lparam, dparam, sparam);
}
Within the main OnEvent(...) method of CTradeManagementPanel, pending-order events are routed as follows:
Calculator first: We forward all events to the embedded calculator. If the calculator handles the event (e.g., the user changes a pip-value input), we stop there.
Pending Orders logic:
- If the event is a “click,” and the clicked object name matches the pending-order button, we call the “Place Pending” handler.
- If the event is an “object change,” and the changed object name matches either the combobox or the date picker, we call the appropriate handler (OnChangePendingOrderType or OnChangePendingDatePicker).
- Fallback: Any other event flows back to the base CAppDialog::OnEvent(...), so the Quick Execution and All-Ops sections get their chance to process clicks or edits.
This routing ensures that pending-order interactions are handled cleanly and in isolation, without interfering with other sections of the panel.

Adjusted TradeManagementPanel (ComboBox and DatePicker Implementation)
(2) Developing the ForexValuesCalculator control class
Before any class definitions, we include five MQL5 standard-library headers under the Controls directory. Each of these makes available a GUI control class that we will leverage inside CForexCalculator:
#include <Controls\Dialog.mqh>
#include <Controls\ComboBox.mqh>
#include <Controls\Edit.mqh>
#include <Controls\Label.mqh>
#include <Controls\Button.mqh>
Dialog.mqh
Provides the base class CAppDialog, which manages a collection of controls, handles layout, and routes events. Although CForexCalculator does not directly derive from CAppDialog, it must integrate into a parent dialog (such as CTradeManagementPanel), so having Dialog.mqh present ensures that any calls to add our calculator’s controls (AddToDialog) and forward events will compile correctly. Without Dialog.mqh, we could not call dlg.Add(...) to attach our labels, edits, and buttons to the parent UI.
ComboBox.mqh
Exposes the CComboBox class, which we use for the dropdown of calculation options. By including this file, we can create and manipulate a CComboBox instance (m_dropdown), call m_dropdown.Create(...) to position it, populate it with AddItem, and respond to CHARTEVENT_OBJECT_CHANGE when the user selects a different term. Without it, the compiler would not know what CComboBox means.
Defines the CEdit class, used for all numeric and text input fields (e.g., account balance, risk percentage, stop-loss, symbol, and so on). We dynamically create a varying number of CEdit controls inside m_inputs[] depending on which calculation term is selected. Each CEdit must be created, added to the dialog, and later cast back to CEdit* by GetInputValue or GetInputString. If we omitted Edit.mqh, none of those calls would compile.
Brings in CLabel, which we use wherever we want static text onscreen: the “Calculation Option:” label (m_calcOptionLabel), each individual input label (for account balance, risk percent, etc.), and the “Result:” label (m_resultLabel). Each CLabel must be created, so the user knows what to type into each CEdit. Without Label.mqh, we could not supply context to each edit box.
Supplies the CButton class. We use CButton for the “Calculate” button (m_calculateButton). By including this header, we can call m_calculateButton.Create(...), give it a background color, set its text, and detect clicks on it via OnEvent. If we left out Button.mqh, the compiler would not recognize CButton, and we could not respond to “Calculate” clicks.
Project-Level Plan for Inclusions
In the larger project, we have two pieces that depend on these controls:
ForexValuesCalculator.mqh needs all five Controls\*.mqh headers because it builds a self-contained, reusable “mini-dialog” for calculating various forex values. Anywhere we use CLabel, CEdit, CComboBox, or CButton, the corresponding header must be present so that MQL5’s preprocessor can locate the class definitions.
By grouping all GUI-related includes together at the top, we ensure that any other EA or panel (for instance, TradeManagementPanel.mqh) can simply #include "ForexValuesCalculator.mqh" and immediately have access to every GUI control needed, without sprinkling extra includes elsewhere.
Member Declarations
The CForexCalculator class begins by declaring several UI controls and data structures that collectively form the calculator’s interface. At the top, a label (m_calcOptionLabel) and dropdown (m_dropdown) allow the user to select which calculation they want to perform (e.g., Position Size, Risk Amount, Pip Value, Profit/Loss, or Risk-to-Reward). Below these, there is a “Calculate” button (m_calculateButton) that the user clicks once all inputs are set. To display results, a read-only edit field (m_resultField) is paired with another label (m_resultLabel) that shows descriptive text like “Result: …” followed by the numeric value.// Forex Calculator Class class CForexCalculator { private: CLabel m_calcOptionLabel; // “Calculation Option:” label CComboBox m_dropdown; // Dropdown for selecting calculation term CEdit m_resultField; // Read-only field to display result CLabel m_resultLabel; // Label preceding the result (e.g., “Result:”) CButton m_calculateButton; // “Calculate” button CWnd *m_inputs[]; // Dynamically added label+edit pairs long m_chart_id; // Chart identifier string m_name; // Prefix for control names int m_originX; // X-coordinate origin for dynamic fields int m_originY; // Y-coordinate origin for dynamic fields InputField m_positionSizeInputs[4]; InputField m_riskAmountInputs[3]; InputField m_pipValueInputs[3]; InputField m_profitLossInputs[4]; InputField m_riskRewardInputs[2]; // … (other private methods follow) … public: CForexCalculator(); bool Create(const long chart, const string &name, const int subwin, const int x, const int y, const int w, const int h); bool AddToDialog(CAppDialog &dlg); void UpdateResult(const string term); double GetInputValue(const string name); string GetInputString(const string &name); CEdit* GetInputEdit(const string &name); string GetSelectedTerm(); bool OnEvent(const int id, const long &lparam, const double &dparam, const string &sparam); ~CForexCalculator(); };
All the variable input fields—each consisting of a label and an edit box—are stored in a dynamic array (m_inputs[]). Behind the scenes, the class holds five fixed-size arrays of InputField structures (m_positionSizeInputs, m_riskAmountInputs, m_pipValueInputs, m_profitLossInputs, m_riskRewardInputs). Each InputField entry contains a name, a label string, and a default numeric value. Finally, m_originX and m_originY track where the calculator panel begins within the parent dialog, while m_chart_id and m_name store the chart identifier and a prefix for unique control names. In combination, these members define both the calculator’s layout and the data required for each type of forex calculation.
Initializing Static Defaults (InitInputs)
The InitInputs method runs once when the calculator object is constructed. It populates the five arrays of InputField structures with descriptive labels and fallback numbers. For example, the “Position Size” group includes fields for account balance, risk percentage, stop-loss in pips, and symbol. The “Risk Amount” group includes position size, stop-loss pips, and symbol. Each array is set up so that later, when the user selects a calculation type, the corresponding InputField array is copied into dynamic controls. At this stage, the “account balance” field is given a placeholder default of 0.0 (to be replaced at runtime), while risk percentages and pip values receive small defaults like 1% or 20 pips. This static initialization ensures that each calculation’s inputs appear with sensible labels and some numeric starting points.
void InitInputs()
{
   // Position Size inputs
   m_positionSizeInputs[0].name         = "accountBalance";
   m_positionSizeInputs[0].label        = "Account Balance (" + AccountInfoString(ACCOUNT_CURRENCY) + ")";
   m_positionSizeInputs[0].defaultValue = 0.0;  // updated at runtime
   m_positionSizeInputs[1].name         = "riskPercent";
   m_positionSizeInputs[1].label        = "Risk Percentage (%)";
   m_positionSizeInputs[1].defaultValue = 1.0;
   m_positionSizeInputs[2].name         = "stopLossPips";
   m_positionSizeInputs[2].label        = "Stop Loss (Pips)";
   m_positionSizeInputs[2].defaultValue = 20.0;
   m_positionSizeInputs[3].name         = "symbol";
   m_positionSizeInputs[3].label        = "Symbol";
   m_positionSizeInputs[3].defaultValue = 0.0;

   // Risk Amount inputs
   m_riskAmountInputs[0].name = "positionSize";
   m_riskAmountInputs[0].label = "Position Size (Lots)";
   m_riskAmountInputs[0].defaultValue = 0.1;
   m_riskAmountInputs[1].name = "stopLossPips";
   m_riskAmountInputs[1].label = "Stop Loss (Pips)";
   m_riskAmountInputs[1].defaultValue = 20.0;
   m_riskAmountInputs[2].name = "symbol";
   m_riskAmountInputs[2].label = "Symbol";
   m_riskAmountInputs[2].defaultValue = 0.0;

   // Pip Value inputs
   m_pipValueInputs[0].name = "lotSize";
   m_pipValueInputs[0].label = "Lot Size";
   m_pipValueInputs[0].defaultValue = 0.1;
   m_pipValueInputs[1].name = "symbol";
   m_pipValueInputs[1].label = "Symbol";
   m_pipValueInputs[1].defaultValue = 0.0;
   m_pipValueInputs[2].name = "accountCurrency";
   m_pipValueInputs[2].label = "Account Currency";
   m_pipValueInputs[2].defaultValue = 0.0;

   // Profit/Loss inputs
   m_profitLossInputs[0].name = "entryPrice";
   m_profitLossInputs[0].label = "Entry Price";
   m_profitLossInputs[0].defaultValue = SymbolInfoDouble(_Symbol, SYMBOL_BID);
   m_profitLossInputs[1].name = "exitPrice";
   m_profitLossInputs[1].label = "Exit Price";
   m_profitLossInputs[1].defaultValue = SymbolInfoDouble(_Symbol, SYMBOL_BID) + 0.0020;
   m_profitLossInputs[2].name = "lotSize";
   m_profitLossInputs[2].label = "Lot Size";
   m_profitLossInputs[2].defaultValue = 0.1;
   m_profitLossInputs[3].name = "symbol";
   m_profitLossInputs[3].label = "Symbol";
   m_profitLossInputs[3].defaultValue = 0.0;

   // Risk-to-Reward inputs
   m_riskRewardInputs[0].name = "takeProfitPips";
   m_riskRewardInputs[0].label = "Take Profit (Pips)";
   m_riskRewardInputs[0].defaultValue = 40.0;
   m_riskRewardInputs[1].name = "stopLossPips";
   m_riskRewardInputs[1].label = "Stop Loss (Pips)";
   m_riskRewardInputs[1].defaultValue = 20.0;
}
Setting Runtime Defaults (SetDynamicDefaults)
Because the user’s actual account balance is only known at runtime, the SetDynamicDefaults method overwrites m_positionSizeInputs[0].defaultValue (the “Account Balance” field) with AccountInfoDouble(ACCOUNT_BALANCE). This ensures that, when the “Position Size” inputs appear onscreen, the account balance edit box is pre-filled with the trader’s real balance. Any other dynamic defaults—such as bid/ask or conversion rates—will similarly update as soon as the calculator is created. By separating static defaults from runtime defaults, the class remains flexible: design-time initialization lives in InitInputs, while quick adjustments to market‐dependent fields occur in SetDynamicDefaults.
void SetDynamicDefaults()
{
   // Overwrite the “Account Balance” default with the real balance at runtime
   m_positionSizeInputs[0].defaultValue = AccountInfoDouble(ACCOUNT_BALANCE);
}
Core Calculation Helpers
Below the input arrays, a series of helper methods perform each formula:
1. CalculatePipValue
double CalculatePipValue(const string symbol, const double lotSize, const string accountCurrency)
{
   double tickSize  = SymbolInfoDouble(symbol, SYMBOL_TRADE_TICK_SIZE);
   double tickValue = SymbolInfoDouble(symbol, SYMBOL_TRADE_TICK_VALUE);
   double pipSize   = (StringFind(symbol, "JPY") >= 0) ? 0.01 : 0.0001;
   double rate      = 1.0;
   string profitCcy = SymbolInfoString(symbol, SYMBOL_CURRENCY_PROFIT);
   if(accountCurrency != profitCcy)
   {
      string pair = profitCcy + accountCurrency;
      if(SymbolSelect(pair, true))
         rate = SymbolInfoDouble(pair, SYMBOL_BID);
   }
   if(tickSize == 0.0) return 0.0;
   return NormalizeDouble((tickValue / tickSize) * pipSize * lotSize * rate, 2);
}
CalculatePipValue computes how much one pip is worth in the account’s currency for a given symbol and lot size. It first calls SymbolInfoDouble to get SYMBOL_TRADE_TICK_SIZE and SYMBOL_TRADE_TICK_VALUE. Then it chooses either 0.01 (for JPY pairs) or 0.0001 as the “pip size.” If the pair’s profit currency differs from the account currency, it concatenates them (e.g., “EURUSD” if profit in EUR, account in USD), selects that conversion symbol, and retrieves its current bid as rate. Finally, it divides tickValue by tickSize, multiplies by pipSize, lotSize, and rate, and returns the result rounded to two decimals. A 0.0 return indicates invalid inputs (e.g., tickSize was zero).
2. CalculatePositionSize
double CalculatePositionSize(double bal, double pct, double sl, string sym)
{
   double pv = CalculatePipValue(sym, 1.0, AccountInfoString(ACCOUNT_CURRENCY));
   if(bal <= 0 || pct <= 0 || sl <= 0 || pv <= 0) return 0.0;
   double size = (bal * (pct / 100.0)) / (sl * pv);
   double step = SymbolInfoDouble(sym, SYMBOL_VOLUME_STEP);
   double minL = SymbolInfoDouble(sym, SYMBOL_VOLUME_MIN);
   double maxL = SymbolInfoDouble(sym, SYMBOL_VOLUME_MAX);
   int dp = (int)-MathLog10(step);
   return NormalizeDouble(MathMax(minL, MathMin(maxL, size)), dp);
}
Given an account balance, a percentage risk, and a stop‐loss in pips, CalculatePositionSize returns the optimal lot size. It first calls CalculatePipValue(sym, 1.0, AccountInfoString(ACCOUNT_CURRENCY)) to find pip value for one lot. If any input or pv is zero or negative, it returns 0.
Otherwise, it uses the formula:
positionSize = (balance × (riskPercent / 100)) ÷ (stopLossPips × pipValue)
Then it retrieves the instrument’s SYMBOL_VOLUME_STEP, SYMBOL_VOLUME_MIN, and SYMBOL_VOLUME_MAX to clamp and round the computed lot size. The rounding decimals dp come from -MathLog10(step), ensuring the returned size adheres to the broker’s allowed increments (e.g., 0.01, 0.1).
3. CalculateRiskAmount
When the user knows their position size (ps in lots) and stop‐loss pips (sl), CalculateRiskAmount calculates how much capital will be at risk in account currency. It obtains pip value for that ps via CalculatePipValue(sym, ps, ...), then multiplies ps × sl × pipValue. The result is normalized to two decimals. If either input is zero or negative, the function returns 0.0, signaling invalid inputs.
double CalculateRiskAmount(double ps, double sl, string sym)
{
   if(ps <= 0 || sl <= 0) return 0.0;
   double pv = CalculatePipValue(sym, ps, AccountInfoString(ACCOUNT_CURRENCY));
   return NormalizeDouble(ps * sl * pv, 2);
}
4. CalculateProfitLoss
double CalculateProfitLoss(double entry, double exit, double lotSize, string sym)
{
   if(entry <= 0 || exit <= 0 || lotSize <= 0) return 0.0;
   double pipSz = (StringFind(sym, "JPY") >= 0) ? 0.01 : 0.0001;
   double diff  = (exit - entry) / pipSz;
   return NormalizeDouble(diff * CalculatePipValue(sym, lotSize, AccountInfoString(ACCOUNT_CURRENCY)), 2);
}
CalculateProfitLoss determines the net P/L in account currency for a given entry price, exit price, lot size, and symbol. It computes the number of pips gained or lost as (exit − entry) ÷ pipSize, where pipSize is 0.01 for JPY pairs and 0.0001 otherwise. It then multiplies the pip difference by CalculatePipValue(sym, lotSize, accountCurrency) to convert pips into account‐currency profit. The final result is rounded to two decimals. If any numeric input is invalid, the method returns 0.0.
5. CalculateRiskRewardRatio
double CalculateRiskRewardRatio(double tp, double sl)
{
   if(tp <= 0 || sl <= 0) return 0.0;
   return NormalizeDouble(tp / sl, 2);
}
For “Risk-to-Reward,” the user only needs take-profit pips (tp) and stop-loss pips (sl). Provided both are positive, the function returns the ratio tp / sl rounded to two decimals. If either input is zero or negative, it returns 0.0, indicating invalid data.
Layout Helpers: Adding Individual Fields (AddField)
The AddField method is responsible for creating a label + edit pair for one InputField. It receives a reference to an InputField (which contains a name, a label text, and a default value) and the current vertical cursor position y. The method calculates x0 = m_originX + CALC_INDENT_LEFT so that all labels start at a consistent left margin.
bool AddField(const InputField &f, int &y)
{
   int x0 = m_originX + CALC_INDENT_LEFT;

   // Create label
   CLabel *lbl = new CLabel();
   if(!lbl.Create(m_chart_id, m_name + "Lbl_" + f.name, 0,
                  x0, y,
                  x0 + CALC_LABEL_WIDTH, y + CALC_EDIT_HEIGHT))
   {
      delete lbl;
      return false;
   }
   lbl.Text(f.label);
   ArrayResize(m_inputs, ArraySize(m_inputs) + 1);
   m_inputs[ArraySize(m_inputs) - 1] = lbl;

   // Create edit
   CEdit *edt = new CEdit();
   if(!edt.Create(m_chart_id, m_name + "Inp_" + f.name, 0,
                  x0 + CALC_EDIT_OFFSET + RESULT_BUTTON_GAP, y,
                  x0 + CALC_EDIT_OFFSET + RESULT_BUTTON_GAP + CALC_EDIT_WIDTH,
                  y + CALC_EDIT_HEIGHT))
   {
      delete edt;
      return false;
   }
   if(f.name == "symbol")
      edt.Text(_Symbol);
   else if(f.name == "accountCurrency")
      edt.Text(AccountInfoString(ACCOUNT_CURRENCY));
   else
      edt.Text(StringFormat("%.2f", f.defaultValue));

   ArrayResize(m_inputs, ArraySize(m_inputs) + 1);
   m_inputs[ArraySize(m_inputs) - 1] = edt;

   y += CALC_EDIT_HEIGHT + CALC_CONTROLS_GAP_Y;
   return true;
}
AddField accepts an InputField reference (containing name, label, default value) and the current vertical position y. First, it calculates x0 = m_originX + CALC_INDENT_LEFT to position the label’s left edge. A new CLabel named m_name + "Lbl_" + f.name is created at (x0, y) with a fixed width/height. Its text is set to f.label, and it is added to m_inputs[].
Next, a CEdit is created at (x0 + CALC_EDIT_OFFSET + RESULT_BUTTON_GAP, y) so that all edit boxes line up consistently. If f.name equals "symbol", it pre-fills _Symbol; if "accountCurrency", it pre-fills the account currency; otherwise, it formats f.defaultValue to two decimals. The new edit control is appended to m_inputs[]. Finally, y is incremented by the control height plus CALC_CONTROLS_GAP_Y, setting up the position for the next field. By injecting each new label+edit into m_inputs[], AddField guarantees, they will be added to the dialog later and properly managed.
Building All Inputs for a Given Term (CreateInputFields)
Whenever the user selects a new calculation term (or at initial creation), CreateInputFields clears out any previously generated controls (ArrayFree(m_inputs)), then sets y to just below the dropdown. It checks which term was chosen—“Position Size” (4 inputs), “Risk Amount” (3), “Pip Value” (3), “Profit/Loss” (4), or “Risk-to-Reward” (2). For each InputField in the appropriate array, it calls AddField(...). If any AddField fails, the method returns false, stopping further layout. If all fields are added successfully, it returns true. The result is that, at runtime, only those label+edit pairs relevant to the selected calculation appear onscreen, neatly stacked with consistent spacing.
bool CreateInputFields(const string term)
{
   ArrayFree(m_inputs);
   int y = m_originY + CALC_INDENT_TOP + CALC_EDIT_HEIGHT + CALC_CONTROLS_GAP_Y;

   if(term == "Position Size")
      for(int i = 0; i < 4; i++)
         if(!AddField(m_positionSizeInputs[i], y)) return false;
   else if(term == "Risk Amount")
      for(int i = 0; i < 3; i++)
         if(!AddField(m_riskAmountInputs[i], y)) return false;
   else if(term == "Pip Value")
      for(int i = 0; i < 3; i++)
         if(!AddField(m_pipValueInputs[i], y)) return false;
   else if(term == "Profit/Loss")
      for(int i = 0; i < 4; i++)
         if(!AddField(m_profitLossInputs[i], y)) return false;
   else if(term == "Risk-to-Reward")
      for(int i = 0; i < 2; i++)
         if(!AddField(m_riskRewardInputs[i], y)) return false;
   else
      return false;

   return true;
}
Panel Construction (Create)
When Create is invoked, the calculator’s UI is instantiated inside a parent dialog. First, the chart ID, a name prefix, and origin coordinates (x, y) are stored. Then:
- Option Label
A static label m_calcOptionLabel is created at (x, y) with the text “Calculation Option:”. This sits above the dropdown.
- Dropdown
The CComboBox (m_dropdown) is created at (comboX + 70, y) to the right of the “Calculation Option” label. It is populated with the five calculation terms. m_dropdown.Select(0) sets “Position Size” as the default.
- Calculate Button
A CButton (m_calculateButton) is positioned near the bottom of the panel block (using btnX and btnY calculations). It is labelled “Calculate” and styled with a steel-blue background and white text. When clicked, it will trigger UpdateResult.
bool Create(const long chart, const string &name, const int subwin,
            const int x, const int y, const int w, const int h)
{
   m_chart_id = chart;
   m_name     = name + "_Calc_";
   m_originX  = x;
   m_originY  = y;

   // 1) “Calculation Option:” label
   if(!m_calcOptionLabel.Create(chart, m_name + "CalcOptLbl", subwin,
                                x, y, x + CALC_LABEL_WIDTH, y + CALC_EDIT_HEIGHT))
      return false;
   m_calcOptionLabel.Text("Calculation Option:");

   // 2) Dropdown immediately to the right
   int comboX = x + CALC_LABEL_WIDTH + DROPDOWN_LABEL_GAP;
   if(!m_dropdown.Create(chart, m_name + "Dropdown", subwin,
                        comboX, y, comboX + (w - CALC_LABEL_WIDTH - DROPDOWN_LABEL_GAP), y + CALC_EDIT_HEIGHT))
      return false;
   m_dropdown.AddItem("Position Size");
   m_dropdown.AddItem("Risk Amount");
   m_dropdown.AddItem("Pip Value");
   m_dropdown.AddItem("Profit/Loss");
   m_dropdown.AddItem("Risk-to-Reward");
   m_dropdown.Select(0);

   // 3) “Calculate” button near the bottom of this panel area
   int btnX = x + w - CALC_BUTTON_WIDTH - 120;
   int btnY = y + h - CALC_BUTTON_HEIGHT + 30;
   if(!m_calculateButton.Create(chart, m_name + "CalcBtn", subwin,
                                btnX, btnY, btnX + CALC_BUTTON_WIDTH, btnY + CALC_BUTTON_HEIGHT))
      return false;
   m_calculateButton.Text("Calculate");
   m_calculateButton.ColorBackground(clrSteelBlue);
   m_calculateButton.Color(clrWhite);

   // 4) Result label and read-only field to the right of the button
   int blockX = btnX + CALC_BUTTON_WIDTH + RESULT_BUTTON_GAP;
   int lblY = btnY - 20;
   if(!m_resultLabel.Create(chart, m_name + "ResultLbl", subwin,
                            blockX, lblY, blockX + CALC_LABEL_WIDTH, lblY + CALC_EDIT_HEIGHT))
      return false;
   m_resultLabel.Text("Result:");

   int fldY = lblY + CALC_EDIT_HEIGHT + RESULT_VERTICAL_GAP;
   if(!m_resultField.Create(chart, m_name + "ResultFld", subwin,
                            blockX, fldY, blockX + CALC_EDIT_WIDTH, fldY + CALC_EDIT_HEIGHT))
      return false;
   m_resultField.ReadOnly(true);

   // 5) Populate dynamic defaults and input rows
   SetDynamicDefaults();
   string initialTerm = m_dropdown.Select();
   CreateInputFields(initialTerm);
   UpdateResult(initialTerm);

   return true;
}
Result Label and Field
A separate block “Result:” label is created to the right of the button, followed immediately by a read-only edit (m_resultField) underneath it. This edit shows the numeric result of whichever calculation is performed.
Dynamic Rows
SetDynamicDefaults() updates the account balance default. Then the currently selected term (m_dropdown.Select()) is fetched, and CreateInputFields(term) is called to generate the appropriate label–edit pairs. Finally, UpdateResult(term) populates the result field with the initial calculation.
Because the dropdown, calculate button, and result area have been laid out first, the subsequent dynamic rows appear sandwiched between them, all based on consistent offsets. If any creation call fails, Create returns false, which allows the calling code to know that the calculator initialization did not complete.
Adding Controls to the Parent Dialog (AddToDialog)
After successfully creating all controls in Create(...), the parent EA or panel calls AddToDialog. This method adds each static control—m_calcOptionLabel, m_dropdown, m_calculateButton, m_resultLabel, and m_resultField—into the dialog’s internal control list. Then, it loops through the dynamic m_inputs[] array (which contains each label+edit pair) and adds them as well. If any Add(...) call fails, the method returns false, so the caller knows the calculator was not fully integrated.
bool AddToDialog(CAppDialog &dlg)
{
   if(!dlg.Add(&m_calcOptionLabel)) return false;
   if(!dlg.Add(&m_dropdown))        return false;
   if(!dlg.Add(&m_calculateButton)) return false;
   if(!dlg.Add(&m_resultLabel))     return false;
   if(!dlg.Add(&m_resultField))     return false;

   for(int i = 0; i < ArraySize(m_inputs); i++)
      if(!dlg.Add(m_inputs[i])) return false;

   return true;
}
Updating the Result Display (UpdateResult):
void UpdateResult(const string term)
{
   double res = 0.0;
   string txt = "Result: ";

   if(term == "Position Size")
   {
      double bal = GetInputValue("accountBalance");
      double pct = GetInputValue("riskPercent");
      double sl  = GetInputValue("stopLossPips");
      string sym = GetInputString("symbol");
      if(bal > 0 && pct > 0 && sl > 0 && SymbolSelect(sym, true))
      {
         res = CalculatePositionSize(bal, pct, sl, sym);
         txt += "Position Size (lots)";
      }
      else txt += "Invalid Input";
   }
   else if(term == "Risk Amount")
   {
      double ps  = GetInputValue("positionSize");
      double slp = GetInputValue("stopLossPips");
      string sym = GetInputString("symbol");
      if(ps > 0 && slp > 0 && SymbolSelect(sym, true))
      {
         res = CalculateRiskAmount(ps, slp, sym);
         txt += "Risk Amount (" + AccountInfoString(ACCOUNT_CURRENCY) + ")";
      }
      else txt += "Invalid Input";
   }
   else if(term == "Pip Value")
   {
      double ls  = GetInputValue("lotSize");
      string sym = GetInputString("symbol");
      string cur = GetInputString("accountCurrency");
      if(ls > 0 && SymbolSelect(sym, true))
      {
         res = CalculatePipValue(sym, ls, cur);
         txt += "Pip Value (" + cur + ")";
      }
      else txt += "Invalid Input";
   }
   else if(term == "Profit/Loss")
   {
      double e   = GetInputValue("entryPrice");
      double x   = GetInputValue("exitPrice");
      double ls  = GetInputValue("lotSize");
      string sym = GetInputString("symbol");
      if(e > 0 && x > 0 && ls > 0 && SymbolSelect(sym, true))
      {
         res = CalculateProfitLoss(e, x, ls, sym);
         txt += "Profit/Loss (" + AccountInfoString(ACCOUNT_CURRENCY) + ")";
      }
      else txt += "Invalid Input";
   }
   else if(term == "Risk-to-Reward")
   {
      double tp  = GetInputValue("takeProfitPips");
      double slp = GetInputValue("stopLossPips");
      if(tp > 0 && slp > 0)
      {
         res = CalculateRiskRewardRatio(tp, slp);
         txt += "Risk-to-Reward Ratio";
      }
      else txt += "Invalid Input";
   }

   m_resultField.Text(StringFormat("%.2f", res));
   m_resultLabel.Text(txt);
}
UpdateResult reads the currently selected calculation term (term) and, using the appropriate combination of GetInputValue and GetInputString, gathers all required inputs. For example:
- Position Size: fetch “accountBalance,” “riskPercent,” “stopLossPips,” and “symbol.” If valid, call CalculatePositionSize(...) and append “Position Size (lots)” to the label.
- Risk Amount: fetch “positionSize,” “stopLossPips,” and “symbol.” If valid, call CalculateRiskAmount(...) and add “Risk Amount (USD).”
- Pip Value: fetch “lotSize,” “symbol,” and “accountCurrency.” Then CalculatePipValue(...) and add “Pip Value (USD).”
- Profit/Loss: fetch “entryPrice,” “exitPrice,” “lotSize,” and “symbol.” Then CalculateProfitLoss(...) and add “Profit/Loss (USD).”
- Risk-to-Reward: fetch “takeProfitPips” and “stopLossPips.” Then CalculateRiskRewardRatio(...) and append “Risk-to-Reward Ratio.”
If any input is invalid or the symbol cannot be selected, the method sets txt = "Result: Invalid Input". In all cases, it updates m_resultField.Text with the numeric res formatted to two decimals, and calls m_resultLabel.Text(txt) to adjust the descriptive text above it. This method guarantees that clicking “Calculate” or changing the dropdown will always refresh both the label and the numeric field with the latest computation or an error message.
Reading User Inputs (GetInputValue and GetInputString)
double GetInputValue(const string name)
{
   for(int i = 0; i < ArraySize(m_inputs); i++)
      if(m_inputs[i].Name() == m_name + "Inp_" + name)
         return StringToDouble(((CEdit*)m_inputs[i]).Text());
   return 0.0;
}

string GetInputString(const string &name)
{
   for(int i = 0; i < ArraySize(m_inputs); i++)
      if(m_inputs[i].Name() == m_name + "Inp_" + name)
         return ((CEdit*)m_inputs[i]).Text();
   return "";
}
These helper methods abstract away finding the correct edit control within the dynamic m_inputs[] array. Given a field name like "stopLossPips", GetInputValue loops over all m_inputs[i], checks if its Name() matches m_name + "Inp_stopLossPips", then returns the numeric value of its Text(). Similarly, GetInputString returns the raw text (e.g., "EURUSD") when given names like "symbol" or "accountCurrency". If no match is found, they return 0.0 or an empty string, respectively, indicating missing input.
Routing User Actions (OnEvent)
bool OnEvent(const int id, const long &lparam, const double &dparam, const string &sparam)
{
   if(id == CHARTEVENT_OBJECT_CHANGE && sparam == m_name + "Dropdown")
   {
      long idx = m_dropdown.Value();
      string term = GetSelectedTerm();
      CreateInputFields(term);
      UpdateResult(term);
      return true;
   }
   if(id == CHARTEVENT_OBJECT_CLICK && sparam == m_name + "CalcBtn")
   {
      string term = GetSelectedTerm();
      UpdateResult(term);
      return true;
   }
   return false;
}
The calculator handles two event types:
1. Dropdown Changes (CHARTEVENT_OBJECT_CHANGE)
- If sparam matches the dropdown’s control name, we fetch the new term via m_dropdown.Select().
- We call CreateInputFields(term) to rebuild all dynamic label+edit pairs for that term.
- Then, to show an immediate preview, UpdateResult(term) recalculates using default or existing inputs.
- Returning true tells the parent dialog that the event was consumed.
2.“Calculate” Button Clicks (CHARTEVENT_OBJECT_CLICK)
- If sparam matches m_name + "CalcBtn", we read the selected term again and call UpdateResult(term).
- This allows the user to change any input values (e.g., adjust stop-loss pips) and then press “Calculate” to refresh results.
Any other events return false, so the parent CAppDialog (or other code) can handle them if needed. This clear separation ensures that only relevant interactions—term changes or button clicks—trigger recalculations or UI updates
Cleanup (~CForexCalculator)
~CForexCalculator()
{
   for(int i = 0; i < ArraySize(m_inputs); i++)
      delete m_inputs[i];
}
When the calculator object is destroyed, the destructor loops over m_inputs[], deleting each dynamically allocated control (labels and edits). This prevents memory leaks. Since each time the user switches terms, CreateInputFields uses ArrayFree to remove the old controls, those old controls must later be deleted. The destructor’s final cleanup ensures that if the entire calculator panel is closed or the EA shuts down, all controls created by this class are properly released.
(3) Integrating the Forex Values Calculator into the Trade Management Panel
Integrating the CForexCalculator into the CTradeManagementPanel begins simply by declaring an instance of the calculator class as one of the panel’s member fields. By placing m_calculator among the protected members, we effectively reserve a chunk of the panel’s memory for the calculator’s internal state (its dropdown, labels, edits, and buttons).
CForexCalculator m_calculator;
Because the panel header already includes ForexValuesCalculator header, the compiler knows exactly how the CForexCalculator class is laid out and what dependencies it has. In practice, this means we do not copy‐paste the calculator’s controls or reorder its code; instead, we rely on composition. The panel can treat m_calculator just like any other control—creating it, sizing it, adding it to the dialog, and forwarding events to it—without peeking into its private members.
#include <ForexValuesCalculator.mqh> Creation and Layout in the Create() Method
The next step takes place inside the panel’s Create() method, where we build out all four sections in sequence. After laying out “Quick Order Execution” and drawing the first separator, we move to the “Forex Calculator” section by first drawing a section header label:
if(!CreateLabelEx(m_secCalcLabel, curX, curY, DEFAULT_LABEL_HEIGHT,

                  "SecCalc", "Forex Values Calculator:", clrNavy))

   return(false)

m_secCalcLabel.Font("Arial Bold");

m_secCalcLabel.FontSize(10);

curY += DEFAULT_LABEL_HEIGHT + GAP;
Immediately after, we invoke the calculator’s own Create method, passing in the current chart, a unique prefix (e.g., name + "_ForexCalc"), the subwindow index, and the exact (x, y) location along with CALCULATOR_WIDTH and CALCULATOR_HEIGHT:
string calcName = name + "_ForexCalc";

if(!m_calculator.Create(chart, calcName, subwin,

                        curX, curY, CALCULATOR_WIDTH, CALCULATOR_HEIGHT))

   return(false);

if(!m_calculator.AddToDialog(this))

   return(false);

curY += CALCULATOR_HEIGHT + GAP * 2;
Internally, CForexCalculator::Create uses that same coordinate system to place its dropdown at the very top‐left of the calculator block and to reserve its own dynamic space for input fields further down. Because we supply a fixed height, the calculator class knows exactly where to position its result label and result field at the bottom. Once m_calculator.Create() returns true, we immediately call m_calculator.AddToDialog(this), which iterates over every sub‐control (m_dropdown, all the dynamically built CLabel/CEdit pairs, the “Calculate” button, and the result display) and adds them to the parent CAppDialog. This registration step is crucial: the dialog’s internal event loop will now include the calculator’s controls and render them in the correct z‐order.
Sizing, Positioning, and Spacing
Maintaining proper spacing between sections is key to avoiding visual overlap. After adding the calculator, we advance our curY by the full CALCULATOR_HEIGHT plus twice the section gap. By doing so, the next separator or subsequent “Pending Orders” section will start exactly below the calculator block, leaving no ambiguity about control boundaries. During this layout process, no control is manually repositioned relative to another; instead, the sequence of drawing a header label, creating the calculator at a known origin, and then advancing the vertical cursor guarantees that the “Calculator” region remains self‐contained.
Because we defined clear constants—CALCULATOR_WIDTH and CALCULATOR_HEIGHT—the panel does not need to know how many input rows the calculator will display. The calculator’s own internal logic dynamically adjusts the size of m_inputs[] but never alters the overall reserved block. Consequently, if in the future we add more input rows (for example, a “Swap Rate” field), the calculator will simply push its own result field downward within that fixed height; the panel can remain oblivious to those details.
Event Forwarding and Prioritization
Equally important is event management. If a user interacts with any of the calculator’s controls—say, selects a new term from the dropdown or clicks the “Calculate” button—those object‐based events arrive in CTradeManagementPanel::OnEvent(...). At the very beginning of OnEvent, we forward every event to:
if(m_calculator.OnEvent(id, lparam, dparam, sparam))

{
   Print("Calculator handled event: ", sparam);

   return(true);
}
If the calculator recognizes the event (i.e., sparam matches one of its child‐control names such as "MyPanel_ForexCalcDropdown" or "MyPanel_ForexCalcCalcBtn"), it returns true after processing, and we immediately exit. This early‐return mechanism ensures that the calculator’s logic for rebuilding input fields or updating the result label always takes precedence.
Only if m_calculator.OnEvent(...) returns false do we continue processing other panel‐specific events—such as button clicks in the “Quick Order” or “Pending Orders” sections. In this way, the calculator effectively owns its own sub‐dialog: it can add and remove its dynamic controls, respond to user input, and update its display all without interfering with or being disrupted by the panel’s other controls
(4) Adjustments to the NewAdminPanel EA for responsiveness to the new updates
Calling g_tradePanel.Run() in the EA’s initialization or panel‐showing routine is absolutely critical for all interactive GUI elements—especially ComboBoxs and datepickers—to function properly. Under the hood, Run() hands control to the CAppDialog base class’s event‐processing loop, which actively listens for mouse clicks, keystrokes, and other chart events targeted at the dialog’s child controls. Without invoking Run(), the CTradeManagementPanel instance simply exists in memory but does not register with the MQL5 runtime as an active dialog. In practice, this means that selecting an item from the “Pending Order Type” combobox or changing the expiration date via CDatePicker would not generate the requisite CHARTEVENT_OBJECT_CHANGE or CHARTEVENT_OBJECT_ENDEDIT events for the panel to handle.
As soon as g_tradePanel.Run() is called. However, the dialog enters its own message loop: every click on the dropdown or datepicker triggers the panel’s OnEvent(...) method, which checks and dispatches to OnChangePendingOrderType() or OnChangePendingDatePicker(). In short, Run() is what turns a static set of controls into a responsive, interactive user interface. Without it, the ComboBox would stay frozen at its initial value, and the datepicker would never fire an event to update the pending‐order price logic or calendar display.
void HandleTradeManagement()
{
    if(g_tradePanel)
    {
        if(g_tradePanel.IsVisible())
            g_tradePanel.Hide();
        else
            g_tradePanel.Show();
        ChartRedraw();
        return;
    }
    g_tradePanel = new CTradeManagementPanel();
    if(!g_tradePanel.Create(g_chart_id, "TradeManagementPanel", g_subwin, 310, 20, 875, 700))
    {
        delete g_tradePanel;
        g_tradePanel = NULL;
        return;
    }
    // ← This line activates the dialog’s own message loop
    g_tradePanel.Run();
    g_tradePanel.Show();

    ChartRedraw();
}
ChartRedraw() usage
Equally important to the user experience is the judicious use of ChartRedraw() immediately after showing or hiding dialogs and after updating any visual elements. Whenever you call Show() or Hide() on a dialog or individual control—like the ComboBox, DatePicker, or calculator fields—the chart’s underlying canvas must be repainted so that new controls appear onscreen (or old controls disappear). In our EA code, you see frequent calls to ChartRedraw() in handlers such as HandleTradeManagement(), ToggleInterface(), and inside OnEvent(...) once an event has been processed.
Each ChartRedraw() forces MetaTrader 5 to re‐render all chart objects and GUI controls, ensuring that drop‐down lists actually expand, that DatePicker calendars overlay correctly, and that newly computed values in the calculator fields become visible without flicker or delay. Without calling ChartRedraw(), the chart can remain “stale” for a noticeable fraction of a second after state changes, leading to unresponsive behavior: the user might click a different dropdown item but still see the old selection until the next tick or automatic refresh. By explicitly requesting a redraw after every significant change—whether toggling panel visibility, updating labels, or recalculating results—we guarantee a consistently smooth, real‐time interface where ComboBox selections appear at once, DatePicker calendars display without lag, and calculator outputs update immediately.
// Toggling the main interface buttons
void ToggleInterface()
{
    bool state = ObjectGetInteger(0, toggleButtonName, OBJPROP_STATE);
    ObjectSetInteger(0, toggleButtonName, OBJPROP_STATE, !state);
    UpdateButtonVisibility(!state);
    // Redraw immediately so button positions update on screen
    ChartRedraw();
}

// In the OnEvent handler, after forwarding to sub‐panels:
void OnChartEvent(const int id, const long &lparam, const double &dparam, const string &sparam)
{
    if(id == CHARTEVENT_OBJECT_CLICK)
    {
        // ... handle panel toggles ...
        ChartRedraw();  // Ensure any Show()/Hide() calls are rendered

        // Forward to communication panel
        if(g_commPanel && g_commPanel.IsVisible())
            g_commPanel.OnEvent(id, lparam, dparam, sparam);
        ChartRedraw();  // Redraw after commPanel’s changes

        // Forward to trade panel
        if(g_tradePanel && g_tradePanel.IsVisible())
            g_tradePanel.OnEvent(id, lparam, dparam, sparam);
        ChartRedraw();  // Redraw after tradePanel’s updates (e.g., combobox or date change)

        // Forward to analytics panel
        if(g_analyticsPanel && g_analyticsPanel.IsVisible())
            g_analyticsPanel.OnEvent(id, lparam, dparam, sparam);
        ChartRedraw();  // Final redraw to reflect any analytics updates
    }
}
- Redraw After Visibility Changes: In HandleTradeManagement(), we call ChartRedraw() immediately after Show() or Hide(). That makes the panel appear or disappear at once, avoiding a stale screen where the panel remains hidden or visible until external chart activity occurs.
- Redraw After Event Delegation: Inside OnChartEvent(...), after forwarding the event to g_tradePanel.OnEvent(...), we again call ChartRedraw(). If the user interacted with the calculator’s combobox—selecting “Risk Amount,” for instance—the calculator will have recreated its input fields or updated its result label. The subsequent ChartRedraw() ensures that those new input boxes and value labels are rendered immediately, preventing flicker or half‐drawn UI elements.
- Smooth, Immediate Feedback: By placing ChartRedraw() at each juncture—after toggling interface buttons, after showing/hiding a panel, and after forwarding events to sub‐panels—we guarantee a fluid, responsive user experience. Combobox dropdown lists open immediately, datepicker pop‐ups appear correctly, and newly calculated values in the Forex calculator field become visible without any perceptible delay.
Now we can proceed to test the new features in the next section.
Testing
The following was executed in MetaTrader 5 after a successful compilation. The updated TradeManagementPanel includes an enhanced pending‐order placement workflow, as well as a built‐in Forex Values Calculator for computing critical forex metrics and supporting more informed trading decisions. 
Testing the Forex Values Calculator integrated in TradeManagementPanel
Conclusion
This has been an incredible, in-depth discussion, and I’m pleased that we achieved our main goal. We explored several essential forex concepts—calculating position size, pip value, risk-reward ratios, and so on—and outlined the underlying mathematics that every forex trader should understand. Converting these formulas into MQL5 code reinforces the theory for traders and also helps developers implement these calculations correctly in their own projects.
A key takeaway from our work on the TradeManagementPanel was leveraging MQL5’s standard library widgets—specifically, CComboBox and `CDatePicker.” By using these controls, we improved the layout and accessibility of related inputs and streamlined the process of setting an expiration date for pending orders. This offers a significant time-savings compared to manually typing dates and reduces the chance of user error.
Along the way, we focused on modular design: separating the calculator, pending-order controls, and quick-execution buttons into distinct classes that interoperate cleanly. Ensuring that our ComboBox and DatePicker events respond correctly within the EA demonstrates a robust, reusable pattern. Each component we’ve built can be extracted and integrated into future projects with minimal editing.
That said, while the front-end UI is now solid, there is still room to refine and optimize our value-calculation logic. I welcome your feedback and suggestions in the comments—your ideas on improving the existing concepts will be invaluable. I hope you’ve found this exercise educational, and I look forward to our next publication. Stay tuned!
Below, you’ll find all the files involved in this project:
| Attached File | Description |
|---|---|
| TradeManagementPanel.mqh | Contains the main trading interface logic, including market/pending order management, risk calculations, and a built-in Forex calculator. It provides GUI controls such as dropdowns, datepickers, and action buttons, all encapsulated in a CAppDialog-derived panel. It plays a critical role in handling trade operations and interactive user inputs. |
| ForexValuesCalculator.mqh | Implements the core calculation engine used in the Trade Management Panel to compute trade parameters such as pip value, margin, position size, and risk-reward ratios. |
| New_Admin_Panel.mq5 | The main Expert Advisor entry point that brings together all the individual modules—Trade Management, Communications, Analytics—into a unified graphical interface. It handles panel instantiation, event routing, chart object creation, and overall layout control. It also ensures smooth responsiveness via frequent ChartRedraw() calls and activates panel functionality using .Run(). |
| Images.zip | A collection of bitmap resources used for interface buttons and visual elements. Includes files such as TradeManagementPanelButton.bmp, expand.bmp, collapse.bmp, and others that provide interactive feedback through button states (normal/pressed). These assets are essential for the application's visual identity and usability. |
| Communications.mqh | Defines the Communications Panel, enabling users to send and receive messages through a Telegram Bot. It includes GUI components for entering credentials (Chat ID, Bot Token) and a message input field. This panel also supports future contact management features and is built with CChartCanvas, CBmpButton, and CEdit controls. |
| AnalyticsPanel.mqh | Provides chart-based analytical summary, including signal evaluation, or performance tracking. The panel is integrated into the main EA and displayed via g_analyticsPanel. Its structure follows the same modular CAppDialog approach, allowing for isolated logic and expandable features. |
| Telegram.mqh | Handles the low-level networking and JSON formatting required to communicate with the Telegram Bot API. It includes functions for sending text messages. This module acts as the backend engine for the Communications Panel. |
| Authentication.mqh | Implements optional two-factor authentication for the Admin Panel, using Telegram as the verification channel. It sends login confirmations to the provided Chat ID and verifies the user password input. This module is typically invoked during EA initialization to enforce user authentication and block unauthorized access. It is currently disabled to avoid repeated prompts during frequent testing and development cycles. |
Please save all header files in the MQL5\include directory, and extract the contents of Images.zip into the MQL5\Images folder. Then, compile New_Admin_Panel.mq5 to run it in the MetaTrader 5 terminal.
Warning: All rights to these materials are reserved by MetaQuotes Ltd. Copying or reprinting of these materials in whole or in part is prohibited.
This article was written by a user of the site and reflects their personal views. MetaQuotes Ltd is not responsible for the accuracy of the information presented, nor for any consequences resulting from the use of the solutions, strategies or recommendations described.

- Free trading apps
- Over 8,000 signals for copying
- Economic news for exploring financial markets
You agree to website policy and terms of use
Hi Again,
You may rue the day I downloaded your Admin EA, but here goes:
I have split out the unique code in the Ea into Admin Common.mqh and compiled it and it works.
However...
When I started playing around, the buttons from top to bottom work well with the exception the bottom button does nothing. but when I move one panel on top of another, the "join forces" and move together. This also occurs with all three panels.
Screen 1 is the program with sequentially pressing the buttons from top to bottom. Note Bottom button does nothing
Screen 2 is overlaying the three panels. If you try to move one, they all move. The mouse move needs to distinguish which chart it should move.
Scren 3 illustrates one move moves all three
Screen 4 illustrates when one of the panel's x button(close) the program closes all and also terminates and removes itself
Screen 5 illustrates when you close the third panel using the X close button and the press the button to redisplay it, the background panel is not redrawn.
I've also included a zip file which contains the includes directory and have placed the !! AdminPanel source and executable in it for you/ In addition, I included my GoldBug common. 99% of it is probably useless but it contains DTS (Double to String)) as I got sick of typing the long name. The DTSC versions have not been fully debugged. I was planning on using them to insert commas for currency displays with or without the $. Probably string format would be easier.
Cheerio! Eat your Wheaties and happy programming
Cape CoddaH
Thank you @CapeCoddah for all your feedback and the effort you’ve invested — it truly contributes toward a more stable version of this multipanel trading tool.
I really appreciate the time you're taking to explore and figure things out.
I'm currently reviewing the issues you've highlighted and will also be checking on the modifications you submitted. Improvements are on the way.
Best regards,
Clemence Benjamin
Hello,
I was trying to install it but no button was showing, i can only see two checkboxes. I extracted the files into the Include folder as mentioned and the images were extracted into the images folder
Hello @Oluwafemi Olabisi,
Could you kindly share a screenshot so I can assist you more effectively?
Hello @Oluwafemi Olabisi,
Could you kindly share a screenshot so I can assist you more effectively?
Hi Clemence,
I've got a few questions and perhaps you can resolve some of them.
First is the Strategy tester
When I run my EA in it, none of the text, panels buttons etc are displayed on the testing machine. I noticed that some of yours are displayed. Do you have any idea what causes this difference? Im planning on incorporating your ea into mine and trying to determine what causes the differences.
Second, How do you contact MetaQuotes to transmit bugs and suggestions for improvement to them. I have spent considerable time in MQL5.com and cannot find a way.
I have attached here, how the files were extracted into the INCLUDE and IMAGES directories respectively.
The ea should be in the experts folder not the include folder. AFter you move it, you must stop the EA and restart it to get the EA to show up in the Navigator Pane. Its one to the things MQ should change. At least allowing users to collapse the Folder, either Indicators or EXperts, and then refresh the list on during the expand command rather than stopping Terminal and restarting it and then opening all of the sub-directories until you reach your target. Better yet they should do it automatically when ever a new executable is placed in the subdirectory.