
From Novice to Expert: Animated News Headline Using MQL5 (IV) — Locally hosted AI model market insights

Contents:
- Introduction
- Overview
- Setting Up and Hosting an AI Model Locally
- Integrating AI Insights into MQL5: Enhancing the News Headline EA
- Testing the Integration
- Conclusion
- Key Lessons
- Attachments
Introduction
In this discussion, we explore how to leverage open-source AI models to enhance our algorithmic trading tools—specifically, how to expand the News Headline EA with an AI Insights lane. The goal is to help newcomers find a solid starting point. Who knows? Today, you may be integrating a model; tomorrow, you might be building one. But it all begins by understanding the foundations laid by those who came before us.
We can’t have a conversation about modern advancements without mentioning artificial intelligence and its rapidly growing influence on human tasks. When it comes to algorithmic trading, the discussion becomes even more relevant—trading is already driven by numbers and automation, making AI a natural fit compared to other areas that still require a shift from manual processes.
While AI models have become powerful tools across various fields, not everyone has the resources or expertise to build their own models due to the complexity involved in developing fully functional systems. Fortunately, the rise of open-source initiatives has made it possible to access and benefit from pre-trained models at no cost. These community-driven efforts offer a practical entry point for many developers and enthusiasts.
That said, premium models often provide broader capabilities due to the extensive work invested in them. Still, open-source models are a valuable starting point, especially for those looking to integrate AI without reinventing the wheel.
In the previous discussion, we focused on Indicator Insights. Today, we’ll explore how to harness open‑source AI for algorithmic trading by self‑hosting a quantized language model and integrating it directly into an MQL5 Expert Advisor. In the next section, we’ll begin with a brief primer on the roles of llama.cpp (the lightweight inference engine) and a 4‑bit GGUF model (the compressed “brain”), then walk through downloading and preparing the model, setting up a local Python‑based inference server with FastAPI, and finally wiring it into the News Headline EA to create a dynamic AI Insights lane.
Along the way, we’ll highlight key decisions, troubleshoot common roadblocks, and demonstrate a simple smoke test—all designed to give you a clear, end‑to‑end blueprint for adding real‑time AI commentary to your trading workflow.
Overview
For this project, we’re using a 64‑bit Intel Core i7‑8550U CPU (1.80–1.99 GHz) with 8 GB of RAM. Given these hardware constraints, we chose a lightweight 4‑bit GGUF model—specifically stablelm‑zephyr‑3b.Q5_K_M.gguf—to ensure efficient loading and inference performance on our system. Later, I will share the recommended hardware specifications suitable for projects of this nature, along with upgrade plans to support larger and more demanding AI models in the future.
Before we proceed further, it’s important to familiarize ourselves with the key components and hardware requirements needed to run this project smoothly. For educational purposes, we are working with modest specifications, but if you have access to more powerful hardware, you’re encouraged to take advantage of it. I will also provide guidance on suitable models and recommended specifications for higher-performance setups.
Undestanding Hugging Face
Hugging Face is a platform that hosts thousands of pre‑trained machine‑learning models (NLP, vision, speech, etc.), along with datasets, evaluation metrics, and developer tools—accessible via web or the huggingface_hub Python library. It simplifies model discovery, versioning, and large‑file management (Git LFS), and offers both free self‑hosting options and a managed Inference API for scalable deployments. With comprehensive docs, community support, and seamless integration with frameworks like PyTorch and TensorFlow, Hugging Face enables anyone to quickly find, download, and run cutting‑edge AI models in their applications.
Hardware requirements
For a 4‑bit, 3 B‑parameter GGUF model running on llama‑cpp‑python, you’ll need at least:
- CPU: 4‑core/8‑thread (e.g. Intel i5/i7 or AMD Ryzen 5/7) for sub‑second per‑token inference.
- RAM: ~6–8 GB free to load the ~1.9 GB quantized model, plus working memory.
- Storage: SSD with ≥3 GB free for the model cache (~1.9 GB) and OS overhead.
- Network: Localhost calls—no external bandwidth required.
Upgrading specs
- Larger Models: Move to 7 B‑parameter or 13 B‑parameter models (quantized) but plan for 12 GB+ and stronger CPUs or GPUs.
- GPU Acceleration: Use NVIDIA GPUs with CUDA/cuBLAS and the llama‑cpp GPU backend or frameworks like Triton/ONNX for 10× speedups.
- Horizontal Scaling: Containerize (Docker) or deploy on Kubernetes clusters to load‑balance multiple inference pods—great for high‑throughput or multi‑user setups.
- Cloud GPUs/TPUs: Shift to AWS/GCP/Azure instances (e.g. A10G, A100) for models >13 B parameters or real‑time SLAs.
Software requirements:
Our workflow uses several complementary shells and environments to streamline development and testing:
- Git Bash is our go‑to for fetching and version‑controlling code—use it to git clone the Hugging Face repo, run python download_model.py (once your preferred Python is on the PATH), and even kick off quick smoke‑tests if you prefer Bash syntax. We can use Windows Command Prompt or other shells for this same process.
- MSYS2 gives us a full POSIX layer on Windows—once the model’s in place, we can stay in MSYS2 to run curl (or httpie) against http://localhost:8000/insights to verify our FastAPI endpoint is alive and returning JSON.
- Anaconda Prompt is where we create and activate our ai‑server Conda environment (python=3.12), conda install the llama‑cpp‑python, FastAPI, and Uvicorn packages, and finally launch uvicorn server:app --reload --port 8000.
Below is a block diagram serving as a blueprint for the processes we’ll cover in this discussion.
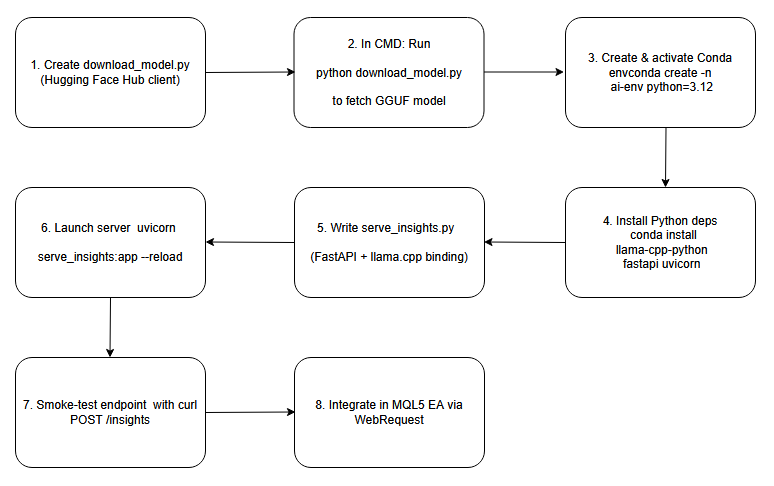
Flow Diagram.
Setting Up and Hosting an AI Model Locally
Step 1: Create the Download Script
To begin, we write a small Python script that leverages the Hugging Face Hub client. In this script, we specify the repository name (e.g., "TheBloke/stablelm‑zephyr‑3b.Q5_K_M.gguf") and call hf_hub_download() to pull the quantized GGUF file into our local cache. By then printing out the returned file path, we gain a reliable, machine‑readable reference to where the model now resides on disk. This approach automates the download and ensures you know the exact cache location—critical for configuring downstream inference code without hard‑coding unpredictable directories.
# download_model.py
from huggingface_hub import hf_hub_download

# Download the public 4-bit GGUF model; no Hugging Face account required
model_path = hf_hub_download(
    repo_id   = "TheBloke/stablelm-zephyr-3b-GGUF",
    filename  = "stablelm-zephyr-3b.Q5_K_M.gguf",
    repo_type = "model"
)
print("Downloaded to:", model_path)
Step 2: Run the Download Script
Next, open a plain Windows Command Prompt and cd into the directory containing your download script (for example, download_model.py). When you execute python download_model.py, the Hugging Face client will connect over HTTPS, download the GGUF weights into its cache, and print the full path (something like C:\Users\You\.cache\huggingface\hub\models--TheBloke--stablelm-zephyr-3b.Q5_K_M\…\stablelm-zephyr-3b.Q5_K_M.gguf). Seeing that path confirms the file is in place and lets you copy it directly into your inference configuration.
Cmd in windows:
python download_model.py
Path to the downloaded model:
Downloaded to: C:\Users\BTA24\.cache\huggingface\hub\…\stablelm-zephyr-3b.Q5_K_M.gguf
Step 3: Create & Activate a Conda Environment
conda create -n ai-env python=3.12 -y
conda activate ai-env
Step 4: Install Python Dependencies
With the ai-server environment active, use pip install llama-cpp-python fastapi uvicorn (or conda install -c conda-forge llama-cpp-python if preferred) to pull in the core libraries. The llama-cpp-python binding wraps the high‑performance C++ inference engine needed to load and run your GGUF model, while FastAPI and Uvicorn provide an asynchronous web framework and server (respectively) to expose endpoints for generating insights. Together, these packages form the backbone of your local AI inference service.
conda install -c conda-forge llama-cpp-python fastapi uvicorn -y
Step 5: Write the FastAPI Server Script
In your project folder, create a new file (e.g. server.py) and import FastAPI and Llama from llama_cpp. In the global scope, instantiate the Llama class with the path to your downloaded GGUF file. Then define a POST endpoint at /insights that accepts a JSON body (containing a "prompt" string), calls llm.create() or equivalent to generate text, and returns a JSON response containing an "insight" field. With just a few lines, you now have a RESTful AI service ready to receive prompts and stream back model outputs.
# serve_insights.py
from fastapi import FastAPI, Request
from llama_cpp import Llama

MODEL_PATH = r"C:\Users\BTA24\.cache\huggingface\hub\models--TheBloke--stablelm-zephyr-3b-GGUF\snapshots\<snapshot-id>\stablelm-zephyr-3b.Q5_K_M.gguf"
llm = Llama(model_path=MODEL_PATH, n_threads=4, n_ctx=512)

app = FastAPI()

@app.post("/insights")
async def insights(req: Request):
    data   = await req.json()
    prompt = data.get("prompt", "")
    out    = llm(prompt, max_tokens=64)
    text   = out["choices"][0]["text"].strip()
    return {"insight": text}
Step 6: Launch the Inference Server
Still in the Anaconda Prompt, change into your project directory and start Uvicorn, pointing at the FastAPI app. Enable auto‑reload to pick up script changes on the fly and listen on port 8000 for incoming requests.
cd into the folder where server.py lives and run:
cd "C:\Users\YOUR_COMPUTER_NAME\PATH_TO_YOUR python serve insights file"
When in, then we run the server:
uvicorn serve_insights:app --host 0.0.0.0 --port 8000 --reload
Step 7: Smoke‑Test the Endpoint
From any terminal, send a simple POST request to http://localhost:8000/insights with a test prompt in JSON form. Verify that the server responds with a valid JSON containing the "insight" field.
curl -X POST http://localhost:8000/insights \
     -H "Content-Type: application/json" \
     -d '{"prompt":"One-sentence FX signal for EUR/USD."}'
A successful response will look like:
{"insight":"Be mindful of daily open volatility…"}
Step 8: Integrate into Your MQL5 EA
With the AI server up and verified, it’s time to return to our MQL5 Expert Advisor and pick up where we left off. We’ll integrate the AI‑Insights endpoint into our EA by adding a dedicated “AI Insights” lane on the chart. Once integrated, your EA will call the local /insights endpoint at the configured interval, parse the returned JSON, and feed the resulting text into the same smooth‑scroll mechanism you already use for news and indicators. In the next section, we’ll walk through the complete code integration—step by step—to deliver a full end‑to‑end AI‑enhanced trading tool.
Integrating AI Insights into MQL5: Enhancing the News Headline EA
Assuming you’ve reviewed our previous article, we’ll now zero in on integrating just the new AI‑Insights feature into the EA. In the following steps, I’ll highlight and explain each code addition required—while leaving the rest of the EA untouched—and then provide the complete, updated EA code at the end of our discussion.
1. Extending Our Inputs
First, we add three new input parameters alongside the existing ones. We include a boolean so we can switch the AI Insights lane on or off at will, a string where we enter the URL for our FastAPI (or other AI) endpoint, and an integer that sets how many seconds must pass between successive POST calls. With these in place, we can experiment interactively—toggling the lane, pointing at different servers, or dialing the refresh rate up or down without touching the core code.
//--- 1) USER INPUTS ------------------------------------------------
input bool   ShowAIInsights         = true;
input string InpAIInsightsURL       = "http://127.0.0.1:8000/insights";
input int    InpAIInsightsReloadSec = 60;   // seconds between requests
2. Declaring Shared Globals
Next, we introduce global variables to hold and manage our AI data. We keep the current insight text in one string, and track its horizontal offset in an integer so we can scroll it each tick. To avoid overlapping requests, we add a flag that marks when a web request is in flight, and we store the timestamp of our last successful fetch. These globals ensure that we always have something to draw, know exactly when to send the next call, and prevent racing HTTP calls.
//--- 3) GLOBALS -----------------------------------------------------
string latestAIInsight      = "AI insights coming soon…";
int    offAI;                            // scroll offset
bool   aiRequestInProgress  = false;     // prevent concurrent POSTs
datetime lastAIInsightTime  = 0;         // last successful fetch time
3. Building FetchAIInsights()
We encapsulate all our HTTP logic in a single function. Inside, we first check our toggle and cooldown: if the AI lane is disabled, or if we’ve fetched too recently (or a previous request is still pending), we simply return. Otherwise, we craft a minimal JSON payload—perhaps including the current symbol—and fire off a WebRequest("POST"). On success, we parse out the "insight" field from the JSON response and update our global text and timestamp. If anything goes wrong, we leave the prior insight intact, so our scrolling lane never goes blank.
void FetchAIInsights()
{
  if(!ShowAIInsights || aiRequestInProgress) return;
  datetime now = TimeTradeServer();
  if(now < lastAIInsightTime + InpAIInsightsReloadSec) return;

  aiRequestInProgress = true;
  string hdrs   = "Content-Type: application/json\r\n";
  string body   = "{\"prompt\":\"Concise trading insight for " + Symbol() + "\"}";
  uchar  req[], resp[]; string hdr;
  StringToCharArray(body, req);

  int res = WebRequest("POST", InpAIInsightsURL, hdrs, 5000, req, resp, hdr);
  if(res > 0)
  {
    string js = CharArrayToString(resp,0,WHOLE_ARRAY);
    int p     = StringFind(js, "\"insight\":");
    if(p >= 0)
    {
      int start = StringFind(js, "\"", p+10) + 1;
      int end   = StringFind(js, "\"", start);
      if(start>0 && end>start)
        latestAIInsight = StringSubstr(js, start, end-start);
    }
    lastAIInsightTime = now;
  }
  aiRequestInProgress = false;
}
4. Seeding the Canvas in OnInit()
In our initialization routine, after setting up all the other canvases, we create the AI canvas too. We give it the same dimensions and a semi-transparent background, then position it just below the existing lanes. Before any data returns, we draw a friendly placeholder (“AI insights coming soon…”) so the chart looks polished. Finally, we call FetchAIInsights() once immediately—this guarantees that, even if we start mid-session, real content appears as soon as the first network call completes.
int OnInit()
{
  // … existing init …

  // AI Insights lane
  if(ShowAIInsights)
  {
    aiCanvas.CreateBitmapLabel("AiC", 0, 0, canvW, lineH, COLOR_FORMAT_ARGB_RAW);
    aiCanvas.TransparentLevelSet(120);
    offAI = canvW;
    SetCanvas("AiC", InpPositionTop, InpTopOffset + (InpSeparateLanes ? 8 : 5) * lineH);
    aiCanvas.TextOut(offAI, (lineH - aiCanvas.TextHeight(latestAIInsight)) / 2,
                     latestAIInsight, XRGB(180,220,255), ALIGN_LEFT);
    aiCanvas.Update(true);

    // initial fetch
    FetchAIInsights();
  }

  EventSetMillisecondTimer(InpTimerMs);
  return INIT_SUCCEEDED;
}
5. Refreshing & Scrolling in OnTimer()
Each timer tick, we already redraw events, news, and indicators. Right after those, we slot in our AI steps: call FetchAIInsights() (which quietly no-ops if the cooldown hasn’t passed), erase the AI canvas, draw the latest insight at its current offset, decrement that offset for a smooth leftward scroll, wrap it around when it leaves the screen, and finally call Update(true) to flush it immediately. The outcome is a beautifully scrolling AI message that refreshes only when we’ve allowed it to—blending smooth animation with controlled network use.
void OnTimer()
{
  // … existing redraw for events/news/indicators …

  // fetch & draw AI lane
  FetchAIInsights();

  if(ShowAIInsights)
  {
    aiCanvas.Erase(ARGB(120,0,0,0));
    aiCanvas.TextOut(offAI, (lineH - aiCanvas.TextHeight(latestAIInsight)) / 2,
                     latestAIInsight, XRGB(180,220,255), ALIGN_LEFT);
    offAI -= InpAIInsightsSpeed;
    if(offAI + aiCanvas.TextWidth(latestAIInsight) < -20)
      offAI = canvW;
    aiCanvas.Update(true);
  }
}
6. Cleaning Up in OnDeinit()
When our EA unloads, we tidy everything up. We kill the timer, destroy and delete the AI canvas (only if it exists), and then run through our existing cleanup for the other canvases, event arrays, and dynamic objects. This ensures that we leave no trace behind—so reloading or redeploying the EA always starts from a clean slate.
void OnDeinit(const int reason)
{
  EventKillTimer();
  // … existing cleanup …

  if(ShowAIInsights)
  {
    aiCanvas.Destroy();
    ObjectDelete(0, "AiC");
  }
}
Testing the Integration
Now that we’ve completed the integration, let’s load our updated Expert Advisor into MetaTrader 5 and observe its real‑time performance. Be sure to keep the AI server running in the background—I’m still exploring whether we can launch it programmatically from the EA itself. In the screenshot below, you’ll see the new AI Insights lane anchored at the bottom of the other lanes, displaying live insight text.
You can easily tweak its color scheme in the code; for this demo, we left it at the default. You’ll also notice the occasional, brief pause in scrolling—an artifact of our current fetch timing, which we’ll fine‑tune in upcoming revisions. With the end‑to‑end AI feature now up and running, we’ll turn next to the server‑side implementation to understand exactly how the backend powers these insights.

News Headline EA featuring AI-driven market insights from a locally hosted model
This snippet below was taken directly from the Anaconda Prompt, where Uvicorn is serving our /insights endpoint. Seeing these logs tells us three things
- The model loaded successfully, so the inference engine is ready.
- Uvicorn is running and listening, so the HTTP server is up.
- Our EA’s WebRequest successfully reached the server, triggering a new inference cycle.
Below, I’ve captured five of those inference cycles during testing—each one corresponds to a single POST from the EA. After this snippet, I’ll walk you through one of these cycles in detail so you can see exactly what happens behind the scenes.
llama_print_timings:        load time =  206235.75 ms
llama_print_timings:      sample time =      58.01 ms /    64 runs   (    0.91 ms per token,  1103.33 tokens per second)
llama_print_timings: prompt eval time =    1487.17 ms /     4 tokens (  371.79 ms per token,     2.69 tokens per second)
llama_print_timings:        eval time =   29555.55 ms /    63 runs   (  469.14 ms per token,     2.13 tokens per second)
llama_print_timings:       total time =   31979.70 ms
←[32mINFO←[0m:     127.0.0.1:52770 - "←[1mPOST /insights HTTP/1.1←[0m" ←[32m200 OK←[0m
Llama.generate: prefix-match hit

llama_print_timings:        load time =  206235.75 ms
llama_print_timings:      sample time =      83.42 ms /    64 runs   (    1.30 ms per token,   767.19 tokens per second)
llama_print_timings: prompt eval time =    1890.97 ms /     6 tokens (  315.16 ms per token,     3.17 tokens per second)
llama_print_timings:        eval time =   32868.44 ms /    63 runs   (  521.72 ms per token,     1.92 tokens per second)
llama_print_timings:       total time =   35799.69 ms
←[32mINFO←[0m:     127.0.0.1:52769 - "←[1mPOST /insights HTTP/1.1←[0m" ←[32m200 OK←[0m
Llama.generate: prefix-match hit

llama_print_timings:        load time =  206235.75 ms
llama_print_timings:      sample time =      51.40 ms /    64 runs   (    0.80 ms per token,  1245.21 tokens per second)
llama_print_timings: prompt eval time =    1546.64 ms /     4 tokens (  386.66 ms per token,     2.59 tokens per second)
llama_print_timings:        eval time =   29878.89 ms /    63 runs   (  474.27 ms per token,     2.11 tokens per second)
llama_print_timings:       total time =   32815.26 ms
←[32mINFO←[0m:     127.0.0.1:52770 - "←[1mPOST /insights HTTP/1.1←[0m" ←[32m200 OK←[0m
Llama.generate: prefix-match hit

llama_print_timings:        load time =  206235.75 ms
llama_print_timings:      sample time =      65.92 ms /    64 runs   (    1.03 ms per token,   970.80 tokens per second)
llama_print_timings: prompt eval time =    1841.83 ms /     6 tokens (  306.97 ms per token,     3.26 tokens per second)
llama_print_timings:        eval time =   31295.30 ms /    63 runs   (  496.75 ms per token,     2.01 tokens per second)
llama_print_timings:       total time =   34146.43 ms
←[32mINFO←[0m:     127.0.0.1:52769 - "←[1mPOST /insights HTTP/1.1←[0m" ←[32m200 OK←[0m
Llama.generate: prefix-match hit

llama_print_timings:        load time =  206235.75 ms
llama_print_timings:      sample time =      55.34 ms /    64 runs   (    0.86 ms per token,  1156.42 tokens per second)
llama_print_timings: prompt eval time =    1663.61 ms /     4 tokens (  415.90 ms per token,     2.40 tokens per second)
llama_print_timings:        eval time =   29311.62 ms /    63 runs   (  465.26 ms per token,     2.15 tokens per second)
llama_print_timings:       total time =   31952.19 ms
←[32mINFO←[0m:     127.0.0.1:52770 - "←[1mPOST /insights HTTP/1.1←[0m" ←[32m200 OK←[0m
Llama.generate: prefix-match hit
Understanding the workings of the Model and WebRequest inside Anaconda Prompt:
llama_print_timings:        load time =  206235.75 ms
llama_print_timings:      sample time =      58.01 ms /    64 runs   (    0.91 ms per token,  1103.33 tokens per second)
llama_print_timings: prompt eval time =    1487.17 ms /     4 tokens (  371.79 ms per token,     2.69 tokens per second)
llama_print_timings:        eval time =   29555.55 ms /    63 runs   (  469.14 ms per token,     2.13 tokens per second)
llama_print_timings:       total time =   31979.70 ms
←[32mINFO←[0m:     127.0.0.1:52770 - "←[1mPOST /insights HTTP/1.1←[0m" ←[32m200 OK←[0m
Llama.generate: prefix-match hit
When your FastAPI‐Uvicorn server loads the GGUF model, llama‑cpp reports a “load time” of around 206 seconds—that’s the one‑time cost of reading and initializing the entire quantized network into memory. After that, each incoming HTTP POST to /insights follows roughly this sequence:
Prompt Evaluation (prompt eval time)
Here, llama‑cpp runs the first few tokens of your prompt through the model’s transformer stack to “prime” the generation. In this log it took 1.49 s total for 4 tokens, which works out to about 372 ms per token.
Token Generation (eval time + sample time)
- For each subsequent token it generates, the library does two things:
- Eval: compute the transformer forward pass (≈ 469 ms per token, so ~2.13 tokens /s).
- Sample: apply nucleus/top‑k/etc sampling to pick the next token (≈ 0.91 ms per token).
- In your run, generating 63 tokens took about 29.6 s for the evals plus 58 ms for sampling all of them.
Total Latency (total time)
Summing the prompt eval, all token evals, and sampling gives 31.98 s from the moment the model started computing until it returned the final text.
Once that generation completes, Uvicorn logs something like:
INFO: 127.0.0.1:52770 - "POST /insights HTTP/1.1" 200 OK
which means the server received your EA’s WebRequest("POST", "http://127.0.0.1:8000/insights", …), processed it, and returned a 200‑status JSON payload containing your "insight".
Finally, the line indicates that llama‑cpp recognized a repeated token sequence (a prefix) in its cache and skipped re‑computing those layers, slightly accelerating the generation.
Llama.generate: prefix-match hit
During testing, I noticed occasional pauses in the EA’s lane scrolling. It turned out that calling FetchAIInsights() directly in the timer loop meant the EA’s WebRequest would block—waiting up to its timeout—while Uvicorn ran the entire model evaluation, token generation, and sampling process (about 32 s) before returning JSON.
By fully decoupling the scroll logic from our HTTP calls—drawing and moving the text every 20 ms before ever invoking FetchAIInsights()—the UI lane can continue animating without interruption. Meanwhile, the heavyweight inference runs on the server, and only when it completes do we update latestAIInsight with the new response.
Conclusion
In conclusion, this exercise has shown just how extensible MQL5 can be when paired with external services—whether you’re pulling live economic calendar events and headlines from Alpha Vantage or enriching your charts with AI‑generated “notes” from a self‑hosted 4‑bit model. While these AI insights aren’t a substitute for real‑time data or a professionally trained trading system, they add an on‑demand layer of qualitative commentary or brainstorming prompts that can spark new ideas.
Along the way, we’ve become familiar with Hugging Face and learned to use MSYS2, Git Bash, and Miniconda to fetch models, configure servers, and manage isolated environments. We bridged two languages—Python for model inference and FastAPI, and MQL5 for on‑chart integration—broadening our programming toolbox and demonstrating how diverse ecosystems can work together. You’re encouraged to experiment, share your feedback in the comments section.
Looking ahead, try feeding real‑time MetaTrader 5 price series or indicator values into your AI prompts to improve context and relevance. You can experiment with different quantized formats, automate zero‑downtime deployments, or distribute inference across multiple nodes. Upgrading to a larger model and beefing up your hardware will unlock richer, more nuanced insights—but even modest setups can yield powerful, interactive trading aides. The intersection of algorithmic trading and self‑hosted AI remains wide open; your next breakthrough could redefine how traders interact with the markets.
Please find the attached support files below. I’ve also prepared a table with a brief description for each file to help you understand their purpose.
Key Lessons
| Lesson | Description |
|---|---|
| Environment Isolation | Use Conda or virtualenv to create isolated Python environments, keeping dependencies like FastAPI and llama‑cpp‑python separate and reproducible. |
| Local Caching | Download and cache large GGUF model files once via the Hugging Face Hub client to avoid repeated network transfers and speed up server startup. |
| Rate‑Limiting | Implement a minimum‑interval throttle (e.g., 300 s) for AI requests, so the EA does not overwhelm the server or incur excessive inference load. |
| Error‑Resilient Parsing | Wrap JSON decoding in error handling and extracts only the first valid object, protecting the EA from malformed or extra‐data responses. |
| Canvas Double‑Buffering | Use Canvas.Update(true) after drawing each cycle to commit changes, preventing flicker and ensuring smooth chart animations. |
| Timer‑Driven Loops | Drive all scrolling and data refresh with a single millisecond timer (e.g., 20 ms) to balance animation fluidity against CPU load. |
| WebRequest Integration | Use MQL5’s WebRequest to POST JSON to the local AI server and retrieve insights, remembering to whitelist the URL in terminal options. |
| Randomization for Diversity | Vary prompts or randomly select currency pairs for each AI request to generate diverse, non‑repetitive trading insights. |
| Resource Cleanup | In OnDeinit, destroy all Canvas objects, delete dynamic arrays, and kill timers to avoid memory leaks and orphan chart objects. |
| Modular Design | Organize code into clear functions—ReloadEvents, FetchAlphaVantageNews, FetchAIInsights, DrawLane—to improve readability and maintainability. |
| Shell Flexibility | Leverage Git Bash for Git and scripting, MSYS2 for POSIX tooling and builds, Conda Prompt for Python environments, and CMD for quick one‑offs. |
| Quantized Model Hosting | Host a quantized GGUF model locally to reduce memory footprint and inference latency compared to full‑precision weights. |
| Server‑Client Separation | Keep heavy inference on the FastAPI/Uvicorn server and let the EA remain lightweight, handling only UI updates and HTTP requests. |
| Decoupled Rendering | Always perform scroll and draw operations before calling network functions, ensuring UI responsiveness even during long requests. |
| Prompt Engineering | Craft concise, targeted JSON prompts—such as “Insight for EURUSD today”—to minimize prompt‑evaluation time and focus model output. |
| Sampling Strategies | Tune sampling parameters (top‑k, top‑p, temperature) in your FastAPI app to balance creativity against consistency in generated insights. |
| Asynchronous Endpoints | Use FastAPI’s async def handlers, so Uvicorn can handle concurrent EA requests without blocking on long‑running inference. |
| Logging & Observability | Instrument both EA and server with log timestamps and levels—e.g. llama_print_timings and EA console prints—to diagnose performance issues. |
| Performance Metrics | Expose metrics (e.g. via Prometheus) such as request latency, tokens per second, and model load time to monitor and optimize system performance. |
| Fallback Strategies | Display a default “insight unavailable” message in EA if WebRequest fails or the server is down, maintaining UI stability under error conditions. |
Attachments
| Filename | Description |
|---|---|
| News Headline EA.mq5 | MetaTrader 5 Expert Advisor script that renders scrolling lanes for economic calendar events, Alpha Vantage news, on‑chart indicator insights (RSI, Stochastics, MACD, CCI), and a throttled AI‑driven market signal lane. |
| download_model.py | Standalone Python script using the Hugging Face Hub client to fetch and cache the 4‑bit GGUF quantized StableLM‑Zephyr model, printing its local path for later reference in the server setup. |
| serve_insights.py | FastAPI application that loads the cached GGUF model via llama‑cpp‑python, exposes a POST /insights endpoint to accept JSON prompts, runs inference, and returns generated market insights. |
Warning: All rights to these materials are reserved by MetaQuotes Ltd. Copying or reprinting of these materials in whole or in part is prohibited.
This article was written by a user of the site and reflects their personal views. MetaQuotes Ltd is not responsible for the accuracy of the information presented, nor for any consequences resulting from the use of the solutions, strategies or recommendations described.

 From Basic to Intermediate: Union (I)
- Free trading apps
- Over 8,000 signals for copying
- Economic news for exploring financial markets
You agree to website policy and terms of use