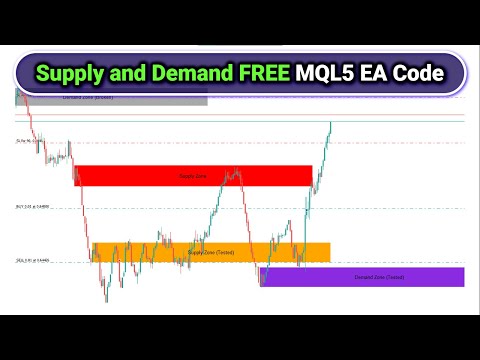
Supply and Demand Price Action MT5 EA
- 专家
- Allan Munene Mutiiria
- 版本: 2.0
- 更新: 6 十月 2025
The Supply and Demand Price Action MT5 EA is an automated trading system for MetaTrader 5 platforms. It identifies supply and demand zones based on price consolidation patterns and trades on zone retests (taps). This EA generates trades when price returns to valid zones after an initial breakout, with configurable risk management. We designed it for forex pairs on timeframes from M5 to H1, but you can test and optimize on any other instrument or timeframe.
The system detects zones through consolidation ranges, optionally validates them with impulsive moves, and manages them dynamically (e.g., marking as tested or broken). It includes trailing stops, zone visualization on the chart, and modes for handling re-trades and broken zones. The EA emphasizes price action without relying on external indicators beyond basic bar data.
Key Features
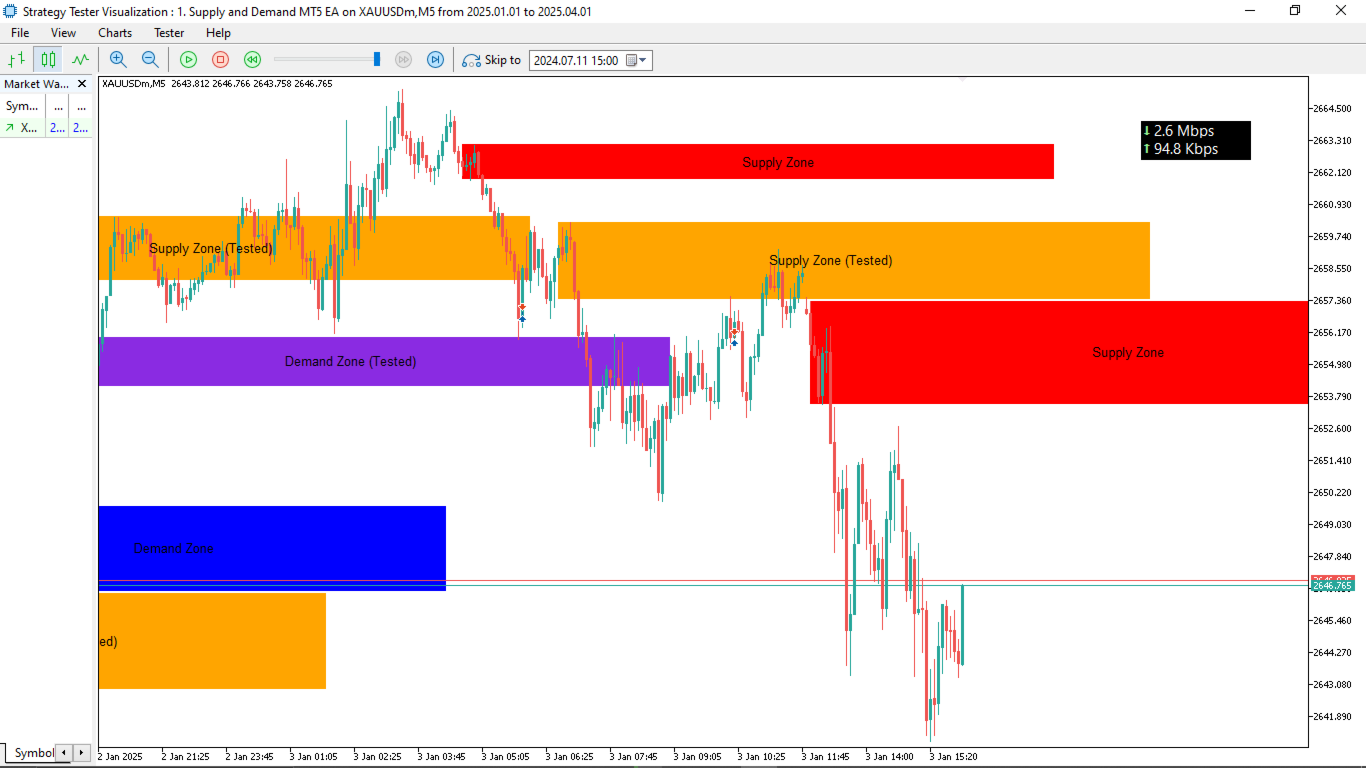
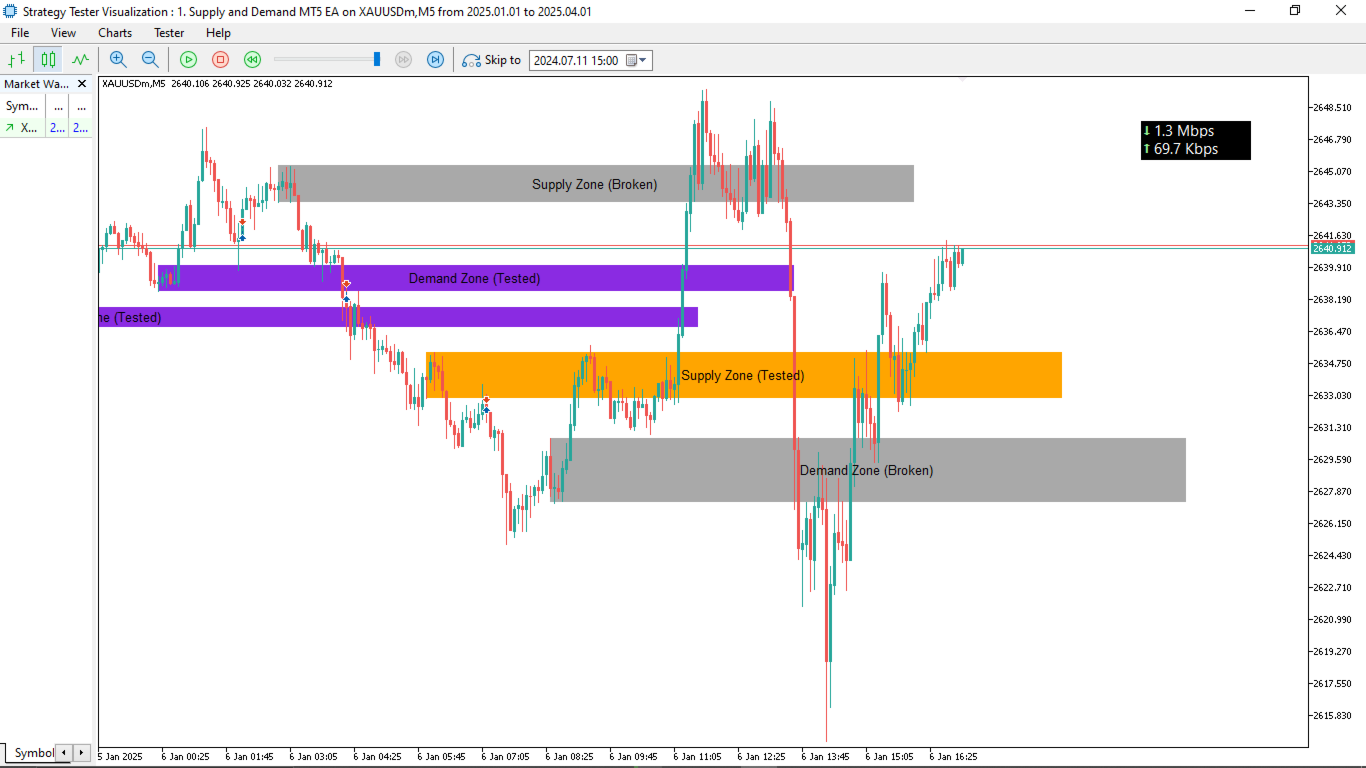
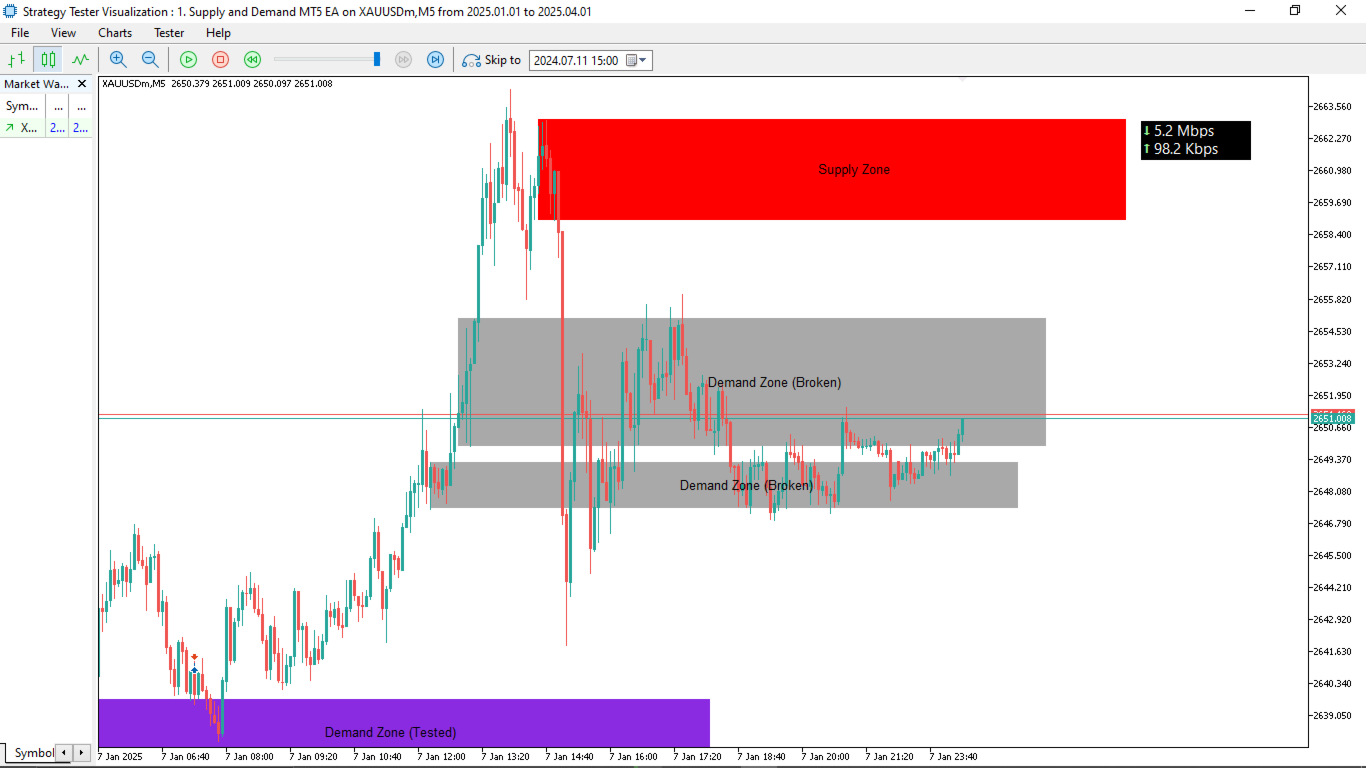
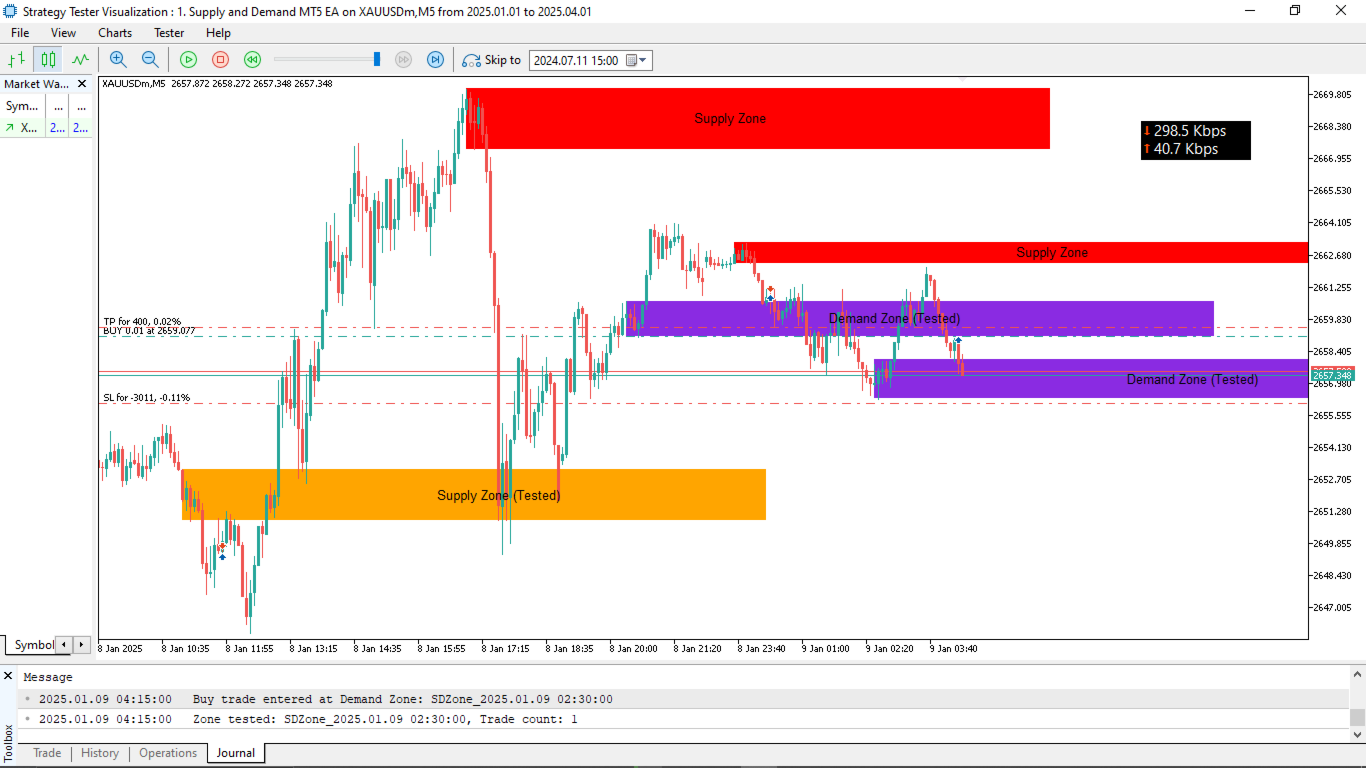
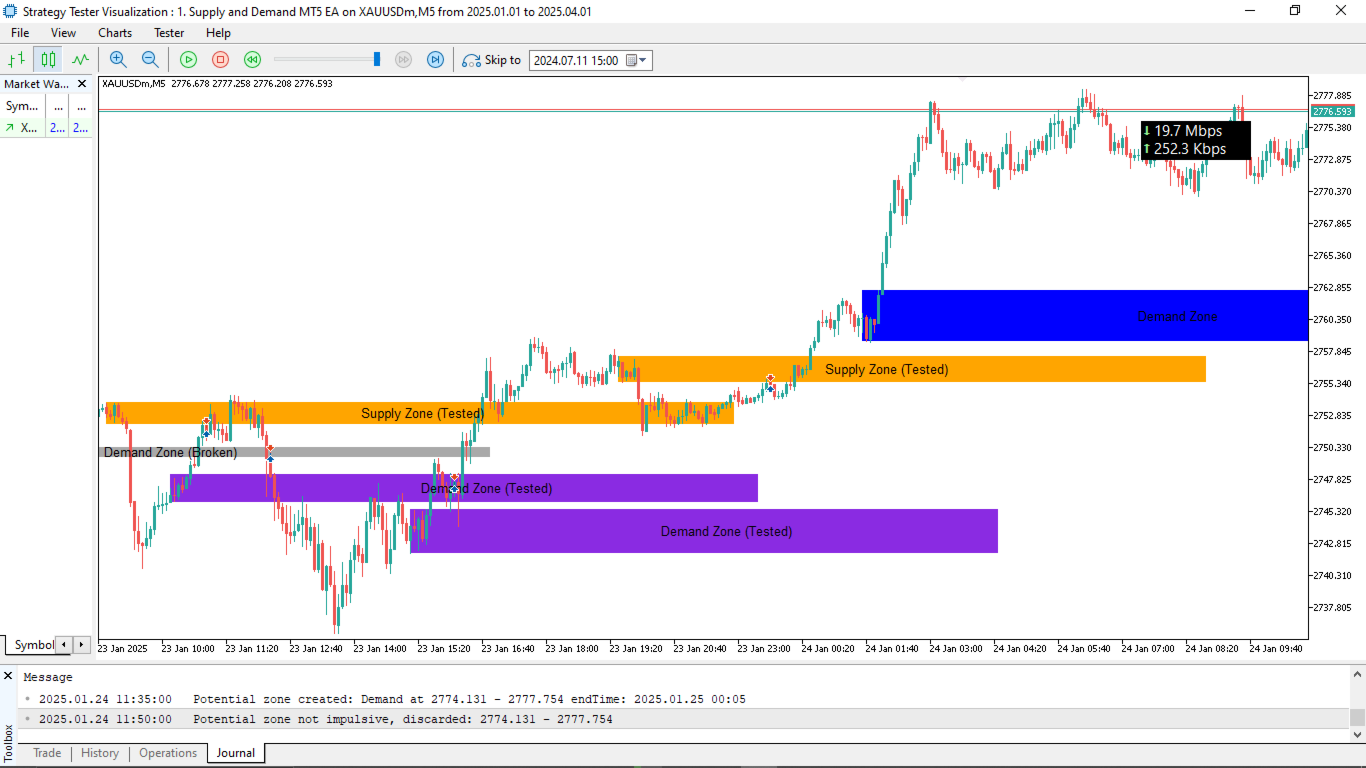
Supply and Demand Zone Detection: Zones form from consolidation periods (configurable bars) where price breaks out sharply. Demand zones trigger below prior highs with upward closes; supply zones above prior lows with downward closes. Optional impulse validation checks for strong post-breakout moves.
Zone Validation and Management: Zones must meet size restrictions (min/max points) and move-away distances before becoming testable. Modes control re-trading tested zones (none, limited, or unlimited) and handling broken zones (allow or ignore breaks). Expired or broken zones can be deleted from the chart.
Trade Execution on Zone Taps: Entries occur on candle overlaps with zones followed by confirming closes (above demand highs or below supply lows). Optional trend confirmation ensures alignment with recent price direction.
Risk Management: Fixed stop-loss and take-profit distances, with optional trailing stops after minimum profit. Validates trades for lot size, margin availability, volume limits, and broker stop/freeze levels before opening.
Chart Visualization: Draws rectangular zones with customizable colors for untested, tested, and broken states. Includes text labels and rightward extensions for future bars.
Broken and Expired Zone Handling: Automatically updates zone status; broken zones change color and may be removed. Expired zones are pruned to limit tracking.
No External Indicators Required: Relies purely on price action and bar data for zone identification and signals.
How It Works
- Zone Detection: On new bars, scans for consolidation ranges meeting spread limits. Validates breakouts to create potential zones, optionally confirming with impulsive price moves post-breakout.
- Zone Updates: Monitors zones for readiness (after price moves away), tests (on taps), and breaks (price piercing the opposite side). Draws and updates zones/labels on the chart.
- Signal Generation: On new bars, checks for taps on ready zones. Confirms with trend filters if enabled, then opens buys on demand zones or sells on supply zones.
- Trade Management: Places orders with SL/TP; applies trailing stops if enabled and profitable. Tracks trade counts per zone for re-trade limits.
- Risk Checks: Before each trade, ensures compliance with broker constraints (volume, margin, levels). Prunes old/expired zones to maintain performance.
- Logging and Debugging: Prints zone creations, validations, tests, and trades for monitoring.
Input Parameters
General Settings:
- Trade Lot Size (default: 0.01): The initial volume (in lots) for each trade. This controls position sizing; smaller values reduce risk, while larger ones increase it. Example: Set to 0.01 for micro accounts or 0.1 for standard accounts, depending on your broker's lot step and account balance.
- Enable Automated Trading (default: true): Toggles whether the EA can open and manage trades automatically. Set to false to use the EA only for zone visualization without executing orders. Example: Disable this during backtesting if you want to observe zones without simulated trades.
- Enable Trailing Stop (default: true): Activates dynamic stop-loss adjustment as trades become profitable. This helps lock in gains but may close positions prematurely in volatile markets. Example: Enable for trending markets; disable in ranging conditions to avoid whipsaws.
- Trailing Stop Points (default: 30): The distance (in points) the stop-loss trails behind the current price once activated. Example: A value of 30 means the SL moves 30 points behind the bid/ask when profitable, securing at least that much profit.
- Minimum Trailing Points (default: 50): The minimum profit (in points) a trade must reach before trailing begins. This prevents early trailing in small moves. Example: Set to 50 to ensure trailing only starts after a trade is up by at least 50 points.
- Magic Number (default: 12345): A unique identifier for the EA's trades, allowing multiple EAs on the same account without interference. Example: Use different numbers like 12345 for EURUSD and 54321 for GBPUSD if running on multiple charts.
- Consolidation Bars (default: 5): The number of bars required to form a consolidation range for zone detection. Higher values create stronger zones but fewer signals. Example: Set to 5 for shorter timeframes like M15; increase to 10 for H1 to filter noise.
- Maximum Consolidation Spread (Points) (default: 100000000000000): The max price range (in points) allowed during consolidation. Very high defaults effectively disable this filter; lower to restrict to tighter ranges. Example: Set to 50 for volatile pairs like GBPJPY to avoid wide, unreliable zones.
- Stop Loss Distance (Points) (default: 200): The fixed distance below demand zones or above supply zones for stop-loss placement.
- Take Profit Distance (Points) (default: 400): The fixed distance for take-profit targets from entry. Typically set to a multiple of SL for positive risk-reward. Example: 400 points aims for 2:1 RR with a 200-point SL.
- Minimum Move Away Points (default: 50): The required price distance away from a zone after breakout before it's considered "ready" for retest trades. This confirms momentum.
- Delete Broken Zones from Chart (default: false): If true, removes broken zones from the chart visually. Useful for clean charts but may hide historical data. Example: Enable if you prefer uncluttered visuals; disable to review past breaks.
- Delete Expired Zones from Chart (default: false): If true, removes zones after their extension period ends. Helps manage chart objects. Example: Enable on lower timeframes where zones expire quickly.
- Zone Extension Bars (default: 150): How many future bars to extend zone rectangles to the right on the chart. Example: 150 bars keeps zones visible for about a day on M15; adjust based on timeframe.
- Enable Impulse Validation (default: true): Requires a strong (impulsive) move after breakout to confirm a zone. Disables false breakouts but may miss some zones. Enable for higher accuracy; disable for more frequent zones in ranging markets.
- Impulse Check Bars (default: 3): Number of bars after breakout to check for the impulsive move. 3 bars looks at immediate follow-through; increase or decrease for stricter validation.
- Impulse Multiplier (default: 1.0): Multiplier applied to the zone range to set the impulse threshold (e.g., price must move at least this multiple away). Example: 1.0 requires a move equal to the zone size; 2.0 demands double for stronger confirmation.
- Mode for Trading Tested Zones (default: NoRetrade): Controls re-trading after a zone tap. Options: NoRetrade (once only), LimitedRetrade (up to max trades), UnlimitedRetrade (any valid tap). Example: Use LimitedRetrade with max 2 for multiple entries in strong zones.
- Maximum Trades per Zone (default: 2): Limit for re-trades in LimitedRetrade mode. Example: 2 allows two taps before ignoring the zone and considering it weak.
- Mode for Broken Zones (default: AllowBroken): Handles zones pierced on the opposite side. AllowBroken marks them invalid; NoBroken ignores breaks and keeps trading. Use AllowBroken for realistic invalidation; NoBroken for aggressive strategies.
Zone Colors:
- Untested Demand Zones (default: Blue): Color for fresh demand rectangles.
- Untested Supply Zones (default: Red): Color for fresh supply rectangles.
- Tested Demand Zones (default: Blue Violet): Color after a demand zone is tapped.
- Tested Supply Zones (default: Orange): Color after a supply zone is tapped.
- Broken Zones (default: Dark Gray): Color for invalidated zones.
- Label Text (default: Black): Color for zone text labels. Change to white for dark chart backgrounds.
Zone Size Restrictions:
- Zone Size Mode (default: NoRestriction): Controls zone width filters. NoRestriction allows any; EnforceLimits applies min/max. EnforceLimits to avoid tiny or huge zones in volatile pairs.
- Minimum Zone Points (default: 50): Smallest allowed zone size (in points) if enforced.
- Maximum Zone Points (default: 300): Largest allowed zone size (in points) if enforced.
Trend Confirmation:
- Trend Confirmation Mode (default: NoConfirmation): Requires trend alignment before trades. NoConfirmation ignores; ConfirmTrend checks recent bars.
- Trend Lookback Bars (default: 10): Bars to assess trend direction if confirmation enabled.
- Minimum Trend Points (default: 1): Min price change (in points) over lookback to confirm trend. 1 point ensures minimal bias; increase for stronger trends.
Disclaimer:
Trading forex and using automated systems involves significant risk of loss and is not suitable for all investors. Past performance does not guarantee future results. This EA does not provide financial advice. Users are responsible for their own decisions and should test thoroughly before live use. No warranties are made regarding performance or suitability. Use at your own risk.


good!