Confluence Dynamics Multi MT5
- Experts
- Version: 2.0
- Updated: 17 May 2026
- Activations: 10

Confluence Dynamics Multi
Live forward testing is here
1. Introduction (The Big Picture)
Confluence Dynamics Multi MT5 is a fully automated, non‑martingale, non‑grid expert advisor that trades a basket of major, cross, and commodity FX pairs (including XAUUSD). It does not guess – it waits for a strict combination of trend alignment, volatility expansion, price location, session, and structural protection before entering a trade.
What it does:
It identifies the dominant HTF (Monthly, Weekly, Daily) bias, confirms it on H4 with Heiken Ashi + MA slope, then waits for an H1 trigger candle (a strong directional candle with minimal wick). Entries can be direct market or pullback limit orders. Each trade is split into two targets: TP1 (partial close, default 50%) and TP2 (weekly level or extended). After TP1 is hit, the remaining position goes to breakeven and then a trailing stop protects profits.
What it does NOT do:
No martingale, no grid, no arbitrage, no tick scalping. It uses a correlation guard to avoid overloading the same currency bucket. It respects a maximum concurrent trades limit (default 3).
Supported symbols:
All major and minor FX pairs, plus XAUUSD (Gold), as long as they are in the Market Watch and have H1/H4 data. The EA automatically scans and monitors up to 50 symbols.
Timeframe: H1 (the EA will display a dashboard but will not trade on other timeframes).
Minimum deposit: $500 recommended (to allow proper risk distribution across symbols).
2. Core Strategy – How It Works (Plain English)
The EA evaluates each symbol once per H1 bar through a 7‑gate filter system. Every gate must pass for a signal to be generated.
| Gate | What it checks | Why it matters |
|---|---|---|
| G0 – ATR Expansion | H4 ATR > 70% of its 50‑period average | Avoids low‑volatility chop |
| G1 – HTF Bias | Monthly, Weekly, Daily candle scores agree (bull/bear) | Captures the true macro direction |
| G2 – H4 Confluence | Heiken Ashi + EMA slope on H4 support the HTF bias | Confirms intermediate trend |
| G3 – Price Location | Price not at weekly exhaustion zone (>0.95 or <0.05) | Avoids chasing extremes |
| G4 – Session | London, New York, or overlap | Trades only during liquid hours |
| G5 – ADX | ADX(14) >= 20 on H4 | Ensures trend strength |
| G6 – HTF Structure | Price not at monthly/weekly resistance (for buys) or support (for sells) | Protects against major reversal zones |
When all 7 gates pass, the EA stores an outlook (bullish or bearish) and a quality score (0–10+). It then waits for an H1 trigger candle – a candle where the body is larger than the upper wick (for bull) or larger than the lower wick (for bear). On the next H1 bar, it enters.
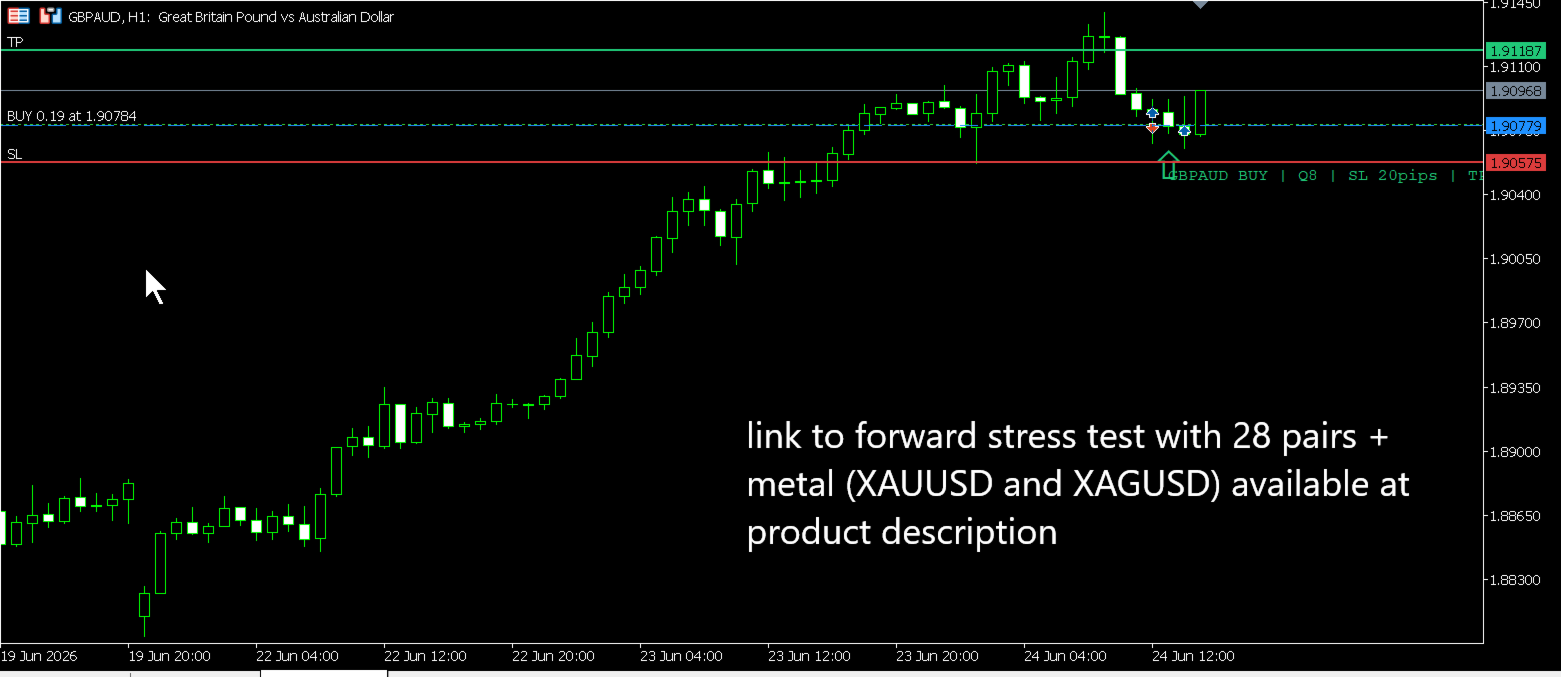
Entry modes:
-
DIRECT: market order at the next bar open.
-
PULLBACK: limit order at a 50% retrace of the trigger candle’s body (expires after 16 H1 bars).
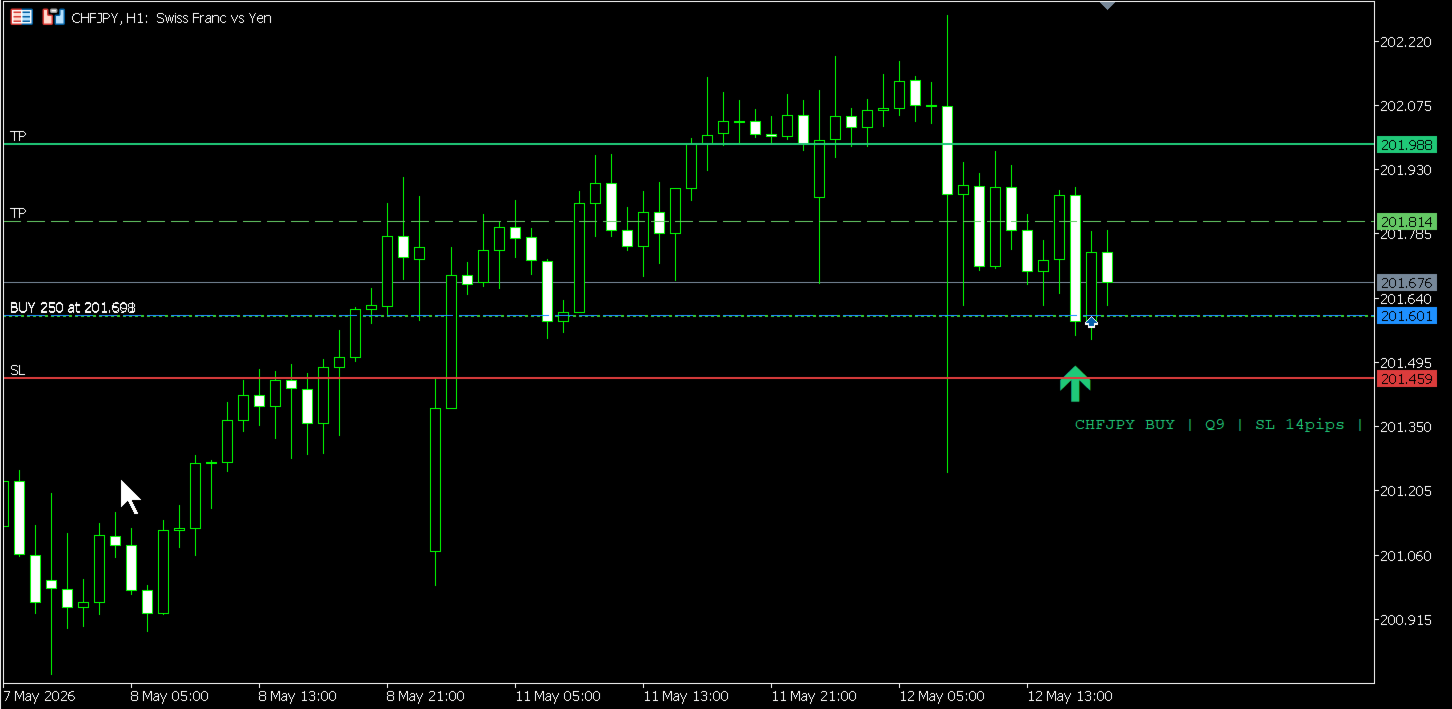
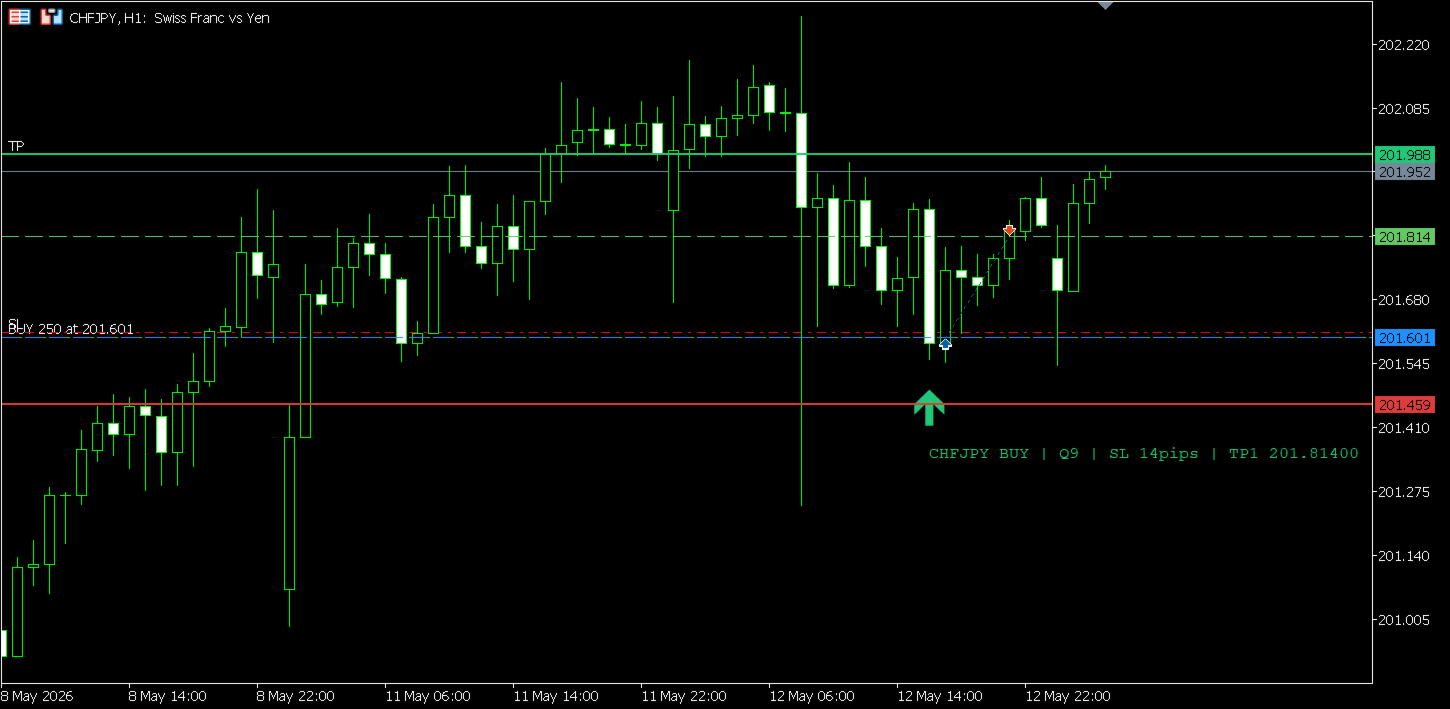
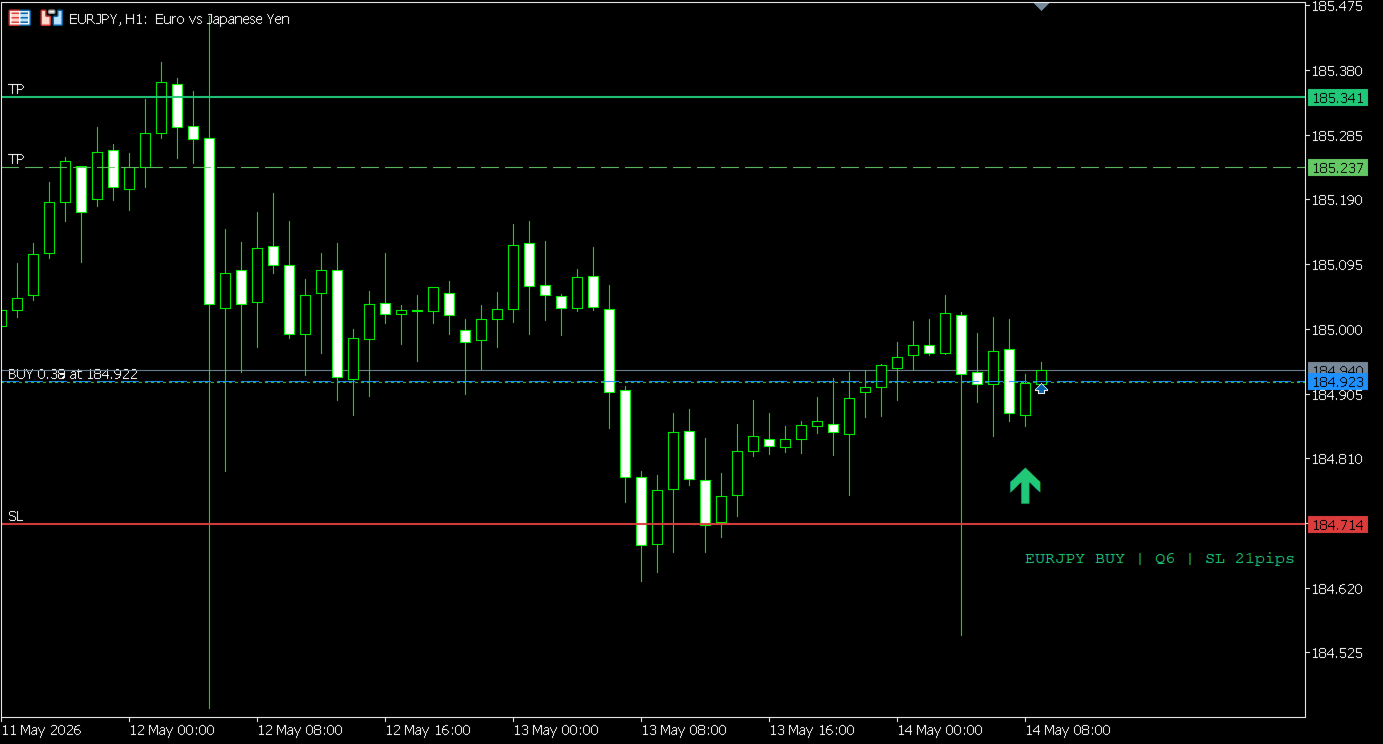
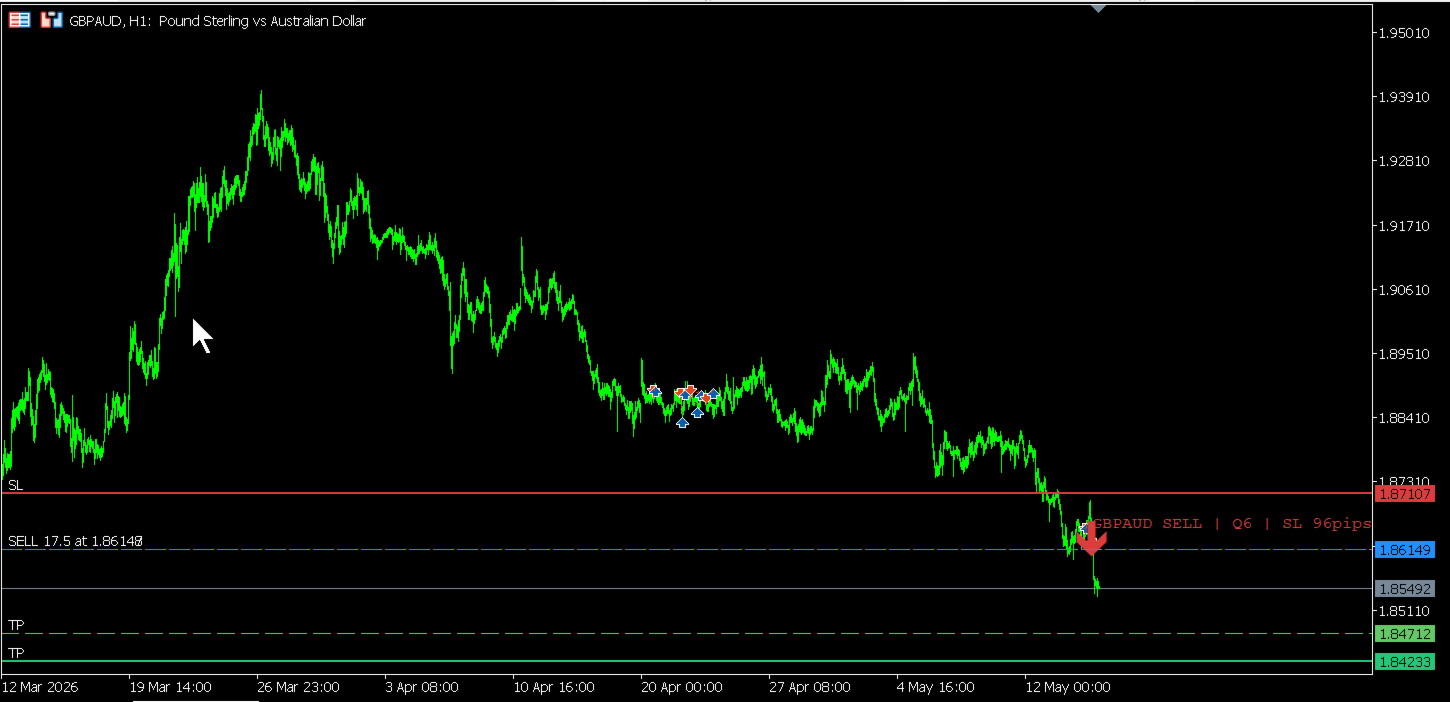
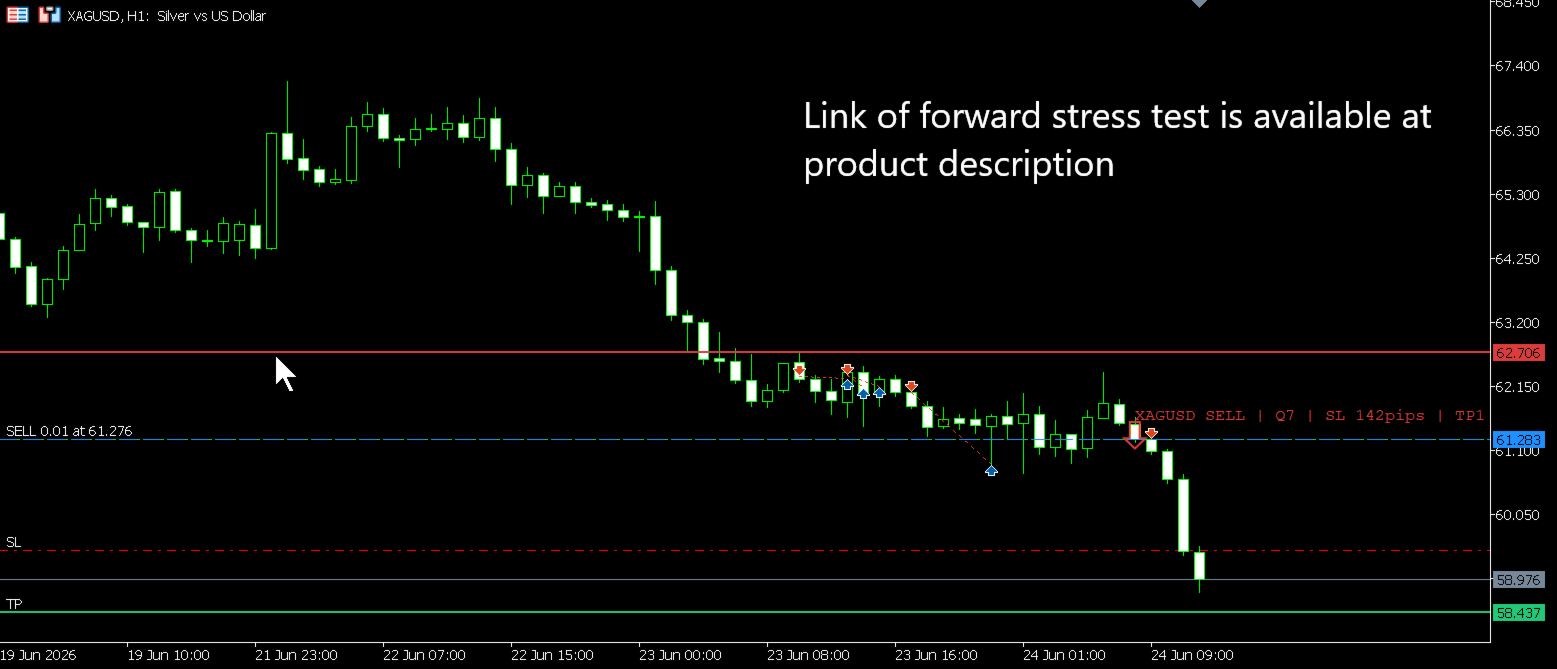
Exit strategy:
-
TP1 = risk * 1.5 (partial close 50%).
-
TP2 = weekly high/low minus/plus a buffer. If that is not beyond TP1, a 2*risk target is used.
-
After TP1 is hit, the remaining position moves to breakeven (+1 pip) and then a trailing stop activates (default: trail start after +10 pips profit, trail distance 15 pips, step 3 pips).
-
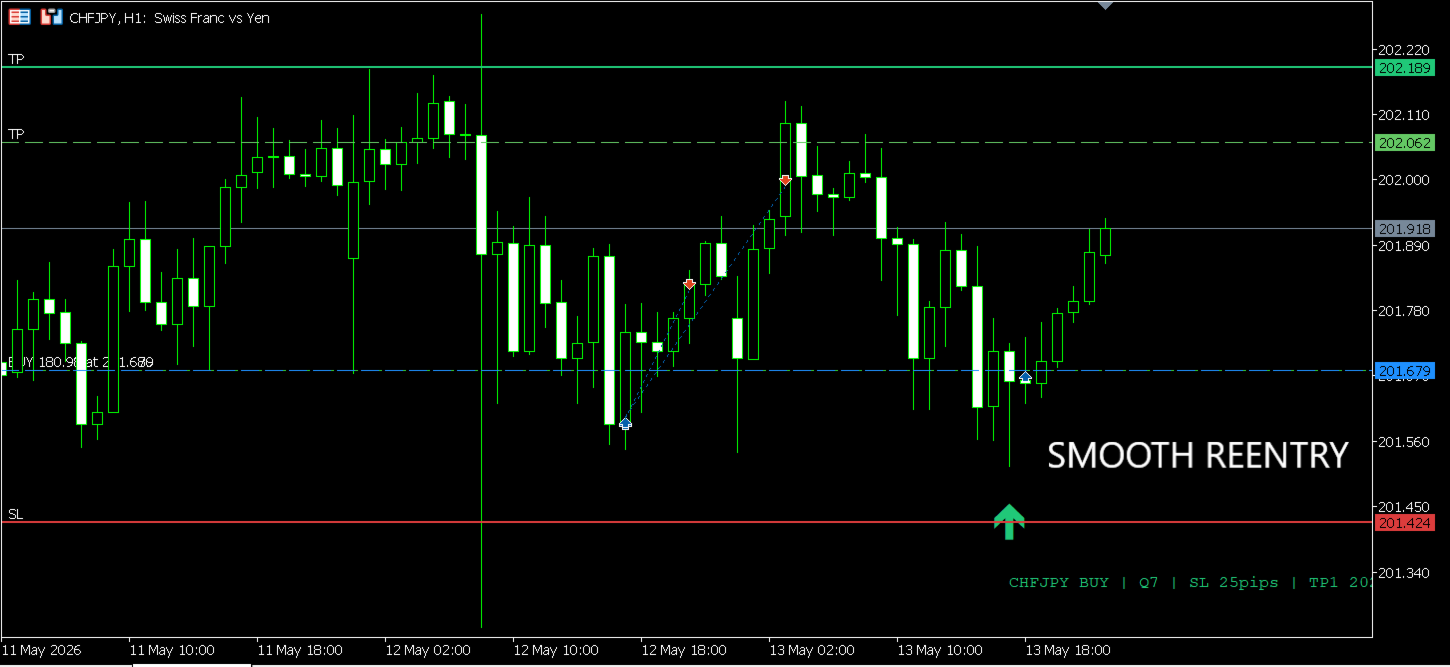
A retest option (disabled by default) can place a new limit order at the original entry price after the trade closes, if HTF bias remains.
3. Key Features & Benefits (What You Actually Get)
Benefit 1 – No curve‑fitted nonsense
The logic is based on classical price action, Heiken Ashi, and trend strength – not obscure indicators. Every filter has a rational market reason.
Benefit 2 – Multi‑symbol with correlation guard
The EA watches up to 50 symbols simultaneously but limits trades per currency bucket (e.g., only one EUR‑based pair in the same direction at a time). This reduces hidden risk.
Benefit 3 – Partial profit taking + breakeven + trailing
You lock in profits early (TP1) while letting the rest run with no risk after breakeven. No more watching winners turn into losers.
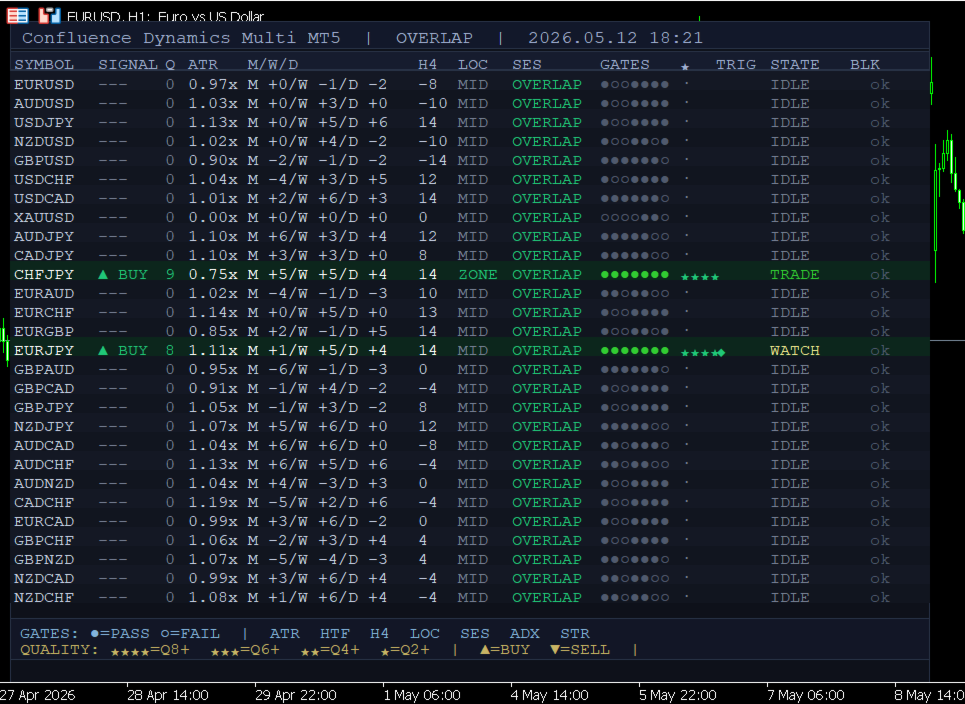
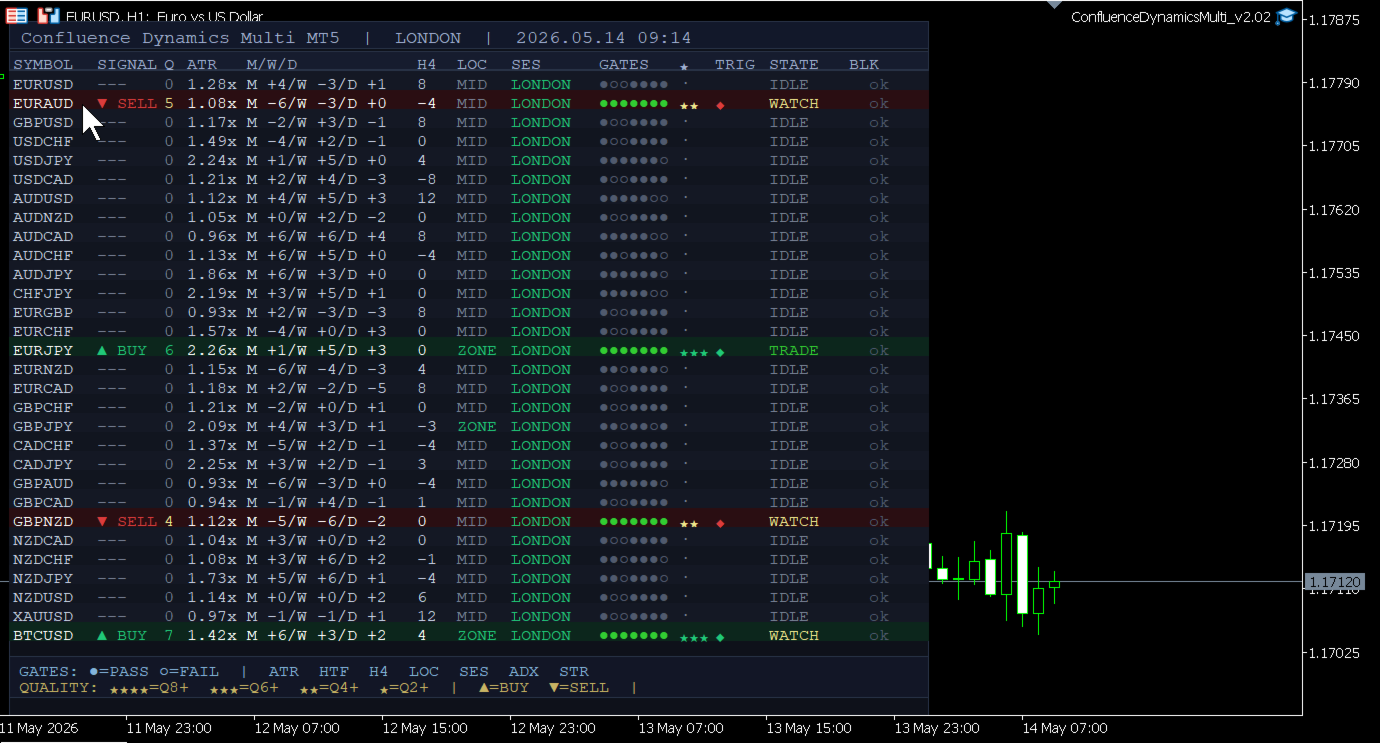
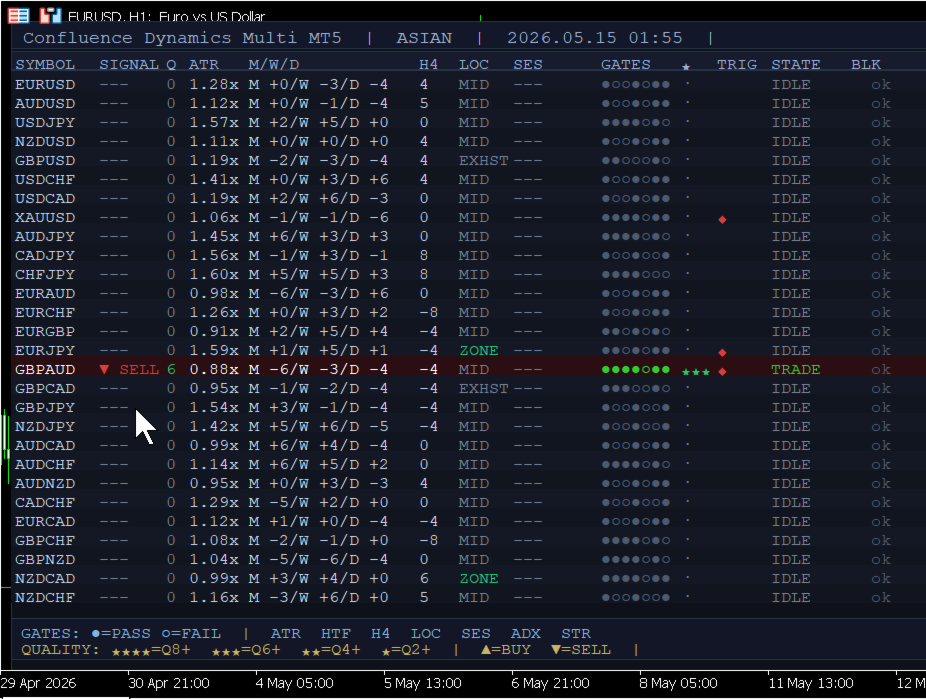
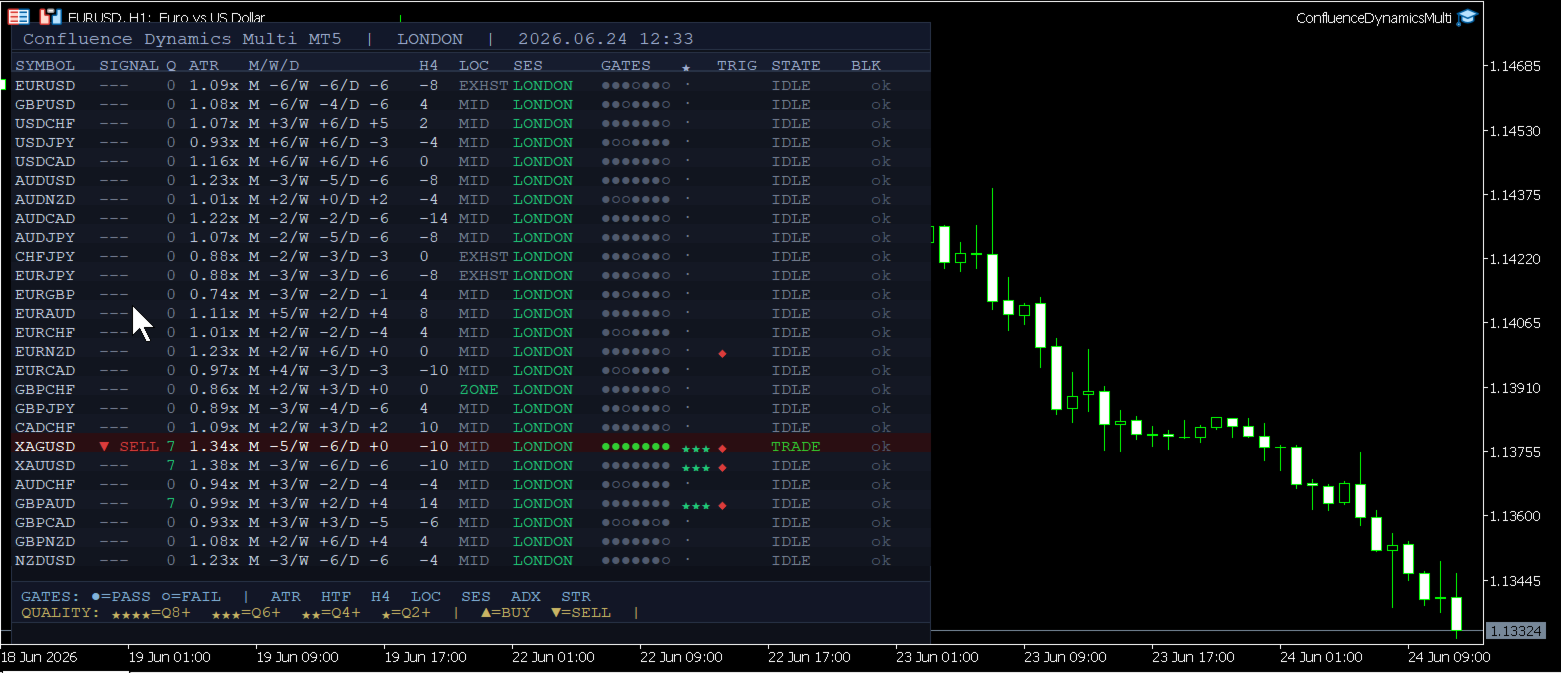
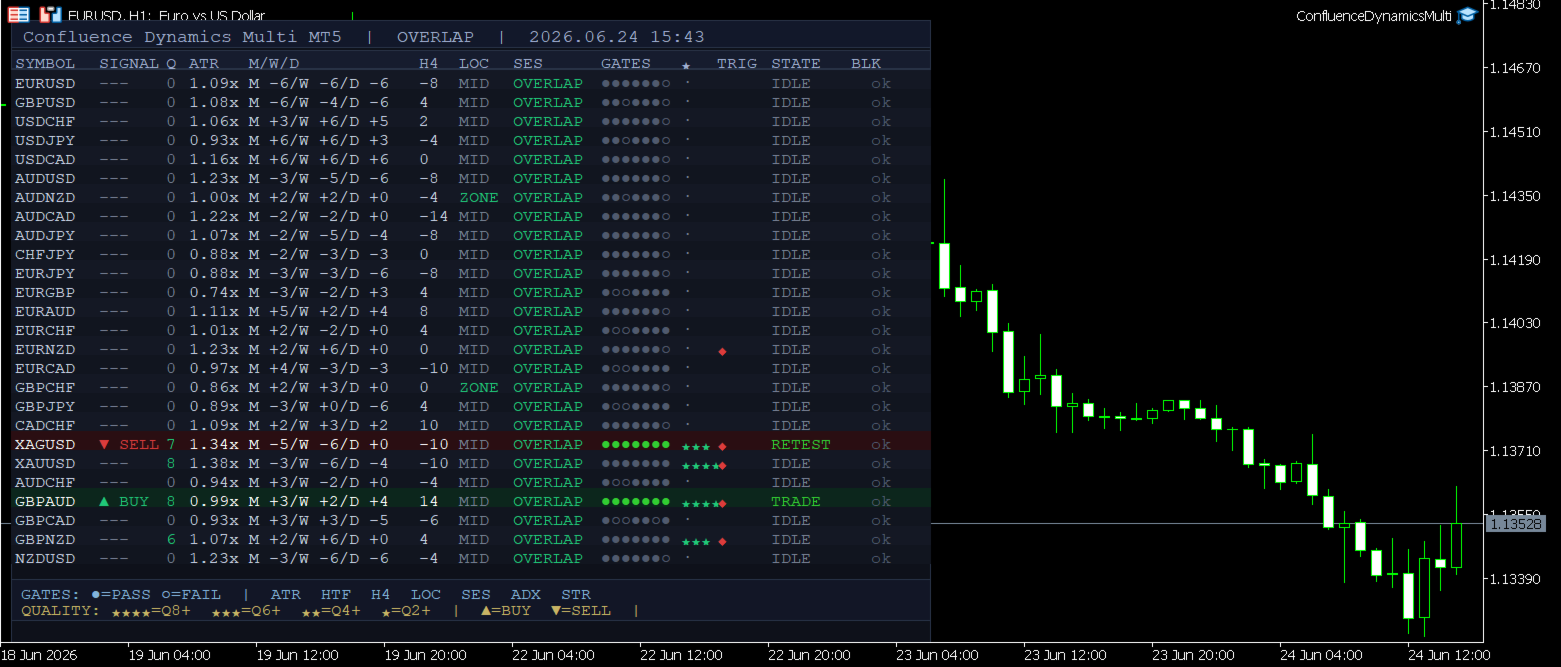
Benefit 4 – Full transparency dashboard
A live dashboard shows for each symbol: signal direction, quality score, ATR ratio, HTF scores, H4 score, location, session, gate pass/fail dots, trigger candle, state, and block status. You see exactly why the EA does or does not trade.
Benefit 5 – No martingale, no grid, no hidden doubling
Every trade has a fixed stop loss based on the trigger candle’s low/high plus buffer. Lot size is calculated from a fixed risk percentage of account balance.
Benefit 6 – Configurable but not overwhelming
Only 30+ inputs – but most users will only touch: RiskPercent , EntryMode , MaxConcurrentTrades , and UseTrailing . Advanced traders can fine‑tune every gate.
4. Input Parameters (Key Ones Explained)
| Parameter | Default | What it does |
|---|---|---|
| RiskPercent | 1.0 | % of balance risked per trade (based on SL distance) |
| EntryMode | DIRECT (0) or PULLBACK (1) | 0 = market order on trigger, 1 = limit order at pullback |
| MaxConcurrentTrades | 3 | Total trades across all symbols |
| UseTrailing | true | Enables trailing stop after TP1 hit |
| TrailActivatePips / TrailPips | 10 / 15 | Profit level to start trailing, and trail distance |
| UseCorrelationGuard | true | Prevents multiple trades in same currency bucket |
| ShowDashboard | true | Displays the live monitoring panel |
All other parameters (ADX period, ATR period, session hours, pullback level, etc.) are fully adjustable. A complete list appears in the product’s Discussion section (link below).
5. Performance Evidence (Proof – Be Transparent)
Live monitoring:
I run this EA on a real, low‑risk account. You can view the live signal here:
What I guarantee:
The code is clean, well‑commented, uses proper MQL structures (no deprecated functions), and is compatible with the latest build. You get free updates for life and support via the MQL5 discussion page.
6. Call to Action
Buy now and start trading with a confluence‑based, risk‑aware system that does not gamble on martingale.
After purchase:
-
Attach the EA to a single H1 chart (any symbol – it will auto‑scan all others).
-
Set RiskPercent to 0.5–1.0 for conservative trading.
-
Enable ShowDashboard to monitor every symbol’s status.
-
Run in demo for 2–4 weeks before going live.
Need help? Post your question in the product Discussion tab – I usually reply within 24 hours.
Important Notes (Compliance & Transparency)
-
The EA does not use AI, neural networks, or high‑frequency trading.
-
It does not guarantee profits or a fixed monthly return.
-
It can lose money if the market becomes range‑bound or if a strong trend reverses abruptly.
-
Always use a stop loss and never risk more than you can afford.
It manages the position like a professional:
-
Split targets (TP1 / TP2) – partial profit taking, letting the rest run to weekly levels
-
Breakeven as soon as TP1 is hit – risk‑free after first target
-
Smart trailing stop – locks in profits without getting whipped out
-
Retest orders – if price returns to the same entry level after TP1, the EA places a fresh limit order (up to 48 hours) – capitalising on pullbacks without you watching
Multi‑currency coordination that actually works
-
Global trade cap – never more than X open positions across all symbols
-
Correlation buckets – only one trade in EURUSD, GBPUSD, AUDUSD etc. at a time. No hidden over‑exposure.
The same rich dashboard as the scanner
See exactly why the EA is taking (or skipping) each trade. Full transparency, no black box.
Who is this for?
Busy traders who want to automate a proven confluence strategy. Semi‑aggressive position traders who understand that quality beats quantity. Anyone tired of babysitting manual entries and exits.