

From Novice to Expert: Candlestick Momentum Confirmation for Classic Crossover Strategies
 2 452
2 452
 0
0

Moving average crossovers provide direction, but immediate entries are vulnerable to whipsaws when the price lacks follow-through. This article develops an educational Expert Advisor (EA) that treats the crossover as an alert, then requires direction-matched momentum and an immediate retracement before a pending breakout order can be considered. A finite-state machine moves through crossover, momentum, retracement, and order management so that every stage must be confirmed before the next begins.
Contents- Solution
- Understanding the Program Structure
- Visual Validation
- Customization Approach
- Practical Example/Application
- Integration and Deployment
- Conclusion and Key Lessons
Solution
The solution separates signal discovery from trade execution. Instead of treating a moving-average crossover as permission to enter, the EA records a candidate direction and advances only when the subsequent behavior of the price supports it. This staged design reduces impulsive entries and gives each rejected setup a clear reset point.
- Crossover establishes direction – the relationship between the fast and slow averages identifies a bullish or bearish candidate. No order is submitted at this stage.
- Momentum confirms participation – a sufficiently large candle must close in the crossover direction. The crossover candle may qualify, or momentum may appear within the short confirmation window.
- Retracement controls timing – the next completed bar must show the selected pullback structure. An invalid immediate retracement cancels the setup rather than extending it indefinitely.
- Conditional execution manages commitment – a pending stop order is prepared at the retracement breakout. The stop loss is anchored beyond the momentum extreme, while take profit is derived from the final broker-valid entry and stop distance.
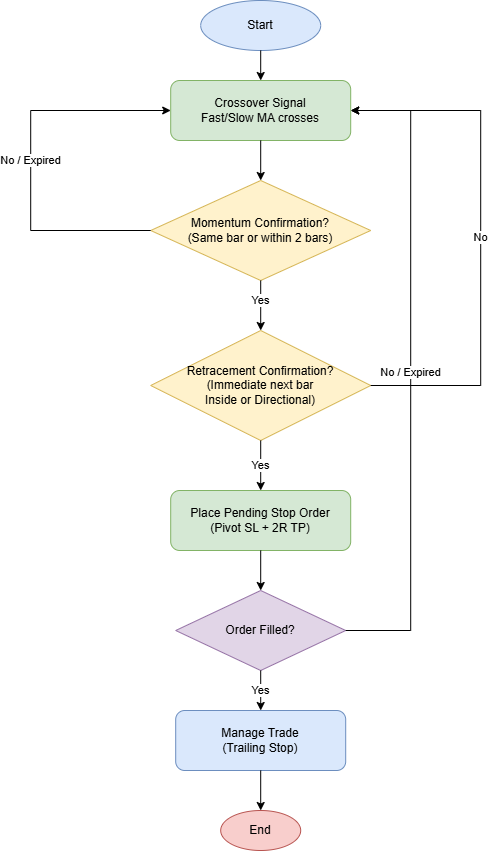
Fig. 1. Strategy Flow Diagram
A finite-state machine preserves this order of events. Each state has one responsibility, and a transition occurs only after the current condition succeeds. If momentum does not appear, the retracement fails, or an unfilled order expires, the system returns to crossover monitoring. This makes the strategy easier to inspect in the Strategy Tester because every accepted or rejected stage has a defined outcome.
Understanding the Program Structure
This framework implements the four-stage workflow introduced above: crossover detection, momentum confirmation, immediate retracement validation, and pending-order management. Each responsibility is represented explicitly in the finite-state machine.
The OnTick() Loop and State Machine
OnTick() is called on every tick. We perform heavy calculations only on new bars using a state machine defined by an enum:
The first listing defines the two enumerations that coordinate the strategy. ENUM_RETRACEMENT_MODE turns the user input into an explicit validation policy, while EState records the single stage currently owned by the finite-state machine. These values do not generate signals themselves. They prevent later code from executing before its prerequisites are complete.
//+------------------------------------------------------------------+
//| Enums                                                            |
//+------------------------------------------------------------------+

//--- Retracement pattern mode: defines which bar structure qualifies
//--- as a valid pullback after the momentum candle.
enum ENUM_RETRACEMENT_MODE
  {
   MODE_RETRACEMENT_ONLY,   // Bar must show a lower high (uptrend) or higher low (downtrend)
   MODE_INSIDE_ONLY,        // Bar must be fully inside the momentum candle range
   MODE_COMBINED,           // Both conditions must be met simultaneously
   MODE_EITHER              // Either a retracement OR an inside bar qualifies
  };

//--- FSM states tracking the EA's progression through the entry sequence
enum EState
  {
   STATE_WAIT_CROSS,         // Waiting for a MA crossover signal
   STATE_WAIT_MOMENTUM,      // Crossover detected, waiting for a momentum candle
   STATE_WAIT_RETRACEMENT,   // Momentum confirmed, waiting for a retracement bar
   STATE_ORDER_PLACED,       // Pending stop order is active on the chart
   STATE_POSITION_OPEN       // The pending order has been filled as an open position
  };
MODE_COMBINED and MODE_EITHER belong to pattern selection, whereas the EState values belong to execution order. Keeping these concerns in separate enums prevents a pattern choice from being confused with lifecycle progress. STATE_ORDER_PLACED also remains distinct from STATE_POSITION_OPEN because a pending order can exist without an open position.
Inside OnTick() we first check for a new bar using CopyTime(). Only on a fresh bar do we recalculate. The state machine prevents re‑entry. Once in STATE_WAIT_MOMENTUM, we stay there until momentum confirms or expires, then transition to STATE_WAIT_RETRACEMENT or back to STATE_WAIT_CROSS.
Crossover Detection
We use iMA() handles created in OnInit():
The moving averages are represented by indicator handles created once during initialization. A handle identifies a terminal-managed calculation; it is not the current average value. Creating both handles before tick processing avoids rebuilding the indicators on every bar and gives subsequent CopyBuffer() calls stable data sources.
int fastHandle = iMA(_Symbol, PERIOD_CURRENT, FastMAPeriod, 0, MODE_SMA, PRICE_CLOSE);
int slowHandle = iMA(_Symbol, PERIOD_CURRENT, SlowMAPeriod, 0, MODE_SMA, PRICE_CLOSE);
The complete EA creates the handles with the selected symbol, timeframe, averaging method, and the price source selected for the calculation. Initialization must reject INVALID_HANDLE, and deinitialization must release both resources. These checks define a clean lifetime for the indicators before crossover logic accesses their buffers.
On each new bar we copy the last two values using CopyBuffer(). A crossover is identified when the fast MA crosses above/below the slow MA on the previous completed bar (index 1) and was opposite on the bar before (index 2).
The crossover listing requests three values from each handle: the forming bar at index 0 and two completed bars at indices 1 and 2. Only the completed bars participate in the comparison. This prevents an intrabar intersection from being accepted before the candle closes.
CopyBuffer() must return all three requested values for both averages. If either copy is incomplete, the current cycle stops instead of using stale array contents. A confirmed comparison stores direction as +1 or -1, records the crossover time, and hands control to momentum evaluation.
//--- Fetch the latest 3 bars of both MAs for crossover detection
if(CopyBuffer(fastHandle, 0, 0, 3, fastMA) < 3 ||
   CopyBuffer(slowHandle, 0, 0, 3, slowMA) < 3)
   return;

//--- Bullish crossover: Fast MA crosses ABOVE Slow MA
if(fastMA[1] > slowMA[1] && fastMA[2] <= slowMA[2])
  {
   direction = 1;
   crossDetected = true;
  }
//--- Bearish crossover: Fast MA crosses BELOW Slow MA
else if(fastMA[1] < slowMA[1] && fastMA[2] >= slowMA[2])
  {
   direction = -1;
   crossDetected = true;
  }
The crossover branch also draws a directional chart label, but that annotation is observational. The state variables are the authoritative outputs. If the crossover candle already satisfies IsMomentumCandle(), the EA can advance directly to retracement; otherwise it starts the limited momentum-wait window.
Bar‑Counting Logic for Momentum Expiry
After crossover, we move to STATE_WAIT_MOMENTUM. We use iBarShift() to count bars since crossover. If barsSinceCross > 2, the setup expires. If ≤ 2 and momentum is found on bar index 1, we proceed to retracement.
Momentum Candle Recognition
The momentum filter is a simple body‑size check. This follows the "strong candle" concept – a single‑bar pattern reflecting aggressive buying or selling.
IsMomentumCandle() receives a bar index and the direction established by the crossover. It reads the bar open and close, converts the absolute body size into points, and compares that value with MomentumBodyMinPips. The name is retained for compatibility, although the input and calculation use points.
Size alone is insufficient. A bullish candidate must close above its open, while a bearish candidate must close below it. This keeps a large candle moving against the candidate direction from advancing the state machine.
//+------------------------------------------------------------------+
//| Checks if a given bar qualifies as a "momentum" candle.          |
//| Requirements:                                                    |
//|   - Candle body (|close - open|) >= MomentumBodyMinPips          |
//|   - Body direction must match the crossover direction            |
//+------------------------------------------------------------------+
bool IsMomentumCandle(const int barIndex, const int dir)
  {
   double open  = iOpen(_Symbol, _Period, barIndex);
   double close = iClose(_Symbol, _Period, barIndex);
   double body  = MathAbs(close - open) / _Point;
//--- Reject if the candle body is smaller than the minimum threshold
   if(body < MomentumBodyMinPips)
      return(false);
//--- Reject if the candle closed against the crossover direction
//--- dir=1 (bullish) -> close must be above open
//--- dir=-1 (bearish) -> close must be below open
   if(dir == 1 && close <= open)
      return(false);
   if(dir == -1 && close >= open)
      return(false);
//--- Store the measured body size for chart display
   momentumBodyPips = body;
   return(true);
  }
A successful call stores the measured body in momentumBodyPips and returns true. The caller then captures the candle high, low, and time because the retracement and stop-loss calculations require the full range. A false result leaves the setup in its current waiting state until the momentum window expires.
Retracement Validation (Immediate Next Bar)
The system does not enter immediately after momentum. It waits for the very next closed bar to confirm a retracement – this is the critical filter. For long, we check for lower high or inside bar; for short, higher low or inside bar.
The retracement listing receives the stored high and low of the momentum candle and compares them with the most recent completed bar. Three Boolean values describe the new structure: containment inside the momentum range, a higher low, and a lower high. Keeping these tests separate allows the selected RetracementMode to combine them without recalculating the price data.
The variable valid controls the state transition. modeStr serves a different purpose: it records the accepted pattern name for the chart label, making visual tester output easier to interpret.
double barHigh = iHigh(_Symbol, _Period, 1);
double barLow  = iLow(_Symbol, _Period, 1);
//--- Evaluate bar structure relative to the momentum candle
bool isInside    = (barHigh <= momentumHigh && barLow >= momentumLow);
bool isHigherLow = (barLow > momentumLow);
bool isLowerHigh = (barHigh < momentumHigh);
bool valid = false;
string modeStr = "";
//--- For long (bullish) setups, look for lower high or inside bar
if(direction == 1)
  {
   if(RetracementMode == MODE_RETRACEMENT_ONLY && isLowerHigh)
     {
      valid = true;
      modeStr = "Lower High";
     }
   else if(RetracementMode == MODE_INSIDE_ONLY && isInside)
     {
      valid = true;
      modeStr = "Inside Bar";
     }
   else if(RetracementMode == MODE_COMBINED && isInside && isLowerHigh)
     {
      valid = true;
      modeStr = "Inside + Lower High";
     }
   else if(RetracementMode == MODE_EITHER && (isInside || isLowerHigh))
     {
      valid = true;
      modeStr = (isInside && isLowerHigh) ? "Inside + Lower High" :
                (isInside ? "Inside Bar" : "Lower High");
     }
  }
//--- For short (bearish) setups, look for higher low or inside bar
else if(direction == -1)
  {
   if(RetracementMode == MODE_RETRACEMENT_ONLY && isHigherLow)
     {
      valid = true;
      modeStr = "Higher Low";
     }
   else if(RetracementMode == MODE_INSIDE_ONLY && isInside)
     {
      valid = true;
      modeStr = "Inside Bar";
     }
   else if(RetracementMode == MODE_COMBINED && isInside && isHigherLow)
     {
      valid = true;
      modeStr = "Inside + Higher Low";
     }
   else if(RetracementMode == MODE_EITHER && (isInside || isHigherLow))
     {
      valid = true;
      modeStr = (isInside && isHigherLow) ? "Inside + Higher Low" :
                (isInside ? "Inside Bar" : "Higher Low");
     }
  }
if(!valid)
  {
   state = STATE_WAIT_CROSS;
   Print("Retracement failed on immediate bar. Resetting.");
  }
The listing produces one decision and explanatory label. When valid remains false, the setup returns to STATE_WAIT_CROSS immediately. When it becomes true, the caller stores the retracement high and low, draws the confirmation label, and passes those levels to order preparation.
The selected RetracementMode determines how the Boolean tests are combined. MODE_RETRACEMENT_ONLY requires the directional pullback; MODE_INSIDE_ONLY requires containment within the momentum candle; MODE_COMBINED requires both conditions; and MODE_EITHER accepts either. For a bullish setup, MODE_COMBINED evaluates isInside with isLowerHigh. For a bearish setup, it evaluates isInside with isHigherLow. If the immediate bar fails the selected rule, the EA resets to STATE_WAIT_CROSS.
Pending Order Management with Pivot SL + 2R TP
Once the retracement bar is validated, the system prepares a pending stop order at its breakout level. Entry begins at the retracement edge, stop loss begins beyond the buffered momentum extreme, and broker-distance checks finalize both prices. Take profit is then calculated from the final risk distance using RiskRewardRatio; its default value of 2.0 produces a 2R target.
PlacePendingOrder() receives the direction and the price levels captured by the momentum and retracement stages. Its responsibility is broader than sending a request. It must convert the pattern into broker-valid entry, stop-loss, and take-profit prices while preserving the configured risk:reward ratio.
The function also writes entryPrice, stopLoss, takeProfit, and orderTicket after a successful server response. Those stored values are used by chart annotations and later state checks, so they are updated only after the placement result is accepted.
//+------------------------------------------------------------------+
//| Places a pending stop order (Buy Stop or Sell Stop) at the       |
//| retracement breakout level.                                      |
//|                                                                  |
//| For long trades:                                                 |
//|   Entry = retraceHigh + 1 point                                  |
//|   SL    = momentumLow - StopLossBufferPips                       |
//|   TP    = Entry + (Entry - SL) * RiskRewardRatio                 |
//|                                                                  |
//| For short trades:                                                |
//|   Entry = retraceLow - 1 point                                   |
//|   SL    = momentumHigh + StopLossBufferPips                      |
//|   TP    = Entry - (SL - Entry) * RiskRewardRatio                 |
//|                                                                  |
//| Broker stop-distance rules are applied before final SL, risk,    |
//| and TP calculation, preserving the requested risk:reward ratio.  |
//+------------------------------------------------------------------+
bool PlacePendingOrder()
  {
//--- Only one pending order at a time
   if(CountPendingOrders() > 0)
      return(false);
   MqlTradeRequest request = {};
   MqlTradeResult result = {};
   double price = 0, sl = 0, tp = 0;
//--- Read the market and the broker's minimum stop distance
   double bid = SymbolInfoDouble(_Symbol, SYMBOL_BID);
   double ask = SymbolInfoDouble(_Symbol, SYMBOL_ASK);
   int stopsLevelPoints = (int)SymbolInfoInteger(_Symbol, SYMBOL_TRADE_STOPS_LEVEL);
   double minStopDistance = MathMax(5.0, (double)stopsLevelPoints) * _Point;
//--- Calculate preliminary entry, then final broker-safe levels
   if(direction == 1)
     {
      //--- Buy Stop must be sufficiently above Ask
      double preliminaryPrice = retraceHigh + _Point;
      price = NormalizeDouble(MathMax(preliminaryPrice, ask + minStopDistance), _Digits);
      //--- Keep SL below both the momentum pivot and the minimum distance
      double pivotSL = momentumLow - StopLossBufferPips * _Point;
      sl = NormalizeDouble(MathMin(pivotSL, price - minStopDistance), _Digits);
      double risk = price - sl;
      if(risk <= 0.0)
         return(false);
      tp    = NormalizeDouble(price + risk * RiskRewardRatio, _Digits);
      request.type = ORDER_TYPE_BUY_STOP;
     }
   else if(direction == -1)
     {
      //--- Sell Stop must be sufficiently below Bid
      double preliminaryPrice = retraceLow - _Point;
      price = NormalizeDouble(MathMin(preliminaryPrice, bid - minStopDistance), _Digits);
      //--- Keep SL above both the momentum pivot and the minimum distance
      double pivotSL = momentumHigh + StopLossBufferPips * _Point;
      sl = NormalizeDouble(MathMax(pivotSL, price + minStopDistance), _Digits);
      double risk = sl - price;
      if(risk <= 0.0)
         return(false);
      tp    = NormalizeDouble(price - risk * RiskRewardRatio, _Digits);
      request.type = ORDER_TYPE_SELL_STOP;
     }
   else
      return(false);
//--- Preserve the ratio; reject instead of silently moving a too-close TP
   if(MathAbs(tp - price) < minStopDistance)
     {
      Print("Take profit is closer than SYMBOL_TRADE_STOPS_LEVEL. Increase RiskRewardRatio.");
      return(false);
     }
//--- Populate the trade request structure
   request.action    = TRADE_ACTION_PENDING;
   request.symbol    = _Symbol;
   request.volume    = LotSize;
   request.price     = NormalizeDouble(price, _Digits);
   request.sl        = NormalizeDouble(sl, _Digits);
   request.tp        = NormalizeDouble(tp, _Digits);
   request.deviation = 10;
   request.magic     = MagicNumber;
   request.comment   = (direction == 1) ? "IntLong" : "IntShort";
//--- Send the order to the trade server
   if(!OrderSend(request, result))
     {
      Print("OrderSend failed. Retcode: ", result.retcode, " | Error: ", GetLastError());
      return(false);
     }
//--- Verify success and store the order ticket and price levels
   if(result.retcode == TRADE_RETCODE_DONE ||
      result.retcode == TRADE_RETCODE_PLACED)
     {
      orderTicket = result.order;
      entryPrice  = request.price;
      stopLoss    = request.sl;
      takeProfit  = request.tp;
      return(true);
     }
   else
     {
      Print("Order rejected. Retcode: ", result.retcode);
      return(false);
     }
  }
Every failure path returns false to the calling state. This includes duplicate pending orders, invalid direction, nonpositive risk, a take-profit distance below the broker minimum, a failed OrderSend() call, or an unaccepted server return code. The caller can therefore reset safely without assuming that an order exists.
Before sending, the function reads the current Bid, Ask, and SYMBOL_TRADE_STOPS_LEVEL. It first adjusts the price of the preliminary pending entry to the broker minimum distance. It then finalizes the stop loss, calculates risk from those final prices, and derives take profit from RiskRewardRatio. This sequence prevents a market-side adjustment from silently changing the requested risk:reward relationship.
The OrderSend() request uses TRADE_ACTION_PENDING. Both TRADE_RETCODE_PLACED and TRADE_RETCODE_DONE are treated as successful pending-order outcomes. Position, order, cancellation, and trailing-stop operations are scoped by both MagicNumber and _Symbol so that EA instances on different charts do not manage one another's trades.
Order Expiry and State Reset
In STATE_ORDER_PLACED, we monitor the pending order. If filled, we transition to STATE_POSITION_OPEN and begin trailing stop management. If canceled or expired (OrderExpiryBars), we reset to STATE_WAIT_CROSS.
STATE_ORDER_PLACED separates successful submission from actual execution. The EA first checks whether its symbol-and-magic scoped pending order still exists. If the order disappears, the presence of an owned position distinguishes a fill from cancellation or manual removal.
While the order remains active, iBarShift() measures its age from orderTime. This uses chart bars rather than elapsed seconds, so OrderExpiryBars behaves consistently with the selected timeframe.
case STATE_ORDER_PLACED:
  {
   //--- Check if the pending order has been filled or canceled
   if(CountPendingOrders() == 0)
     {
      //--- Order filled -> transition to position management
      if(CountOpenPositions() > 0)
         state = STATE_POSITION_OPEN;
      //--- Order removed externally -> reset sequence
      else
         state = STATE_WAIT_CROSS;
      break;
     }
   //--- Check order expiry: cancel if unfilled beyond the allowed number of bars
   int barsSinceOrder = iBarShift(_Symbol, _Period, orderTime, false);
   if(barsSinceOrder > OrderExpiryBars)
     {
      CancelAllPending();
      state = STATE_WAIT_CROSS;
      Print("Order expired.");
     }
   break;
  }
If no pending order and no owned position are found, the state returns to STATE_WAIT_CROSS. If the order exceeds its permitted age, CancelAllPending() removes only matching orders before the same reset. This prevents an expired setup from remaining active after its original signal context has passed.
Professional Chart Labels
The EA draws bold text labels and horizontal pointer lines for every key level using OBJ_TEXT and OBJ_HLINE:
- Crossover – "Bullish Crossover" (green) or "Bearish Crossover" (red).
- Momentum Candle – e.g., "Momentum: 45 pips" – shown near the candle.
- Retracement Confirmation – e.g., "Conf: Inside + Lower High".
- Order Levels – "Entry", "SL", "TP" with exact prices and dashed lines.
Labels are automatically cleaned (keeping the last 30) and can be toggled via ShowChartLabels.
Putting It All Together: Full Code Framework
The final framework listing shows where the previously explained components meet inside OnTick(). It emphasizes orchestration rather than repeating every case body. New-bar detection runs first, indicator data is validated next, open-position management receives priority, and only then does the finite-state machine process entry stages.
//+------------------------------------------------------------------+
//| Expert tick function - main strategy logic                       |
//| Runs once per new bar via IsNewBar() guard.                      |
//| Operates as a Finite State Machine (FSM) with these states:      |
//|   WAIT_CROSS -> WAIT_MOMENTUM -> WAIT_RETRACEMENT ->             |
//|   ORDER_PLACED -> POSITION_OPEN -> (back to WAIT_CROSS)          |
//+------------------------------------------------------------------+
void OnTick()
  {
//--- Only process at the start of each new bar
   if(!IsNewBar())
     return;
//--- Remove old chart labels to keep the chart clean
   CleanOldObjects();
//--- Fetch the latest 3 bars of both MAs for crossover detection
   if(CopyBuffer(fastHandle, 0, 0, 3, fastMA) < 3 ||
      CopyBuffer(slowHandle, 0, 0, 3, slowMA) < 3)
     return;
//--- If a position exists, manage its trailing stop and skip entry logic
   if(CountOpenPositions() > 0)
     {
      ManageTrailingStop();
      return;
     }
//--- Finite State Machine: process current state
   switch(state)
     {
      case STATE_WAIT_CROSS:     // Awaiting a Fast/Slow MA crossover
        break;
      case STATE_WAIT_MOMENTUM:  // Crossover seen, waiting for a momentum candle
        break;
      case STATE_WAIT_RETRACEMENT: // Momentum confirmed, waiting for retracement bar
        break;
      case STATE_ORDER_PLACED:   // Pending stop order active on the chart
        break;
      default:
        break;
     }
  }
The early returns establish processing priority. Incomplete indicator data prevents all later work, while an owned position prevents a new entry sequence from starting. Because the new-bar guard surrounds this framework, its trailing-stop check also runs on new bars rather than on every incoming tick.
Visual Validation
Figure 3 presents the Strategy Tester visualization for EURUSD H1 with chart labels enabled. The replay provides a direct visual checkpoint for the retracement and order-placement stages of the finite-state machine.
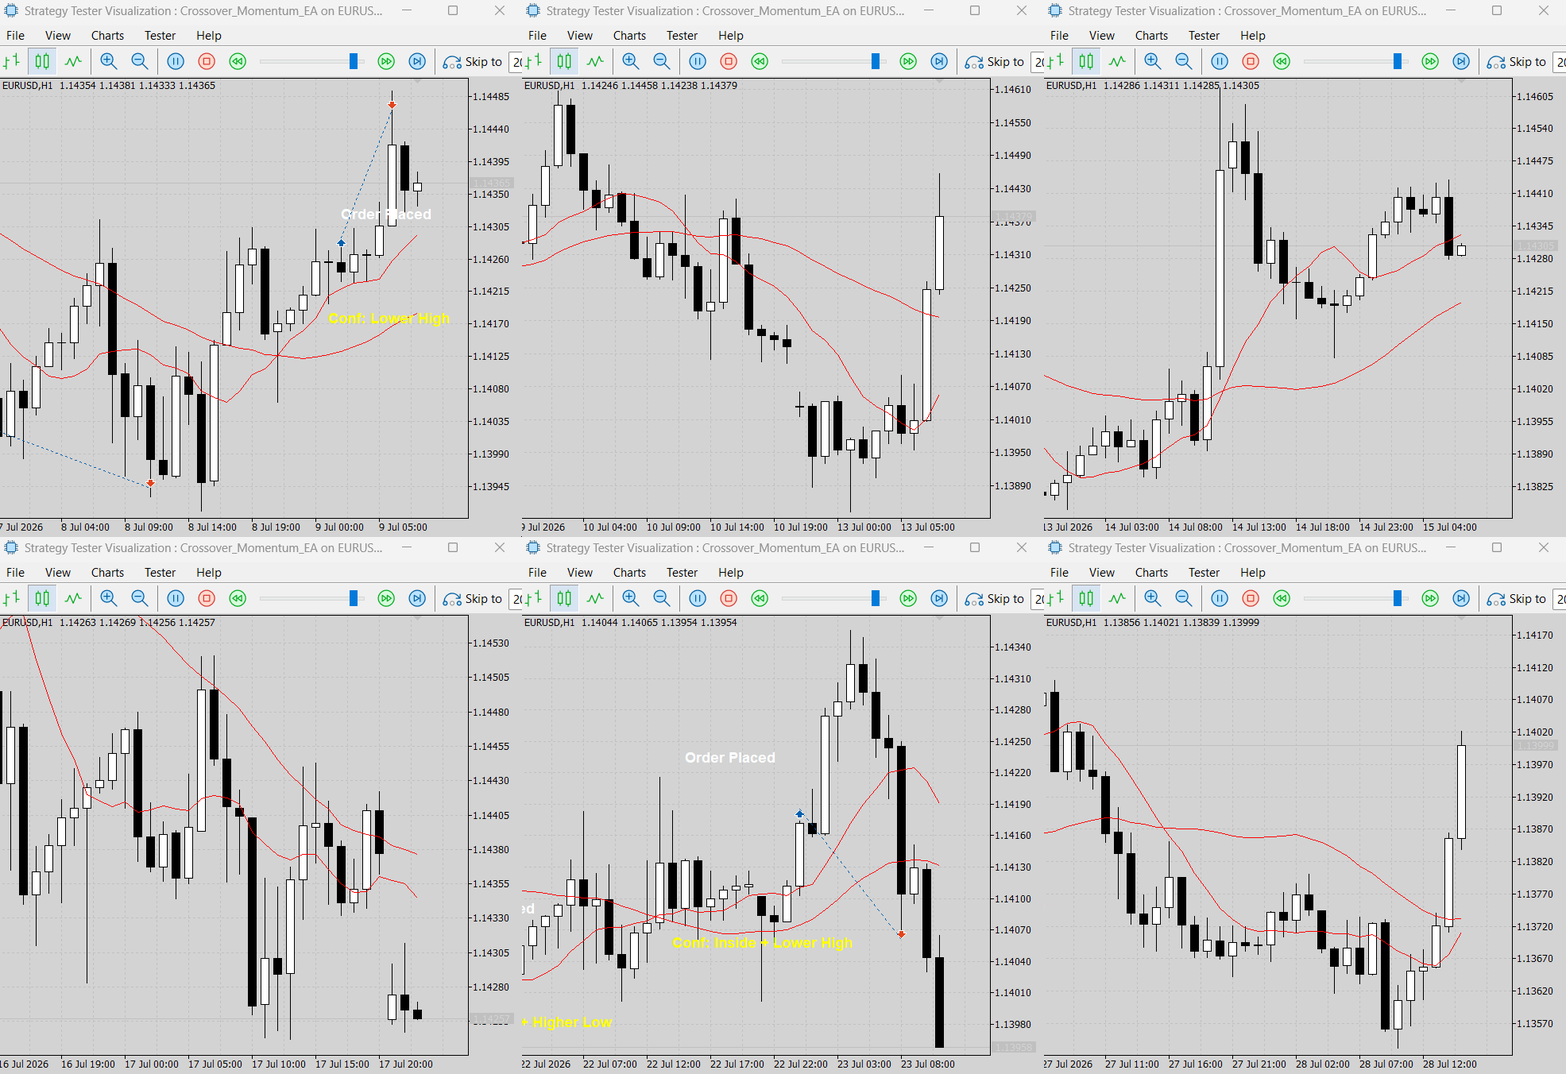
Fig. 3. Strategy Tester replay showing lower-high confirmation and pending-order placement
The visible sequence provides the following validation points:
- Test context – the Strategy Tester is running the Crossover_Momentum_EA on EURUSD H1. The price candles and the two moving-average lines remain visible while the EA evaluates the setup.
- Retracement confirmation – the yellow "Conf: Lower High" label records the directional retracement accepted for the bullish setup. This corresponds to the long-side lower-high condition described in the retracement logic.
- Pending-order stage – the white "Order Placed" label and the plotted order markers show that the EA advanced from retracement validation to the pending-order state.
The replay therefore supports the state transition from a confirmed lower-high retracement to pending-order placement.
Customization Approach
A fixed‑parameter system is rarely profitable across all regimes. The true value lies in adaptability. By modifying five key parameters, we can tune the system to different markets.
Parameter Summary Table
| Parameter | Purpose | Recommended Range | Typical Value |
|---|---|---|---|
| FastMAPeriod | Sensitivity of fast MA | 5–20 | 10 |
| SlowMAPeriod | Sensitivity of slow MA | 15–50 | 30 |
| MomentumBodyMinPips | Minimum candle size for momentum (points) | 15–60 points | 30 |
| RetracementMode | Filter strictness | MODE_EITHER, MODE_COMBINED | MODE_EITHER |
| StopLossBufferPips | Buffer beyond pivot for SL (points) | 5–20 points | 10 |
| RiskRewardRatio | TP = Entry + (Entry - SL) × Ratio | 1.0–4.0 | 2.0 |
The Discipline of Journaling and Robust Optimization
Keep a trading journal recording: date, symbol, timeframe, parameter values, number of trades, win rate, risk‑reward, drawdown, net profit. Use walk‑forward analysis: optimize on a training period, validate on out‑of‑sample data. Prefer "flat" optima – regions where performance is stable – over sharp peaks that suggest overfitting.
Practical Implementation in MQL5
The EA exposes all customizations as external parameters:
The input listing groups related settings so that a tester can change signal sensitivity, pattern strictness, and trade management without editing source code. The defaults document the baseline example rather than a universal configuration. Each symbol and timeframe requires separate evaluation.
Several distance inputs are expressed in points despite retaining “Pips” in their historical names. This distinction matters on symbols with different digit formats. RiskRewardRatio is dimensionless, while LotSize is a fixed volume and does not enforce percentage-based account risk.
//+------------------------------------------------------------------+
//| Input parameters (configurable via MetaTrader 5 UI)              |
//+------------------------------------------------------------------+

input group "Moving Average Crossover"
input int      FastMAPeriod        = 10;            // Fast MA period (shorter lookback)
input int      SlowMAPeriod        = 30;            // Slow MA period (longer lookback)
input ENUM_MA_METHOD MAMethod      = MODE_SMA;      // MA type: SMA, EMA, SMMA, LWMA
input ENUM_APPLIED_PRICE MAPrice   = PRICE_CLOSE;   // Price used for MA calculation

input group "Momentum & Retracement"
input int      MomentumBodyMinPips = 30;            // Minimum candle body size (in points) for momentum confirmation
input ENUM_RETRACEMENT_MODE RetracementMode = MODE_EITHER;  // Retracement pattern filter
input int      OrderExpiryBars     = 5;             // Max bars before an unfilled pending order is canceled

input group "Risk & Reward"
input double   RiskRewardRatio     = 2.0;           // Take profit = Risk Amount * R:R (e.g. 2.0 = 1:2)
input int      StopLossBufferPips  = 10;            // Additional buffer (points) added beyond the momentum low/high
input double   LotSize             = 0.1;           // Fixed lot size per trade
input int      TrailDistance        = 200;          // Trailing stop distance in points (0 = disabled)
input int      MagicNumber          = 20240820;     // Unique identifier to distinguish this EA's orders
These parameters should be recorded with every test result. Without the exact input set, symbol properties, timeframe, and modeling period, a replay cannot be reproduced reliably. Fixed-volume and point-distance settings should be reviewed especially carefully when moving the EA to another instrument.
Practical Example/Application
Consider a bullish EURUSD H1 setup evaluated with RetracementMode set to MODE_EITHER. The implementation described above processes the sequence as follows:
| Observed condition | EA response | Resulting state |
|---|---|---|
| The fast average crosses above the slow average. | Records a bullish direction without opening a trade. | STATE_WAIT_MOMENTUM |
| A qualifying bullish momentum candle closes within the allowed window. | Stores the momentum high and low for later validation and risk levels. | STATE_WAIT_RETRACEMENT |
| The immediate next closed bar forms a lower high. | Accepts the directional retracement under MODE_EITHER and stores its range. | Order preparation |
| The pending entry, stop loss, and take profit satisfy the broker-distance checks. | Submits the Buy Stop and records a successful placement return code. | STATE_ORDER_PLACED |
Figure 3 shows the visible later part of this process: the chart records “Conf: Lower High” and then “Order Placed.” These labels demonstrate that the retracement stage passed and the finite-state machine advanced to pending-order management. They do not, by themselves, prove that the order filled or that the resulting trade was profitable.
What to verify during testing
- Confirm that a failed immediate retracement returns the EA to STATE_WAIT_CROSS.
- Confirm that an unfilled pending order is canceled after OrderExpiryBars.
- Check the Experts and Journal tabs for the server return code and any broker-distance rejection.
- Run separate scenarios for MODE_RETRACEMENT_ONLY, MODE_INSIDE_ONLY, MODE_COMBINED, and MODE_EITHER.
The example demonstrates state progression rather than profitability. Spread, commission, slippage, symbol settings, and data quality must be included in broader Strategy Tester and demo-account evaluation.
Integration and Deployment
Compiling the EA
Open MetaEditor (F4) and load Crossover_Momentum_EA.mq5. Press "Compile" (F7). If warnings appear, use IntegerToString(), declare variables correctly, and consider CTrade instead of raw OrderSend(). Successful compilation produces an .ex5 file in the Experts folder.
Attaching to a Chart
Drag the EA onto a chart (e.g., EURUSD H1). In the Expert Advisor Properties dialog, enable "Allow live trading" and "Allow automated trading". Set inputs, then click OK.
Input Parameters
The table below lists essential inputs, their purpose, and typical values:
| Input Name | Type | Description | Common Value |
|---|---|---|---|
| FastMAPeriod | int | Fast MA period | 10 |
| SlowMAPeriod | int | Slow MA period | 30 |
| MomentumBodyMinPips | int | Minimum body size in points | 30 |
| RetracementMode | enum | Filter strictness | MODE_EITHER |
| RiskRewardRatio | double | TP = Entry + (Entry - SL) × Ratio | 2.0 |
| StopLossBufferPips | int | Buffer beyond pivot for SL | 10 |
| LotSize | double | Fixed lot size | 0.1 |
| OrderExpiryBars | int | Max bars to wait for fill | 5 |
| TrailDistance | int | Trailing stop (0 = disabled) | 200 |
Monitoring Trade Execution
Use the Experts tab to see Print() output and error messages. The system logs each stage: crossover, momentum (with body size in points), retracement validation, order placement, and fill. The Journal tab shows all trade‑related events.
What to watch for:
- If the EA resets without orders, MomentumBodyMinPips may be too high for current volatility.
- If orders are placed but rarely filled, StopLossBufferPips may be too wide.
- If no orders appear, inspect the chart labels – they show exactly what was detected.
Risk Management
The EA uses a fixed lot size (LotSize). Because the EA uses a fixed volume, monetary risk changes with the symbol, stop distance, tick value, and account currency. Test conservative values on demo and implement validated percentage-based sizing before considering production use.
Demo Testing and Chart Label Validation
Always test on demo first. The chart labels provide immediate visual feedback on every stage – you can see the exact pattern detected and the levels used. This feedback loop is invaluable for fine‑tuning parameters.
Final Deployment Checklist
- AutoTrading enabled in MetaTrader 5.
- LotSize selected after calculating symbol-specific monetary risk; this test EA does not enforce a percentage-risk limit.
- StopLossBufferPips appropriate for pair volatility.
- Broker allows pending stop orders (Buy Stop / Sell Stop).
- Journal and Experts tabs visible.
- ShowChartLabels enabled for visual verification.
With these steps complete, the system is ready for Strategy Tester and demo-account evaluation. It is not presented as production-ready for real-money execution. The momentum and retracement filter, combined with broker-aware order levels and configurable risk:reward, provides a structured test approach that avoids the premature entries common in simple crossover systems.
Conclusion and Key Lessons
We have successfully enhanced the Crossover Strategy with candlestick momentum and retracement confirmation. We now have a test EA that filters signals, waits for a pullback, requests a breakout entry, and calculates take profit from the final entry and stop distance. The supplied Strategy Tester visualization shows a lower-high confirmation followed by the pending-order stage; compilation and broker-specific execution must still be verified in your own environment. The replay does not independently prove an order fill, profitability, or trailing-stop outcome. More filters and approaches can be used to enhance classic strategies; this framework provides a solid foundation for further refinement.
1. The Crossover as a Directional Compass – Moving averages reveal underlying trend. This step is necessary but not sufficient – it gives direction, not permission.
2. Momentum Confirmation Adds Conviction – Candlestick psychology teaches that strong candles reveal buyer/seller conviction. Requiring momentum (body size ≥ threshold, close in direction) within 2 bars eliminates listless crossovers.
3. Retracement Validation Imposes Discipline – On the immediate next bar, we require an inside bar OR directional retracement. This prevents chasing and ensures we enter only after a healthy pullback – a cornerstone of systematic trading.
4. Pivot SL + 2R TP Provides Objective Risk Management – Stop loss uses the momentum pivot, buffer, and broker minimum distance; take profit uses the configured multiple of final risk. This creates a consistent, logical risk‑reward framework.
| Filter Step | Purpose | Key Concept |
|---|---|---|
| Moving average crossover | Determine trend direction | Lagging indicators reveal trend |
| Momentum confirmation | Ensure the price follows through | Candlestick patterns show conviction |
| Retracement validation | Enter on pullback, avoid chasing | Execution logic is critical |
| Pivot SL + 2R TP | Objective risk‑reward | Consistent risk management |
Iterative Refinement – No system is one‑size‑fits‑all. Tune parameters for each market and timeframe. Keep a detailed trading log noting why each trade succeeded or failed. This transforms the system into a learning instrument.
Final Encouragement – Take this three‑step filter and integrate it into your own EA. Start with the provided framework, then customize the momentum check (e.g., ATR‑based threshold). Run forward tests on at least 100 trades. You will likely find that the "unnecessary triggers" are now automatically filtered out.
Attachments
| File Name | Type | Description |
|---|---|---|
| Crossover_Momentum_EA.mq5 | Expert Advisor (.mq5) | Complete EA source code implementing the multi‑step entry strategy with momentum and retracement filters, pivot‑based SL + 2R TP, and trailing stop. Place the file inside the /Article23620 folder under Experts. |
Warning: All rights to these materials are reserved by MetaQuotes Ltd. Copying or reprinting of these materials in whole or in part is prohibited.
This article was written by a user of the site and reflects their personal views. MetaQuotes Ltd is not responsible for the accuracy of the information presented, nor for any consequences resulting from the use of the solutions, strategies or recommendations described.

 Distribution-Free Price Channels in MQL5: Quantile Regression by Iteratively Reweighted Least Squares
 Meta-Labeling the Classics (Part 3): Filtering and Sizing Bollinger Band Trades
 Neural Networks in Trading: Probabilistic Time Series Forecasting (Conclusion)
 Implementing a Daily Loss Limit and Drawdown Circuit Breaker in MQL5

- Free trading apps
- Over 8,000 signals for copying
- Economic news for exploring financial markets
You agree to website policy and terms of use