

From Basic to Intermediate: Queues, Lists, and Trees (III)
 650
650
 0
0

Introduction
In the previous article From Basic to Intermediate: Queues, Lists, and Trees (II), we explained what served as the initial basis for creating a linked list. However, the information presented in that article was not complete. We still need to implement something that would make linked lists truly interesting from both a practical and a theoretical standpoint.
Unlike how linked lists would be explained when studying this topic in an academic setting, here we will focus on the practical aspects of their implementation and use. To fully understand the content of this article, you must thoroughly review the material covered in the previous article. In addition, of course, you should have a solid understanding of the basic principles and concepts underlying arrays. This is important because many beginners often confuse what we are discussing here with a special type of array implementation. Especially when we start using another type of resource—one that is possible and available in MQL5—which I have not mentioned yet, but which I will discuss another time.
Precisely to avoid further complicating a topic that requires the utmost clarity and understanding—given its importance when it comes to lists and their use—we will now move on to the main topic of this article.
Queues, Lists, and Trees (III)
To start, let's quickly review what we covered in the previous article. It is very important to keep the material covered there clearly in mind so that you can understand our next steps. So, let's take the final code from that article. The code is shown below:
01. //+------------------------------------------------------------------+
02. #property copyright "Daniel Jose"
03. //+------------------------------------------------------------------+
04. template <typename T> class stList
05. {
06.     private:
07. //+----------------+
08.         T info;
09.         stList <T> *prev;
10. //+----------------+
11.     public:
12. //+----------------+
13.         stList(void)
14.             :prev(NULL)
15.         {}
16. //+----------------+
17.         void Push(T arg)
18.         {
19.             stList <T> *loc;
20.
21.             loc = new stList <T>;
22.             (*loc).info = arg;
23.             (*loc).prev = prev;
24.             prev = loc;
25.         }
26. //+----------------+
27.         bool Pop(T &arg)
28.         {
29.             stList <T> *loc;
30.
31.             if (prev == NULL)
32.                 return false;
33.
34.             loc = prev;
35.             arg = (*loc).info;
36.             prev = (*loc).prev;
37.
38.             delete loc;
39.
40.             return true;
41.         }
42. //+----------------+
43. };
44. //+------------------------------------------------------------------+
45. void OnStart(void)
46. {
47.     stList <char> list;
48.
49.     list.Push(10);
50.     list.Push(84);
51.     list.Push(-6);
52.
53.     for (char info; list.Pop(info);)
54.         Print(info);
55. };
56. //+------------------------------------------------------------------+
Code 01
This Code 01 is intended to create the equivalent of a stack, which is a type of queue in which the most recently added values are retrieved first. However, unlike the queue implementation, this code 01 no longer uses any internal array. It is precisely this small detail that accounts for a different classification of this implementation. Therefore, code 01 will be classified as a LINKED LIST. However, it still cannot be considered a linked list in the full sense.
This is because it still lacks something that a linked list can do and that code 01 cannot yet do: add or remove elements at any position within the list of elements. In other words, code that implements a linked list would, in general, allow us to create something like a dynamic array, but without having to use the operations that are typically required when working with arrays, since in many situations processing can be significantly faster than in array-based implementations.
"But wait a second. Let me make sure I understood what I read correctly. Are you saying that the purpose of a linked list is to create something array-like without actually using an array? But what is the point of that?" To understand this, dear reader, I first need you to understand something else. I am assuming that you have only minimal programming knowledge; that is, you do not really know how certain things are carried out inside the processor.
The ArrayInsert function from the MQL5 library is designed to insert new data into an existing array. So far, so good. However, this function has one particular characteristic: when we insert new data at the end of an existing array, the data is simply copied into the array. Essentially, this is equivalent to using the ArrayCopy function.
However, when we want to add elements to the middle of an existing array or to the beginning of that same array, something different happens. In this case, the ArrayInsert function will allocate a new memory block and then copy some elements into that new block. Next, the elements being inserted will be added to this new block. Only then will the function copy the remainder of the original array into the allocated block. Consequently, when working with a very large array, execution time can be quite long. However, given the characteristics of modern motherboards and the data bus they use, the blocks that need to be moved would have to be quite large for you to notice a difference. Or, at the very least, we need to perform several insertions for the processing time to become noticeable.
However, in the early days of computing, data processing was much slower. The data bus was slow, and these memory transfers, even with a small number of elements, took a long time. Thus, engineers and scientists developed a solution to this problem. And that solution is precisely lists. Now let's return to Code 01. Once the list is fully constructed, in memory we will end up with something similar to what is shown below:
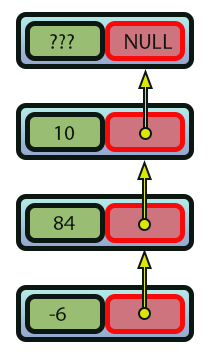
Image 01
The method we used to arrive at the result shown in Image 01 was already explained in the previous article. However, here we will take it a step further: we will make the linked list truly functional. But to make sure the operations we are implementing are truly clear, let's first figure out how the same thing would be done using an array. As a result, Image 01 will look similar to Image 02:
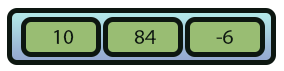
Image 02
Now let's assume that we want to add a new element to the array shown in Image 02, as shown in Image 03:
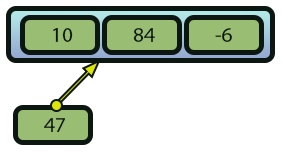
Image 03
How can this be done without using the ArrayInsert function? All right, if you understood the explanation given a little earlier in this article, the first thing you'll need to do is allocate a new block of memory. The result will be the image shown below:
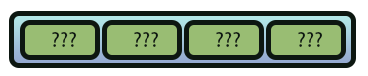
Image 04
Please note that we have not copied anything into this new block yet. We simply allocated memory for it. The next step will be to copy the elements preceding the position where the new element will be inserted. Let's assume that the new element will be inserted at index 1. In this case, the first copy operation will produce the state shown below:
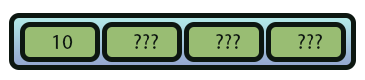
Image 05
Now we can insert a new element into the array. Thus, we get the following:

Image 06
Once the new element has been inserted into the final array, we can copy the remaining elements that were in the original array. Thus, the final result is shown in Image 07:
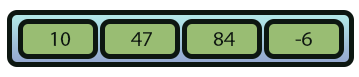
Image 07
Please note that the step-by-step process is very easy to implement, even for a beginner programmer. Something very similar happens when you need to remove an element from an array. In this case, however, the steps you need to follow will be the reverse of what was shown here. First, we allocate a block with fewer elements, copy the elements to be kept, skip the ones to be deleted, and finish copying the remaining elements into the array.
But let's get back to the issue of processing time. Imagine that you are doing this with an array containing thousands of elements, and you need to insert or delete thousands more elements at non-consecutive positions—that is, you might insert one element at position two, the next at position four, and so on. In this case, the steps shown in the previous figures will have to be repeated thousands of times, resulting in a significant amount of this data movement. This ultimately results in a large amount of CPU time being consumed, even with a modern data bus. However, this is exactly where the magic of linked lists comes into play. To do the same thing shown in the previous images, we can use far fewer steps, as shown below:
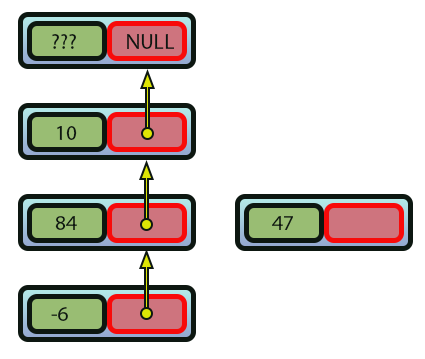
Image 08
Note that Image 08 is very similar to Image 01. Here, however, we need to add a new element. And this element is not yet part of the linked list. In that case, all we need to do to add this new element is specify where it should be added. The implementation itself will convert Image 08 into Image 09, shown below:
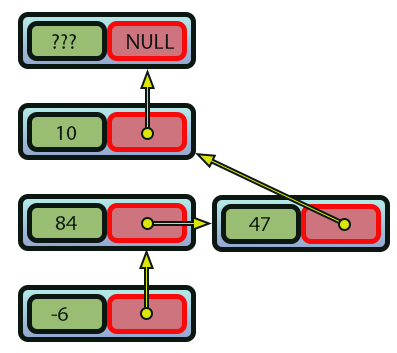
Image 09
Notice how much easier it has become to add a new element. It is also much easier to remove an element. It is enough to remove the link that connects it to the list and update the pointers that maintain the list structure. Thus, what was once a slow system now becomes a much faster one simply by changing how the implementation performs its operations internally.
So, now that you understand the basic underlying idea, we can take a look at how it is implemented in code. And here is the most interesting part of the article.
Let's go back to Code 01, which we saw at the beginning of this article. But now we will modify that same code as shown below:
01. //+------------------------------------------------------------------+
02. #property copyright "Daniel Jose"
03. //+------------------------------------------------------------------+
04. template <typename T> class stList
05. {
06.     private:
07. //+----------------+
08.         T info;
09.         stList <T>  *prev,
10.                     *start;
11. //+----------------+
12.     public:
13. //+----------------+
14.         stList(void)
15.             :prev(NULL),
16.             start(NULL)
17.         {}
18. //+----------------+
19.         void Store(T arg)
20.         {
21.             stList <T> *loc;
22.
23.             loc = new stList <T>;
24.             (*loc).info = arg;
25.             (*loc).prev = prev;
26.             prev = loc;
27.         }
28. //+----------------+
29.         bool Restore(T &arg)
30.         {
31.             stList <T> *loc;
32.
33.             if (prev == NULL)
34.                 return false;
35.
36.             loc = prev;
37.             arg = (*loc).info;
38.             prev = (*loc).prev;
39.
40.             delete loc;
41.
42.             return true;
43.         }
44. //+----------------+
45. };
46. //+------------------------------------------------------------------+
47. void OnStart(void)
48. {
49.     stList <char> list;
50.
51.     list.Store(10);
52.     list.Store(84);
53.     list.Store(-6);
54.
55.     for (char info; list.Restore(info);)
56.         Print(info);
57. };
58. //+------------------------------------------------------------------+
Code 02
Now, dear reader, please pay attention. In Code 02, we begin implementing what is essentially a simple linked list. You can use any name you like for the defined functions and procedures. It doesn't matter. However—and this is very important—you need to carefully plan the implementation of the code to ensure that the list is created and maintained correctly. As Code 02 currently stands, we still have what could be called a stack implemented as a list. Understanding this is important for understanding what we will see next.
Now we can gradually implement these functions and procedures. But before we do that, how about we take a look at the result of running Code 02? Although those who have read the previous article already know this. In any case, you can see the result below:
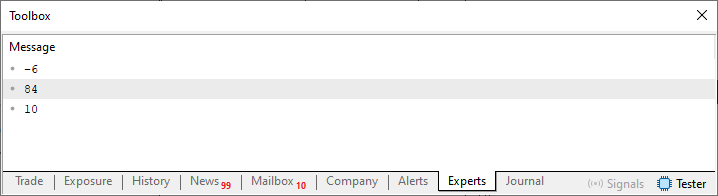
Image 10
Great, now let's make the first modification to this same Code 02 so that we can add a value to the beginning of what will be our list. The first change can be seen below:
01. //+------------------------------------------------------------------+
02. #property copyright "Daniel Jose"
03. //+------------------------------------------------------------------+
04. template <typename T> class stList
05. {
06.     private:
07. //+----------------+
08.         T info;
09.         stList <T>  *prev,
10.                     *start;
11. //+----------------+
12.     public:
13. //+----------------+
14.         stList(void)
15.             :prev(NULL),
16.             start(NULL)
17.         {}
18. //+----------------+
19.         void Store(T arg, const ENUM_FILE_POSITION pos = SEEK_END)
20.         {
21.             stList <T> *loc;
22.
23.             loc = new stList <T>;
24.             switch(pos)
25.             {
26.                 case SEEK_SET:
27.                     (*loc).info = arg;
28.                     (*loc).prev = NULL;
29.                     (*start).prev = loc;
30.                     start = loc;
31.                     break;
32.                 case SEEK_END:
33.                     (*loc).info = arg;
34.                     (*loc).prev = prev;
35.                     prev = loc;
36.                     start = (start == NULL ? loc : start);
37.                     break;
38.             }
39.         }
40. //+----------------+
41.         bool Restore(T &arg)
42.         {
43.             stList <T> *loc;
44.
45.             if (prev == NULL)
46.                 return false;
47.
48.             loc = prev;
49.             arg = (*loc).info;
50.             prev = (*loc).prev;
51.
52.             delete loc;
53.
54.             return true;
55.         }
56. //+----------------+
57. };
58. //+------------------------------------------------------------------+
59. void OnStart(void)
60. {
61.     stList <char> list;
62.
63.     list.Store(10);
64.     list.Store(84);
65.     list.Store(-6);
66.     list.Store(47, SEEK_SET);
67.
68.     for (char info; list.Restore(info);)
69.         Print(info);
70. };
71. //+------------------------------------------------------------------+
Code 03
And now, dear reader, please pay close attention to what I will explain now. Although what is being done here in Code 03 is very easy for me and for experienced programmers to understand, for many of you it is extremely difficult. And this is just the beginning of implementing the list itself. To avoid creating too many extra things, here in Code 03 I use a file-positioning enumeration. You can see this on line 19.
Please note that there is a difference between Code 02 and Code 03 in this very procedure. Code 03 continues to function as if it were a stack, but a stack that can now be built more flexibly. Now let's get to the point. SEEK_END will always insert elements starting from the end of what is already in the list. And SEEK_SET will always insert elements starting from the beginning of the elements already in the list. The same principle applies when working with binary files.
But confusion arises precisely when we need to place something at the beginning of the list. This happens when we already have a list that was created earlier. I say this because, upon closer inspection, you can see that the part responsible for placing data at the end of the list is very similar to what was done earlier. However, line 36 had to be added specifically to ensure that the pointer to the beginning of the list was set correctly. This is exactly what will allow us to add new elements to the beginning of the list later on.
So, when the procedure call in line 19 has SEEK_SET as its second argument—as is the case in line 66—the code between lines 26 and 31 is executed. Let's take a look, line by line, at what is happening here. Line 27 stores the value of the element, just as line 33 does. In turn, line 28 ensures that the previous value is NULL. This is important so that the check in line 45 succeeds if there are no elements in the list. So, line 29 makes the current pointer to the previous value point to what will become the new first element at the beginning of the list. Finally, line 30 sets the pointer to the first element so that it is set correctly.
I know that, when viewed this way, seemingly simple things like this can make you let your guard down, thinking that this code is too easy to understand. However, I must warn you, dear reader, that without understanding what is done in code 03, you are unlikely to understand what you will see shortly. In any case, when executed, code 03 will produce the following result:
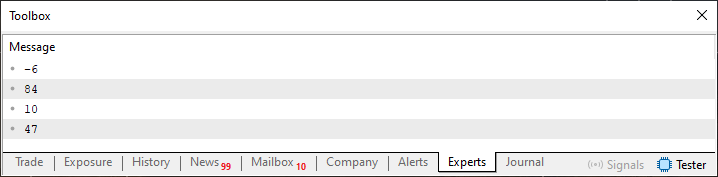
Image 11
Okay, but you might be thinking: Couldn't we place the contents of line 66 before what would have been line 63? This would help avoid potential confusion in the code. Actually, that is not quite the issue here, dear reader. The thing is, we need to make sure that the code can add elements to what will be the beginning of our list. That is why line 66 looks the way it does in Code 03.
That was pretty interesting, but we can—and will—make it even more interesting. Now let's change Code 03 into Code 04, which is shown below:
01. //+------------------------------------------------------------------+
02. #property copyright "Daniel Jose"
03. //+------------------------------------------------------------------+
04. template <typename T> class stList
05. {
06.     private:
07. //+----------------+
08.         T info;
09.         stList <T>  *prev,
10.                     *start;
11. //+----------------+
12.     public:
13. //+----------------+
14.         stList(void)
15.             :prev(NULL),
16.             start(NULL)
17.         {}
18. //+----------------+
19.         void Store(T arg, const ENUM_FILE_POSITION pos = SEEK_END)
20.         {
21.             stList <T> *loc;
22.
23.             loc = new stList <T>;
24.
25.             (*loc).info = arg;
26.             (*loc).prev = NULL;
27.             switch(pos)
28.             {
29.                 case SEEK_SET:
30.                     (*loc).start = start;
31.                     (*start).prev = loc;
32.                     start = loc;
33.                     break;
34.                 case SEEK_END:
35.                     if (prev != NULL) (*prev).start = loc;
36.                     (*loc).prev = prev;
37.                     prev = loc;
38.                     start = (start == NULL ? loc : start);
39.                     break;
40.             }
41.         }
42. //+----------------+
43.         bool Restore(T &arg, const ENUM_FILE_POSITION pos = SEEK_END)
44.         {
45.             stList <T> *loc = NULL;
46.
47.             if ((prev == NULL) || (start == NULL))
48.                 return false;
49.
50.             switch (pos)
51.             {
52.                 case SEEK_SET:
53.                     loc = start;
54.                     start = (*loc).start;
55.                     break;
56.                 case SEEK_END:
57.                     loc = prev;
58.                     prev = (*loc).prev;
59.                     break;
60.             }
61.             arg = (*loc).info;
62.
63.             delete loc;
64.
65.             return true;
66.         }
67. //+----------------+
68. };
69. //+------------------------------------------------------------------+
70. void OnStart(void)
71. {
72.     stList <char> list;
73.
74.     list.Store(10);
75.     list.Store(84);
76.     list.Store(-6);
77.     list.Store(47, SEEK_SET);
78.
79.     for (char info; list.Restore(info, SEEK_SET);)
80.         Print(info);
81. };
82. //+------------------------------------------------------------------+
Code 04
In Code 04, we are already starting to implement something that, at first glance, does not look like what it actually is. So, let's relax a little and take a calm look at Code 04. Note that we now have the Restore function on line 43, which can also receive an instruction on how the read operation should be performed.
Thus, it is at this very point that we encounter the problem already described in the article From Basic to Intermediate: Queues, Lists, and Trees (I), where we discussed FIFO queues as well as circular queues. However, for the sake of keeping the code simple, we will not delve into the topic of circular queues here. Let's focus on the simplest—and at the same time most interesting—issue for this article.
Before we move on to the Restore function, let's take a look at what has changed compared to the Store procedure. Although it may seem that nothing has changed, the modifications made to this procedure result in something different from what is shown in Image 01. So, please pay attention, dear reader, because in Image 01 we saw what would be a simple singly linked list. However, Code 04—more specifically, the Store procedure—creates what is known as a DOUBLY LINKED LIST. "But wait a second. Didn't we create this type of doubly linked list in Code 03?" No, dear reader. In code 03, we were still dealing with a simple list. However, these minor changes made to code 04 transformed what had been a simple list into a doubly linked list. To understand this, take a look at the following image, which depicts a doubly linked list.
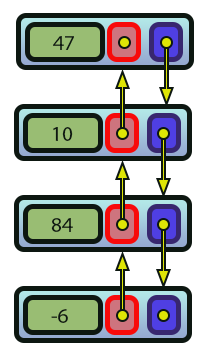
Image 12
Note that in this case, Image 12 has arrows in two directions, unlike Image 01, where the arrows went in only one direction. This is precisely what allows us to distinguish between a doubly linked list and a simple list.
"But wait, I still don't understand why code 03 is a simple list, while code 04 is a doubly linked list. Could you explain this in more detail?" Then let's make everything clearer. Note that on line 30 of code 04, we created a link to indicate the beginning of the list. This is also done on line 35, but the way we do it changes the behavior of the list. Not during writing, but during the reading process, which we will discuss a little later. Please note that each element—or node, as a list element is commonly called—has two directions in which you can move. The first of these directions takes us to the beginning, or the first element in the list, while the second direction, by contrast, takes us to the end of the list. Since we do not connect the list back to itself to make it a circular list, navigation is limited to this range.
Please note that the changes made to create a doubly linked list are only the ones I mentioned. And this does not change the way the procedure for storing data in the list is used. However, this does allow us to create a completely different way of reading the list. Let's now take a look at the Restore function, located on line 43. You will notice right away that we can specify whether the list should be read from the oldest element to the newest, or vice versa. And that is precisely what distinguishes a FIFO queue from a stack, as was shown in previous articles. However, in this case, we are not dealing with queues, but with lists. Nevertheless, the concept itself still applies here.
Please note that in the check on line 47, we checked two conditions under which the list is empty. If it is not empty, we move on to the part responsible for reading. Since the SEEKEND implementation—that is, reading from the newest element to the oldest—has already been explained sufficiently, let's move on to the new material. In other words, let's move on to SEEK_SET. When using this method, we will traverse from the oldest element—that is, from the first elements of the list—to the newest, which will be the last elements in the list. Note that to do this, we process the current element on line 53 and immediately afterward reassign the current element pointer to the next element in the list. This is done on line 54. And that's all we need to do. Therefore, when we run the code, we will see what is shown in the following image:
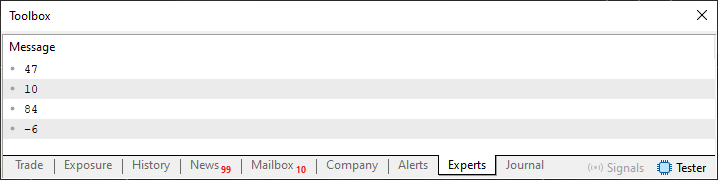
Image 13
"Wow, at first glance, that might seem strange." Indeed, dear reader, if you look at the situation this way, you might not fully understand what is happening. In any case, you will find the main code snippets discussed in this article in the attachment, so you can experiment with them. But do not forget to try out the intermediate code snippets shown in this article, as they will help you better understand what is going on here.
In any case, before we conclude this article, I would like to show you one more thing, dear reader. This might help you better understand how this doubly linked list is created in memory.
It is very important that you master this material so that you can understand what I will explain in the next article, since I do not want to overwhelm you with too much information. There is enough material in this article to give many readers plenty to think about and work through. The part I want to highlight can be seen in the code below.
01. //+------------------------------------------------------------------+
02. #property copyright "Daniel Jose"
03. //+------------------------------------------------------------------+
04. template <typename T> class stList
05. {
06.     private:
07. //+----------------+
08.         T info;
09.         stList <T>  *prev,
10.                     *start;
11. //+----------------+
12.     public:
13. //+----------------+
14.         stList(void)
15.             :prev(NULL),
16.             start(NULL)
17.         {}
18. //+----------------+
19.         void Store(T arg, const ENUM_FILE_POSITION pos = SEEK_END)
20.         {
21.             stList <T> *loc;
22.
23.             loc = new stList <T>;
24.
25.             (*loc).info = arg;
26.             (*loc).prev = NULL;
27.             switch(pos)
28.             {
29.                 case SEEK_SET:
30.                     (*loc).start = start;
31.                     (*start).prev = loc;
32.                     start = loc;
33.                     break;
34.                 case SEEK_END:
35.                     if (prev != NULL) (*prev).start = loc;
36.                     (*loc).prev = prev;
37.                     prev = loc;
38.                     start = (start == NULL ? loc : start);
39.                     break;
40.             }
41.         }
42. //+----------------+
43.         bool Restore(T &arg, const ENUM_FILE_POSITION pos = SEEK_END)
44.         {
45.             stList <T> *loc = NULL;
46.
47.             if ((prev == NULL) || (start == NULL))
48.                 return false;
49.
50.             switch (pos)
51.             {
52.                 case SEEK_SET:
53.                     loc = start;
54.                     start = (*loc).start;
55.                     break;
56.                 case SEEK_END:
57.                     loc = prev;
58.                     prev = (*loc).prev;
59.                     break;
60.             }
61.             arg = (*loc).info;
62.
63.             delete loc;
64.
65.             return true;
66.         }
67. //+----------------+
68.         void Debug(void)
69.         {
70.             Print("===== DEBUG =====");
71.             for (stList <T> *loc = prev; loc != NULL; loc = (*loc).prev)
72.                 PrintFormat("0x%06X ->> 0x%06X <<- 0x%06X = [%d]",(*loc).start, loc, (*loc).prev, loc.info);
73.             Print("=================");
74.         }
75. //+----------------+
76. };
77. //+------------------------------------------------------------------+
78. void OnStart(void)
79. {
80.     stList <char> list;
81.
82.     list.Store(10);
83.     list.Store(84);
84.     list.Store(-6);
85.     list.Store(47, SEEK_SET);
86.
87.     list.Debug();
88.
89.     for (char info; list.Restore(info, SEEK_SET);)
90.         Print(info);
91. };
92. //+------------------------------------------------------------------+
Code 05
If you take your time and work carefully with Code 05, which will be included as an attachment, you will understand how a list is created in practice. This is because, on line 68, I added a procedure whose purpose is to display the list in memory. Since here in MetaTrader 5 we cannot do certain things without delving into even more advanced details, this procedure on line 68 will display the list structure in the terminal in a relatively easy-to-understand format. When line 87 is executed, we will call this procedure from line 68. You can see the result in the following image:
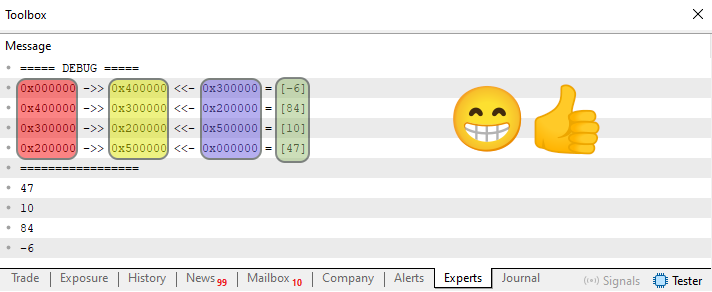
Image 14
Here, four areas are marked. And these areas correspond, to some extent, to what is shown in Image 12. Please note that the values stored in this node are highlighted in green in the image. The node's address is highlighted in yellow. “What about the areas highlighted in red and purple?” Well, these areas indicate the direction toward the next and previous node. Please note that the arrows in Image 14 indicate the direction of traversal we will follow. If the arrow points to the left, we will traverse from the oldest element to the newest. This would be equivalent to traversing the list in FIFO order. On the other hand, with arrows pointing to the right, we will process the nodes in a way that is equivalent to a stack; that is, from the newest element to the oldest in the list.
Well, that's all, dear reader. Now it is time to study and practice so that we can truly understand what is going on in these code examples.
Final Thoughts
In this article, whose content is quite dense and fairly difficult for most beginners, we have seen in practice how to implement a simple and quite useful linked list model. We started with what could be called an implementation of a simple list, and ended up with what is classified as a doubly linked list.
Although what you see here may seem much more complicated than it actually is, I would like to ask you to take your time and carefully review what has been described in this article. The thing is, we still need to show how to implement one aspect of this list system. This means precisely inserting and removing elements based on an index value. Since these operations involve something that many people would find much simpler and easier to understand when using arrays, I will not cover this part in this article. However, there is one more detail that makes this missing piece even more confusing. However, this detail will be explained at a later time. In my opinion, although this detail makes things much more confusing for beginners, it significantly simplifies the implementation and use of the code.
In any case, I am not going to comment on that right now. But I would like you to make the effort, even if you do not end up succeeding. Try to create a mechanism that allows you to insert and remove elements within a list using an index value, just as you would with arrays. To help you understand how to do this, and for those who want to test themselves to see how much they have already learned about MQL5 programming, here is a hint:
Try modifying the procedure on line 68 of code 05 to determine the points where data is removed from and inserted into the list. Once you have managed to do that, try modifying the procedure on line 19 accordingly so that it accepts an index specifying the position at which the list will be modified. This will allow you to insert or remove a specific node at the required position in the list, resulting in something very similar to what is shown in Image 09. Note: It will be easier to implement the code for a doubly linked list, since code 05 creates a doubly linked list. But there is nothing stopping you from creating a simple linked list.
Try doing this before you see what my proposed solution to this kind of problem will be. Keep in mind that the code does not have to be exactly the same as the one I will provide. But it must be capable of achieving a similar effect. So, I wish you success in your studies and hope you enjoy thinking about how to do it. See you in the next article.
| MQ5 file | Description |
|---|---|
| Code 01 | Simple list |
| Code 02 | Simple list |
Translated from Portuguese by MetaQuotes Ltd.
Original article: https://www.mql5.com/pt/articles/16628
Warning: All rights to these materials are reserved by MetaQuotes Ltd. Copying or reprinting of these materials in whole or in part is prohibited.
This article was written by a user of the site and reflects their personal views. MetaQuotes Ltd is not responsible for the accuracy of the information presented, nor for any consequences resulting from the use of the solutions, strategies or recommendations described.

 Market Simulation: Position View (XI)
 Machine Learning Under Constraint (Part 1): A Configurable Rule Set for Prop-Firm Position Sizing
 First Fractal Breakout — Intraday Strategy, Expert Advisor and Backtesting
 Market Simulation: Position View (X)

- Free trading apps
- Over 8,000 signals for copying
- Economic news for exploring financial markets
You agree to website policy and terms of use