

From Basic to Intermediate: Queues, Lists, and Trees (II)
 543
543
 0
0

Introduction
In the previous article From Basic to Intermediate: Queues, Lists, and Trees (I), we started discussing one of the topics that many beginners underestimate, since in most cases they do not receive adequate explanations regarding specific implementations or implementation models. Many beginners simply assume that in order to learn programming, all you need to do is roll up your sleeves and dive into books and articles. But the truth is that programming itself is not very difficult, since all you need to know boils down to learning a few commands and their syntax.
While that may be true, the main challenge every beginner faces is realizing that programming is, in essence, mathematics. In many cases, this mathematics has already been studied and applied in various mechanisms widely covered in books and articles available to the general public. However, even in such cases, it is often difficult for a beginner to understand why and when to use such mechanisms, and as a result, they end up spending a lot of time trying to reinvent solutions that already exist. All that is needed is to adapt existing concepts to the problem being analyzed.
It was precisely one of these concepts that we began to examine in the previous article. But this was only the first step, aimed primarily at demonstrating how queues, lists, and trees could be implemented using only a minimal set of general knowledge about MQL5.
However, even though FIFO queues and circular queues have already been demonstrated, we should discuss one more type of queue to complete the list of the main types we can implement. It is very important that you, dear reader, try to understand the concepts presented here. Don't try to memorize the code structure, as it may vary from case to case. Of course, this depends on the type of problem you are trying to solve.
So, we will continue with the same topic we started in the previous article. To do that, let's move on to a new topic. It is worth remembering that the material presented here will be closely related to what was shown in the previous article.
Queues, Lists, and Trees (II)
Well, it is quite likely that if you are just starting out in programming, you were left somewhat puzzled about where and how to use what was covered in the previous article. Nevertheless, in many situations, the ability to apply what was discussed and explained there can play an important role in your practice as a programmer. But you have probably noticed that both a FIFO queue and a circular queue have one thing in common: the elements in them are always processed in the order in which they were placed in the queue. In other words, the oldest element is always read first, and therefore the newest element in the queue is always read last. However, we often need to reverse this order. So, we want the newest element to be read first, and the oldest element in the queue to be read last.
One might even think that, to do this, it would be enough to change the order in which elements placed in a FIFO queue or a circular queue are read. In fact, in some practical situations, that is exactly what happens. However, there is a type of queue designed specifically to make this possible without having to modify existing code. This type of queue, designed specifically to reverse the order of elements, is called a stack.
A stack is, quite literally, exactly what its name suggests. In other words, when we add new elements, we cannot remove older elements without first removing the newest ones. There is even a toy that perfectly illustrates what a stack is and where it can be used. This toy is shown in the following image.
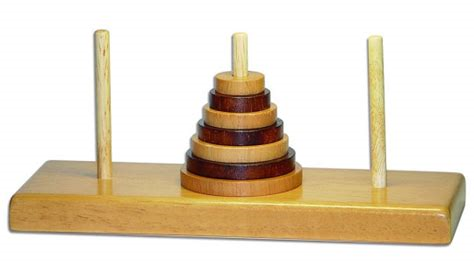
Image 01
For those who are not familiar with this toy, it is known as the Tower of Hanoi. Believe me, this toy has been used in the past to analyze and compare processors. This is because there are ways to use it to obtain a good estimate of processing speed. However, because many processors began to be optimized to speed up the algorithm itself rather than to reflect the CPU's actual computing speed, this comparison model was subsequently abandoned. If you'd like to try solving this Tower of Hanoi puzzle in practice, you can visit the Somatemática website.
But what does this have to do with us? Well, dear reader, understanding how this “Tower of Hanoi” works will help you grasp the logic behind implementing a stack. The stack itself is very easy to implement. But understanding where and when to use it is something you will only learn to recognize more quickly and without hesitation through practice. To make this easier to understand, let's use the FIFO queue code that was shown and explained in the previous article as a starting point. The same code is reproduced below.
01. //+------------------------------------------------------------------+
02. #property copyright "Daniel Jose"
03. //+------------------------------------------------------------------+
04. template <typename T> struct stFIFO
05. {
06.     private:
07. //+----------------+
08.         T   value[];
09. //+----------------+
10.     public:
11. //+----------------+
12.     T Restore(void)
13.     {
14.         T local = NULL;
15.
16.         if (value.Size() > 0)
17.         {
18.             local = value[0];
19.             ArrayRemove(value, 0, 1);
20.         };
21.         return local;
22.     };
23. //+----------------+
24.     void Stock(T arg)
25.     {
26.         T local[1];
27.         local[0] = arg;
28.         ArrayInsert(value, local, value.Size());
29.     }
30. //+----------------+
31. };
32. //+------------------------------------------------------------------+
33. void OnStart(void)
34. {
35.     stFIFO <char> fifo;
36.
37.     fifo.Stock(10);
38.     fifo.Stock(84);
39.     fifo.Stock(-6);
40.
41.     Print(fifo.Restore());
42.     Print(fifo.Restore());
43.     Print(fifo.Restore());
44.     Print(fifo.Restore());
45. }
46. //+------------------------------------------------------------------+
Code 01
When Code 01 is executed, it produces a result that we already know and that can be seen in the following image:
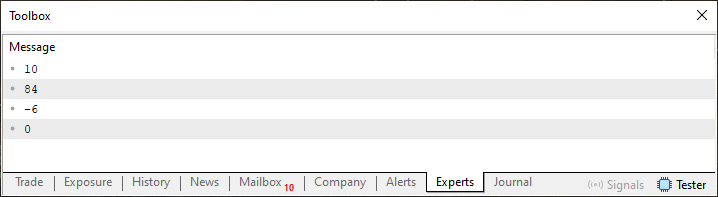
Image 02
Now, note: function and procedure names can be whatever you like. However, when implementing a stack, programmers usually use specific names for them. So, the first thing you need to do is change Code 01 to the version shown below:
01. //+------------------------------------------------------------------+
02. #property copyright "Daniel Jose"
03. //+------------------------------------------------------------------+
04. template <typename T> struct stStack
05. {
06.     private:
07. //+----------------+
08.         T   value[];
09. //+----------------+
10.     public:
11. //+----------------+
12.     bool Pop(T &arg)
13.     {
14.         arg = NULL;
15.
16.         if (value.Size() == 0)
17.             return false;
18.         arg = value[0];
19.         ArrayRemove(value, 0, 1);
20.         return true;
21.     };
22. //+----------------+
23.     void Push(T arg)
24.     {
25.         T local[1];
26.         local[0] = arg;
27.         ArrayInsert(value, local, value.Size());
28.     }
29. //+----------------+
30. };
31. //+------------------------------------------------------------------+
32. void OnStart(void)
33. {
34.     stStack <char> my;
35.
36.     my.Push(10);
37.     my.Push(84);
38.     my.Push(-6);
39.
40.     for (char info; my.Pop(info);)
41.         Print(info);
42. }
43. //+------------------------------------------------------------------+
Code 02
All right, note that we have changed a few things between Code 01 and Code 02. However, even in Code 02, we are still using a FIFO queue. However, when you run it, the result will be slightly different, as you can see in Image 03 below:
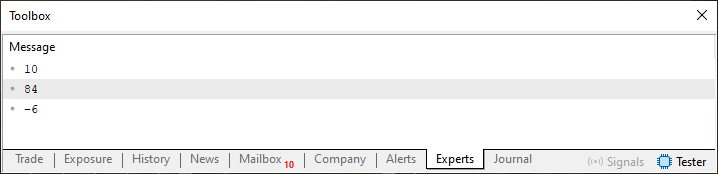
Image 03
Now for the interesting part: note that the order in which elements are added to the queue does not change. However, we want the elements at the end of the queue—that is, the most recent elements—to be read and removed from it first, so that the elements are read from newest to oldest. To do this, we only need to change the code on lines 18 and 19 of Code 02. In doing so, we are converting the FIFO queue into a stack. Notice how easy it is to make this change. Since the change we need to make is in a very specific place, we can set aside the rest of the code and focus solely on that specific point. Thus, the required changes are shown in the following code snippet:
                   .
                   .
                   .
11. //+----------------+
12.     bool Pop(T &arg)
13.     {
14.         arg = NULL;
15.
16.         if (value.Size() == 0)
17.             return false;
18.         arg = value[value.Size() - 1];
19.         ArrayRemove(value, value.Size() - 1, 1);
20.         return true;
21.     };
22. //+----------------+
                   .
                   .
                   .
Snippet 01
"That's all? I don't believe it. I need to see the result of executing this code." Well, dear reader, you can see this for yourself by looking at the following image, which shows the result displayed in the MetaTrader 5 terminal.
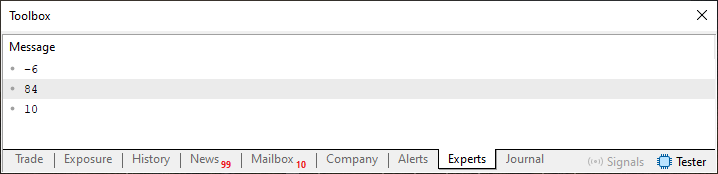
Image 04
Note that in Image 04, the elements are read in the reverse of the order shown in Image 03. And since we are not changing any other part of the code—only lines 18 and 19—this means that we are reading the elements from the most recently added element in the queue to the oldest. In other words, it works; as a result, we get a stack.
This technique is not limited to special cases. The processor itself uses something very similar when calling procedures or functions. In this case, the CPU uses a reserved area of memory as a stack. If you look for information on how applications are executed at the processor level, you'll find references to what we just discussed. This might interest you if you want to better understand how a computer works.
"But now I have a question. Is there such an implementation, and if so, where can it be used? Does any one of them use the concept of a stack in a circular queue?" Well, my dear reader, it is possible; there is nothing to prevent it from happening. The key question is what the purpose of such an implementation would be. Because, in the end, a circular queue will ultimately discard its oldest elements. However, depending on the particular case being implemented, it may be useful to apply the concept of a stack in a circular queue. But it depends on each specific case. And since this is a very specific thing, I don't see any reason to show how to implement it here. But I don't think you will have any trouble with this, precisely because of the similarity between a FIFO queue and a circular queue. This was shown in the previous article.
Now that we have discussed the basic types of queues, it's time to turn these very queues into something a little more complex. And this gives rise to a new concept: lists. To understand what a list is and why it represents an evolution of queues, you first need to understand one thing that you should obviously already have noticed. When working with queues, we CANNOT change—or, more precisely, specify—the position at which a particular element should be placed in the queue. That kind of operation is simply IMPOSSIBLE. All we can do is add an element or data to the queue, without being able to specify exactly where it will be placed.
Listen carefully—this is very important. A queue can be viewed as an abstraction of an array, and a list as a further development of this idea. However, here is what’s important: when working with lists, we don’t necessarily specify an index for placing an element in the queue, as we would when using an array. Instead—that is, instead of specifying the index at which the element should be placed in the queue—we do things a little differently. And this is exactly where things get complicated, since many beginners find it hard to understand why we do certain things. The concept remains the same, but the implementation itself varies greatly from one specific case to another, which ultimately confuses many people. This is especially true when we consider the concept of a tree. But let's take it slowly. Step by step.
Let's start by looking at how we can modify the queue implementations we have discussed so far to create a list. With one caveat: there are two types of lists. A singly linked list and a doubly linked list. The difference between them lies in how we can traverse the list. In addition, of course, there are some differences in how the code is implemented. But we'll learn about that later.
Before I start talking specifically about lists, I need to briefly explain something else. I will keep this explanation very brief so you can understand what will be done. We will take a closer look at this topic later. The fact is that MQL5 DOES NOT ALLOW THE USE OF POINTERS TO STRUCTURES. "I don't understand. Why is this a problem for us?" Well, dear reader, the problem is that to create lists correctly, we need to use pointers. And whatever the reason may be, in MQL5 we cannot do this using structures.
However, we can do this by using classes. Broadly speaking, and to put it very roughly, a class is nothing more than a structure. I will say it again: this isn't the best way to define or introduce the concept of classes. Classes are much more complex constructs than structures. However, since I do not want to go into detail about classes just yet, for now—and solely for the purposes of our current implementation—you can think of classes as structures. But keep in mind that we will be taking a closer look at what a class is shortly.
Assuming this is clear to you, we can start working on the list. To make the explanation as simple as possible while also making it more illustrative, we will start with a very simplified implementation. You can see it below:
01. //+------------------------------------------------------------------+
02. #property copyright "Daniel Jose"
03. //+------------------------------------------------------------------+
04. class stList
05. {
06.     private:
07. //+----------------+
08.         int info;
09. //+----------------+
10.     public:
11. //+----------------+
12.         void Set(int arg)
13.         {
14.             info = arg;
15.         }
16. //+----------------+
17.         int Get(void)
18.         {
19.             return info;
20.         }
21. //+----------------+
22. };
23. //+------------------------------------------------------------------+
24. void OnStart(void)
25. {
26.     stList list;
27.
28.     list.Set(512);
29.     Print(list.Get());
30. };
31. //+------------------------------------------------------------------+
Code 03
As you can see in Code 03, this is NOT yet a list. But I want you to pay attention to what is written on line 04. Here, the keyword "class" replaces the reserved word "struct." Therefore, until we explain the concept of a class, you should think of this code as creating a structure rather than a class. Since the result of executing this code is very simple, I will not go into details. But if we modify it slightly, we can create a stack. I prefer to start this way; that way, you will understand where I am going with this. Okay, to turn Code 03 into a stack, we need to modify it as shown below:
01. //+------------------------------------------------------------------+
02. #property copyright "Daniel Jose"
03. //+------------------------------------------------------------------+
04. template <typename T> class stList
05. {
06.     private:
07. //+----------------+
08.         T info[];
09. //+----------------+
10.     public:
11. //+----------------+
12.         void Push(T arg)
13.         {
14.             T loc[1];
15.             loc[0] = arg;
16.             ArrayInsert(info, loc, info.Size());
17.         }
18. //+----------------+
19.         bool Pop(T &arg)
20.         {
21.             arg = NULL;
22.             if (info.Size() == 0)
23.                 return false;
24.             arg = value[value.Size() - 1];
25.             ArrayRemove(value, value.Size() - 1, 1);
26.
27.             return true;
28.         }
29. //+----------------+
30. };
31. //+------------------------------------------------------------------+
32. void OnStart(void)
33. {
34.     stList <char> list;
35.
36.     list.Push(10);
37.     list.Push(84);
38.     list.Push(-6);
39.
40.     for (char info; list.Pop(info);)
41.         Print(info);
42.
43. };
44. //+------------------------------------------------------------------+
Code 04
When run, Code 04 will produce the same result as in Image 04, since here we created something very similar to Code 02 using snippet 01, which was discussed in this same article. Please note: we have not created a list yet because we are still using an array on line 08. Now I want you to pay special attention to one thing in Code 04. Note what we are doing on lines 16 and 25. In these lines, we add elements to the array and also remove an element from it.
But this is where things get really interesting: what happens if we remove the array from the system? In this case, lines 16 and 25 will no longer be valid, since we will no longer be working with the array. However, if we change line 08 of Code 04 to use a scalar value, we will return to the situation we saw in Code 03, where we could not store a sequence of values in memory and then retrieve them. You probably did not understand what I just said. So, let's turn these words into code. This is shown below:
01. //+------------------------------------------------------------------+
02. #property copyright "Daniel Jose"
03. //+------------------------------------------------------------------+
04. template <typename T> class stList
05. {
06.     private:
07. //+----------------+
08.         T info;
09. //+----------------+
10.     public:
11. //+----------------+
12.         void Push(T arg)
13.         {
14.             info = arg;
15.         }
16. //+----------------+
17.         bool Pop(T &arg)
18.         {
19.             arg = info;
20.
21.             return true;
22.         }
23. //+----------------+
24. };
25. //+------------------------------------------------------------------+
26. void OnStart(void)
27. {
28.     stList <char> list;
29.
30.     list.Push(10);
31.     list.Push(84);
32.     list.Push(-6);
33.
34.     for (char info, c = 0; list.Pop(info) && c < 4; c++)
35.         Print(info);
36.
37. };
38. //+------------------------------------------------------------------+
Code 05
Now, when we run Code 05, we will get the result shown in the following image:
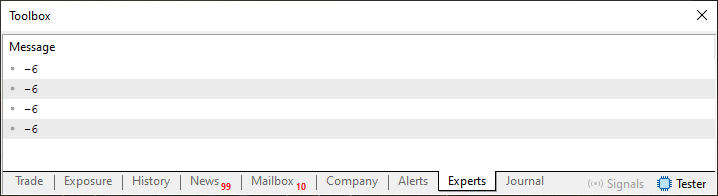
Image 05
In this case, it was necessary to modify line 34 in Code 05 to avoid an infinite loop. But look what happened to Code 05. In this case, we are working with code that can no longer retain the values we passed in lines 30 through 32, and only the last value will be returned. You might naturally think that this happens because line 08 of Code 05 uses a scalar value rather than an array. And this is the catch, and exactly where the list starts to make sense.
What we need to do here is create a mechanism that will somehow allow the variable on line 08 to retain its value. This should be done using accessor methods. However, this mechanism MUST NOT USE AN ARRAY. So, how can we do this? The answer is shown in the code below:
01. //+------------------------------------------------------------------+
02. #property copyright "Daniel Jose"
03. //+------------------------------------------------------------------+
04. template <typename T> class stList
05. {
06.     private:
07. //+----------------+
08.         T info;
09.         stList <T> *prev;
10. //+----------------+
11.     public:
12. //+----------------+
13.         stList(void)
14.             :prev(NULL)
15.         {}
16. //+----------------+
17.         void Push(T arg)
18.         {
19.             stList <T> *loc;
20.
21.             loc = new stList <T>;
22.             (*loc).info = arg;
23.             (*loc).prev = prev;
24.             prev = loc;
25.         }
26. //+----------------+
27.         bool Pop(T &arg)
28.         {
29.             stList <T> *loc;
30.
31.             if (prev == NULL)
32.                 return false;
33.
34.             loc = prev;
35.             arg = (*loc).info;
36.             prev = (*loc).prev;
37.
38.             delete loc;
39.
40.             return true;
41.         }
42. //+----------------+
43. };
44. //+------------------------------------------------------------------+
45. void OnStart(void)
46. {
47.     stList <char> list;
48.
49.     list.Push(10);
50.     list.Push(84);
51.     list.Push(-6);
52.
53.     for (char info; list.Pop(info);)
54.         Print(info);
55. };
56. //+------------------------------------------------------------------+
Code 06
What you see in Code 06 is something very, very curious. At the same time, it is very interesting, because when you run Code 06, you will get the same result as in Image 04. Please note that we are not using an array here. But how is that possible? The answer is that Code 06 creates what is known as a singly linked list. However, this list is not being used to its full potential. It is modeled only so that you can understand what we are doing here. In this article, we are essentially talking about a stack. And since a stack is a type of simple queue, we have, in a sense, created a simple list, but with the same operational capabilities that we would have obtained if we had implemented a stack.
Now I want you to pay attention to the following fact. Code 06 produces the same result that you would see when using Code 04. Or even Code 02, but with Snippet 01 included in it. In this case, the full code will be available in the appendix, as will Code 06.
But I want you to understand (and this may play a decisive role in your future as a programmer): it does not matter at all exactly how the code was implemented internally. What matters is the interface through which others will access what you have programmed. This has a huge impact on both how your code is used and the kind of result you can expect. Please note that even when using a different approach to create the stack, the final result is exactly the same as the one achieved earlier.
In other words, you can implement something that works one way internally, while the user of your code will not even know exactly what mechanism you are using. That is the beauty of programming. You can create things in ways that many people may find absurd, whether because of their complexity or because of their extreme simplicity. That does not matter; what matters is the final result.
"Okay, I think I understand. But could you explain how Code 06 works? I do not understand how values can be saved and then restored, as shown." No problem, dear reader. I think you have no doubts about how the OnStart procedure located on line 45 works. Your main question is probably how exactly we manage to push values onto the stack without using an array and still be able to pop them from the stack later. To understand this, you need to understand, or already be familiar with, another topic that I have already touched on here.
This is about recursion. This topic was covered in the article From Basic to Intermediate: Recursion. Why is understanding this topic important specifically here? The reason is that when we create a list, or the base of the list, as is done in Code 06, we are creating a recursive mechanism. However, this mechanism differs somewhat from the one discussed in the aforementioned article. So pay close attention so that you can understand what is happening here. You may notice that on line 04 of Code 06, we declare a class template. Now forget that we are using a class; think of it as a structure. Well, within a data structure, we can logically group various kinds of data. Usually, these data are limited to values that you, as a programmer, can manipulate and declare. That is the basic principle.
Therefore, on line 08, we have a value that we, as programmers, can manipulate in the most convenient way. But—and this is where the magic begins—we can also add one additional element to the data structure. Or elements, depending on the specific case. In our case, this additional element is precisely line 09. This line is something like a magic line, and if you look at it, you will see that we have declared a pointer. But what does the pointer point to? This pointer will point to a copy of the structure declared on line 04. "Wow, things have really gotten a lot more complicated now. How is that possible? Are we inside a structure that will point to itself? That does not make much sense. At least, that's how it seems to me." In a sense, I have to agree with you, dear reader. When I was just starting to learn programming, it was not easy for me to understand what I'm trying to explain to you.
The point is that by using the pointer declared on line 09 inside the structure, we can create recursion within the structure itself without affecting the structure itself. Since this is probably the first time you have seen this, it might not make complete sense to you. But this will become clear once we extend the functionality of Code 06 to create a linked list. But before doing that, you need to understand the concepts I’m explaining. Otherwise, you won't be able to acquire the knowledge you need to write your own code.
All right, let's get back to the explanation. When we use the procedure on line 17 to add an element to the stack, note that the first thing we do on line 19 is declare something very similar to what is shown on line 9. In other words, a pointer. However, here, on line 19, this pointer is local and temporary. Pay close attention to this point, because it is important. On line 21, we allocate memory for the structure type used by the pointers declared on lines 09 and 19.
Now comes the point where many people get lost when trying to understand these lists. DO NOT STORE THE NEW ELEMENT IN THE VARIABLE DECLARED ON LINE 08. We need to store the new element in the memory area we have allocated. Remember that this memory area corresponds exactly to what is declared in the structure for which we allocated memory. Thus, the variable on line 08 can now be used to store the new element. However, the most important thing is what happens on line 23. It is at this very moment that we create a link between the current position and the new position, thus forming a chained structure that, in a sense, resembles an array, as will be shown later.
Since the pointer now points to the new element, we use line 24 to update the structure and thereby keep the elements linked. That's an important detail. Line 14 eliminates the need to add an extra variable to the structure itself. Since we are using a class here, we can use this approach to simplify the data structure. So, when we initialize the structure, we get what is shown in the following image:
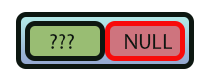
Image 06
Here, the green area indicates the content stored in the variable on line 08. In contrast, the red area indicates the value of the pointer declared on line 09. Okay, this happens when line 47 is executed. Now, when line 49 is executed, the Push procedure, which you can see on line 17 and whose operating principle I have just briefly described, will be called. But to make it much easier to understand how this Push procedure works, we will use a new image. It is shown below:
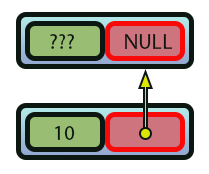
Image 07
"Hmm, I don't understand. What does Image 07 show?" It illustrates the formation of a recursive data structure. Please note that the value 10 is now stored in memory, but the value of the variable on line 09 now points to the previous memory area. This is indicated by the yellow arrow. After executing line 51, we will get the result shown in the following image:
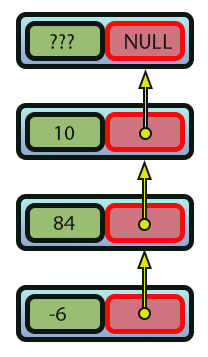
Image 08
Please note that in all cases, the value that will be written to the variable on line 09 will always point to the previously allocated memory area. This creates a chain of values. Thus, when the loop on line 53 starts, we will traverse this structure, shown in Image 08, but in reverse order. Note that the condition that causes the loop on line 53 to terminate is satisfied precisely on line 31. When this condition is met, it means we have reached the base of the list. Thus, we can pop data from the stack in a very simple and easy way; to do so, we simply need to use the reverse of the mechanism used when pushing data onto the stack.
In this particular case, we used line 34 to access the memory area that was allocated on line 21. This simplifies the code, since we could use another way to tell the compiler what to do. However, since the purpose here is educational, I decided to leave it as is. Therefore, since we are now pointing to the allocated memory region, we can access the value in that region using line 35. Using line 36, we update the current pointer so that, finally, on line 38, we can free the previously allocated memory, thereby completing the loop.
Final Thoughts
This article is worth studying in detail, since I have only introduced the basic concept we need to create a list. However, since the process of creating a list can be quite difficult for a beginner to understand, I have tried to write this article in a way that gives you an initial foundation for further study. To do this, I first used a queue to create a stack, and then created the base of the list, also using the stack. This makes it much easier to understand the basic concepts underlying the creation and implementation of linked lists, since in practice they are fairly simple to implement. However, understanding the theory and the correct way to create them requires an understanding of what is explained in this article.
I tried to present everything in the most informative way possible, and I believe I achieved that goal. In any case, be sure to study these code examples carefully, dear reader, because in the next article we’ll delve a little deeper into the topic of lists. However, without understanding what has been presented and explained here, it will be very difficult to grasp the material that will be covered in the next article. So study hard, and see you in the next article.
| File | Description |
|---|---|
| Code 01 | Simple queue |
| Code 02 | Simple queue |
Translated from Portuguese by MetaQuotes Ltd.
Original article: https://www.mql5.com/pt/articles/16558
Warning: All rights to these materials are reserved by MetaQuotes Ltd. Copying or reprinting of these materials in whole or in part is prohibited.
This article was written by a user of the site and reflects their personal views. MetaQuotes Ltd is not responsible for the accuracy of the information presented, nor for any consequences resulting from the use of the solutions, strategies or recommendations described.

 Market Simulation: Position View (X)
 Building a Bar Replay Tool in MQL5
 Machine Learning Under Constraint (Part 1): A Configurable Rule Set for Prop-Firm Position Sizing
 Price Action Analysis Toolkit Development (Part 81): Adding Persistent Historical Bookmarks to an MQL5 Navigator

- Free trading apps
- Over 8,000 signals for copying
- Economic news for exploring financial markets
You agree to website policy and terms of use