
MQL5 Wizard Techniques you should know (Part 46): Ichimoku
Introduction
The Ichimoku Kinko Hyo, that is often referred to as the Ichimoku Cloud, is a wide-embracing technical analysis system designed to provide a holistic view of market trends; support and resistance levels; as well as momentum. Developed in the late 1930s and refined over the subsequent three decades, Ichimoku Kinko Hyo translates from Japanese to "one-look equilibrium chart" or "at-a-glance balance chart,"; names which emphasize its design to offer a single, detailed perspective on the market.
This indicator, which serves as a system, consists of five lines (or buffers) and a shaded area usually called the Kumo (which is Japanese for Cloud). Each of the constituent buffers is meant to capture particular aspects of price behaviour, and they are the Tenkan-sen (aka Conversion Line, and serves as a Short-term momentum indicator); Kijun-sen (aka baseline & it acts as a Medium-term trend indicator); Senkou Span A (or Leading Span A) and Senkou Span B (or Leading Span B) which together, form the Kumo, projecting support and resistance levels into the future; and finally the Chikou Span (or Lagging Span) which works as a line that plots the closing price, shifted backward, thus offering a look at historical price action in relation to current levels.
Below are the formulae for each of these 5 buffers:
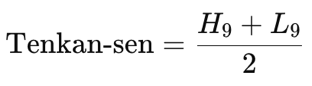
Where:
- H 9 Is the highest high over the past 9 periods.
- L 9 Is the lowest low over the past 9 periods.
This is meant to reflect the short-term trend by averaging the highest high and lowest low over the last 9 periods.

Where:
- H 26 Is the highest high over the past 26 periods.
- L 26 Is the lowest low over the past 26 periods.
This represents the medium-term trend, using a 26-period range to smooth price fluctuations.

Where:
- Tenkan-sen Is the Conversion Line as defined above.
- Kijun-sen Is the baseline as defined above.
Where this buffer is calculated as the average of the Tenkan-sen and Kijun-sen and is projected 26 periods into the future.
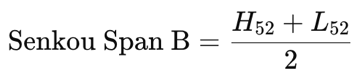
Where:
- H 52 Is the highest high over the past 52 periods.
- L 52 Is the lowest low over the past 52 periods.
Where this is the average of the highest high and lowest low price over 52 periods, projected 26 periods into the future. This forms the upper or lower boundary of the cloud, depending on its position relative to Span A.
![]()
Where:
- Close t−26 Is the current closing price shifted back 26 periods.
Where this offers historical context by plotting today’s closing price 26 periods behind the current date.
The Kumo (or cloud) is formed by the area between Senkou Span A and Senkou Span B, and it serves as a zone of future support and resistance. Often a thicker cloud indicates stronger support/resistance, while a thinner cloud implies it may be easily broken, which suggests weaker levels. The cloud colour is another key feature of the Ichimoku since typically, when Senkou Span A is above Senkou Span B, the cloud is bullish (which is usually shaded green), and when Senkou Span B is above Senkou Span A, the cloud is bearish (and is often shaded red).
Let’s now go over the various patterns of the Ichimoku as we have been with other indicators in these articles. We are going to review 11 patterns for the Ichimoku and as we have in the past articles we’ll start by looking at one pattern at a time where we use the input integer of ‘Signal_Ichimoku_PatternsUsed’ to define which set of patterns are looked at by the Expert Advisor and which patterns are ignored. This input integer is initially used to select just one of the 11 patterns at a time, and once all patterns have been independently tested, we then optimize for an ideal combination of these patterns that would provide us with the most ideal results.
Since we have 11 patterns, this input integer should not be assigned a value greater than 211 minus 1 (2047) since this integer is able to capture all the possible pattern combinations. We are performing our tests on the pair GBP JPY on the one-hour time frame for the year 2022. All test results presented here are merely runs from some of the fair results got from optimizing the Expert Advisor over it short test window of, 2022 with GBP JPY. No forward walks or cross validations were done, and the attached code is meant to be assembled into an Expert Advisor using the MQL5 wizard, for which there are guidelines here and here for new readers.
Tenkan-Sen and Kijun-Sen Crossover
This is arguably the most common or popular signal amongst the Ichimoku patterns. It is in essence almost translates into a simple moving average cross over (for fast & slow periods) and given its Stoic input parameters for the averaging periods, many find it and this indicator in general not sensitive enough to changing market conditions. Nonetheless, a bullish signal is when the Tenkan-sen crosses above the Kijun-sen and also with a bearish pattern being the opposite which is when the Tenkan-sen crosses below the Kijun-sen. We implement this in MQL5 as follows:
//+------------------------------------------------------------------+
//| Check for Pattern 0.                                             |
//+------------------------------------------------------------------+
bool CSignalIchimoku::IsPattern_0(ENUM_POSITION_TYPE T)
{  if(T == POSITION_TYPE_BUY && Tankensen(X()+1) < Kijunsen(X()+1) && Tankensen(X()) > Kijunsen(X()))
   {  return(true);
   }
   else if(T == POSITION_TYPE_SELL && Tankensen(X()+1) > Kijunsen(X()+1) && Tankensen(X()) < Kijunsen(X()))
   {  return(true);
   }
   return(false);
}
Test runs for GBP JPY on the 1-hour in 2022 do present us the following results:

This crossover is however susceptible to Market Noise given that the crossover can be highly reactive to minor fluctuations, particularly on lower timeframes. This over-sensitivity can then result in false signals where crossovers occur without a significant trend change, leading to opened positions experiencing frequent whipsaws in choppy or consolidating markets.
This does mean pattern-0 could have limited effectiveness in Range-Bound Markets since the crossover method is best suited for trending markets; in range-bound or sideways markets, the frequent crossings can mislead traders, leading to entries and exits that lack direction or consistency. Without a clear trend, therefore, crossovers between the Tenkan-sen and Kijun-sen may result in increased transaction costs and potential losses from entering unproductive trades.
Price vs. Kijun-Sen (Baseline) Signal
Our pattern 1 much like pattern-0 is also like a cross-over of price and moving averages if we were to consider pattern 0 above as a pure moving average cross-over. The Kijun-sen looks at a slightly longer period than the Tenkan-sen so any price crossings it registers are often significant. For a bullish signal price crosses, it from below to close above it and for the bearish it does the opposite crossing from above to close below. We implement this as follows in MQL5:
//+------------------------------------------------------------------+
//| Check for Pattern 1.                                             |
//+------------------------------------------------------------------+
bool CSignalIchimoku::IsPattern_1(ENUM_POSITION_TYPE T)
{  if(T == POSITION_TYPE_BUY && Close(X()+1) < Kijunsen(X()+1) && Close(X()) > Kijunsen(X()))
   {  return(true);
   }
   else if(T == POSITION_TYPE_SELL && Close(X()+1) > Kijunsen(X()+1) && Close(X()) < Kijunsen(X()))
   {  return(true);
   }
   return(false);
}
Test runs with similar settings as above after a short optimization run, with the input for patterns used assigned to 2, gives us the following results:

Even though pattern-1 shows some promise from this test run above, it does present some pitfalls that traders should be mindful of. Firstly, the Kijun-sen reflects the mean price over 26 periods, but it does not provide any guidance on trend momentum or trend strength. This usually means that traders solely depending on this signal may miss pointers of weakening momentum, which could result in losses for open positions should the trend revert or head into a consolidation.
Furthermore, this pattern does not provide clues on exit signals or more importantly price targets. While the Kijun-sen can be resourceful in marking prevalent trends, its unhelpfulness in not just defining take profit or even stop loss levels can be a concern for traders that opt to rely on just this pattern.
Kumo (Cloud) Breakout
Much like the crossover we considered in pattern-0, the cloud, Kumo, is a major indicator and source of patterns within the Ichimoku. Stretching between the two Senkou spans, its importance primarily stems from its association with support and resistance. A bullish signal here is defined as a breakout when price pierces through and is able to close above the cloud. A bearish signal would be the reverse when price drops through the cloud and stays there after a close. We show this in code as follows:
//+------------------------------------------------------------------+
//| Check for Pattern 2.                                             |
//+------------------------------------------------------------------+
bool CSignalIchimoku::IsPattern_2(ENUM_POSITION_TYPE T)
{  if(T == POSITION_TYPE_BUY &&
      ((Close(X()+1) < SenkouSpanA(X()+1) && Close(X()) > SenkouSpanA(X()) && SenkouSpanA(X()) > SenkouSpanB(X()))
      ||
      (Close(X()+1) < SenkouSpanB(X()+1) && Close(X()) > SenkouSpanB(X()) && SenkouSpanB(X()) > SenkouSpanA(X())))
      )
   {  return(true);
   }
   else if(T == POSITION_TYPE_SELL &&
      ((Close(X()+1) > SenkouSpanA(X()+1) && Close(X()) < SenkouSpanA(X()) && SenkouSpanA(X()) < SenkouSpanB(X()))
      ||
      (Close(X()+1) > SenkouSpanB(X()+1) && Close(X()) < SenkouSpanB(X()) && SenkouSpanB(X()) < SenkouSpanA(X())))
      )
   {  return(true);
   }
   return(false);
}
Test runs with similar settings as above but with focus on pattern 2, by assigning patterns used input to 4, do give us the following results:

While pattern-2, does also offer interesting report results as we can see above, it is very sensitive to time frames. This is particularly important because on shorter time frames, breakouts are more susceptible to market noise and temporary price fluctuations; which can lead to frequent false signals. Conversely, and unfortunately, on the larger time frames there are often times when the breakout signal lags and ends up missing the ideal entry point.
Pattern-2, in addition, needs to depend on a trend’s context for confirmation. This is because for a Kumo breakout to be reliable it should be in line with the broader trend as indicated by other Ichimoku components, like the Lagging Line as well as the relative positions of the baseline and Conversion Line. And this leads to another weakness which may cut across all indicators but is still worth mentioning. Overlooking Market Fundamentals. Traders relying solely on the Kumo breakout may miss crucial market context.
Kumo (Cloud) Twist
The cloud twist is our pattern-3, and it stems from the cloud changing colour or Senkou span A and Senkou span B trading places. These two also being defacto moving averages does make this out as another cross-over, albeit with a lagging effect. A bullish signal therefore is when Senkou span A (the ‘shorter’ period buffer) crosses the Senkou span B from below to close above it. This is also known as a bullish Kumo twist, that signals a potential future uptrend. Likewise, a bearish signal would be when it crosses from above to close below, which is also referred to as a bearish Kumo twist. This is how we realize this in code:
//+------------------------------------------------------------------+
//| Check for Pattern 3.                                             |
//+------------------------------------------------------------------+
bool CSignalIchimoku::IsPattern_3(ENUM_POSITION_TYPE T)
{  if(T == POSITION_TYPE_BUY && SenkouSpanA(X()+1) < SenkouSpanB(X()+1) && SenkouSpanA(X()) > SenkouSpanB(X()))
   {  return(true);
   }
   else if(T == POSITION_TYPE_SELL && SenkouSpanA(X()+1) > SenkouSpanB(X()+1) && SenkouSpanA(X()) < SenkouSpanB(X()))
   {  return(true);
   }
   return(false);
}
Testing on GBP JPY for the year 2022 on the 1-hour as above does present us with the following results:

Pattern-3, does have its pitfalls, though, and the prime of which is the misinterpretation of cloud thickness. For many traders, the Kumo-twist is often associated with cloud thickness, with cloud thickness indicated to mean stronger trends. The assessment of this thickness though does require experience and proper market context because quite often a cloud twist can be easily reversed, especially when dealing with choppy markets.
This pattern, like others we have seen above, provides little in terms of indication of trend strength or momentum. This makes it difficult to determine whether a reversal will have staying power. This presents risks of entering waning or fading trades. This again emphasizes the point of depending on a broader Ichimoku context, in that the Kumo twist should ideally be confirmed by other Ichimoku elements such as the Tenkan-sen and Kijun-sen cross or the Chikou Span. Sole reliance on the twist without these confirmations may lead to false signals. Traders who do not consider the complete Ichimoku system may misinterpret twists, which is why we are presenting these patterns not individually but as an ensemble from which traders can pick what is most suitable to their setups.
Chikou Span (Lagging Line) Confirmation
The Chikou span is a lagging buffer and while using it off a chart in manual trading can be straightforward, when it comes to reading it in code one needs to ensure his indexing is properly offset. We would have a bullish Signal if the Chikou Span crosses above the price action, which would confirm bullish momentum and strengthens the case for buying. On the flip side a bearish signal would be if the Chikou Span crosses below the price action, thus signalling bearish momentum and a confirmation of the sell signal. We code this as follows:
//+------------------------------------------------------------------+
//| Check for Pattern 4.                                             |
//+------------------------------------------------------------------+
bool CSignalIchimoku::IsPattern_4(ENUM_POSITION_TYPE T)
{  if(T == POSITION_TYPE_BUY && ChikouSpan(X()+1) <= Tankensen(X()+1) && ChikouSpan(X()) > Tankensen(X()))
   {  return(true);
   }
   else if(T == POSITION_TYPE_SELL && ChikouSpan(X()+1) >= Tankensen(X()+1) && ChikouSpan(X()) < Tankensen(X()))
   {  return(true);
   }
   return(false);
}
Testing with the same settings as with the other patterns gives us the following results:

Potential over-reliance while ignoring other key signals is a pitfall for pattern-4. This bears mentioning again, as with the other patterns above, but the Chikou span is ideally a confirmation signal as the pattern title suggests, so a pairing with the likes of the Kumo breakout or the Tenkan-sen and Kijun-sen crossover would be suitable. Focusing solely on it may result in an incomplete understanding of market dynamics. This also leans into other already mentioned weaknesses of limited relevance in fundamentally driven markets, as well as the risk of failure to consider broader market context and factors.
Kumo as Support and Resistance
Besides acting as a breakthrough threshold, the Kumo can serve as a form of dynamic support or resistance which can define a pattern separate from pattern-2 above that we label pattern-5. The trading strategy will therefore feature a bullish bounce which is formed if the price pulls back to the cloud but fails to break through it, whereby the cloud acts as support, which can be taken as an entry point for long trades. The bearish Rejection would register if the price rallies into the cloud but fails to break above it, with the cloud acting as a resistance, thus signalling a potential sell opportunity. Coding of pattern-5 is as follows:
//+------------------------------------------------------------------+
//| Check for Pattern 5.                                             |
//+------------------------------------------------------------------+
bool CSignalIchimoku::IsPattern_5(ENUM_POSITION_TYPE T)
{  if(T == POSITION_TYPE_BUY &&
      ((Close(X()+2) > SenkouSpanA(X()+2) && Close(X()+1) < SenkouSpanA(X()+1) && Close(X()) > SenkouSpanA(X()) && SenkouSpanA(X()) > SenkouSpanB(X()))
      ||
      (Close(X()+2) > SenkouSpanA(X()+2) && Close(X()+1) < SenkouSpanB(X()+1) && Close(X()) > SenkouSpanB(X()) && SenkouSpanB(X()) > SenkouSpanA(X())))
      )
   {  return(true);
   }
   else if(T == POSITION_TYPE_SELL &&
      ((Close(X()+2) < SenkouSpanA(X()+2) && Close(X()+1) > SenkouSpanA(X()+1) && Close(X()) < SenkouSpanA(X()) && SenkouSpanA(X()) < SenkouSpanB(X()))
      ||
      (Close(X()+2) < SenkouSpanA(X()+2) && Close(X()+1) > SenkouSpanB(X()+1) && Close(X()) < SenkouSpanB(X()) && SenkouSpanB(X()) < SenkouSpanA(X())))
      )
   {  return(true);
   }
   return(false);
}
Test runs with the input for patterns used assigned the value 32 which ensures we test only this pattern and none of the other 10 does give us the following results:

Pattern-5, where Kumo acts as support/ resistance, suffers from delayed reaction in identifying trend reversals. This is because Kumo lags behind current price action due to its calculation (of 26 forward shifted periods) which results in delayed signals when compared to alternative real-time support/ resistance indicators. These delays can result in traders entering late, thus reducing its effectiveness as a support/ resistance metric, especially in fast-paced markets.
Also, pattern-5, does pose challenges in precisely identifying its levels. Unlike traditional support and resistance lines, Kumo cloud is a zone rather than a particular price level. This slightly encumbers the process of identifying precise entry and exit points. This ambiguity could trade management difficult, as setting accurate stop-loss or take-profit levels within the cloud can be challenging.
Finally, this pattern can be unreliable in strongly trending markets, since prices easily breach the Kumo with less hesitation. This makes it less reliable as a support or resistance indicator and more of a price buffer. This could lead to missed opportunities if traders solely rely on it for trade decisions.
Strong Crossovers (Above or Below the Kumo)
Our pattern-6 revisits the all-important and anchor pattern of the Ichimoku, pattern-0, by adding a filter that considers the relative position of the Kumo to the crossing Tenkan-sen and Kijun-sen. These two can cross over at any time; however, it is argued by pairing each cross-over with a particular Kumo positioning yields an even stronger signal. The bullish signal for this would be marked if the bullish Tenkan-sen/Kijun-sen crossover occurs above the cloud, which, as already emphasized, would indicate a strong buy signal. The strong bearish signal would be indicated if the bearish Tenkan-sen/Kijun-sen crossover occurs below the cloud. This signal does imply that any crossover, that happens inside the cloud, is less strong due to indecision in the market. We code pattern-6 as follows:
//+------------------------------------------------------------------+
//| Check for Pattern 6.                                             |
//+------------------------------------------------------------------+
bool CSignalIchimoku::IsPattern_6(ENUM_POSITION_TYPE T)
{  if(T == POSITION_TYPE_BUY  && Tankensen(X()+1) < Kijunsen(X()+1) && Tankensen(X()) > Kijunsen(X()) &&
      ((Tankensen(X()) > SenkouSpanA(X()) && SenkouSpanA(X()) > SenkouSpanB(X()))
      ||
      (Tankensen(X()) > SenkouSpanB(X()) && SenkouSpanB(X()) > SenkouSpanA(X())))
      )
   {  return(true);
   }
   else if(T == POSITION_TYPE_SELL && Tankensen(X()+1) > Kijunsen(X()+1) && Tankensen(X()) < Kijunsen(X()) &&
      ((Tankensen(X()) < SenkouSpanA(X()) && SenkouSpanA(X()) < SenkouSpanB(X()))
      ||
      (Tankensen(X()) < SenkouSpanB(X()) && SenkouSpanB(X()) < SenkouSpanA(X())))
      )
   {  return(true);
   }
   return(false);
}
Testing with similar strategy tester settings as above with the input parameter for patterns used assigned to 64 gives us the following results:

In spite of our pattern-6 report above, Kumo crossovers tend to lag a lot. A strong crossover above or below the Kumo usually occurs after a significant trend change has already taken place, and this can cause potential delays in entry or exit. Traders therefore relying solely on Kumo crossovers for their entries may enter late, missing out on the initial, more profitable parts of the trend.
There is also vulnerability to reversals in volatile markets. This is because in highly volatile or news-driven markets, a strong crossover can quickly reverse direction, trapping traders who enter based on that crossover alone. These sudden reversals therefore can lead to significant losses, especially if traders fail to confirm the trend with other indicators.
Finally, and this could be taken as a theme for the Ichimoku, frequent whipsaw price-action in range-bound markets is bound to produce a lot of false signals as prices oscillate around the Kumo without clear direction.
Trend Strength via Cloud Thickness
Another pattern within Ichimoku that can be used to inform buy and sell decisions is Kumo thickness. The premise behind this is a thin Kumo indicates weak support or resistance, which can lead to breakouts or reversals, while a thick Kumo indicates strong support or resistance and can signal the continuation of the current trend. To apply this, we define our bullish signal as a bullish trend over a period of about 26-bars that is also marked by an increase in the cloud thickness. Conversely, the bearish signal will be a bearish trend over a similar spanning period that is also marked by thickening clouds over that period. We implement this as follows:
//+------------------------------------------------------------------+
//| Check for Pattern 7.                                             |
//+------------------------------------------------------------------+
bool CSignalIchimoku::IsPattern_7(ENUM_POSITION_TYPE T)
{  if(T == POSITION_TYPE_BUY && Close(X()) > Close(X()+26) && fabs(SenkouSpanB(X()) - SenkouSpanA(X())) > fabs(SenkouSpanB(X()+26) - SenkouSpanA(X()+26)))
   {  return(true);
   }
   else if(T == POSITION_TYPE_SELL && Close(X()) < Close(X()+26) && fabs(SenkouSpanB(X()) - SenkouSpanA(X())) > fabs(SenkouSpanB(X()+26) - SenkouSpanA(X()+26)))
   {  return(true);
   }
   return(false);
}
Test runs with the input for patterns used assigned to 128 does give us the following:

Cloud thickness is vulnerable to false signals in low volatility or side-ways markets. This is because the cloud may remain thick because of historical price action, in spite of prevalent weak trends. This therefore can result in false signals, since the cloud thickness may not always correlate with trend strength. Misinterpretation of this is bound to lead to unnecessary trades.
Also, the risks for late exiting of trades during trend reversals do abound because the cloud-thickness can give a false sense of security given its lagging nature. An overfocus on cloud thickness could mask early warning signs, especially if other Ichimoku signals, like the Chikou Span moving are in opposition to the trend, indicating potential reversals.
Finally, the subjectivity in defining "thick" vs "thin" clouds does mean traders need to independently arrive at a suitable means of measuring this that is backed by one’s own decent history test results with quality data and not necessarily rely on peer definitions. This is key because traders with different definitions of cloud thickness may interpret the same market conditions in conflicting ways, leading to a lack of clarity in trade signals.
Price Rebound from Kijun-sen (Baseline)
Pattern-8 focuses on the Kijun-sen, the 26-period average. Being over 26 periods and not 9 like Tenkan-sen does make any price action involving it more significant because it does not happen often, given the longer averaging period. We get signals by looking out for rebounding price action. A bullish-rebound is when the price touches the Kijun-sen from above and bounces upward, thus signalling that the trend is still intact, presenting a potential buy entry. The bearish-rebound, on the other hand, is when the price touches the Kijun-sen from below and bounces downward, signalling the continuation of a downtrend and a potential sell opportunity. We implement this as follows in our custom signal class:
//+------------------------------------------------------------------+
//| Check for Pattern 8.                                             |
//+------------------------------------------------------------------+
bool CSignalIchimoku::IsPattern_8(ENUM_POSITION_TYPE T)
{  if(T == POSITION_TYPE_BUY && Close(X()+2) >= Kijunsen(X()+1) && Close(X()+1) <= Kijunsen(X()+1) && Close(X()) > Kijunsen(X()))
   {  return(true);
   }
   else if(T == POSITION_TYPE_SELL && Close(X()+2) <= Kijunsen(X()+1) && Close(X()+1) >= Kijunsen(X()+1) && Close(X()) < Kijunsen(X()))
   {  return(true);
   }
   return(false);
}
If we make test runs for this particular pattern by having the input parameter for patterns used assigned 256, we do get the following results:

Even though pattern-8’s report above is slightly promising, traders need to be wary of its inherent inadequacy in strong trends when there is a breakout, as this will not produce the desired rebound. Also, as a pattern signal it lacks confirmation that the strength of the price rebound constitutes a major trend, which is why it is a good idea to pair it with one of the crossover patterns such as pattern-0 above. Finally, context dependence on time frames is another common theme with Ichimoku patterns and traders therefore should ensure this pattern is not read a lot from the smaller time frames as a larger time frame signal will carry more weight.
Price and Chikou Span Agreement
Pattern-9, which is our 10th, considers price action and the lagging Chikou span. The Chikou-span being lagged close prices necessitates another current buffer besides raw prices in order to draw meaningful signals. We therefore use the Tenkan-sen buffer to represent our current price action and look for times when it agrees the Chikou span to read off signals. A bullish signal is if both the price and the Chikou Span are above the cloud, as this is thought to strengthen a bullish trend signal. Conversely, the bearish signal would be if both the price and the Chikou Span were below the cloud, confirming a bearish signal. We implement this as follows:
//+------------------------------------------------------------------+
//| Check for Pattern 9.                                             |
//+------------------------------------------------------------------+
bool CSignalIchimoku::IsPattern_9(ENUM_POSITION_TYPE T)
{  if(T == POSITION_TYPE_BUY  &&
      ((Close(X()) > SenkouSpanA(X()) && ChikouSpan(X()) > SenkouSpanA(X()) && SenkouSpanA(X()) > SenkouSpanB(X()))
      ||
      (Close(X()) > SenkouSpanB(X()) && ChikouSpan(X()) > SenkouSpanB(X()) && SenkouSpanB(X()) > SenkouSpanA(X())))
      )
   {  return(true);
   }
   else if(T == POSITION_TYPE_SELL &&
      ((Close(X()) < SenkouSpanA(X()) && ChikouSpan(X()) < SenkouSpanA(X()) && SenkouSpanA(X()) < SenkouSpanB(X()))
      ||
      (Close(X()) < SenkouSpanB(X()) && ChikouSpan(X()) < SenkouSpanB(X()) && SenkouSpanB(X()) < SenkouSpanA(X())))
      )
   {  return(true);
   }
   return(false);
}
A test run from some of the optimized inputs with input parameter for the patterns used assigned 512, does give us the following report:

Despite our rosy results above, traders need to be wary of inconsistencies for pattern-9 across different time frames, not to neglect market context when using this pattern, and the vulnerability to trend reversals.
Trend Reentry Based on Tenkan-sen and Kijun-sen
Our 11th pattern, pattern-10, combines the crossover we saw in pattern-0, as a lag, with price action testing of the Tenkan-sen line. We implement this as follows:
//+------------------------------------------------------------------+
//| Check for Pattern 10.                                             |
//+------------------------------------------------------------------+
bool CSignalIchimoku::IsPattern_10(ENUM_POSITION_TYPE T)
{  if(T == POSITION_TYPE_BUY && Tankensen(X()+3) < Kijunsen(X()+3) && Tankensen(X()+2) > Kijunsen(X()+2) && Tankensen(X()+1) >= Close(X()+1) && Tankensen(X()) < Close(X()))
   {  return(true);
   }
   else if(T == POSITION_TYPE_SELL && Tankensen(X()+3) > Kijunsen(X()+3) && Tankensen(X()+2) < Kijunsen(X()+2) && Tankensen(X()+1) <= Close(X()+1) && Tankensen(X()) > Close(X()))
   {  return(true);
   }
   return(false);
}
The trading strategy is, after a bullish Tenkan-sen/Kijun-sen crossover, the price may retest the Kijun-sen, at the lower bound and then bounce off and resume the upward movement, providing a reentry point for buyers. Similarly, after a flip cross over with the Tenkan-sen being below the Kijun-sen, price may retest the Kijun-sen from below, bounce off it and then resume its descent. We test just this pattern by assigning the input parameter of patterns used the value 1024, an in one of the favourable optimized runs, our report is as follows:

Pattern-10 has potential however traders need to be on the lookout for false signals in sideways markets, give proper consideration of the broader market and context when executing trades, and avoid the risk of over trading given the many signals this pattern is bound to generate.
Combining all the patterns
It is always better to trade across multiple patterns only if the relative pattern weightings are assigned from one’s own knowledge on their relative importance, which should come from experience. The danger with optimizing individual pattern weights when all of them are used is they will tend to close each other’s trades, and so it would not be easy to infer performance of each based on the assigned weights. Nonetheless, the results are presented below simply to illustrate the difference in performance one can get from combining multiple signals rather than just using single patterns.


Conclusion
In conclusion, while the Ichimoku Kinko Hyo offers a comprehensive overview with its multifaceted components and diverse patterns, its practical application remains nuanced and demands a deep understanding of market dynamics. Traders employing the Ichimoku Cloud must be vigilant about its limitations, including potential lagging indicators, susceptibility to market noise, and reliance on additional confirmation signals to avoid false positives.
Furthermore, the system’s diverse patterns underscore the necessity for combining multiple elements within Ichimoku, along with complementary analysis techniques, to enhance decision-making accuracy and minimize risk.
As demonstrated, no single pattern guarantees success; thus, a robust approach involves leveraging the ensemble of patterns in alignment with broader market contexts and fundamentals. By doing so, traders can better harness the power of the Ichimoku Kinko Hyo as a balanced tool in their trading arsenal, strategically navigating market trends to achieve informed and disciplined trading strategies.
Warning: All rights to these materials are reserved by MetaQuotes Ltd. Copying or reprinting of these materials in whole or in part is prohibited.
This article was written by a user of the site and reflects their personal views. MetaQuotes Ltd is not responsible for the accuracy of the information presented, nor for any consequences resulting from the use of the solutions, strategies or recommendations described.
- Free trading apps
- Over 8,000 signals for copying
- Economic news for exploring financial markets
You agree to website policy and terms of use