Auto Zone Marker
- Indicators
- Version: 1.0
- Activations: 5

================================================================
ZONETRADER INDICATOR v1.0 — MQL5 MARKETPLACE DESCRIPTION
================================================================
━━━━━━━━━━━━━━━━━━━━━━━━━━━━━━━━━━━━━━━━━━━━━━━━━━━━━━━━━━━
TITLE (use as product name on MQL5):
ZoneTrader v1.0 — Big Candle & Range Zone Detector for XAUUSD
━━━━━━━━━━━━━━━━━━━━━━━━━━━━━━━━━━━━━━━━━━━━━━━━━━━━━━━━━━━
─────────────────────────────────────────────────────────────
[ OVERVIEW — Heading 1 ]
─────────────────────────────────────────────────────────────
ZoneTrader v1.0 is built specifically for XAUUSD (Gold) traders who trade on the M15 and M30
timeframes. It automatically detects two types of high-probability zones on the chart — Big Candle
Zones and Range High/Low Zones — and fires a precise BUY or SELL arrow the moment price returns
and confirms inside that zone on a closed candle.
This is not a trend indicator. This is not an oscillator. It is a pure price-action zone tool that
works on one simple idea: when Gold moves hard and fast in one direction, that candle's body
becomes a magnet — price almost always comes back to test it. ZoneTrader marks that area and
signals you when the retest happens.
No repainting. Signals are always on the closed bar.
─────────────────────────────────────────────────────────────
[ THE LOGIC — Heading 1 ]
─────────────────────────────────────────────────────────────
[ Logic 1 — Big Candle Zone — Heading 2 ]
When a candle on XAUUSD closes with a body larger than the minimum threshold (default $30 for Gold),
the indicator draws a zone box around the midpoint of that candle's body — $2 above and $2 below
the body base. This marks the area where institutional orders were placed and price is likely to
return for a retest.
When price later comes back into this zone, the indicator checks the next candle that closes
inside the box:
— If it closes bullish (green body) → BUY arrow fires below that candle
— If it closes bearish (red body) → SELL arrow fires above that candle
One extra filter is built in: if the entry candle itself is too large (body exceeds $15 for Gold),
the indicator does not signal immediately. It marks a Retest Pending arrow and waits for the
next smaller candle to confirm. This prevents you from chasing big momentum spikes.
[ Logic 3 — Range High/Low Zones — Heading 2 ]
When a candle has a total range (High to Low) larger than $100, the indicator places TWO separate
zones — one at the candle's HIGH (a resistance zone, red box) and one at the candle's LOW (a
support zone, green box). These mark the exact wicks and extremes where price rejected before.
Each zone works independently and generates its own BUY or SELL signals when price returns to
that level on M15 or M30.
[ Zone Strength Rating — Heading 2 ]
Every zone is rated from 1 to 5 stars based on how large the candle body/range was compared to
the current 14-period ATR. A 5-star zone means the candle was more than 4 times the average ATR —
that is an exceptional move and the zone deserves maximum attention. A 1-star zone is still valid
but smaller.
★☆☆☆☆ — Small zone (body < 1× ATR)
★★☆☆☆ — Moderate zone
★★★☆☆ — Strong zone (body ≈ 1.5–2.5× ATR)
★★★★☆ — Very strong zone
★★★★★ — Exceptional zone (body > 4× ATR) — highest priority
─────────────────────────────────────────────────────────────
[ SIGNALS — Heading 1 ]
─────────────────────────────────────────────────────────────
The indicator plots 4 types of arrows directly on the chart:
▲ Green Arrow — BUY confirmed. A bullish candle closed inside an active zone.
Price is showing buying pressure at the zone. Look for a long trade.
▼ Red Arrow — SELL confirmed. A bearish candle closed inside an active zone.
Price is showing selling pressure at the zone. Look for a short trade.
◈ Aqua Arrow — BUY Retest Pending. A big bullish candle entered the zone but
was too large to trust immediately. Wait for the next candle to confirm.
◈ Orange Arrow — SELL Retest Pending. A big bearish candle entered the zone.
Wait for the next smaller candle to confirm before acting.
Each zone can generate a maximum of 3 BUY and 3 SELL signals. After that it deactivates
automatically so it does not keep firing on an exhausted zone.
─────────────────────────────────────────────────────────────
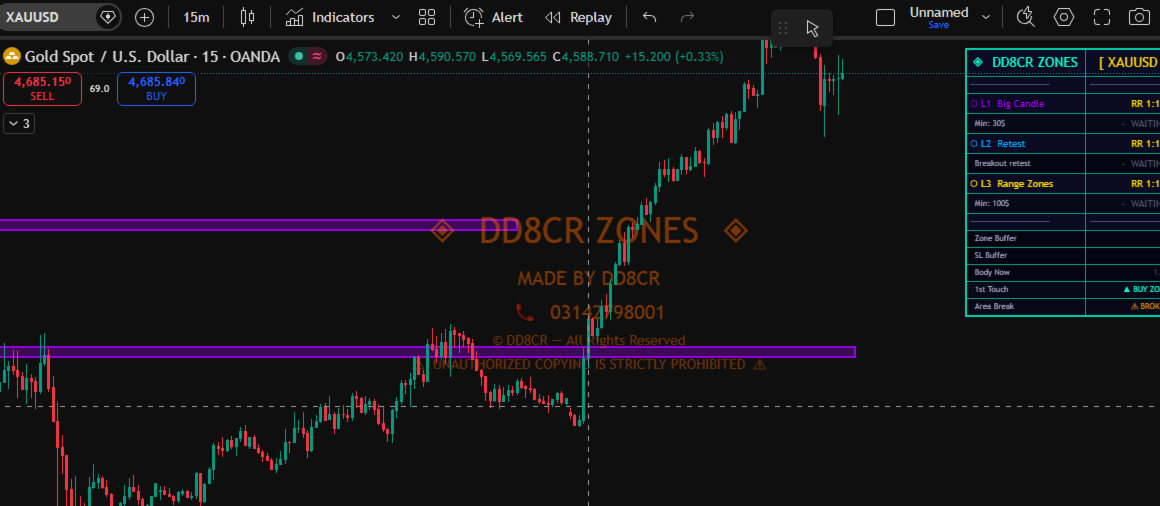
[ ZONE VISUALS — Heading 1 ]
─────────────────────────────────────────────────────────────
Purple box — Active Logic 1 zone (Big Candle body zone)
Red box — Active Logic 3 resistance zone (at candle High)
Green box — Active Logic 3 support zone (at candle Low)
Gold dashed — Broken zone: price has closed through it (structure broken)
Grey faded — Expired zone: maximum signals reached or age limit passed
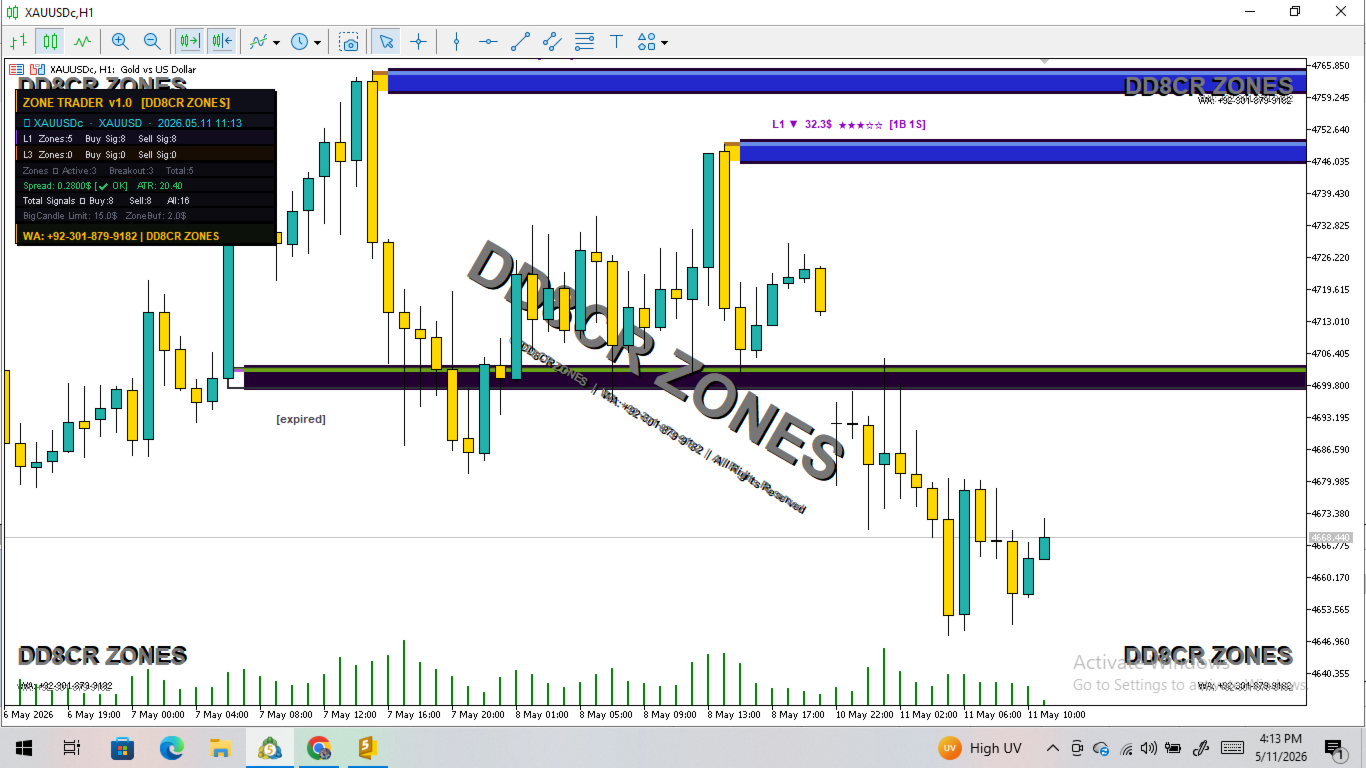
Each active zone also shows a label with:
— Zone type (L1 or L3), direction (▲ or ▼)
— Body/range size in dollars
— Star strength rating
— Current signal count [Buys / Sells]
[ Proximity Glow — Heading 2 ]
As price approaches an active zone, the box starts to glow. The closer price gets, the brighter
the glow becomes. This gives you a visual warning before price even reaches the zone so you are
ready when it arrives.
─────────────────────────────────────────────────────────────
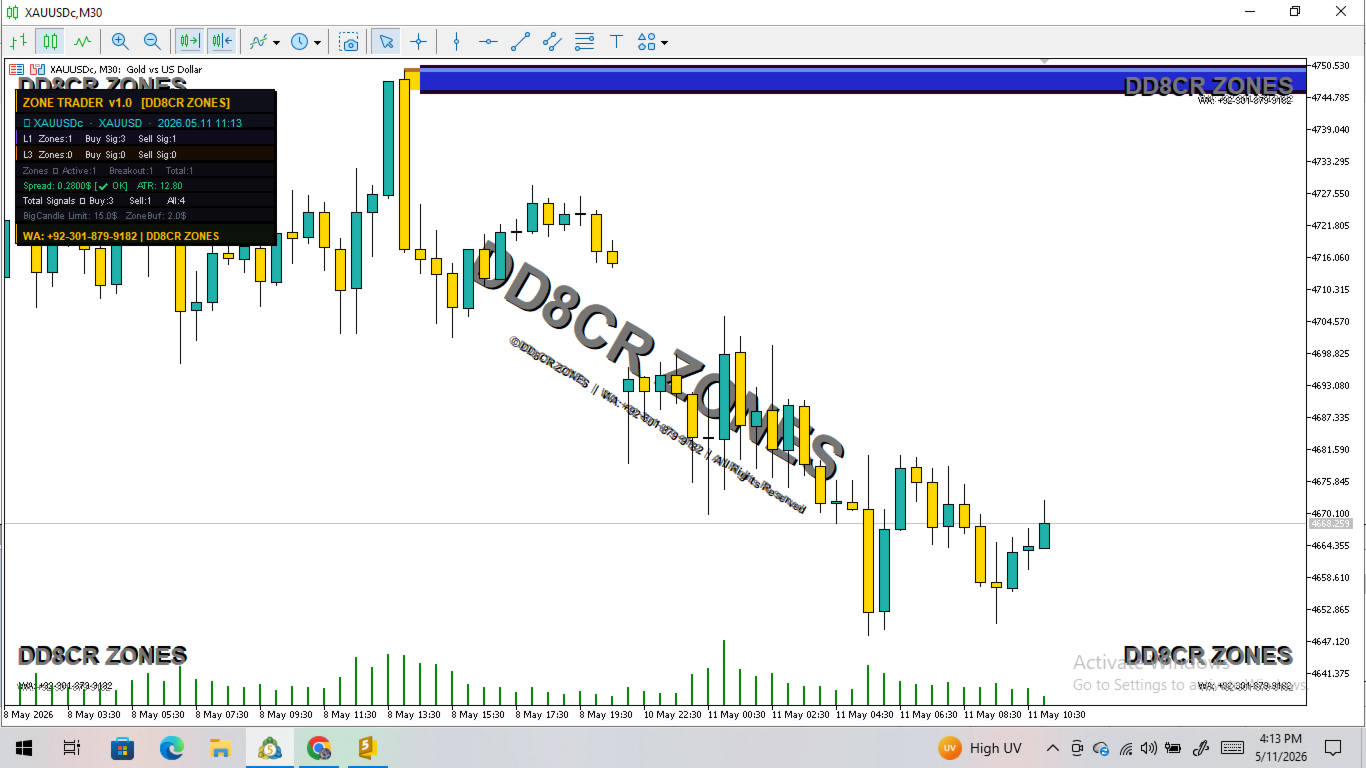
[ LIVE DASHBOARD — Heading 1 ]
─────────────────────────────────────────────────────────────
A dark-theme panel in the top-left corner of the chart shows:
— Symbol, type (XAUUSD / FOREX / BTC), current date and time
— Logic 1 stats: total zones, buy signals generated, sell signals generated
— Logic 3 stats: total zones, buy signals generated, sell signals generated
— Active zones, broken zones, total zones on chart
— Live spread with OK or HIGH warning
— Current ATR value
— Total buy and sell signal count since indicator loaded
— Big candle limit and zone buffer reference values
─────────────────────────────────────────────────────────────
[ ALERTS — Heading 1 ]
─────────────────────────────────────────────────────────────
When a new BUY or SELL signal fires, a popup alert appears with:
— Symbol name
— Zone logic (L1 or L3)
— Signal direction
— Date and time of the signal
Sound alert also plays on every new signal and every new zone detection.
─────────────────────────────────────────────────────────────
[ RECOMMENDED SETUP — Heading 1 ]
─────────────────────────────────────────────────────────────
Symbol : XAUUSD (Gold)
Timeframes : M15 (primary) · M30 (confirmation)
Best session: London (07:00–12:00 GMT) · New York (13:00–18:00 GMT)
Suggested workflow:
1. Let the indicator scan and draw zones on M15
2. Wait for a BUY or SELL arrow (not a Retest Pending)
3. Confirm the zone strength is ★★★ or higher
4. Check that the dashboard shows spread as ✔ OK
5. Enter on the next candle open with SL below/above the zone box
─────────────────────────────────────────────────────────────
[ INPUT PARAMETERS — Heading 1 ]
─────────────────────────────────────────────────────────────
[ XAUUSD (Gold) Settings — Heading 2 ]
XAUUSD_Override — Set to true to use the Gold-specific values below instead of
the Forex pip values. Keep this ON for Gold trading. (Default: true)
XAUUSD_L1_MinUSD — Minimum candle body size in dollars for a candle to qualify as
an L1 Big Candle Zone. A $30 body on Gold M15 is a strong impulse move.
Increase this to only catch the very largest candles. (Default: 30.0)
XAUUSD_L3_MinUSD — Minimum total candle range (High minus Low) in dollars for a
candle to qualify for L3 Range Zones at its High and Low.
(Default: 100.0)
XAUUSD_ZoneBuf_USD — Half-width of the zone box in dollars. The zone is drawn
this amount above and below the zone midpoint. $2 means the
full zone is $4 wide. (Default: 2.0)
XAUUSD_MaxSpread — If the Gold spread exceeds this value in dollars, the
dashboard shows a HIGH spread warning. (Default: 0.80)
[ BTCUSD Settings — Heading 2 ]
BTCUSD_Override — Enable dedicated Bitcoin settings. (Default: true)
BTCUSD_L1_MinUSD — Minimum candle body in USD for L1 zone on BTC. (Default: 500.0)
BTCUSD_L3_MinUSD — Minimum candle range in USD for L3 zones on BTC. (Default: 2000.0)
BTCUSD_ZoneBuf_USD — Zone half-width in USD for BTC. (Default: 80.0)
BTCUSD_MaxSpread — Max spread in USD for BTC spread warning. (Default: 60.0)
[ Forex (Other Pairs) Settings — Heading 2 ]
Other_L1_MinPips — Minimum candle body in pips for L1 zones on Forex pairs. (Default: 300.0)
Other_L3_MinPips — Minimum candle range in pips for L3 zones on Forex. (Default: 1000.0)
Other_ZoneBufPips — Zone half-width in pips for Forex. (Default: 10.0)
Other_MaxSpreadPips — Max spread in pips before spread warning. (Default: 3.0)
[ Logic Settings — Heading 2 ]
L1_Enabled — Turn Logic 1 Big Candle Zones on or off. (Default: true)
L3_Enabled — Turn Logic 3 Range High/Low Zones on or off. (Default: true)
BigCandleLimit_USD — For Gold/BTC: if a candle that enters the zone has a body larger
than this dollar value, the indicator does NOT signal immediately.
Instead it fires a Retest Pending arrow and waits for the next
smaller candle to confirm. This filters out chasing big spikes.
(Default: 15.0)
BigCandleLimit_Pips — Same filter for Forex pairs, in pips. (Default: 50.0)
MaxBuyPerZone — Maximum BUY signals one zone can produce before it deactivates.
Prevents overtrading a single exhausted zone. (Default: 3)
MaxSellPerZone — Maximum SELL signals one zone can produce before it deactivates.
(Default: 3)
[ Zone Settings — Heading 2 ]
ZoneLookback — How many historical bars to scan when the indicator first loads
or when the chart reloads. Higher = more historical zones drawn.
(Default: 150)
MaxBarsZoneActive — A zone will automatically expire and turn grey after this many
bars have passed since it was created. Keeps the chart clean.
(Default: 300)
ATR_Period — Period for the ATR indicator used to calculate zone strength stars.
(Default: 14)
[ Visuals — Heading 2 ]
L1_ZoneColor — Colour of Logic 1 Big Candle zone boxes. (Default: purple)
L3_UpperColor — Colour of Logic 3 resistance (High) zone boxes. (Default: red)
L3_LowerColor — Colour of Logic 3 support (Low) zone boxes. (Default: green)
GlowColor — Colour of the proximity glow that pulses when price is near a zone.
(Default: gold)
ShowZoneGlow — Enable or disable the animated glow effect. (Default: true)
ShowZoneLabels — Show the text label on each zone (type, size, stars, signal count).
(Default: true)
ShowPriceTag — Show a live current-price label on the right side of the chart.
(Default: true)
LabelOffsetBars — How many bars to the right of the zone the label is placed.
(Default: 3)
ShowWatermark — Show the DD8CR ZONES watermark on the chart background.
(Default: true)
ShowDashboard — Show or hide the live stats dashboard panel. (Default: true)
DashX — Horizontal position of dashboard panel in pixels from left. (Default: 10)
DashY — Vertical position of dashboard panel in pixels from top. (Default: 30)
EnableAlerts — Popup alert when a new BUY or SELL arrow fires. (Default: true)
EnableSounds — Sound alert on new zone detection and new signal. (Default: true)
─────────────────────────────────────────────────────────────
[ IMPORTANT NOTES — Heading 1 ]
─────────────────────────────────────────────────────────────
• This indicator does NOT open or manage any trades. It is a visual and alert tool only.
• All signals are generated on the closed bar (shift 1). The current live candle never
shows a signal until it closes. There is no repainting.
• Optimised and tested specifically for XAUUSD M15 and M30.
• The indicator auto-detects whether you are on XAUUSD, BTCUSD, or a Forex pair and
applies the correct parameter group automatically. You do not need to change settings
when switching symbols.
─────────────────────────────────────────────────────────────
[ CONTACT — Heading 1 ]
─────────────────────────────────────────────────────────────
Developer : DD8CR ZONES
WhatsApp : +92-301-879-9182
For support, custom settings help, or questions — message directly on WhatsApp.
================================================================
================================================================