

Price Action Analysis Toolkit Development (Part 79): Extending the Indicator Search Panel with Dynamic Input Parameter Configuration
 1 522
1 522
 0
0

Contents
- Introduction
- From Indicator Discovery to Indicator Configuration
- Designing a Metadata-Driven Parameter System
- Creating a Repository of Indicator Parameter Definitions
- Building the Parameter Configuration Dialog
- Reading and Validating User Input
- Extending the Chart Launcher
- Integrating the Parameter Dialog into the Search Panel
- Testing
- Conclusion
Introduction
In Part 77 of this series, we introduced an indicator search panel that made it easier to locate and launch MetaTrader 5's built-in technical indicators. Part 78 expanded this functionality by allowing indicators to be attached to any selected symbol, eliminating the need to manually switch between charts.
Although these enhancements streamlined the process of finding and opening indicators, one important limitation remained. Indicators were still attached with default parameters. To customize settings, traders had to open the indicator properties window manually.
In this article, we address that limitation by extending the search panel with a dynamic parameter configuration system. Instead of immediately attaching the selected indicator, users are first presented with a configuration dialog where they can adjust the indicator's input values before it is created.
By integrating parameter configuration directly into the search workflow, our application moves beyond simple indicator discovery and provides a smoother workflow for searching, configuring, and attaching indicators.
From Indicator Discovery to Indicator Configuration
The Limitation of Default Indicator Parameters
By the end of Part 78, our indicator launcher had become a practical tool for everyday chart analysis. From a single panel, we could quickly search for built-in indicators and attach them to any symbol available in Market Watch.
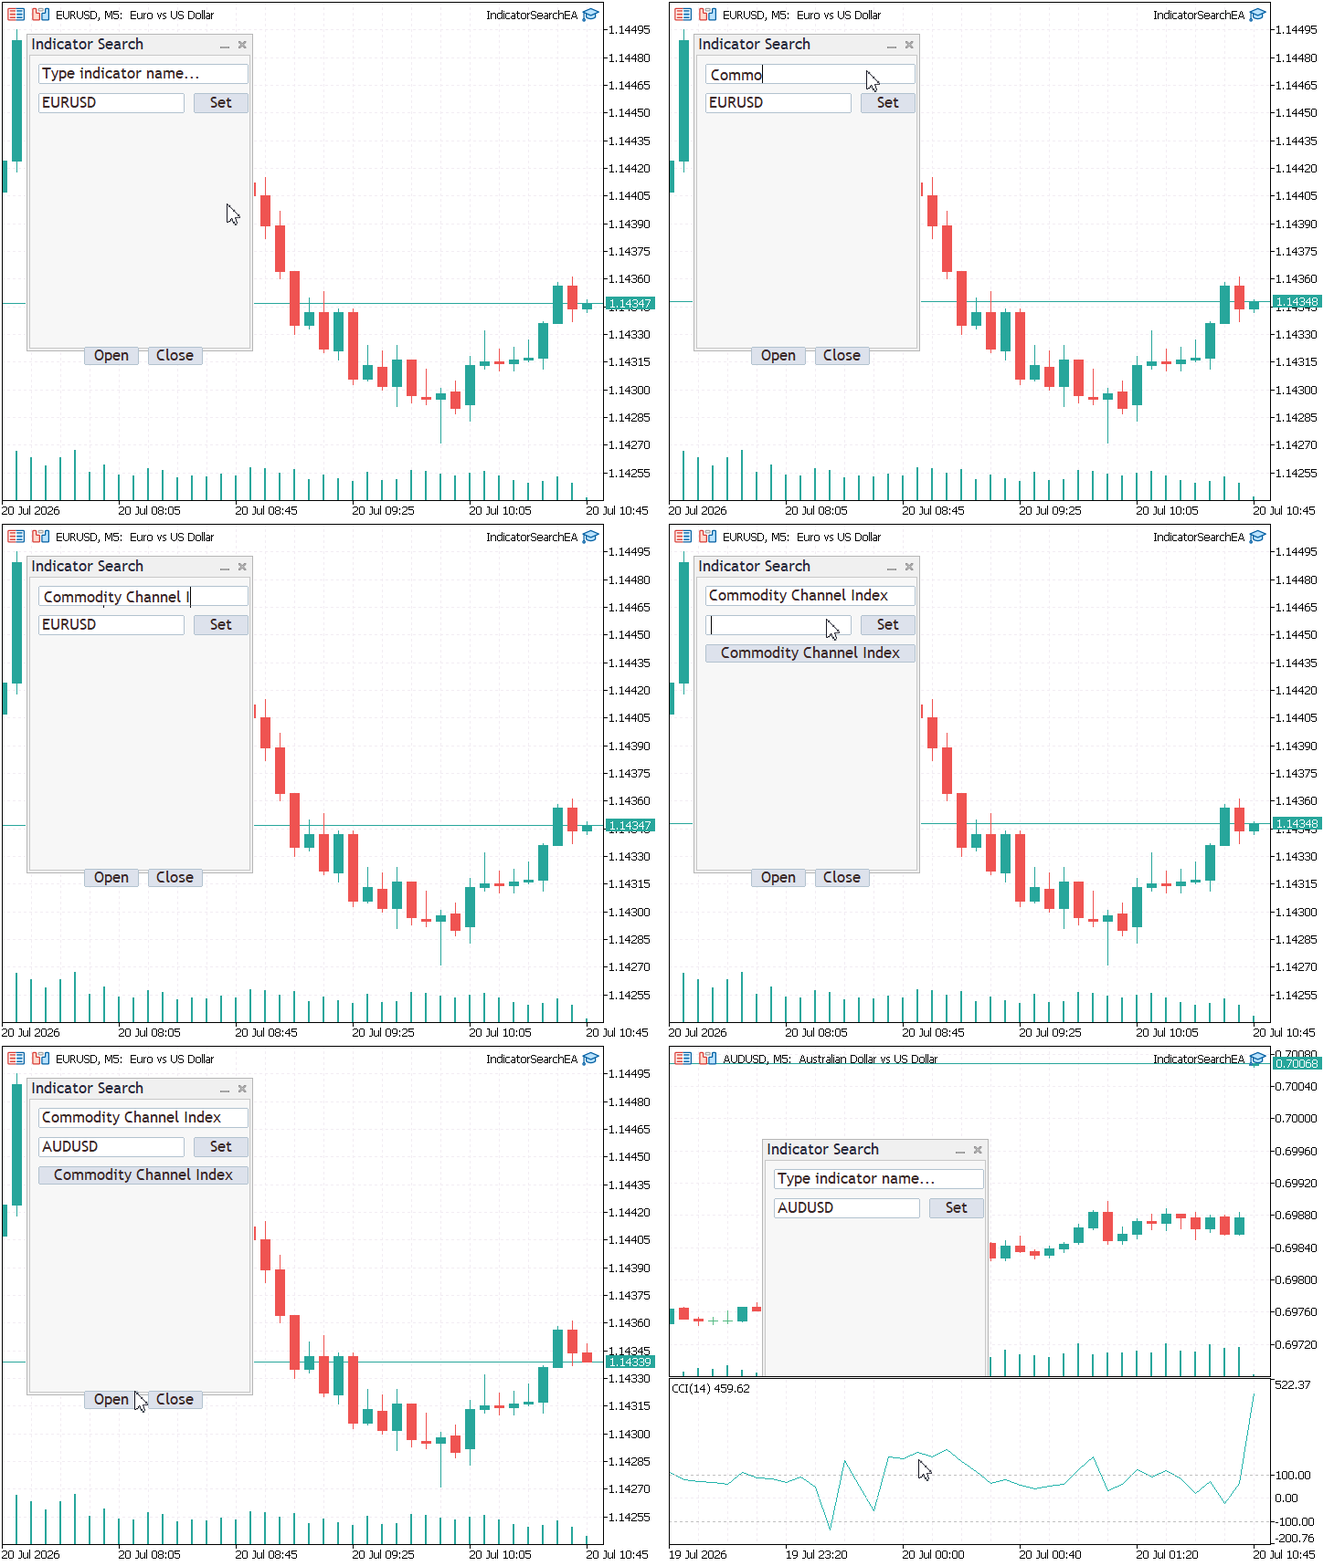
Figure 1: Selecting a different symbol before launching an indicator.
Traders rarely use indicators with their default settings. A Moving Average period may need to be increased, the averaging method changed from SMA to EMA, the applied price switched from Close to Typical Price, or the Bollinger Bands deviation adjusted. These small changes are often necessary before meaningful analysis can begin.
Whenever different settings were required, the process remained the same:
- Search for the indicator.
- Attach it to the chart.
- Open its properties.
- Modify the input parameters.
- Apply the changes.
Although the search panel had simplified the first part of this process, parameter configuration still relied on MetaTrader 5's built-in properties window. This meant leaving the panel each time an indicator needed anything other than its default settings.
That naturally raised a simple question:
Why not configure the indicator before attaching it?
This question became the motivation for this enhancement. Instead of attaching an indicator first and editing it afterwards, the goal is to present its configurable inputs immediately after it is selected. Once the parameters are confirmed, the indicator can be created using those values, keeping the entire process within the same interface.
Designing the Configuration Workflow
Instead of attaching an indicator straight away, we first present its configurable inputs. Once the required values have been entered, the indicator is created using those settings, removing the extra step of editing its properties afterwards.
The figure below illustrate how the workflow changes.
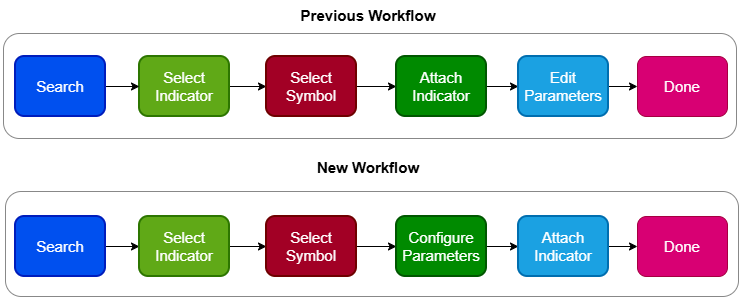
Figure 2. Previous vs. New Workflow
Designing a Metadata-Driven Parameter System
Why We Need a Parameter Definition Model
Every built-in indicator accepts a different set of input parameters. RSI requires a period and an applied price, Moving Average adds a shift and averaging method, while Bollinger Bands introduce a deviation value. Other indicators, such as Awesome Oscillator, do not require any configurable inputs.
Table 1:
| Indicator | Required Parameters |
|---|---|
| RSI | Period, Applied Price |
| Moving Average | Period, Shift, MA Method, Applied Price |
| Bollinger Bands | Period, Deviation, Shift, Applied Price |
| Awesome Oscillator | None |
Building a separate dialog for every indicator would duplicate the same logic repeatedly. The labels and controls may differ, but the process remains identical: display the inputs, collect user values, validate them, and pass them to IndicatorCreate(). Each input parameter is described by a single structure. The dialog reads these definitions and builds the required controls at runtime. This allows one interface to support all indicators.
//+------------------------------------------------------------------+
//|                                         ParameterDefinitions.mqh |
//|                                  Copyright 2026, MetaQuotes Ltd. |
//|                          https://www.mql5.com/en/users/lynnchris |
//+------------------------------------------------------------------+
#property copyright "Copyright 2026, MetaQuotes Ltd."
#property link      "https://www.mql5.com/en/users/lynnchris"
#property version   "3.0"

#ifndef _PARAMETER_DEFINITIONS_MQH
#define _PARAMETER_DEFINITIONS_MQH

#include <Indicators\Indicators.mqh>

//--- Parameter type enumeration
enum ENUM_PARAM_TYPE
  {
   PARAM_INTEGER,
   PARAM_DOUBLE,
   PARAM_ENUM
  };

//--- Structure describing a single parameter
struct SParameterDef
  {
   string            name;
   ENUM_PARAM_TYPE   type;
   int               default_int;
   double            default_double;
   int               default_enum;
   int               min_value;
   int               max_value;
   string            enum_values[];
   int               enum_codes[];
   string            description;
  };
Each member describes one characteristic of a parameter.
Table 2:
| Member | Purpose |
|---|---|
| name | Parameter name displayed in the dialog. |
| type | Integer, double, or enumeration. |
| default_int | Default integer value. |
| default_double | Default double value. |
| default_enum | Default enumeration value. |
| min_value / max_value | Integer validation limits. |
| enum_values | Text shown for enumeration choices. |
| enum_codes | MetaTrader 5 enumeration values passed to IndicatorCreate(). |
| description | Optional description of the parameter. |
Parameter types are represented by the following enumeration.
//--- Parameter type enumeration
enum ENUM_PARAM_TYPE
  {
   PARAM_INTEGER,   // integer (whole number) value
   PARAM_DOUBLE,    // double value
   PARAM_ENUM       // enumeration (e.g., MA method, applied price)
  };
Enumeration parameters require both display text and the corresponding MetaTrader 5 enumeration values. Rather than defining these lists repeatedly, helper functions populate them whenever they are needed.
For example, applied price options are defined once and reused by every indicator that accepts an applied price.
//+------------------------------------------------------------------+
//| Helper to fill an SParameterDef with applied price enum values   |
//+------------------------------------------------------------------+
void AddPriceEnums(SParameterDef &def)
  {
//--- 6 possible applied price options
   ArrayResize(def.enum_values, 6);
   ArrayResize(def.enum_codes, 6);
   def.enum_values[0] = "Close";
   def.enum_codes[0] = PRICE_CLOSE;
   def.enum_values[1] = "Open";
   def.enum_codes[1] = PRICE_OPEN;
   def.enum_values[2] = "High";
   def.enum_codes[2] = PRICE_HIGH;
   def.enum_values[3] = "Low";
   def.enum_codes[3] = PRICE_LOW;
   def.enum_values[4] = "Median";
   def.enum_codes[4] = PRICE_MEDIAN;
   def.enum_values[5] = "Typical";
   def.enum_codes[5] = PRICE_TYPICAL;
  }
Moving average methods are handled in the same way.
//+------------------------------------------------------------------+
//| Helper to fill an SParameterDef with MA method enum values       |
//+------------------------------------------------------------------+
void AddMAMethodEnums(SParameterDef &def)
  {
//--- 4 standard moving average methods
   ArrayResize(def.enum_values, 4);
   ArrayResize(def.enum_codes, 4);
   def.enum_values[0] = "SMA";
   def.enum_codes[0] = MODE_SMA;
   def.enum_values[1] = "EMA";
   def.enum_codes[1] = MODE_EMA;
   def.enum_values[2] = "SMMA";
   def.enum_codes[2] = MODE_SMMA;
   def.enum_values[3] = "LWMA";
   def.enum_codes[3] = MODE_LWMA;
  }
This approach keeps the parameter definitions focused on the indicator itself instead of repeatedly defining the same enumeration values.

Figure 3. Parameter Configuration Architecture
The next step is to organize these parameter definitions so they can be retrieved for any built-in indicator.
Creating a Repository of Indicator Parameter Definitions
Building the Parameter Repository
The parameter model defines how a single input is described, but we also need a way to determine which inputs belong to each built-in indicator. To achieve this, we introduce the CParameterDefinitions class, which exposes a single static function for retrieving an indicator's parameter definitions.
class CParameterDefinitions
  {
public:
   static int GetDefinitions(const ENUM_INDICATOR type,
                             SParameterDef &defs[]);
  };
GetDefinitions() takes an ENUM_INDICATOR value and fills an array of SParameterDef definitions. It returns the number of configurable parameters for that indicator.
Implementing GetDefinitions()
The implementation starts by clearing the output array before processing the requested indicator.
//+------------------------------------------------------------------+
//| Returns the parameter definition array for the indicator type    |
//+------------------------------------------------------------------+
int CParameterDefinitions::GetDefinitions(const ENUM_INDICATOR type,
                                          SParameterDef &defs[])
  {
   ArrayResize(defs, 0);
   int count = 0;

//--- Each indicator defines its own configurable parameters
   switch(type)
     {
      // ... indicator cases ...
     }

   return(count);
  }
The switch statement maps each supported indicator to its corresponding parameter definitions. Each case specifies the inputs required by an indicator, including their names, data types, default values, validation ranges, and enumeration options where applicable.
Moving Average (4 Parameters)
A Moving Average exposes four configurable inputs: the averaging period, shift, moving average method, and applied price.
//--- Moving Average – 4 parameters
case IND_MA:
   ArrayResize(defs, 4);

   defs[0].name = "Period";
   defs[0].type = PARAM_INTEGER;
   defs[0].default_int = 10;
   defs[0].min_value = 1;
   defs[0].max_value = 1000;

   defs[1].name = "Shift";
   defs[1].type = PARAM_INTEGER;
   defs[1].default_int = 0;
   defs[1].min_value = -100;
   defs[1].max_value = 100;

   defs[2].name = "MA Method";
   defs[2].type = PARAM_ENUM;
   defs[2].default_enum = MODE_SMA;
   AddMAMethodEnums(defs[2]);

   defs[3].name = "Applied Price";
   defs[3].type = PARAM_ENUM;
   defs[3].default_enum = PRICE_CLOSE;
   AddPriceEnums(defs[3]);

   count = 4;
   break;
RSI (2 Parameters)
The Relative Strength Index requires only two configurable inputs: the calculation period and the applied price.
//--- RSI – 2 parameters
case IND_RSI:
   ArrayResize(defs, 2);

   defs[0].name = "Period";
   defs[0].type = PARAM_INTEGER;
   defs[0].default_int = 14;
   defs[0].min_value = 1;
   defs[0].max_value = 1000;

   defs[1].name = "Applied Price";
   defs[1].type = PARAM_ENUM;
   defs[1].default_enum = PRICE_CLOSE;
   AddPriceEnums(defs[1]);

   count = 2;
   break;
Bollinger Bands (4 Parameters)
Bollinger Bands combines integer, double, and enumeration inputs to define its behavior.
//--- Bollinger Bands – 4 parameters
case IND_BANDS:
   ArrayResize(defs, 4);

   defs[0].name = "Period";
   defs[0].type = PARAM_INTEGER;
   defs[0].default_int = 20;
   defs[0].min_value = 1;
   defs[0].max_value = 1000;

   defs[1].name = "Deviation";
   defs[1].type = PARAM_DOUBLE;
   defs[1].default_double = 2.0;

   defs[2].name = "Shift";
   defs[2].type = PARAM_INTEGER;
   defs[2].default_int = 0;
   defs[2].min_value = -100;
   defs[2].max_value = 100;

   defs[3].name = "Applied Price";
   defs[3].type = PARAM_ENUM;
   defs[3].default_enum = PRICE_CLOSE;
   AddPriceEnums(defs[3]);

   count = 4;
   break;
Indicators with No Configurable Parameters
Some built-in indicators do not expose configurable inputs. For these, the function returns a parameter count of zero, allowing the application to bypass the configuration dialog and attach the indicator immediately.
//--- Zero‑parameter indicators – no configurable parameters
case IND_AO:
case IND_AC:
case IND_AD:
case IND_OBV:
case IND_BWMFI:
case IND_GATOR:
case IND_VOLUMES:
case IND_FRACTALS:
   count = 0;
   break;
Supported Indicator Definitions
The complete ParameterDefinitions.mqh file contains definitions for more than thirty built-in indicators. Table 3 summarizes the indicators currently supported by the repository.
Table 3:
| Indicators | Parameters | Count |
|---|---|---|
| Moving Average (MA) | Period, Shift, Method, Price | 4 |
| RSI | Period, Price | 2 |
| MACD | Fast, Slow, Signal, Price | 4 |
| Bollinger Bands | Period, Deviation, Shift, Price | 4 |
| Stochastic | %K, %D, Slowing, Method, Price | 5 |
| ADX / ADXW / ATR | Period | 1 |
| CCI | Period, Price | 2 |
| Momentum / TRIX | Period, Price | 2 |
| WPR / DeMarker | Period | 1 |
| Envelopes | Period, Shift, Method, Price, Deviation | 5 |
| Ichimoku | Tenkan, Kijun, Senkou B, Chikou, Offset | 5 |
| SAR | Step, Maximum Step | 2 |
| Alligator | Jaw, Teeth, Lips (Periods and Shifts) | 6 |
| DEMA / TEMA | Period, Shift, Method, Price | 4 |
| VIDYA | Period, Volatility, Price | 3 |
| AMA | Period, Fast, Slow, Efficiency, Price | 5 |
| Force Index | Period, Method, Volume | 3 |
| RVI | Period, Method | 2 |
| OSMA | Fast, Slow, Signal, Price | 4 |
| Chaikin | Fast, Slow, Method, Volume | 4 |
| Bears Power / Bulls Power | Period, Price | 2 |
| Standard Deviation | Period, Shift, Price | 3 |
| MFI | Period, Volume | 2 |
| AO / AC / AD / OBV / BWMFI / GATOR / Volumes / Fractals | None | 0 |
All indicator-specific information is now maintained in one place. Whenever the search panel needs to configure an indicator, it simply calls GetDefinitions() to retrieve the corresponding metadata.
Building the Parameter Configuration Dialog
The parameter definitions tell us which inputs belong to an indicator, but users still need a way to review and modify those values before the indicator is attached to the chart. Instead of creating a separate dialog for every built-in indicator, we build a single dialog that adapts itself according to the parameter definitions returned by GetDefinitions().
The same dialog can configure indicators with different numbers and types of inputs. Whether an indicator has one parameter or several, the dialog builds the required interface dynamically from the available metadata.
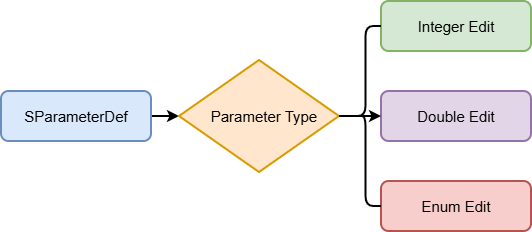
Figure 4. Dynamic Dialog Generation
The dialog is implemented by the CParameterConfigDialog class.
//+------------------------------------------------------------------+ //| Parameter configuration dialog – shows editable parameter fields | //+------------------------------------------------------------------+ class CParameterConfigDialog : public CAppDialog { private: //--- Layout constants (spacing and control sizes) enum { MARGIN=10, LABEL_WIDTH=120, CONTROL_WIDTH=150, CONTROL_HEIGHT=22, ROW_HEIGHT=28 }; //--- Dynamic control arrays (one set per parameter) CLabel m_labels[]; CEdit m_editInt[]; CEdit m_editDouble[]; CEdit m_editEnum[]; SParameterDef m_defs[]; int m_paramCount; ENUM_INDICATOR m_indicatorType; string m_targetSymbol; CSearchPanel *m_parentPanel; CButton m_btnOK; CButton m_btnCancel; void BuildControls(); void ReadValues(MqlParam ¶ms[]); bool ValidateValues(); public: CParameterConfigDialog(); ~CParameterConfigDialog(); bool Create(const long chart, const string name, const ENUM_INDICATOR indicatorType); void SetIndicatorInfo(const ENUM_INDICATOR type, const string symbol); void SetParentPanel(CSearchPanel *parent) { m_parentPanel = parent; } void DetachParent() { m_parentPanel = NULL; } void CloseDialog(); virtual bool OnEvent(const int id, const long &lparam, const double &dparam, const string &sparam); void ChartEvent(const int id, const long &lparam, const double &dparam, const string &sparam); bool IsVisible() const { return CAppDialog::IsVisible(); } void DestroyControls(); };
The dialog stores its labels and edit boxes in dynamic arrays. The arrays are resized according to the number of parameter definitions returned for the selected indicator, allowing the same implementation to support indicators with different input requirements.
Separate edit arrays are maintained for integer, double, and enumeration values. This keeps each parameter type independent while allowing every control to be initialized using its corresponding default value.
The dialog also stores the selected indicator type, the target symbol, and a pointer to the parent search panel. These members are used later when the configured parameters are validated and the indicator is attached to the chart.
The dialog is created via Create(). The function retrieves parameter definitions, calculates the dialog size, builds the controls, and adds OK/Cancel buttons.
Creating the Controls Dynamically
Once the dialog has been created, the BuildControls() function constructs the interface using the parameter definitions returned by GetDefinitions(). It begins by resizing the control arrays so that one set of controls is available for each parameter.
//+------------------------------------------------------------------+
//| Builds the parameter controls (labels + edit boxes)              |
//+------------------------------------------------------------------+
void CParameterConfigDialog::BuildControls()
  {
   if(m_paramCount == 0)
      return;

//--- Resize control arrays to match the number of parameters
   ArrayResize(m_labels, m_paramCount);
   ArrayResize(m_editInt, m_paramCount);
   ArrayResize(m_editDouble, m_paramCount);
   ArrayResize(m_editEnum, m_paramCount);

   int yPos = MARGIN + 10;

   for(int i = 0; i < m_paramCount; i++)
     {
      //--- Create a label for the parameter name
      if(!m_labels[i].Create(0, "lbl" + IntegerToString(i), 0, MARGIN, yPos, MARGIN + LABEL_WIDTH, yPos + CONTROL_HEIGHT))
         continue;
      if(!Add(m_labels[i]))
         continue;
      m_labels[i].Text(m_defs[i].name);

      //--- Create the appropriate edit control based on parameter type
      switch(m_defs[i].type)
        {
         case PARAM_INTEGER:
           {
            //--- Simple edit box for integer values
            if(!m_editInt[i].Create(0, "edt" + IntegerToString(i), 0, MARGIN + LABEL_WIDTH + 5, yPos,
                                    MARGIN + LABEL_WIDTH + 5 + CONTROL_WIDTH, yPos + CONTROL_HEIGHT))
               break;
            if(!Add(m_editInt[i]))
               break;
            m_editInt[i].Text(IntegerToString(m_defs[i].default_int));
            break;
           }
         case PARAM_DOUBLE:
           {
            //--- Edit box for double values
            if(!m_editDouble[i].Create(0, "edtd" + IntegerToString(i), 0, MARGIN + LABEL_WIDTH + 5, yPos,
                                       MARGIN + LABEL_WIDTH + 5 + CONTROL_WIDTH, yPos + CONTROL_HEIGHT))
               break;
            if(!Add(m_editDouble[i]))
               break;
            m_editDouble[i].Text(DoubleToString(m_defs[i].default_double, 2));
            break;
           }
         case PARAM_ENUM:
           {
            //--- Enum parameters use a simple edit box where the user types the value name
            //--- (We avoid combo box because of event handling differences across MT5 builds)
            if(!m_editEnum[i].Create(0, "ede" + IntegerToString(i), 0, MARGIN + LABEL_WIDTH + 5, yPos,
                                     MARGIN + LABEL_WIDTH + 5 + CONTROL_WIDTH, yPos + CONTROL_HEIGHT))
               break;
            if(!Add(m_editEnum[i]))
               break;
            //--- Set the default text from the enum definition
            string defaultText = "";
            for(int j = 0; j < ArraySize(m_defs[i].enum_values); j++)
              {
               if(m_defs[i].enum_codes[j] == m_defs[i].default_enum)
                 {
                  defaultText = m_defs[i].enum_values[j];
                  break;
                 }
              }
            m_editEnum[i].Text(defaultText);
            break;
           }
        }
      yPos += ROW_HEIGHT;
     }
  }
For every parameter, the function first creates a label using the display name stored in the parameter definition. After creating the label, the function determines which edit control should be displayed according to the parameter type.
Each control is initialized with the default value stored in the corresponding SParameterDef structure. Integer parameters display their default integer values, double parameters display their default decimal values, while enumeration parameters display the default enumeration name rather than its underlying numeric code.
Because the controls are generated from metadata, the dialog remains independent of any particular indicator.
Reading and Validating User Input
The configuration dialog displays editable controls for every parameter, but the entered values cannot be passed directly to IndicatorCreate(). The MQL5 API expects every input to be supplied as an array of MqlParam structures, with each element containing the correct data type and value.
The dialog therefore performs two tasks before an indicator is attached:
- It converts the contents of the controls into an MqlParam array.
- It validates the entered values before they are passed to IndicatorCreate().
Converting Control Values into MqlParam Objects
The conversion is performed by the ReadValues() function. It reads every control created by the dialog, converts its contents according to the parameter definition, and stores the result in an MqlParam array.
//+------------------------------------------------------------------+ //| Reads the values from the controls into a MqlParam array | //+------------------------------------------------------------------+ void CParameterConfigDialog::ReadValues(MqlParam ¶ms[]) { ArrayResize(params, m_paramCount); for(int i = 0; i < m_paramCount; i++) { switch(m_defs[i].type) { case PARAM_INTEGER: params[i].type = TYPE_INT; params[i].integer_value = (int)StringToInteger(m_editInt[i].Text()); break; case PARAM_DOUBLE: params[i].type = TYPE_DOUBLE; params[i].double_value = StringToDouble(m_editDouble[i].Text()); break; case PARAM_ENUM: { //--- Match the typed text to one of the enum values string text = m_editEnum[i].Text(); int foundCode = m_defs[i].default_enum; for(int j = 0; j < ArraySize(m_defs[i].enum_values); j++) { if(StringCompare(m_defs[i].enum_values[j], text, false) == 0) { foundCode = m_defs[i].enum_codes[j]; break; } } params[i].type = TYPE_INT; params[i].integer_value = foundCode; break; } } } }
The conversion performed depends on the parameter type:
- Integer parameters are converted using StringToInteger() and stored as TYPE_INT.
- Double parameters are converted using StringToDouble() and stored as TYPE_DOUBLE.
Enumeration parameters require an additional lookup. Although the user enters a readable value such as EMA, LWMA, or Close, IndicatorCreate() expects the corresponding enumeration constant. The function searches the available enumeration definitions, retrieves the matching code, and stores that numeric value in the parameter array.
After the loop completes, every configured input has been converted into the format required by IndicatorCreate().
Validating the Input Values
Before the parameter array is used, the dialog verifies that the entered values satisfy the constraints defined in the parameter metadata. This prevents invalid input from being passed to the indicator creation routine.
The validation is implemented in the ValidateValues() function.
//+------------------------------------------------------------------+
//| Validates integer values (range check)                           |
//+------------------------------------------------------------------+
bool CParameterConfigDialog::ValidateValues()
  {
   for(int i = 0; i < m_paramCount; i++)
     {
      switch(m_defs[i].type)
        {
         case PARAM_INTEGER:
           {
            int val = (int)StringToInteger(m_editInt[i].Text());
            if(val < m_defs[i].min_value || val > m_defs[i].max_value)
              {
               Print("Invalid value for ", m_defs[i].name, ": ", val);
               return(false);
              }
            break;
           }
         default:
            break;
        }
     }
   return(true);
  }
For integer parameters, the entered value is compared with the minimum and maximum limits defined in the corresponding SParameterDef structure. If the value falls outside the permitted range, the function reports the error and immediately returns false. Otherwise, the validation continues until every parameter has been checked successfully.
Extending the Chart Launcher
The configuration dialog now produces a validated MqlParam array containing the values entered by the user. The remaining task is to pass those values to IndicatorCreate() when attaching the selected indicator.
Our existing chart launcher already knows how to open charts, determine the correct destination window, and attach indicators. However, it always builds its own default parameters internally. To support user-defined settings without affecting the existing functionality, we overload the AttachIndicator() function.
Attaching an Indicator with Custom Parameters
The new overload accepts an additional MqlParam array. Apart from creating the indicator with the supplied parameters, the remaining workflow is identical to the original implementation.
//+------------------------------------------------------------------+ //| Attaches an indicator with custom parameters | //+------------------------------------------------------------------+ bool AttachIndicator(const ENUM_INDICATOR type, const string symbol, const MqlParam ¶ms[]) { string targetSymbol = (symbol == "") ? Symbol() : symbol; if(!SymbolSelect(targetSymbol, true)) return(false); int bars = BarsAvailable(targetSymbol, PERIOD_CURRENT); if(bars < 10) return(false); long chartId = FindOrOpenChart(targetSymbol); if(chartId == -1) return(false); //--- Use the provided parameter array instead of building defaults int paramCount = ArraySize(params); int handle = IndicatorCreate(targetSymbol, PERIOD_CURRENT, type, paramCount, params); if(handle == INVALID_HANDLE) return(false); int window = GetTargetWindow(type); if(!ChartIndicatorAdd(chartId, window, handle)) { IndicatorRelease(handle); return(false); } ChartRedraw(chartId); Print("Indicator ", EnumToString(type), " attached to ", targetSymbol, " using custom parameters"); return(true); }
The same sequence used by the original launcher is followed:
- Verify that the selected symbol is available.
- Ensure sufficient historical data has been loaded.
- Locate an existing chart or open a new one.
- Create the indicator handle.
- Attach the indicator to the appropriate chart window.
- Refresh the chart.
The only difference is how the indicator handle is created. Rather than constructing a predefined parameter list, the function passes the MqlParam array generated by the configuration dialog directly to IndicatorCreate(). This allows every configurable value entered by the user to be applied during indicator creation.
Keeping the original overload unchanged also preserves backward compatibility. Indicators that do not expose configurable parameters continue to use the existing implementation with default values, while configurable indicators use the new overload. Both approaches share the same chart management logic, avoiding code duplication while extending the launcher with parameter support.
Integrating the Parameter Dialog into the Search Panel
The search panel is responsible for handling indicator selection. In the previous articles, selecting an indicator immediately called AttachIndicator(). With the introduction of configurable parameters, the panel first determines whether the selected indicator requires user input before it can be created.
This behavior is implemented inside CSearchPanel::OpenSelected().
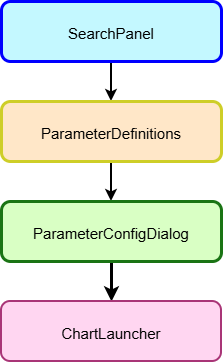
Figure 5. Relationship Between Components
Opening the Configuration Dialog
Execution begins by validating the selected item and retrieving the corresponding indicator type. Before creating a new dialog, it also ensures that any previously opened dialog has been removed.
//+------------------------------------------------------------------+
//| Opens the selected indicator (launches parameter dialog)         |
//+------------------------------------------------------------------+
void CSearchPanel::OpenSelected(int index)
  {
   if(index < 0 || index >= ArraySize(m_filtered))
      return;

//--- If a previous parameter dialog is still open, close it first
   if(g_paramDialog != NULL)
     {
      g_paramDialog.DetachParent();
      delete g_paramDialog;
      g_paramDialog = NULL;
     }

   string symbol = m_targetSymbol;
   if(symbol == "")
      symbol = Symbol();

   ENUM_INDICATOR type = m_filtered[index].type;

//--- Check if this indicator has configurable parameters
   SParameterDef defs[];
   int paramCount = CParameterDefinitions::GetDefinitions(type, defs);

   if(paramCount > 0)
     {
      //--- Launch the parameter configuration dialog
      Print("Launching parameter configuration dialog for ", m_filtered[index].name);
      //--- Hide the main panel while the dialog is open
      Hide();

      CParameterConfigDialog *dlg = new CParameterConfigDialog();
      if(!dlg.Create(0, "Configure Indicator", type))
        {
         //--- Dialog creation failed – fall back to default parameters
         Print("Dialog creation failed – using defaults");
         delete dlg;
         ShowPanel();
         AttachIndicator(type, symbol);
         return;
        }

      //--- Pass the parent panel pointer so the dialog can re‑show it on close
      dlg.SetParentPanel(GetPointer(this));
      dlg.SetIndicatorInfo(type, symbol);
      g_paramDialog = dlg;
      dlg.Show();
     }
   else
     {
      //--- No parameters – attach directly with defaults
      AttachIndicator(type, symbol);
     }
  }
The first decision is made by calling GetDefinitions(). If the selected indicator has one or more configurable parameters, the search panel creates a CParameterConfigDialog and temporarily hides itself. The dialog receives both the selected indicator and the target symbol before being displayed.
Indicators without configurable parameters follow the original workflow. Since there is nothing for the user to modify, they are attached immediately using the existing launcher.
Both workflows coexist without requiring separate implementations.
Returning to the Search Panel
After the user finishes configuring the indicator, the dialog closes and returns control to the search panel. Instead of destroying the dialog immediately, the application simply hides it and restores the main panel.
//+------------------------------------------------------------------+
//| Closes the parameter dialog                                      |
//+------------------------------------------------------------------+
void CParameterConfigDialog::CloseDialog()
  {
   if(m_parentPanel != NULL)
      m_parentPanel.ShowPanel();

   g_paramDialog = NULL;
   Hide();
  }
Using Hide() keeps the Expert Advisor running while allowing the dialog to disappear from view. The main search panel becomes available again, enabling another indicator to be selected without restarting the application.
By integrating the parameter dialog into OpenSelected(), the search panel controls the entire indicator launch process in one place. Whether an indicator requires configuration or not, the user follows the same sequence—search, select the symbol, choose the indicator, and continue from there—while the application automatically determines the appropriate path.
Testing
To verify the implementation, I tested the enhanced indicator search panel on a live chart using several built-in indicators. The objective was to confirm that the complete workflow—from selecting a target symbol to attaching an indicator with custom parameters—operated as intended.

Figure 6. Testing the enhanced system
In this demonstration, I searched for the Parabolic SAR indicator before selecting EURUSD as the target symbol. After selecting the indicator, the parameter configuration dialog was displayed, allowing the Step and Maximum Step values to be reviewed before creating the indicator. Once the parameters were confirmed, the indicator was successfully attached to the EURUSD chart using the specified settings.
This test also confirmed that the entire process is completed within the search panel. The parameter dialog opens only when required, the configured values are passed correctly to IndicatorCreate(), and the search panel is restored after the dialog is closed without interrupting the running Expert Advisor.
Conclusion
In this article, we extended the indicator search panel by introducing parameter configuration before indicator attachment. The implementation combines a metadata repository, a dynamic configuration dialog, input validation, and MqlParam generation to create indicators using user-defined settings rather than default values.
The result is an indicator launcher that allows traders to search for an indicator, select a target symbol, configure its inputs, and attach it to the chart from a single workflow.
Attachments
| File | File Type | Description |
|---|---|---|
| IndicatorSearchEA.mq5 | Expert Advisor | Main Expert Advisor that creates and manages the indicator search panel. |
| SearchPanel.mqh | Include | Implements the graphical user interface, symbol selection controls, search functionality, and user interactions. |
| ChartLauncher.mqh | Include | Creates indicator handles, switches charts when necessary, and attaches built-in indicators to the selected symbol. |
| SearchEngine.mqh | Include | Performs case-insensitive filtering of the built-in indicator catalog based on the user's search input. |
| IndicatorCatalog.mqh | Include | Stores the catalog of supported built-in indicators and their corresponding ENUM_INDICATOR mappings. |
| ParameterDefinitions.mqh | Include | Defines the metadata for configurable indicator parameters, including names, data types, default values, validation ranges, and enumeration options. |
| ParameterConfigDialog.mqh | Include | Implements the dynamic parameter configuration dialog, validates user input, converts values into MqlParam arrays, and passes the configured parameters to the chart launcher. |
| MQL5.zip | Root Archive | Complete project archive containing all source files arranged in the required MetaTrader 5 directory structure. Extract the archive into the terminal's Data Folder so all files are placed automatically in their correct locations. |
Warning: All rights to these materials are reserved by MetaQuotes Ltd. Copying or reprinting of these materials in whole or in part is prohibited.
This article was written by a user of the site and reflects their personal views. MetaQuotes Ltd is not responsible for the accuracy of the information presented, nor for any consequences resulting from the use of the solutions, strategies or recommendations described.

 Controller Objects for Everything: Draggable Slider Control
 Implementing a Trade Throttle and Rate Limiter in MQL5
 Hypothesis Testing for Trading Strategies — Proving Whether Your Edge is Real
 Larry Williams Market Secrets (Part 17) : Detecting Oops Signals Using a Custom Indicator

- Free trading apps
- Over 8,000 signals for copying
- Economic news for exploring financial markets
You agree to website policy and terms of use