MQL5 Cookbook: 다중 통화 Expert Advisor - 간단하고 깔끔하며 빠른 접근
소개
이 글에서는 다중 통화 Expert Advisor에 적합한 간단한 접근 방식의 구현에 대해 설명합니다. 이는 동일한 조건에서 각 기호에 대해 다른 매개변수를 사용하여 테스트/거래를 위해 Expert Advisor를 설정할 수 있음을 의미합니다. 예를 들어, 필요한 경우 코드를 약간 변경하여 추가 기호를 추가할 수 있는 방식으로 두 개의 기호에 대한 패턴을 만들 것입니다.
다중 통화 패턴은 여러 가지 방법으로 MQL5에서 구현될 수 있습니다.
Expert Advisor가 시간에 따라 안내되는 패턴을 사용할 수 있으므로 OnTimer() 함수에 지정된 시간 간격으로 보다 정확한 검사를 수행할 수 있습니다.
또는 시리즈의 이전 글에서 소개된 모든 Expert Advisors에서와 같이 OnTick() 함수에서 검사를 수행할 수 있습니다. 이 경우 Expert Advisor는 현재 적용되는 현재 기호의 틱에 의존합니다. 따라서 다른 기호에 완료된 바가 있지만 현재 기호에 대한 틱이 아직 없는 경우 Expert Advisor는 현재 기호에 대한 새 틱이 있는 경우에만 확인을 수행합니다.
저자 Konstantin Gruzdev(Lizar)가 제안한 또 다른 흥미로운 옵션이 있습니다. 이벤트 모델을 사용합니다. OnChartEvent() 함수를 사용하여 Expert Advisor는 테스트/거래와 관련된 기호 차트에 있는 지표 에이전트에 의해 재현되는 이벤트를 가져옵니다. 표시 에이전트는 연결된 기호의 새 바 및 틱 이벤트를 재현할 수 있습니다. 이러한 종류의 지표(EventsSpy.mq5)는 글 끝부분에서 다운로드할 수 있습니다. Expert Advisor의 운영에 필요합니다.
Expert Advisor 개발
"MQL5 Cookbook: 지표를 사용하여 Expert Advisors에서 거래 조건 설정" 글에 나오는 Expert Advisor가 템플릿 역할을 합니다. 나는 이미 정보 패널과 관련된 모든 것을 삭제하고 이전 글 "MQL5 Cookbook: 트리플 스크린 전략을 기반으로 하는 거래 시스템을 위한 프레임워크 개발"에서 구현된 것처럼 포지션 개시 조건을 단순화했습니다. . 두 개의 기호에 대한 Expert Advisor를 만들려고 하므로 각각 고유한 외부 매개변수 세트가 필요합니다.
//--- External parameters of the Expert Advisor
sinput long   MagicNumber           = 777;      // Magic number
sinput int    Deviation             = 10;       // Slippage
//---
sinput string delimeter_00=""; // --------------------------------
sinput string Symbol_01             = "EURUSD"; // Symbol 1
input  int    IndicatorPeriod_01    = 5;        // |     Indicator period
input  double TakeProfit_01         = 100;      // |     Take Profit
input  double StopLoss_01           = 50;       // |     Stop Loss
input  double TrailingStop_01       = 10;       // |     Trailing Stop
input  bool   Reverse_01            = true;     // |     Position reversal
input  double Lot_01                = 0.1;      // |     Lot
input  double VolumeIncrease_01     = 0.1;      // |     Position volume increase
input  double VolumeIncreaseStep_01 = 10;       // |     Volume increase step
//---
sinput string delimeter_01=""; // --------------------------------
sinput string Symbol_02             = "NZDUSD"; // Symbol 2
input  int    IndicatorPeriod_02    = 5;        // |     Indicator period
input  double TakeProfit_02         = 100;      // |     Take Profit
input  double StopLoss_02           = 50;       // |     Stop Loss
input  double TrailingStop_02       = 10;       // |     Trailing Stop
input  bool   Reverse_02            = true;     // |     Position reversal
input  double Lot_02                = 0.1;      // |     Lot
input  double VolumeIncrease_02     = 0.1;      // |     Position volume increase
input  double VolumeIncreaseStep_02 = 10;       // |     Volume increase step
외부 매개변수는 사용되는 기호 수에 따라 크기가 달라지는 배열에 배치됩니다. Expert Advisor에 사용되는 기호 수는 파일 시작 부분에 생성해야 하는 NUMBER_OF_SYMBOLS 상수 값에 따라 결정됩니다.
//--- Number of traded symbols
#define NUMBER_OF_SYMBOLS 2
//--- Name of the Expert Advisor
#define EXPERT_NAME MQL5InfoString(MQL5_PROGRAM_NAME)
외부 매개변수를 저장하는 데 필요한 배열을 생성해 보겠습니다.
//--- Arrays for storing external parameters
string Symbols[NUMBER_OF_SYMBOLS];            // Symbol
int    IndicatorPeriod[NUMBER_OF_SYMBOLS];    // Indicator period
double TakeProfit[NUMBER_OF_SYMBOLS];         // Take Profit
double StopLoss[NUMBER_OF_SYMBOLS];           // Stop Loss
double TrailingStop[NUMBER_OF_SYMBOLS];       // Trailing Stop
bool   Reverse[NUMBER_OF_SYMBOLS];            // Position reversal
double Lot[NUMBER_OF_SYMBOLS];                // Lot
double VolumeIncrease[NUMBER_OF_SYMBOLS];     // Position volume increase
double VolumeIncreaseStep[NUMBER_OF_SYMBOLS]; // Volume increase step
배열 초기화 함수는 포함 InitArrays.mqh 파일에 배치됩니다. Symbols[] 배열을 초기화하기 위해 GetSymbol() 함수를 생성합니다. 외부 매개변수에서 기호 이름을 가져오고 해당 기호가 서버의 기호 목록에 있으면 Market Watch 창에서 선택됩니다. 또는 서버에서 필요한 기호를 찾을 수 없는 경우 함수는 빈 문자열을 반환하고 Journal of Expert Advisors는 그에 따라 업데이트됩니다.
다음은 GetSymbol() 함수 코드입니다.
//+------------------------------------------------------------------+
//| Adding the specified symbol to the Market Watch window           |
//+------------------------------------------------------------------+
string GetSymbolByName(string symbol)
  {
   string symbol_name="";   // Symbol name on the server
//--- If an empty string is passed, return the empty string
   if(symbol=="")
      return("");
//--- Iterate over the list of all symbols on the server
   for(int s=0; s<SymbolsTotal(false); s++)
     {
      //--- Get the symbol name
      symbol_name=SymbolName(s,false);
      //--- If the required symbol is available on the server
      if(symbol==symbol_name)
        {
         //--- Select it in the Market Watch window
         SymbolSelect(symbol,true);
         //--- Return the symbol name
         return(symbol);
        }
     }
//--- If the required symbol cannot be found, return the empty string
   Print("The "+symbol+" symbol could not be found on the server!");
   return("");
  }
Symbols[] 배열은 GetSymbols() 함수에서 초기화됩니다.
//+------------------------------------------------------------------+
//| Filling the array of symbols                                     |
//+------------------------------------------------------------------+
void GetSymbols()
  {
   Symbols[0]=GetSymbolByName(Symbol_01);
   Symbols[1]=GetSymbolByName(Symbol_02);
  }
또한 특정 기호의 외부 매개변수에 빈 값이 있으면 해당 블록이 테스트/거래에 참여하지 않음을 나타내는 방식으로 구현할 것입니다. 이것은 나머지를 완전히 배제하면서 각 기호에 대한 매개변수를 개별적으로 최적화할 수 있도록 하기 위해 필요합니다.
외부 매개변수의 다른 모든 배열은 동일한 방식으로 초기화됩니다. 즉, 각 배열에 대해 별도의 함수를 생성해야 합니다. 이러한 모든 기능의 코드는 다음과 같습니다.
//+------------------------------------------------------------------+
//| Filling the indicator period array                               |
//+------------------------------------------------------------------+
void GetIndicatorPeriod()
  {
   IndicatorPeriod[0]=IndicatorPeriod_01;
   IndicatorPeriod[1]=IndicatorPeriod_02;
  }
//+------------------------------------------------------------------+
//| Filling the Take Profit array                                    |
//+------------------------------------------------------------------+
void GetTakeProfit()
  {
   TakeProfit[0]=TakeProfit_01;
   TakeProfit[1]=TakeProfit_02;
  }
//+------------------------------------------------------------------+
//| Filling the Stop Loss array                                      |
//+------------------------------------------------------------------+
void GetStopLoss()
  {
   StopLoss[0]=StopLoss_01;
   StopLoss[1]=StopLoss_02;
  }
//+------------------------------------------------------------------+
//| Filling the Trailing Stop array                                  |
//+------------------------------------------------------------------+
void GetTrailingStop()
  {
   TrailingStop[0]=TrailingStop_01;
   TrailingStop[1]=TrailingStop_02;
  }
//+------------------------------------------------------------------+
//| Filling the Reverse array                                        |
//+------------------------------------------------------------------+
void GetReverse()
  {
   Reverse[0]=Reverse_01;
   Reverse[1]=Reverse_02;
  }
//+------------------------------------------------------------------+
//| Filling the Lot array                                            |
//+------------------------------------------------------------------+
void GetLot()
  {
   Lot[0]=Lot_01;
   Lot[1]=Lot_02;
  }
//+------------------------------------------------------------------+
//| Filling the VolumeIncrease array                                 |
//+------------------------------------------------------------------+
void GetVolumeIncrease()
  {
   VolumeIncrease[0]=VolumeIncrease_01;
   VolumeIncrease[1]=VolumeIncrease_02;
  }
//+------------------------------------------------------------------+
//| Filling the VolumeIncreaseStep array                             |
//+------------------------------------------------------------------+
void GetVolumeIncreaseStep()
  {
   VolumeIncreaseStep[0]=VolumeIncreaseStep_01;
   VolumeIncreaseStep[1]=VolumeIncreaseStep_02;
  }
이제 모든 외부 매개변수 배열을 한 번에 편리하게 초기화하는 데 도움이 되는 함수인 InitializeInputParameters() 함수를 만들어 보겠습니다.
//+------------------------------------------------------------------+
//| Initializing external parameter arrays                           |
//+------------------------------------------------------------------+
void InitializeInputParameters()
  {
   GetSymbols();
   GetIndicatorPeriod();
   GetTakeProfit();
   GetStopLoss();
   GetTrailingStop();
   GetReverse();
   GetLot();
   GetVolumeIncrease();
   GetVolumeIncreaseStep();
  }
외부 매개변수 배열을 초기화한 후 주요 부분으로 진행할 수 있습니다. 지표 핸들, 값 및 가격 정보를 가져오고 새 바를 확인하는 등의 일부 절차는 각 기호에 대해 연속적으로 루프에서 수행됩니다. 이것이 외부 매개변수 값이 배열로 배열된 이유입니다. 따라서 다음과 같이 루프에서 모두 수행됩니다.
//--- Iterate over all symbols
for(int s=0; s<NUMBER_OF_SYMBOLS; s++)
  {
//--- If trading for this symbol is allowed
   if(Symbols[s]!="")
     {
      //--- The rest of the code
     }
  }
그러나 기존 함수를 수정하고 새 함수를 생성하기 전에 해당 패턴에 필요한 배열도 생성해 보겠습니다.
지표 핸들에는 두 개의 배열이 필요합니다.
//--- Array of indicator agent handles
int spy_indicator_handles[NUMBER_OF_SYMBOLS];
//--- Array of signal indicator handles
int signal_indicator_handles[NUMBER_OF_SYMBOLS];
이 두 배열은 먼저 잘못된 값으로 초기화됩니다.
//+------------------------------------------------------------------+
//| Initializing arrays of indicator handles                         |
//+------------------------------------------------------------------+
void InitializeArrayHandles()
  {
   ArrayInitialize(spy_indicator_handles,INVALID_HANDLE);
   ArrayInitialize(signal_indicator_handles,INVALID_HANDLE);
  }
가격 데이터 및 지표 값의 배열은 이제 구조를 사용하여 액세스됩니다.
//--- Data arrays for checking trading conditions
struct PriceData
  {
   double            value[];
  };
PriceData open[NUMBER_OF_SYMBOLS];      // Opening price of the bar
PriceData high[NUMBER_OF_SYMBOLS];      // High price of the bar
PriceData low[NUMBER_OF_SYMBOLS];       // Low price of the bar
PriceData close[NUMBER_OF_SYMBOLS];     // Closing price of the bar
PriceData indicator[NUMBER_OF_SYMBOLS]; // Array of indicator values
이제 목록에서 첫 번째 기호의 마지막 완료된 바에서 지표 값을 가져와야 하는 경우 다음과 같이 작성해야 합니다.
double indicator_value=indicator[0].value[1];
또한 이전에 CheckNewBar() 함수에서 사용된 변수 대신 배열을 생성해야 합니다.
//--- Arrays for getting the opening time of the current bar
struct Datetime
  {
   datetime          time[];
  };
Datetime lastbar_time[NUMBER_OF_SYMBOLS];
//--- Array for checking the new bar for each symbol
datetime new_bar[NUMBER_OF_SYMBOLS];
그래서 배열을 정리했습니다. 이제 위의 변경 사항에 따라 여러 기능을 수정해야 합니다. GetIndicatorHandles() 함수부터 시작하겠습니다.
//+------------------------------------------------------------------+
//| Getting indicator handles                                        |
//+------------------------------------------------------------------+
void GetIndicatorHandles()
  {
//--- Iterate over all symbols
   for(int s=0; s<NUMBER_OF_SYMBOLS; s++)
     {
      //--- If trading for this symbol is allowed
      if(Symbols[s]!="")
        {
         //--- If the handle is yet to be obtained
         if(signal_indicator_handles[s]==INVALID_HANDLE)
           {
            //--- Get the indicator handle
            signal_indicator_handles[s]=iMA(Symbols[s],_Period,IndicatorPeriod[s],0,MODE_SMA,PRICE_CLOSE);
            //--- If the indicator handle could not be obtained
            if(signal_indicator_handles[s]==INVALID_HANDLE)
               Print("Failed to get the indicator handle for the symbol "+Symbols[s]+"!");
           }
        }
     }
  }
이제 테스트/거래에 사용되는 기호의 수에 관계없이 함수의 코드는 동일하게 유지됩니다.
마찬가지로 다른 기호에서 틱을 전송할 지표 에이전트의 핸들을 가져오기 위해 GetSpyHandles()라는 또 다른 함수를 만들 것입니다. 그러나 그 전에 Enums.mqh 파일에 플래그로 정렬된 ENUM_CHART_EVENT_SYMBOL 기호로 모든 이벤트의 열거를 하나 더 추가합니다.
//+------------------------------------------------------------------+
//| New bar and tick events from all symbols and time frames         |
//+------------------------------------------------------------------+
enum ENUM_CHART_EVENT_SYMBOL
  {
   CHARTEVENT_NO         = 0,          // Events are disabled - 0
   CHARTEVENT_INIT       = 0,          // Initialization event - 0
   //---
   CHARTEVENT_NEWBAR_M1  = 0x00000001, // New bar event on a minute chart (1)
   CHARTEVENT_NEWBAR_M2  = 0x00000002, // New bar event on a 2-minute chart (2)
   CHARTEVENT_NEWBAR_M3  = 0x00000004, // New bar event on a 3-minute chart (4)
   CHARTEVENT_NEWBAR_M4  = 0x00000008, // New bar event on a 4-minute chart (8)
   //---
   CHARTEVENT_NEWBAR_M5  = 0x00000010, // New bar event on a 5-minute chart (16)
   CHARTEVENT_NEWBAR_M6  = 0x00000020, // New bar event on a 6-minute chart (32)
   CHARTEVENT_NEWBAR_M10 = 0x00000040, // New bar event on a 10-minute chart (64)
   CHARTEVENT_NEWBAR_M12 = 0x00000080, // New bar event on a 12-minute chart (128)
   //---
   CHARTEVENT_NEWBAR_M15 = 0x00000100, // New bar event on a 15-minute chart (256)
   CHARTEVENT_NEWBAR_M20 = 0x00000200, // New bar event on a 20-minute chart (512)
   CHARTEVENT_NEWBAR_M30 = 0x00000400, // New bar event on a 30-minute chart (1024)
   CHARTEVENT_NEWBAR_H1  = 0x00000800, // New bar event on an hour chart (2048)
   //---
   CHARTEVENT_NEWBAR_H2  = 0x00001000, // New bar event on a 2-hour chart (4096)
   CHARTEVENT_NEWBAR_H3  = 0x00002000, // New bar event on a 3-hour chart (8192)
   CHARTEVENT_NEWBAR_H4  = 0x00004000, // New bar event on a 4-hour chart (16384)
   CHARTEVENT_NEWBAR_H6  = 0x00008000, // New bar event on a 6-hour chart (32768)
   //---
   CHARTEVENT_NEWBAR_H8  = 0x00010000, // New bar event on a 8-hour chart (65536)
   CHARTEVENT_NEWBAR_H12 = 0x00020000, // New bar event on a 12-hour chart (131072)
   CHARTEVENT_NEWBAR_D1  = 0x00040000, // New bar event on a daily chart (262144)
   CHARTEVENT_NEWBAR_W1  = 0x00080000, // New bar event on a weekly chart (524288)
   //---
   CHARTEVENT_NEWBAR_MN1 = 0x00100000, // New bar event on a monthly chart (1048576)
   CHARTEVENT_TICK       = 0x00200000, // New tick event (2097152)
   //---
   CHARTEVENT_ALL        = 0xFFFFFFFF  // All events are enabled (-1)
  };
이 열거는 코드가 아래에 제공된 GetSpyHandles() 함수의 사용자 지정 지표 EventsSpy.mq5(파일이 글에 첨부됨)로 작업하는 데 필요합니다.
//+------------------------------------------------------------------+
//| Getting agent handles by the specified symbols                   |
//+------------------------------------------------------------------+
void GetSpyHandles()
  {
//--- Iterate over all symbols
   for(int s=0; s<NUMBER_OF_SYMBOLS; s++)
     {
      //--- If trading for this symbol is allowed
      if(Symbols[s]!="")
        {
         //--- If the handle is yet to be obtained
         if(spy_indicator_handles[s]==INVALID_HANDLE)
           {
            //--- Get the indicator handle
            spy_indicator_handles[s]=iCustom(Symbols[s],_Period,"EventsSpy.ex5",ChartID(),0,CHARTEVENT_TICK);
            //--- If the indicator handle could not be obtained
            if(spy_indicator_handles[s]==INVALID_HANDLE)
               Print("Failed to install the agent on "+Symbols[s]+"");
           }
        }
     }
  }
iCustom() 함수의 마지막 매개변수에 유의하세요. 이 경우 CHARTEVENT_TICK 식별자가 틱 이벤트를 가져오는 데 사용되었습니다. 그러나 필요한 경우 새 바 이벤트를 가져오도록 수정할 수 있습니다. 예를 들어 아래와 같이 라인을 사용하는 경우 Expert Advisor는 1분(M1) 및 1시간(H1) 시간 프레임에 새 바 이벤트를 가져옵니다.
handle_event_indicator[s]=iCustom(Symbols[s],_Period,"EventsSpy.ex5",ChartID(),0,CHARTEVENT_NEWBAR_M1|CHARTEVENT_NEWBAR_H1);
모든 이벤트(모든 시간 프레임의 틱 및 바 이벤트)를 가져오려면 CHARTEVENT_ALL 식별자를 지정해야 합니다.
모든 배열은 OnInit() 함수에서 초기화됩니다.
//+------------------------------------------------------------------+
//| Expert initialization function                                   |
//+------------------------------------------------------------------+
void OnInit()
  {
//--- Initialization of arrays of external parameters
   InitializeInputParameters();
//--- Initialization of arrays of indicator handles
   InitializeArrayHandles();
//--- Get agent handles
   GetSpyHandles();
//--- Get indicator handles
   GetIndicatorHandles();
//--- Initialize the new bar
   InitializeArrayNewBar();
  }
글의 시작 부분에서 이미 언급했듯이 지표 에이전트의 이벤트는 OnChartEvent() 함수에서 수신됩니다. 다음은 이 함수에서 사용할 코드입니다.
//+------------------------------------------------------------------+
//| Chart events handler                                             |
//+------------------------------------------------------------------+
void OnChartEvent(const int id,         // Event identifier
                  const long &lparam,   // Long type event parameter
                  const double &dparam, // Double type event parameter
                  const string &sparam) // String type event parameter
  {
//--- If this is a custom event
   if(id>=CHARTEVENT_CUSTOM)
     {
      //--- Exit if trading is not allowed
      if(CheckTradingPermission()>0)
         return;
      //--- If there was a tick event
      if(lparam==CHARTEVENT_TICK)
        {
         //--- Check signals and trade on them
         CheckSignalsAndTrade();
         return;
        }
     }
  }
CheckSignalAndTrade() 함수(위 코드에서 강조 표시된 줄)에는 OnTick() 함수에는 이전에 구현된 바와 같이 새로운 바 이벤트 및 거래 신호에 대해 모든 기호가 교대로 확인되는 루프가 있습니다.
//+------------------------------------------------------------------+
//| Checking signals and trading based on the new bar event          |
//+------------------------------------------------------------------+
void CheckSignalsAndTrade()
  {
//--- Iterate over all specified symbols
   for(int s=0; s<NUMBER_OF_SYMBOLS; s++)
     {
      //--- If trading for this symbol is allowed
      if(Symbols[s]!="")
        {
         //--- If the bar is not new, proceed to the next symbol
         if(!CheckNewBar(s))
            continue;
         //--- If there is a new bar
         else
           {
            //--- Get indicator data. If there is no data, proceed to the next symbol
            if(!GetIndicatorsData(s))
               continue;
            //--- Get bar data
            GetBarsData(s);
            //--- Check the conditions and trade
            TradingBlock(s);
            //--- Trailing Stop
            ModifyTrailingStop(s);
           }
        }
     }
  }
외부 매개변수를 사용하는 모든 기능과 기호 및 지표 데이터는 위의 모든 변경 사항에 따라 수정되어야 합니다. 이를 위해 첫 번째 매개변수로 기호 번호를 추가하고 함수 내부의 모든 변수와 배열을 위에서 설명한 새 배열로 교체해야 합니다.
예를 들어, CheckNewBar(), TradingBlock() 및 OpenPosition() 함수의 수정된 코드가 아래에 나와 있습니다.
CheckNewBar() 기능 코드:
//+------------------------------------------------------------------+
//| Checking for the new bar                                         |
//+------------------------------------------------------------------+
bool CheckNewBar(int number_symbol)
  {
//--- Get the opening time of the current bar
//    If an error occurred when getting the time, print the relevant message
   if(CopyTime(Symbols[number_symbol],Period(),0,1,lastbar_time[number_symbol].time)==-1)
      Print(__FUNCTION__,": Error copying the opening time of the bar: "+IntegerToString(GetLastError()));
//--- If this is a first function call
   if(new_bar[number_symbol]==NULL)
     {
      //--- Set the time
      new_bar[number_symbol]=lastbar_time[number_symbol].time[0];
      Print(__FUNCTION__,": Initialization ["+Symbols[number_symbol]+"][TF: "+TimeframeToString(Period())+"]["
            +TimeToString(lastbar_time[number_symbol].time[0],TIME_DATE|TIME_MINUTES|TIME_SECONDS)+"]");
      return(false);
     }
//--- If the time is different
   if(new_bar[number_symbol]!=lastbar_time[number_symbol].time[0])
     {
      //--- Set the time and exit
      new_bar[number_symbol]=lastbar_time[number_symbol].time[0];
      return(true);
     }
//--- If we have reached this line, then the bar is not new, so return false
   return(false);
  }
TradingBlock() 기능 코드:
//+------------------------------------------------------------------+
//| Trading block                                                    |
//+------------------------------------------------------------------+
void TradingBlock(int symbol_number)
  {
   ENUM_ORDER_TYPE      signal=WRONG_VALUE;                 // Variable for getting a signal
   string               comment="hello :)";                 // Position comment
   double               tp=0.0;                             // Take Profit
   double               sl=0.0;                             // Stop Loss
   double               lot=0.0;                            // Volume for position calculation in case of position reversal
   double               position_open_price=0.0;            // Position opening price
   ENUM_ORDER_TYPE      order_type=WRONG_VALUE;             // Order type for opening a position
   ENUM_POSITION_TYPE   opposite_position_type=WRONG_VALUE; // Opposite position type
//--- Find out if there is a position
   pos.exists=PositionSelect(Symbols[symbol_number]);
//--- Get the signal
   signal=GetTradingSignal(symbol_number);
//--- If there is no signal, exit
   if(signal==WRONG_VALUE)
      return;
//--- Get symbol properties
   GetSymbolProperties(symbol_number,S_ALL);
//--- Determine values for trade variables
   switch(signal)
     {
      //--- Assign values to variables for a BUY
      case ORDER_TYPE_BUY  :
         position_open_price=symb.ask;
         order_type=ORDER_TYPE_BUY;
         opposite_position_type=POSITION_TYPE_SELL;
         break;
         //--- Assign values to variables for a SELL
      case ORDER_TYPE_SELL :
         position_open_price=symb.bid;
         order_type=ORDER_TYPE_SELL;
         opposite_position_type=POSITION_TYPE_BUY;
         break;
     }
//--- Get the Take Profit and Stop Loss levels
   sl=CalculateStopLoss(symbol_number,order_type);
   tp=CalculateTakeProfit(symbol_number,order_type);
//--- If there is no position
   if(!pos.exists)
     {
      //--- Adjust the volume
      lot=CalculateLot(symbol_number,Lot[symbol_number]);
      //--- Open a position
      OpenPosition(symbol_number,lot,order_type,position_open_price,sl,tp,comment);
     }
//--- If the position exists
   else
     {
      //--- Get the position type
      GetPositionProperties(symbol_number,P_TYPE);
      //--- If the position is opposite to the signal and the position reversal is enabled
      if(pos.type==opposite_position_type && Reverse[symbol_number])
        {
         //--- Get the position volume
         GetPositionProperties(symbol_number,P_VOLUME);
         //--- Adjust the volume
         lot=pos.volume+CalculateLot(symbol_number,Lot[symbol_number]);
         //--- Reverse the position
         OpenPosition(symbol_number,lot,order_type,position_open_price,sl,tp,comment);
         return;
        }
      //--- If the signal is in the direction of the position and the volume increase is enabled, increase the position volume
      if(!(pos.type==opposite_position_type) && VolumeIncrease[symbol_number]>0)
        {
         //--- Get the Stop Loss of the current position
         GetPositionProperties(symbol_number,P_SL);
         //--- Get the Take Profit of the current position
         GetPositionProperties(symbol_number,P_TP);
         //--- Adjust the volume
         lot=CalculateLot(symbol_number,VolumeIncrease[symbol_number]);
         //--- Increase the position volume
         OpenPosition(symbol_number,lot,order_type,position_open_price,pos.sl,pos.tp,comment);
         return;
        }
     }
  }
OpenPosition() 함수 코드:
//+------------------------------------------------------------------+
//| Opening a position                                               |
//+------------------------------------------------------------------+
void OpenPosition(int symbol_number,
                  double lot,
                  ENUM_ORDER_TYPE order_type,
                  double price,
                  double sl,
                  double tp,
                  string comment)
  {
//--- Set the magic number in the trading structure
   trade.SetExpertMagicNumber(MagicNumber);
//--- Set the slippage in points
   trade.SetDeviationInPoints(CorrectValueBySymbolDigits(Deviation));
//--- Instant Execution and Market Execution mode
//    *** Starting with build 803, Stop Loss and Take Profit ***
//    *** can be set upon opening a position in the SYMBOL_TRADE_EXECUTION_MARKET mode ***
   if(symb.execution_mode==SYMBOL_TRADE_EXECUTION_INSTANT ||
      symb.execution_mode==SYMBOL_TRADE_EXECUTION_MARKET)
     {
      //--- If the position failed to open, print the relevant message
      if(!trade.PositionOpen(Symbols[symbol_number],order_type,lot,price,sl,tp,comment))
         Print("Error opening the position: ",GetLastError()," - ",ErrorDescription(GetLastError()));
     }
  }
따라서 각 함수는 이제 기호 번호(symbol_number)를 받습니다. 또한 빌드 803에 도입된 변경 사항에 유의하세요.
기타 기능의 수정된 코드는 첨부파일에서 확인하실 수 있습니다. 이제 매개변수를 최적화하고 테스트를 수행하기만 하면 됩니다.
매개변수 최적화 및 Expert Advisor 테스트
먼저 첫 번째 기호에 대한 매개변수를 최적화한 다음 두 번째 기호에 대해 매개변수를 최적화합니다. EURUSD부터 시작하겠습니다.
다음은 전략 테스터의 설정입니다.

그림 1. 전략 테스터 설정.
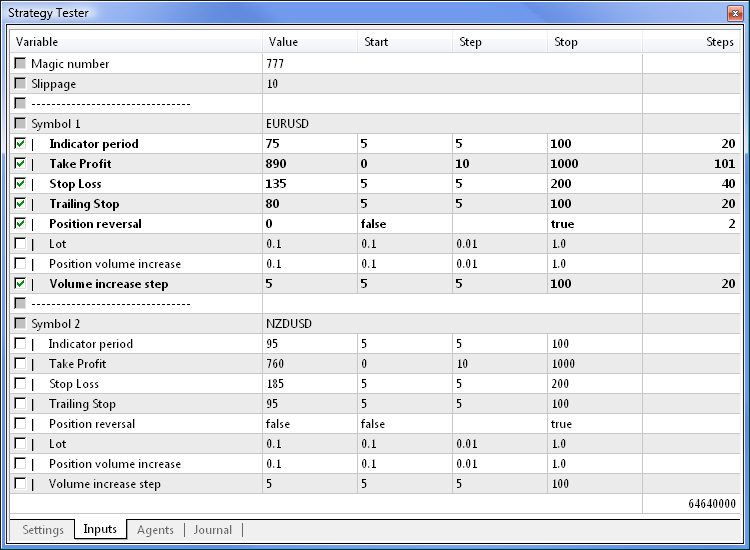
Expert Advisor의 설정은 아래와 같이 해야 합니다(편의상 각 기호에 대한 설정이 포함된 .set 파일이 문서에 첨부되어 있습니다). 최적화에서 특정 기호를 제외하려면 기호 이름 매개변수 필드를 비워 두기만 하면 됩니다. 각 기호에 대해 개별적으로 수행되는 매개변수 최적화도 최적화 프로세스의 속도를 높입니다.

그림 2. 매개변수 최적화를 위한 Expert Advisor 설정: EURUSD.
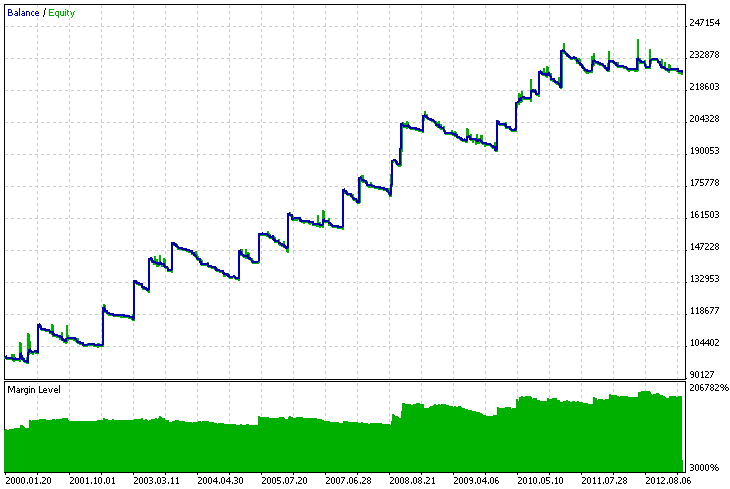
최적화는 듀얼 코어 프로세서에서 약 1시간이 소요됩니다. 최대 회복 계수 테스트 결과는 다음과 같습니다.

그림 3. EURUSD에 대한 최대 회복 계수 테스트 결과.
이제 NZDUSD를 두 번째 기호로 설정하세요. 최적화를 위해 첫 번째 매개변수 블록의 기호 이름이 있는 줄을 비워 둡니다.
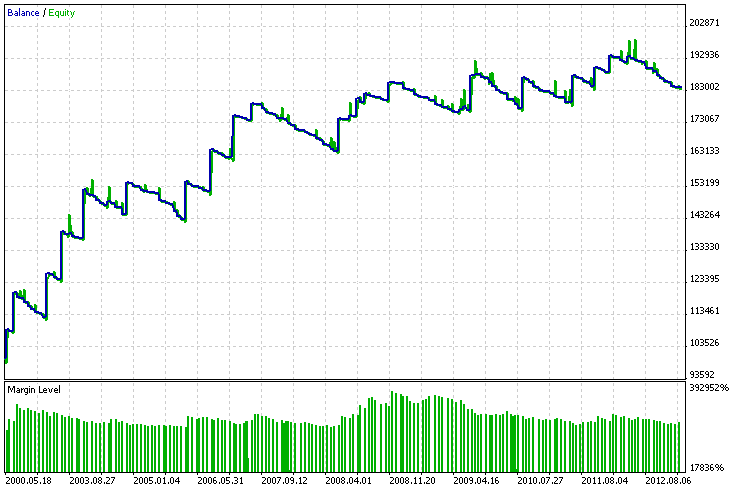
NZDUSD에 대한 결과는 다음과 같습니다.

그림 4. NZDUSD에 대한 최대 회복 계수 테스트 결과.
이제 두 개의 기호를 함께 테스트할 수 있습니다. 전략 테스터 설정에서 결과가 동일하므로 Expert Advisor가 실행되는 기호를 설정할 수 있습니다. 거래/테스트와 관련이 없는 기호일 수도 있습니다.
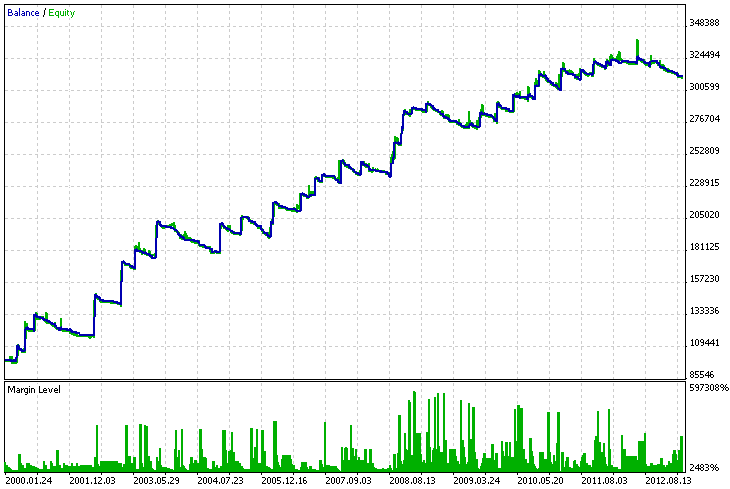
다음은 함께 테스트한 두 기호에 대한 결과입니다.

그림 5. EURUSD 및 NZDUSD의 두 가지 기호에 대한 테스트 결과.
결론
그게 다입니다. 소스 코드는 아래에 첨부되어 있으며 위의 더 자세한 연구를 위해 다운로드할 수 있습니다. 연습을 위해 하나 이상의 기호를 선택하거나 다른 지표를 사용하여 포지션 개방 조건을 변경해 보십시오.
아카이브에서 파일을 추출한 후 MultiSymbolExpert 폴더를 MetaTrader 5\MQL5\Experts 디렉토리에 넣습니다. 또한 EventsSpy.mq5 지표는 MetaTrader 5\MQL5\Indicators 디렉토리에 있어야 합니다.
MetaQuotes 소프트웨어 사를 통해 러시아어가 번역됨.
원본 기고글: https://www.mql5.com/ru/articles/648
경고: 이 자료들에 대한 모든 권한은 MetaQuotes(MetaQuotes Ltd.)에 있습니다. 이 자료들의 전부 또는 일부에 대한 복제 및 재출력은 금지됩니다.
이 글은 사이트 사용자가 작성했으며 개인의 견해를 반영합니다. Metaquotes Ltd는 제시된 정보의 정확성 또는 설명 된 솔루션, 전략 또는 권장 사항의 사용으로 인한 결과에 대해 책임을 지지 않습니다.
이 기사는 깔끔하고 따라하기 쉬우며 .set 파일에 설정을 제공합니다. 심볼 실행 모드, 특히 즉시 또는 시장가인지 여부를 확인하고 그 후에야 주문을 열 수 있도록하는 조건에 문제가 있었기 때문에 제거해야했지만 모든 것이 잘 작동했습니다 .
질문이 있습니다. 저는 이와 같은 다양한 고급 접근 방식을 보았는데, 일부 기능을 복제하는 데 많은 코드 (및 시간)를 소비하더라도 제공된 Expert, ExpertSignal, ExpertTrade.... 구조를 무시하고 처음부터 구축되었습니다. 누구든지 제게 이것을 정당화 할 수 있습니까?
안녕하세요 여러분!
이 EA를 테스트하려고 하는데 전략 테스터에서 다음과 같은 메시지가 나타납니다: "포지션을 여는 동안 오류가 발생했습니다: 4753 - 1 포지션을 찾을 수 없음". 이유를 모르겠습니다. 이것은 "TradeFunctions.mqh" 파일의 159번째 줄에서 "trade.PositionOpen" 함수가 실행될 때 발생합니다. 누군가 도와주실 수 있나요?
저자가 설명한 대로 포지션 반전이 발생하는 위치를 알려주시겠어요? 다음은 설명과 함께 그의 코드입니다.
OpenPosition(symbol_number,lot,order_type,position_open_price,sl,tp,comment) 함수를 살펴보세요 ;
그냥 잠금입니다! 반전이 없습니다... 로트 증분도 마찬가지입니다! 제가 틀린 건 아닌지 설명해 주시겠어요?저자가 설명한 대로 포지션 반전이 발생하는 위치를 알려주시겠어요? 다음은 설명과 함께 그의 코드입니다.
OpenPosition(symbol_number,lot,order_type,position_open_price,sl,tp,comment) 함수를 살펴보세요;
그냥 잠금입니다! 반전이 없습니다... 로트 증분도 마찬가지입니다! 제가 틀린 건가요?거래 계좌에는 네팅과 헤지의 두 가지 유형이 있습니다.
트레이딩 계좌에는 네팅과 헤지의 두 가지 유형이 있습니다.
구매 완료! 감사합니다!