
MQL5 Coobook: MetaTrader 5 거래 이벤트에 대한 소리 알림

소개
이 글에서는 Expert Advisor의 파일에 사운드 파일을 포함하여 거래 이벤트에 사운드 알림을 추가하는 것과 같은 문제를 고려할 것입니다. 파일이 포함된다는 사실은 사운드 파일이 Expert Advisor 내부에 위치한다는 것을 의미합니다. 따라서 Expert Advisor의 컴파일된 버전(*.ex5)을 다른 사용자에게 제공할 때 사운드 파일도 제공하고 저장해야 하는 위치를 설명할 필요가 없습니다.
개발
테스트 목적으로 우리는 이전 글 "MQL5 Cookbook: 지정된 기준에 따른 Expert Advisor 최적화 결과 저장"의 Expert Advisor를 사용할 것입니다. 더 간단하게 하기 위해 현재 주제와 관련이 없는 모든 것을 제거했습니다.
MQL5 리소스를 사용하여 거래 이벤트에 소리 알림을 추가하려면 Alert() 및 PlaySound() 함수를 사용할 수 있습니다. Alert() 기능을 선택하면 항상 동일한 소리 알림이 재생되고 관련 메시지가 있는 창이 열립니다. "MQL5 Cookbook: 다른 프린트 모드 사용"라는 제목의 글에서 실제로 작동하는 모습을 볼 수 있습니다.
경고음은 터미널 설정에서 설정할 수 있습니다: 도구 -> 옵션 또는 Ctrl+O. 또한 이벤트 탭에서 "활성화" 옵션을 선택하여 이벤트에 대한 사운드 알림을 활성화하고 알림 드롭다운 목록에서 적절한 사운드 파일을 선택해야 합니다.
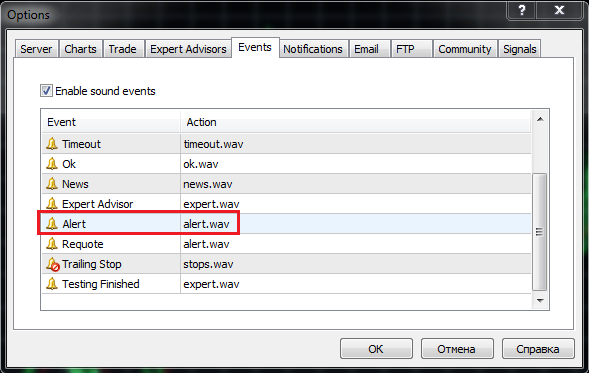
그림 1. 터미널 설정의 "이벤트" 탭
그러나 사용자 지정 프로그램 이벤트에 대해 고유한 소리 알림을 설정할 수도 있습니다. 이를 위해 PlaySound() 함수를 사용합니다.
Expert Advisor에 소리 알림을 추가하기 전에 테스트 목적으로 Expert Advisor를 만들어 보겠습니다. 차트에 Expert Advisor를 로드할 때 사운드 패널을 여는 아이디어를 구현해 보겠습니다. 사운드 패널은 버튼(OBJ_BUTTON)과 같은 그래픽 개체로 구성됩니다. 각 버튼에는 버튼을 클릭할 때 재생될 고유한 사운드가 할당됩니다.
온라인에 접속하여 *.wav 형식의 25가지 다른 사운드 파일을 찾았습니다(글 끝부분에서 다운로드 가능). MetaTrader 5\MQL5\Files\Sounds 폴더에 있어야 합니다. 사운드 파일 작업에 익숙해지기 위해 이제 MQL5 마법사를 사용하여 새로운 Expert Advisor를 생성합니다. 처음에는 사운드 패널의 버튼 수에 따라 배열 크기를 지정합니다(총 26개의 버튼이 있음).
//--- Array size
#define ARRAY_SIZE 26
그런 다음 Expert Advisor에 리소스를 제공할 폴더와 파일 이름을 지정해야 합니다. 이는 #resource 지시문을 사용하여 수행할 수 있습니다. 지시문 다음에 큰따옴표로 파일 위치를 지정합니다.
//--- Sound files
#resource "\\Files\\Sounds\\alert.wav"
#resource "\\Files\\Sounds\\AHOOGA.wav"
#resource "\\Files\\Sounds\\APPLAUSE.wav"
#resource "\\Files\\Sounds\\BONK.wav"
#resource "\\Files\\Sounds\\CARBRAKE.wav"
#resource "\\Files\\Sounds\\CASHREG.wav"
#resource "\\Files\\Sounds\\CLAP.wav"
#resource "\\Files\\Sounds\\CORKPOP.wav"
#resource "\\Files\\Sounds\\DOG.wav"
#resource "\\Files\\Sounds\\DRIVEBY.wav"
#resource "\\Files\\Sounds\\DRUMROLL.wav"
#resource "\\Files\\Sounds\\EXPLODE.wav"
#resource "\\Files\\Sounds\\FINALBEL.wav"
#resource "\\Files\\Sounds\\FROG.wav"
#resource "\\Files\\Sounds\\GLASS.wav"
#resource "\\Files\\Sounds\\GUNSHOT.wav"
#resource "\\Files\\Sounds\\LASER.wav"
#resource "\\Files\\Sounds\\LATNWHIS.wav"
#resource "\\Files\\Sounds\\PIG.wav"
#resource "\\Files\\Sounds\\RICOCHET.wav"
#resource "\\Files\\Sounds\\RINGIN.wav"
#resource "\\Files\\Sounds\\SIREN.wav"
#resource "\\Files\\Sounds\\TRAIN.wav"
#resource "\\Files\\Sounds\\UH_OH.wav"
#resource "\\Files\\Sounds\\VERYGOOD.wav"
#resource "\\Files\\Sounds\\WHOOSH.wav"
이제 리소스 파일의 위치, 그래픽 개체의 이름, 그래픽 개체에 표시되는 텍스트를 포함하는 세 개의 문자열 배열을 만들어야 합니다. 파일 위치를 지정할 때 이중 콜론을 사용한다는 점에 유의하십시오. 이는 이름으로 리소스를 호출하기 위한 특별한 표시입니다.
//--- Sound file location
string sound_paths[ARRAY_SIZE]=
  {
   "::Files\\Sounds\\alert.wav",
   "::Files\\Sounds\\AHOOGA.wav",
   "::Files\\Sounds\\APPLAUSE.wav",
   "::Files\\Sounds\\BONK.wav",
   "::Files\\Sounds\\CARBRAKE.wav",
   "::Files\\Sounds\\CASHREG.wav",
   "::Files\\Sounds\\CLAP.wav",
   "::Files\\Sounds\\CORKPOP.wav",
   "::Files\\Sounds\\DOG.wav",
   "::Files\\Sounds\\DRIVEBY.wav",
   "::Files\\Sounds\\DRUMROLL.wav",
   "::Files\\Sounds\\EXPLODE.wav",
   "::Files\\Sounds\\FINALBEL.wav",
   "::Files\\Sounds\\FROG.wav",
   "::Files\\Sounds\\GLASS.wav",
   "::Files\\Sounds\\GUNSHOT.wav",
   "::Files\\Sounds\\LASER.wav",
   "::Files\\Sounds\\LATNWHIS.wav",
   "::Files\\Sounds\\PIG.wav",
   "::Files\\Sounds\\RICOCHET.wav",
   "::Files\\Sounds\\RINGIN.wav",
   "::Files\\Sounds\\SIREN.wav",
   "::Files\\Sounds\\TRAIN.wav",
   "::Files\\Sounds\\UH_OH.wav",
   "::Files\\Sounds\\VERYGOOD.wav",
   "::Files\\Sounds\\WHOOSH.wav"
  };
//--- Names of graphical objects
string sound_names[ARRAY_SIZE]=
  {
   "sound_button01","sound_button02",
   "sound_button03","sound_button04",
   "sound_button05","sound_button06",
   "sound_button07","sound_button08",
   "sound_button09","sound_button10",
   "sound_button11","sound_button12",
   "sound_button13","sound_button14",
   "sound_button15","sound_button16",
   "sound_button17","sound_button18",
   "sound_button19","sound_button20",
   "sound_button21","sound_button22",
   "sound_button23","sound_button24",
   "sound_button25","sound_button26"
  };
//--- Text displayed on graphical objects
string sound_texts[ARRAY_SIZE]=
  {
   "ALERT","AHOOGA","APPLAUSE","BONK","CARBRAKE","CASHREG",
   "CLAP","CORKPOP","DOG","DRIVEBY","DRUMROLL","EXPLODE","FINALBEL",
   "FROG","GLASS","GUNSHOT","LASER","LATNWHIS","PIG",
   "RICOCHET","RINGIN","SIREN","TRAIN","UH_OH","VERYGOOD","WHOOSH"
  };
지정된 속성을 가진 차트에 그래픽 개체 "Button"을 생성하는 CreateButton() 함수를 작성해 보겠습니다.
//+------------------------------------------------------------------+
//| Creating the Button object                                       |
//+------------------------------------------------------------------+
void CreateButton(long              chart_id,         // chart id
                  int               sub_window,       // window number
                  string            name,             // object name
                  string            text,             // displayed name
                  ENUM_ANCHOR_POINT anchor,           // anchor point
                  ENUM_BASE_CORNER  corner,           // chart corner
                  string            font_name,        // font
                  int               font_size,        // font size
                  color             font_color,       // font color
                  color             background_color, // background color
                  color             border_color,     // border color
                  int               x_size,           // width
                  int               y_size,           // height
                  int               x_distance,       // X-coordinate
                  int               y_distance,       // Y-coordinate
                  long              z_order)          // Z-order
  {
//--- Creating an object
   if(ObjectCreate(chart_id,name,OBJ_BUTTON,sub_window,0,0))
     {
      ObjectSetString(chart_id,name,OBJPROP_TEXT,text);                  // setting name
      ObjectSetString(chart_id,name,OBJPROP_FONT,font_name);             // setting font
      ObjectSetInteger(chart_id,name,OBJPROP_COLOR,font_color);          // setting font color
      ObjectSetInteger(chart_id,name,OBJPROP_BGCOLOR,background_color);  // setting background color
      ObjectSetInteger(chart_id,name,OBJPROP_BORDER_COLOR,border_color); // setting border color
      ObjectSetInteger(chart_id,name,OBJPROP_ANCHOR,anchor);             // setting anchor point
      ObjectSetInteger(chart_id,name,OBJPROP_CORNER,corner);             // setting chart corner
      ObjectSetInteger(chart_id,name,OBJPROP_FONTSIZE,font_size);        // setting font size
      ObjectSetInteger(chart_id,name,OBJPROP_XSIZE,x_size);              // setting width X
      ObjectSetInteger(chart_id,name,OBJPROP_YSIZE,y_size);              // setting height Y
      ObjectSetInteger(chart_id,name,OBJPROP_XDISTANCE,x_distance);      // setting X-coordinate
      ObjectSetInteger(chart_id,name,OBJPROP_YDISTANCE,y_distance);      // setting Y-coordinate
      ObjectSetInteger(chart_id,name,OBJPROP_SELECTABLE,false);          // cannot select the object if FALSE
      ObjectSetInteger(chart_id,name,OBJPROP_STATE,false);               // button state (clicked/unclicked)
      ObjectSetInteger(chart_id,name,OBJPROP_ZORDER,z_order);            // higher/lower Z-order
      ObjectSetString(chart_id,name,OBJPROP_TOOLTIP,"\n");               // no tooltip if "\n"
     }
  }
더 재미있게 만들기 위해 각 버튼의 색상은 무작위로 선택됩니다. 이를 구현하기 위해 간단한 함수인 GetRandomColor()를 작성합니다.
//+------------------------------------------------------------------+
//| Returning a random color                                         |
//+------------------------------------------------------------------+
color GetRandomColor()
  {
//--- Select a random color from 0 to 25
   switch(MathRand()%26)
     {
      case 0  : return(clrOrange);           break;
      case 1  : return(clrGold);             break;
      case 2  : return(clrChocolate);        break;
      case 3  : return(clrChartreuse);       break;
      case 4  : return(clrLime);             break;
      case 5  : return(clrSpringGreen);      break;
      case 6  : return(clrMediumBlue);       break;
      case 7  : return(clrDeepSkyBlue);      break;
      case 8  : return(clrBlue);             break;
      case 9  : return(clrSeaGreen);         break;
      case 10 : return(clrRed);              break;
      case 11 : return(clrSlateGray);        break;
      case 12 : return(clrPeru);             break;
      case 13 : return(clrBlueViolet);       break;
      case 14 : return(clrIndianRed);        break;
      case 15 : return(clrMediumOrchid);     break;
      case 16 : return(clrCrimson);          break;
      case 17 : return(clrMediumAquamarine); break;
      case 18 : return(clrDarkGray);         break;
      case 19 : return(clrSandyBrown);       break;
      case 20 : return(clrMediumSlateBlue);  break;
      case 21 : return(clrTan);              break;
      case 22 : return(clrDarkSalmon);       break;
      case 23 : return(clrBurlyWood);        break;
      case 24 : return(clrHotPink);          break;
      case 25 : return(clrLightSteelBlue);   break;
      //---
      default : return(clrGold);
     }
//---
   return(clrGold);
  }
이제 차트에 사운드 패널을 추가하는 함수 - SetSoundPanel()을 작성해 보겠습니다.
//+------------------------------------------------------------------+
//| Adding the sound panel to the chart                              |
//+------------------------------------------------------------------+
void SetSoundPanel()
  {
   int   column_count =0;       // Column counter
   int   x_dist       =10;      // Indent from the left side of the chart
   int   y_dist       =15;      // Indent from the top of the chart
   int   x_size       =100;     // Button width
   int   y_size       =20;      // Button height
   color button_color =clrNONE; // Button color
//--- Set the objects
   for(int i=0; i<ARRAY_SIZE; i++)
     {
      //--- Increase the column counter
      column_count++;
      //--- Get the button color
      button_color=GetRandomColor();
      //--- Draw a button
      CreateButton(0,0,sound_names[i],sound_texts[i],
                   ANCHOR_LEFT_UPPER,CORNER_LEFT_UPPER,"Arial",8,
                   clrWhite,button_color,button_color,x_size,y_size,x_dist,y_dist,1);
      //--- If two buttons have already been set in the same row
      if(column_count==2)
        {
         x_dist=10;        // Move the X-coordinate to the initial position
         y_dist+=20;       // Set the Y-coordinate for the next row
         column_count=0;   // Zero out the counter
        }
      else
      //--- Set the X-coordinate for the next button
         x_dist+=x_size;
     }
//--- Refresh the chart
   ChartRedraw(0);
  }
차트에서 패널을 제거하려면 아래 제공된 기능을 사용합니다.
//+------------------------------------------------------------------+
//| Deleting the info panel                                          |
//+------------------------------------------------------------------+
void DeleteSoundPanel()
  {
//--- Delete position properties and their values
   for(int i=0; i<ARRAY_SIZE; i++)
      DeleteObjectByName(name_sound_object[i]);
//--- Redraw the chart
   ChartRedraw();
  }
//+------------------------------------------------------------------+
//| Deleting objects by name                                         |
//+------------------------------------------------------------------+
void DeleteObjectByName(string name)
  {
//--- If the object is found
   if(ObjectFind(ChartID(),name)>=0)
     {
      //--- If an error occurred when deleting, print the relevant message
      if(!ObjectDelete(ChartID(),name))
         Print("Error ("+IntegerToString(GetLastError())+") when deleting the object!");
     }
  }
따라서 Expert Advisor를 로드할 때 OnInit() 함수에서 차트에 패널이 설정되고 OnDeinit()기능에 의해 Expert Advisor를 제거할 때 차트에서 삭제됩니다.
//+------------------------------------------------------------------+
//| Custom indicator initialization function                         |
//+------------------------------------------------------------------+
void OnInit()
  {
//--- Set the sound panel
   SetSoundPanel();
  }
//+------------------------------------------------------------------+
//| Deinitialization function of the expert advisor                  |
//+------------------------------------------------------------------+
void OnDeinit(const int reason)
  {
//--- Delete the sound panel
   DeleteSoundPanel();
  }
이제 특정 버튼을 클릭할 때 적절한 사운드가 재생되도록 패널과의 상호 작용만 구현하면 됩니다. 더욱 경쾌하게 하기 위해 사운드 패널 버튼 중 하나를 눌렀을 때 버튼 색상이 변경됩니다. 이를 구현하려면 코드가 아래와 같은 ChangeColorsOnSoundPanel() 함수가 필요합니다.
//+------------------------------------------------------------------+
//| Changing colors on the sound panel                               |
//+------------------------------------------------------------------+
void ChangeColorsOnSoundPanel()
  {
   color clr=clrNONE; // Button color
//--- Iterate over all buttons in a loop and change their color
   for(int i=0; i<ARRAY_SIZE; i++)
     {
      //--- Get the new color
      clr=GetRandomColor();
      //--- Set the border color
      ObjectSetInteger(0,sound_names[i],OBJPROP_BGCOLOR,clr);
      //--- Set the background color
      ObjectSetInteger(0,sound_names[i],OBJPROP_BORDER_COLOR,clr);
      //--- Unclicked button
      ObjectSetInteger(0,sound_names[i],OBJPROP_STATE,false);
      //--- Refresh the chart
      ChartRedraw(0);
      //--- Wait for 20 ms (lag)
      Sleep(20);
     }
  }
마지막으로 OnChartEvent() 함수에 다음 코드를 추가해야 합니다.
//+------------------------------------------------------------------+
//| Event handler                                                    |
//+------------------------------------------------------------------+
void OnChartEvent(const int     id,     // Event identifier
                  const long&   lparam, // Parameter of the event of type long
                  const double& dparam, // Parameter of the event of type double
                  const string& sparam) // Parameter of the event of type string
  {
//--- If there was an event of left-clicking on the object
   if(id==CHARTEVENT_OBJECT_CLICK)
     {
      //--- If the object name contains "sound_button"
      if(StringFind(sparam,"sound_button",0)>=0)
        {
         //--- Play the sound based on the object name
         //    5019 - ERR_FILE_NOT_EXIST - The file does not exist
         if(!PlaySound(GetSoundPath(sparam)))
            Print("Error: ",GetLastError());
         //--- Change colors of all buttons
         ChangeColorsOnSoundPanel();
        }
     }
  }
위 코드에서 강조 표시된 문자열은 사용자 정의 GetSoundPath() 함수를 사용하여 사운드 파일의 위치가 PlaySound() 함수에 전달되었음을 나타냅니다. GetSoundPath() 함수의 코드는 다음과 같습니다.
//+------------------------------------------------------------------+
//| Returning sound file location by the object name                 |
//+------------------------------------------------------------------+
string GetSoundPath(string object_name)
  {
//--- Iterate over all sound panel objects in a loop
   for(int i=0; i<ARRAY_SIZE; i++)
     {
      //--- If the name of the object clicked in the chart
      //    matches one of those available on the panel, return the file location
      if(object_name==name_sound_object[i])
         return(path_sound_object[i]);
     }
//---
   return("");
  }
이제 모든 것이 준비되었습니다. 사운드 패널(프로그램은 글의 첨부 파일에서 다운로드할 수 있음)은 Expert Advisor가 차트에 첨부되는 즉시 설정됩니다.

그림 2. 차트의 사운드 패널
따라서 사운드 파일 작업의 원리는 이제 명확해졌습니다. "MQL5 Coobook: 지정된 기준을 기반으로 하는 Expert Advisor의 최적화 결과 저장"이라는 제목의 이전 글에서 Expert Advisor로 돌아가서 Expert Advisor에서 사용할 사운드를 결정합니다. Resources.mqh를 생성하여 Expert Advisor의 기본 파일에 포함시켜 보겠습니다.
//--- Include custom libraries
#include "Include/Errors.mqh"
#include "Include/Enums.mqh"
#include "Include/Resources.mqh"
#include "Include/TradeSignals.mqh"
#include "Include/TradeFunctions.mqh"
#include "Include/ToString.mqh"
#include "Include/Auxiliary.mqh"
이제 주요 거래 이벤트에 대한 파일을 선택합니다.
//--- Sound files
#resource "\\Files\\Sounds\\AHOOGA.WAV"   // Error
#resource "\\Files\\Sounds\\CASHREG.WAV"  // Position opening/position volume increase/pending order triggering
#resource "\\Files\\Sounds\\WHOOSH.WAV"   // Pending order/Stop Loss/Take Profit setting/modification
#resource "\\Files\\Sounds\\VERYGOOD.WAV" // Position closing at profit
#resource "\\Files\\Sounds\\DRIVEBY.WAV"  // Position closing at loss
//--- Sound file location
string SoundError          = "::Files\\Sounds\\AHOOGA.WAV";
string SoundOpenPosition   = "::Files\\Sounds\\CASHREG.WAV";
string SoundAdjustOrder    = "::Files\\Sounds\\WHOOSH.WAV";
string SoundCloseWithProfit= "::Files\\Sounds\\VERYGOOD.WAV";
string SoundCloseWithLoss  = "::Files\\Sounds\\DRIVEBY.WAV";
또한 리소스로 사용되는 사운드 파일 외에도 Expert Advisor에서 인터페이스 목적으로 *.bmp 이미지, 텍스트 파일 및 지표를 저장할 수도 있음을 언급하고 싶습니다. MetaTrader 5용 EA는 이제 완전한 기능을 갖춘 응용 프로그램으로 간주됩니다. 여러 파일 대신 하나만 전달하면 되므로 매우 편리합니다.
계속하자. 외부 매개변수에서 UseSound 매개변수를 추가하여 소리를 비활성화할 수 있도록 해야 합니다.
//--- External parameters of the Expert Advisor
input  int        NumberOfBars =2;    // Number of one-direction bars
sinput double     Lot          =0.1;  // Lot
input  double     TakeProfit   =100;  // Take Profit
input  double     StopLoss     =50;   // Stop Loss
input  double     TrailingStop =10;   // Trailing Stop
input  bool       Reverse      =true; // Position reversal
sinput bool       UseSound     =true; // Sound notifications
Include\Enums.mqh에서 사운드에 대한 ENUM_SOUNDS 열거형을 만듭니다.
//--- Sounds
enum ENUM_SOUNDS
  {
   SOUND_ERROR             =0,   // Error
   SOUND_OPEN_POSITION     = 1,  // Position opening/position volume increase/pending order triggering
   SOUND_ADJUST_ORDER      = 2,  // Stop Loss/Take Profit/pending order setting
   SOUND_CLOSE_WITH_PROFIT = 3,  // Position closing at profit
   SOUND_CLOSE_WITH_LOSS   = 4   // Position closing at loss
  };
이러한 식별자는 사용자 정의 함수 PlaySoundByID()에 필요합니다.
//+------------------------------------------------------------------+
//| Playing sounds                                                   |
//+------------------------------------------------------------------+
void PlaySoundByID(ENUM_SOUNDS id)
  {
//--- If it is the real-time mode and sounds are enabled
   if(IsRealtime() && UseSound)
     {
      //--- Play the sound based on the identifier passed
      switch(id)
        {
         case SOUND_ERROR              : PlaySound(SoundError);            break;
         case SOUND_OPEN_POSITION      : PlaySound(SoundOpenPosition);     break;
         case SOUND_ADJUST_ORDER       : PlaySound(SoundAdjustOrder);      break;
         case SOUND_CLOSE_WITH_PROFIT  : PlaySound(SoundCloseWithProfit);  break;
         case SOUND_CLOSE_WITH_LOSS    : PlaySound(SoundCloseWithLoss);    break;
        }
     }
  }
Expert Advisor가 거래를 수행하는 동안 적절한 거래 기능에서 PlaySoundByID()를 호출하여 음향 효과를 재생할 수 있습니다. OpenPosition() 함수에서 이것이 어떻게 구현되는지 봅시다.
//+------------------------------------------------------------------+
//| Opening a position                                               |
//+------------------------------------------------------------------+
void OpenPosition(double lot,
                  ENUM_ORDER_TYPE order_type,
                  double price,
                  double sl,
                  double tp,
                  string comment)
  {
//--- Set the magic number in the trading structure
   trade.SetExpertMagicNumber(0);
//--- Set the slippage in points
   trade.SetDeviationInPoints(CorrectValueBySymbolDigits(10));
//--- The Instant Execution and Market Execution modes
//    *** Starting with build 803, Stop Loss and Take Profit                             ***
//    *** can be set upon opening a position in the SYMBOL_TRADE_EXECUTION_MARKET mode ***
   if(symb.execution_mode==SYMBOL_TRADE_EXECUTION_INSTANT ||
      symb.execution_mode==SYMBOL_TRADE_EXECUTION_MARKET)
     {
      //--- If the position failed to open
      if(!trade.PositionOpen(_Symbol,order_type,lot,price,sl,tp,comment))
        {
         //--- Play the error sound and print the relevant message
         PlaySoundByID(SOUND_ERROR);
         Print("Error opening the position: ",GetLastError()," - ",ErrorDescription(GetLastError()));
        }
      //--- Otherwise play the position opening sound
      else
         PlaySoundByID(SOUND_OPEN_POSITION);
     }
  }
그러나 수동 또는 다른 방법으로 손절매, 이익실현에서 포지션이 마감된 경우 이 이벤트는 OnTrade() 기능에서 모니터링되어야 합니다. 이를 구현하기 위해 필요한 검사를 담당하는 SoundNotification() 함수를 하나 더 작성할 것입니다. 거래 기록이 DEAL_ENTRY_OUT 또는 현재 기호에 대한 DEAL_ENTRY_INOUT 식별자(포지션의 전체/부분 마감 또는 반전)가 있는 경우 프로그램은 해당 거래가 손익으로 마감되었는지 확인하고 적절한 사운드를 재생합니다.
//+------------------------------------------------------------------+
//| Sound notification                                               |
//+------------------------------------------------------------------+
void SoundNotification()
  {
//--- If it is the real-time mode and sounds are enabled
   if(IsRealtime() && UseSound)
     {
      ulong        ticket      =0; // Deal ticket
      int          total       =0; // Total deals
      static ulong last_ticket =0; // Last ticket prior to this check
      //--- Get the complete history
      if(!HistorySelect(0,TimeCurrent()+1000))
         return;
      //--- Get the number of deals in the obtained list
      total=HistoryDealsTotal();
      //--- In the obtained list, iterate over all deals from the last one to the first one
      for(int i=total-1; i>=0; i--)
        {
         //--- If the deal ticket by its position in the list has been obtained
         if((ticket=HistoryDealGetTicket(i))>0)
           {
            //--- get the symbol of the deal
            GetHistoryDealProperties(ticket,D_SYMBOL);
            //--- If the symbol of the deal and the current symbol are the same
            if(deal.symbol==_Symbol)
              {
               //--- get the direction of the deal
               GetHistoryDealProperties(ticket,D_ENTRY);
               //--- If it is position closing, volume decrease or reversal
               if(deal.entry==DEAL_ENTRY_OUT || deal.entry==DEAL_ENTRY_INOUT)
                 {
                  //--- If the ticket of the current deal from the list (the last deal for the symbol) is equal to the previous ticket
                  //    or this is the initialization of the ticket of the last deal
                  if(ticket==last_ticket || last_ticket==0)
                    {
                     //--- Save the ticket and exit
                     last_ticket=ticket;
                     return;
                    }
                  //--- Get the result of the deal
                  GetHistoryDealProperties(ticket,D_PROFIT);
                  //--- In case of profit
                  if(deal.profit>=0)
                    {
                     //--- Profit sound
                     PlaySoundByID(SOUND_CLOSE_WITH_PROFIT);
                     //--- Save the ticket number
                     last_ticket=ticket;
                     return;
                    }
                  //--- In case of loss
                  if(deal.profit<0)
                    {
                     //--- Loss sound
                     PlaySoundByID(SOUND_CLOSE_WITH_LOSS);
                     //--- Save the ticket number
                     last_ticket=ticket;
                     return;
                    }
                 }
              }
           }
        }
     }
  }
SoundNotification() 함수는 OnInit() 및 OnTrade() 함수에 배치되어야 합니다.
//+------------------------------------------------------------------+
//| Initialization                                                   |
//+------------------------------------------------------------------+
int OnInit()
  {
//--- Initialize the new bar
   CheckNewBar();
//--- Initialize tickets of the last deals for the symbol
   SoundNotification();
//--- Initialization completed successfully
   return(INIT_SUCCEEDED);
  }
//+------------------------------------------------------------------+
//| Monitoring trade events                                          |
//+------------------------------------------------------------------+
void OnTrade()
  {
//--- Sound notification
   SoundNotification();
  }
또한 Trailing Stop 레벨을 수정할 때 ModifyTrailingStop() 함수 끝에 소리 알림이 추가되었습니다.
결론
그게 다입니다. 테스트 목적을 위한 모든 파일은 글의 첨부 파일에서 다운로드할 수 있습니다. 터미널의 소리에 대해 이야기하자면 CMIDI(by Integer)라는 이름으로 Code Base에서 사용할 수 있는 흥미로운 솔루션에 주의를 기울이고자 합니다. 즉, 이는 MetaTrader 5의 MIDI를 플레이하도록 해줍니다. 행운을 빕니다!
MetaQuotes 소프트웨어 사를 통해 러시아어가 번역됨.
원본 기고글: https://www.mql5.com/ru/articles/748
경고: 이 자료들에 대한 모든 권한은 MetaQuotes(MetaQuotes Ltd.)에 있습니다. 이 자료들의 전부 또는 일부에 대한 복제 및 재출력은 금지됩니다.
이 글은 사이트 사용자가 작성했으며 개인의 견해를 반영합니다. Metaquotes Ltd는 제시된 정보의 정확성 또는 설명 된 솔루션, 전략 또는 권장 사항의 사용으로 인한 결과에 대해 책임을 지지 않습니다.

 MQL5 표준 라이브러리 확장 및 코드 재사용
...
예를 들어, 제안하신 거래 이벤트의 경우 수익, 킬 등의 값과 함께 구체적인 음성 코멘트를 추천 및 조언과 함께 제공하는 것이 합리적일 것입니다.
어드바이저는 언젠가 정상적인 인간 언어로 조언을 시작해야 합니다...).
...
이 글은 언제나 그렇듯이 간단한 예시입니다. 예를 들어 저는 FL Studio 11 프로그램을 좋아합니다. 모든 사운드를 합성 할 수 있습니다. 또는 먼저 녹음 (음성 포함)한 다음 고품질로 처리합니다.
기사 작성해 주셔서 감사합니다.
첨부된 프로그램을 어디에 넣어야 하나요? "스크립트" 또는 "전문가"에 넣어야 하나요?
그런데 스크립트와 전문가의 차이점은 무엇인가요? 온스타트 기능은 스크립트(차트로 드래그할 수 있음)에서 작동하나요?
MT5 사운드 파일을 찾을 수 없습니다. 위치를 알려주셨는데 제 폴더 어디에서도 찾을 수 없습니다. 사운드를 아무 곳에나 넣었다가 나중에 찾을 수 있나요?
올바른 폴더는 다음과 같습니다:
C:\프로그램 파일\플랫폼 폴더\사운드
(파일 및 폴더 - 고급 사용자용 - 시작하기 - MetaTrader 5 도움말).
기사 작성해 주셔서 감사합니다.
첨부된 프로그램을 어디에 넣어야 하나요? "스크립트" 또는 "전문가"에 넣어야 하나요?
그런데 스크립트와 전문가의 차이점은 무엇인가요? 온스타트 기능은 스크립트(차트로 드래그할 수 있음)에서 작동하나요?
저자의 기사에서"전문가 어드바이저를 만들어 봅시다..." 를 참조하십시오.
따라서 이것은 스크립트가 아니라 전문가입니다.
스크립트는 첨부 시 한 번만 실행됩니다. Expert는 코드의 특정 표준 함수에 따라 매 틱마다(또는 타이머, 이벤트 등에 따라) 실행됩니다.