
トレーダーのキット:デコインディケータ

はじめに
インディケータとは何でしょうか?それは特定タイプのデータを表示するためのツールです。通常、それは価格系列プロパティに関する情報で、このタイプのインディケータがのちに考察されるものです。
インディケータそれぞれも独自のプロパティと特徴を持ちます。たとえば、値範囲、買い過ぎ/売り過ぎゾーン、ラインの交差、頂点と底、などです。それらは数多く、主要なインディケータ値と共に相次いで使用されます。ただし、そのようなプロパティは必ずしも明確であるとは限りません。理由はさまざまです。インディケータウィンドウのサイズが小さい、低密度、などです。
本稿の目的は、みなさんのインディケータの記述値と情報価値を改善および、部分的自動化とコード実装過程促進の手助けをすることです。以下のコードがプロ、初心者両開発者にとって難しいものとならないことを願っています。
本稿の対象は、少なくとも MQL4 の開始レベルの知識があり、シンプルな考えやアルゴリズムをコードに実装でき、またターミナルにおけるコードストレージの構造についての知識があり、ライブラリ(エキスパート/ライブラリ)やヘッダファイル(エキスパート/インクルード)を使用できる方です。
1. タスク設定
すべてのインディケータの中で、もっとも有益で頻繁に利用されるものを概説したいと思います。
- ライン交差
レベル-レベル交差ポイントのみならず、全レベルが取り上げられます。
簡単な解釈での頂点/底
上昇/下降方向に対する異なる着色
以上についてお話します。
2. 基本概念
誤解を避けるために、インディケータのストラクチャを考察することにいくらか時間をかけます、
#property indicator_separate_window

// number of visible buffers of the indicator
#property indicator_buffers 3

// setting the range of indicator values
#property indicator_minimum 0
#property indicator_maximum 100

// setting indicator colors
#property indicator_color1  White
#property indicator_color2  Red
#property indicator_color3  Blue

// external settings
extern int RSIPeriod       = 9;
extern int AppliedPrice    = 0;
extern int MAPeriod        = 5;

// declaring indicator buffers. Here they can be declared in any order.
// Any names can be given to buffers, though better meaningful

double Values[];           // Values
double SmoothedValues[];   // Smoothed values
double Crosses[];          // intersections

// Significant number of digits after a decimal point in indicator values
int DigitsUsed = 5;

// Used empty value. In MQL4 there are two empty values -- EMPTY (-1)
// -- used as an empty parameter when calling functions
// EMPTY_VALUE (0x7FFFFFFF) -- used as an unacceptable value
// (or default value) of a variable in indicators and function calls.
// The fact is, most built-in indicators return 0 if there is no value
// Besides, in custom (iCustom) indicators the empty value can be
// set as any, this must be noted.
int EmptyValueUsed = 0;

// Initialization function.
int init()
{
   // Number of used buffers can be larger than that of displayed ones; some
   // may contain intermediate calculations and additional information. The total
   // number of buffers including additional ones is displayed here.
   // If there are no additional buffers,
   // this line is not needed. Total number must not exceed 8
   // IndicatorBuffers(3);

   // associate buffers. Indexes must go from 0 till the declared number (not including)
   // buffers are drawn in the order of index growing, this is important and can be
   // used when righting indicators further.
   // It means that a buffer with a larger index is drawn above the buffer with lower one
   SetIndexBuffer(0, Values);
   SetIndexBuffer(1, SmoothedValues);
   SetIndexBuffer(2, Crosses);
   // besides, it is important that additional buffers are located after displayed ones
   // (i.e. they must have higher index) otherwise problems may occur displaying buffers,
   // and sometimes the error can be hardly found

   // This function sets an empty value for the buffer with the preset index
   // I do not recommend to use this function in order to avoid possible difficulties
   // Default empty value for buffers -- EMPTY_VALUE.
   // Empty buffer values are not drawn in a chart (except for DRAW_ZIGZAG)

   // SetIndexEmptyValue(0, EMPTY_VALUE);

   // Set parameters for buffers
   SetIndexStyle(0, DRAW_LINE);     // The main signal is a solid line
   SetIndexStyle(1, DRAW_LINE, STYLE_DASH); // Smoothed -- dotted line
   SetIndexStyle(2, DRAW_ARROW, STYLE_SOLID, 2); // Intersections -- crosses of the size 2

   SetIndexArrow(2, 251); // cross code in Wingdings

   IndicatorDigits(DigitsUsed); // set number of significant digits after point

   // Setting the starting plotting point for each indicator. If in terms of the current index
   // the history depth
   // is lower than the value written here, the buffer value with this index will not be drawn.
   SetIndexDrawBegin(0, RSIPeriod);
   SetIndexDrawBegin(1, RSIPeriod + MAPeriod);
   SetIndexDrawBegin(2, RSIPeriod + MAPeriod + 1);

   return(0);
}

int start()
{
   // counting number of bars for re-calculation
   int toCount = Bars - IndicatorCounted();

   // Calculating values
   // counting from history start till the current moment
   for (int i = toCount - 1; i >=0; i--)
   {
      // I understood its convenience only when I started to use it
      // I recommend to conduct the normalization of data at once,
      // so that later comparison could be easily made
      Values[i] = NormalizeDouble(iRSI(Symbol(), 0, RSIPeriod, AppliedPrice, i), DigitsUsed);
   }

   // Counting smoothed values
   for (i = toCount - 1; i >=0; i--)
   {
      SmoothedValues[i] = NormalizeDouble(iMAOnArray(Values, 0, MAPeriod, 0, MODE_EMA, i), DigitsUsed);
   }

   // ...

   return(0);
}
3. 特徴
特徴を細かく考察します。
3.1. ライン交差
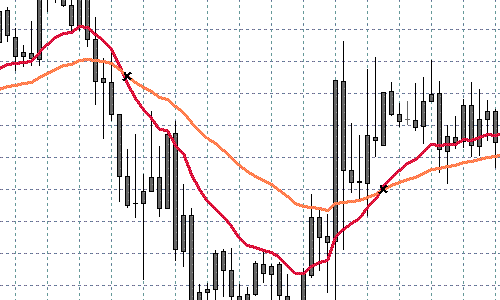
おそらくどんな開発者も、2つの MA(移動平均)の交差を用いた、または同様にMACD のベース ラインとシグナルラインの交差トレーディングのアルゴリズムを実装しようと試みたことがあるものです。それを視覚化してインディケータで交点を表示することでより明確にしましょう。
例として、テキスト内では相対力指数を利用します。われわれの目的は新しい利点を持つ改善されたを作成することにあるのです。
3.1.1. タスクの公式化
ライン交差するバーを個別のバッファでマークすることが必要です。
3.1.2. 問題
すべてが簡単で明確に思えます。タスクはむつかしくなく、コード数行で行うことが可能です。
以下のようにライン交差を記述する必要があります。
if ((x1 > y1 && x2 < y2) || (x1 < y1 && x2 > y2))
{
    // line crossing here
}
または、それをシンプルにできます。
if ((x1 - y1)*(x2 - y2) < 0)
{
    // line crossing here
}
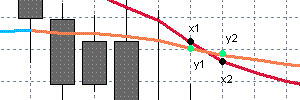
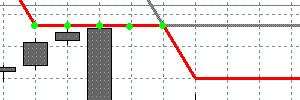
ですが、以下のケースを考察しましょう。
グリーンの点は同一値を持つことに注意します。そのような場合には、ラインの交差はなく、ラインが接触するにすぎません。
しかし以下では、
交差を判断するのはそれほど簡単ではありません。このようなケースがきわめて可能です。
また、検索中バッファや履歴の最後に空の値を見つける可能性を考慮して、接触と交差を正確に区別することが必要です。
3.1.3. ソリューション
この時点から、関数 init() は重要ではないため考慮されることはありません。フルコードはソースの中にあります。
以下は「相対力指数インディケータ」のシンプルな平滑化された値に対するソリューションです。
//|                                 RSI_Crosses_Sample.mq4 |

extern int RSIPeriod       = 9;
extern int AppliedPrice    = 0;
extern int MAPeriod        = 5;

// buffers
double Values[];           // Values
double SmoothedValues[];   // Smoothed values
double Crosses[];          // Crosses

int DigitsUsed = 5;
int EmptyValueUsed = 0;

int start()
{
   int toCount = Bars - IndicatorCounted();

   // Reading the values and normalizing them
   // Mark the crosses
   for (i = toCount - 1; i >=0; i--)
   {
      // i+1 must be greater or equal bars count in the history
      if (i + 1 >= Bars)
      {
         continue;
      }

      // if some of the values are empty, it is not necessary to check
      if (
            Values[i]               == EmptyValueUsed ||
            Values[i + 1]           == EmptyValueUsed ||
            SmoothedValues[i]       == EmptyValueUsed ||
            SmoothedValues[i + 1]   == EmptyValueUsed ||
            Values[i]               == EMPTY_VALUE    ||
            Values[i + 1]           == EMPTY_VALUE    ||
            SmoothedValues[i]       == EMPTY_VALUE    ||
            SmoothedValues[i + 1]   == EMPTY_VALUE
      )
      {
         continue;
      }

      // clear the current value
      Crosses[i] = EMPTY_VALUE;

      // crossing check (simple case)
      if ((Values[i] - SmoothedValues[i])*(Values[i + 1] - SmoothedValues[i + 1]) < 0)
      {
         Crosses[i] = SmoothedValues[i];
         continue;
      }

      // the crossing condition for a complicated case -
      // when crossing contain several bars with the same values
      //
      if (Values[i + 1] == SmoothedValues[i + 1] && Values[i] != SmoothedValues[i])
      {
         // there is potential crossing - checking it
         // lets find the second end

         int index = i + 1;
         bool found = false;
         while (
               index < Bars &&    // out of range
               Values[index] != EmptyValueUsed &&   // check for empty
               Values[index] != EMPTY_VALUE &&      // check for empty
               SmoothedValues[index] != EmptyValueUsed &&  // check for empty
               SmoothedValues[index] != EMPTY_VALUE)       // check for empty
         {
            if (Values[index] != SmoothedValues[index])
            {
               // ok, we have found the second end
               found = true;
               break;
            }

            index++;
         }

         if (!found)
         {
            // the case of the end of history or empty value
            // anyway, we mean that there is no crossing
            continue;
         }

         // checking the ends for crossing
         if ((Values[i] - SmoothedValues[i])*(Values[index] - SmoothedValues[index]) < 0)
         {
            // crossing found
            Crosses[i] = SmoothedValues[i];
         }  // else we have a touching - do not mark it

      }
   }

   return(0);
}
3.1.4. 自動化
本項では、Indicator_Painting ライブラリを用いて問題解決法を考察します。
//|                                 RSI_Crosses_Lib_Sample.mq4 |

#include <Indicator_Painting.mqh>

extern int RSIPeriod       = 9;
extern int AppliedPrice    = 0;
extern int MAPeriod        = 5;

// buffers
double Values[];           // Values
double SmoothedValues[];   // Smoothed values
double Crosses[];          // Crosses

int DigitsUsed = 5;
int EmptyValueUsed = 0;

int start()
{
   // Reading values
   // ...

   // Mark crosses
   MarkCrosses
   (
      Values,            // the fast buffer with values to check
      SmoothedValues,    // the slow buffer with values to check
      Crosses,           // the crosses buffer
      toCount - 1,       // start check index
      0,                 // final check index
      CROSS_ALL,         // use CROSS_UP for up crosses CROSS_DOWN for down crosses CROSS_ALL for all
      0);                // used empty value

   return(0);
}
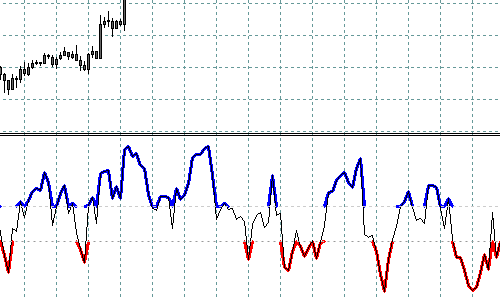
3.2. レベルマーク
制限ある厳密に設定された値範囲のオシレータ(RSI、ストキャスティックオシレータ、DeMarker、マネーフローインデックス、ウィリアムの%R)の一部には、ゾーンやレベルをマークする必要があることが多いものです。たとえば、フラットゾーン、買われ過ぎ/売られ過ぎゾーン、tトレンドゾーンなどです。異なる着色で定義済みレベルを概説します。
3.2.1. タスクの公式化
個別バッファで定義されたレベルの外にある値を持つバーをマークする必要があります。
3.2.2. 問題
一見して思えるほどそれは単純ではありません。
第1の問題は、定義済みレベルが交差するバーの描画です。以下がソリューションです。
//|                                 RSI_Cut_Levels_Sample.mq4 |

extern int RSIPeriod       = 9;
extern int AppliedPrice    = 0;

extern int HigherLevel     = 70;
extern int LowerLevel      = 30;

// buffers
double Higher[];           // Overbought
double Lower[];            // Oversold
double Values[];           // Values

int DigitsUsed = 5;
int EmptyValueUsed = 0;

int start()
{
   int toCount = Bars - IndicatorCounted();

   // Reading values
   // ...

   // Mark levels - upper
   for (i = toCount - 1; i >=0; i--)
   {
      // check for empty values
      if (Values[i] == EMPTY_VALUE || Values[i] == EmptyValueUsed)
      {
         continue;
      }

      // empty current value
      Higher[i] = EMPTY_VALUE;

      // greater than high
      if (Values[i] >= HigherLevel)
      {
         Higher[i] = Values[i];
      }
   }

   // for the levels mark - the code is same
   // ...

   return(0);
}
このコードは定義されたタスクを行いますが、問題が一つあります。
それを視覚的に分析するのは困難です。というのも、シグナル描画はレベルより大きい(小さい)値から開始するためです。シグナルバーの一部が分析できないのはそのためです。隣接するバーの迅速な変化によっておこる描画の特殊性によるのです。
その解決法は、定義されたレベルより高い(低い)バーだけでなく、すでにマークされたバー以前のバーとその次のバーもマークすることです。そして、それ自体の値ではなく、レベル値でマークすることが必要です。
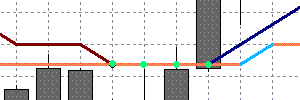
第2の問題は第1の問題解決後に現れます。シグナルバッファがアルゴリズム完了の結果として『偽』レベル ブレークダウンの疑似マークを持つことです。
それは、バー形成中価格はレベル外にあったものの、最終バーがレベルないの値を持つのです。このため、以下のような図を取得します。
この問題は、リアルタイムクオートでインディケータを使用する場合にのみ現れます。解決法はシンプルです。処理中2本のバー(0 および 1)を確認し、その他のバーは必要に応じて確認するのです。
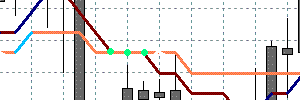
その後、RSI に対して以下のような図を取得することとなります。
3.2.3. ソリューション
それらをすべてコードに書きます。
//|                                 RSI_Levels_Sample.mq4 |

extern int RSIPeriod       = 9;
extern int AppliedPrice    = 0;

extern int HigherLevel     = 70;
extern int LowerLevel      = 30;

// buffers
double Higher[];           // Overbought
double Lower[];            // Oversold
double Values[];           // Values

int DigitsUsed = 5;
int EmptyValueUsed = 0;

// looking at least two bars - 0 and 1.
int Depth = 2;

int start()
{
   int toCount = Bars - IndicatorCounted();

   // Reading values
   // ...

   toCount = MathMax(toCount, Depth);

   // Marking levels - upper
   for (i = toCount - 1; i >=0; i--)
   {
      if (Values[i] == EMPTY_VALUE || Values[i] == EmptyValueUsed) continue;

      Higher[i] = EMPTY_VALUE;

      // greater than level
      if (Values[i] >= HigherLevel)
      {
         Higher[i] = Values[i];

         // if previous is lower
         if (Values[i + 1] < HigherLevel && Values[i + 1] != EmptyValueUsed)
         {
         // mark it also but with the level value
            Higher[i + 1] = HigherLevel;
         }
      }
      // if current lower
      else
      {
         // if previous is greater
         if (Values[i + 1] >= HigherLevel && Values[i + 1] != EMPTY_VALUE)
         {
            // mark it also but with the level value
            Higher[i] = HigherLevel;
         }
      }
   }

   // Mark levels - the code is the same
   // ...

   return(0);
}
3.2.4. 自動化
Indicator_Painting ライブラリを使用することで同じ問題を解決します。
//|                                 RSI_Levels_Lib_Sample.mq4 |

#include <Indicator_Painting.mqh>

extern int RSIPeriod       = 9;
extern int AppliedPrice    = 0;

extern int HigherLevel     = 70;
extern int LowerLevel      = 30;

// buffers
double Higher[];           // Overbought
double Lower[];            // Oversold
double Values[];           // Values

int DigitsUsed = 5;
int EmptyValueUsed = 0;
int Depth = 2;

int start()
{
   int toCount = Bars - IndicatorCounted();

   // Read values
   for (int i = toCount - 1; i >= 0; i--)
   {
      Values[i] = NormalizeDouble(iRSI(Symbol(), 0, RSIPeriod, AppliedPrice, i), DigitsUsed);
   }

   // Mark levels - upper
   MarkLevel(Values, Higher, 0, toCount - 1, HigherLevel, GREATER_THAN, EmptyValueUsed);
   // Mark levels - lower
   MarkLevel(Values, Lower, 0, toCount - 1, LowerLevel, LESS_THAN, EmptyValueUsed);

   return(0);
}
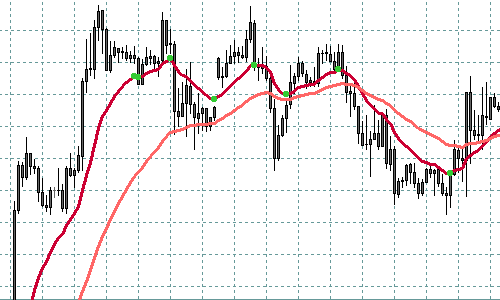
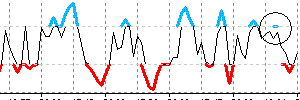
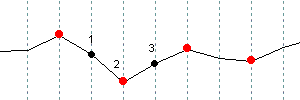
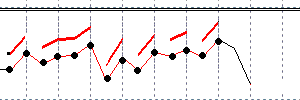
3.3. 頂点と底
インディケータの極端なポイント(極値)はシグナルとして使用できます。本稿では、『極値』という語は一番簡単な意味で使われています。それは、バーが隣接する値より大きな(小さな)値であれば、それは極値とみなされる、というものです。
3.3.1. タスクの公式化
個別バッファの極値を持つバーはマークする必要があります。
3.3.2. 問題
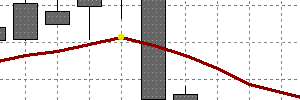
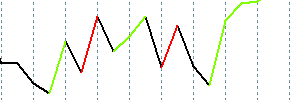
いくつか例を考察します。
ここでは明確な極値は赤色でマークされています。
if ((x1 > x2 && x3 > x2) || (x1 < x2 && x3 < x2))
{
    // x2 is extremal
}
または、それをシンプルにできます。
if ((x1 - x2)*(x2 - x3) < 0)
{
    // x2 is extremal
}
ですが、以下の場合を考えます。
マークされたポイントは同一の値を持ちます。ブルーのポイントは極値です。それを明確にするのは簡単ではありません。そして次の場合です。
極値はありません。反転があると推測します。
そのような場合の解決法は、交差の場合のように、2番目の終わりを見つけることです。
3.3.3. ソリューション
以下がコードです。
//|                                 RSI_Extremums_Sample.mq4 |

extern int RSIPeriod       = 9;
extern int AppliedPrice    = 0;

// buffers
double Values[];           // Values
double Extremums[];        // Extremums

int DigitsUsed = 5;
int EmptyValueUsed = 0;

int start()
{
   int toCount = Bars - IndicatorCounted();
   for (int i = toCount - 1; i >=0; i--)
   {
      Values[i] = NormalizeDouble(iRSI(Symbol(), 0, RSIPeriod, AppliedPrice, i), DigitsUsed);
   }

   for (i = toCount - 1; i >=0; i--)
   {
      // check the values relative to the current index.
      if (i + 2 >= Bars)
      {
         continue;
      }

      // check for empty values, if there are, it is not necessary to check
      if (
            Values[i]      == EmptyValueUsed ||
            Values[i + 1]  == EmptyValueUsed ||
            Values[i + 2]  == EmptyValueUsed
      )
      {
         continue;
      }

      // fill the current value of the mark buffer
      Extremums[i + 1] = EMPTY_VALUE;

      // cross condition - the simple case
      if ((Values[i] - Values[i + 1])*(Values[i + 1] - Values[i + 2]) < 0)
      {
         // we have found the cross
         Extremums[i + 1] = Values[i + 1];
         continue;
      }

      // the cross condition in a complicated case -
      // when top contain several bars with the same value
      if (Values[i + 1] == Values[i + 2] && Values[i] != Values[i + 1])
      {
         // there is possible extremum - to check it
         // we have to find the second end

         int index = i + 2;
         bool found = false;
         while (index < Bars && Values[index] != EmptyValueUsed && Values[index] != EMPTY_VALUE)
         {
            if (Values[i + 2] != Values[index])
            {
               // ok, we have found the second end
               found = true;
               break;
            }

            index++;
         }

         if (!found)
         {
            // we are at the end of the history or have an empty value
            // for the both cases we assume that there is no extremum
            continue;
         }

         // checking the ends for a cross
         if ((Values[i] - Values[i + 1])*(Values[i + 1] - Values[index]) < 0)
         {
            // there is a cross
            Extremums[i + 1] = Values[i + 1];
         }  // else -- there is a bend point, do not mark it
      }
   }

   return(0);
}
3.3.4. 自動化
Indicator_Painting ライブラリを使用することで同じタスクを解決します。
//|                                 RSI_Extremums_Lib_Sample.mq4 |

#include <Indicator_Painting.mqh>

extern int RSIPeriod       = 9;
extern int AppliedPrice    = 0;

// buffers
double Values[];           // Values
double Extremums[];        // Extremal points

int DigitsUsed = 5;
int EmptyValueUsed = 0;

int start()
{
   int toCount = Bars - IndicatorCounted();

   for (int i = toCount - 1; i >=0; i--)
   {
      Values[i] = NormalizeDouble(iRSI(Symbol(), 0, RSIPeriod, AppliedPrice, i), DigitsUsed);
   }

   MarkExtremums(Values, Extremums, toCount - 1, 0, DIR_ALL, EmptyValueUsed);

   return(0);
}
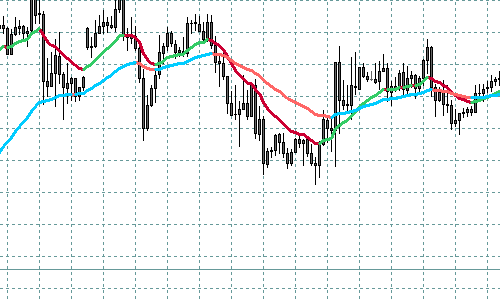
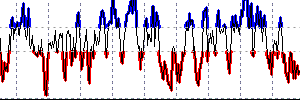
3.4. 方向ごとの着色
この視覚化方法は標準的インディケータの一部で行われ、役に立つものです。
3.4.1. タスクの公式化
いくつかのインディケータ値セット(たとえば、上昇または下降するセット)を異なる色に着色する必要があります。方向はもっとも単純な場合を言います。現在値が前回値より大きければ、上昇方向にあり、それ以外なら下降方向とします。
3.4.2. 問題
特徴から始めます。基本データバッファがあり、このバッファはプロットされているとします。されていなければ、プロットします。なぜなら、カスタム指向着色のためには、最低2色と2つのバッファが必要だからです。ここから機能です。基本バッファについて一方向を描画する場合、もう一方向は着色する必要がありません。それを基本バッファの無着色の方として見るのです。
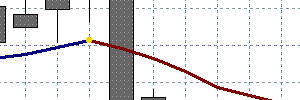
基本バッファ
以下は上昇方向がプロットされた基本バッファです。
のちに一方向のみ、たとえば上昇方向、のプロットを考察するのはその理由によります。そして発生しうる問題を考えます。
以下は単純な機能の実装です。
//|                                 RSI_Simple_Directions_Sample.mq4 |

extern int RSIPeriod       = 9;
extern int AppliedPrice    = 0;

// buffers
double Values[];           // Values
double Growing[];          // Growing buffer

int DigitsUsed = 5;
int EmptyValueUsed = 0;

int start()
{
   int toCount = Bars - IndicatorCounted();

   // Reading values
   for (int i = toCount - 1; i >=0; i--)
   {
      Values[i] = NormalizeDouble(iRSI(Symbol(), 0, RSIPeriod, AppliedPrice, i), DigitsUsed);
   }

   // Mark the growing levels - we will get the falling levels as a result
   for (i = toCount - 1; i >=0; i--)
   {

      // check for empty value, if there are, the further check is not necessary
      // ...

      // filling the current values with empty values
      Growing[i] = EMPTY_VALUE;

      // if growing
      if (Values[i] > Values[i + 1])
      {
         Growing[i] = Values[i];
         Growing[i + 1] = Values[i + 1];
      }
   }

   return(0);
}
コンパイル、チャートへのアタッチなどをして、コードを実行した結果を見ます。
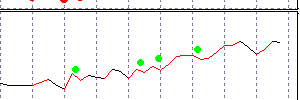
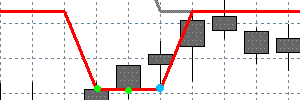
問題がいくつかあります。それらは点でマークされています。なぜこのように表示されるのか考えます。一方向を描画する間、その他の部分に空の(EMPTY_VALUE)値を残すことで効果を得ます。
以下の場合を考察します。
空でない値を持つ追加のバッファデータは黒の点でマークされています。点の間に直線が引かれることのないように(スタイル DRAW_LINE によって)、その間に空でない値を少なくとも1つ持つことが必要です。プロットされた範囲はすべて空の値ではありません。基本バッファが『鋸歯状の』箇所でのみプロットされるのはそのためです。
この問題の解決法は明確ではありません。たとえば、平滑化や条件をいくつか追加することで問題はより複雑になるのです。結果、再着色するバーを複数取得したり、何か他に困難なことが起こるのです。
解決はそれに対してバッファを 2つ追加することです。そうすると、描画された部分を交互にすることが可能です。これで、バッファそれぞれに必要な空の値を持つこととなります。
追加バッファに異なる色を割り当て、結果を確認します。
主な問題は解決しましたが、ゼロバーについてのもう一つ小さな問題があります。それは毎回再描画され、方向が変わってしまうと上昇方向のプロットを削除する必要がある場合があります。
その実装を考察します。
3.4.3. ソリューション
//|                                 RSI_Directions_Sample.mq4 |

extern int RSIPeriod       = 9;
extern int AppliedPrice    = 0;

// buffers
double Values[];           // Values
double Growing1[];         // First growing buffer
double Growing2[];         // Second growing buffer

int DigitsUsed = 5;
int EmptyValueUsed = 0;

int start()
{
   int toCount = Bars - IndicatorCounted();

   // Reading values
   for (int i = toCount - 1; i >=0; i--)
   {
      Values[i] = NormalizeDouble(iRSI(Symbol(), 0, RSIPeriod, AppliedPrice, i), DigitsUsed);
   }

   // Mark for the growing levels - we will get the falling levels as a resut
   for (i = toCount - 1; i >=0; i--)
   {
      // check of an empty values
      // ...

      // assume that the current values are empty
      Growing1[i] = EMPTY_VALUE;
      Growing2[i] = EMPTY_VALUE;

      // if it growing
      if (Values[i] > Values[i + 1])
      {
         // if it growing on the previous bar
         if (Values[i + 1] > Values[i + 2])
         {
            // writing to the current growing buffer
            if (Growing1[i + 1] != EMPTY_VALUE) Growing1[i] = Values[i];
            else                                Growing2[i] = Values[i];
         }
         // if the previous bar was not increasing
         else
         {
            // write to the buffer which it was not used the last 2 bars
            // we must have at least one such bar

            if (Growing2[i + 2] == EMPTY_VALUE)
            {
               Growing2[i] = Values[i];
               Growing2[i + 1] = Values[i + 1];
            }
            else
            {
               Growing1[i] = Values[i];
               Growing1[i + 1] = Values[i + 1];
            }
         }
      }
      // if the last value does not grow, remove it
      else if (i == 0)
      {
         if (Growing1[i + 1] != EMPTY_VALUE && Growing1[i + 2] == EMPTY_VALUE)
         {
            Growing1[i + 1] = EMPTY_VALUE;
         }

         if (Growing2[i + 1] != EMPTY_VALUE && Growing2[i + 2] == EMPTY_VALUE)
         {
            Growing2[i + 1] = EMPTY_VALUE;
         }
      }
   }

   return(0);
}
3.4.4. 自動化
Indicator_Painting ライブラリを使用することで同じタスクを解決します。
ライブラリでは、下降方向に対しても同様の実装があります。
//|                                 RSI_Directions_Lib_Sample.mq4 |

#include <Indicator_Painting.mqh>

extern int RSIPeriod       = 9;
extern int AppliedPrice    = 0;

// buffers
double Values[];           // Values
double Growing1[];         // First growing buffer
double Growing2[];         // Second growing buffer

int DigitsUsed = 5;
int EmptyValueUsed = 0;

int start()
{
   int toCount = Bars - IndicatorCounted();

   // Reading values
   for (int i = toCount - 1; i >=0; i--)
   {
      Values[i] = NormalizeDouble(iRSI(Symbol(), 0, RSIPeriod, AppliedPrice, i), DigitsUsed);
   }

   // Mark the growing levels - we will get the falling levels automatically
   MarkGrowing(Values, Growing1, Growing2, toCount - 1, 0, EmptyValueUsed);

   return(0);
}
4. Indicator_Painting ライブラリ
完了したすべての作業の結果、Indicator_Painting ライブラリがあります。
それはいくつか追加を伴い、記述された操作の自動化のために特別に考案されたものです。
以下が変数関数のリストです。
// ====================================================
// Mark for tops and bottoms
// ====================================================
void MarkExtremums(
      double values[],        // Indicator values
      double& extremums[],    // Buffer for extremums
      int startIndex,         // Start index for check (it included)
      int endIndex,           // End index for check (it included)
      int direction,          // DIR_TOP for tops, DIR_BOTTOM for bottoms, DIR_ALL for tops an bottoms
      double emptyValueUsed); // The value used for "empty" mark


// ====================================================
// Mark for crosses
// ====================================================
void MarkCrosses(
      double values1[],       // Values of the first indicator
      double values2[],       // Values of the second indicator
      double& crosses[],      // Buffer for their crosses
      int startIndex,         // Start index for check (it included)
      int endIndex,           // End index for check (it included)
      int direction,          // CROSS_UP for up crosses,CROSS_DOWN for down crosses, CROSS_ALL for all crosses
      double emptyValueUsed); // The value used for "empty" mark


// ====================================================
// Mark for level crosses
// ====================================================
void MarkLevelCrosses(
      double values[],        // Values of the indicator
      double level,           // Level value for a cross check
      double& crosses[],      // Buffer for the crosses
      int startIndex,         // Start index for check (it included)
      int endIndex,           // End index for check (it included)
      int direction,          // CROSS_UP for up crosses,CROSS_DOWN for down crosses, CROSS_ALL for all crosses
      double emptyValueUsed); // The value used for "empty" mark


// ====================================================
// Mark for levels
// ====================================================
void MarkLevel(
      double values[],        // Values of the indicator
      double& level[],        // Buffer for the crosses
      int startIndex,         // Start index for check (it included)
      int endIndex,           // End index for check (it included)
      double levelValue,      // Level value
      int condition,          // Mark condition (LESS_THAN = -1, GREATER_THAN = 1)
      double emptyValueUsed); // The value used for "empty" mark

// ====================================================
// Mark for dynamic levels
// ====================================================
void MarkDynamicLevel(
      double values[],        // Values of the indicator
      double dynamicLevel[],  // Dynamical level values for check
      double& level[],        // Buffer for the crosses
      int startIndex,         // Start index for check (it included)
      int endIndex,           // End index for check (it included)
      int condition,          // меньше (LESS_THAN = -1) или больше уровня (GREATER_THAN = 1)
      double emptyValueUsed); // The value used for "empty" mark

// ====================================================
// Mark for direction (upward)
// ====================================================
void MarkGrowing(
      double values[],        // Values of the indicator
      double& growing1[],     // The first buffer to mark the direction
      double& growing2[],     // The second buffer to mark the direction
      int startIndex,         // Start index for check (it included)
      int endIndex,           // End index for check (it included)
      double emptyValueUsed); // The value used for "empty" mark

// ====================================================
// Mark for direction (downward)
// ====================================================
void MarkReducing(
      double values[],        // Values of the indicator
      double& reducing1[],    // The first buffer to mark the direction
      double& reducing2[],    // The second buffer to mark the direction
      int startIndex,         // Start index for check (it included)
      int endIndex,           // End index for check (it included)
      double emptyValueUsed); // The value used for "empty" mark
以下はライブラリ使用の例の一部です。
ライブラリを使用するには、以下を行うことが必要です。
1. ファイル"Indicator_Painting.mq4" をフォルダ "experts/libraries" にコピーします。
2. ファイル""Indicator_Painting.mqh" をフォルダ "experts/include" にコピーします。
3. インディケータコードに以下の文字列を追加します。
#include <Indicator_Painting.mqh>
これでライブラリ関数をすべて利用することができます。詳しくはファイル"Indicator_Painting.mqh" を参照ください。
本稿添付のファイルに例があります。
おわりに
本稿が、みなさんのどなたかの作業を簡素化するのに役立つことを願っています。本稿の目的は達成されたと思います。
謝辞
タスク提案と手助けをいただき、本稿をより良いものとするためコメントを頂いたことに対し、Viktor Rustamov 氏(granit77)に感謝を申し上げたいと思います。
MetaQuotes Ltdによってロシア語から翻訳されました。
元の記事: https://www.mql5.com/ru/articles/1569
警告: これらの資料についてのすべての権利はMetaQuotes Ltd.が保有しています。これらの資料の全部または一部の複製や再プリントは禁じられています。
この記事はサイトのユーザーによって執筆されたものであり、著者の個人的な見解を反映しています。MetaQuotes Ltdは、提示された情報の正確性や、記載されているソリューション、戦略、または推奨事項の使用によって生じたいかなる結果についても責任を負いません。

 金融証券の重ね合わせとインターフェース
 MеtaTrader 4 と MATLAB エンジン(仮想 MATLAB マシン)間のインタラクション
 開発者諸君、己を守れ!
 メタトレーダーでニューラルネットワークを利用する
- 無料取引アプリ
- 8千を超えるシグナルをコピー
- 金融ニュースで金融マーケットを探索