Trade Assistant: multifunctional tool for a convenient trading
- This utility will help you simplify, automate and make your trading faster, while significantly expanding the standard capabilities of the MetaTrader terminal.
- If you have any questions, ideas for improvement, or if you suddenly notice a bug, please contact me, I am open to suggestions:
- MQL profile: https://www.mql5.com/en/users/mqlmoney
- email: bossplace@yahoo.com
The utility is divided into 4 main tabs:
- [new] tab: New trades, Lot / Risk / Risk-Reward calculation, Grid orders.
- [manage] tab: Trade management, Breakeven, Trailing, Auto-Close, Auto-Levels, Auto-Grid.
- [info] tab: Trade statistics, market analysis.
- [tool] tab: Indicators and auxiliary utilities.
For ease of navigation, the interface elements have different colors:
- Green: commonly used to activate / deactivate something.
The green color is also used for profitable / buy trades, and TP levels. - [tab]: buttons located nearby: use to switch between the modes / tabs.
- Red: loss-making / sell trades, SL levels. Using [X] you can cancel something.
- Blue: when clicked, you can change the value of the button, or show a drop-down list.
[s]: additional settings. [P]: presets. Hotkeys looks like [1] [2] [3] [4]. - [< >] drag to move the panel.
- [v] click to collapse the panel.
- [D] click to change the interface theme: Dark / Light.
- [T] click to show / hide Trade buttons on the chart, to manage the existing trades.
- [v] Symbol presets, at the top of the panel: you can save the ones you use frequently and then quickly switch between.
When saving a Symbol to the list, you can also activate the [remember TF] option: if activated, the current chart timeframe will also be remembered, and will be applied when selecting a preset.
- Hover the cursor over any element to see a popup hint: it will help you at the beginning;
- When moving the chart levels, hold down the <TAB> button to activate the magnet mode: it spans levels to the closest OHLC values.
- When activating the entry field with a price: left-click on the chart to quickly set the level.
Shortcuts:
- Shift + T: show / hide Trade levels on the chart
- Shift + 1 / 2 / 3 / 4: switch between the main tabs
- Shift + TAB: take a screenshot
- Shift + i: show / hide all previously active indicators, while working on other tabs
- ESC: close the settings, or cancel the trade management
- Shift + H: Hide / Show the main panel
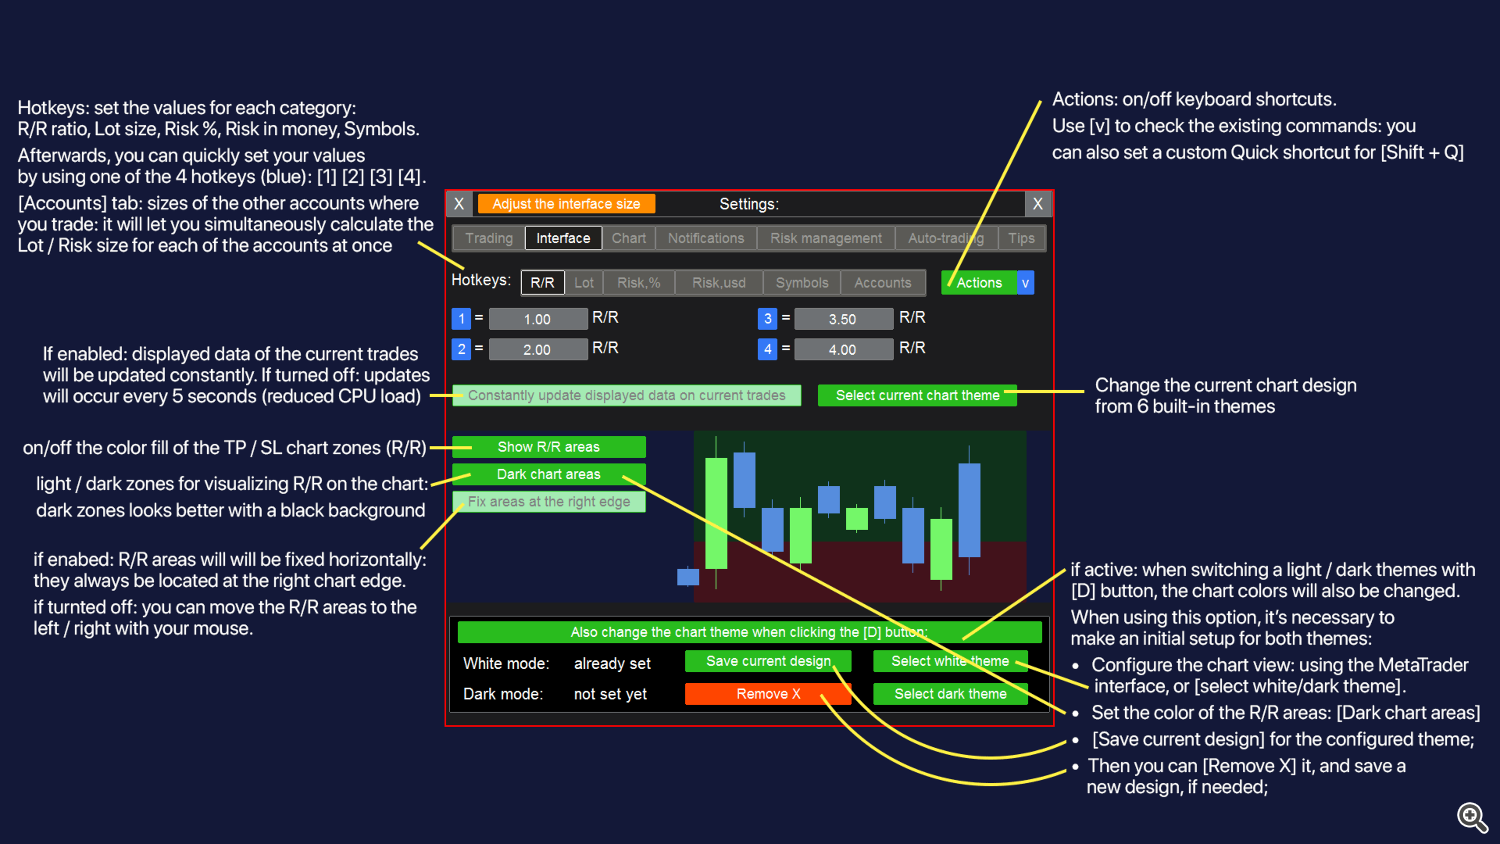
- Shift + Q: Quick action: can be customized in the settings [s]
- UP: Switch to the Higher TimeFrame: (M5 > M15, H1 > H4 ...)
- DOWN: Switch to the Lower TimeFrame: (M15 > M5, H4 > H1 ...)
Shortcuts for the [new] tab: - Shift + V: make all levels Visible. Convenient if levels are outside the chart
- Shift + R: Reverse the direction of the current trade setup
- Shift + E: on/off the Entry price indication (pending order / market execution)
The following shortcuts need to be activated in the settings [s] on the [new] tab: - Shift + B: execute a Buy trade, with the current parameters
- Shift + S: execute a Sell trade, with the current parameters
- Shift + C: Close a recently executed through the utility trade (if still exist)
Shortcuts for the [manage] tab: need to be activated in the settings [s] on the [new] tab:
[manage] [Groups]: - Shift + P: close Profits
- Shift + L: close Losses
- Shift + B: close Buys
- Shift + S: close Sells
- Shift + A: close all Active trades
[manage] [Order]: - Shift + C: Close the selected trade
Shortcuts for the [tool] tab: - Shift + Z: delete the last group of objects while drawing
- Left / Right: swith through the list of Symbols, while [Market watch] tool is active
Calculator: you can make calculations when you enter a value in the input field.
To activate the calculator, start typing with "=" , e.g: '=480/2'. The result will be 240.
Available operators: * / + - % ( ) .
When entering a price value, you can also use the keywords: 'points', 'bid', 'ask', 'spread'. E.g.:
- = bid +100 points
- = bid -spread
- = 1.50300 +spread
- = 50.25 +250 points
The calculator is available for the main input fields on the [new] and [manage > Order] tabs, and for the [Alerts] tool.
If the calculator is available for a specific input field, you will see information about it when you hover your mouse over it.
Indicator of your trading sentiment. When a main panel is minimized, you can use the colored toggle to choose between [neutral / bullish / bearish]. If a non-neutral direction is selected, the [^] button (panel collapse button) will be colored in the appropriate color. This way, you can always keep in mind your preferred trading direction.
[new] tab: trade execution | Lot, Risk, RR calculation
On this tab you can open a new trade. For the convenience, let's divide this process into 5 stages:
- Specify the amount of risk to calculate the lot size, or specify custom lot size.
- Specify the entry price for the pending order, or select execution by market.
- Set the SL level, or disable it.
- Set the TP level, or set the RR ratio for its automatic calculation based on the SL size.
- Execute the order using the Buy / Sell buttons.
Entry, SL, TP levels can be set in 6 ways: custom price, bar price, or size: in pips / points / % ATR value.
SL / TP size can also be set in terms of the potential loss / profit of the trade, based on the lot size used.
For the SL level, this option is available only if the lot size is set manually: [Lot] method
During the selection, you can activate [change ALL] to apply the new method to all levels (Entry, SL, TP).
If the level is set in size, you can use additional buttons [^] / [v] to place the level on the opposite side.
For example, when the SL level = +50 pips and placed above the entry, you can click [^] to invert it and place it below the entry: so it will become -50 pips.
If the [bar price] method is selected: you can choose the bar price used in the calculations: open / high / low / close.
You can also set the offset of the calculated bar relative to the current one, where 0 will mean current (floating) bar.
You can also set additional price offset from the calculated bar price.
[L] button: click to show / hide the visualization of the Levels on the chart.
[P] button: you can save the current settings into Presets so that you can use them later for faster trading.
It is especially convenient if the levels are set not as a price, but in size.
Shift + V hotkey: click to make all levels (Entry, SL, TP) visible.
Convenient if the prices have changed and the levels are outside the visible chart area.
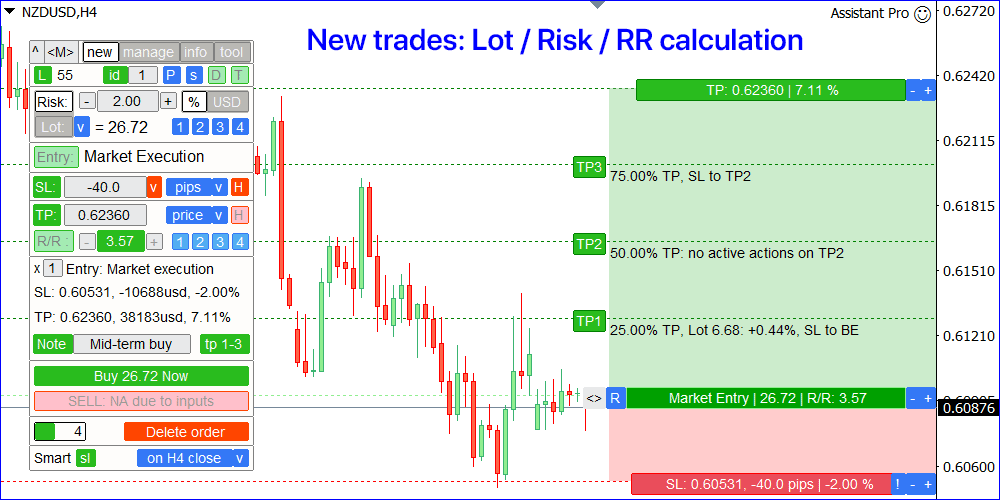
1. Risk / Lot calculation
There are 2 options available:
- Activate [Risk] switch and set the risk amount to calculate the lot size. The risk can be set as a [%] of the deposit, or in monetary terms [currency].
- Activate [Lot] switch and set the lot size: the utility will calculate the size of the potential risk.
- If you trade on multiple accounts, you can calculate the lot size or risk amount for the other deposits at the same time:
click [v] selector next to the [Lot] / [Risk] buttons. Other accounts sizes can be set in the settings [s]. - Use customizable [1] [2] [3] [4] hotkeys to quickly set the risk size or lot size.
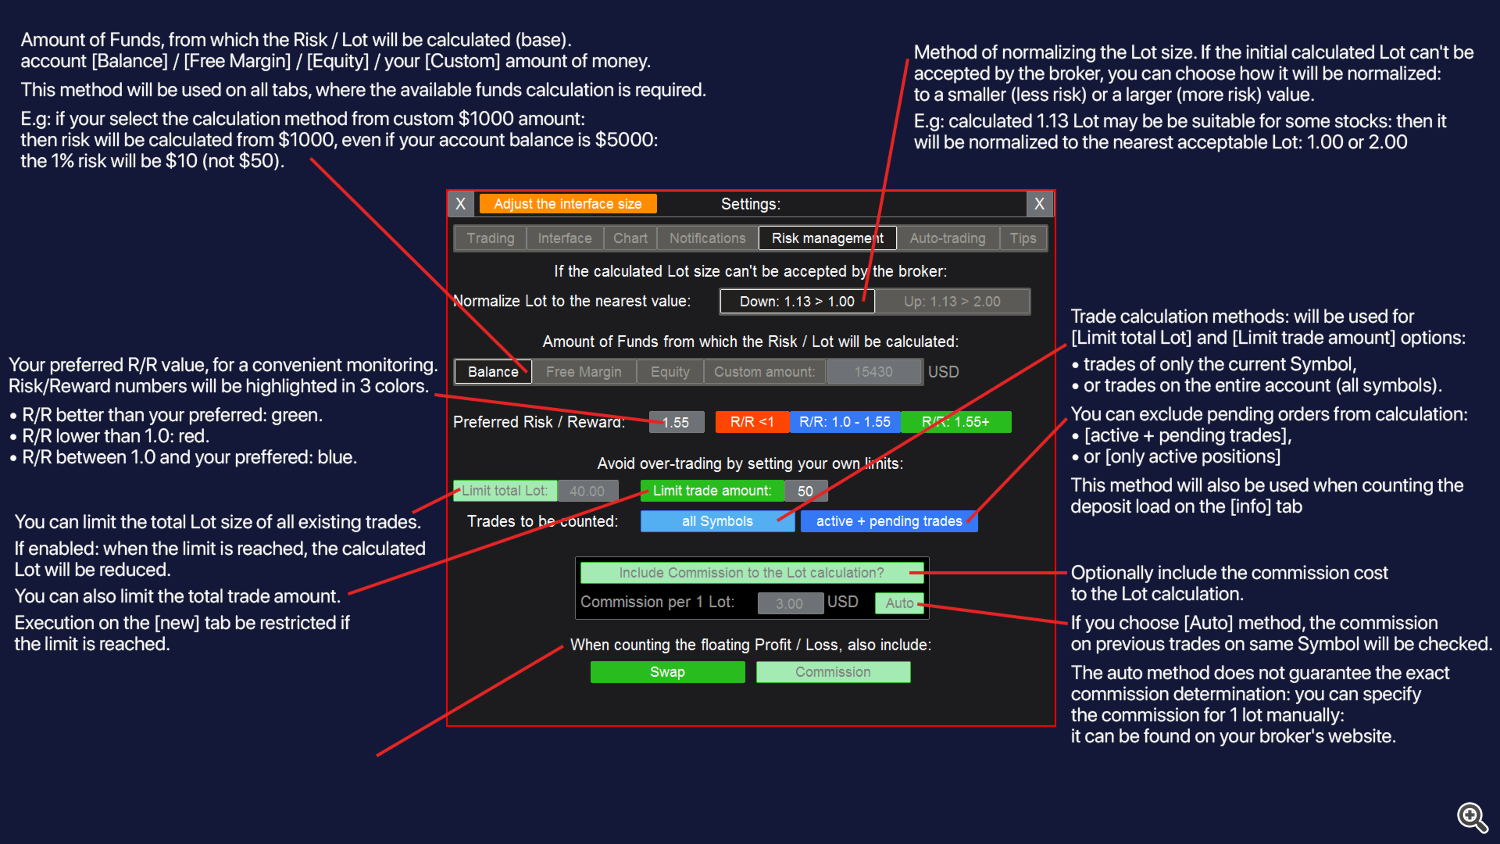
- There are 4 calculation methods of the account size: it can be set in the settings [s]:
Account balance / Free margin / Current equity / Custom amount of money. - While typing a risk size for a trade: you will be invited to use the floating profit / loss size of all trades on the account. This feature may be convenient for risk management strategies when it's necessary to cover a loss, or when you want to risk only the floating profit size.
- If the calculated lot size exceeds the maximum allowed value: the trade will be automatically divided into several orders with a smaller lot size, info will be highlighted in orange. E.g.: if the calculated lot = 150.00, but the maximum allowed lot = 100.00: there will be 2 identical orders with the lot size = 75.00.
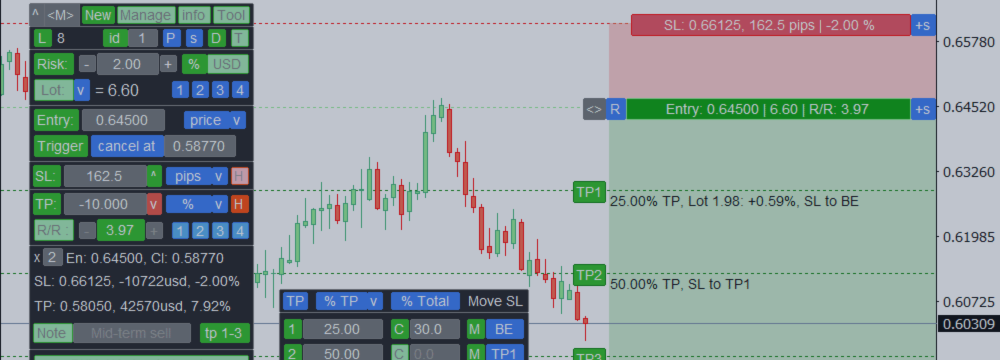
![[New] tab, buttons [New] tab, buttons](https://c.mql5.com/6/967/1_Main_Buttons.png)
2. Entry price:
If the [Entry:] button is activated, the pending orders mode will be activated.
If you want to switch to market execution at the current price - deactivate the [Entry:] button.
- Market execution mode: the trade will be opened at the current market price.
- Pending orders: in this mode, additional interface elements will be displayed: you can use them to set additional parameters of a pending order.
- [Trigger] option: set the levels when the pending order should will be canceled or activated:
- [cancel at]: if the price reaches the cancellation level before the order is activated - trade will be deleted. Levels are monitored by the utility (not sent to the server).
- [activate at]: the order will be placed at the entry price, but only after the price reaches the activation level.
MT4: activation trigger is monitored by the utility and are not sent to the server.
MT5: activation trigger will be sent to the broker only on Buy/Sell StopLimit orders.
There is an additional panel (below the execution buttons) where you can adjust a pending order:
- [exp]: the expiration time of the order: in minutes / hours / days / number of bars / today.
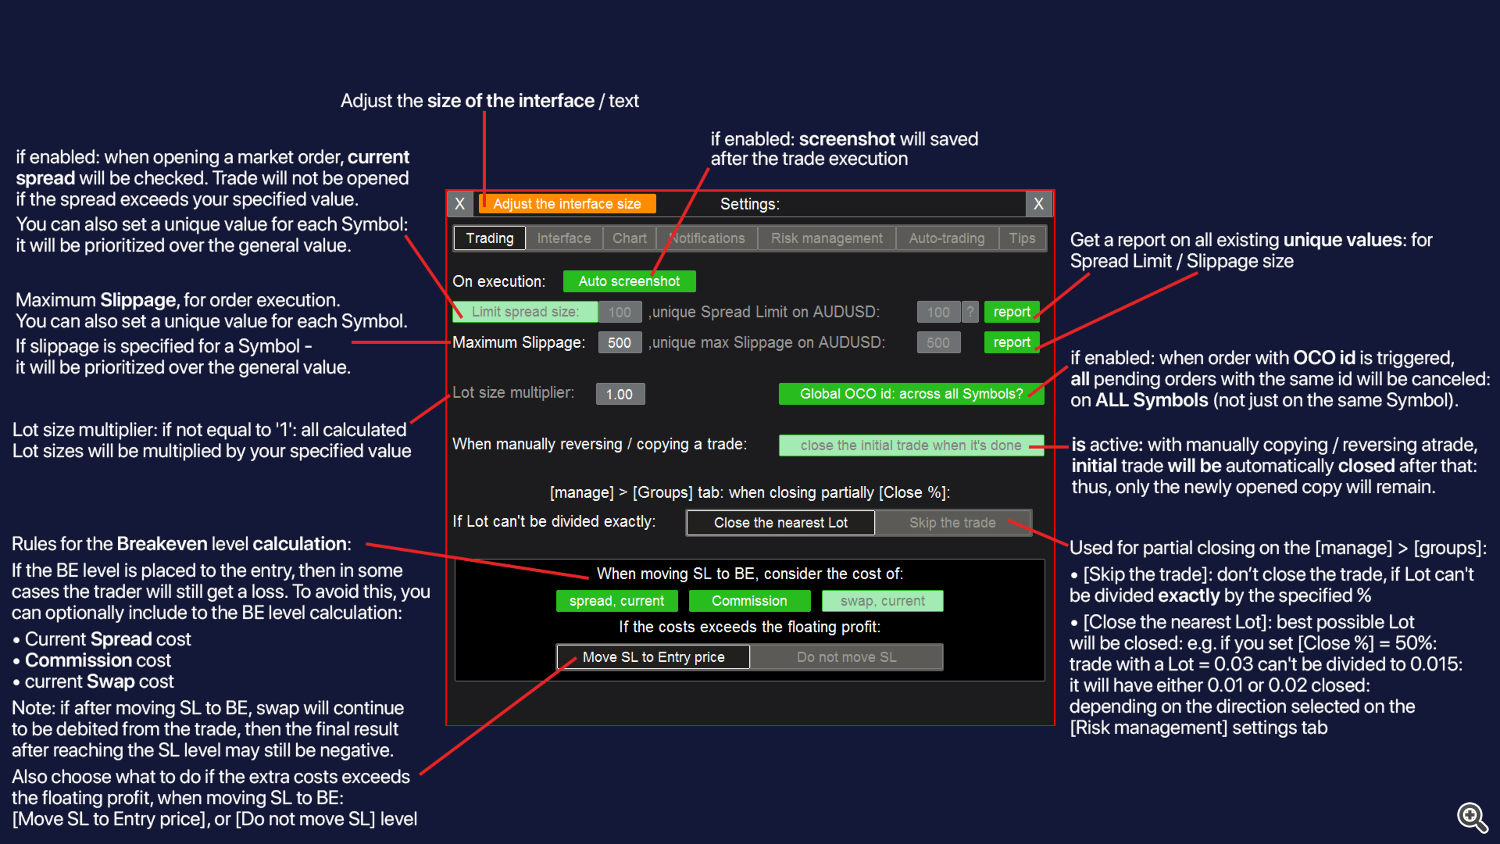
When [today] is selected, the order will be deleted when the current bar closes on the daily TF. - [Oco id] (one cancels the other). If active: as soon as one of the pending orders is activated, all other pending orders with the same OCO id will be automatically canceled. You can set a different IDs: that is, you can have a different groups of orders. In the settings [S] you can also set a global OCO id option: if active, OCO orders will be monitored on all Symbols: not only on the same Symbol.
- [Place later] option. If active, the trade will be opened automatically at a specified time. There are 5 types of the periods: minutes / hours / days / new bar / at market opening.
Using the [at market open] option you can place a trade even when the market is closed: it will be sent to the server when the market opens. Until the trade is sent to the broker - utility must be active on the device where it was placed.
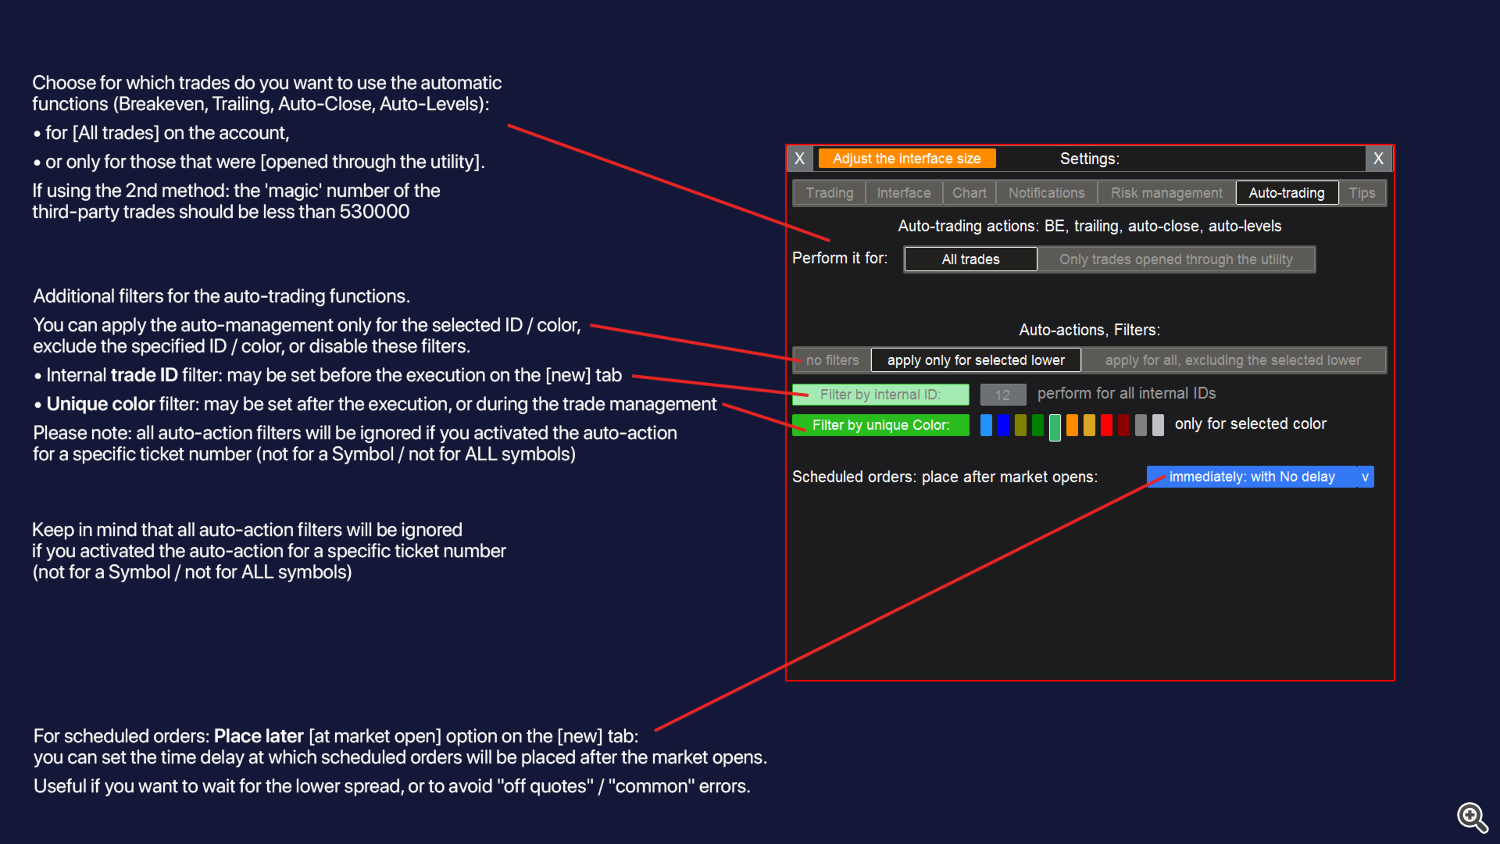
For the [at market open] option, you can set the time delay at which scheduled orders will be placed after the market opens. May be useful if you want to wait for the lower spread, or to avoid "off quotes" / "common" errors.
Settings [s] > [Auto-trading] > "Scheduled orders: place after market opens" value. - When using scheduled orders [Place later], you can specify the Entry price within the current spread (between Bid and Ask): the actual order type will be determined when the activation time comes: either a pending order will be placed (its type will be determined by the location of the entry price: Limit or Stop), or the trade will be executed by market, at a given or better price.
[H]: hidden pending orders:
- Virtual orders are not sent to the broker until the activation: their monitoring takes place on the device where they were placed, so the utility must remain active.
- When activating hidden orders, you can also activate the [monitor entry @BID price] option: if active, BuyLimit / BuyStop orders will be activated only when the Bid price reaches the entry, so you can protect yourself from accidental order triggering due to the spread size.
- Keep in mind, when the entry price is reached, the buy trade will still be opened at the Ask price, so the entry level will be worse than without this option.
- Smart [en] / [tr] : trade will be opened / triggered (cancelled) only if the bar(s) on the selected TF is closed beyond the entry / trigger: you can avoid false entry / trigger due to the volatility.
With smart [en] option, the trade will be opened by the market price, when the bar of the selected TF is closed: thus, the final entry price is unpredictable and may be worse than planned. You can set the number of bars that must be closed beyond the specified level in order for it to be considered triggered. To do this, open the TF selection window in the smart option row.
3. Stop Loss:
If the [SL:] button is activated, the SL level will be sent to the broker at the execution.
You can also turn off the [SL:] button, and then the trade will be executed without the SL level.
- SL level can be set as a custom price, bar price, or size: in pips / points / % / ATR value.
[H]: hidden SL levels:
- If [H] is active - SL level will not be sent to the broker, it will be monitored by the utility, so it must remain active on the device where the trade was placed.
When activating hidden SL, you can also activate:
- [monitor SL on Short trades based on the BID price] option: if active, sell trade will be closed only when the Bid price reaches the SL, so you can protect yourself from accidental SL triggering due to the spread size.
Please note: when the SL is reached, the trade will still be closed at the Ask price, so the final loss will be bigger than without this option. - [monitor SL on Long trades based on the ASK price] option: if active, buy trade will be closed only when the Ask price reaches the SL.
Please note: when the SL is reached, the trade will still be closed at the Bid price, so the final loss will be bigger than without this option. - Smart [sl]: trade will be closed only when the bar(s) on the selected TF is closed beyond the SL price, so you can avoid false SL triggering due to the volatility and 'fake' movements.
With this option, the trade will be closed at the market price, when the bar of the selected TF is closed: thus, the final loss is unpredictable and may be bigger than planned.
You can set the number of bars that must be closed beyond the specified level in order for it to be considered triggered. To do this, open the TF selection window in the smart option row.
There are 2 options for monitoring the hidden SL: it can be chosen while activating the hidden SL:
- [Close strictly at the specified price]: using this option, you can avoid a larger loss due to possible price gap: but in this case, the trade will not be closed until the price returns back to the specified SL level, so the floating loss may be bigger than planned.
- [Continue to try even at the worst price]: the trade will be closed even if the price has formed a gap and is further than the SL. Means a possible bigger loss.
4. Take Profit and Risk / Reward ratio:
There are 2 options available:
- Activate [R/R :] button and set the Risk/Reward ratio: the TP level will be calculated automatically based on the specified SL size.
- Deactivate [R/R :] button and set the TP level: the utility will calculate the actual R/R ratio.
For the convenience of monitoring, the R/R window changes its color:
- If the Reward is less than the Risk (RR < 1): the window will be red;
- In the settings [s], set your preferred R/R: values from 1.0 to the specified RR will be blue;
- Values greater than the specified value will be green;
[H]: hidden TP levels:
- If [H] is active - TP level will not be sent to the broker, it will be monitored by the utility, so it must remain active on the device where the trade was placed.
- When activating hidden TP, you can also activate the [monitor based on the BID price] option: if active, sell trade will be closed when the Bid price reaches the TP, so you can protect yourself from a situation when the trade does not closes at the TP level due to the spread.
Please note: when the TP is reached, the trade will still be closed at the Ask price, so the final profit will be smaller than without this option.
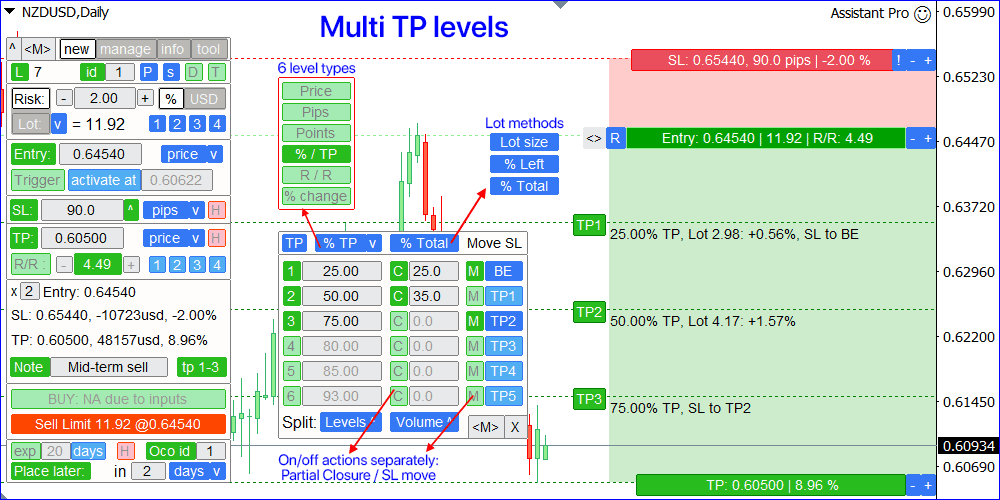
Multi Take Profit levels:
Using Multi TP levels, you can set additional actions for the trade: partial closing and moving the SL.
This is convenient if you want to protect your profits as the price moves towards the final TP level.
- To set additional TP levels, click the [add tp] button. If the levels are already set, this button will show you information about the amount of the extra levels.
- Multi TP interface opens in a separate window: it can be moved [< >] to any place on the chart.
- Multi TP levels are monitored by the utility, so it must remain active.
- [1] - [6] buttons (left column): click to fully activate / deactivate each of the multi TP levels.
The levels must be set in turn: when deactivating TP2, TP3 will also be deactivated. - In the next window, you need to set the location of each TP level.
- There are 6 types of the levels, it can be selected on the top line:
price, size in pips or points, % of the final TP level, R/R ratio, % of the price change. - [C] buttons: on/off the action of partial trade Closing, separately for each of the multi TP level.
- In the next window, you can set the volume that will be closed when a certain level is reached:
separately for each TP, where the [C] action is active. - Using the blue switch on the top line, you can choose the type of the volume calculation:
lot size / % of the total lot size / % of the remaining lot. - [M] buttons: on/off the action of Moving the SL, separately for each of the multi TP level.
- If [M] is active, you can choose where the SL should be moved, separately for each TP:
either the break-even level, or one of the previous TP levels. - On the bottom line there are 2 buttons for quickly dividing values into equal parts:
- [Levels ^]: place all active TP levels at an equal distance from each other.
- [Volume ^]: split the close volume evenly between the levels where [C] action is active.
- There is a [TP] button on the top line: click to save the current settings to a preset, then quickly adjust the multi TP levels.
It will be convenient if TP levels are set not as a price, but in size.
Working with the chart lines: if [L] button is active
Entry, SL, TP and Trigger levels will be visualized on the chart. The chart buttons will show important information about each level. Hold and drag these buttons (not lines!) to adjust the level.
- SL / TP zones are filled with color: when you hold and move these areas, all levels will be changed simultaneously, while maintaining the R/R ratio.
- Use the [+] / [-] buttons to move the level further / closer by the size of the current spread.
- [R] button: quick reversal of the trade setup on the opposite side.
- Drag the [<>] button to adjust the width of TP / SL areas.
- If the RR is fixed ( [R/R:] button), then when adjusting the SL - the TP will also be changed, and vice versa. If you want to change the levels independently, turn off the RR ratio.
- TP/SL buttons show the potential profit/loss in the selected type: %, or monetary terms.
- If the [Entry / SL / TP / Trigger] levels are set as a distance (pips / points / % / ATR), you can fix [!] each of the levels on the chart.
- If the level is fixed: the price of the level will not change with the market, but the current distance will be updated. To lock / unlock a level - use the blue [!] button on the right of the chart.
Additionally, before execution:
- The final trade levels, potential profit and loss are visible above the execution buttons.
- Optionally, you can open several identical trades at the same time: to do this, specify the amount of trades in the input field: ( [x 1] Entry ).
- To execute a Grid orders: click on the [G] button: an additional panel will be shown, where you can adjust the Grid settings.
- Optionally, you can type your comment to the trade: it will be visible during the subsequent trade management, and in the list of orders of the terminal.
- [id] button on the 1st line: if enabled - the trade will have an internal ID: it may be used for the subsequent trade management.
- The maximum slippage can be set in the input settings [s].
If the unique slippage is specified for a Symbol - it will be prioritized over the general value.
Trade execution:
- BUY / SELL buttons automatically determine the available trade type.
Both directions will be available only if the SL and TP levels are disabled. - When using market execution, you can set the maximum spread size in the settings [s]: so you can protect yourself during a period of high volatility.
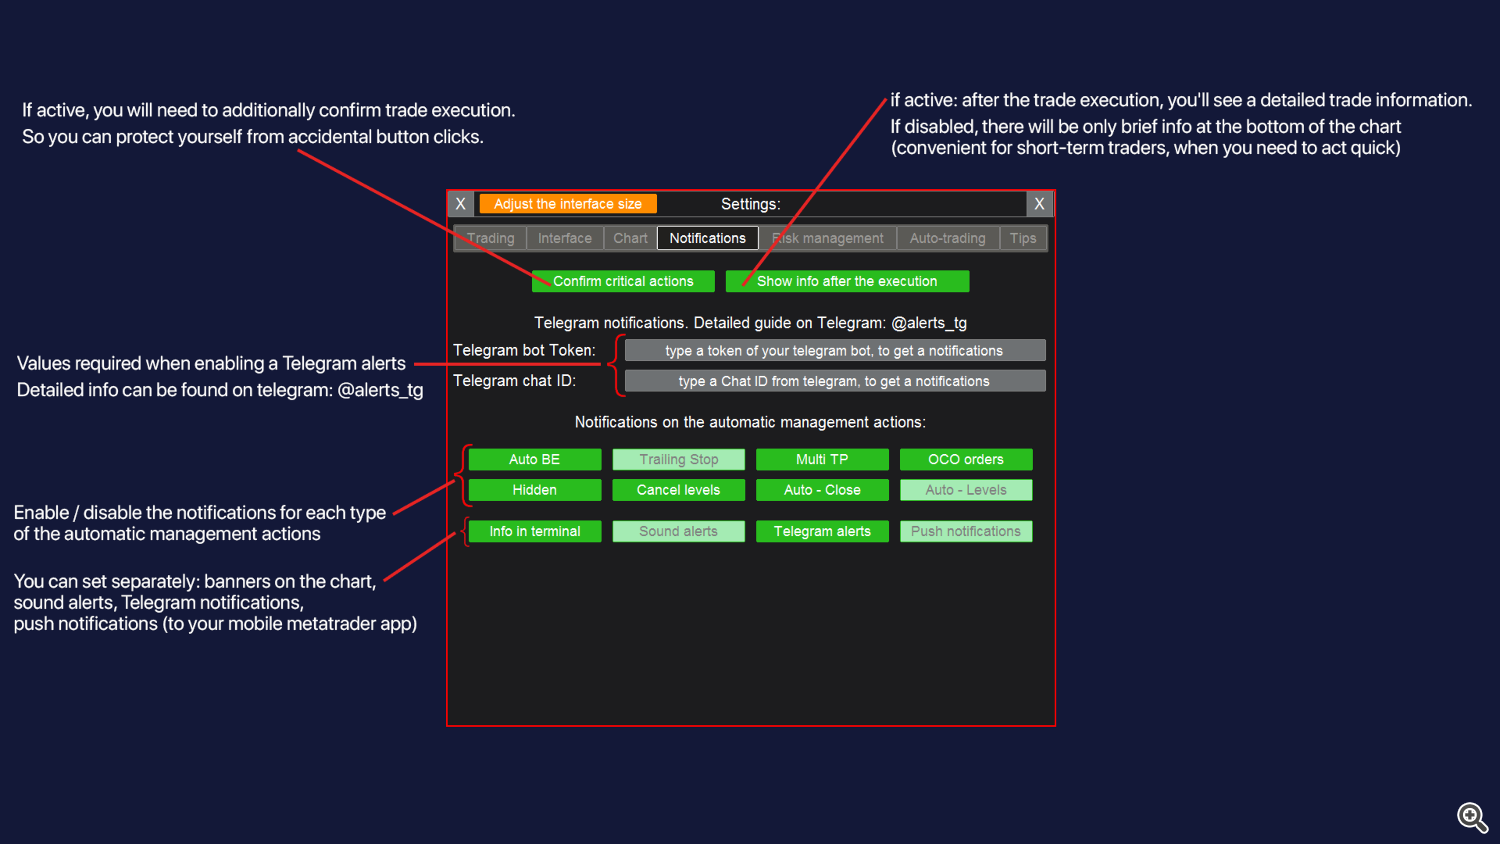
- If [show info after the execution] is enabled in the settings [s]: when the trade is executed, you will be invited to save the trade to a hotkey: if you save it, then you can quickly select this trade for subsequent management on the [manage] tab.
- You can also set the identification color: it will be convenient for the quick trade recognition on the chart. Color can also be changed or removed later: in the quick management panel, or during trade management on the [Order] tab.
[s] Settings on the [New] tab:
Links to the descriptions of the other tabs:
